
QC 25 eM - Battery charger Wolf Garten - Free user manual and instructions
Find the device manual for free QC 25 eM Wolf Garten in PDF.
| Product type | Battery charger |
| Brand | Wolf Garten |
| Model | QC 25 eM |
| Input voltage | 230 V ~ 50 Hz |
| Output voltage | 25 V DC |
| Charging time | Approx. 1 hour (empty battery) |
| Compatible batteries | Wolf Garten control handles with integrated battery module |
| Charge indicator | LED: red (charging), green (charging complete or battery disconnected) |
| Charging temperature | +10 °C to +40 °C |
| Wall mounting | Yes (recommended height 1.70 m, screws not supplied) |
| Weight | Approx. 0.5 kg |
| Protection | Protection class II |
| Use | Indoor use only |
| Fuse | Yes (integrated) |
| Cleaning | Soft dry cloth; clean contacts and ventilation slots |
| Warranty | According to manufacturer's conditions |
| Recycling | Do not dispose of with household waste; appropriate collection point |
Frequently Asked Questions - QC 25 eM Wolf Garten
User questions about QC 25 eM Wolf Garten
0 question about this device. Answer the ones you know or ask your own.
Ask a new question about this device
Download the instructions for your Battery charger in PDF format for free! Find your manual QC 25 eM - Wolf Garten and take your electronic device back in hand. On this page are published all the documents necessary for the use of your device. QC 25 eM by Wolf Garten.
USER MANUAL QC 25 eM Wolf Garten
natural_image
Technical line drawing of a mechanical assembly with two connected components (no text or symbols)
Ladegerät
Charger
Chargeur
QC 25 eM
text_image
A 1 2 3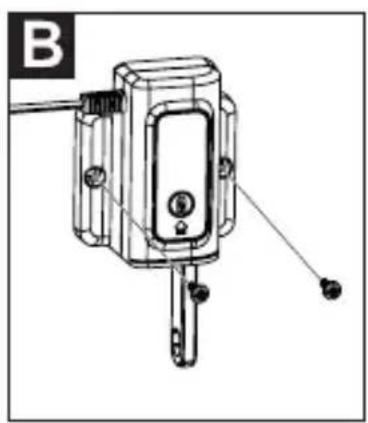
natural_image
Technical line drawing of a mechanical device with mounting holes and a shaft (no text or symbols)
text_image
Diagram showing cable installation steps with labeled components and directional arrows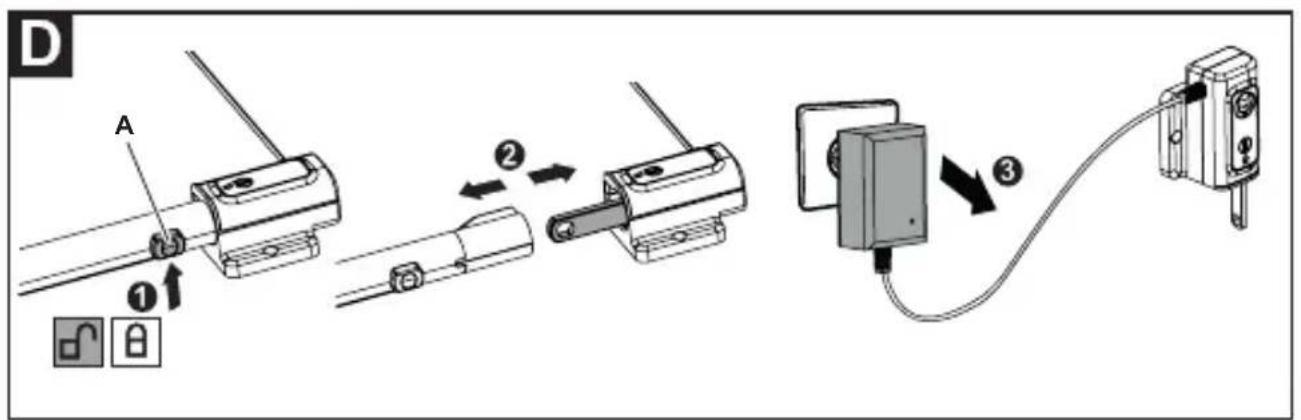
text_image
D A ① ② ③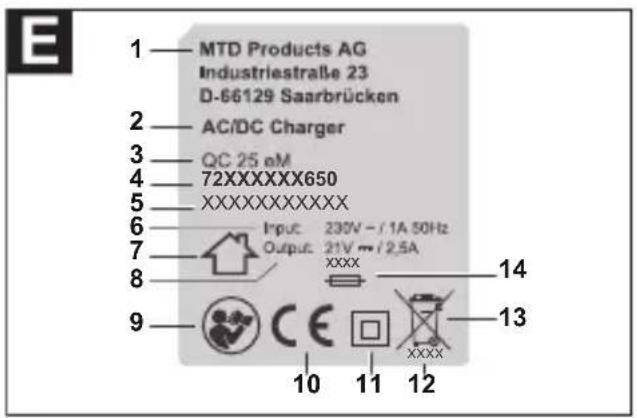
text_image
MTD Products AG Industriestraße 23 D-66129 Saarbrücken AC/DC Charger QC 25 eM 72XXXXXXXX650 XXXXXXXXXXXXX Input: 230V - / 1A 50Hz Output: 21V mm / 2.5A XXXX 14 13 9 CE 10 11 12
EN English 13 (Original operating instructions)
Meaning of the symbols.... 13
For your safety.... 14
Intended use....16
Identification plate.... 16
Operating elements 17
Operation....17
Servicing / Care 18
Transport and storage 18
Troubleshooting information...... 19
CE Declaration of Conformity...... 19
Warranty 19
Disposal....19
Meaning of the symbols

Warning!
To reduce the risk of injury, read the instruction manual!
Only suitable for indoor use.

Note
Observe the symbols and their meaning in the operating manual of the operating arm.
For your safety
Before using your device for the first time, read this instruction manual carefully and observe the instructions. Keep this instruction manual for later use or subsequent owners.
→ It is essential that you read the safety information before using for the first time! Failure to observe the instruction manual and the safety information can result in damage to the device and danger for the operator and other persons.
→ All persons involved with first use, operation and servicing of the device, must have appropriate qualifications.
The making of unauthorised changes or conversions is not permitted
Do not make any changes to the device or convert it to make other machinery. Such changes can result in personal injury and incorrect operation.
→ Repairs to the device must only be performed by trained persons who have been instructed to do so.
When doing so, always use original spare parts. This ensures that the safety of the device is maintained.
Information symbols in this manual
The signs and symbols in this manual should help you to use the manual and product quickly and safely.

Note
Information to ensure the most effective and practical use of the device.
→ Step
Requires you to perform an action.
√ Action result
This is the result of a sequence of steps.
[1] Position number
are indicated in the text with square brackets [].
For your safety
A Illustration label
Illustrations are numbered with letters and identified in the text.
① Step number
The defined sequence of action steps is numbered and identified in the text.
Danger levels
The following danger levels are used in this instruction manual to indicate potentially dangerous situations:

WARNING!

A dangerous situation may occur and, if the measures are not followed, will result in severe injury and even death.

CAUTION!

A dangerous situation may occur and, if the measures are not followed, will result in slight or minor injuries.
Attention!
A possibly harmful situation may occur which if not avoided will result in property damage.
Safety information content

WARNING!

Type and source of the danger!
Consequences of non-observation
➢ Measure for preventing the danger
Safety information
Safety in the work area
- Do not operate the charger on easily combustible surfaces or substrates (e.g. paper, textiles, etc.) or in a flammable environment. There is a risk of fire due to heating of the charger occurring during charging.
Electrical safety
- Keep the device away from rain or damp. The ingress of water increases the risk of an electric shock.
- Only charge power packs approved by the manufacturer and the approved operating arms with a permanently installed power pack unit – see EC declaration of conformity.
Otherwise there is a risk of fire and explosion.
Safety information
- Keep the device clean. Dirt increases the risk of an electric shock.
- Do not use the device with a damaged cable. Do not touch any damaged cable and pull out the mains plug if the cable is damaged during charging.
- Under no circumstances must the charger be opened.
- If the mains cable of this device is damaged, it must be replaced by the manufacturer, its customer service or a qualified person in order to avoid hazards.
Protection of yourself and others
- Vapours can escape if the power pack is damaged or used incorrectly. Ensure a supply of fresh air is available and see a doctor if you do not feel well. The vapour can irritate the airways.
- Children must be supervised to ensure they do not play with the charger.
- The device can be used by children aged 8 or older as well as by persons with limited physical, sensory or mental abilities or lack of experience and / or knowledge, insofar that they are supervised and have received instructions about the safe handling of the charger and understand the associated dangers. Children are not allowed to play with the device.
Cleaning and servicing may not be carried out by children if they are not under supervision.
Otherwise there is a risk of incorrect use and injuries.
Safety information
General safety information
- Before initial use, perform a visual inspection of the device to check for damage. Prior to
use any damage must be repaired by a qualified expert or workshop. - Do not charge any damaged, defective or deformed power packs.
- Do not charge any third party power packs.
- Never try to charge non-rechargeable batteries.
- Do not cover the ventilation slits of the charger. Otherwise the charger may overheat and no longer function correctly.
- Do not charge power packs whose temperature is less than 10^ C or greater than 40^ C.
- Repairs must only be performed by a qualified expert or workshop.
Intended use
The device is intended for charging power packs authorised by the manufacturer. The authorised power packs and the authorised operating arms with a permanently installed battery pack unit are indicated in the CE declaration of conformity (enclosed). Any other use is classed as an unintended use. The user is liable for any damage arising from unintended use.
Identification plate
Position
The identification plate is located at the charger casing.

Note
The identification is considered as a document. It must never be altered or obliterated.
Layout E
1 Manufacturer
2 Type of device (charger)
3 Model name
4 Model number
5 Serial number
6 Rated input voltage, kind of current/rated power, mains frequency
7 Only for indoor use
8 Rated output voltage, kind of current/rated current
9 Read the instruction manual
10 CE label
11 Protection class
12 Year of manufacture
13 Disposal instruction
14 Fuse
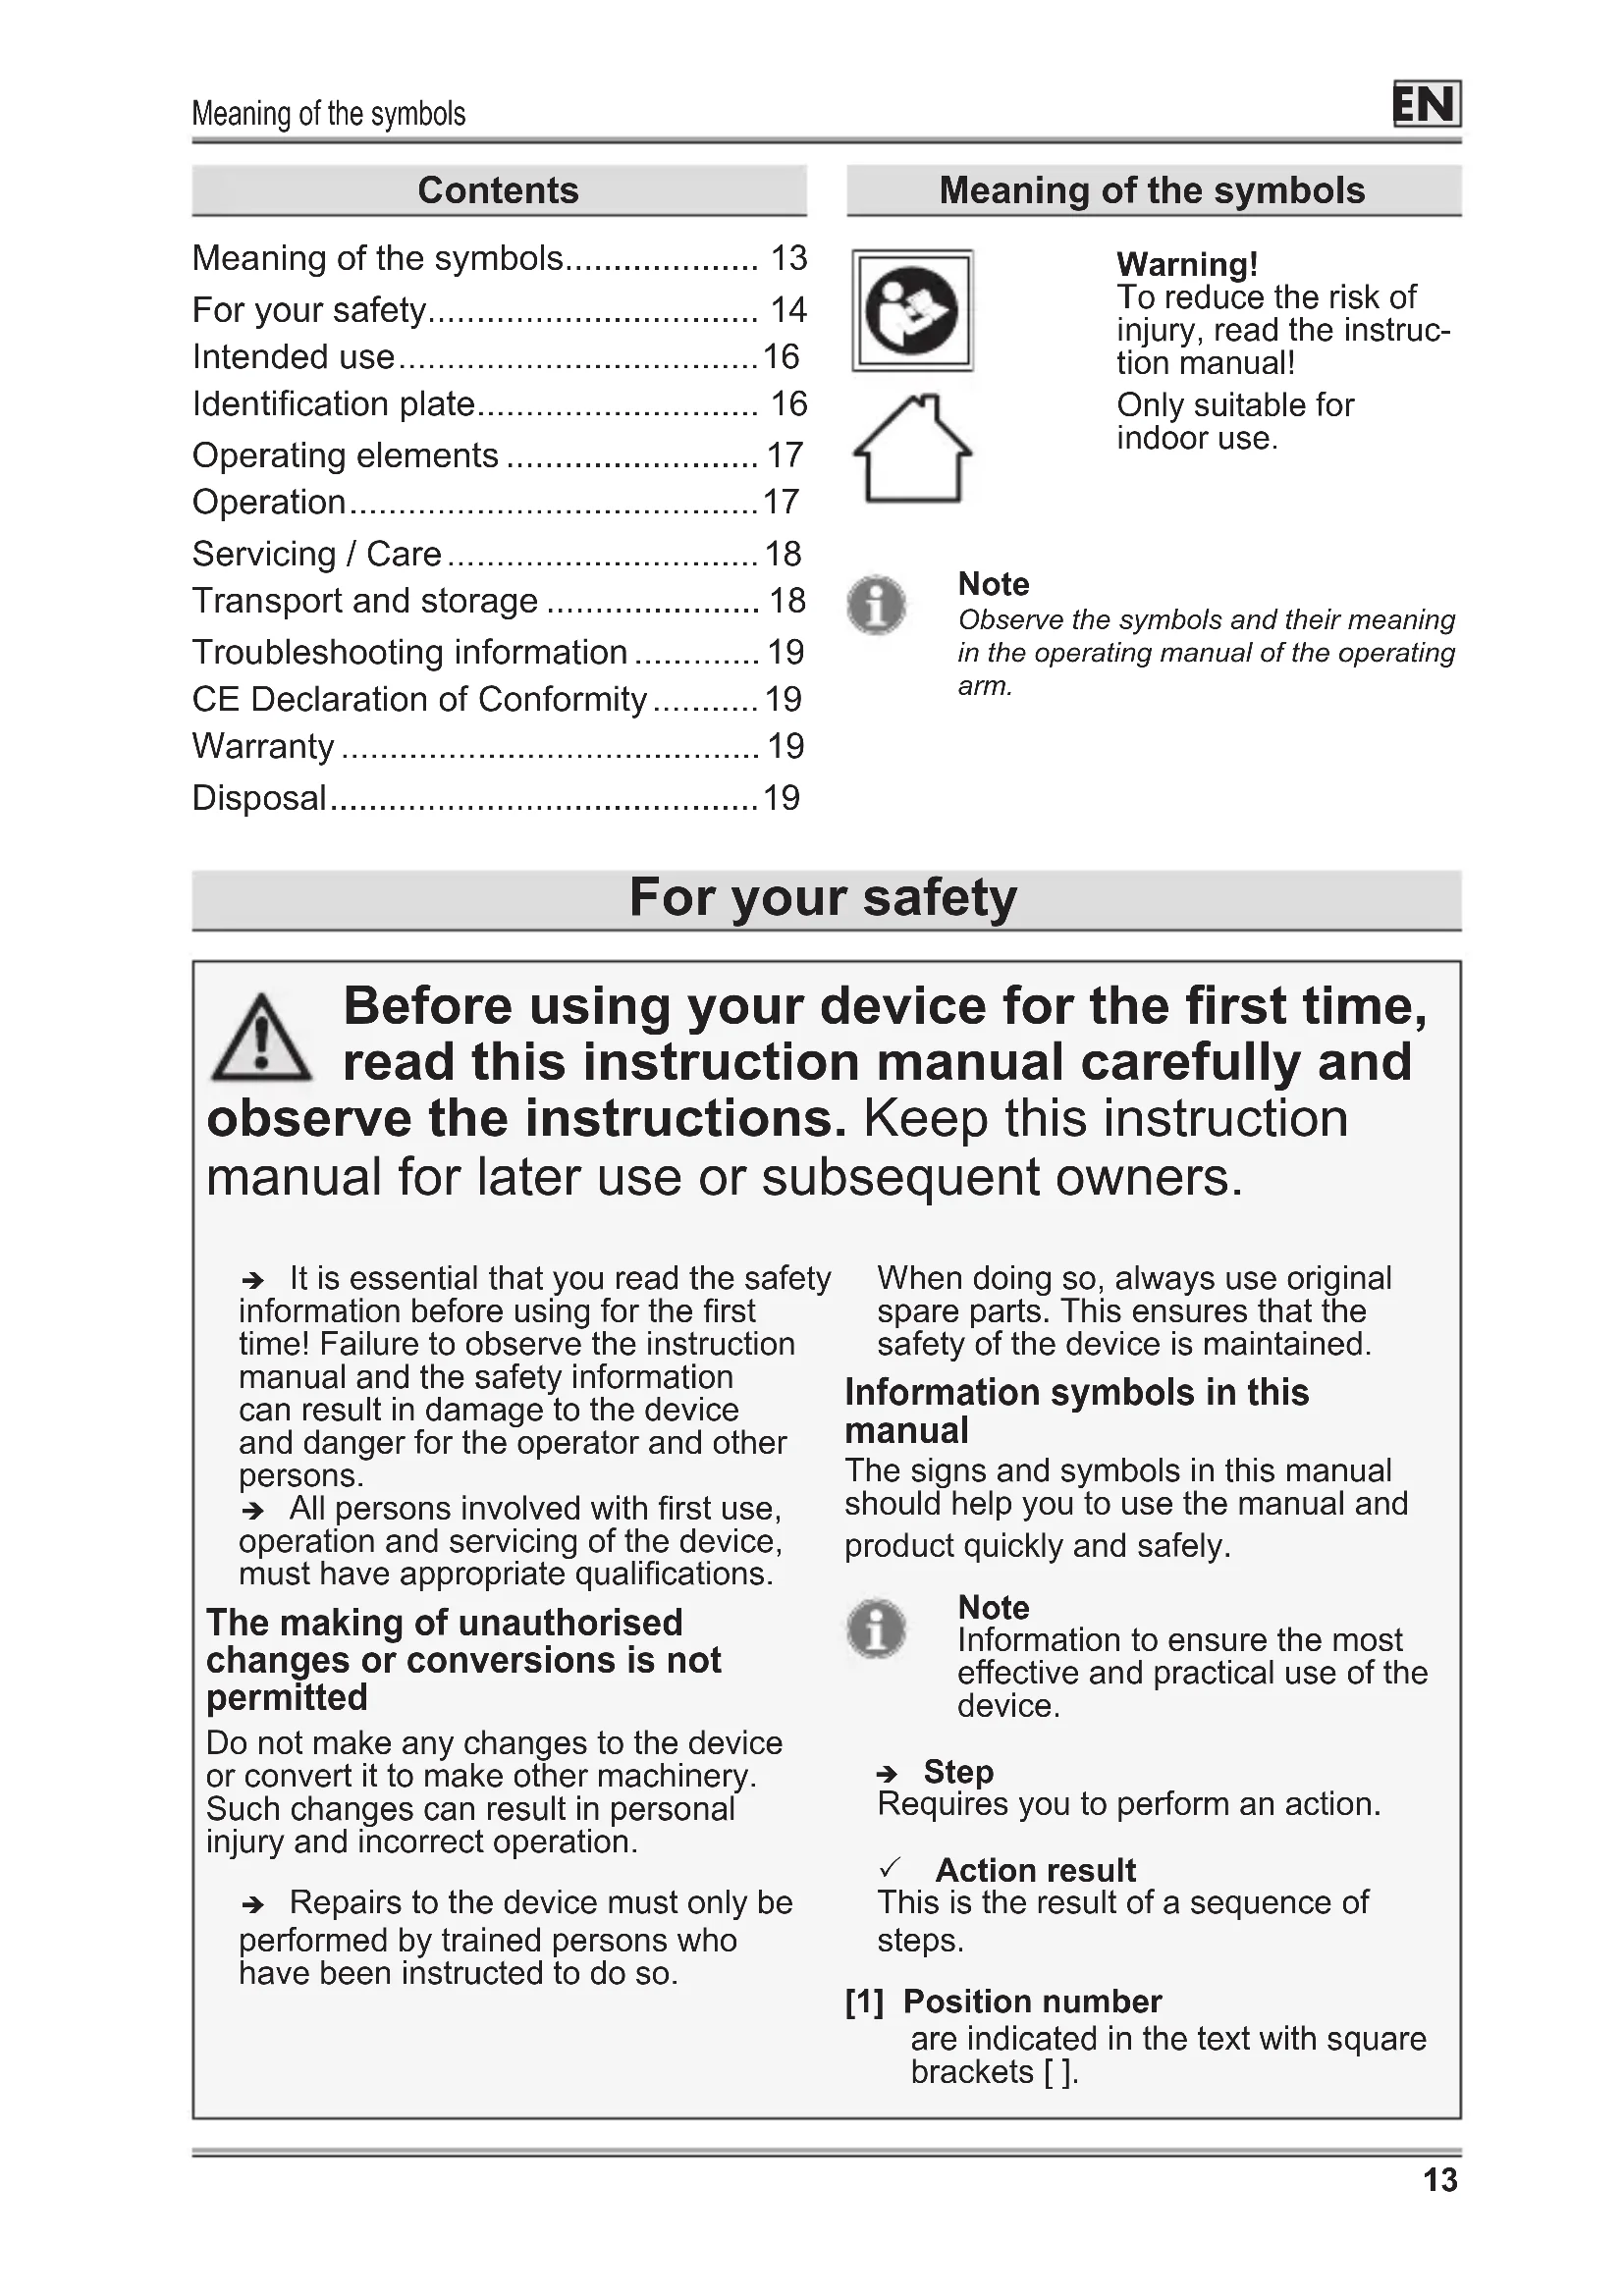
Operating elements
Charger A
1 Charger
2 Charging indicator light
3 Mains adapter
Operation

Note
The charging unit can be attached to a wall with screws or screws and dowels (not included with in the scope of supply).
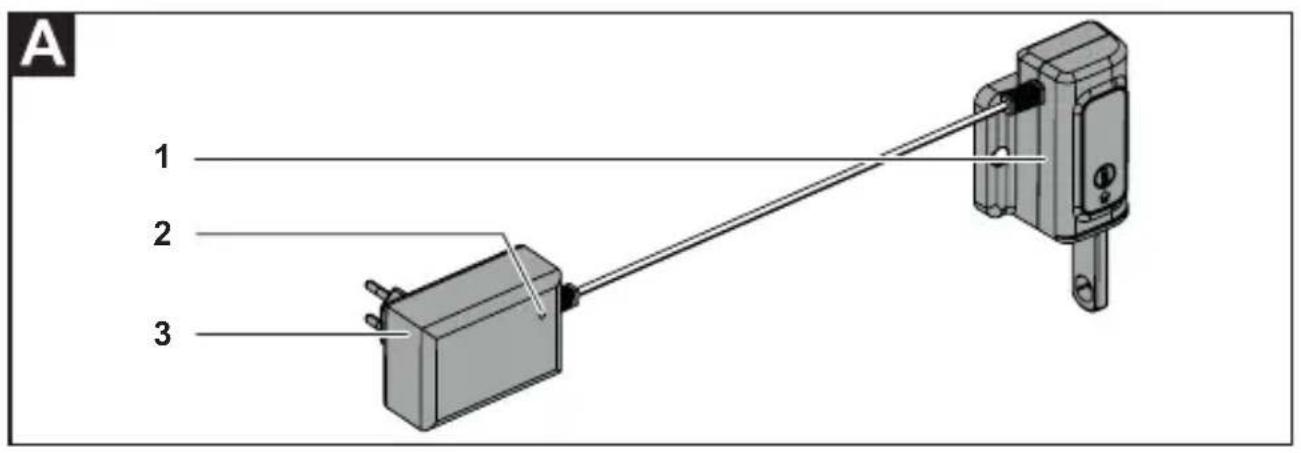
Mounting the charger on the wall B
→ Mount the charger at a height of approx. 1.70 m in the vicinity of a socket.

Note
During mounting, ensure that sufficient distance from the ground is maintained so the operating arm with the permanently installed power pack can be inserted into the charger.

WARNING!

Risk of injuries or material damage.
Do not charge power packs whose temperature is less than 10^ C or greater than 40^ C.
The recommended charging temperature (outside temperature/ambient temperature) is approx. 24^ C.

CAUTION!

Injuries or material damage.
Observe the mains voltage.
The power source voltage must match the information on the device identification plate.

Note
The power pack heats up during charging.
Charging ©
→ Insert the operating arm with the permanently installed power pack into the charger until the operating arm is firmly engaged there ①.
→ Plug the mains adapter into a suitable mains socket ②.
√ The charging indicator light briefly lights up green and then switches over to red. Charging has started.

Note
The charging time is approx. one hour if the power pack is empty. Then end of charging is indicated by the green charging indicator light.
Charging indicator light on the mains adapter
LED status Meaning
| Steady green | Mains voltage connected. The operating arm is not plugged in. |
| Steady red | Charging with the operating arm inserted. |
| Steady green | Charging completed with the operating arm inserted. |
| Steady green | Mains voltage connected. Operating arm not inserted correctly or the contacts are dirty or the temperature is beyond the charging temperature. The power pack is not charging. |

Information concerning charging temperature
If the charging temperature during charging is beyond the specified range, the indicator light lights up green. As soon as the charging temperature corresponds with the indicated values, the indicator light automatically switches to red and charging begins.

Note
To protect the power pack and ensure a long service life, the charger switches off as soon as the power pack is fully charged. The charger does not charge faulty power packs.
After charging is complete D
→ Press the locking button [A] on the operating arm ①.
→ Pull the operating arm out of the charger ②.
→ Disconnect the charger from the mains socket ③.

Note
The operating arm can be inserted and stored the designated charger until the next used or for long-term storage without any hesitation. For this purpose however, remove the mains plug of the charger out of the mains socket.
Servicing / Care
WARNING!

Risk of injuries or material damage.
Before performing any work, switch the device off and remove the operating arm, in which the permanently installed power pack is located.
➢ Pull out the mains plug.
Do not open the device.
Servicing and repair must only be performed by a specialist.
→ Keep the charger clean and dry.
→ Clean the contacts and ventilation slits of the charger pack with a soft dry cloth or if it is heavily soiled use a brush.
Transport and storage
Transport
→ Secure the device sufficiently to prevent its unintentional slipping if you are transporting it on or in a motor vehicle.
Storage
→ Always store the device in a dry and safe location that is inaccessible to children.
Troubleshooting information

WARNING!

Risk of injuries or material damage.
➢ Pull out the mains plug.
Do not open the device.
In case of doubt always consult a specialist workshop.
Fault Possible cause Remedy
| No charging takes place. | The contacts are dirty. Clean the contacts. | |
| The operating arm with the permanently installed power pack unit is not properly inserted into the charger. | Insert the operating arm correctly into the charger. | |
| Power pack or charger defective. | Have the charger and the operating arm with the permanently installed power pack unit inspected at a specialist workshop. | |
| The fuse at the mains connection has blown/is defective. | Contact an qualified electrician to arrange its repair. | |
| The power pack temperature is outside the range 10°C - 40°C. | Allow the power pack to cool down or heat up. | |
CE Declaration of Conformity

Further details about the device are contained on the separately enclosed CE Declaration of Conformity. This forms a part of this instruction manual.
Warranty
The warranty conditions of our local company or importer apply in all countries. Under the terms of the warranty we will repair faults on your device free of charge, insofar as material or manufacturing defects are the cause. To make a claim under warranty please contact your seller or your nearest branch.
Disposal
Power tools, accessories and packaging must be disposed of via an environmentally compatible recycling chain.
Do not throw old electrical and electronic devices away with your domestic waste. Take it to a suitable disposal facility.