
CSA 700 - Saw Wolf Garten - Free user manual and instructions
Find the device manual for free CSA 700 Wolf Garten in PDF.


| Product type | Electric chain saw |
| Brand | Wolf Garten |
| Model | CSA 700 |
| Guide bar length | 35 cm |
| Motor power | 2000 W |
| Supply voltage | 230 V / 50 Hz |
| Weight | 4.5 kg |
| Oil tank capacity | 150 ml |
| Chain speed at no load | 12 m/s |
| Chain type | Oregon 91VXL |
| Chain pitch | 3/8 inch |
| Drive link gauge | 0.050 inch |
| Number of drive links | 55 |
| Sound level (LpA) | 95 dB(A) |
| Vibrations (front hand) | 4.5 m/s² |
| Vibrations (rear hand) | 5.0 m/s² |
| Safety features | Chain brake, trigger lock, kickback guard |
| Maintenance | Regular cleaning of guide and chain, sharpening, lubrication |
| Spare parts | Chain, guide, clutch drum, air filter, spark plug |
| Warranty | 2 years |
Frequently Asked Questions - CSA 700 Wolf Garten
User questions about CSA 700 Wolf Garten
0 question about this device. Answer the ones you know or ask your own.
Ask a new question about this device
Download the instructions for your Saw in PDF format for free! Find your manual CSA 700 - Wolf Garten and take your electronic device back in hand. On this page are published all the documents necessary for the use of your device. CSA 700 by Wolf Garten.
USER MANUAL CSA 700 Wolf Garten
Original operating instructions 15
D
3 Rear On / Off button
4 Battery
5 Oil tank level indicator
6 Sawing chain
7 Chain saw bar
8 Kickback protection
9 Protective hood
10 Spiked bumper
11 Oil tank cover
F
8 Kickback-bescher- ming
9 Beschermkap
10 Boomhaak
11 Dop olietank
DK
1 Forreste start/stop-knap
2 Udløserknap
3 Bageste start/stop-knap
4 B a t t e r i
5 Oliestandsindikator tank
6 K æ d e
7 Skinne
8 Kickback-værn









Congratulations on the purchase of your WOLF-Garten product!

Please read the instructions carefully and familiarize yourself with the different control elements and how to operate the device properly. Attention! When using power tools it is important to observe the following safety advice in order to protect yourself against electrical shock. The operator is responsible for accidents involving other persons and/or their property.
Contents
Safety instructions ..... 15
Assembly....19
Operation....19
Maintenance 22
Fault rectification ..... 23
Spare parts and accessories ..... 23
Warranty 23
Safety instructions
Meaning of symbols

Warning! Read the operating instructions before placing in service!

Keep bystanders away!

Wear safety gloves!

Wear sturdy shoes!

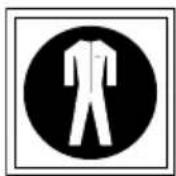
Wear protective clothing!
For recommendations, see page 23 (Spare parts and accessories)
Caution! Risk of rebound or recoil - avoid touching the tip of the saw bar on any object.

Wear protective gear for the eyes, head and ears.

Do not expose to moisture!
General safety instructions for electric tools

WARNING! Read all safety warnings and instructions.
If the safety instructions are not strictly adhered to, there is a risk of serious injury, electric shock or damage by fire.
- Keep the safety instructions for future reference.
●The term "electric tool" used in the safety instructions refers to both mains-powered electric tools (with mains cable) and battery-operated tools (without mains cable).
Workplace safety
- Keep the working area tidy and ensure that it is properly illuminated. Working in cluttered or poorly lit areas can lead to accidents.
- Do not use the electric tool in explosive atmospheres containing flammable liquids, gases or dusts. Electric tools might generate sparks that can ignite dust or vapors.
- Keep electric tools away from children and do not operate them when other persons are standing near you. When distracted, you might lose control over the tool.
Electric safety
- Protect all electric tools against rain and dampness. There is an increased risk of electric shock, if water enters the electric tool.
Personal safety
- When working with the electric tool, ensure that your full attention is on the task in hand, do not let yourself be distracted and apply common sense. Do not use the electric tool when you are tired, or when you are under the influence of drugs alcohol or medication. Even brief moments of inattention can lead to serious injury.
●Wear personal protective equipment and protective goggles. Wearing personal protective equipment such as dust mask, safety footwear, hard hat and hearing protection reduces the risk of injury. Whether this equipment is necessary depends on the type of the electric tool.
●Avoid inadvertent start-up of the electric tool. Ensure that the electric tool is switched off before carrying it or disconnecting/connecting it to the power supply (mains or battery). When carrying the electric tool, do not place your finger on the switch and do not connect it to the power source while it is switched on, as this could cause injury.
●Before switching on the electric tool, remove all adjusting tools such as spanners, etc. Tools or spanners left on a rotating part can cause injury. - Avoid unnatural postures. Ensure that you are standing on firm ground and avoid a posture where you could lose your balance. This ensures that you will be able to control the electric tool even in unexpected situations.
●Wear suitable clothing. Do not wear loose clothing or jewelry. Keep your hair, clothing and gloves away from moving parts. Loose clothing and jewelry and long hear can be caught in moving parts.
Proper use of electric tools
- Do not exceed the maximum load of the tool. Use the tool only for the intended purpose. To ensure safe and efficient working, operate the electric tool only within the specified power range.
- Do not use electric tools whose switches are defective. Electric tools that cannot be properly switched on or off are dangerous and must be repaired without delay.
●Before adjusting the tool, changing accessory parts or putting the tool away for storage, disconnect the power plug from the socket or remove the battery. This safety measure reduces the risk of inadvertent tool start. - Store the electric tool outside the reach of children. Do not allow persons who have not read these instructions to operate the tool. When operated by inexperienced persons, electric tools can be very dangerous.
- Handle the electric tool with care and service it regularly. Ensure that all moving parts can work properly and are not jammed and regularly inspect the tool for defective or damaged parts that might impair its function. Have damaged parts repaired before you start the tool. Many accidents are caused by insufficiently maintained electric tool.
- Keep the cutting parts sharp and clean. Carefully maintained cutting tools with sharp cutting edges will rarely get jammed and are easier to operate.
- When using the electric tool, the accessories and replacement parts, strictly adhere to the instructions in this manual. Take into account the actual working conditions and the task in hand. The use of electric tools for purposes other than the intended can lead to dangerous situations.
Proper use of battery-powered tools
●Recharge the battery only with chargers that have been specifically recommended by the manufacturer. If a different charger is used, there is a risk of fire.
●Operate the electric tool only with the battery provided for this task. The use of other batteries can lead to injury or fire.
- Keep the battery that is not in use away from office clips, coins, keys, nails, screws or other small metallic objects that could cause shorting of the contacts. A short-circuit of the battery contacts may lead to burns or fire.
- Improper use may lead to liquid leaking out from the battery. Avoid contact with the liquid. In case of accidental contact with the battery liquid, rinse with water. In case of contact with the eyes please seek medical assistance. Leaking battery liquid may lead to skin irritations or burns.
Service
- If the electric tool needs to be repaired, have the repair carried out by specialist personnel and instruct them to use only original spare parts. This ensures the operational safety of the electric tool.
Device-specific safety instructions
- Keep all parts of the body away when the saw is operating. Before starting the saw, ensure that the saw chain is not touching anything. While working with a chain saw, one instant of negligence may result in clothing or body parts being caught by the saw chain.
●Always hold the chain saw with your right hand at the rear handle and your left hand on the front handle. Holding the chain saw the other way round enhances the risk of injuries and should not be used.
●Wear safety goggles and ear muffs. It is recommended to use other protective gear for the head, hands, legs and feet. Appropriate protective clothing reduces the risk of injury caused by shavings flying about and accidental contact with the saw chain. - Do not work with the chain saw on a tree. There is risk of injuries when operating the saw on a tree.
●Always ensure a stable stance and posture and use the chain saw only if you are standing on a solid, safe and level floor. A slippery floor or unstable surfaces, such as on a ladder, may lead to loss of balance or loss of control of the chain saw.
- Reckon with the fact that while cutting a branch under tension, it is likely to recoil or rebound. When the tension in the wooden fibres gets released, the tensioned branch may hit the operator and / or snatch control of the chain saw.
- Be particularly careful while cutting under-growth and young trees. The thin material may get caught in the saw chain and hit you or make you lose your balance.
- Carry the saw chain at the front handle when it is switched off so that the saw chain is turned away from your body. Always pull the protective cover over the saw chain when transporting it or storing it away. Working with the saw chain carefully and diligently reduces the likelihood of touching it inadvertently while it is operating.
●Follow the instructions for lubrication, tightening the chain and replacing accessories. A chain that has not been tightened or lubricated properly may either snap or enhance the risk of a rebound or recoil.
- Keep the handles dry, clean and free from oil and grease. Greasy and oily handles are slippery and cause loss of control.
- Use it to saw only wood. Do not use the chain saw for work that it is not designed or intended for - Example: Do not use the chain saw to saw plastics, brickwork or construction materials that are not made of wood. Using the chain saw for work that it has not been designed or intended for may lead to hazardous situations.
- Never try to use a machine that is incomplete or one that has been modified without approval.
- Please note that in the case of devices that have been discharged, there is a basic risk of injury caused by residual charge.
● These devices are not meant to be used by persons with little experience and / or knowledge or by those with physical, sensory or mental limitations, unless they are supervised by persons in charge of their safety or have received instructions from them about how these devices are to be used.
●Youth below 16 years of age should not operate the devices.
● Using the device must be avoided under poor weather conditions, particularly when there is the risk of lightning.
Maintenance
- Do not clean or carry out any maintenance work on the tool until after you switch the motor off and pull the mains plug.
Charger
- Do not connect the charger to the power socket if it has become wet or damp.
- Use the charger in dry rooms only.
- Disconnect it from the power supply by removing the plug from the socket. Do not pull the plug by the cable as this could damage the equipment so that its electrical safety might be impaired.
●Never use the charger, if there is visible damage to the cable, the plug or the charger itself. In this case, have the charger repaired at a specialized workshop.
●Never open the charger housing. In the event of malfunction, have the charger repaired by a specialized workshop. - Do not charge the battery-powered shears while using them.
Battery
- In the event of improper use of the battery pack, there is a risk of escaping hazardous vapors. Always ensure proper ventilation and immediately consult a doctor, if you feel unwell. The vapors might irritate the respiratory track.

Risk of fire!
●Never charge batteries near acids or flammable materials.
- Charge battery only at a temperature between 5°C - 45°C. After heavy use, allow battery to cool down before charging it.

Risk of explosion!
Protect the battery-powered trimmer from direct exposure to heat and fire.
- Do not place the battery on radiators. Avoid prolonged direct exposure to sunlight.
●Operate the tool only at temperatures between 5°C to 45°C (41 to 113 °F).

Risk of short circuit
- For disposal, transport or storage, pack the battery in a plastic bag or a cardboard box, or isolate the contacts with adhesive tape.
- Do not open the battery pack.
Safe disposal of batteries

●WOLF-Garten batteries are designed according to the latest state of technology and optimized for the use in electric tools. Lithium ion cells contain hazardous substances and may therefore not be disposed off with normal household waste.
●WOLF-Garten batteries are lithium ion cells and are therefore subject to special disposal regulations. Bring defective batteries to your specialist dealer. Before disposing of the tool, remove the battery.
●WOLF-Garten wishes to encourage users to act in an environmentally friendly manner. It therefore guarantees to take back and recycle old batteries that are returned to WOLF-Garten dealers.
Disposal

●Electric tools must not be disposed with household waste. Bring the device, accessories and packaging to a recycling centre for proper recycling and disposal.
Assembly
General

Caution! Sharp saw chain
Tool is still running!
●Always remove battery before performing any work on the trimmer!
●Wear safety gloves when doing any work on the saw chain!
Fastening the saw chain
- Loosen the screw and remove the chain cover .A
- Place the saw chain around the sawing bar .B

Take care to ensure that the chain is moving in the right direction a
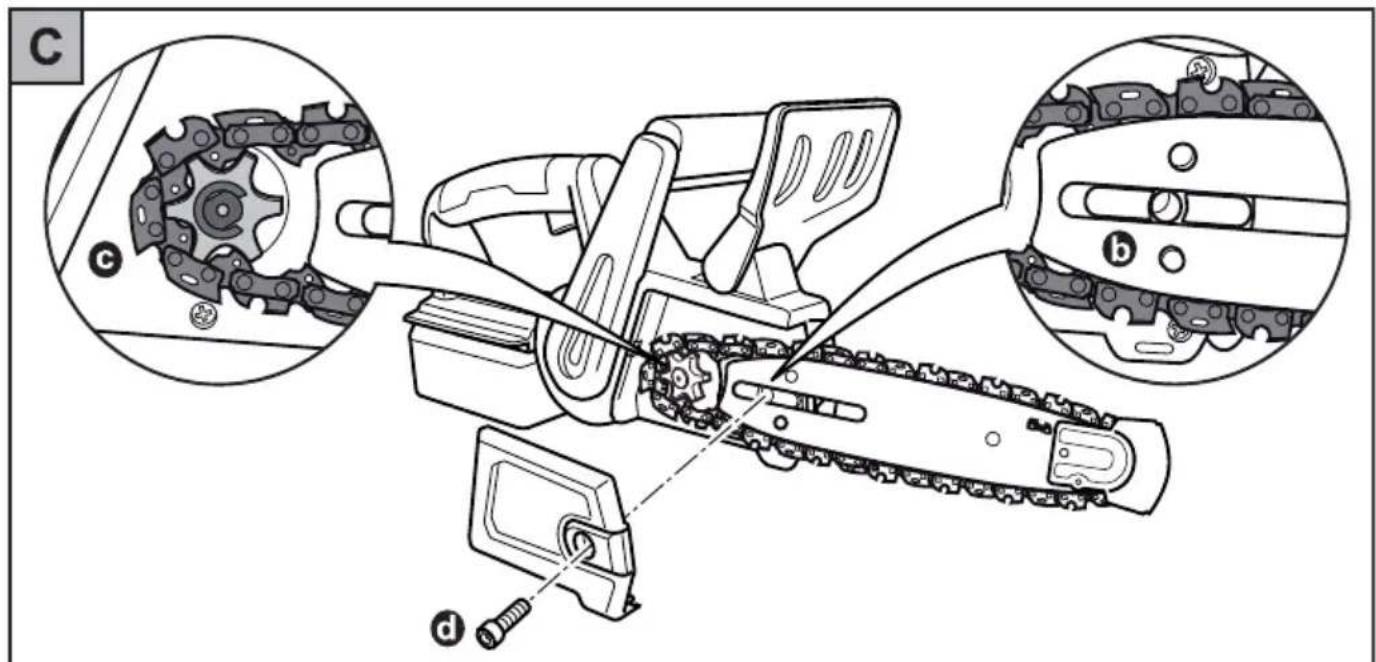
- Place the sawing bar along with the saw chain on the device C

Take care to ensure that the chain tensioning pin engages in the sawing bar.

Ensure that the saw chain fits around the sprocket Ⓗ.
- Place the chain cover and tighten it on the device C d.
Fastening the saw chain

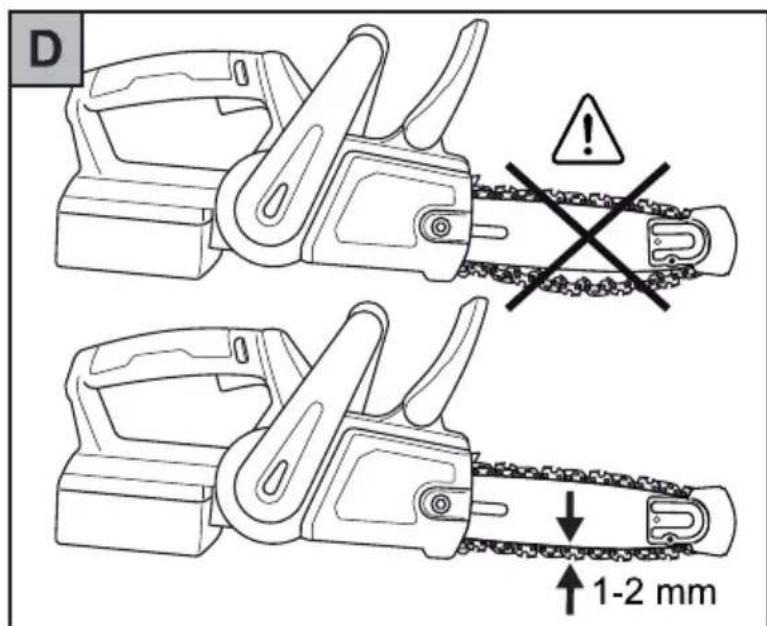
The saw chain should not hang loose, but it should be possible to pull it a few millimetres away from the sawing bar .D
- Turn the screw and rosen it enough so that the sawing bar can be moved by hand.
- Tighten the chain tensioning screw using a screwdriver E.
- Turn the saw chain by hand in order to check that it runs smoothly and properly.
- Turn the screw so that it is fastened tightly.
Operation
Times of operation
- Please consult regional/local regulations.
● Inquire about the operating times at your local regulatory agency.
Charging
FGH

Attention! Only use battery charger in dry places.
Before first use, the battery needs to be charged for about 2 hours.
Use only the original WOLF-Garten charger (part no. 41A30--E650)!
- Remove the battery from the device .
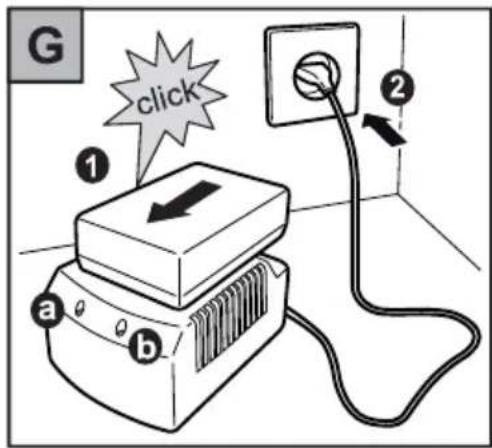
- Insert the battery into the charger
- Connect the charger to the mains voltage
② (LED lights up green).


Notes on charger : G
●LED lights up red: Battery is charging
●LED lights up green: Charging completed
- LED blinks red: Fault (e.g., battery is too hot)

Self-discharge of batteries! Remove the battery from the charger once it is fully charged.

General instructions:
regarding the battery In order to maintain the long service life of the battery, always follow the instructions below:
●The lawn trimmer are automatically switched off when the battery voltage is low. The battery must then be recharged before the shears can be used again.
● Always recharge the lithium-ion battery prior to any prolonged period of non-use, i.e. before storing the shears away in autumn.
● The charging time is 2 hours for a battery that is completely empty.
- The lithium-ion rechargeable battery can be charged at any charge level and charging can be interrupted at any time without damaging the battery (no memory effect)
Chain lubrication

Caution! The device should be operated only with adequate chain lubrication oil.
Check the oil level with the help of the oil level indicator J. a

Tank capacity 65 ml, is sufficient for approx. 30 min. of operating time.
Filling up chain lubrication oil

Avoid spilling the oil.
Wipe off any oil that may have got spilt.
-
Unscrew the oil tank cover and remove it.
-
Fill in the chain lubricating oil carefully until it reaches the upper marking on the oil level indicator.
-
Tighten the oil tank cover by hand.

Caution!
Take care to ensure that no dirt or contamination gets into the oil tank.

Recommendation:
In order to prevent environmental damage, we recommend the use of bio chain lubricating oil based on vegetable oils.
Working with the chain saw

The chain saw has been designed for sawing wood and felling trees
● Fell only those trees whose trunk diameter is smaller than the length of the chain saw blade.

Prior to each use:
- Check the saw chain and sawing bar for any signs of damage
- Check the chain tension
●Check the chain lubrication

During operation:
●Take care to ensure that you have a stable standing position.
●Work at an incline above the tree.
●Hold the saw chain away from the body.
●Hold the device tightly in both hands.
●Never stand on a ladder or an unstable surface or ground.
- Do not use the device above shoulder height.

Caution! Risk of injury
●Do not saw wood that is under tension.
●Do not saw any shrubs or bushes.
Switching the motor on K
- Press the unlock button and keep it pressed.
- Press the On / Off button at the rear.
- Press the On / Off button at the front.
- Release the unlock button . 1
Switching the motor off K
●Release one of the two On / Off buttons
(203) .
Working method

Caution! Risk of rebound or recoil
A rebound or recoil may lead to fatal cut injuries.
In the event of a rebound or recoil (kick-back), the saw is turned suddenly and uncontrollably towards the user.
●The integrated kickback protection reduces the risk of a rebound or recoil. Nonetheless, the risk of a rebound or recoil cannot be ruled out entirely.
●Exert uniform pressure on the device, but not excessive force.
- Place the device, if possible, with the spiked bumper on the branch to be sawed off K a
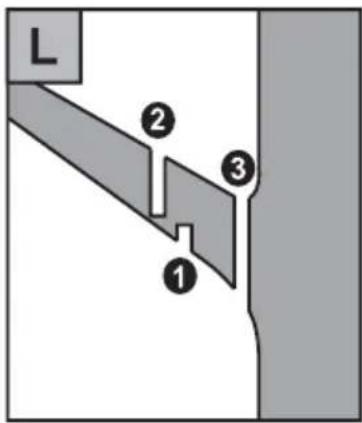
Cutting a tree L
- Cut the branch 10-15 cm from the start of the branch from below upwards up to 1/3 of the branch diameter ①
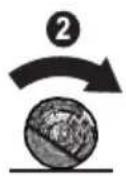
- Saw off the branch somewhat more from the top to the bottom ②
- Make a cut close to the trunk . ③
Felling trees M

Caution! Risk of accidents
●Fell trees only if you have adequate experience in doing so!
●Fell only those trees whose trunk diameter is smaller than the length of the chain saw blade.

Caution! Falling direction
●Take care to ensure that the tree cannot get hooked in other trees while felling.
●While felling the trees, take the inclination and bend of the tree into consideration as well as the wind direction.

Caution!
●Take care to ensure that there are no persons or animals in the danger zone (area of the tree falling).
●The danger zone M equivalent to double the length of the tree.
- Keep two escape routes free where there is no risk of stumbling, should the tree not tilt and fall in the expected direction M = escape routes ;
b = Planned direction of fall;
G = Danger zone)
- Remove any branches on the tree that hinder the felling of the tree.
- Cut a groove in the trunk of the tree . ①

This groove determines the direction in which the tree falls and must be 1/4 the trunk diameter.
- Continue with the felling cut on the side opposite to that where the initial groove has been cut ②.

The felling cut must be made 3-5 cm above the horizontal line of the groove cut initially.

Caution! Risk of accidents
The felling cut must end at a distance that is 1/10 of the trunk diameter. The trunk should not be completely cut through under any circumstances, since otherwise the tree falls uncontrollably.

The uncut part of the trunk serves as a hinge.
- After the groove cut and the felling cut have been completed, the tree begins to fall. Use felling ropes or cables (if required) for support.
Removing branches from the trunk N

Let those branches that support the felled tree remain initially.
- Remove the branches of the tree trunk from the bottom to the top N a
Cutting the tree trunk to size N

Caution!
- Avoid touching the ground with the saw chain when it is operating. This leads to premature wear of the chain.
The tree trunk is lying steady N b
- Saw off the tree trunk up to 2/3 of the diameter from the top to the bottom ①
- Turn the tree trunk around . ②
- Saw off the tree trunk completely from the top to the bottom ③

By turning the tree trunk around you prevent the saw chain from touching the ground.
Tree trunk supported on one side N

Proceed as follows so that the tree trunk does not splinter while sawing it:
- Saw off the tree trunk up to 1/3 of the diameter from the bottom to the top ①
- Saw off the tree trunk completely from the top ②
Tree trunk supported on both sides N

Proceed as follows so that the saw chain does not get jammed while sawing:
- Saw off the tree trunk up to 1/3 of the diameter from the top to the bottom ①
- Saw off the tree trunk completely from the bottom ②.
Maintenance
General

Caution! Sharp saw chain
Tool is still running!
●Always remove battery before performing any work on the trimmer!
●Wear safety gloves when doing any work on the saw chain!

Have the device checked once a year by a specialist workshop.
Cleaning
●Clean the device, particularly the ventilation slots, and with a dry cloth after every use or with a brush if it is excessively dirty.
●Never spray off the device with water.
Oil guide groove of the sawing bar

Caution!
In order to ensure working safely with the device and adequate oil lubrication of the saw chain, the guide groove of the sawing bar must be cleaned if it is very dirty.
- Dismantle the chain cover, the saw chain and the sawing bar (see section "Caution! Sharp saw chain", page 19).
- Clean the oil guide groove using a suitable tool (e.g., wire brush).
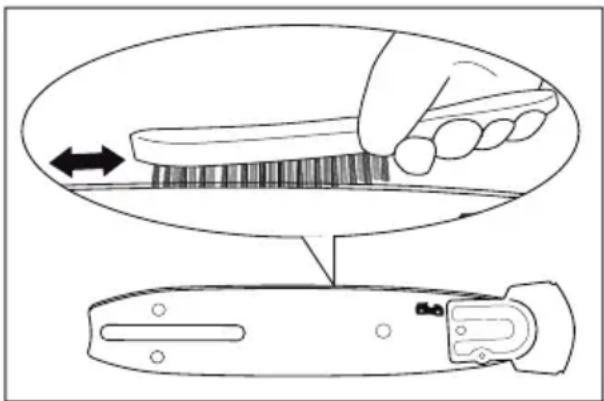
- Mount the saw chain, the sawing bar and the chain cover (see section "Caution! Sharp saw chain", page 19).

Sawing bar wear
The sawing bar of the device becomes worn out over time.
●After cleaning it, turn the sawing bar around by 180° . This balances the wear and tear and enhances the service life of the sawing bar.
Storage

Caution! Sharp saw chain
Always pull over the protective cover when storing the device.
- Store the device in a dry place, out of the reach of children.
●Take care to ensure that no chain lubrication oil can be discharged while it is stored. - Keep the device as horizontal as possible with the oil tank sealing cap facing upwards.
- Remove the chain lubricating oil from the device for longer storage periods (4 weeks or more) in order to prevent resin formation in the lubricating oil pump.
Sharpening the saw chain

Caution! Risk of injury
A saw chain that has not been properly grounded increases the risk of injury.
●Special tools are required in order to be able to ensure that the saw chain is sharpened properly. Hence, we recommend that the saw chain is sharpened by a specialist.
Fault rectification
| Problem Possible cause Remedial action | ||
| The saw chain becomes hot | Excessive chain tension | Adjust the chain tension (see section "Fastening the saw chain", page 19) |
| Excessive friction on account of inadequate lubrication | Fill up the oil tank | |
| Saw chain is blunt·Look for a WOLF Garten service workshop | ||
| The saw chain is dry | No oil in the tank·Fill up the oil tank | |
| Oil guide groove is clogged | Clean the sawing bar (see section "Oil guide groove of the sawing bar", page 22) | |
| The engine is not running | The battery is discharged or defective·The battery is too hot or too cold·Allow the battery to cool down or warm up | Charge the battery or replace it. |
| Noisy operation, excessive vibration of the device | Inadequate chain tension | Adjust the chain tension (see section "Fastening the saw chain", page 19) |
| Saw chain mounted in the wrong direction of movement | Mount the saw chain correctly (see section "Caution! Sharp saw chain", page 19) | |
| Saw chain or sawing bar defective·Look for a WOLF Garten service workshop | ||
In case of doubt, always look for a WOLF Garten service workshop.

Prior to checking the device or working on it, switch off the saw chain and remove the chargeable battery. Wear safety gloves when doing any work on the saw chain!
Spare parts and accessories
| Ordering Number | Designation of the item | Description of the item |
| 41A20--M650 LI-ION POWER | Pack 6 Battery 18 V / 3 Ah | |
| 41A30--E650 | LI-ION POWER CA 700 | Charger |
| 1091-X2-5033 | Saw chain | |
| 1092-U1-0097 | Sawing bar | |
| 6012-X1-0043 | Bio (Organic) chain lubrication oil 1.0 litre | |
| 6012-X1-0041 | Mineral chain lubrication oil 1.0 litre | |
| 6061-X1-0001 | Safety helmet with protective visor | |
| 6061-X1-0019 | Safety goggles | |
| 7760 002 | GH-M 8 | Safety gloves |
| 7760 003 | GH-M 10 |
Supplied by your dealer
Warranty
The warranty rules issued by our company or the importer apply to every country. As part of the warranty, we remedy malfunctions on your appliance free of charge provided that this malfunction is caused by a material or manufacturing defect.
In the event of a warranty claim, please turn to your dealer or the nearest branch office.
Attention ! Direction
- Monteer de zaagketting, de zaagrail en de kettingkap (zie hoofdstuk "Zaagketting bevestigen", s. 49).

Slijtage zaagrail
- Monter sagkjedet, sagsverdet og kjedeskjermen (se kapittel "Feste sagkjedet", s. 77).

Upozorenje! Prije puštanja u pogon pročitati upute za upotrebu!

Iné osoby držte bokom mimo nebezpečia!

Noste ochranné rukavice!

Noste pevnú obuv!

Noste ochranné oblečenie!
Opozorilo! Pred zagonom naprave obvezno preberite navodilo za uporabo!

- Namestite verigo, meč in pokrov verige (gl. poglavje "Pritrditev verige", str. 143).

Obraba meča
Προσοχή!

LI-ION Power PACK 5

LI-ION Power PACK 6



- D
- F
- DK
- CONGRATULATIONS ON THE PURCHASE OF YOUR WOLF-GARTEN PRODUCT
- CONTENTS
- SAFETY INSTRUCTIONS
- MEANING OF SYMBOLS
- GENERAL SAFETY INSTRUCTIONS FOR ELECTRIC TOOLS
- WORKPLACE SAFETY
- ELECTRIC SAFETY
- PERSONAL SAFETY
- PROPER USE OF ELECTRIC TOOLS
- PROPER USE OF BATTERY-POWERED TOOLS
- SERVICE
- DEVICE-SPECIFIC SAFETY INSTRUCTIONS
- MAINTENANCE
- CHARGER
- BATTERY
- RISK OF FIRE
- RISK OF EXPLOSION
- RISK OF SHORT CIRCUIT
- SAFE DISPOSAL OF BATTERIES
- DISPOSAL
- ASSEMBLY
- GENERAL
- CAUTION! SHARP SAW CHAIN
- FASTENING THE SAW CHAIN
- TAKE CARE TO ENSURE THAT THE CHAIN IS MOVING IN THE RIGHT DIRECTION A
- OPERATION
- TIMES OF OPERATION
- CHARGING
- FGH
- ATTENTION! ONLY USE BATTERY CHARGER IN DRY PLACES
- NOTES ON CHARGER : G
- GENERAL INSTRUCTIONS
- CHAIN LUBRICATION
- CAUTION! THE DEVICE SHOULD BE OPERATED ONLY WITH ADEQUATE CHAIN LUBRICATION OIL
- TANK CAPACITY 65 ML, IS SUFFICIENT FOR APPROX. 30 MIN. OF OPERATING TIME
- FILLING UP CHAIN LUBRICATION OIL
- AVOID SPILLING THE OIL
- CAUTION
- RECOMMENDATION
- WORKING WITH THE CHAIN SAW
- THE CHAIN SAW HAS BEEN DESIGNED FOR SAWING WOOD AND FELLING TREES
- PRIOR TO EACH USE
- DURING OPERATION
- CAUTION! RISK OF INJURY
- SWITCHING THE MOTOR ON K
- SWITCHING THE MOTOR OFF K
- WORKING METHOD
- CAUTION! RISK OF REBOUND OR RECOIL
- CUTTING A TREE L
- FELLING TREES M
- CAUTION! RISK OF ACCIDENTS
- CAUTION! FALLING DIRECTION
- THIS GROOVE DETERMINES THE DIRECTION IN WHICH THE TREE FALLS AND MUST BE 1/4 THE TRUNK DIAMETER
- THE FELLING CUT MUST BE MADE 3-5 CM ABOVE THE HORIZONTAL LINE OF THE GROOVE CUT INITIALLY
- THE UNCUT PART OF THE TRUNK SERVES AS A HINGE
- REMOVING BRANCHES FROM THE TRUNK N
- LET THOSE BRANCHES THAT SUPPORT THE FELLED TREE REMAIN INITIALLY
- CUTTING THE TREE TRUNK TO SIZE N
- THE TREE TRUNK IS LYING STEADY N B
- BY TURNING THE TREE TRUNK AROUND YOU PREVENT THE SAW CHAIN FROM TOUCHING THE GROUND
- TREE TRUNK SUPPORTED ON ONE SIDE N
- PROCEED AS FOLLOWS SO THAT THE TREE TRUNK DOES NOT SPLINTER WHILE SAWING IT
- TREE TRUNK SUPPORTED ON BOTH SIDES N
- PROCEED AS FOLLOWS SO THAT THE SAW CHAIN DOES NOT GET JAMMED WHILE SAWING
- CLEANING
- OIL GUIDE GROOVE OF THE SAWING BAR
- SAWING BAR WEAR
- STORAGE
- SHARPENING THE SAW CHAIN
- WARRANTY
- ATTENTION ! DIRECTION
- SLIJTAGE ZAAGRAIL
- OBRABA MEČA
- ΠΡΟΣΟΧΉ
Brand : Wolf Garten
Model : CSA 700
Category : Saw