186312 - Weather Station HAMA - Free user manual and instructions
Find the device manual for free 186312 HAMA in PDF.
| Product type | Indoor/outdoor weather station with wireless sensor |
| Brand and model | Hama 186312 |
| Base station power supply | 3 LR03/AAA batteries (4.5 V) or 4.5 V / 100 mA power adapter (ref. 00137330, not included) |
| Outdoor sensor power supply | 2 LR6/AA batteries (3.0 V); lithium batteries recommended for temperatures below 0 °C |
| Indoor temperature measurement range | 0 °C to +50 °C (32 °F to 122 °F) |
| Outdoor temperature measurement range | -40 °C to +60 °C (-40 °F to +140 °F) |
| Indoor and outdoor humidity measurement range | 20 % to 99 % |
| Radio frequency | 433 MHz |
| Maximum radio range | 30 m in open space |
| DCF radio-controlled clock | Yes, automatic synchronization; manual adjustment possible |
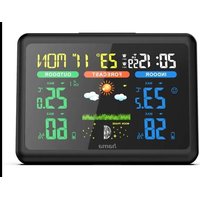
| Display functions | Indoor/outdoor temperature, humidity, atmospheric pressure (hPa/inHg), weather trend (4 symbols), moon phase, time, date, alarm, backlight |
| Max. number of outdoor sensors | 3 (additional sensors ref. 00186347) |
| Alarm | Alarm function with snooze (SNOOZE) |
| Backlight | Permanent only with power adapter; on batteries: 10 seconds |
| Approximate dimensions (base station) | Approximately 120 x 80 x 30 mm (estimated) |
| Approximate weight (base station with batteries) | Approximately 200 g (estimated) |
| Maintenance and cleaning | Clean with a slightly damp, lint-free cloth; avoid harsh detergents |
| Safety | Do not open, do not expose to moisture, do not use near heat sources |
| Repairability and spare parts | Power adapter available separately (ref. 00137330); additional sensors (ref. 00186347) |
| Warranty | Legal warranty; any unauthorized modification voids the warranty |
Frequently Asked Questions - 186312 HAMA
User questions about 186312 HAMA
0 question about this device. Answer the ones you know or ask your own.
Ask a new question about this device
Download the instructions for your Weather Station in PDF format for free! Find your manual 186312 - HAMA and take your electronic device back in hand. On this page are published all the documents necessary for the use of your device. 186312 by HAMA.
USER MANUAL 186312 HAMA
OperatingInstructions
Bedienungsanleitung
Moded'emploi
Instruccionesdeuso
text_image
SNOOZE LIGHT UP DOWN SET ALARM
natural_image
Vertical column of black rectangular blocks with no text or symbols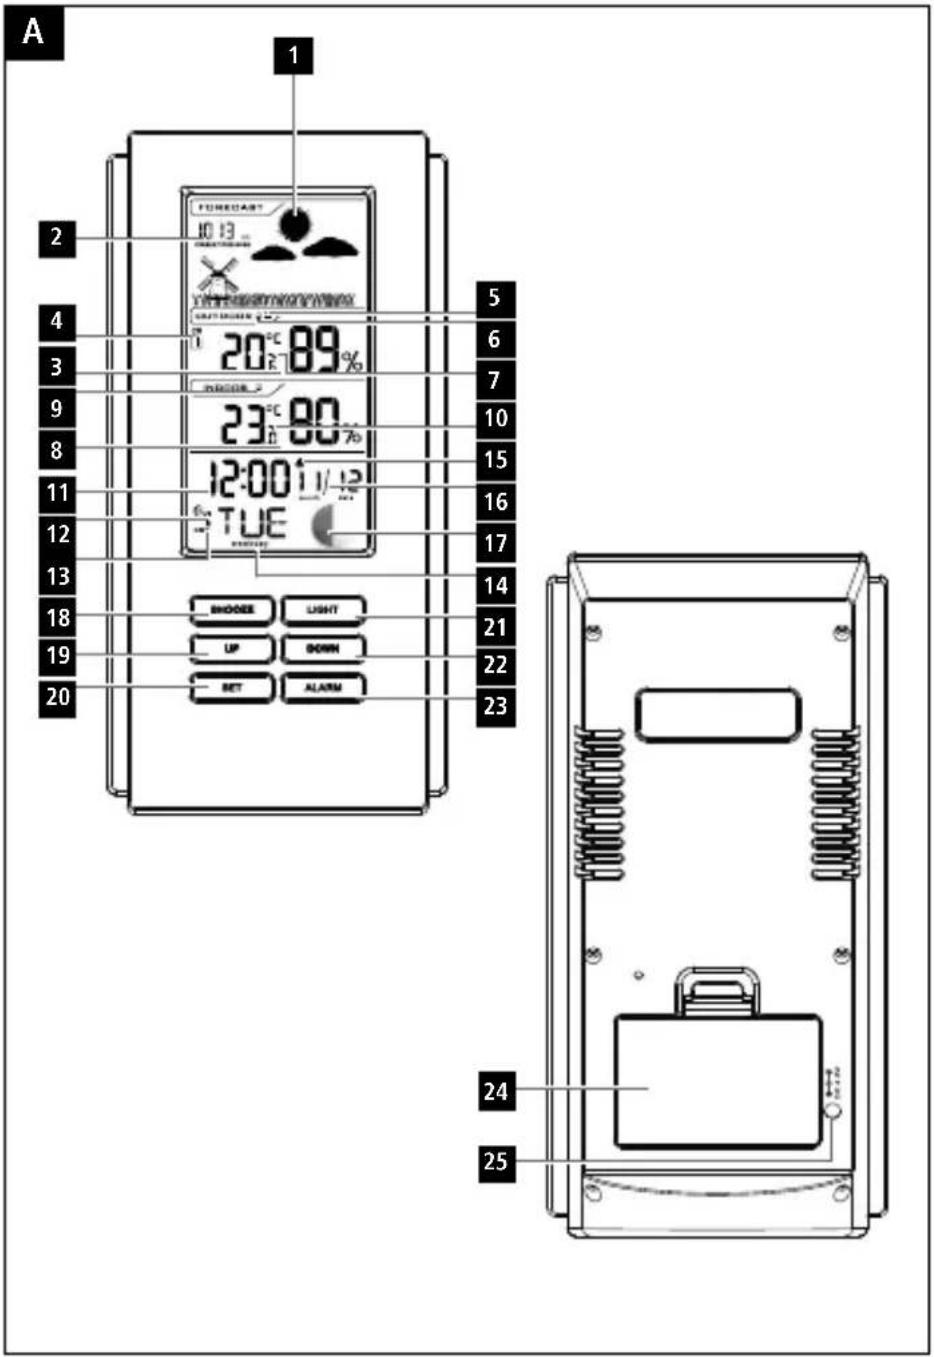
text_image
A 1 2 3 4 5 6 7 8 9 10 11 12 13 14 15 16 17 18 19 20 TUE 21 22 23 UP DOWN SET ALARM 24 25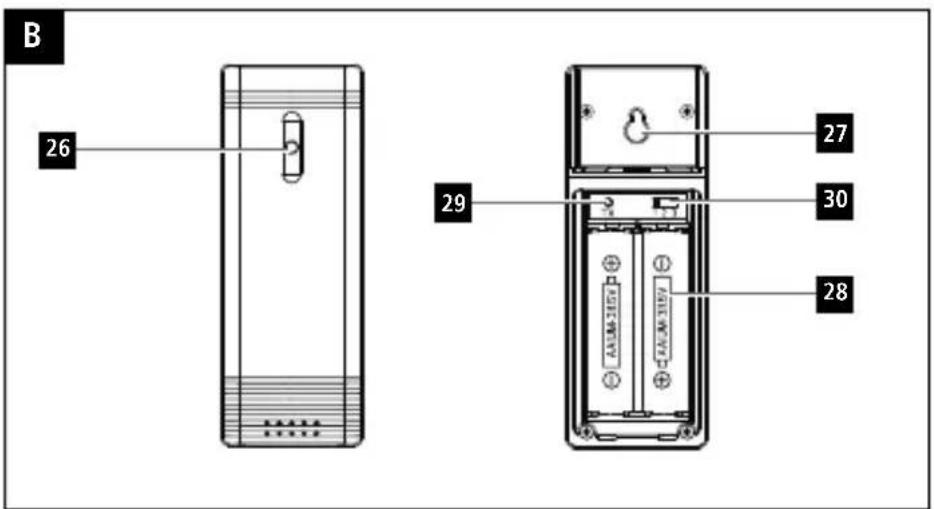
text_image
B 26 29 27 30 28ControlsandDisplays
A B asestation
- Weathertrenddisplay
2.Barometer - Outdoor temperature and humidity
- Channel display
5.Sensorradiosymbol - Batterycapacityofsensor
- Displayofoutdoortemperature trend
- Indoortemperature a ndhumidity
-
Battery capacity of weather station
-
Displayofindoortemperature trend
11.Time
12.DCFradiosymbol
13.Summertime
14.Weekday
-
Alarmsymbol
-
Date
17.Moonphase
18.SNOOZEbutton
=i nterruptsthealarm
19.UPbutton
= r aises t hesetting/switchesbetween
°Cand°F
20.SETbutton
=s ettings/confirmsthesetting
- LIGHTbutton
=a ctivatesthebacklight
22.DOWNbutton
= lowersthesetting/switchesthechannel
23.ALARMbutton
=d isplay/setting/activatesalarmmode
-
Batterycompartment
-
Powersupplyunit
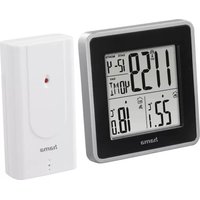
B M easuringstation
26.StatusLED
-
Recessforwallmounting
-
Batterycompartment
29.TXbutton(nofunction)
30.TXchannelslideswitch
1. ExplanationofWarningSymbolsand Notes
Warning
This symbol is used to indicate safety instructions to draw your attention to specific hazards and risks.

Note
This symbol is used to indicate additional information or important notes.

2.PackageContents
• ColorEdgeweatherstation
(basestationforindoors/measuringstation foroutdoors)
- 3 AAAbatteries
- 2 AAbatteries
• Theseoperatinginstructions
3. SafetyNotes
• T heproductisintendedforprivate,non-commercialuseonly.
- D o n otoperatetheproductoutsidethepower limitsgiveninthespecifications.
- D o n otusetheproductinmoistenvironments andavoidsplashes.
- Do n otusetheproductintheimmediate vicinityofheatersorotherheatsourcesorin directsunlight.
- Do not use the product in areas where the use of electronic devices is not permitted.
- Do on otplacetheproductnearinterference fields, metalframes, computers, TVs, etc. Electronicdevices and windowframes can negatively affect the product's functionality.
- D o n otdroptheproductanddonotexposeit toanymajorshocks.
- D o n otopenthedeviceorcontinuetooperate itifitbecomesdamaged.
- D o n otattempttoserviceorrepairtheproduct yourself. L eaveanyandallserviceworkto qualifiedexperts.
- K eepthepackagingmaterialoutofthereach ofchildrenduetotheriskofsuffocation.
• D isposeofpackagingmaterialimmediately accordingtolocallyapplicableregulations.
- Do not modify the product in any way. Doing sovoid sthewarranty.
- P rotec the product from dirt, moisture and overheating, and only use it in dry environment.
- Keep this product, as all electrical products, outofthereachofchildren!
• U setheitemonlyinmoderateclimatic conditions.
Warning-Batteries
- W heninsertingbatteries, notethecorrect polarity(+and-m arkings) and insert the batteries accordingly. Failure to do socouldresultinthebatteriesleaking orexploding.
- O nlyusebatteries(orrechargeable batteries)thatmatchthespecifiedtype.
• Before you insert the batteries, clean the battery contacts and the polar contacts.
• D o n otallowchildrentochangebatteries withoutsupervision.
• D o n otmixoldandnewbatteriesor batteriesofa d differenttypeormake. - R emovethebatteriesfromproductsthat are n otbeingusedforanextendedperiod (unlesstheseare b eingkeptreadyforan emergency).
• D o n otshort-circuitbatteries.
• D o n otchargebatteries.
• Do not throw batteries in a fire. - Keepbatteriesoutofthereachofchildren.

Warning-Batteries

- N everopen,damageorswallowbatteries orallowthemtoentertheenvironment. Theycancontaintoxic,environmentally harmfulheavymetals.
- I immediately remove and dispose of dead batteries from the product.
- A voidstoring, chargingorusing the device in extreme temperatures and extremely low atmospheric pressure (forexample, at high altitudes).
4. Getting Started
4.1 Insertbatteries
Note

Before use, ensure you insert the batteries in themeasuringstationfirstandtheninthe basestation.
Measuringstation
- O penthebatterycompartment(28)and removethecontactbreaker.
• T henclosethebatterycompartmentcover. - T hestatusLEDlightsup.
Basestation
- O penthebatterycompartment(24)and removethecontactbreaker.
• T henclosethebatterycompartmentcover.
4.2Replacingthebatteries
Note— R eplacingthebatteries

- N otethatthestationshavetobe resynchronisedeachtimeafteryouchange thebatteriesinthemeasuringorbase station.
• T o d o t his, removethebatteries from the other station and then reinsert them, or changethemas required.
Measuringstation
- If the symbol is displayed (next to 'OUTDOOR'), replacethetwoAAbatteries of themeasuring station with twonewones.
- O penthebatterycompartment(28),remove andproperlydisposeofthedeadbatteries andinserttwonewAAbatterieswiththe correctpolarity. T henclosethebattery compartmentcover.
Basestation
- If the symbol is displayed (next to 'INDOOR'), replacethethreeAAA batteries in the based device with new ones.
- O penthebatterycompartment(24), remove and properly dispose of the dead batteries and insert three new AA batteries with the correct polarity. The closethe battery compartment cover(24).
5. Installation
Note-Installation

- W er recommendinitiallyplacingthebase andmeasuringstationsintheintended locationswithoutinstallingthemand makingallthesettingsdescribedin6. Operation—t o d o.
- Only install the station on the appropriate settings have been made and a stable wireless connection is established.
Note

- T hewirelesstransmissionrangebetween themeasuringstationandbasestationis upto30m i n o penspaces.
- Before installation, ensure that wireless transmission will not be disrupted by interference or obstacles like buildings, trees, vehicles, high-voltagelines, etc.
- To a voidtransmissioninterference, donot operateadjacentwirelessdevicesonthe samefrequency(433MHz).
- Before the final installation, ensure that there is sufficient reception between the intended installation locations.
- W heninstallingthemeasuringstation, ensure t hatitisprotectedfromdirect sunlightandrain.
- T heinternationalstandard h eightfor measuring air temperature is 1.25 m (4 ft) aboveground.
Warning

- B uyspecialorsuitableinstallation materialfroma s specialiseddealerfor wall-mounting.
- Ensure that no faultyordamaged parts are installed.
- N everapplyforceduringinstallation.This coulddamagetheproduct.
- Before installation, ensure that the chosen wallissuitablefortheweighttobe mounted, and make sure that there are no electricalwires,water,g asorotherlinesat theinstallationsiteonthewall.
• D o n otmounttheproductabovelocations where p ersonsmightlinger.
5.1 Basestation
- U sethebasetopositionthebasestationon a levelsurface.
5.2 Measuringstation
- Y oucanalsopositionthemeasuringstation onal eveloutdoorsurface.
- We recommend installing themeasuring stationsecurely on an outdoor wall using the recess(27).
• Install an anchor, screw, nail, etc. in the wall of your choice.
- H angupthebase/measuringstationusingthe opening(27)intendedforthispurpose.
6.Operation
6.1 Connectiontothemeasuringstation
- W henthebatterieshavebeeninserted, the basestationautomaticallysearchesfora connectiontothemeasuringstationandtotheradiosignal.
Note
- T herespectivesymbolswillflashduring theconnectionattempts:connectionto themeasuringstation,connectionto theDCFsignal
- Do not press any buttons during setup. Otherwise, values may not be transmitted correctly and there is a risk of value errors and inaccuracies.
• D o n otchangethelocationofthebase stationduringthesearchprocesses. - T heprocessiscompletedwhentheindoor (8)andoutdoor(3)measurementdata isdisplayed.
6.2 Basic and manual settings
AutomaticsettingusingtheDCFsignal
Whenthebasestationhasbeenswitchedon forthefirsttimeandsuccessfultransmission hasbeenestablishedbetweenthebasestation andthemeasuringstation, theclockwill automaticallysearchfortheDCFsignal. During thesearch,theradiosymbolflashes.
| Display | SearchfortheDCF signal |
| Flashingdisplay Manualentrynot possible! | Active |
| Constantdisplay | Successful–signalisbeingreceived |
| NodisplayInactive |
- If the station still does not receive a signal, pressandholdtheUPbutton(19)for approximately3 s econdstostartthemanual searchfortheDCFsignal.Theradiosymbol startstoflash.
Note— Timesettings
- T hesearchprocesscantakeupto7 minutes.Ifitfails,theradiosymbol willgoout.
- In the meantime, however, you can set the timeandthedatemanually.

Note-Timesettings
- T heclockautomaticallycontinuestosearch fortheDCFsignalona d ailybasis(at1 amand5 a m). If the signal is received successfully, t hemanuallysettime and date are o verwritten.
Note- Summertime
Theclockautomaticallyswitchcestosummer time. DST appearsonthedisplayaslongas summertimeisactivated.


Manualsettings
- P ressandholdtheSETbutton(20)for approximately3 s econdstomakethe followingsettingsoneaftertheother:
• Time zone (from -12 to +12 hours CET)
• Hour - Minute
- Year
- Month
Day
• Unit of atmospheric pressure (hPa or inHg) - Press the UP button (19) or DOWN button (22)toselectyoursetting.PresstheSET button(20)toconfirmyouentries.
Note-Time zone
- T heDCFsignalcanbereceivedoverlong distances, butalwaystransmitsthecurrent CentralEuropeanTimeinGermany. Make sure youaccountforthetimedifferencein countriesinothertimezones.
- If you are in Moscow, the time is 3 hours laterthaninGermany. This mean that you should set + 3 forthetimezone. The clock then set the time automatically to 3 hours ahead after receiving the DCF signal or according to them manually set time.

Alarm
- P ressandholdtheALARMbutton(23)for approximately3 s econdstosetthetime ofthealarmdisplayed.Thehoursdisplay beginstoflash.
- Press the UP button (19) or DOWN button (22)toselectthehourforthealarmtime and confirmyourselectionbypressingthe ALARMbutton(23).
• R epeatheprocesstosettheminutesforthe alarmtime. - Repeat the entire process to set the second alarm.
- P resstheALARMbutton(23)oncetodisplay thealarmtime.PresstheALARMbutton(23) oncemore to a ctivatethealarm.
-
Press the ALARM button (23) a third time to deactivatethealarm.
-
I f t healarmistriggered, thealarmsymbolis displayed and an alarm will sound.
- Press UP (19), DOWN (22), SET (20) or ALARMtostopthealarm.
Note—S noozefunction
- W hilethealarmsignalissounding,press theSNOOZEButton(18)orLIGHTbutton (21)toactivatethesnoozefunction.The iconbeginstoflashonthedisplay. The alarmsignalwillstopforapproximately10 minutes,afterwhichitwillsoundagain.
- Press UP (19), DOWN, (22), SET (20) or ALARMtostopthesnoozefunction and thealarm.
Temperature(Celsius/Fahrenheit)
- P resstheUPbutton(19)toswitchbetween °Cand°Fforthetemperature d isplay.
- The weather station indicates a trend as to how the values for the indoor and outdoor temperature are likely to develop over the next few hours.
DisplayTrend

Increasing

Constant

Decreasing
Atmosphericpressure(hPA/inHg)
Note-5 noozefunction
- W hilethealarmsignalissounding,press theSNOOZButton(18)orLIGHTbutton (21)toactivatethesnoozefunction. The iconbeginstoflashonthedisplay. The alarmsignalwillstopforapproximately10 minutes,afterwhichitwillsoundagain.
- Press UP (19), DOWN, (22), SET (20) or ALARMtostopthesnoozefunction and thealarm.
Note
Like all measurement values, atmospheric pressure is subject to a certain measurement tolerance.
- P ressandholdtheSetbutton(20)untilthe timebeginstoflash.
- Press the Set button (20) repeatedly until hPA orinHGappearsonthedisplay.

- Press the UP button (19) or DOWN button (22)tochangetheunittoinHGorhPA.
- T heweatherstationgivesa currentvalue trendforatmosphericpressure.
6.3Weathertrenddisplay
Basedonchangesintheatmosphericpressure andthedatasaved,thebasestationisable tomakewheatherforecastsforthenext12to 24hours.

Note- W eathertrenddisplay
The weather forecast function is not available during the first few hours of operation because it requires data that is collected during operation.
Theweathertrendandthecurrentweatherare displayedusingfourdifferentsymbols(1):
| SymbolWeather | |
 | Sunny |
 | Slightlycloudy |
 | Cloudy |
 | Rainy |
6.4Moonphases
Thebasestationdisplaysthecurr entmoonphase withthefollowingsymbols:
 | NewMoonFullMoon | |
 | Waxing Crescent | |
 | FirstquarterLastquar | |
 | Waxing Gibbous |
6.5Backlight
- If you upresstheSNOOZEbutton(18)or LIGHTbutton(21)inbatteryoperation, thedisplaywilllightupforapproximately 10seconds.
- By repeatedlypressingtheSNOOZEbutton (18)orLIGHTbutton(21)inmainsoperation, youcanspecifythebrightnesslevelofthe lightingandturnitoff.
Note— P ermanentbacklightmode

Permanentbacklightmodeisonlypossible whenthebasestationisoperatedusing the'00137330'powersupplyunit(further informationcanbefoundat:www.hama.com). Powersupplyunitisnotincluded.
8.WarrantyDisclaimer
HamaGmbH & C o KGassumesnoliability and provides now warranty for damageresulting from improper installation/mounting, improper use of the product from failure to observe operating instructions and/or safety notes.
7. Care and Maintenance
Onlycleanthisproductwitha s lightlydamp, lint-freeclothanddonotuseaggressivecleaning agents.Makesure t hatwaterdoesnotgetinto theproduct.
9.TechnicalData
| BasestationMeasuringstation | ||
| Powersupply | 4.5V3 x A AAbatteries | 3.0V2 x A AbatteriesWerecommendusingAAlithiumbatteriesfortheoutdoorsensorswhenoutdoortemperaturesarebelow0°C/32°F. |
| Additionalpowersupplyvia‘00137330’ powersupplyunitispossible:Output4.5Vminimum100mA | ||
| Measuringrange:Temperature | 0°C- 5 0°C32°F- 1 22°F | -40°C- + 60°C- 4 0°F- + 140°F |
| Measuringrange:Humidity | 20- 9 9 % 20- 9 9% | |
| DCFradio-controlledclockYesNo | ||
| AlarmfunctionYesNo | ||
| Max.numberofmeasuringstations | 3Additionalsensor00186347 | |
| Frequency433MHz | ||
| Range≤30m | ||
10. DeclarationofConformity

Hereby, Hama GmbH & Co KG declares that the radio equipment type [00186312] is in compliance with Directive 2014/53/EU. The full text of the EU declaration of conformity is available at the following internet address: www.hama.com ->00186312 ->Downloads.
Maximumradio-frequencypowertransmitted4,487μW
= U nterbrechungdesWecksignals
19.UP-Taste
www.hama.com ->00186312->Downloads.
Maximaalradiofrequentvermogen
4,487μW
86652Monheim/Germany
Service& Support
www.hama.com
+499091502-0
D | GB
CE


PAP
RaccoltaCarta