
EWS-190 - Weather Station HAMA - Free user manual and instructions
Find the device manual for free EWS-190 HAMA in PDF.


| Product Type | Weather Station with Indoor/Outdoor Thermometer and Radio Controlled Clock |
| Model Number | EWS-190 |
| Brand | Hama |
| Dimensions (Main Unit) | Approx. 130 x 100 x 30 mm (estimated) |
| Dimensions (Remote Sensor) | Approx. 60 x 40 x 20 mm (estimated) |
| Weight (Main Unit) | Approx. 150 g (including batteries) |
| Weight (Remote Sensor) | Approx. 50 g (including batteries) |
| Power Supply | Main unit: 2 x AA (UM-3) 1.5V batteries; Remote sensor: 2 x AA (UM-3) 1.5V batteries |
| Number of Remote Sensors Supported | Up to 3 |
| Transmission Frequency | 433 MHz |
| Maximum Transmission Range | 30 meters (open area) |
| Indoor Temperature Range | -5.0°C to +50.0°C |
| Outdoor Temperature Range | -10°C to +60°C |
| Temperature Resolution | 0.1°C / 0.2°F |
| Update Interval | Approx. 43-47 seconds |
| Clock Type | Radio-controlled (DCF77) with manual setting option |
| Display Modes | Clock with seconds, clock with weekday, zone time, date (day-month) |
| Alarm Features | Dual weekday alarm (Mon-Fri), single alarm, pre-alarm (ice warning) adjustable 15-90 min before alarm |
| Language Options | English, German, French, Italian, Spanish, Dutch, Swedish (for day of week) |
| Memory Function | Records and displays max/min indoor and outdoor temperatures |
| Mounting Options | Table stand or wall-mount (both units) |
| Low Battery Indicator | Yes, on display for both indoor and outdoor |
| Cleaning and Maintenance | Wipe with a soft, dry cloth. Do not use abrasive cleaners or immerse in water. |
| Safety Precautions | Use only fresh batteries of specified type. Do not mix old and new batteries. Keep away from extreme temperatures and moisture. No user-serviceable parts inside. |
| Repair and Spare Parts | No spare parts available. Contact Hama support for service. Do not attempt to open or repair. |
Frequently Asked Questions - EWS-190 HAMA
User questions about EWS-190 HAMA
0 question about this device. Answer the ones you know or ask your own.
Ask a new question about this device
Download the instructions for your Weather Station in PDF format for free! Find your manual EWS-190 - HAMA and take your electronic device back in hand. On this page are published all the documents necessary for the use of your device. EWS-190 by HAMA.
USER MANUAL EWS-190 HAMA
Electronic Weather Station
hama®
Hama GmbH & Co KG
D-86652 Monheim
www.hama.com
All listed brands are trademarks of the corresponding companies. Errors and omissions excepted, and subject to technical changes. Our general terms of delivery and payment are applied.

00104933/02.13
00104933
GB Operating Instruction
INTRODUCTION
Congratulations on your purchase of the In-Out Thermometer with 433 MHz cable free sensor and radio controlled clock.
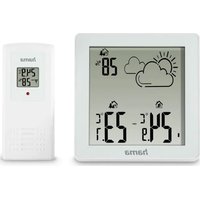
The basic package comes with a main unit, which is the temperature and radio controlled clock station, and remote unit, the thermo sensor. The main unit shows the indoors temperature, calendar clock and temperatures collected and transmitted by 3 (max) remote units. The main unit is capable of keeping track of the maximum and minimum temperature of different sites, and no wire installation is required and operates at 433 MHz.
As for the calendar clock, it included five language display, and two minutes crescendo weekday and single alarm.

A Four-Line Display
Facilitates easy reading of remote and indoors temperatures and calendar clock
B Channel Button
Display different sensor temperature
C Memory MEN Button
Recalls the maximum or minimum temperature of main and remote unit
D Mode Button
Toggles the display modes and confirms entry while setting the values for display
E Alarm Button
Displays the alarm time or sets the alarm status
F Snooze Button or Snooze/Light button
Activate the snooze function or backlight
G Wall-Mount Recessed hole
For mounting the main unit on a wall
H Up ▲ button
advances the value of a setting
1 Down ▼ button
Decrease the value of a setting
J Battery compartments
Accommodates two UM-3 or AA size 1.5V alkaline batteries
K Removable table stand
For standing the main unit on a flat surface
Main features: remote unit

A led indicator
Flashes once when the remote unit transmits a reading. Flashes twice when low battery is detected on sensor unit
B battery compartment
Accommodates two AA-size batteries
C reset button
Press to reset all setting if you have selected different channel
D channel selector
Select the channel before you install batteries.
E wall-mount recessed hole
Supports the remote until in wall-mounting
Before you begin
For best operation,
-
Insert batteries for remote units before doing so for the main unit
-
Place the main unit as close as possible net to the remote unit
-
Position the remote unit and main unit within effective transmission range, which, in usual circumstances, is 20 to 30 meters.
Note that the effective range is vastly affected by the building materials and where the main and remote units are positioned. Try various set-ups for best result. Though the remote units are weather proof, they should be placed away from direct sunlight, rain or snow.
BATTERY INSTALLATION: REMOTE UNIT
-
Remove the screws on the battery compartment.
-
Select the channel
-
Install 2 batteries (UM-3 or AA size 1,5V) strictly according to the polarities shown.
-
Replace the battery compartment door and secure its screws.
BATTERY INSTALLATION: MAIN UNIT
-
Open the battery compartment door
-
Install 2 batteries (UM-3 or AA size 1,5V) strictly according to the polarities shown.
-
Replace the battery compartment door.
LOW Battery warning
When it is time to replace batteries, the respective low-battery indicator will show up on the indoor or outdoor temperature.
HOW TO USE THE TABLE STAND OR WALL MOUNTING
The main unit has a removable table stand, which when connected, can support the unit on a flat surface. Or you can remove the stand and mount the unit on a wall using the recessed screw hole. As for the remote unit, you can place it on a flat surface or mount the unit on a wall using the recessed screw hole.
Getting started
Once batteries are in place for the remote unit, they will start transmitting temperature readings at around 45 seconds intervals. The main unit will also start searching for signals for about two minutes once batteries are installed. Upon successful reception, the outdoors temperatures will be displayed on the top line and the indoors temperature on the bottom line. The main unit will automatically update its readings at about 45 second intervals.
If no signals are received, blanks ***- will be displayed. Hold ▼ for 2 seconds to enforce another search for about 2 minutes. This is useful in synchronizing the transmission and reception of the remote and main units. Repeat this step whenever you find discrepancies between the reading shown on the main unit and that on the remote unit.
How to check remote and indoor temperatures
The indoors temperature is shown on the second line of the display. The outdoors temperature is shown on the top line of the display. The wave display on the outdoors temperature indicates the reception of the remote unit is in good order.
If no readings are received from the remote unit for more than two minutes, blanks **- will be displayed until further readings are successfully searched. Check the remote unit is sound and secure. You can wait for little while or hold ▼ for 2 seconds to enforce an immediate search. If the temperature goes above or below than the temperature measuring range of the main unit or the remote unit (stated in specification), the display will show **..
How to read the kinetic wave display.
The kinetic wave display shows the signal receiving status of the main unit. There are three possible forms:
| The unit is in searching mode | |
| Temperature readings are securely registered | |
| No signals. | -∞ °C |
MAXIMUM AND MINIMUM TEMPERATURES
The maximum and minimum recorded indoor temperature, outdoor temperatures will be automatically stored in memory. To display them, Press MEM once to display the maximum readings and again the minimum readings. The respective indicators, MAX or MIN will be displayed. To clear the memory, hold down MEM for two seconds. The maximum and minimum readings will be erased. If you press MEM now, the maximum and minimum readings will have the same values as the current ones until different readings are recorded.
Disconnected Signals
If without obvious reasons the displays of the outdoor temperature blank. Hold ▼ for 2 seconds to enforce an immediate search.
If that fails, check;
-
The remote unit is still in place.
-
The batteries of both the remote unit and main unit. Replace as necessary.
Note: When the temperature falls below freezing point, the batteries of outdoor units will freeze, lowering their voltage supply and the effective range.
- The transmission is within range and path is clear of obstacles and interference. Shorten the distance when necessary.
TRANSMISSIN COLLISION
Signals from other household devices, such as door bells, home security systems and entry controls, may interfere with those of this product and cause temporarily reception failure. This is normal and does not affect the general performance of the product. The transmission and reception of temperature readings will resume once the interference recedes. Different channel may be reduce the interference
HOW TO ET THE RADIO CONTROLLED CLOCK
- After the batteries are installed. The clock will automatically search the radio signal. It takes about 10 minutes to finish this process.
- If the radio signal is received, the date & time will be set automatically with radio control signal icon [@] turn. on.
- If the clock fails to receive the time signal, it will be with the icon [☐] turns off. Then user can set the time manually.
- Radio controlled signal will be scheduled to receive every hour.
Calendar clock display modes
The clock and the calendar share the same section of the display. The calendar is displayed in a day-month format. Each press on the MODE button will change the display between clock with second, clock with day of week, zone time with second and day-month.
HOW TO SET THE CLOCK MANAULLY
To set the clock manually, hold MODE for two seconds it will show the year. Use ▲ or ▼ to change it. Press MDOE to confirm. Repeat the same procedure to see the month, date, date-month format, 12/24, hour, minute, display language, zone time offset and °C/°F. During the setting, press and hold ▲ or ▼ will increase or decrease the value rapidly.
For display language, you can choose among English (EN), German (DE), French (FR), Italian (IT), Spanish (SP), Dutch (DU) and Swedish (SW)- in that order.
If there is an item you do not wish to change, simply press MODE to bypass the item. When you finished the change, press MODE to exit. The display will return to the clock mode.
How to set and arm the alarm
To set an alarm,
-
Press ALARM once to display alarm time. If the alarm is disarmed, the time will be displayed as OFF
-
Hold ALARM for two seconds. The hour digits will blink.
- Enter the hour using ▲ or ▼
- Press ALARM. The minute digits will blink.
- Enter the minutes using ▲ or ▼
- Press ALARM to exit.
- Repeat the same procedure to set single alarm
The alarm **, *s and Pre-AL icons will be displayed indicating which alarm is armed. You can also arm or disarm an alarm by pressing the UP, DOWN button at alarm display mode. Press MODE to return to clock display mode
Snooze Feature
When the alarm sound is on, press the snooze key enter snooze mode. After 8 minutes, it alarm sound will be wake up automatically. The snooze cycle will be restart if you press the snooze key again. If you leave the alarm sound on for 2 minutes, it will enter snooze mode automatically with maximum 3 times.
HOW TO STOP AN ALARM
Press ALARM on the unit to stop an alarm
PRECAUTIONS:
This product is engineered to give you years of satisfactory service if you handle it carefully. Here are a few precautions:
- Do not immerse the unit in water.
- Do not clean the unit with abrasive or corrosive materials. They may scratch the plastic party and corrode the electronic circuit.
- Do not subject the unit to excessive force, shock, dust, temperature or humidity, which may result in malfunction, shorter electronic life span, damaged battery and distorted parts.
- Do not tamper with the unit's internal components. Doing so will invalidate the warranty on the unit and may cause unnecessary damage. The unit contains no user-service able parts.
- Only use fresh batteries as specified in the user's manual. Do not mix new and old batteries as the old ones may leak.
- Always read the user's manual thoroughly before operating the unit.
Alarm feature
- Weekday Alarm (I-I)
This function allows you to restrict the alarm to weekday (Monday to Friday). The alarm is activated and the weekday symbol lights up if the weekday alarm function was set and the alarm time is reached. There is no alarm on Saturdays and Sundays for this alarm function.
- Single alarm (S)
The alarm sound will be activated and the icon will be flashed once when it is armed and the alarm time is reach. Once it finished, it will be disabled automatically.
- Pre-Alarm (PRE/AL)
The pre-alarm sound will be activated and the icon will be flashed if outdoor temperature under or equal zero degree. Which is programmable 15, 30, 45, 60 or 90 minutes earlier than the weekday alarm or single alarm time.
SPECIFICATIONS
Temperature Measurement
Main unit
Indoor Temperature measurement
Proposed operating range:
-5.0°C to +50.0°C
Temperature resolution:
0.1°C / 0.2°F
Remote unit
Proposed operating range:
-10°C to +60°C / 14°F to 140,0°F
Temperature resolution:
0.1°C / 0.2°F
RF Transmission Frequency: 433 MHz
No. of Remote unit 3
RF Transmission Range:
Maximum 30 meters (open area)
Temperature sensing cycle:
around 43-47 seconds
Calendar Clock
12/24 h display with hh: mm
Date Format: Day- Month or Month-day.
Day of week selectable in 7 language (English, German,
French, Italian, Spanish, Dutch and Swedish)
Dual 2-minute crescendo alarm
Pre-alarm for ice warning
Power
Main unit
use 2 pcs UM-3 or AA 1.5V battery
Remote sensing unit
use 2pcs UM-3 or AA 1.5V battery
F Mode d'emploi
INTRODUCTION
REŽIMY INDIKACE ČASU A DATA
NAJVYŠŠIE A NAJNIŽŠIE TEPLOTY



- ELECTRONIC WEATHER STATION
- HAMA®
- GB OPERATING INSTRUCTION
- INTRODUCTION
- A FOUR-LINE DISPLAY
- B CHANNEL BUTTON
- C MEMORY MEN BUTTON
- D MODE BUTTON
- E ALARM BUTTON
- F SNOOZE BUTTON OR SNOOZE/LIGHT BUTTON
- G WALL-MOUNT RECESSED HOLE
- H UP ▲ BUTTON
- 1 DOWN ▼ BUTTON
- J BATTERY COMPARTMENTS
- K REMOVABLE TABLE STAND
- A LED INDICATOR
- B BATTERY COMPARTMENT
- C RESET BUTTON
- D CHANNEL SELECTOR
- E WALL-MOUNT RECESSED HOLE
- BEFORE YOU BEGIN
- BATTERY INSTALLATION: REMOTE UNIT
- BATTERY INSTALLATION: MAIN UNIT
- LOW BATTERY WARNING
- HOW TO USE THE TABLE STAND OR WALL MOUNTING
- GETTING STARTED
- HOW TO CHECK REMOTE AND INDOOR TEMPERATURES
- HOW TO READ THE KINETIC WAVE DISPLAY
- MAXIMUM AND MINIMUM TEMPERATURES
- DISCONNECTED SIGNALS
- TRANSMISSIN COLLISION
- HOW TO ET THE RADIO CONTROLLED CLOCK
- CALENDAR CLOCK DISPLAY MODES
- HOW TO SET THE CLOCK MANAULLY
- HOW TO SET AND ARM THE ALARM
- SNOOZE FEATURE
- HOW TO STOP AN ALARM
- PRECAUTIONS
- ALARM FEATURE
- SPECIFICATIONS
- TEMPERATURE MEASUREMENT
- F MODE D'EMPLOI
- REŽIMY INDIKACE ČASU A DATA
- NAJVYŠŠIE A NAJNIŽŠIE TEPLOTY
Brand : HAMA
Model : EWS-190
Category : Weather Station