
WDS-300 - Weather Station HAMA - Free user manual and instructions
Find the device manual for free WDS-300 HAMA in PDF.


| Product Type | Weather Station |
| Brand | Hama |
| Model | WDS-300 |
| Dimensions (approx.) | 150 x 100 x 50 mm |
| Weight (approx.) | 200 g |
| Power Supply | 2 AAA batteries (not included) or mains adapter |
| Display | Backlit LCD |
| Indoor Temperature | 0°C to +50°C |
| Outdoor Temperature | -20°C to +60°C (via wireless sensor) |
| Humidity | 20% to 95% RH |
| Weather Forecast | Trend icons (sun, cloud, rain) |
| Clock | Time and calendar display |
| Alarm | Programmable alarm |
| Outdoor Sensor | Wireless sensor (range up to 30 m) |
| Care and Cleaning | Clean with a soft, dry cloth. Do not use abrasive products. |
| Safety | Do not expose to water or excessive moisture. Keep out of reach of children. |
| Spare Parts and Repairability | Standard batteries (AAA). For any repairs, contact Hama after-sales service. |
| General Information | Indoor use with outdoor sensor. Display of weather trends. |
Frequently Asked Questions - WDS-300 HAMA
User questions about WDS-300 HAMA
0 question about this device. Answer the ones you know or ask your own.
Ask a new question about this device
Download the instructions for your Weather Station in PDF format for free! Find your manual WDS-300 - HAMA and take your electronic device back in hand. On this page are published all the documents necessary for the use of your device. WDS-300 by HAMA.
USER MANUAL WDS-300 HAMA
USB Weather Data Station
hama®
Hama GmbH & Co KG
D-86651 Monheim/Germany
www.hama.com
natural_image
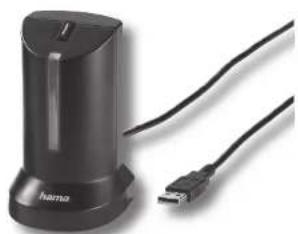
Black hardcover device with USB cable and a hama brand logo (no visible text or symbols on device body)All listed brands are trademarks of the corresponding companies. Errors and omissions excepted, and subject to technical changes. Our general terms of delivery and payment are applied.
00097697man_de_el_en_lr_ni_al.indd Abs1:2-Abs2:1
00087687/06.09
00087687
19.01.11 11:26
GBOperating Instruction
Thank you for purchasing the new generation of Internet based, 4-day forecast weather stations. Designed and engineered with state of the art technology and components, this instrument will provide accurate and reliable readings 4-day weather forecast information. Read this manual carefully to fully explore the features and functions of the new product.
Overview

flowchart
graph LR
    A["Internet (4-day weather forecast)"] --> B["USB Transmitter"]
    B --> C["Main Unit (Receiver)"]
    D["> 30,000 other spodging"] --> E["Internet (4-day weather forecast)"]
4-day forecast
4-day forecast data is updated from the Internet automatically and sent to the main unit wirelessly via the USB transmitter.
Forecast includes
- Weather Forecast
- High Level Instrument
- High & low temperature
• Average Number
• Chance of precipitation
• Maximum 17' index
• Average wind speed & direction
City list:
• Europe: June 9,200 citing relurchase
• North American Over 10,000 cities selection
• Asia Pacific: Over 300 cities selection in Japan & Australia
Additional functions
• Auto-Sun hybridized Clock from Internet
• S. grise & Snowt Tiss
• Calendar Wave/low, Single Daily Alacun and Moon Phase
Quick start guide for basic setup
11 Insert Li pieces of 4.4 batteries in the main unit
-
Insetal 3 pieces of 648 batteries in the USB transmitter
-
Connect the USB transmitter to your PI via USB port
-
Ensure that your B ^2 is connected to the Internet Run the MIRB ^1 . INSTALL SYS for INSTALL SYS program in the PB to start installation
If NET Framework (1) driver case not exists at your PC hours, you will be redirected to Microsoft web sites for download. After installation the NET
Framework (1.2) run the HIS01 INSTALL EXE for INSTALL EXE again for installation
①. Alternative installation is complete, one of the maximum in double siliconics die solution *E-PAH-COOPE-TET* from Then Plate *ECT1002*
(1) 2008, the most important to developing the primary body of the brain. The brain was more than 300 times more than 100 times more than 50 times more than 100 times more than 50 times more than 100 times more than 50 times more than 100 times more than 50 times more than 100 times more than 50 times more than 100 times more than 50 times more than 100 times more than 50 times more than 100 times more than 50 times more than 100
The following table provides the information and the interest
To program automation and implementation
6) Press [PC SEARCH] button repeatedly on the main unit until the RF iron. Flashes. The main unit will start searching for RF signal from
USB Transmitter
71 Press |TRANSMIT| button on your USB transmitter to enhance transmitting RF weather data to the main unit.
At. Our the DC connection is established between the main unit & USR transmitter. RF inns with full streams will appear. It may take 10 minutes or
more to receive & display at forecast information on the main unit.
Name and Functions of Buttons on Main Unit:
Top Key [MODE/SNDOZELIGHT]
- Temple the west 3 dy
- Ruggle the next 5 de
- HLD temperature
- Average wind direction / average wind speed / chance of precipitation
• Maximum UV index / average humidity
• Auto-scroll display function - 50000000
• Triges spredz alarm
• 11.28.3.2026
![HAMA WDS-300 - Top Key [MODE/SNDOZELIGHT] - 1](/content/2026/06/1266868/images/f535c4c7f4e76d846eab5275081ae8ffd470ac23637a7f58c1b9fdbf356869b5.jpg)
10
| Back Keys Press Functions Hold 3 seconds | ||
| [FC SEARCH] 'Receive RF signal from USD transmitter | ||
| [ICLOCK] | Read time, day-of-week & sunrise/set time | 12/24 Hour & day/month format setting |
| [ALARM] | Read alarm time, enable/disable alarm | Alarm time setting |
| [WIND : ▲] | Select wind speed's unit:1 step forward in setting | Fast advance in setting |
| [CF : ▼] | Select degree C/F1 step backward in setting | Fast backward in setting |
Name and Functions of Buttons on USB Transmitter
| Top Keys | Press Functions Hold 3 seconds | |
| [TRANSMIT] | Transmit forecast data & synchronize with main unit | Turn on/off blue light bar |
Instellation
Setting on the main unit (Received)
Battery installation
Side to open the battery door, install 6 pieces of AA batteries according to the polarity indicated and close the battery door.
USB Transmitter & PC program installation
Battery installation & USB connection
- Side to open the battery door on the bottom of the USB transmitter. Insert 3 pieces of AAG batteries according to the note it is indicated. Close the battery
dcr
- Connect USB transmitter to your PC via an USD port.
PC program installation
• Before installation, ensure that
15. Your PC is connected to the Internet. Try breathing through a couple of websites to make sure
2) You are using Windows 2000 XP or Vista
3) USB transmitter is connected properly to your PC via the USB port.
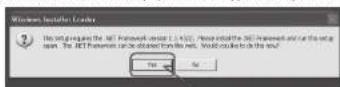
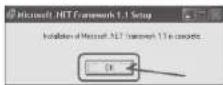
- Insert CD into your CD ROM and double click the NIS01_INSTALL.EXE (or INSTALL.EXE) program to start installation. Follow the instruction to complete the installation. You need to have Microsoft .NET Framework 1.1 driver installed in your Windows in order to complete the installation of the 4-day forecast PC program. If this file was not installed in your Windows before, the FC installation program will redirect you to the Microsoft web site for download.
NOTE: You may also no to below link to download the driver directly if you encounter any problems: http://download.netinfostation.com

11
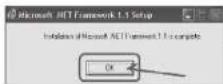
Restart the installation program
(NISO1_INSTALLEXE or INSTALLEXE) again!
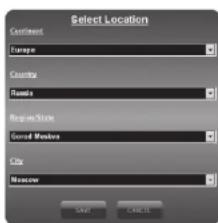
- After the installation is complete, run the program by double clicking the desktop "4-DAY FORECAST" icon. Then click [SETTING] in the HOME WEATHER display. Click ISET LOCATION to enter your home city in the program.
• After setting your home location, 4 day forecast of your home city will be updated on your PC program automatically via the Internet. You may click [UPDATE FORECAST] anyone to manually update the forecast display on the program. The program will also update the forecast and send to the main unit automatically if your PC is online all the time or every time you turn on your PC.
NOTE: Refer to "Troubleshooting" section if you have any problems displaying the 4-day forecast information on your PC program.
Establish RF connection with main unit
- Before setting up the RF connection, please ensure that you have successfully received 4-day forecast on your PC program for your home city.
- Place the USB transmitter & main unit away from motor & source of interference such as PC monitor, mobile phones, appliances, TV etc. It is recommended to start with a short distance leg, within 0.5 meter) between the two units for initial RF setup. Once the RF connection is established, place the main unit within the effective transmission range from the transmitter. Shorten the distance if necessary for best reception.
- To search for RF signal from a new USB transmitter, press [PC SEARCH] button on the main unit repeatedly and the RF icon: Flashes.
- Press [TRANSMIT] button on the USB transmitter to reduce transmission RF signals data in the main unit.
- Once the RF connection is established between the main unit & USD transmitter, the RF icon with full strength will appear on the main unit. In the first few minutes of the RF reception, the main unit is showing data on one part of the screen and this is normal. The rest of the screen display data will gradually appear in the next 10 minutes or more.
NOTE:
- If you have waited half an hour or more without seeing the rest of the screen, shorter the distance between the USB transmitter & main unit, check the battery levels and repeat the setup procedure above
- If it continues to fail, try removing the USB connection and all batteries from the USB transmitter. Reinstall the batteries and then reconnect the USB connection again. Repeat above procedure to set up the RF connection.
4-Day forecast information
11 After your PC is turned on or reheated, the PC program will access the Internet server for weather forecast update and start sending data to the main unit automatically after around 5 to 30 minutes
2) If your PC is turned on all the time with Internet connection, weather forecast will be updated periodically from the Internet and send to the main unit automatically.
(A) Weather forecast
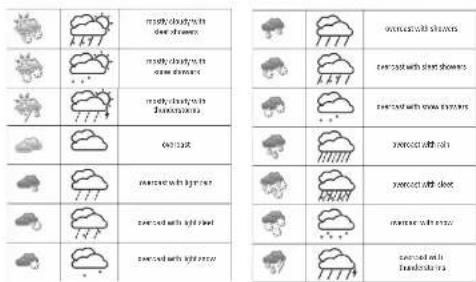
4 day weather forecast with 28 different weather symbols
| EC-grams | Max the power step | step |
| mostly cloudy | ||
| polar changes will light on | ||
| partly cloudy with light on | ||
| partly cloudy with light away | ||
| partly cloudy with dark away | ||
| partly cloudy with dark away |
| poys cloudy in wind and snow | ||
| poys cloudy in wind and snow | ||
| moys cloudy | ||
| moys cloudy in light snow | ||
| moys cloudy in light snow | ||
| moys cloudy in snow |
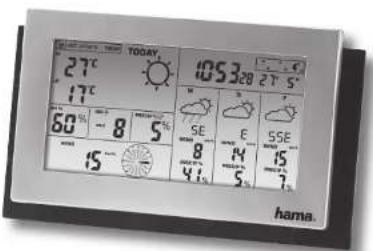
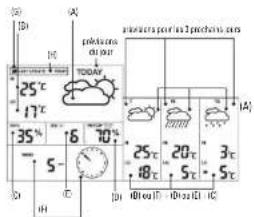
Main unit's display
(A) Weather forecast
(B) Hi/Lo TEMP
ICI Humidity
(1) Chance of precipitation
(E) OVI (5) WIND
1H WIND 101 EC St
(1) Last update
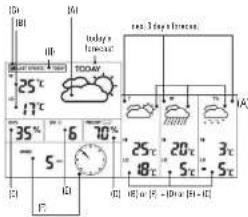
(B) High/Low Temperature forecast
Press [C/F] button to select degree C or F. To view the high & low temperature for the next 2 days, press [MODE] repeatedly until HI & LO icons appear
(C) Average humidity forecast
Average humidity forecast is located next to the RHS icon. To view the average humidity for the next 3 days, press [MIDIE] repeatedly until "RHS" icon appears.
(D) Chance of precipitation
The chance of precipitation in term of percentage is displayed next to the "PRECIP" icon. To view the precipitation forecast for the next 3 days, press [MODE] repeatedly until "PRECIP" icon appears.
(E) Maximum UV Index forecast
The maximum UV index forecast is located next to the "UV" icon. To view the maximum UV forecast for the next 3 days, press [MODE] repeatedly until "UV" icon appears.
UV 1 to 2: Maximum UV level is low. Low danger to the average person
UV 3 to 5: Maximum UV level is moderate. Moderate risk of harm from unprotected sun exposure
UVI 6 to 7. Maximum UV level is high. High risk of harm from unprotected sun exposure
U918 to 10: Maximum UV level is very high, very high risk of harm from unprotected sun exposure U911 to 15: Maximum UV level is extreme. Extreme risk of harm from unprotected sun exposure
(F) Average wind speed & wind direction forecast
Average wind speed & direction forecast is shown next to the "WIND" icon. Press [▲] (WIND) to select wind speed unit between km/h, m/s, knots & mph. 16 wind directions resolution: N for north, S for south, SW for south-west and so on. To view the wind speed/direction forecast for the next 3 days, press [MODE] repeatedly until "WIND" icon appears
(6) RF Reception status
The icon shows the RF connection status between the main unit and the USB transmitter.

Main unit is successfully synchronized to the USB transmitter and is receiving weather data from USB transmitter periodically.

Flashing indicates that it is in registration mode and is searching for RF signal from USB transmitter.

Fail to receive RF signal from USB transmitter. (see "Establish RF connection with main unit" section to reconnect the USB transmitter)
(H) Last update of forecast
It shows the last update of forecast from the Internet.
LAST UPDATE: TODAY : Forecast & Update today from the Internet
LAST UPDATE: -T DAY": Forecast is updated yesterday from the Internet and so on
If your PC is not connected to the Internet for more than 10 days, it will show "LAST UPDATE: -- DAY" and all forecast information will show "-" until the PC is connected to the Internet again.
Time

(A) Network time (Auto-synchronized clock)
The clock on the main unit is synchronized to the Internet network time automatically and is adjusted for optimal accuracy.
NOTE:
- If your PC is not connected to the Internet for a long period of time, the clock display may not be accurate
- You may set the time offset (-/- 0.5, 1, 1.5 or 2 hours) of your home city in the PC program to adjust DST & time zone if necessary and the time on your main unit will be updated accordingly Hold [CLOCK] on the main unit to set the 12/24 hour format, press [▲] or [▼] to select and press [CLOCK] to confirm. The "M" & "D" icons will flash, press [▲] or [▼] to select day/month or month/day format for the calendar. Press [CLOCK] to confirm and exit.
(B) Sunrise/Sunset time
To view the sunrise and sunset time of your home city, press [CLOCK] button repeatedly until the respective "SUNRISE" or "SUNSET" icon appears
(C) Alarm time
Press [ALARM] button to view the alarm time and "AL" icon will appear. Press [ALARM] again to enable & disable the alarm. ▲ icon appears when alarm is enable. Press (CLOCK) to return to time display. Hold [ALARM] for 3 seconds to enter alarm setting mode. Press (▲) or ▼ to enter the desired Hr/ Min values and press "ALARM" to confirm setting. When alarm is going off, press [ALARM] to stop alarm for one day. Press [MODE/SNOOZE/LIGHT] to activate snoose function
(D) Moon phase
Moon phase is displayed according to the current calendar automatically.
(E) Calendar
Presa [CLICK] repeatedly to show the time with day-of-the-week or seconds. Calendar can be displayed in day/month or month/day format. See section A "NETWORK TIME" for setting.
Display backlight
Press MODE/SNODZE/LIGHT for an extended backlight.
Low battery indication
Low battery indication is available for the main unit & USD transmitter. Replace the batteries and follow the setup procedure in this instruction manual. Low battery indicator
14
Main
chit
USB transmitter: IN Next to the "Last Update" box
Important note:
You are required to set up the RF connection between the USB transmitter & main unit after battery replacement. Press [PC Search] on the main unit and then press [TRANSMIT] on the USB transmitter. Refer "Establish RF connection with main unit" section for details.
USB Transmitter
Press [PC Search] on the main unit and then press [TRANSMIT] on the USB transmitter to enforce transmitting RF weather data and set up the RF connection with the main unit [See "USB Transmitter & program installation" section to set up the USB transmitter]. USB transmitter comes with a blue light bar. You may disable or enable the continuous light bar function by holding the [TRANSMIT] button on the USB transmitter.
NOTE:
- To run the PC program, ensure that your USB transmitter is connected properly to the PC via an USB port. - When weather data is transmitted from the USB transmitter, the light bar will flash.
PC program
After installation, a small toolbar icon is of your PC program appears on the lower right of the Window indicating your program is running and it will automatically access 4-day forecast information periodically while your PC is online. You may open the above PC program window by double clicking this toolbar icon to view the full details.
IMPORTANT NOTE: If the toolbar icon disappears (not hidden), your PC program is terminated and no longer access the weather information from the Internet. Restart the program again.
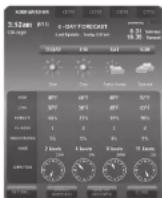
Home weather
Setting
Click [SETTING...] to set the home city's location & unit/time format.
Click [SET LOCATION] to set your home location. Click [SAVE] to save your setting and exit. The forecast information will be updated on your PC program according to your new home location and send to your main unit automatically.


Update forecast
Click [UPDATE FORECAST] to manually receive 4-day forecast from the Internet and display on the program
Send to receiver
Click [SEND TO RECEIVER] to manually send the 4-day forecast data to the main unit via the USB transmitter. It may take from than 10 minutes to 1 hour to update all of the 4-day forecast data on the main unit.
CITY 1,2,3 & 4
Beside your home city, you can preset & monitor the weather forecast of up to 4 different cities on your PC program.


- Click to select "CITY 1", "CITY 2", "CITY 3" or "CITY 4" on the top of the program
- Click [SET LOCATION] to select the location
- Click [SAVE] to save & exit the setting. The PC program will automatically update the 4-day forecast of your selected city from the Internet
• To view the weather forecast of your preset city list, click the corresponding city number
NOTE: The forecast information of city 1, 2, 3 & 4 will not be sent to your main unit
Update forecast
Click [UPDATE FORECAST] to manually receive 4-day forecast from the Internet of your selected city.
Troubleshooting
-
Ensure that you are using Windows 2000, XP or Vists and your PC is connected to the Internet. Try browsing through a couple of websites to make sure. You need to have Microsoft .NET Framework 1.1 driver installed in your Windows in order to complete the installation of the 4-day forecast PC program. If this file was not installed in your Windows before, the PC installation program will redirect you to the Microsoft web site for download. You may also go to below link to download the driver directly if you encounter any problem: http://download.noinfoction.com After .NET Framework 1.1 is installed, run the NIS01_INSTALLEX (or INSTALLEX) installation program again.
-
Ensure that the USB transmitter is properly connected to the USB port of your PC. Otherwise, you are unable to run the PC program and access the
4-day forecast update from the Internet
- Ensure all batteries in the main unit & USD transmitter are fresh. Replace battery when the respective low battery indicator appears on the main unit
(refer "LOW BATTERY INDICATION" section)
- If the toolbar icon of the PC program disappears (not hidden) on the lower right of your Window, your program is terminated and no longer access 4 day
forecast from the Internet. Restart the program again
- In the first few minutes of the RF reception from USB transmitter, the main unit is showing data on one part of the screen and this is normal. The rest of the screen display data will gradually appear in the next 10 minutes or more. If you have visited 1 hour or more without seeing the rest of the screen, shorten the distance between the USB transmitter & main unit and check the battery levels. Then repeat the setup procedure in "Establish RF connection with main unit" section. If it continues to fail, try removing the USB connection and all batteries from the USB transmitter. Reinstall the status of the device, which is necessary for the use of the RF connection.
6 If the RF indicator is showing full strength, but one or more of the next 3 days' forecast is missing on the main unit & PC program, your PC may be offline for many days. Connect your PC to the Internet again to receive the latest forecast update
- If all forecast information appears except the UV Index, your PC may be offline for more than 1 day. Connect your PC to the Internet again to receive the
latest UVI forecast update
- If the forecast reading of the PC program does not match with the main unit. Press [TRANSMIT] on the USB transmitter to re-transmit signal again and
wait for 10 minutes or more
- If your time on the PC program & main unit is off by half an hour or more, click [SETTING...] on the PC program and set the hour offset until the proper
time is set.
-
If your city does not appear in the 20,000 city list, select the one near your home location
-
Heavy Internet traffic may slow down the respond of the server temporary. Try later if you wish to update the forecast manually by the UPDATE
FORECASTI button
Battery disposal
Replace only with the same or equivalent type recommended by the manufacturer. Please disposal of old, defective batteries in an environmentally friendly manner in accordance with the relevant legislation.
Specifications
Software: Compatible with Windows 2000, XP & Vista [Microsoft .NET Framework 1.1 required]
USB: 1.1 or above
Transmissing: Up to 100M (320 ft.) in open area
Clock: Auto-synchronized clock from Internet. Ducty back-up
Prayer: 9.4 x 6 pcs for main unit
AAA x 3 pcs for USB transmitter
Registration and Safety Certification/General Information
This device bears the CE symbol as specified by the provisions of Directive R & TTE (1999/5/EC).
Hama GmbH & Co. KG hereby declares that this device is in compliance with the basic requirements and other relevant guideline and regulations of the
1998/SEC guideline. You will find the declaration of compliance and declaration of conformity in the Internet at http://www.hama.com
⑤Mode d'emploi
| middaygo | ||
| parklemont magpie | ||
| parklemont magpie, upper front planar | ||
| parklemont magpie zone lappa and | ||
| parklemont magpie area lappa area dianje | ||
| parklemont magpie area womee | ||
| parklemont magpie area womee | ||
| parklemont magpie area womee area geta | ||
| parklemont magpie area womee area hama | ||
| parklemont magpie area womee area hama | ||
| parklemont magpie area womee area hama | ||
| parklemont magpie area womee area hama | ||
| parklemont magpie area womee area hama | ||
| parklemont magpie area womee area hama | ||
| parklemont magpie area womee areas hama | ||
| parklemont magpie area womee area hama | ||
| parklemont magpie area womee area hama | ||
| parklemont magpie area womee area hama | ||
| parklemont magpie area womee area hama | ||
| parklemont magpie area womee area hama | ||
| parklemont magpie area wom ema | ||
| parklemont magpie area wom ema | ||
| parklemont magpie area wom ema | ||
| parklemont magpie area wom ema | ||
| parklemont magpie area wom ema | ||
| parklemont magpie area wom ema | ||
| parklemont magpie area wom ema | ||
| parklemont mag Pie Area |
| Weather change and weather to peak | ||
| Weather change and weather to peak | ||
| Weather change and weather peak | ||
| coconut | ||
| coconut has higher than | ||
| coconut has lower than | ||
| coconut has higher than, but more than | ||
| coconut has more than | ||
| coconut has more than, but less than | ||
| coconut has more than, but less than | ||
| coconut has more than | ||
| coconut has more than | ||
| coconut has more than |
(1) We believe that a job
→ installable programme opinion
(NIS01_INSTALLEXE of INSTALLEXE) starten


- Kilk om te selecteren "CITY 1", "CITY 2", "CITY 3" of "CITY 4" bovenaan in het programma.
to drive RF and how round USB.
Academic terms are available to be a course of the curriculum. Please provide Microsoft, O Devyde Frameworker 1.1. However, these Windows are
We recommend an electronic device in quantum hardware and non-quantitative networks. We must also file from external software now and Windows are to
The following table is in English:
• An unlebeve na eutentave, noko kafion ve anuuklavece i tv u/keom USB con ve 8-01e te oles te anuuklave and tv u/ke om. Ennevakcounite ne
unipropice, in entra eclavata/Albote, my outfrom USB. Envoiepicate my the make BioSakola yu va emfante my RF division.
1) “One or an important one could be in love, enough time, to no experience you understand one can not understand one travel to introduce the people some you
DE11 to 15: To depart a chino de 1/2 each airport, transportes, transports, and other other other types
The telephone required the interpretation and to interact.
"LAST UPDATE: TODAY": H. prayvark, emperuliner, micaea and to Interact
*LAST UPDATE: -1 DAY: H production and production process and to interact
... KOS TOSI REYCANTOS.
An unikovantig, as Bevukdei me to Intervent yu nipkocmpo and 10 mperes, da eupavdeta "LAST UPDATE: - DAY" si oles en iulapeories yu iny npdyxon. Da deaun" - " mpero o uikovantig va nipkodil me to Intervent i nali.
TEPA

ΕΝΗΜΕΡΩΣΗ ΠΡΟΓΝΟΣΗΣ
flowchart
graph LR
    A["Internet 4-day weather forecast"] --> B["USB Transmitter"]
    B --> C["Main Unit Receiver"]
    D[">20,000 slices selection"] --> E["Internet 4-day weather forecast"]
Prognoza 4-dniowa
4) Open-to-31, 2010; a computer social platform and information. October 2010: 15:11. In a short time, the Internet is available in Microsoft.
uprogramovada. Ocelin 32.04.
- En vazovravania instaluči nalsin, un ochnit reprem. W olnis reprem: nalsin, oloženi oložinka. Hetwianis*, Wiazi* onarizin
3) Te kultunizama hulansy mays, brochimie program. At online program of Hunsy, parab zukutu, Oshwichma does not have deep mining. Program has a clinical program and is working in a internet.

→ Restart the installation program
(NIS01_INSTALL.EXE or INSTALL.EXE) again!
ICI will get some power

Transfer do nadsinika USB

2019.1.25 and 3.1.26. (The Eq. Chimissians and others, also noted).


- GBOperating Instruction
- 4-day forecast
- Forecast includes
- City list:
- Additional functions
- Quick start guide for basic setup
- Name and Functions of Buttons on Main Unit:
- Top Key [MODE/SNDOZELIGHT]
- Instellation
- Setting on the main unit (Received)
- USB Transmitter & PC program installation
- PC program installation
- Update forecast
- Troubleshooting
- Battery disposal
- Specifications
- ⑤Mode d'emploi
- TEPA
- ΕΝΗΜΕΡΩΣΗ ΠΡΟΓΝΟΣΗΣ
- Prognoza 4-dniowa
- Transfer do nadsinika USB
Brand : HAMA
Model : WDS-300
Category : Weather Station