
TH-200 - Weather Station HAMA - Free user manual and instructions
Find the device manual for free TH-200 HAMA in PDF.


| Product type | Weather station |
| Brand | Hama |
| Model | TH-200 |
| Dimensions (indoor station) | 120 x 80 x 20 mm |
| Weight (indoor station) | 200 g |
| Power supply | 2 AA batteries (1.5 V) |
| Outdoor sensor | Wireless sensor, range up to 30 m |
| Main functions | Indoor and outdoor temperature, humidity, weather forecast, clock, alarm, calendar, moon phase |
| Display | Backlit LCD |
| Care and cleaning | Clean with a dry, soft cloth. Do not use abrasive products. |
| Safety | Do not expose to water or excessive humidity. Keep out of reach of children. |
| Spare parts and repairability | Spare parts not available. In case of failure, contact Hama after-sales service. |
| General information | Weather trend display, memory of extreme values, battery level indicator |
Frequently Asked Questions - TH-200 HAMA
User questions about TH-200 HAMA
0 question about this device. Answer the ones you know or ask your own.
Ask a new question about this device
Download the instructions for your Weather Station in PDF format for free! Find your manual TH-200 - HAMA and take your electronic device back in hand. On this page are published all the documents necessary for the use of your device. TH-200 by HAMA.
USER MANUAL TH-200 HAMA
OperatingInstructions
Bedienungsanleitung
Moded'emploi
Instruccionesdeuso
Gebruiksaanwijzing
Istruzioniperl'uso
Instrukcjaobstugi
Használatiútmutató
Manualdeutilizare
Návodkpoužití
Návodnapoužitie
Manualdeinstruções
Bruksanvisning
natural_image
Vertical column of evenly spaced black squares with no text or symbols
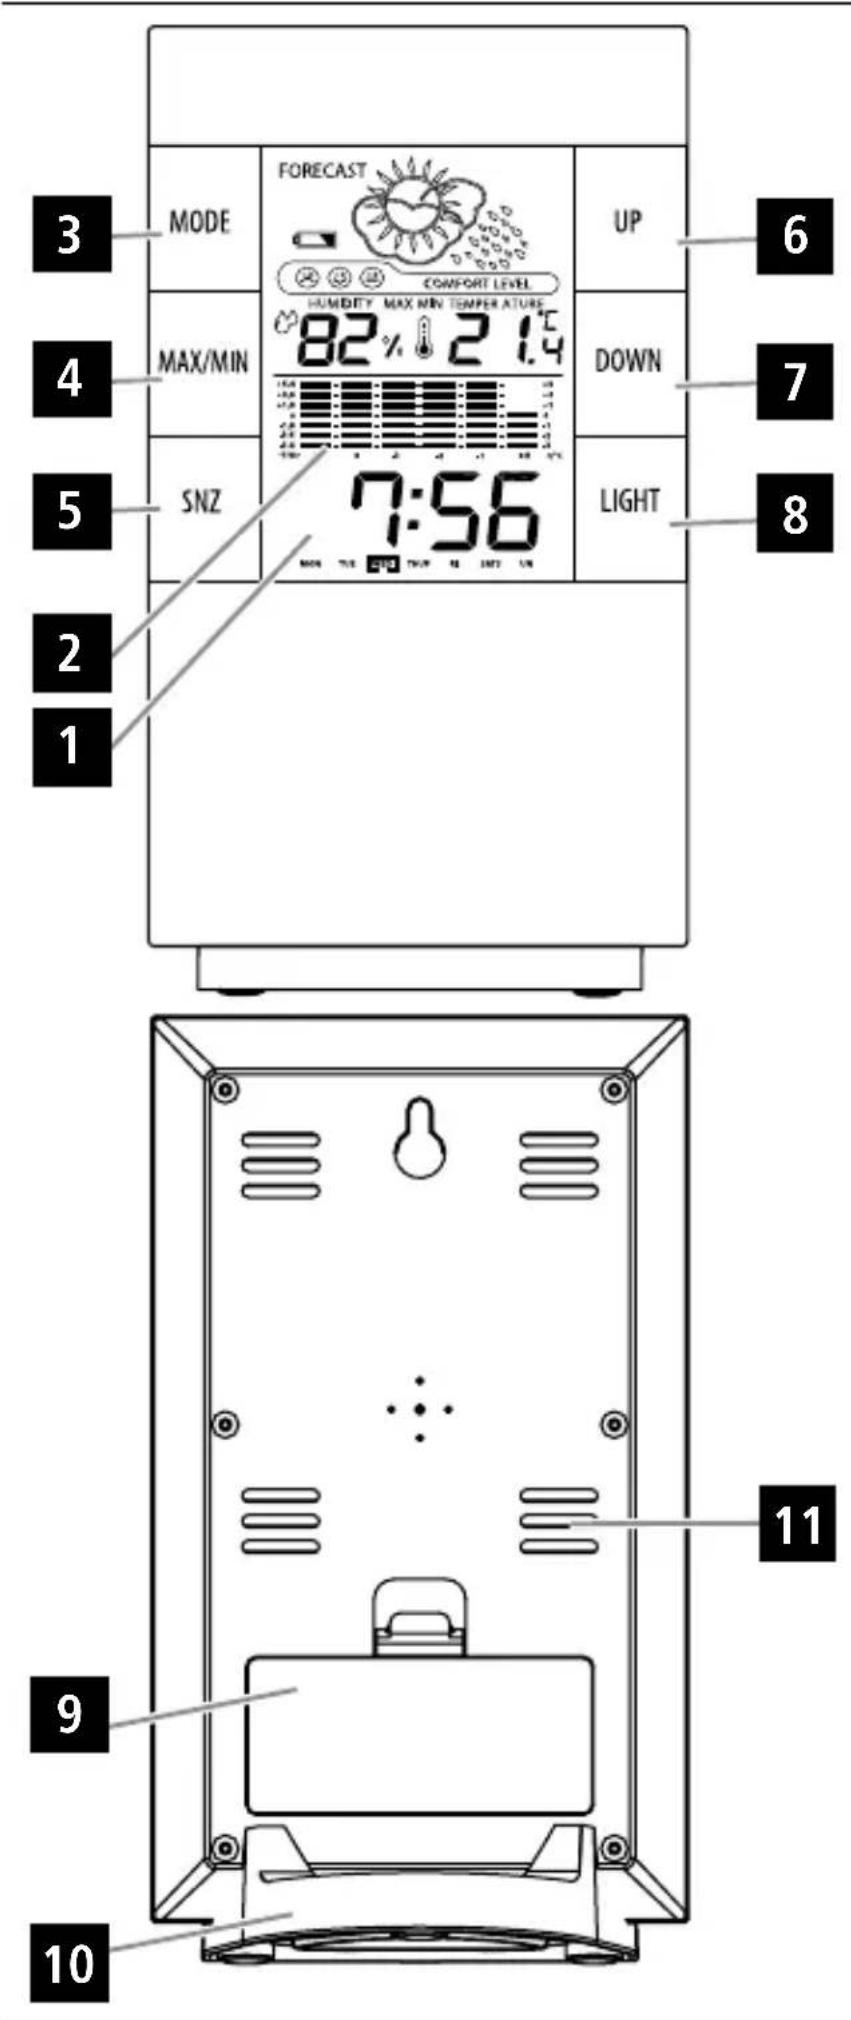
ControlsandDisplays
- Display
2.Temperaturetrenddisplay(h/°C)
3.MODEbutton
4.MAX/MINbutton
5.SNZ(snooze)button
6.UPbutton(increasesetvalue)
7.DOWNbutton(decreasesetvalue) - LIGHTbutton(displaylight)
9.Batterycompartment - Stand(removable)
- Measurementopenings(donotcover)
ThankyouforchoosingaHamaproduct.
Takeyourtimeandreadthefollowinginstructionsandinformationcompletely.Pleasekeep theseinstructionsinasafeplaceforfuturereference.Ifyousellthedevice,pleasepassthese operatinginstructionsontothenewowner.
1. ExplanationofWarningSymbolsandNotes
Warning
This symbol is used to indicate safety instructions to draw your attention to specific hazards and risks.

Note
This symbol is used to indicate additional information or important notes.

2.PackageContents
• TH-200LCDthermometer/hygrometer
• 2AAAbattery
• Theseoperatinginstructions
3.SafetyNotes
• The product is intended for private, non-commercial use only.
- Protect the product from dirt, moisture and overheating, and only use it in a dry environment.
- Donotusetheproductintheimmediatevicinityofheatersorotherheatsourcesorindirectsunlight.
- Donotoperatetheproductoutsidethepowerlimitsgiveninthespecifications.
- Donotdropheproductanddonotexposeittoanymajorshocks.
- Donotattempttoserviceorrepairtheproductyourself.Leaveanyandallservicework toqualifiedexperts.
- Donotmodifytheproductinanyway.Doingsovoidsthewarranty.
Warning-Batteries
- Wheninsertingbatteries, notethecorrectpolarity(+and-markings)andinsert thebatteriesaccordingly.Failuretodosocouldresultinthebatteriesleakingor exploding.
- Onlyusebatteries(orrechargeablebatteries)thatmatchthespecifiedtype.
- Beforeyouinsertthebatteries,cleanthebatterycontactsandthepolarcontacts.
- Donotallowchildrentochangebatterieswithoutsupervision.
- Donotmixoldandnewbatteriesorbatteriesofadifferenttypeormake.
- Removethebatteriesfromproductsthatarenotbeingusedforanextended period(unlessthesarebeingkeptreadyforanemergency).
- Donotshort-circuitbatteries.
- Donotchargebatteries.
- Donotthrowbatteriesinafire.
- Keepbatteriesoutofthereachofchildren.
- Neveropen,damageorswallobatteriesorallowthemtoentertheenvironment. Theycancontaintoxic,environmentallyharmfulheavymetals.
- Immediatelyremoveanddisposeofdeadbatteriesfromtheproduct.
- Avoidstoring, chargingorusingbatteriesinextremetemperatures.

4. Getting Started
Insertingthebattery
- Openthebatterycompartment(9), insertthebattery/batteries, ensuring that the batteries are inserted correctly intermsofpolarity, and then close the battery compartment(9). Thethermometer is now ready for use.
Replacingthebatteries
- Ifthedisplay(1)becomesdimmer,youmustreplacethebattery.
- Wheninsertingthebatteries,ensurethatthepolarityiscorrect.
5.Operation
- PresstheMODEbutton(3)toswitchbetweenethreedisplaymodesavailable. The modesareasfollows(inthatorder):clock,calendar,alarm.

Note
- Theproductisusuallyinclockmode. If the product is in another mode, press the MODE button(3) until it is in the mode you want.
- Whenyouadjustthesettings, theselecteditemwillflashtoindicatethatitcanbeset.
5.1 Setting the time format/time
- In clock mode, press and hold the MODE button (3) for about 4 seconds to start setting the time:
• Hours
- Minutes
- Press the UP (6) or DOWN (7) buttons to select the individual values.
- PresstheMODEbutton(3)toadoptthesetvaluedisplayedandskiptothenextitem.
- PresstheMODEbutton(3)tosavethesettingsandreturntothenormaldisplay.
5.2 Setting the calendar
- In calendar mode, press and hold the MODE button (3) for about 4 seconds to start setting the calendar:
• Year
• Month
• Day
- Press the UP (6) or DOWN (7) buttons to select the individual values.
- PresstheMODEbutton(3)toadoptthesetvaluedisplayedandskiptothenextitem.
- PresstheMODEbutton(3)tosavethesettingsandreturntothenormaldisplay.
Note
- Theweekdayissetautomaticallywhensettingthedatemanually.
- If you donot make an entry for several minutes, you automatically exit the setup mode. The setting that were made up to that point are not saved!

5.3 Switching between the 12/24-hour display formats
PressandholdtheUPbutton(6)foraboutfoursecondstoswitchbetween12-hourand24-hourtimeformats,AMorPMappearsbeforethetime.
5.4Settingthealarm
• RepeatedlypresstheMODEbutton(3)toenteralarmmode.
- PressandholdtheMODEbutton(3)foraboutfoursecondstostartsettingthealarm.
• Hours
- Minutes
- Press the UP (6) or DOWN (7) buttons to select the individual values.
- PresstheMODEbutton(3)toadoptthesetvaluedisplayedandskiptothenextitem.
- PresstheMODEbutton(3)tosavethesettingsandreturntothenormaldisplay.
5.5 Temperature measurements, maximum/minimum display
- PresstheDOWNbutton(7)wheninanymodetochoosebetween°C(Celsius)and°F (Fahrenheit).
- PresstheMAX/MINbutton(4)todisplaythemaximumorminimumrecordedvaluesfor temperatureandhumidity.
5.6Alarm
- In time or calendar mode, press the UP button (6) to switch the alarms on or off. If one of these symbols appear on the display, therelevant functions are activated.
- If the alarm miss switched on, it will stop going off automatically after about 1 minute or when the SNZ (5) or LIGHT (8) button is pressed. If you press the SNZ button (5), the alarm will go off again four times.
5.7 Temperature trend display(2)
Thisdisplayshowsthetemperaturetrendoverthelast12,6,3,2or1hour(s),withinamax.rangeof+/-3°Cor+/-5.4°F.Itisonlyforinformationalpurposes;youcannotmakeanysettingsonthisdisplay.
6. Care and Maintenance
Onlycleanthisproductwithaslightlydamp,lint-freeclothanddonotuseaggressive cleaningagents.Makesurethatwaterdoesnotgetintotheproduct.
7.WarrantyDisclaimer
HamaGmbH&CoKGassumesnoliabilityandprovidesnowarrantyfordamageresulting fromimproperinstallation/mounting,improperuseoftheproductorfromfailuretoobserve theoperatinginstructionsand/orsafetynotes.
8.TechnicalData
| Powersupply | 3,0V2xAAA |
| Measuringrange Temperature | 0°C-+50°C |
| Measuringrange Humidity | 30%-85% |
86652Monheim/Germany
Service&Support

www.hama.com

+499091502-0
D GB
CE


PAP
RaccoltaCarta



- ControlsandDisplays
- ExplanationofWarningSymbolsandNotes
- Warning
- Note
- 2.PackageContents
- 3.SafetyNotes
- Warning-Batteries
- Getting Started
- Insertingthebattery
- Replacingthebatteries
- 5.Operation
- Setting the time format/time
- Setting the calendar
- Switching between the 12/24-hour display formats
- 5.4Settingthealarm
- Temperature measurements, maximum/minimum display
- 5.6Alarm
- Temperature trend display(2)
- Care and Maintenance
- 7.WarrantyDisclaimer
- 8.TechnicalData
- 86652Monheim/Germany
- Service&Support
Brand : HAMA
Model : TH-200
Category : Weather Station