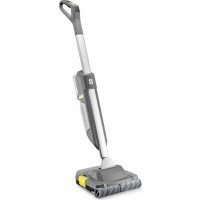
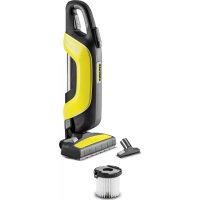
EB 301 LiIon - Broom Kärcher - Free user manual and instructions
Find the device manual for free EB 301 LiIon Kärcher in PDF.

| Product type | Cordless electric broom |
| Brand | Kärcher |
| Model | EB 301 LiIon |
| Power supply | Rechargeable lithium-ion battery 7.2 V, 2.6 Ah |
| Battery nominal voltage | 7.2 V |
| Battery capacity | 2.6 Ah |
| Maximum running time | 61 minutes |
| Charging time | 10 minutes (with rapid charger BC 1/1.8) |
| Charger | Mains voltage 100-240 V, 50-60 Hz |
| Nominal power | 25 W |
| Maximum power | 40 W |
| Sound pressure level | 56 dB(A) |
| Operating weight | 2.8 kg |
| Floor types | Hard floors and carpets (except wet floors, exposed aggregate concrete) |
| Dirt collector | Removable, manual emptying |
| Roller brush | Interchangeable, with unlocking |
| Telescopic handle | Height-adjustable, with rotating handle |
| Use | Professional (hotels, schools, hospitals, etc.) |
| Maintenance | Cleaning the roller brush, emptying the dirt collector, removable battery |
Frequently Asked Questions - EB 301 LiIon Kärcher
User questions about EB 301 LiIon Kärcher
0 question about this device. Answer the ones you know or ask your own.
Ask a new question about this device
Download the instructions for your Broom in PDF format for free! Find your manual EB 301 LiIon - Kärcher and take your electronic device back in hand. On this page are published all the documents necessary for the use of your device. EB 301 LiIon by Kärcher.
USER MANUAL EB 301 LiIon Kärcher
natural_image
Line drawing of a cleaning brush with handle and base (no text or symbols)Deutsch 4
English 7
Français 11
Italiano 14
Nederlands 18
Español 21
Português 25
Dansk 28
Norsk 32
Svenska 35
Suomi 38
Ελληνικά 41
Türkçe 45
Русский 48
Magyar 52
Čeština 55
Slovenščina 59
Polski 62
Românește 66
Slovenčina 69
Hrvatski 73
Srpski 76
Български 80
Eesti 84
Latviešu 87
Lietuviškai 90
Українська 94
Қазақша 98
A
natural_image
Diagram showing a car interior with a device component being inserted, no text or symbols present
Inhalt

H. Jenner
Chairman of the Board of Management

S. Reiser
Director Regulatory Affairs & Certification
71364 Winnenden (Germany)
Tel.: +49 7195 14-0
Fax: +49 7195 14-2212
Winnenden, 2020/10/01
Technische Daten
EB 30/1
Environmental protection 7
Intended use 8
Hazard levels 8
Safety instructions 8
Description of the device 8
Symbols on the device 8
Initial startup.... 8
Operation 9
Transport.... 9
Storage.... 9
Care and service 9
Troubleshooting guide.... 9
Warranty.... 10
Accessories and spare parts.... 10
Declaration of Conformity.... 10
Technical data 10
General notes
Read the original instructions before using the device for the first time and act in accordance with it. Keep this document
for future reference or for future owners.
- If the operating instructions and safety instructions are not observed, the device can be damaged and dangers could arise for users and other persons.
- Notify the dealer immediately in the case of shipping damage.
- Check the package contents when unpacking for missing accessories or for damage.
Environmental protection

The packing materials can be recycled. Please dispose of packaging in accordance with the environmental regulations.

Electrical and electronic devices contain valuable, recyclable materials and often components such as batteries, rechargeable batteries or oil, which - if handled or disposed of incorrectly - can pose a potential danger to human health and the environment. However, these components are required for the correct operation of the device. Devices marked by this symbol are not allowed to be disposed of together with the household rubbish.
- Remove the installed battery pack before scrapping the device, and dispose of it in an environmentally friendly manner.
- Do not open the battery pack, there is a risk of a short-circuit; in addition, irritating vapours or corrosive liquids may escape.
Notes on the content materials (REACH)
Current information on content materials can be found at: www.kaercher.de/REACH
Intended use
- This electric broom is intended for cleaning dirty areas on hard and carpeted floors.
- This device is suitable for commercial use, e.g. in hotels, schools, hospitals, factories, shops, offices and rental businesses, using accessories and spare parts approved by KÄRCHER.
- The device is suitable to a limited extent for deep-pile carpets.
- The device is not suitable for wet floor coverings.
- The device is not suitable for washed concrete, crushed stone or similar.
Any other use is considered as improper use. The manufacturer is not responsible for any resultant damage; the risk for this is borne by the user alone.
Hazard levels
⚠️DANGER
- Indication of an imminent threat of danger that will lead to severe injuries or even death.
⚠ WARNING
- Indication of a potentially dangerous situation that may lead to severe injuries or even death.
△CAUTION
- Indication of a potentially dangerous situation that may lead to minor injuries.
ATTENTION
- Indication of a potentially dangerous situation that may lead to damage to property.
Safety instructions
In addition to the notes in the operating instructions, the general safety regulations and accident prevention guidelines applicable by law must be adhered to.
⚠️ DANGER • Never reach into the rotating roller brush with your fingers or tools during operation. • Do not charge the battery pack in an explosion-hazard environment. • Danger of explosion. Do not charge any non-rechargeable battery. • Do not throw battery packs into a fire or into the household rubbish. • Avoid contact with fluid leaking from defective batteries. Immediately rinse off the fluid using water if contact is made, and also consult a doctor in the event of contact with the eyes.
⚠ WARNING • Only charge the battery pack using the original charger enclosed or with a charger approved by KÄRCHER. • Inspect the charger and battery pack for damage every time before use. Do not use any damaged devices. Only have damaged parts repaired by specialist personnel. • Check that the mains voltage corresponds with the voltage stated on the type plate of the charger. • Only use the charger for charging approved battery packs. • Do not charge any damaged battery packs. Replace damaged battery packs with battery packs approved by KÄRCHER.
⚠️ CAUTION • Remove the battery pack from the device before carrying out any service or care work.
- Do not use the battery pack when dirty or wet. • Do not put the battery pack into the battery mount of the charger if it is dirty or wet.
ATTENTION • Short circuit hazard. Protect the contacts of the battery mount from metal parts. • Short circuit hazard. Do not store the battery packs together with metal objects.
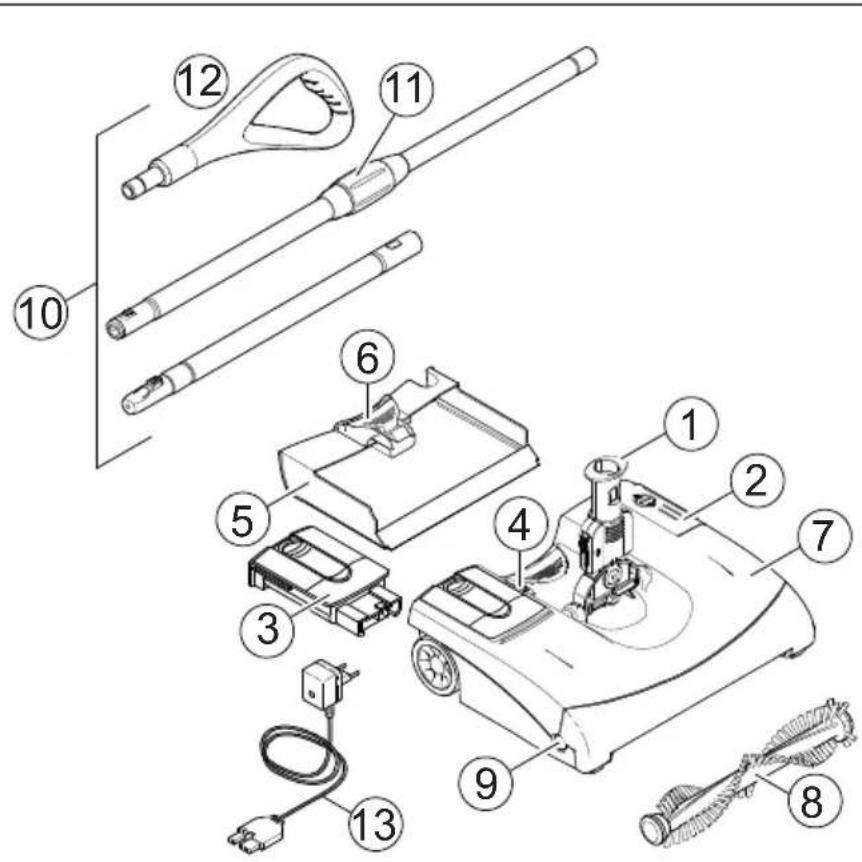
Description of the device
Illustration A
① Universal joint with locking mechanism
② On/off foot switch
③ Battery pack, removable
④ Unlocking button, battery pack
⑤ Dirt receptacle, removable
⑥ Dirt receptacle release mechanism
⑦ Casing
⑧ Interchangeable roller brush
⑨ Roller brush unlocking button
⑩Telescopic handle, height adjustable
⑪ Twist grip, for height adjustment
⑫Handle
⑬ Charger with charging status display and charging cable
Symbols on the device
Protect the charger from moisture and store in a dry place. The device is only suitable for use in rooms, do not expose the device to rain.
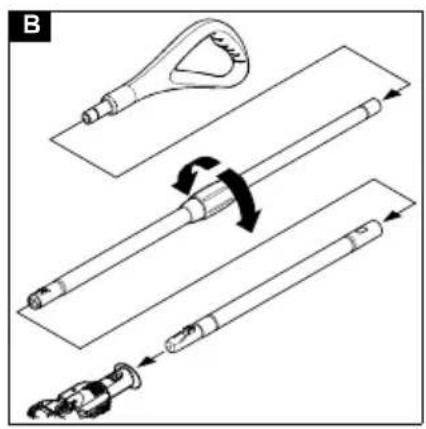
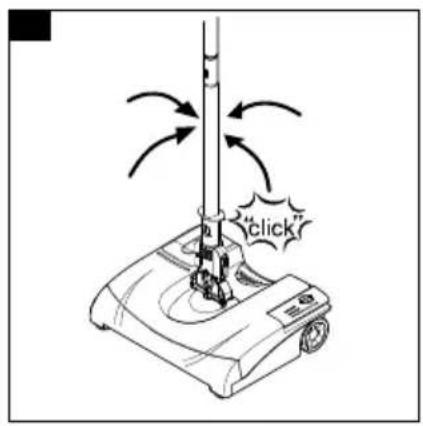
Initial startup
Mounting the telescopic handle and handle, and adjusting the height
The telescopic handle consists of 3 parts. When assembling them, make sure that the parts snap into place.
- Push the handle onto the longer handle with the twist grip.
Illustration B
- Put the longer and shorter handles into place by pressing the lock knob when putting them together.
- Insert the entire handle with the lock knob towards the front into the joint on the device.
- Loosen the twist grip and extend the handle to the desired working height, turn the handle into the correct position and tighten the twist grip.
Charging the battery pack
Note
The battery pack is not charged on delivery. Charge before use and when necessary.
Note
The battery pack can only be charged when it is removed.
Note
If the charging time is exceeded, the charger switches to maintenance charging. Charging mode indicator lights up green.
- Fault display: Charging mode indicator flashes red Contact the authorised Customer Service when in doubt.
| Description Charging time | when the battery pack is empty (Li-lon, 6.654-359.0) |
| Quick charger BC 1/1.8 110 | min |
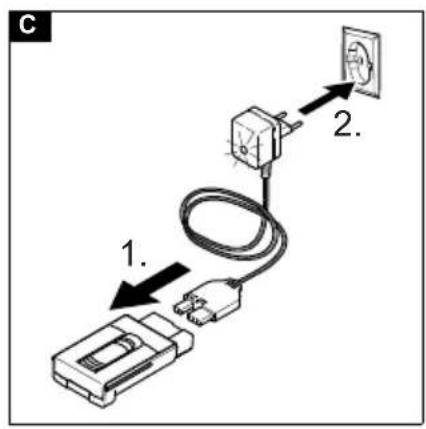
- Connect the battery pack to the charger using the charging cable, or plug the battery pack into the charger.
Illustration C
- Plug the charger supplied into a proper socket. The charging mode indicator flashes green, the battery pack is being charged.
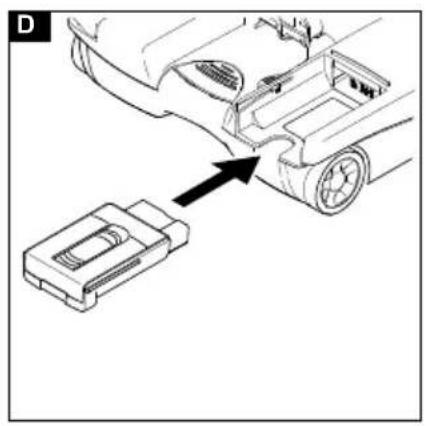
Inserting the battery pack
- Slide the battery pack into the holder and lock it in place.
Illustration D
Operation
Lock/unlock the telescopic handle sideways
The universal joint can be locked to clean deep-pile carpets to prevent the telescopic handle from moving sideways.
- To lock the telescopic handle sideways: Actuate the locking mechanism, slide it down and snap it into place.
Illustration E
- To unlock the telescopic handle: Actuate the locking mechanism, slide it up and snap it into place.
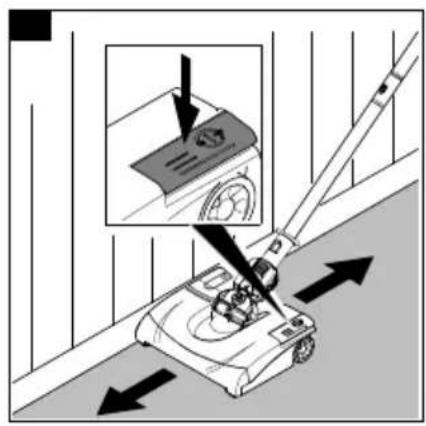
Starting work
- Switch on the device by pressing the on/off foot switch.
Illustration F
-
Move the device forwards and backwards for cleaning.
-
Use the right side for cleaning close to the edge (battery pack side).
Stopping work
- Switch off the device by pressing the on/off foot switch.
Illustration G
- So that the telescopic handle is secured in a stable position during work breaks, place it vertically; a lock holds it in this position.
Finishing work
-
Switch off the device at the end of work.
-
Empty the dirt receptacle after each cleaning.
-
Press the unlocking button on the battery pack and remove the battery pack.
-
Charge the battery pack.
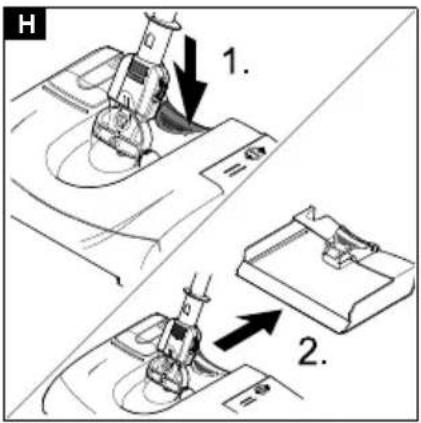
Draining the dirt receptacle
- Unlock and remove the dirt receptacle.
Illustration H
-
Empty the dirt receptacle.
-
Reinsert the dirt receptacle until it latches into place.
Storing the device
- The device can be hung on the handle; if necessary, turn the handle (see chapter "Mounting the telescoping handle and handle, and adjusting the height").
Transport
△CAUTION
Failure to observe the weight
Risk of injury and damage
Be aware of the weight of the device during transportation.
- When transporting the device in vehicles, secure it to prevent it from slipping or overturning in accordance with the respective valid guidelines.
Storage
△CAUTION
Failure to observe the weight
Risk of injury and damage
Be aware of the weight of the device during storage.
The device may only be operated indoors.
Care and service
⚠️DANGER
Danger of electric shock
Injuries due to touching live parts
Switch off the device.
Remove the battery pack.
Cleaning the device
- Wipe off the device on the outer side with a damp cloth. Do not use any aggressive agents, e.g. scouring powder.
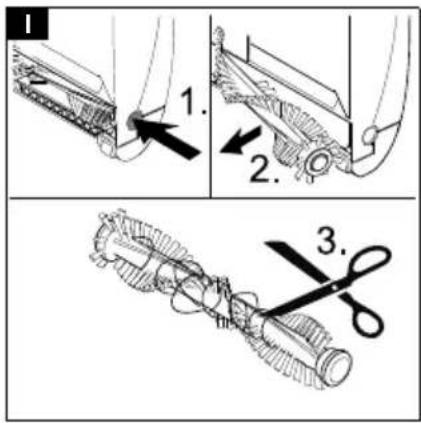
Cleaning/replacing the roller brush
-
Press the unlocking button and remove the roller brush. Illustration I
-
It is best to remove wound hair with a knife or scissors by moving it along the specified cutting edge of the roller brush. Remove loose hair from the roller brush.
-
Insert cleaned or new roller brush and check it is fitted correctly.
Troubleshooting guide
⚠️DANGER
Danger of electric shock
Injuries due to touching live parts
Switch off the device.
Remove the battery pack.
Charging mode indicator flashes red and green at the same time
-
The battery pack is already fully charged.
-
Remove the battery pack from the charger.
Charging mode indicator does not light up
-
Check the connection from the charger to the battery pack.
-
Check the power supply for the socket.
Device does not clean reliably
-
Clean or change the roller brush (see chapter "Cleaning/replacing the roller brush").
-
Charge the battery pack (see chapter "Charging the battery pack").
Dirt is thrown out of the device
- Empty the full dirt receptacle (see chapter "Draining the dirt receptacle").
Customer Service department
If the malfunction cannot be corrected, the device must be checked by the Customer Service department.
Warranty
The warranty conditions issued by our relevant sales company apply in all countries. We shall remedy possible malfunctions on your appliance within the warranty period free of cost, provided that a material or manufacturing defect is the cause. In a warranty case, please contact your dealer (with the purchase receipt) or the next authorised customer service site. (See overleaf for the address)
Accessories and spare parts
Only use original accessories and original spare parts. They ensure that the appliance will run fault-free and safely. Information on accessories and spare parts can be found at www.kaercher.com.
Optional accessories
| Description Order number | |
| Exchangeable battery pack Li-Ion (2.6 Ah) | 6.654-328.0 |
| Roller brush, soft, red 4.762-401.0 |
Declaration of Conformity
EU Declaration of Conformity
We hereby declare that the machine described below complies with the relevant basic safety and health requirements in the EU Directives, both in its basic design and construction as well as in the version placed in circulation by us. This declaration is invalidated by any changes made to the machine that are not approved by us. Product: Electric broom Type: 1.545-xxx
Currently applicable EU Directives
2009/125/EC
2011/65/EU
2014/30/EU
2014/35/EU
Harmonised standards used
EN IEC 63000: 2018
EN 55014-1: 2017 + A11: 2020
EN 55014-2: 2015
EN 60335-1
EN 60335-2-10
EN 60335-2-29
EN 61000-3-2: 2014
EN 61000-3-3: 2013
EN 62233: 2008
The signatories act on behalf of and with the authority of the company management.

H. Jenner
Chairman of the Board of Management
S. Reiser
Director Regulatory Affairs & Certification
Documentation supervisor:
S. Reiser
Alfred Kärcher SE & Co. KG
Alfred-Kärcher-Str. 28 - 40
71364 Winnenden (Germany)
Ph.: +49 7195 14-0
Fax: +49 7195 14-2212
Winnenden, 2020/10/01
Declaration of Conformity (UK)
We hereby declare that the product described below complies with the relevant provisions of the following UK Regulations, both in its basic design and construction as well as in the version put into circulation by us. This declaration shall cease to be valid if the product is modified without our prior approval.
Product: Electric broom
Type: 1.545-xxx
Currently applicable UK Regulations
S.I. 2010/2617 (as amended)
S.I. 2012/3032 (as amended)
S.I. 2016/1091 (as amended)
S.I. 2016/1101 (as amended)
Designated standards used
EN IEC 63000: 2018
EN 55014-1: 2017 + A11: 2020
EN 55014-2: 2015
EN 60335-1
EN 60335-2-10
EN 60335-2-29
EN 61000-3-2: 2014
EN 61000-3-3: 2013
EN 62233: 2008
The signatories act on behalf of and with the authority of the company management.
H. Jenner
Chairman of the Board of Management
S. Reiser
Director Regulatory Affairs & Certification
Documentation supervisor:
S. Reiser
Alfred Kärcher SE & Co. KG
Alfred-Kärcher-Str. 28 - 40
71364 Winnenden (Germany)
Ph.: +49 7195 14-0
Fax: +49 7195 14-2212
Winnenden, 2020/10/01
Technical data
EB 30/1
| Electrical connection | ||
| Battery pack type Li-Ion | ||
| Battery pack nominal voltage V 7,2 | ||
| Output voltage of charger V 8,4 | ||
| Charging current A 1,8 | ||
| Nominal power W 25 | ||
| Maximum power W 40 | ||
| Charger mains voltage (EU/GB/ V 100-240 CH) | ||
| Charger mains frequency Hz 50-60 | ||
| Device performance data | ||
| Maximum operating time with full battery charge (depending on the floor covering) | Minutes | 61 |
| Sound level (EN 60704-2-1) | dB(A) | 56 |
| Dimensions and weights | ||
| Typical operating weight | kg | 2,8 |
Subject to technical modifications.
Contenu
Chairman of the Board of Management

S. Reiser
Director Regulatory Affairs & Certification
71364 Winnenden (Germany)
Winnenden, 2020/10/01

H. Jenner
Chairman of the Board of Management

S. Reiser
Director Regulatory Affairs & Certification
71364 Winnenden (Germany)
Tel.: +49 7195 14-0
Fax: +49 7195 14-2212
Winnenden, 2020/10/01
Dati tecnici

H. Jenner
Chairman of the Board of Management

S. Reiser
Director Regulatory Affairs & Certification
71364 Winnenden (Germany)
Tel.: +49 7195 14-0
Fax: +49 7195 14-2212
Winnenden, 2020/10/01
Technische gegevens
② Interruptor ON/OFF

Chairman of the Board of Management

S. Reiser
Director Regulatory Affairs & Certification
71364 Winnenden (Germany)
Tel.: +49 7195 14-0
Fax: +49 7195 14-2212
Winnenden, 2020/10/01
Datos técnicos
H. Jenner
Chairman of the Board of Management

S. Reiser
Director Regulatory Affairs & Certification
Winnenden, 2020/10/01
Dados técnicos
Chairman of the Board of Management

S. Reiser
Director Regulatory Affairs & Certification
71364 Winnenden (Germany)
Tlf.: +49 7195 14-0
Fax: +49 7195 14-2212
Winnenden, 2020/10/01
Tekniske data
EB 30/1
Elektrisk tilslutning
| Batteritype Li-Ion |
| Nominel spænding batteripakke V 7,2 |

H. Jenner
Chairman of the Board of Management

S. Reiser
Director Regulatory Affairs & Certification
71364 Winnenden (Germany)
Tlf.: +49 7195 14-0
Winnenden, 2020/10/01
H. Jenner
Chairman of the Board of Management

S. Reiser
Director Regulatory Affairs & Certification
D-71364 Winnenden (Germany)
Tfn: +49 7195 14-0
Fax: +49 7195 14-2212
Winnenden, 2020/10/01
Tekniska data
EB 30/1

H. Jenner
Chairman of the Board of Management
S. Reiser
Director Regulatory Affairs & Certification
71364 Winnenden (Germany)
Puh.: +49 7195 14-0
Winnenden, 2020/10/01
Tekniset tiedot
EB 30/1
Sähköliitäntä
H. Jenner
Chairman of the Board of Management

S. Reiser
Director Regulatory Affairs & Certification
71364 Winnenden (Germany)
Tηλ.: +49 7195 14-0
Φαξ: +49 7195 14-2212
Winnenden, 2020/10/01
Τεχνικά στοιχεία

H. Jenner
Chairman of the Board of Management

S. Reiser
Director Regulatory Affairs & Certification
Winnenden, 2020/10/01
Teknik bilgiler

H. Jenner
Chairman of the Board of Management

S. Reiser
Director Regulatory Affairs & Certification
71364 Winnenden (Germany)
Тел.: +49 7195 14-0
Факс: +49 7195 14-2212
Winnenden, 2020/10/01
H. Jenner
Chairman of the Board of Management

S. Reiser
Director Regulatory Affairs & Certification
Winnenden, 2020/10/01
Műszaki adatok

H. Jenner
Chairman of the Board of Management
S. Reiser
Director Regulatory Affairs & Certification
Zmocněnec pro dokumentaci: S. Reiser
Alfred Kärcher SE & Co. KG
Alfred-Kärcher-Str. 28 - 40
Winnenden, 2020/10/01
Technické údaje

H. Jenner
Chairman of the Board of Management
S. Reiser
Director Regulatory Affairs & Certification
Winnenden, 2020/10/01
Tehnični podatki
H. Jenner
Chairman of the Board of Management

S. Reiser
Director Regulatory Affairs & Certification
71364 Winnenden (Germany)
Tel.: +49 7195 14-0
Winnenden, 2020/10/01
Dane techniczne
Directive UE relevante
2009/125/UE
2011/65/UE
2014/30/UE
2014/35/UE
Norme armonizate aplicate
EN IEC 63000: 2018
EN 55014-1: 2017 + A11: 2020
EN 55014-2: 2015
EN 60335-1
EN 60335-2-10
EN 60335-2-29
EN 61000-3-2: 2014
EN 61000-3-3: 2013
EN 62233: 2008

H. Jenner
Chairman of the Board of Management

S. Reiser
Director Regulatory Affairs & Certification
71364 Winnenden (Germania)
Tel.: +49 7195 14-0
Fax: +49 7195 14-2212
Winnenden, 2020/10/01
Date tehnice

H. Jenner
Chairman of the Board of Management

S. Reiser
Director Regulatory Affairs & Certification
71364 Winnenden (Germany)
Tel.: +49 7195 14-0
Fax: +49 7195 14-2212
Winnenden, 2020/10/01
Technické údaje

H. Jenner
Chairman of the Board of Management

S. Reiser
Director Regulatory Affairs & Certification
Opunomoćenik za dokumentaciju:
S. Reiser
Alfred Kärcher SE & Co. KG
Alfred-Kärcher-Str. 28 - 40
71364 Winnenden (Njemačka)
Tel.: +49 7195 14-0
Telefaks: +49 7195 14-2212
Winnenden, 2020/10/01
Tehnički podaci
EB 30/1
Chairman of the Board of Management
S. Reiser
Director Regulatory Affairs & Certification
Lice ovlašćeno za dokumentaciju:
S. Reiser
Alfred Kärcher SE & Co. KG
Alfred-Kärcher-Str. 28 - 40
71364 Winnenden (Germany)
Tel.: +49 7195 14-0
Winnenden, 2020/10/01
Tehnički podaci
EB 30/1
Chairman of the Board of Management

S. Reiser
Director Regulatory Affairs & Certification
71364 Winnenden (Germany)
Тел.: +49 7195 14-0
Факс: +49 7195 14-2212
Winnenden, 2020/10/01
Технически данни

H. Jenner
Chairman of the Board of Management

S. Reiser
Director Regulatory Affairs & Certification
71364 Winnenden (Germany)
Tel: +49 7195 14-0
Winnenden, 2020/10/01
Tehnilised andmed
EB 30/1
Elektriühendus

H. Jenner
Chairman of the Board of Management
S. Reiser
Director Regulatory Affairs & Certification
Winnenden, 2020/10/01
Tehniskie dati

Chairman of the Board of Management

S. Reiser
Director Regulatory Affairs & Certification
Winnenden, 2020/10/01
Techniniai duomenys
Chairman of the Board of Management
S. Reiser
Director Regulatory Affairs & Certification
71364 Winnenden (Germany)
Тел.: +49 7195 14-0
Факс: +49 7195 14-2212
Winnenden, 2020/10/01
Chairman of the Board of Management
S. Reiser
Director Regulatory Affairs & Certification
Winnenden, 2020/10/01
natural_image
Black silhouette of a hand giving a thumbs-up gesture (no text or symbols)THANK YOU!
MERCI! DANKE! iGRACIAS!

Register your product and benefit from many advantages.
www.kaercher.com/welcome


Rate your product and tell us your opinion.
natural_image
Icon showing a gear and wrench inside a square frame (no text or symbols)www.kaercher.com/dealersearch
Alfred Kärcher SE & Co. KG
Alfred-Kärcher-Str. 28-40
71364 Winnenden (Germany)
Tel.: +49 7195 14-0
Fax: +49 7195 14-2212