
WHP5327 - Headphones THOMSON - Free user manual and instructions
Find the device manual for free WHP5327 THOMSON in PDF.

| Product Type | Wireless Digital Headphones |
| Brand | Thomson |
| Model | WHP5327 |
| Transmitter Power Supply | 5 V, 550 mA (via included power adapter) |
| Headphone Power Supply | 2.4 V (2 AAA Ni-MH rechargeable batteries included) |
| Wireless Technology | 2.4 GHz Digital |
| Maximum Range | 25 meters (depending on environment) |
| Frequency Response | 20 Hz - 20 kHz |
| Audio Connectivity | Digital optical, digital coaxial, analog RCA, 3.5 mm line input on headphones |
| Main Functions | Wireless transmission, charging station, volume control, auto standby mode, wired usage possible |
| Care and Cleaning | Clean with a slightly damp, lint-free cloth, without harsh detergent |
| Safety | Instructions: do not use while driving, keep volume at a reasonable level, risk of interference with pacemakers |
| Spare Parts and Repairability | Replaceable rechargeable batteries, audio cables provided; do not attempt to repair yourself, refer to a qualified technician |
| Package Contents | Headphones, transmitter/charging station, power adapter, 2 AAA batteries, audio cables (3.5 mm jack, RCA adapter), 6.3 mm adapter |
Frequently Asked Questions - WHP5327 THOMSON
User questions about WHP5327 THOMSON
0 question about this device. Answer the ones you know or ask your own.
Ask a new question about this device
Download the instructions for your Headphones in PDF format for free! Find your manual WHP5327 - THOMSON and take your electronic device back in hand. On this page are published all the documents necessary for the use of your device. WHP5327 by THOMSON.
USER MANUAL WHP5327 THOMSON
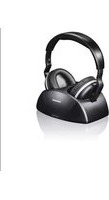
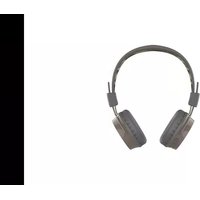
Digital Wireless Headphones
natural_image
Black and white photo of a THOMSON headphones with charging case (no visible text or symbols on the device body)Operating Instruction
Mode d'emploi
Bedienungsanleitung
THOMSON
GB Operating Instructions
F Mode d'emploi
Thank you for choosing a Thomson product.
Take your time and read the following instructions and information completely. Please keep these instructions in safe place for future reference. If you sell the device, please pass these operating instructions on to the new owner.
1. Explanation of Warning Symbols and Notes

Warning
This symbol is used to indicate safety instructions or draw your attention to specific hazards and risks.

Note
This symbol is used to indicate additional information important notes.
2. Controls and displays
Transmitter/charging station (Fig. 1 + 3)
- Charge LED indicator
- Power LED
- Charging contacts
- Input selection switch: optical, coax or analogue
- Adjustment of input sensitivity (attenuator)
- Optical audio input (digital)
- Coaxial audio input (digital)
- RCA audio input (analogue)
- Power on/off switch
- DC input socket (power supply unit)
Headphones (Fig. 1 + 2)
- Charging contacts (protected against twisting)
- Volume control
- Power LED
- Power on/off switch
- Direct audio line-in (analogue, 3.5 mm stereo jack)
- 'R' earpad as battery compartment cover
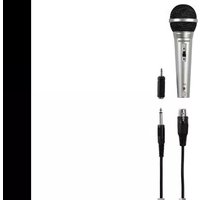
3. Package contents
• 1 W HP5327 digital wireless headphones
• 1 power supply unit
- 2 A AA batteries
- 1 audio cable
3.5 mm jack plug - 3.5 mm jack plug
• 1 audio adapter cable
3.5 mm jack plug - R CA plug
- 1 audio adapter (3.5 mm jack socket – RCA plug)
• 1 a udio adapter (3.5 mm/6.3 mm)
• 1 optical fibre cable
• These operating instructions
4. Safety Notes
- Never open, damage or swallow batteries or allow them to enter the environment. They can contain toxic, environmentally unfriendly heavy metals.
-
Do not tamper with or damage/heat/disassemble the batteries/rechargeable batteries.
-
The product is intended for private, non-commercial use only.
- Use the product for its intended purpose only.
- Children should be supervised to ensure that they do not play with the device.
• Do not use the product in areas where the use of electronic devices is not permitted. - Only connect the product to a socket that has been approved for the device. The socket must be installed close to the product and easily accessible.
- Disconnect the product from the network using the power button - if this is not available, unplug the power cord from the socket.
- Lay all cables so that they do not pose a tripping hazard.
- Do not bend or crush the cable.
- Do not drop the product and do not expose it to any major shocks.
- Dispose of packaging material immediately according to locally applicable regulations.
- Do not modify the product in any way. Doing so voids the warranty.
- Do not use the product if the adapter, connection cable or power cable is damaged.
- Do not attempt to service or repair the product yourself. Leave any and all service work to qualified experts.
- Do not open the device or continue to operate it if it becomes damaged.

Warning -pacemaker
The body current that flows when using this product can affect the functioning of a pacemaker.
5. Introduction
These 2.4-GHz digital wireless headphones use the latest wireless technology, and enable you to enjoy pure, crystal-clear music or TV sound in your entire home. Simply connect the transmitter to the desired audio source; DVD player, CD player, TV set, hi-fi system, iPod or smartphone.
6. Getting Started
6.1 Connecting the transmitter
- Connect the connecting cable of the power supply unit to the DC IN connection (10) on the transmitter. Now connect the power supply unit to an easily accessible outlet.
- Connect one of the included audio cables (RCA or optical) to the [ANALOG] (8) or [OPTIC] (6) audio input on rear of the transmitter and to the corresponding audio output on your playback device (TV or audio source,ternatively, you can also use the digital coaxial input
- Set the [INPUT Select] switch (4) to the input you using (Optic/Coax/Analog).
- Charging begins automatically; the Charge LED (1) on the transmitter turns green as soon as the charging contacts of the transmitter and headphones are correctly connected. - When charging is complete, the green Charge LED (1) goes out.

Note
6.2 Inserting the batteries (headphones) (Fig. 4)
The batteries will not be charged if the transmitter is off.

Warning
- When inserting the rechargeable batteries, always make sure that the polarity is correct ("+" and "-" markings). Failure to do so could result in the rechargeable batteries leaking or exploding.
- Do not allow batteries/rechargeable batteries to discharge completely.
- Do not tamper with or damage/heat/disassemble batteries/rechargeable batteries.
- Do not short circuit the batteries/rechargeable batteries and keep them away from uncoated metal objects
- The batteries and charging station included in the delivery go together and should always be used in combination.

Note - Batteries
- Switch off your device before changing the batteries.
- When stored over a long period of time, batteries should be charged regularly (at least every three months).
- The batteries may be charged at any time; it is not essary to discharge them completely before charging.
- Before using the device for the first time, you must insert the supplied batteries into the headphones and fully charge them (takes about 7 hours).
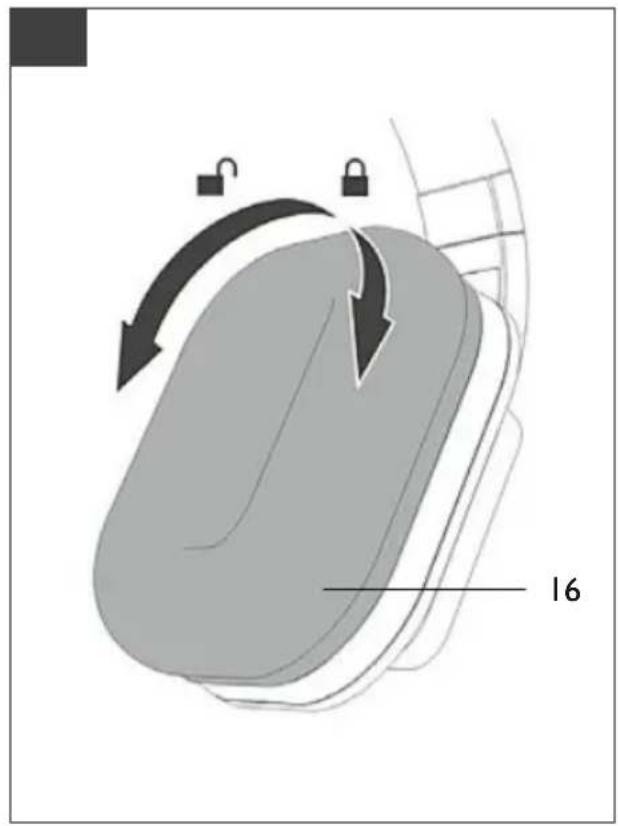
- Open the battery compartment cover by holding the side of the right earpiece (16) and carefully turning right earpad anti-clockwise.
- Insert the two AAA batteries (supplied) into the batte compartment, observing correct polarity. Close the batte compartment properly by putting back the earpad and turning it clock-wise until you feel it snap into place.
6.3 Charging the headphones
- First switch off the headphones by pressing and hold the Power button (14) for about 2 seconds.
- Hang the headphones onto the charging contacts (3) the transmitter.
- Switch on the transmitter at the back of the device moving the [Power] slide control (9) to the [ON] posi
6.4 Adjusting input sensitivity (attenuator)
- Depending on your connected playback device, adjust the sensitivity of the input level using the [ATT.] switch (5) on the transmitter.
- Use the switch position [-8dB] for TV, DVD or hi-fi, for example; for portable devices, such as an iPod or smartphone, use the switch position [0dB].
the7. Operation
7.1 Switching on the transmitter
• Switch on the playback device (TV or audio component) that your transmitter is connected to.
- Move the [Power] slide control (9) on the rear of the transmitter to the [ON] position. The Power LED begins to flash blue; it stops flashing and is solid after about 8–9 seconds.
7.2 Switching on the headphones

Warning - Volume
- Using this product limits your perception of ambient noise. For this reason, do not operate any vehicles or machines while using this product.
• Always keep the volume at a reasonable level. Loud volumes, even over short periods, can cause hearing loss.
- Switch on the headphones by pressing and holding the power button (14) for about 2 seconds. The Power LED battery (13) lights up red, and then changes to green as soon as there is a signal connection between the transmitter and headphones. If no audio signal is detected, the LED stays red.
- Adjust the headband and put the headphones on. - Set the desired volume using the volume control (12) on the headphones.
• If the charge level of the headphone batteries is low, the Power LED (13) on the headphones will flash red. Five minutes before the headphones switch off, a warning tone will also sound: one tone per minute for four minutes and two tones in the last minute. The headphones then switch off automatically.


Note
- In the case of interference or poor reception, the headphone sound is muted and the LED is lit red. automatic channel search is started.
- These headphones can also be used as standard w headphones. For this purpose, connect the headphone output on your playback device to the jack socket your headphones using the 3.5 mm jack cable (Fig 2–15).
- Switch off the headphones if they are not being used and put them back onto the transmitter's charging contacts (3).
- Make sure that the charging contacts lie on top of each other.

Note - Manual channel search in the connection problems
An In the case of interference or poor reception, the headphone sound is muted and the LED is lit red.
• e thsert two charged AAA batteries into the battery compartment of the headphones, as described in on Chapter 6.2.
- Connect the transmitter to the outlet using the power supply unit. DO NOT switch on the transmitter.
- Press and hold the Power button (14) on the headphones (receiver) for about 7 seconds until the green LED begins to flash.
- Now switch on the transmitter. The connection from the transmitter to the headphones (receiver) is automatically established.
7.3 Standby mode
- To protect the transmitter and to save power, the transmitter automatically switches to standby mode if audio signal is received for about 5 minutes. The Po LED (2) then goes out.
- As soon as an audio signal is detected again, the mitter automatically switches back on and the Power (2) lights up blue.
- To play your device's audio through the headphones, switch the headphones back on by pressing and hold the Power button (14) for about 2 seconds.
- The headphones likewise switch off automatically if they receive no signal from the transmitter for about 5 minutes.
8. Troubleshooting
8.1 No sound
- Make sure that the power supply unit is correctly connected to the wall socket and to the transmitter's power socket.
- Check whether the headphones are on.
- The headphone charge level may be too low, in which case you need to fully charge the batteries.
- Make sure that the desired TV set or audio device is switched on.
• The headphone volume may be too low. - The audio signal may be too low. Increase the volume on your playback device.
• The headphones may be too far from the transmitter.
9. Volume control with analogue input selection (for example, headphone output on TV)
We to ensure clean signal level quality, you should set the volume of the source (for example, television volume) to trans. 60%.
- Set the volume on the headphones to the minimum level and increase it gradually, in order to avoid hearing loss.
10 Care and Maintenance
Only clean this product with a slightly damp, lint-free cloth they and do not use aggressive cleaning agents.
11. Warranty Disclaimer
Hama GmbH & Co. KG assumes no liability and provides no warranty for damage resulting from improper installation/mounting, improper use of the product or from failure to observe the operating instructions and/or safety notes.
12. Service and Support
Please contact Hama Product Consulting if you have any questions about this product.
Hotline: +49 9091 502-115 (German/English)
Further support information can be found here: www.hama.com
13. Technical Data
| Operating voltage | Transmitter: 5 V, 5 50 mAHeadphones: 2.4 V(2 x A AA Ni-MH) |
| Distortion | |
| Signal-to-noise ratio | 80 dB |
| Range | Up to 25 metres (dependir on the composition of intervening walls) |
| Frequency range | 20 Hz - 2 0 kHz |
| Max. emitted transmitting power | 6,06 dBm |
| Frequency band | 406 - 2 472 MHz |
14. Recycling Information
Note on environmental protection:
After the implementation of the European Directive 2012/19/EU and 2006/66/EU in the national legal system, the following applies: Electric and
electronic devices as well as batteries must not be
disposed of with household waste. Consumers are obliged by law to return electrical and electronic devices as well as batteries at the end of their service lives to the public collecting points set up for this purpose or point of sale. Details to this are defined by the national law of the respective country. This symbol on the product, the instruction manual or the package indicates that a product is subject to these regulations. By recycling, reusing the materials or other forms of utilising old devices/Batteries, you are making an important contribution to protecting our environment.
15. Declaration of Conformity
CE Hereby, Hama GmbH & Co KG declares that the radio equipment type [00131988] is in compliance with Directive 2014/53/EU. The full text of the EU
declaration of conformity is available at the following internet address:
www.hama.com ->00131988 -> Downloads.
Sender/Ladestation (Pic. 1 + 3)
www.hama.com->00131988 ->Downloads.
6.1 Conectar oemissor
www.hama.com->00131988 -> Downloads.
www.hama.com ->00131988->Downloads.
Thomson is a trademark of Technicolor or its affiliates used under license to HAMA GmbH & Co KG, 86652 Monheim/Germany

- Digital Wireless Headphones
- THOMSON
- Explanation of Warning Symbols and Notes
- Warning
- Note
- Controls and displays
- Transmitter/charging station (Fig. 1 + 3)
- Headphones (Fig. 1 + 2)
- Package contents
- Safety Notes
- Warning -pacemaker
- Introduction
- Getting Started
- Connecting the transmitter
- Inserting the batteries (headphones) (Fig. 4)
- Note - Batteries
- Charging the headphones
- Adjusting input sensitivity (attenuator)
- the7. Operation
- Switching on the transmitter
- Switching on the headphones
- Warning - Volume
- Note - Manual channel search in the connection problems
- Standby mode
- Troubleshooting
- No sound
- Volume control with analogue input selection (for example, headphone output on TV)
- Care and Maintenance
- Warranty Disclaimer
- Service and Support
- Technical Data
- Recycling Information
- Note on environmental protection:
- Declaration of Conformity
- Sender/Ladestation (Pic. 1 + 3)
- Conectar oemissor
Brand : THOMSON
Model : WHP5327
Category : Headphones