WEAR7009 - Headphones THOMSON - Free user manual and instructions
Find the device manual for free WEAR7009 THOMSON in PDF.
| Product type | Bluetooth stereo in-ear headphones |
| Brand | Thomson |
| Model | WEAR7009 |
| Connection technology | Bluetooth stereo with Multipoint function |
| Compatible devices | Smartphones, tablets and other Bluetooth-compatible devices |
| Power supply | Built-in rechargeable battery, charging via USB port (cable included) |
| Charging time | Approximately 2 hours |
| Charge indicator | Red LED while charging, blue LED when charged |
| Control functions | Volume +/-, next/previous track, play/pause, calls, voice assistant |
| Microphone | Built-in for hands-free calls and voice assistant |
| Voice assistant | Compatible with Siri and Google Assistant |
| Call management | Answer, reject, end, redial last number |
| Automatic connection | Yes, after first successful pairing |
| Bluetooth range | Up to 10 meters (without obstacles) |
| Frequency bands | 2402 - 2480 MHz |
| Maximum RF power | 3.5 mW (EIRP) |
| Package contents | 1 pair of earphones, 1 USB charging cable, 1 user manual |
| Care and cleaning | Clean with a slightly damp, lint-free cloth, avoid harsh detergents, do not allow liquid to enter |
| Safety | Do not listen at high volume for extended periods, do not expose to moisture, do not open the product, do not throw into fire |
| Repairability | Not user-repairable, no spare parts available |
| Customer service | Hama GmbH & Co KG, phone +49 9091 502-0 (German/English) |
| Recycling | Do not dispose of with household waste, take to a collection point or retailer |
| Warranty | Warranty excluded for damage due to improper use |
Frequently Asked Questions - WEAR7009 THOMSON
User questions about WEAR7009 THOMSON
0 question about this device. Answer the ones you know or ask your own.
Ask a new question about this device
Download the instructions for your Headphones in PDF format for free! Find your manual WEAR7009 - THOMSON and take your electronic device back in hand. On this page are published all the documents necessary for the use of your device. WEAR7009 by THOMSON.
USER MANUAL WEAR7009 THOMSON
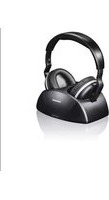
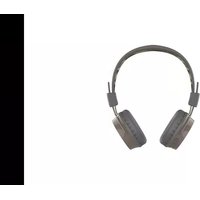
Bluetooth® In-Ear-Headphones
Operating Instruction
Moded'emploi
Bedienungsanleitung
THOMSON
GB OperatingInstruction2
F Moded'emploi6
D Bedienungsanleitung10
E Instruetionesdeuso14
Istruzioniperl'uso18
P Manualdeinstruções22
NL Gebruiksaanwijzing26
PL Instrukcjaobslugi30
H Hasznalatiutmutato34
GR O8nyiexcxponc38
CZ Navodk pouziti42
SK Návodnapoužitie45
S Bruksanvisning49
RO Manualdeutilizare53
GB Operatinginstruction
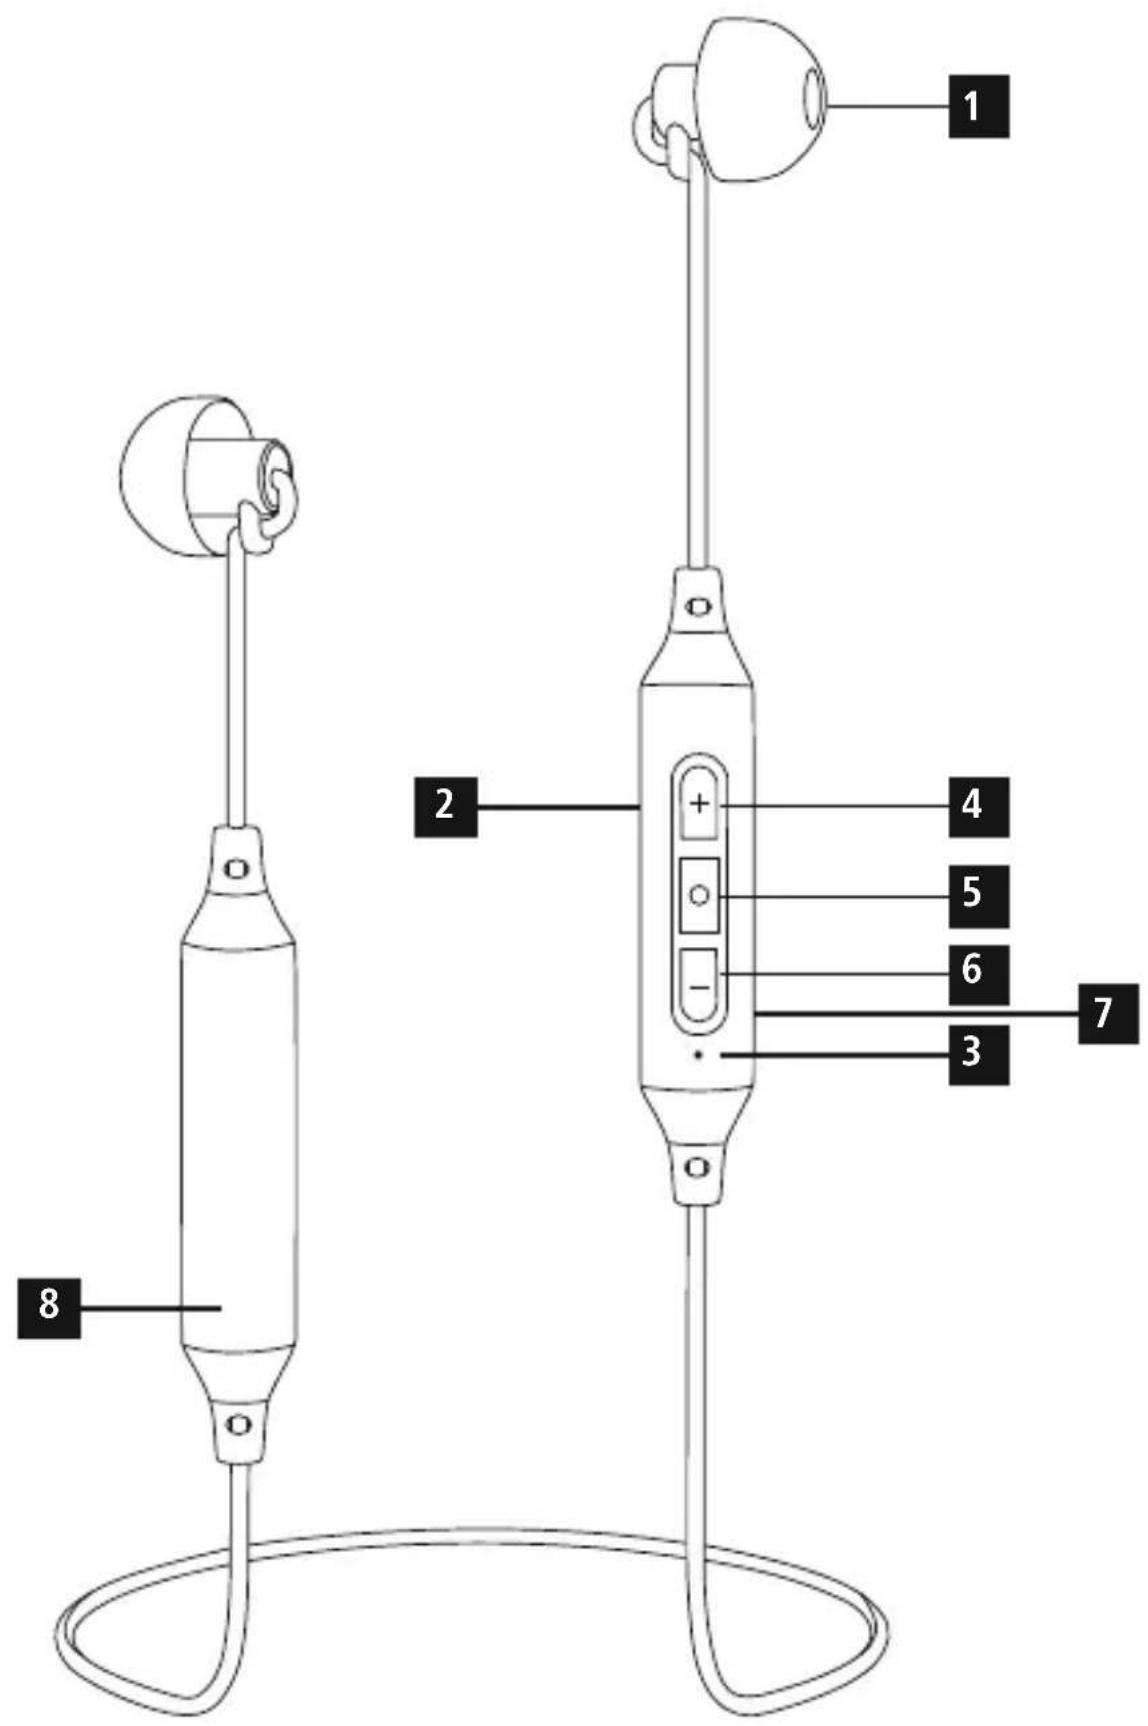
ControlsandDisplays
1.Earphones
2.Microphone
3.StatusLEDs
4.Volume+, jumpforward o netitle
5. On/offbutton,voicecontrol,multifunctionbutton(MF)
6.Volume-, jumpbackward on title
7. Chargingsocket
8.Battery
1.ExplanationofWarningSymbolsandNotes
Warning

Thissymbolisusedtoindicatesafetyinstructionsortodraw yourattentionospecific h azardsandrisks.
Note

Thissymbolisusedtoindicateadditionalinformationor importantnotes.
2.PackageContents
- 1 x Bluet® stardroearphones
- 1 x USBchargingcable
T heseoperatinginstructions
3.SafetyNotes
T heproductisintendedforprivate,non-commercialuseonly.
- U setheproductforitsintendedpurposeonly.
- Protect the product from dirt, moisture and overheating, and onlyuseitina d ryenvironment.
D on otusetheproductintheimmediaticeviciityofheaters orotherheatsourcesorindirectsunlight.
- D o n otdroptheproductanddonotexposeittoanymajor shocks.
- D o n otoperatetheproductoutsidethepowerlimitsgiven in the specifications.
- D o n otopenthedeviceorcontinuetooperateitift becomesdamaged.
- S incethebatteryisintegratedandcannotberremoved, you willneedtodisposeoftheproductasa w hole. Dothisin compliancewiththelegalrequirements.
- D isposeofpackagingmaterialimmediatelyaccordingto locallyapplicableregulations.
- Do not modify the product in any way. Doing so voids the warranty.
- Do not use the product in areas where the use of electronic devices is not permitted.
- D o n otattempttoserviceorrepairtheproductyourself. Leaveanyandallserviceworktoqualifiedexperts.
- Do not throw the battery or the product into fire.
- D o n ottamperwithordamage/heat/disassemblethe batteries/rechargeablebatteries.
- U setheitemonlyinmoderateclimaticconditions.
Warning-Highvolumes

- Highboundpressure level!
There is a risk of hearing damage. - To prevent hearing loss, avoid listening at high volume levels for long periods.
Always keep the volume at a reasonable level. Loud volumes, evenovershortperiods, can cause hearingloss. - U singthisproductlimitsyourperception ofambientnoise. For thisreason, donot operateanyvehiclesormachines while usingthisproduct.
4. Getting Started

Warning-Battery
- O nlyusesuitablechargingdevicesorUSBconnections forcharging.
- A s a rule, donotchargedevicesorUSBconnectionsthat are d effectiveanddonottrytorepairthemyourself.
- D o n tovercharge the productor allow the battery to completely discharge.
- A voidstoring, charging or using the device in extreme temperatures and extremely low atmospheric pressure (for example, at high altitudes).
-
When stored over a long period of time, batteries should becharged regularly (atleasteverythreemonths).
-
The earphones are equipped with a rechargeable battery. Thebatterymustbefullychargedbefore u singthedeviceforthefirsttime.
- Ensure that the earphones are switched off before charging them.
- B eginchargingbyconnectingtheincludedUSBcharging cabletothechargingsocket(7)aswellastheUSB connectionofa P C/laptop.
- Alternatively, you can charge the earphones using a suitable USBcharger. Please refer to the operating instructions for the USBcharger used.
- The display lights up constantly in red during the charging process.
It takes around 2 hours until the battery is completely charged. - Once the charging process is complete, the red light of the LED(3)turnstobluelight.
- D isconnectallcableandmainsconnectionsafteruse.
5. Operation
Switchingtheearphoneson/off
-
Press the MF button (5) until a voice says "Power ON" and theblueLEDflashes.
-
To switch it off, press and hold the MF button (5) until a voice says "Power OFF" and the red LED flashes.

Note
The functions described in this section are only available for Bluetooth®-capable terminal devices.
5.1Bluetooth® pairing

Note-Pairing
- M akesure t hatyourBluetooth®- capableterminaldeviceis onandBluetooth ® isactivated.
- M akesure t hatyourBluetooth® capableterminaldeviceis visibleforotherBluetooth® devices.
-
For more information, please refer to the operating instructions of your terminal device.
-
T heearphonesandtheterminaldevicesshouldbenofurther thanonemetre a part.Thessmallerthedistance,thebetter.
- S witchchonthearphoneswiththeMFbutton(5).
- Press and hold the MF button (5) until the red and blue LEDs flashalternatingly. Theearphones are searching for Bluetooth® connection.
- O pentheBluetooth® settingsonyourterminaldeviceand waituntil ThomsonWear7009 appearsinthelistof Bluetooth® devicesfound.
- Se |ThomsonWEAR7009 andwaituntiltheearphones are listedasconnectedintheBluetooth® settingsyour terminaldevice.
Note-Blueto8password

Some terminal devices require a password in order to connecttoanotherBluetooth device.
If your terminal device requests a password for connection to the earphones, enter 0000.

Note
- Once the connection has been established, a voice says, "Connected".
- I f t heconnectionattempttakeslongerthan300seconds tocomplete,itiscancelledandtheLEDsgoout.
- I n t hiscase,repeatatthestepslistedpreviouslyunder5.1 Bluetooth® pairing.
5.2.AutomaticBluetooth connection(aftersuccessful pairing)

Note
- M akesure t hatyourBluetooth®- capableterminaldeviceis onandBluetooth ® isactivated.
- M akesure t hatyourBluetooth®- capableterminaldeviceis visibleforotherBluetooth ® devices.
-
For more information, please refer to the operating instructions of your terminal device.
-
S witchontheearphoneswiththeMFbutton(5).Theblue LEDbeginstoflashandtheearphonesautomaticallyconnect withthelastterminaldeviceused.

Note
- Once the connection has been established, a voice says, "Connected".
- I f t heconnectionattempttakeslongerthan300seconds tocomplete,itiscancelledandtheLEDsgoout. Inthis case,repeatthesteplistedpreviouslyunder5.2.
- I m aybenecessaryytochangethe settingssonyour terminaldevice to enable itto automatically connect to theearphones.
Note-C onnectionimpaired

Aftertheheadsetandterminaldevicehavebeenpaired,a connectionistablishedautomatically. If t heBluetooth connectionisnotestablishedautomatically, checkthe following:
- C hecktheBluetooth® settingsofyourterminaldevicetosee whether ThomsonWEAR7009 isconnected.Ifnot,repeat thestepslistedunder5.1.Bluetooth ® pairing.
- Check whether obstacles are impairing the range. If so, movethedevicesclosertogether.
The performance can also be affected by a weak battery.
5.3Bluetooth®multipointconnection
TheseearphonescanconnecttotwoBluetooth -enabledterminal devicesimultaneously(multipoint).
- Firstconnecttheearphoneswiththefirstterminaldeviceas describedin5.1.
T hendisableBluetooth onthatterimaldevice. - N ext,connecttheearphoneswiththesecondterminaldevice asdescribedin5.1.
- A citateBluetooth onthefirstterminaldeviceoncemore.The earphonesnowconnecttothatterminaldeviceautomatically.
5.4.Audiplayback

Note
Note that the functions described under 5.3. and 5.4. are only possible with an active Bluetooth connection.
- Y ourterminaldevicemustalsosupporttheindividual functions.
- For more information, please refer to the operating instructions of your terminal device.
- F unctionscanstillbecontrolleddirectlyviatheterminal device.
- Set the volume on your terminal device to a low level.
-
S witchchthontheearphoneswiththeMFbutton(5).Upon successful connection, a voice says, "Connected".
-
S tartaudiplaybackontheconnectedterminaldevice.
- Press Volume + (4) to increase the volume. There is an announcementwhenthemaximumvolumeisreached.
- Press Volume - (6) to reduce the volume.
- Press the MF button (5) to start or pause audio playback.
- Press and hold Jump forward one title (4) to skip to the nexttitle.
- Press and hold Jump backward one title (6) to skip to theprevioustitle.
5.5. VoiceAssistantfunction
TheVoiceAssistantisanintegrated,interactivefunctionthat enablesyoutostartcommunicationwithyourSiriorGoogle Assistant at the press of a button. This function enables you toaskquestionsandgetvariousformsofhelpfromyour voiceassistant,evenifyouare n otholdingyourtelephonein yourhands.
Belowyouwillfindsomeexamplesselectedfromthelarge numberofpossibilities.
Note-Siri

SirisonlyavailableonsuitableterminaldeviceswithiOS5 orhigher(fromiPhone4sonwards).
Note-GoogleAssistant

- T heGoogleAssistantonlyavailableonsuitableterminal devices with Android 5.0 or higher, Google Play Services, >1.5 GB of free memory and a minimum screen resolutionof720P.
- The Google Assistant app must be available on your terminal device and set a default voice assistant.
PresstheMultifunctionbutton(5)whiletheheadsetis connectedviaBluetooth tostartcommunicationwithyourSirior GoogleAssistant. Assoonasyouhearanacousticsignal,your voiceassistantisreadytohelpyou.
-Example1:
PresstheMultifunctionbutton(5)untilyouhearancousticsignalandthevoiceassistantisstarted.Assoonas the voice assistant is ready, you will hear a secondsignal.Thenspeakintoyourheadset,forexample:'What'stheweatherliketoday?'Thevoiceassistanttwillanswerasfollows,forexample:'Mainlycloudywithsomeshowers'
Example2:
PresstheMultifunctionbutton(5)untilyouhearan acousticsignalandthevoiceassistantistarted.Assoonasthe voice assistant is ready, you will hear a second signal. Thenspeakintoyourheadset,forexample:'Whattweis it?'Thevoiceassistanttwillanswerasfollows,forexample: 'Itis8 p m'
- Other examples: Set an alarm for tomorrow at 7 am. Playmusic. What's in thenews?
5.6.Hands-freefunction
- Press the MF button (5) once to answer an incoming call.
- Press the MF button(5) twice or use your telephone to reject anincomingcall.
During a call, press the MF button (5) once to end the call. - Press the MF button (5) twice to call the number of the last call.
Note-Callquality

To increase the call quality, make sure that you are near the earphoneswithyourmobilephoneduringthecall.
5.7.Disconnectingthearphones
- S witchofftheearphones.
- D isconnectttheearphonesviatheBluetooth 念 settingsyouterminaldevice.
5.8.Batterycapacity
- An announcement is made and the display flashes in red when the battery is low
C hargetheearphonesasdescribedin4.Gettingstarted.
6.CareandMaintenance
Onlycleanthisproductwitha s lightlydamp,lint-freeclothanddonotuseaggressivecleaningagents.Makesure t hatwaterdoesnotgetintotheproduct.
7.WarrantyDisclaimer
Hama GmbH & Co KG assumes no liability and provides no warranty for damages resulting from improper installation/ mounting, improper use of the product from failure to observethe operating instructions and/or safety notes.
8. Service and Support
PleasecontactHamaProductConsultingifyouhaveany questionsaboutthisproduct.
Hotline: +499091502-0 (German/English)
Furthersupportinformationcanbefoundhere: www.hama.com
9. Recycling Information
Noteonenvironmentalprotection:
AftertheimplementationoftheEuropeanDirective 2012/19/EUand2006/66/EUnthenationallegal system, the following applies: Electric and electronic devices as well as batteries must not be disposed of with household waste. Consumers are
obligedbylawtoreturnelectrcaleandecronicdevicessaswell asbatteriesattheendoftheirservicelivestothepublic collectingpointsetupforthispurposeorpointofsale.Details to this are defined by the national law of the respective country. Thissymbolontheproduct, theinstructionmanualorthe package indicates that a product is subject to these regulations.
Byrecycling,reusingthematerialsorotherformsofutilisingold devices/Batteries,youare makinganimportantcontributionto protectingourenvironment.
10.DeclarationofConformity

Hereby, Hama GmbH & Co KG declares that the radioequipmenttype[ 00132644/00132645/ 00132646/00132647] is in compliancewith
Directive2014/53/EU. The fulltextoftheEU declaration of conformityisavailableatthefollowinginternetaddress: www.hama.com->00132644/00132645/00132646/00132647 ->Downloads.
| Frequencyband(s)2402MHz- 2 4 8 0 M H z | |
| Maximumradio-frequency powertransmitted | 3.5mWEIRP |
F Moded'emploi
9. Pokynyk likvidaci
Ochranaživotnihoprostřédi:

Hotline:+499091502-0(ty/eng)
Duhittarmersupport-informationhar:
www.hama.com
The Bluetooth® word mark and logos are registered trademarks owned by the Bluetooth SIG, Inc. and any use of such marks by Hama GmbH & Co KG is under license. Other trademarks and trade names are those of their respective owners.
Thomson is a trademark of Technicolor (S.A.) or its affiliates used under license by HAMA GmbH & Co KG in 86652 Monheim / Germany
83534
www.thomson-av-accessories.eu

WEAR7009 / 00132644_47