110207 - Food thermometer Xavax - Free user manual and instructions
Find the device manual for free 110207 Xavax in PDF.
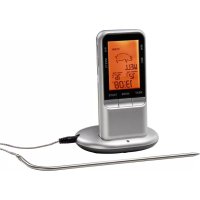
| Product Type | Wireless Digital Cooking Thermometer |
| Brand | Xavax |
| Model | 110207 |
| Power Supply | 4 LR03/AAA 1.5 V batteries |
| Wireless Range | Approximately 8 m |
| Measuring Range | -20 °C to 250 °C (-4 °F to 482 °F) |
| Measurement Accuracy | ±1 °C |
| Radio Frequency | 433.93 MHz |
| Number of Probes Included | 2 stainless steel cable probes (resistant up to 250 °C) |
| Main Functions | Meat presets (8 types), 5 doneness levels, timer (99 min 59 s), stopwatch, temperature alarm |
| Display | Current temperature, target temperature, meat type, timer/stopwatch |
| Units | °C / °F (switchable) |
| Cleaning | Probes: water and mild detergent. Do not immerse sensor and cable. Housing and base station: damp cloth only. |
| Safety | Do not place housing in oven. Hot probe: use oven mitts. Not waterproof. Keep out of reach of children. |
| Warranty | Warranty excluded in case of improper use or failure to follow instructions. |
| Package Contents | Thermometer, base station, 2 cable probes, 4 AAA batteries, instruction manual |
Frequently Asked Questions - 110207 Xavax
User questions about 110207 Xavax
0 question about this device. Answer the ones you know or ask your own.
Ask a new question about this device
Download the instructions for your Food thermometer in PDF format for free! Find your manual 110207 - Xavax and take your electronic device back in hand. On this page are published all the documents necessary for the use of your device. 110207 by Xavax.
USER MANUAL 110207 Xavax
natural_image
Vertical column of evenly spaced black rectangular blocks (no text or symbols)
text_image
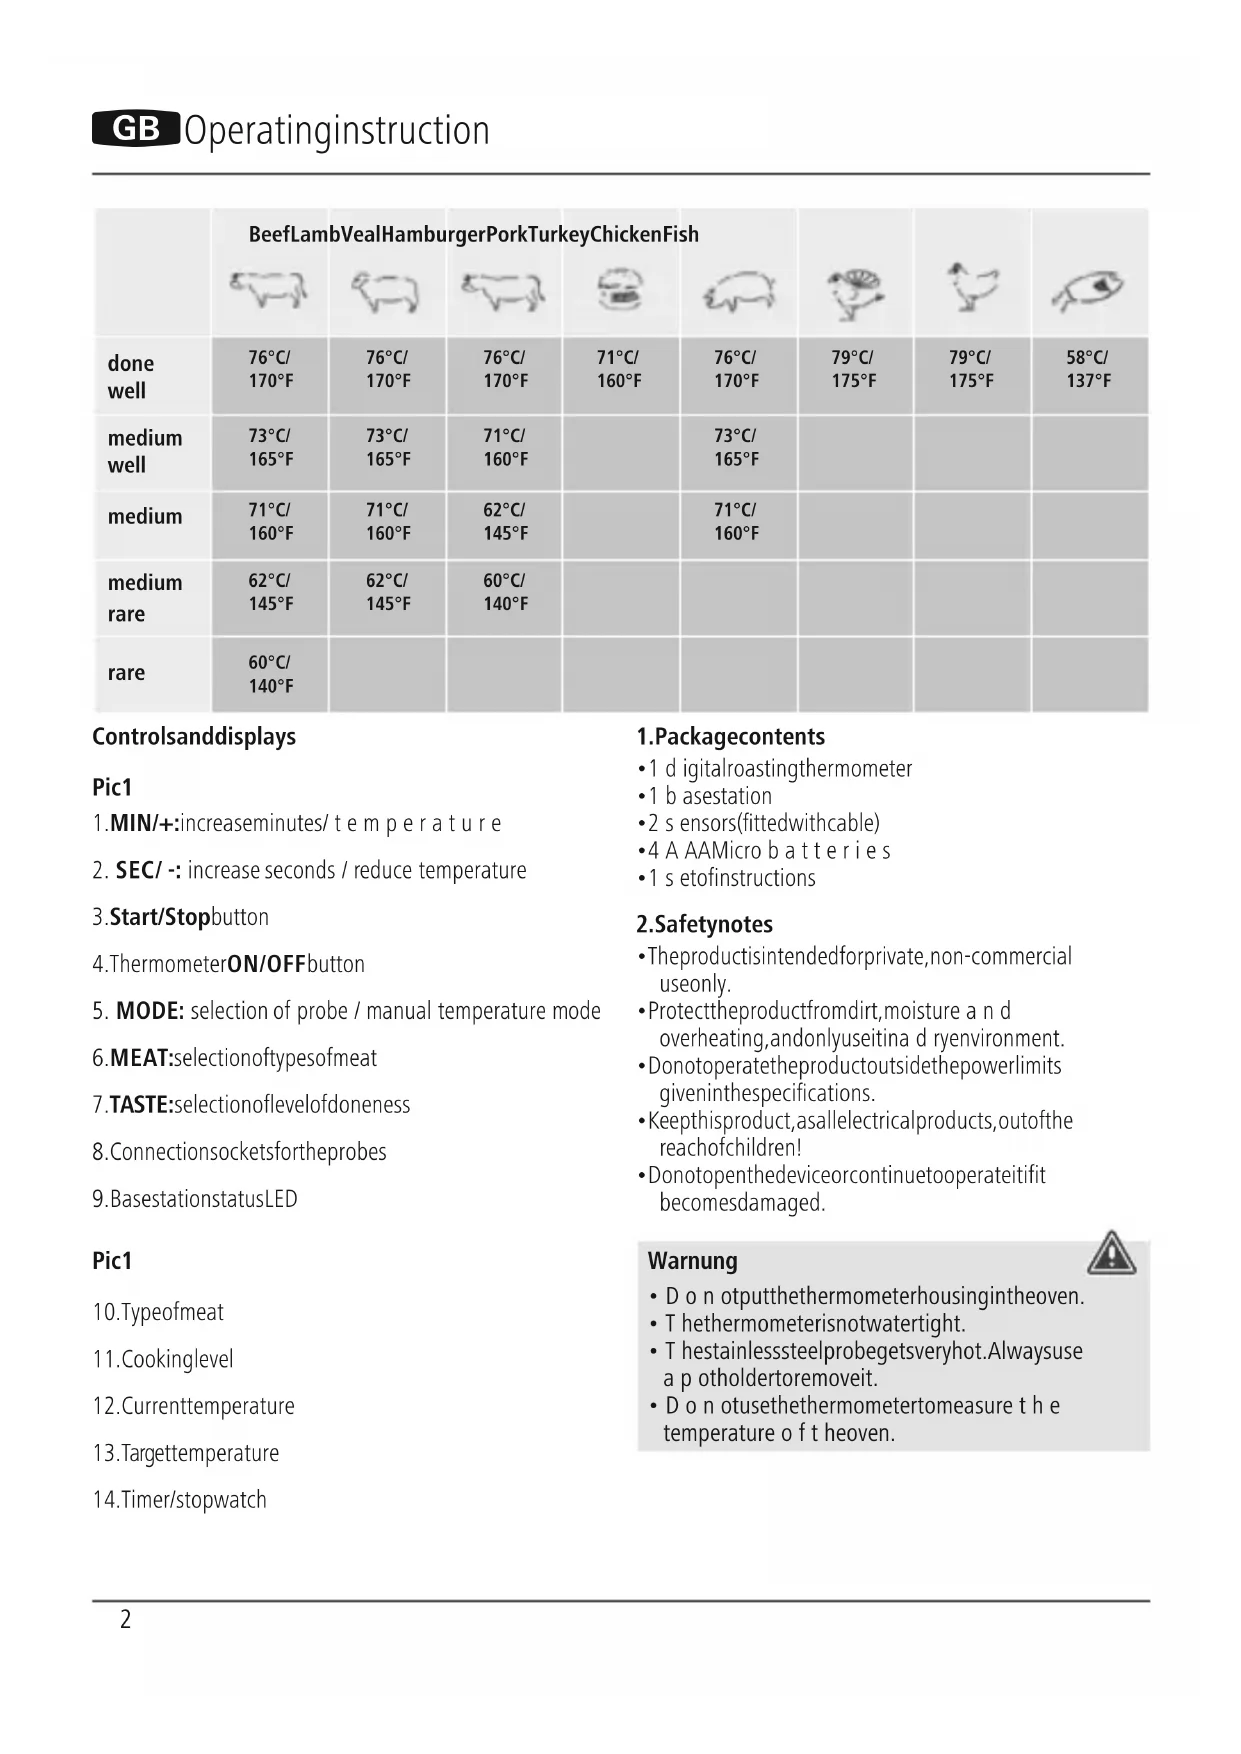
101 12 LAMB DONE WELL PROBE1 TEMP 25°C SET 76°C 13 PROBE1 TEMP 25°C DONE WELL TIMER 0:00 9 MODE MEAT TASTE 1 2 3 4 5 6 7 8| BeefLambVeaHamburgerPorkTurkeyChickenFish | ||||||||
 |  |  |  |  |  |  |  | |
| done well | 76°C/170°F | 76°C/170°F | 76°C/170°F | 71°C/160°F | 76°C/170°F | 79°C/175°F | 79°C/175°F | 58°C/137°F |
| medium well | 73°C/165°F | 73°C/165°F | 71°C/160°F | 73°C/165°F | ||||
| medium | 71°C/160°F | 71°C/160°F | 62°C/145°F | 71°C/160°F | ||||
| medium rare | 62°C/145°F | 62°C/145°F | 60°C/140°F | |||||
| rare | 60°C/140°F | |||||||
Controlsanddisplays
Pic1
- MIN/+: increase minutes/ temperature
- SEC/ -: increase seconds / reduce temperature
- Start/Stopbutton
- ThermometerON/OFFbutton
- MODE: selection of probe / manual temperature mode
6.MEAT:selectionoftypesofmeat - TASTE: selectionoflevelofdoneness
- Connection sockets for the probes
- BasestationstatusLED
Pic1
10.Typeofmeat
11. Cookinglevel
12. Currenttemperature
13. Targettemperature
14. Timer/stopwatch
1.Packagecontents
• 1 digitalroastingthermometer
• 1 b asestation
- 2 sensors(fittedwithcable)
•4 A AAMicro batteries
- 1 setofinstructions
2. Safetynotes
• The product is intended for private, non-commercial use only.
- Protect the product from dirt, moisture and overheating, and only use it in dry environment.
- Donotoperatetheproductoutsidethepowerlimits giveninthespecifications.
- Keep this product, as all electrical products, out of the reach of children!
- Donotopenthedeviceorcontinuetooperateitifit becomesdamaged.
Warnung

- Don oputthethermometerhousingintheoven.
• Thethermometerisnotwatertight. - T hestainlesssteelprobegetsveryhot.Alwaysuse a p otholdertoremoveit.
- Do notusethethermometertomeasure the temperature of the heaven.
Warning-batteries

- Onlyusebatteries(orrechargeablebatteries)that matchthespecifiedtype.
- W heninsertingbatteries, notethecorrectpolarity (+and-m markings) and insertthebatteries accordingly. Failure to do so could result in the batteries leakingorexploding.
- Keep b atteriesoutofthereachofchildren.
- N everopen,damageorswallowbatteriesorallow themtoentertheenvironment.Theycancontain toxic,environmentallyunfriendlyheavymetals.
- Don ottamperwithordamage/heat/disassemble thebatteries/rechargeablebatteries.
- I mmediately remove and dispose of dead batteries from the product.
- Don otshortcircuitthebatteries/rechargeable batteriesandkeepthemawayfromuncoated metalobjects.
3. Gettingstarted
- Clean the probes with a mild cleaning agent under runningwaterbefore s tartingupthedevice.
- Openthebatterycompartmentsontherearofthe basestationandthermometer, a ndinsertthesupplied AAAbatterieswiththecorrectpolarity. C losethe batterycompartmentsproperly.
- Thethermometerbeepsoncethebatterieshavebeen insertedandisimmediatelyon.Switchthebasestation onbysettingtheON/OFFbuttonontheunderside toON.ThebasestationLEDconstantlyflashesred, indicatingthattemperature d atacanbereceived.
- Inserttheconnectionplugsofthetwoprobesintothe 'P1' and 'P2' socketsonthebasestation. Alternatively, youcanpluginonlyoneprobe.
Note

If you switch on themeat thermometer without connecting the probes, -····^ appears in the display.
4.Operation
4.1 Switching ON/OFF

- To switch on the thermometer, press the ON/OFF button; the device beepsonce. To switch off the thermometer, press and hold the ON/OFF button for approximately 3 seconds.
- To switch on the base station, set the ON/OFF button on the underside to ON. To switch it off, set the ON/OFF buttontoOFF.
4.2 Directionsforuse
- Prepare the meat or fish. You can either use preset cookingtimesorsetyourowncookingtimeor temperature.
- Insert the probe at least 2 cm into the thickest part of the food. Only the probe and the cable can withstand temperatures of upto 250°C.
- Carefullyguidethecableoutoftheoven. Theoven sealingstripwilladjusttoit.
Warning

Keepthebasestationandthermometerawayfrom thesourceofheat.Donotusethedeviceinthe microwave.Donotallowanypartoftheprobeto comeintocontactwithanopenflame;mayonlybe usedforovensandgrills.
5.Settings
5.1SelectionofProbe1 a ndProbe2
- Press MODE to select between Probe 1 and Probe 2, inordertomakesettingsforeachprobe.
• ▶ PROBE 1: Probe 1 (P1 on the base station)
• PROBE 1: Probe 2 (P2 on the base station)
5.2Selectionofpresettypesofmeat/cookingprogrammes
- PressMEATtoselectbetweenvarioustypesofmeat. Eachtimeyoupressthebutton,thetypeofmeat changesinthegivenorder:
- Hamburger – Lamb – Fish – Veal – Beef – Turkey – Chicken– Pork
- Use TASTE to select the desired level of doneness. The following levels are available: Well Done – Medium Well – Medium – Medium Rare – Rare.
• Each time you press the button, the displayed cooking level changes. The target temperature is set automatically based on the cooking level and type of meat selected. - Analarmsignalwillsoundwhenthesettemperature isreached.StopthealarmbypassingtheStart/Stop button.
Note
Duetopotentialrisktohealth, not all cooking levels are a vailableforeverytype of meat.
5.3 Setting the temperature manually
- PressandholdtheMODEbuttonforapproximately3 seconds. The target temperature begins to flash.
-
NowpresstheMINbuttontoincrease the temperature,ortheSECbuttontoreduceit.
-
When the desired temperature is reached, press MODEonceagain,inordertosavethevalue.
- An alarm signal will sound when the set temperature is reached. StopthealarmbypassingtheStart/Stopbutton.
Note
PressandholdtheMINorSECbuttontochangethe temperature q quickly.

5.4Timer
- Press the MIN and SEC buttons to set the desired time (maximumsettingof99minutesand59seconds).
- PresstheStart/Stopbuttontostartthecountdown.As soonasthecountdownreacheszero,analarmsounds.
- Stop the alarm by pressing the Start/Stop button.
- Press the MIN and SEC buttons at the same time to resetthetimertozero.
5.5Stopwatch
- PresstheStart/Stopbuttontostartthestopwatch.
- Tostophetime, presstheStart/Stopbuttonagain.
- Press the MIN and SEC buttons at the same time to resetthestopwatchtozero.
Press and hold the MEAT button for approximately 2 secondstoswitchbetweentheunitsoftemperature °C and°F.
6.Cleaning
- Cleanthestainlesssteelprobewithwateranda mild cleaningagentaftereachuse.
- Donotsubmergethesensorandcableinwater.
- Only use a damp cloth to clean the cable, thermometer and basestation.
- Notsuitablefordishwashers.
7.WarrantyDisclaimer
HamaGmbH& C o K G a ssumesnoliabilityandprovides nowarrantyfordamageresultingfromimproper installation/mounting,improperuseoftheproductor from failure to observe the operating instructions and/orsafetynotes.
8.Technicaldata
Powersupply4x1,5VAAAbatteries
Rangeapprox.8m
Measuring range
-20^ - 250^, 4^ - 482^
Measuring accuracy
+/-1°C
Frequencyband433.93MHz
Max.emitted transmitting power
10dBm(i.e.10mW)
9. Recycling Information
Noteonenvironmentalprotection:

AftertheimplementationoftheEuropean Directive2012/19/EUand2006/66/EUinthe nationallegalsystem,thefollowingapplies: Electricandelectronicdevicesaswellas batteriesmustnotbedisposedofwith
householdwaste. Consumers are obliged by law to return electrical and electronic devices as well as batteries at the end of their service to the public collecting points setup forth this purpose or point of sale. Details to this are defined by the national law of the respective country. This symbol on the product, the instruction manual or the package indicates that a product is subject to the regulations. By recycling, reusing thematerials or other forms of utilising old devices/Batteries, you are making an important contribution to protecting our environment.
10. Declaration of Conformity

Hereby, Hama GmbH & Co KG declares that theradioequipmenttype[00110207]isin compliancewithDirective2014/53/EU. Thefull
textoftheEUdeclarationofconformityisavailableatthe followinginternetaddress:
www.xavax.eu->00110207->Downloads.
| RindLammKalbHamburgerSchweinTruthahnHühnchenFisch | ||||||||
 |  |  |  |  |  |  | ||
| done well | 76°C/170°F | 76°C/170°F | 76°C/170°F | 71°C/160°F | 76°C/170°F | 79°C/175°F | 79°C/175°F | 58°C/137°F |
| well medium | 73°C/165°F | 73°C/165°F | 71°C/160°F | 73°C/165°F | ||||
| medium | 71°C/160°F | 71°C/160°F | 62°C/145°F | 71°C/160°F | ||||
| medium rare | 62°C/145°F | 62°C/145°F | 60°C/140°F | |||||
| rare | 60°C/140°F | |||||||
9. Pokynyk likvidaci
86652Monheim/Germany
+499091502-0
www.xavax.eu
Service& Support

www.hama.com

+499091502-115