111971 - Thermostat Xavax - Free user manual and instructions
Find the device manual for free 111971 Xavax in PDF.
| Product type | Programmable wireless radiator thermostat |
| Brand | Xavax |
| Model | 111971 |
| Power supply | 2 AA (Mignon) batteries - rechargeable batteries not allowed |
| Temperature range | Comfort: adjustable (factory 21 °C), Economy: adjustable (factory 16 °C), Frost protection: 6-8 °C |
| Connectivity | Bluetooth - free Xavax app (iOS/Android) |
| Scheduling | Up to 4 heating periods and 4 economy periods per day, individually or in blocks |
| Special functions | Automatic valve adaptation, window function, holiday function, child lock, manual mode, automatic mode, frost protection, anti-limescale protection, temperature offset, timer function |
| Display | Screen with icons for heating, economy, protection, etc. |
| Supplied adapters | Danfoss RA, RAV, RAVL + coupling ring + pin for RAV |
| Valve compatibility | Heimeier, Junkers, Landys+Gyr, MNG, Honeywell, Braukmann (M30x1.5 thread) and others via adapters |
| Cleaning | Dry or slightly damp cloth, without chemicals |
| Safety | Keep out of reach of children, do not open, observe battery polarity, recycle used batteries |
| Repairability | No user-serviceable parts - in case of defect, contact Hama customer service |
| Usage | Indoor, dry rooms, domestic non-commercial use |
Frequently Asked Questions - 111971 Xavax
User questions about 111971 Xavax
0 question about this device. Answer the ones you know or ask your own.
Ask a new question about this device
Download the instructions for your Thermostat in PDF format for free! Find your manual 111971 - Xavax and take your electronic device back in hand. On this page are published all the documents necessary for the use of your device. 111971 by Xavax.
USER MANUAL 111971 Xavax
Operating Instructions
Please read these operating instructions before installing the energy-saving controller. Keep these documents for future reference and pass them on you give the device to someone else.
Extent of delivery
- Wireless Radiator Controller/Timer
- Set of operating instructions
- Coupling ring
- Adapters (Danfoss RA, Danfoss RAV, Danfoss RAVL)
Safety instructions
- The product is intended for indoor use only.
- The product is intended for private, non-commercial use only.
- Protect the product from dirt, moisture and overheating, and only use it in a dry environm
- U se the product for its intended purpose only.
- Do not drop the product and do not expose any major shocks.
- Keep this product, as all electrical products, o the reach of children!
- Do not modify the product in any way. Doing voids the warranty.
- Do not open the device or continue to operate it becomes damaged.
- D ispose of packaging material immediately according to locally applicable regulations.

Warning
- Immediately remove and dispose of dead batteries from the product.
- Only use batteries (or rechargeable batteries) that match the specified type.
- When inserting batteries, note the correct polarity (+ and - markings) and insert the batteries accordingly. Failure to do so could result in the batteries leaking or exploding.
- Do not mix old and new batteries or batte of a different type or make
- Do not attempt to charge non-rechargeable batteries, as they may explode.
-
Keep batteries out of the reach of children.
-
D o not short circuit the batteries/rechargeable batteries and keep them away from uncoated metal objects.
- N ever open, damage or swallow batteries or allow them to enter the environment. They can contain toxic, environmentally unfriendly heavy metals.
- Remove the batteries from products that are not being used for an extended period (unless these are being kept ready for an emergency).
Proper use
The Wireless Radiator Controller/Timer is a programmable radiator controller that can be used to regulate the temperature in closed rooms and thereby reduce the consumption of heating energy. Please use Wireless Radiator Controller / Timer only for this purpose. You can program and control Wireless Radiator Controller/Timer manually using the control buttons or conveniently via Bluetooth.
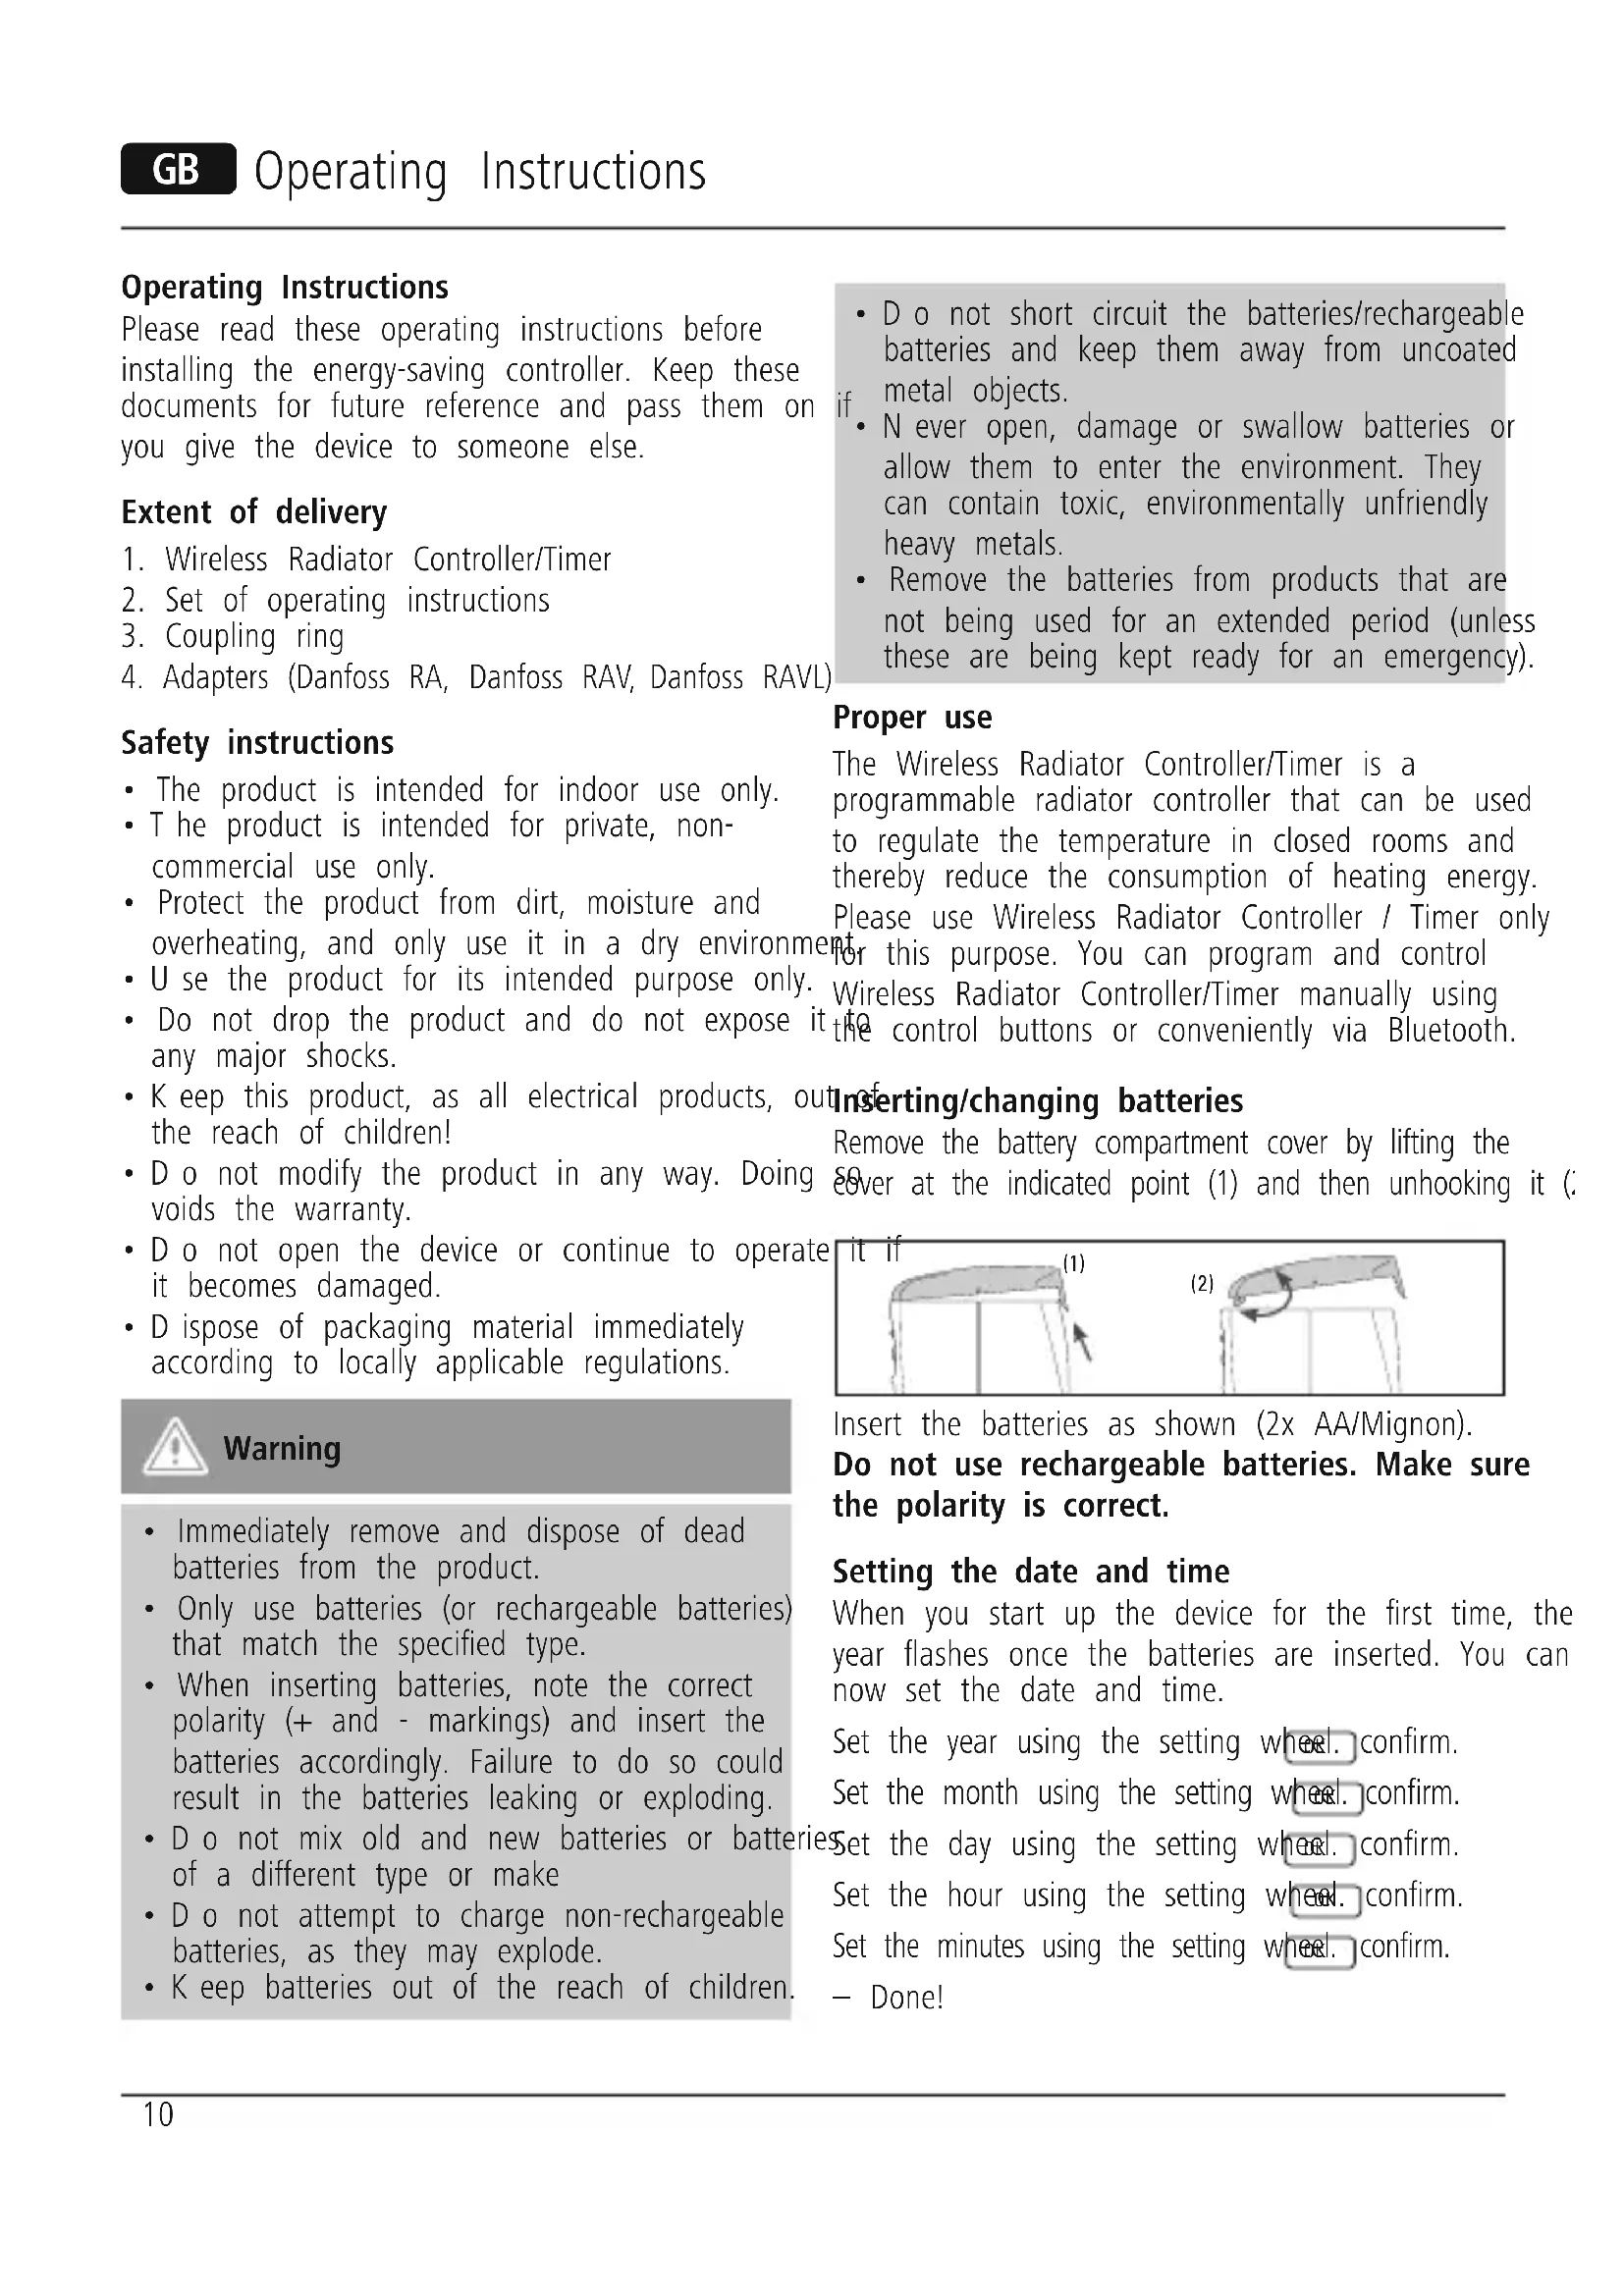
Inserting/changing batteries
Remove the battery compartment cover by lifting the over at the indicated point (1) and then unhooking it.
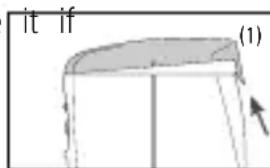
Insert the batteries as shown (2x AA/Mignon).
Do not use rechargeable batteries. Make sure the polarity is correct.
Setting the date and time
When you start up the device for the first time, the year flashes once the batteries are inserted. You can now set the date and time.
Set the year using the setting wheel.confirm. Set the month using the setting wheel.confirm.
Set the day using the setting wheel. confirm. Set the hour using the setting wheel. confirm. Set the minutes using the setting wheel. confirm. - Done!
PREP appears on the display The motor now fully starts up to make installation easier (appears on the display once the Radiator Controller is ready for installation INST can be selected from the menu at any time). Please do not push any other buttons. Mount the device on the coupling ring. → Installation.
The Wireless Radiator Controller/Timer automatically ce changes over to summer and winter time. You canth also set the date and time at a later point using the
TIME menu item. However, the Radiator Controller will not enter the installation position afterwards. The saved schedule is retained when the batteries Valve - coupling ring Valve - adapter, coupling ring

are changed. You may need to check the time.
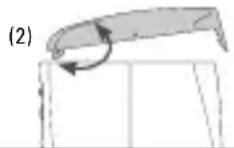
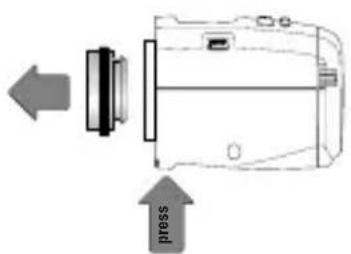
Installation
The Wireless Radiator Controller /Timer can be installed on all familiar valve bases (see adapter without difficulty. There are no messes and no sp because the hot water circuit is not broken.
- Fully open old thermostat head, unscrew fastene1. Operation via Bluetooth
and remove from valve.
2. Choose a suitable adapter, if necessary, and it on the valve.
3. Screw the coupling ring onto the valve or a
4. Gently press the Radiator Controller onto the coupling piece until you hear a click.
WARNING: You must mount the Wireless Radiator Controller/Timer without applying excessive force; ensure that the device is in the "ON" or "ON" position.
If you install the device at a later time, set it to INST in the menu before installation. Only install the device in this position
Adaptation
Initial installation: Press OK until ADAP appears so that the Radiator Controller can start the adaptation process. The device now adapts to the stroke of your valve base. To do so, the device operates and closes the valve multiple times to learn the end points. This process may take several minutes under certain circumstances. After successful adaptation, the Radiator Controller switches to normal operation.
If you need to perform the adaptation process again, e.g. because the radiator is not cold in the OFF position, navigate to the menu and wait until adaptation starts against.
If the error appears on the display, place the Radiator Controller on the radiator valve and briefly remove the batteries to perform a reset.
You have two options for setting your energy-saving controller. If you wish to set the Radiator Controller via your smartphone or tablet, begin reading under item 1. Operation via Bluetooth. If you wish to set the Radiator Controller manually, begin reading
under item 2. Manual Operation via the Control Buttons.
et. Operation via Bluetooth
Download the free Xavax app from the App Store (iOS) or the Google Play Store (Android) onto your smartphone or tablet. Activate the Bluetooth function
your smartphone or tablet using the settings menu.

Open the app once you have installed it on your smartphone or tablet. Select the The Wireless Radiator Controller/Timer device from the start screen.
Setting room profiles
Tap the menu button to add a room. Assign a name to the room in the appropriate box and confirm your entry with OK. Select the room you created and then tap the menu but again to add a device.

- Select "Connect". Tap "Connect" to search for the device. If a device is found, "New Radiator" appears on the display.
Select this device. During initial start-up, you must enter a PIN. The PIN is 000 000. To keep your equipment apart, rename the devices under the field "Title".
You can use the menu to change the PIN at any time to keep your devices separate.
You can also end the process using "Cancel" or the set-up in "Offline mode".
CAUTION! The device adopts the time from the smartphone/tablet.
Setting the comfort and energy-saving temperatures
You can easily set the desired comfort and energy saving temperatures in the corresponding boxes using the arrows on the right edge.
Setting the offset temperature
Since the temperature is measured at the radiator, it may differ at other locations in the room. You set an offset to compensate for this. For example, you measure 19^ instead of the set 21^ , set offset to 2^
Current temperature
The current room temperature is displayed in the
Schedule type
You can program each day individually or set them in blocks.
Individual comfort times
ON - Each day (Mo-Su) receives an individual heating/energy-saving profile.
OFF - The weekdays (Mo-Fr) and the weekends Su) receive different heating/energy-saving profiles.
Comfort times per day
ON - 4 heating times and 4 energy-saving times can be programmed per day.
OFF - 2 heating times and 2 energy-saving times can be programmed per day.
Child protection
ON - Child protection active
OFF - Child protection inactive
Setting comfort times
You can now begin programming the days or blocks, depending on which schedule type you selected. Tap the "Start time 1" box and select the time at which you wish your radiator to heat up. For example: 6:0 AM. Then tap the "End time 1" box and enter the time at which you wish your radiator to switch back to energy-saving mode.
Holiday function
- You can enter your holidays in advance. The energy-saving controller will set the temperature to your specified value during this time. You can create up to six holiday profiles. To specify the date and time for the start of your holiday, tap the right arrow an select the appropriate time and date, then specify the end of your holiday. Finally, set the desired temperature for the duration of your holiday.
Saving room profiles
To save your room profiles, tap "Profile" in the upper right on Apple devices or tap the menu button on Android devices.
Transmitting room profiles
Once you have finished programming your room profiles, transmit them to the controller by tapping "Finished" on Apple devices or the menu button on Android devices. The profile is now automatically transmitted to the device. An overview of the room profile you created is now displayed, complete with Saame, temperature and heating time.
Editing and deleting room profiles
To edit your room profiles, tap "Edit" in the upperThe MENU button takes you to the settings menu. right on Apple devices or tap the menu button onYou can select the various items using the setting Android devices. You can also delete the entire wheel. Press OK to select a menu item; you can profile here. change the value using the setting wheel.
2. Manual Operation via the Control Buttons
Setting the date and time
When you start up the device for the first time, the year flashes once the batteries are inserted. You can now set the date and time.
Set the year using the setting wheel.confirm.
Set the month using the setting wheel. confirm.
Set the day using the setting wheel. confirm.
Set the hour using the setting wheel. confirm
Set the minutes using the setting wheel. confirm
Controls and displays
1 Heating times
2 Child protection active
3 Batteries dead
4.a Holiday function active
4.b Comfort temperature active
4.c Energy-saving temperature active
4.d Window/frost protection function active
5 AUTO or MANU mode active
6.a MENU - button - takes you to the main men (starting from the default screen); within the menu, pressing this button takes you one step back in the menu
6.b OK - button - confirm settings
6.c -button - timer function
7 Setting wheel
Settings menu
rThe MENU button takes you to the settings menu. You can select the various items using the setting wheel. Press OK to select a menu item; you can change the value using the setting wheel.
OK confirms your entry, and menu takes you one step back in the menu.
MODE
Select mode
AUTO = automatic mode
MANU = manual mode
Create a schedule
Set the comfort and energy-saving temperatures
Set the date and time
Window function
Reset the device to factory settings Start a new valve adaptation proce Holiday function
Installation function (please place the controller on the coupling ring only when in this position)
Adjust temperature according to local conditions Version
OFF5
VERS
Basic operating modes
MANU mode
In MANU mode, the Radiator Controller regulates the temperature to the manually selected value.
AUTO mode
In AUTO mode, the Wireless Radiator Controller/Timer switches between two temperatures according to the set schedule:
comfort temperature (factory setting: 21^ energy-saving temperature (factory setting: 16^
You can freely set the heating and energy-saving times within the schedule. A maximum of 8 switching points (4 heating times and 4 energy-saving times) can be set per day.
The Wireless Radiator Controller/Timer is delivered with the following factory settings:
Heating time:
Heat to comfort temperature
(factory setting:1st heating time at 7:00 AM)
Energy-saving time:
Reduce to energy-saving temperature
(factory setting: 1st energy-saving time at 10:00
Setting heating and energy-saving times
With the Wireless Radiator Controller/Timer, you can set 4 heating times and 4 energy-saving times per day - for each day individually or for multiple days in a block.
DAY1 to DAY7 represent the days of the week from Monday to Sunday. The corresponding days are also displayed as abbreviations below the bar on the display.
Blocking:
D1-5 = same schedule Monday to Friday
D1-6 = same schedule Monday to Saturday
D1-7 = same schedule Monday to Sunday
For days that are not programmed, the factory settings remain in effect.
Setting an individual schedule:
Press MENU. Selecting the setting wheel.
Press OK . Appears on the display for
Monday. Select day/block using the setting wheel.
- Confirm with OK. Use the setting wheel to set the start of the 1st heating time (Symbol). Confirm
with OK. Use the setting wheel to set the start of the 1st energy-saving time (symbol) Confirm
with OK. You can now enter a 2nd, 3rd and 4th heating/energy-saving time if desired.
If you do not wish to set any further heating/ energy-saving times, confirm the display with 0K . The next day to be programmed appears on the display.
If you do not wish to set any further days, exit the menu using When the temperature appears on the display, this means that programming is complete.
You can also overwrite individual days within a block to assign different times.
Setting the comfort and energy-saving temperatures
Press MENU. Select the menu item using the setting wheel. Confirm with OK
Set the comfort temperature using the setting wheel. Confirm with OK. Set the energy-saving temperature using the setting wheel. Confirm with OK
M Range OFF ^ C frost protection function active Range ON valve fully open
Tip: You can achieve maximum energy savings by selecting an energy-saving temperature that is approx. 5^ below the comfort temperature.
Manual operation
You can change the room temperature at any time using the setting wheel. In AUTO mode, this remains in effect until the next switching point. The Radiator Controller then switches back to the set schedule.
Additional Functions
Timer function
You can access the timer function using the timer button This function lets you set the temperature for a desired time period. This can be useful during a party, for example. Press The display shows the time for which the schedule is to be temporarily deactivated. Confirm with. You can now set the desired temperature. Confirm with OK You can then not manually change the temperature during the selected time period; the setting wheel is locked. You can unlock the wheel by pressing the menu button.
Offset
If the temperature in an area of the room differs from can lock the Wireless Radiator Controller/ Timer the set temperature, you can perform a temperature to prevent unauthorized operation. To do so, press offset. Press MENU. Select the menu item and hold OK + simultaneously for approx. using the setting wheel. Confirm with 2 sec. until the symbol flashes on the display. The degree setting flashes on the display. Holding this combination again causes the symbol to Now set the desired temperature offset (from -5 to disappear and removes the lock. +5^ ) using the setting wheel. Press. The temperature shown on the display does not change. Pause heating/close valve
Window function
If you open a window, causing the temperature towheel to set the temperature on the display to drop rapidly, the Wireless Radiator Controller/Timer MANU The valve is now closed and operates without automatically closes the heating valve to save energy.schedule. The once-weekly limescale prevention * appears on the display. The Wireless Radiator function remains active. After the pause in heating, Controller/Timer resumes normal operation switch to AUTO mode in the menu to resume the afterwards. To set up this function, select schedule you have set.
Confirm with OK. First select the sensitivity using the setting wheel high high sensitivity, moderate sensitivity (default setting) = low sensitivity). Confirm with OK.
Now select the time (10 min (factory setting) -min) for which the valve should remain closed. Confirm with OK
Holiday function
You can specify a set temperature for the time you are away. The schedule you have set resumes after the holiday period. Press SELECT the HOLI menu item using the setting wheel. Confirm with OK. (The case symbol appears on the display.) Use the setting wheel to set the end time the holiday function = date for regular heating tin to resume). Confirm with OK. Then enter the time and confirm with OK flashes on the display. Now set the temperature and confirm with appears on the display. You can deactivate the function with MENU
All reset
Press MENU. Select the RES menu item using the setting wheel. Confirm with OK . OK flashes; confirm with OK . The Wireless Radiator Controller/Timer is now in back to the state in which it was delivered. Proceed as though you were starting up the device for the first time.
The frost protection and limescale prevention functions are automatically active:
Frost protection function
If the temperature falls below 6^ , the Wireless Radiator Controller/Timer opens the valve until the temperature climbs above 8^ . This prevents the
Limescale prevention function
To prevent limescale from forming in the radiator valves, the Wireless Radiator Controller/ Timer performs a limescale prevention run once per week (Friday morning).
Cleaning and Disposal of Devices
To clean the Wireless Radiator Controller/Timer, use only a dry or lightly damp cloth. Avoid chemi solvents, as these may damage the device.
Adapters
| Heimeier, Junkers Landys+Gyr, MNG, Honeywell Braukmann M30 x 1.5 thread | No adapter required |
| Danfoss RAV (included pin must be inserted into valve tappet) | + included pin, only for RAV |
| Danfoss RA | |
| Danfoss RAVL |
Please completely remove all connecting pieces on the plastic adapters before using any of the incluadapters.
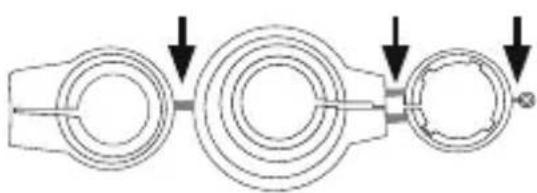
Completely remove the connecting rods marked in grey before installing the adapters.
Help
| Problem Ca cal | Use Solution | |
| Batteries nearly dead. | Replace the batteries. | |
| Radiator will not heat up. | Water temperature in boiler okay? Valve will not open after heat was off for the summer-limescale build-up? | Correct temperature of water in boiler. Disassemble the Radiator Controller. Move valve tapping back and forth multiple times b hand or with a tool. |
| Radiator will not cool down | Valve is not closing completely. The point where your valve seal closes may have shifted. | Carry out adaptation again (see "Adaptation"). Move valve tapping multiple times by hand - adaptation may not be possible because your valve may have limescale build-up or the seal may no longer be functioning. |
| Compress- sion piece fall out. (This can also cause an E1 error.) | Because the device has an endless screw, the compression piece on the bottom can fall out if the controller is not mounted on the valve. | Insert the compression piece. Start the adaptation process using the MENU item or by removing and reinserting the batteries. The endless screw rotates and tightens the compression piece again. Mount device on radiator and perform adaptation again. |
| E1-E3 | Pressing any button deletes the error show on the display and starts the adaptation process again. | |
| E1 | Adaptation not possible. The Wireless Radiator Controller/Timer not mounted on radiator. | Device correctly mounted on radiator? Mount the Wireless Radiator Controller/Timer. |
| E2 | Valve stroke too short or battery power too weak. | Open and close valve tap pet multiple times by hand or insert new batteries. |
| E3 | Valve will not move. | Can the valve tapping move freely? |
Disassembly
To disassemble the Wireless Radiator Controller/ Timer, set it to the position; to do so, move the setting wheel past the highest temperature of 28 until appears on the display. Wait for a moment and then press on the mechanism for unlocking the snap fastener. Remove the Radiator Controller from the valve.
Service and Support
Please contact Hama Product Consulting if you have any questions about this product. Hotline: +49 9091 502-115 (German/English) Further support information can be found here: www.xavax.eu
Declaration of Conformity
CE Hereby, Hama GmbH & Co. KG, declares that 00111971 is in compliance with the essential requirements and other relevant provisions of Directive 1999/5/EC. See www.xavax.eu for declaration of conformity according to R&TTE Directive 99/5/EC guidelines.
Recycling Information

After the implementation of the European Directive 2002/96/EU and 2006/66/EU in the national legal system, the following applies: Electric and electronic devices as well as batteries must not be disposed of with household waste. Consumers are by law to return electrical and electronic as well as batteries at the end of their service. The public collecting points set up for this or point of sale. Details to this are defined as national law of the respective country. This in the product, the instruction manual or the indicates that a product is subject to these laws. By recycling, reusing the materials or parts of utilising old devices/Batteries, you are an important contribution to our environment.
Mode d'emploi
Service et assistance
BHMaHHe: Pn yctaHObKe 6ecnpoBOJHO peryIaTopa HArpeBaTeJI He npImeHЯITE n36bIToCHyO cnly. CneIte 3a Tem, YTO6bl npN6bp HaxOdINcB INoIOXeHN "INST" uIN ON
→ PnnoCneIyUoIeM MoNTaXe nepei MOHTaXOM B MeHIO yCTaHOBInTe ,INST". UcTaHaBnBaIte npu6Op TOnbko B 3TOM NIOLOXKeHHN.
AdaanTaun
HaepBOHaJaIbHbIMoHTaX: HaxmMaIteOK DoTex nop, noka Ha dinCnIee He noBnT, nocIe Yero MOxHO npCTyNaTb K aAnTauuN 6ecnpoBoHoro peryIaTopa HArpeBaTeJI. Pnibop aAnTnpyETcK XOdy Kopnyca KlanaHa. Dna 3toro Klanah HeCKoJbKO pa3 OTkpbIbAetcN 3aKpbIbAEtCdIg NporpaMMnPOBaHnra COOTBeTCTByUOnx KOHeuHbIX NoIoxEHN. 3TO T pOceCC MoXeT 3aHrTaHbHeckoJbKO mHyT. Nocne ycneShOH aAnTauuN 6ecnpoBO-dHbI peryIaTop HArpeBaTeJI nePexOOnT B peXIM HopMaJIbHo pa60Tbl.
Ecnn Tpe6yetc noBtOpHa aAnTaun, Hnnpimep ecnn HaTpeBaTeIb B NoLoXeHn OFF He octbIbAeT, B MeHIO yCTaHOBNTe ADAP IJIa NaHauana NOBtOPhoAaTauuN.
→ Ecnn Ha nncnnee oTo6paxaetcna Own6ka E2, yctahOBNTe np6op Ha KlananH HargpeBaTeJn n3BleKeTne n3 HeTo 6atapEn nn nepe3a- rpy3Kn.
NДЯ NaCTPOnKn 6ecnpoBOJHOrO peYJrTopa HaRpeBATEJI NMeETcA DBe BO3MOxHocTn. EcIn Bbl XOTNTe HAcTPOINTb 6ecnpoBOJHbI peYJrTOp HArpeBaTeJI C NOMOuBIO cMapTOHa IIN NlaHWeTHORO KOMNbIoTEpa, npOHTne n. 1. YnpaBLeHne C NOMOuBIO Bluetooth. EcIn BBi XOTNTe NaCTPOnTB 6ecnpoBOJHbI peYJrTOp HaRpeBATEJI BpyHyU, npOHTne n. 2. PyHoe ynpaBLeHne c NOMOuBIO KHOJOK.
1. YnpabJIeHne c nOmoIbIo Bluetooth
3arpy3nte 6ecnnaThoe npinloXeHne Xavax B App Store (iOS) nnn Google Play Store (Android) Ha cMaprfoh nn nlaanuHTbI KOMnbIOTepe. AktnBnpuyte fynKcNIO Bluetooth B MeHIO hAcTpoek cMaprfoHa nn nlaanuTeHO KOMnbIOTepa.

Iocne yctaHOBN npINOxHnHa cMapTFOH nIN pNaHsEThbIKOMNbIOTe 3anyCTnte erO. Ha CTapTOBOn CtpaHnue Bbl6epnte «PeryJrTop HarpeBaTeJIa>.
yctpoiCTBO «PeryIaTOp HarpeBaTeIa>.
HacrpoKa npoФnIe nome- uen
HaxMnte KhoNky MeHIO, yTo6bI
do6aBnTb NOMEuEHe. B COOTBeTCTByIOUeM NOJIe BBeINTe Ha3BaHne
NOMeUeHn I NOITBepDInTe C
POMOsbIO KHOKN OK. BbI6epNTe
NOMeUeHn E CHOBA HaxMnte
KHOKNy MeHIO, yTo6bI Do6aBnTb
ycTroPOINCTBO.

Bb6epnte nyHKT «CoeDnHeHne»
Connect) Haxmte KhoNky «CoeHnHTb» (Connect) nnonka yctpoCTBa. Ecn npnbop haJeH, ha dinCnlee noBJIeTc coo6uHne «Hobbl peyIaTOp HarpeBaTeJra'. (New Radiator) BbIbepnte erO.
Pn nepBOM BBOe B 3KcNpyataun 3anpaunBaetc PIN-KoD. BBeDnte 000 000.
Дя pa3иченя устpoьтВ npncBOITE NM Ha3BaHЯ B noJe «Ha3BaHne».
Kpome Toro, onepauno MoXHo npepBaTb c nomOu KOMaHdbI «OTMeHa» (Cancel) nn 3anycnttb NaCTpoKy B «ABTOHOMHom pexime» (Mode offline) (6e3 noDKJIIOUeHnK yCTpoNCTBy).
BhimaHne! Bpemnpehocntc co cmapToHa / nlaHweTHoro KOMNbIOTepa.
HacpoKa KOMΦopTHoN n 3Heproc6eperaio- uen Temnepaotypbl
KoMΦopTHyO n ΘeHeproc6eperaUsoyU TemnepaTyPy MoXHO HaCTpOHTb B COOTBeTcTBHyOuNX NOLx C NOMOsbIO CTpeIOK y npaBOrO KpaJ.
Hactpoika koppekun TemnepaTpybI
IockoJIbky Tempeatypa n3MepaETcB 6bln3n HarpE-MoxHo 3aDaTb MaKcImyM WeCTb NepnoOob OTnycka. BATEJ, OHa MoXeT OTnUaTbcB B DpyrNx MeCTax PnJa HAcTPOKn DaTb N BpeMeH NaHaJa OTnycka Ha MeueHna. IyI ee KOMpeHcaZnn MOxHO HAcTPONTb XMITE Ha CTrpEkCy CNpaBa N BbIbePte NapaMeTpbl, KoppeKzIO. Hanpimep, ecIn n3MepenHna TEmpea-3aTe M HAcTPONe KOHeC OTnycka. B KOHe cHaCtpoTte Typa coCTabJIaET 19^ npn HAcTPOEHHom 3HaueHneHempeNepaTyPy Ha Becb NepnoD OTnycka. 21^, yctahOBHTe KoppeKzIO 2^.
Фактуеска TemпepаТура
Фaktnuecka Temnepatypa BnomeueHn OTo6paxaetcB npJIOXeHn.
Bpemennho rpaФNK
Moxho 3anporpaMMnPOBaTb pa60ty peryIaTopa OTdJIbHO Ha KaXdbI DeHb, IIn6o CΦOpMnPOBaTb 6Jokn.
HnBnDaJbHbIe nepnoI kOΦoPa
BKJ. -ДЯ Кждого Дня (ПН - BC) HabtpaNBaeTcI INHINBnDyaJIbHbI npoФиь OToPJIeHry/3KOHOMN.
BbIKJI. -Дя pa6OuX (nH - nT) n BbIXoHbIX (c6 - BC) Днй HabТрANBaIOTcЯ pa3ЛИчьie npOФиу OToPJIeHry/3KOHOMN.
IepnoDbI KOMΦopTa Ha npotJxKeHn DnA
BKJI. - MoxHo 3anporpaMMnpoBaTb no 4 nepnoDa KOMΦopTa n 3Heproc6epeXeHnHa npotJxHn DnI.
BbIKI. - moXHO 3anporpamMnpoBaTb no 2 nepnoJa KOMΦopTa n 3Heproc6epeXeHnHa npotXeHn DnA.
PpeoxpaHnteIb 6e3oNaChocTn DeTei
BKJI. - npeOxpaHnteIb 6e3oNaChocTn JeTei aKtNBeh
BbIKI. - npedeoxpaHnteIb 6e3onacHocTn dTee HeaKtNBeh
Hactpoika nepnoob kOmΦopTa
B 3aBnCmOCTn OT BbI6paHHoro BpeMeHHoro rpaФи-ka MoXHO 3anpoRpaMMnPoBaTb pexIM pa60Tb I OdHrM/6Jokam. BbI6epnte nolte «BpemHaayala 1» (Starttime 1) n HactpoiTe Bpem BKIOUeHnHaIpeBaTeJI. HanpImep, 06:00. 3atEm BbI6epnte nolte «Bpem OkOHuaHn 1» (Endtime 1) n BBeInte BpeM nepeKlIOUeHn HaIpeBaTeJI B pexIM 3koHOMn.
Функцу OTnycka
3decb MoXHo 3aJaTb nepNoD otNyska. B 3Tu nepuOdbi 6ecnpoBOHbI peryIaTOp HArpeBaTeIaYcTaHaBnBaET 3aDaHHyo Nolb3OBaTeIem TemnepaTpy.
CoxpaheHne npoФnIe nOmeuHn
Длг coхраеня npoфиелnomeшени Ha yctpoi-CTbax Apple BB6epnte «ПрофиNi» BBepy cnpaBa, 2Ha yctpoiCTbax Android haxmnte KhoNky MeHIO.
3arpy3ka npoФnJIeI nOmeUeHnI
Iocne 3aBepseHnnpoRpaMMnpoBaHn npoΦnJIe NOMEuHn 3aRpy3nte BBeJeHHbIe DaHHbIe, Haxab KhONkY《ToTOBO》(Finished)Ha yCTpOuCTBax Apple nn HaxMnTe KhoNky MeHIO Ha yCTpOuCTBax Android. IpoΦnIb 6yDet ABTOMaTnueckn 3aRpyKeH Ha yCTpOuCTBO. Iocne 3tOrO oTo6pa3ntcra 063Op CO3daHnHO npoΦnJI npoSeHn C Ha3BaHnEm, TempepaTyPOi N BpeMeHem HarpeBaHnI.
PepaKtpoBaHne u ydaJIeHne npOΦnJIe nOmeueHn
Для рededaktnopoBaHЯ co3daHHbIX npoФиJeI NOMeueHn Ha yctpoiCTbax Apple Bbl6epnte «PedaktnopoBaTb》(Edit) BBepxycnpaBa,aHa yctpoiCTbax Android HaxMnte KhoNky MeHIO. 3decb MoKHoTAKXe NOJIHOCTbU OydaJIHTb npoФиJB. 6.
2. Puyhoe ynpablenne c nomoubIO KhoNOK
HactpoKa DaTbI N BpeMeHN
Ipn nepBOM BBOe B 3KcNlyaTaunHO nocJe yCTaHOB- Kn 6
HnHaHT MuraTb
HnKaunr rOa. IocNe 3TOrO MoXHo HAcTpOnTb 6
Daty N BpeM. 7
HacrpoTe roC nOMoBIO nobopoTHoro peryIaTopa. OK bestatigen. Mit Stellrad Monat einstellen.oK noTBePnTe.
HactpoTe MecaC c NOMOuIIOBOPOTHOPOreYJrTopa. OK NOdTBePdNTe.
HactpoTe DeHb C NOMOuBIO NOBOPOTHOPOperyIaTopa. OK NODTBepDNTe.
HactpoIte yac c nOMOuBIO NOBOPOTHOpeyJIaTOpA. OK NODTBepDNTe.
HactpoIte MInHyTbI C NOMOuBIO NOBOPOTHOPOpeyIaTopa. OK NOITBepDHTe.
OprahbI ynpabLeHnI n Hndkaun
BpeMa HargpeBaHnI
PpeOxpaHntIb
6e3OpacHOCTN
TeaAKTUNBeH
3 BaTapepa pa3pax
4.aФункциЯ OTnycka aKTINBHa
4.b KomΦopTHa TemnepaTypa aKTNBHa
4.c Θheprocbeperaio- 云a TemnepaTypa aKTHBHa
4.dФyHKUOKHaN3aUNtblOT3aMep3AHnA aKTHBHa
ABTOMATUHECKM nIpyHOJ pexm aKTHBEN
6.a KhoNka MENU - nepexoB B rIaBHOe MeHIO (n3 cTaNapTHoro 3KpaHa); BHyTpN MeHIO 3Ta KhoNka Cnyknt dIy nepexoHa oDInH ypoBeHb MeHIO Ha3aI
6.b KhoNka OK -noTBepxJeHne HacTpoek
6.c KhoNka - cyHKunra TaMepa
7 NobopoTHbI peYJrTop
Hactpoyn
KhONKa MENU CnyXnT DЯ Bbl3OBA MeHIO HaCTpoE.K. Pa3JIuHbIe NyHKtBIMeHIO MoXHO Bbl6paTb C NOMO- ⅢbIO NOBOPOTHOpeYJrTOpA.C NOMOJIbIO KhoKN OK Bbl6epNTe HxHbI INyHKT MeHIO, C NOMOJIbIO NOBOPOTHOpeYJrTOpa MoXHO N3MeHnTb 3HaueHne. KhoNka OK CnyXnT DЯ NODTBepXJdEHnRA BBeDEHHORo 3HaueHnRA. C NOMOJIbIO KhoNMIENU MOXHO NepeITNaHa OdnH yPOBeHb MeHIO Ha3aI.
Selecteer "Verbinden" (Connect).
MANU = handmatige modus
Distributed by Hama GmbH & Co KG
86652 Monheim/Germany
+49 9091 502-0
www.xavax.eu
The Bluetooth word mark and logos are owned by the Bluetooth SIG, Inc. and any use of such marks by hama is under license. Other trademarks and trade names are those of their respective owners.
All listed brands are trademarks of the corresponding companies. Errors and omissions excepted, and subject to technical changes. Our general terms of delivery and payment are applied.