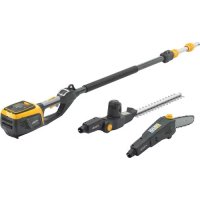
HET 1501 - Hedge trimmers STIGA - Free user manual and instructions
Find the device manual for free HET 1501 STIGA in PDF.

| Product Type | Hedge trimmer attachment for brushcutter/trimmer |
| Brand | Stiga |
| Model | HET 1501 |
| Intended use | Trimming and shaping hedges of small-branch shrubs (max diameter 5 mm) |
| Power type | Mechanical (driven by the brushcutter engine) |
| Number of blades | Double blade (fixed comb and moving blade) |
| Blade length | Approximately 60 cm (estimate) |
| Tilt adjustment | Yes, via release lever (multiple positions) |
| Weight | Approximately 1.5 kg (estimate) |
| Blade material | Steel |
| Cutting speed | Depends on the brushcutter engine |
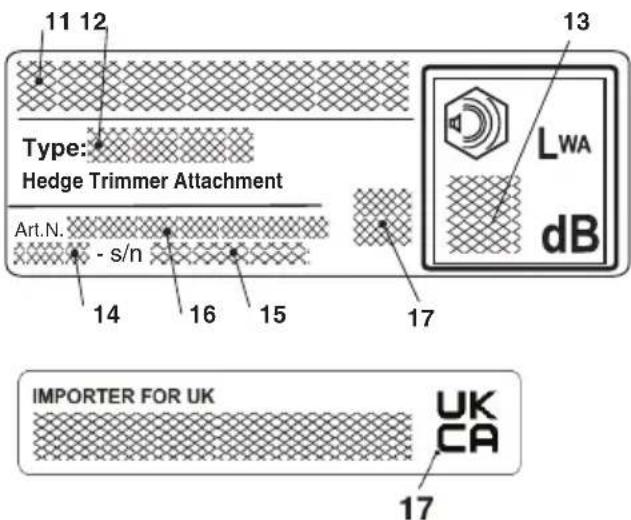
| Noise level | Up to 85 dB(A) (hearing protection mandatory) |
| Safety distance | 15 m from people, animals, and high-voltage cables |
| Required protective equipment | Safety glasses, hearing protection, gloves, safety shoes, helmet (if risk of falling) |
| Lubrication | Special oil for blades (engine off); lithium grease for gearbox every 20 h |
| Assembly | On the brushcutter attachment shaft (stop pin and clamping knob) |
| Blade maintenance | No adjustment needed; sharpening only at a specialist centre if performance drops |
| Spare parts | Use exclusively genuine Stiga parts |
| Warranty | Refer to the warranty of the main product (brushcutter) |
| Compliance standards | CE marking, sound power level LWA indicated on the label |
| Storage | Out of reach of children, with blade guard in place |
Frequently Asked Questions - HET 1501 STIGA
User questions about HET 1501 STIGA
0 question about this device. Answer the ones you know or ask your own.
Ask a new question about this device
Download the instructions for your Hedge trimmers in PDF format for free! Find your manual HET 1501 - STIGA and take your electronic device back in hand. On this page are published all the documents necessary for the use of your device. HET 1501 by STIGA.
USER MANUAL HET 1501 STIGA
natural_image
Silhouette of a person reading a book inside a circle (no text or symbols)IT Dispositivo tagliasiepi - MANUALE DI ISTRUZIONI
ATTENZIONE: prima di utilizzare la macchina, leggere attentamente il presente libretto.
Nůžky na živý plot - NÁVOD K POUŽITÍ
POZOR: Pred použitím stroje si pozorné prečtete tento návod k použití.
DA Hækkeklipper - BRUGSANVISNING
ADVARSEL: Læs instruktionsbogen omhyggeligt igennem, før du tager denne maskine i brug.
DE Heckenschere - GEBRAUCHSANWEISUNG
ACHTUNG: vor Inbetriebnahme des Geräts die Gebrauchsanleitung aufmerksam lesen.
ΕΙ Σύστημα κλαδευτήρι θάμνων - ΕΓΧΕΙΡΙΔΙΟ ΟΔΗΓΙΩΝ
Προδοχή: πριν χρησιμοποιήσετε το μηχάνημα, διαβάστε προσεκτικά το παρόν εγχειρίδιο.
EN Hedge trimmer - OPERATOR'S MANUAL
WARNING: read thoroughly the instruction booklet before using this machine.
ES Dispositivo recortadora de setos - MANUAL DE INSTRUCCIONES
CUIDADO: antes de utilizar esta máquina, lea atentamente el manual de instrucciones.
ET Hekilõikur - KASUTUSJUHEND
TÄHELEPANU: enne masina kasutamist lugege tähelepanelikult kasutusjuhendit.
Pensasleikkuri - KÄYTTÖOHJEET
VAROITUS: lue käyttöopas huolellisesti ennen koneen käyttöä.
ED Dispositif de taille-haies - MANUEL D'UTILISATION
ATTENTION: lire attentivement le manuel avant d'utiliser cette machine.
HD Rezač živice - PRIRUČNIK ZA UPORABO
POZOR: Prije nego pristupite uporabi stroja, pažljivo pročitajte upute.
NI Heggeschaar - GEBRUIKERSHANDLEIDING
LET OP: Voordat u de deze machine gaat gebruiken dient u eerst deze handleiding aandachtig door te lezen.
NO Hekklipperutstyr - INSTRUKSJONSBOK
ADVARSEL: Les denne bruksanvisningen nøye før du bruker maskinen.
DI Urządzenie do przycinania żywopłotów - INSTRUKCJE OBSŁUGI
UWAGA: Przed użyciem urządzenia przeczytaj uważnie niniejszą instrukcję.
DT Dispositivo cortador de sebes - MANUAL DE INSTRUÇÕES
ATENCAO! Antes de usar a moto-roçadeira, ler com atenção este manual de instruções.
Шпалерные ножницы - РУКОВОДСТВО ПО ЭКСПЛУАТАЦИИ
ВНИМАНИЕ: Прежде чем пользоваться оборудованием, внимательно прочтите это руководство по эксплуатации.
Obrezovalnik grmičevja - PRIROČNIK ZA UPORABU
POZOR: Preden uporabite stroj, pazljivo preberite priročnik z navodili.
cv Häcksax - BRUKSANVISNING
WARNING: Läs igenom hela detta häfte innan du använder maskinen.
TP Çit budama aparati - KULLANIM KILAVUZU
DIKKAT! Makineyi kullanmadan önce talimatlar içeren kılavuzu dikkatle okuyun.
ENGLISH - Translation of the original instructions ...... EN
EN - WARNING! - This accessory can be applied only on models of brush cutters / trimmers with jointed rod, shown below. For Commands - Maintenance - Technical Data - Warnings: refer to the Instruction Manual of the machine on which you fit the accessory.
natural_image
Illustration of a person in protective gear spraying water onto a pile of granular material (no text or symbols)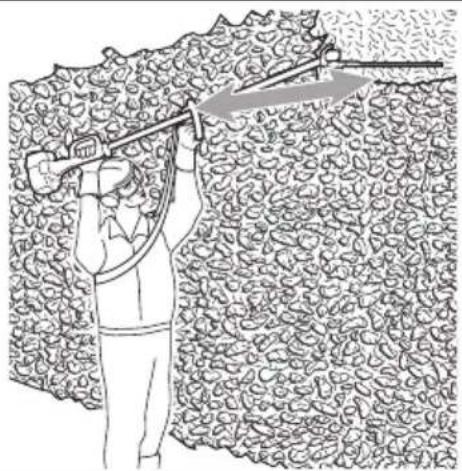
natural_image
Illustration of a person using a tool to lift a large pile of granular material, with no visible text or symbols.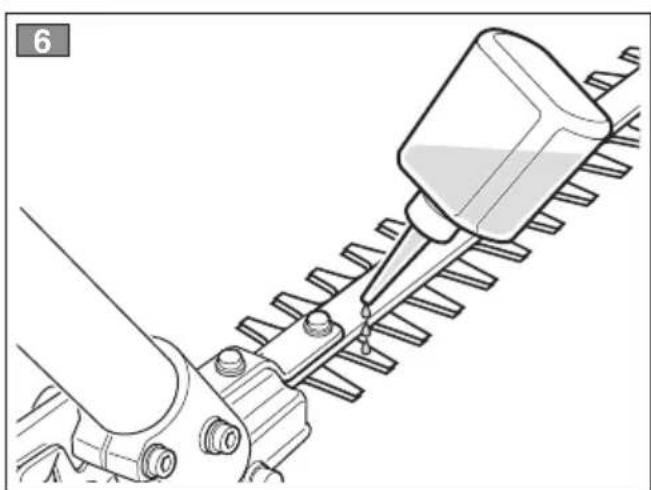
natural_image
Technical illustration of a mechanical tool interacting with a gear-like structure (no text or symbols)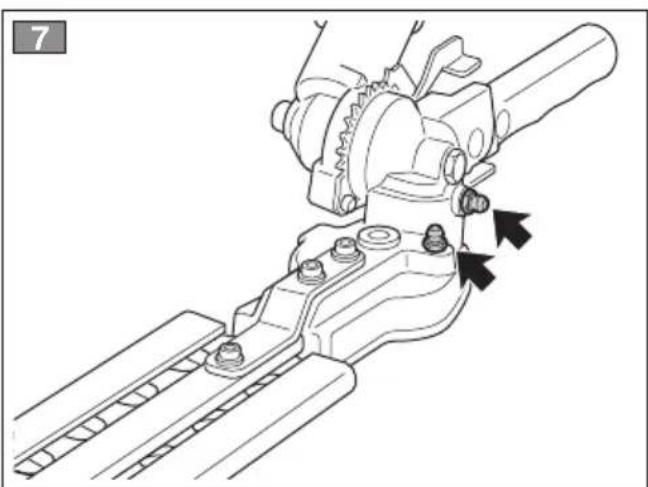
natural_image
Technical line drawing of a mechanical assembly with no visible text or symbols| 1]EN-TECHNICAL SPECIFICATIONS2] Gear ratio3] Type of cut - Mowing blades4] Number of teeth5] Toothing pitch6] Useful cutting width7] Maximum cutting diameter8] Adjustment angle (in relation to the bar)9] cutting tools10] Guaranteed sound power level | 1] FR - CARACTERISTIQUES TECHNIQUES2] Rapport de réduction3] Type de coupe - Lames de tonte4] Nombre de dents5] Écart des dents6] Largeur de coupe utile7] Diamètre de coupe maximum8] Angle de réglage (par rapport à la barre)9] outil de coupe10] Niveau de puissance acoustique garanti | 1] DE - TECHNICHE DATEN2] Untersetzerverhältnis3] Schnittart - Mähmesser4] Anzahl der Messer5] Messerabstand6] Nominale Schnittbreite7] Maximaler Schnittdurchmesser8] Justierwinkel (bez. Messerbalken)9]Schneidewerkzeug10]Garantierter Schalleistungspegel |
| 1] ES - DATOS TÉCNICOS2] Relación de reducción3] Tipo de corte - Cuchillas de corte4] Número de los dientes5] Paso de dentadura6] Anchura útil de corte7]Diámetro máximo de corte8] Angulo de ajuste (con respecto a la barra)9] Herramienta de corte10] Nivel de potencia acústica garantizado | 1] NL - TECHNICHE GEGEVENS2] Overbrengingsverhouding3] Type van snijwijze - Maaimessen4] Aantal tanden5] Steek tanden6] Nuttige snijbreedte7]Maximale snijdiameter8] Hellingshoek (ten opzichte van de balk)9] Snijgereedschap10] Gegarandeerd geluidsniveau | [1] PT - DADOS TÉCNICOS[2] Relação de redução3] Tipo de corte - Lâminas de corte4] Número de dentes5] Passo entre dentes6] Largura de corte útil7]Diámetro de corte máximo8] Ângulo de ajuste (em relação à barra)9] Ferramentas de corte10] Nível de potência acústica garantido |
| [1] EL - TEXNIKA XAPAKTHPISTIKA2] Σχέση μίωσης3] Túπος κοτής - Γραμμές κοτής4] Αριθμός δοντιών5] Βήμα δοντιών6] Ωφέλιμο πλάτος κοτής7]Μέγιστη διάμτρος κοτής8] Γωνία ρύθμισης (ως προς την μπάρα)9] εργαλείων κοτής10] Στάθμη εγγυώμενης ηχητικής ισχύος | 1] TR - TEKNÍK VERÍLER2] Dişli orani3] Keşici tipi - Biçme bîçakları4] Diş sayışı5] Diş adıml6] Nominal keşme ğenişligi7] Azami keşme çapı8] Ayarlama açışı (kola çöre)9] kesme aletlerinin10] Garanti edilen ses gücü seviyesi | [1] PL - DANE TECHNICZNE[2] Stosunek redukcji3] Rodzaj krawędzi tnącej-Ostrza do koszenia4] Liczba zębów5] Podziłka uzebienia6] Szerokość cięcia użytecznego7] Średnica cięcia maksymalnego8] Kąt regulacji (w stosunku do drążka)9] narzędzi skrawających10] Gwarantowany poziom mocy akustycznej |
| 1] SL - TEHNIČNI PODATKI2] Reduktorno razmerje3] Nastavek - Kosilnice4] Število zobcev5] Razdalja med zobci6] Koristna dolžina rezila7] Maksimalni premer pri rezanju8] Kot reguliranja (glede na palico)9] rezalnega orodja s10] Zagotovljena raven zvočnega tlaka | 1]RU - TEXHNIЧЕСКИЕ ХАРАКТЕРИСТИКИ2] Передаточное число3] Режущий орган - Косить лезвия4] Чиско зубьев5] Шаг зубьев6] Полезная ширина реза7]Максимальный диаметр реза8] Регулировка угла (относительно штанги)9] применение режущего инструмента10] Гарантируемый уровень звуковой мощности | 1] HR - TEHNIČKI PODACI2] Reduktorni omjer3] Rezni nož - Noževi za košnju4] Broj zubaca5] Korak zubaca6] Korisna duljina pri orezivanju7] Maksimalni promjer pri orezivanju8] Kut reguliranja (u odnosu na šipku)9] reznog alata10] Zajamčena razina zvučne snage |
| 1] SV - TEKNISKA SPECIFIKATIONER2] Utväxlingsförhållande3] Klingtyp - Klippblad4] Antal klingor5] Tandspalt6] Max. skärbredd7] Max. kvistdiameter8] Vinkelreglering (i förhållande till riggröret)9] skärverktyg10] Garanterad ljudeffektsnivå | 1] FI - TEKNISET TIEDOT2] Välityssuhde3] Terätyyppi - Leikkuuterät4] Hammasmäärä5] Hammastus6] Leikattava maksimileveys7] Leikattava maksimihalkaisija8] Korjauskulma (runkoputken nähden)9] käyttää leikkausteriä10] Taattu äänitehotaso | 1] DA - TEKNISKE DATA2] Udvekslingsforhold3] Klingetype - Klipper4] Antal tænder5] Tandåbning6] Maks. skærebredde7] Maks. skærediameter8] AnTilpasningsvinkel (i forhold til rigrøret)9] skæreværktøjer10] Garanteret lydeffektniveau |
| 1] NO - TEKNISKE DATA2] Utvekslingsforhold3] Bladtype - Klippeblad4] Antall tenner5] Tannåpning6] Maks. snittbredde7] Maks. snittdiameter8] Reguleringsvinkel (i forhold til riggröret)9] kutteverktøy10] Garantert lydeffektnivå | 1] CS - TECHNICKÉ PARAMETRY2] Převodový poměr3] Typ řezání - Sekací nože4] Počet zubů5] Zubová mezera6] Užitečná délka lišt7] Maximální průměr řezaného materiálu8] Úhel náklonu lišty9] řezací nástroj10] Zaručená úroveň akustického výkonu | 1] ET - TEHNILISED ANDMED2] Redutseerimise suhe3] Lõike tüüp - Niiduterad4] Hammaste arv5] Hammaste samm6] Kasulik lõikelaius7] Löikamise maksimaalne läbimõõt8] Tööriista pöördenurk varda suhtes9] Löikeriist10] Garanteeritud helivõimsuse tase |
natural_image
Two black circular icons with white hand and sock symbols, no text or numbers present.

natural_image
Two black circular icons: one showing a hand and the other showing a sock, both without any text or symbols.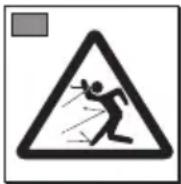
natural_image
Two circular icons: one showing a pair of gloves, the other showing a sock (no text or symbols)

natural_image
Two circular icons: one showing a pair of gloves, the other showing a sock (no text or symbols)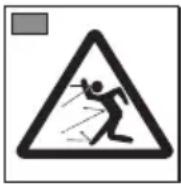

natural_image
Two circular icons showing gloves and socks, one with a white outline and the other with a black outline (no text or symbols)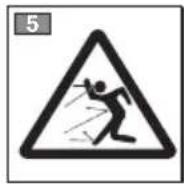
- Starter unit
- Connecting rod
- Cutting device (blade)
- Handgrip
- Release lever (to regulate the inclination)
- Blade protection

IDENTIFICATION PLATE
- Name and address of the manufacturer
- Type of machine
- Sound power level
- Year of manufacture
- Serial number
- Article code
- Conformity marking
2. SYMBOLS

natural_image
Two circular icons: one showing a pair of gloves, the other showing a sock (no text or symbols)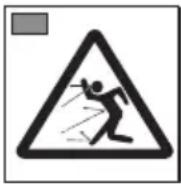
WARNING: The machine you have purchased has been manufactured for domestic use.
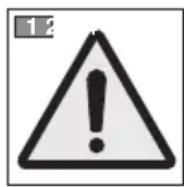
1) Warning! Danger.
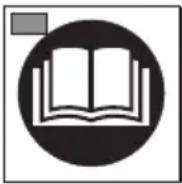
2) Read the instruction booklet before using this machine.
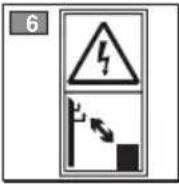
3) Your hearing is at risk of irreparable damage. Anyone operating this machine under normal conditions during continuous daily use may be exposed to a noise level equal to or exceeding 85 dB (A). The operator must wear Personal Protective Equipment (PPE). Whenever the machine is in use, safety goggles must be worn to safeguard against flying objects, as must ear protectors, such as a soundproof helmet, in order to protect the operator's hearing. If the operator is working in an area where there is a risk of falling objects, a safety helmet must also be worn.
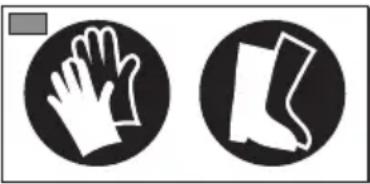
4) Wear protective footwear and gloves!
3. USING THE MACHINE
A) TRAINING
1) Read the instructions carefully. Become acquainted with the controls and the proper use of the machine. Learn how to stop the engine quickly.
2) Only use the machine for its intended use, that is “the cutting and trimming of hedges, consisting in plants with small sized branches”.
Any other use may be dangerous and severely damage the machine.
Examples of improper use may include, but are not limited to:
– general grass cutting and in particular, near kerbs;
– chopping material for composts;
- pruning;
– using the machine for cutting non-plant material;
– use of the machine by more than one person.
3) Never allow children or persons unfamiliar with these instructions to use the machine. Local regulations may restrict the age of the operator.
4) The machine must never be used by more than one person.
5) Never use the machine :
- when people, especially children or pets are in the vicinity;
- if the user is tired or unwell, or has taken medicine, drugs, alcohol or any substances which
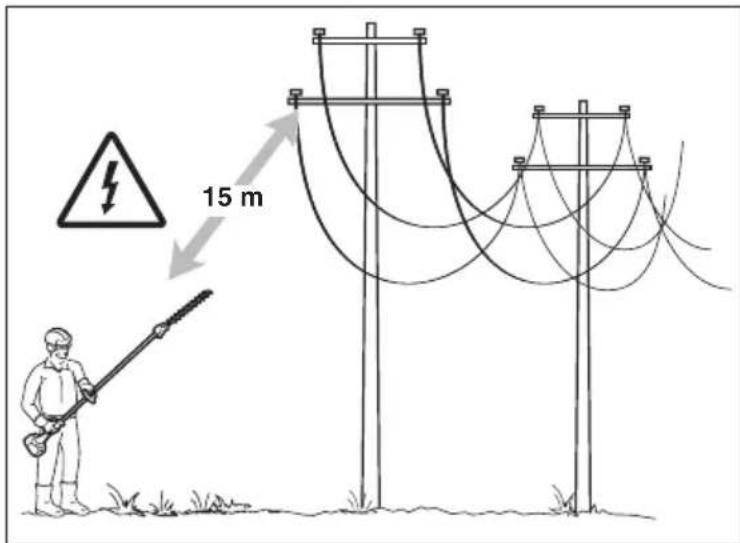
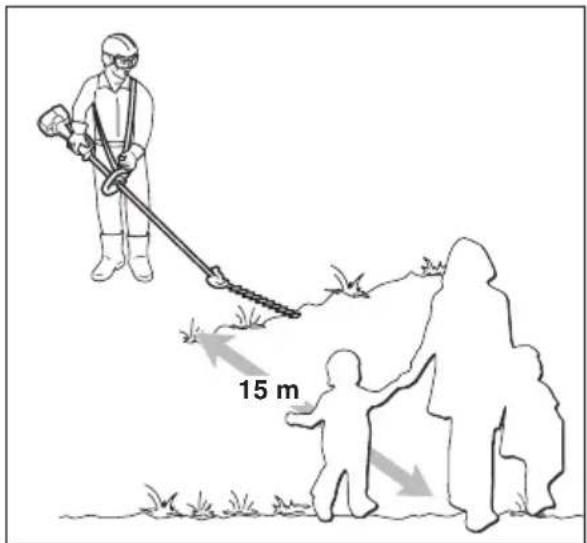
5) Danger: objects thrown up by machine! Keep people or animals at least 15 m away from the machine during operation!
•) Work in an obstacle-free area, choosing the most suitable tilt of the cutting unit in relation to the ground. Make sure it is correctly fitted on the brush cutter.
•) Always work in stable, safe positions. Do not work on stairs, steps and, in general, on surfaces that are not perfectly stable.
•) The user must comply with any National Regulations which can limit machine use.
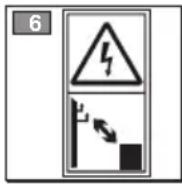
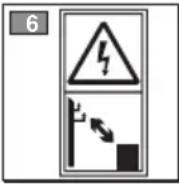
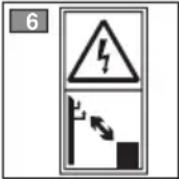
6) Danger! Electrocution. Keep a distance of at least 15 m from overhead line cables.
may slow his reflexes and compromise his judgement;
- if the user is not capable of holding the machine firmly with two hands and/or of remaining standing on the ground whilst working.
6) Remember that the operator or user is responsible for accidents or hazards occurring to other people or their property.
B) PREPARATION
1) Always wear adequate clothing when using the machine which do not hamper movements in any manner.
- Always wear slim-fitting protective clothing, fitted with shear-proof protection devices.
- Always wear protective gloves and eye-goggles and safety anti-shear boots with non-slip soles.
- Always wear ear and hearing protection devices.
- Never wear scarves, shirts, necklaces, or any hanging or flapping accessory that could catch in the machine or in any objects or materials in the work area.
– Tie your hair back if it is long.
2) Before starting your work, make sure that all the protection devices are correctly fitted.
C) OPERATION
1) Work only in daylight or good artificial light.
2) Take on a firm and well-balanced position:
- where possible avoid working on wet slippy ground or in any case on uneven or rigid ground which does not guarantee stability for the operator;
– avoid using unstable ladders or platforms;
– never run, but walk carefully paying attention to the lay of the land and any eventual obstacles.
3) Check that when the machine is running at minimum speed and ticking over, there is no movement of the blades and, after accelerating, the engine quickly returns to minimum speed.
4) Make sure the blades do not come into violent contact with foreign bodies and try to prevent any material from being hurled after trimming.
5) Stop the engine:
- whenever you leave the machine unattended.
- before refuelling.
1) Keep all nuts, bolts and screws tightly fastened to be sure the equipment is in safe working condition. Routine maintenance is essential for safety and for maintaining a high performance level.
2) Always wear protective gloves when handling the cutting device.
3) Make sure the blades are well sharpened. All operations on the blades require a certain level of experience and specialised tools. For safety reasons, take them to a specialised centre to be sharpened.
4) For safety reasons, never use the machine with worn or damaged parts. Damaged parts are to be replaced and never repaired. Only use original
spare parts. Parts that are not of the same quality can seriously damage the equipment and compromise safety.
5) Store the machine out of the reach of children!
E) TRANSPORTATION AND HANDLING
1) Whenever the machine is to be handled or transported you must:
– turn off the engine, wait for the blades to stop and disconnect the spark plug cap;
- apply the protection devices to the blades;
- only hold the machine using the handgrips and position the blades in the opposite direction to that used during operations.
2) When using a vehicle to transport the machine, position it so that it can cause no danger to persons and fasten it firmly in place to avoid it from tipping over, which may cause damage or fuel spillage.
F) HOW TO READ THE MANUAL
Certain paragraphs in the manual contain particularly significant information and are marked with various levels of highlighting with the following meaning:
IMPORTANT
These give details or further information on what has already been indicated, and aim to prevent both damage to the machine and the machine from causing damage.
DANGER!
n-observance will result in the risk of serious injury or death to oneself or others.
4. USING THE MACHINE
ASSEMBLING THE ROD (if supplied separately) (Fig. 1)
- Insert the rod (1) in the sleeve (2) so that the hole (3) coincides with the screw (4).
- Tighten the two screws (4) and (5) completely. The head of the screw (4) must not stick out when tightened.
⚠️ Wait until the motor is sufficiently cold before removing the hedge trimmer device.
CONNECTING THE HEDGE TRIMMER (Fig. 2)
- Pull out the stop pin (1) and push the rod (2) right down until the stop pin (1) clicks into the hole (3) in the rod. This is easier to do if you rotate the bottom of the rod (2) slightly in both directions. The pin (1) is in place when it is completely lodged in the hole.
- Once inserted, tighten the knob (4) securely.
SETTING AT WORK
IMPORTANT Also carefully read the operator's manual for the brush cutter fitted with the hedge trimming device.
Before starting work please:
- Check that all the screws on the machine and the blade are tightly fastened;
- check that the blades are sharp and there are no signs of any damage;
- check that the protection devices are well fastened and working efficiently;
– check that the handgrips are well fastened
- Directions for use
- Cut branches up to a maximum diameter of 5 mm; cutting branches with a larger diameter could damage the hedge trimmer.
-
ONLY adjust the tilt angle with the motor switched off. SWITCH OFF the motor before removing any branches caught up in the blades.
-
Never bring the blades close to body parts while working.
- Always fit the blade guards when the device is switched off.
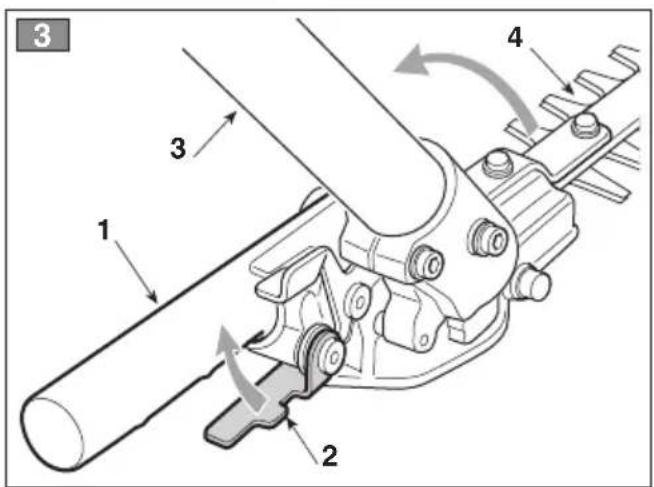
- Adjustment of blade inclination (Fig. 3)
- Turn the engine off and wait for the blade to stop.
- Grasp the handgrip (1) then, holding the rod (3) steady with one hand, pull the release lever (2) move the handgrip (1) as needed to change blade (4) inclination.
- On releasing the lever (2), the blade remains blocked in the desired position.
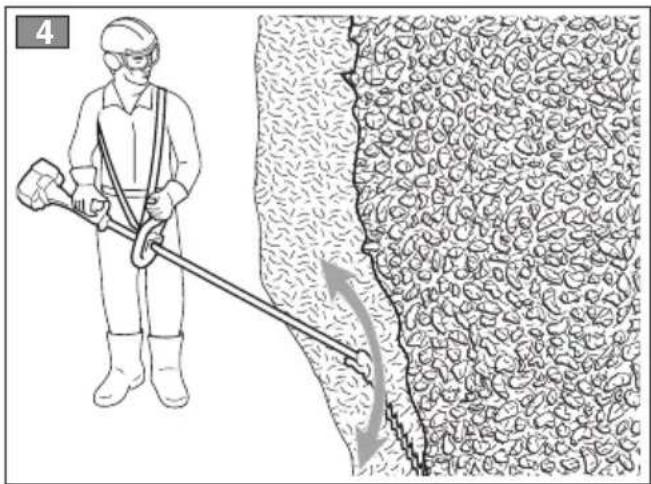
• Vertical trimming (Fig. 4)
Proceed to cut by using curved movements from the bottom towards the top, keeping the blade as far from the body as possible.
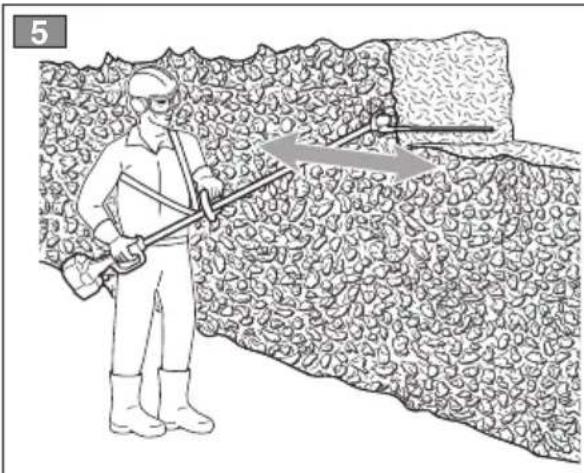
• Horizontal trimming (Fig. 5)
The best results will be obtained with the blade slightly inclined ( 5^ - 10^ ) in the direction you are cutting, proceed with a curved movement, slowly and without interruptions, especially in the case of very thick hedges.
LUBRICATING THE BLADES DURING JOBS (Fig. 6)
If the cutting device gets excessively hot during operations, grease the blade's internal surfaces with the specific oil.
DANGERS this operation must only be performed when the blades have stopped running and the motor is switched off.
5. MAINTENANCE AND STORAGE
DANGERS always work with the motor switched off.
1. BLADE REDUCTION GEAR GUARD (Fig. 7)
- Lubricate every 20 hours through the grease nipples provided.
- Only use lithium-based grease for high temperatures and extreme pressures.
2. MAINTENANCE AND SHARPENING OF THE BLADE
DANGERS periodically check that the blades are not bent or damaged and that the fixed comb on the blade is intact.
Adjustment of the distance between blades is not necessary, as this is predetermined by the manufacturer.
If the blades are used correctly, following all the instructions provided, they will not require any maintenance work and will not need sharpening.
It is necessary to sharpen the blades only when the trimming performance decreases and the branches tend to stick together.
NOTE
Any intervention on the blade
should always be conducted at a specialised Centre that has the most appropriate tools and is able to perform the operations without compromising the safety of the machine.
Given the product evolution, the above mentioned tools may be replaced in time by others, with similar interchangeable and operating safety characteristics.
natural_image
Two circular icons: one showing a pair of gloves, the other showing a sock (no text or symbols)

natural_image
Two circular icons: one showing a pair of gloves, the other showing a sock (no text or symbols)

natural_image
Two black circular icons with white hand and sock symbols, no text or numbers present.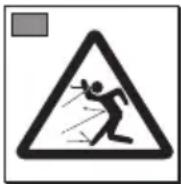

5. HUOLTO JA SÄILYTYS

VAARA!
natural_image
Two circular icons: one showing a pair of gloves, the other showing a sock (no text or symbols)

natural_image
Two circular icons: one showing a pair of gloves, the other showing a sock (no text or symbols)

natural_image
Two circular icons: one showing a pair of gloves, the other showing a sock (no text or symbols)

natural_image
Two circular icons: one showing a pair of gloves, the other showing a sock (no text or symbols)

D) VEDLIKEHOLD OG LAGRING
5. VEDLIKEHOLD OG LAGRING

FARE!
en må alltid være
avslått.
1. BLADENES REDUKSJONSGIR (Fig. 7)
2. VEDLIKEHOLD OG SLIPING AV KNIVEN

FARE!
GŁÓWNE CZE, ŚCI SKŁADOWE
natural_image
Two circular icons: one showing a pair of gloves, the other showing a sock (no text or symbols)

natural_image
Two black circular icons with white hand and sock symbols, no text or numbers present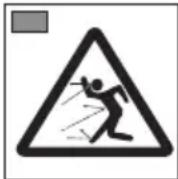
natural_image
Two circular icons: one showing a pair of gloves, the other showing a sock (no text or symbols)

natural_image
Two black circular icons with white hand and sock symbols, no text or numbers present.

natural_image
Two circular icons: one showing a pair of gloves, the other showing a sock (no text or symbols)

UK DECLARATION OF CONFORMITY
(Supply of Machinery (Safety) Regulations 2008, S.I. 2008 No. 1597, Annex II, part A)
- The company: ST. S.p.A. – Via del Lavoro, 6 – 31033 Castelfranco Veneto (TV) – Italy
- Hereby declares under its own responsibility that the machine (function):
Hedge trimmer device
a) Homologation type:
HET 1501
c) Serial number:
23A••HTR000001 ÷ 99L••HTR999999
d) Engine:
- Conforms to UK Regulations:
• S.I. 2008/1597 - Supply of Machinery (Safety) Regulations 2008
- S.I. 2012/3032 - The Restriction of the Use of Certain Hazardous Substances in Electrical and Electronic Equipment Regulations 2012
- Reference to harmonised standards:
EN ISO 10517:2019
EN IEC 63000:2018
h) Guaranteed sound power level:
107 dB(A)
n) Person authorised to compile the technical file:
ST. S.p.A.
Via del Lavoro, 6
31033 Castelfranco Veneto (TV) - Italia
o) Castelfranco Veneto, 01/03/2023
CEO Stiga Group
Sean Robinson

UK Importer:
STIGA LTD
Unit 8, Bluewater Estate Plympton,
Devon, PL7 4JH, England

| CS (Překlad původního návodu k používání)ES – Prohlášení o shodě(Směrnice o Strojnicn zařizeních 2006/42/ES, Příloha II, část A)1. Společnost2. Prohlašuje na vlastní odpovědnost, že stroj: Zařízení pro nůžky na živý plota) Typ / Základní modelc) Výrobní číslod) Motor: /3. Je ve shodě s nařizeními směrnic:4. Odkazy na Harmonizované normyh) Zaručená úroveň akustického výkonun) Osoba autorizovaná pro vytvoření Technického spisu:o) Misto a Datum | DA (Oversættelse af den originale brugsanvisning)EF-overensstemmelseserklæring(Maskindirektiv 2006/42/EF, bilag II, del A)1. Firmaet2. Erklærer på eget ansvar, at maskinen:Hækkeklipper anordninga) Type / Modelc) Serienummerd) Motor: /3. Er i overensstemmelse med specifikationerne ifølge direktiverne:4. Henvisning til harmoniserede standarderh) Garanteret lydeffektniveau n) Person, der har bemyndigelse til at udarbejde det tekniske dossier:o) Sted og dato | DE (Übersetzung der Originalbetriebsanleitung)EG-Konformitätserklärung(Maschinenrichtlinie 2006/42/EG, Anhang II, Teil A)1. Die Gesellschaft2. Erklärt auf eigene Verantwortung, dass die Maschine:Heckenschere Gerätá) Typ / Basismodellc) Seriennummerd) Motor: /3. Den Anforderungen der folgenden Richtlinien entspricht:4. Bezugnahme auf die harmonisierten Normenh) Garantierter Schalleistungspegeln) Zur Verfassung der technischen Unterlagen befugte Person:o) Ort und Datum |
| EL (Μετάφραση του πρωτοτύπου των οδηγιών χρήσης)ΕΚ-Δήλωση συμμόρφωσης(Οδηγία Μηχανών 2006/42/CE, Παράρτημα II, μέρος A)1. Η Εταιρία2. Δηλώνει υπεύθυνα ότι η μηχανή:Συσκευή κοπής φράχτηa) Túπος / Βασικό Μοντέλοc) Αριθμός μητρώουd) Κινητήρας: /3. Συμμορφώνεται με τις προδιαγραφές της οδηγίας:4. Αναφορά στους Κανονισμούς εναρμόνισηςh) Στάθμη εγγυημένης ακουστικής ισχύοςn) Εξουσιοδοτημένο άτομο για την κατάρτιση του Τεχνικού Φυλλαδίου:o) Tóπος και Χρόνος | EN (Translation of the original instruction)EC Declaration of Conformity(Machine Directive 2006/42/EC, Annex II, part A)1. The Company2. Herby declares under its own responsibility that the machine: Hedge trimmer devicea) Type / Base Modelc) Serial numberd) Engine: /3. Conforms to directive specifications:4. Reference to harmonised Standards h) Sound power level guaranteedn) Person authorised to create the Technical Folder:o) Place and Date | ES (Traducción del Manual Original)Declaración de Conformidad CE(Directiva Máquinas 2006/42/CE, Anexo II, parte A)1. La Empresa2. Declara bajo su propia responsabilidad que la máquina: Dispositivo cortasetosa) Tipo / Modelo Basec) Matrícula d) Motor: /3. Cumple con las especificaciones de las directivas:4. Referencia a las Normas armonizadash) Nivel de potencia sonora garantizadon) Persona autorizada a realizar el Manual Técnico:o) Lugar y Fecha |
| ET (Algupārase kasutusjuhendi tõlge)EÜ vastavusdeklaratsioon(Masinadirektliv 2006/42/EÜ, Lisa II, osa A)1. Firma2. Kinnitab omal vastutusel, et masin:Hekilōikuri seadea) Tüüp / Põhimudel) Matrikkeld) Mootor: /3. Vastab direktiivide nöuetele:4. Viide ühtlustatud standarditeleh) Garanteeritud helivõimsuse tase n) Tehnilise Lehe autoriseeritud koostaja:o) Koht ja Kuupäev | FI (Alkuperäisten ohjeiden käännös)EY-VAATIMUSTENMUKAISUUSVAKUUTUS(Konedirektiivi 2006/42/EY, Liïte II, osa A)1. Yritys2. Vakuuttaa omalla vastuullaan, että kone:Pensasleikkuri laitea) Tyyppi / Perusmallic) Sarjanumerod) Moottori : /3. On yhdenmukainen seuraavien direktiivien asettamien vaatimusten kanssa:4. Viittaus harmonisoituihin standardeihinh) Taattu äänitehotason) Teknisten asiakirjojen laatimiseenvaltuutettu henkilö:o) Paikka ja päivämäärä | FR (Traduction de la notice originale)Déclaration CE de Conformité(Directive Machines 2006/42/CE, Annexe II, partie A)1. La Société2. Déclare sous sa propre responsabilité que la machine : Appareil taille-haiea) Type / Modèle de Basec) Série d) Moteur: /3. Est conforme aux prescriptions des directives :4. Renvoi aux Normes harmoniséesh) Niveau de puissance sonore garanti n) Personne habilitée à établir le DossierTechnique:o) Lieu et Date |
| HR (Prijevod originalnih uputa)EK Izjava o sukladnosti(Direktiva 2006/42/EZ o strojevima, dodatak II, dio A)1. Tvrtka:2. pod vlastitom odgovornošću izjavljuje da je stroj: Uređaj za škare za živicua) Vrsta / Osnovni modelc) Matični brojd) Motor: /3. sukladan s temeljnim zahtjevima direktiva:4. Primijenjene su slijedeće harmonizirane norme:h) Zajamčena razina zvučne snagen) Osoba ovlaštena za pravljenje Tehničke datoteke:o) Mjesto i datum | NL (Vertaling van de oorspronkelijke gebruiksaanwijzing)EG-verklaring van overeenstemming (Richtlijn Machines 2006/42/CE, Bijlage II, deel A)1. Het bedrijf2. Verklaart onder zijn eigen verantwoordelijkheid dat de machine:Heggenschaar apparaata) Type / Basismodelc) Serienummerd) Motor: /3. Voldoet aan de specificaties van derichtlijnen:4. Verwijzing naar de Geharmoniseerde normenh) Gegarandeerd niveau van geluidsvermogenn) Bevoegd persoon voor het opstellen van het Technisch Dossiero) Plaats en Datum | NO (Oversettelse av orginal bruksanvisning)EF- Samsvarserklæring(Maskindirektiv 2006/42/EF, Vedlegg II, del A)1. Firmaet2. Erklærer på eget ansvar at maskinen: Hekksaksanordninga) Type / Modellc) Serienummerd) Motor: /3. Oppfyller kravene i direktivene:4. Henvisning til harmoniserte standarderh) Garantert lydeffektniván) Person som har fullmakt til à utferdigeteknisk dokumentasjon:o) Sted og dato |
| PL (Tlumaczenie instrukcji oryginalnej)Deklaracja zgodności WE(Dyrektywa maszynowa 2006/42/WE, Załącznik II, część A)1. Spółka2. Oświadcza na własną odpowiedzialność, że maszyna: Urządzenie do przyclnania żywopłotua) Typ / Model podstawowyc) Numer seryjnyd) Silnik: /3. Spełnia podstawowe wymogi następujących Dyrektyw:4. Odnieslenie do Norm zharmonizowanychh) Gwarantowany poziom mocy akustycznejn) Osoba upoważniona do zredagowania Dokumentacji technicznej:o) Miejscowość i data | PT (Tradução do manual original)Declaração CE de Conformidade(Diretiva de Máquinas 2006/42/CE, Anexo II, parte A)1. A Empresa2. Declara sob a própria responsabilidade que a máquina: Dispositivo corta-sebesa) Tipo / Modelo Basec) Matrículad) Moto: /3. É conforme às especificações das diretivas:4. Referência às Normas harmonizadash) Nivel garantido de potência sonoran) Pessoa autorizada a elaborar o Caderno Técnicoo) Local e Data | RU (Перевод оригинальных инструкций)Декларация соответствия нормам EC(Директива о машинном оборудовании 2006/42/EC, Приложение II, часть A)1. Предприятие2. Заявляет под собственнуюответственность, что машина:Устройство триммера для живойизгородиа) Тип / Базовая модельс) Паспортd) Двигатель: /3. Соответствует требованиям следующих директив:4. Ссылки на гармонизированные нормыh) Гарантируемый уровень звуковой мощностип) Лицо, уполномоченное на подготовку технической документации:o) Место и дата |
| SL (Prevod izvirnih navodil)ES izjava o skladnosti(Direktiva 2006/42/ES), priloga II, del A)1. Družba2. pod lastno odgovornostjo izjavlja, da je stroj: Naprava za škarje za živo mejoa) Tip / osnovni modelc) Serijska številkad) Motor: /3. Skladen je z določili direktiv :4. Sklicevanje na usklajene predpiseh) Zagotovljen nivo zvočne močin) Oseba, pooblaščena za sestavo tehnične knjižice:o) Kraj in datum | SV (Översättning av bruksanvisning i original)EG-försäkran om överensstämmelse (Maskindirektiv 2006/42//EG, bilaga II, de la)1. Företaget2. Försäkrar på eget ansvar att maskinen:Häcksaxanordninga) Typ / Basmodellc) Serienummerd) Motor: /3. Överensstämmer med föreskrifterna i direktivet4. Referens till harmoniserade standarderh) Garanterad ljudeffektniván) Auktoriserad person för upprättandet av den tekniska dokumentationen:o) Ort och datum | TR (Orijinal Talimatların Tercümesi)AT Uygunluk Beyani(2006/42/CE Makine Direktifi, Ek II, bölüm A)1. Şirket2. Şahsi sorumluluğu altında aşağıdaki makinenin: Çit düzelici cilhaz) Tip / Standart modelc) Sicil numarasıd) Motor: /3. Aşağıdaki direktiflerin özelliklerine uygun olduğunu beyan etmektedir:4. Harmonize standartlara atifh) Garanti edilen ses güç seviyesin) Teknik Dosyayi oluşturmaya yetkili kişi:o) Yer ve Tarih |
EN • The content and images in this User Manual were produced expressly for ST. S.p.A. and are protected by copyright – any unauthorised reproduction or modification to the document, either partially or in full, is prohibited.