HT 300e - Hedge trimmers STIGA - Free user manual and instructions
Find the device manual for free HT 300e STIGA in PDF.

User questions about HT 300e STIGA
0 question about this device. Answer the ones you know or ask your own.
Ask a new question about this device
Download the instructions for your Hedge trimmers in PDF format for free! Find your manual HT 300e - STIGA and take your electronic device back in hand. On this page are published all the documents necessary for the use of your device. HT 300e by STIGA.
USER MANUAL HT 300e STIGA
2

natural_image
Technical illustration of a hairpin tool with two views showing the process (no text or symbols present)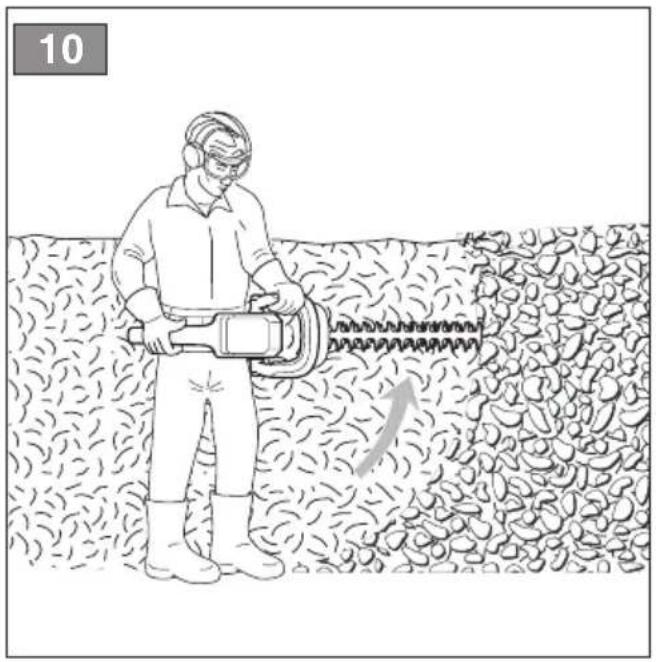

14
15
natural_image
Line drawing of a rectangular electronic device with ventilation grille and ports (no text or symbols)16
natural_image
Line drawing of a portable electric shaver with power cord and plug (no text or symbols)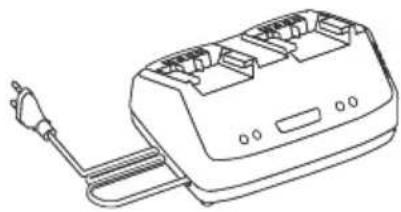
natural_image
Line drawing of a portable electronic device with three ports and a plug, no text or symbols present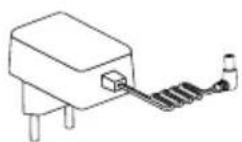
[18] Batarya grubu, mod.
- USO DELLA MACCHINA....7
2.3 MANUTENZIONE, RIMESSAGGIO
6. USO DELLA MACCHINA
4.2 MONTÁŽ NABÍJECÍ ZÁKLADNY (OBR. 3)
6.4 PRACOVNÍ ČINNOST
3.3 PRODUKTETS TYPESKILT (Fig.1)
- XEIPISTHPIA EΛΕΓΧΟΥ 8
- GENERAL INFORMATION .... 1
- SAFETY REGULATIONS....1
- ABOUT THE MACHINE 5
3.1 Machine description and intended use...... 5
3.2 Main components (Fig.1) 5
3.3 Product identification label (Fig.1) 5
3.4 Safety signs (Fig.2) 6
- ASSEMBLY 6
4.1 UNPACKING 6
- CONTROLS....6
5.1 Blade control locking button (Fig. 3.C) ...... 6
5.2 Blade control lever (Fig. 3.A) 6
5.3 Safety switch (Fig. 3.B)....7
- USING THE MACHINE 7
6.1 Preliminary operations....7
6.2 Safety checks....7
6.3 Start-up 7
6.4 Operation 8
6.5 Stop....8
6.6 After use....8
- MAINTENANCE....9
7.1 General Information....9
7.2 Battery....9
7.3 Cleaning the machine.... 10
7.4 Cleaning and lubrication of the cutting means 10
7.5 Nuts and bolts 10
7.6 Cutting means 10
- STORAGE....11
8.1 Storing.... 11
8.2 Storing the battery.... 11
-
HANDLING AND TRANSPORT 11
-
ASSISTANCE AND REPAIRS 11
- WARRANTY COVERAGE.... 11
- TROUBLESHOOTING 12
- ACCESSORIES ON REQUEST.... 13
13.1 Batteries.... 13
13.2 Battery charger.... 13
1. GENERAL INFORMATION
1.1 HOW TO READ THIS MANUAL
NOTE or IMPORTANT These give details or further information on what has been previously indicated and aim to prevent damage to the machine or cause other damage.
The symbol highlights danger. Failure to observe the warning can lead to possible personal and/or third party injury and/or damage.
The paragraphs highlighted in a dotted grey square indicate optional characteristics not available on all models documented in this manual. Check if the characteristics are available on this model.
Whenever reference is made to a position on the machine "front", "back", "left" or "right" hand side, this refers to the operator's working position.
2. SAFETY REGULATIONS
2.1 GENERAL SAFETY WARNINGS
Read all safety warnings, instructions, illustrations and specifications. provided with this power tool. Failure lo follow all instructions listed below may result in electric shock, fire and/or serious injury.
Save all warnings and instructions for future reference.
The term “power tool” in the warnings refers to your mains-opera/eel (cordecl) power tool or battery-operated (cordless) power tool.
1) Work area safety
a) Keep the work area clean and well lit. Cluttered and dark areas invite accidents.
b) Do not operate power tools in explosive atmospheres, such as in the presence of flammable liquids, gases or dust. Power tools create sparks which may ignite the dust or fumes.
c) Keep children and bystanders away while operating a power tool. Distractions can cause you to lose control.
2) Electrical safety
a) Power tool plugs must match the outlet. Never modify the plug in any way. Do not use any adapter plugs with earthed (grounded) power tools. Unmodified plugs and matching outlets will reduce risk of electric shock.
b) Avoid body contact with earthed or grounded surfaces, such as pipes, radiators, ranges and refrigerators. There is an increased risk of electric shock if your body is earthed or grounded.
c) Do not expose power tools to rain or wet conditions. Water entering a power tool will increase the risk of electric shock.
d) Do not abuse the cord. Never use the cord for carrying, pulling or unplugging the power tool. Keep cord away from heat, oil, sharp edges or moving parts. Damaged or entangled cords increase the risk of electric shock.
e) When operating a power tool outdoors, use an extension cord suitable for outdoor use. Use of a cord suitable for outdoor use reduces the risk of electric shock.
f) If operating a power tool in a damp location is unavoidable, use a residual current device (RCD) protected supply. Use of an RCD reduces the risk of electric shock.
3) Personal safety
a) Stay alert, watch what you are doing and use common sense when operating a power tool. Do not use a power tool while you are tired or under the influence of drugs, alcohol or medication. A moment of inattention while operating power tools may result in serious personal injury.
b) Use personal protective equipment. Always wear eye protection. Protective equipment such as a dust mask, non-skid safety shoes, hard hat or hearing protection used for appropriate conditions will reduce personal injuries.
c) Prevent unintentional starting. Ensure the switch is in the off-position before connecting to power source and/or battery pack, picking up or carrying the tool. Carrying power tools with your finger on the switch or energising power tools that have the switch on invites accidents.
d) Remove any adjusting key or wrench before turning the power tool on. A wrench or a key left attached to a rotating part of the power tool may result in personal injury.
e) Do not overreach. Keep proper footing and balance at all times. This enables
better control of the power tool in unexpected situations.
f) Dress properly. Do not wear loose clothing or jewellery. Keep your hair and clothing away from moving parts. Loose clothes, jewellery or long hair can be caught in moving parts.
g) If devices are provided for the connection of dust extraction and collection facilities, ensure these are connected and properly used. Use of dust collection can reduce dust-related hazards.
h) Do not let familiarity gained from frequent use of tools allow you to become complacent and ignore tool safety principles. A careless action can cause severe injury within a fraction of a second.
4) Power tool use and care
a) Do not force the power tool. Use the correct power tool for your application. The correct power tool will do the job better and safer at the rate for which it was designed.
b) Do not use the power tool if the switch does not turn it on and off. Any power tool that cannot be controlled with the switch is dangerous and must be repaired.
c) Disconnect the plug from the power source and/or remove the battery pack, if detachable, from the power tool before making any adjustments, changing accessories, or storing power tools. Such preventive safety measures reduce the risk of starting the power tool accidentally.
d) Store idle power tools out of the reach of children and do not allow persons unfamiliar with the power tool or these instructions to operate the power tool. Power tools are dangerous in the hands of untrained users.
e) Maintain power tools and accessories. Check for misalignment or binding of moving parts, breakage of parts and any other condition that may affect the power tool's operation. If damaged, have the power tool repaired before use. Many accidents are caused by poorly maintained power tools.
f) Keep cutting tools sharp and clean. Properly maintained cutting tools with sharp cutting edges are less likely to bind and are easier to control.
g) Use the power tool, accessories and tool bits etc. in accordance with these instructions, taking into account the working conditions and the work to be performed. Use of the power tool for operations different from those intended could result in a hazardous situation.
h) Keep handles and grasping surfaces dry, clean and free from oil and grease. Slippery handles and grasping surfaces do not allow for safe handling and control of the tool in unexpected situations.
5) Battery tool use and care
a) Recharge only with the charger specified by the manufacturer. A charger that is suitable for one type of battery pack may create a risk of fire when used with another battery pack.
b) Use power tools only with specifically designated battery packs. Use of any other battery packs may create a risk of injury and fire.
c) When battery pack is not in use, keep it away from other metal objects, like paper clips, coins, keys, nails, screws or other small metal objects, that can make a connection from one terminal to another. Shorting the battery terminals together may cause burns or a fire.
d) Under abusive conditions, liquid may be ejected from the battery; avoid contact. If contact accidentally occurs, flush with water. If liquid contacts eyes, additionally seek medical help. Liquid ejected from the battery may cause irritation or burns.
e) Do not use a battery pack or tool that is damaged or modified. Damaged or modified batteries may exhibit unpredictable behaviour resulting in fire, explosion or risk of injury.
f) Do not expose a battery pack or tool to fire or excessive temperature. Exposure to fire or temperature above 130 °C may cause explosion. NOTE The temperature „130 °C“ can be replaced by the temperature „265 °F“.
g) Follow all charging instructions and do not charge the battery pack or tool outside the temperature range specified in the instructions. Charging improperly or at temperatures outside the specified range may damage the battery and increase the risk of fire.
6) Service
a) Have your power tool serviced by a qualified repair person using only identical replacement parts. This will ensure that the safety of the power tool is maintained.
b) Never service damaged battery packs.
Service of battery packs should only be performed by the manufacturer or authorized service providers.
2.2 SPECIFIC SAFETY REGULATIONS FOR HEDGE TRIMMERS
a) Keep all parts of the body away from the blade. Do not remove cut material or hold material to be cut when blades are moving.
Blades continue to move after the switch is turned off. A moment of inattention while operating the hedge trimmer may result in serious personal injury.
b) Carry the hedge trimmer by the handle with the blade stopped and taking care not to operate any power switch. Proper carrying of the hedge trimmer will decrease the risk of inadvertent starting and resultant personal injury from the blades.
c) When transporting or storing the hedge trimmer, always fit the blade cover. Proper handling of the hedge trimmer will decrease the risk of personal injury from the blades.
d) When clearing jammed material or servicing the unit, make sure all power switches are off and the battery pack is removed or disconnected. Unexpected actuation of the hedge trimmer while clearing jammed material or servicing may result in serious personal injury.
e) Hold the hedge trimmer by insulated gripping surfaces only, because the blade may come in contact with hidden wiring.
Contact between cutter blades and a "live" wire may cause exposed metal parts of the tool to become "live" and give the operator an electrical shock.
f) Keep all power cords and cables away from cutting area. Power cords or cables may be hidden in hedges or brushes and can be accidentally cut by the blade.
g) Do not use the hedge trimmer in bad weather conditions, especially when there is a risk of lightning. This decreases the risk of being struck by lightning.
h) During work operations, always hold the machine firmly with both hands. Operating it with only one hand can cause loss of control and serious personal injury.
⚠️ If something breaks or an accident occurs during work, turn off the motor immediately and move the machine away to prevent further damage; if an accident occurs with injuries or third parties are injured, carry out the first aid measures most suitable for the situation immediately and contact the medical authorities for any necessary health care. Carefully remove any debris which could cause damage or injury to persons or animals if ignored.
Prolonged exposure to vibrations can cause injuries and neurovascular disorders (also called "Raynaud's syndrome" or "white finger"), especially to people suffering from circulation disorders. The symptoms can regard the hands, wrists and fingers and are shown through loss of sensitivity, torpor, itching, pain and discolouring of or structural changes to the skin. These effects can be worsened by low ambient temperatures and/or by gripping the hand grips excessively tightly. If the symptoms occur, the length of time the machine is used must be reduced and a doctor consulted.
Ensure regular maintenance and correct storage to maintain machine safety and high performance levels.
- When the machine is stopped for servicing, inspection, or storage, or to change an accessory, shut off the power source, disconnect the machine from the supply and make sure that all moving parts are come to a complete stop.
- Allow the machine to cool beforemaking any inspections, adjustments, and before storing.
- Maintain the machine with care and keep it clean in a dry place out of the reach of children.
- Never use the machine with worn or damaged parts. Faulty or worn-out parts must always be replaced and never repaired. Use original replacement parts only.
- To reduce fire risks, do not leave containers with debris inside a room.
The noise and vibration levels shown in these instructions are the maximum levels for use of the machine. Suitable preventive measures must be adopted to eliminate possible harm caused by high noise levels and vibration-induced stresses; utilise the machine at constant speed, firmly hold the handgrip with adequate strength, utilise the machine at the minimum speed required to perform the work, wear ear-protection devices, make frequent and adequate pauses during the work.
2.4 BATTERY / BATTERY CHARGER
ATTENTION
The following safety rules complement the safety rules contained in the battery charger manual.
- Only use battery chargers recommended by the manufacturer to recharge batteries. An inadequate battery charger may cause electric shock, overheating or corrosive liquid to leak from the battery.
- Use only batteries specifically designed for your power tool. The use of other batteries may cause injuries and fire risks.
- Keep all unused batteries at a distance from paper clips, coins, keys, nails, screws or other small metal objects as contact with the same can cause short circuits. Short circuits between battery contacts can lead to explosion or fires.
- Never use the battery charger in environments in the presence of vapours, flammable substances or on easily flammable surfaces such as paper, fabric, etc. The battery charger heats up during recharging and may cause a fire.
- When transporting batteries, make sure the contacts never come into contact with each other and never use metal containers to transport them.
2.5 ENVIRONMENTAL PROTECTION
- Scrupulously comply with local regulations for the disposal of packaging, deteriorated parts or any elements with a strong environmental impact; this waste must not be disposed of with regular waste, but must be separated and taken to collection centres, which will recycle the materials.
- Scrupulously comply with local regulations for the disposal of waste materials
- When the machine is withdrawn from service, do not dispose of it in the environment, but take it to a waste disposal facility in accordance with the local regulations in force.

Do not throw electrical equipment away with domestic waste. According to the European Directive 2012/19/EU on electrical and electronic equipment waste and its implementation, according to UK Regulation “The waste electrical and electronic equipment regulations 2013 (as amended)” and according to national regulations, old electrical equipment must be collected separately, for eco-compatible recycling. If electrical equipment is disposed of in landfills or in the ground, hazardous substances can leak into the groundwater and contaminate the food chain, damaging your health and well-being. For further information on the disposal of this
product, contact your dealer or a domestic waste collection service.
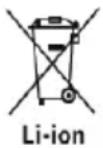
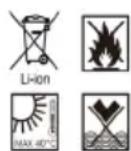
At the end of their working life, dispose of batteries paying due attention to the environment. Batteries contain material classified as hazardous for you and the environment. They must be removed and disposed of separately at a facility that accepts lithium-ion batteries.

Separate waste collection of the products and packaging used allows the materials to be recycled and reused. Reuse of recycled materials help to prevent environmental pollution and reduces the demand for raw materials.
3. ABOUT THE MACHINE
3.1 MACHINE DESCRIPTION AND INTENDED USE
This machine is a garden tool and more precisely a battery-powered portable hedge trimmer.
The machine is essentially composed of a motor which drives a cutting means.
The operator can operate the machine and use the main controls, always keeping a safe distance from the cutting means.
3.1.1 Intended use
This machine was designed and manufactured for:
• cutting and trimming bushes and hedges comprising shrubs with small branches
- being used by one operator.
3.1.2 Improper use
Any other use that does not comply with the above, can be dangerous and cause damage to people and/or property. Examples of improper use may include, but are not limited to:
- cutting grass in general and in particular close to kerbs;
- shredding of materials for composting;
- pruning;
-
using the machine with the cutting means above the operator's shoulder level;
-
use of the machine for cutting non-plant material;
- using cutting means other than those found in the "Technical Data" table. Risk of serious injury and injuries;
• using of the machine by more than one person.
IMPORTANT Improper use of the machine will void the warranty and relieves the Manufacturer of any liability, placing all responsibility for damage or injury, to him/herself or third parties, on the user.
3.1.3 Type of users
This machine is intended for use by consumers, i.e. non-professional operators. It is intended for "hobby-related activities".
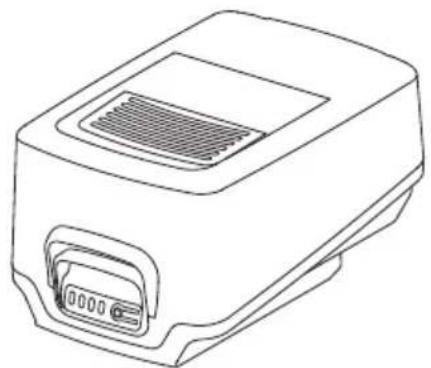
3.2 MAIN COMPONENTS (Fig.1)
A. Engine: supplies the drive power to the cutting means.
B. Blade (cutting means): the element designed to cut the vegetation.
C. Front hand grip: used to handle the machine and equipped with the safety switch.
D. Rear hand grip: used to handle the machine and equipped with the main control buttons.
E. Blade protection (for machine transport and handling): protects against accidental contact with the cutting means that can cause serious injuries.
F. Battery (if not supplied with the machine, see chapter : 13 “optional attachments” device that supplies electric current to the tool; its specifications and regulations for use are described in a specific manual.
G. Battery charger (if not supplied with the machine, see chapter : 13 “optional attachments” device used to charge the battery; its specifications and regulations for use are described in a specific manual.
H. Rail
I. Charging dock
J. Loop
K. Screws and plastic dowels supplied
IMPORTANT The machine works only with both batteries inserted.
NOTE The batteries can be charged directly on the machine with its charging dock.
3.3 PRODUCT IDENTIFICATION LABEL (Fig.1)
- Name and address of Manufacturer
- Type of machine
- Sound power level
- Conformity marking
- Power supply frequency and voltage
- Year of manufacture
- Serial number
- Article code
- Blade speed
Write the identification data of the machine in the specific space on the label on the back of the cover page.
IMPORTANT Quote the information on the product identification label whenever you contact an Authorised Service Centre.
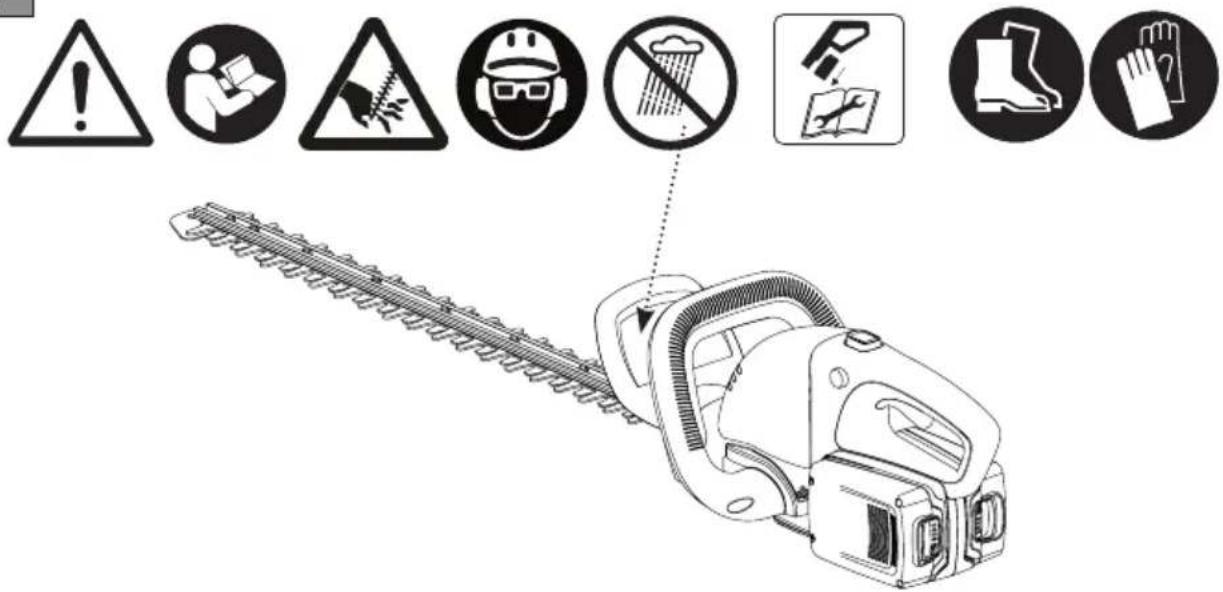
3.4 SAFETY SIGNS (Fig.2)
The machine has various symbols on it. Meanings of the symbols:

WARNING! DANGER! The failure to use this machine correctly can be hazardous for oneself and others.

WARNING! Read the owner's manual before using the machine.

DANGER! Keep hands away from blade

Use ear and headprotection, and goggles.

Wear non-slip safety footwear.

Use thick non-slip protective gloves.

Do not leave the machine in the rain (or in damp conditions)
Remove the battery before performing any inspections, cleaning or maintenance/adjustment interventions on the machine
WARNING! For battery and battery charger see the dedicated manual
IMPORTANT Any damaged or illegible decals must be replaced. Order replacement decals from an Authorised Service Centre.
4. ASSEMBLY
IMPORTANT The safety regulations to follow are described in chap. 2. Strictly comply with these instructions to avoid serious risks or dangers.
For storage and transport purposes, some components of the machine are not installed in the factory and have to be assembled after unpacking. Follow the instructions below.
⚠ Unpacking and completing the assembly should be done on a flat and stable surface, with enough space for machine handling and its packaging, always making use of suitable equipment.
4.1 UNPACKING
- Carefully open the packaging, paying attention not to lose components.
- Consult the documentation in the box, including these instructions.
- Remove the machine from the box.
- Dispose of the box and packaging in compliance with local regulations
⚠️ Before assembling (if necessary), make sure the batteries are not inserted in their housing.
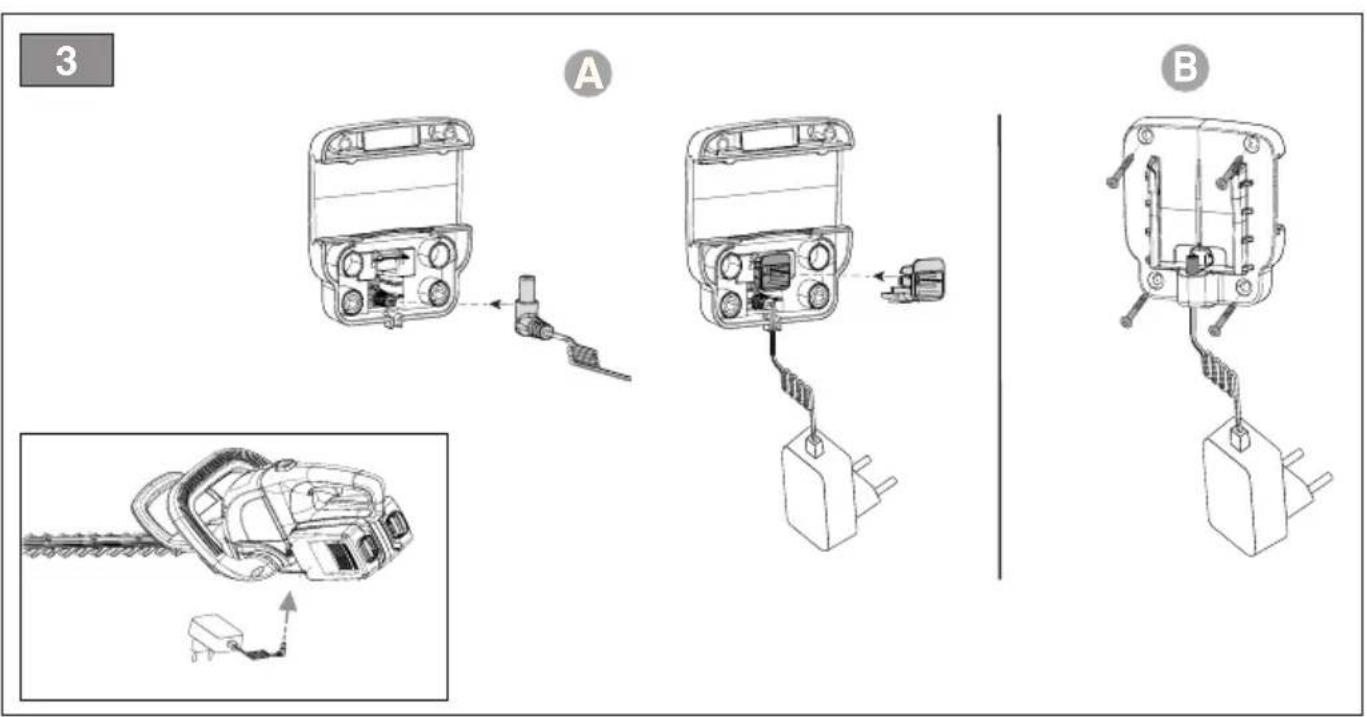
4.2 ASSEMBLY OF THE CHARGING DOCK (Fig. 3)
NOTE The machine can be hung on the wall, making sure that the rear hand grip is in its original position.
The batteries can be charged directly on the machine with its charging dock (Fig. 3.A).
NOTE The charging dock can be fixed to the wall (Fig. 3.B) (with the screws and the plastic dowels supplied, Fig. 1. K).
4.3 ASSEMBLY OF THE RAIL FOR WALL FIXING (Fig. 4)
Once the rail (Fig. 1. H) has been fixed to the wall (with the screws supplied), slide the charging dock (Fig. 4. A) and the loop (Fig. 4. B).
5. CONTROLS
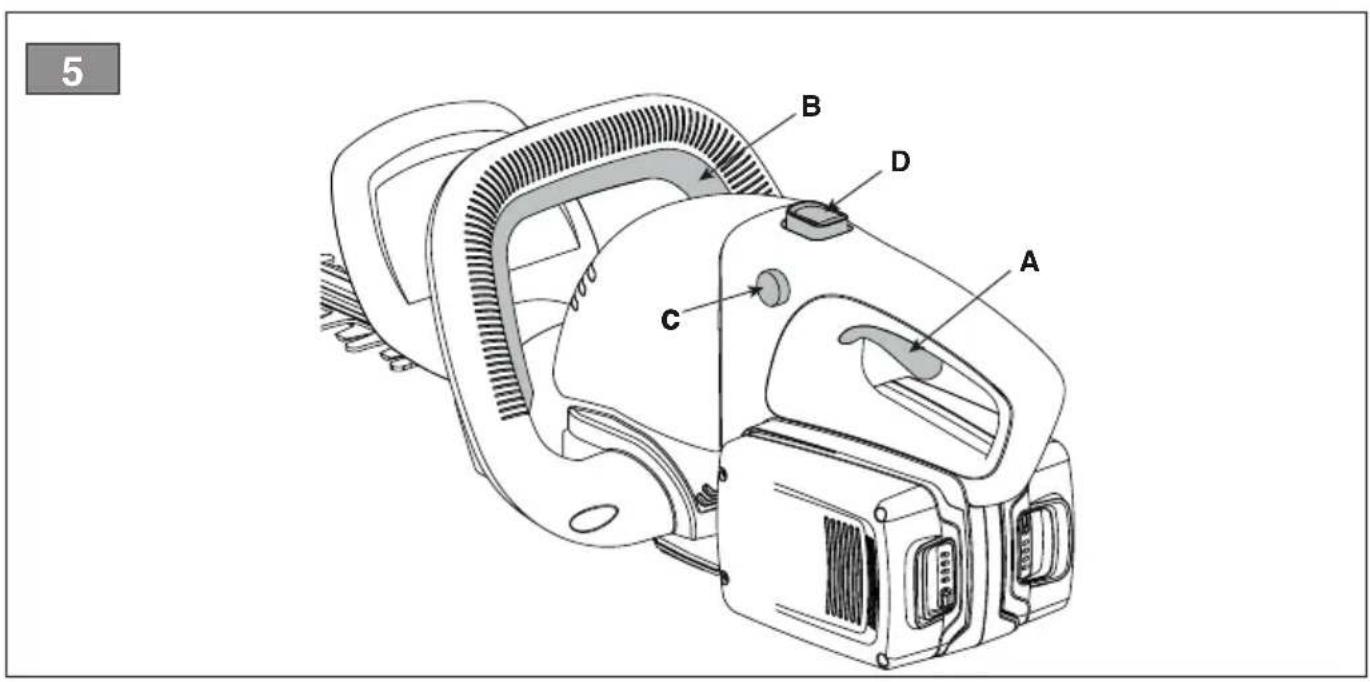
5.1 BLADE CONTROL LOCKING BUTTON (Fig. 5.C)
Allows operation of the blade control lever (Fig. 5.A).
5.2 BLADE CONTROL LEVER (Fig. 5.A)
Allows the blade (cutting device) to be operated.
NOTE The cutting device stops automatically when the lever is released
5.3 SAFETY SWITCH (Fig. 5.B)
The safety switch, on the front handle, provides additional safety, since it must be held down together with the blade control lever in order to operate the cutting device.
NOTE The cutting device stops automatically when the lever is released
5.4 REAR HANDGRIP RELEASE BUTTON (Fig. 5.D)
It's used to adjust the rear handgrip (Fig. 1.D) to 5 different positions in relation to the cutting means to make trimming your hedges easier (par 6.4.1).
The handgrip must only be adjusted when the machine is switched off.
6. USING THE MACHINE
IMPORTANT The safety standards to be followed are described in chapter. 2. Strictly comply with these instructions to avoid serious risks or dangers.
6.1 PRELIMINARY OPERATIONS
Place the machine in a stable horizontal position on the ground.
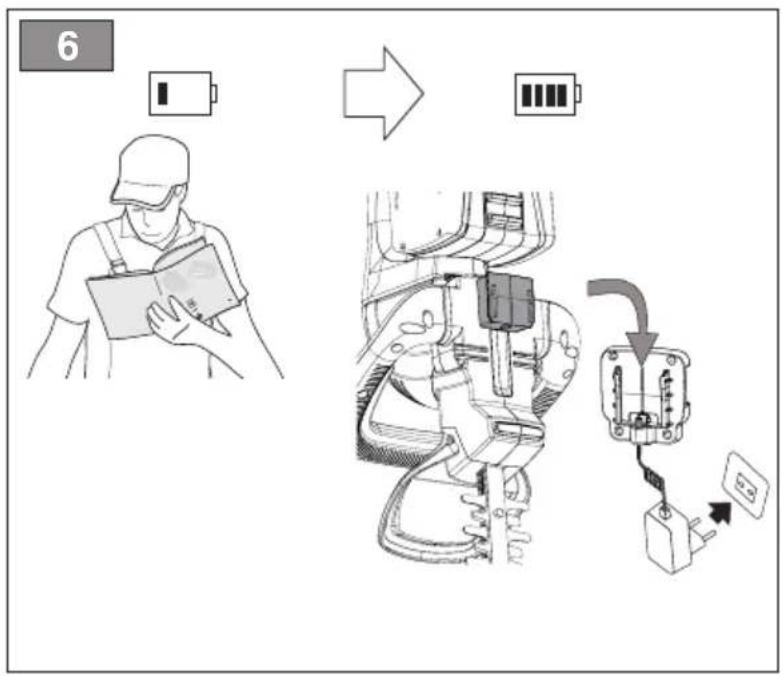
6.1.1 Checking and charging the battery (Fig. 6)
Before each use check the batteries charge status according to the instructions in the battery booklet.
NOTE The machine works only with both batteries inserted.
6.2 SAFETY CHECKS
⚠️ Always carry out the safety checks before use.
6.2.1 General check
| Object | Result |
| Handgrips (Fig. 1.C, Fig. 1.D) and guards | Are clean, dry and fixed firmly to the machine |
| Screws on the machine and blade | Correctly tightened (not loose) |
| Cooling air ducts | Not clogged |
| Blade (Fig. 1.B) | Sharp, not damaged or worn, well sharpened. |
| Guards | Intact, undamaged. |
| Battery (Fig. 1.F) | No damage to the casing, no liquid leakage. |
| Machine | No signs of damage or wear. No abnormal vibrations.No abnormal sound. |
| Levers, buttons, and safety switches | They must move freely, not be forced and when released they must return automatically and rapidly to the neutral position. |
6.2.2 Machine operating test
| Action Result | |
| 1. Start the machine (para. 6.3);2. Release the blade control lever (Fig. 5.A) or the safety switch (Fig. 5.B,) | 1. The blade should move2. The controls should return automatically and rapidly to the neutral position and the blade should stop |
⚠️ If any of the results fail to match the indications provided in the tables below, do not use the machine! Take it to a service centre to be checked and repaired if necessary.
6.3 START-UP
NOTE It is recommended to use the machine at a temperature between -10^ and 60^
Starting the machine causes the simultaneous engagement of the blade.
Don't start the machine when it's under charging status.
NOTE Operate the machine only on a firm, level surface.
- Remove the blade guard (Fig. 1.E) (if used)
- Make sure the blade is not touching the ground or any other object
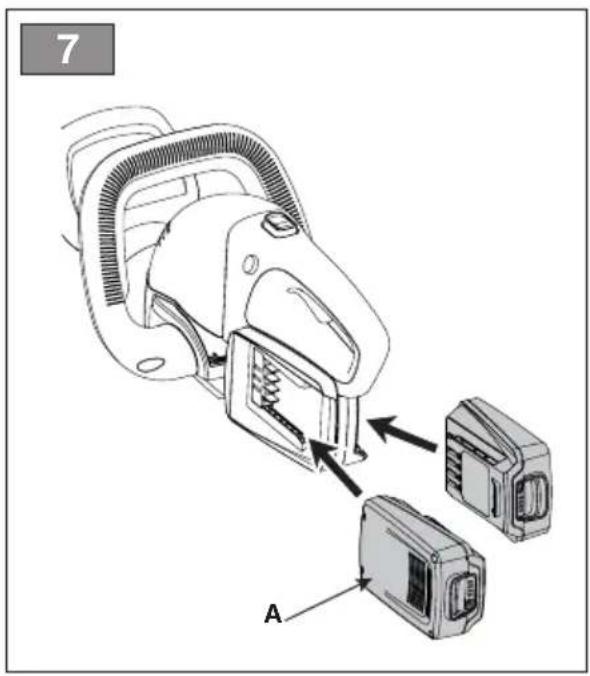
- Fit the batteries inside their housing (Fig. 7.A) pressing down until you hear the "clicks" firmly into position and assure the electrical contact;
NOTE The machine works only with both batteries inserted.
- Take a firm and balance position
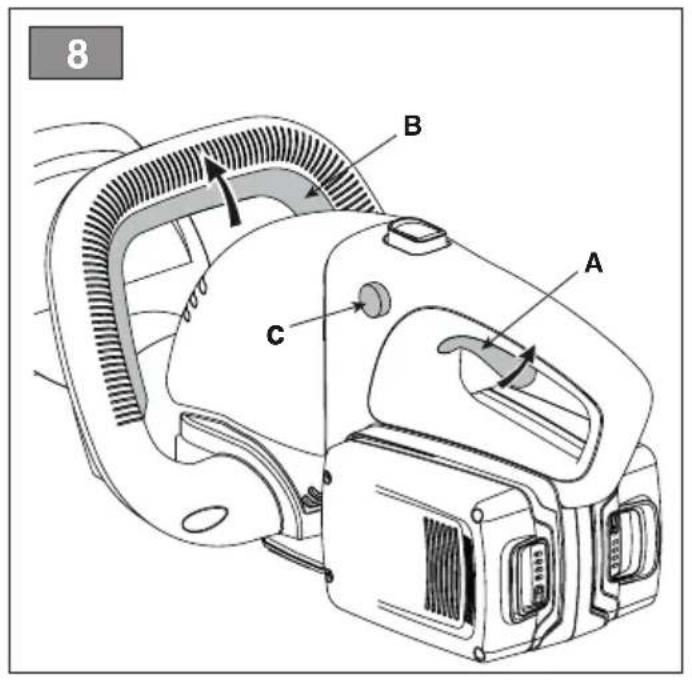
- Press the control lock button (Fig.8.C)
- Press the blade control lever (Fig. 8.A)
- Press the safety switch (Fig. 8.B).
6.4 OPERATION
During use, always hold the machine firmly with two hands, using the machine with the cutting means under the operator's shoulder level.
Always use the machine at ground level and not on ladders or any other unstable support.
Do not remove cut material or hold material to be cut when blades are moving. Make sure the machine is turned off when removing cut material.
NOTE During use, the battery is protected against total drainage with a protective device that switches off the machine and stops it from working.
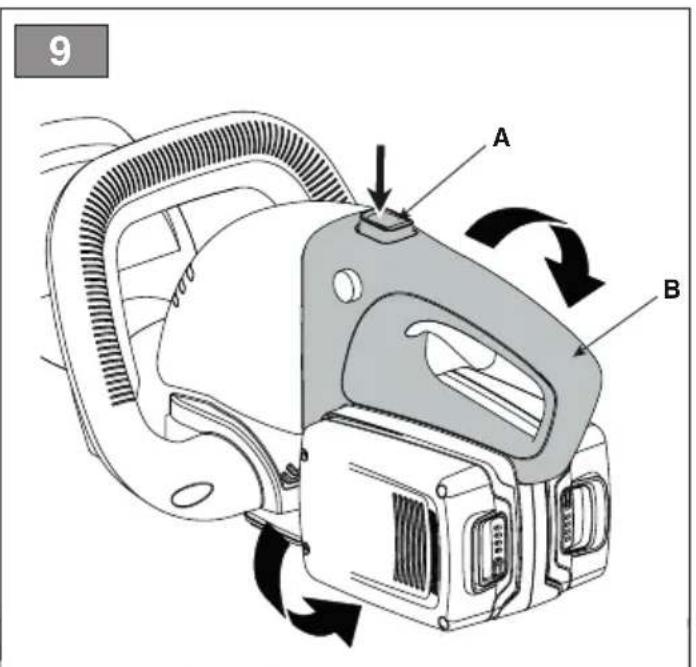
6.4.1 Adjusting the rear handgrip (Fig.9)
Perform this operation with the machine off.
- Press the rear handgrip release button (Fig. 9.A)
- Start rotating the rear handgrip (Fig. 9.B)
- Release the button
- Rotate the handgrip until it clicks into the desired position.
IMPORTANT Before using the machine check that the release button has correctly returned to the block position, and the rear handgrip is firmly attached.
When working, the rear handgrip must always be in a vertical position, whatever the position of the cutting means
6.4.2 Work techniques
It is recommended to trim the two vertical sides of the hedge before trimming the top.
NOTE Battery power reserve (and therefore the cuttable vegetation area before charging is required) depends on many factors described in (para. 7.2.1).
6.4.2.a Vertical cutting (Fig. 10)
Proceed by cutting using curved movements from the bottom towards the top, keeping the blade as far from the body as possible.
6.4.2.b Horizontal cutting (Fig. 11)
The best results will be obtained with the blade slightly inclined ( 5^ - 10^ ) in the direction you are cutting, proceed with a curved movement, slowly and without interruptions, especially in the case of very thick hedges.
6.4.3 Advice for operation
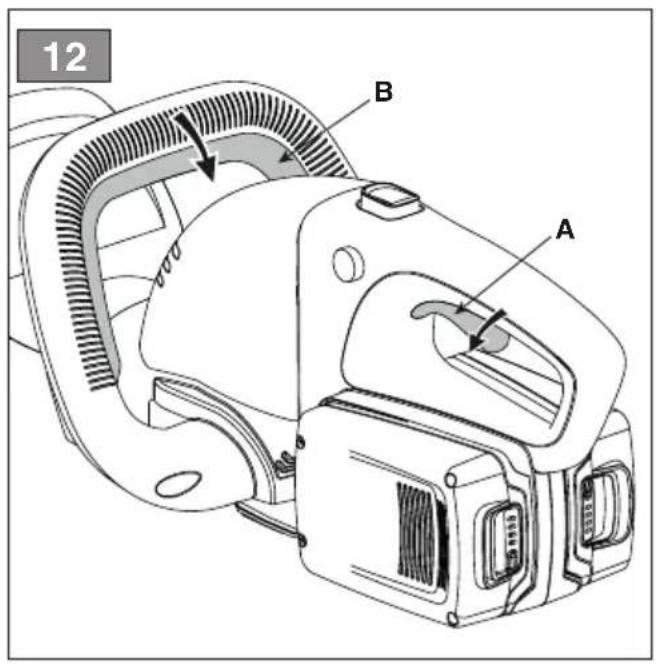
- If the blades block while running or get caught up in the hedge branches:
- Release the blade control lever (Fig. 12.A) or the safety switch (Fig. 12.B) immediately;
- Wait for the cutting means to come to a halt
- Remove the batteries (para. 7.2.2)
- Remove the jammed material.
6.4.4 Lubricating the blades whilst working
If the cutting means overheats whilst working, it is necessary to lubricate the internal surfaces of the blades (para. 7.4).
This operation can only be done with the machine off and the batteries removed from their housing.
6.5 STOP
- Release the blade control lever (Fig. 12.A) or the safety switch (Fig. 12.B).
When you have stopped the machine, it will take a few seconds for the cutting means to stop.
Always stop the machine when moving between work areas.
Do not keep your hand on the safety switch when moving the machine to avoid accidentally starting the machine.
6.6 AFTER USE
- If the machine isn't in charge, remove the batteries from their housing
- When the cutting means has halted, fit the blade guard (Fig. 1.E).
- Allow the engine to cool before storing in an enclosed space.
- Clean (para. 7.3).
- Check there are no loose or damaged components. If necessary, replace the damaged components and tighten any screws and loose bolts or contact the authorised service centre.
- Check there are no damages to the machine. If necessary contact the authorised service centre.
IMPORTANT Always remove the batteries and fit the blade guard whenever the machine is unused or left unattended.
6.6.1 Removing the batteries
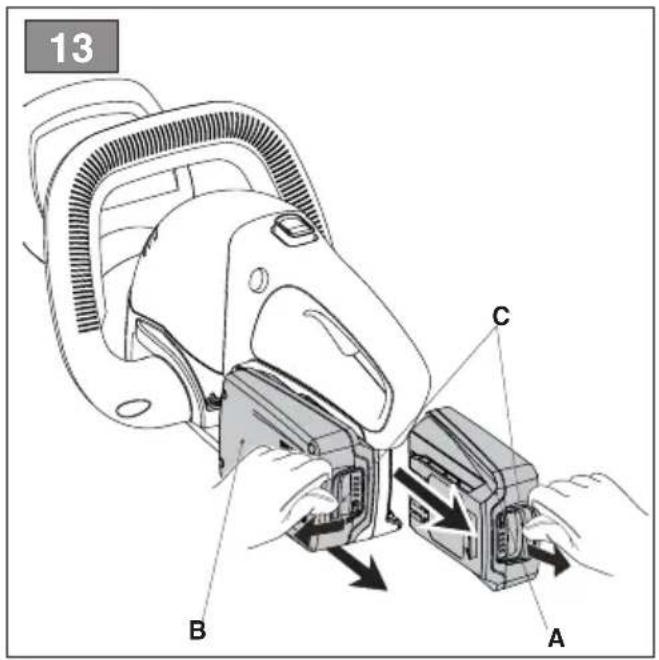
To remove the batteries press the lock button on the battery (Fig. 13. C).
7. MAINTENANCE
7.1 GENERAL INFORMATION
⚠️ Before performing any inspections, cleaning or maintenance/adjustment interventions on the machine:
- Stop the machine
- Remove the batteries from their housing (never leave the battery inserted or within the reach of children or unauthorised persons)
- When the cutting means is stationary, apply the blade protection device, (except when working directly on the blade)
- Allow the engine to cool before storing in an enclosed space
- Use suitable clothing, protective gloves and goggles
- Read the relevant instructions.
IMPORTANT Any maintenance and adjustment operations not described in this manual must be carried out by your dealer or Authorised Service Centre.
7.2 BATTERY
7.2.1 Battery power reserve
Battery power reserve (and therefore the cuttable vegetation area before charging is required) mainly depends on:
a. Environmental factors, that cause higher energy requirements:
- cutting/trimming of very thick or wet hedges;
- cutting/trimming of bushes with branches that are too thick;
b. operator behaviour that should be avoided:
- switching the machine on and off frequently whilst working;
- adopting a cutting technique that is unsuitable for the work to be performed (para. 6.4.1);
- cutting speed unsuitable for the condition of the hedge to be cut.
To optimise battery power reserve it is always recommended to:
• cut the hedge when dry;
- set a cutting speed suitable for the condition of the shrubs;
- use the most appropriate technique for the work to be performed.
If the need arises to use the machine for sessions which exceed the capability of the standard batteries, it is possible to:
• purchase other two standard batteries to immediately replace the discharged batteries, without compromising the continuity of operations;
- purchase two batteries with an extended power reserve compared to the standard version (para. 13.1).
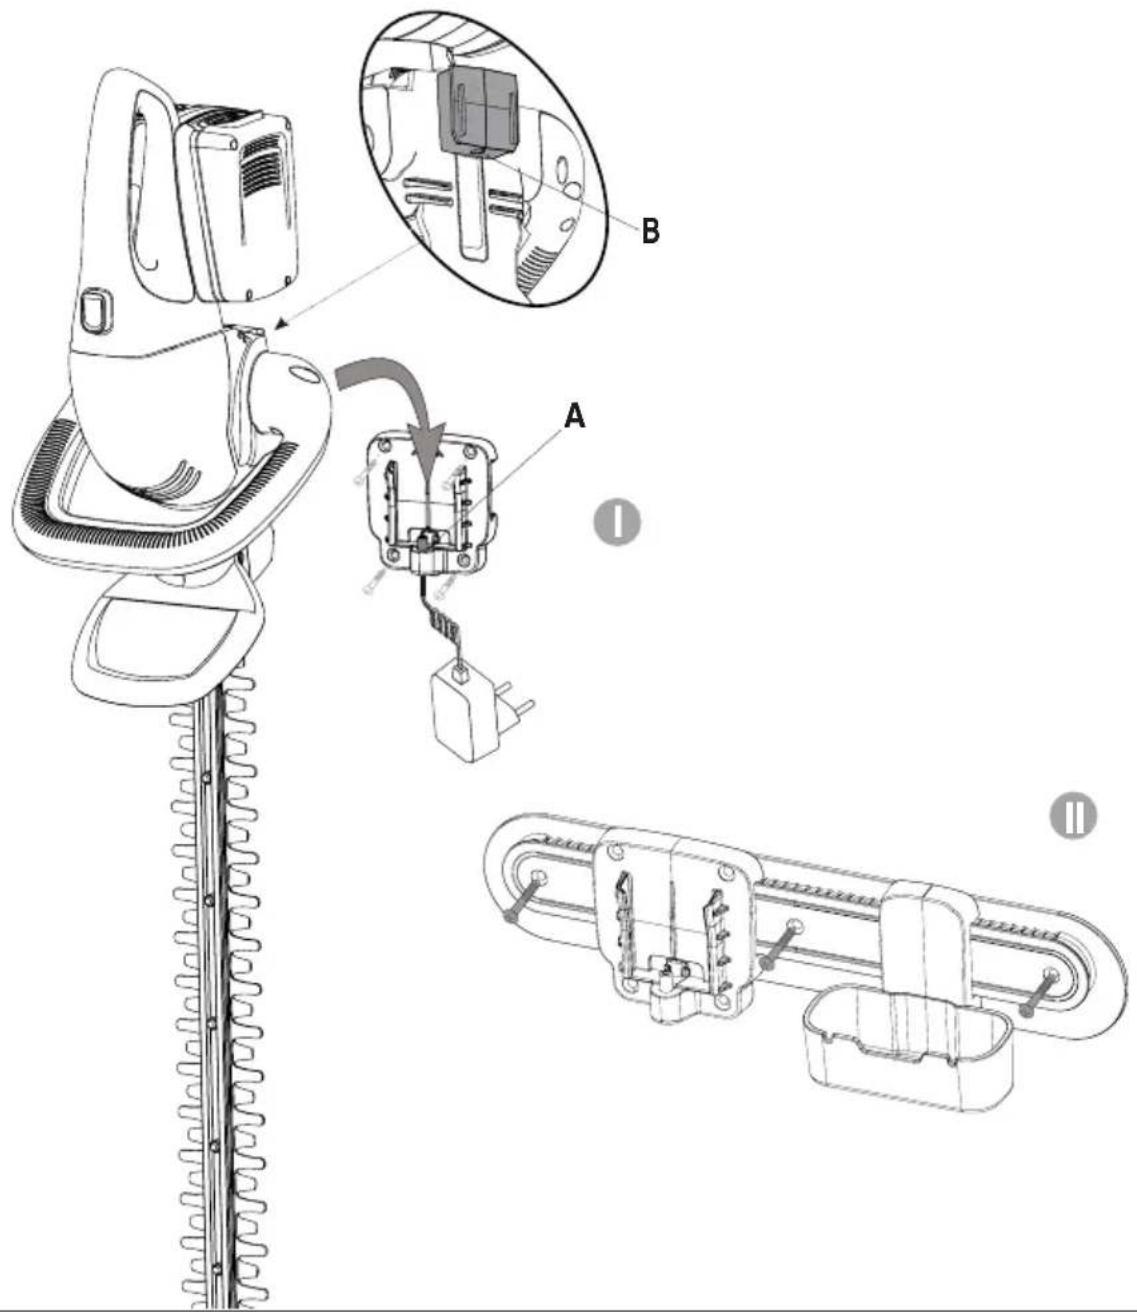
7.2.2 Battery charge directly on the machine (Fig. 14)
The batteries can be charged directly on the machine by connecting the connector (Fig. 14. A) to the machine (Fig. 14. B) via its charging dock.
The machine can be hung on the wall:
- fixing the charging dock directly to the wall (Fig.14.1);
- fixing the rail on the wall on which to slide the charging dock and the loop (Fig.14.II).

Fit the bar cover before hanging the nine on the wall
NOTE The battery is equipped with a guard that inhibits charging if the environmental temperature is not between 0^ C - 40^ C.
IMPORTANT The battery can be charged at any time, even partially, with no risk of damaging it.
The batteries are partially charged in sequence, as per the scheme:
| Phase | Battery (Fig. 13) | Charger |
| 1 | A (right) | 40% |
| 2 | B (left) | 40% |
| 3 | A (right) | 100% |
| 4 | B (left) | 100% |
NOTE Partial charge allows you to use the machine to finish the job without waiting for a full charge.
NOTE Don't remove the batteries when the machine is under charging.
NOTE Don't start the machine when it's under charging status.
7.3 CLEANING THE MACHINE
- To reduce fire hazards, keep the machine and, in particular, the motor free of leaves, branches or excessive grease.
• Always clean the machine after use with a damp cloth dipped in neutral detergent. - Remove all traces of humidity using a soft damp cloth. Humidity can generate risks of electric shocks.
- Do not use aggressive detergents or solvents to clean the plastic parts or hand grips.
- Do not spray water onto the motor and electrical components and prevent them from getting wet.
- To avoid overheating and damage to the motor or the battery, always keep the cooling air vents clean and free of debris.
7.4 CLEANING AND LUBRICATION OF THE CUTTING MEANS
To increase the efficiency and working life of the blades, clean and lubricate them carefully after each work session:
⚠ Do not touch the cutting device until the battery has been removed and the cutting device is completely stationary.
- Place the machine in a stable horizontal position on the ground.
- Use a soft cloth to clean the blades, along with a brush to remove more difficult dirt and debris.
- Lubricate the blades by applying a light layer of specific oil, preferably the non-pollutant type, along the upper edge of the blade.
7.5 NUTS AND BOLTS
- Keep all nuts, bolts and screws tight to be sure the equipment is in safe working condition.
- Check regularly that the handles are fixed firmly.
7.6 CUTTING MEANS
⚠ Do not touch the cutting means until the batteries have been removed and the cutting means is completely stationary.
7.6.1 Checks
Periodically check that the blades are not bent, damaged or deformed and that the screws are adequately tightened.
Adjustment of the distance between blades is not necessary, as this is predetermined by the manufacturer.
7.6.2 Sharpening
It is necessary to sharpen the blades when the trimming performance decreases and the branches tend to stick together.
⚠ For safety reasons, sharpening must be done by an Authorised Service Centre with suitable skills and equipment for the job; without risking any damage to the blade which would make it unsafe when used.
⚠️ Always replace and never repair a blade which has blunt cutting edges.
7.6.3 Replacement
The blade must never be repaired, but must be replaced as soon as signs of breaking, wearing, bending are noted or the sharpening limit is exceeded. For safety reasons replacements must be performed by an Authorised Service Centre.
IMPORTANT Blades displaying the code indicated on the Technical Data table should be used on this machine.
Given product evolution, the blades listed in the "Technical Data" table may be replaced in time with others having similar interchangeable and operating safety features.
8. STORAGE
IMPORTANT The safety regulations to follow for putting into storage are described in paragraph 2.3. Strictly comply with these instructions to avoid serious risks or hazards.
8.1 STORING
When the machine is to be stored away:
- Remove the batteries from their housing;
- When the cutting means has halted, fit the blade guard;
- Allow the engine to cool before storing in an enclosed space;
- Clean (para. 7.3);
- Make sure there are no loose or damaged components. If necessary, replace any
damaged components and tighten any screws and loose bolts or contact the authorised service centre;
-
Store the machine:
-
in a dry place;
– protected from inclement weather;
– in a place out of children's reach; -
making sure that keys or tools used for maintenance are removed.
-
the machine can be hung on the wall (Fig. 14. I - II).
NOTE Make sure that the wall can hold loads of minimum 20 kg
8.2 STORING THE BATTERY
Charge. (par. 7.2.2)
The battery must be stored in closed and humidity-free environments, at a temperature between:
0°C - 60°C for 1 month
0°C - 45°C for 3 months
0°C-25°C for 1 year
NOTE If unused for any length of time, charge the battery every two months to prolong its working life.
9. HANDLING AND TRANSPORT
Whenever the machine is to be handled or transported you must:
- Stop the machine (para. 6.5);
- Make sure that all moving parts have come to a complete stop
- Remove the batteries from their housing
– Wear protective work gloves - When the cutting means has halted, fit the blade guard
- Only hold the machine using the hand grips and position the cutting means in the opposite direction to that used during operations
- Make sure that machine movements do not cause damage or injuries.
When transporting the machine on a vehicle, always:
- Position it so that it does not cause a hazard to anyone
– Fasten the machine securely with cables or chains.
10. ASSISTANCE AND REPAIRS
This manual provides all the necessary information to run the machine and for correct basic maintenance operations which can be performed by the user. Any regulations and maintenance operations not described herein must be carried out by your Dealer or Authorised Service Centre.
Any operations performed in unauthorised centres or by unqualified persons will totally invalidate the
Warranty and all obligations and responsibilities of the Manufacturer.
- Non-original parts and attachments are not approved; use of non-original spare parts and attachments will jeopardise the safety of the machine and relieve the Manufacturer from all obligations or liabilities.
- Original spare parts are supplied by authorised Dealers and by Authorised Service Centres.
11. WARRANTY COVERAGE
The warranty conditions are intended for consumers only, i.e. non-professional operators.
The warranty covers all material quality and manufacturing defects recognised during the warranty period by your Dealer or Authorised Service Centre.
The warranty is restricted to the repair or replacement of components recognised as faulty.
The warranty only applies to machines subjected to regular maintenance.
The warranty does not cover damages resulting from:
- Failure to become familiar with the documentation accompanying the machine (Instruction manuals).
- Professional use.
-
Carelessness, negligence.
-
Poor maintenance.
- Modification to the machine.
- Use of non-genuine spare parts (adaptable parts).
-
Use of accessories not supplied or approved by the manufacturer.
-
External causes (lightning, impact, presence of foreign bodies inside the machine) or incidents.
- Incorrect use or assembly are prohibited by the manufacturer.
The warranty does not cover:
- The maintenance operations (described in the instruction manual).
• Normal wear and tear of consumables.
• Normal wear and tear. - Deterioration in the appearance of the machine due to use.
- Any ancillary expenses related to the enforcement of the warranty, such as costs incurred to travel to the user's location, transfer of the machine to the Dealer, rental of replacement equipment or calling of independent enterprises to perform maintenance work.
The user is protected by his or her own national legislation. The user's rights under the national laws or his or her own country are not in any way restricted by this warranty.
12. TROUBLESHOOTING
| PROBLEM PROBALE CAUSE SOLUTION | ||
| 1. Blade control lever, blade control locking button and safety switch operated but the machine will not start (mod. HT 20 Li S) | Battery is not inserted or is inserted incorrectly | Make sure that the batteries are inserted correctly (Fig. 7.A) |
| Low battery capacity Check the batteries | es status and charge if necessary (Cap.7) | |
| Hedge trimmer is damaged. Do not use the hedge trimmer.Remove the battery and contact an authorised service centre. | ||
| 2. The motor shuts down whilst working | Battery is not inserted correctly | Make sure that the batteries are inserted correctly (Fig. 7.A) |
| Low battery capacity Check the batteries | es status and charge if necessary (para. 7.2.2) | |
| 3. The cutting means overheats whilst working | Insufficient blade lubrication Turn off the machine, wait until the cutting means is stationary, remove the batteries and lubricate the blades (para. 7.4) | |
| 4. The cutting means comes into contact with a line or electric cable | - DO NOT TOUCH THE BLADE AS IT | MAY BE LIVE AND BE EXTREMELY DANGEROUS! Grasp the machine using the insulated rear handgrip only and position it at a safe distance from yourself.Disconnect the current that powers the severed line or mains cable and remove the batteries before freeing the blade teeth. |
| 5. The cutting means comes into contact with a foreign body. | - Turn off the machine remove the batteries and:- Inspect for damage- Check for and tighten any loose parts- Contact an Authorised Service Centre for replacement or repair damaged parts with parts having equivalent specifications. | |
| 6. Excessive noise and/or vibration is experienced whilst working | Loose or damaged parts | Turn off the machine remove the batteries and:- inspect for damage;- check for and tighten any loose parts;- Contact an Authorised Service Centre for replacement or repair damaged parts with parts having equivalent specifications. |
| 7. The machine gives off smoke whilst working | Hedge trimmer is damaged. Do not use the hedge trimmer. Immediately turn off the machine remove the batteries and Contact an Authorised Service Centre. | |
| 8. Battery power reserve is low | Severe working conditions requiring greater current absorption | Optimise operations (para. 7.2.1) |
| Battery is insufficient for operating requirements | Use extended batteries (para. 13.1) | |
| Decrease in battery capacity | Purchase new batteries | |
| PROBLEM PROBABLE CAUSE SOLUTION | ||
| 9. The battery charger is not charging the battery | Battery is not correctly inserted in the battery charger or plug not properly connected to the machine | Check it is correctly inserted (para. 7.2.2) |
| Unsuitable environmental conditions Charge the battery in places with suitable temperatures (see battery/battery charger instruction manual) | ||
| Dirty contacts Clean the contacts | ||
| The battery charger is not energised Check it is plugged in and the power socket is energised | ||
| Faulty battery charger Replace with an original spare part | ||
| Battery too hot or too cold Bring the battery to an ambient temperature between 4-40°C | ||
| If the problem persists, refer to the battery/battery charger manual | ||
If problems persist after implementing the solution, contact your Dealer.
13. ACCESSORIES ON REQUEST
13.1 BATTERIES (Fig. 15)
Different capacity batteries are available to suit specific operating requirements.
The list of homologated batteries for this machine can be found in the “Technical Data” table.
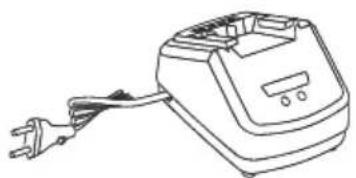
13.2 BATTERY CHARGER (Fig. 16)
There are several devices for recharging the battery.
The list of homologated battery chargers for this machine can be found in the “Technical Data” table.
ÍNDICE
1.1 KUIDAS KASUTUSJUHENDIT LUGEDA
3.2 PÕHIKOMPONENDID (Jn 1)
3.3 TOOTE ANDMESILT (Jn1)
9. MANUTENTION ET TRANSPORT
2.5 BESCHERMING VAN DE OMGEVING
7.5 MOEREN EN SCHROEVEN VOOR BEVESTIGING
13.1 ACCU'S (AFB. 15)
2.3 VEDLIKEHOLD, LAGRING
3. BLI KJENT MED MASKINEN
3.1 BESKRIVELSE AV MASKINEN OG BEREGNET BRUK
6.1 CZYNNOŚCI WSTĘPNE
6.4 PRACOVNÁ ČINNOSŤ
INNEHÅLLSFÖRTECKNING
- ALLMÄN INFORMATION....1
- SÄKERHETSNORMER 1
- LÄRA KÄNNA MASKINEN 5
UK DECLARATION OF CONFORMITY
(Supply of Machinery (Safety) Regulations 2008, S.I. 2008 No. 1597, Annex II, part A)
- The company: ST. S.p.A. – Via del Lavoro, 6 – 31033 Castelfranco Veneto (TV) – Italy
- Hereby declares under its own responsibility that the machine (function):
Powered hand-held hedge trimmer, hedge cutting/trimming
a) Homologation type:
c) Serial number:
d) Engine: battery-operated
HT 20 Li B
23A••HTR000001 ÷ 99L••HTR999999
- Conforms to UK Regulations:
• S.I. 2008/1597 - Supply of Machinery (Safety) Regulations 2008
• S.I. 2001/1701 - Schedule 8 - Noise Emission in the Environment by Equipment for use Outdoors Regulations 2001
• S.I. 2016/1091 - Electromagnetic Compatibility Regulations 2016
• S.I. 2012/3032 - The Restriction of the Use of Certain Hazardous Substances in Electrical and Electronic Equipment Regulations 2012
- Reference to harmonised standards:
EN 62841-1:2015+AC:2015+A11:2022
EN 62841-4-2: 2019+A1:2022+A11:2022
EN IEC 55014-1:2021
EN IEC 55014-2:2021
EN IEC 63000:2018
g) Measured sound power level:
h) Guaranteed sound power level:
k) Power installed:
n) Person authorised to compile the technical file:
o) Castelfranco Veneto, 01/09/2023
85.5 dB(A)
87 dB(A)
/ kW
ST. S.p.A.
Via del Lavoro, 6
31033 Castelfranco Veneto (TV) - Italia
CEO Stiga Group
Sean Robinson

UK Importer:
STIGA LTD
Unit 8, Bluewater Estate Plympton,
Devon, PL7 4JH, England

| FR (Traduction de la notice originale)Déclaration CE de Conformité(Directive Machines 2006/42/CE, Annexe II, partie A)1. La Société2. Déclare sous sa propre responsabilité que la machine : Taille-haie de jardin portatif a) Type / Modèle de Base c) Série d) Moteur: accu3. Est conforme aux prescriptions des directives : e) Organisme de certification4. Renvoi aux Normes harmonisées g) Niveau de puissance sonore mesuré h) Niveau de puissance sonore garanti k) Puissance installée n) Personne habilitée à établir le Dossier Technique : o) Lieu et Date | EN (Translation of the original instruction)EC Declaration of Conformity(Machine Directive 2006/42/EC, Annex II, part A)1. The Company2. Herby declares under its own responsibility that the machine: Portable garden hedge trimmer a) Type / Base Model c) Serial number d) Engine: battery-operated3. Conforms to directive specifications: e) Certifying body4. Reference to harmonised Standards g) Sound power level measured h) Sound power level guaranteed k) Power installed n) Person authorised to create the Technical Folder: o) Place and Date | DE (Übersetzung der Originalbetriebsanleitung)EG-Konformitätserklärung(Maschinenrichtlinie 2006/42/EG, Anhang II, Teil A)1. Die Gesellschaft2. Erklärt auf eigene Verantwortung, dass die Maschine: Tragbare Heckenschere für den Garten a) Typ / Basismodell c) Seriennummer d) Motor: Batterie3. Den Anforderungen der folgenden Richtlinien entspricht: e) Zertifizierungsstelle4. Bezugnahme auf die harmonisierten Normen g) Gemessener Schalleistungspegel h) Garantierter Schallleistungspegel k) Installierte Leistung n) Zur Verfassung der technischen Unterlagen befragte Person: o) Ort und Datum |
| NL (Vertaling van de oorspronkelijke gebruiksaanwijzing)EG-verklaring van overeenstemming (Richtlijn Machines 2006/42/CE, Bijlage II, deel A)1. Het bedrijf2. Verklaart onder zijn eigen verantwoordelijkheid dat de machine: Draagbare heggenschaar voor in de tuin a) Type / Basismodel c) Serienummer d) Motor: accu3. Voldoet aan de specificaties van de richtlijnen: e) Certificatie-instituut4. Verwijzing naar de Geharmoniseerde normen g) Gemeten niveau van geluidsvermogen h) Gegarandeerd niveau van geluidsvermogen k) Geinstalleerd vermogen n) Bevoegd persoon voor het opstellen van het Technisch Dossier o) Plaats en Datum | ES (Traducción del Manual Original)Declaración de Conformidad CE (Directiva Máquinas 2006/42/CE, Anexo II, parte A)1. La Empresa2. Declara bajo su propia responsabilidad que la máquina: Cortasetos de jardin portátil a) Tipo / Modelo Base c) Matrícula d) Motor: batería3. Cumple con las especificaciones de las directivas: e) Ente certificador4. Referencia a las Normas armonizadas g) Nivel de potencia sonora medido h) Nivel de potencia sonora garantizado k) Potencia instalada n) Persona autorizada a realizar el Manual Técnico: o) Lugar y Fecha | PT (Tradução do manual original)Declaração CE de Conformidade (Diretiva de Máquinas 2006/42/CE, Anexo II, parte A)1. A Empresa2. Declara sob a própria responsabilidade que a máquina: Corta-sebes portátil de jardim a) Tipo / Modelo Base c) Matrícula d) Moto: Bateria3. É conforme às especificações das diretivas: e) Órgão certificador4. Referência às Normas harmonizadas g) Nivel medido de potência sonora h) Nivel garantido de potência sonora k) Potência instalada n) Pessoa autorizada a elaborar o Caderno Técnico o) Local e Data |
| EL (Μετάφραση του πρωτοτύπου των οδηγιών χρήσης)ΕΚ-Δήλωση συμμόρφωσης (Οδηγία Μηχανών 2006/42/CE, Παράρτημα II, μέρος A)1. Η Εταιρία2. Δηλώνει υπεύθυνα ότι η μηχανή: Φορητό ψαλίδι κήπου a) Τύπος / Βασικό Μοντέλο c) Αριθμός μητρώου d) Κινητήρας: μηταταρία3. Συμμορφώνεται με τις προδιαγραφές της οδηγίας: e) Οργανισμός πιστοποίησης 4. Αναφορά στους Κανονισμούς εναρμόνισης g) Στάθμη μέτρησης ακουστικής ισχύος h) Στάθμη εγγυημένης ακουστικής ισχύος k) Εγκαταστημένη ισχύς n) Εξουσιοδοτημένο άτομο για την κατάρτιση του Τεχνικού Φυλλαδίου: o) Τόπος και Χρόνος | TR (Orijinal Talimatlann Tercümesi)AT Uygunluk Beyanı (2006/42/CE Makine Direktifi, Ek II, bölüm A)1. Şirket2. Şahsi sorumluluğu altında aşağıdaki makinenin: : Taşınabilir bahçe çit düzelitici a) Tip / Standart model c) Sicil numarası d) Motor: batarya3. Aşağıdaki direktiflerin özelliklerine uygun olduğunu beyan etmektedir: e) Sertifikalandiran kurum4. Harmonize standartlara atıf g) Ölçülen ses güç seviyesi h) Garanti edilen ses güç seviyesi k) Kurulu güç n) Teknik Dosyayı oluşturmaya yetkili kişi: o) Yer ve Tarih | MK (Превод на оригиналните упатства)Декларација за усогласеност со ЕУ (Директива за машини 2006/42/CE, Анекс II, дел A)1. Компанијата2. изјавува со целосна лична одговорност дека следната машина: Пренослив тример за жива ограда за градина а) Тип / основен модел с) етикета d) мотор: акумулатор3. Усогласено со спецификацииите според директивите: e) тепло за сертификација4. Референци за усогласени нормативи g Акустички притисок h) измерено ниво на звучна мо́кност k) инсталирана мо́кност н) областено лице за составување на Техничката брошура o) место и датум |
| NO (Oversettelse av original bruksanvisning)EF- Samsvarserklæring(Maskindirektiv 2006/42/EF, Vedlegg II, del A)1. Firmaet2. Erklærer på eget ansvar at maskinen:Bærbar hage hekksaksa) Type / Modellc) Serienummerd) Motor: batteri3. Oppfyller kravene i direktivene:e) Sertifiseringsorgan4. Henvisning til harmoniserte standarderg) Målt lydeffektnivåh) Garantert lydeffektnivåk) Installert effektn) Person som har fullmakt til å utferdigeteknisk dokumentasjon:o) Sted og dato | SV (Översättning av bruksanvisning i original)EG-försäkran om överensstämmelse(Maskindirektiv 2006/42//EG, bilaga II, de la)1. Företaget2. Försäkrar på eget ansvar att maskinen:Bärbar trädgårdshäcksaxa) Typ / Basmodellc) Serienummerd) Motor: batteri3. Överensstämmer med föreskrifterna idirektivete) Intygsorgan_ Anmält organ4. Referens till harmoniserade standarderg) Uppmätt ljudeffektnivåh) Garanterad ljudeffektnivåk) Installerad effektn) Auktoriserad person för upprättandet avden tekniska dokumentationen:o) Ort och datum | DA (Oversættelse af den originalebrugsanvisning)EF-overensstemmelseserklæring(Maskindirektiv 2006/42/EF, bilag II, del A)1. Firmaet2. Erklærer på eget ansvar, atmaskinen: Bærbar havehækkeklippera) Type / Modelc) Serienummerd) Motor: batteri3. Er i overensstemmelse medspecifikationerne ifølge direktiverne:e) Certificeringsorgan4. Henvisning til harmoniserede standarderg) Målt lydeffektniveauh) Garanteret lydeffektniveauk) ) Installeret effektn) Person, der har bemyndigelse til atudarbejde det tekniske dossier:o) Sted og dato |
| FI (Alkuperäisten ohjeiden käännös)EY-VAATIMUSTENMUKAISUUSVAKUUTUS(Konedirektliví 2006/42/EY, Lilte II, osa A)1. Yritys2. Vakuuttaa omalla vastuullaan, että kone: Kannettava puutarha pensasleikkuria) Typpi / Perusmallic) Sarjanumerod) ) Moottori : akku3. On yhdenmukainen seuraaviendirektlivien asettamien vaatimusten kanssa:e) Sertifointlyritys4. Viittaus harmonisoituihin standardeihing) Mitattu äänitehotasoh) Taattu äänitehotasok) Asennettu tehon) Teknisten asiakirjojen laatimiseenvaltuutettu henkilö:o) Paikka ja päivämäärä | CS (Překlad původního návodu k používání)ES – Prohlášení o shodě(Směrnice o Strojních zařízeních2006/42/ES, Přiloha II, část A)1. Společnost2. Prohlášuje na vlastní odpovědnost, žestroj: přenosné zahradní nůžky na živýplota) Typ / Základní modelc) Výrobní číslod) Motor: akumulátor3. Je ve shodě s nařizeními směrnic:e) Certifikační orgán4. Odkazy na Harmonizované normyg) Naměřená úroveň akustického výkonuh) Zaručená úroveň akustického výkonuk) lInstalovaný výkonn) Osoba autorizovaná pro vytvořeníTechnického spisu:o) Misto a Datum | PL (Tłumaczenie instrukcji oryginalnej)Deklaracja zgodności WE(Dyrektywa maszynowa 2006/42/WE,Załącznik II, część A)1. Spółka2. Oświadcza na własnąodpowiedzialność, že maszyna: przenośnenożyce do żywopłotu ogrodowegoa) Typ / Model podstawowyc) Numer seryjnyd) Silnik: akumulator3. Spelnia podstawowe wymoginastępujących Dyrektyw:e) Jednostka certyfikująca4. Odniesienie do Norm zharmonizowanychg) Zmierzony poziom mocy akustycznejh) Gwarantowany poziom mocy akustycznejk) Moc zainstalowanan) Osoba upoważniona do zredagowaniaDokumentacji technicznej:o) Miejscowość i data |
| HU (Eredeti használati utasítás fordítása)EK-megfelelőségl nyllatkozata(2006/42/EK gépirányelv, ll. melléklet "A"rész)1. Alulirott Vállalat2. Felelősségének teljes tudatábankijelenti, hogy az alábbi gép: hordozhatókerti sövényníróa) Tipus / Alaptipusc) Gyártási számd) Motor: akkumulátor3. Megfelel az alábbi irányelvekelőírásainak:e) Tanúsító szerv4. Hivatkozás a harmonizált szabványokrag) Mért zajteljesítmény szinth) Garantált zajteljesítmény szintk) Beépített teljesítményn) Müszaki Dosszlé szerkesztésérefelhatalmazott személy:o) Helye és ideje | RU (Перевод оригинальных инструкций)Декларация соответствия нормам EC(Директива о машинном оборудовании2006/42/EC, Приложение II, часть A)1. Предприятие2. Заявляет под собственнуюответственность, что машина:переносной садовый триммер для живойизгородиа) Тип / Базовая модельс) Паспортd) Двигатель: батарея3. Соответствует требованиямследующих директив:e) Сертифицирующий орган4. Ссылки на гармонизированные нормыg) Измеренный уровень звуковоймощностин) Гарантируемый уровень звуковоймощностик) Установленная мощностьn) Лицо, уполномоченное на подготовкутехнической документации:o) Место и дата | HR (Prijevod originalnih uputa)EK Izjava o sukladnosti(Direktiva 2006/42/EZ o strojevima, dodatakII, dio A)1. Tvrtka:2. pod vlastitom odgovornošću izjavljujeda je stroj: prijenosne vrtné škare za živicua) Vrsta / Osnovní modelc) Matični brojd) Motor: baterija3. sukladan s temeljnim zahtjevimadirektiva:e) Certifikacijsko tijelo4. Primijenjene su slijedeće harmoniziranenorme:g) Izmjerena razina zvučne snageh) Zajamčena razina zvučne snagek) Instalirana snagn) Osoba ovlaštena za pravljenje Tehničkedatoteke:o) Mjesto i datum |
| SL (Prevod izvirnih navodil)ES izjava o skladnosti(Direktiva 2006/42/ES), priloga II, del A)1. Družba2. pod lastno odgovornostjo izjavlja, da je stroj: prenosne vrtne škarje za živo mejoa) Tip / osnovni modelc) Serijska številkad) Motor: baterija3. Skladen je z določili direktiv :e) Ustanova, ki izda potrdilo4. Sklicevanje na usklajene predpiseg) Izmerjen nivo zvočne močih) Zagotovljen nivo zvočne močik) Instalirana močn) Oseba, pooblaščena za sestavo tehničneknjížice:o) Kraj in datum | BS (Prijevod originalnih uputa)EZ izjava o sukladnosti(Direktiva o mašinama 2006/42/EZ, Prilog II, deo A)1. Firma2. Daje izjavu pod vlastitom odgovornošću da je mašina: prijenosne vrtne makaze za živu ogradua) Tip / Osnovni modelc) Serijski brojd) Motor: akumulator3. sukladna s osnovnim zahtjevima direktive:e) Certifikaciono tijelo4. Pozivanje na usklađene normeg) Izmjereni nivo zvučne snageh) Garantovani nivo zvučne snagek) Instalisana snagan) Osoba ovlaštena za izradu tehničke brošure:o) Mjesto i datum | SK (Preklad pôvodného návodu na použitie)ES vyhlásenie o zhode(Smernica o Strojných zariadeniach 2006/42/ES, Priloha II, čast' A)1. Spoločnosť2. Vyhlasuje na vlastnú zodpovednosť, že stroj: prenosné záhradné nožnice na živý plota) Typ / Základný modelc) Výrobné číslod) Motor: akumulátor3. Je v zhode s nariadeniami smerníc:e) Certifikačný orgán4. Odkaz na Harmonizované normyg) Nameraná úroveň akustického výkonuh) Zaručená úroveň akustického výkonuk) Inštalovaný výkonn) Osoba autorizovaná na vytvorenie Technického spisu:o) Miesto a Dátum |
| RO (Traducerea manualului fabricantului)CE -Declaratie de Conformitate(Directiva Mašini 2006/42/CE, Anexa II, partea A)1. Societatea2. Declară pe propria răspundere că mașina: mașină de tuns gard viu de grădină portabila) Tip / Model de bazăc) Număr de serie)d) Motor: baterie3. Este în conformitate cu specificațiile directiveselor:e) Organism de certificare4. Referință la Standardele armonizateg) Nivel de putere sonoră măsurath) Nivel de putere sonoră garantatk) Putere instalatán) Persoană autorizată să întocmeascăDosarul Tehnico) Locul și Data | LT (Originalių instrukcijų vertimas)EB atitikties deklaracija(Mašinų direktyva 2006/42/CE, Priedas II, dalis A)1. Bendrovė2. Prisiima atsakomybę, kad įrenginys: nešiojamas sodo gyvatvorių žirklėsa) Tipas / Bazinis Modelisc) Serijos numerisd) Variklis: baterijia3. Atitinka direktyvose pateiktas specifikacijas:e) Sertifikavimo įstaiga4. Nuoroda j suderintas Normasg) Išmatuotas garso galios lygish) Užtikrinamas garso galios lygisk) Instaliuota galian) Autorizuotas asmuo sudaryti Techninę Dokumentaciją:o) Vieta ir Data | LV (Instrukciju tulkojums no originálvalodas)EK atbilstības deklarācija(Direktīva 2006/42/EK par mašinām, pielikums II, daļa A)1. Uznēmums2. Uzņemoties par to pilnu atbildību, paziņo, ka mašina: pārnēsājams dārza dzīvžogā šķeresa) Tips / Bāzes modelisc) Sērijas numursd) Motors: akumulators3. Atbilst šādu direktīvu prasībām:e) Sertifikācijas iestāde4. Atsauce uz harmonizētiem standartiemg) Izmērītais skaņas intensitātes līmenish) Garantētais skaņas intensitātes līmenisk) Uzstādītā jaudan) Pilnvarotais darbinieks, kas sagatavoja tehnisko dokumentāciju:o) Vieta un datums |
| SR (Prevod originalnih uputstval)EC deklaracija o usaglašenosti(Direktiva o mašinama 2006/42/EC, Prilog II, deo A)1. Preduzeće2. Daje izjavu pod vlastitom odgovornošćuda je mašina: Ručni trimer za živu ogradua) Tip / Osnovni modelc) Serijski brojd) Motor: akumulator3. u skladu s osnovnim zahtevima direktiva: e) Sertifikaciono telo4. Pozivanje na usklađene normeg) Izmereni nivo zvučne snageh) Garantovani nivo zvučne snagek) Instalisana snagan) Osoba ovlaščena za sastavljanjetehničke brošureo) Mesto i datum | BG (Превод на оригиналните инструкции)EO декларация за съответствие(Директива Машини 2006/42/EO, Приложение II, част A)1. Дружеството2. На собствена отговорност декларира, че машината: Преносима градинска ножица за жив плетa) Вид / Базисен моделс) Сериен номерd) Мотор: акумулатор3. E в съответствие със спецификата на директивите:e) Сертифициращ орган4. Базирано на хармонизираните нормig) Ниво на измерена акустична мощностh) Гарантирано ниво на акустична мощностk) Инсталирана мощностn) Лице, упълномощено да състави Техническата Документация:o) Място и дата | ET (Algupārase kasutusjuhendi tõlge)EÜ vastavusdeklaratsioon(Masinadirektiiv 2006/42/EÜ, Lisa II, osa A)1. Firma2. Kinnitab omal vastutusel, et masin: kaasaskantav iaiahekilõikura) Tüüp / Põhimudel c) Matrikkeld) Mootor: aku3. Vastab direktiivide nõuetele:e) Kinnitav asutus4. Viide ühtlustatud standarditeleg) Möödetud helivõimsuse taseh) Garanteeritud helivõimsuse tasek) Installeeritud võimsusn) Tehnilise Lehe autoriseeritud koostaja:o) Koht ja Kuupäev |
EN • The content and images in this User Manual were produced expressly for ST. S.p.A. and are protected by copyright – any unauthorised reproduction or modification to the document, either partially or in full, is prohibited.