ProMax Rain 4000 - Pump OASE - Free user manual and instructions
Find the device manual for free ProMax Rain 4000 OASE in PDF.
User questions about ProMax Rain 4000 OASE
0 question about this device. Answer the ones you know or ask your own.
Ask a new question about this device
Download the instructions for your Pump in PDF format for free! Find your manual ProMax Rain 4000 - OASE and take your electronic device back in hand. On this page are published all the documents necessary for the use of your device. ProMax Rain 4000 by OASE.
USER MANUAL ProMax Rain 4000 OASE
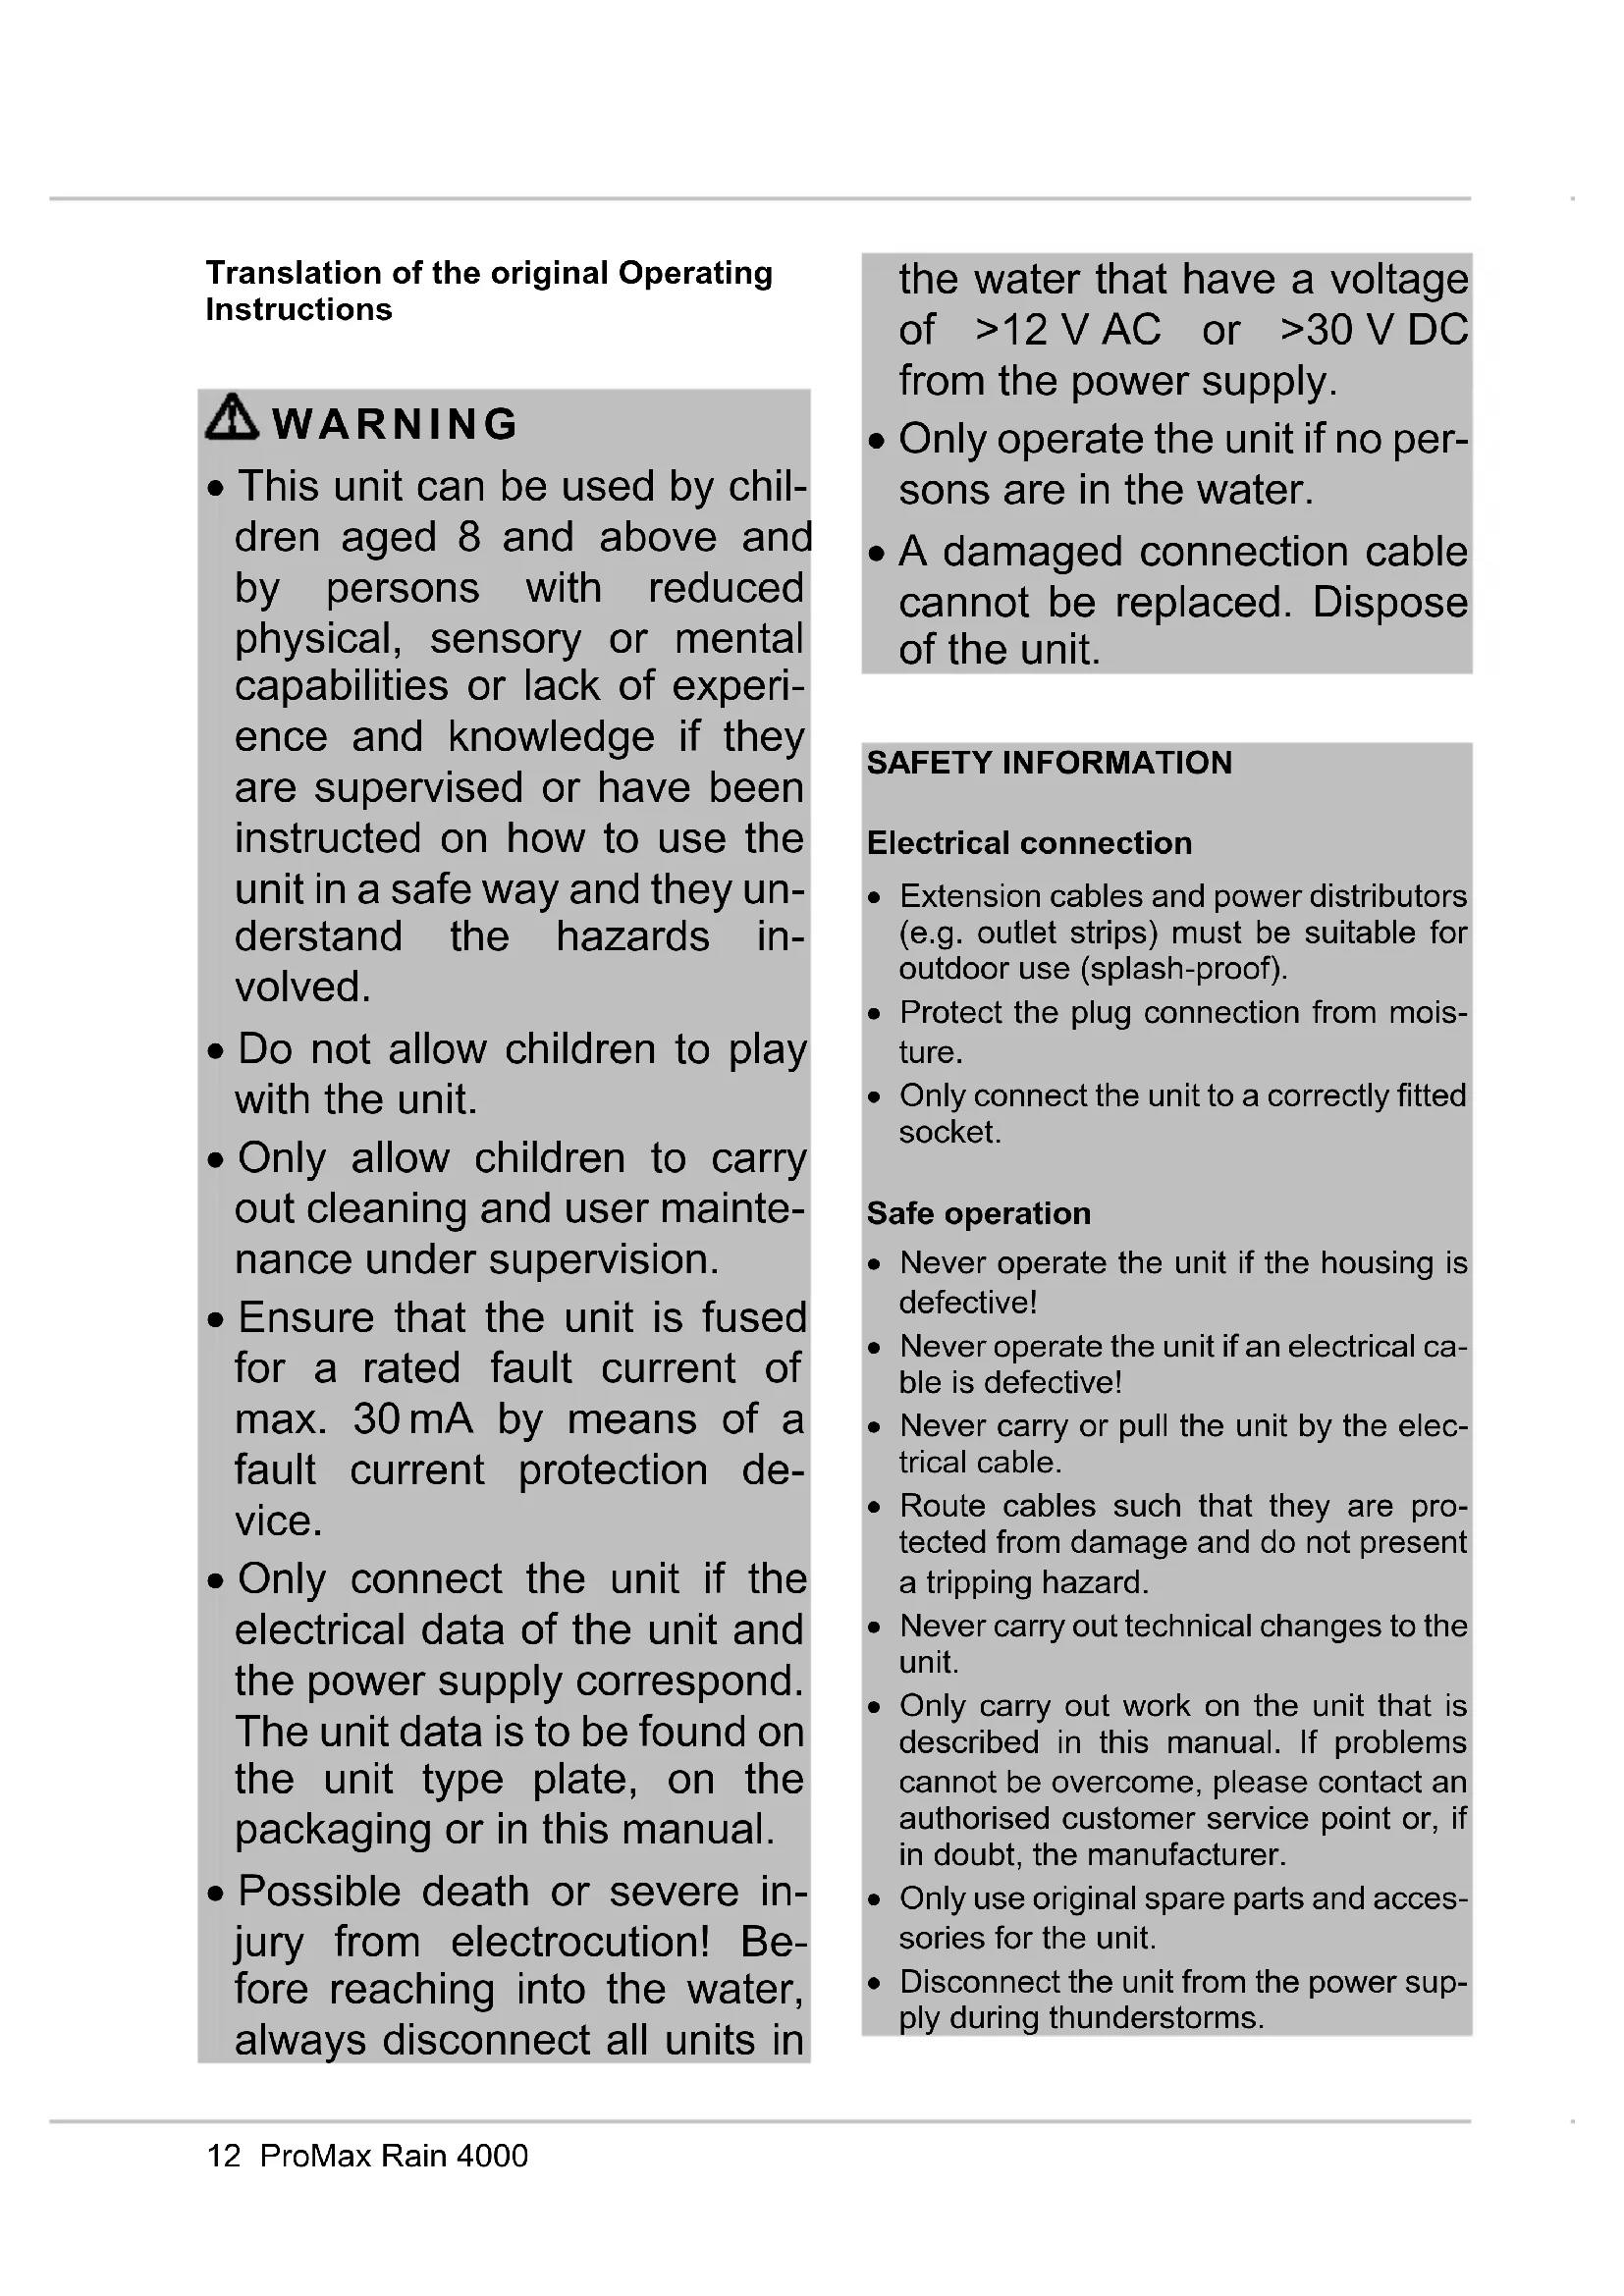
Translation of the original Operating Instructions

WARNING
- This unit can be used by children aged 8 and above and by persons with reduced physical, sensory or mental capabilities or lack of experience and knowledge if they are supervised or have been instructed on how to use the unit in a safe way and they understand the hazards involved.
- Do not allow children to play with the unit.
- Only allow children to carry out cleaning and user maintenance under supervision.
- Ensure that the unit is fused for a rated fault current of max. 30mA by means of a fault current protection device.
- Only connect the unit if the electrical data of the unit and the power supply correspond. The unit data is to be found on the unit type plate, on the packaging or in this manual.
- Possible death or severe injury from electrocution! Before reaching into the water, always disconnect all units in
the water that have a voltage of >12V AC or >30V DC from the power supply.
- Only operate the unit if no persons are in the water.
- A damaged connection cable cannot be replaced. Dispose of the unit.
SAFETY INFORMATION
Electrical connection
- Extension cables and power distributors (e.g. outlet strips) must be suitable for outdoor use (splash-proof).
- Protect the plug connection from moisture.
- Only connect the unit to a correctly fitted socket.
Safe operation
- Never operate the unit if the housing is defective!
- Never operate the unit if an electrical cable is defective!
- Never carry or pull the unit by the electrical cable.
- Route cables such that they are protected from damage and do not present a tripping hazard.
- Never carry out technical changes to the unit.
- Only carry out work on the unit that is described in this manual. If problems cannot be overcome, please contact an authorised customer service point or, if in doubt, the manufacturer.
- Only use original spare parts and accessories for the unit.
- Disconnect the unit from the power supply during thunderstorms.
INFORMATION ABOUT THIS OPERATING MANUAL
Welcome to OASE Living Water. You made a good choice with the purchase of this product ProMax Rain 4000.
Prior to commissioning the unit, please read the instructions of use carefully and fully familiarise yourself with the unit. Ensure that all work on and with this unit is only carried out in accordance with these instructions.
Adhere to the safety information for the correct and safe use of the unit.
Keep these instructions in a safe place! Please also hand over the instructions when passing the unit on to a new owner.
Symbols used in these instructions Warnings
The warning information is categorised by signal words, which indicate the extent of the hazard.

WARNING
- Indicates a possibly hazardous situation.
Non-observation may lead to death or serious injuries.

NOTE
Information for the purpose of clarification or for preventing possible damage to assets or to the environment.
Additional information
A Reference to a figure, e.g. Fig. A.
Reference to another section.
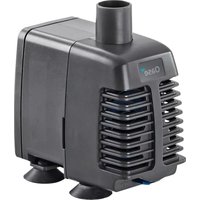
PRODUCT DESCRIPTION Overview
| ☐ A | ProMax Rain 4000 |
| Position | Description |
| 1 | Handle, adjustable |
| 2 | Pump base |
| 3 | Pressure hose kink protection |
| 4 | Float switch |
| 5 | Power connection cable |
| 6 | Connection set -1 × quick-release coupling -2 × hose connector -2 × tap connection -1 × ball valve -1 × G½ hose |
| 7 | Connection, pressure side G1 |
Intended use
Exclusively use the ProMax Rain 4000 as follows:
- For pumping clear water or rain water.
- For pumping water and max. 0.3mm large particles.
- For irrigating and watering.
- For transferring water from and draining basins or ponds/pools.
-
Extraction of water from a well.
-
Only for irrigation and watering purposes!
-
For pumping the water out of water butts/rain barrels or cisterns.
- Operation under observance of the technical data.
Possible incorrect use
The following restrictions apply to the unit:
- Not suitable for salt water.
- Not suitable for drinking water.
-
Never use for pumping dirty water/waste water.
-
Do not use for long-term operation (e.g. continuous recirculation of the water in a pond).
- Do not use for commercial or industrial purposes.
- Do not use in conjunction with chemicals, foodstuff, easily flammable or explosive substances.
- Do not connect to the drinking water supply.
INSTALLATION AND CONNECTION
Connecting the pressure hose
An optimum flow rate is achieved with the largest possible hose inside diameter.
How to proceed:
B
- Screw the quick-release coupling onto the pump outlet.
- Fit the hose connector onto the quick-release coupling.
Fitting the connection set
The connection set makes it possible to route the pressure hose (G1 / 2) via the kink protection.
C
Fitting the kink protection
Using the kink protection, the pressure hose (G1 / 2) can be routed over an edge without any kinks.
How to proceed:
D
- Place the pressure hose into the kink protection.
- Fold down the cover clips and allow the fasteners to engage.
- Hang the pressure hose over the edge.
Removing the kink protection
D
- Press both fasteners and push them out of the lugs.
- Undo the cover clips and remove the pressure hose.
Automatic mode
When the water level rises, it lifts the float switch until the switch-on point is reached and the pump switches on.
When the water level drops, the float switch lowers until the switch-off point is reached and the pump switches off.
E
- Push the float switch cable into the cable clip.
- The shorter the cable between the float switch and the cable clip, the lower the switch-on point and the higher the switch-off point.
NOTE
To ensure faultless function, ensure that the length of cable between the float switch and the cable clip measures at least 10cm
NOTE
The minimum residual water height is only reached in manual mode.
Manual mode
The pump remains permanently switched on if the float switch is set vertically and the cable points downward.

NOTE
The pump can run dry in manual mode.
- Switch off the pump when the minimum water level is reached.
- Running the pump dry increases wear.
□F
- Move the handle into the horizontal position and push the cable directly at the transition to the float switch into the cable clip such that the float switch is in a vertical position.
Installing the pump
G
- Install the pump in a horizontal and stable position in the water.
- If the filter screen becomes clogged by dirt particles, install the pump in an elevated position.
- If it needs to be lowered into a well or a shaft, fasten a rope to the handle. Do not carry it by the power connection cable.
- Ensure that the float switch can always move freely.
SWITCHING ON AND OFF

WARNING
Dangerous electrical voltage!
Death or severe injury from electrocution.
- Only connect the pump to the power supply when there are no persons in or reaching into the water.
- Before stepping into or reaching into the water, switch off all units located in the water.
Switching on the unit
-
Insert the power plug into the socket.
-
The pump is ready for operation.
- The pump will start up as soon as the level of the water reaches the switch-on height.
Switching off the unit
- Disconnect the power plug.
- When the pump is switched off, residual water in the hose may flow back and out of the pump intake.

NOTE
Do not use the unit for long-term operation. Otherwise this will impair the operating life of the unit accordingly.
REMEDY OF FAULTS
| Malfunction | Cause | Remedy |
| Pump does not start. | Power supply interrupted | Check the fuse and electrical plug connections. |
| Pump switches off after a short running period. | Overload protection has switched the pump off due to overheating. | Clean the intake and pressure hose. Allow the pump to cool down. |
| The pump is running but is not delivering, or the delivered quantity is insufficient | Pressure hose blocked | Route the pressure hose without kinks. Check the outlet and clean if necessary |
| Intake blocked | Clean the intake | |
| Air in the pressure hose | Expel the air from the pressure hose. | |
| Filter screen clogged | Clean the filter screen. | |
| If applicable: Non-return valve incorrectly fitted in the pressure hose or clogged | Correctly fit the non-return valve. Clean the non-return valve. | |
| Impeller defective or worn | Contact OASE The impeller may only be replaced by the OASE Service. |
MAINTENANCE AND CLEANING

WARNING
Dangerous electrical voltage!
- Switch off the mains voltage of all units before reaching into the water.
- Switch off the mains voltage of the unit before carrying out any work. If the mains voltage is switched on during cleaning and maintenance work, there is danger to life due to electrocution.

NOTE
Recommendation regarding cleaning:
-
Clean the unit as required but at least twice a year.
-
Do not use aggressive cleaning agents or chemical solutions as they could attack the housing or impair the function of the unit.
- Recommended cleaning agent for removing stubborn limescale deposits:
-Pump cleaning agent PumpClean from OASE.
- Vinegar- and chlorine-free household cleaning agent.
After cleaning, thoroughly rinse all parts in clean water.
Cleaning the filter screen
i NOTE
Recommendation regarding cleaning:
- Clean the filter screen as required, but at least once per month.
How to proceed:
□H
- Turn the filter screen clockwise as far as it goes and then remove it from the unit.
- Clean the filter screen in clean water.
- Reassemble the unit in the reverse order.
Replacing the handle
How to proceed:
□
- Turn the handle to a 45^ position.
- Release the handle from the holder by pulling with both hands at the side.
- Fit the spare part onto the unit in the reverse order.
Replacing the filter screen
How to proceed:
□H
- Turn the filter screen clockwise as far as it goes and then remove it from the unit.
- Fit the spare part onto the unit in the reverse order.
WEAR PARTS
Wear parts are excluded from the warranty.
The following components are wear parts and may only be replaced by the OASE Service.
- Impeller
STORAGE/OVERWINTERING
The unit is not frost-proof and has to be removed and put into storage if minus temperatures are expected.
How to correctly store the unit:
- Drain the unit as far as possible, clean thoroughly and check for damage.
- Empty all hoses, pipes and connections as far as possible.
- Thoroughly clean the unit, check it for damage and replace any damaged parts.
- Store the unit in a dry and frost-free place.
- Protect open plug connections from moisture and dirt.
DISPOSAL

NOTE
This unit contains electronic components - do not dispose of this unit with domestic waste.
- Render the unit unusable by cutting off the cables.
- Dispose of the unit by using the return system provided for this purpose.
SPARE PARTS
The use of original parts from OASE ensures continued safe and reliable operation of the unit.
Please visit our website for spare parts drawings and spare parts.

www.oase-livingwater.com/spareparts-di
TECHNICAL DATA
| ProMax Rain 4000 | |||
| Rated voltage | V AC | 230 | |
| Rated frequency | Hz | 50 | |
| Rated power | W | 370 | |
| Protection type | IP X8 | ||
| Connection, pressure side | G1 | ||
| Minimum switch-on height / maximum switch-off height | mm | 370 / 140 | |
| Maximum switch-on height / minimum switch-off height | mm | 500 / 50 | |
| Minimum water level for starting up | mm | 35 | |
| Flow rate | Max. | l/h | 4000 |
| Head height | Max. | m | 12 |
| Immersion depth | Max. | m | 7 |
| Particle size | Max. | mm | 0.3 |
| Power connection cable | Length | m | 10 |
| Dimensions | Length | mm | 177 |
| Width | mm | 167 | |
| Height | mm | 317 | |
| Weight | kg | 4.5 | |
AFVOER VAN HET AFGEDANKTE APPARAAT

OPMERKING
www.oase-livingwater.com/onderdelen-di
TECHNISCHE GEGEVENS
OPSTILLING OG TILSLUTNING
RENGJØRING OG VEDLIKEHOLD

ADVARSEL
Anbefalinger for rengjoring:
Anbefalinger for rengjoring:
INSTALLATION OCH ANSLUTNING
www.oase-livingwater.com/nahradnidily-di
TECHNICKE UDAJE
CONECTAREA $I DECONECTAREA

AVERTIZARE
MoHTaX Ha KOMnJIeKT 3a CBbP3BaHe
KOMJIeKbT 3a Cbbp3BaHe N03BOJRA Ba npokapBaHe Ha HanopHnMa Mapky (G1/2) npe3 3aunTaTa OT npeBbaHe.
C
Noctabraye Ha 3aunta ot npereBahe
Cbc 3aunTaT aO TnpBbAHe HAnOpHnT Mapky (G12) MoKe Da ce npokapa npes pb6 6e3 npEpbAHe.
PpoeepaTe no cJeHnHaunH:
D
1.Пoctabete HanopHnMa Mapkyu B 3aun-TaTa OT npereBBAHe.
2. OTbopete KaanaKaTa n BkapaTe DbataΦHKcnpaun e3nka B XaJIKeT.
3. Okayete Hanopnma Mapkyu NaD p6a.
CbaJHe Ha 3aunTa OT npereBbaHe
D
HaTnchTe Dbata fHKcapaun e3nka n 36yTaIe fHKcapuunt e3nOxJKNTE.
- OTbopeTe kanaqkaTaNcBaneTe HAnOpHnA Mapkyu.
AByOMaTHUeH peKIM Ha pa6Ota
YBEnuBaAsTa Ce BODa NOBnra No- PnAaBbUHnI PpeKbcBaU DoKaTO Ce DoCTnIHe ToKaTa Ha BKIOUcBaHe I NOMnTaCe BKIOUcBa.
Pn HamaJiao HnBO Ha BODaTa NOBnIgA nonNaBbUHn IpeKbcBaY NaJa DOkato Ce DOCTnRHe TOyKaTa Ha N3KnIOuBaHe N NOMnata Ce N3KnIOvBa.
E
HaTnchete Ka6ena Ha nonlaBbHnna npeKbCBaay BdbpxaHa Ka6ena.
- KOKOTO e NO-Kbc Ka6eJIbT MExdy no- nIaBbHnI ppeKbcBaU nDbpxkaHa Ha Ka6ena, TOIKOBA No-HNcKO Jexn ToyKaTa Ha BKNIOVAHe N TOIKOBA NO-BNcKO Jexn TOyKaTa Ha N3KNIOVAHe.
iYKA3AHNE
3aФyHKUHnPaHe 6e3 Heu3npaBHOCTn Cna3BaIte Ha-MaJIko 10 cm DbJxHa Ha Ka6eJa MExdy nonJaBvHnI npekbcay nDbpkaHa Ka6eJa.

YKA3AHNE
MnHmHaHaTa BnCOuHa Ha OctaTbHuHa Ta BOda ce DoCTura cAmo B pBueH peXHM Ha pa6Ota.
PbyeH peXm Ha pa6oTa
POMnatae BKNHueHa HEnpeKbCHaTo, KOrato NOnPaBbUHNr TpeKbCBauch CeHAMnpa BepTnKaIHo n Ka6eJIbT Bucn HaDoNy.

YKA3AHNE
Bpbueh pexm Ha pa6oTa nomnata MoKe Da pa6OTn Ha cyxo.
PpoeepaTe no cJeHnHaunH:
□H
- 3aBbPTeTe ΦnTTbPHaTa ueKa DoKpaHnAraCHO n CBaIeTe OT ypeDa.
2.Поистeteфнгьрнataцeдka noДчNTa BODa. - Ctrnoobete OTHOBO ypeDa B o6paTHa noCneIOBATEHNOCT.
CmHa Ha npbKkaTa
PpoeepaTe no cJeHnHaunH:
□
1.3aBbptete IocTa Ha 45^ -no3nua.
2.Pa3xla6eTe loCTa OT Dbpxkaa Ype3 DbprnaHe C DBeTe pBue.
3. MoHTnpaIte OTHOBo pe3epBHaTа Yact B o6pTaHa NocJeIOBaTeJIHOCr Ha ypeDa.
CmHa HaΦnIITbPHaTa ZeDka
PpoeepaTe no cJeHnHaunH:
□H
-
3aBbPTeTe ΦnTTbPHaTa ueKa DoKpaHnAraCHO n CBaIeTe OT ypeDa.
-
MoHTnpaIte OTHOBo pe3epBHaTa qact KbM ypeDa B o6paTHa NocJeDoBaTeJIHOCr.
Бьр30 ИЗHOCBAДСЕЧАNTI
IHCTPYKlIa 3 TEXHIK Bc3NEKn
PiKluoyHnDo MepeXi
- Побожуваи рознодьнки (hanpin-KnaД, колди) NOBHHI 6byTN npn3haYeHi Дя ВИКОпСТаHHЯ Ha BiДКрNTOMy nobitpi (3axucheHb IiD BoDAHnx 6pn3OK).
- Μτέπεινλήρο3'εΜη Κεόδχιδη 3axn-CTιNTu BID BπΠΥB OJΩΟι.
-ПідклочаитepnlaTINbKndo po3etkn,BCTaHOBJIeHOI 3riIDHO 3 iHcTpyKciEIO.
Бezпецна po6oTa
3a6bopohraetbcra BnKOpncTOByBaTu npntpiyBnnaKy noSKoJKeHHa Kopnycy!
- Пр пошкожжehніеелктучно Ka-6блно ekсплуатуВати пист pi 3a6obopo-HeHo.
3a6bopohreTbcraHHTn a6o HeCTn npncptpi 3a eNeKtpnHi ka6eni.
- Ka6eni cnid npoknaadatn TaK, 0o6 3axnCTNTn ix BiD ykoJKeHb i He CTBOpOBAtN He6e3neky naIHnIJa IHOdei.
3abopohreTbc 3MiHOBaTN KOHCTpyKciIO npNCtpoI.
-Пювовье Ha npсстpoi Tiлькп ti po6otи,яki onиcahi B zuin iHctpykuii.Якшо npo6лемн He BdaeTbcg yCyHyTu, 3BepHiTbca Do aBTopn3ObaHoro cepBicHoro ceHTpy a60,B pa3i cymHiBIB,do Bnpo6Hnka.
-Дяпстою можна ВИКОпСТОВВаТи ТИБКИ ОПИHAЛьНI 3aNacHIЧАCTИHи OрИгIHаЛьНI KOMПЛeKТуЮчI BИРби.
- Пд час грози Вд'снHyВаТи пист piBд сеКтрмереши.
JOKJIADHIWE INPO IHCTPYKUHO 3 EKCNIYATAUII
Padi BItaTn Bac y komnaHii «OASE Living Water'. PrudabuN daHy npodykuio ProMax Rain 4000, Bu 3po6nI napHn Bn6ip.
Ipeed nepuHm BnKOpNCTaHHm npn- cTpoHO peTeBHO npOHTaHTe iHcTpyKciIO 3 ekCnnyataqii i O3HaNoMTEc8 3 npn- cTpoem. Bci po6OTn 3 daHm npnAdom Ta Ha HbOMy Do3BOJRAcTBcR npoBOdHTn TiIbKn pni DOpTpMaHHi yMOB ciEi iHcTpyKciII no ekCnnyataqii.
O6OB'3KOBO DoTpIMyITeCn npaBnI TexHikn 6e3neKn dny npaBnIbHoro Ta 6e3NeuHoro BnKOpNCtAHN nPncTpOu.
PeTeNbHo 36epiraTe IHCtpyKciIO 3 ekCnIpyataui. Y BnPaIky 3MiHn BlaChnka nepeaIte Nomy IHCTpyKciIO 3 EKCnIpyataui.
CnmboI, 0BnkOpncTaH y ciH iNCTpyKci 3 ekcnnyataci
NonepeJxByaJIbHi 3HaKn
PonepeJyBaIbHi CnHaJI N B ciN iHCTpyKci KnaCnΦiKyIObCra 3a DOnOMOrIo CnHaJIbHnx CnIB, kKi No3NaUaIOb P03Mip 3arpo3N.

NONEPEKENH
O3Haaye MOxJINBO He6e3neHy cnTyauio.
YBIMKHEHHA TABUMKHEHHA

NONEPEDKEHHA
He6e3neuHa eJekTpnuHa Hanpyra! Cmeptb a6o BaxkI TpaBMn BhacliDok ypaxeHHa eJekTpnuHm cTpyMOM.
-Пидкночати НасOC y BODIdo eNeKtpo-Mepeksi NIIwe ToDi,ЯКIo JIOHn He cToTb y BODi a6O 3acOByIOTb pyKn y BODy.
- BiДкЛючItb МержЕв Hanpyry Bcix npinlaIb, lo 3HaxOЯTbcS y BoDi, pepei TmЯk 3aXODnTu y Body a6o 6paTny pykam.
YbIMKHeHH npucTpoU
- BCTaBTe BnIky Bpo3eTKy.
-Hacoc roTOBni do pOboTn.
-Hacoc nouHaε npaObaTu, k TiiIbKn pIBeHb BOdN DOcRHe BNCOTn BMUKaHHJ.
BumKHeHH npHnaNy
- BntaHItb BuNkY.
-ПисяВiДКЛЮЧЕНЯЗЛИСОВODIN B IJIaHry Mоже NOTeKТи HаЗаД i Виctу-NITN Yupe3 BxIDHn OTBip Hacoca.

BKA3IBKA
Tpmbaeknnyatai npnady 3aboponeHa.Y npotnneKHomy BnnapkCTpOK cnjkbnpnaDy BiIDNOBIDHO CKOpOyETbCra.
UCYHEHHH HECINPABHOCTE
HeraTnBHO BnInHyTu Ha cyHKcIOhyBaHH npJaNy.
- PekomeHDoBaHi 3acO6n dIy uIuSeHn npi cTIkOMy BaHryHOMy BiKnaJeHHi:
-Фильтph Hacoca PumpClean BiOASE.
-ПобутовиЗасбиДлЯчшениHa OCHOBIOUTOBOI KNCLOTnTa XLOpy. - PeTeIbHo npomntu Bci DeTani YnCTOIO BOIOIO NiCJIa YnCTKII.
IOnuCTnI IjIbTpYBaJIbHy ciTKy

BKA3IBKA
PekomeHdaucuIuOdoouHn:
OuIyTe pInbTpYBaJIbHy ciTKy y pa3i Heo6xIDHocTi, aJe 0HaJMeHwe 1 pa3 Ha Micra.
Heo6xIDHO BnKoHaTu HaCTynHi iii:
□H
YKA3AHNЯ NO TEXHnKE 6E3OpACHOCTN
3JIeKTpNueckoe coeINHeHne
- YdHnHnTeJI n paCnpeJInTeJI (HaPnIpMep, KOIoDKn) DOJXHbI 6bITb npEHa3HaueHbI dJa NcNoB3OBaHn Ha OTKpbITOM BO3dyxe (3aunuEhbl OT BODaHbIX 6pb13r).
3aunuainTe uTekehble coeHHeHnO T BnaI. - YcTpoIcTBO HxKHO NOkNIOuHaTb TOnbKO K npaBnIbHo yCTaHOBJeHHo p03eTke.
O DAHHOM PYKOBODCTBE NO 3KcPJIYATAUIN
PaBbI npuBeTcBOBaTb Bac B KOMnAHn OASE Living Water. Pnpo6peT daHnyo npOdyKUHO ProMax Rain 4000, Bbl cdeJaanxopoWNI BbI6Op.
Ipeed nepBbIM nCNoJb3OBaHHeM npn-6opa TuaTeJIbHO npOHTaIe INHCTpyKcIIO NO 3KcNpyaTauIN O3HaKOMbTEEcB C np6obopom. Bce pa6oTBc DaHHbIM np6oPOM Ha HEM pa3peWaeTcN pOBOdITb TOJbKO npn CO6JIouDeHNu ycNOBn daH-Horo pyKOBODCTBa No 3KcNpyaTaUIN.
PekomeHdaunno ounctke:
OuNTka cETkn fNJIbTpapnpoN3BOIDTCa NO Heo6xoDnMoCTn, Ondako He pexe 1 pa3a B Meca.
Heo6xOdmo BbINOJHnTb CneDyUoUne DeiCTBn:
□H
1.Повернту секу Фильтуdo уnapa BnpaBOИСЯТьсустpoистВа.
2. YnCTNTb ceTky fNtpa cJeDyET noJ UnCTO BDOJ.
3.CHOBa co6paTb yCTpOuCTBO B o6paTHOM IopRdKe.
3aMeHnTb pyuKy
Heo6xoJIMO BbIIOJHnTb CNeDyUOuNe DeiCTBn:
□
1.Повернту ручу на поцию 45^
2. OcbooNTb pyky n3 depxkateTn, noTHyB o6eIMN pykamn no 6okam.
3. C6paTb 3aunactb Ha ycTpoiCTBe B o6paTHoNocNeIOBaTeJIbHOCTn.
3aMeHnTb ceTkYΦnJIbTppa
Heo6xoJIMO BbINOHNITb cNeDyUOuNe DeiCTBn:
□H
1.Повернту сету Фильта до уnapа Вправо И сгту с устороства.
2. Co6paTb 3aunactb Ha yCTpoiCtBe B o6paTHoI nocJeIOBaTeJIbHOcTn.
N3HAUNBAIOUNECEAETALIN
TapaHTnHoe 683aTeJbCTBO He pacnpocTpaHReTcHa N3HaWNBaIOUneCg DeTaN.
CneyuOuIe KOMNoHEHTbI YBJIOTcN 3HaUNBaUoMmucn DeTaJAMN, KOToPbIe NOpIeKaT 3aMeHe cepBnCHOn CnyK6oN fnpMbIOASE:
Pa6oyee koneco
YCTPOIcTBO He yCTOuHBO K Hn3KIM TeMnepaTypam, npn OxNJaEMbIX 3aMOp03Kaxero HyXHO DeMOHTnpOBaTb N y6paTb Ha xpaHeHne.
PpabnIbHoe xpaHeHne ycTpoiCTBa:
- MaKcHMaJIbHo onOpoxHHTb yCTpOInCTBO, OCHOBaTeJIbHO npOuNCTnTb I npoBepNTb Ha HAnuNe NOBpeXdEHN.
MaKcMaJIbHo onOpOxHnTb ⅢaHn, Tpy6oPBOOdbI n CoeINHeHn.
TuaTeIbHO OuHCTHTb yCTPOiCTBO, npOBepHTb Ha HauNue NOBpeXdEHN, 3aMeHHTb NOBpeXdEHhle DeTaN.
XpaHntb npnbop BCyXOM BnDe, He do-nycka er0 3aMep3aHn. - OTKpbITbIe WTeKepeHbIe CoeINHeHn 3a- uHTb OT BnaI N rpa3n.
YTNIN3AUIN

YKA3AHNE
HeIb3a Bbl6paCbBaTb DaHHoe ycTpOuCTBO BMeCTe C DomaUHM MycopOM, TaK KaK OHO COepXHT JIeKtpOHHbIe KOMNo-HEHTbl.
- IpepepekTe Ka6eIb n CdeJaIte yCTpOncTBo HEnPnroHbIM dJIa NcNoJIb30BaHnI.
- Ytuln3npyTe yctpoNCTBO uepe3 cnCTemy cdauN npneMa npombIeHbIX OTXODOB.