Quarius Universal 40000 - Pump OASE - Free user manual and instructions
Find the device manual for free Quarius Universal 40000 OASE in PDF.

User questions about Quarius Universal 40000 OASE
0 question about this device. Answer the ones you know or ask your own.
Ask a new question about this device
Download the instructions for your Pump in PDF format for free! Find your manual Quarius Universal 40000 - OASE and take your electronic device back in hand. On this page are published all the documents necessary for the use of your device. Quarius Universal 40000 by OASE.
USER MANUAL Quarius Universal 40000 OASE
natural_image
Black-and-white photo of a fountain with multiple water fountains in the foreground, surrounded by urban buildings and traffic (no visible text or symbols)AquariusUniversal 21000, 27000, 40000
GB Operating instructions
FR Notice d'emploi
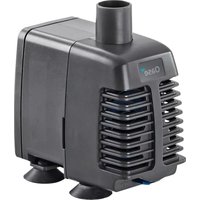
natural_image
Black industrial water heater with grid-patterned insulation and ventilation slots (no text or symbols visible)
text_image
Technical diagram of an internal combustion engine with numbered components for identification| 1 | 2 | 3 | 4 | 5(Aquarius Universal 40.000) | 6 | |
| DE | Saugstutzen | Druckslutzen | Filterwangen | Filterfrontblech | Stabilisator | Gerätefuß |
| GB | Suction socket Pressure | socket Strainer cheeks | Strainer front plate Stabiliser Support foot | |||
| FR | Buse d'aspiration Raccord de tuyau de refoulement | Éléments defiltration Élément métallique frontal du filtre | Stabilisateur Pied de l'appareil | |||
| NL | Aanzuigopening | Spuilkop | Filterkorven | Filterfrontplaat | Stabilisator | Apparaatvoet |
| ES | Tubuladura de aspiración | Tubuladura de presión | Filtros laterales | Filtro frontal | Estabilizador | Pie del equipo |
| PT | Boca de aspiração | Bocal de saída de pressão | Filtros laterais | Filtro frontal | Estabilizador | Pé |
| IT | Tronchetto di aspirazione | Tronchetto di pressione | Lati del filtro | Lamiera frontale del filtro | Stabilizzatore | Piede dell'apparecchio |
| DK | Sugestuds | Trykstuds | Filtervanger | Filterfrontplade | Stabilisator | Apparatfod |
| NO | Sugestuss | Trykkstuss | Filtervegger | Filterfrontplate | Stabilisator | Fot |
| SE | Sugstos | Tryckstos | Fillerkápor | Filterfrontplàt | Stabilisator | Apparatbotten |
| FI | Imuistukka | Paineistukka | Suodattimen puoliskot | Suodattimen etulevy | Vakauttaja | Laitejalusta |
| HU | Usisni priključak | Potisni priključak | Szürő-oldalfalak | Szürő-frontlemez | Stabilizátor | Nogar uređaja |
| PL | Króciec ssawny | Króciec tloczny | Ścianki filtra | Blacha czolowa filtra | Stabilizator | Podstawa urządzenia |
| CZ | Sací hrdlo | Výtlačné hrdlo | Bočnice filtru | Čelní plech filtru | Stabilizátor | Patka přístroje |
| SK | Sacie hrdlo | Výtlačné hrdlo | Bočnica filtra | Čelný plech filtra | Stabilizátor | Pätka přístroja |
| SI | Sesalni priključek | Tlačni priključek | Filtrirna stena | Prednja filtrima pločevina | Stabilizator | Podnožje aparata |
| HR | Usisni priključak | Potisni priključak | filtarska krilca | prednji lim filtra | stabilizator | Nogar uređaja |
| RO | Štuț de aspiratie | Štuț de presiune | Capace filtru | Placă frontală filtru | Stabilizator | Picior aparat |
| BG | Всмукателни накрайници | Пневматични накрайници | Филтърни стени | Филтърна фронтална ламарина | Стабилизатор | Краче на уреда |
| UA | Всмоктувальний патрубок | Нагнітальний патрубок | Фільтраційні стінки | Фронтальна фільтраційна пластина | Стабілізатор | Стійка пристрою |
| RU | Всасывающий патрубок | Напорный патрубок | Боковина фильтра | Передний лист фильтра | Стабилизатор | Лапка прибора |
| CN | 抽水接管 | 压水接管 | 过滤器侧壁 | 过滤器前盖 | 稳定器 | 设备底座 |

natural_image
Technical line drawing of a mechanical assembly with no visible text or symbols
natural_image
Diagram of a mechanical device embedded in a wavy surface with a plant sprout, no text or symbols present.
text_image
Technical diagram of a device rear panel with labeled components C and D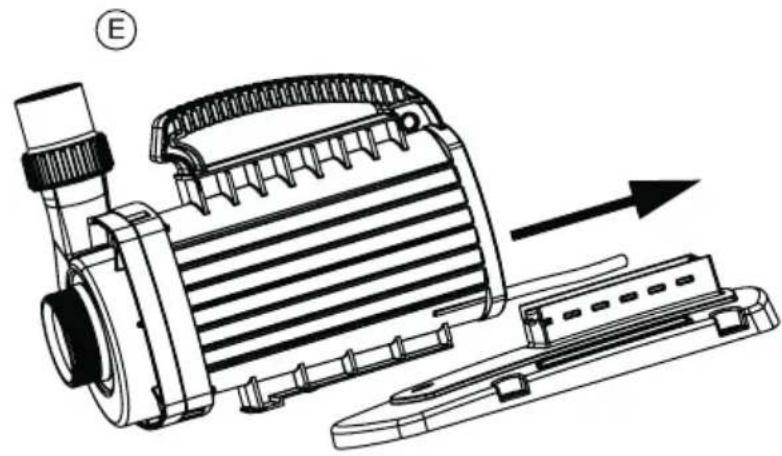
natural_image
Technical line drawing of an electric motor with internal components and a directional arrow (no text or symbols)Translation of the original Operating Instructions
Information about these operating instructions
Welcome to OASE Living Water. You made a good choice with the purchase of this product Aquarius Universal 21000, 27000, 40000.
Prior to commissioning the unit, please read the instructions of use carefully and fully familiarise yourself with the unit.
Ensure that all work on and with this unit is only carried out in accordance with these instructions.
Adhere to the safety information for the correct and safe use of the unit.
Keep these instructions in a safe place! Please also hand over the instructions when passing the unit on to a new owner.
Symbols used in these instructions
The symbols used in this operating manual have the following meanings:

Risk of injury to persons due to dangerous electrical voltage
This symbol indicates an imminent danger, which can lead to death or severe injuries if the appropriate measures are not taken.

Risk of personal injury caused by a general source of danger
This symbol indicates an imminent danger, which can lead to death or severe injuries if the appropriate measures are not taken.

Important information for trouble-free operation.
Intended use
Aquarius Universal 21000, 27000, 40000, in the following termed "unit", and all other parts from the delivery scope may be used exclusively as follows:
- For pumping normal pond water for water features and fountains.
- For operation with clean water.
– Operation under observance of the technical data.
The following restrictions apply to the unit:
- Do not use in swimming ponds.
- Never use the unit to convey fluids other than water.
- Never run the unit without water.
- Do not use in conjunction with chemicals, foodstuff, easily flammable or explosive substances.

Attention! Risk of damage!
Ensure that the unit does not take in air or run dry. Do not connect the unit to the domestic water lines.
Safety information
The company OASE has built this unit according to the state of the art and the valid safety regulations. Despite the above, hazards for persons and assets can emanate from this unit if it is used in an improper manner or not in accordance with its intended use, or if the safety instructions are ignored.
For safety reasons, children and young persons under 16 years of age as well as persons who cannot recognise possible danger or who are not familiar with these operating instructions, are not permitted to use the unit. Keep children under supervision to ensure that they do not play with the unit.
Hazards encountered by the combination of water and electricity
- The combination of water and electricity can lead to death or severe injury from electrocution, if the unit is incorrectly connected or misused.
- Prior to reaching into the water, always switch off the mains voltage to all units used in the water.
Correct electrical installation
– Electrical installations must meet the national regulations and may only be carried out by a qualified electrician.
- A person is regarded as a qualified electrician, if, due to his/her vocational education, knowledge and experience, he or she is capable of and authorised to judge and carry out the work commissioned to him/her. Working as a qualified person also includes the recognition of possible hazards and the adherence to the pertinent regional and national standards, rules and regulations.
- For your own safety, please consult a qualified electrician.
- The unit may only be connected when the electrical data of the unit and the power supply coincide. The unit data is to be found on the unit type plate or on the packaging, or in this manual.
- Ensure that the unit is fused for a rated fault current of max. 30 mA by means of a fault current protection device.
- GB -
- Extension cables and power distributors (e.g. outlet strips) must be suitable for outdoor use.
- Ensure that the power connection cable cross section is not smaller than that of the rubber sheath with the identification H05RN-F. Extension cables must meet DIN VDE 0620.
- Protect the plug connections from moisture.
- Only plug the unit into a correctly fitted socket.
Safe operation
- Never operate the unit if either the electrical cables or the housing are defective!
- Do not carry or pull the unit by its electrical cable.
- Route all cables such that damage is excluded and nobody can trip over them.
- Never open the unit housing or its attendant components, unless this is explicitly required in the operating instructions.
- Only use original spare parts and accessories for the unit.
- Never carry out technical modifications to the unit.
- Only have repairs carried out by customer service points authorised by OASE.
- The power connection cables cannot be replaced. When the cable is damaged, the unit or the component needs to be disposed of.
- Only operate the unit if no persons are in the water!
- Keep the socket and power plug dry.
Installation
Only use the unit in its horizontal position and ensure stable seating on a firm ground. The unit must be positioned below the water surface level. The unit can be placed within the pond (submersed) or outside of the pond (dry). Please note the installation examples (A and B). Do not carry or pull the unit using the connection cable. Ensure that the unit will never run without water flowing through!
To fit the suction hose with the unit installed outside of the pond (dry), remove the two strainer cheeks by unscrewing the screws, then remove the front plate of the strainer.
For replacement, the support foot (C) can be removed by releasing the locking lever (D) at the underside of the support foot and pulling it to the rear. To install the support foot, push the pump body onto the foot until it engages (E).
Start-up

Attention! The pump must never run dry.
Possible consequence: The pump will be destroyed.
Protective measure: Check the water level at regular intervals. Always place the unit below water level.

Attention! The unit is heavy.
Possible consequence: Lifting and carrying the unit could put considerable strain on your cardiovascular and musculoskeletal system.
Protective measure: Only lift and carry the unit with the help of a second person.
Install the unit so that it is not exposed to direct sun radiation (max. 40 °C).
This is how to connect the power supply:
Switching on: Connect power plug to the socket. The unit switches on immediately when the power connection is established.
Switching off: Disconnect the power plug.
Immerse the unit in water for approx. 1 hour prior to switching it on for the first time. Following this, operate the unit for 10 minutes against an almost fully closed pressure socket. Following this, you can fit the nozzle and arrange the fountain system.
The pump power can only be controlled by an OASE current management unit.
Maintenance and cleaning

Attention! Dangerous electrical voltage.
Possible consequences: Death or severe injury.
Protective measures:
- Prior to reaching into the water, disconnect the power supply to all units used in the water.
- Disconnect the power plug prior to carrying out work on the unit.
Cleaning the unit
If necessary, clean the unit with clear water using a soft brush.
- In the event of stubborn furring (calcium deposits), a common household cleaner free from vinegar and chlorine can be used. Subsequently, clean the pump thoroughly using clear water.
- Never use aggressive cleaning agents or chemical solutions. These could attack the housing surface or impair the function.
Malfunctions
| Trouble shooting Cause | Remedy | |
| Unit does not run - no power supply | - fuse defective- FI switch tripped- rotor blocked | - check power supply- check fuse and replace, if necessary- check switch system and connection cable- check strainer and rotor for blockages, and remove if found, Check strainer |
| Unit delivers very little or not at all | - strainer not covered by water- slide valve closed- air pocket in the system- strainer cheeks clogged | - check water level and position of the pump- check the hose system- check the hose system- check and clean |
| The unit switches off, then on again after some time | The unit is overheated.- Fluid temperature above 35°C- Inner cooling channels clogged | - Operate the unit with cooler fluid- Have the unit interior cleaned by an expert |
Disposal

Do not dispose of this unit with domestic waste! For disposal purposes, please use the return system provided. Disable the unit beforehand by cutting off the cables.
Storage/Over-wintering
The unit is frost resistant to minus 20 °C. Should you store the unit outside of the pond, clean it thoroughly with a soft brush and water, check it for damage, then store immersed in water or filled with water. Do not immerse the power plug in water!
Repair
A damaged unit cannot be repaired and must be put out of operation. Dispose of the unit in accordance with the regulations.