Professionel 3 1200XLT - Water filter EHEIM - Free user manual and instructions
Find the device manual for free Professionel 3 1200XLT EHEIM in PDF.
| Product type | External filter for aquarium |
| Brand | EHEIM |
| Model | Professional 3 1200XLT |
| Category | Water filter |
| Filtration type | Mechanical, biological, adsorptive |
| Number of filter baskets | 3 |
| Priming system | Integrated, with manual pump |
| Flow indicator | Float with red marker |
| Prefilter | Yes, with removable blue filter pad |
| Power supply | 220-240 V, 50/60 Hz |
| Max. installation height | 180 cm between water surface and filter bottom |
| Recommended filter media | EHFIMECH, SUBSTRAT pro (original EHEIM) |
| Prefilter maintenance | Regularly clean the blue filter pad with lukewarm water |
| Filter media maintenance | Rinse the baskets with lukewarm water, replace the white felt at each cleaning |
| Pump cleaning | Disassemble the chamber, clean shaft and impeller with a soft brush |
| Hose cleaning | With EHEIM universal cleaning brush (ref. 4005570) |
| Safety | Safety adapter with integrated taps, shut-off before opening |
| Tank material | Robust plastic |
| Included accessories | Hoses, intakes, suction cups, spray bar, hose clamp |
| Country of manufacture | Germany |
| After-sales service | EHEIM GmbH & Co. KG, Plochinger Str. 54, 73779 Deizisau, Germany |
Frequently Asked Questions - Professionel 3 1200XLT EHEIM
User questions about Professionel 3 1200XLT EHEIM
0 question about this device. Answer the ones you know or ask your own.
Ask a new question about this device
Download the instructions for your Water filter in PDF format for free! Find your manual Professionel 3 1200XLT - EHEIM and take your electronic device back in hand. On this page are published all the documents necessary for the use of your device. Professionel 3 1200XLT by EHEIM.
USER MANUAL Professionel 3 1200XLT EHEIM
natural_image
Black-and-white photo of a snowy landscape with a zebra-patterned rock formation and scattered vegetation (no text or symbols visible)
natural_image
Black-and-white photo of two fish swimming in a pool (no text or symbols visible)
natural_image
Top-down view of a mechanical device with mounting flanges and a central housing (no visible text or symbols)2080/2180
| deutsch | Bedienungsanleitung |
| english | Operating Instructions |
| français | Mode d'emploi |
| nederlands | Gebruiksaanwijzing |
| italiano | Istruzioni per l'uso |
| svenska | Bruksanvisning |
| español | Instrucciones de uso |
| dansk | Betjeningsvejledning |
| suomi | Käyttöohje |
| norsk | Bruksanvisning |
| português | Manual de instruções |
| eλληνικά | Οδηγίες χρήσης |
| русский | Руководство по эксплуатации |
| magyar | Kezelési utasítás |
| čeština | Návod k obsluze |
| slovenčina | Návod na obsluhu |
| polski | Instrukcja obsługi |
| slovensko | Navodila za uporabo |
| română | Instrucțiuni de utilizare |
| 德文 | 使用说明 |
| 한국어 | 사용 설명서 |

text_image
Exploded view diagram of a cleaning or cleaning device with numbered parts for identificationFiltermedien
Filter media
natural_image
Simple line drawing of a U-shaped pipe with a valve and wavy line above, no text or symbols present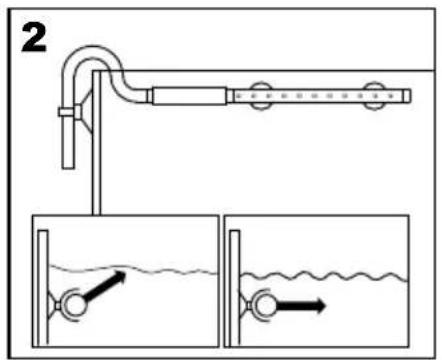
text_image
2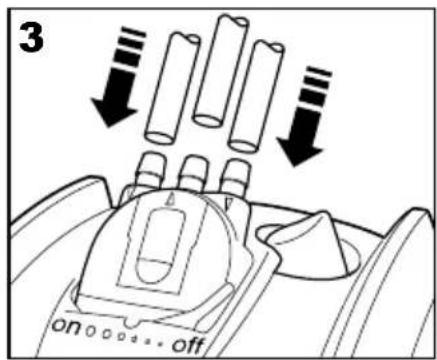
text_image
3 on off
text_image
4 on ... off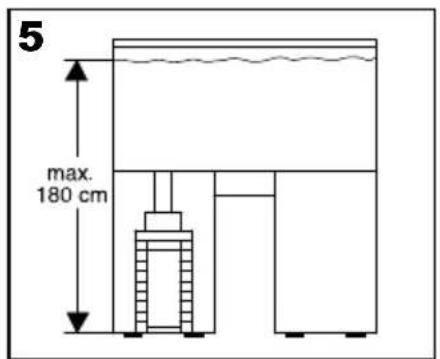
text_image
5 max. 180 cm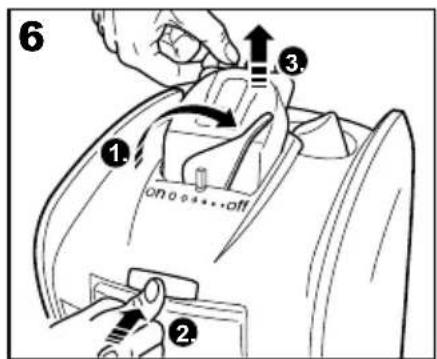
text_image
6 ① on o + + + off ② ③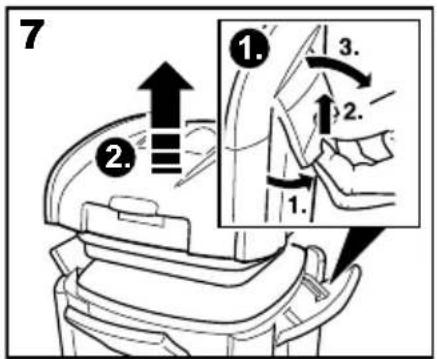
text_image
7 ① ② ③ ④ 1. 2.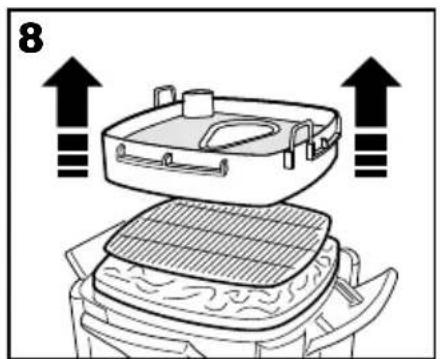
text_image
8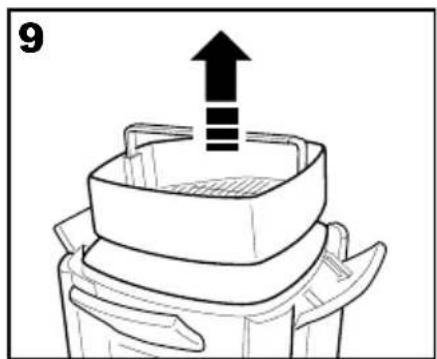
natural_image
Diagram of a container with an upward arrow indicating flow or movement (no text or symbols)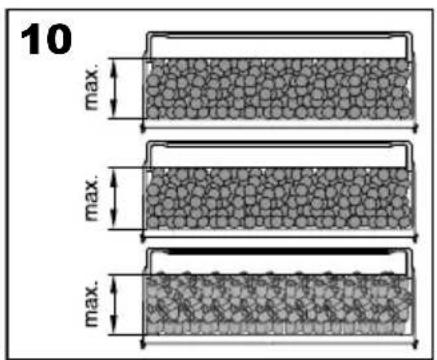
text_image
10 max. max. max.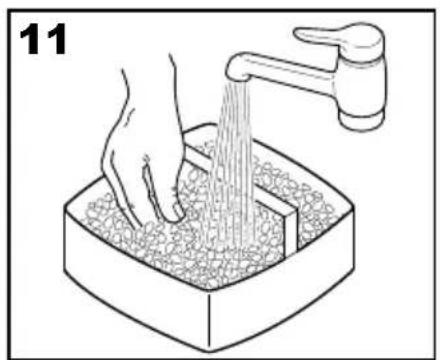
natural_image
Illustration of hands washing granular material in a container with a faucet (no text or symbols)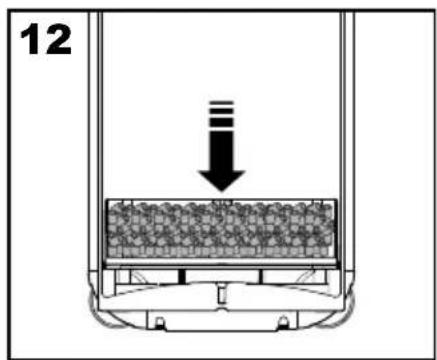
text_image
12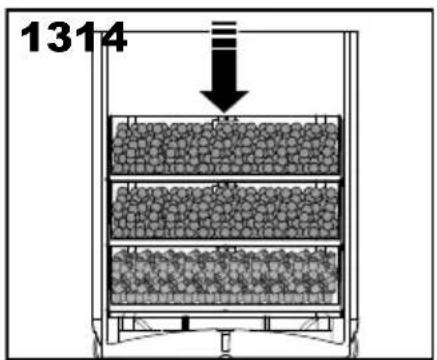
text_image
1314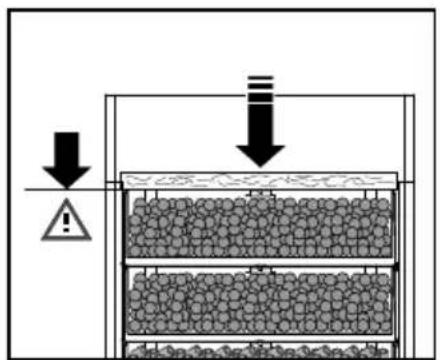
text_image
Diagram showing a container with granular material and downward arrows indicating process, with an exclamation mark and warning symbol.
text_image
15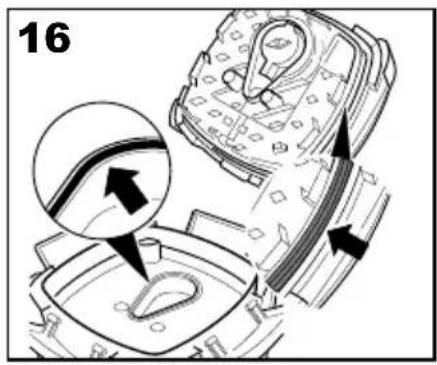
text_image
16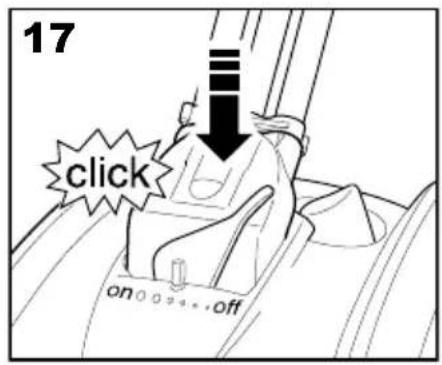
text_image
17 click on 0 0 4 4 4 4 off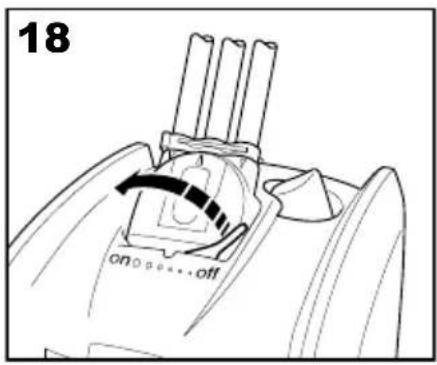
text_image
18 on...pe...off
text_image
19 on...off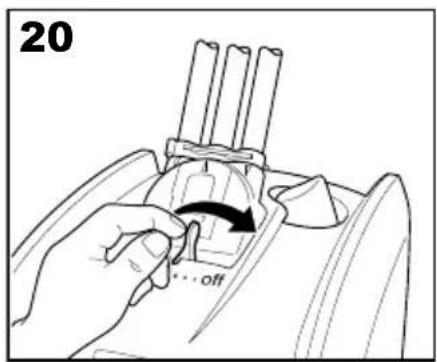
text_image
20 ...off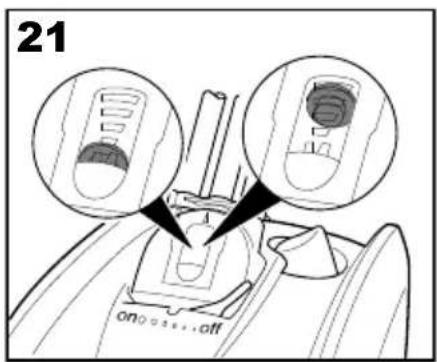
text_image
21 on...off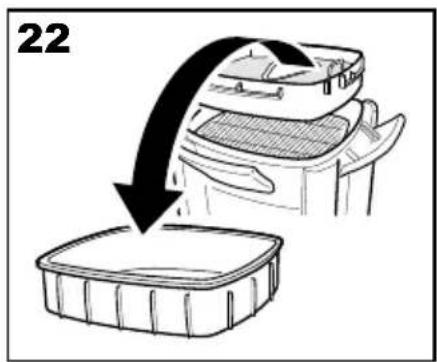
text_image
22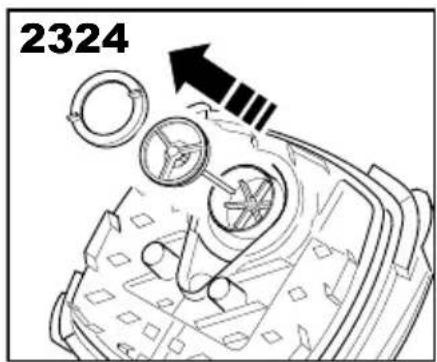
text_image
2324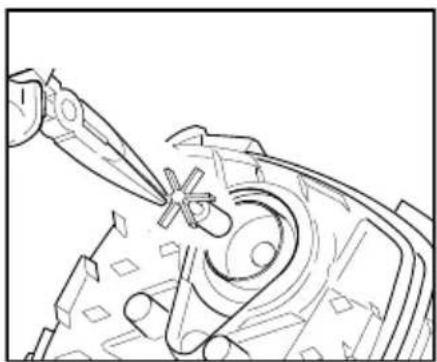
natural_image
Technical line drawing of a mechanical component with a tool interacting with a central part (no text or symbols)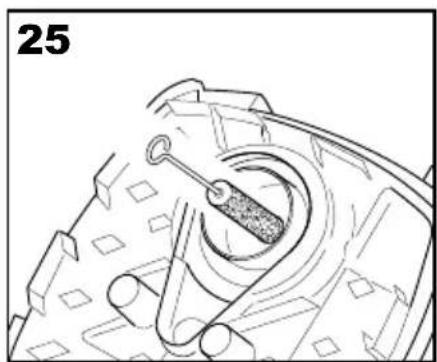
natural_image
Technical line drawing of a mechanical component with a central shaft and textured base (no text or symbols)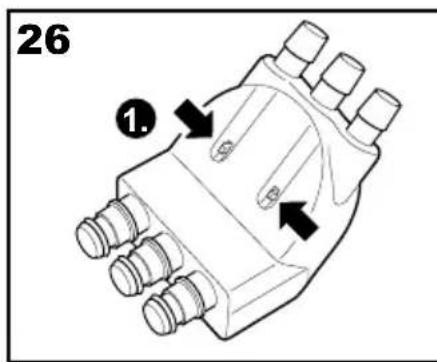
text_image
26 ①.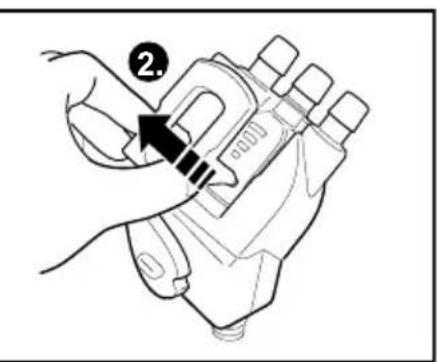
text_image
②.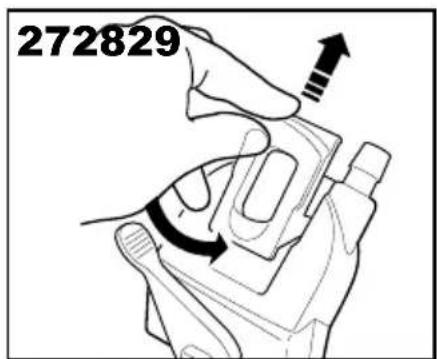
text_image
272829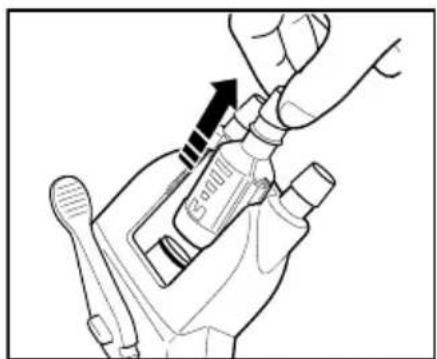
natural_image
Line drawing of a hand holding a medical or laboratory device with an arrow indicating motion (no text or symbols present)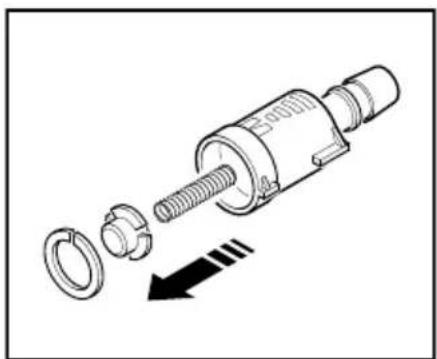
natural_image
Technical illustration of a mechanical assembly with exploded view and directional arrow (no text or symbols)Vielen Dank
IMPORTANT SAFETY INSTRUCTIONS
WARNING - To guard against injury, basic safety precautions should be observed, including the following.
a) READ AND FOLLOW ALL SAFETY INSTRUCTIONS.
b) DANGER- To avoid possible electric shock, special care should be taken since water is employed in the use of aquarium equipment. For each of the following situations, do not attempt repairs yourself; return the appliance to an authorized service facility for service or discard the appliance
1) If the appliance falls into the water, DON'T reach for it. First unplug it then retrieve it. If electrical components of the appliance get wet, unplug the appliance immediately. (Non-immersible equipment only)
2) If the appliance shows any sign of abnormal water leakage, immediately unplug it from the power source. (Immersible equipment only)
3) Carefully examine the appliance after installation. It should not be plugged in if there is water on parts not intended to be wet.
4) Do not operate any appliance if it has damaged cord or plug, or if it is malfunctioning or has been dropped or damaged in any manner.
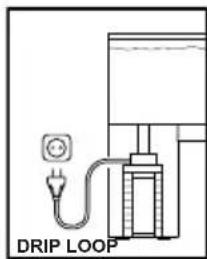
5) To avoid the possibility of the appliance plug or receptacle getting wet, position aquarium stand and tank to one side of a wall-mounted receptacle to prevent water from dripping onto receptacle or plug. A „drip-loop“, shown in the figure below, should be arranged by the user for each cord connecting an aquarium appliance to a receptacle. The „drip-loop“ is a part of the cord below the lever of the receptacle, or the connector if an extension cord is used, to prevent water traveling along the cord and coming in contact wit the receptacle.
text_image
DRIP LOOPIf the plug or socket does get wet, DON'T unplug the cord. Disconnect the fuse or circuit breaker that supplies power to the appliance. Then unplug and examine for presence of water in the receptacle.
c) Close supervision is necessary when any appliance is used by or near children.
d) To avoid injury, do not contact moving parts or hot parts such as heater, reflectors, lamp bulbs, and the like.
e) Always unplug an appliance from an outlet when not in use, before putting on or taking off parts, and before cleaning. Never yank cord to pull plug from outlet. Grasp the plug and pull to disconnect.
f) Do not use an appliance for other than intended use. The use of attachments not recommended or sold by the appliance manufacturer may cause an unsafe condition.
g) Do not install or store the appliances where it will be exposed to the weather or to temperatures below freezing.
h) Make sure an appliance mounted on a tank is securely installed before operating it.
i) Read and observe all the important notices on the appliance.
j) If an extension cord is necessary, a cord with a proper rating should be used. A cord rated for less amperes or watts than the appliance rating may overheat. Care should be taken arrange the cord so that it will not be tripped over or pulled.
k) „SAVE THESE INSTRUCTIONS“
Thank you very much
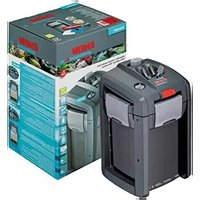
for buying your new EHEIM professionel 3 high tech generation external filter. With its developed priming aid, functional safety adapter and optical flow monitoring, this innovative system provides optimal convenience and utmost safety. The large container volume, the prefilter on top and the finely balanced filter media assembly ensure optimal water clarification and a highly efficient decomposition of pollutants, thus ensuring the well-being of your aquarium occupants.
The filter is extremely easy and convenient to operate properly. These detailed instructions tell you everything worth knowing about initial installation, maintenance and servicing.
Safety Instructions

Only use in closed rooms for aquarium applications
Prior to dipping your hand into the aquarium water, disconnect all electronic devices installed in the water from the mains. It is imperative to disconnect the filter from the mains prior to opening it.
text_image
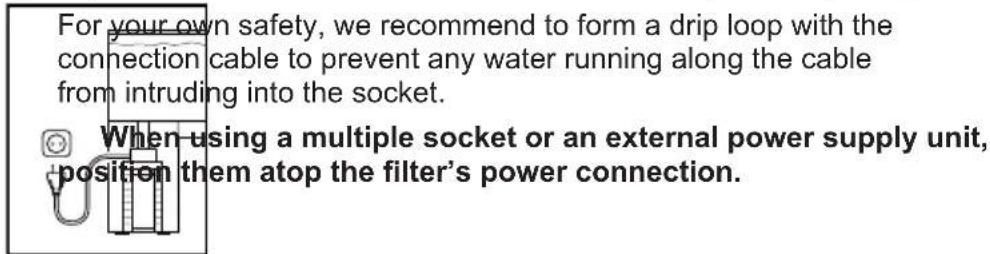
For your own safety, we recommend to form a drip loop with the connection cable to prevent any water running along the cable from intruding into the socket. When using a multiple socket or an external power supply unit, position them atop the filter's power connection.
Burning danger! Be careful when touching the heating coil of devices with integrated heater.

The device's power cable cannot be replaced.
An external power cable or power supply unit must not be repaired.
In case of cable damage, the device must no longer be used.
Any damaged external power cables or power supply units must always be replaced.
Contact your specialist dealer or an EHEIM service center. The heating coil and the electronic components must only be replaced by experts commissioned by the EHEIM customer service.

text_image
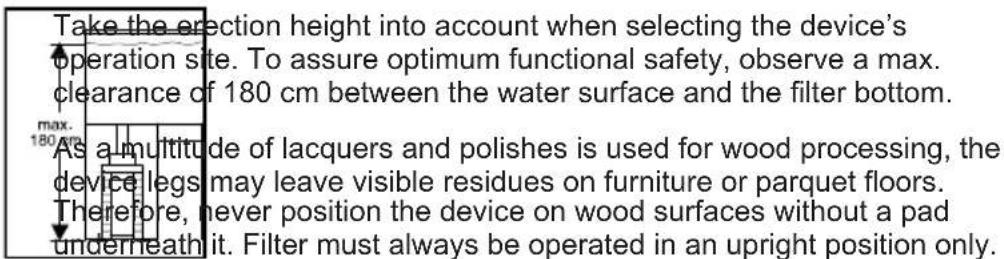
Take the erection height into account when selecting the device's operation site. To assure optimum functional safety, observe a max. clearance of 180 cm between the water surface and the filter bottom. As a multitude of lacquers and polishes is used for wood processing, the device legs may leave visible residues on furniture or parquet floors. Therefore, never position the device on wood surfaces without a pad underneath it. Filter must always be operated in an upright position only.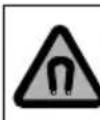
Magnetic fields may generate electronic or mechanical interferences or damage with these devices. This also applies to cardiac pacemakers. The required safety clearances are specified in the manuals of such medical equipment.
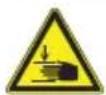
During maintenance works, observe the risk of crushing fingers due to high magnetic forces.

The product is approved in accordance with the respective national regulations and guidelines and complies with the EU standards.

This equipment is not intended for use by persons (including children) with limited physical, sensory or mental abilities or for persons with no experience or knowledge unless they are supervised by a person responsible for safety or unless they have received from such a person instructions on how to use the equipment. Children should be supervised to ensure that they do not play with the equipment.

Do not clean the unit – or parts of it – in the dishwater. Not dishwater resistant!

Do not dispose of this product as normal household waste. Take it to your local refuse collection site.
External filter 2080 for aquariums
Model:
See nameplate on top part of the filter
Subject to technical alterations.
Contents Page
| Definition of individual parts / What delivery includes 18 | |
| Installing the hose | 18-19 |
| Installing the filter | 19 |
| Filling of filter materials | 20 |
| Taking into operation | 21 |
| Servicing and maintenance | 21-23 |
| what to do if... | 23-25 |
General operating description
The EHEIM professionel 3 external filter cleans the aquarium water in a closed loop. The professionel 3 external filter has two suction channels for individual placement of suction areas in the aquarium. The built-in maintenance-free pump ensures continuous circulation. Water from the aquarium is passed through several filter layers where it is filtered mechanically, biologically or by adsorption before flowing back into the aquarium. For the filter to function, air has first to be removed from the system. This is easily done using the built-in priming aid.
Note: For optimal filter performance and trouble-free operation, it is essential to use EHEIM original filter materials (see chapter on Filling of Filter Materials).
Definition of individual parts / What delivery includes
- Hose guard, 2. Safety adapter with integrated shut-off valves, 3. Shut-off lever, 4. Indicator,
- Red safety catch, 6. Pump head, 7. Priming aid, 8. Intake fitting, 9. Sealing gasket,
- Sealing rings (prefilter), 11. Filter pad (blue), 12. Prefilter, 13. Lattice screen cover,
- Filter pad (white), 15. Filter inserts, 16. Transportation dish for prefilter, 17. Closing clips,
- Filter container, 19. Castors, 20. Partition, 21. Indicator lid, 22. Indicator housing, 23. Spring with float, 24. Brace, 25. Sealing ring, 26. Suction pipe (2x), 27. Strainer (2 x), 28. Suction head with clamp, 29. Outlet bend, 30. Nozzle tube, 31. Hoses.
Unpacking
When unpacking, check that all parts are present. Some installation accessories are packed in the filter container.
- Tilt out all four closing clips on the filter head, push up and fold out. Remove pump head (see Point 7). Remove prefilter, lattice screen cover and filter pad (white) from the container (see Point 8). Pull out filter inserts by the handle (see Point 9).
Installing the hose
1 Place a strainer on each suction pipe and fit at the desired locations in the aquarium with the help of the suction holders.
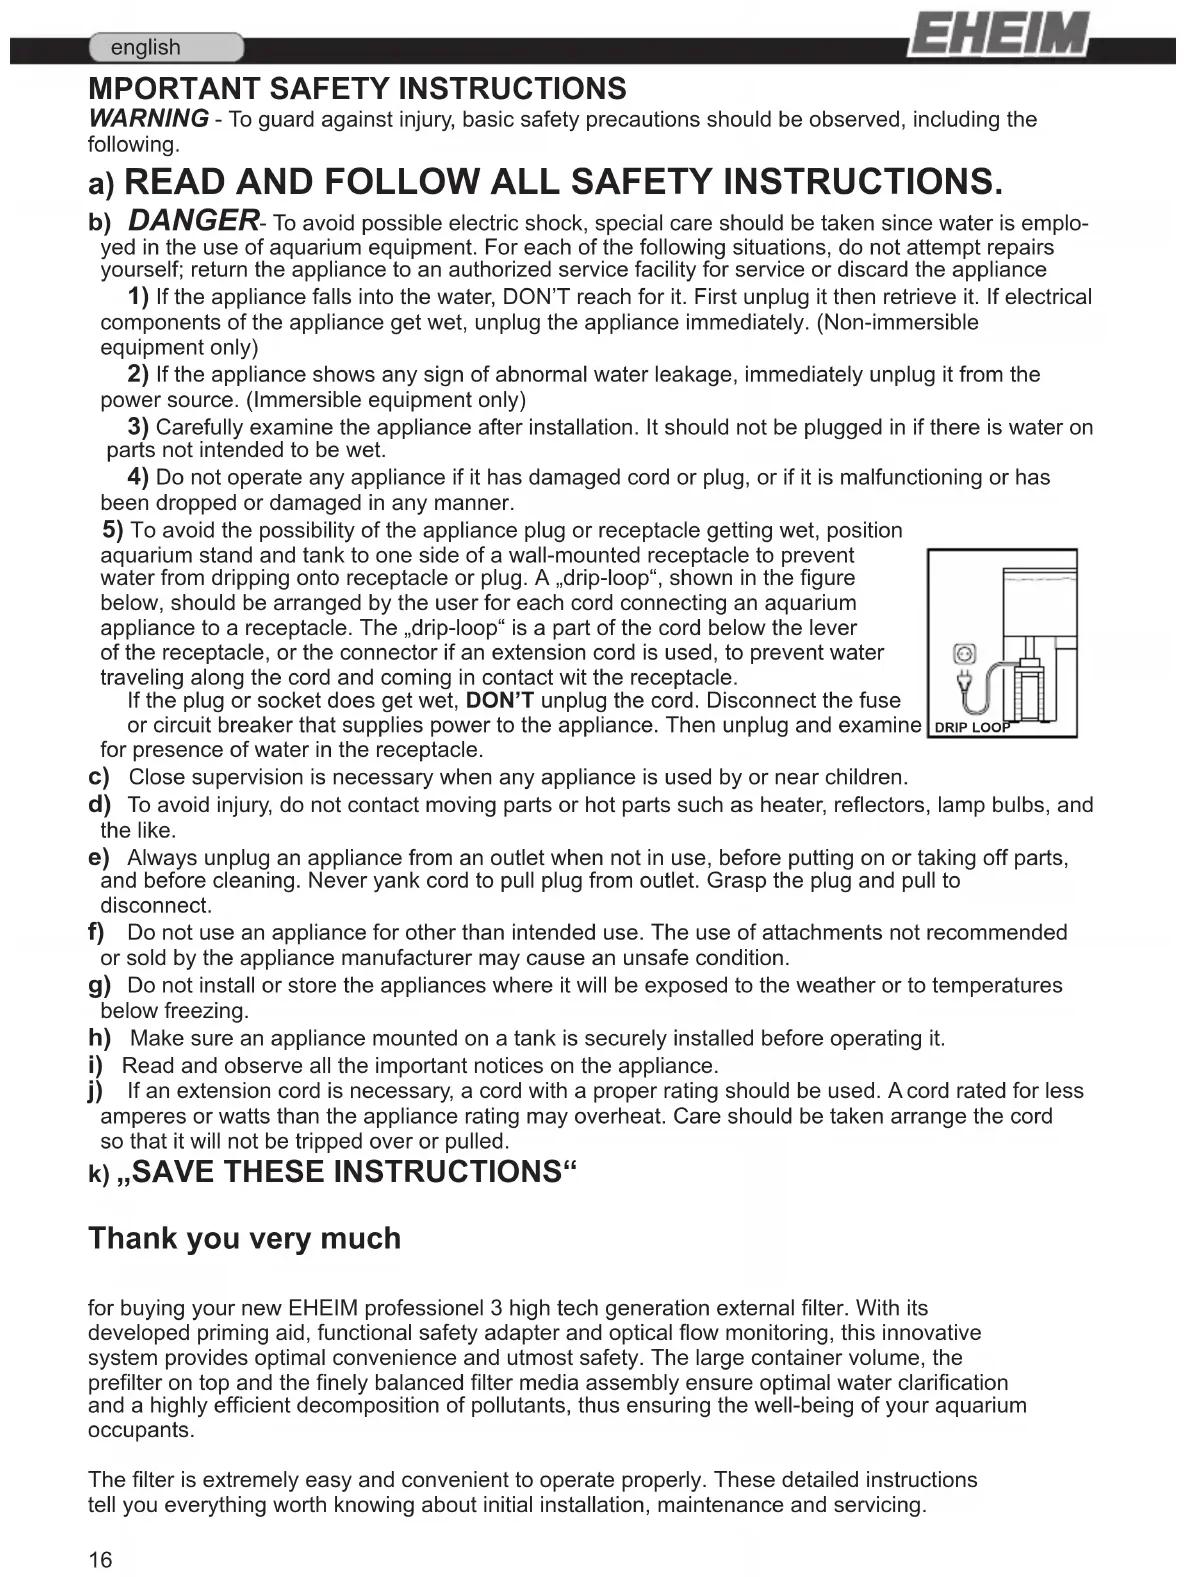
2 Outlet bend and nozzle tube are connected with a short section of hose and likewise fastened to the inside wall of the tank with suction pads. The plug for the open end of the nozzle tube is not fitted until the filter is running.
Tip: The nozzle tube can be installed either below or at water level, depending on the degree of surface movement desired. Cut each hose to the required length and push up at least 1 cm on to the suction pipe and outlet bend. Make sure that the hoses are laid as short as possible and that they do not sag or kink. Sagging hoses can worsen the suction process considerably.
Tip: Any kinks that form can be pressed out if the hoses are rendered supple in hot water.
3 Connect the suction pipe hoses to the left and right hose connectors on the adapter (marked ▼) and join the outlet bend to the adapter with the middle hose connector (marked ▲ Push up all three hose ends until they lock into place (if necessary, render supple with hot water beforehand).
4 Then, lay the two-part hose guard right round the assembled ends close to the adapter, hook in laterally and clip together.
Note: Be sure to use original EHEIM hoses. Check all hose connections at regular intervals to make sure they fit properly.
Installing the filter
5 When choosing a location for the filter, pay attention to the prescribed vertical clearance. To achieve optimal operational safety, the distance between the water surface and the filter bottom may not exceed 180 cm. However, the upper edge of the pump head should be at least 10 cm below the surface of the water. It is better to place it underneath the aquarium.
Tip: The EHEIM professionel 3 external filter has 4 castors. By tilting slightly, the filter can easily be placed in the cabinet. In the standing position, the load is removed from the castors.
Note: Since a wide variety of varnishes and polishes are used when processing timber, the feet of the appliance can leave visible traces on furniture or parquet floors as a result of chemical reactions. Therefore the device should not be placed on unprotected wooden surfaces.

tion: Always operate the filter in a standing position.
Filling with filter materials
Remove adapter
6 Turn shut-off lever on the adapter to the OFF position. Press the red safety catch (can only be pressed when the shut-off lever is in the OFF position). The safety adapter springs out of its holder and can be removed.
Open filter
7 Tip out all four closing clips on the filter container, push up and fold out. Remove pump head.
8 Take prefilter, covering grid plate and filter pad (white) out of the container.
9 Pull out filter inserts by the handle. The recessed handle can be pulled up and out.
Filling
To ensure optimal, trouble-free functioning of your EHEIM professionel 3 external filter, we recommend that you use original EHEIM filter materials. Only they are designed precisely for use with the EHEIM external filter, provide an ideal surface for purifying bacteria to colonise and ensure clean, healthy aquarium water. You can buy the right media set for the EHEIM professionel 3 from your pet shop dealer, order number 2520800.
10 Fill the bottom filter insert with EHFIMECH to just below the edge. Fill the second and third filter insert to just below the edge with SUBSTRAT pro.

Attention: Do not overfill as otherwise the filter inserts will not fit on top of each other
11 Next, rinse the filter medium in the filter insert under running water, mixing thoroughly at the same time, until no cloudiness is visible in the water.
12 Insert the filter insert filled with EHFIMECH at the bottom of the filter container and press down firmly onto the base runners.
13 Insert the second and third filter inserts (both filled with SUBSTRAT pro) after rinsing in the same way. Push the handles back in and make sure that all filter inserts lie flush on top of each other.
14 Next, lay the white filter pad on the top filter insert so that it is placed on the pushed-in handle.

Attention: The white filter pad must not be under the handle!
- Place the lattice screen cover on the white filter pad.
Prefilter
Function: The prefilter collects coarse dirt from the aquarium water so that the water that flows through the filter inserts has been pre-filtered. This substantially reduces the amount of dirt that reaches the filter inserts and guarantees highly efficient biological decomposition of pollutants and a long service life. The prefilter can easily be removed. To make interim cleaning even easier, the scope of delivery includes a dish for transporting the prefilter.
15 Insert prefilter with blue filter pad in the filter container so that that the overflow area is above the partition.
Note: The priming system only functions when the prefilter is empty.
Close filter, insert safety adapter
16 Check that the gasket fits properly on the pump head and the sealing ring fits properly on the prefilter and remove any soiling. Check for soiling on the sealing surface on the upper edge of the container, clean if necessary and grease lightly with EHEIM Care Spray, Order No. 400 100 0.
- Place pump head on filter container and close all four clips.
17 Push safety adapter into the pump head, applying light pressure, until it engages with anaudible CLICK. The shut-off lever must be in the OFF position to insert the adapter as otherwise a safety mechanism prevents it from engaging.
Taking into operation
18 First turn the shut-off lever on the safety adapter to the ON position to open the three valves. If the shut-off lever cannot be turned to the ON position, the safety adapter has not been fitted correctly to the pump head. In that case, repeat step 17.
19 Press the suction aid firmly several times until the filter container automatically fills with water. As soon as the container is full the mains plug can be plugged in to begin operating the filter. Make sure that the nozzle tube (delivery side) is above the surface of the water during the filling process so that the device is optimally bled of air.

Attention: Depending on the way the hoses are laid, initially only one of the two hoses with water. In that case, you can squeeze the filled suction channel firmly to get in your fingers until the empty hose has filled.
- Then place the plug in the open end of the nozzle tube.
Regulating the flow
20 To set the desired filtering performance on the delivery side, turn the shut-off lever on the safety adapter slowly in the OFF direction. The float in the indicator window shows the actual flow of water.
Indicator
21 The indicator provides continuous information about the volume of water flowing through and signals any faults that may occur. If the float touches the red bar, the filter is not performing to its full capacity and the filter system must be checked (see what to do if..., pages 17-19).
Service and maintenance
- First turn the shut-off lever on the safety adapter to the OFF position (see step 20). Pull out plug from mains. Remove safety adapter (see step 6).
- Tilt the filter slightly forward, using the recessed grips and pull out of the cabinet on the castors. Open all four closing clips and remove the pump head.
Interim cleaning (prefilter)
22 Pull prefilter out of the container by the two handles and place in the prefilter transportation dish. Empty prefilter and rinse out blue filter pad thoroughly under lukewarm running water until the water runs clear.
Tip: Renew blue filter pad after the second or third cleaning (Order No. 2616802).
- Remove lattice screen from the container and check to see if the white filter pad is very dirty. Replace if necessary. The white filter pad is for mechanical fine filtering. Since the dir particles that cling to it cannot be completely washed out, the filter pad may only be used once. Use a new filter pad (Order No. 2616802).
- Replace prefilter in the filter container. Check seals on the pump head and the upper edge of the container and clean off any soiling. Replace pump head. Close all four closure clips. Reinsert safety adapter (see step 17).
- Turn shut-off lever to the ON position (see step 18) and press suction aid several times (see step 19). Then take the device into operation by plugging it into the mains.
Thorough cleaning
- Remove prefilter, lattice screen, filter pad and all three filter inserts from the filter container. Rinse filter media in the filter inserts thoroughly under lukewarm running water until water runs clear. The white filter pad is for mechanical fine filtering. Since the dirt particles that cling to it can not be completely washed out, the filter pad may only be used once. Use a new filter pad (Order No. 2616802).
The blue filter pad (Order No. 2616802) can be used two or three times more. Wash out gently under running water before reinsertion so that some of the bacteria that have colonised it remain.
Tip: When changing the SUBSTRAT pro, mix approx. one third of the used filter medium with the new material so that the bacteria cultures multiply more rapidly.
- Wash out the filter container then push the filter inserts back in. Press the bottom one on to the base runners and make sure the other filter inserts fit tightly. Then lay a new filter pad on the top filter insert. To do this, the handle must be pushed in. Lay the lattice screen on top and insert the prefilter.

Attention: The white filter pad must not be laid beneath the handle of the filter insert.
- Check the upper edge of the filter and the gasket in the upper part of the filter for soiling and damage. If need be, replace the gasket. Spray upper edge of container lightly with EHEIM Care Spray (Order No. 4001000), replace upper part of filter and close all four clips. Place filter in cabinet.
- Reinsert safety adapter (see step 17).
Note: Check all hose connections at regular intervals to make sure they fit properly.
- For the container to fill with water, water circulation is reinstated by pressing the primer several times. Then plug into the mains to begin operation.
Note: The priming system only works when the prefilter is empty.
Cleaning the hoses
Clean hoses regularly with an EHEIM universal cleaning brush (Order No. 4005570).
Cleaning the pump chamber
23 Open pump cover by turning the sealing ring and remove.
Note: With these devices, magnetic fields can cause electronic or mechanical disturbance or damage. This can also affect cardiac pacemakers. The safe distances required can be found in the manuals for these medical appliances.

tion: Due to strong magnetic forces, there is a risk of crushing the fingers when g out servicing work. It is best to pull the impeller out with pliers.
24 Pull impeller out of the pump chamber.
25 Carefully rinse off ceramic shaft (risk of breakage) and clean all parts, including the pump chamber, lubrication channel and pump cover with a soft brush (cleaning set Order No. 4009560).
- Replace all parts and close pump chamber by turning the sealing ring.
Cleaning the indicator
- Remove safety adapter (see step 6). Empty all hosepipes. Then, and only then, open hose guard and remove hoses from safety adapter.
26 Press together safety catch on the back of the safety adapter and move indicator lid for ward to remove.
27 Position the indicator lid further up and use it to lever the indicator housing out of the safety adapter.
28 Remove indicator housing.
29 Remove brace carefully and take the float and spring out of the indicator housing.
Make sure you do not damage the spring. Clean the indicator housing with cleaning brush Order No. 4009560. Replace float with spring and fasten by means of the brace. Reinsert the indicator housing into the safety adapter and press the indicator lid in until the catch engages.
Gaskets and sealing rings
Spray all gaskets and sealing rings with EHEIM Care Spray Order No. 4001000 each time you clean. This keeps them supple for longer and increases their service life. Be sure to replace any damaged seals (see list of spares).
What to do if...

Danger!
When working at the filter, assure that no water gets into contact with electrical interfaces. Disconnect the power plug! In case of problems, visit our website www.eheim.de.
...Top part of filter can't be closed
| Cause | Solution |
| Filter inserts have been inserted wrongly. | Push filter inserts and prefilter in until they lie flush on top of each other. |
| Filter inserts are too full. Do not overfill filter inserts. If need be, clean the touching surfaces. | |
| Partition not fitted properly. Push partition into the filter container until it engages correctly. | |
| Gasket not fitted properly. Insert correctly into the groove provided in the upper part of the filter. Check for damage and if necessary replace. | |
...Top of filter leaks
| Cause | Solution |
| Closing clips not closed properly. | Close all clips properly. |
| Sealing areas or gasket soiled. | Clean seal areas and spray lightly with EHEIM-silicon grease spray Order No. 4001000. |
| Sealing ring not fitted, inserted wrongly or damaged. | Insert sealing ring correctly or renew. |
...Primer does not work
| Cause | Solution |
| Pre-filter flap in pre-filternot closed. | Check the pre-filter flap for pollution and, if required, clean it. The pre-filter flap must be unobstructed. |
| Prefilter is filled with water. Empty | prefilter and repeat priming. Priming only works when the prefilter is empty. |
...Filter performance has greatly deteriorated
| Cause | Solution |
| Safety adapter lever position not correct. | Check lever setting and adjust. |
| Safety adapter soiled. Remove | safety adapter; open shut-off lever and clean openings with cleaning brush (Order No. 4005570). |
| Hose installation. Check that there are no kinks or marked narrowing of cross-section. | |
| Hose installation soiled Clean | hose installation at regular intervals by drawing a universal cleaning brush (Order No. 4005570) through the suction channels and pressure channel or suction pipes and nozzle tube. |
| Only one suction pipe is filled with water | Squeeze the suction pipe that is filled with water together with your fingers until the other suction pipe has filled with water. |
| Strainer blocked. Remove coarse dirt, clean strainer. | |
| Filter media heavily soiled. Clean filter media. | |
| Filter media filled into a net bag. | Never put long-term filter media in net bags or nylon stockings. This leads to a drastic reduction in pump performance within a short time. |
| Filter media not cleaned properly. | When cleaning, remove the filter media from the filter media basket and rinse through with lukewarm water. |
| Filter media wrongly assembled. | Check that filter media have been assembled in the recommended layers for filtering. Fill bottom filter insert to just under edge with EHEIM MECH. Fill next two filter inserts with SUBSTRAT, also to just under edge. Never place white filter pad under the handle. |
| Filter pad inserted wrongly. After inserting the top filter insert, push in the handle and lay the white filter pad on top. | |
| Filter pad not renewed. Be sure to renew the filter pad each time you clean (Order No. 2616802). | |
| Pump is dirty. Clean pump chamber, cooling and lubrication channel with cleaning brush set (Order No. 4009560) (see chapter on Servicing and Maintenance). | |
| Water is not circulating properly. | Take filter into operation by priming (as described in the instructions). Make sure that the water runback (delivery side) is above the surface of the water during filling so that air is optimally bled from the device. |
| Too many accessories installed on the hose system. | Connected accessories reduce filter performance. Check and remove unnecessary accessories or operate via a separate water circulation system. |
...Pump does not work
| Cause | Solution |
| No mains supply. Plug in to mains. | |
| Shaft broken. Renew shaft (see list of spares). | |
| Impeller missing or blocked by bits of gravel, shells or similar. | Fit impeller, clean pump chamber. |
...Air in the filter
| Cause | Solution |
| Filter location. The top edge of | the pump head should be at least 10 cm beneath the surface of the water. It is better to place it underneath the aquarium. |
| Air is being sucked in via the hose installation. | Check that hose connector is fitted properly, and maybe check whether hoses leak. |
| Additional air supply (membrane pump). | Do not install diffuser in the vicinity of the suction pipe. |
| Filter media heavily soiled. Clean filter media. | |
| Filter media have been placed in net bags. | Never put long-term filter media in net bags or nylon stockings. This leads to a drastic reduction in pump performance within a short time. |
... the pump causes loud operating noise
| Cause | Solution |
| Ceramic sleeve not or incorrectly installed. | Correctly install or, if required, replace the ceramic sleeve. |
| Ceramic axis broken. Replace | the ceramic axis. |
natural_image
Simple line drawing of a water pump connected to a tank (no text or symbols)Reproduction or copying – even parts thereof – only with the express permission of the producer.