PSB Universal+ - Drill BOSCH - Free user manual and instructions
Find the device manual for free PSB Universal+ BOSCH in PDF.
Download the instructions for your Drill in PDF format for free! Find your manual PSB Universal+ - BOSCH and take your electronic device back in hand. On this page are published all the documents necessary for the use of your device. PSB Universal+ by BOSCH.
USER MANUAL PSB Universal+ BOSCH
OBJ_BUCH-2936-001.book Page 3 Monday, December 19, 2016 2:52 PM1 609 92A 2LY | (21.12.16) Bosch Power Tools 4 |
OBJ_DOKU-55126-001.fm Page 4 Wednesday, December 21, 2016 10:10 AM| 5 Bosch Power Tools 1 609 92A 2LY | (19.12.16)
50–3000 50 – 3100 Rated speed min
Rated torque Nm 1.65 1.45 Stall torque in accordance with EN 60745 Nm 17 19 Speed preselection
Constant electronic control
Rapid Shut-off (Kickback Control)
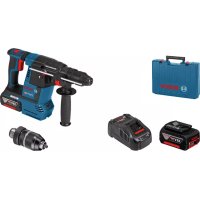
Spindle collar dia. mm 43 43 The values given are valid for a nominal voltage [U] of 230 V. For different voltages and models for specific countries, these values can vary. OBJ_BUCH-2936-001.book Page 13 Monday, December 19, 2016 2:52 PM14 | English 1 609 92A 2LY | (19.12.16) Bosch Power Tools Noise/Vibration Information Sound emission values determined according to EN 60745-2-1. The vibration level given in this information sheet has been measured in accordance with a standardised test given in EN 60745 and may be used to compare one tool with anoth- er. It may be used for a preliminary assessment of exposure. The declared vibration emission level represents the main ap- plications of the tool. However if the tool is used for different applications, with different accessories or insertion tools or is poorly maintained, the vibration emission may differ. This may significantly increase the exposure level over the total working period. An estimation of the level of exposure to vibration should also take into account the times when the tool is switched off or when it is running but not actually doing the job. This may sig- nificantly reduce the exposure level over the total working period. Identify additional safety measures to protect the operator from the effects of vibration such as: maintain the tool and the accessories, keep the hands warm, organisation of work pat- terns. Assembly Before any work on the machine itself, pull the mains plug. Auxiliary Handle (see figure A) Operate your machine only with the auxiliary handle
Before any work, make sure that the wing bolt 9 is firm- ly tightened. Loss of control can cause personal injury. Turn the wing bolt 9 counterclockwise and guide the auxiliary handle 10 over the drill chuck onto the spindle collar of the power tool. You can swivel the auxiliary handle 10 in order to achieve a safe work posture that minimises your fatigue. Swivel the auxiliary handle 10 to the required position and retighten the wing bolt 9 in clockwise direction. Adjusting the Drilling Depth (see figure B) The required drilling depth X can be set with the depth stop
Press the button for depth stop adjustment 8 and insert the depth stop into the auxiliary handle 10. The knurled surface of the depth stop 11 must face down- ward. Pull out the depth stop until the distance between the tip of the drill bit and the tip of the depth stop corresponds with the desired drilling depth X. Max. drilling dia. – Brickwork –Concrete – Steel – Wood
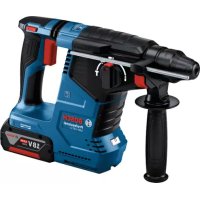
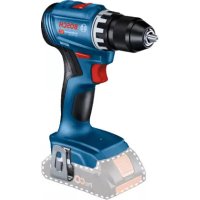
Chuck clamping range mm 2 – 13 2–13 Weight according to EPTA-Procedure 01:2014 kg 1.7 1.7 Protection class /II /II Impact Drill PSB Universal PSB Universal
The values given are valid for a nominal voltage [U] of 230 V. For different voltages and models for specific countries, these values can vary. PSB Universal PSB Universal
Typically the A-weighted noise levels of the product are Sound pressure level Sound power level Uncertainty K Wear hearing protection! dB(A) dB(A) dB(A)
(triax vector sum) and uncertainty K determined according to EN 60745-2-1: Drilling in metal:
Impact drilling in concrete:
OBJ_BUCH-2936-001.book Page 14 Monday, December 19, 2016 2:52 PMEnglish | 15 Bosch Power Tools 1 609 92A 2LY | (19.12.16) Dust Extraction Dust from materials such as lead-containing coatings, some wood types, minerals and metal can be harmful to one’s health. Touching or breathing-in the dust can cause allergic reactions and/or lead to respiratory infections of the user or bystanders. Certain dust, such as oak or beech dust, is considered car- cinogenic, especially in connection with wood-treatment additives (chromate, wood preservative). Materials con- taining asbestos may only be worked by specialists. – Use a dust extraction system suitable for the material being worked. – Provide for good ventilation of the working place. – It is recommended to wear a P2 filter-class respirator. Observe the relevant regulations in your country for the materials to be worked. Prevent dust accumulation at the workplace. Dust can easily ignite. Changing the Tool Keyless Chuck (PSB Universal) (see figure C) Press the spindle lock button 2 only when the machine is at a standstill. The drill spindle is locked by pressing the spindle lock button
2. This makes quick and easy changing of the tool in the drill
chuck possible. Open the keyless chuck 1 by turning in rotation direction , until the tool can be inserted. Insert the tool. Firmly tighten the collar of the keyless chuck 1 by hand in ro- tation direction until the locking action (“click”) is no longer heard. This automatically locks the chuck. The lock will disengage again if you turn the sleeve in the op- posite direction to remove the tool with the spindle locking button pressed. Keyless Chuck (PSB Universal
) (see figure D) The drill spindle is locked when the On/Off switch 6 is not pressed. This makes quick, convenient and easy changing of the tool in the drill chuck possible. Open the keyless chuck 1 by turning in rotation direction , until the tool can be inserted. Insert the tool. Firmly tighten the collar of the keyless chuck 1 by hand in ro- tation direction until the locking action (“click”) is no longer heard. This automatically locks the chuck. The locking is released again to remove the tool when the col- lar is turned in the opposite direction. Screwdriver Tools When working with screwdriver bits 15, a universal bit holder 14 should always be used. Use only screwdriver bits that fit the screw head. For driving screws, always position the “Drilling/Impact Drill- ing” selector switch 3 to the “Drilling” symbol. Replacing the Drill Chuck Before any work on the machine itself, pull the mains plug. Removing the Drill Chuck (see figure E) Remove the auxiliary handle 10. Insert a steel pin with a diameter of Ø 4 mm and approx. 50 mm of length into the drill hole on the spindle neck in order to lock the drill spindle. Clamp the short end of a hex key 16 into the keyless chuck 1. Place the machine on a stable surface (e. g. a workbench). Hold the machine firmly and loosen the keyless chuck 1 by turning the hex key 16 in rotation direction . Loosen a tight- seated keyless chuck by giving the long end of the hex key 16 a light blow. Remove the hex key from the keyless chuck and completely unscrew the keyless chuck. Mounting the Drill Chuck (see figure F) The keyless chuck is mounted in reverse order. Remove the steel pin from the drill hole on the spindle neck after mounting is completed. The drill chuck must be tightened with a tightening torque of approx. 30–35 Nm. Operation Starting Operation Observe correct mains voltage! The voltage of the pow- er source must agree with the voltage specified on the nameplate of the machine. Power tools marked with 230 V can also be operated with 220 V. Reversing the rotational direction (see figure G) The rotational direction switch 4 is used to reverse the rota- tional direction of the machine. However, this is not possible with the On/Off switch 6 actuated. Right Rotation: For drilling and driving in screws, push the rotational direction switch 4 left to the stop. Left Rotation: For loosening and unscrewing screws and nuts, press the rotational direction switch 4 through to the right stop. Setting the operating mode Drilling and Screwdriving Set the selector switch 3 to the “Drilling” symbol. Impact drilling Set the selector switch 3 to the “Impact drilling” symbol. The selector switch 3 engages noticeably and can also be ac- tuated with the machine running. OBJ_BUCH-2936-001.book Page 15 Monday, December 19, 2016 2:52 PM16 | English 1 609 92A 2LY | (19.12.16) Bosch Power Tools Switching On and Off To start the machine, press the On/Off switch 6 and keep it pressed. To lock the pressed On/Off switch 6, press the lock-on button
To switch off the machine, release the On/Off switch 6 or when it is locked with the lock-on button 5, briefly press the On/Off switch 6 and then release it. To save energy, only switch the power tool on when using it. Rapid Shut-off (Kickback Control) (PSB Universal