
GBH 187LI Professional - Drill BOSCH - Free user manual and instructions
Find the device manual for free GBH 187LI Professional BOSCH in PDF.
| Product type | Cordless rotary hammer (hammer drill) |
| Brand | Bosch |
| Model | GBH 187LI Professional |
| Power source | Lithium-ion 18 V battery (recommended GBA 18V... ≥4.0 Ah or ProCORE18V 8.0/12.0 Ah) |
| Tool holder | SDS-plus, also compatible with cylindrical shanks 6–10 mm and hex shanks |
| Rated speed | 0–980 rpm (clockwise and counterclockwise) |
| Impact rate | 0–4,350 min⁻¹ |
| Impact energy (according to EPTA 05:2016) | 2.4 J |
| Max. drilling diameter | Concrete: 24 mm (optimum 6–14 mm); Steel: 13 mm; Wood: 30 mm |
| Weight (according to EPTA 01:2014) | 3.6 – 4.5 kg (depending on battery used) |
| Operating modes | Hammer drilling, drilling without hammer, chiseling, Vario-Lock (40 chisel positions) |
| Safety features | Kickback Control, safety clutch, double battery lock |
| Connectivity | Bluetooth® Low Energy 4.2 for mobile app (max. range 30 m) |
| Control display | Displays charge status, temperature, work mode, connection status |
| Lighting | Integrated LED to illuminate the work area |
| Operating temperature | -20°C to +50°C (recommended charging 0°C to +35°C) |
| Auxiliary handle | Continuously adjustable (rotation) |
| Depth stop | Adjustable, integrated into auxiliary handle |
| Maintenance | Regularly clean ventilation slots and tool holder; replace dust cap if damaged |
| Button cell battery (Bluetooth module) | CR2450, 3 V, service life approx. 5 years |
| Recommended accessories | GDE 18V-16 dust extractor for mineral dust |
Frequently Asked Questions - GBH 187LI Professional BOSCH
User questions about GBH 187LI Professional BOSCH
0 question about this device. Answer the ones you know or ask your own.
Ask a new question about this device
Download the instructions for your Drill in PDF format for free! Find your manual GBH 187LI Professional - BOSCH and take your electronic device back in hand. On this page are published all the documents necessary for the use of your device. GBH 187LI Professional by BOSCH.
USER MANUAL GBH 187LI Professional BOSCH
GBH 187-LI Professional
Robert Bosch Power Tools GmbH
70538 Sollgart
GERMANY
www.bosch-pt.com
160992A82W(2022.09)PS/107

1609 92A 82W
en Original instructions
fr Notice originale
pt Manual original
zh 正本使用说明书
zh原始使用说明
thnnaa
2046111
id Peturiqi Peturiq untuk
Paragunaar Original
Ban goc hurong dan sur dung
ar 1
fa 1

English Page 6
Francais.. Page 15
Portugues. Pagina 25
中文 页 36
繁體中文. 页44
Inu. 52
General Power Tool SafetyWarnings
WARNING
Read all safety warnings, instructions, illustrations and specifica
tions provided with this power tool. Failure to follow all instructions listed below may result in electric shock, fire and/ or serious injury.
Save all warnings and instructions for future reference.
The term "power tool" in the warnings refers to your mains-operated (corded) power tool or battery-operated (cordless) power tool.
Work area safety
- Keep work area clean and well lit. Cluttered or dark areas invite accidents.
Do not operate power tools in explosive atmospheres, such as in the presence of flammable liquids, gases or dust. Power tools create sparks which may ignite the dust or fumes. - Keep children and bystanders away while operating a power tool. Distractions can cause you to lose control.
Electrical safety
Power tool plugs must match the outlet. Never modify the plug in any way. Do not use any adapter plugs with earthed (grounded) power tools. Unmodified plugs and matching outlets will reduce risk of electric shock.
- Avoid body contact with earthed or grounded surfaces, such as pipes, radiators, ranges and refrigerators. There is an increased risk of electric shock if your body is earthed or grounded.
Do not expose power tools to rain or wet conditions. Water entering a power tool will increase the risk of electric shock.
Do not abuse the cord. Never use the cord for carrying, pulling or unplugging the power tool. Keep cord away from heat, oil, sharp edges or moving parts. Damaged or entangled cords increase the risk of electric shock.
When operating a power tool outdoors, use an extension cord suitable for outdoor use. Use of a cord suitable for outdoor use reduces the risk of electric shock.
If operating a power tool in a damp location is unavoidable, use a residual current device (RCD) protected supply. Use of an RCD reduces the risk of electric shock.
Personal safety
Stay alert, watch what you are doing and use common sense when operating a power tool. Do not use a power tool while you are tired or under the influence of drugs, alcohol or medication. A moment of inatten
tion while operating power tools may result in serious personal injury.
Use personal protective equipment. Always wear eye protection. Protective equipment such as a dust mask, non-skid safety shoes, hard hat or hearing protection used for appropriate conditions will reduce personal injuries.
Prevent unintentional starting. Ensure the switch is in the off-position before connecting to power source and/or battery pack, picking up or carrying the tool. Carrying power tools with your finger on the switch or energising power tools that have the switch on invites accidents.
- Remove any adjusting key or wrench before turning the power tool on. A wrench or a key left attached to a rotating part of the power tool may result in personal injury.
- Do not overreach. Keep proper footing and balance at all times. This enables better control of the power tool in unexpected situations.
Dress properly. Do not wear loose clothing or jewellery. Keep your hair and clothing away from moving parts. Loose clothes, jewellery or long hair can be caught in moving parts.
If devices are provided for the connection of dust extraction and collection facilities, ensure these are connected and properly used. Use of dust collection can reduce dust-related hazards.
Do not let familiarity gained from frequent use of tools allow you to become complacent and ignore tool safety principles. A careless action can cause severe injury within a fraction of a second.
Power tool use and care
Do not force the power tool. Use the correct power tool for your application. The correct power tool will do the job better and safer at the rate for which it was designed.
Do not use the power tool if the switch does not turn it on and off. Any power tool that cannot be controlled with the switch is dangerous and must be repaired.
- Disconnect the plug from the power source and/or remove the battery pack, if detachable, from the power tool before making any adjustments, changing accessories, or storing power tools. Such preventive safety measures reduce the risk of starting the power tool accidentally.
- Store idle power tools out of the reach of children and do not allow persons unfamiliar with the power tool or these instructions to operate the power tool. Power tools are dangerous in the hands of untrained users.
- Maintain power tools and accessories. Check for misalignment or binding of moving parts, breakage of parts and any other condition that may affect the power tool's operation. If damaged, have the power tool repaired before use. Many accidents are caused by poorly maintained power tools.
- Keep cutting tools sharp and clean. Properly maintained cutting tools with sharp cutting edges are less likely to bind and are easier to control.
Use the power tool, accessories and tool bits etc. in accordance with these instructions, taking into account the working conditions and the work to be performed. Use of the power tool for operations different from those intended could result in a hazardous situation. - Keep handles and grasping surfaces dry, clean and free from oil and grease. Slippery handles and grasping surfaces do not allow for safe handling and control of the tool in unexpected situations.
Battery tool use and care
- Recharge only with the charger specified by the manufacturer. A charger that is suitable for one type of battery pack may create a risk of fire when used with another battery pack.
Use power tools only with specifically designated battery packs. Use of any other battery packs may create a risk of injury and fire.
When battery pack is not in use, keep it away from other metal objects, like paper clips, coins, keys, nails, screws or other small metal objects, that can make a connection from one terminal to another. Shorting the battery terminals together may cause burns or a fire.
Under abusive conditions, liquid may be ejected from the battery; avoid contact. If contact accidentally occurs, flush with water. If liquid contacts eyes, additionally seek medical help. Liquid ejected from the battery may cause irritation or burns.
Do not use a battery pack or tool that is damaged or modified. Damaged or modified batteries may exhibit unpredictable behaviour resulting in fire, explosion or risk of injury.
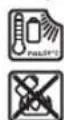
Do not expose a battery pack or tool to fire or excessive temperature. Exposure to fire or temperature above 130^ may cause explosion.
Follow all charging instructions and do not charge the battery pack or tool outside the temperature range specified in the instructions. Charging improperly or at temperatures outside the specified range may damage the battery and increase the risk of fire.
Service
Have your power tool serviced by a qualified repair person using only identical replacement parts. This will ensure that the safety of the power tool is maintained.
- Never service damaged battery packs. Service of battery packs should only be performed by the manufacturer or authorized service providers.
Hammer SafetyWarnings
Safety instructions for all operations
Wear ear protectors. Exposure to noise can cause hearing loss.
Use auxiliary handle(s), if supplied with the tool. Loss of control can cause personal injury.
Hold the power tool by insulated gripping surfaces, when performing an operation where the cutting accessory or fasteners may contact hidden wiring. Cutting accessory or fasteners contacting a "live" wire may make exposed metal parts of the power tool "live" and could give the operator an electric shock.
Safety instructions when using long drill bits with rotary hammers
Always start drilling at low speed and with the bit tip in contact with the workpiece. At higher speeds, the bit is likely to bend if allowed to rotate freely without contacting the workpiece, resulting in personal injury.
Apply pressure only in direct line with the bit and do not apply excessive pressure. Bits can bend, causing breakage or loss of control, resulting in personal injury.
Additional safety information
Use suitable detectors to determine if there are hidden supply lines or contact the local utility company for assistance. Contact with electric cables can cause fire and electric shock. Damaging gas lines can lead to explosion. Breaking water pipes causes property damage.
Always wait until the power tool has come to a complete stop before placing it down. The application tool can jam and cause you to lose control of the power tool.
- Secure the workpiece. A workpiece clamped with clamping devices or in a vice is held more secure than by hand.
In case of damage and improper use of the battery, vapours may be emitted. The battery can set alight or explode. Ensure the area is well ventilated and seek medical attention should you experience any adverse effects. The vapours may irritate the respiratory system.
Do not open the battery. There is a risk of short-circuiting.
The battery can be damaged by pointed objects such as nails or screwdrivers or by force applied externally. An internal short circuit may occur, causing the battery to burn, smoke, explode or overheat.
Only use the battery in the manufacturer's products. This is the only way in which you can protect the battery against dangerous overload.

Protect the battery against heat, e.g. against continuous intense sunlight, fire, dirt, water and moisture. There is a risk of explosion and short-circuiting.
Do not touch any application tools or adjacent housing components shortly after operation. These can become very hot during operation and cause burns.
The application tool may jam during drilling. Make sure you have a stable footing and hold the power tool firmly with both hands. Otherwise you could lose control of the power tool.
8 | English
Take care when carrying out demolition work using the chisel. Falling fragments of the demolition material could injure you or any bystanders.
Hold the power tool firmly with both hands and make sure you have a stable footing. The power tool can be more securely guided with both hands.
Do not direct the power tool at nearby persons during operation. The application tool may fly out and cause serious injuries.
Always wear a safety helmet and safety glasses/face protection. Normal glasses and sunglasses are not safety glasses.
Check that the application tool is seated securely and safely before operation.
Always make sure that you maintain a safe distance. When operating the power tool in high up areas, e.g. on a ladder, ensure that no one is beneath you.
Do not open or close the drill chuck by switching on the power tool. The drill can be ejected. This poses a risk of injury.


WARNING


Ensure that the coin cell is kept out of the reach of children. Coin cells are dangerous.
- Coin cells must never be swallowed or inserted into any other part of the body. If you suspect that someone has swallowed a coin cell or that a coin cell has entered the body in another way, seek medical attention immediately. Swallowing coin cells can result in severe internal burns and death within 2 hours.
- Caution! When using the power tool with Bluetooth, a fault may occur in other devices and systems, aeroplanes and medical devices (e.g. pacemakers, hearing aids). Also, damage to people and animals in the immediate vicinity cannot be completely excluded. Do not use the power tool with Bluetooth in the vicinity of medical devices, petrol stations, chemical plants, areas with a potentially explosive atmosphere or in blasting areas. Do not use the power tool with Bluetooth in aircraft. Avoid using the product near your body for extended periods.
The Bluetooth® word mark and logos are registered trademarks owned by Bluetooth SIG, Inc. Any use of such marks by Robert Bosch Power Tools GmbH is under license.
Symbols
The following symbols may be important for the operation of your power tool. Please take note of these symbols and their meaning. Correctly interpreting the symbols will help you to operate the power tool more effectively and safely.
Symbols and their meaning

Tool data logging is enabled in this tool.

Wireless connectivity tool with built-in Bluetooth technology
Product Description and Specifications

Read all the safety and general instructions. Failure to observe the safety and general instructions may result in electric shock, fire and/or serious injury.
Please observe the illustrations at the beginning of this operating manual.
Intended Use
The power tool is intended for hammer drilling in concrete, brick and stone, as well as for light chiselling work. It is also suitable for drilling without impact in wood, metal, ceramic and plastic. Power tools with electronic control and right/left rotation are also suitable for screwdriving.
With the Bluetooth Low Energy Module inserted, power tool data and settings can be transferred between the power tool and a mobile device by means of Bluetooth wireless technology.
Product Features
The numbering of the product features refers to the diagram of the power tool on the graphics page.
(1) Drill chuck
(2) Tool holder
(3) Dust protection cap
(4) Front sleeve
(5) Rear sleeve
(6) Button for depth stop adjustment
(7) Release button for impact/mode selector switch
(8) Impact/mode selector switch
(9) Rotational direction switch
(10) On/off switch
(11) Handle (insulated gripping surface)
(12) Rechargeable batterya
(13) Worklight
Auxiliary handle (insulated gripping surface)
(15) Depth stop
(16)User Interface
(17) Rechargeable battery release button
(18) Power tool status indicator (user interface)
(19) Battery charge indicator (user interface)
(20) Rapid shut-off indicator (user interface)
(21) Button to select the working mode (user interface)
(22) Smartphone indicator (user interface)
(23) Working modes indicator (user interface)
(24) Temperature indicator (user interface)
(25) Universal bit holdera
a) Accessories shown or described are not included with the product as standard. You can find the complete selection of accessories in our accessories range.
Technical Data
Cordless rotary hammer GBH 187-LI
| Article number | 3611 J23 1.. | |
| Rated voltage V= 18 | ||
| Rated speed | ||
| - Clockwise min | i | 0-980 |
| - Anticlockwise min | i | 0-980 |
| Impact rateA) | min-1 | 0-4350 |
| Impact energy per stroke ac-cording to EPTA-Procedure 05:2016 | J 2.4 | |
| Tool holder SDS plus | Cylindrical Hexagonal | |
| Drill chuck clamping range for cylindrical shanks | mm 6-10 | |
| Max. drilling diameter | ||
| - ConcreteB) | mm 24 | |
| - Steel mm 13 | ||
| - Wood mm 30 | ||
| Weight according to EPTA-Procedure 01:2014C) | kg 3.6-4.5 | |
| Recommended ambient tem-perature during charging | °C 0 to +35 | |
| Permitted ambient temperat-ure during operationD) and during storage | °C -20 to +50 | |
| Recommended rechargeable batteries | GBA 18V... (≥ 4.0 Ah)ProCORE18V 8.0Ah/12.0Ah | |
| Recommended chargers GAL 18... | GAX 18... | |
| GAL 36... | ||
Data transfer
Cordless rotary hammer GBH 187-LI
| Bluetooth® | Bluetooth® 4.2 (Low Energy)® | |
| Max. signal range m | 30 | F) |
| Frequency range used | MHz | 2400–2483.5 |
| Output power | mW | < 1 |
Energy supply Bluetooth Low Energy module
| Coin cell | 3 V lithium battery, CR 2450 |
| Coin cell service life, approx. | Years |
A) Measured at 20-25°C with rechargeable battery ProCORE18V 12.0Ah.
B) optimum performance with drilling diameter 6-14 mm
C)Depends on battery in use
D) Limited performance at temperatures < 0^ C
E) The mobile devices must be compatible with Bluetooth Low Energy devices (version 4.2) and support the Generic Access Profile (GAP).
F) The signal range may vary greatly depending on external conditions, including the receiving device used. The Bluetooth® range may be significantly weaker inside closed rooms and through metallic barriers (e.g. walls, shelving units, cases, etc.).
Rechargeable battery
Bosch sells some cordless power tools without a rechargeable battery. You can tell whether a rechargeable battery is included with the power tool by looking at the packaging.
Charging the battery
Use only the chargers listed in the technical data. Only these chargers are matched to the lithium-ion battery of your power tool.
Note: Lithium-ion rechargeable batteries are supplied partially charged according to international transport regulations. To ensure full rechargeable battery capacity, fully charge the rechargeable battery before using your tool for the first time.
Inserting the Battery
Push the charged battery into the battery holder until it clicks into place.
Removing the Battery
To remove the rechargeable battery, press the battery release button and pull the battery out. Do not use force to do this.
The rechargeable battery has two locking levels to prevent the battery from falling out if the battery release button is pressed unintentionally. The rechargeable battery is held in place by a spring when fitted in the power tool.
Battery charge indicator
The green LEDs on the battery charge indicator indicate the state of charge of the battery. For safety reasons, it is only
10 | English
possible to check the state of charge when the power tool is not in operation.
Press the button for the battery charge indicator or to show the state of charge. This is also possible when the battery is removed.
If no LED lights up after pressing the button for the battery charge indicator, then the battery is defective and must be replaced.
The state of charge of the battery is also displayed on the user interface Status indications.
Battery model GBA 18V...

LED Capacity
3 × continuous green light 60 - 100%
2× continuous green light 30 - 60%
1× continuous green light 5 - 30%
1× flashing green light 0-5%
Battery model ProCORE18V...

LED Capacity
5 × continuous green light 80 - 100%
4× continuous green light 60 - 80%
3× continuous green light 40 - 60%
2× continuous green light 20 - 40%
1× continuous green light 5-20%
1× flashing green light 0 - 5%
Recommendations for Optimal Handling of the Battery
Protect the battery against moisture and water.
Only store the battery within a temperature range of -20 to 50^ . Do not leave the battery in your car in the summer, for example.
Occasionally clean the ventilation slots on the battery using a soft brush that is clean and dry.
A significantly reduced operating time after charging indicates that the battery has deteriorated and must be replaced.
Follow the instructions on correct disposal.
Assembly
- Remove the battery from the power tool before carrying out work on the power tool (e.g. maintenance, changing tool, etc.). The battery should also be removed for transport and storage. There is risk of injury from unintentionally pressing the on/off switch.
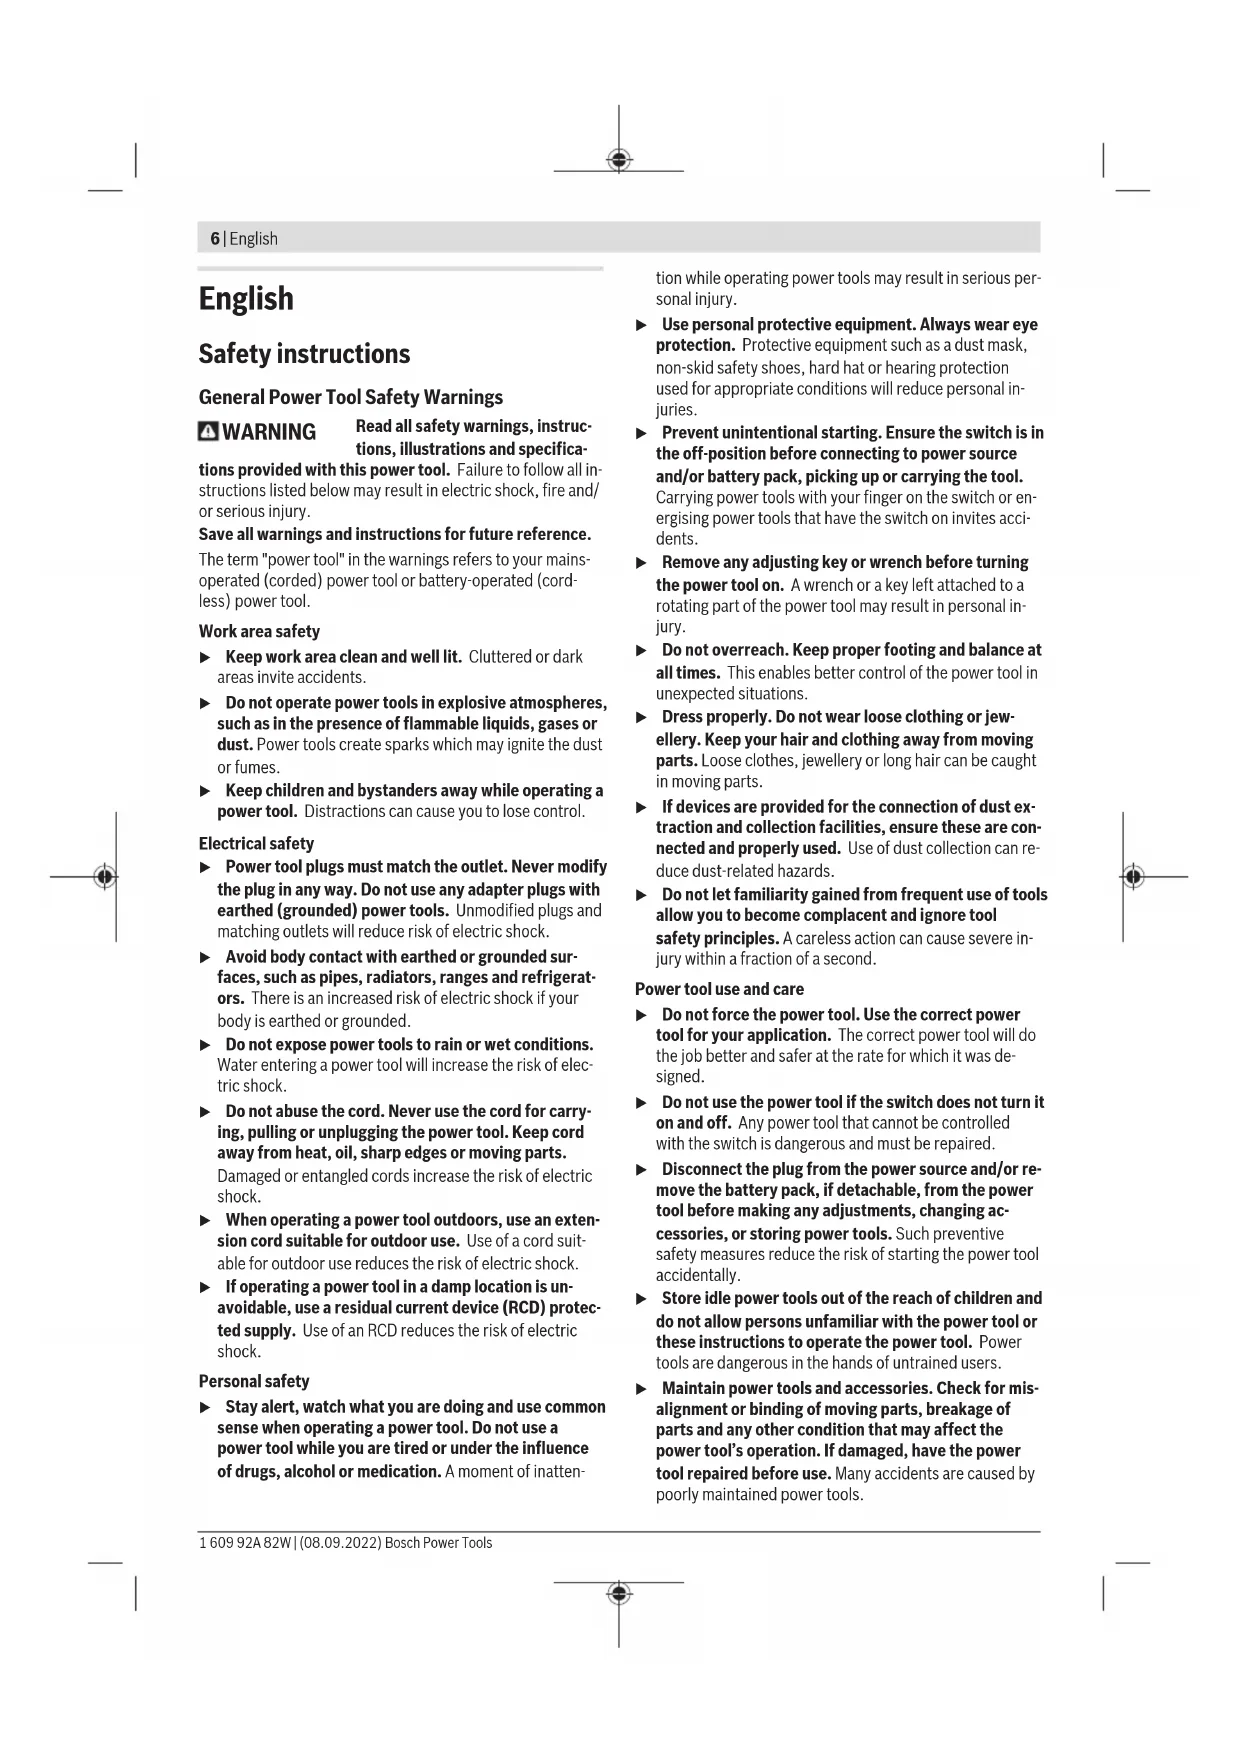
Auxiliary handle
Do not operate your power tool without the auxiliary handle (14).
Make sure that the auxiliary handle is always tightened. Otherwise you could lose control of the power tool when working.
Swivelling the auxiliary handle (see figure A)
You can swivel the auxiliary handle (14) to any angle for a safe work posture that minimises fatigue.
Turn the lower gripping end of the auxiliary handle (14) anticlockwise and swivel the auxiliary handle (14) into the required position. Then turn the lower gripping end of the auxiliary handle (14) clockwise to retighten it. Make sure that the retaining strap of the auxiliary handle slots into the corresponding groove of the housing.
Changing the Tool

The drill chuck enables you to use SDS plus application tools, cylindrical and hexagonal application tools easily and conveniently without needing to use additional tools or change the drill chuck.
The dust protection cap (3) largely prevents the penetration of drilling dust into the tool holder during operation. When inserting the tool, make sure that the dust protection cap (3) does not become damaged.
Replace a damaged dust protection cap immediately. It is recommended that you have use an after-sales service for this.
Changing the tool (SDS plus)
Inserting the SDS plus Application Tool (see figures B1-B2)
Hold the rear sleeve (5) of the drill chuck with one hand. Use your other hand to fully open the tool holder by turning the front sleeve (4).
- Clean and lightly grease the shank of the SDS plus application tool.
- Insert the SDS plus application tool into the tool holder while turning it until it locks automatically.
- Check that it is locked by pulling on the tool.
As a requirement of the system, the SDS-plus application tool can move freely. This causes a certain radial run-out at no-load, which has no effect on the accuracy of the drill hole, as the drill bit centres itself upon drilling.
Removing SDS-plus application tools (see figure B3)
- Push the rear sleeve (5) back and remove the SDS plus application tool.
Changing the Tool (cylindrical/hexagonal shank) Inserting the Application Tool (see figure C1)
Note: Application tools that do not have SDS plus must not be used for hammer drilling or chiselling. Tools without SDS plus and their drill chucks are damaged by hammer drilling or chiselling.
Note: Only use tools with a cylindrical or hexagonal shank in the drilling operating mode.
Do not close the drill chuck by switching on the power tool. The drill can be ejected. This poses a risk of injury.
Note: Only use application tools with a cylindrical or hexagonal shank with a shank diameter of 6 to 10mm
- Turn the impact/mode selector switch (8) to the "drilling" position.
Hold the rear sleeve (5) of the drill chuck with one hand. Use your other hand to open the tool holder by turning the front sleeve (4) until the application tool can be inserted. - Insert the cylindrical or hexagonal application tool into the drill chuck.
Hold the rear sleeve (5) in place with one hand and, with the other hand, turn the front sleeve (4) firmly in the direction of the arrow until you hear a clear clicking sound. - Check that it is seated securely by pulling on the tool. Only insert the application tool if the power tool is switched off.
Removing the Application Tool (see figure C2)
- Hold the rear sleeve (5) of the drill chuck with one hand. Use your other hand to open the tool holder by turning the front sleeve (4) in the direction of the arrow until the application tool can be removed.
- Remove the application tool.
Do not open the drill chuck by switching on the power tool. The drill can be ejected. This poses a risk of injury.
Dust/Chip Extraction
The dust from materials such as lead paint, some types of wood, minerals and metal can be harmful to human health. Touching or breathing in this dust can trigger allergic reactions and/or cause respiratory illnesses in the user or in people in the near vicinity.
Certain dusts, such as oak or beech dust, are classified as carcinogenic, especially in conjunction with wood treatment additives (chromate, wood preservative). Materials containing asbestos may only be machined by specialists.
- Use a dust extraction system that is suitable for the material wherever possible.
- Provide good ventilation at the workplace.
-
It is advisable to wear a P2 filter class breathing mask. The regulations on the material being machined that apply in the country of use must be observed.
-
Avoid dust accumulation at the workplace. Dust can easily ignite.
Dust extraction with GDE 18V-16 (accessory) (see figure H)
The GDE 18V-16 dust extraction attachment (accessory) is required for extracting concrete dust and stone dust. This dust extraction system is not suitable for dust from wood, metal and plastic or for dust which is harmful to one's health (e.g. asbestos).
Operation
Start-up
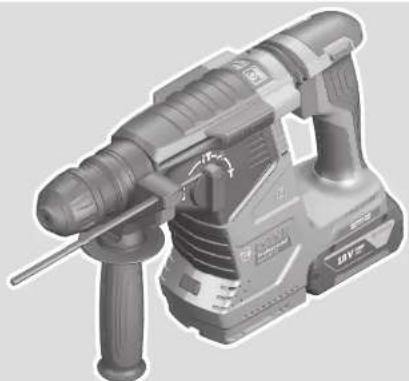
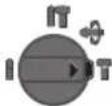
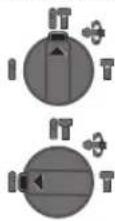
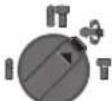
Setting the Operating Mode
The operating mode of the power tool is selected using the impact/mode selector switch (8).
- To change the operating mode, press the release button (7) and turn the impact/mode selector switch (8) until it clicks into the required position.
Note: Only change the operating mode when the power tool is switched off. Otherwise, the power tool may become damaged.
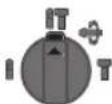
Position for hammer drilling into concrete or stone
Position for drilling without impact in wood, metal, ceramic and plastic and for screwdriving
Vario-Lock position for adjusting the chisel position
The impact/modest selector switch (8) will not engage in this position.
Position for chiselling
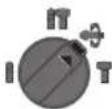
Setting the rotational direction (see figure D)
The rotational direction switch (9) is used to change the rotational direction of the power tool. However, this is not possible while the on/off switch (10) is being pressed.
Only operate the rotational direction switch (9) when the power tool is not in use.
Always set the rotational direction to clockwise rotation for hammer drilling, drilling and chiselling.
- Clockwise: To drill and to drive in screws, press the rotational direction switch (9) all the way to the left.
- Anticlockwise: To loosen and unscrew screws and nuts, press the rotational direction switch (9) all the way to the right.
Switching On/Off
- To switch on the power tool, press the on/off switch (10).
The worklight (13) lights up when the on/off switch (10) is lightly or fully pressed, allowing the work area to be illuminated in poor lighting conditions. - To switch off the power tool, release the on/off switch (10).
For low temperatures, the power tool reaches the full hammer/impact capacity only after a certain time.
12 | English
Adjusting the Speed/Impact Rate
You can adjust the speed/impact rate of the power tool when it is on by pressing in the on/off switch (10) to varying extents.
Applying light pressure to the on/off switch (10) results in a low rotational speed/impact rate. Applying increasing pressure to the switch increases the speed/impact rate.
You can also control the speed on the user interface and/or via a smartphone app: .
Changing the chiselling position (Vario-Lock)
You can lock the chisel in 40 different positions, so you can select the optimum working position for each task.
- Insert the chisel into the tool holder.
- Turn the impact/mode selector switch (8) to the "VarioLock" position.
- Turn the application tool to the required chisel position.
- Turn the impact/mode selector switch (8) to the "chiselling" position. With this, the tool holder is locked.
- Set the rotational direction for chiselling to clockwise.
User interface (see figure E)
The user interface (16) is used to select the working mode and to indicate the status of the power tool.
Status indications
| Battery charge indicator (user interface) (19) | Meaning/cause Solution | |
| Green (2 to 5 bars) Battery charged - | ||
| Yellow (1 bar) Battery almost empty Replace or charge battery soon | ||
| Red (1 bar) Battery empty Replace or charge battery | ||
| Temperature indicator (24) Meaning/cause Solution | ||
| Yellow Operating temperature of the battery or the power tool has significantly increased, performance is reduced | Leave the power tool to cool down or replace overheated battery | |
| Red Operating temperature of the battery or the power tool has been exceeded, power tool switches itself off as a precautionary measure | Leave the power tool to cool down or replace overheated battery | |
| Power tool status indicator (18) | Meaning/cause Solution | |
| Green Status OK - | ||
| Yellow Critical temperature has been reached or rechargeable battery is almost empty | Allow the power tool to cool down, or replace or charge the battery | |
| Red Power tool has overheated or rechargeable battery is empty | Allow the power tool to cool down, or replace or charge the battery | |
| Red Impact/mode selector switch activated during operation | Turn the power tool off and on again | |
| Motor is jammed, battery too weak Charge the battery or use the recommended battery type | ||
| General error - Turn the power tool off and on again, or remove the battery and reinsert itIf the error persists:- Send the power tool to the after-sales service | ||
| Flashing red-In combination with the rapid shut-off indicator (20) | Rapid shut-off is triggered Turn the power tool off and on again | |
| Flashing blue | Power tool is connected to a mobile device via -Bluetoothor settings are being transferred | |
| Smartphone status indicator (22) | Meaning/cause Solution | |
| white Important information available (e.g. temperature warning) | Read the message on the smartphone | |
| Selecting the working mode | Note: In Favorite working mode, the functions are configured via the smartphone app, while the functions are pre-set in Auto working mode. | |
| Press the (21) button for selecting the working mode repeatedly until the working mode you require lights up. | ||
| Working mode (23) indicator | Functions | |
| Auto lights up | In Auto working mode, the power tool reaches maximum performance. - 100 % of the maximum speed - Rapid Shut-off (KickBack Control) | |
| Favorite lights up | In Favorite working mode, the power tool can be individually configured via a smartphone app. - The speed can be configured in several settings for different applications: low/medium/high (100 % of the maximum speed) speed | |
Connectivity functions
System Requirements for Using the App
System Requirements
Mobile device (tablet, smartphone)
Android 6.0 (and newer)
iOS 11 (and newer)
Installing and Setting up the App
You will need to install the device-specific app before you can use the connectivity functions.
- Download the app from the corresponding app store (Apple App Store, Google Play Store). Note: You will need to have a user account with the relevant app store to do this.
App name iOS Android
Bosch Toolbox

App name
Bosch BeConnected

- Then select the MyTools or Connectivity sub-item in the app.
- The display of your mobile device shows you all of the subsequent steps required to connect the power tool to the mobile device.
Data Transfer via Bluetooth
The built-in Bluetooth Low Energy Module sends a signal at regular intervals. Depending on ambient conditions, multiple transmission intervals may be required before the power tool is detected. If the power tool is not detected, check the following:
Is the distance to the mobile device too great? Reduce the distance between the mobile device and the power tool.
Is the coin cell for the built-in Bluetooth Low Energy Module weak or drained? Contact an authorised after-sales service centre for Bosch power tools to replace the coin cell.
- Switch Bluetooth *off and on again on your mobile device. Check whether the power tool has now been detected.
Functions in Conjunction with the Power Tool
In conjunction with the Bluetooth® Low Energy Module, the following connectivity functions are available for the power tool:
- Registration and personalisation
- Status check, output of warning messages
- General information and settings
- Management
- Adjusting the Bluetooth transfer settings for Favourite working mode
Practical Advice
The power tool with built-in Bluetooth Low Energy Module is equipped with a radio interface. Local operating restrictions, e.g. in aircraft or hospitals, must be observed.
In areas in which the Bluetooth® wireless technology must not be used, the Bluetooth® Low Energy Module must be switched off via the app.
14|English
Setting the drilling depth (see figure F)
You can use the depth stop (15) to set the required drilling depth X .
- Press the button for depth stop adjustment (6) and insert the depth stop into the auxiliary handle (14). The fluting on the depth stop (15) must face downwards.
- Insert the SDS-plus application tool into the SDS-plus tool holder to the stop. Otherwise, the movability of the SDS-plus drilling tool can lead to incorrect adjustment of the drilling depth.
- Pull the depth stop far enough out that the distance between the drill bit tip and the edge of the depth stop corresponds to the required drilling depth X .
Overload clutch
If the application tool jams or snags, the power transmission to the drill spindle will be interrupted. Always hold the power tool firmly with both hands to withstand the forces this may create and adopt a position with stable footing.
- Switch the power tool off immediately and remove the application tool if the power tool becomes blocked. Switching on when the drilling tool is blocked may cause high torque reactions.
Rapid shut-off (KickBack Control)

The rapid shut-off function (KickBack Control) gives the user greater control over the power tool and offers them better protection than power tools that do not have Kickback Control. If the power tool suddenly and unforeseeably rotates around the drilling axis, it will switch off, the rapid shut-off indicator (20) will light up red and the worklight (13) will flash. When rapid shut-off is activated, the status indicator (18) flashes red.
- To switch the tool back on, release the on/off switch (10) and then press it again.
Inserting screwdriver bits (see figure G)
Only apply the power tool to the screw/nut when the tool is switched off. Rotating tool inserts can slip off.
A universal holder with SDS-plus shank (accessory) is required to work with screwdriver bits.
- Clean and lightly grease the insertion end of the shank.
- Insert the universal holder into the tool holder while turning it until it locks automatically.
- Check that it is locked by pulling the universal holder.
- Insert a screwdriver bit in the universal holder. Only use screwdriver bits that fit the screw head.
- To remove the universal holder, slide the locking sleeve backwards and remove the universal holder from the tool holder.
Maintenance and Service
Maintenance and Cleaning
- Remove the battery from the power tool before carrying out work on the power tool (e.g. maintenance, changing tool, etc.). The battery should also be removed for transport and storage. There is risk of injury from unintentionally pressing the on/off switch.
To ensure safe and efficient operation, always keep the power tool and the ventilation slots clean.
Replace a damaged dust protection cap immediately. It is recommended that you have use an after-sales service for this.
Clean the tool holder after each use.
Replacing the Built-in Coin Cell
The Bluetooth Low Energy Module is fitted with a coin cell. You will be notified via the Bosch Toolbox app if the coin cell is too weak or if it is drained. The coin cell replacement must be performed by Bosch or by an after-sales service centre authorised to work with Bosch power tools.
Caution: The coin cell must always be replaced with a coin cell of the same type. There is a risk of explosion.
Remove and dispose of drained coin cell correctly.
Drained coin cell may leak and damage the product or cause personal injury.
After-Sales Service and Application Service
Our after-sales service responds to your questions concerning maintenance and repair of your product as well as spare parts. You can find explosion drawings and information on spare parts at: www.bosch-pt.com
The Bosch product use advice team will be happy to help you with any questions about our products and their accessories.
In all correspondence and spare parts orders, please always include the 10-digit article number given on the nameplate of the product.
Malaysia
Robert Bosch Sdn. Bhd.(220975-V) PT/SMY
No.8A,Jalan 13/6
46200 Petaling Jaya
Selangor
Tel.: (03) 79663194
Toll-Free: 1800 880188
Fax: (03) 79583838
E-Mail: kiathoe.chong@my.bosch.com
www.bosch-pt.com.my
You can find further service addresses at:
www.bosch-pt.com/serviceaddresses
Transport
The recommended lithium-ion batteries are subject to legislation on the transport of dangerous goods. The user can transport the batteries by road without further requirements.
When shipping by third parties (e.g.: by air transport or forwarding agency), special requirements on packaging and labelling must be observed. For preparation of the item being shipped, consulting an expert for hazardous material is required.
Dispatch battery packs only when the housing is undamaged. Tape or mask off open contacts and pack up the battery in such a manner that it cannot move around in the packaging. Please also observe the possibility of more detailed national regulations.
Disposal

Power tools, rechargeable batteries, accessories and packaging should be sorted for environmental-friendly recycling.

Do not dispose of power tools and batteries/re-chargeable batteries into household waste!
Battery packs/batteries:
Li-ion:
Please observe the notes in the section on transport (see "Transport", page 14).
Français
Robert Bosch Morocco SARL
- Rue Lieutenant Mahmoud Mohamed
20300 Casablanca
Tel.: +212 5 29 31 43 27
E-Mail: sav.outillage@ma.bosch.com
www.bosch-pt.com/serviceaddresses
Transport
Aparelho terminal movable
(Tablet, Smartphone)
Android 6.0 (e superior)
iOS 11 (e superior)
www.bosch-pt.com/serviceaddresses
搬运
www.bosch-pt.com/serviceaddresses
搬運
Jnunnnnnae nnnnne nnnnne nnne nnnnne nnnnne nnnnne nnnnne nnnnne nnnnne nnnnne nnnnne nnnnne nnnnne nnnnne nnnnne nnnnne nnnnne nnnnne nnnnne nnnnne nnnnne nnnnne nnnnne nnnnne nnnnne nnnnne nnnnne nnnnne nnnnee
Juvunrnnnnaeovluiivia aannnuuul 1nnuuulucunnuvduanauuauuauu uua/uauuuuauuauu uuuuuuuuuuuuuuuuuuuuuuuuuuuuuuuuuuuuuuuuuuuuuuuuuuuuuuuuuuuuuuuuuuuuuuuuuuuuuuuuuuuuuuuuuuuuuuuuuuuuuuuuuuuuuuuuuuuuuuuuuuuuuuuuuuuuuuuuuuuuuuuuuuuuuuuuuuuuuuuuuuuuuuuuuuuuuuuuuuuuuuuuuuuuuuuuuuuUU
1 1
aunnnaanuunnuunnnnnn
VWNTNNNNTNNNNNNNNNNNNNNNNNNNNNNNNNNNNNNNNNNNNNNNNNNNNNNNNNNNNNNNNNNNNNNNNNNNNNNNNNNNNNNNNNNNNNNNNNNNNNNNNNNNNNNNNNNNNNNNNNN
Vnnaovolwnuovnnnuovnnn nnuuuvnuuauu uuuuauuauuauuauuauuauuauuauu
1 1
nnaaannnnnneanenrwn
aannnnaeauanen nnnnneauuunn nn nnnnneauu uaeauauauauauauauuuu uauauauauauuuu uuuuuuuuuuuuuuuuuuuuuuuuuuuuuuuuuuuuuuuuuuuuuuuuuuuuuuuuuuuuuuuuuuuuuuuuuuuuuuuuuuuuuuuuuuuuuuuuuuuuuuuuuuuuuuuuuuuuuuuuuuuuuuuuuuuuuuuuuuuuuuuuuuuuuuuuuuuuuuuuuuuuuuuuuuuuuuuuuuuuuuuuuuuuuuuuuuuuuUU
Uywnnnaaunnnnnaaannnnnnaanennnnnnaaannnnnnnnnnnnnnnnnnnnnnnnnnnnnnnnnnnnnnnnnnnnnnnnnnnnnnnnnnnnnnnnnnnnnnnnnnnnnnnnnnnnnnnnnnnnnnnnnnnnnnnnnnnnnnnnnnnnnnnnnnnnnnnnnnnnnnnnnnnnnnnnnnnnnnnnn nn nannn
nununununununununununununununununununununununununununununununun
I 1
aannnnnnaeennnnnne nnnnne nnnnne nnnnne nnnnne nnnnne nnnnne nnnnne nnnnne nnnnne nnnnne nnnnne nnnnne nnnnne nnnnne nnnnne nnnnne nnnnne nnnnne nnnnne nnnnne nnnnne nnnnne nnnnne nnnnne nnnnne
nraaannnnnae
Wnwnnnnnaaennnnnne nnnnnn nn nnnnnn nnnnnn nnnnnn nnnnnn nnnnnn nnnnnn nnnnnn nnnnnn nnnnnn nnnnnn nnnnnn nnnnnn nnnnnn nnnnnn nnnnnn nnnnnn nnnnnn nnnnnn nnnnnn nnnnnn nnnnnn nnnnnn nnnnnn nannnnn nannnnn nannnnn nannnnn nannnnn nannnnn nannnnn nannnnn nannnnn nannnnn nannnnn nannnnn nannnnn nannnnn nannnnn nannnnn nannnnn nannnnn nannnnn nannnnn nannnnn nannnnn nannnnn nannnnn nannnnn nenn
nnaaalnnnnaaaanennnnae
alunnuuauuaaunlunulnuuauu uanzauuunununununun ununun unun anuununununununununununununununununununununununun
wnnnnnaaannnnnnnnnnnnnnnnnnnnnnnnnnnnnnnnnnnnnnnnnnnnnnnnnnnnnnnnnnnnnnnnnnnnnnnnnnnnnnnnnnnnnnnnnnnnnnnnnnnnnnnnnnnnnnnnnnnnnnnnnnnnnnnnnnnnnnnnnnnnnn
wannnnnnaaannnnnnnnnnnnnnnnnnnnnnnnnnnnnnnnnnnnnnnnnnnnnnnnnnnnnnnnnnnnnnnnnnnnnnnnnnnnnnnnnnnnnnnnnnnnnnnnnnnnnnnnnn
y
130°C
y
#
- nynunnuuunnuuunnuu (14) nuu uuuu (14) uuuuuuuuuuuuuuuuuuuuuuuuuuuuuuuuuuuuuuuuuuuuuuuuuuuuuuuuuuuuuuuuuuuuuuuuuuuuuuuuuuuuuuuuuuuuuuuuuuuuuuuuuuuuuuuuuuuuuuuuuuuuuuuuuuuuuuuuuuuuuuuuuuuuuuuuuuuuuuuuuuuuuuuuuuuuuuuuuuuuuuuuuuuuuuuuuuuuuuuuu uu
nraaannnnnae

Tnunnnnnnnnnnnnnnnnnnnnnnnnnnnnnnnnnnnnnnnnnnnnnnnnnnnnnnnnnnnnnnnnnnnnnnnnnnnnnnnnnnnnnnnnnnnnnnnnnnnnnnnnnnnnnnnnnnnnnnnnnnnnnnnnnnnnnnnnnnnnnnnnnnnnn
Bluetooth Low Energy Module nnnnns nnu B Bosch Toolbox nwwwunwnnneBnBnBnBnBnBnBnBnBnBnBnBnBnBnBnBnBnBnBnBnBnBnBnBnBnBnBnBnBnBnBnBnBnBnBnBnBnBnBnBnBnBnBnBnBnBnBnBnBnBnB
JANWNTU:OWUULUNTUNUUINNNNU
unnnnnaaannnnaanr naunnnae nnnnnaaennnnnnaaannnnnnaaannnnnnaaannnnnnaaannnnnnaaannnnnnaaannnnnnaaannnnnnaaannnnnnaaannnnnnaaannnnnnaaannnnnnaaannnnnnaaannnnnnaaannnnnnaaannnnnnaaannnnnnaaannnnnnaaannnnnnaaannnnnnaaannnnnnaaennnnnnaaannnnnnaaannnnnnaaannnnnnaaannnnnnaaannnnnnaaannnnnnaaannnnnnaaannnnnnaaannnnnnaaannnnnnaaannnnnnaaannnnnnaaannnnnnaaannnnnnaaannnnnnaaannnnnnaaannnnnnaaannnnnnaa ann
nna nna naa aannnnnnaa anananaananaananaananaananaananaananaananaananaananaananaananaananaananaananaananaananaananaananaananaananaananaananaananaananaananaananaananaananaananaananaananaananaananaananaananaananaananaananaananaananaananaananaananaananaananaananaananaananaananaanaraannnnaaa
1
lnu wbn lnwnn nn
wnna 1 n5
2525nnn4
wnnnn 10110
+66 2012 8888
+66 2064 5800
www.bosch.co.th
nnuuunnnnaaannnnaa nnnnnae 10/11 nu 16
nuuunnnnnnnaa annnnae nnnae 10540
lnnnn 027587555
lnnnn 027587525
aannnnae aennnnne nnnnne nn
www.bosch-pt.com/serviceaddresses
#
Keselamatan personnel
www.bosch-pt.com/serviceaddresses
Transpor
Cac canh bao phy them
Dung thiet bj do tim thich hop de xac dinh neu co cac cong trinh cong cong lap dat ngam trong khu vu c lam viec hay lien he voi Cty cong trinh cong cong dia phuong de nhoh tro. Dung cham duong dan dien co the gay ra hoa hoan va dien giat. Lam hu' hai duong dan khia ga co the gay no. Lam thung ong dan nuoc co the lam hu' hai tai san hay co the gay ra dien giat.
Luon luon doi cho may hoan toan ngung hantruoc khi dat xuong.Dung cu lap vao may co the bi kep chat dan den viec dung cu dien cam tay bi mat dieu khien.
Kep chat vatgia cong. Vat gia cong duoc kep bang mot thi et bi kep hay bang eto thi vung chan hon giu bang tay.
Trong truong hop pin bi hong hay su dung sai cach, hoi nuoc co the boc ra. Pin co the chay hoac no. Hay lam cho thong thoang khi va trong truong hop bi dau phai nh o y te chu a tri. Hoi nuoc co the gay ngua he ho hap.
Khong duoc thao pin ra. Nguyen cd bi chap mach.
Pin co the bi hu hai boi cac vat dung nhon nhu dinh hay tuoc-no-vit hoac boi cac tac dong luc t buen ngoai. No co the dan toi doan mach nao bo va lam pin bi chay, boc khoi, phat no hoac qua nong.
Chi sū dung pin trong cac san pham cua nha san xuát. Chi bang cach nay, pin se duoc bao vē THANh nguy co qua tai.
Bao vé pin khong de bi lam nong, vi du, chong de lau dai duii anh nang gay gat, lua, chat ban, nuoc, va su am uot. Co nguy co no va chap mach.
Khong cham vao bat ky dung cu hoac bo phan vo gan ke nao ngay sau khi van hanh.
Chung co the rat nong trong qua trinh vanh va gay bong.
Dung cu gai co the chan khi khoan. Giu dung cu dien that chac bang ca hai tay va giu tu the dung cho thich hop va can bang. Ban co the mat kiem soat thong qua dung cu dien.
Can than voi cong viec pha do bang may duc. Cac manh vocua vat lieuu pha do roixuong co thegay thuong tich cho nguoi xung quanh hoac chinh ban.
Giu' may that chac bang ca hai tay trong khi lam viec va luon luon giu tu the dung cho thich hop va can bang. Dung hai tay de dieu khien may thi an toan hon.
Khong huo ngung cu dien vao nguo o gan trong khi van hanh. Dung cu gai co the vang rangoi va gay thuong tich nghiem tong.
Luon doi mu bao hiem va deo kinh bao ve/ tam chan maf. Kinh thong thuong hoac kinh ram khong phai la kinh bao ve.
Kiem tra do khit chat cua dung cu gai truckhi vanh.
Luon dam bao rang ban co mot cho dung chac chan. Dam rang khong ai o ben duoi ban, khi ban su dung dung cu dien o mot vi tri cao, vi du trén thang.
Khong mo hoac dong dau cap mui khoan bang cach bat dung cu dien. Mui khoan co the bi vang ra, co nguy co thuong tich.


CÁNH BAO


Dām bāo rang pin nut áo khóng òrong tay tre em. Pin nut áo rát nguy hiēn.
Khong bao giou duoc nuot pin nut ao hoac nhét vao cac cho hô tren co the. Neu nghi ngà dā nuot phai pin nut ao hoac bi lot vao mot Iô tren co the, hy den bac sy ngay lap tuc. ViEc nuot pin nut ao co the dan den bong nang ben trong va dan den tu vong trong vong 2 gió.
Can than! Neu su dung dung cu dien voi cong Bluetooth co the gay nhieu cac dung cu, thiet bi khac cung nu may bay va dung cu y te (vi du: may tao nhip tim, may tro thinh). Va cung khong the loai tru hoan toan nhung ton hai cho nguo va dong vat o moi truong truc dien xung quanh. Khong su dung dung cu dien co ket noi Bluetooth o gan nhung thiet bi y te, tram xang, co so hoa hoc, cac khu vu c nguy co gay no va cac khu vu c chay no. Khong sur dung dung cu dien co ket noi Bluetooth tren may bay. Tranh de may hoat dong gan co the trong thoi bian dai.
Nhan tu Bluetooth® cung nhu cac bieu tupong (Lo-go) la cac nhan hiieu va tai san da dang ky cua Bluetooth SIG, Inc. Bat ky viec su dung nhan tu/bieu tupong nay boiRobert Bosch Power Tools GmbH phai co giay hep.
Cac Bièu Túng
Cac bieu tong saudayco kha nang dien dat y nghia ve cach sur dung dung cu dien cam tay cua ban.Xin vui long ghi nhan cac bieu tong va y nghia cua chung.Suhieu dung cac bieu tong se giup ban su dung may mot cach tot va an toan hon.
Lu y: Can phai co tai khoan nguoi dung kho ung dung tung ung.
Khop Ly Hop Chong Qua Tai
Neu dung cu lap trong may bi ket hay kep, luc truyen dong den truc khoan bi ngan lai. Luon gi chat dung cu dien bang hai tay va dung vung vi khi dung cu hoat dong se phat sinh luc.
Hayt dung cu dien va thao dung cu gai neu dung cu dien bi vuong. Khi mo may ma dung cu ung dung bi ket cung, luc xoan van cao co the xay ra.
Ché do ngat nhanh (Kickback Control)

Che do ngat nanh (Kickback Control) se cung cap cach kiem soat dung cu dien tôt hon va qua do lam tang muc do bao vengu'di dung so voi cac dung cu dien khong co Kickback Control. O nhung vong quayDOT ngot va khong the doan trucc cua dung cu dien, dung cu dien se tat truc may khoan, hien thi ngat nanh (20) sang do va den lam Vietc (13) nhap nhay. Khi che do ngat nanh duoc kich hoat, hien thi tranq thai (18) nhap nhay do.
- De khoi dong lai hya tha nut bat tat (10) vanhan lai lan nua.
Lap dau chia vän vit (xem Hinh G)
Chi dát dung cu dién da tát len dai oc/vit.
Dung cu dang quay co the bi tuot ra.
Dé su dung dαu chia vān vit ban can co phan lap dαu gai pho thong vovi chuovi tiép hop SDS-plus (Phu kien).
-Lam sach can chuoi cua chuoi tiep hop va boi mot lop mong dau boi tron len.
-Lap phan lap dau gai po thong bang dong tac xoay vao trong phan lap dung cu cho den khi duoc tu dong khoa lai.
- Kiem tra hiieu qua khoa bang cach keo thu phan lap dai gai po thong ra.
Lap dai gai vān vit vao trong phan lap dai gai pho thong. Chi su dung dai gai vān vit vu a voi dai vit.
- De thao phan lap dau gai po thong hay day vong Khoa ra phia sau va thao phan lap dau gai po thong ra khoi phan lap dung cu.
www.bosch-pt.com/serviceaddresses
Vanhuyen
Pin Li-lon duoc khuyen nghi la doi tuong phai tuan theo cac qui dinh cua Phap Luat ve Hang Hoa Nguyen Hiem. Nguoi su dung co the van chuyen pin hop khoi bang duong bo ma khong can them yeu cau nao khac.
Khi duoc van chuyen thong qua ben thu ba (vd.
van chuyen bang dong hang khong hay dai ly giao
nhan), thai tuan theo cac yeu cau dac biét ve dong
goi va dan nhan. Thai tham van chuyen gia vé
hang hoa nguy hiem khi chuán bi goiHang.
Chi gui pin hop khoi khi v o ngoai khong bi hong. Dán bang keo hay che kin cac diem tiep xuc ho vdóng goi pin hop khoi theo cach sao cho pin khong the xé dich khi nam trong bao bi. Ngoai ra, xin vui long chap hanh cac qui dinh chi tiét co the duoc bo sung them cua quoc gia.
Su thai bo

Dung cu dien, pin, phu kien va bao bi can duoc tai su dung theo quy dinh v mei truong.
Ban khong duoc nem dung cu dien va pin vao thung racgia dinh!
Pin/acute:
Li-Ion:
Tuan tu nhung hong dan trong phan van chuyen (xem,Van chuyenTrang 84).
85
Iooaal jno yolll Jaaasu yao
a aaii 1
Lsall jla lalaiJI JUJUaIgU
Jol
auiuS oec paaaiuX .Jssy auiuqSII 1u uugSlo sic gI ueio ngSlo sic
oWjP oJc.a gSgI gSgI gI JsAaJI 8 aJySJI osaiI pJsiJ sic adag abJJ
.
aIJIgJlJL J. aIgUJIJIaIJs
JUaJg JUJI JALggl EIAASdAuaI IJg gJg jgJg
joo. auiy 0eoll Jaaaiw ggbu waa 2g jauo
Lgogj g oIabao aJgSJI oSJI uS
glg g ggl/gj
LulalolIgusU
aJjglg jgl aJgSjO
g g g g g g g g g g g g g g
.0gJgJgJgJg
aaiolgl ooi 15g j g .uuljll
aIooJI JgJgJgJgJgJgJg
·29
aaii jgi jag
gai jui jiu jiu
aogio mJl
J 1
aJJIJaJI JcI JsuJg
JgJgJgJgJgJgJgJgJgJgJgJgJgJgJgJgJgJgJgJgJgJgJgJgJgJgJgJgJgJgJgJgJgJgJgJgJgJgJgJgJgJgJgJgJgJgJgJgJgJgJ
aaiai 1jxu
LgolsswI ayagagogo LjJ no sli
bouwl jqpaaiw lao. 1
JUJIJI JUcAaJIJIJIJIJIJIJIJIJIJIJIJIJIJIJIJIJIJIJIJIJIJIJIJIJIJIJIJIJIJIJIJIJIJIJIJIJIJIJIJIJIJIJIJIJIJIJIJIJIJIJIJIJIJIJIJIJIJIJIJIJIJIJIJIJIJIJIJIJIJIJIJIJIJIJIJIJIJIJIJIJIJIJIJIJIJIJIJIJIJIJIJIJIJIJIJIJIJIJIJIJ
a aai jolal 1g g
aui jSUI oai i aow lge goi
gplaiuuiuuaaagLqolaaowjisg
jai jai aaiy aia
.
aJgSJI sssj plaiwgl alolo jua
.
oall abwgloljSg JosJswos
JgSdJI,1sJI UJLQ aJIOJIJI aJUJSEJI
gao uL u! auiu 0aai
Jooa JJI aJySJI oJai. JIq
4aill jaii j klyj j
JlKlI JdJ!
J J 1
aUJSEJ
yj
gagagagagagagagagagagagagagagagagagagagagagagagagagagagagagagagagagagagagagagagagagagagagagagagagagagagagagagagagagag
ooc. auijgSll ossu aagjullaolgaJg
gJgOoljogllalleil E
2g juXgl/g gJy gW JduS do
.0
Lalai|g yu jil l uai Jai
g.aaannn aanrnnn 1
100 1
Jgoggl ayuysd jydu
(aJusJasuJUaBwU)aJusJasuJU
山(g)sJy oogjaiuLg
a<11
10 5
JwI JKgJLO21
Joll lalbig Jzll 1sO g
1gJg gJgdd=laJI μ
SduLglls
a jg g u 11 slo k j
<1
Jbui Jjw Jg auiu<1 1
.ooJyIg oμcI Jw
4joo 1bui g a
4J0
i. cog. aibbckdll jaoaughgshuggbvuaqj
j0j00000000000000000000000000000000000
jL
jUqS1 Uo21
4uill 2. aulio u-1jL
40 auiuJl oJ
JU 15uLJI jg.
gaiIgaiJosuW .Jgai
()aJgJJIaJUgSJJ
Lwai Suolill wulgll yaoj
y
aogolawu
.1gJgJgJgJgJg
jgsu ngic auiu<1. ulo yall jbs slju
y
4gJUboJUjc aJU.
j! aJyHsJU oJssJbbsJj.ugpJl
Robert Bosch Morocco SARL
sgoo oo ojolal gJw.53
JU JU 20300
+212529314327:
sav.outillage@ma.bosch.com:
:aaaslluglicjosajll
www.bosch-pt.com/serviceaddresses
山
U 1
pogai pssiwal gaa.0jall glal jgil
bgsauiu jguljllpJl Jai
a
()jgjgjgJqJwJylo
aIbgaJgUgUgUgU (JawdSgUgU
a ojw w y. loBg gog cuiu
jouy uoylo sic ojubll lgolJai yauoia
. aJlJI o 1d iai jai jai
111111111111111111
LwJgwsollwosollda.
y. 12
.0g j! aall aall aolul ool
auiuJ 10
auiuul 100
aJb Jg gJgJg
aI aI I aI I aI b Jc aI aI aI aI
auii 15y
/01Jg
!aJIaIulUlaIulJooUJU

:UJUJI/0S1JUJI
:oguU Uligj pslj
Julll lKikbadle aabg) jullIabx aa
(Control
gjwJl olbya olae
4.2.9.1
aJoo jig aJyjSll oess
aJlao pssuall aLaa
aabgjogjoljjuJgSJI
JL. KickBack Control
ggiJgIaJIgJI
aill jgdo gda djjgSll
gagduljll 0eall
(20)
JaaIgOaoggJagU
labla aoluaaai La. (13)
(18) all
.

KICKBACK CONTROL
-
1.1234567890101123456789010112345678901011234567890101123456789010112345678901011234567890101123456789010112345678
(GgJgJJIbJI)UJIgUJI bJI JcJ
aUgUJ/ugU
Jswll ssc u! olabo ngSlo sic b
. 日 日 1
go Jolw Jola gllglll bjj joi
.(gj)SDS-plus jw
aagw gnnl glu lgsjcbj
.aaai jai jao dlqjui
-1JUJUJU|L
.01
-0.aaWl .gJU JolA
JUJUauiu
UgU UJ JU UUgU bJ a
.5 10 J 10 J 10 J 10 J E jg cal
aJg aJ
auiIg aaiJll
4JU UaUuS
aJusll:10) aJyJgSJJ 0sJU JIocI sI
gI gai sic IaIg (..g 1sJl Jss
Lc bssll sic gjy ayol jas ell .quj
gaoo uJsuu labg Jusui eliao
aJg
.aaJIgJgJgJgJgJgJgJgJgJgJgJgJgJgJgJgJgJgJgJgJgJgJgJgJgJgJgJgJgJgJgJgJgJgJgJgJgJgJgJgJgJgJgJgJgJgJgJgJgJgJg
a0s j 100 n0 cllj pui jgai
:LaJl
-olaiulssyoo
aooJl aoojll aJUbJI J
Bluetooth Low Energy Module
aJUoJ aUJUc
aagaiiaaae aae aaii iis
Bosch Toolbox abw!
j d jg jla JlaJ L a J J J J J
A
dawlgai jgbljla dduwulbgo
Joaia Jbaa dS Lg
g 10000000000000000000000000000000000000000000000000000000000000
4uugggs
JdsjgdsjI jI JI JI JI JI JI JI JI JI JI JI JI JI JI JI JI JI JI JI JI JI JI JI JI JI JI JI JI JI JI JI JI JI JI JI JI JI JI JI JI JI JI JI JI
j11
Lw Lgjy
dawg j s dig .swy dwi y 1 g o w g o w g o w g o w g o w g o w g o w g o w g o w g o w g o w g o w g o w g o w g o w g o w g o
aW aJuao Ue
J 1 J 1 J 1 J 1 J 1 J 1 J 1 J 1 J 1 J 1 J 1 J 1 J 1 J 1 J 1 J 1 J 1 J 1 J 1 J 1 J 1 J 1 J 1 J 1 J 1 J 1 J 1 J 1 J 1 J 1 J 1 J 1 J 1 J 1 J
aio jolaiwI pLg iJgI sI Jssjgws
julcewg wolal jls abg diaowl sao j21sagicw .sis jle
jI jU g Jl jI jI
10LssSgJ slj
g jljl sJL g. ais sJSSa
jIuIeJIgI JIgI dS gua u cU yu
sOlaiw jiu liabu g jqolw
JjI Jog g b
J1j1. sio oaiol oios j 8y Sui, sUog g bO l jI Ugi oia .g0g
49 Lalaio ugs
J 1 J 1 J 1 J 1 J 1 J 1 J 1 J 1 J 1 J 1 J 1 J 1 J 1 J 1 J 1 J 1 J 1 J 1 J 1 J 1 J 1 J 1 J 1 J 1 J 1 J 1 J 1 J 1 J 1 J 1 J 1 J 1 J 1 J 1 J
0slaowl
dgi dai jin uauuuiu uo uus 1jui jui sjjg jg c gglw g
jI jI 3u 5jU jI
98|
(User Interface) gw jilw (20)
(User Interface)JL
User) 品 量 量 (20 量 量 量 (Interface
(User Interface)JSLUJJi
(User Interface) Lj
(a)doogocujsdi (25)
aai ju g qai jds jalao a (a
.
gi Laa
Ug Jg Ug Ug Ug Ug Ug Ug Ug Ug Ug Ug Ug Ug Ug Ug Ug Ug Ug Ug Ug Ug Ug Ug Ug Ug Ug Ug Ug Ug Ug Ug Ug Ug Ug Ug Ug Ug Ug Ug Ug Ug Ug Ug Ug Ug Ug Ug Ug Ug Ug Ug
oljwsljal
oLuo uogai jds oBswjol oJlawu gao d s wuyo yjIgdu bgyo gua. Cwol aq
(1) _U = _d
(2)
(3)JgSjμJU
(4)
(5)LacWg
(6) 1 g w c o s i s p
100|
JU 1 JU 1 JU 1 JU 1 JU 1 JU 1 JU 1 JU 1 JU 1 JU 1 JU 1 JU 1 JU 1 JU 1 JU 1 JU 1 JU 1 JU 1 JU 1 JU 1 JU 1 JU 1 JU 1 JU 1 JU 1 JU 1
jLw Lg yjy jJg jLw Lg yjy ddo o doo jLw yjy .siu ly siy
jw lgl y jy bgs
sllg sss sll g y jy bs y sl
pim .sis aia 1 u g y slg y sl
.iss sss gla jls pai
ds sly o jda 2 sll jy slg y
jua ju jlu jiu jil gila li .sgw go syl sllj dss gai gali
jq jj jj jj jj jj jj jj jj jj jj jj jj jj jj jj jj jj jj jj jj
jJlwhg jilw
jJU JU JU JU LED JU U JU JU JU JU JU JU JU JU JU JU JU JU JU JU JU JU JU JU JU JU JU JU JU JU JU JU JU JU JU JU JU JU JU JU JU JU JU JU JU JU JU JU JU JU JU JU JU JU JU JU JUUJUUUUUUUUUUUUUUUUUUUUUUUUUUUUUUUUUUUUUUUUUUUUUUUUUUUUUUUUUUUUUUUUUUUUUUUUUUUUUUUUUUUUUUUUUUUUUUUUUUUUUUUUUUUUUUUUUUUUUUUUUUUUUUUUUUUUUUUUUUUUUUUUUUUUUUUUUUUUUUUUUUuuuuuuuuuuuuuuuuuuuuuuuuuuuuuuuuuuuuuuuuuuuuuuuuuuuuuuuuuuuuuuuuuuuuuuuuuuuuuuuuuuuuuuuuuuuuuuuuuuuuuuuuuuuuuuuuuuuuuuuuuuuuuuuuuuuuuuuuuuuuuuuuuuuuuuuuuuuuuuuuuuuuuuuuuuuuuuuuuuuuuuuuuuuuuuuuuuuuuuuu uu u u u u u u u u u u u u u u u u u u u u u u u u u u u u u u u u u u u u u u u u u u u u u u u u u u u uu uu uu uu uu uu uu uu uu uu uu uu uu uu uu uu uu uu uu uu uu uu uu uu uu uu uu uu uu uu uu uu uu uu uu uu uu uu uu uu uu uu uu uu uu uu uu uu uu uu uu uu uu uu uu uu uu uu uu uu uu uu uu uu uu uu uu uu uu uu uu uu uu uu uu uu uu uu uu uu uu uu uu uu uu uu uu uu uu uu uu uu uu uu uu uu uu uu uu uu uu xu
GBA 18V...5jU E9j

| LED | |
| % 100-60 | ∆aa jμw ∠jε √3 |
| % 60-30 | ∆aa jμw ∠jε √3 √2 |
| % 30-5 | ∆aa jμw ∠jε √3 √1 |
| % 5-0 | ∆jj Saaa jμw ∠jε √3 √1 |
ProCORE18V... 5jI g9i

| LED | |
| % 100-80 | ∆aa jμw √jμs 5 |
| % 80-60 | ∆aa jμw √jμs 4 |
| % 60-40 | ∆aa jμw √jμs 3 |
| % 40-20 | ∆aa jμw √jμs 2 |
| GBH 187-LI | ### |
| kg4,5-3,6 ### | |
| ℃0...+35 ### | |
| ℃-20...+50### | |
| GBA 18V...(≥4.0Ah) | JjJsh## |
| ProCORE18V8.0Ah/12.0Ah | ### |
| GAL 18... | ### |
| GAX 18... | ### |
| ...GAL 36 | ### |
| Bluetooth*4.2(Low Energy) | Bluetooth° |
| 30 m | Jl### |
| MHz2400-248a### | ### |
| mW<1 | ### |
| Bluetooth*Low ### Energy | ### |
| 3V ### CR 2450 | ### |
| Jlω5 | ### |
.ProCORE18V 12.0Ah
(A)U 20-25°C
(B14 mm-6 [5]
(CsUJISUgEgAa
( D < 0^ CSloS SGso)
(E
(Fy
Bluetooth® gawuS u wuI yam gawuS gawu Low Energy (Version 4.2) Jw Generic Access Profile (GAP)
J.Sis sui Csw d o sis cui 0iws plaiil i jusnilo) gilgo bawgi duqilo Ucuu uSao (gucg Luaa lauag .sui Jauu Bluetooth Cj
jLw山LgSjU
Bosch
jw u
SjL Jw SLo oKssuJ Lai. Jk
(2) bio Lo w gur jU (Li-Ion) UgoguJ Lw
. siu
A L
sJ 3)Jg jgs
dggjgge jg9 jduu wJg jao 1jauai bgi jI kui I guo aolplil (wglj uu loa)
(SDS-plus)
SdsplusjIjUJgogB1-B2 gaiEg
4 4
.1sGgGgj
JSGa dSgai jj jjI Js
JLdiljI JSSD-splus j1j 3)JUgBcIaIgJUJUeJ (JJIuI aIplaiolglgJUeJ (JJIuI uI gWgWg WgWgWgWgWgWgWgWgWgWgWgWgWgWgWgWgWgWgWgWgWgWgWgWgWgWgWgWgWgWgWgWgWgWgWgWgWgWgWgWgWgWgWgWgWgWgWgWgWgWgWg
JjIjIjOaiwI jgo
JU JU JU G G G G G G G G G G G G G G G G G G G G G G G G G G G G G G G G G G G G G G G G G G G G G G G G G G G G G G G G G G G G G G G G G G G G G G G G G G G G G G G G G G G G G G G G G G G G G G G G G G G G C U U U U U U U U U U U U U U U U U U U U U U U U U U U U U U U U U U U U U U U U U U U U U U U U U U U U U U U U U U U U U U U U U U U U U U U U U U U U U U U U U U U U U UU
102|
jui jgolla gJlJIuI Lgai JSLac egi:diSj JJIUJUeWJUKoJgaui JcJ!
L 1
JdsuoggSsIgW Gggo
Juaa g SswL, sJolJw, jL, g
Sls
Cgo j Sj Vario-Lock ggo g 1g UJ (8) u/aj o g j sS .si I J Cgo Gj p Cgo
(Dgai ayis gaj) qaa puii
(10) wgla (10) gola/ jwgl d s oikim 13] jgj wu lols wu wu wu wu wu wu wu wu wu wu wu wu wu wu wu wu wu wu wu wu wu wu wu wu wu wu wu wu wu wu wu wu wu wu wu wu wu wu wu wu wu wu wu wu wu wu wu wu wu wu wuuw u u u u u u u u u u u u u u u u u u u u u u u u u u u u u u u u u u u u u u u u u u u u u u u u u u u u u u
10) gola Jolg jdo j 1s oJg jI Jg Cws dJd sJg Sj
w g/ u/ u 1u 1u 1u 1u 1u 1u 1u 1u 1u 1u 1u 1u 1u 1u 1u 1u 1u 1u 1u 1u 1u 1u 1u 1u 1u 1u 1u 1u 1u 1u 1u 1u 1u 1u
GDE 18V-16 sJL Jg g o siO (H ygi d jsi Egi) (Ulaio)
jUjui ju g jjuucg jS uSo sUj .CwJlui (CulaoG) GDE 18V-16 Jucg jS jI ,uua Juc g sJ uSo Coo pso aauu uJ .GLOU (Lgicg Jg g g g Ssuu J .CuwJcuio (Cuwj Jluo sU
oiis
sjlol jslac ggi pabuogai jjlslcg (8) /d.
(8) /a/ a/ gj g j 7 (7) wgssg b d l jolgdo
-10a0 0iiS 0j1 daS.
(losjssuJwLaiJUo (sIμ)
Jaww wUwJus
jI Jl LsLac.Favorite jS Cua:diSj. gw co s Ssu Saaog wg k uuui Auto jS CuaJ LsLac .si o
JL
jw jL sJ Ls U J (21) dS s JwJow Jbi Jg JSLUdJol J .sW
(23)JL CJIa JSLW
JU JU 1gj jSd A JJ Auto JL Ua
Auto
wuljwgl 100
-(Kickback Control)
Siaawg w g s nsskui jj j j j j j j. Faveorite Jc Jc Jc Jc Jc Jc Jc Jc Jc Jc Jc Jc Jc Jc
Favorite
:uwuiuuiuieaawsiuolus
JUSSO JUSSO JUSSO JUSSO JUSSO JUSSO JUSSO JUSSO JUSSO JUSSO JUSSO JUSSO JUSSO JUSSO JUSSO JUSSO JUSSO JUSSO JUSSO JUSSO JUSSO JUSSO JUSSO JUSSO JUSSO JUSSO
a Jus L Bosch u ju w o o g s 0w y lalao g xgaao ojds law kla
J 10 j
-1J (LgWgSbI) JwJgWgO sJdSs Jgllo y, CwJ jLo®Bluetooth
uSbl I gJbI J Low Energy® Bluetooth
-ljU uJg WgW bJ UJn JgGol
(Fugu a Sis Egs) alJgW Gac paii ogai
-1w gauuuiuuiuuiuuiuuiuuiuuiuuiuuiuuiuuiuuiuuiuuiuuiuuiuuiuuiuuiuuiuuiuuiuuiuuiuuiuuiuuiuuiuuiuuiuuiuuiuuiuuiuuiuuiuuiuuiuuiuuiuuiuuiuuiuuiuuiuuiuuiuuiuuiuuiuuni
14.2020 15.2020
-(6)gac0sj
-SDS-plus
-alaolguiuuiugj
du SsodSDS-plus jj1 sJg.
a dao gac u gac o sj Sg j g dao Sgi ij) a j l u L sL ags
ai a ai 分母最小值为 k .
459j1,siJ3J.
a
4.155 5g5 gaw as
4J1Jlucg jSjBjCagb0o SdS 59jIjIjIg0sWgolaIgjIjIj IgjIjIjIjIgJ.ajIjIjI JSLAICU,swOJg dOJJIaJL
.9gW 10
(KickBack Control) gmuu b
(KickBack Control) g w b
g j l s g j l j i s
cbl a dg j l g d s o p m j
g j l j l u d aa I J J L S
u b KickBack Control s lg
g jlg u pl kim .s

Egi Ug Lg Ly Iaoku Lyu:dgj gola jjlaia jao
20 15 g o w jo j S
jg .sij 0 Saa (13)
Sliw gw jg U
Saojoa 18 Cog
.6j 0
-ugol/ugj
. 1JUgUjIgSisLj (10)
Jgai 1
g 59j gola
JU JI JI JI JI JI JI JI JI JI JI JI JI JI JI JI JI JI JI JI JI JI JI JI JI JI JI JI JI JI JI
0uJlQgSdUw gW (SjL SjL jlu jlu (Culoeo)-SDS-plus cow u Jwguig
GosIjI Sgijl Caa
.
wJUJJWg-1Jg
Uulu,olusugu,Sig udo
.ogwdd3oJawjysto JlaiaIaw
1994834571 U
9821+42039000:Jai
aolslj jloa jLw wjs
www.bosch-pt.com/serviceaddresses
olius Jaa
JoljUgaiu uagj gugui sl jil jLjL .iiuuiuuiuuiuuiu
Jusu jui 10sauwul ugsu Jg.
gJaa:la) uJwBwgJUwJ Ujgo J du bguo Uugai yu (juoj ly g
JJJg jg g 15
Jluoldoe (sjuo ool Uglaia yu jyui J. 1500000000000000000000000000
Lai di s ds sis JwJg jao Jg jy Jj y (sles) cJal .dy o y d 1d sds dy d y g b Jy g g
J 150
olwJgJgOjI
g lalao, 10 sjy, g jy sljj
bdo ojjao 10sdy, 10 sdi dwn
.igw cajj y g jo j j Cwjj
1g 1/10 g jj1 1j1 jj

Gol/(SjJwSgJy
:g g