
MB 2010 - Electric cleaner AL-KO - Free user manual and instructions
Find the device manual for free MB 2010 AL-KO in PDF.
| Product type | Cordless joint cleaner |
| Brand | AL-KO |
| Model | MB 2010 |
| Use | Private: cleaning of joints and outdoor surfaces (slabs, pavers, wood) |
| Power supply | Lithium-ion battery (not included) |
| Compatible battery | B50 Li (ref. 113559) or B50 Li (ref. 113698) |
| Compatible charger | C30 Li (ref. 113560) |
| Power consumption | 36 V (battery voltage) |
| Weight | Approximately 8 kg |
| Telescopic handle | Adjustable (extension of approx. 10 cm) |
| Brush head tilt | 4 positions: 0°, 18°, 36°, 54° |
| Type of brushes included | 1 wire brush, 1 nylon brush |
| Child safety | Bore for padlock (not included) on switch |
| Protective screen | Yes, protects against splashes and rotating brush |
| Maintenance | Clean after use, replace brush if worn, store in a dry place |
| Warranty | Legal warranty against manufacturing defects |
Frequently Asked Questions - MB 2010 AL-KO
User questions about MB 2010 AL-KO
0 question about this device. Answer the ones you know or ask your own.
Ask a new question about this device
Download the instructions for your Electric cleaner in PDF format for free! Find your manual MB 2010 - AL-KO and take your electronic device back in hand. On this page are published all the documents necessary for the use of your device. MB 2010 by AL-KO.
USER MANUAL MB 2010 AL-KO
natural_image
Line drawing of a manual tool with a handle and wheels (no text or symbols)| DE |
| GB |
| NL |
| FR |
| ES |
| IT |
| SI |
| HR |
| PL |
| CZ |
| SK |
| HU |
| DK |
| SE |
| NO |
| FI |
| LT |
| LV |
| RU |
| UA |


Inhaltsverzeichnis
Deutsch 8
English....21
Nederlands 34
Français....47
Español 61
Italiano 75
Slovenščina 88
Hrvatski....100
Polski 112
Česky 126
Slovenská 138
Magyarul....151
Dansk 164
Svensk....176
Norsk 188
Suomi 200
Lietuvių 212
Latviešu 224
Русский....237
Україна....251
© 2018
AL-KO KOBER GROUP Kötz, Germany
This documentation or excerpts therefrom may not be reproduced or disclosed to third parties without the express permission of the AL-KO KOBER GROUP.
01
text_image
01 ① ② ③ ④ ⑤ ⑥ ⑦ ⑧ ⑨* ⑩*
text_image
02 ② ① a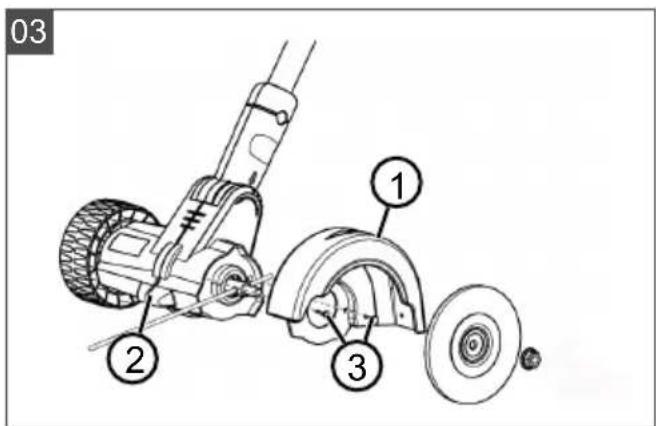
text_image
03 ① ② ③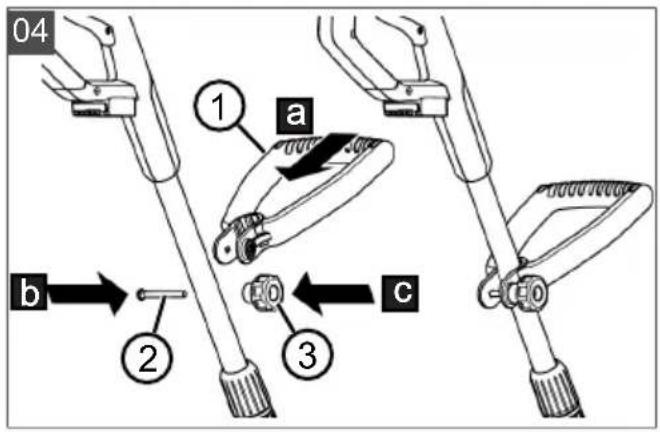
text_image
04 1 a b 2 3 c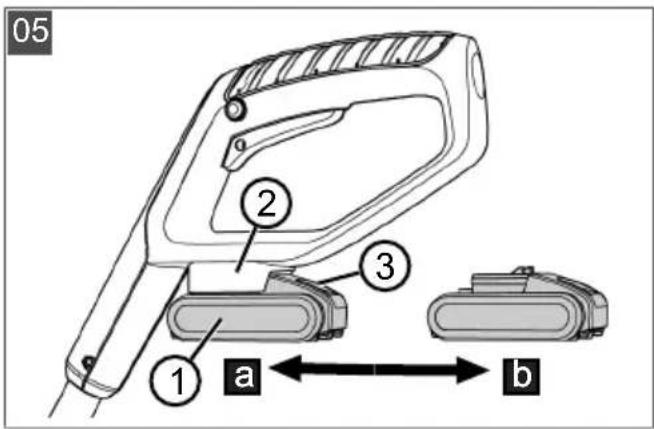
text_image
05 1 2 3 a b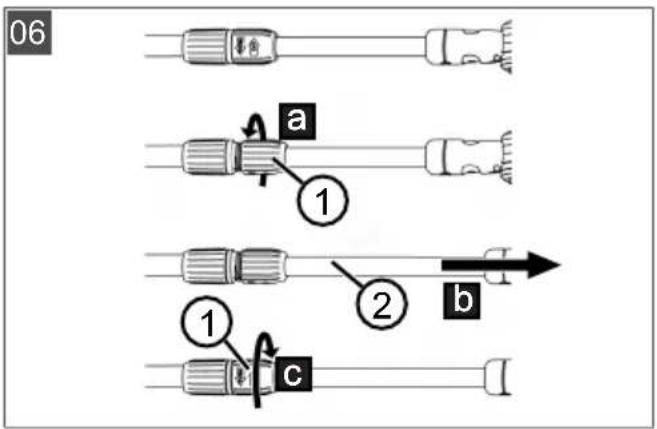
text_image
06 a ① ② b ① c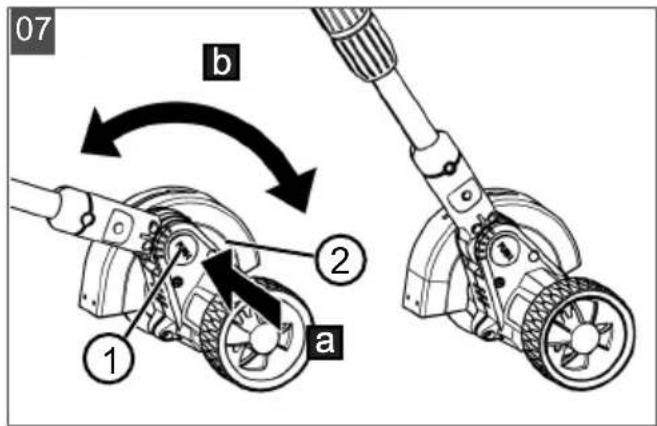
text_image
07 b 1 2 a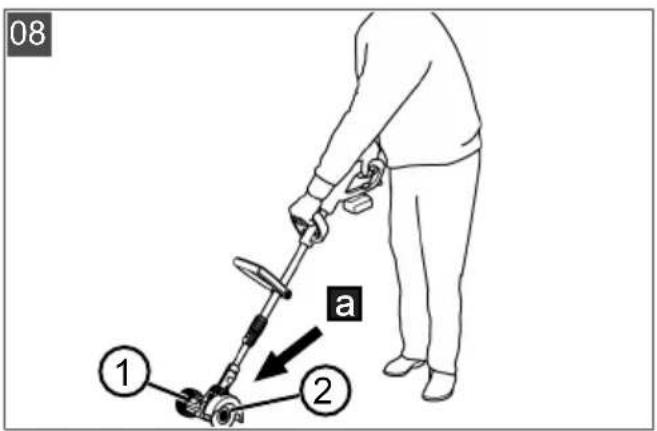
text_image
08 a ① ②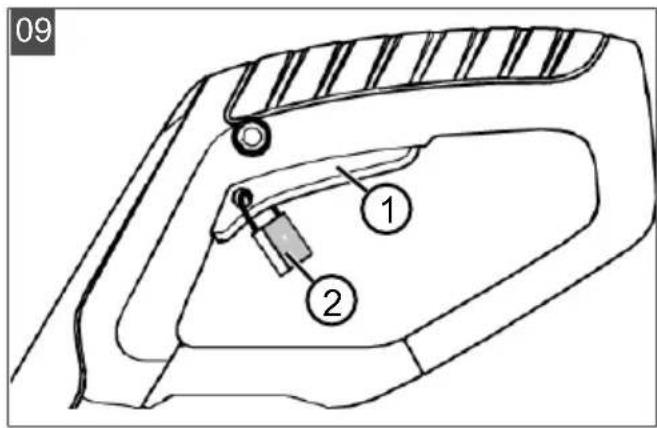
text_image
09 1 2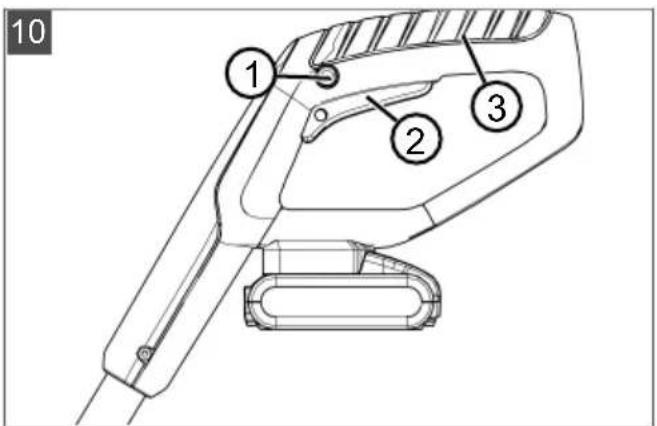
text_image
10 1 2 3
text_image
11 4 2 a 3 1 5 6
MB 2010
Art.-Nr. 113696

ca. 1,5 kg


1200 min ^-1
LpA = 62,5 dB(A), K = 3 dB(A)
LwA = 82,5 dB(A), K = 3 dB(A)
a_h,w = 1,85 ~m / s^2 (K = 1,5 ~m / s^2)
100 mm


B50 Li (ABP118L25)
Art.-Nr. 113559

B100 Li (ABP118L5)
Art.-Nr. 113698
18 V / 20 V max. 18 V / 20 V max.
2,5 Ah 5 Ah
45 Wh 90 Wh

C30 Li (ACG18LD3)
Art.-Nr. 113560
100 - 240 V (AC)
50/60 Hz; 78 W

14,4 V - 20 V (DC)

3A

+5^-+40^
text_image
Labeled diagram of a manual push tool with numbered parts and an open book iconNr. Bauteil
1 About these operating instructions ..... 21
1.1 Symbols on the title page.... 21
1.2 Legends and signal words ...... 22
2 Product description 22
2.1 Designated use 22
2.2 Possible foreseeable misuse .... 22
2.3 Residual risks.... 22
2.4 Safety and protective devices ..... 22
2.4.1 Child protection (09) 22
2.4.2 Guard plate (03) 22
2.5 Symbols on the appliance 23
2.6 Scope of supply.... 23
2.7 Product overview (01) 24
2.7.1 Adjustable telescopic handle (06) 24
3 Safety instructions 24
3.1 Safety instructions for patio brush..... 24
3.1.1 Safety in the workplace 26
3.1.2 Safety of persons, animals and property 26
3.1.3 Appliance safety 26
3.1.4 Safety instructions relating to operation.... 27
3.2 Safety notes for rechargeable battery and charger 27
4 Installation.... 27
4.1 Installing guide wheel (02) 27
4.2 Installing guard plate (03).... 27
4.3 Installing guide handle (04) 27
4.4 Installing brush (11)...... 27
5 Start-up 28
5.1 Charging the rechargeable battery..... 28
5.2 Inserting and pulling out the rechargeable battery (05) 28
6 Operation 28
6.1 Adjusting telescopic handle (06) ..... 28
6.2 Swivelling brush head (07)...... 28
6.3 Switching the patio cleaner on and off (10).... 28
7 Working behaviour and working technique (08) 28
8 Maintenance and care.... 29
8.1 Changing brush (11)...... 29
9 Help in case of malfunction 29
10 Transport.... 30
11 Storage.... 31
11.1 Storage of battery and charger...... 31
12 Disposal.... 31
13 After-Sales / Service.... 32
14 Guarantee 32
15 Translation of the original EU/EC declaration of conformity.... 33
1 ABOUT THESE OPERATING INSTRUCTIONS
The German version is the original operating instructions. All additional language versions are translations of the original operating instructions.
■ Always safeguard these operating instructions so that they can be consulted if you need any information about the appliance.
■ Only pass on the appliance to other persons together with these operating instructions.
■ Comply with the safety and warning information in these operating instructions.
1.1 Symbols on the title page
Symbol Meaning

It is essential to read through these operating instructions carefully before start-up. This is essential for safe working and trouble-free handling.

Operating instructions
Symbol Meaning
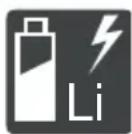
Handle Li-Ion rechargeable batteries with care! In particular, observe the notes on transport, storage and disposal in these operating instructions!
1.2 Legends and signal words

DANGER!
Denotes an imminently dangerous situation which will result in fatal or serious injury if not avoided.

WARNING!
Denotes a potentially dangerous situation which can result in fatal or serious injury if not avoided.

CAUTION!
Denotes a potentially dangerous situation which can result in minor or moderate injury if not avoided.
IMPORTANT!
Denotes a situation which can result in material damage if not avoided.

NOTE
Special instructions for ease of understanding and handling.
2 PRODUCT DESCRIPTION
2.1 Designated use
This appliance can be used for:
■ Cleaning and caring for joints and surfaces on and between outdoor coverings such as stone slabs, paving stones, wood coverings.
■ Removing dust, dirt and weeds.
Only work with the appliance when it is fully assembled.
This appliance is intended solely for use in non-commercial applications. Any other use (as well as unauthorised conversions or add-ons) are regarded as contrary to the intended use and will result in exclusion of the warranty as well as loss of conformity (CE mark); the manufacturer will thus decline any responsibility for damage and/or injury suffered by the user or third parties.
2.2 Possible foreseeable misuse
The tool is designed neither for commercial use in public parks and sports facilities, nor for use in farming and forestry.
Above all, note:
The appliance is unsuitable for horizontal use, overhead work, for unsuitable floor or joint materials or for uses other than those specified.
- Do not use the appliance in wet weather, rain or in and under water.
2.3 Residual risks
Even during correct use of the appliance, there is always a certain residual risk that cannot be excluded. Depending on the use, the following potential risks can be derived from the type and construction of the appliance:
■ Damage to the hearing if no hearing protection is worn.
■ Physical damage caused by hand-arm vibrations when the appliance is used for long periods or is not serviced as specified.
■ Throwing out earth and small stones.
■ Lacerations from reaching into the rotating brush.
2.4 Safety and protective devices

WARNING!
Risk of injury
Defective and disabled safety and protective devices can lead to serious injury.
■ Have any defective safety and protective devices repaired.
■ Never disable safety and protective devices.
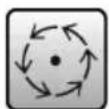
2.4.1 Child protection (09)
The hole (5 mm) at the on/off switch (09/1) is intended for a padlock* (09/2). The padlock prevents the appliance from being started inadvertently.
* Not included in the scope of supply.
2.4.2 Guard plate (03)
The guard plate (03/1) protects the operator from the rotating brush and objects that are thrown out.
2.5 Symbols on the appliance
Symbol Meaning

Pay special attention when handling this product!

Read the operating instructions before starting operation!
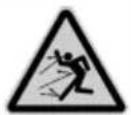
Danger due to objects being thrown out!

Keep other people out of the danger area!
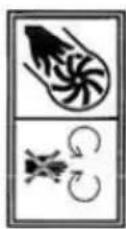
Keep hands and feet away from the rotating brush!

Wear eye protection!

Protect the appliance from rain and moisture!
2.6 Scope of supply
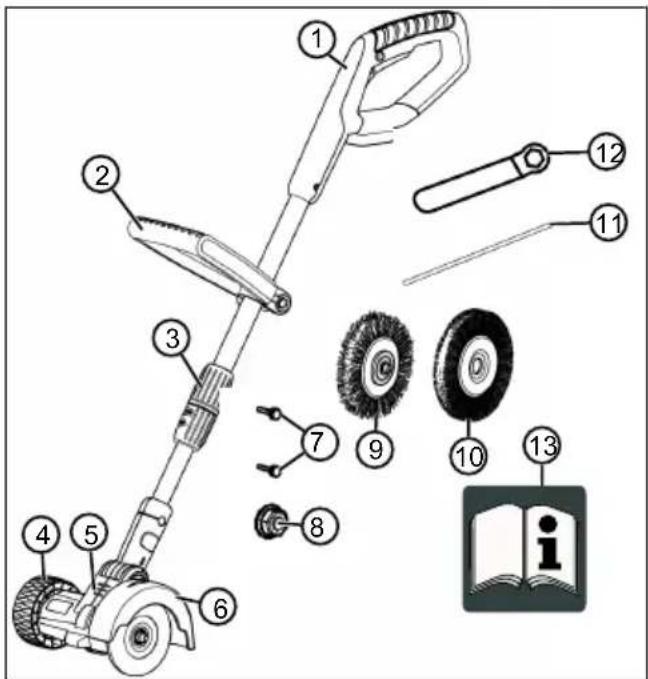
The items listed here are part of the scope of supply. Check that all items are included:
text_image
Labeled diagram of a manual push tool with numbered parts and an open book iconNo. Component
| 1 Base unit |
| 2 Guide handle |
| 3 Telescopic handle |
| 4 Guide wheel |
| 5 Brush head, adjustable |
| 6 Guard plate |
| 7 2 screws 3.5 x 13 |
| 8 Nut M8 |
| 9 Wire brush |
| 10 Nylon brush |
| 11 Pin |
| 12 Wrench |
| 13 Operating instructions |

NOTE
The rechargeable battery and charging unit are not included in the scope of delivery and must therefore be purchased separately.
Available under the following part numbers are:
Lithium-ion rechargeable battery – B50 Li, Item No. 113559
Lithium-ion rechargeable battery – B100 Li, Item No. 113698
- Charging unit – C30 Li – Item No. 113560
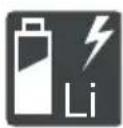
2.7 Product overview (01)
The product overview (01) provides an overview of the appliance.
No. Component
| 1 Base unit |
| 2 On/off switch with child safety lock |
| 3 Safety button |
| 4 Guide handle |
| 5 Telescopic handle |
| 6 Guide wheel |
| 7 Brush head, adjustable |
| 8 Guard plate |
| 9 Rechargeable battery* |
| 10 Charger with mains plug* |
* Not included in the scope of delivery.
2.7.1 Adjustable telescopic handle (06)
The appliance is equipped with an adjustable telescopic handle. This allows the appliance to be adjusted to individual body sizes and the brush head to be swivelled.
3 SAFETY INSTRUCTIONS

DANGER!
Danger of fatal injury and danger of extremely severe injury!
Lack of knowledge of the safety instructions and operating instructions can lead to extremely serious and even fatal injury.
- Observe all safety instructions and instructions for use in these operating instructions as well the operating instructions which are referred to before you start using the appliance.
- Keep all supplied documents in a safe place for future reference.
3.1 Safety instructions for patio brush
Operator
- Carefully read the safety instructions. Familiarise yourself with the operating and adjustment elements and the intended use of the appliance.
This appliance can be used by children of 8 years and older and by persons with reduced physical, sensory or mental capabilities, or those lacking experience and knowledge, if they are supervised or have been instructed with regard to the safe use of the appliance and the ensuing risks. Children must not be allowed to play with the appliance. Cleaning and maintenance must not be carried out by children without supervision.
■ People with very strong and complex restrictions may have needs that exceed the instructions described here.
■ Never allow children or persons unfamiliar with these instructions to use the appliance. National regulations may limit the age of the operator.
■ Do not operate the appliance if you are under the influence
of alcohol, drugs or medication.
■ The user is responsible for accidents involving other people and their property.
■ Never lift or carry the appliance with the motor running. If you have to transport the appliance to and from the work area or tilt it, switch off the motor and remove the rechargeable battery.
Preparation
■ Before operation, always check that protective devices and covers are undamaged, present or correctly fitted. Damaged protective devices and covers must be replaced, missing protective devices and covers must be correctly fitted.
■ Never put the appliance into operation while people, especially children or pets, are in the immediate vicinity.
■ Before working, remove any dangerous objects from the working area, e.g. branches, glass or metal pieces, stones.
operation
■ Always wear safety glasses and sturdy shoes when working with the appliance.
- Do not work with the appliance in bad weather conditions, especially when thunderstorms are approaching.
■ Only use the appliance in daylight or good artificial light.
■ Never use the appliance if protective devices and covers are damaged or not present.
■ Always disconnect the appliance from the power supply, i.e. remove rechargeable batteries:
■ before leaving the appli-
ance unattended
■ before removing blockages in the appliance
■ before checking, cleaning or working on the appliance
■ whenever the appliance starts to vibrate in an unusual way
■ Have the appliance repaired if it has been damaged.
Maintenance and storage
■ Disconnect the appliance from the power supply, i.e. actuate any switch-on lock or remove rechargeable batteries, before performing maintenance or cleaning work.
■ Always wear protective gloves during maintenance, care and cleaning work.
■ Only use the spare parts and accessories recommended by the manufacturer.
■ Regularly check and maintain the appliance. The appliance may only be repaired by an AL-KO service centre.
- Keep the appliance out of the reach of children when not in use.
3.1.1 Safety in the workplace
■ Before working, remove any dangerous objects from the working area, e.g. branches, glass or metal pieces, stones.
■ Work only in daylight or under very bright artificial light.
■ Operate the appliance only on solid and level ground and not on sharp inclines.
■ Pay attention to stability.
3.1.2 Safety of persons, animals and property
■ Note that the user is responsible for accidents and damage that may befall other persons or their property.
■ Use the appliance only for the purposes for which it is intended. Any non-intended use can lead to injury and property damage.
■ Switch on the appliance only when there are no other per-
sons or animals in the working area.
- Maintain a safe distance to persons or animals, or switch off the appliance if persons or animals approach.
3.1.3 Appliance safety
■ Use the appliance only under the following conditions:
■ The appliance is not soiled.
■ The appliance show no signs of damage.
■ All controls function properly.
- Do not overload the device. It is intended for light work in the private sector. Overload can lead to damage to the appliance.
■ Never operate the appliance with worn or defective parts. Always replace defective parts with original spare parts from the manufacturer. If the appliance is operated with worn or defective parts, guarantee claims against the manufacturer are excluded.
■ Repair work is only allowed to be carried out by expert workshops or our service centres.
3.1.4 Safety instructions relating to operation
■ Always operate the machine with two hands.
■ Always keep hands and feet away from the cleaning brush, particularly when switching on the motor.
■ Wait until the cleaning brush comes to a stop after switching off the motor.
■ Remove residues only when the motor and brush have come to a stop and the rechargeable battery has been removed.
■ Always keep the guard plate, brush and motor free of residues.
■ People who are not familiar with the appliance should practice handling it while the motor is turned off.
3.2 Safety notes for rechargeable battery and charger
Heed the safety instructions for the rechargeable battery and for the charging unit in the separate operating instructions.
See:
■ Operating instructions 442228: Li-ion rechargeable battery B50 Li, B100 Li
■ Operating instructions 442230: Charging unit C30 Li
4 INSTALLATION

WARNING!
Danger if assembly is not carried out completely!
Operation of an incompletely assembled appliance can result in serious injury.
■ Only operate the appliance when it is fully assembled.
- Do not insert the battery into the appliance until it is fully assembled.
- Check that all safety and protective devices are in place and functioning correctly before switching on.
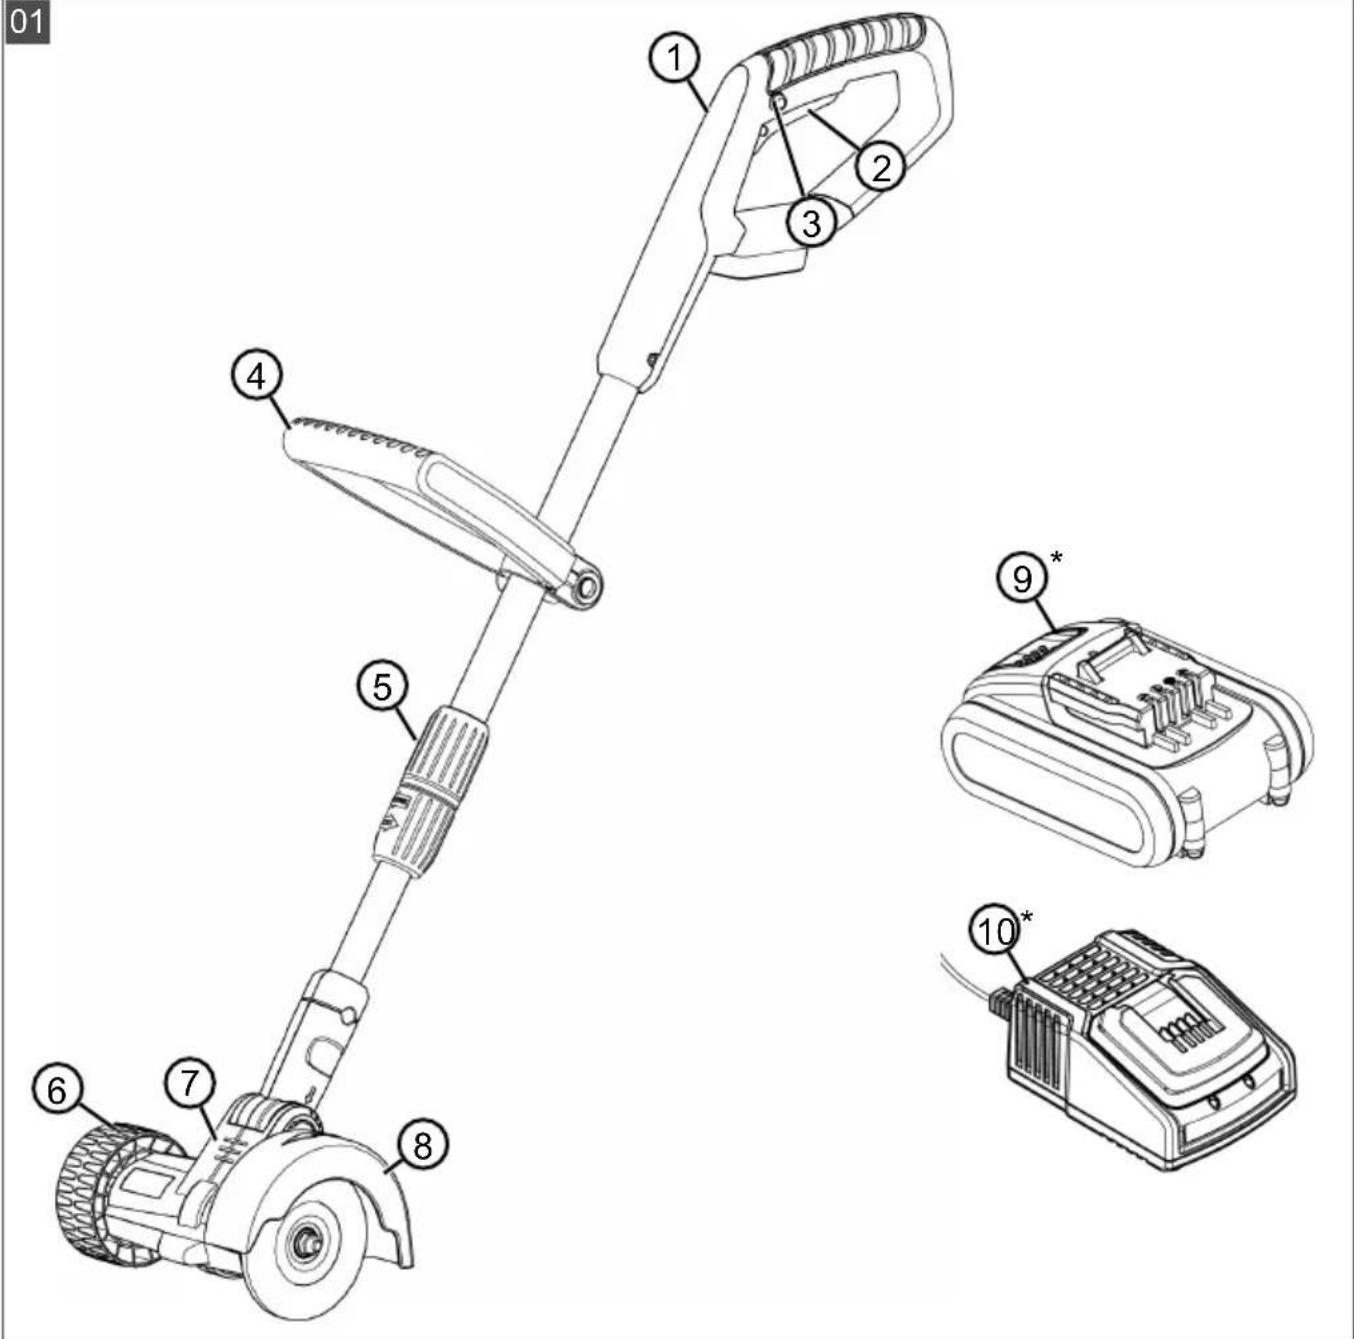
4.1 Installing guide wheel (02)
- Insert (02/a) the guide wheel (02/1) into the brush head (02/2) until it engages.
4.2 Installing guard plate (03)
- Place the guard plate (03/1) onto the brush head (03/2).
- Secure the guard plate (03/1) on the brush head with the screws provided (03/3).
4.3 Installing guide handle (04)
- Push guide handle (04/1) onto the telescopic handle (04/a).
- Insert threaded bolt (04/2) into the guide handle (04/b).
- Place (04/c) the rotary knob (04/3) onto the threaded bolt (04/2) and tighten.
- Tighten the rotary knob so that the height of the guide handle can be adjusted with little effort.
4.4 Installing brush (11)
- Place (11/a) brush (11/1) onto the drive shaft (11/2). Make sure that the brush is seated correctly on the drive shaft.
- Insert pin (11/3) into hole (11/4) of the drive shaft and hold with one hand.
- Position nut (11/5) and tighten.
- Tighten the nut with the wrench (11/6) in the other hand.
- Remove pin and wrench.
5 START-UP
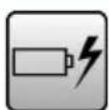
5.1 Charging the rechargeable battery

CAUTION!
Danger of fire during charging!
Due to heating of the charger, there is a danger of fire if it is placed on an inflammable surface and is not adequately ventilated.
■ Always use the charger on a non-inflammable surface or in a non-combustible environment.
If available: Keep the ventilation slots free.

NOTE
The rechargeable battery and the charging unit are not included.
The rechargeable battery is partially charged. Fully charge the rechargeable battery before using it for the first time. The rechargeable battery can be charged in any charge status. Interrupting charging does not damage the rechargeable battery.

NOTE
For detailed information, heed the separate operating instructions for the rechargeable battery and for the charging unit.
See:
■ Operating instructions for lithium-ion rechargeable battery - B50 Li
- Operating instructions for charging unit – C30 Li
5.2 Inserting and pulling out the rechargeable battery (05)
Inserting the rechargeable battery (05/a)
- Push the rechargeable battery (05/1) into the rechargeable battery slot (05/2) until it engages.
Pulling out the rechargeable battery (05/b)
- Press and hold the unlock button (05/3) on the rechargeable battery.
- Pull out the rechargeable battery.
6 OPERATION
6.1 Adjusting telescopic handle (06)
- Turn upper locking sleeve (06/1) approximately 180^ in the direction of the arrow (06/a) to release.
- Adjust telescopic handle (06/2) individually to a comfortable height. The telescopic handle can be extended by approx. 10 cm (06/b).
- Screw locking sleeve tight (06/c).
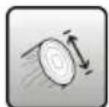
6.2 Swivelling brush head (07)
The brush head can be swivelled to four positions, 0^ , 18^ , 36^ and 54^ , to make working easier.
- Press (07/a) locking button (07/1).
- Set (07/b) the brush head (07/2) to the desired position.
- Release the locking button.
6.3 Switching the patio cleaner on and off (10)
- Stand securely.
- Hold the appliance with both hands. Do not rest the brush head on the ground when doing this.
- Grip the guide handle (01/4) with one hand and the handle of the basic appliance (01/1) with the other.
- Press the safety button (10/1).
- Press the on/off switch (10/2) and hold. The tool starts. Release the safety button.
- The appliance switches off when the ON/OFF switch (10/2) is released.
7 WORKING BEHAVIOUR AND WORKING TECHNIQUE (08)
■ Switch the appliance on before approaching the surface to be cleaned, and only lower it then to avoid overloading.
■ Position the appliance with the guide wheel (08/1) first to clean the surfaces with the brush (08/2). Walk forwards slowly (08/a).
- Do not swivel the appliance to the left and right when working.
■ Severe dirt must be cleaned in layers. Always proceed in the same direction (08/a).
If the appliance is overloaded by pressing on too hard, the brush is blocked. Immediately lift the appliance so it releases. Otherwise, the motor could be permanently damaged.
- Keep the appliance away from sensitive surfaces.
8 MAINTENANCE AND CARE

WARNING!
Danger of lacerations
Danger of cutting injuries when reaching into sharp-edged, moving appliance parts and into cutting tools.
■ Before maintenance, care and cleaning work, always switch off the appliance. Remove the rechargeable battery.
■ Always wear protective gloves during maintenance, care and cleaning work.
8.1 Changing brush (11)
- Switch off the appliance and remove the rechargeable battery.
- Insert pin (11/3) into hole (11/4) of the drive shaft (11/2) and hold with one hand. Release the nut (11/5) with the wrench (11/6) in the other hand.
-
Unscrew nut (11/5) and remove brush (11/1).
-
Insert (11/a) another brush (11/1). Make sure that the brush is seated correctly on the drive shaft.
- Tighten the nut (11/5) with the wrench (11/6) in the other hand.
- Remove pin (11/3) and wrench.
- Install the rechargeable battery in the appliance.
9 HELP IN CASE OF MALFUNCTION

CAUTION!
Risk of injury
Sharp-edged and moving appliance parts can lead to injury.
■ Always wear protective gloves during maintenance, care and cleaning work.

NOTE
For malfunctions that are not listed in this table or that you cannot resolve yourself, please contact our customer service.
| Malfunction Cause Remedy | ||
| Motor does not run. Rechargeable battery is flat. Charge the rechargeable battery. | ||
| Rechargeable battery missing or rechargeable battery not seated correctly. | Insert the rechargeable battery correctly. | |
| Rechargeable battery is too cold or too hot. | Warm up the rechargeable battery slightly or allow it to cool down. | |
| Motor cuts out. Motor protection switch has tripped. | Wait until the motor protection switch switches the machine back on. | |
| Ventilation slits are soiled. Clean the equipment. | ||
| Rechargeable battery operating time is significantly shorter. | Rechargeable battery discharged because it has not been used for some time. | Charge the rechargeable battery. |
| The service life of the rechargeable battery has expired. | Replace the rechargeable battery. Only use genuine accessories from the manufacturer. | |
| Rechargeable battery cannot be charged. | Rechargeable battery contacts are dirty. | Contact an AL-KO service centre. |
| Rechargeable battery or charging unit is defective. | Order spare parts. Contact an AL-KO service centre. | |
| Rechargeable battery is too hot. | Allow the battery to cool down. | |
| Surfaces are not cleaned. | Brush is worn. Replace brush. | |
10 TRANSPORT
Before transporting, carry out the following measures:
- Switch off the appliance.
- Remove the rechargeable battery from the appliance.
- Pack the battery properly.

NOTE
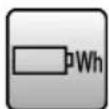
The nominal energy of the rechargeable battery is less than 100 Wh. Therefore, heed the following transport instructions.
The li-ion rechargeable battery contained in the appliance is subject to the hazardous goods law, but can be transported under simplified conditions:
The undamaged rechargeable battery can be transported on public roads by the private user without further conditions provided it is packaged for retail sale and the transport serves personal purposes. The weight limits for batteries sent separately must be observed:
Max. 30 kg total weight per package when transported by road, rail and water
No upper limit for air transport but max. 2 pieces per package
If damage to the battery (e.g. due to the appliance falling) is suspected, transport is not permissible.
■ Commercial users who carry out the transport in connection with their main activity (e.g. delivery from and to building sites, or demonstrations) can also take advantage of this simplification.
In both cases, it is essential to take the mandatory precautions mentioned above to prevent any leakage of the contents. In other cases, it is essential to comply with the regulations of the haz-
ardous goods law. In the case of non-compliance, severe penalties can be imposed on the sender and possibly the transporter.
Additional notes on transport and shipment
■ Only transport or ship lithium-ion rechargeable batteries in an undamaged state.
- Secure the appliance in such a way as to prevent it from starting to operate inadvertently during transport.
- Secure the appliance with strong outer packaging (cardboard shipment box). Use the manufacturer's original packaging if possible.
■ Ensure correct identification and documentation of the consignment during transport or dispatch (e.g. by parcel or forwarding):
When transporting by road, rail and water, a warning sticker must be applied to the packaging when the battery/batteries accompany the appliance. No warning sticker is necessary if the battery/batteries are installed or fitted into the appliance, since the outer packaging/original packaging must already comply with specific regulations.
A warning sticker must always be placed on the packaging when transporting by air. The maximum weight limits for batteries sent together with the appliance must be observed: max. 5 kg battery weight per package and max. 2 pieces per package, if the battery/batteries are accompanying the appliance.
■ Please find out in advance whether transport is possible with the selected service provider, and show your shipment.
We recommend involving a hazardous goods specialist in the preparation of the shipment.
Please heed any other national regulations.
11 STORAGE
Thoroughly clean the appliance after each use and – if present – attach all covers. Store the appliance in a dry, lockable place out of the reach of children.
Carry out the following jobs before intervals in work lasting longer than 30 days:
■ Wipe the entire appliance and accessory parts with a cleaning rag. Do not use petrol or other solvents!
If severely soiled, remove the brushes and clean them thoroughly.
■ Clean the brushes in water and with a hard brush, and allow the brushes to dry completely.
■ Remove dirt from all ventilation slits.
■ Store the machine in a cool, dry place.
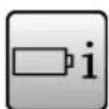
11.1 Storage of battery and charger

DANGER!
Danger of explosion and fire!
Persons will be fatally or severely injured if the rechargeable battery explodes because it was stored in front of naked flames or heat sources.
■ Store the rechargeable battery in cool and dry conditions, but not in front of naked flames or heat sources.

NOTE
When charging, the rechargeable battery is protected from overcharging due to automatic detection of the charge status and thus can remain connected to the charging unit for some time, but not permanently.

NOTE
Heed the separate operating instructions for the rechargeable battery and for the charging unit.
■ Store the rechargeable battery in a dry, frost-free place at an ambient temperature between 0°C and 35°C and with a charge state of approx. 40 - 60%.
- Do not store the rechargeable battery in the vicinity of metallic objects or of objects containing acid to avoid the risk of short-circuit.
■ Recharge the rechargeable battery for approx. 1 hours after approx. 6 months' storage.
12 DISPOSAL
Information on the German Electrical and Electronic Equipment Act (ElectroG)

■ Electrical and electronic appliances do not belong in household waste, but should be collected and disposed of separately.
■ Used batteries or rechargeable batteries that are not installed permanently in the old appliance must be removed before disposal. Their disposal is regulated by the battery law.
- Owners or users of electrical and electronic appliances are obliged by law to return them after use.
The end user bears personal responsibility for deleting his personal data from the old appliance to be disposed of.
The symbol of the crossed-through rubbish bin means that electrical and electronic appliances may not be disposed of in the household rubbish. Electrical and electronic appliances can be handed in at the following places at no charge:
■ Public service disposal or collection points (e.g. municipal building yards)
■ Points of sale of electrical appliances (stationary and online) provided traders are obliged to take them back or offer this voluntarily.
These statements only apply to appliances that are installed and sold in the countries of the European Union and are subject to European Directive 2012/19/EU. Different provisions may apply to the disposal of electrical and electronic appliances in countries outside the European Union.
Information on the German Battery Act (BattG)

■ Used batteries and rechargeable batteries do not belong in household waste, but should be collected and disposed of separately.
For safe removal of batteries or rechargeable batteries from the electrical appliance and for information on their type or chemical system, follow the further information within the operating or installation instructions.
- Owners or users of batteries and rechargeable batteries are obliged by law to return them after use. Return is limited to the handover of customary household quantities.
Used batteries can contain harmful substances or heavy metals that can cause damage to the environment and human health. Reuse of the used batteries and use of the resources contained therein contributes to the protection of these two essential commodities.
The symbol of the crossed-through rubbish bin means that batteries and rechargeable batteries may not be disposed of in household rubbish.
In addition, if the symbol Hg, Cd or Pb appears under the rubbish bin, this stands for the following:
■ Hg: Battery contains more than 0.0005 % mercury
Cd: Battery contains more than 0.002 % cadmium
■ Pb: Battery contains more than 0.004 % lead Rechargeable batteries and batteries can be handed in at the following places at no charge:
■ Public service disposal or collection points (e.g. municipal building yards)
■ Points of sale of batteries and rechargeable batteries
■ Disposal points of the common take-back system for the used batteries of appliances
■ Disposal point of the manufacturer (if not a member of the common take-back system)
These statements apply only to rechargeable batteries and batteries that are sold in the countries of the European Union and that are subject to European Directive 2006/66/EU. Different provisions can apply to the disposal of rechargeable batteries and batteries in countries outside the European Union.
13 AFTER-SALES / SERVICE
In the event of questions of warranty, repair or spare parts, please contact your nearest AL-KO Service Centre. These can be found on the Internet at: www.al-ko.com/service-contacts
14 GUARANTEE
We will resolve any material or manufacturing faults on the appliance during the legal warranty period for claims relating to faults, in accordance with our choice either to repair or replace. The legal warranty period is determined by the legislation of the country in which the appliance was purchased.
Our warranty promise applies only if:
■ These operating instructions are heeded
■ The appliance is handled correctly
■ Original spare parts have been used
The guarantee excludes:
■ Paint damage that can be attributed to normal wear and tear
■ Wear parts that are marked with a frame xxxxxx (x) on the spare parts card
The guarantee period commences with purchase by the first end user. The date on the proof of purchase is decisive. In the event of a guarantee claim, please take this guarantee declaration and the original proof of purchase, and contact your dealer or the nearest authorised customer service centre. This statement does not affect the purchaser's statutory claims for defects against the vendor.
The warranty becomes void in the case of:
■ Unauthorised repair attempts
■ Unauthorised technical modifications
Non-intended use
15 TRANSLATION OF THE ORIGINAL EU/EC DECLARATION OF CONFORMITY
We hereby declare, as the exclusive responsible party, that this product in its marketed form conforms to the requirements of the harmonised EU Directives, EU safety standards and the product-specific standards.
Product
Cordless patio cleaner
Serial number
G4990012
Manufacturer
AL-KO Geräte GmbH
Ichenhauser Str. 14
D-89359 Kötz
Germany
Duly authorised person for technical file
Andreas Hedrich
Ichenhauser Str. 14
D-89359 Kötz
Germany
Type
MB 2010
EU directives
2006/42/EC
2014/30/EU
2011/65/EU
Harmonised standards
EN 60745-1:2009+A11:2010
EN 786:1996+A2:2009
EN 55014-1:2017
EN 55014-2:2015
Kötz, 15 Nov 2018

Dr. Wolfgang Hergeth
Managing Director
VERTALING VAN DE ORIGINELE GEBRUIKERSHANDLEIDING
Inhoudsopgave
2 PRODUCTOMSCHRIJVING
2.1 Beoogd gebruik
text_image
Labeled diagram of a manual push tool with numbered parts and an open book iconNr. Component
www.al-ko.com/service-contacts
14 GARANTIE
text_image
Labeled diagram of a manual push tool with numbered parts and an open book iconN° Pièce
www.al-ko.com/service-contacts
14 GARANTIE
text_image
Labeled diagram of a manual push tool with numbered parts and an open book iconN.° Componente
www.al-ko.com/service-contacts
14 GARANTÍA
text_image
Labeled diagram of a manual push tool with numbered parts and an open book iconN. Componente
www.al-ko.com/service-contacts
14 GARANZIA
text_image
Labeled diagram of a manual push tool with numbered parts and an open book iconŠt. Sestavni del
text_image
Labeled diagram of a manual push tool with numbered parts and an open book iconBr. Dio
| 1 Osnovni uređaj |
| 2 Ručka za vođenje |
| 3 Teleskopska poluga |
| 4 Kotač za vođenje |
| 5 Glava četke, pomična |
| 6 Štitnik |
| 7 2 vijka 3,5 x 13 |
| 8 Matica M8 |
| 9 Žičana četka |
| 10 Najlonska četka |
| 11 Zatik |
| 12 Odvijač |
| 13 Upute za uporabu |

NAPOMENA
Akumulator i punjač nisu isporučeni i stoga se ih treba zasebno kupiti.
Izvucite akumulator (05/b)
-
Pritisnite gumb za deblokiranje (05/3) i zadržite ga.
-
Izvucite akumulator.
6 UPRAVLJANJE
6.1 Pomicanje teleskopske drške (06)
-
Za otpuštanje okrenite gornju sigurnosnu čahuru (06/1) za oko 180° u smjeru strelice (06/a).
-
Teleskopsku dršku (06/2) namjestite individualno prema veličini tijela. Teleskopska drška može se produljiti za oko 10 cm (06/b).
-
Pritegnite sigurnosnu čahuru (06/c).
6.2 Zakretanje glave četke (07)
Glava četke može se kod lakših radova zakrenuti u četiri položaja: 0°, 18°, 36° i 54°.
-
Pritisnite gumb za fiksiranje (07/1) (07/a).
-
Namjestite glavu četke (07/2) u željeni položaj (07/b).
-
Pustite gumb za namještanje.
6.3 Uključivanje i isključivanje čistača spojnica (10)
- Zauzmite stabilan položaj.
-
Držite uređaj objema rukama. Pritom glavu četke ne odlazite na tlo.
-
Jednom rukom obuhvatite ručku za vođenje (01/4), a drugom rukom obuhvatite ručku glavnog uređaja (01/1).
-
Pritisnite sigurnosni gumb (10/1).
-
Pritisnite skloplku za uključivanje/isključivanje (10/2) i čvrsto je držite. Uređaj se pokreće. Otpustite sigurnosni gumb.
-
Ako se sklopka za uključivanje-/isključivanje (10/2) pusti, uređaj će se isključiti.
7 NAČIN I TEHNIKA RADA (08)
Uključite uređaj prije nego što se približite površini koja se čisti, a zatim ga spustite da biste izbjegli preopterećenje.
Uređaj namjestite s kotačem za vođenje (08/1) i tek tada čistite površine četkom (08/2). Polako se krećite naprijed (08/a).
■ Prilikom rada nemojte zakretati na desno i li-jevo.
Velika onečišćenja moraju se čistiti postupno. Uvijek se krećite u istom smjeru (08/a).
Kod preopterećenja uređaja zbog previsokog pritisnog tlaka dolazi do blokade četke. Uređaj odmah podignite kako bi se rasteretio. U suprotnom slučaju može doći do trajnog oštećenja motora.
■ Uređaj držite dalje od osjetljivih površina.
8 ODRŽAVANJE I NJEGA

UPOZORENJE!
www.al-ko.com/service-contacts
14 JAMSTVO
Možebitne greške u materijalu ili proizvodnji na uređaju uklonit ćemo tijekom zakonskoga roka zastare za jamstvo na nedostatke prema vlastitom izboru popravljanjem ili zamjenskom dostavom. Rok zastare određuje se prema pravu države u kojoj je uređaj kupljen.
text_image
Labeled diagram of a manual push tool with numbered parts and an open book iconNr elementu
text_image
Labeled diagram of a manual push tool with numbered parts and an open book iconČ. Součást
www.al-ko.com/service-contacts
14 ZÁRUKA
text_image
Labeled diagram of a manual push tool with numbered parts and an open book icontext_image
Labeled diagram of a manual push tool with numbered parts and an open book iconSz. Alkatrész
text_image
Labeled diagram of a manual push tool with numbered parts and an open book iconNr. Komponent
text_image
Labeled diagram of a manual tool with numbered parts including a power shaver and wheel assemblyNr. Komponent
www.al-ko.com/service-contacts
14 GARANTI
text_image
Labeled diagram of a manual push tool with numbered parts and an open book iconNr. Komponent
| 1 Basismaskin |
| 2 Styrehåndtak |
| 3 Teleskopstang |
| 4 Føringshjul |
| 5 Børstehode, justerbart |
| 6 Skjold |
| 7 2 skruer 3,5 x 13 |
| 8 Mutter M8 |
| 9 Trådbørste |
| 10 Nylonbørste |
| 11 Stift |
| 12 Skrunøkkel |
| 13 Bruksanvisning |

MERK
8 VEDLIKEHOLD OG PLEIE

ADVARSEL!
Fare for kuttskader
text_image
Labeled diagram of a manual push tool with numbered parts and an open book iconNro Osa
Dr. Wolfgang Hergeth Managing Director
ORIGINALIOS NAUDOJIMO INSTRUKCIJOS VERTIMAS
Turinys
text_image
Labeled diagram of a manual push tool with numbered parts and an open book iconwww.al-ko.com/service-contacts
14 GARANTIJA
text_image
Labeled diagram of a manual push tool with numbered parts and an open book iconNr. Detaja
www.al-ko.com/service-contacts
14 GARANTIJA
text_image
Labeled diagram of a manual push tool with numbered parts and an open book iconНомер компонента
www.al-ko.com/service-contacts
14 ГАРАНТИЯ
text_image
Labeled diagram of a manual push tool with numbered parts and an open book iconHo- мер
компонента