
ASP50ES - Vacuum Cleaner SCHEPPACH - Free user manual and instructions
Find the device manual for free ASP50ES SCHEPPACH in PDF.
| Product type | Wet and dry vacuum cleaner |
| Brand | Scheppach |
| Model | ASP50ES |
| Tank capacity | 50 L |
| Rated power | 1400 W |
| Max. power of integrated outlet | 2000 W |
| Maximum total power | 3400 W |
| Maximum vacuum pressure | 19 kPa |
| Supply voltage | 220-240 V~, 50/60 Hz |
| Protection rating | IPX4 |
| Protection class | I |
| Tank material | Stainless steel |
| Main functions | Dry vacuuming, wet vacuuming, blowing, automatic mode with integrated outlet |
| Included accessories | 3 m suction hose, foam filter, paper dust bag, pleated filter, floor nozzle, crevice tool, metal extension hose, wheels, casters, handle, drain hose |
| Safety | Automatic shut-off float valve in case of liquid filling, IPX4 water splash protection |
| Maintenance and cleaning | Foam filter washable with soapy water, pleated filter and dust bag replaceable; tank to be cleaned with a damp cloth |
| Wear parts | Foam filter, paper dust bag, pleated filter |
| Recommended storage temperature | 5 °C to 30 °C |
| Intended use | Vacuuming of non-flammable, non-explosive, non-harmful dusts and liquids |
Frequently Asked Questions - ASP50ES SCHEPPACH
User questions about ASP50ES SCHEPPACH
0 question about this device. Answer the ones you know or ask your own.
Ask a new question about this device
Download the instructions for your Vacuum Cleaner in PDF format for free! Find your manual ASP50ES - SCHEPPACH and take your electronic device back in hand. On this page are published all the documents necessary for the use of your device. ASP50ES by SCHEPPACH.
USER MANUAL ASP50ES SCHEPPACH
natural_image
Black-and-white photo of a vacuum cleaner with coiled hose and control lever (no visible text or symbols)
Made in P.R.C.
ASP50-ES
| DE | Nass- / TrockensaugerOriginalbetriebsanleitung | 7 |
| GB | Wet / dry vacuum cleanerTranslation of original instruction manual | 18 |
| FR | Aspirateur eau et poussièreTraduction des instructions d'origine | 26 |
| IT | Aspiratore solidi/liquidiLa traduzione dal manuale di istruzioni originale | 35 |
| NL | Nat en droogstofzuigerVertaling van de originele gebruikshandleiding | 44 |
| ES | Aspiracdor en húmedo-secoTraducción del manual de instrucciones original | 53 |
| PT | Aspirador a húmido / secoTradução do manual de operação original | 62 |
| CZ | Vysavač pro mokré/suché vysáváníPřeklad originálního návodu k obsluze | 71 |
| SK | Mokro/suchý vysávačPreklad originálneho návodu na obsluhu | 79 |
| HU | Nedves/száraz porszívóEredeti használati utasítás fordítása | 87 |
| PL | Odkurzacz do pracy na mokro / suchoTlumaczenie oryginalnej instrukcji obsługi | 96 |
| HR | Usisivač za mokro/suho čišćenjePrijevod originalnog priručnika za uporabu | 105 |
| SI | Sesalnik za mokro in suho sesanjePrevod originalnih navodil za uporabo | 113 |
| EE | Märg-/kuivimurOriginaalkältusjuhendi tõlge | 121 |
| LT | Šlapio / sauso valymo siurblysOriginalios naudojimo instrukcijos vertimas | 129 |
| LV | Puteklusūcējs mitrai/sausai tīrīšanaiOriginālas lietošanas instrukcijas tulkojums | 137 |
| SE | Våt-/torrsugÖversättning av original-bruksanvisning | 145 |
| FI | Märkä-/kuivaimuriKäännös alkuperäisestä käyttöohjeesta | 153 |
| DK | Våd-/tørsugerOversættelse fra den oprindelige betjeningsvejledning | 161 |
| NO | Batteridrevet våt-/tørrstøvsugerOversettelse av den originale brukervelledningen | 169 |
| BG | Акумулаторна прахосмукачка замокро/сухо почистванеПревод на оригиналното ръководство заексплоатация | 177 |
| GR | Σκούπα υγρού/στεγνού καθαρισμούμπαταρίαςΜετάφραση του πρωτοτύπου των οδηγιών χρήσης | 186 |
| RO | Dispozitiv de aspirare umedă / uscată cuacumulatorTraducere din manualul de exploatare original | 195 |
| RS | Akumulatorski usisivač na mokro/suvoPrevod originalnog uputstva za upotrebu | 204 |
| TR | Akülü yaş ve kuru elektrikli süpürgeOrijinal kullanım talimatı çevirisi | 212 |


Günzburger Straße 69
D-89335 Ichenhausen
Verehrter Kunde,
Homepage: https://www.scheppach.com/de/service
Explanation of the symbols on the product
Symbols are used in this manual to draw your attention to potential hazards. The safety symbols and the accompanying explanations must be fully understood. The warnings themselves will not rectify a hazard and cannot replace proper accident prevention measures.
 | Warning! Disregard results in a risk of death or injury, or damage to the tool! |
 | Before commissioning, read and observe the operating manual and safety instructions! |
 | The product complies with the applicable European directives. |
 | The product complies with the applicable Serbian directives. |
Table of contents: Page:
- Introduction....20
- Device description (Fig. 1)....20
- Scope of delivery 20
- Proper use 21
- Safety instructions 21
- Technical data....22
- Assembly 22
- Operation 23
- Cleaning and maintenance....24
- Storage 24
- Electrical connection 24
- Disposal and recycling.... 25
- Troubleshooting 25
- Declaration of conformity 221
1. Introduction
Manufacturer:
Scheppach GmbH
Günzburger Straße 69
D-89335 Ichenhausen
Dear Customer,
we wish you much pleasure and success in working with your new device.
Note:
In accordance with the applicable product liability laws, the manufacturer of this device assumes no liability for damage to the device or caused by the device arising from:
- Improper handling,
- Failure to comply with the operating instructions,
• Repairs carried out by third parties, unauthorised specialists,
• Installing and replacing non-original spare parts,
• Application other than specified, - Failures of the electrical system in the event of the electrical regulations and VDE provisions 0100, DIN 57113 / VDE0113 not being observed.
Note:
Read the whole text of the operating manual before assembly and commissioning.
This operating manual should help you familiarise yourself with your power tool and teach you how to use it for its intended purpose.
The operating manual include important instructions for the safe, proper and economic operation of the power tool, for avoiding danger, for minimising repair costs and downtimes and for increasing the reliability and extending the service life of the power tool.
In addition to the safety instructions in this operating manual, you must also observe the regulations applicable to the operation of the power tool in your country.
Keep the operating manual package with the power tool at all times and store it in a plastic cover to protect it from dirt and moisture. They must be read and carefully observed by all operating personnel before starting the work. The power tool may only be used by personnel who have been trained to use it and who have been instructed with respect to the associated hazards. The required minimum age must be observed.
In addition to the safety instructions in this operating manual and the separate regulations of your country, the generally recognised technical rules relating to the operation of such machines must also be observed.
We accept no liability for accidents or damage that occur due to a failure to observe this manual and the safety instructions.
2. Device description (Fig. 1)
- Handle
- Machine head
- Connection cable
- Push grip
- Locking hooks
- Push grip mount
- Drain hose stopper
- Drain hose holder
- Wheels with axle
- Caster mounting base
- Drain hose
- Castors
- Drain hose retaining clip
- Drain hose connection
- Stainless steel container
- Suction connection
- Socket with auto switch-on device
- On/off switch
- Connection for blower function
- Filter basket with safety float valve
- 3 m suction hose
- Foam filter
- Paper filter bag
- Folded filter
- Floor nozzle
- Joint nozzle
- Metal extension tube
- Handle screw (2x)
- Screws for wheel axle fixing (2x)
3. Scope of delivery
- Open the packaging and carefully remove the device.
- Remove the packaging material, as well as the packaging and transport safety devices (if present).
- Check whether the scope of delivery is complete.
- Check the device and accessory parts for transport damage.
- If possible, keep the packaging until the expiry of the warranty period.
ATTENTION!
The device and the packaging are not children's toys! Do not let children play with plastic bags, films or small parts! There is a danger of choking or suffocating!
50l wet / dry vacuum cleaner (1x)
3 m suction hose (1x)
Foam filter (1x)
Paper filter bag (1x)
Folded filter for dry vacuuming (1x)
Castors (2x)
Handle (1x)
Wheels (2x) with axle (1x)
Push grip (1x)
Screw for handle (2x)
Screw for wheel axle fixing (2x)
Drain hose with stopper (1x)
Retaining clip (1x)
Floor nozzle (1x)
Joint nozzle (1x)
Metal extension tube (1x)
Operating manual (1x)
4. Proper use
The wet and dry vacuum cleaner is suitable for wet and dry vacuuming using the appropriate filter. The device is not intended for vacuuming flammable, explosive or harmful substances.
The machine may only be used in the intended manner. Any use beyond this is improper. The user/operator, not the manufacturer, is responsible for damages or injuries of any type resulting from this.
Please note that our equipment was not designed with the intention of use for commercial or industrial purposes.
We assume no guarantee if the device is used in commercial or industrial applications, or for equivalent work.
5. Safety instructions
⚠️ DANGER!
- Connect the device to alternating current only. The voltage must match the type plate on the device.
Never touch the mains plug and socket with wet hands.
- Do not pull the mains plug out of the socket by pulling on the connection cable.
- Check the connection cable with the mains plug for damage before each use. Immediately replace a damaged connection cable by an authorised customer service / qualified electrician in order to avoid hazards.
- To avoid electrical accidents, we recommend using sockets with an upstream residual current circuit breaker (max. 30 mA nominal tripping current).
- Pull out the mains plug before carrying out any cleaning and maintenance work.
- All repair work, also to any electrical components, must be carried out by an authorised customer service centre.
⚠ WARNING!
- This device is not designed to be operated by persons with impaired physical, sensory or mental capabilities, or who have insufficient experience and/or insufficient knowledge unless they are being supervised by a person who is responsible for their safety or they are receiving instruction about how this device is to be used.
- Children may only use the device if they are over 8 years old and if they are supervised by a person responsible for their safety or if they have received instructions from them on how to use the device and have understood the resultant hazards.
• Children may not play with the device.
• Children should be supervised in order to ensure that they do not play with the device. - Cleaning and user maintenance must not be carried out by children unsupervised.
- Keep packaging films away from children, there is a risk of suffocation!
- It is recommended to switch off the device after each usage and before maintenance work.
- Risk of fire. Do not vacuum any burning or glowing particles.
- Do not operate the device in explosive environments.
- If foam forms or liquid escapes, switch off the device immediately or pull out the mains plug!
- Do not use abrasive cleaners, glass or all-purpose cleaners! Do not immerse the device in water.
Certain substances can form explosive vapours or mixtures when they are swirled with the suction air!
Never vacuum the following substances:
- Explosive or flammable gases, liquids and dusts (reactive dusts)
- Reactive metal dusts (such as aluminium, magnesium, zinc) combined with strongly alkaline and acidic cleaning agents
• Undiluted strong acids and alkalis - Organic solvents (such as petrol, paint thinner, acetone, heating oil).
In addition, these substances can corrode the materials used on the device.
⚠ WARNING!
This power tool generates an electromagnetic field during operation. This field can impair active or passive medical implants under certain circumstances. In order to prevent the risk of serious or deadly injuries, we recommend that persons with medical implants consult with their physician and the manufacturer of the medical implant prior to operating the power tool.
6. Technical data
Mains voltage 220-240 V\~ 50/60 Hz
| Power 1400 W | |
| Maximum device socket power | 2000 W |
| Total power 3400 W | |
| Water tank capacity 50 l | |
| Suction performance 19 kPA | |
| Protection category IPX4 | |
| Protection class l | |
Subject to technical changes!
7. Assembly
ATTENTION!
Prior to use, ensure that the device has been correctly and fully assembled.
Unpacking (Fig. 1, 2, 3)
- Release the locking hooks (5) and remove the machine head (2). The accessories are located inside the stainless steel container (15). Only the metal extension tube (27) is located outside the stainless steel container (15) in the packaging.
Remove all of the accessories from the stainless steel container (15).
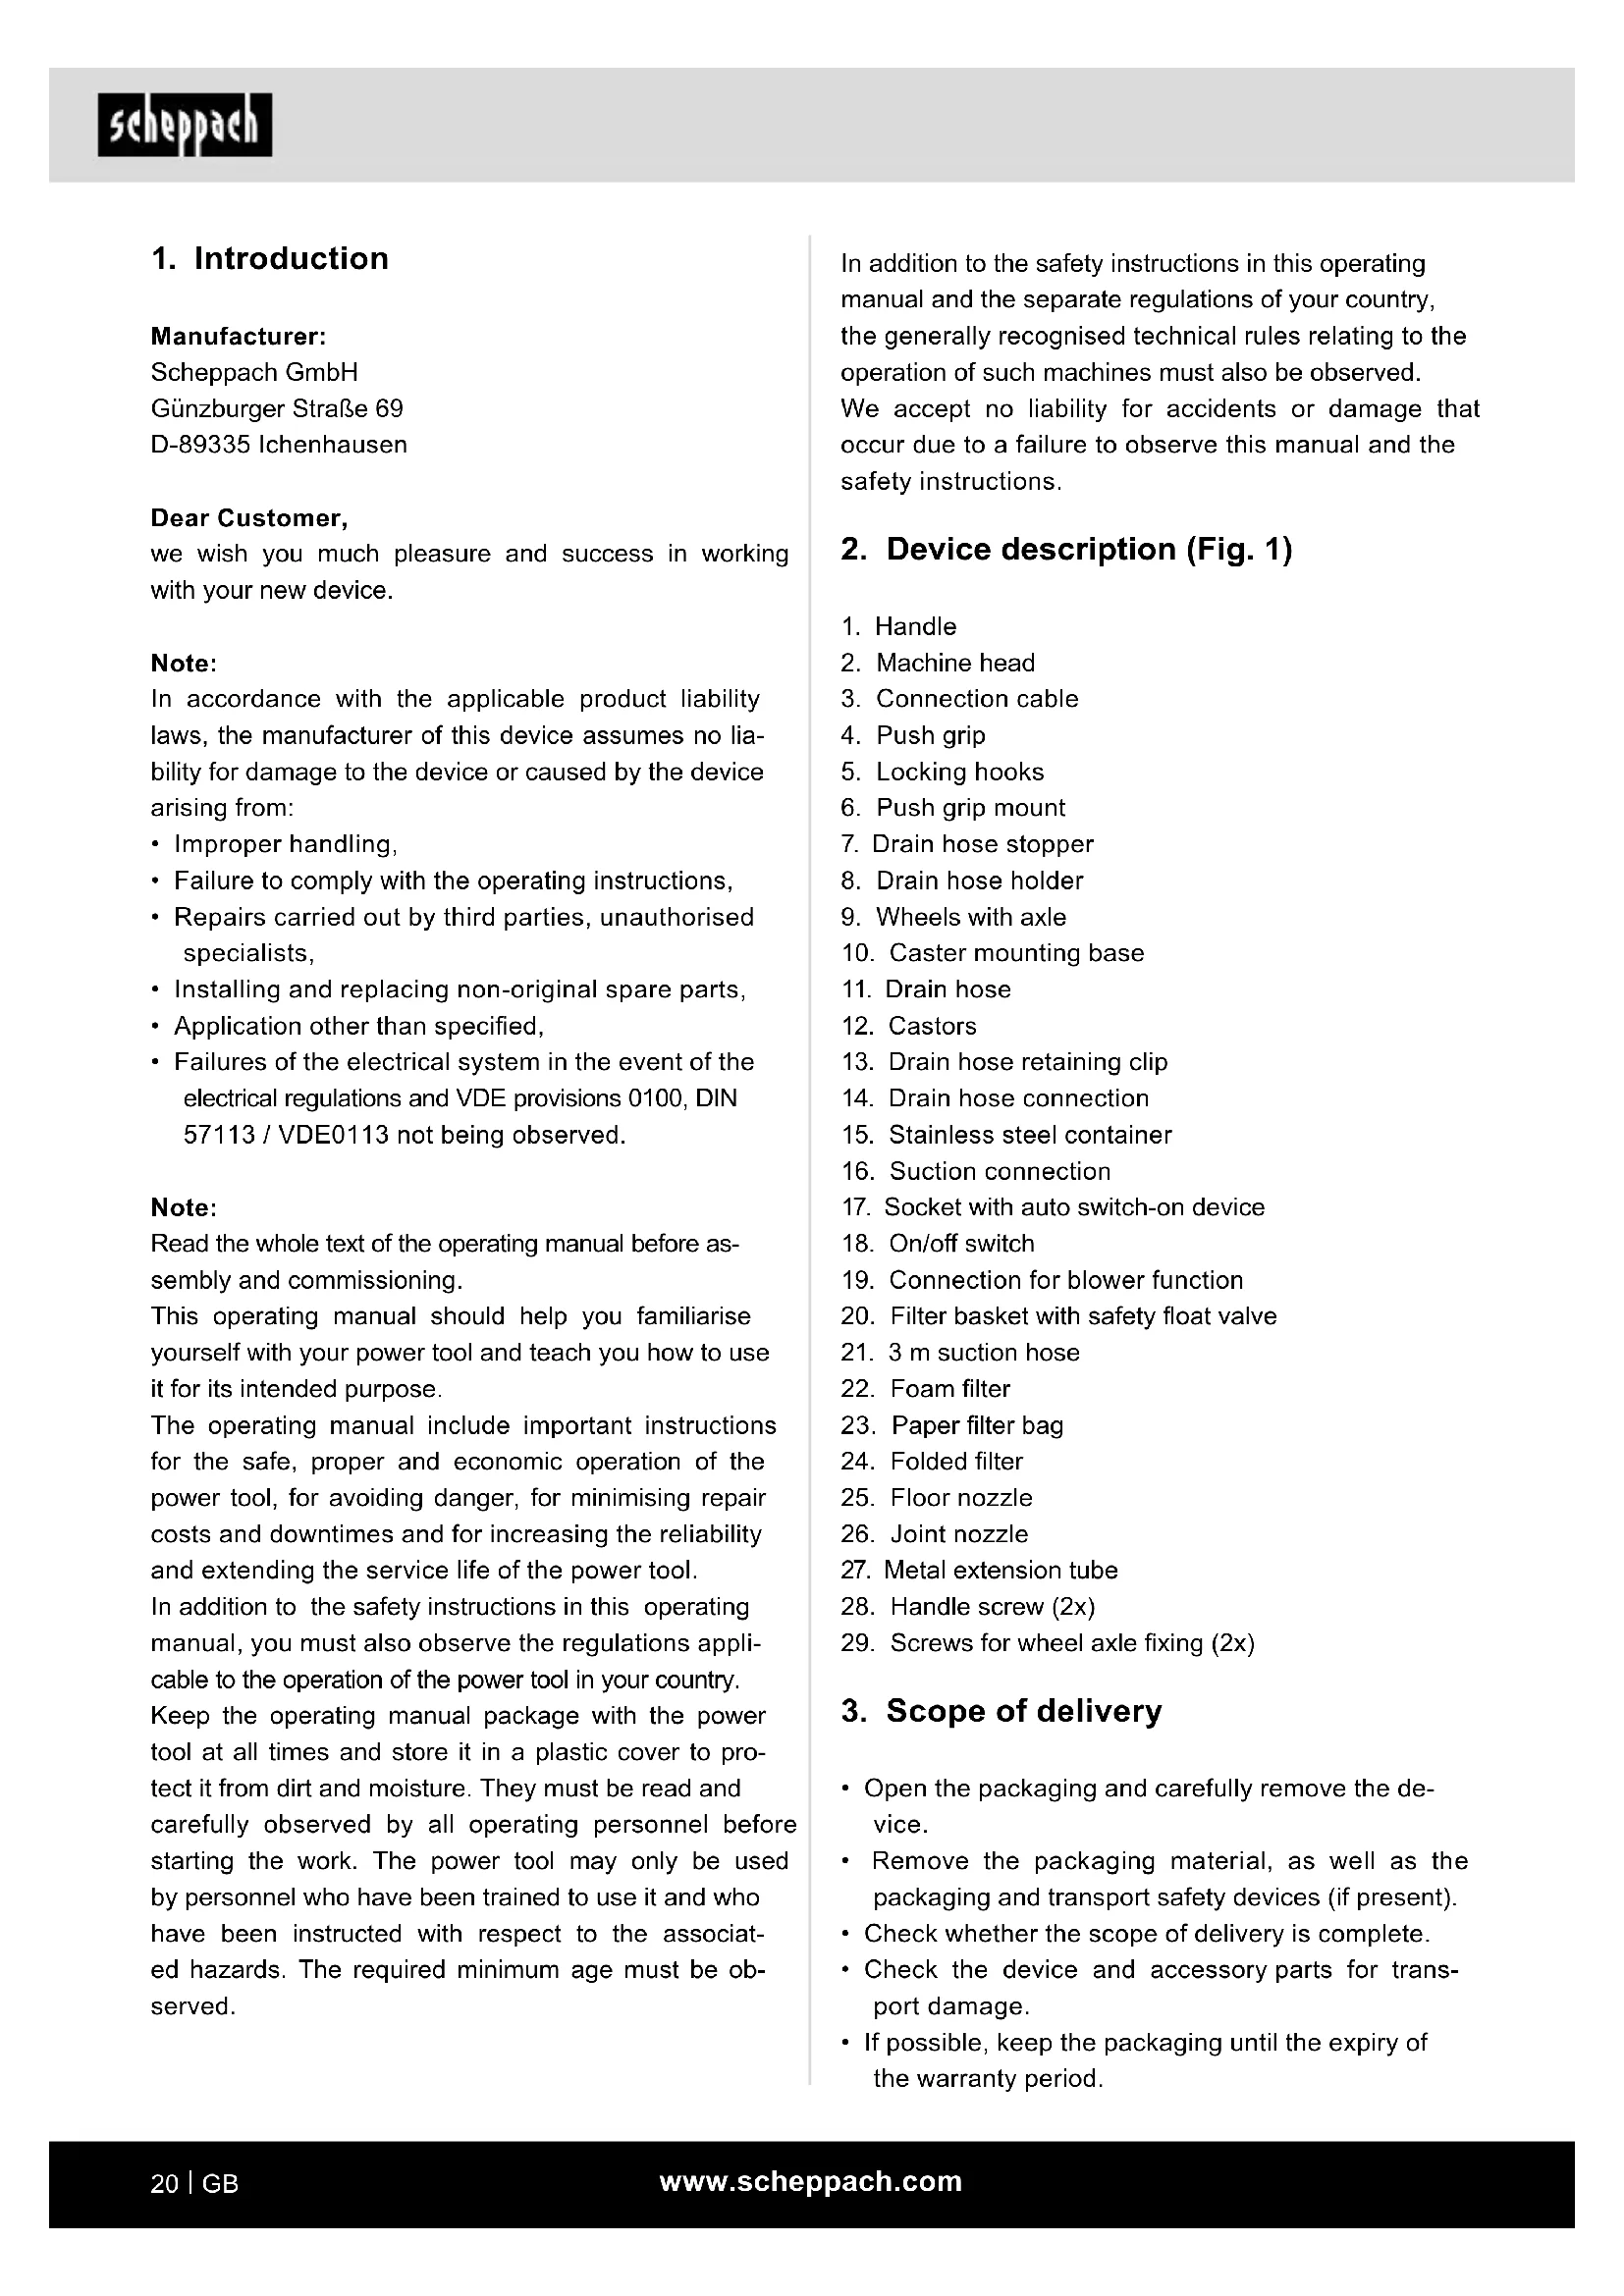
Fitting the wheels with axle (9) and the adjustable ditchers (12) (Fig. 4, 5).
- Place the wheels with axle (9) into the recesses provided on the wheel mounting base (10). Fix the wheels with axle (9) with the screws for the axle-mounted wheels (29) with the help of a screwdriver (not included in scope of delivery).
- Press the two castors (12) into the holes in the wheel mounting base (10).
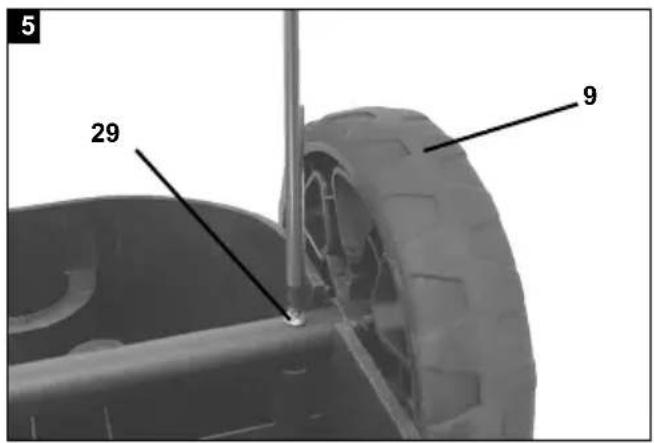
Installing the push grip (4) (fig. 6)
- Push the push grip (4) into the push grip mount (6) on the stainless steel container. In doing so, ensure that the push grip (4) latches into place.
Installing the machine head (2) and the handle (1) (Fig. 7)
- Place the machine head (2) on the stainless steel container (15). Secure the machine head (2) with the locking hooks (5). When installing the machine head (2), ensure that the locking hooks (5) latch into place correctly.
- Place the handle (1) on the machine head (2) and fix it with two screws (28) with a screwdriver (not included in scope of delivery).
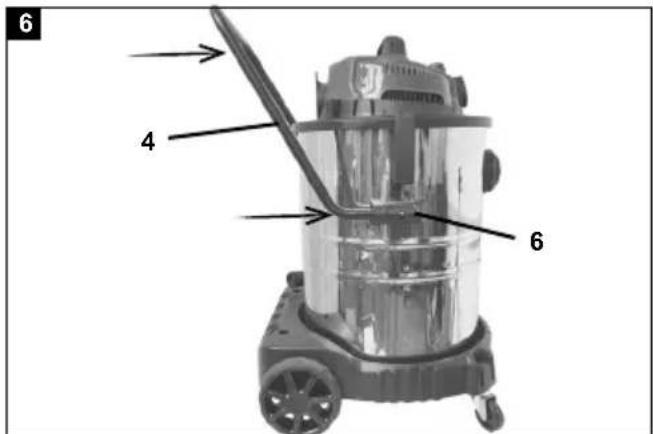
Installing the drain hose (11) (Fig. 8, 9, 10)
- Thread the retaining clip (13) over the drain hose (11). (Fig. 8)
- Fit the drain hose (11) to the drain hose connection (14). Position the retaining clip (13) such that it fastens the drain hose (11) to the drain hose connection (14). Tighten the retaining clip (13) with a screwdriver (not included in scope of delivery). (Fig. 9)
- At the other end of the drain hose (11) there is a stopper (7) which must be closed during suction operation. The drain hose can also be fixed at the drain hose holder (8). (Fig. 10)
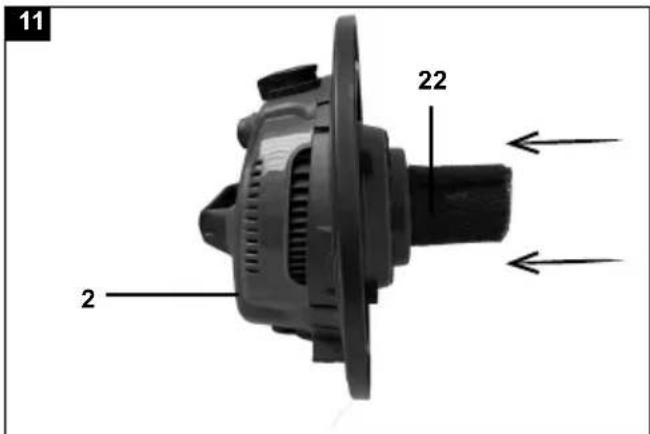
Installing the foam filter (22) (Fig. 3, 11)
Never use the device without filter! Always ensure that the filters are correctly fitted.
- Installing the foam filter (22): For wet vacuuming, slide the foam filter (22) provided over the filter basket with safety float valve (20).
Installing the folded filter (24) (Fig. 3, 12)
For dry vacuuming, slide the folded filter (24) onto the filter basket with the safety float valve (20). The folded filter (24) is only suitable for dry vacuuming!
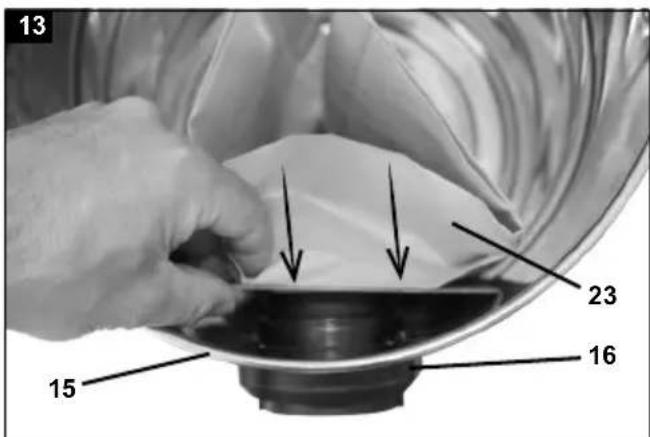
Installing the paper filter bag (23) (Fig. 3, 13)
It is recommended to use an additional paper filter bag (23) when vacuuming fine, dry dirt.
- Slide the paper filter bag (23) over the suction opening in the stainless steel container (15). The paper filter bag (23) is only suitable for dry vacuuming. The paper filter bag (23) makes it easier to dispose of the dust collected.
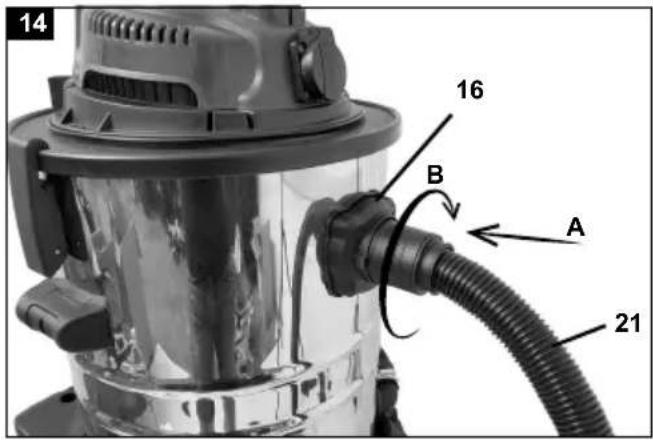
Installing the suction hose (21) (Fig. 3, 14, 15)
Connect the suction hose (21) to the corresponding port, depending on the desired use, on the wet and dry vacuum cleaner.
Vacuuming:
Connect the suction hose (21) to the suction hose port (16). To do so, slide the end of the suction hose (21) with the two nipples into the suction hose port (16) (A). Insert the two nipples into the recesses.
Once the suction hose is fully inserted, turn it clockwise (B).
Blowing:
Connect the suction hose (21) to the blowing function connection port (19). Slide the end of the suction hose (21) with the two nipples into the blowing function connection port (19). Insert the two nipples into the recesses. It is not necessary to turn it here.
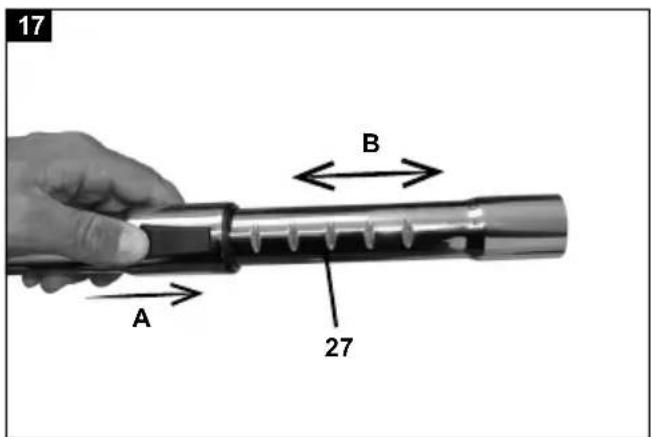
Mount the metal extension tube (27), suction hose (21) and nozzles (25/26) (Fig. 16, 17)
- Connect the metal extension tube (27) with the bent end of the suction hose (21).
- Fit the floor nozzle (25) or joint nozzle (26) to the other end of the metal extension tube (27).
- Push the slide piece forwards (A) to change the length of the metal extension tube (27). (Fig. 17)
- Pull the tube to the desired length (B). Ensure that the slide lock latches into place. (Fig. 17)
8. Operation
⚠ Attention!
Always make sure the product is fully assembled before commissioning!
⚠ WARNING!
Switch the device off if liquid or foam emerges with the exhaust air during wet vacuuming.
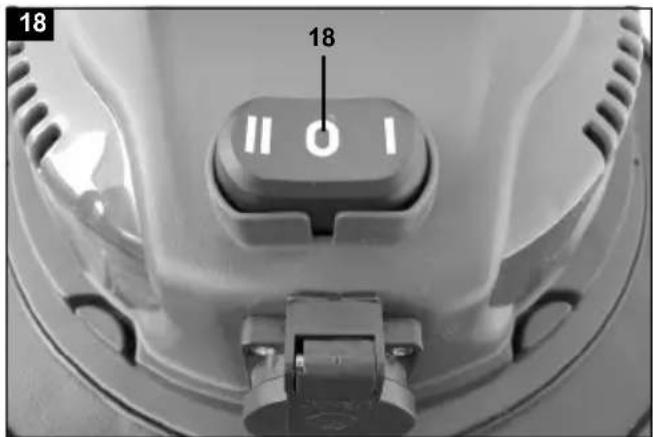
Switching on/off/automatic (Fig. 18, 19)
The ON/OFF switch (18) has three settings:
1 Switch setting 0: Off
2 Switch setting II: On
- Press the on/off switch (18) to switch on.
- Press the on/off switch (18) again to switch the device off.
3 Switch setting I: Automatic mode (the vacuum cleaner will be switched on by an electrical tool).
- Plug your power tool's cable into the automatic socket (fig. 19).
- Connect the suction hose to the suction connection on your power tool.
- Check that the connection is secure and airtight.
- Set the switch on the vacuum system to position "I" = Automatic mode.
Dry vacuuming (Fig. 3, 12, 13)
Use the folded filter (24) for dry vacuuming. The paper filter bag (23) can be used in addition. This ensures that the folded filter (24) remains free of dust for longer and maintains the vacuum power for longer.
In addition, the disposal of the dust is also easier.
Always ensure that the filters are correctly fitted.
Wet vacuuming (Fig. 3, 11)
Use the foam filter (22) for wet vacuuming. Ensure that the foam filter (22) is correctly fitted.
If the stainless steel container (15) is full, the safety float valve (20) closes the suction port and suction operation is interrupted.
ATTENTION!
The device is not suitable for vacuuming flammable liquids. For wet vacuuming, use the only the foam filter (22) provided.
Drain hose (11) (fig. 20)
The stainless steel container (15) is equipped with a water drain hose (11) in order to make it easier to drain. To do so, pull the stopper (7) out of the drain hose (11) and drain off the liquid. Then insert the stopper (7) again.
9. Cleaning and maintenance
⚠ WARNING!
Pull out the mains plug before carrying out any setting, servicing or repair work!
Cleaning
It is recommended to clean the device after each use.
Do not spray the device with water or clean it under running water. This can result in electric shocks and can damage the device.
Empty the stainless steel container (15) after each use: After opening the stopper in the drain hose (7), the liquid collected can be drained out. Residual liquid remains in the stainless steel container (15). To remove residual liquid, take off the machine head (2) by releasing the locking hooks (5) from the stainless steel container (15). Pour out the liquid residue.
Clean the container with a damp cloth.
- Replace paper filter bag when full.
• Always keep the device clean. Do not use cleaning agents or solvents. - Keep the ventilation slots clean and free of dirt and dust.
- Clean the device only with a soft brush or a damp cloth.
- Clean the foam filter (22) with a little soap and running water and then leave it to air dry.
Maintenance
The device is maintenance-free.
Service information
With this product, it is necessary to note that the following parts are subject to natural or usage-related wear, or that the following parts are required as consumables. Wearing parts*: Folded filter, paper filter bag, HEPA filter
* may not be included in the scope of delivery!
Spare parts and accessories can be obtained from our Service Centre. To do this, scan the QR code on the front page.
10. Storage
Store the device and its accessories in a dark, dry and frost-free place that is inaccessible to children. The optimum storage temperature is between 5 and 30°C. Store the power tool in its original packaging.
Cover the power tool to protect it from dust or moisture.
Store the operating manual with the power tool.
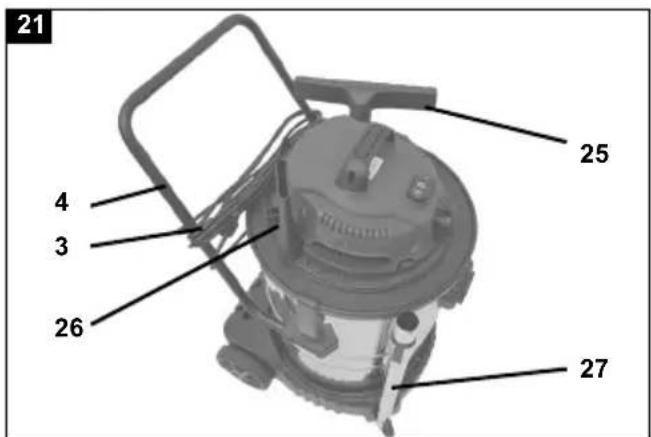
- There are recesses in the wheel mounting base (10) at the rear of the machine and on the machine head (2) for storing the floor nozzle (25), the joint nozzle (26) and the metal extension tube (27).
- The mains cable (3) can be wound around the push grip (4). (Fig. 21)
11. Electrical connection
The electrical motor installed is connected and ready for operation. The connection complies with the applicable VDE and DIN provisions. The customer's mains connection as well as the extension cable used must also comply with these regulations.
Damaged electrical connection cable
The insulation on electrical connection cables is often damaged.
This may have the following causes:
- Pressure points, where connection cables are passed through windows or doors.
- Kinks where the connection cable has been improperly fixed or routed.
- Places where the connection cables have been cut due to being driven over.
• Insulation damage due to being ripped out of the wall outlet. - Cracks due to the insulation ageing.
Such damaged electrical connection cables must not be used and are life-threatening due to the insulation damage. Check the electrical connection cables for damage regularly. Ensure that the connection cables are disconnected from electrical power when checking for damage.
Electrical connection cables must comply with the applicable VDE and DIN provisions. Only use connection cables with the designation H05VV-F.
The printing of the type designation on the connection cable is mandatory.
AC motor
• The mains voltage must be 230 V\~
- Extension cables up to 25 m long must have a cross-section of 1.5 mm ^2 .
Connections and repair work on the electrical equipment may only be carried out by electricians.
Connection type Y
If it is necessary to replace the mains connection cable, this must be done by the manufacturer or their representative to avoid safety hazards.
12. Disposal and recycling
Notes for packaging


The packaging materials are recyclable. Please dispose of packaging in an environmentally friendly manner.
Notes on the electrical and electronic equipment act (ElektroG)
Waste electrical and electronic equipment does not belong in household waste, but must be collected and disposed of separately!
- Used batteries or rechargeable batteries that are not installed permanently in the old device must be removed non-destructively before disposal! Their disposal is regulated by the battery act.
-
Owners or users of electrical and electronic devices are legally obliged to return them after use.
-
The end user is responsible for deleting their personal data from the old device being disposed of!
- The symbol of the crossed-out dustbin means that waste electrical and electronic equipment must not be disposed of with household waste.
-
Waste electrical and electronic equipment can be handed in free of charge at the following places:
-
Public disposal or collection points (e.g. municipal works yards).
- Points of sale of electrical appliances (stationary and online), provided that dealers are obliged to take them back or offer to do so voluntarily.
- Up to three waste electrical devices per type of device, with an edge length of no more than 25 centimetres, can be returned free of charge to the manufacturer without prior purchase of a new device from the manufacturer or taken to another authorised collection point in your vicinity.
- Further supplementary take-back conditions of the manufacturers and distributors can be obtained from the respective customer service.
- If the manufacturer delivers a new electrical device to a private household, the manufacturer can arrange for the free collection of the old electrical device upon request from the end user. Please contact the manufacturer's customer service for this.
- These statements only apply to devices installed and sold in the countries of the European Union and which are subject to the European Directive 2012/19/EU. In countries outside the European Union, different regulations may apply to the disposal of waste electrical and electronic equipment.
13. Troubleshooting
Fault Possible cause Remedy
| Engine does not run. | Check whether the mains plug is plugged in. | Plug the mains plug back in to the socket. |
| Check whether there is power to the socket. Call an electrician. | ||
| Check whether the vacuum cleaner on/off switch is switched on. | Switch the on/off switch on. | |
| Reduced vacuuming power. | Brush is blocked. | Switch the vacuum cleaner off to remove the blockages. |
| Dust bag is full of dust. Remove and empty the dust bag. | ||
| Filter is full of dust. Remove and empty the filter. | ||
Günzburger Straße 69
D-89335 Ichenhausen
Cher client,
Günzburger Straße 69
D-89335 Ichenhausen, Germania
Egregio cliente,
Günzburger Straße 69
D-89335 Ichenhausen
Geachte klant,
Günzburger Straße 69
Günzburger Straße 69
Günzburger Straße 69
D-89335 Ichenhausen
Vážený zákazníku,
Günzburger Straße 69
D-89335 Ichenhausen
Vážený zákazník,
Günzburger Straße 69
D-89335 Ichenhausen
Kedves Ügyfelünk!
Günzburger Straße 69
D-89335 Ichenhausen
Szanowny Kliencie,
Günzburger Straße 69
D-89335 Ichenhausen
Poštovani kupci,
Günzburger Straße 69
D-89335 Ichenhausen
Spoštovani kupec,
Günzburger Straße 69
D-89335 Ichenhausen
Austatud klient!
Kuivimemine (joon. 3, 12, 13)
Günzburger Straße 69
D-89335 Ichenhausen
Gerbiamas kliente,
Günzburger Straße 69
Günzburger Straße 69
D-89335 Ichenhausen
Bästa kund!
Günzburger Straße 69
D-89335 Ichenhausen
Arvoisa asiakas,
Günzburger Straße 69
D-89335 Ichenhausen, Tyskland
Kære kunde,
Günzburger Straße 69
D-89335 Ichenhausen
Kjære kunde,
Günzburger Straße 69
D-89335 Ichenhausen, Германия
Уважаеми клиенти,
Günzburger Straße 69
D-89335 Ichenhausen
Αξιότιμε πελάτη,
Günzburger Straße 69
D-89335 Ichenhausen
Stimate client,
Günzburger Straße 69
D-89335 Ichenhausen
Poštovani kupče,
Günzburger Straße 69
D-89335 Ichenhausen
İthalatçı:
EU Declaration of Conformity
NASS-/TROCKENSAUGER - ASP50-ES
WET / DRY VACUUM CLEANER - ASP50-ES
ASPIRATEUR EAU ET POUSSIÈRE - ASP50-ES
5907710901


| 2000/14/EG_2005/88/EG | |
| Noise: measured LWA= xx dB; guaranteed LAVA= xx dB | |
| Annex V | |
| Annex VI | |

| 2016/1628/EU | |
| Emission. No: |
Standard references:
EN 60335-1:2012+A11:2014+A13:2017+A1:2019+A2:2019+A14:2019+A15:2021; EN 62233:2008;
EN 60335-2-2:2010+A11:2012+A1:2013; EN IEC 55014-1:2021; EN IEC 55014-2:2021;
EN IEC 61000-3-2:2019+A1:2021; EN 61000-3-3:2013+A1:2019+A2:2021;
This declaration of conformity is issued under the sole responsibility of the manufacturer.
The object of the declaration described above fulfils the regulations of the directive 2011/65/EU of the European Parliament and Council from 8th June 2011, on the restriction of the use of certain hazardous substances in electrical and electronic equipment.
Subject to change without notice
Documents registrar: Dawid Hudzik
Günzburger Str. 69, D-89335 Ichenhausen
EU Declaration of Conformity
NASS-/TROCKENSAUGER - ASP50-ES
WET / DRY VACUUM CLEANER - ASP50-ES
ASPIRATEUR EAU ET POUSSIÈRE - ASP50-ES
5907710901
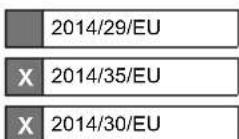
| 2014/29/EU | 2004/22/EG | 89/686/EWG_96/58/EG | |||
| X | 2014/35/EU | 2014/68/EU | 90/396/EWG | ||
| X | 2014/30/EU | X 2011/65/EU* | |||
| 2006/42/EG | |||||
| Annex IVNotified Body:Notified Body No.:Certificate No.: | |||||
Standard references:
EN 60335-1:2012+A11:2014+A13:2017+A1:2019+A2:2019+A14:2019+A15:2021; EN 62233:2008;
EN 60335-2-2:2010+A11:2012+A1:2013; EN IEC 55014-1:2021; EN IEC 55014-2:2021;
EN IEC 61000-3-2:2019+A1:2021; EN 61000-3-3:2013+A1:2019+A2:2021;
This declaration of conformity is issued under the sole responsibility of the manufacturer.
The object of the declaration described above fulfils the regulations of the directive 2011/65/EU of the European Parliament and Council from 8th June 2011, on the restriction of the use of certain hazardous substances in electrical and electronic equipment.
Subject to change without notice
Documents registrar: Dawid Hudzik
Günzburger Str. 69, D-89335 Ichenhausen
EU Declaration of Conformity
NASS-/TROCKENSAUGER - ASP50-ES
WET / DRY VACUUM CLEANER - ASP50-ES
ASPIRATEUR EAU ET POUSSIÈRE - ASP50-ES
5907710901
| 2014/29/EU | 2004/22/EG | 89/686/EWG_96/58/EG | |||
| X | 2014/35/EU | 2014/68/EU | 90/396/EWG | ||
| X | 2014/30/EU | X | 2011/65/EU* | ||
| 2006/42/EG | |||||
| Annex IVNotified Body:Notified Body No.:Certificate No.: | |||||
| 2016/1628/EU | |||||
| Emission. No: | |||||
Standard references:
EN 60335-1:2012+A11:2014+A13:2017+A1:2019+A2:2019+A14:2019+A15:2021; EN 62233:2008;
EN 60335-2-2:2010+A11:2012+A1:2013; EN IEC 55014-1:2021; EN IEC 55014-2:2021;
EN IEC 61000-3-2:2019+A1:2021; EN 61000-3-3:2013+A1:2019+A2:2021;
This declaration of conformity is issued under the sole responsibility of the manufacturer.
The object of the declaration described above fulfils the regulations of the directive 2011/65/EU of the European Parliament and Council from 8th June 2011, on the restriction of the use of certain hazardous substances in electrical and electronic equipment.
Subject to change without notice
Documents registrar: Dawid Hudzik
Günzburger Str. 69, D-89335 Ichenhausen
EU Declaration of Conformity
AB uygunluk beyanı
CE
Scheppach GmbH, Günzburger Str. 69, D-89335 Ichenhausen
| DE | erklärt folgende Konformität gemäß EU-Richtlinien und Normen für den Artikel | RO | declară următoarea conformitate corespunzător directivelor și normelor UE pentru articolul |
| GB | hereby declares the following conformity under the EU Directive and standards for the following article | GR | δηλώνει την ακόλουθη συμμόρφωση σύμφωνα με την Οδηγία ΕΕ και τα πρότυπα για το προϊόν |
| BG | декларира съответното съответствие съгласно Дирек-тива на ЕС и норми за артикул | TR | Burada açıklanan ürünün geçerli yönetmeliklere ve standartlara uygun olduğunu tamamen kendi sorumluluğumuz altında beyan ediyoruz. |
| RS | potvrđuje sledeću usklađenost prema smernicama EZ i normama za artikal |
Article name: WET / DRY VACUUM CLEANER - ASP50-ES
Ürün Tanım:
Standard references:
EN 60335-1:2012+A11:2014+A13:2017+A1:2019+A2:2019+A14:2019+A15:2021; EN 62233:2008;
EN 60335-2-2:2010+A11:2012+A1:2013; EN IEC 55014-1:2021; EN IEC 55014-2:2021;
EN IEC 61000-3-2:2019+A1:2021; EN 61000-3-3:2013+A1:2019+A2:2021;
This declaration of conformity is issued under the sole responsibility of the manufacturer.
The object of the declaration described above fulfils the regulations of the directive 2011/65/EU of the European Parliament and Council from 8th June 2011, on the restriction of the use of certain hazardous substances in electrical and electronic equipment.
Subject to change without notice
Documents registrar: Dawid Hudzik
Günzburger Str. 69, D-89335 Ichenhausen
Garantie DE
Apparent defects must be notified within 8 days from the receipt of the goods. Otherwise, the buyer loses its rights of claim due to such defects are invalidated. We guarantee for our machines in case of proper treatment for the time of the statutory warranty period from delivery in such a way that we replace any machine part free of charge which provably becomes unusable due to faulty material or defects of fabrication within such period of time. With respect to parts not manufactured by us we only warrant insofar as we are entitled to warranty claims against the upstream suppliers. The costs for the installation of the new parts shall be borne by the buyer. The cancellation of sale or the reduction of purchase price as well as any other claims for damages shall be excluded.
Garantie FR
Apparent defects must be notified within 8 days from the receipt of the goods. Otherwise, the buyer's rights of claim due to such defects are invalidated. We guarantee for our machines in case of proper treatment for the time of the statutory warranty period from delivery in such a way that we replace any machine part free of charge which provably becomes unusable due to faulty material or defects of fabrication within such period of time. With respect to parts not manufactured by us we only warrant insofar as we are entitled to warranty claims against the upstream suppliers. The costs for the installation of the new parts shall be borne by the buyer. The cancellation of sale or the reduction of purchase price as well as any other claims for damages shall be excluded.
Záruka CZ
Apparent defects must be notified within 8 days from the receipt of the goods. Otherwise, the buyer is rights of claim due to such defects are invalidated. We guarantee for our machines in case of proper treatment for the time of the statutory warranty period from delivery in such a way that we replace any machine part free of charge which provably becomes unusable due to faulty material or defects of fabrication within such period of time. With respect to parts not manufactured by us we only warrant insofar as we are entitled to warranty claims against the upstream suppliers. The costs for the installation of the new parts shall be borne by the buyer. The cancellation of sale or the reduction of purchase price as well as any other claims for damages shall be excluded.
Garantii EE
Apparent defects must be notified within 8 days from the receipt of the goods. Otherwise, the buyer's rights of claim due to such defects are invalidated. We guarantee for our machines in case of proper treatment for the time of the statutory warranty period from delivery in such a way that we replace any machine part free of charge which provably becomes unusable due to faulty material or defects of fabrication within such period of time. With respect to parts not manufactured by us we only warrant insofar as we are entitled to warranty claims against the upstream suppliers. The costs for the installation of the new parts shall be borne by the buyer. The cancellation of sale or the reduction of purchase price as well as any other claims for damages shall be excluded.
гаранция BG


- ASP50-ES
- Verehrter Kunde,
- Explanation of the symbols on the product
- Table of contents: Page:
- Introduction
- Manufacturer:
- Dear Customer,
- Note:
- Device description (Fig. 1)
- Scope of delivery
- ATTENTION!
- Proper use
- Safety instructions
- ⚠️ DANGER!
- ⚠ WARNING!
- Technical data
- Assembly
- Unpacking (Fig. 1, 2, 3)
- Fitting the wheels with axle (9) and the adjustable ditchers (12) (Fig. 4, 5).
- Installing the push grip (4) (fig. 6)
- Installing the machine head (2) and the handle (1) (Fig. 7)
- Installing the drain hose (11) (Fig. 8, 9, 10)
- Installing the foam filter (22) (Fig. 3, 11)
- Installing the folded filter (24) (Fig. 3, 12)
- Installing the paper filter bag (23) (Fig. 3, 13)
- Installing the suction hose (21) (Fig. 3, 14, 15)
- Vacuuming:
- Blowing:
- Mount the metal extension tube (27), suction hose (21) and nozzles (25/26) (Fig. 16, 17)
- Operation
- ⚠ Attention!
- Switching on/off/automatic (Fig. 18, 19)
- Dry vacuuming (Fig. 3, 12, 13)
- Wet vacuuming (Fig. 3, 11)
- Drain hose (11) (fig. 20)
- Cleaning and maintenance
- Cleaning
- Maintenance
- Service information
- Storage
- Electrical connection
- Damaged electrical connection cable
- This may have the following causes:
- AC motor
- Connection type Y
- Disposal and recycling
- Notes for packaging
- Notes on the electrical and electronic equipment act (ElektroG)
- Troubleshooting
- Cher client,
- Egregio cliente,
- Geachte klant,
- Vážený zákazníku,
- Vážený zákazník,
- Kedves Ügyfelünk!
- Szanowny Kliencie,
- Poštovani kupci,
- Spoštovani kupec,
- Austatud klient!
- Kuivimemine (joon. 3, 12, 13)
- Gerbiamas kliente,
- Bästa kund!
- Arvoisa asiakas,
- Kære kunde,
- Kjære kunde,
- Уважаеми клиенти,
- Αξιότιμε πελάτη,
- Stimate client,
- Poštovani kupče,
- İthalatçı:
- EU Declaration of Conformity
- Standard references:
- AB uygunluk beyanı
- Garantie DE
- Garantie FR
- Záruka CZ
- Garantii EE
- гаранция BG
Brand : SCHEPPACH
Model : ASP50ES
Category : Vacuum Cleaner