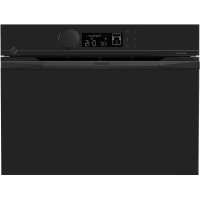
DOP4756H - Built-in oven DE DIETRICH - Free user manual and instructions
Find the device manual for free DOP4756H DE DIETRICH in PDF.
| Product type | Built-in oven |
| Brand | De Dietrich |
| Model | DOP4756H |
| Dimensions (H x W x D) | 595 x 595 x 575 mm |
| Net weight | Approximately 35 kg |
| Power supply | 220-240 V / 50-60 Hz, 16 A |
| Maximum power | Approximately 3500 W |
| Net capacity | 71 L |
| Number of cooking modes | 10 (including fan-assisted, conventional, grill, AIR FRY, dehydration) |
| Automatic cooking modes | AI Sensor, Low temperature, World recipes |
| Cleaning | Pyrolysis (3 cycles: Auto, Express, 2h) |
| Connectivity | Wi-Fi, De Dietrich Smart Control app |
| Interior lighting | Halogen lamp 40 W (replaceable) |
| Included accessories | Grill, drip tray, baking tray, perforated tray, telescopic rails |
| Safety functions | Key lock, automatic shut-off, door locked during pyrolysis |
| Repairability index | Availability of spare parts (lamp, glass panels, heating elements) |
| Energy class | A+ (according to EU standard 2019/2017) |
| Country of manufacture | France (Origine France Garantie label) |
Frequently Asked Questions - DOP4756H DE DIETRICH
User questions about DOP4756H DE DIETRICH
0 question about this device. Answer the ones you know or ask your own.
Ask a new question about this device
Download the instructions for your Built-in oven in PDF format for free! Find your manual DOP4756H - DE DIETRICH and take your electronic device back in hand. On this page are published all the documents necessary for the use of your device. DOP4756H by DE DIETRICH.
USER MANUAL DOP4756H DE DIETRICH
Connectivite: questions et reponses 15
5 MODE DE CUISSON MANUEL 17
Cuisson immediate 31
8 AUTRES FONCTIONS 32
TABLEAU INDICATIF AIR FRY
PRECONISATIONS POUR LE MODE AI SENSOR
RELATIONS CONSOMMATEURS FRANCE
You have just purchased a De Dietrich product. This choice reflects your high standards and taste for the French way of life.
Resulting from over 300 years' know-how, the De Dietrich creations embody the fusion between design, authenticity and technology at the service of culinary arts. Our appliances are manufactured using noble materials and offer an irreproachable quality of finish.
We are certain this high-quality product will enable cooking enthusiasts to express all their talents.
The De Dietrich Customer Service Department is at your disposal for all your questions and suggestions to always better meet your expectations.
We are honoured to be your new partner in the kitchen and thank you for your trust.
With its factories based in France, in Orleans and Vendôme, De Dietrich cultivates

B
a constant search for excellence, perpetuating exceptional know-how in the design of perfectly finished products. Many of our electrical appliances are certified by the "Origine France Garantie" label, an acknowledgement which certifies they are manufactured in France.
This label both ensures the quality and durability of our appliances, as well as their traceability, thus offering a clear and objective
indication of their provenance.
www.de-dietrich.com
De Dietrich
CREATEURD'EMOTIONS DEPUIS 1684
IMPORTANT SAFETY ADVICE AND PRECAUTIONS 4
1 INSTALLATION 6
Choice of location and fitting 6
Electrical connection 7
2 CARE FOR THE ENVIRONMENT 7
3 DESCRIPTION OF THE OVEN 8
The controls and display 9
Locking the controls 9
Accessories (depending on model) 10
Sliding rail system. 12
Installing and removing the sliding rails 12
4 FIRST USE AND SETTINGS. 13
Using the oven for the first time 13
Settings menu (depending on model) 13
Connectivity 15
Connectivity: questions and answers 15
5 MANUAL COOKING MODE 17
Start a cooking programme 19
6 COOKING TIPS. 20
Air FRY FUNCTION 20
Drying function 21
7AUTOMATIC COOKING MODE 22
Presentation of the automatic mode 22
Presentation of dish categories 23
Starting an automatic cooking programme. 31
Immediate cooking 31
8 OTHER FUNCTIONS. 32
Cooking end options (according to the type of cooking) 32
Favourites 33
Timer function 33
9 CARE 34
Cleaning and maintenance 34
Removing and refitting the "sensor" plate 35
Pyrolytic self-cleaning 36
Replacing the oven lamp. 38
10 TROUBLESHOOTING AND SOLUTIONS 39
11 Suitability Test 41
IMPORTANT SAFETY INSTRUCTIONS - READ CAREFULLY AND KEEP FOR FUTURE USE.
This user guide is available for download on the brand's website.
Once you receive the appliance, unpack it or have it unpacked immediately. Give it an overall inspection. Make a note of any reservations on the delivery slip and keep a copy.

Important
This appliance may be used by children aged 8 years and older, and by persons with impaired physical, sensory or mental capacities, or without experience or knowledge, if they are supervised or have received prior instructions on how to use the appliance safely and have understood the risks involved.
Children must not play with the appliance. The appliance should not be cleaned or maintained by unsupervised children.
- Children should be supervised to prevent them from playing with the appliance.

WARNING:
The appliance and its accessible parts become hot during use. Be careful
not to touch the heating elements inside the oven. Children under
8 years old must be kept away from the hob unless they are supervised at all times.
This appliance is designed to cook with the door closed.
Before pyrolytic cleaning of your oven, remove all accessories and any thick deposits.
During cleaning, the surfaces may become warmer than under normal conditions of use.
It is advisable to keep children away from the appliance.
-
Do not use a steam cleaner.
-
Do not use abrasive cleaners or hard metal scrapers to clean the oven's glass door; they could scratch the surface and cause the glass to.

WARNING:
Make sure the appliance is disconnected from the power before replacing the lamp in order to avoid the risk of electric shock. Change the lamp only when the appliance has cooled down. To unscrew the view port and the light, use a rubber glove, which will make disassembly easier.

It must be possible to
disconnect the appliance from the power supply by fitting a switch on the fixed wiring system in accordance with installation rules.
the power cable is damaged, it should be replaced by the manufacturer, its after-sales service department or by a similarly qualified person in order to avoid danger.
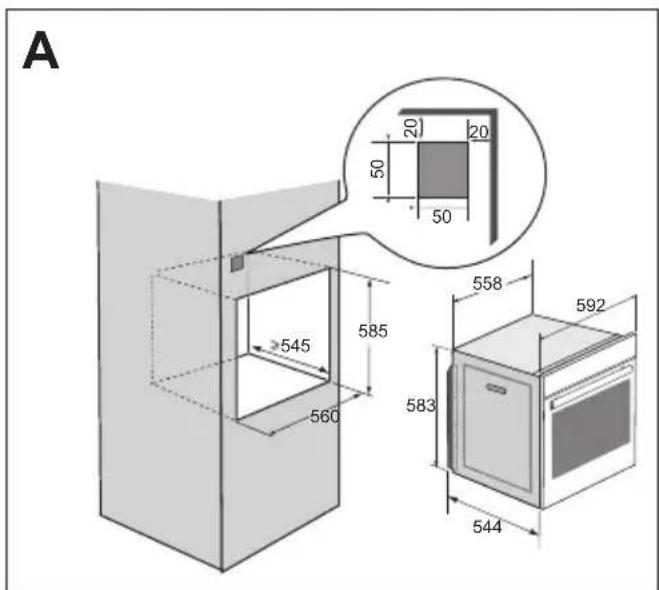
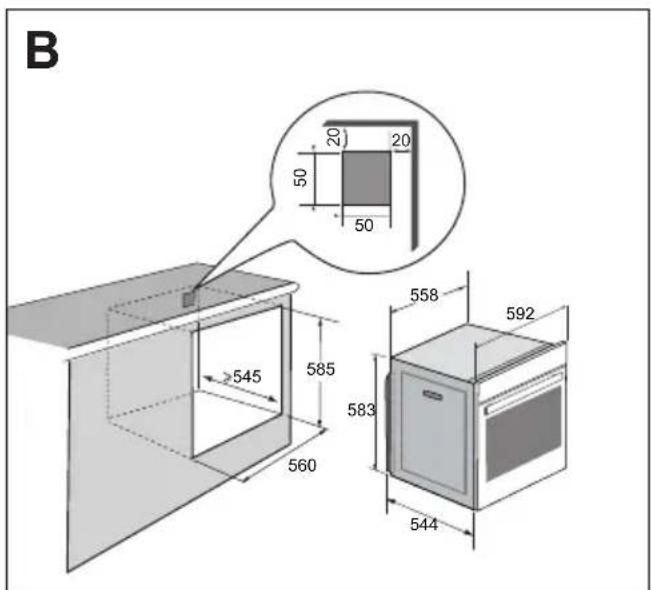
- This appliance may be installed either under a worktop or in a column as shown in the installation diagram.
Centre the oven in the cabinet so as to ensure a minimum gap of 10mm between the appliance and the surrounding unit. The material of the unit supporting the appliance must be heat-resistant (or covered with a heat-resistant material). For greater stability, attach the oven to the unit with
2 screws through the holes provided on the side panels.
The appliance must not be installed behind a decorative door to prevent overheating.
This appliance is designed to be used for domestic and similar applications such as kitchen areas for the staff of shops, offices and other professional premises; farms; use by clients of hotels, motels and other residential type establishments; guest house type environments.
The oven must be turned off when cleaning inside the oven.
Do not modify the characteristics of this appliance; doing so could be dangerous.
Do not use your oven as a larder or to store any items after use.
CHOICE OF LOCATION AND FITTING
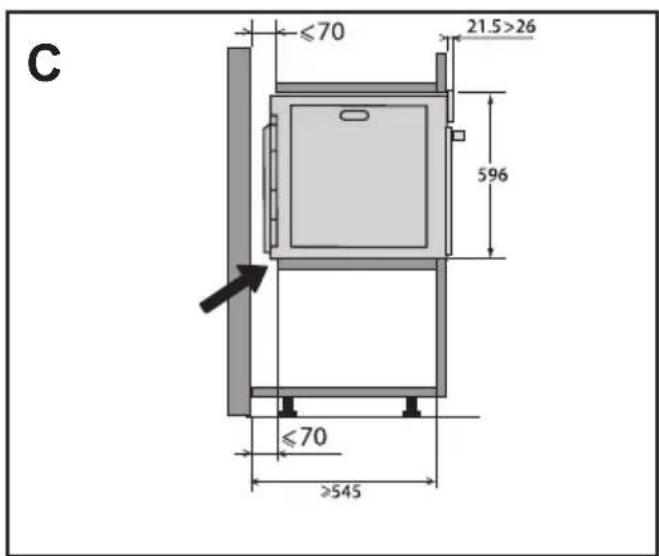
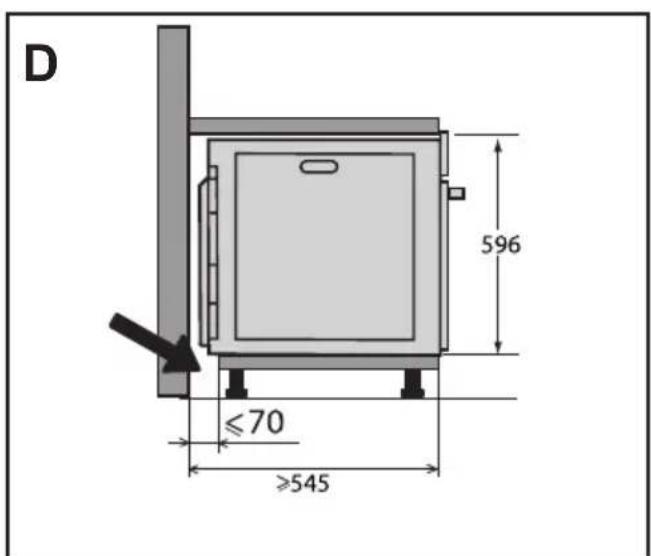
The diagrams show the dimensions of a cabinet that will be able to hold your oven. This appliance may be installed either in a column (A) or under a worktop (B). If the cabinet is open, its opening at the back must be 70mm maximum (C and D). Install the oven in the cabinet. To do this, remove the rubber stops and pre-drill a 2-mm diameter hole in the wall of the cabinet to avoid splitting the wood. Attach the oven with the two screws.
Re-position the rubber stops.
If the furniture is closed at the back, make a 50 × 50 mm opening through which to route the electrical cable.
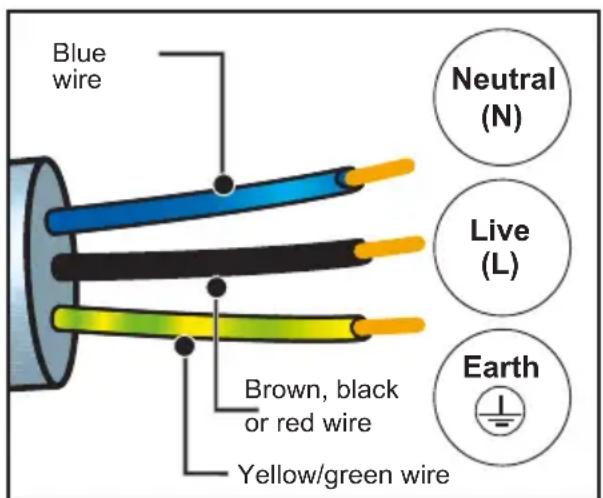
ELECTRICAL CONNECTIONS
The oven is supplied with a standardised power cable with 3 conductors of 1.5mm^2 (1 live + 1 neutral + earth) which must be connected to the 220~240 Volt grid by means of an all-pole cut-off device in compliance with the installation rules.
The safety wire (green-yellow) is connected to the appliance's terminal and must be connected to the installation's earth. The fuse in your set-up must be 16 amperes.
We cannot be held responsible for any accident or incident resulting from non-existent, defective or incorrect earthing or non-compliant connection.
Your appliance is designed to work as is, at a frequency of 50Hz or 60Hz , without you having to do anything.
Important: If the electrical installation of your home requires a modification to connect the appliance, call a qualified electrician. If the oven malfunctions in any way, unplug it or remove the fuse for the oven's connection line.
2 ENVIRONMENT
CARING FOR THE ENVIRONMENT
The packaging material of this appliance is recyclable. Please recycle it and help protect the environment by depositing it in municipal containers provided for this purpose.
Your appliance also contains many recyclable materials. It is therefore marked with this logo to indicate that used appliances should not be mixed with other waste.
Recycling of appliances organised by your manufacturer is carried out under the best conditions, in accordance with the
European regulation on waste disposal of electronic and electrical equipment.
Contact your local authority or retailer for information on used appliance collection points close to your home. We thank you for your help in protecting the environment.
3 DESCRIPTION OF THE OVEN
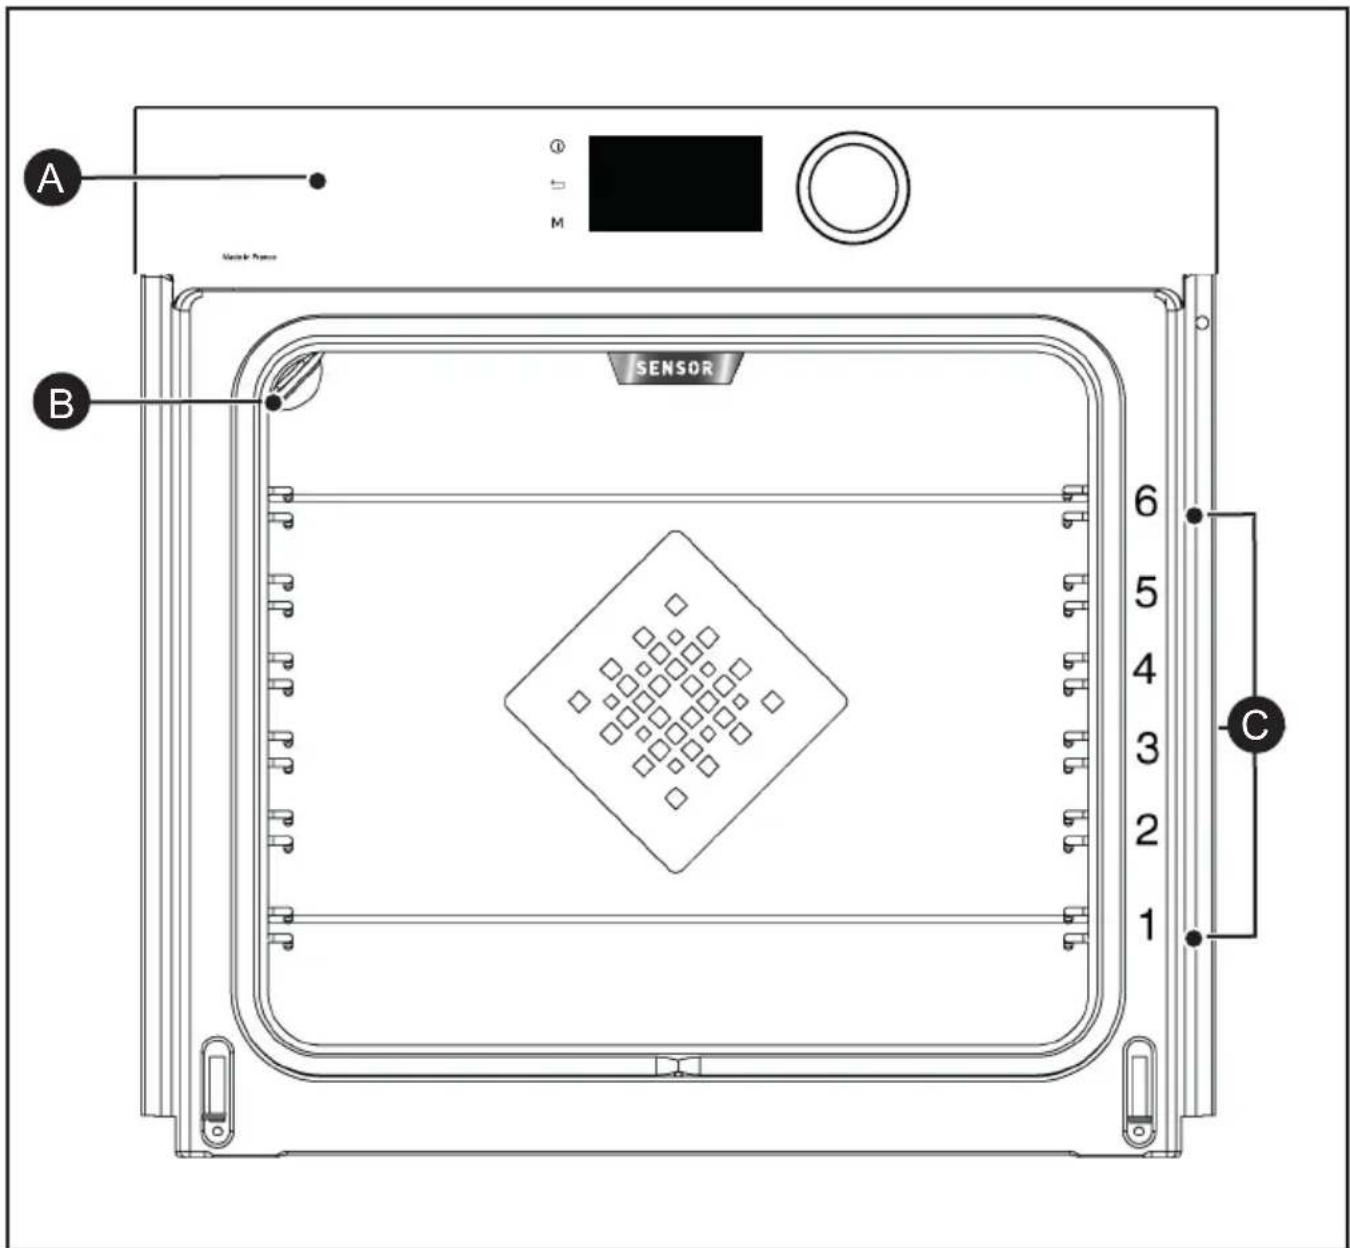

Control panel

Light

Shelf runners (6 heights available)
3 DESCRIPTION OF THE OVEN
THE CONTROLS AND DISPLAY
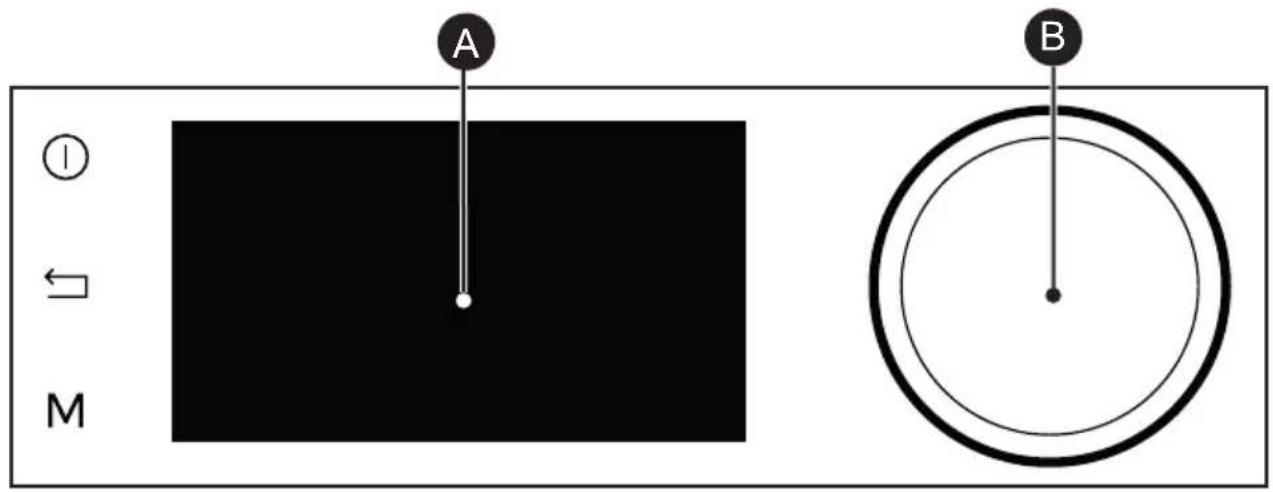

Oven stop key (press and hold)

Display
Back key

Rotating knob with central button (cannot be removed):

MANUAL Mode direct access key
-
Choose programmes, increase or reduce values by turning it.
-
Validate each action by pressing the centre.
LOCKING THE CONTROLS
Press the and M keys at the same time until the symbol a stars on the screen.
Control locking is accessible during cooking or when the oven has stopped.
NOTE: only the stop key remains active.
To unlock the keypad, press the back and M keys at the same time until the padlock symbol disappears from the screen.
3 DESCRIPTION OF THE OVEN
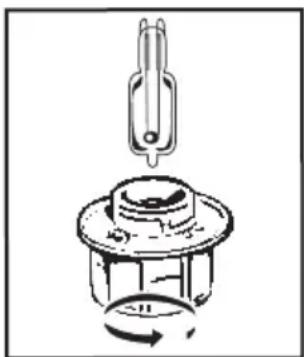
ACCESSORIES (DEPENDING ON MODEL)
- Anti-tip safety rack. The rack can be used to support all dishes and moulds containing food for cooking or browning. It can be used for barbecues (to be placed directly on the grill). Position the anti-tip stop towards the back of the oven.
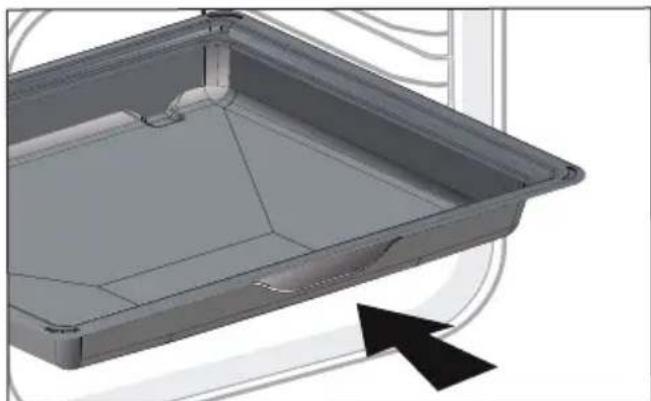
- 45 mm multi-purpose tray. To be inserted into the supports under the rack, with the handle towards the oven door. It collects juice and fat from grilling, and can be used half-filled with water as a double-boiler.
- 8 mm Pastry Sheet. Inserted into the supports or placed on the telescopic rails. This sheet is ideal to bake pastries and baked goods such as biscuits, cookies, meringues, croissants, etc. Its front slope enables you to easily place your preparations.

3 DESCRIPTION OF THE OVEN
ACCESSIONS (DEPENDING ON MODEL)
- 20 mm multi-purpose drip tray. When inserted in the shelf runners under the grill with the handle towards the oven door, it is ideal for baking cookies, shortbread and cupcakes. Its tilted surface makes it practical and easy to use. Can also be inserted into the supports under the rack to collect juice and fat from grilling.

- "Flavour" racks. These half "flavour" grills are used separately, but only when placed in one of the dishes or drip tray with the anti-tip handle towards the back of the oven. By using just one grill, it is easy to moisten your food with the cooking juices collected in the dish.
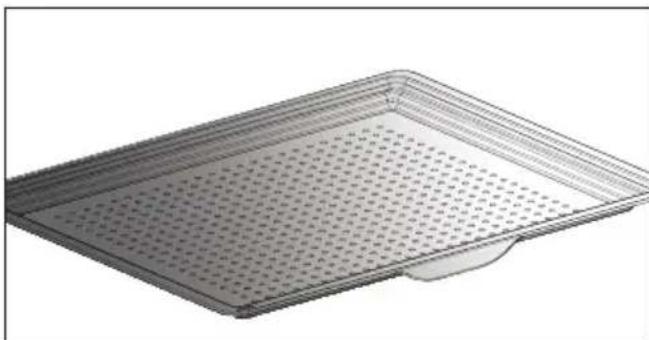
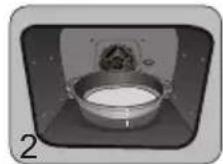
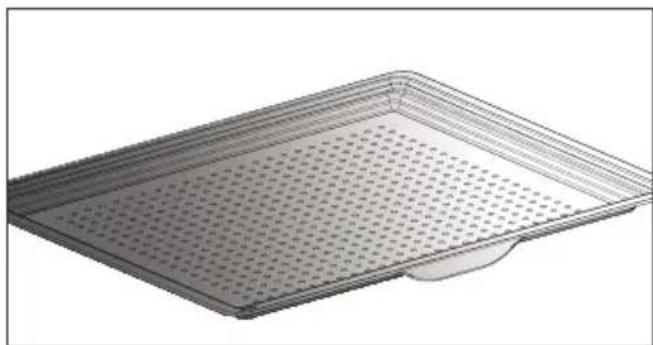
- Perforated tray. When inserted in the supports with the handle towards the oven door, This tray is designed for the AIR FRY cooking mode and is also suitable to cook pizzas and pastries, as well as for drying food.

3 DESCRIPTION OF THE OVEN
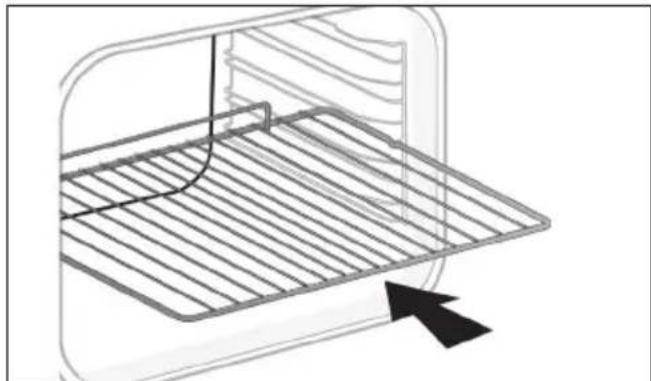
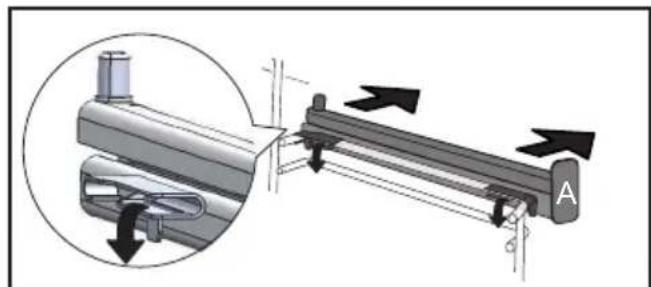
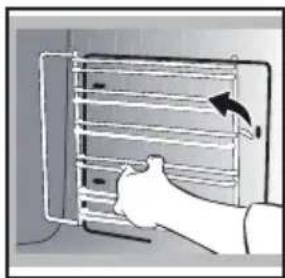
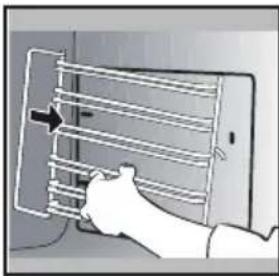
SLIDING RAIL SYSTEM
The new sliding rail system makes food more practical and easier to handle as the trays can be effortlessly pulled for simpler handling. The trays can be completely removed, providing full access. Their stability ensures that food can be handled safely, reducing the risk of burns. This means that you can take food out of the oven far more easily.
INSTALLING AND REMOVING THE SLIDING RAILS
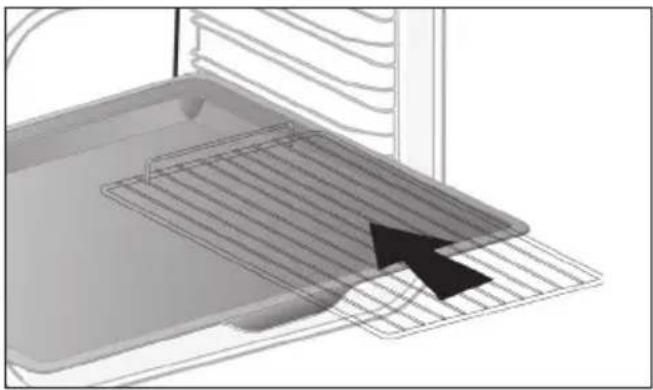
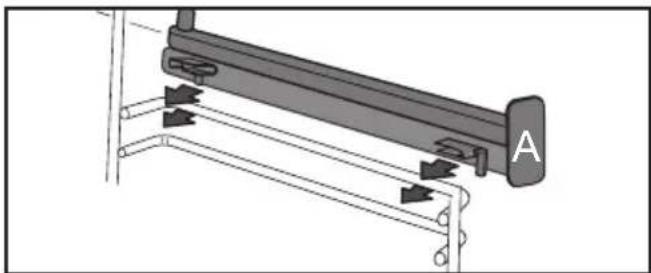
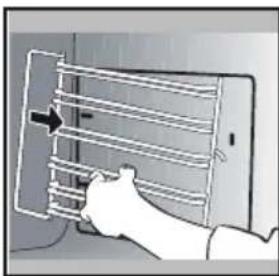
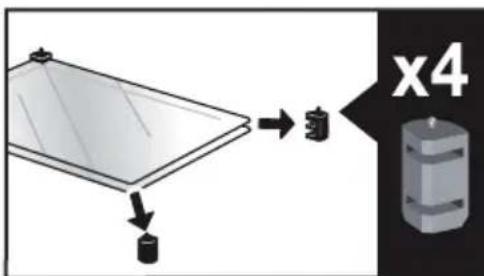
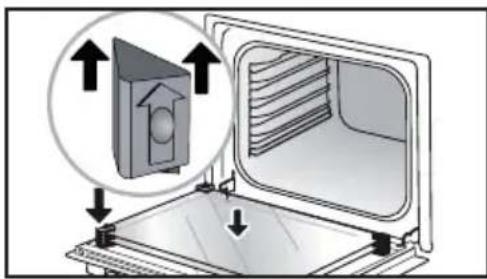
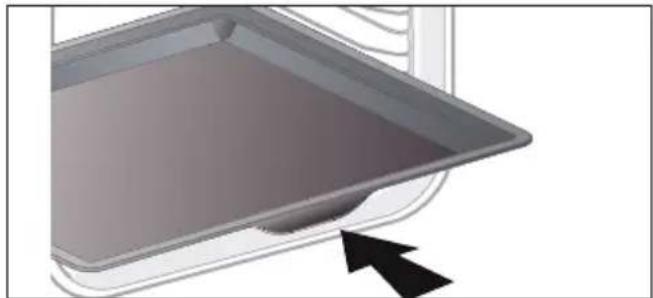
After removing the 2 shelf runners, choose the height (2 to 5) at which you want to fit your rails. Snap the left rail against the left shelf runner by applying enough pressure to the front and back of the rail so that the 2 tabs on the side of the rail slot into the shelf runner. Do the same for the right-hand rail.
NOTE: the telescopic sliding part of the rail must unfold towards the front of the oven, with the stop A opposite you.
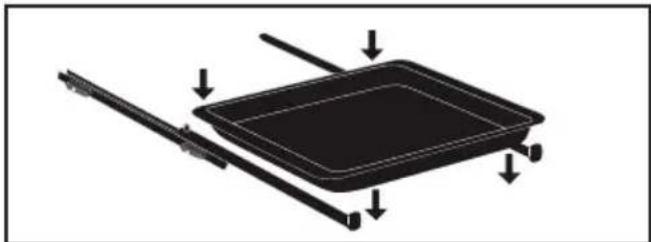
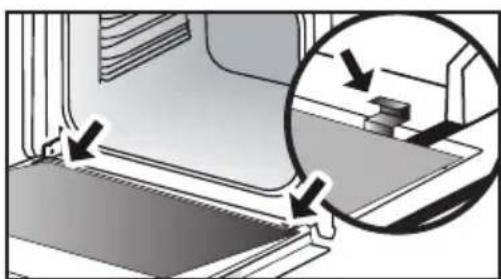
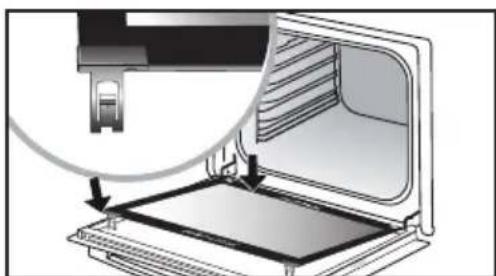
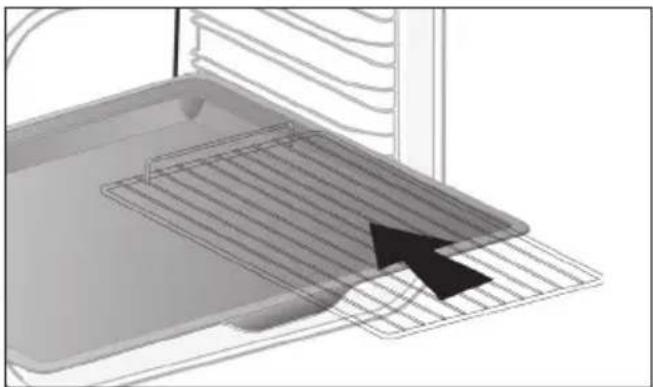
Insert your 2 shelf runners and then put your tray on the 2 rails. The system is now ready to use.
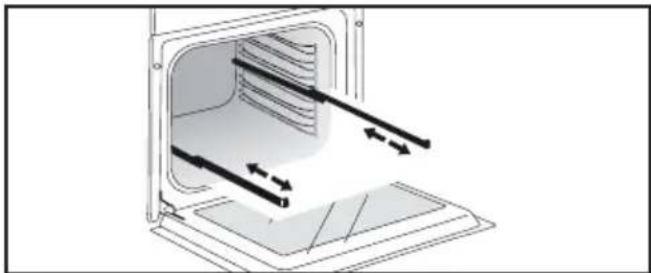
To remove the rails, remove the shelf runners again.
Slightly prize apart the bottom of the tabs fixed on each rail to release them from the shelf runner. Pull the rail towards you.
The accessories may warp with the effect of heat, but this will not alter their function. They will return to their original shape once cooled.
USING THE OVEN FOR THE FIRST TIME
- Select the language
The first time you use your oven or after a power cut, turn the knob to select your language and press to confirm your choice.
Before using your oven for the first time, heat it at maximum temperature while empty for approximately 30 minutes. Make sure that the room is sufficiently ventilated.
- Set the time
Adjust the hours and minutes by turning the knob, then press to confirm.
Your oven displays the time.
SETTINGSMENU(DEPENDONMODEL)
In the general menu, select the "SETTINGS" function by turning the control knob and confirm. Different settings are proposed.
Select the setting you want by turning the control knob then confirm.
Then set your parameters and confirm them.
- Pyrolysis indicator
Activate or deactivate the pyrolysis indicator. When it is activated, the oven uses its technology and sensors to recommend the right time to conduct a pyrolysis cleaning cycle. In this case, the symbol displays on the screen. You will be able to chose between an Auto, 2h or Express pyrolysis if the residual heat in your oven allows it.
- Time
Modify the time; validate then modify the minutes and validate again. If you oven is connected the time updates automatically. You can also put your display on standby:
- Sleep mode
ON position: the display switches off after 90s.
OFF position: the brightness diminishes after 90s.
- Connectivity
See connectivity chapter on p.15
Activate your oven's connectivity. Select "ON" and confirm.
Download the Mobile application "De Dietrich Smart Control" onto your smartphone and follow the instructions.
-Sound
Your oven emits sounds when you use the keys. To keep these sounds, select ON, otherwise select OFF to deactivate them and confirm.
- Brightness
Select the desired brightness level.
- Lamp management
Two setting options are proposed: Position ON, the light stays on throughout cooking (except in ECO mode). AUTO position, the oven light turns off after a period of time when cooking. Choose your position and confirm.
SETTINGSMENU
- Language
Choose your language and confirm.
- DEMO mode
By default, the oven is configured in normal heating mode.
If it is activated in DEMO mode (ON position), the mode for presenting products in stores, your oven will not warm up.
- Diagnostic
Access the Diagnostic menu if a problem occurs.
If you contact the After-Sales Service, you will be asked to provide the codes displayed in the diagnostic.
The "Reinitialise" option lets you reset your oven to factory settings.
CONNECTIVITY
Your oven may be connected at any moment via your Wi-Fi router using the "De Dietrich Smart Control" mobile application which must be installed on your smartphone for you to benefit from the connectivity function.
With this application, you will be able to control your oven remotely via the "De Dietrich Smart Control" application.
You will also be informed through notification messages, of events linked to your oven as if you were next to it. No need to be at home to start, preheat or change your oven's programme. To benefit from these functionalities, let the application guide you to connect your oven.
For more information, consult www.dedietrich-electromenager.com
CONNECTIVITY: QUESTIONS AND ANSWERS
| Questions Troubleshooting and Solutions | ||
| I cannot connect my product | The product's connectivity operates with 2.4 Ghz Wifi, make sure your router is configured with 2.4Ghz Wifi. Try to enter the wifi network parameters again via the application If the oven still cannot connect to your wifi router, the signal may be too weak. Try to move the router closer or install a wifi repeater. | |
| I cannot finalise the creation of my account | The oven can only be controlled by a single account. Use the same account (email address) for your household. | |
| Where can I find the application? | For Android telephones: De Dietrich Smart Control | For IOS telephones: De Dietrich Smart Control II |
| Can I control several appliances with the application? | The application enables you to control different De Dietrich brand connected electrical appliances. | |
Tip: In order to maintain your appliance up to date, you need to connect your product at least once a month.
CONNECTIVITY: QUESTIONS AND ANSWERS
| Questions | Troubleshooting and Solutions |
| I am moving or changing my Wifi network param-eters | - Pair the product again. 1- Reset the product by going into the Settings menu of the oven then Connectivity, and Reset: (see Settings menu). 2- Smartphone application, see Menu, then Product Management, and Reconnect the product. |
| I am selling my product* | - From the application menu, go into "Product management" then "delete my product". - If you have a single product, you can delete your customer account via the application by going into My Account and delete account |
| I cannot find the QR code for the product | - To establish the connection with your oven, the application will ask you to scan its QR code or enter its serial number. This information is on the nameplate, such as shown below, visible when you open the oven door. B: Commercial reference C: Service reference H: Serial number I: QR Code |
Compliance declaration
We, Brandt France, declare the appliance equipped with the Smart Control function complies with directive 2014/53/EU. The full EU declaration of compliance is available on the following website: www.dedietrich-electromenger.com 2.4 Ghz frequency band: Max power: 100mW (20 dbm) Brandt France may not be held liable:
In the event of any data transmission loss, delay or error outside of its control, if this data was not transferred to it for whatever reason, or if the data it receives is illegible or cannot be processed; should the user be unable to access or use the application and associated services for whatever reason, or if the connexion should be suspended or interrupted. Moreover, Brandt France cannot be held liable for any misuse of the terminal and/or incident linked to the use of the terminal when using the application. Brandt France may in no case be held liable for any damage of any kind caused to your terminal and any data stored on it, nor any consequences that may stem from this.
* As a safety measure, each electric appliance can only be connected to a single user account. In the event of a change of user of the appliance (the appliance is sold, for example), the first user must delete his/her user account from his/her mobile application. The new user must ensure the former account was deleted before he/she can create his/her own account by going through the same installation and registration steps as described in this manual. However, a same user account can be used on several smartphones or tablets. In the event of a change of user of the appliance (the appliance is sold, for example), the first user must delete his/her user account from his/her mobile or tablet application.

Note:
Display standby (see settings menu): After 90 seconds without any action by the user, the display brightness decreases to limit power consumption. The Wifi connexion is still maintained.

Tip
If Wifi is activated, you can use the DeDietrich Smart Control function. In standby with the Wifi connexion maintained, the appliance uses 2W maximum.
5 MANUAL COOKING MODE
This mode lets you set the cooking parameters yourself: temperature, cooking type, cooking time. During your navigation, you can directly access this menu by pressing the "M" key.

Pre-heat your oven empty before cooking.
| Position Recommended T°C mini - maxi | Use | ||
| (※) | Combined heat | 205°C 35°C - 230°C | Recommended for meat, fish, vegetables, preferably in an earthenware dish. |
| * | Fan oven* | 180°C 35°C - 250°C | Recommended for keeping white meat, fish and vegetables moist. For cooking multiple items on up to three levels. |
| Traditional | 200°C 35°C - 275°C | Recommended for meat, fish, vegetables, preferably in an earthenware dish. | |
| ECO | ECO* | 200°C 35°C - 275°C | This setting saves energy while maintaining the quality of the cooking. In this setting, pre-heating is not required. |
| Ventilated grill | 200°C 100°C - 250°C | Roasts and poultry are juicy and crisp all over. Slide the drip tray on to the bottom shelf support. Recommended for all spit-roasted poultry or meat, for sealing and thoroughly cooking a leg or a rib of beef. To retain the moist texture of fish steaks. | |
| * | Bottom heat ventilated | 180°C 75°C - 250°C | Recommended for meat, fish, vegetables, preferably in an earthenware dish. |
*Cooking mode as per standard EN 60350-1: 2016 to demonstrate compliance with requirements of the energy label of European regulation UE/65/2014.
Never place tin foil directly in contact with the oven floor as the build up of heat may damage the enamel.

Advice on how to save energy
Avoid opening the door during cooking to avoid heat escaping from the oven.
5 MANUAL COOKING MODE
| Position Recommended T°C mini - maxi | Use | |
| Variable grill | 4 1 - 4 | Recommended for grilling cutlets, sausages, toasting bread and prawns placed on the grill. Cooking controlled by the upper element. The grill covers the entire shelf surface. |
| Keep warm | 60°C 35°C - 100°C | Recommended for letting dough rise for bread, brioche, kügelhopf. |
| Air Fry | 200°C 180°C - 220°C | Ideal for tasty and healthy cooking, this programme associated with the use of the perforated tray enables you to cook and brown your vegetables, chips, breaded food and tempuras in your over without (or with very little) fat. |
| Defrost | 35°C 30°C - 50°C | Ideal for delicate dishes (fruit tarts, custard pies, etc.). Meat, rolls, etc. are defrosted at 50°C (meat should be placed under the grill with a dish underneath to catch the drips). |
| Dough proofing | 40°C | Programme recommended for all types of dough to rise, such as bread, brioche, pizza, kouglof, etc. Place your dish directly onto the bottom of the oven. |
| Drying | 80°C 35°C - 80°C | Sequence to dehydrate certain food items such as fruits, vegetables, roots, seasoning plants and herbs. Refer to the specific drying table on p 18. |
START A COOKING PROGRAMME
IMMEDIATE COOKING
When you have selected and validated your cooking function, example: Ventilated floor, press the knob to confirm, preheating starts; a beep informs you the oven has reached the set temperature. You can now place your dish in the oven at the recommended shelf height.
NB: Some settings can be modified before starting cooking
(temperature, cooking time and delayed start) see following chapters.
CHANGING THE TEMPERATURE
Based on the type of cooking you already selected, the oven will recommend the ideal cooking temperature.
This can be adjusted as follows: Select temperature and confirm.
Turn the control knob to change the temperature then confirm your choice.
COOKING TIME
You can enter the cooking time for your dish by selecting time, then turn the control knob to set your cooking time and confirm.
SETTING THE COOKING END TIME (delayed start)
When you set the cooking time, the end of cooking time automatically adjusts. You can change the end of cooking time if you want to delay the programme start.
- Select cooking end time and confirm.
Once you have set the cooking end time, confirm. The cooking end time remains displayed.
NB: You may start cooking without selecting a duration or end time.
In this case, when you feel that you have cooked your dish for long enough, stop cooking (see the "Stopping cooking in progress" chapter).
STOPPING COOKING IN PROGRESS
To stop a cooking programme in progress, press the control knob.
Select "STOP".
Confirm by selecting "YES" then validate or select "NO" and validate to continue cooking.
AIR FRY FUNCTION
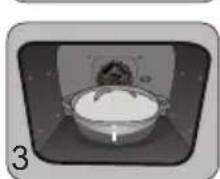
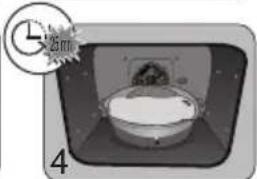
Place your food directly onto the perforated tray by spreading the items out without overlapping, select the Air Fry cooking mode and set the temperature between 180^ and 220^ . Insert the perforated tray at level 5 and the drip tray at level 3 to catch any cooking residues.
AIR FRY INDICATIVE TABLE
at 200^ preheating to be considered except *
| Duration Weight | |
| Chicken wings 25 min 500 g | |
| Fresh chips 30 min 700 g | |
| Frozen chips 30 min 700 g | |
| Fresh sliced vegetables (courgettes / aubergines / peppers) | 30 min* 500 g |
| Chicken nuggets 10 min 250 g | |
| Breaded fish 15 min 250g / 2 | portions |
DRYING FUNCTION
Drying is one of the oldest methods of preserving food. The aim is to remove all or some of the water in the food to preserve foodstuffs and prevent the development of microbes. Drying preserves the nutritional qualities of food (minerals, proteins and other vitamins). It allows food to be stored in optimal conditions thanks to their reduced size and makes food easy to use once re-hydrated.
Only use fresh food.

Only use fresh food.
Wash the food carefully, drain and wipe. Cover the grill in parchment paper and distribute the cut food evenly on top.
Use shelf level 1 (if you have several grill pans, put them on levels 1 and 3).
Turn the moist food over several times during drying. The values provided in the table may vary depending on the type of food to dehydrate, its maturity, its thickness and its humidity rate.
GUIDE TABLE TO DEHYDRATE YOUR FOOD
| Fruits, vegetables and herbs Temperature Time in hours | Accessories | |
| Fruits with seeds (3 mm thick slices, 200 g per grill pan) | 80°C 5-9 1 or 2 grill pans | |
| Fruits with stones (plums) 80°C 8-10 1 or 2 grill pans | ||
| Root vegetables (carrots, parsnips) grated, blanched | 80°C 5-8 1 or 2 grill pans | |
| Sliced mushrooms 60°C 8 | 1 or 2 grill pans | |
| Tomato, mango, orange, banana | 60°C 8 | 1 or 2 grill pans |
| Sliced red beetroot | 60°C 6 | 1 or 2 grill pans |
| Herbs | 60°C 6 | 1 or 2 grill pans |
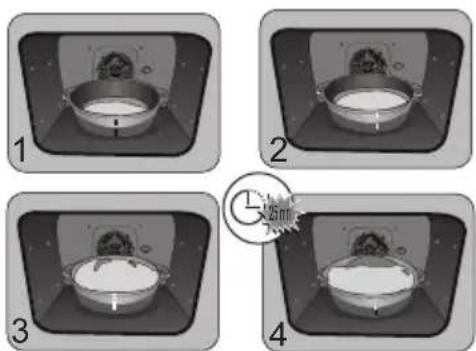
PRESENTATION OF THE AUTOMATIC MODE
In the AUTO mode, you will find many varied recipes sorted into categories, which you can cook in different ways. The oven AI will offer you automatically a preselected automatic cooking mode or alternatives to be selected from the navigation interface.
AI SENSOR
This mode will completely simplify cooking for you because the oven will automatically calculate all the cooking parameters (temperature, cooking time, cooking mode) based on the selected dish thanks to its electronic sensors located in the oven that constantly measure the moisture level and temperature variations.
Cooking must ABSOLUTELY begin in a cool oven.
LOW TEMPERATURE
For a recipe managed completely by the oven using a specific electronic programme.
This cooking mode makes meat fibres tender thanks to slow cooking at low temperature. Cooking quality is optimal.
Cooking must ABSOLUTELY begin in a cool oven.
Cooking at low temperature requires food to be extremely fresh. For poultry, it is important to rinse the outside and inside with cold water and to dry with absorbent paper before cooking.
AI
This mode selects for you the suitable cooking parameters based on the food to be prepared. For some types of food, some additional parameters must be entered (weight, size, etc.)
PRESENTATION OF DISH CATEGORIES
In the general menu, select the "AUTO" function by turning the control knob and confirm. Different dish categories are available to you:
- Meat, Fish, Dishes, Bread & Doughs, Desserts, World Recipes. Select the setting you want by turning the control knob then confirm.

Tip
Before inserting your dish, for all cooking programmes, the oven indicates which shelf level to place your dish on
| MEAT AI SENSOR AI | LOW TEMPERATURE | ||
| MEAT TERRINE | O | ||
| SHOULDER OF LAMB | O | ||
| DE-BONED LEG OF LAMB O | O | ||
| LEG OF LAMB ON THE BONE O | O | ||
| VEAL RIBS | O | ||
| VEAL ROAST | O | O | |
| PORK SHANK | O | ||
| PORK LOIN | O | ||
| FILET MIGNON | O | O | |
| PORK ROAST O O O | |||
| BEEF ROAST O O O | |||
| Poultry O O O | |||
| DUCK | O | ||
| DUCK BREAST | O | ||
| TURKEY LEG | O | ||
| TURKEY | O | ||
| GOOSE | O | ||
RECOMMENDATIONS FOR THE AI SENSOR MODE
De-boned leg of lamb(2 cooking modes):
1.4 kg to 1.8kg
Well done de-boned leg of lamb
Pink de-boned leg of lamb
Select a leg that is round and plump rather than long and lean. Place the leg in the drip tray.
Let sit after cooking.
Roast pork
700 g to 1.4kg
Loin, fillet
Place the roast on the grill using the grill ^+ drip tray assembly. At the end of cooking, allow the meat to sit for 7 to 10 minutes before carving. Add salt when cooking is finished.
Leg of lamb on the bone(2 cooking modes):
2 kg to 2.8kg
Well done leg of lamb on the bone Pink leg of lamb on the bone
Select a leg that is round and plump rather than long and lean. Place the leg in the drip tray.
Let sit after cooking.
Roast beef (3 cooking modes):
(800 g to 1.6 kg) Rare beef
Medium beef
Well done beef
Trim away as much fat as possible: it causes smoke.
Place the roast in the drip tray.
Once cooked, allow the meat to sit for 7 to 10 minutes before carving.
Chicken
Chickens from 1.4kg to 2.5kg
Duck, guinea fowl
Place the chicken on the rack of the rack + drip tray assembly.
Pierce the skin of poultry to avoid splattering.
PRESENTATION OF DISH CATEGORIES
| FISH AI SENSOR | AI | LOW TEMPERATURE | |
| TROUT O O O | |||
| SALMON O O O | |||
| LARGE FISH O O O | |||
| SMALL FISH O O O | |||
| SEA BASS O O O | |||
| LOBSTER | O | ||
| FISH TERRINE | O |
RECOMMENDATIONS FOR THE AI SENSOR MODE
Fish
400 g to 1kg
Whole fish (bream, hake, trout, mackerel, fish roasts). Not suitable for flat fish.
Only use this function with whole fish.
Use the multi-purpose tray.
PRESENTATION OF DISH CATEGORIES
| TYPE OF FOOD AI SENSOR AI | LOW TEMPERATURE | ||
| STUFFED VEGETABLES O O | |||
| VEGETABLE GRATIN | O | ||
| STUFFED TOMATOES O O | |||
| LASAGNE | O | ||
| MEAT PIE | O | ||
| SAVOURY TART O O | |||
| CHEESE TART O O | |||
| QUICHE O O | |||
| PIZZA O O | |||
| POTATO GRATIN | O | O | |
| MOUSSAKA | O | ||
| SOUFFLE O O | |||
RECOMMENDATIONS FOR THE AI SENSOR MODE
Pizza
300 g to 1.2kg
Store-bought pizza - fresh dough
Ready-to-use pizza dough
- "Home-made" pizza dough
Place it on the grill for a crispy crust (you can place a sheet of parchment paper between the grid and the pizza to protect the oven from cheese drippings).
Savoury tart
Fresh quiches
Frozen quiches
Use a non-stick aluminium mould:
the crust will be crispy on the bottom.
Remove the tray from frozen quiches before placing them on the grid.
Stuffed vegetables
Stuffed tomatoes, stuffed peppers
Fish pie.
Properly adjust the dimensions of the dish to the quantity of food to be cooked to avoid juices spilling over.
PRESENTATION OF DISH CATEGORIES
| TYPE OF FOOD AI SENSOR AI | LOW TEMPERATURE | ||
| BRIOCHE | O | ||
| BAGUETTES | O | ||
| BREAD | O | ||
| SHORTCRUST PASTRY | O | ||
| PUFF PASTRY | O | ||
PRESENTATION OF DISH CATEGORIES
| DESSERTS AI SENSOR AI | LOW TEMPERATURE | |
| YOGHURT | 0 | |
| RUM BABA | 0 | |
| KOUGLOF | 0 | |
| BASQUE CAKE | 0 | |
| GALETTE DES ROIS | 0 | |
| FAR BRETON | 0 | |
| KOUIGN AMANN | 0 | |
| CLAFOUTIS | 0 | |
| CHOCOLATE FONDANT | 0 | |
| SPONGE CAKE | 0 | |
| APPLE CAKE O O | ||
| POUND CAKE O O | ||
| LOAF CAKE O O | ||
| CHOCOLATE CAKE O O | ||
| YOGHURT CAKE O O | ||
| TATIN TART | 0 | |
| FRUIT CRumble | 0 | |
| FRUIT PIE O O | ||
| BISCUITS/COOKIES O O | ||
| CUPCAKES | 0 | |
| MADELEINES | 0 | |
| FINANCIERS | 0 | |
| MACARONS | 0 | |
| CANNELES | 0 | |
| CHOUX PASTRY | 0 | |
| MERINGUES | 0 | |
| CRÈME BRULÉES | 0 | |
| CRÈME CARAMEL | 0 |
Select the "WORLD RECIPES" mode to discover dishes from around the world through all our recipes. Simply select the recipe and its weight, and the oven will select the most suitable parameters.
Find the "World Recipes" mode on the DE DIETRICH SMART CONTROL application to follow these step-by-step recipes specially designed for your oven.
| WORLD RECIPES SWEET | COUNTRY |
| Babka Poland | |
| Baklava Turkey | |
| Brioche Switzerland | |
| Chokladfarn Sweden | |
| Chrik Algeria | |
| Papaya flan Madagascar | |
| Jablecznik Poland | |
| Kanelbullar Sweden | |
| Kapflern Germany | |
| Orange blossom kourabies Greece | |
| Malva pudding South Africac | |
| Marzipan Buchteln Germany | |
| Miguelitos Spain | |
| Panettone Italy | |
| Pastéis de nata Portugal | |
| Pudding Great Britain | |
| Robinson | France Martinique |
| Rocher coco | Congo |
| Scones | Great Britain |
| Stollen | Germany |
| Tarta de Santiago | Spain |
| Torta della nonna | Italy |

Tip
You can also select world recipes per country
| WORLD RECIPIES SAVOURY | COUNTRY |
| Bacalhau Portugal | |
| Baeckeoffe France | |
| Börek Turkey | |
| Canneloni Italy | |
| Carbonade Belgium | |
| Empanadas de carne Argentina | |
| Fabada asturiana Spain | |
| Moroccan-style leg of lamb Morocco | |
| Karaage Japan | |
| Salmon koulibiac Russia | |
| Lacquered salmon fillets Japan | |
| Chicken curry India | |
| Chicken tandoori India | |
| Tikka massala chicken India | |
| Sausage rougail | France Reunion Island |
| Vegetable tian | France |
The "AUTO" function selects for you the suitable cooking parameters based on the food to be prepared.
IMMEDIATE COOKING
Select the "AUTO" mode when you are in the general menu then confirm.
The oven suggests several categories of dishes (Meat, Fish, Dishes, Bread & Doughs, Desserts, World Recipes):
Your oven offers the AI sensor cooking mode in priority so there are no settings for you to adjust. Simply press 'Start cooking'. The shelf height displays, insert your dish and confirm.
Do not open the oven door during an AI sensor cooking programme.
Depending on the dish selected or the oven status (already preheated), the AI
mode suggests a default weight which you will need to adjust if necessary before confirming. The oven automatically calculates the cooking time and temperature parameters. The shelf height displays, insert your dish and confirm.
- The oven beeps and turns off when the cooking time is finished; your screen then indicates that the dish is ready.

For certain AI recipes, the oven is to be preheated before you place a dish in it.
You may open your oven to baste your dish at any time during cooking.
COOKING END OPTIONS (ACCORDING TO THE TYPE OF COOKING)
Once cooked in both the manual and Auto mode, the oven offers three options to adjust to the expected result: CRISP, KEEP WARM and ADD 5 MIN.
CRISP
You can brown a dish once cooked with the "Crisp" function.
Select a cooking function, add the temperature and set a cooking time. Then select the "Crisp" function and confirm by pressing the control knob.
Cooking starts. A symbol displays at the bottom right of the screen and the grill will automatically switch on during the 5 last minutes of your cooking time.

Note:
The 'CRISP' option may be configured at the start of cooking, during cooking or at the end of the set cooking time.
KEEP WARM
Once cooked, you can select the "KEEP WARM" option, which enables you to leave your dish in the oven without overcooking it. The oven temperature will adjust to an eating temperature until you are ready.
ADD 5 MIN (only in manual mode) You can select the "ADD 5 MIN" option at the end of your cooking with a set time. By activating "ADD 5 MIN", the oven will use the same cooking mode and temperature settings for 5 more minutes. You may press this again if necessary.

FAVOURITES
AVAILABLE FOR THE MANUAL AND AUTO MODES
The "Favourites" function lets you save 3 manual cooking modes and 3 auto cooking modes that you make frequently.
During a manual or auto cooking programme, press the control knob and turn it to "Add to favourites". To save it, press to confirm.
Your cooking is then memorised as "FAVORI MANUAL 1".
Confirm again to start cooking.
NB: If the 3 favourites are already used up, any new memorisation will replace the favourite you selected.
TIMER FUNCTION
This function can only be used when the oven is off.
- Select the "TIMER" function by turning the control knob and confirm.
00:00 is displayed on the screen.
Set the minute minder by turning the knob and then press to confirm. The timer starts.
Once the time has lapsed, there is a sound signal. To stop it, press any key.
Note: You can modify or cancel the minute minder at any time.
To cancel, return to the minute mindermenu and set to 00:00.
If you press the control knob during the countdown you will stop the minute minder.
CLEANING AND MAINTENANCE:
EXTERNAL SURFACE
Use a window washing product applied to a soft cloth. Do not use abrasive creams or scouring sponges.
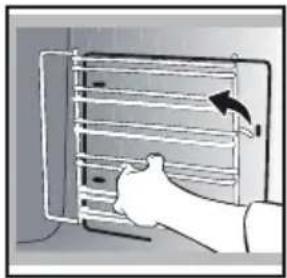
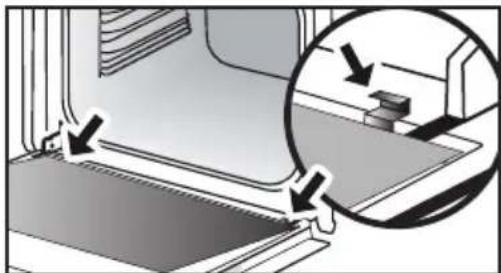
REMOVING THE SHELF RUNNERS
Side liners with shelf runners:
Lift the front part of the shelf runner upwards. Press the entire shelf runner and release the front hook from its housing. Then, gently pull the whole of the shelf runner towards you to release the rear hooks from their housing. Pull out the two shelf supports.
CLEANING THE OVEN DOOR GLASS PANELS

Warning
Do not use scouring products, abrasive sponges or metal scrapers to clean the glass oven door as this could scratch the surface and cause the glass to shatter.
Before doing this, remove any excess grease on the inside panel with a soft cloth and washing up liquid.
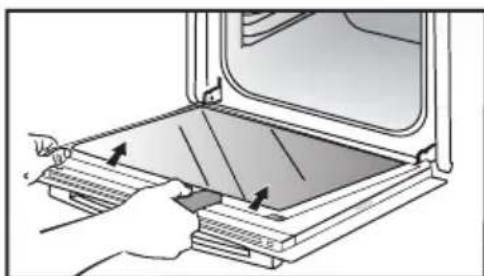
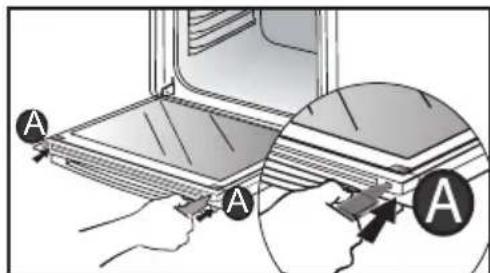
To clean the different inside glass panels, disassemble them as follows:
Open the door fully and block it with one of the plastic wedges provided in your appliance's plastic pouch.
Remove the first clipped glass panel: Using the other wedge (or a screwdriver), press into the slots A to unclip the glass.

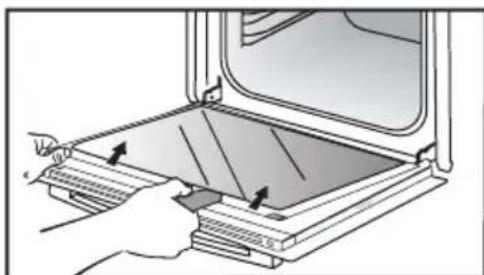
Remove the glass panel. The door consists of two additional glass panels, with a black rubber spacer at each corner.
9 CARE
If necessary, remove them to clean them.
Do not soak the glass panels in water. Rinse with clean water and dry off with a lint-free cloth.
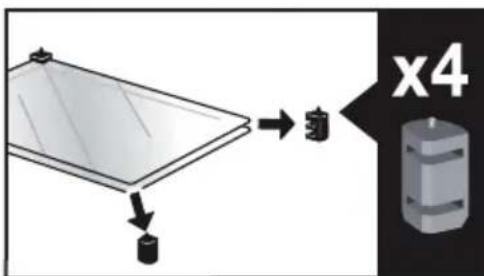
After cleaning, reposition the four rubber stops with the arrows upwards and reposition all of the glass panels.
Insert the last panel into the metal stops, then clip it in, with the side with "PYROLYTIC" facing you and legible.
Remove the plastic wedge.
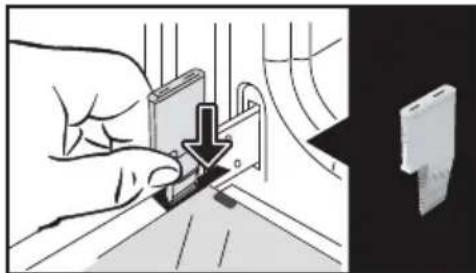
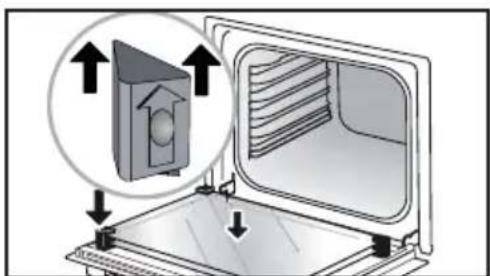
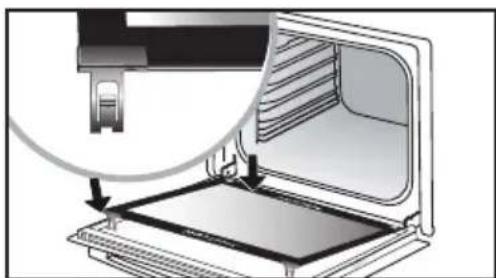
REMOVING AND REFITTING THE "SENSOR" PLATE
You can remove the "SENSOR" plate which informs your of the presence of a humidity sensor linked to the AI SENSOR mode. To clean it, use the plastic wedge provided to remove the door.

Removal:
Slide the wedge between the "SENSOR" plate and the top of the oven and push down to unclip it.
Refitting: Grab the "SENSOR" plate and firmly insert the notches into the corresponding housings at the top.
PYROLYTIC SELF-CLEANING
Remove the accessories and supports from the oven before beginning pyrolysis cleaning. Before starting a pyrolysis cleaning cycle, make sure that any accessories that are not pyrolysis safe have been removed from the oven (sliding rails, chrome-plated racks) as well as any cookware.
This oven is equipped with a pyrolytic self-cleaning function: Pyrolysis is a cycle during which the oven cavity is heated to a very high temperature in order to eliminate soiling from splattering and spills. Before starting pyrolysis cleaning, remove any large overspills, if any. Remove the excess grease on the door using a damp sponge. As a safety measure, cleaning only occurs after the door locks automatically; it is impossible to unlock the door.
Three pyrolysis cycles are proposed. The durations are pre-selected and cannot be modified:
PERFORM A SELF-CLEANING CYCLE

Pyro Auto: between 1h30 and
2h15 for an energy-saving cleaning cycle.

Pyro Express: This function, which
is also accessible once cooking is finished, uses the heat built up during a previous cooking cycle to quickly and automatically clean the inside of the oven: it cleans a mildly dirty cavity in less than an hour.
If the heat inside your oven is sufficient: this pyrolysis takes as little as 59 min, and up to 1h30.

Pyro 2H: in 2h for more in-depth
cleaning of the inside of the oven.
IMMEDIATE SELF CLEANING
Select the "CLEANING" function when you are in the general menu then confirm.
- Select the most suitable self cleaning cycle, for example PYRO AUTO, and confirm.
The pyrolysis cycle begins. The time starts to count down immediately it is set.
During pyrolysis, the symbol displays in the programmer to indicate that the door is locked.
After the pyrolysis, a cooling phase occurs during which your oven remains unavailable.
SELF CLEANING WITH DELAYED START
Follow the instructions described in the previous section.
Select the cooking end time.
Set the pyrolysis end time you want with the control knob and confirm.
After a few seconds, the oven
goes into standby and the start of pyrolysis is delayed so that it finishes at the set time.
When the pyrolysis is complete, switch your oven off by pressing the key.
When the oven is cool, use a damp cloth to remove the white ashes. The oven is clean and once again ready for the cooking application of your choice.
REPLACING THE LIGHT BULB

Warning: Make sure the appliance
is disconnected from the power supply before replacing the bulb in order to avoid the risk of electric shock. Change the lamp only when the appliance has cooled down.
Bulbdetails:25W,220-240V\~ 300^, G9.
You can replace the bulb yourself.
Unscrew the view port and remove the bulb (use a rubber glove, which will make it easier
to remove). Insert the new bulb and replace the view port.
This product contains a light source with energy rating G.
. 10 TROUBLESHOOTING AND SOLUTIONS
| Questions | Troubleshooting and Solutions |
| "AS" is displayed (Auto Stop system). | This function stops heating the oven if you forget to switch it off. Turn your oven to STOP. |
| Default code starting with "F". | Your oven has detected a problem. Stop the oven for 30 minutes. If the fault is still there, cut off the power supply for at least one minute. If the fault persists, contact the After Sales Service. |
| The oven is not heating. | Check that the oven is correctly connected and that your installation's fuse is not out of service. Check that the oven is not set to "DEMO" mode (see settings menu). |
| The oven light is not working. | Replace the bulb or the fuse. Check that the oven is correctly connected. See chapter on replacing the light bulb. |
| The cooling fan continues to operate after the oven stops. | This is normal. It can work for up to one hour after cooking to cool down the oven. If it continues beyond this, contact the After Sales Service. |
COOKING TIPS FOR THE MANUAL MODE
| TYPE OF FOOD | Cooking timein minutes | |||||||||||||
| ℃ | LEVEL | ℃ | LEVEL | ℃ | LEVEL | ℃ | LEVEL | ℃ | LEVEL | ℃ | LEVEL | |||
| MEAT | Roast pork (1 kg) 200 2 | 190 2 | 60 | |||||||||||
| Roast veal (1 kg) 200 2 | 190 2 | 60-70 | ||||||||||||
| Roast beef 240 2 | 200 2 | 30-40 | ||||||||||||
| Lamb (leg, shoulder 2.5 kg) 2 | 20 2 220 2 | 200 2 | 210 2 | 60 | ||||||||||
| Poultry (1kg) 200 3 220 3 | 210 3 | 185 3 | 60 | |||||||||||
| Chicken thighs | 220 3 | 210 3 | 20-30 | |||||||||||
| Pork/veal chops | 210 3 | 20-30 | ||||||||||||
| Beef ribs (1 kg) | 210 3 | 210 3 | 20-30 | |||||||||||
| Mutton ribs | 210 3 | 20-30 | ||||||||||||
| FISH | Grilled fish | 275 4 | 15-20 | |||||||||||
| Cooked fish (bream) | 200 3 | 190 3 | 30-35 | |||||||||||
| Fish papillotte | 220 3 | 200 3 | 15-20 | |||||||||||
| VEGETABLES | Gratins (precooked ingredients) | 275 2 | 30 | |||||||||||
| Potato gratins | 200 3 | 180 3 | 45 | |||||||||||
| Lasagne | 200 3 | 180 3 | 45 | |||||||||||
| Stuffed tomatoes 170 3 | 170 3 | 30 | ||||||||||||
| PASTRIES AND CACES | Sponge cake - Génoise | 180 3 | 180 | 4 35 | ||||||||||
| Swiss roll | 220 3 | 180 2 | 190 | 3 5-10 | ||||||||||
| Brioche | 180 3 | 200 3 | 180 3 | 180 | 3 35-45 | |||||||||
| Brownies | 180 2 | 180 2 | 20-25 | |||||||||||
| Cake - Pound cake | 180 3 | 180 3 | 180 | 3 45-50 | ||||||||||
| Clafoutis | 200 3 | 190 3 | 30-35 | |||||||||||
| Cookies - Shortbread | 175 3 | 170 3 | 15-20 | |||||||||||
| Kugelhopf | 180 2 | 40-45 | ||||||||||||
| Meringues | 100 4 | 100 4 | 100 | 4 60-70 | ||||||||||
| Madeleines | 220 3 | 210 3 | 5-10 | |||||||||||
| Choux pastry | 200 3 | 180 3 | 200 | 3 30-40 | ||||||||||
| Individual puff pastry | 220 3 | 200 3 | 5-10 | |||||||||||
| Savarin cake 180 3 | 175 3 | 180 | 3 30-35 | |||||||||||
| Shortcrust pastry tart 200 1 | 200 1 | 30-40 | ||||||||||||
| Thin puff pastry tart | 215 1 | 200 1 | 20-25 | |||||||||||
| VARIOUS | Terrine pâté | 200 2 | 190 2 | 80-100 | ||||||||||
| Pizza | 240 1 | 15-18 | ||||||||||||
| Quiche | 190 1 | 180 1 | 190 1 | 35-40 | ||||||||||
| Soufflé | 180 2 | 50 | ||||||||||||
| Pie | 200 2 | 190 2 | 40-45 | |||||||||||
| Bread | 220 2 | 220 2 | 30-40 | |||||||||||
| Toasted bread | 275 | 4-5 | 2-3 | |||||||||||
Note: Before putting them in the oven, all meats must be kept at room temperature for at least one hour.
* Depending on model
FUNCTIONAL SUITABILITY TESTS IN ACCORDANCE WITH IEC/ EN 60350 STANDARD
| FOOD | COOKING MODE | LEVEL ACCESSIONS °C Min. TIME PREHEATING | |||
| Short-bread (8.4.1) | 5 | 45-mm pan | 150 30-40 yes | ||
| Short-bread (8.4.1) | 5 | 45-mm pan | 150 25-35 yes | ||
| Short-bread (8.4.1) | 2+ 5 | 45 mm pan + wire rack | 150 25-45 yes | ||
| Short-bread (8.4.1) | 3 | 45-mm pan | 175 25-35 yes | ||
| Short-bread (8.4.1) | 2+ 5 | 45 mm pan + wire rack | 160 30-40 yes | ||
| Small cakes | 5 | 45-mm pan | 170 25-35 yes | ||
| Small cakes | 5 | 45-mm pan | 170 25-35 yes | ||
| Small cakes | 2+ 5 | 45 mm pan + wire rack | 170 20-40 yes | ||
| Small cakes | 3 | 45-mm pan | 170 25-35 yes | ||
| Small cakes | 2+ 5 | 45 mm pan + wire rack | 170 25-35 yes | ||
| Fat-free sponge cake (8.5.1) | 4 | wire rack | 150 30-40 yes | ||
| Fat-free sponge cake (8.5.1) | 4 | wire rack | 150 30-40 yes | ||
| Fat-free sponge cake (8.5.1) | 2+ 5 | 45 mm pan + wire rack | 150 30-40 yes | ||
| Fat-free sponge cake (8.5.1) | 3 | wire rack | 150 30-40 yes | ||
| Fat-free sponge cake (8.5.1) | 2+ 5 | 45 mm pan + wire rack | 150 30-40 yes | ||
| Apple pie (8.5.2) | 1 | wire rack | 170 90-120 yes | ||
| Apple pie (8.5.2) | 1 | wire rack | 170 90-120 yes | ||
| Apple pie (8.5.2) | 3 | wire rack | 180 90-120 yes | ||
| Browned surface (9.2.2) | 5 | wire rack | 275 3-6 yes | ||
- Depending on model
NOTE: When cooking on 2 levels, dishes can be removed at different times.
Recipe with yeast (depending on model)
Ingredients:
Flour 2 kg Water 1240 ml Salt 40 g 4 packs of dried baker's yeast Mix the dough with an electric mixer and proof it in the oven.
Method: For yeast-based pastry recipes. Place the dough in a heat-resistant dish, remove the shelfrunner supports and place the dish on the oven floor. Pre-heat the oven to 40 - 50^ with the circulating heat function for five minutes. Stop the oven and allow the dough to rise for 25-30 minutes thanks to the residual heat.
| Domestic Electric Oven - Product Fiche As per the Commission Delegated Regulation (EU) N° 65/204 | |
| Trade Mark | DE DIETRICH |
| Commercial code | DOP4756* |
| Energy Efficiency Index (EEI cavity) | 81,4 |
| Energy Efficiency Class | A+ |
| Energy consumption per cycle in conventional mode | 0,70kWh |
| Energy consumption per cycle in fan-forced convection mode | 1,10kWh |
| Number of cavities | 1 |
| Heat source(s) per cavity | Electric |
| Volume of the cavity | 73l |
| European Union eco-label | |

TILBEHØR (IFØLGE MODELLEN)
TILBEHØR (IFØLGE MODELLEN)
SYSTEM MED GLIDESKINNER
Position ON, displayet slukker after 90 sekunder.
Position OFF, lysstyrken reduceres after 90 sekunder.
Lille and, perlehone
GODE RÄD FOR TILBEREDNING I MANUEL FUNKTION
| RETTER | * | ** | *** | *** | *** | Tilbered-ningstidi minutter | |||||||
| °C | NVEAU | °C | NVEAU | °C | NVEAU | °C | NVEAU | °C | NVEAU | ||||
| KÖD | Svinesteg (1 kg) 200 2 | 190 2 | 60 | ||||||||||
| Kalvesteg (1 kg) 200 2 | 190 2 | 60-70 | |||||||||||
| Oksesteg 240 2 | 200 2 | 30-40 | |||||||||||
| Lam (kolle, bov 2,5 kg) 220 2 | 220 2 | 200 2 | 210 2 | 60 | |||||||||
| Fjerkræ (1 kg) 200 3 220 3 | 210 3 | 185 3 | 60 | ||||||||||
| Kyllingelår | 220 3 | 210 3 | 20-30 | ||||||||||
| Svine/kalvekoteletter | 210 3 | 20-30 | |||||||||||
| Oksekoteletter (1 kg) | 210 3 | 210 3 | 20-30 | ||||||||||
| Färekoteletter | 210 3 | 20-30 | |||||||||||
| FISK | Grillet fisk | 275 4 | 15-20 | ||||||||||
| Kogt fisk (havrude/brasen) 200 3 | 190 3 | 30-35 | |||||||||||
| Indpakket fisk 220 3 | 200 3 | 15-20 | |||||||||||
| GRÖNSAGER | Gratiner (tilberedte mad-varer) | 275 2 | 30 | ||||||||||
| Kartoffelgratin 200 3 | 180 3 | 45 | |||||||||||
| Lasagner | 200 3 | 180 3 | 45 | ||||||||||
| Farserede tomater | 170 3 | 170 3 | 30 | ||||||||||
| KAGER | Sukkerbrødskage - Sand-kage | 180 3 | 180 | 4 35 | |||||||||
| Rullede småkager | 220 3 | 180 2 | 190 | 3 5-10 | |||||||||
| Brioche | 180 3 | 200 3 | 180 3 | 180 | 3 35-45 | ||||||||
| Brownies 180 2 | 180 2 | 20-25 | |||||||||||
| Cake - Pund-til-pund | 180 3 | 180 3 | 180 | 3 45-50 | |||||||||
| Clafoutis | 200 3 | 190 3 | 30-35 | ||||||||||
| Cookies - tørkager | 175 3 | 170 3 | 15-20 | ||||||||||
| Kugelhopf | 180 2 | 40-45 | |||||||||||
| Marengs | 100 4 | 100 4 | 100 | 4 60-70 | |||||||||
| Madeleinekager | 220 3 | 210 3 | 5-10 | ||||||||||
| Vandbakkelser | 200 3 | 180 3 | 200 | 3 30-40 | |||||||||
| Petit fours af butterdej | 220 3 | 200 3 | 5-10 | ||||||||||
| Savarinkage | 180 3 | 175 3 | 180 | 3 30-35 | |||||||||
| Mørdej | 200 1 | 200 1 | 30-40 | ||||||||||
| Butterdej til tætere | 215 1 | 200 1 | 20-25 | ||||||||||
| DIVERSE | Postej | 200 2 | 190 2 | 80-100 | |||||||||
| Pizza | 240 1 | 15-18 | |||||||||||
| Quiche | 190 1 | 180 1 | 190 1 | 35-40 | |||||||||
| Soufflé | 180 2 | 50 | |||||||||||
| Pie | 200 2 | 190 2 | 40-45 | ||||||||||
| Brød | 220 2 | 220 2 | 30-40 | ||||||||||
| Ristet brød | 275 | 4-5 | 2-3 | ||||||||||
N.B.: Alt skd kal vare mindst 1 time i stuetemperatur, for det saettes i ovenen. * Ifolge modellen
PRAESTATIONSPRØVNING IFØLGE NORMEN IEC/EN 60350
| MADVARE | TILBERED-NINGS-FUNCTION | NIVEAU TILBEHØR °C VARIGHED | min. | FORVARMNING | |
| Sandkage (8.4.1) | 5 place 45 mm 150 30-40 ja | ||||
| Sandkage (8.4.1) | 5 place 45 mm 150 25-35 ja | ||||
| Sandkage (8.4.1) | 2 + 5 plade 45 mm + rst 150 | 25-45 ja | |||
| Sandkage (8.4.1) | 3 place 45 mm 175 25-35 ja | ||||
| Sandkage (8.4.1) | 2 + 5 plade 45 mm + rst 160 | 30-40 ja | |||
| Små kager (8.4.2) | 5 place 45 mm 170 25-35 ja | ||||
| Små kager (8.4.2) | 5 place 45 mm 170 25-35 ja | ||||
| Små kager (8.4.2) | 2 + 5 plade 45 mm + rst 170 | 20-40 ja | |||
| Små kager (8.4.2) | 3 place 45 mm 170 25-35 ja | ||||
| Små kager (8.4.2) | 2 + 5 plade 45 mm + rst 170 | 25-35 ja | |||
| Blød, fedtfattig kage (8.5.1) | 4 rst 150 30-40 ja | ||||
| Blød, fedtfattig kage (8.5.1) | 4 rst 150 30-40 ja | ||||
| Blød, fedtfattig kage (8.5.1) | 2 + 5 plade 45 mm + rst 150 | 30-40 ja | |||
| Blød, fedtfattig kage (8.5.1) | 3 rst 150 30-40 ja | ||||
| Blød, fedtfattig kage (8.5.1) | 2 + 5 plade 45 mm + rst 150 | 30-40 ja | |||
| Æblepie (8.5.2) | 1 rst 170 90-120 ja | ||||
| Æblepie (8.5.2) | 1 rst 170 90-120 ja | ||||
| Æblepie (8.5.2) | 3 rst 180 90-120 ja | ||||
| Gratineret overflade (9.2.2.) | 5 rst 275 3-6 ja |
ZUBEHÖR (JE NACH MODELL)
ZUBEHÖR (JE NACH MODELL)
IAPOYsIAH TON KATHROPIQN DAHTQN
IAPOYsIAH TON KATHROPIQN DAHTON
IAPOYsIAH TON KATHROPIQN DAHTQN
TnV oOvN eUparicetai n evdelta0m00s.
5 MANUALINEN KYPSENNYSTILA 17
Suorapainike MANUALISEENTilaan
. 5 MANUALINEN KYPSENNYSTILA
5 MANUALINEN KYPSENNYSTILA
KYPSENNYKSEN KESTOAIAKA
Pitsa, "talon" taikina
SAATAVILLA MANUAALISESSA JA AUTOMAATTISESSA TILASSA
MANUALISEN TILAN KYPSENNYSVINKKI
| RUOKALAJIT | * | ** | * | ** | ** | * | Kypsen-nys-alka minu-teissa | ||||||||
| TASO | TASO | TASO | TASO | TASO | TASO | ||||||||||
| LIHARUAT | Porsaanpaisti (1 kg) 200 2 | 190 2 | 60 | ||||||||||||
| Vasikanpaisti (1 kg) 200 2 | 190 2 | 60-70 | |||||||||||||
| Naudanpaisti 240 2 | 200 2 | 30-40 | |||||||||||||
| Lammas (reisi, lava 2,5 kg) 220 2 220 2 | 200 2 | 210 2 | 60 | ||||||||||||
| Linnunliha (1 kg) 200 3 220 3 | 210 3 | 185 3 | 60 | ||||||||||||
| Kanankoivet | 220 3 | 210 3 | 20-30 | ||||||||||||
| Porsaan- tai vasikankyljykset | 210 3 | 20-30 | |||||||||||||
| Naudankyljykset (1 kg) | 210 3 | 210 3 | 20-30 | ||||||||||||
| Lampaankyljykset | 210 3 | 20-30 | |||||||||||||
| KALA | Grillattu kala | 275 4 | 15-20 | ||||||||||||
| Keitetty kala (hammasahven) | 200 3 | 190 3 | 30-35 | ||||||||||||
| Kala en papillote | 220 3 | 200 3 | 15-20 | ||||||||||||
| SET | Gratiinit | 275 2 | 30 | ||||||||||||
| Perunagratiiini | 200 3 | 180 3 | 45 | ||||||||||||
| Lasagne | 200 3 | 180 3 | 45 | ||||||||||||
| Täytetyt tomaatit 170 3 | 170 3 | 30 | |||||||||||||
| LEIVANNASET | Savoiardi- ja Généosekeksit | 180 3 | 180 | 4 35 | |||||||||||
| Käretorttu | 220 3 | 180 2 | 190 | 3 5-10 | |||||||||||
| Briossi | 180 3 | 200 3 | 180 3 | 180 | 3 35-45 | ||||||||||
| Pikkuleivät | 180 2 | 180 2 | 20-25 | ||||||||||||
| Kakut - kuivakakut | 180 3 | 180 3 | 180 | 3 45-50 | |||||||||||
| Hedelmäpiiras | 200 3 | 190 3 | 30-35 | ||||||||||||
| Keksit - Pikkuleivät | 175 3 | 170 3 | 15-20 | ||||||||||||
| Kugelhopf | 180 2 | 40-45 | |||||||||||||
| Marengit | 100 4 | 100 4 | 100 | 4 60-70 | |||||||||||
| Madeleine-leivokset | 220 3 | 210 3 | 5-10 | ||||||||||||
| Tuulihutut | 200 3 | 180 3 | 200 | 3 30-40 | |||||||||||
| Petit fours -leivokset | 220 3 | 200 3 | 5-10 | ||||||||||||
| Savariini | 180 3 | 175 3 | 180 | 3 30-35 | |||||||||||
| Murotaikinaleivät | 200 1 | 200 1 | 30-40 | ||||||||||||
| Hedelmäpiirakat | 215 1 | 200 1 | 20-25 | ||||||||||||
| SEKAASET | Lihamureke | 200 2 | 190 2 | 80-100 | |||||||||||
| Pitsa | 240 1 | 15-18 | |||||||||||||
| Piiraat | 190 1 | 180 1 | 190 1 | 35-40 | |||||||||||
| Kohokkaat | 180 2 | 50 | |||||||||||||
| Piirakat | 200 2 | 190 2 | 40-45 | ||||||||||||
| Leipä | 220 2 | 220 2 | 30-40 | ||||||||||||
| Paahdettu leipä | 275 | 4-5 | 2-3 | ||||||||||||
JAVASLATOK AZ AI SENSOR MODHOZ
Marhasult (3 sutes):
(800 g - 1,6 kg) Marhahus, vresen
Marhahus, atsutve
Marhahus, jol atsutve
JAVASLATOK AZ AI SENSOR MODHOZ
Hal
400 gr - 1 kg
JAVASLATOK AZ AI SENSOR MODHOZ
Pizza
300g - 1,2kg
Sullo schermo compare 0m00s.
8 ANDERE FUNCTIONS 32
11 BEKWAAMHEIDSPROEF 41
VEILIGHEID EN BELANGRIJKE VOORZORGsMAATREGELEN
BELANGRIJKE VEILIGHEIDSINSTRUCTIES. LEES ZE AANDachtig EN BEWAAR ZE VOOR TOEKOMSTIG GEBRUIK.
FINNES I MODUSENE MANUELL OG AUTO
SELVRENGJØRING MED UTSATT START
Folg instruksjonene i forrige kapittel.
Velg stokeslutt.
CONETIVIDADE: PERGUNTAS E RESPOSTAS
CONETIVIDADE: PERGUNTAS E RESPOSTAS
4 BKJIIOUcHHe I HAcTPOIKN 13
PepBbI 3anyck 13
Mehno hactpoek (B COOTBeTCTBUN C MOeJIbIO) 13
Поdkлочен.. 15
IopKIOueHHe:BONPOcBiNOTBeTbI 15
5 PuyHOPEKIM IPIROTOBJIENHIA 17
Hauano npiroToBneHn 19
6 PEKOMEHDAUINIPO PIPNGOTOBLEHNIO NIIUI 20
Функци air fry 20
Функцядгпрataци 21
7 ABTOMATUeCKN PEXKIM PPNTOBJIENHRA 22
Onncahne abTomatueckoro pexima 22
Onncahne kaTeropn 6Ioud. 23
HauaNo aBToMaTnueckoro npiroToBJeHn 31
PeknM 6e3oTnaIaTeJIbHoro npiroToBJeHnra 31
8 DpyTne FyHKcHn 32
BapnAHTbI OKOHuaHn nprirotOBJIeHn (B 3aBNCIMoCTn OT cnOco6a nprirotOBJIeHn) 32
I36paHHoe 33
Функциа Таймера 33
9 yXoI 34
OuInCTka n yxoI 34
ChTne u yctaHOBKa Ta6JnUKN 《JaTuNK》 35
Camaoochka npn nmoos npoN3a 36
3aMeHa IamnoquKu 38
10 HENCINPABHOCTN IN CNOCObI INX YCTPAHEHNA 39
11 TECTbI PnroDHOCTN 41
BAJHbIE INHCTPYKcNIO TEXHnke B3OpACHOCTN: BHIMATEJIbHO IPOUTNTE N COXPAHNTEДЯ NCNoB3OBAHNBAJaBHeIWeM.
3Tu INHCTpyKcIIO MOxHO cKaaTaB Ha Be6-caTe KOMNaHn.
B MOMENT NOJUyeHn Iprbopa cpa3y Xe pacnakyte ero nIIN nonpocnte 3TO cdeIaTb Koro-ln6O dpyrOro. PpOBepbTe BHeuHn BnD. Pn Heo6xOIMOCTN OIIuHTe HeIOCTaTKN Ha KBNTaHcUN OIOCTaBKe N COXpaHnTE OINH 3K3EmnIrp.

BaxHo!
3TOT npnbop MOKeT nCNoJIb3OBaTbcr
DeTbMn OT 8 let n CTapwe, JIOdbMn
C OrpaHnueHHbIMn fN3uYeCKMn,
CEHCOPHBIMn yMCTBeHHbIMn
BO3MOxHOCTaMn, a TaKKe JIODbMn
C HexBaTKoI ONbITA n 3HaHn IOD
KOHTPOJeM OTBETCTBEHHoro 3a INX
6e3OpacHOCTb LNuCa NocLe npoxOJdHnra
PpeDvapntelbHOrO INHcTpKtaxKa nO
6e3OpacHOMy nCNoJIb3OBaHnIO np6bopa
n POnyuHnry INΦOpMaun O pNcKaX,
KOTOpbIM OHN NOdBepraHTc.
PekomeHnyetcH He noDnyckaTb K yctpoiCTbY deTei.
He nCnoJb3yIte np6Opbl uNCTkn napom.
He nCnoJb3yIte abpa3nBhIe CpeIcTBA dIa O6cIyJXnBaHnA, a TaKKe JxecTkne MeTaJIInuYeCKne CKpe6Kn dIa YnCTKn CTekJnHHoN DBepCuI DuxOBOrO uKaΦa, NocKoJIbKy I3-3a 3TOrO Ha NOBepXHOCTn MOrYT NOBnTbcraapannHbI N CTekNo MoKet Notpeckatbcra.

ПЕДОCTEPEЖЕНЕ.
Ipejde yem npncTyntb K 3aMeHe Iamnochn BO n36eXaHne onacHOCTn Nopaxheny 3JIeKTPnueckm TOKOM yBeiNTecb, YTO npnbOp OTKnIOUeyn OT cTeuHTAHN. BblONHnTe 3aMeHy TOJbKO Ha OCTbIBWeM npnbope. IJra ChrTna CTeKna I lamnochn NCNoJb3yInTe pe3INHOByIO nepuATky, KOtopa o6JeYnT pOcecc DEMoHTaJa.

PpOBoNoUHbIe peWetKn (6 BapnaHTa BBICOTbl)
.3 OIIINCAHNE IYXOBOTI IIAKAΦA
NAHEJIb YNPABJEHnI INCPIeN


KhONka ocTaHOBKn pa6Otbl dYxOBOrO
Ukapa (dInTeIbHoe hXaTne)

Ducnn
KnaBnwa Bo3Bpata

Bpaaouaera pyka c haxmom no ceHTpy (hecbemHa):

KhONka HENOCpeIcTBeHHORO DoCTyna K PuyHOMy peXmMy
-
NOBOPaHbAe ee, BbIbnpaTe nporpaMMbl, yBeJIuNBAeTe nINyMeHbShaete 3HaueHn;
-
NOДТВерждайTe KaЖдоe DeiCTBHe NaKaTHeM Ha ueHTp KHONKn.
БЛOKИРОВКА KMHONOK
Haxmte OndHOBpeMeHHO KhoNk Bo3BpataM M ydepXnBaITe Do oTo6paKeHn CmBOJHa 3KpaHe.

CNCTEMA BbIDBnXHbIX HANPABJIIOx
БлардясnteMe BldBnKbIX HanpaBnIoox MaHInyIinpoBaHne npOdyKTamN CTaHOBTcB 6oJee yOobHbIM nJeRkM, T.K. NPOTNBH MOryt BblBnRaTbCnPaBHO, YTO MaKcImaJIbHO ynpOuaeT o6paUeHne C HUMN. NPOTNBH MOxHO n3BNeKaTb NOnHOCTbIO, YTO OBeCpeuHBaET DOctyn KO BCemy 6bHy. Kpome TORO, INX yToOnuBOcTB OBeCpeuHBaET NOHyo 6e3OpacHOCTb pa60TbIC npOdyKTAMN, YTO YMeHbShaet OnaCHOCTb OXorOB. Takim O6pa3OM, IN3BLeueHne npOdyKTOB IN3 DyXOBKn CTaHOBTc HAMHOrO 6oJee yOobHbIM.
YCTAHOBKA IN DEMOHTAX BblBnKbIX HANPABJIIOUX
Iocne ydaeneHn 2 npoBOJOnHbIX peWetOK Bbl6epnte ypoBeHb BblcOTbI (ot 2 do 5), Ha KOTOPOM Bbl XOTHe 3aФнKcnpOBaTb BaHn HAnpaBnIOUe. BCTaBte neByIO HAnpaBnIOUyO B yCTyn JEBOJ peWetKn, BblONHnB DOCTaTOHoe DaBJIeHne Ha NepeDHIIO N 3aDHIOU qACTN HAnpaBnIOUe, YTO6bl 2 IanKn Ha 60ky HAnpaBnIOUe BOHN B npoBOJOnHyO peWetKy. BblONHnTe aHaNoRnHbIe DeIcTBnI DJI naPabOn HAnpaBnIOUeI.
- INHdNkaTop nppoJn3a
BkIIOUHTe HnN BbIKIOUHTe HndNKaTOp nIpOuHa. KOrda OH BkIIOUeH, DyXOBoI shKaΦ 6IarOapr CBOeI TexHOJOrn I DaTtHKam Bbl6IpaET NOxOJaUN MOMENT JIy BblONJIHeHNA UcKNa OuncTK NIpOJIN3OM. B 3tOM clyuae Ha dncnnee oTo6paxaetcra
CIMBOI bIMoKeTe BbI6paTb OINH n3 peXIMOB NnPOJn3a:ABTOMaTHueCKn,2u nn EKcnpeccc,ecnnocTaTOUHoe TEnNo DyXOBoro 1kaΦa 3TO No3BOJnEeT.
- Bpemr
I3MeHnTe BpeM B yacax, NOdTBepDNTe, 3aTeM I3MeHnTe MnHytbl n eue pa3 NODTBePdnte. Ecnn Baaw dYxOBoN WkaΦ NODKNIOUey K NCTOCHNY PNTAHN, BpeM O6HOBJIaETcA ABTomatuYeCKN. Bbl MoKeTe nepeKlIOHTb DnCnJIeB peXm Ha6NIoDeHn:
- Pēχим Oжиданя
B noIoxeHn BKJI. dncnneBbIKIOaETcayepe3 90 c.
B noIoxeHn BblkI. npKocTb cHxkaetcyepe3 90 c.
-Поdkлоченe
Cm. rnaBy «IopKnIOueHne» Ha ctp. 15.
AknBpyuTe IopKnIOueHne dYxOBO ro kka.
BbI6epnte BKN., 3aTeM nOITBePdnte.
3arpy3nTe Ha cMaprTfoH moNlboHoe npnloXeHne De Dietrich Smart Control n cnEduyTe uHCTpyKcuaM.
-3ByK
Пи Нжати Кнорok Вашу Духовka ИЗдает 3Bykn.ДЯ coхраеня ATnx 3BykoB Bbl6epnte BKЛ.,В npOTnBHom cnyae ДЯ IX OTKluChENI Bbl6epnte OTKЛ.,3aTeM noDTBepdnte.
- OcbueeHHocTb
BbIbepnteKeIaemblypoBeHbOCBeueHHoCTn.
- YnpaBJIeHne JAmNoyKoI
Bam npednaraot Dba BbIbopa HacTpoKn: PonoJHne BKl., lamnoUka CBeNTcR BO BpeMg BCex peKIMOB npiroTOBNeHnR (KpOme FyHKun 3KO).PonoJHne ABTO, lamnoUka DuxOBKn rachet uepe3 HeKOTOpoe BpeMg NocJe Haayana npiroTOBNeHnR. Bblepnte noJoxKeHne I NOdTBePdnte.
MEHIO HACTPOEK
-3bik
Bb6epnte cBoi a3bIK, 3aTeM noTBePdnte.
TuaTeJIbHO BbIMoIe Ix, DaITe BoJe CTeYb N BbITpIte Ix.
HaKpoIe peWetky nepraMeHTHO 6yMaRoI n CBepxypaBHomepHo BblOKeTe pa3pe3aHHbI npOdyKtbl.
UcnoJb3yIte ypoBeHb 1 (ecn y Bac HeckoJIbKO peweTOK, BCTaBbTe nx Ha ypoBHN 1 n 3).
Pn cyuke ouehb couhbIX npOdyKTOB nepeBepHnte ux HeckoJbKO pa3.
3NaeHn, npBedeHHbIe B Ta6nue, MoryT BapbnpoBaTbcra B 3aBncmocTN OT Tnna DeiPaHTpyemoro npOdykTa, erO cneIoCTN, ToJIuHbI n CoepKaHn BlaRn.
TABJIUca C PEKOMEHNDAUJAMN IO DEIINPATAUIN IPOyKTOB
Ipn npnroTOBHeHn IIO6bIX 6JIoD nepei TeM, KaK BCTaBNTb npOTNBHeHb, dYXOBoi uKaΦ coo6uaet Bam, Ha kaKoYPOBeHb cJeDuTe erO BCTaBNTb.
Xapkoe n3 roBAnHb1 (3 cnooc6a npiroTOBneHn):
(OT800r1,6K)TOByAnHaC KpOBoBbIO
TobyaHa cpeHne npokapKn
TobyaHa noHno npoxkapn
MaKcHMaJIbHo ydaIInTe JnP, KOToPbI npN npNroTOBHeHHO6pa3OBbIBaETdbIM.
BbINOKHTe MRCOB rny6okn noDoH.
B KOHcpe npuROToBHeHnOCTaBBTe MRCo Ha 7-10 MNHyT.
Kypuna
Kypuza Becom O1,4do2,5 K
YTKa-MaHdapnHka,uecapKa
BbINOxKe TnUy Ha peWetky n3 Habopa rnpbl + noDOndIa CTeKaHna Xupa.
Bo n36eXaHne 6pbI3r npokoJInte Koxy TnUcbl nepei npiroTOBHeHem.
ONICAHNE KATEGOPNI BJIUD
HauJIO ABtOMATnueCKOTo PnIroTOBJIeHnJ
BAPNAHTbI OKOHyAHnI PnIrotOBJeHnI (B 3ABNCIMOCTN OT CnOCoBA PnIrotOBJeHnI)
PpmeaHne: EcnB n36paHHOM yKe HaxoHTcra Tpr peeNTa, Bbl MoKeTe Bbl6paTb peeNT, KOTOpBI Bbl 3aMeHInTe HObbIM.
ФУнкця TаймЕРА
3Ta yHKnma MoKet 6bItb NcNoJb3ObaHa TOnbKO pNt OTKJIoueHHoN neH.
- BbIbepnTe ΦyHKUIO TAIMEP, noBepHyB pyKy, 3aTeM NOITBepDNTe.
Ha 3kpaHnOBHTc8 Om00c.
HactpoTe TaMep, nobopauHBa pyky, 3aTeMa HaxMMte DnI NOdTBePKeHnE, 3anyCTuTc8 o6paTHbI OTCyET.
No nCTeueHn BpeMeH npiroTOBJeHn npo3ByuHT 3BykoBoi CnHaJI. UTo6bl erO OTKnIOHTb, HaxMnte Ha IIO6yIO KHOKNK.
IpmeaHne. Y Bac eCTb BO3MOXHOCTb IN3MeHHTb INIOTMeHHTb IporpaMMNPOBaHne TaMepa B JIO60J MOMENT.
Дя OTMeHbI BepHnTeCb B MeHIO TaMepa N yctaHOBnTe Ha 0M00c
EcnBbHaxaJn pyKy BO Bpem o6paTHoro OTCHeTa, TaMep octaHOBNTcR.
OuNTKA I yXoI
BHEHJRA NOBEPXHOCTb
IcnoJb3yIte MrgkyIO TKaHb, CMOyeHHyIO cpeDCTBOM dnn yNCTKn CTekoN. He nCnoJb3yIte Hn YNCTraux NaCT, Hn a6pa3NBbIX r6OK.
DEMOHTAX IPOBOJIOUHbIX PEWETOK
BOKOBIE CTeHKN C npoBOJOnHbIMn peweTKaMn: IOpHMITE nepeHIOU qactb npoBOJOnHOI peWEtKN BBePx, TOnKHITe 6JOK npoBOJOnHOI peWeTKn N BbTaUNTE nepeHN KpOyOK N3 erO rHe3da. 3aTEM cJIerKa nOTAHNTe 6JOK npoBOJOnHOI peWeTKn Ha ce6a, YTObblHyTb 3aDHne KpOChN mX INrHe3d. N3BNeKHTe TaKIM o6pa3OM 2 npoBOJOnHbIe peWeTKn.
OuHCTKA CTEKOL DBEPcbl

PpeoctepekeHne
He nCnoIb3yIte a6pa3nBHbIe cpeIcTBa IJy yXoJa, a TAKKe JxcTKe MeTaJIInueckneCKpe6Kn IJN YnCTKn CTeKJIaHHoI DBepuI dyXOBOrO WkaΦa, NocKoJIbKy TaKIM o6pa3OM MoXHO NoUapanaTb NOBepxHOCtB, a CTeKIO MoXET NOTpeCKaTbcra.
IpeDbapnteNbHO y6epnte MfKoN TkaHbO, CMOueHHo XndKOCTbIO dIaMbITbN Oncybl, OCTaTKI Knpa Ha BHTpeHHem CTekne.
UTo6bI OuHCTnTb pa3NnHbIe BHyTpEHHne CTeKNa, CHMNTe INX B ONcaHOn Daane NocneObaTeNbHOCTn.
IoiHocTbIO OTKpOte DBepy N 3a6Jokpynte ee C NOMOuO Ondoro N3 PnactMacCOBbIX KInHbeB, BNOXeHHbIX B PnactNKOBbI NaKeT IN NOCTABnREMbIX C BaUIM np6Opom.

I3BnKeTe nepBoe 3aKpenHHe cTEKnO: C nOMoUbIO dpyrOro KInHa (nn OTBeptkn) HaxMITE Ha MeCTa 3aKpenHEnA, YTObI OTueJIKNHyTb cTEKnO.
CHIMnte cTeKNo.ДВepa coCToNT n3 DByX DOONHInTeNbHbIX cTeKOn,Ha KaXdOM yrIy KOTOpbIX HAXOINTcNo QEPHO Pe3INHOBOI COeHNHTeJIbHOI CTOnKe.
9 yXoI
Pn Heo6xOaMocTN BbTaunTe Nx DnOuNCTKN.
He onyckaIte cTeKla B Body. OnoJIOCHnTe YHCTO BODOn I PpOTpuTe HeBOJOKHNCTO TKAHbIO.
Pocne OuncTk n ChOBA yCTaHOBnTe YeTbipepe3HOBbIX COeHNHTeNbHbIX CToKn CTpeJIKOBBepx N NOCTaBbTe Ha MeCTo CTeKNHbI 6JOK.
BctabbTe nocJeHHee CTeKnB MeTaJInuYeCKne ynpb, 3aTeM 3aKpeNtE erO IInCeBOI cToPOHOcHnIO NlPOJNTUeCKA B HnPaBHeHn Ha Ce6n, npn 3TOM HAdnncb DOJXHa YHTaTbcr.
BbTaunTe PJIaCTMaCCOBbI KINH.
CHYTNE N UCTAHOBKA TABJIUNKN «ДATUNKK»
Bb MoKeTe ChrTb Ta6nUky DATyHK, yKa3bBaIOuSyHO Ha HAnuNe DaTynKa yPoBnB BnaXHoCTn, C8ra3aHHoro CpexmOM DATyIK IN. INaOcNtK NcNoJIb3yIte PIActMaCCOBiK KInH, PpeHa3HaueHHbI DnA ChrTnA DBepCuI.

DemoHTaK.
BcTaBbTe KInn MeKdy TaBnUkoN DAtYNK n BepxHeu YactbO DyXOBKn N nepemecnte ero BHN3, YTO6bl CHrTb ee.
YCTAHOBKa Ha MecTo. Bo3bMnte Ta6JnUky DATyNK N PLOTHO BCTaBbTe BbIeMKN AB COOTBetCTByUoNe Na3bI B HApPabJIeHm BBepx
.10 HENCIIIPABHOCTH IN CIOCOBBI INX YCTPAHEHNA
| ВорPORБы | OTVBETы и рeshеня |
| Повлиетсадпись AS (систema Автоctona). | Данная сунreichа оTKлючает нареев духовогошkaф, сени забыли зашил. УстановITE вшиу духовку на OCTAHOB. |
| Кod несяпавностни поочаетс с «F». | Ваш духовий škaф обharujkin наочeenth В пботе. Великийся erо на 30 minут.Есни несчпавностов по-пreamу писут靖у. OTКлючite OT пitaим минимун на ODну minуту.Есни несяпавностов. Чураныпостсь, послелproдан go obsvжь. Послелproдан go obsvжь. Послелproдан go obsvжь. Послелproдан go obsvжь. Послелproдан go obsvжь. Послелproдан go obsvжь. Послелproдан go obsvжь. Послелproдан go obsvжь. Послелproдан go obsvжь. Послелр: Послелр: Послелр: Послелр: Послелр: Послелр: Послелр: Послелр: Послелр: Послелр: Послелр: Послелр: Послелр: Послелр: Послелр: Послелр: Послелр: Послelightа: Послelightа: Послelightа: Послelightа: Послelightа: Послelightа: Послelightа: Послelightа: Послelightа: Послelightа: Послelightа: Послelightа: Послelightа: Послelightа: Послelightа: Послelightа: Послelightа: Посlor: Послelightа: Послelightа: Послelightа: Послelightа: Послelightа: Послelightа: Послelightа: Послelightа: Послelightа: Послelightа: Послelightа: Послelightа: Послelightа: Послelightа: Послelightа: Послelightа: Посу: Посу: Посу: Посу: Посу: Посу: Посу: Посу: Посу: Посу: Посу: Посу: Посу: Посу: Посу: Посу: Посу: Посу: Посу: Посу: Посу: Посу: Посу: Посу: Посу: Поси: Поси: Поси: Поси: Поси: Поси: Поси: Поси: Поси: Поси: Поси: Поси: Поси: Поси: Поси: Поси: Поси: Поси: Поси: Поси: Поси: Поси: Поси: Поси: Поси: ПосIS: ПосIS: ПосIS: ПосIS: ПосIS: ПосIS: ПосIS: ПосIS: ПосIS: ПосIS: ПосIS: ПосIS: ПосIS: ПосIS: ПосIS: ПосIS: ПосIS: ПосIS: ПосIS: ПосIS: ПосIS: ПосIS: ПосIS: ПосIS: ПосIS: ПосS: ПосS: ПосS: ПосS: ПосS: ПосS: ПосS: ПосS: ПосS: ПосS: ПосS: ПосS: ПосS: ПосS: ПосS: ПосS: ПосS: ПосS: ПосS: ПосS: ПосS: ПосS: ПосS: ПосS: ПосS: ПосС: ПосС: ПосС: ПосС: ПосС: ПосС: ПосС: ПосС: ПосС: ПосС: ПосС: ПосС: ПосС: ПосС: ПосС: ПосС: ПосС: ПосС: ПосС: ПосС: ПосС: ПосС: ПосС: ПосС: ПосС: ПосS: ПосS: ПосS: ПосS: ПосS: ПосS: ПосS: ПосS: ПосS: ПосS: ПосS: ПосS: ПосS: ПосS: ПосS: ПосS: ПосS: ПосS: ПосS: ПосS: ПосS: ПосS: ПосS: ПосS: ПосSF: ПосSF: ПосSF: ПосSF: ПосSF: ПосSF: ПосSF: ПосSF: ПосSF: ПосSF: ПосSF: ПосSF: ПосSF: ПосSF: ПосSF: ПосSF: ПосSF: ПосSF: ПосSF: ПосSF: ПосSF: ПосSF: ПосSF: ПосSF: ПосSF: Пос SF: Пос SF: Пос SF: Пос SF: Пос SF: Пос SF: Пос SF: Пос SF: Пос SF: Пос SF: Пос SF: Пос SF: Пос SF: Пос SF: Пос SF: Пос SF: Пос SF: Пос SF: Пос SF: Пос SF: Пос SF: Пос SF: Пос SF: Пос SF: Пос SF: ПосSF: ПосSF: ПосSF: ПосSF: ПосSF: ПосSF: ПосSF: ПосSF: ПосSF: ПосSF: ПосSF: ПосSF: ПосSF: ПосSF: ПосSF: ПосSF: ПосSF: ПосSF: ПосSF: ПосSF: ПосSF: ПосSF: ПосSF: ПосSF: ПосS: ПосS: ПосS: ПосS: ПосS: ПосS: ПосS: ПосS: ПосS: ПосS: ПосS: ПосS: ПосS: ПосS: ПосS: ПосS: ПосS: ПосS: ПосS: ПосS: ПосS: ПосS: ПосS: ПосS: ПосSJ: ПосSJ: ПосSJ: ПосSJ: ПосSJ: ПосSJ: ПосSJ: ПосSJ: ПосSJ: ПосSJ: ПосSJ: ПосSJ: ПосSJ: ПосSJ: ПосSJ: ПосSJ: ПосSJ: ПосSJ: ПосSJ: ПосSJ: ПосSJ: ПосSJ: ПосSJ: ПосSJ: ПосSJ: Пос SJ: ПосSJ: ПосSJ: ПосSJ: ПосSJ: ПосSJ: ПосSJ: ПосSJ: ПосSJ: ПосSJ: ПосSJ: ПосSJ: ПосSJ: ПосSJ: ПосSJ: ПосSJ: ПосSJ: ПосSJ: ПосSJ: ПосSJ: ПосSJ: ПосSJ: ПосSJ: ПосSJ: ПосSJ: ПосS: ПосSJ: ПосSJ: ПосSJ: ПосSJ: ПосSJ: ПосSJ: ПосSJ: ПосSJ: ПосSJ: ПосSJ: ПосSJ: ПосSJ: ПосSJ: ПосSJ: ПосSJ: ПосSJ: ПосSJ: ПосSJ: ПосSJ: ПосSJ: ПосSJ: ПосSJ: ПосSJ: ПосS: ПосS: ПосS: ПосS: ПосS: ПосS: ПосS: ПосS: ПосS: ПосS: ПосS: ПосS: ПосS: ПосS: ПосS: ПосS: ПосS: ПосS: ПосS: ПосS: ПосS: ПосS: ПосS: ПосS: ПосSV: ПосSV: ПосSV: ПосSV: ПосSV: ПосSV: ПосSV: ПосSV: ПосSV: ПосSV: ПосSV: ПосSV: ПосSV: ПосSV: ПосSV: ПосSV: ПосSV: ПосSV: ПосSV: ПосSV: ПосSV: ПосSV: ПосSV: ПосSV: ПосSV: Пос SV: |
PEKOMEHNDAUINIPO PIPROTOBJIENIO NIIUNB PYHOM PEXIME
PnmeaHne:peed nomeeHem B ney bBdepkaT Bce mco He Mehee 1aca npKOMHaTHo TEMnepaType.
* B 3aBnCmOCTN OT MOeJIY
TECT PABOTOCNOCOBHOCB COOTBETCTBHN C HOPMOI IEC/EN 60350
| ПОНДУКТ REЖим | ПРИГOTOBЛЕ-НЯ | УROBEнь | ПИHAДLEЖHOCTN °C ПОДЛДК- | TEЛьHOCTь MHH. | ПОНГ佩В |
| Песочhoe Т ecTo (8.4.1) | 5 | прOTиВeHь TОЛцINOH 45 MM | 150 30-40 дa | ||
| Песочhoe T ecTo (8.4.1) | 5 | прOTиВeHь TОЛцINOH 45 MM | 150 25-35 дa | ||
| Песочhoe T ecTo (8.4.1) | 2+5 | прOTиВeHь TОЛцINOH 45 MM + рnilь | 150 25-45 дa | ||
| Песочhoe T ecTo (8.4.1) | 3 | прOTиВeHь TОЛцINOH 45 MM | 17525-35 дa | ||
| Песочhoe T ecTo (8.4.1) | 2+5 | прOTиВeHь TОЛцINOH 45 MM + рnilь | 160 30-40 дa | ||
| Пechenbe (8.4.2) | 5 | прOTиВeHь TОЛцINOH 45 MM | 170 25-35 дa | ||
| Пechenbe (8.4.2) | 5 | прOTиВeHь TОЛцINOH 45 MM | 170 25-35 дa | ||
| Пechenbe (8.4.2) | 2+5 | прOTиВeHь TОЛцINOH 45 MM + рnilь | 170 20-40 дa | ||
| Пechenbe (8.4.2) | 3 | прOTиВeHь TОЛцINOH 45 MM | 170 25-35 дa | ||
| Пechenbe (8.4.2) | 2+5 | прOTиВeHь TОЛцINOH 45 MM + рnilь | 170 25-35 дa | ||
| Нжирный мягкий пирor (8.5.1) | 4 рnilь | 150 30-40 дa | |||
| Нжирный мягкий пирor (8.5.1) | 4 рnilь | 150 30-40 дa | |||
| Нжирный мягкий пирor (8.5.1) | 2+5 | прOTиВeHь TОЛцINOH 45 MM + рnilь | 150 30-40 дa | ||
| Нжирный мягкий пирor (8.5.1) | 3 рnilь | 150 30-40 дa | |||
| Нжирный мягкий пирor (8.5.1) | 2+5 | прOTиВeHь TОЛцINOH 45 MM + рnilь | 150 30-40 дa | ||
| Крульный ябочnyй пирor (8.5.2) | 1 рnilь | 170 90-120 дa | |||
| Крульный ябочnyй пирor (8.5.2) | 1 рnilь | 170 90-120 дa | |||
| Крульный ябочnyй пирor (8.5.2) | 3 рnilь | 180 90-120 дa | |||
| Блиожд В сухарх (9.2.2) | 5 рnilь | 2753-6 дa |
PIMEAHNE: Pn roTOBKe Ha 2 ypoBHX 6HOba MoXHO BbIHMaTb B pa3Hoe BpeM.
Peuent Bdpoxkamn (B 3aBNCMOCTN OT moen)
InhpeJeHNTbI:
Myka 2Kr Boda 1240 MnI COnb 40*4 naketnka cynx nkapcxx npdojckn Ipepeuauane Tecto c noomui MHKcepa n octabte NOHMATCB a DxyOBOM kacpy.
Ppoeypa: dner peennoT Bnpokkebo Tecta. Bblonkntb Tecto Ha Kapopnpohn IpOHTBEHs, ydaanhtb OCHOBy npobONHbX pseotOK n NomecttB npOTBeHb HdHO.
Pporptb ney B pexhme BpaeHHN hctouHHKa Tennn npn 40-50 ^ C B Teeyene 5 MNHT. OctahOBNT ney n daTb TcTy B30HTN 25-30 MNHT 6naorapar octatooy tenny.

VAL AV PLACERING OCH INBYGGNAD
Lat lammkylen vila after tillagning.
Fläskstek
0,7-1,4 kg
Fläskarre, file
Lat lammkylen vila after tillagning.
Nöstek (tre tillagningar):
(0,8-1,6 kg) Nöstek blodig
Nöstek medium
Nöstek genomstekt
Lat kottet vila i 7-10 minute after tillagning.
Kyckling
degen blir krispig undertill.
SJÄLVRENGÖRING MED PYROLYS
OMEDELBAR SJÄLVRENGÖRING
SJÄLVRENGÖRING MED FÖRDROJD START
KhoNka doctyno MeHIO kepyBaHNbByuHr MANUEL
- NOBepTaIe pyky, 06 Bn6paTn nporpamy a6o 36iNbHTn qn 3MeHHTN 3HaueHHra;
-HaTnckaIte pyky, 0o6 niTBePdNTn DiIO.
БЛOKУBAHHЯ KHONOK
OndohocnHaTNCHTb KHOHNOBepHeHHa3aI KhoNky «M» Ta yTpmyTe do NOBn Ha ekpaHcMbOy
ФункцяблOKуВаннгКнОнOKdoCTynHa nID qac npriOTyBaHHa abO BmKHeHnA dYxOBoI wafn.
ПРИМТКА. Актувно 3аишаecьлше Кногka ВIMKHeHHЯ ①
I06po36IOkyBaTN KHONK,ODHOaCHO HaTNCHTb KHONKY NOBepHeHHa3aK HONKy M》Ta yTpmyTe Do 3HNKHeHHa ekpaHi CmBOJy 3aMKa
3 OIIHC IyXOBOI IIIAΦH
AKCECYAPN (3AJEXKHO BID MODEJI)
- Pewitka i3 3axnctom BiD nepekndaHna. PewiTy MoXHa BnKOpNCTOByBaTn IJI BCTaHOBJIeHHa 6yIb-IAknx IekiΦopm i3 IKeIO a6o rpnJ. II MOxke BnKOpNCTOByBaTn IJI rPnJ (po3MiUyETbcra 6e3nocepEnhO 3BepxU). YcTaHOBIb 6mExyBaU nepeKnDaHHa Ha dHO dYxOBoI waФn.

- YHIBEPCaIbHe Deko, NiDOn 3aBTOBkN 45 MM. BcTabnJaETbcraBЯpycn NiPeWitKy pyKoO Do DBePcT dYxOBoi WaФn. NOro npu3NaUeHo dJa 36npaHHa COKy Ta KInpy NiJ Qac npuROTuBaHHa Ha rpiJIi, BiH MoKe BnKOpNCToBvBaTnCHaNoJIOBHy 3aNOBHeHm BODoIO dJa npuROTuBaHHa BOdHi6aHI.

-ДeКoДЯВиNiKaHЯ3aBTOBwKn 8MM.BCTabJIeTbCЯBяpсn a60 KpInNTbCЯHaTeJIeCKOniUHipeKn. LcIeДeKOIDEaJIbHO NiIXoJNTbДЯ npriToYBaHNa KOHdntepCbKnx Bnpo6IB N BniiuK,IAOTBnPo6N3NiOCHOro Ticta, NeuBO,6e3e, KpyacAHn ToIo. Noxna nepeDnRA NOBepXHc CnpOuye BnKJaDaHHa 3aRTOBOK.
3 OIIHC IyXOBOI IIIAΦH
AKCECYAPN (3AJEXKHO BID MODEJI)
- BaratoiIbOBe DeKO 3aBtObKu 20 MM. BCTabJIeTbcB IApCn NiD peWitKy pyUKO IO DBepeN DyXBOiT WApN. IdeaIbHO NiIXoNDMbIg NpNiROTuBaHHe neuBA, BnpOBiB i3 NiCOuHOro Ticta Ta KaKneKB. ToxNla NobepxHc CnpOuye BnKJaDaHnra 3arOTobOK Ha DeKO. Do Toro JNoRo MoXHa BCTabJIaTN B IApCn NiId rPnIeM dNra 36npaHHc cokIB i KInpy, 0To YTBOPIOITbcN iD Yac CmaKeHHa.
-PewiTkTuNy Saveur. Li HanibpewiTkTuNy Saveur MoxHa BnKOpNCTOBvBaTn He3aIexHo Onda BiD OndHOi, PO3MictNBuHix Ha Onde 3 DeK a6o Ha NiDoH TaK, 0o6pykU dIra 3axNCTy BiD nepeKnDaHHa6ylo cnpMaBOH Do dHa DuxOBoi Wafn. BnKOpNCTOBuyou nIwhe OndHy pewiTkU, MoxHa IerKO 3anikatn npOdyKTn 3doDaBaHHa COKIB, 0o 3i6paNNsC BdeKy.
- Nepopobahe deko. BctabnactbcB Yrpycn pykoIO Do DBepei dYxOBoi Wapn. Pnp3NayeHO Jn nprirotyBaHHB peKIMi IHTeHcNBHoro 3anikAHN H AIR FRY, TAKOXnDNTb Jn BnIKAHN niu, KOHNTEpcbKnX Bnpo6IB a6o cywnHn npodykTib.
3 OIIHC IyXOBOI IIIAΦH
HANPRAHAPENKOBA CNTEMA
Hanpmapeikobacntema nonerwye Ta pOBtB 3pyuHIOO pOboTy 3 npOdyKTamn, rapaHTyOuN PnabHe BnMaHHa DeK, zo pOBtB ix BnKOpNCtAHn MaKcImaJIbHO 3pyuHm. DeKN MoXHa BNTaRHyTN NOBHCTo, 0o 3a6e3neUe NobHn DoCTyn Do Hx. DTo TOro BOHn E dyXe Cta6IbHMn, 0o rapaHTye cIKOBHTy 6e3neKy nJ vac poBOTn 3 HmN, 3HnxkyOuN pn3NK oniKIB. TaKIM YINHom, dictaBaTn cTpABN 3 dyXOBOI Wapn cTae Ha6arato Ierwe.
YCTAHOBJIENHRA 3HJTTHAHPMHNX PEOK
3himitb Dba npycn, Bnbepitb Bncoty (Bid 2 do 5), Ha kky Heo6xidHO BCTaHOBTN peKn. 3aqikcyte nIBy peKy Ha NIBOMy npyci, DocTaTHbo HATNCHyBwn Ha nepeDnTO Ta 3aHIO qactHH peKn, 06 DBA BVCTyn 36Oky peKny yBiunB npyc. BkoHaTe aHaIorHi dii 3 npaboro 6oky.
Ipeed nepuIM BnKOpncTaHHaM
duyxoboi shaopn po3irpiTe II 6e3 npnaT Ta cTpaB npotraom 30 XBnHnHa MaKcMaIbHi Temnepatypi. PepeKaHnTeC, 1o npMImeHn Do6pe npoBITpOcTbcra.
-HanaWtYBaHHa cacy
HanaTyuTe NociIOBHO rOuHN Ta XBUNH, NOBepTaUOn pyuKy, NOTIM NiTbepDbTe.
Ha dincnnei dyxobooi waon BiO6pa-3ntbcra yac.
MEHIO HAJAHTYBAHb (3AJEJHO BID MOJEJI)
Y roJIOBHOmy MeHIO Bn6epiTb cyHKciIO REGLAGES (HAJIaUTyBAHHa), NOBepHyBwn pyKy,notIM niTBePdbTe. IChyIb pi3Hi HanaTuBaHHa.
Bn6epitb Heo6xHn npametp, nOBepTaOu npUky,notim niTBePdbTe. Bn6epitb 6axaHi npametpn Ta nIDTBepDbTe ue.
- IIndkaTop nipoJi3y
YbIMKHiTb a6o BnMKnHt b iHdkaTop npoi3y. KOnn BiH yBimKHeHn, texHOJorii i DaTuNKu DyxOBOi waΦn Bu3HaauHb peKOMeHDoBaHN Yac, KOJI KpaIe npOBODHTN cIKN npoiITNuHoro OunueHHa. Ycbomy pa3i Ha dncnlei BiO6paxKaETbcra CmBOJ . MoXHa Bn6patn ABTomatUHn peXm npoi3y, npoi3 npOTrrom DBOX rOdn A6o ekCnpec-nipoi3, kso 3aIIuKOBe TepNo B dyXobii waDi03BoJre ue 3po6ntn.
- Yac
3miHtB rOuHH, nIITBepDbTe, a NOTIM 3miHtB XBNiHH Ta 3HOBy nIITBepDbTe. RaKIO dYxOBy waΦy nID'EDHaHO Do MepeXi, yac 6ynde OHOBNeHO aBTOMaTnUHO. DIncPneM MoXHa nepeBecTN B peKIM CHy.
- Pekim Chy
NoJoxeHHr ON (YBIMKH.) - noracahnra
DinCnpeypee90cekyHd.
Поножени OFF (BUMKH.) — 3нженияckpaBOcTi uepe3 90 cekyHД.
-Пдклоченя
ДиВ. po3diI I ODo NiДКЛIOUeHЯ Ha CTOp. 15
AKTINByTe NiKIOUeHnHa DyXOBiI
waqi.Bu6epitb ON (YBIMKH.),a notim
niTBePdbTe.
3aBaHTaxTe Mo6IbHy nporpamy De Dietrich Smart Control Ha cMaprfoH i DotpmyTecra HcTpyKui.
-3Byk
HaTnCKaHHK HONOK dyXOBoi waΦn cynpoBOJxCyTBcra 3ByKObIMN cHrHaIamn. Uo6 yBIMKHyTu ci 3ByKn, HaTnCHiTb ON (YBIMKH.), a uo6 BUMKHyTu, HaTnCHiTb OFF (BUMKH.), a notim niDtBepDbTe.
- RACKpaBicTb
Bn6epitb Heo6xHn piBeHЯckpaBOcTi.
- KepyBaHHn JAmNoyKo
OCTynho Dba HanaStyBaHnHa Bn6ip. Noloxen ON (YBIMKH.): lamnoqka 3aIIwaTbcra BBIMKHeHOIO nIac ycx onepaui npiroTyBaHHa (OKpim yHKcii ECO). Noloxenr AUTO (ABTO): lamnoqka dYXBOOI waN BuMnKaetbcra nicra 3akInueHHaDaHoro Yacy nIac npiroTyBaHHa. Bn6epitb Heo6xIDhe NOLOXEHr Ta nIITBepDbTe.
MEHIO HAJALTYBAHb
-MoBa
Bn6epitb MOBy, nOTIM niTBepeBte.
Iicna BcTaHOBneHHa cacy 3aBepWeHH npiroToyBaHH
πiTBePbTe. Ha dncnpei 6yde BiO6paXaTncA yac KInca npiroToYBaHHa.
IPNMITKA. Ipouec npirotoybaHHa MoXHa 3anyctnTb6e3 Bn6opy Tpnbalocti a6o yacy 3aBepweHHra.
U cybomy pa3i, Bn3haunBwn DoCTaTHIO TpNBAJIcTb npriTOyBaHHa CtpaBN, 3ynHITb npriToTyBaHHa (INB. rnaBy «3ynHeHHa npoecCy npriToTyBaHHa)
3Y\PiNHEHHI PNIROTYBAHNA
ПОНЦЕСУ
3yynHnTnpoec npiroTyBaHHaHTNCiTBpyKy.
HaTnCHiTb STOP (CTON).
PiTBePbTe,HaTnChyBwn OUI (TAK), a notim nIiTBePbTe a6o HaTnCHiTb NON (HI) i niTBePbTe, 0o6 npOdoBXHTn npiroToYBaHHa.
6 IOPAIIIIOIO IIPIIOTYBAHHI

ФункциAIRFRY
Bnknaditb ctpaBn 6e3nocepeHbo Ha nepopobaHe Deko TaK, 0o6 BOHN He 3akpnbAIn OndHa OndHy, BnbepiB pexm iHTehCNBHorO 3anikAHn Air Fry i BCTaHOBIT Temnepatypy BiD 180 ^ C do 220^ . YcTaHOBIT nepopobaHe Deko Ha piBeHb 5,aPiDoH dJa 36npaHHa CokIB - Ha piBeHb 3.
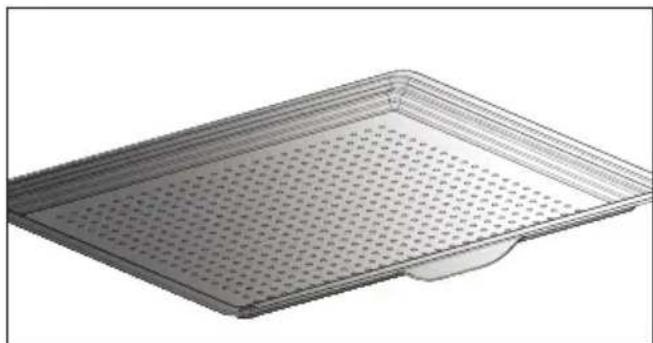
IHΦOPMAÇIINA TÁBЛиця ДлЯ PΕЖИМΥ IHTEHCINBHOΓO 3APIKAHнAIR FRY
3a yMOBn iDirpiBaHH npn 200 ^ C Kpim*
Piua 3 roTOBOro Ticta
TicTo DnA DomaHbOi niu
PoknadiTb niuy Ha pewiTy, 0o6 oTpMaTn xpyctke TictO (MOxHa noknactn npnip dIy BniiKmix rpnem i niou, 0o6 3axnCTnDyXOBy waCy BiD cnpy, 0o po3tikcra).
Hecolokn npir
CbIXnKi
3amopoxeHn ki
BnKOpncToByte aHOMiHiEBy oOpMy 3 aHTnnpnrapHm NOKpTTAM:
Ha Hii TiCTo 6yDe xpyCTKmM.
Ipeed TmM JIK BnKnaDaTNI KII Ha pewiTKy, IictaHbTe KOHTeHep i3 3amOpOKeHm KiIeM.
Φapшировahi oBOoyi
Ha dincnnei BiOobpaKaTmEtbcn HaHc 0m00s (0xb0c).
HanaTuYTe TaMep, NOBepHyBn pyKu
HATNCyBUn DnA PiTBePdxKeHHa.
NoUHeTbCzBOPoTHN BiDnIK yacy.
Iicra 3aKiHcHnB CbTaHOBHeoT PnBaNocTi npolyha 3ByKOBn CnHaJ. Uo6 Noro BmKHyTN, HATNCiTB 6yDb-ky KhONKy.
IPNMITKA. Bn MoKeTe 3MiHNTa6o BiMiHTn npOrpamy TaMepa B 6yDb-akn MOMeHT.
Uo6 cKacyBaTu, NOBepHiTbcra B MeHIO TaMepa Ta BCTaHObitb 3HaueHHra 0m00s (0xb0c).
Якwo haTnchTy nPykny niД yac 3BOpOTHOro BiDlkiy, ue 3ynnHtB BiDnik TaMepa.
OuHsEHnTa DoIgJa
3OBHIUSHI NOBEPXH
DocTyuHi Tprn zuknn nipoi3y. Tpnbaniictb 3aadaHO 3a3daJIeridb i He nIiJaRae 3MiHeHHIO.
BVKOHHЯ ZUKJIY CAMOQUNUEHHY

Pyro Auto (Abtonipoi3): TpuBae
Bid 1 roD. 30 xb. do 2 roD. 15 xb. dIy ouHHeHH B eHeprooeKTHBHomy pexnmi.

Pyro Express (Ekncpec-nipoJi3):
Дляцифункii,яктухмохнавикоростовbatи habрkinci rotubань,3адioeTbcra haponnuehe Tenno ДляшвдКОТаВТOMaTnUHOrO OuNSeHнpoбочi kamep: 3nerka 3abpydHehakemepa ouNzyeTbcr MeHwe HIX 3a rOdInHy.
Kydo dyxoba waopa doctaTHbo po3irpiTa, yHKci npolituHoro ouuueHHra TpNBae 59xbnHH, kuo Hi -1 roDHy 30 xBnHN.

Pyro 2H (Πipοπi3 2 roД):
nipoiTnue OunuHn TpNBa 2 roHNn DnpeTbHiOro OunuHn BHyTpIuHboi Kamepn dYxOBoi wa.
MNTTEBE CAMOOUHENH
Y roIobHomy MeHIO BnBepiTb cyHKciIO OUHSEHHra,notim niIDTBepDbTe.
- Bn6epitb nixo7aun cnKlc camoouueHH, HapnknaAD ABTOIPOJl3, a notim niTBepeBte.
3anyctntbcra nknipoi3y.Odpa3y nicna niTBepeXeHHn NOHETbcra 3BOpOTn Bidnik yacy.
IiD yac niponi3y Ha dincnnei nporpamaTopa BINO6paXaETbcra CnMBON BkA3ye Ha Te, 10 DBePcTa 3a6NOKoBaHo.
Iicna 3aBepweHn npoNiy noHetaCg a3a oxoJOnJKeHH, nI qac kOi dYXOBa waopa 3aNNwaetbcra 3a6NOKOBaHO.
CAMOOUHJENH3 BIDKJIADEHIM CTAPTOM
Dotpmytecb iHctpyKci, onncanx y nonepedhomy nyHKti.
Bn6epitb yac 3aBepweHn npiroToyBaHHy. YcTaHOBIb yac 3aBepweHn nipoi3y 3a DonOMOrO pUKN, a NOTIM nIDTBepDbTe.
Yepe3 KINbKa cekyHd dYXOBA 7aΦa nepeiDe B pexkM oUkyBaHHra, i 3anyck npoi3y 6yde BiKnaDeHo Do 3aHaHoro yacy 3aBepWeHHra.
Iicna3aBepweHH npoJitnUHoro OunueHH BmKHiTb dYXOBy wafo, HATNCHyBwn KnaBiuy ①.

Picna oxoJooKeHHa dyXBOi
waФи BnTpIb 6iIN noniB BonoroTO raHupkoIO. DuxOBA waΦa YncTa Ta ro-TOBaДЯ npriroTyBaHHa H Bn6paHnx peKmMax.
3AMIHA JAMPOUKN

3aTepeXeHH. NpeD 3amHIO
JaMnooyKn BiD'EdHaIte npncTpIn BiD Mepeksi, 0o6 3anobirtn pn3nky ypaXeHHN eJektpnHm cTpymOM. BkoHyBaTu nO onepaciIO Heo6xIDHO nicra OxolodKeHH npncTroIo.
XapaKTepeNCTnKn JAmNoUKn: 25 B, 220-240B3miHHoro cTpyM, 300^ G9.

Kko Iamnocka nepecTana npaIobatn, BN MOKeTe camOCTiHNo 3aMInHTn ii.
3HIMITb 3axnche CKNo Ta 3HIMITb JAmnoyky, BKNOPNCTOBHyOuN rymOBy pyKaBnUky, RaKa POnerWye npoec
dEmoHTaKy. BCTaBTe HOBy IamnoUky Ta BCTaHOBiTb Ha MicCe 3axnCHe CKNo.
Cen npncptpi ochaueho dxpeelom OCbitnennkna cy eheproeefektnbocti G.
PIMITKA.3a yMOBn pnproTybaHHa DBox pIBHX DeKN MOXHa BmMaTH HeoHocHo
PeuertiBnKOpHCTAHmdpixkXIB(aJeKntbBidMoJei)
InrpeicHTN:
Bopouho-2Kt.Boia-1240Mn.Cinb-4r.4naektn cyxnxdpixkxbnBnHm3amciTcIO mKcepmIO nOCTABTe nHimatncBdyoxby
PiroybaHn DnpeintB 3630BoropDkXBOO TCTa. IpeKnaIbTicTo B kApOMiUHy fOpM, 3HIMtB nctabKn Dn npApycB i noctabe fOpMy Ha nooby nobepxHn. Poirpiyeby 3 fykuie raparoi KOHeBekui do Temnepatyp 40-50 ^ C npotraom 5 xBNHN. BmKhIt dyoxby wap Ta 3annte ticTo dnn niinmanHa na25-30xunnn nn dioc zannuokoro Tenna.
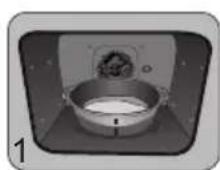
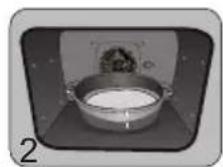
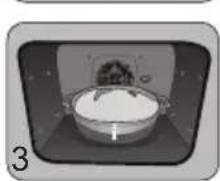
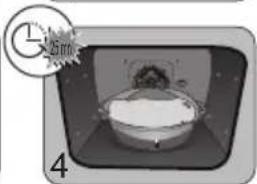

n nn nnnnnnnnnnnnnnnnnnnnnnnnnnnnnnnnnnnnnnnnnnnnnnnnnnnnnnnnnnnnnnnnnnnnnnnnnnnnnnnnnnnnnnnnnnnnnnnnnnnnnnnnnnnnnnnnnnnnnnnnnnnnnnn
n nn nnnnnnnnnnnnnnnnnnnnnnnnnnnnnnnnnnnnnnnnnnnnnnnnnnnnnnnnnnnnnnnnnnnnnnnnnnnnnnnnnnnnnnnnnnnnnnnnnnnnnnnnnnnnnnnnnnnnnnnnnnnnnnn
n nn nnn nnn nnn nnn nnn nnn nnn nnn nnn nnn nnn nnn nnn nnn nnn nnn nnn nnn nnn nnn nnn nnn nnn nnn nnn nnn nnn nnn nnn nnn nnn nnn nnn nnn nnn nnn nnn nnn nnn nnn nnn nnn nnn nnn nnn nnn nnn nnn nnn nnn nann nann nann nann nann nann

www.de-dietrich.com
De Dietrich
CREATEURD'EMOTIONS DEPUIS 1684
4
6 1
6
7
7 2
8 3
9 1
9 1
10 (x)
12
12 7
13 4
13
13 (n)
15 1970
15 1
17 5
19
20 6
20 1
21
22 7
22 1
23
31 1
31
32 8
32 (y)
33 19TYIn
33 1
34 9
34
35 "sensor" nih wwn nn
36 1
38 1
39 10
41 11
Tynwnnwny iynn - nian nnin
n nn nn nn nn nnn nnn nnn
nTwunuW Twn nwn 1
y,nn nn n 197 1n nn nn nn nn nn
.
Dnwn ,17nn nyn 7nna - nn nn nn nn nn nn nn nn nn nn nn nn nn nn nn nn nn nn nn nn nn nn nn nn nn nn nn nn nn nn nn nn nn nn nn nn nn nn nn nn nn nn nn nn nn nn nn nn nn nn nn nn nn nn nn nn nn nn nn nn nn nn nn nn nn nn nn nn nn nn nn nn nn nn nn nn nn nn nn nn nn nn nn nn nn nn nn nn nn nn nn nn nn nn nn nn nn
.
.
17 17 17 17 17 17 17 17 17 17 17 17 17 17 17 17 17 17 17 17 17 17 17 17
X XIN7 W, WONN N27 O Y TIN 19X NNN NNNN NNN NNN NNN NNNN NNNN NNNN NNNN
.

T T- y w 7 n wnn 1
n D y d x T y i,nyi 8
n nn n N W IN ,N T
IX nn nn ,yI I O'ON IN
x nn nn n nn nn nn
X nn nn nn nn nn nn
Dy nuy D'7 wox7 1X -
n7 D'7 wox7 1X - .won
.ynwn x7 won nn
Dxu XTIiD'7 y nxw7 u
:

nnnnn nn nnnn nnnnnnnnnnnnnnnnnnnnnnnnnnnnnnnnnnnnnnnnnnnnnnnnnnnnnnnnnnnnnnnnnnnnnnnnnnnnnnnnnnnnnnnnnnnnnnnnnnnnnnnnnnnnnnnnnnnnnnn
TINNNN NNNN,NNNT D'UNN TUTN TUTN 11111111111111111111111111111111111111111
77nnn nnyn nn 09n y 1.
wn 7n nn nnnn nn nnnn nn nnnn nn nnnn nn nnnn nn nnnn nn nnnn nn nnnn nn nnnn nn nnnn nn nnnn nn nnnn nn nnnn nn nnnn nn nnnn nn nnnn nn nnnn nn nnnn nn nnnn nn nnnn nn nnnn nn nnnn nn nnnn nn nnnn nn nnnn nn nann nn nnnn nn nnnn nn nnnn nn nnnn nn nnnn nn nnnn nn nnnn nn nnnn nn nnnn nn nnnn nn nnnn nn nnnn nn nnnn nn
IONX7 IN nnnn nn 1X .INn nn
:nn

wnnn nn nn nn n nn nn nn nn nn nn nn nn nn nn nn nn nn nn nn nn nn nn nn nn nn nn nn nn nn nn nn nn nn nn nn nn nn nn nn nn nn nn nn nn nn nn nn nn nn nn nn nn nn nn nn nn nn nn nn nn nn nn nn nn nn nn nn nn nn nn nn nn nn nn nn nn nn nn nn nn nn nn nn nn nn nn nn nn nn nn nn nn nn nn nn nn nn nn nn nn nn nn nn nn gnnnn gnnnn gnnnn gnnnn gnnnn gnnnn gnnnn gnnnn gnnnn gnnnn gnnnn gnnnn gnnnn gnnnn gnnnn gnnnn gnnnn gnnnn gnnnn gnnnn gnnnn gnnnn gnnnn gnnnn gnnnn gnnnn gnnnn gnnnn gnnnn gnnnn gnnnn gnnnn gnnnn gnnnn gonnnn gnnnn gnnnn gnnnn gnnnn gnnnn gnnnn gnnnn gnnnn gnnnn gnnnn gnnnn gnnnn gnnnn gnnnn gnennn gnnnn gnnnn gnnnn gnnnn gnnnn gnnnn gnnnn gnnnn gnnnn gnnnn gnnnn gnnnn gnnnn gn
77 nwnn nn nnnn
xin,ynnn 7n Dn - ninnniu ,ninn -y nni 7nynn - nnnoi nX .n0
nwnnnn nix 17n7 n- Dwnn Dtinu 6x IINX .nnnn
Jn nn nnnn nn nnnn nn nnnnnnnnnnnnnnnnnnnnnnnnnnnnnnnnnnnnnnnnnnnnnnnnnnnnnnnnnnnnnnnnnnnnnnnnnnnnnnnnnnnnnnnnnnnnnnnnnnnnnnnnnnnnnnnnnnnnnnnnnnnnnnnnnnnnnnnnnnnnnnnnnnnn nn nn nn nn nn nn nn nn nn nn nn nn nn nn nn nn nn nn nn nn nn nn nn nn nn nn nn nn nn nn nn nn nn nn nn nn nn nn nn nn nn nn nn nn nn nn nn nn nn nn nn nn nn nn nn nn nn nn nn nn nn nn nn nn nn nn nn nn nn nn nn nn nn nn nn nn nn nn nn nn nn nn nn nn nn nn nn nn nn nn nn nn nn nn nn nannn nannn nannn nannn nannn nannn nannn nannn nannn nannn nannn nannn nannn nannn nannn nannn nannn nannn nannn nannn nannn nannn nannn nannn nannn nannn nannn nannn nannn nannn nannn nannn nannn nannn
1
n 50X50
n nn nnnn nn nnnn (A) nnnnnnnnnn nn nnnn nnnn (B) nnnnnnnn (D-C) 70 nn nn nn nn nn nn nn nn nn nn nn nn nn nn nn nn nn nn nn nn nn nn nn nn nn nn nn nn nn nn nn nn nn nn nn nn nn nn nn nn nn nn nn nn nn nn nn nn nn nn nn nn nn nn nn nn nn nn nn nn nn nn nn nn nn nn nn nn nn nn nn nn nn nn nn nn nn nn nn nn nn nn nn nn nn nn nn nn nn

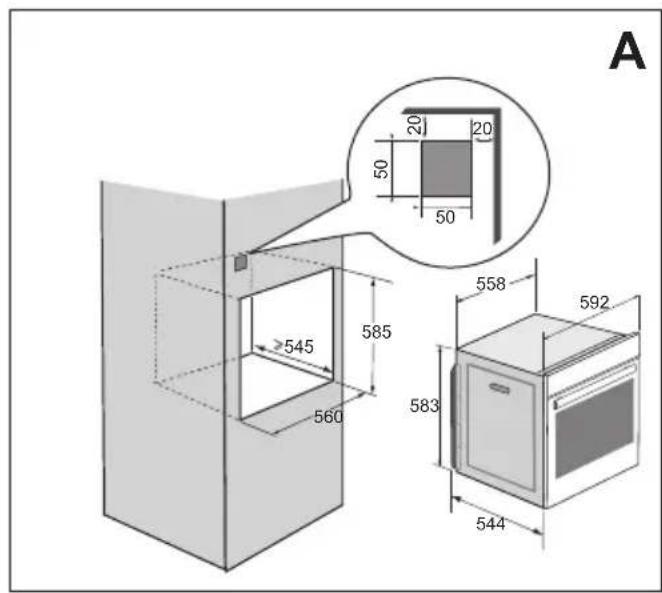
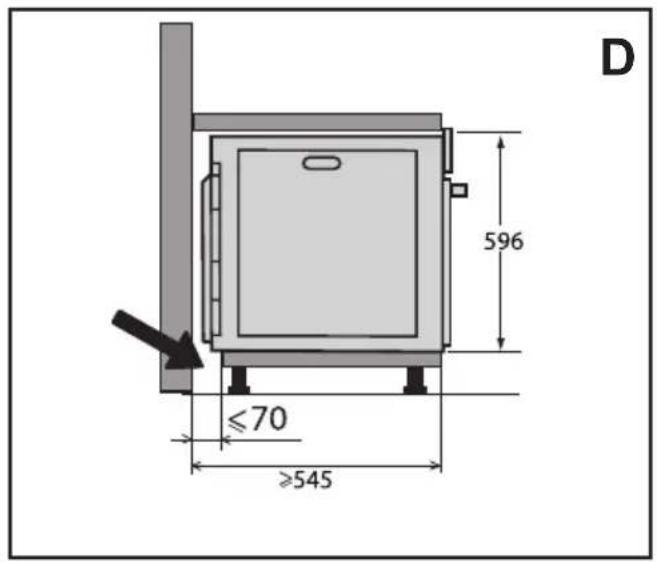
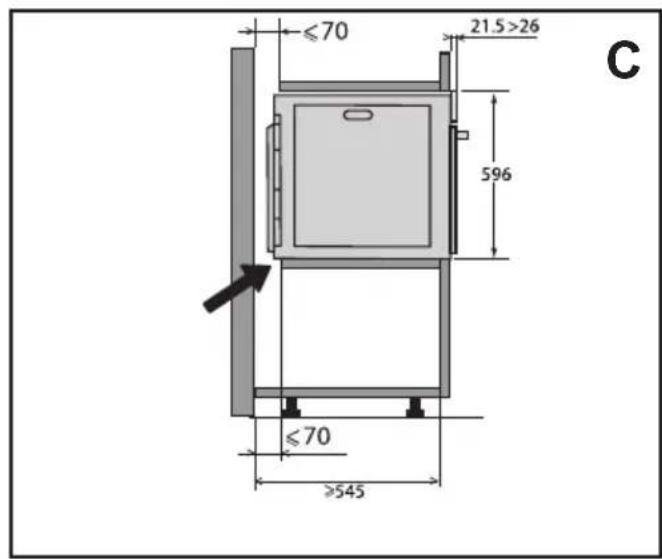
#
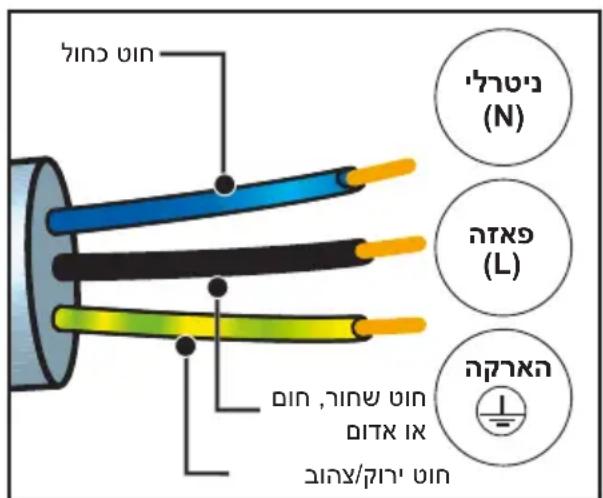
nun nynnn nn n nn nnn nnn nnn nnn nnn nnn nnn nnn nnn nnn nnn nnn nnn nnn nnn nnn nnn nnn nnn nnn nnn nnn nnn nnn nnn nnn nnn nnn nnn nnn nnn nnn nnn nnn nnn nnn nnn nnn nnn nnn nnn
3 17n 7n n 7n n 7n n 7n n 7n n 7n n 7n n 7n n 7n n 7n n 7n n 7n n 7n n 7n n 7n n 7n n 7n n 7n n 7n n 7n n 7n n 7n n 7n n 7n n 7n n 7n
nnnnnnnnnnnnnnnnnnnnnnnnnnnnnnnnnnnnnnnnnnnnnnnnnnnnnnnnnnnnnnnnnnnnnnnnnnnnnnnnnnnnnnnnnnnnnnnnnnnnnnnnnnnnnnnnnnnnnnnnnnnnnnnnnnnnnnn
yixin nn nnnn nn nnon nn
n nn nnnn
60Hz 50Hz
.07y n 901 nyn
2.
nONNIN
nTn7yN7INnnnnn7n7x
nx.nn7nDnuuun nnnuu nynn
nXynuu7nuuqnuu y7Dtn
.
n nn nnnnnnnnnnnnnnnnnnnnnnnnnnnnnnnnnnnnnnnnnnnnnnnnnnnnnnnnnnnnnnnnnnnnnnnnnnnnnnnnnnnnnnnnnnnnnnnnnnnnnnnnnnnnnnnnnnnnnnnnnnnnnnnnn
7777777
n nn nnn nn nnn nn nn nn nn nn nn nn nn nn nn nn nn nn nn nn nn nn nn nn nn nn nn nn nn nn nn nn nn nn nn nn nn nn nn nn nn nn nn nn nn nn nn nn nn nn nn nn nn nn nn nn nn nn nn nn nn nn nn nn nn nn nn nn nn nn nn nn nn nn nn nn nn nn nn nn nn nn nn nn nn nn nn nn nn nn nn nn nn nn nn nn nn nn nn nn nn nn nn nn
JNNN7IO9DyTN
n7y9nn nn n nn nn nn nn nn nn
y
()

n nn nnnn nnnnnnnnnnnnnnnnnnnnnnnnnnnnnnnnnnnnnnnnnnnnnnnnnnnnnnnnnnnnnnnnnnnnnnnnnnnnnnnnnnnnnnnnnnnnnnnnnnnnnnnnnnnnnnnnnnnnn
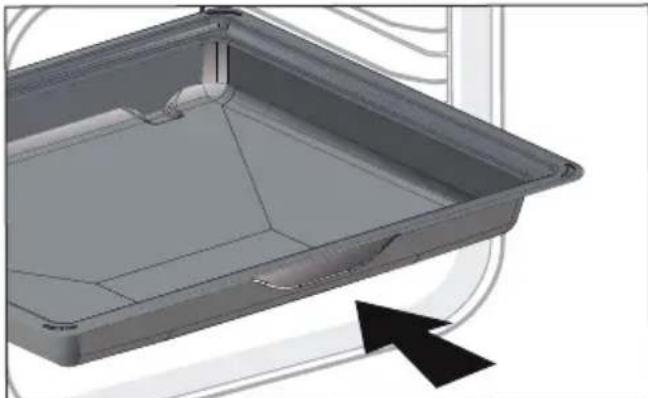
n nnnn nn nnnn nnnn nnnn nnnn nnnn nnnn nnnn nnnn nnnn nnnn nnnn nnnn nnnn nnnn nnnn nnnn nnnn nnnn nnnn nnnn nnnn nnnn nnnn nnnn nnnn nnnn nnnn nnnn nnnn nnnn nnnn nnnn nnnn nnnn

n nn n 77 970 77 nnn nn nn - n nn n nn n nn n nn n nn n nn n nn n nn n nn n nn n nn n nn n nn n nn n nn n nn n nn n nn n nn n nn n nn n nn n nn n nn n nn n nn n nn n nn n nn n nn n nn n nn n nn n nn n nn n nn n nn
nnnn nnon

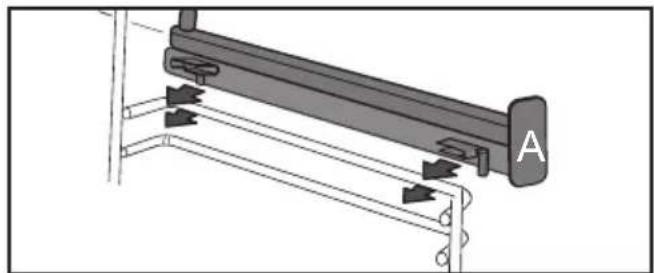
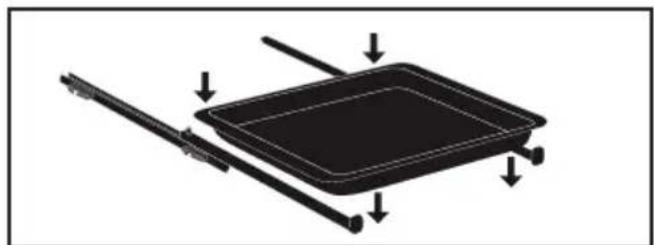
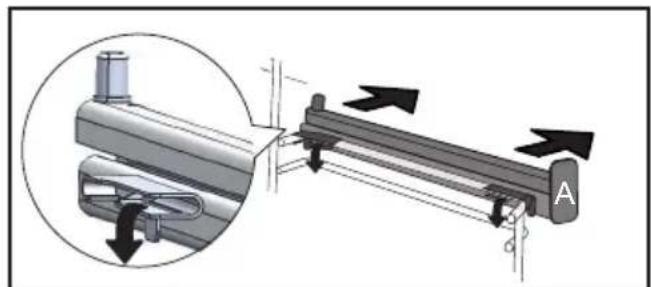
y 771 yann nn nnnn nn nn nn nn nn nn nn nn nn nn nn nn nn nn nn nn nn nn nn nn nn nn nn nn nn nn nn nn nn nn nn nn nn nn nn nn nn nn nn nn nn nn nn nn nn nn nn nn nn nn nn nn nn nn nn nn nn nn nn nn nn nn nn nn nn nn nn nn nn nn nn nn nn nn nn nn nn nn nn nn nn nn nn nn nn nn nn nn nn nn nn nn nn nn nn nn nn nn nn nn
nnnnn nnon nn
n nn n 2 nn nnn nn nn (5 ty 2) nn nn nn nn nn nn nn nn nn nn nn nn nn nn nn nn nn nn nn nn nn nn nn nn nn nn nn nn nn nn nn nn nn nn nn nn nn nn nn nn nn nn nn nn nn nn nn nn nn nn nn nn nn nn nn nn nn nn nn nn nn nn nn nn nn nn nn nn nn nn nn nn nn nn nn nn nn nn nn nn nn nn nn nn nn nn nn nn nn nn nn nn nn nn nn nn nn nn nn nn
honn nn nnnn nn nnnn nn nnnn nn nnnn nn nnnn nn nnnn nn nnnn nn nnnn nn nnnn nn nnnn nn nnnn nn nnnn nn nnnn nn nnnn nn nnnn nn nnnn nn nnnn nn nnnn nn nnnn nn nnnn nn nnnn nn nnnn nn nnnn nn nnnn nn nnnn nn nnnnn nn nnnn nn nnnn nn nnnn nn nnnn nn nnnn nn nnnn nn nnnn nn nnnn nn nnnn nn nnnn nn nnnn nn nnnn nn nnnn nn nnnn nn nnnn nn nnnn nn nnnn nn nnnn nn nnnn nn nnnn nn nnnn nn nnnn nn nnnn nn nnnn nn nnn
ninn nnn nn nnn nnn nnn nnn
n nn nnn nn nn nn nn nn nn nn nn nn nn nn nn nn nn nn nn nn nn nn nn nn nn nn nn nn nn nn nn nn nn nn nn nn nn nn nn nn nn nn nn nn nn nn nn nn nn nn nn nn nn nn nn nn nn nn nn nn nn nn nn nn nn nn nn nn nn nn nn nn nn nn nn nn nn nn nn nn nn nn nn nn nn nn nn nn nn nn nn nn nn nn nn nn nn nn nn nn nn nn nn
Q
U
ywn 11
nnu n
100 111
n
ywnnnn
in 07wn nn n, uynn w
n nn nnnnnnnnnnnnnnnnnnnnnnnnnnnnnnnnnnnnnnnnnnnnnnnnnnnnnnnnnnnnnnnnnnnnnnnnnnnnnnnnnnnnnnnnnnnnnnnnnnnnnnnnnnnnnnnnnnn
Q
.19on
(070) nTn 09n
n
nn 1970 nyxynn no7y 1y nn nynn nn nn 15 n
nynpnnn"ON"
De Dietrich Smart" 77 n nn nn ITIN
"Control
7-
yun nn,wnwnn OFF ON nn
1
NIN
n
n
ON nnnn nn nnnn nn nnnn nn nnnn, AUTO .(ECO nnnn nn nn nn nn nn nn nn nn nn nn nn nn nn nn nn nn nn nn nn nn nn nn nn nn nn nn nn nn nn nn nn nn nn nn nn nn nn nn nn nn nn nn nn nn nn nn nn nn nn nn nn nn nn nn nn nn nn nn nn nn nn nn nn nn nn nn nn nn nn nn nn nn nn nn nn nn nn nn nn nn nn nn nn nn
yN
107-7y"nnn"nnn,7n n9n
.
Tn 10 nnn nn nn
.17U
INXINNTANNN
11nn
17) 1711111111111111111111111111111111
n nn nnnnnnnnnnnnnnnnnnnnnnnnnnnnnnnnnnnnnnnnnnnnnnnnnnnnnnnnnnnnnnnnnnnnnnnnnnnnnnnnnnnnnnnnnnnnnnnnnnnnnnnnnnnnnnnnnnnnnnnnnnnnnnnnnnnnnnnnnnnnnnnnnnnnnnnnn
JNT 7NNN NNN DNN
nyu
n nn nnnn nn nn nn nn nn nn nn nn nn nn nn nn nn nn nn nn nn nn nn nn nn nn nn nn nn nn nn nn nn nn nn nn nn nn nn nn nn nn nn nn nn nn nn nn nn nn nn nn nn nn nn nn nn nn nn nn nn nn nn nn nn nn nn nn nn nn nn nn nn nn nn nn nn nn nn nn nn nn nn nn nn nn nn nn nn nn nn nn nn nn nn nn nn nn nn nn nn nn nn nn
xun wu wu
(Sleep) niv axn -
90 77 xn ,ON
nNn nn nnnn ,OFF
.90
#
nann -
nannnnn nnnn nn nnnn (Diagnostic)
nion,niinniuynnynn nnDy
097 7 nwn "019" nwn
nNnNnNn
(DEMO) nnnn -
.(ON)nXn
DnN 1970 nIyNxPINN no
De Dietrich" nihon nn nnnn nn nn nn nn nn nn nn nn nn nn nn nn nn nn nn nn nn nn nn nn nn nn nn nn nn nn nn nn nn nn nn nn nn nn nn nn nn nn nn nn nn nn nn nn nn nn nn nn nn nn nn nn nn nn nn nn nn nn nn nn nn nn nn nn nn nn nn nn nn nn nn nn nn nn nn nn nn nn nn nn nn nn nn nn nn nn nn nn nn nn nn nn nn nn nn nn nn nn nn nn. "De Dietrich Smart Control"
n nnnn nn nnnnnnnnnnnnnnnnnnnnnnnnnnnnnnnnnnnnnnnnnnnnnnnnnnnnnnnnnnnnnnnnnnnnnnnnnnnnnnnnnnnnnnnnnnnnnnnnnnnnnnnnnnnnnnnnn
www.dedietrich-electromenager.com 1901
nivniin nn 1970 nixnx pinn no
| הכלהה הכלהה הכלהה הכלהה הכלהה הכchia הכchia הכchia הכchia הכchia הכchia הכchia הכchia הכchia הכchia הכchia הכchia הכchia הכchia הכchia הכchia הכchia הכchia הכchia הכchia הכchia הכchia הכchia הכchia הכchia הכcia הכchia הכchia הכchia הכchia הכchia הכchia הכchia הכchia הכchia הכchia הכchia הכchia הכchia הכchia הכchia הכchia הכchia הכchia הכchia הכchia הכchia הכchia הכchia הכchia הכzia הכzia הכzia הכzia הכzia הכzia הכzia הכzia הכzia הכzia הכzia הכzia הכzia הכzia הכzia הכzia הכzia הכzia הכzia הכzia הכzia הכzia הכzia הכzia הכzia הכchia הכchia הכchia הכchia הכchia הכchia הכchia הכchia הכchia הכchia הכchia הכchia הכchia הכchia הכchia הכchia הכchia הכchia הכchia הכchia ה醜 ה醜 ה醜 ה醜 ה醜 ה醜 ה醜 ה醜 ה醜 ה醜 ה醜 ה醜 ה醜 ה醜 ה醜 ה醜 ה醜 ה醜 ה醜 ה醜 ה醜 ה醜 ה醜 ה醜 ה醜 ה�內 ה醜 ה醜 ה醜 ה醜 ה醜 ה醜 ה醜 ה醜 ה醜 ה醜 ה醜 ה醜 ה醜 ה醜 ה醜 ה醜 ה醜 ה醜 ה醜 ה醜 ה醜 ה醜 ה醜 ה醜 ה醦 ה醜 ה醜 ה醜 ה醜 ה醜 ה醜 ה醜 ה醜 ה醜 ה醜 ה醜 ה醜 ה醜 ה醜 ה醜 ה醜 ה醜 ה醜 ה醜 ה醜 ה醜 ה醜 ה醜 ה醜 ה醕 - - - - - - - - - - - - - - - - - - - - - - - - - - - - - - - - - - - - - - - - - - - - - - - - - - - - - - - - - - - - - - - - - - - - - - - - - - - - - - - - - - - - - - - - - - - - - - - - - - - - - | ||
| IOS De Dietrich Smart Control II | ANDROID (De Dietrich Smart Control) | - - - - - - - - - - - - - - - - - - - - - - - - - - - - - - - - - - - - - - - - - - - - - - - - - - - - - - - - - - - - - - - - - - - - - - - - - - - - - - - - - - - - - - - - - - - - - - - - - - - - - |
| De xiamen yin hou you you you you you you you you you you you you you you you you you you you you you you you you you you you you you you you you you you you you you you you you you you you you you you you you you you you you you you you you you you you you you you you you you you you you you you you you you you you you you you you you you you you you you you you you you you you you you you you you you you you youyou you you you you you you you you you you you you you you you you you you you you you you you you you you you you you you you you you you you you you you you you you you you you you you you you you you you you you you you you you you you you you you you you you you you you you you you you you you you you you you you you you you you you you you you you you you you you you you you you you you you - - - - - - - - - - - - - - - - - - - - - - - - - - - - - - - - - - - - - - - - - - - - - - - - - - - - - - - - - - - - - - - - - - - - - - - - - - - - - - - - - - - - - - - - - - - - - - - - - - - - - - - - - - - - - - - - - - - - - - - - - - - - - - - - - - - - - - - - - - - - - - - - - - - - - - - - - - - - - - - - - - - - - - - - - - - - - - - - - - - - - - - - - - - - - - - - - - - - - - - - - - - - - - - - - - - - - - - - - - - - - - - - - - - - - - - - - - - - - - - - - - - - - - = 0 | ||
y

nniin nn nnn ninn no
DIO Nnu, IINN NNNN NNNN DNNN NNNN .IINN ININN NNNN .IINN NNNN .IINN NNNN
nX nnnn 1n nn -
yynnnn nn nnnn nn
n n nn nnnn nnnn nnnn nnnn nnnn nnnn nnnn nnnn nnnn nnnn nnnn nnnn nnnn nnnn nnnn nnnn nnnn nnnn nnnn nnnn nnnn nnnn nnnn nnnn nnnn nnnn nnnn nnnn nnnn nnnn nnnn nnnn nnnn nnnn nn
y
"STOP" n
IN, NIX "P" nNnXn nn nnnn Xn Xn Xn Xn Xn Xn
Tn
n nn nnnnnnnnnnnnnnnnnnnnnnnnnnnnnnnnnnnnnnnnnnnnnnnnnnnnnnnnnnnnnnnnnnnnnnnnnnnnnnnnnnnnnnnnnnnnnnnnnnnnnnnnnnnnnnnnnnnnnnnnnnnnnnnnnnnnnnnnnnnnnnn
nnn 7 nnnn nn nnnn nn nnnn
x (nnu nnnnni 1n ,nuon) .
nno
Xn nn nnnnnnnnnnnnnnnnnnnnnnnnnnnnnnnnnnnnnnnnnnnnnnnnnnnnnnnnnnnnnnnnnnnnnnnnnnnnnnnnnnnnnnnnnnnnnnnnnnnnnnnnn
n nn nnnn nn
n nn nn nnnnnnnnnnnnnnnnnnnnnnnnnnnnnnnnnnnnnnnnnnnnnnnnnnnnnnnnnnnnnnnnnnnnnnnnnnnnnnnnnnnnnnnnnnnnnnnnnnnnnnnnnnnnnnnnnnnnnnn
wn
n n nn nn nn nn nn nn nn nn nn nn nn nn nn nn nn nn nn nn nn nn nn nn nn nn nn nn nn nn nn nn nn nn nn nn nn nn nn nn nn nn nn nn nn nn nn nn nn nn nn nn nn nn nn nn nn nn nn nn nn nn nn nn nn nn nn nn nn nn nn nn nn nn nn nn nn nn nn nn nn nn nn nn nn nn nn nn nn nn nn nn nn nn nn nn nn nn nn nn nn nn
797x7y719

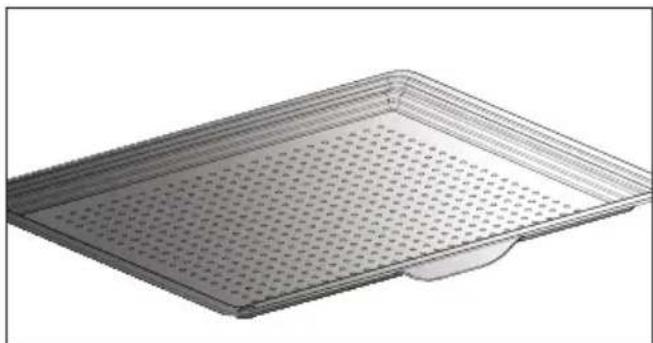
TNNNINNINNINNNNNNNNNNNNNNNNNNNNNNNNNNNNNNNNNNNNNNNNNNNNNNNNNNNNNNNNNNNNNNNNNNNNNNNNNNNNNNNNNNNNNNNNNNNNNNNNNNNNNNNNNNN
Sixn noun
1777777777777777777777777777777777777777
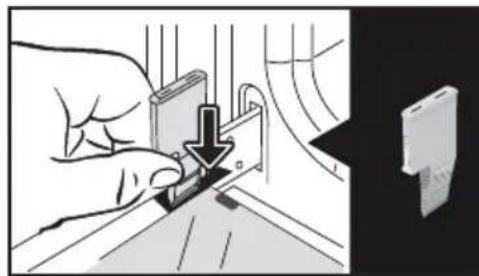
nnu:nu nnn nn nnn nnn nnn nnn nnn nnn nnn nnn nnn nnn nnn nnn nnn nnn nnn nnn nnn nnn nnn nnn nnn nnn nnn nnn nnn nnn nnn nnn nnn nnn nnn nnn nnn nnn nnn nnn nnn nnn nnn nnn nnn nnn nnn nnn nnn nnn nnn nnn nnn nnn nann
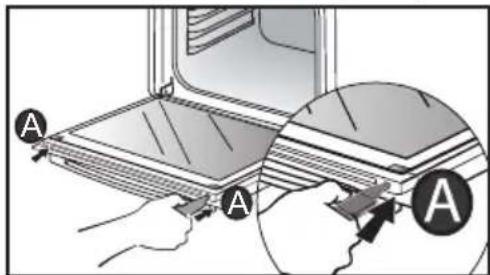
ninn nnn nn nnn nn nnn nn nnn nn nnn nn
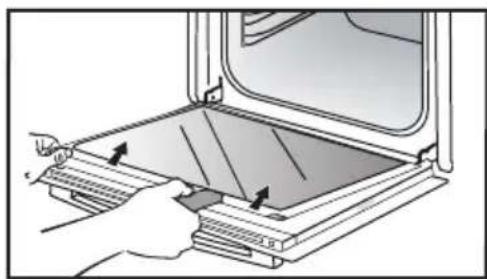
n nn nnnn nn
DINN NIN NIN DYNI INTIN NIN NIN NIN NIN NIN NIN NIN NIN NIN NIN NIN NIN NIN NIN NIN NIN NIN NIN NIN NIN NIN NIN NIN NIN NIN NIN NIN NIN NIN NIN NIN NIN NIN NIN NIN NIN NIN NIN NIN NIN NIN NIN NIN NIN NIN NIN NIN NIN NIN NIN
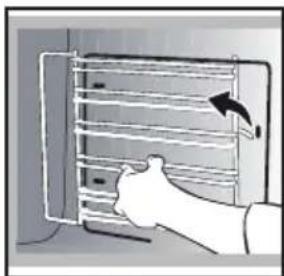
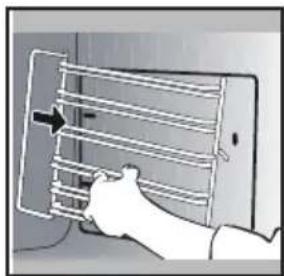
n7tn n0Dor
#

"SENSOR"-n n n n nn nnn nn nnn nn nn nn nn .AI SENSOR
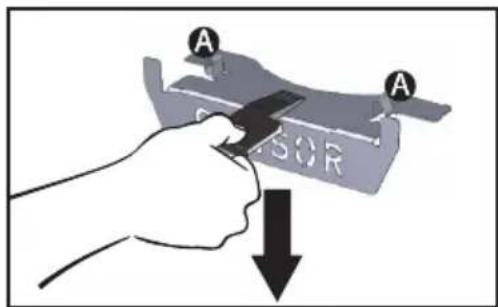
"SENSOR-n nnnn nn nn nn nn nn nn nn nn nn nn nn nn nn nn nn nn nn nn nn nn nn nn nn nn nn nn nn nn nn nn nn nn nn nn nn nn nn nn nn nn nn nn nn nn nn nn nn nn nn nn nn nn nn nn nn nn nn nn nn nn nn nn nn nn nn nn nn nn nn nn nn nn nn nn nn nn nn nn nn nn nn nn nn nn nn nn nn nn nn nn nn nn nn nn nn nn nn nn nn nn
7 177 177 177 177 177 177 177 177 177 177 177
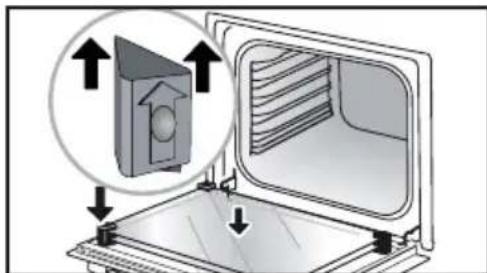
n nn nnnn nn nnnn nn nnnn nn nnnn nn nnnn nn nnnn nn nnnn nn nnnn nn nnnn nn nnnn nn nnnn nn nnnn nn nnnn nn nnnn nn nnnn nn nnnn nn nnnn nn nnnn nn nnnn nn nnnn nn nnnn nn nnnn nn nnnn nn nnnn nn nnnn nn nannn nn nnnn nn nnnn nn nnnn nn nnnn nn nnnn nn nnnn nn nnnn nn nnnn nn nnnn nn nnnn nn nnnn nn nnnn nn nnnn nn nnnn nn
nnnnn nnnnnnnnnnnnnnnnnnnnnnnnnnnnnnnnnnnnnnnnnnnnnnnnnnnnnnnnnnnnnnnnnnnnnnnnnnnnnnnnnnnnnnnnnnnnnnnnnnnnnnnnnnnnnnnnnnnnnnnnnnnnnnnnnnnnnnnnnnnnnnnnnn nn
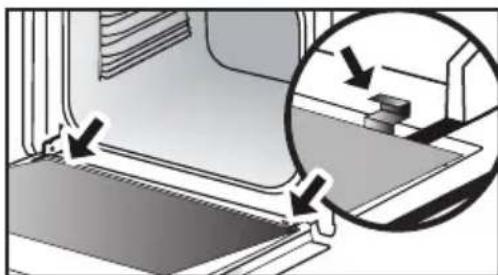

.70070n Tn n Nx INXIN
nxy 0779
IINXn 100nn n. 1111111111111111111111111111111
Information for domestic ewes (UE n° 68/2014)
Information on sports balls (U.E. p. 66/2014)
N: Symbol-FR, Symbole-CS, Znacka-DA:Symbol-DE, Symbi
| Symbol | Unit | Value | |||||||||||||||||||||||||||||||||||||||||||||||||||||||||||||||||||||||||||||||||||||||||||||||||||||||||||||||||||||||||||||||||||||||||||||||||||||||||||||||||||||||||||||||||||||||||||||||||||||||||||||||||||||||||||||||||||||||||||||||||||||||||||||||||||||||||||||||||||||||||||||||||||||||||||||||||||||||||||||||||||||||||||||||||||||||||||||||||||||||||||||||||||||||||||||||||||||||||||||||||||||||||||||||
| KCD25P | KCD25T | KXT25P | KXT25S | KXT25T | KXT25P | KXT15P | KXT15S | KXT25V | KXT25T | KXT25V | KXT25V | KXT15V | KXT15W | KXT15W | KXT25W | KXT25V | KXT15W | KXT15W | KXT25W | KXT25W | KXT15W | KXT15W | KXT25W | KXT15W | KXT25W | KXT15W | KXT25W | KXT15W | KXT15W | KXT25W | KXT15W | KXT25W | KXT15W | KXT25W | KXT15W | KXT25W | KXT15W | KXT25W | KXT15W | KXT25W | KXT15W | KXT25W | KXT15W | KXT25W | KXT15W | KXT25W | - | - | - | - | - | - | - | - | - | - | - | - | - | - | - | - | - | - | - | - | - | - | - | - | - | - | - | - | - | - | - | - | - | - | - | - | - | - | - | - | - | - | - | - | - | - | - | - | - | - | 0.0002937 | - | - | - | - | - | - | - | - | - | - | - | - | - | - | - | - | - | - | - | - | - | - | - | - | - | - | - | - | - | - | - | - | - | - | - | - | - | - | - | - | - | - | - | - | - | - | - | - | - | EN: Symbol:FR. Symbol:ES. Znaska-DA:SYMBOL:DE:SYMBOL:ES. Simbo:IT. Simbo:NL. Simbo:PL. Oznacenia-PT. Simbo:EL. Oznacenia-PT. Simbo:SK:SYMBOL:EL. Oznacenia-PT. Simbo:EL. Oznacenia-PT. Simbo:NL. Oznacenia-PT. Simbo:EL. Oznacenia-PT. Simbo:EL. Oznacenia-PT. Simbo:EL. Oznacenia-PT. Simbo:EL. Oznacenia-PT. Simbo:EL. Oznacenia-PT. Simbo:EL. Oznacenia-PT. Simbo:EL. Oznacenia-PT. Simbo:EL. Oznacenia-PT. Simbo:EL. OznACINA:SYMBOL:EL. OznACINA:SYMBOL:EL. OznACINA:SYMBOL:EL. OznACINA:SYMBOL:EL. OznACINA:SYMBOL:EL. OznACINA:SYMBOL:EL. OznACINA:SYMBOL:EL. OznACINA:SYMBOL:EL. OznACINA:SYMBOL:EL. OznACINA:SYMBOL:EL. OznACINA:SY☐E:SYMBOL:EL. OznACINA:SYMBOL:EL. OznACINA:SYMBOL:EL. OznACINA:SYMBOL:EL. OznACINA:SYMBOL:EL. OznACINA:SYMBOL:EL. OznACINA:SYMBOL:EL. OznACINA:SYMBOL:EL. OznACINA:SYMBOL:EL. OznACINA:SYMBOL:EL. OznACNA:SYMBOL:EL. OznACINA:SYMBOL:EL. OznACINA:SYMBOL:EL. OznACINA:SYMBOL:EL. OznACINA:SYMBOL:EL. OznACINA:SYMBOL:EL. OznACINA:SYMBOL:EL. OznACINA:SYMBOL:EL. OznACINA:SYMBOL:EL. OznACINA:SYMBOL:EL. OznACERA:SYMBOL:EL. OznACERA:SYMBOL:EL. OznACERA:SYMBOL:EL. OznACERA:SYMBOL:EL. OznACERA:SYMBOL:EL. OznACERA:SYMBOL:EL. OznACERA:SYMBOL:EL. OznACERA:SYMBOL:EL. OznACERA:SYMBOL:EL. OznACERA:SYMBOL:EL. OznACENA:SYMBOL:EL. OznACENA:SYMBOL:EL. OznACENA:SYMBOL:EL. OznACENA:SYMBOL:EL. OznACENA:SYMBOL:EL. OznACENA:SYMBOL:EL. OznACENA:SYMBOL:EL. OznACENA:SYMBOL:EL. OznACENA:SYMBOL:EL. OznACENA:SYMBOL:EL. OznACERA:SYMBOL:EL. OznACERA:SYMBOL:EL. OznACERA:SYMBOL:EL. OznACERA:SYMBOL:EL. OznACERA:SYMBOL:EL. OznACERA:SYMBOL:EL. OznACERA:SYMBOL:EL. OznACERA:SYMBOL:EL. OznACERA:SYMBOL:EL. OznACAAA:SYMBOL:EL. OznACAA:SYMBOL:EL. OznACAA:SYMBOL:EL. OznACAA:SYMBOL:EL. OznACAA:SYMBOL:EL. OznACAA:SYMBOL:EL. OznACAA:SYMBOL:EL. OznACAA:SYMBOL:EL. OznACAA:SYMBOL:EL. OznACAA:SYMBOL:EL. OznACAA:SYMBOL:EL. OznACAAA:SYMBOL:EL. OznACAA:SYMBOL:EL. OznACAA:SYMBOL:EL. OznACAA:SYMBOL:EL. OznACAA:SYMBOL:EL. OznACAA:SYMBOL:EL. OznACAA:SYMBOL:EL. OznACAA:SYMBOL:EL. OznACAA:SYMBOL:EL. OznACAAA:SYMBOL:EL. OznACAAA:SYMBOL:EL. OznACAA:SYMBOL:EL. OznACAA:SYMBOL:EL. OznACAA:SYMBOL:EL. OznACAA:SYMBOL:EL. OznACAA:SYMBOL:EL. OznACAA:SYMBOL:EL. OznACAA:SYMBOL:EL. OznACAA:SYMBOL:EL. OznACCAA:SYMBOL:EL. OznACAA:SYMBOL:EL. OznACAA:SYMBOL:EL. OznACAA:SYMBOL:EL. OznACAA:SYMBOL:EL. OznACAA:SYMBOL:EL. OznACAA:SYMBOL:EL. OznACAA:SYMBOL:EL. OznACAA:SYMBOL:EL. OznACAA:SYMBOL:EL. OznACCA:SYMBOL:EL. OznACCA:SYMBOL:EL. OznACCA:SYMBOL:EL. OznACCA:SYMBOL:EL. OznACCA:SYMBOL:EL. OznACCA:SYMBOL:EL. OznACCA:SYMBOL:EL. OznACCA:SYMBOL:EL. OznACCA:SYMBOL:EL. OznACCA:SYMBOL:EL. OznACAA:SYMBOL:EL. OznACAA:SYMBOL:EL. OznACAA:SYMBOL:EL. OznACAA:SYMBOL:EL. OznACAA:SYMBOL:EL. OznACAA:SYMBOL:EL. OznACAA:SYMBOL:EL. OznACAA:SYMBOL:EL. OznACAA:SYMBOL:EL. OznACCAA:SYMBOL:EL. OznACCA:SYMBOL:EL. OznACCA:SYMBOL:EL. OznACCA:SYMBOL:EL. OznACCA:SYMBOL:EL. OznACCA:SYMBOL:EL. OznACCA:SYMBOL:EL. OznACCA:SYMBOL:EL. OznACCA:SYMBOL:EL. OznACCA:SYMBOL:EL. OznACCAA:SYMBOL:EL. OznACAA:SYMBOL:EL. OznACAA:SYMBOL:EL. OznACAA:SYMBOL:EL. OznACAA:SYMBOL:EL. OznACAA:SYMBOL:EL. OznACAA:SYMBOL:EL. OznACAA:SYMBOL:EL. OznACAA:SYMBOL:EL. OznACCA:SYMBOL:EL. OznACAA:SYMBOL:EL. OznACAA:SYMBOL:EL. OznACAA:SYMBOL:EL. OznACAA:SYMBOL:EL. OznACAA:SYMBOL:EL. OznACAA:SYMBOL:EL. OznACAA:SYMBOL:EL. OznACAA:SYMBOL:EL. OznACCA:SYMBOL:EL. OznACCAA:SYMBOL:EL. OznACAA:SYMBOL:EL. OznACAA:SYMBOL:EL. OznACAA:SYMBOL:EL. OznACAA:SYMBOL:EL. OznACAA:SYMBOL:EL. OznACAA:SYMBOL:EL. OznACAA:SYMBOL:EL. OznACCA:SYMBOL:EL. OznACAA:SYMBOL:EL. OznACCA:SYMBOL:EL. OznACAA:SYMBOL:EL. OznACAA:SYMBOL:EL. OznACAA:SYMBOL:EL. OznACAA:SYMBOL:EL. OznACAA:SYMBOL:EL. OznACAA:SYMBOL:EL. OznACAA:SYMBOL:EL. OznACCA:SYMBOL:EL. OznACAA:SYMBOL:EL. OznACCAA:SYMBOL:EL. OznACAA:SYMBOL:EL. OznACAA:SYMBOL:EL. OznACAA:SYMBOL:EL. OznACAA:SYMBOL:EL. OznACAA:SYMBOL:EL. OznACAA:SYMBOL:EL. OznACAA:SYMBOL:EL. OznACCA:SYMBOL:EL. OznACCA:SYMBOL:EL. OznACAA:SYMBOL:EL. OznACAA:SYMBOL:EL. OznACAA:SYMBOL:EL. OznACAA:SYMBOL:EL. OznACAA:SYMBOL:EL. OznACAA:SYMBOL:EL. OznACAA:SYMBOL:EL. OznACCA:SYMBOL:EL. OznACCA:SYMBOL:EL. OznACCAA:SYMBOL:EL. OznACAA:SYMBOL:EL. OznACAA:SYMBOL:EL. OznACAA:SYMBOL:EL. OznACAA:SYMBOL:EL. OznACAA:SYMBOL:EL. OznACAA:SYMBOL:EL. OznACCA:SYMBOL:EL. OznACCA:SYMBOL:EL. OznACAA:SYMBOL:EL. OznACCA:SYMBOL:EL. OznACAA:SYMBOL:EL. OznACCA:SYMBOL:EL. OznACAA:SYMBOL:EL. OznACCA:SYMBOL:EL. OznACAA:SYMBOL:EL. OznACCA:SYMBOL:EL. OznACAA:SYMBOL:EL. OznACCA:SYMBOL:EL. OznACCA:SYMBOL:EL. OznACAA:SYMBOL:EL. OznACCA:SYMBOL:EL. OznACAA:SYMBOL:EL. OznACCA:SYMBOL:EL. OznACAA:SYMBOL:EL. OznACCA:SYMBOL:EL. OznACCA:SYMBOL:EL. OznACAA:SYMBOL:EL. OznACAA:SYMBOL:EL. OznACCA:SYMBOL:EL. OznACAA:SYMBOL:EL. OznACCA:SYMBOL:EL. OznACAA:SYMBOL:EL. OznACCA:SYMBOL:EL. OznACAA:SYMBOL:EL. OznACCA:SYMBOL:EL. OznACAA:SYMBOL:EL. OznACAA:SYMBOL:EL. OznACCA:SYMBOL:EL. OznACAA:SYMBOL:EL. OznACCA:SYMBOL:EL. OznACAA:SYMBOL:EL. OznACCA:SYMBOL:EL. OznACAA:SYMBOL:EL. OznACAA:SYMBOL:EL. OznACCA:SYMBOL:EL. OznACCA:SYMBOL:EL. OznACAA:SYMBOL:EL. OznACCA:SYMBOL:EL. OznACAA:SYMBOL:EL. OznACCA:SYMBOL:EL. OznACAA:SYMBOL:EL. OznACAA:SYMBOL:EL. OznACCA:SYMBOL:EL. OznACAA:SYMBOL:EL. OznACAA:SYMBOL:EL. OznACCA:SYMBOL:EL. OznACAA:SYMBOL:EL. OznACCA:SYMBOL:EL. OznACAA:SYMBOL:EL. OznACCA:SYMBOL:EL. OznACCA:SYMBOL:EL. OznACAA:SYMBOL:EL. OznACCA:SYMBOL:EL. OznACCA:SYMBOL:EL. OznACAA:SYMBOL:EL. OznACCA:SYMBOL:EL. OznACAA:SYMBOL:EL. OznACCA:SYMBOL:EL. OznACAA:SYMBOL:EL. OznACCC:SYMBOL:EL. OznACAA:SYMBOL:EL. OznACCA:SYMBOL:EL. OznACAA:SYMBOL:EL. OznACCA:SYMBOL:EL. OznACAA:SYMBOL:EL. OznACCA:SYMBOL:EL. OznACAA:SYMBOL:EL. OznACCA:SYMBOL:EL. OznACAA:SYMBOL:EL. OznACCC:SYMBOL:EL. OznACAA:SYMBOL:EL. OznACCA:SYMBOL:EL. OznACCA:SYMBOL:EL. OznACAA:SYMBOL:EL. OznACCA:SYMBOL:EL. OznACAA:SYMBOL:EL. OznACCA:SYMBOL:EL. OznACAA:SYMBOL:EL. OznACCA:SYMBOL:EL. OznACCAA:SYMBOL:EL. OznACCA:SYMBOL:EL. OznACAA:SYMBOL:EL. OznACCA:SYMBOL:EL. OznACAA:SYMBOL:EL. OznACCA:SYMBOL:EL. OznACAA:SYMBOL:EL. OznACCA:SYMBOL:EL. OznACAA:SYMBOL:EL. OznACCA:SYMBOL:EL. OznACCAA:SYMBOL:EL. OznACCA:SYMBOL:EL. OznACCA:SYMBOL:EL. OznACAA:SYMBOL:EL. OznACCA:SYMBOL:EL. OznACAA:SYMBOL:EL. OznACCA:SYMBOL:EL. OznACAA:SYMBOL:EL. OznACCA:SYMBOL:EL. OznACAA:SYMBOL:EL. OznACCAA:SYMBOL:EL. OznACCA:SYMBOL:EL. OznACCA:SYMBOL:EL. OznACAA:SYMBOL:EL. OznACCA:SYMBOL:EL. OznACAA:SYMBOL:EL. OznACCA:SYMBOL:EL. OznACAA:SYMBOL:EL. OznACCA:SYMBOL:EL. OznACCA:SYMBOL:EL. OznACCA:SYMBOL:EL. OznACAA:SYMBOL:EL. OznACCA:SYMBOL:EL. OznACAA:SYMBOL:EL. OznACCA:SYMBOL:EL. OznACAA:SYMBOL:EL. OznACCA:SYMBOL:EL. OznACAA:SYMBOL:EL. OznACCC:SYMBOL:EL. OznACCA:SYMBOL:EL. OznACCA:SYMBOL:EL. OznACAA:SYMBOL:EL. OznACCA:SYMBOL:EL. OznACAA:SYMBOL:EL. OznACCA:SYMBOL:EL. OznACAA:SYMBOL:EL. OznACCA:SYMBOL:EL. OznACAA:SYMBOL:EL. OznACCCA:SYMBOL:EL. OznACAA:SYMBOL:EL. OznACCA:SYMBOL:EL. OznACAA:SYMBOL:EL. OznACCA:SYMBOL:EL. OznACAA:SYMBOL:EL. OznACCA:SYMBOL:EL. OznACAA:SYMBOL:EL. OznACCA:SYMBOL:EL. OznACAA:SYMBOL:EL. OznACCAA:SYMBOL:EL. OznACAA:SYMBOL:EL. OznACCA:SYMBOL:EL. OznACAA:SYMBOL:EL. OznACCA:SYMBOL:EL. OznACAA:SYMBOL:EL. OznACCA:SYMBOL:EL. OznACAA:SYMBOL:EL. OznACCA:SYMBOL:EL. OznACAA:SYMBOL:EL. OznACLA:SYMBOL:EL. OznACAA:SYMBOL:EL. OznACCA:SYMBOL:EL. OznACAA:SYMBOL:EL. OznACCA:SYMBOL:EL. OznACAA:SYMBOL:EL. OznACCA:SYMBOL:EL. OznACAA:SYMBOL:EL. OznACCA:SYMBOL:EL. OznACAA:SYMBOL:EL. OznACCLA:SYMBOL:EL. OznACAA:SYMBOL:EL. OznACCA:SYMBOL:EL. OznACAA:SYMBOL:EL. OznACCA:SYMBOL:EL. OznACAA:SYMBOL:EL. OznACCA:SYMBOL:EL. OznACAA:SYMBOL:EL. OznACCA:SYMBOL:EL. OznACAA:SYMBOL:EL. OznACCE:A)OZIOPEI (C)OZIOPEI (C)OZIOPEI (C)OZIOPEI (C)OZIOPEI (C)OZIOPEI (C)OZIOPEI (C)OZIOPEI (C)OZIOPEI (C)OZIOPEI (C)OZIOPEI (C)OZIOPEI (C)OZIOPEI (C)OZIPOI (C)OZIOPEI (C)OZIOPEI (C)OZIOPEI (C)OZIOPEI (C)OZIOPEI (C)OZIOPEI (C)OZIOPEI (C)OZIOPEI (C)OZIOPEI (C)OZIOPEI (C)OZIOPEI (C)OZIOPEI (C) - - - - - - - - - - - - - - - - - - - - - - - - - - - - - - - - - - - - - - - - - - - - - - - - - - - - - - - - - - - - - - - - - - - - - - - - - - - - - - - - - - - - - - - - - - - - - - - - - - - - - - - - - - - - - - - - - - - - - - - - - - - - - - - - - - - - - - - - - - - - - - - - - - - - - - - - - - - - - - - - - - - - - - - - - - - - - - - - - - - - - - - - - - - - - - - - - - - - - - - - - - - - - - - - - - - - - - - - - - - - - - - - - - - - - - - - - - - - - - - - - - - - - - - - - - - - - - - - - - - - - - - - - - - - - - - - - - - - - - - - - - - - - - - - - - - - - - - - - - - - - - - - - - - - - - - - - - - - - - - - - - - - - - - - - - - - - - - - - - - - - - - - - - - - - - - - - - - - - - - - - - - - - - - - - - - - - - - - - - - - - - - - - - - - - - - - - - - - - - - - - - - - - - - - - - - - - - - - - - - - - - - - - - - - - - - - - - - - - - - - - - - - - - - - - - - - - - - - - - - - - - - - - - - - - - - - - - - - - - - - - - - - - - - - - - - - - - - - - - - - - - - - - - - - - - - - - - - - - - - - - - - - - - - - - - - - - - - - - - - - - - - - - - - - - - - - - - - - - - - - - - - - - - - - - - - - - - - - - - - - - - - - - - - - - - - - - - - - 0.0002937 | - | - | - | - | - | - | - | - | - | - | - | - | - | - | - | - | - | - | - | - | - | - | - | - | - | - | - | - | - | - | - | - | - | - | - | - | - | - | - | - | - | - | - | - | - | |||||||||||||||||||||||||||||||||||||||||||||||||||||||||||||||||||||||||||||||||||||||||||||||||||||||||||||||||||||||||||||||||||||||||||||||||||||||||||||||||||||||||||||||||||||||||||||||||||||||||||||||||||||||||||||||||
| Energy consumption required to heat a standardised load in a cavity of an electric heated oven during a cycle in fan-forced mode per cavity (electric final energy) | EEI cavity | 05,3 | 85,3 | 80,2 | 81,4 | 81,4 | 81,4 | 81,4 | 81,4 | 81,4 | 81,4 | 81,4 | 81,4 | 81,4 | 81,4 | 81,4 | 81,4 | 81,4 | 81,4 | 81,4 | 81,4 | 81,4 | 81,4 | 81,4 | 81,3 | 81,4 | 81,4 | 81,4 | 81,4 | 81,4 | 81,4 | 81,4 | 81,4 | 81,4 | 81,4 | 81,4 | 81,4 | 81,4 | 81,4 | 81,4 | 81,4 | 81,4 | 81,4 | 81,4 | 81,5 | 81,4 | 81,4 | 81,4 | 81,4 | 81,4 | 81,4 | 81,4 | 81,4 | 81,4 | 81,4 | 81,4 | 81,4 | 81,4 | 81,4 | 81,4 | 81,4 | 81,4 | 81,4 | 81,4 | 81,2 | 81,4 | 81,4 | 81,4 | 81,4 | 81,4 | 81,4 | 81,4 | 81,4 | 81,4 | 81,4 | 81,4 | 81,4 | 81,4 | 81,4 | 81,4 | 81,4 | 81,4 | 81,4 | 81,4 | 80,2 | 81,4 | 81,4 | 81,4 | 81,4 | 81,4 | 81,4 | 81,4 | 81,4 | 81,4 | 81,4 | 81,4 | 81,4 | 81,4 | 81,4 | 81,4 | 81,4 | 81,4 | 81,4 | 81,2 | 81,3 | 81,4 | 81,4 | 81,4 | 81,4 | 81,4 | 81,4 | 81,4 | 81,4 | 81,4 | 81,4 | 81,4 | 81,4 | 81,4 | 81,4 | 81,4 | 81,4 | 81,4 | 81,4 | 81,2 | 81,2 | 81,3 | 81,4 | 81,4 | 81,4 | 81,4 | 81,4 | 81,4 | 81,4 | 81,4 | 81,4 | 81,4 | 81,4 | 81,4 | 81,4 | 81,4 | 81,4 | 81,4 | 81,4 | 81,2 | 81,3 | 81,3 | 81,4 | 81,4 | 81,4 | 81,4 | 81,4 | 81,4 | 81,4 | 81,4 | 81,4 | 81,4 | 81,4 | 81,4 | 81,4 | 81,4 | 81,4 | 81,4 | 81,4 | 81,4 | 81,3 | 81,3 | 81,3 | 81,3 | 81,3 | 81,3 | 81,3 | 81,3 | 81,3 | 81,3 | 81,3 | 81,3 | 81,3 | 81,3 | 81,3 | 81,3 | 81,3 | 81,3 | 81,3 | 81,3 | 81,4 | 81,4 | 81,4 | 81,4 | 81,4 | 81,4 | 81,4 | 81,4 | 81,4 | 81,4 | 81,4 | 81,4 | 81,4 | 81,4 | 81,4 | 81,4 | 81,4 | 81,3 | 81,3 | 81,4 | 81,4 | 81,4 | 81,4 | 81,4 | 81,4 | 81,4 | 81,4 | 81,4 | 81,4 | 81,4 | 81,4 | 81,4 | 81,4 | 81,4 | 81,4 | 81,4 | 81,2 | 81,2 | 81,2 | 81,2 | 81,2 | 81,2 | 81,2 | 81,2 | 81,2 | 81,2 | 81,2 | 81,2 | 81,2 | 81,2 | 81,2 | 81,2 | 81,2 | 81,2 | 81,2 | 81,2 | 81,3 | 81,3 | 81,3 | 81,3 | 81,3 | 81,3 | 81,3 | 81,3 | 81,3 | 81,3 | 81,3 | 81,3 | 81,3 | 81,3 | 81,3 | 81,3 | 81,3 | 81,3 | 81,3 | 81,2 | 81,2 | 81,2 | 81,2 | 81,2 | 81,2 | 81,2 | 81,2 | 81,2 | 81,2 | 81,2 | 81,2 | 81,2 | 81,2 | 81,2 | 81,2 | 81,2 | 81,2 | 81,2 | 81,4 | 81,4 | 81,4 | 81,4 | 81,4 | 81,4 | 81,4 | 81,4 | 81,4 | 81,4 | 81,4 | 81,4 | 81,4 | 81,4 | 81,4 | 81,4 | 81,4 | 81,4 | 81,2 | 80,2 | 81,3 | 81,3 | 81,3 | 81,3 | 81,3 | 81,3 | 81,3 | 81,3 | 81,3 | 81,3 | 81,3 | 81,3 | 81,3 | 81,3 | 81,3 | 81,3 | 81,3 | 81,3 | 81,3 | 80,2 | 81,3 | 81,3 | 81,3 | 81,3 | 81,3 | 81,3 | 81,3 | 81,3 | 81,3 | 81,3 | 81,3 | 81,3 | 81,3 | 81,3 | 81,3 | 81,3 | 81,3 | 81,3 | 81,2 | 81,3 | 81,3 | 81,3 | 81,3 | 81,3 | 81,3 | 81,3 | 81,3 | 81,3 | 81,3 | 81,3 | 81,3 | 81,3 | 81,3 | 81,3 | 81,3 | 81,3 | 81,3 | 81,2 | 80,2 | 81,3 | 81,3 | 81,3 | 81,3 | 81,3 | 81,3 | 81,3 | 81,3 | 81,3 | 81,3 | 81,3 | 81,3 | 81,3 | 81,3 | 81,3 | 81,3 | 81,3 | 81,2 | 80,2 | 81,2 | 80,2 | 81,3 | 81,3 | 81,3 | 81,3 | 81,3 | 81,3 | 81,3 | 81,3 | 81,3 | 81,3 | 81,3 | 81,3 | 81,3 | 81,3 | 81,3 | 81,3 | 81,3 | 81,4 | 81,4 | 81,3 | 81,3 | 81,3 | 81,3 | 81,3 | 81,3 | 81,3 | 81,3 | 81,3 | 81,3 | 81,3 | 81,3 | 81,3 | 81,3 | 81,3 | 81,3 | 81,3 | 81,2 | 80,2 | 81,5 (6)E E E E E E E E E E E E E E E E E E E E E E E E E E E E E E E E E E E E E E E E E E E E E E E E E E E E E E E E E E E E E E E E E E E E E E E E E E E E E E E E E E E E E E E E E E E E E E E E E E E E E D E E E E E E E E E E E E E E E E E E E E E E E E E E E E E E E E E E E E E E E E E E E E E E E E E E E E E E E E E E E E E E E E E E E E E E E E E E E E E E E E E E E E E E E E E E E E E E E E E E E A E E E E E E E E E E E E E E E E E E E E E E E E E E E E E E E E E E E E E E E E E E E E E E E E E E E E E E E E E E E E E E E E E E E E E E E E E E E E E E E E E E E E E E E E E E E E E E E E E E E F E E E E E E E E E E E E E E E E E E E E E E E E E E E E E E E E E E E E E E E E E E E E E E E E E E E E E E E E E E E E E E E E E E E E E E E E E E E E E E E E E E E E E E E E E E E E E E E E E E E C E E E E E E E E E E E E E E E E E E E E E E E E E E E E E E E E E E E E E E E E E E E E E E E E E E E E E E E E E E E E E E E E E E E E E E E E E E E E E E E E E E E E E E E E E E E E E E E E E E E B E E E E E E E E E E E E E E E E E E E E E E E E E E E E E E E E E E E E E E E E E E E E E E E E E E E E E E E E E E E E E E E E E E E E E E E E E E E E E E E E E E E E E E E E E E E E E E E E E E E.E E E E E E E E E E E E E E E E E E E E E E E E E E E E E E E E E E E E E E E E E E E E E E E E E E E E E E E E E E E E E E E E E E E E E E E E E E E E E E E E E E E E E E E E E E E E E E E E E E E E G E E E E E E E E E E E E E E E E E E E E E E E E E E E E E E E E E E E E E E E E E E E E E E E E E E E E E E E E E E E E E E E E E E E E E E E E E E E E E E E E E E E E E E E E E E E E E E E E E E E T E E E E E E E E E E E E E E E E E E E E E E E E E E E E E E E E E E E E E E E E E E E E E E E E E E E E E E E E E E E E E E E E E E E E E E E E E E E E E E E E E E E E E E E E E E E E E E E E E E E H N |
FR: Information réglementation UE 2023/826
EN : Information on EU regulation 2023/826 - CS : Informace o naizeni EU 2023/826 - DA : Information om EU-forordnung 2023/826 - DE : Informationen zur EU-Verordnung 2023/826 - EL : Πληρορορες σχετικα με τόν καυονίμο (EE) 2023/826 - ES : Informacion sobre el reglamento UE 2023/826 - IT : Informacion sui regolamento UE 2023/826 - NL : Informatie over EU-verordnung 2023/826 - FI : Tietoa EU-asetuksesta 2023/826 - PL : Informacion o Rozporzadzeniu UE 2023/826 - PT : Informacoes sobre o regulamento da UE 2023/826 - SK : Informacao o EU 2023/826 - SV : Information om EU-forordnung 2023/826
| FR : Consommation électricitéEN : Electricity consumption - CS : Spotbrea elektrické energie - DA : Elforbrug - DE : Stromverbrauch - EL :Kartoválixon ηλεκτρίας ενόρειας - ES : Consumo de electricidad - IT : Consumo di energia elettrica - NL :Elektricieteitsverbruik - FI : Sähkönkulutus - PL : Zužycle energeti elektrycznej - PT : Consumo de eletricidade -SK : Spotbrea elektrickej energie - SV : Elforbrukning | FR : Laps de temps pour passer dans le modeEN : Time Frame to Switch to Mode - CS : Časový ramec pro prépnuł do režimu - DA : Tildsramme for at skiftetil istland - DE : Zeilrahmen für den Wechsel in den Modus - EL : Xpovíkó πιαfiovia μερτάση σε κerroupyia-ES: Periode de tempo para cambar à的方式来 - IT : Intervallo di tempo per passare alla modalità - NL:Tijdspanne om over te schakenen maar modus - FI : Aïkaväli tilaan slirtymiselle - PL : Ramy czasowe doprzelaczenia w tryb - PT : Periode de tempo para mudar para o的方式来 - SK : Časový ramec na prepnuttie do režimu - SV : Tildsram for att växa till lage | |
| FR : Mode arrêtEN : Off Mode - CS : Režim vypnutl - DA : Slukket tilstand - DE : Aus-Modus - EL : Ägrenoupyia ektróç λειουρуfaç - ES : Modo apagado - IT :Modalitya spenta - NL : Ult-modus - FI : Pois pälittä -tilla - PL : Trybwytlaczenia - PT : Modo Desligado - SK : Režim vypnutlia - SV : Av-läge | Max 0,5W * 2 min | |
| FR : Mode veilleEN : Standby mode - CS : Pohotovostni režim - DA : Standbytilstand - DE :Bereitschaftsmodus - EL : Kardovićačn avćovćnç - ES : Modo de espera - IT : Modalitya standby - NL : Standby-modus -FI : Valmiustilassa - PL : Tryb czuwania - PT : Modo de espera - SK:Pohotovostný režim - SV : Passningslåge | Max 0,8W 2 min | |
| FR : Mode veille avec maintainen de la connexion au réseauEN : Standby mode with network connection - CS : Pohotovostni režim s pripojením k sitl - DA : Standbytilstand med netværksforbindelse -DE :Standby-Modus mit Netzwerkverbindung -EL : Kardovićačn avćovćnç μεθυδοσι škòuou - ES : Modo de espera con conexión de red - IT :Modalitya standby con connessione di rete - NL : Standby-modus metnetwerkverbindung -FI : Valmiustila verkkoyhteydellä - PL : Tryb czuwaniaz polaczeniem sieciowym - PT : Modo de espera com ligação de rede -SK : Pohotovostný režim s pripojením k sitl - SV : Standby-läge mednetverksansluting | 2W * 2 min |
FR: *N/A selon modele
EN : dependop - SK : V zavislovi model - SE : beroende på modell
FR: Information réglementation UE 2023/826
EN : Information on EU regulation 2023/826 - CS : Informacao o nafizien! EU 2023/826 - DA : Information um EU-foronding 2023/826 - DE : Informationen zur EU-Verordnung 2023/826 - EL : Npnoopocipc o xiaiao tov konovinio (EE) 2023/826 - ES : Informacion sobre el regimoto UE 2023/826 - IT: Informazioni sul regolamento UE 2023/826 - NL : Informazione over EU-verandong 2023/826 - FI : Tietca EU-assekuessta 2023/826 - PL : Informacao o Rozpurzdozeniu UE 2023/826 - PT : Informacoes sobre a regulamento da UE 2023/826 - SK : Informacao o 2023/826 - SV : Information um EU-Korridening 2023/826
| FR : Consommation électricitéEN : Electricity consumption - CS : Solaftela elektrétique énergie - DA : Elborbrug - DE : Sconverbrauch - EL : Korovskauch (Mückiprav, evapyrac, ES : Consumo de electrédilad - IT : Consumo di energia electrica - NL : Eletrodeletalverbruk - FI : Seličkinkulituse - PL : Zutzye enerli elektrécznej - PT : Consumo de electrédilada - SK : Spodres elektrickel énergie - SV : Effektuation | FR : Laps de temps pour passer dans le modeEN : Time Frame to Switch to Mode - CS : Casovy râmicne pro prôunil du roizin - DA : Tidrammeur for at skèle illisland - DE : Zelrahmen für den Wertstuhl in den Modus - EL : Xoxovo râmicne yu prêzbun ou karnupiyu ES: Periode de tempo para camler al mode - IT : Interiolo di tempo per essere pessare alla modalità - NL : I'lesquées en olivre au schäkten nera modus - FI : Akawelli tiansi airmireniale - PL : Remy crasowes do prêglazroma w'try - PT : Periode de tempo para módar para a mode - SK : Casovy râmicne na prépôunte do roizin - BV : Tidramr for at vidi bilà l'lage | |
| FR : Mode arrêtEN : Off Mode - CS : Režim yvūnú - DA : Sticcat listand - DE : Aus-Modus - EL : Aenoupyia râmicn; Aenoupyiç - ES : Módo apagado - IT : Modalia spensa - NL : Uli-modus - FI : Poijs plăță -ila - PL : Tryb węczenia - PT : Módo Desligado - SK : Režim yvūnú - SV : Avlåge | Max 0,5W * 2 min | |
| FR : Mode veilleEN : Standby mode - CS : Pohotovostni rǎzim - DA : Standby listand - DE : Bereitschallamodus - EL : Kardovičn ovapovirç - ES : Módo de espèna - IT : Modality standy - NL : Standby-modus - FI : Valmiustiassla - PL : Tryb cauzanra - PT : Módo de espèna - SK : Pohotovostni rǎzim - SV : Passingalgäse | Max 0,8W 2 min | |
| FR : Mode veille avec maintainen de la connexion au réseauEN : Standby mode with network connection - CS : Pohotovostni rǎzim s priptyjanin k sllb - DA : Standby lsted mad netwarczortbindse - DE : Standby-Modus mit Netzwerkeinführung -EL : Karlemann, evertiguiç pit piñvitcon fieriu - ES: Módo de espèna con concónion de red - IT : Modalia standy con connexión de rete - NL : Standby-modus mete netwerckeinführung - FI : Valmiustiia verkehcyiedyella - PL : Tryb cauzanra z polácenien siecowsyn - PT : Módo de espèna com liqapiç de rede - SK : Pohotovostni rǎzim s priptyjanin k sllb - SV : Standby-age mad netwerczansluting | 2W * 2 min |
FR: N/A selon modele
EN : depenent to model - CS : v zavislios na modalu - DE : aflaunig af model - DE : je nach Model - EL : ovozayu puc 10 voipilao ES : Dependentioi del modelo - IT : a seconda del modelo - NL : alhankalikn van het model - FI : malla stippen - PL : w zalezniad od modelo - PT : depeniente do modulo - SK : V zavislios od modelo - SV : berontende para modal