USER MANUAL DOP4543H DE DIETRICH
RELATIONS CONSOMMATEURS FRANCE
Information for domestic ovens (UE n° 66/2014)
Information for domestic ovens (UE n° 66/2014)
You have just purchased a De Dietrich product. This choice reflects your high standards and taste for the French way of life.
Resulting from over 300 years' know-how, the De Dietrich creations embody the fusion between design, authenticity and technology at the service of culinary arts. Our appliances are manufactured using noble materials and offer an irreproachable quality of finish.
We are certain this high-quality product will enable cooking enthusiasts to express all their talents.
The De Dietrich Customer Service Department is at your disposal for all your questions and suggestions to always better meet your expectations.
We are honoured to be your new partner in the kitchen and thank you for your trust.
With its factories based in France, in Orléans and Vendôme, De Dietrich cultivates a constant search for excellence, perpetuating exceptional know-how in the design

of perfectly finished products. Many of our electrical appliances are certified by the "Origine France Garantie" label, an acknowledgement which certifies they are manufactured in France. This label both ensures the quality and durability of our appliances, as well as their traceability, thus offering a clear and objective indication of their provenance.
www.de-dietrich.com
IMPORTANT SAFETY ADVICE AND PRECAUTIONS 4
1 INSTALLATION 6
Choice of location and fitting. 6
Electrical connection 7
2 ENVIRONMENT 7
Caring for the environment 7
3 DESCRIPTION OF THE OVEN 8
The controls and display. 9
Locking the controls 9
Accessories (depending on model) 10
Sliding rail system 12
Installing and removing the sliding rails 12
4 FIRST USE AND SETTINGS 13
Using the oven for the first time 13
Settings menu (depending on model) 13
5 MANUAL COOKING MODE 14
Start a cooking programme 16
6 COOKING TIPS 17
Air FRY function 17
Drying function 18
7AUTOMATIC COOKING MODE 19
Presentation of the automatic mode 19
Presentation of dish categories 20
Starting an automatic cooking programme 25
Immediate cooking 25
8 OTHER FUNCTIONS 26
Cooking end options (according to the type of cooking) 26
Timer function 26
9 CARE 27
Cleaning and care: 27
Removing and refitting the "sensor" plate 28
Pyrolytic self-cleaning 29
Replacing the light bulb. 31
10 TROUBLESHOOTING AND SOLUTIONS 32
SUITABILITY TEST 34
IMPORTANT SAFETY ADVICE AND PRECAUTIONS
IMPORTANT SAFETY INSTRUCTIONS - READ CAREFULLY AND KEEP FOR FUTURE USE.
This user guide is available for download on the brand's website.
Once you receive the appliance, unpack it or have it unpacked immediately. Give it an overall inspection. Make a note of any reservations on the delivery slip and keep a copy.

Important:
This appliance may be used by children aged 8 years and older, and by persons with impaired physical, sensory or mental capacities, or without experience or knowledge, if they are supervised or have received prior instructions on how to use the appliance safely and have understood the risks involved.
-
Children must not be allowed to play with the appliance. The appliance should not be cleaned or maintained by unsupervised children.
-
Children should be supervised to prevent them from playing with the appliance.

WARNING:
The appliance and its accessible parts become hot during use. Be careful not to touch the heating elements inside
the oven. Children under 8 should not be allowed near the appliance unless they are constantly supervised
- This appliance is designed to cook with the door closed.
Before pyrolytic cleaning of your oven, remove all accessories and any thick deposits.
During cleaning, the surfaces may become warmer than under normal conditions of use.
It is advisable to keep children away from the appliance.
— Do not use a steam cleaner.
- Do not use abrasive cleaners or hard metal scrapers to clean the oven's glass door; they could scratch the surface and cause the glass to crack.
IMPORTANT SAFETY ADVICE AND PRECAUTIONS

WARNING:
Make sure the appliance is disconnected from the power before replacing the lamp in order to avoid the risk of electric shock. Change the lamp only when the appliance has cooled down. To unscrew the view port and the light, use a rubber glove, which will make disassembly easier.

It must be possible to disconnect the appliance from
the power supply by fitting a switch on the fixed wiring system in accordance with installation rules.
If the power cable is damaged, it should be replaced by the manufacturer, its after-sales service or by a similarly qualified person in order to avoid danger.
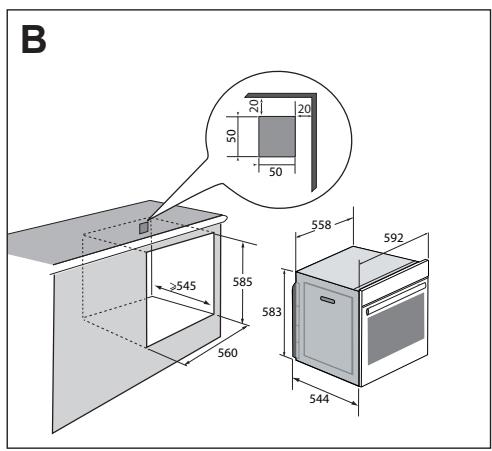
- This appliance may be installed either under a worktop or in a column as shown in the installation diagram.
Centre the oven in the cabinet so as to ensure a minimum gap of 10mm between the appliance and the surrounding unit. The material of the unit supporting the appliance must be heat-resistant (or covered with a heat-resistant material). For greater stability, attach the oven to the unit with
2 screws through the holes provided on the side panels.
-
The appliance must not be installed behind a decorative door to prevent overheating.
-
This appliance is designed to be used for domestic and similar applications such as kitchen areas for the staff of shops, offices and other professional premises; farms; use by clients of hotels, motels and other residential type establishments; guest house type environments.
The oven must be turned off when cleaning inside the oven.
Do not modify the characteristics of this appliance; doing so could be dangerous.
Do not use your oven as a larder or to store any items after use.
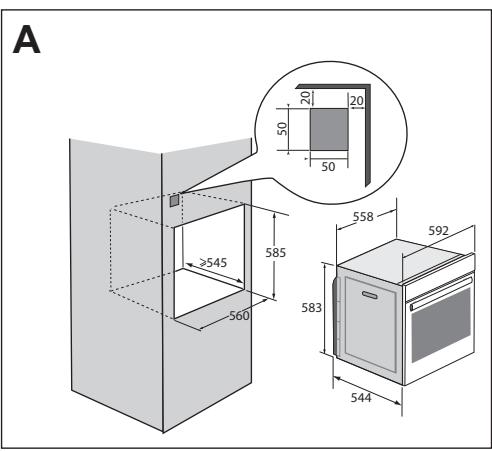
CHOICE OF LOCATION AND FITTING
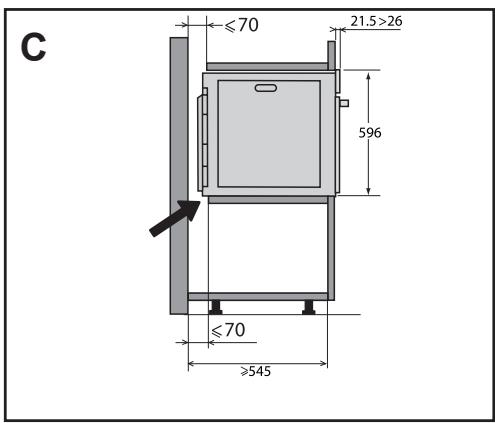
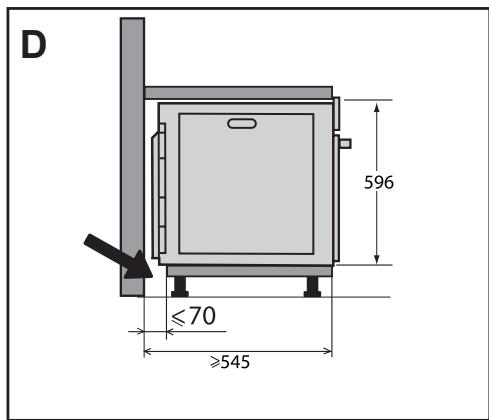
The diagrams show the dimensions of a cabinet that will be able to hold your oven. This appliance may be installed either in a column (A) or under a worktop (B). If the cabinet is open, its opening at the back must be 70mm maximum (C and D). Install the oven in the cabinet. To do this, remove the rubber stops and pre-drill a 2-mm diameter hole in the wall of the cabinet to avoid splitting the wood. Attach the oven with the two screws.
Re-position the rubber stops.
If the furniture is closed at the back, make a 50 × 50 ~mm opening through which to route the electrical cable.
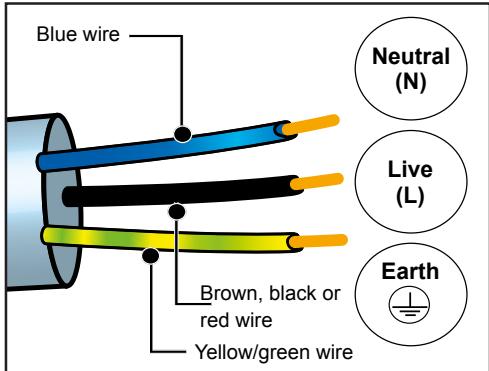
ELECTRIC CONNECTION
The oven is supplied with a standardised power cable with 3 conductors of 1.5mm^2 (1 live + 1 neutral + earth) which must be connected to the 220-240 Volt grid by means of an all-pole cut-off device in compliance with the installation rules.
The safety wire (green-yellow) is connected to the appliance's terminal and must be connected to the installation's earth. The circuit should be protected with a 16Amp fuse.
We cannot be held responsible for any accident or incident resulting from nonexistent, defective or incorrect earthing or non-compliant connection.
Your appliance is designed to work as is, at a frequency of 50Hz or 60Hz , without you having to do anything.
Important: If the electrical installation of your home requires a modification to connect the appliance, call a qualified electrician. If the oven malfunctions in any way, unplug the appliance or remove the fuse for the oven's connection line.
2 ENVIRONMENT
CARING FOR THE ENVIRONMENT
The packaging material of this appliance is recyclable. Please recycle it and help protect the environment by depositing it in municipal containers provided for this purpose.
Your appliance also contains many
recyclable materials. It is therefore marked with this logo to indicate that used appliances should not be mixed with other waste.

Recycling of appliances organised by your manufacturer
is carried out under the best conditions, in
accordance with the European regulation on waste disposal of electronic and electrical equipment.
Contact your local authority or retailer for information on used appliance collection points close to your home. We thank you for your help in protecting the environment.
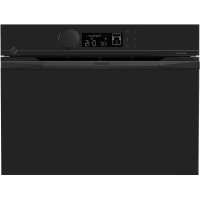
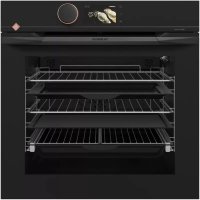
3 DESCRIPTION OF THE OVEN
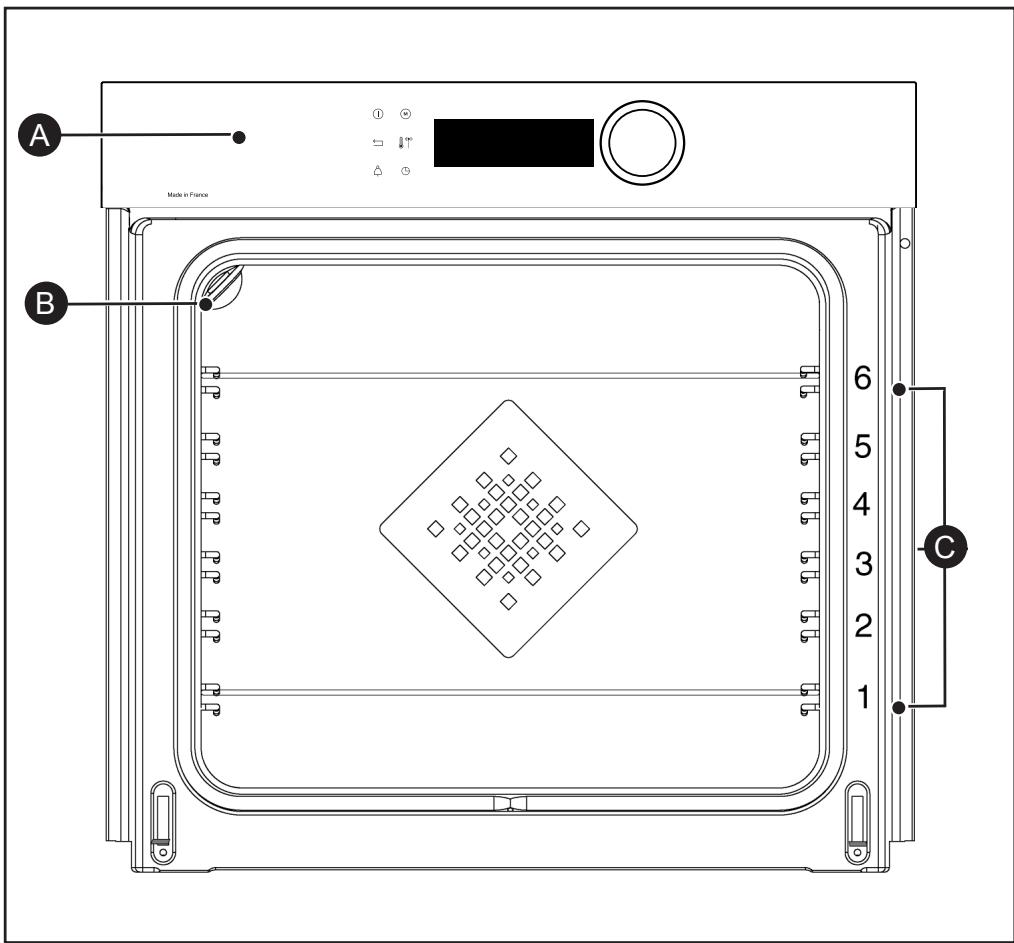

Control panel

Light

Shelf runners (6 heights available)
3 DESCRIPTION OF THE OVEN

THE CONTROLS AND DISPLAY

Display

Rotating knob with central button (cannot be removed):
- programme selection, increase or reduce values by turning it.
- Validate each action by pressing the centre.

LOCKING THE CONTROLS
Press and at the same time until the
Control locking is accessible during cooking or when the oven has stopped.
NOTE: only the stop key ① remains active.
To unlock the keypad, press the back and stop keys at the same time until the padlock
symbol

disappears from the screen.
3 DESCRIPTION OF THE OVEN
ACCESSIONS (DEPENDING ON MODEL)
- Anti-tip safety rack. The rack can be used to support all dishes and moulds containing food for cooking or browning. It can be used for barbecues (to be placed directly on the grill). Position the anti-tip stop towards the back of the oven.
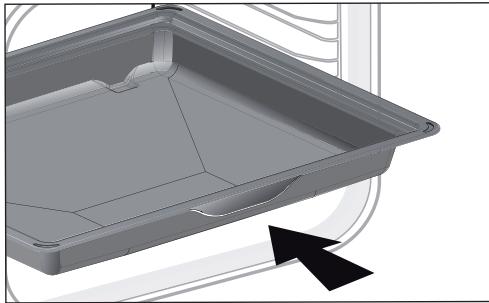
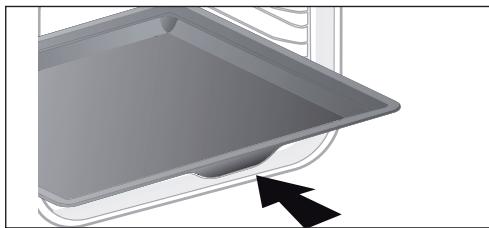
- 45 mm multi-purpose drip tray. To be inserted into the supports or placed under the rack, with the handle towards the oven door. It collects juice and fat from grilling, and can be used half-filled with water as a double-boiler.
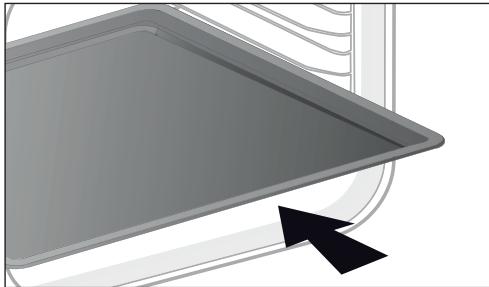
- 8 mm pastry sheet. To be inserted into the supports. Ideal for baking cookies, shortbread and cupcakes. The tilted surface makes it easier for you to put your preparations in a dish.
3 DESCRIPTION OF THE OVEN
ACCESSORIES (DEPENDING ON MODEL)
- 45 mm multi-purpose tray. To be inserted into the supports under the rack, with the handle towards the oven door. It is ideal for baking cookies, shortbread and cupcakes. Its tilted surface makes it practical and easy to use. Can also be inserted into the supports under the rack to collect juice and fat from grilling.
- "Flavour" racks. These half "flavour" grills are used separately, but only when placed in one of the dishes or drip tray with the anti-tip handle towards the back of the oven. By using just one grill, it is easy to moisten your food with the cooking juices collected in the dish.
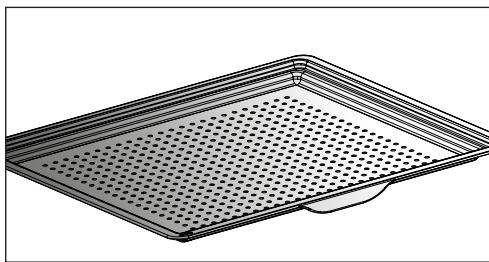
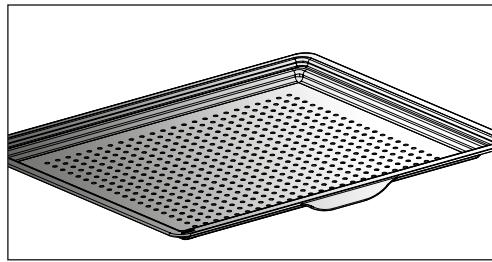
- Perforated tray. When inserted in the supports with the handle towards the oven door, This tray is designed for the AIR FRY cooking mode and is also suitable to cook pizzas and pastries, as well as for drying food.
3 DESCRIPTION OF THE OVEN
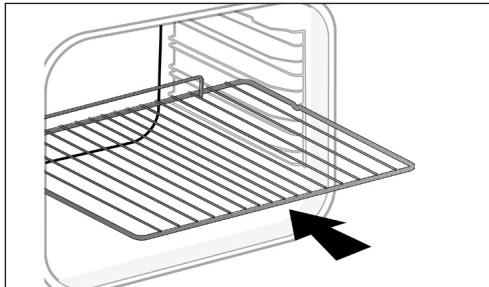
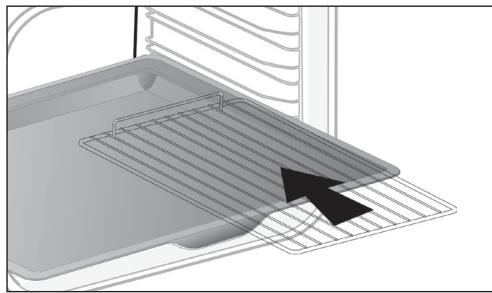
SLIDING RAIL SYSTEM
The new sliding rail system makes food more practical and easier to handle as the trays can be effortlessly pulled for simpler handling. The trays can be completely removed, providing full access. Their stability ensures that food can be handled safely, reducing the risk of burns. This means that you can take food out of the oven far more easily.
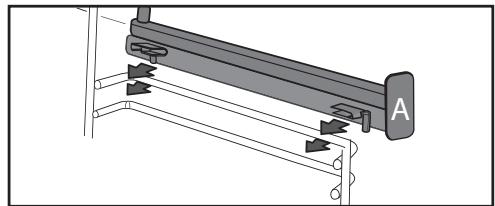
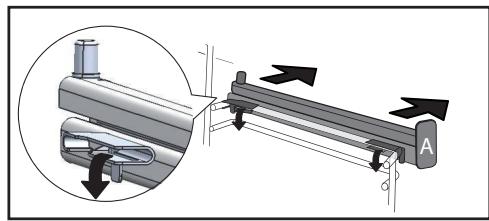
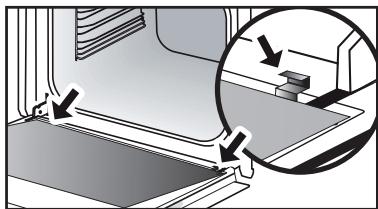
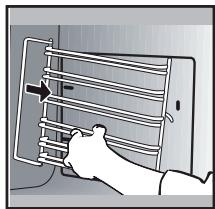
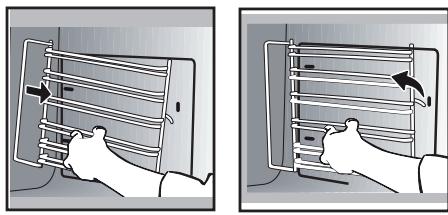
INSTALLING AND REMOVING THE SLIDING RAILS
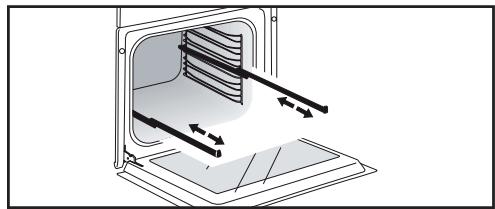
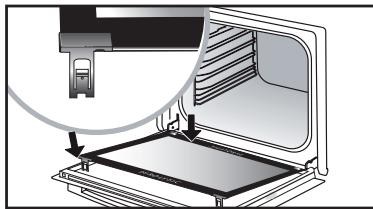
After removing the 2 shelf runners, choose the height (2 to 5) at which you want to fit your rails. Snap the left rail against the left shelf runner by applying enough pressure to the front and back of the rail so that the 2 tabs on the side of the rail slot into the shelf runner. Do the same for the right-hand rail.
NOTE: the telescopic sliding part of the rail must unfold towards the front of the oven, with the buffer opposite you. Insert your 2 shelf runners and then put your tray on the 2 rails. The system is now ready to use.
To remove the rails, remove the shelf runners again.
Slightly prisepart the bottom of the tabsfixed on each rail to release the shelfrunner.Pull the rail towards you.

The accessories may warp with the effect of heat, but this will not alter their function. They will return to their original shape once cooled.
USING THE OVEN FOR THE FIRST TIME
- Select the language
The first time you use your oven or after a power cut turn the knob to select your language and press to confirm your choice.

Before using your oven for the first heat it at maximum temperature empty for approximately 30 minutes.
Make sure that the room is sufficiently ventilated.
- Set the time
Adjust the hours and minutes by turning the knob, then press to confirm.
Your oven displays the time.
In the general menu, select the " SETTINGS" function by turning the control knob and confirm. Different settings are proposed.
Select the setting you want by turning the control knob then confirm.
Then set your parameters and confirm them.
- Time
Modify the hour, validate, then modify the minutes and validate again. If you oven is connected the time updates automatically.
-Sound
Your oven emits sounds when you use the keys. To keep these sounds, select ON, otherwise select OFF to deactivate them and confirm.
- Brightness
Select the desired brightness level.
- Sleep mode
You can also put your display on standby:
ON position: the display switches off after a certain amount of time.
OFF position: the brightness diminishes after a certain amount of time.
- Lamp management
Two setting options are proposed: ON position: the lamp remains on during all cooking programmes (except in ECO function). AUTO position: the oven lamp goes off after a certain period of time during the cooking programmes. Select your position and confirm.
- Language
Choose your language and confirm.
- DEMO mode
By default, the oven is configured in normal heating mode.
If it is activated in DEMO mode (ON position), the mode for presenting products in stores, your oven will not warm up.
- Diagnostic
Access the Diagnostic menu if a problem occurs.
If you contact the After-Sales Service, you will be asked to provide the codes displayed in the diagnostic.
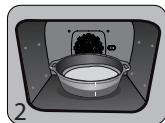
5 MANUAL COOKING MODE
This mode lets you set the cooking parameters yourself: temperature, cooking type, cooking time. During your navigation, you can directly access this menu by pressing the "M" key.

Pre-heat your oven empty before cooking.
| Position | T°C recommended
mini - maxi | Use |
| Combined heat | 205°C
35°C - 230°C | Recommended for meat, fish, vegetables, preferably in an earthenware dish. |
| Fan oven* | 180°C
35°C - 250°C | Recommended for keeping white meat, fish and vegetables moist. For cooking multiple items on up to three levels. |
| Traditional | 200°C
35°C - 275°C | Recommended for meat, fish, vegetables, preferably in an earthenware dish. |
| ECO* | 200°C
35°C - 275°C | This setting saves energy while maintaining the quality of the cooking. In this setting, pre-heating is not required. |
| Ventilated grill | 200°C
100°C - 250°C | Roasts and poultry are juicy and crisp all over. Slide the drip tray on to the bottom shelf support. Recommended for all spit-roasted poultry or meat, for sealing and thoroughly cooking a leg or a rib of beef. To retain the moist texture of fish steaks. |
| Bottom heat ventilated | 180°C
75°C - 250°C | Recommended for meat, fish, vegetables, preferably in an earthenware dish. |
| Variable grill | 4
1 - 4 | Recommended for grilling cutlets, sausages, toasting bread and prawns placed on the grill. Cooking controlled by the upper element. The grill covers the entire shelf surface. |
*Cooking mode as per standard EN 60350-1: 2016 to demonstrate compliance with requirements of the energy label of European regulation UE/65/2014.
5 MANUAL COOKING MODE
| Position | Recommended T°C
mini - maxi | Use |
| Air Fry | 200°C
180°C - 220°C | Ideal for tasty and healthy cooking, this programme associated with the use of the perforated tray enables you to cook and brown your vegetables, chips, breaded food and tempuras in your over without (or with very little) fat. |
| Keep warm function | 60°C
35°C - 100°C | Recommended for letting dough rise for bread, brioche, kügelhopf.
Put the mould on the bottom, not exceeding 40°C (plate-warming, defrosting). |
| Defrost | 35°C
30°C - 50°C | Ideal for delicate dishes (fruit tarts, custard pies, etc.). Defrost meat, bread rolls, etc. at 50°C (meat should be placed on the rack with a dish underneath to catch the drips). |
| Dough rising | 40°C | Programme recommended for all types of dough to rise, such as bread, brioche, pizza, kouglof, etc. Place your dish directly onto the bottom of the oven. |
| Drying | 80°C
35°C - 80°C | Sequence to dehydrate certain food items such as fruits, vegetables, roots, seasoning plants and herbs. Refer to the specific table on P.16. |
| Shabbat | 90°C | Special sequence: the oven operates uninterrupted for 25 to 75 hours at 90°C only. |

Never place tin foil directly in contact with the oven floor as the build up of heat may damage the enamel.

Advice on how to save energy
Avoid opening the door during cooking to avoid heat escaping from the oven.
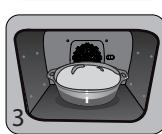
STARTING A COOKING PROGRAMME
When you have selected and validated your cooking function, example: Ventilated floor, press the knob to confirm, preheating starts; a beep informs you the oven has reached the set temperature. You can now place your dish in the oven at the recommended shelf height.
NB: Certain parameters may be modified before cooking starts (temperature, cooking time and delayed start); see the following chapters.
CHANGING THE TEMPERATURE
Based on the type of cooking you already selected, the oven will recommend the ideal cooking temperature.
This can be adjusted as follows:
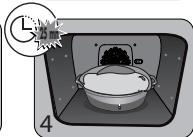
COOKING TIME
You can enter the cooking time for your dish by pressing the key, enter the cooking time by turning the control knob then confirm.
SETTING THE COOKING END TIME (delayed start)
You can change the cooking end time if you want to delay it by pressing twice on the key, then enter your cooking end time by turning the knob and confirm.
Once you have set the cooking end time, confirm. The cooking end time remains displayed.
NB: You may start cooking without selecting a duration or end time.
In this case, when you feel that you have cooked your dish for long enough, stop cooking (see the "Stopping cooking in progress" chapter).
STOPPING COOKING IN PROGRESS
To stop a cooking programme in progress, press the control knob.
"STOP" displays on the screen
Confirm by pressing the knob or by pressing and holding the oven stop key.

AIR FRY FUNCTION
Place your food directly onto the perforated tray by spreading the items out without overlapping, select the Air Fry cooking mode and set the temperature between 180^ and 220^ . Insert the perforated tray at level 5 and the drip tray at level 3 to catch any cooking residues.

AIR FRY INDICATIVE TABLE
at 200^ preheating to be considered except *
| Duration | Weight |
| Chicken wings | 25 min | 500 g |
| Fresh chips | 30 min | 700 g |
| Frozen chips | 30 min | 700 g |
| Fresh diced vegetables (courgettes / aubergines / peppers) | 30 min* | 500 g |
| Chicken nuggets | 10 min | 250 g |
| Breaded fish | 15 min | 250g / 2 portions |

DRYING FUNCTION
Drying is one of the oldest methods of preserving food. The aim is to remove all or some of the water in the food to preserve foodstuffs and prevent the development of microbes. Drying preserves the nutritional qualities of food (minerals, proteins and other vitamins). It allows food to be stored in optimal conditions thanks to their reduced size and makes food easy to use once rehydrated.
Only use fresh food. Wash the food carefully, drain and wipe. Cover the grill in parchment paper and distribute the cut food evenly on top. Use shelf level 1 (if you have several grill pans, put them on levels 1 and 3). Turn the food over several times during drying. The values provided in the table may vary depending on the type of food to dehydrate, its maturity, its thickness and its humidity rate.
GUIDE TABLE TO DEHYDRATE YOUR FOOD
| Fruits, vegetables and herbs | Temperature | Time in hours | Accessories |
| Fruits with seeds (in 3 mm slices, 200 g per grill pan) | 80°C | 5-9 | 1 or 2 grill pans |
| Fruits with stones (plums) | 80°C | 8-10 | 1 or 2 grill pans |
| Edible roots (carrots, parsnips), grated and blanched | 80°C | 5-8 | 1 or 2 grill pans |
| Sliced mushrooms | 60°C | 8 | 1 or 2 grill pans |
| Tomato, mango, orange, banana | 60°C | 8 | 1 or 2 grill pans |
| Sliced red beetroot | 60°C | 6 | 1 or 2 grill pans |
| Herbs | 60°C | 6 | 1 or 2 grill pans |
PRESENTATION OF THE AUTOMATIC MODE
In the AUTO mode, you will find many varied recipes sorted into categories, which you can cook in different ways. The oven AI will offer you automatically a preselected automatic cooking mode or alternatives to be selected from the navigation interface.
AI SENSOR
This mode will completely simplify cooking for you because the oven will automatically calculate all the cooking parameters (temperature, cooking time, cooking mode) based on the selected dish thanks to its electronic sensors located in the oven that constantly measure the moisture level and temperature variations.

Cooking ABSOLUTELY must begin in a cool oven.
LOW TEMPERATURE
For a recipe managed completely by the oven using a specific electronic programme.
This cooking mode makes meat fibres tender thanks to slow cooking at low temperature. Cooking quality is optimal.

Cooking ABSOLUTELY must begin in a cool oven.

Cooking at low temperatures fires food to be extremely fresh. For sure, it is important to rinse the side and inside with cold water and a gray with absorbent paper before cooking.
AI
This mode selects for you the suitable cooking parameters based on the food to be prepared. For some types of food, some additional parameters must be entered (weight, size, etc.)
7 AUTOMATIC COOKING MODE
PRESENTATION OF DISH CATEGORIES
In the general menu, select the "AUTO" function by turning the control knob and confirm. Different dish categories are available to you:
- Meat, Fish, Dishes, Bread & Doughs, Desserts.
Select the setting you want by turning the control knob then confirm.

Tip
Before inserting your dish, for all cooking programmes, the oven indicates which shelf level to place your dish on
| MEAT | AI SENSOR | AI | LOW TEMPERATURE |
| MEAT TERRINE | | O | |
| SHOULDER OF LAMB | | O | |
| DE-BONED LEG OF LAMB | O | | O |
| LEG OF LAMB ON THE BONE | O | | O |
| VEAL RIBS | | O | |
| VEAL ROAST | | O | O |
| PORK SHANK | | O | |
| PORK LOIN | | O | |
| FILET MIGNON | | O | O |
| PORK ROAST | O | O | O |
| BEEF ROAST | O | O | O |
| Poultry | O | O | O |
| DUCK | | O | |
| DUCK BREAST | | O | |
| TURKEY LEG | | O | |
| TURKEY | | O | |
| GOOSE | | O | |
RECOMMENDATIONS FOR THE AI SENSOR MODE
De-boned leg of lamb(2 cooking modes):
1.4 kg to 1.8kg
Well done de-boned leg of lamb
Pink de-boned leg of lamb
Select a leg that is round and plump rather than long and lean. Place the leg in the drip tray.
Let sit after cooking.
Roast pork
700 g to 1.4kg
Loin, fillet
Place the roast on the grill using the grill ^+ drip tray assembly. At the end of cooking, allow the meat to sit for 7 to 10 minutes before carving. Add salt when cooking is finished.
Leg of lamb on the bone(2 cooking modes):
2 kg to 2.8kg
Well done leg of lamb on the bone
Pink leg of lamb on the bone
Select a leg that is round and plump rather than long and lean. Place the leg in the drip tray.
Let sit after cooking.
Roast beef (3 cooking modes):
(800 g to 1.6kg)
Rare beef
Medium beef
Well done beef
Trim away as much fat as possible: it causes smoke.
Place the roast in the drip tray.
Once cooked, allow the meat to sit for 7 to 10 minutes before carving.
Chicken
Chickens from 1.4kg to 2.5kg
Duck, guinea fowl
Place the chicken on the rack of the rack + drip tray assembly.
Pierce the skin of poultry to avoid splattering.
PRESENTATION OF DISH CATEGORIES
| FISH | AI SENSOR | AI | LOW TEMPERATURE |
| TROUT | O | O | O |
| SALMON | O | O | O |
| LARGE FISH | O | O | O |
| SMALL FISH | O | O | O |
| SEA BASS | O | O | O |
| LOBSTER | | O | |
| FISH TERRINE | | O | |
RECOMMENDATIONS FOR THE AI SENSOR MODE
Fish
400 g to 1kg
Whole fish (bream, hake, trout, mackerel, fish roasts). Not suitable for flat fish.
Only use this function with whole fish. Use the multi-purpose tray.
PRESENTATION OF DISH CATEGORIES
| TYPE OF FOOD | AI SENSOR | AI | LOW TEMPERATURE |
| STUFFED VEGETABLES | O | O | |
| VEGETABLE GRATIN | | O | |
| STUFFED TOMATOES | O | O | |
| LASAGNE | | O | |
| MEAT PIE | | O | |
| CHEESE TART | O | O | |
| SAVOURY TART | O | O | |
| QUICHE | O | O | |
| PIZZA | O | O | |
| POTATO GRATIN | | O | O |
| MOUSSAKA | | O | |
| SOUFFLE | O | O | |
RECOMMENDATIONS FOR THE AI SENSOR MODE
Pizza
300 g to 1.2kg
Store-bought pizza - fresh dough
Ready-to-use pizza dough
"Home-made" pizza dough
Place it on the grill for a crispy crust (you can place a sheet of parchment paper between the grid and the pizza to protect the oven from cheese drippings).
Savoury tart
Fresh quiches
Frozen quiches
Use a non-stick aluminium mould: the crust will be crispy on the bottom.
Remove the tray from frozen quiches before placing them on the grid.
Stuffed vegetables
Stuffed tomatoes, stuffed peppers
Fish pie.
Properly adjust the dimensions of the dish to the quantity of food to be cooked to avoid juices spilling over.
7 AUTOMATIC COOKING MODE
PRESENTATION OF DISH CATEGORIES
| BREAD AND DOUGHS | AI SENSOR | AI | LOW TEMPERATURE |
| BRIOCHE | | O | |
| BAGUETTES | | O | |
| BREAD | | O | |
| SHORTCRUST PASTRY | | O | |
| PUFF PASTRY | | O | |
| DESSERTS | AI SENSOR | AI | LOW TEMPERATURE |
| YOGHURT | | | O |
| Kouglof | | O | |
| SPONGE CAKE | | O | |
| APPLE CAKE | O | O | |
| POUND CAKE | O | O | |
| LOAF CAKE | O | O | |
| CHOCOLATE CAKE | O | O | |
| YOGHURT CAKE | O | O | |
| FRUIT CRumble | | O | |
| FRUIT PIE | O | O | |
| BISCUITS/COOKIES | O | O | |
| CUPCAKES | | O | |
| CHOUX PASTRY | | O | |
| CRÈME Caramel | | O | |
7 AUTOMATIC COOKING MODE
STARTING AN AUTOMATIC COOKING PROGRAMME
The "AUTO" function selects for you the suitable cooking parameters based on the food to be prepared.
- Select the "AUTO" mode when you are in the general menu then confirm.
The oven suggests several categories of dishes (Meat, Fish, Dishes, Bread & Doughs, Desserts, World Recipes):
- Your oven offers the AI sensor cooking mode in priority so there are no settings for you to adjust. Simply press 'Start cooking'. The shelf height displays, insert your dish and confirm.

Do not open the oven door during an AI sensor cooking programme.
Depending on the dish selected or the oven status (already preheated), the Al mode suggests a default weight which you will need to adjust if necessary
before confirming. The oven automatically calculates the cooking time and temperature parameters. The shelf height displays, insert your dish and confirm.
- The oven beeps and turns off when the cooking time is finished; your screen then indicates that the dish is ready.
For certain AI recipes the oven must be preheated before you place your dish in it.
You may open your oven to baste your dish at any time during cooking.
COOKING END OPTIONS (ACCORDING TO THE TYPE OF COOKING)
Once cooked in both the manual and Auto mode, the oven offers three options to adjust to the expected result: CRISP, KEEP WARM and ADD 5 MIN.
CRISP
You can brown a dish once cooked with the "Crisp" function.
Select a cooking function, add the temperature and set a cooking time. Once cooked, select the "Crisp" function and confirm by pressing the control knob.
Cooking starts. The grill will automatically switch on during the 5 last minutes of your cooking time.
ADD 5 MIN (only in manual mode)
You can select the "ADD 5 MIN" option at the end of your cooking with a set time. By activating "ADD 5 MIN", the oven will use the same cooking mode and temperature settings for 5 more minutes. You may press this again if necessary.
KEEP WARM
Once cooked, you can select the "KEEP WARM" option, which enables you to leave your dish in the oven without overcooking it. The oven temperature will adjust to an eating temperature until you are ready.
TIMER FUNCTION
This function can only be used either when the oven is off or during cooking.
Set the minute minder by turning the knob and then press to confirm. The timer starts.
Once the time has lapsed, there is a sound signal. To stop it, press any key.
Note: You can modify or cancel the timer at any time.
Press the key again and set your time or set it to 0m00s to cancel. Pressing the control knob during the countdown will also stop the timer.
CLEANING AND MAINTENANCE:
EXTERNAL SURFACE
Use a window washing product applied to a soft cloth. Do not use abrasive creams or scouring sponges.
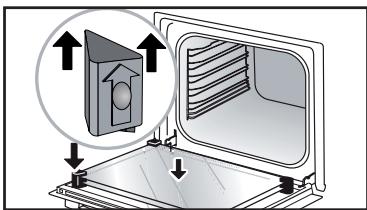
REMOVING THE SHELF RUNNERS
Side liners with shelf runners:
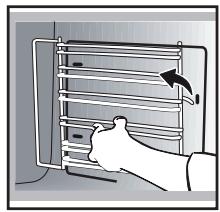
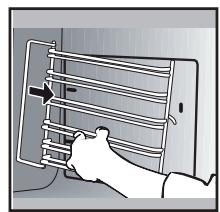
Lift the front part of the shelf runner upwards. Press the entire shelf runner and release the front hook from its housing. Then, gently pull the whole of the shelf runner towards you to release the rear hooks from their housing. Pull out the two shelf supports.
CLEANING THE OVEN DOOR GLASS PANELS
Warning Do not
7:3 Do not use scouring products, abrasive sponges or metal scrapers to clean the glass oven door as this could scratch the surface and cause the glass to shatter.
Before doing this, remove any excess grease on the inside panel with a soft cloth and washing up liquid.
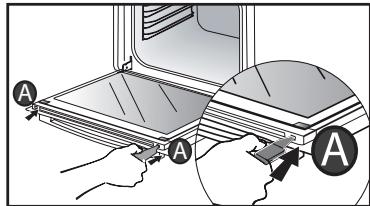
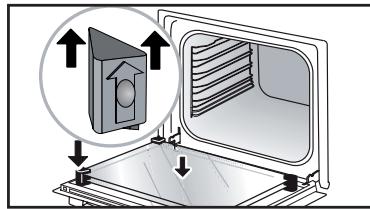
To clean the different inside glass panels, disassemble them as follows:
Open the door fully and block it with one of the plastic wedges provided in your appliance's plastic pouch.

Remove the first clipped glass panel: Using the other wedge (or a screwdriver), press into the slots A to unclip the glass. Remove the glass panel. The door consists of two
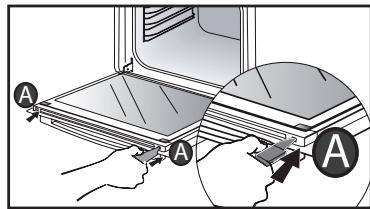
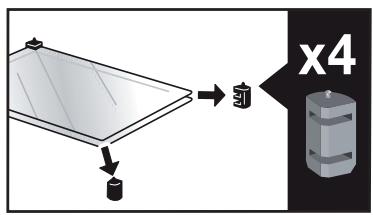
additional glass panels, with a black rubber spacer at each corner.
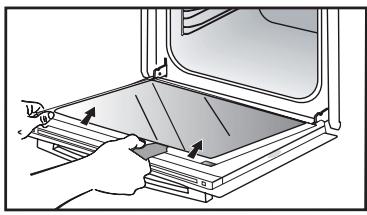
.9 CARE
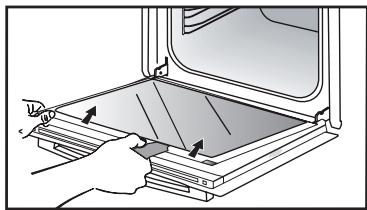
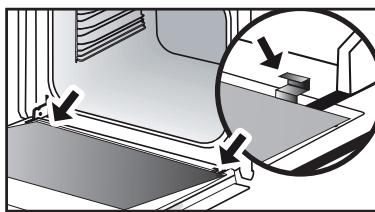
If necessary, remove them to clean them.
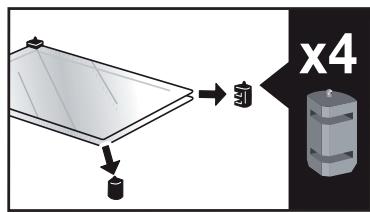
Do not soak the glass panels in water. Rinse with clean water and dry off with a lint-free cloth.
After cleaning, reposition the four rubber stops with the arrows upwards and reposition all of the glass panels.
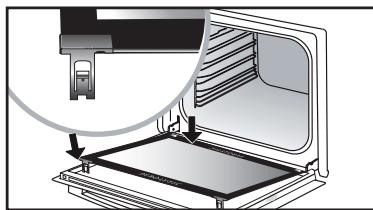
Insert the last panel into the metal stops, then clip it in, with the side with "PYROLYTIC" facing you and legible.
Remove the plastic wedge.
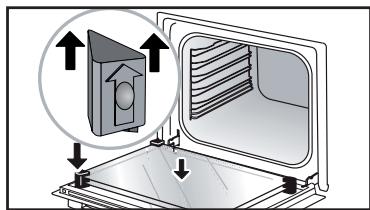
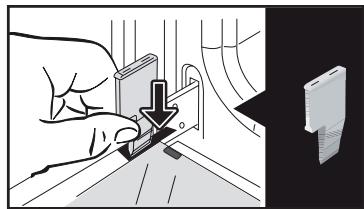
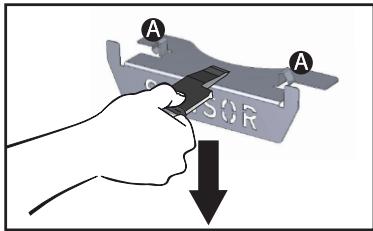
REMOVING AND REFITTING THE "SENSOR" PLATE
You can remove the "SENSOR" plate which informs your of the presence of a humidity sensor linked to the AI SENSOR mode. To clean it, use the plastic wedge provided to remove the door.

Removal:
Slide the wedge between the "SENSOR" plate and the top of the oven and push down to unclip it.
Refitting: Grab the "SENSOR" plate and firmly insert the notches A into the corresponding housings at the top.
PYROLYTIC SELF-CLEANING
! Remove the accessories and supports from the oven before beginning pyrolysis cleaning. Before starting a pyrolysis cleaning cycle, make sure that any accessories that are not pyrolysis safe have been removed from the oven (sliding rails, chrome-plated racks) as well as any cookware.
This oven is equipped with a pyrolytic self-cleaning function: Pyrolysis is a cycle during which the oven cavity is heated to a very high temperature in order to eliminate soiling from splattering and spills. Before starting pyrolysis cleaning, remove any large overspills, if any. Remove the excess grease on the door using a damp sponge. As a safety measure, cleaning only occurs after the door locks automatically; it is impossible to unlock the door.
Three pyrolysis cycles are proposed. The durations are pre-selected and cannot be modified:

Pyro Auto: between 1h30 and 2h15 energy-saving cleaning cycle.

Pyro Express: This function, which is accessible once cooking is finished, the heat built up during a previous long cycle to quickly and automatically in the inside of the oven: it cleans a dirty cavity in less than an hour.
If the heat inside your oven is sufficient: this pyrolysis takes as little as 59 min, and up to 1h30.

Pyro 2H: in 2h for more in-depth of the inside of the oven.
- Select the "CLEANING" function when you are in the general menu then confirm.
- Select the most suitable self cleaning cycle, for example PYRO AUTO, and confirm.
The pyrolysis cycle begins. The time starts to count down immediately it is set.
During pyrolysis, the symbol displays in the programmer to indicate that the door is locked.
After the pyrolysis, a cooling phase occurs during which your oven remains unavailable.
SELF CLEANING WITH DELAYED START
Follow the instructions described in the previous section.
- Select the cooking end time.
- Set the pyrolysis end time you want with the control knob and confirm.
After these steps, the oven switches to standby and the start of pyrolysis is delayed so that it finishes at the programmed time.
When the pyrolysis is complete, switch your oven off by pressing the ① key.

When the oven is cool, use a damp cloth to remove the white ashes.
The oven is clean and once again ready for the cooking application of your choice.
REPLACING THE LIGHT BULB
Warning: Make sure the appliance is disconnected from the power supply before replacing the bulb in order to avoid the risk of electric shock. Change the lamp only when the appliance has cooled down.
Bulldetails:25W,220-240V\~, 300^ G9.
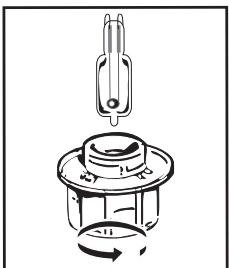
You can replace the bulb yourself. Unscrew the view port and remove the bulb (use a rubber glove, which will make it easier to remove). Insert the new bulb and replace the view port.
This product contains a light source with energy rating G.
| Questions | Troubleshooting and Solutions |
| - "AS" is displayed (Auto Stop system). | This function stops heating the oven if you forget to switch it off. Turn your oven to STOP. |
| - Fault code starting with "F". | Your oven has detected a problem. Stop the oven for 30 minutes. If the fault is still there, cut off the power supply for at least one minute. If the fault persists, contact the Customer Service Department. |
| - The oven is not heating. | Check that the oven is correctly connected and that your installation's fuse is not out of service. Check that the oven is not set to "DEMO" mode (see settings menu). |
| - The oven light is not working. | Replace the bulb or the fuse. Check that the oven is correctly connected. See chapter on replacing the light bulb. |
| - The cooling fan continues to operate after the oven has stopped. | This is normal. It can work for up to one hour after cooking to cool down the oven. If it continues beyond this, contact the After Sales Service. |
COOKING TIME FOR THE MANUAL MODE
| TYPE OF FOOD | * | * | * | * | * | * | Cooking time in minutes |
| °C | LEVEL | °C | LEVEL | °C | LEVEL | °C | LEVEL | °C | LEVEL | °C | LEVEL |
| MEAT | Roast pork (1 kg) | 200 | 2 | | | | | | | | | 190 | 2 | 60 |
| Roast veal (1 kg) | 200 | 2 | | | | | | | | | 190 | 2 | 60-70 |
| Roast beef | 240 | 2 | | | | | | | | | 200 | 2 | 30-40 |
| Lamb (leg, shoulder 2.5 kg) | 220 | 2 | 220 | 2 | | | 200 | 2 | | | 210 | 2 | 60 |
| Poultry (1kg) | 200 | 3 | 220 | 3 | | | 210 | 3 | | | 185 | 3 | 60 |
| Chicken thighs | | | 220 | 3 | | | 210 | 3 | | | | | 20-30 |
| Pork/veal chops | | | 210 | 3 | | | | | | | | | 20-30 |
| Beef ribs (1 kg) | | | 210 | 3 | | | 210 | 3 | | | | | 20-30 |
| Mutton ribs | | | 210 | 3 | | | | | | | | | 20-30 |
| FISH | Grilled fish | | | 275 | 4 | | | | | | | | | 15-20 |
| Cooked fish (bream) | 200 | 3 | | | | | | | | | 190 | 3 | 30-35 |
| Fish papillotte | 220 | 3 | | | | | | | | | 200 | 3 | 15-20 |
| VEGETABLES | Gratins (precooked ingredients) | | | 275 | 2 | | | | | | | | | 30 |
| Potato gratins | 200 | 3 | | | | | | | | | 180 | 3 | 45 |
| Lasagne | 200 | 3 | | | | | | | | | 180 | 3 | 45 |
| Stuffed tomatoes | 170 | 3 | | | | | | | | | 170 | 3 | 30 |
| PASTRÉS AND CAKES | Sponge cake - Génoise | | | | | | | | | 180 | 3 | 180 | 4 | 35 |
| Swiss roll | 220 | 3 | | | | | | | 180 | 2 | 190 | 3 | 5-10 |
| Brioche | 180 | 3 | | | 200 | 3 | | | 180 | 3 | 180 | 3 | 35-45 |
| Brownies | 180 | 2 | | | | | | | | | 180 | 2 | 20-25 |
| Cake - Pound cake | 180 | 3 | | | | | | | 180 | 3 | 180 | 3 | 45-50 |
| Clafoutis | 200 | 3 | | | | | | | | | 190 | 3 | 30-35 |
| Cookies - Shortbread | 175 | 3 | | | | | | | | | 170 | 3 | 15-20 |
| Kugelhopf | | | | | | | | | 180 | 2 | | | 40-45 |
| Meringues | 100 | 4 | | | | | | | 100 | 4 | 100 | 4 | 60-70 |
| Madeleines | 220 | 3 | | | | | | | | | 210 | 3 | 5-10 |
| Choux pastry | 200 | 3 | | | | | | | 180 | 3 | 200 | 3 | 30-40 |
| Individual puff pastry | 220 | 3 | | | | | | | | | 200 | 3 | 5-10 |
| Savarin cake | 180 | 3 | | | | | | | 175 | 3 | 180 | 3 | 30-35 |
| Shortcrust pastry tart | 200 | 1 | | | | | | | | | 200 | 1 | 30-40 |
| Thin puff pastry tart | 215 | 1 | | | | | | | | | 200 | 1 | 20-25 |
| VARIOUS | Terrine pâté | 200 | 2 | | | | | | | | | 190 | 2 | 80-100 |
| Pizza | | | | | 240 | 1 | | | | | | | 15-18 |
| Quiche | 190 | 1 | | | 180 | 1 | | | | | 190 | 1 | 35-40 |
| Soufflé | | | | | | | | | 180 | 2 | | | 50 |
| Pie | 200 | 2 | | | | | | | | | 190 | 2 | 40-45 |
| Bread | 220 | 2 | | | | | | | | | 220 | 2 | 30-40 |
| Toasted bread | | | 275 | 4-5 | | | | | | | | | 2-3 |
Note: Before putting them in the oven, all meats must be kept at room temperature for at least one hour.
* Depending on model
FUNCTIONAL SUITABILITY TESTS IN ACCORDANCE WITH IEC/ EN 60350 STANDARD
| FOOD | * COOKING MODE | LEVEL | ACCESSORIES | °C | Min. TIME | PREHEATING |
| Short-bread (8.4.1) | | 5 | 45-mm pan | 150 | 30-40 | yes |
| Short-bread (8.4.1) | | 5 | 45-mm pan | 150 | 25-35 | yes |
| Short-bread (8.4.1) | | 2+ 5 | 45 mm pan + wire rack | 150 | 25-45 | yes |
| Short-bread (8.4.1) | | 3 | 45-mm pan | 175 | 25-35 | yes |
| Short-bread (8.4.1) | | 2+ 5 | 45 mm pan + wire rack | 160 | 30-40 | yes |
| Small cakes | | 5 | 45-mm pan | 170 | 25-35 | yes |
| Small cakes | | 5 | 45-mm pan | 170 | 25-35 | yes |
| Small cakes | | 2+ 5 | 45 mm pan + wire rack | 170 | 20-40 | yes |
| Small cakes | | 3 | 45-mm pan | 170 | 25-35 | yes |
| Small cakes | | 2+ 5 | 45 mm pan + wire rack | 170 | 25-35 | yes |
| Fat-free sponge cakes (8.5.1) | | 4 | wire rack | 150 | 30-40 | yes |
| Fat-free sponge cakes (8.5.1) | | 4 | wire rack | 150 | 30-40 | yes |
| Fat-free sponge cakes (8.5.1) | | 2+ 5 | 45 mm pan + wire rack | 150 | 30-40 | yes |
| Fat-free sponge cakes (8.5.1) | | 3 | wire rack | 150 | 30-40 | yes |
| Fat-free sponge cakes (8.5.1) | | 2+ 5 | 45 mm pan + wire rack | 150 | 30-40 | yes |
| Apple pie (8.5.2) | | 1 | wire rack | 170 | 90-120 | yes |
| Apple pie (8.5.2) | | 1 | wire rack | 170 | 90-120 | yes |
| Apple pie (8.5.2) | | 3 | wire rack | 180 | 90-120 | yes |
| Browned surface (9.2.2) | | 5 | wire rack | 275 | 3-6 | yes |
- Depending on model
NOTE: When cooking on 2 levels, dishes can be removed at different times.
Recipe with yeast (depending on model)
Ingredients:
Flour 2 kg Water 1240 ml Salt 40 g 4 packets of dehydrated baker's yeast
Mix the dough in a mixer and allow it to rise in the oven.
Method: For yeast-based pastry recipes. Pour the dough into a heat-resistant dish. Remove the wire shelf supports and put the dish on the bottom.
Pre-heat the oven to 40 - 50^ with the circulating heat function for five minutes. Stop the oven and allow the dough to rise for 25-30 minutes thanks to the residual heat.
Domestic Electric Oven - Product Fiche As per the Commission Delegated Regulation (EU) N° 65/204
| Trade Mark | DE DIETRICH |
| Commercial code | DOP4556* |
| Energy Efficiency Index (EEI cavity) | 81,4 |
| Energy Efficiency Class | A+ |
| Energy consumption per cycle in conventional mode | 0,70kWh |
| Energy consumption per cycle in fan-forced convection mode | 1,10kWh |
| Number of cavities | 1 |
| Heat source(s) per cavity | Electric |
| Volume of the cavity | 73l |
| European Union eco-label | |

VAŽENA ZAKAZNICE, VAŽENY ZAKAZNIKU
3 PRAESENTATION AFOVNEN


Betjeningspanel

Lampe

TILBEHØR (IFØLGE MODELLEN)
TILBEHØR (IFØLGE MODELLEN)
SYSTEM MED GLIDESKINNER
Lille and, perlehone
ZUBEHÖR (JE NACH MODELL)
ZUBEHÖR (JE NACH MODELL)
Pyro Express: These Function,
- Diayvwon TpoBAmatwv
5 MANUALINEN KYPSENNYSTILA. 14
5 MANUALINEN KYPSENNYSTILA
5 MANUALEN KYPSENNYSTILA
KYPSENNYKSEN KESTOAIAKA
7 AUTOMAATTINEN KYPSENNYSTILA
AUTOMAATTISEN TILAN KUVAUS
Pitsa, "talon" taikina
7 AUTOMAATTINEN KYPSENNYSTILA
AUTOMAATTISEN KYPSENNYKSEN KÄYNNISTYS
MANUALISEN TILAN KYPSENNYSVINKKI
| RUOKALAJIT | * | * | * | * | * | * | Kypsennyksenkestoikaismäkettuna minuuteissa |
| °C | TAS | °C | TAS | °C | TAS | °C | TAS | °C | TAS | °C | TAS |
| LIHARIUAT | Porsaanpaisti (1 kg) | 200 | 2 | | | | | | | | | 190 | 2 | 60 |
| Vasikanpaisti (1 kg) | 200 | 2 | | | | | | | | | 190 | 2 | 60-70 |
| Naudanpaisti | 240 | 2 | | | | | | | | | 200 | 2 | 30-40 |
| Lammas (reisi, lava 2,5 kg) | 220 | 2 | 220 | 2 | | | 200 | 2 | | | 210 | 2 | 60 |
| Linnunliha (1 kg) | 200 | 3 | 220 | 3 | | | 210 | 3 | | | 185 | 3 | 60 |
| Kanankoivet | | | 220 | 3 | | | 210 | 3 | | | | | 20-30 |
| Porsaan- tai vasikankyljykset | | | 210 | 3 | | | | | | | | | 20-30 |
| Naudankyljykset (1 kg) | | | 210 | 3 | | | 210 | 3 | | | | | 20-30 |
| Lampaankyljykset | | | 210 | 3 | | | | | | | | | 20-30 |
| KALA | Grillattu kala | | | 275 | 4 | | | | | | | | | 15-20 |
| Keitetty kala (hammasahven) | 200 | 3 | | | | | | | | | 190 | 3 | 30-35 |
| Kala en papillote | 220 | 3 | | | | | | | | | 200 | 3 | 15-20 |
| VIHANKE- | Gratiinit | | | 275 | 2 | | | | | | | | | 30 |
| Perunagratiini | 200 | 3 | | | | | | | | | 180 | 3 | 45 |
| Lasagne | 200 | 3 | | | | | | | | | 180 | 3 | 45 |
| Täytetyt tomaatit | 170 | 3 | | | | | | | | | 170 | 3 | 30 |
| LEIVONNASET | Savoiardi- ja Génoisekeksit | | | | | | | | | 180 | 3 | 180 | 4 | 35 |
| Käärertorttu | 220 | 3 | | | | | | | 180 | 2 | 190 | 3 | 5-10 |
| Briossi | 180 | 3 | | | 200 | 3 | | | 180 | 3 | 180 | 3 | 35-45 |
| Pikkuleivät | 180 | 2 | | | | | | | | | 180 | 2 | 20-25 |
| Kuivakakut | 180 | 3 | | | | | | | 180 | 3 | 180 | 3 | 45-50 |
| Hedelmäpiiras | 200 | 3 | | | | | | | | | 190 | 3 | 30-35 |
| Keksit - Pikkuleivät | 175 | 3 | | | | | | | | | 170 | 3 | 15-20 |
| Kugelhopf | | | | | | | | | 180 | 2 | | | 40-45 |
| Marengit | 100 | 4 | | | | | | | 100 | 4 | 100 | 4 | 60-70 |
| Madeleine-leivokset | 220 | 3 | | | | | | | | | 210 | 3 | 5-10 |
| Tuulihatut | 200 | 3 | | | | | | | 180 | 3 | 200 | 3 | 30-40 |
| Petit fours -leivokset | 220 | 3 | | | | | | | | | 200 | 3 | 5-10 |
| Savariini | 180 | 3 | | | | | | | 175 | 3 | 180 | 3 | 30-35 |
| Murotaikinaleivät | 200 | 1 | | | | | | | | | 200 | 1 | 30-40 |
| Hedelmäpiirakat | 215 | 1 | | | | | | | | | 200 | 1 | 20-25 |
| SEKALASET | Lihamureke | 200 | 2 | | | | | | | | | 190 | 2 | 80-100 |
| Pitsa | | | | | 240 | 1 | | | | | | | 15-18 |
| Piiraat | 190 | 1 | | | 180 | 1 | | | | | 190 | 1 | 35-40 |
| Kohokkaat | | | | | | | | | 180 | 2 | | | 50 |
| Piirakat | 200 | 2 | | | | | | | | | 190 | 2 | 40-45 |
| Leipä | 220 | 2 | | | | | | | | | 220 | 2 | 30-40 |
| Paahdetttu leipä | | | 275 | 4-5 | | | | | | | | | 2-3 |
JAVASLATOK AZ AI SENSOR MODHOZ
Hal
400 gr - 1 kg
JAVASLATOK AZ AI SENSOR MÓDHOZ
Pizza
300 g - 1,2 kg
8 ANDERE FUNCTIONS 26
11 BEKWAAMHEIDSPROEF 34
VEILIGHEID EN BELANGRIJKE VOORZORGSAATREGELEN
BELANGRIJKE VEILIGHEIDSINSTRUCTIES. LEES ZE AANDachtig EN BEWAAR ZE VOOR TOEKOMSTIG GEBRUIK.
Räd for energisparing.
Unngå à apne døren under tilberedningen for a unngå varmetap.
STARTEN TILBEREDNING
UMIDDELBAR STEKESTART
Nár du har valgt og bekreftet stekefunksjonen, f.eks. Undervarme + vifte, trykk pa dreiebryteren for a bekrefte. Ovnen forvarmes. En pipelyd varsler om at ovenen har nadd den innstilte temperaturen. Du kan sette inn formen pa den anbefalte rillehoyden.
NB: Enkelte innstlinger kan endres for du slar pa ovenen (temperatur, steketid og utsatt start). Se de;neste kapitlene.
ENDRE TEMPERATURE
Avhengig av tilberedningstypen du valgte, vil ovenen anbefale en egnet steketemperatur.
Temperatures kan endres sik:
INNSTILLE STEKESLUTT (utsatt start)
Legg不解. "I don't know what you're saying," he said. "It's just a matter of time."
SELVRENGJØRING MED UTSATT START
Oh rapaHTnpuyet He ToIbKO KaueCTBO I DOJIROBEuHOCt HaIIN pN6OpOB, Ho IN IX OTCLeKINBaEMOCTb, To eCTb yKa3bIbae TOTHoe N YeTKOE MeCTO IN IIPONCXOXJDeHnA.
www.de-dietrich.com
BAKHBIE INHCTPYKUNI NO TEXHNIKE BE3OINACHOCTN I INPEIOCTEPEXEHNIA.4
1 YCTAHOBKA 6
Bb6op meCTa u yctaHObKa 6
3JIeKtpnueckoe POKNIouHne 7
2 OKPYKAIOUCA CPEA 7
Oxpana okpykaioe cpebl 7
3 OINICAHNE DUYXOBOTO UKAΦA 8
PanaJIb ynpabLeHnI n dncIeI 9
Блорвка конок 9
PpHaIeJXHOCTN (B COOTBeTCTBmC MoJeIbIO) 10
CnCTema BbIDBHXHbIX HnpaBnHOuix 12
UctaHOBkaI DeMOHTax BbIDBnKhbIX HappaBIAIOxix 12
4 BKJIIOUCHNE I HACTPOIKA 13
PepBbI 3anyck 13
MeHIO hAcTpoEk (B COOTBETCTBnC MoJeIbIo) 13
5 PYHON PEXKIM IPIIOTOBJEHNA 14
HauaJIo npriroToBJIeHnI 16
6 PEKOMEHNDAUINIPOIPIRTOBOJIENIOIII 17
ФункцAir FRY 17
Функция дгпратуи 18
7 ABTOMATUÇECKNE PΕΧΜBi IπριΓΟΤΟΒΙEHη. 19
OncanHe aBToMaTnueckoro pexima. 19
Oncanhe kateropn 6noid 20
Hauano abTOMaTnueckoro npriroToBneHnra 25
Obchyhny peximnpirotoBneHn 25
8ДРУГЕФУHKUIN 26
BapnantbokohuaHn nprirotoblen (B 3abncmoctn OT cnocoba nprirotoblenna) ..26
Функциа Таймера 26
9 YXOД 27
OuicTka u yxo.. 27
ChTne u yctanOBka Ta6nuk DaTnK 28
Camaoocntka npn nomoos npnpn3a 29
3aMeHa IamnoUKN 31
10 HENCPABHOCTN IN CNOObI INX YCTPAHEHNA 32
11 TECTbI PnroDHOCTN 34
БЕЗПАС"HОCTь И BAЖHbI EMEРы ПРЕДО-CTОРОЖHOCTN
BAKHbIe IHCTPyKcIIN PO TEXHnke B63OpACHOCTN: BHIMATEJIbHO IPOyTtE N COXPAHNTE JIЯ NCIOJb3OBAHnRA B DAJIbHEIWeM.
3Tu INHCTpyKcIIO MOxHO cKaaTaB Ha Be6-CanTe KOMpaHmN.
B MOMENT NOJUeyHnI np6bopa cpa3y Jxpe paCnakyIte ero nn INPONPOcHTe 3TO CdelaTb KOrO-JIn6o DpyrOro. PpOBepbTe BHeuHnBnD. Pn HEO6XODIMOCtN ONINHTe HeIOCTaTKn Ha KBNTaHcUN O DOCTaBKe n COxpaHnTe OOnH 3K3eMnIpaR.

Baxho!
3TOT npnbop MOKeT NcNoJIb3OBaTbCSr DeTbMn OT 8 JeT, JIOdbMn C ORpaHnueHHbIMN cN3UeCKIMN, CEHCOPHbIMN uYMCTBeHHbIMN BO3MOXHOCTaMn, a TaKke JIOdbMn C HEXBaTKoI ONbITA u 3HaHn IOD KOHTPOJEM OTBETCTBEHHORO 3a ux 6e3OpacHOCTb Liuca nocJe npoxxJDeHnI PpeDvapntelbHOrO INHCTpykTaJa PO 6e3OpacHOMy NCNoJIb3OBaHnIO npNbopa N pOnyueHnI INΦOpMaun O pNcKaX, KOTOpbIM OHn IOdBepraOTcR.
PeKOMeHdyetc Hne IoIpyckaTb K yCTpOiCTBy DeTei.
He nCnoIb3yIte npI6Opbl qnCTkn napom.
He nCnoB3yIte a6pa3nBhIe cpeIcTbA dIa O6cnyKuBaHnA, a TAKKe JecTkne MeTaJIInueckNe CKpe6Kn dIy ChcTKn CTeKJrHHoN DBepCuI dyXOBOrO ShkaΦa, NOCKoJIbKy I3-3a 3TOrO Ha NOBepxHOCTn MOryT NORBtCBs CuapAnHbI IN CTekIO MOKET NOTpeCKaTbCS.
БЕЗПАС"HОCTь И BAЖHbI EMEРы ПРЕДО-CTОРОЖHOCTN

ПЕДОCTEPEЖЕНЕ.
Ipexde yem npucTynntb K 3aMeHe IamNoCKN IN BO n36eXaHne ONaCHOCTN NopaxKeHna 3JeKtpuYeCKIM TOKOM y6eINTecb, YTO npiBOp OTKnIOueH ONcTn PNTAHNA. BblONHnTe 3aMeHy TOnbKO Ha OCTbIBwE m npiope. Dnra ChrTnA CTeKJa IN lamNoCKN uCNOJb3yInTe pe3INHOBy IO nepuaTKy, KOtOpa O6JIerHTIPOUeCC DeMOHTaJa.

Должна ьыть пpeдусмOTpeHa BO3MOxHOCtB OTKJIIO-
YeHnI np6oPa OT 3neKtpocTeN C NOMOuB BbIKIOUaTeJy, YCTaHOBJIeHHOro B QNKcnpOBaHHbIX Ka6eJIePpOBoDAx B COOTBeTCTBnC PpaBnJaMn yCTaHOBKn.
—Bo n36exhaHne onaChocTn npi NOBpeXdEHN Ka6eYI NTaHn erO 3aMeHa DOJXHa BblIOJIHTbcn PON3BOIDTeJeM, COTpydHnKamN cJyX6bI NocJIePPOdaXHOrO OBCJyXuBaHn JIn6o nepCOHaJOM C COOTBeTCTByUoSei KBaJIINΦnKaUnei.
-3TOT npnbop MOKeT yCTaHaBnBaTbCay KaK NOd pa6OyeIIOBepxHOCTbH, TaK N HaD HeN B COOTBeTCTBn CO CXeMoY yCTaHOBKN.
—PacnoIoxnTe dYXOBoN shkaB MebeNIO ceHTpy TaK, YTObIMeJy shKaΦOM N COCEdHm
IpeDMeTOM Me6eNIOCTaBaNc3a3Op He MeHee 10 MM.MaTePnAJI Me6eNIN, B KOTOpYIO BCTpaNBaETCAdyXOBOI ShKaΦ, DOLJKeH 6bITb UCTOuHBbIM K BO3DeIcTBNUo BblCOKoI TeMnepaTpybl (NJN Me6eNBo IOnJxHa 6bITb NOKpbTa TaKIM MaTePnALOM).ДЯ OBeScneHEna BoJbWeYCTOuNbOcTn 3aKpeNITE dYxOBOI ShKaΦ B Me6eNIN C POMOu2 BVHTOB IN OTBepCTNI, IpeDyCMOTPeHHbIX DJI HNX.
PpOBONOuHbIe peWSEKn (6 BapHaHTa BbICOTbl)
3 OIIHCAHNE JYXOBOFO IIKAΦA

NAHEJIbYNPABJIENHnI INCJIeN

Ducnnei

Bpaaiooaaerpa c haxmom no ceHTpy (hecbemHa):
- NOBopauhBaayee,MOXHO BbIpaTb npOrpamMbI,yBeJIuHvBaTb IyMHehShaTa3HaueHnra;
-NotBepKdaiTe KaKdoe DeiCTBHe HaxaTneM Ha ceHTp KHONKn.
KHOKNaOCTaHOBKn pa6oTbI dyXOBORO uKaΦa (dNITeJIbHoe HaxaTne)
KlaBnua BO3Bpata
Khonka TaHmepa

Khonka HenocpeDCTBeHHoro
docTyna K PYHOMy pexmMy
KhONka TemnepaTpybl
KhONka npoOJXnTeNbHocTn npriTOBJIeHn/ npriTOBJIeHn C OTJIOKeHHbIM CTapTOM
БЛOKИРОВКА KHONOK
HaxMnTe OJHOBpeMeHHO KONKn BO3BpaTa 一 n ydepxnBaIte nx do oTo6paKeHn CmBOJa ! Ha 3KpaHe.
CNCHEMA BbIDBnKhbIX HANPABJIIOUx
Благорapсстeme Вьдвньхьн
нанравл Anyх Маниулроване
пpoуктам CTahOBNTc 6Oоe
удбим Iягим, T.K. npOTNBH MOrYT
ВьдВИrATbCЯПаВHO, YTO MaKСmмЛьHo
уnpошaet obpaшeнe C HIMN.
ПрOTNBH MОЖно ИЗВLEКаТ bONHOCTbU,
ЧTO obecneчиBaET DoCTyn KО BCEMY
БлODY. КрOME TOTO, INx ySTOnuVBOCtB
obecneчиBaET NOHHyO 6e3ОпаСHOCtB
paBoTb c PoDyKTAm, YTO yMeHbWAeT
ОпаСHOCt b OXOROB. TAKIM OБразOM,
ИЗВLEЧЕНЕ ПpoDyKTOB ИДУХOBKN
СТАнOBNTc HAMHOrO 6Oоe yOd6hblm.
YCTAHOBKA I DEMOHTAX BbIDBVHbIX HAPPABJIIOUX
Iocne ydaJIeHn 2 npoBOJOnuHbIX peWetOK BbI6epnte YpOBeHb BbICOTbI (OT 2 do 5),Ha KOTOPOM Bbl XOTnTe 3aФнкspOBaTb Baun HAnpaBnIouIe. BcTaBte JEBYIO HAnpaBnIauOyU B yCTyn JbeOi peWetKn,HaDaBnB C DoCTaTOUHO CNIoN Ha nepeDnIOU N 3aDnIOU qAcTN HAnpaBnIouSei, YTObI 2 NaKN Ha 60ky HAnpaBnIouSei BOJIN B npoBOJOnuHyO peWetKy.BbIOnHnTE aHaIOnuHbIe DeJeCTBnI dI pyBoH nApabnIauOseI.
- YnpabJeHne JAmnoyKoJ
BamnpednagaTDbBa Bb6opa hactpoKn: B noIoxKeHn BkN. lamnoKca cBeNTcR BO BpeMg BCero npiroTOBJIeHn (KpOme fynKcnn 3KO).B noIoxKeHn ABTO lamnoKca DyXOBKn rachet nO nCTeueHn ONpeJeHHoro BpeMeHn npiroTOBJIeHn. Bb6epnte noIoxKeHne n oNDtBepdnte.
-3bIK
BbIbePHTe CBOIЯ3bIK, 3aTeM IOdTBepDITe.
OCTAHOB BbIIOJIHReMOrO IPIrTOBJIeHn
ДлЯ OCTaHOBa BblNoJIHReMOrO
Пи�罗TOBHeHnHaXmTe pyUkY.
Ha əkpaH e NPOBNTc HaDnncb OTKJIIOUOHEHNE.
IoiTBePnte BbI6Op HaxKaTIeM Ha pyKu IINyUepXnBaHneM KHOKN OCTaHOBKn pa6oTbl.
6PEKOMEHNIAIINIO IIPNIGOTOBJIENIOIII

ФУHKЦЯ AIR FRY
PomeCTnTe npOdykTbI npraMo Ha nepΦopnpoBaHnyo φOpMy, pa3JIoKINb INB OODH CNOi, Bbl6epnte pexKIM nprirotoblenHa Air Fry n yctaHOBnTe tempeatpy B dana3one 180°C-220°C. YcTaHOBnTe nepΦopnpoBaHnyo φOpMy ha ypOBeHb 5, a rIy6okn noDOn Ha ypOBeHb 3, qTO6bI B Hero CTekaln OCTaTKN.
TABLIUCA C PEKOMEHDAZIaMNI PO PEXIMy AIR FRY
Hnyken npedbapntelhny harpeb do 200 ^ C^*
MaKcImaJIbHO ydaJInte KInp, KOToPbI npn npriroTOBJIeHNI 6pa3ObIbAeT dbIM.
BbIIOKInTe mAcO B rIyboKn nO.
B KOHuce npnroTOBJIeHna OCTaBBte MraCoHa 7-10 MNHyT.
Kypuza
Kypuca Becom ot 1,4 do 2,5 Kr
Ytka-MaHapuHka, Zecapka
BbINOxNte pNTuCy Ha peWetky u3 Habopa rPnIb +noDOnH dJa CTeKaHnJxJupa.
Bo n36exaHne 6pbI3r npokoJIte Koxy nTnCbI nepeD nprirotobHeHem.
7 ABTOMATHUeCKN PEKHM IPIPNO-TOBJIeHnI
ОпUCAHNE KATEGOPи БЛЮД
IydnHn3amOpOxKeHHbIe
IcnoJb3yIteΦopMy n3 aIHomHnY cAHTnnpurapHbIM NOKpbITnEM — BblneYKa 6byet xpyctrauei CHN3y.
Ipejde Yem BblIOXnTb 3amOpOxeHHbIe nyDnHn Ha peWetKy, He 3a6yDbTe y6paTb NOJIOKky.
ΦaπuρoBaHHbIe OBOU
AapshinpoBaHbIe TOMaTbI, nepeu
Tpecka no-npobaHcaJIbckn
IpaBnIbHO nOdbepnte pa3MepebI fOpMbI dIy 3aKeHnB B 3aBNCIMOCTN OT KOJIYcECTBa npOdykTA, BO n36eKaHne BbTEKaHnCoka.
7 ABTOMATHUeCKN PEKHM IPIPNO-TOBJIeHnI
ONICAHNKATEGOPN BJIUD
IcnoJb3yIte MryKyo TkaHb, CMOeHHyO cpeDCTBOM IJIY NICTKN CTekoJ. He IcNoJb3yIte HN YNCTaXn Nact, Hn a6pa3nBbIX r60K.
ДЕMOHTAX ПОBOJOUHbIX PEWETOK
Бokobbie cTeHKn C npOBOnOHyIMn peWetKamn:
IopHnMnte nepeHIOU qactb npoBOJOnHoi peWetKn BBepx,ToJKNHTe 6NOK npoBOJOnHoi peWetKn N BbTaunTe nepEni KpOcK n3 erO rHe3da.3aTeM cJeRka NotAHnTe 6NOK npoBOJOnHoi peWetKn Ha Ce6a, YTObbl BbHyTb 3aHNHe KpOuKn n3 nX rHe3d. N3BNeKeTIte TAKIM o6pa3OM 2 npoBOJOnHbIe peWetKn.

OuNCTKA CTEKOL DBEPZbl
IpeoctepexeHHe nCnoB3yTe a6pa3nBhble cpeCTBa dlya yxoJa, a TaKKe JecTKnE MeTaNHeCKne CKe6Kn dJa YnCTKn CTekJHHoN DBePcbl DyXOBOrO WkaFpa, NocKOJIbKy TaKIM O6pa3OM MoxHO nozaapanaTb NOBepXHoCTb, a CTeKNo MOKeT NOTpeCaTbCra.
Låt lammkylen vila after tillagning.
Låt lammkylen vila after tillagning.
Fläskstek
0,7-1,4 kg
Flaskarre, filé
Låt kottet vila i 7-10 minutes after tillaging.
Kyckling
SJÄLVRENGÖRING MED PYROLYS
OMEDELBAR SJÄLVRENGÖRING
SJÄLVRENGÖRING MED FÖRDROJD START
BAKJIIBI INPABUNIA TEXHIKN BE3NEKN 3ANOBIXHI 3AXOIN.4
1.BCTAHOBJIENHJ 6
Bn6ip micra dIpa03a7ybaHHra Ta B6ydoByBaHHra 6
Пд'еданндао eнektpomepeksi 7
2. HABKOLIshne CEPEIOBNUe 7
3axnCT nabkoNnHbOre cepeoBnua .7
3. ONIC DUYXOBOI 8
KlabiWi kepyBaHHa I ducnnei 9
Блokуваши ...9
Akccecyapn (3aIeKHO BiD MoJeNi) 10
HaprmapekoBa cncTeMa 12
UctaHOBJIeHH Ta 3HJTTpeIKOBHX HnnpMHNX. 12
4. YBEDEHHB EKCPIYATAUIO TA HAJAHTYBAHH
Iepue BBeDeHnB Eeknnyatauio 13
Mehno hanahtybanb (3anexho bi Modeni) 13
5. Puchni PEKIM IPIIOTYBAHNA 14
3anyck npocecy npirotoybaHHa 16
Ipeed npiroTybaHn po3irpiTe nopoxHIO dYxOBy wa?y.
Piua 3 roTOBoro Ticta
TicTo DnIaDomauHbOi Niu
XIN, NNNN NNNN - IN NINIIN NINN, INN T-YY NNI - DNND NOIN DNNN.
nnnn nn nnnn nn nnnn nnnn nnnn nnnn nnnn nnnn nnnn nnnn nnnn nnnn nnnn nnnn nnnn nnnn nnnn nnnn nnnn nnnn nnnn nnnn nnnn nnnn nnnn nnnn nnnn nnnn nnnn nnnn nnnn nnnn nnnn nnnn nnnn nnnn nn
,ON nnnn nn nnnn (AUTO) nnnn .(ECO 100 nnn
JN
10 7
.1111 790111111
Tn 100nnnnnnnnnnnnnn
.17UNI
JNINNNN
#
1
yU -
Jn nn nn nn nn nn nn nn nn nn nn nn nn nn nn nn nn nn nn nn nn nn nn nn nn nn nn nn nn nn nn nn nn nn nn nn nn nn nn nn nn nn nn nn nn nn nn nn nn nn nn nn nn nn nn nn nn nn nn nn nn nn nn nn nn nn nn nn nn nn nn nn nn nn nn nn nn nn nn nn nn nn nn nn nn nn nn nn nn nn nn nn nn nn nn nn nn nn nn nn nn
.10111X 1912TUNN
#
yNnNnNnNnNnNnNnNnNnNnNnNnNnNnNnNnNnNnNnNnNnNnNnNnNnNnNnNnNnNnNnNnNnNnNnNnNnNnNnNnNnNnNnNnNnNnNnNnNnNnN
77
ONONNNN
.17x10
nna
n nn nnnn nn nnnn nn nnnn nn (Diagnostic)
OONN NNNN NNNN NNNN NNNN NNNN NNNN NNNN NNNN NNNN NNNN NNNN NNNN NNNN NNNN NNNN NNNN NNNN NNNN NNNN NNNN NNNN NNNN NNNN NNNN NNNN NNNN NNNN NNNN NNNN NNNN NNNN NNNN NNNN NNN
AI
AI
nniin Al sensor n"nn nn nnn nnn nnn nnn nnn nnn nnn nnn nnn nnn nnn nnn nnn nnn nnn nnn nnn nnn nnn nnn nnn nnn nnn nnn nnn nnn nnn nnn nnn nnn nnn nnn nnn nnn nnn nnn nnn nnn nnn nnn nnn nnn nnn nnn nnn nnn nnn nnn nnn nnn nann
Tn n nn Alnnnnnnnnnnnnnnnnnnnnnnnnnnnnnnnnnnnnnnnnnnnnnnnnnnnnnnnnnnnnnnnnnnnnnnnnnnnnnnnnnnnnnnnnnnnnnnnnnnnnnnnnnnnn
Hnnn nn nnnn nn nnnn .Al sensor
ynnn nn yN Al nnnnnn nn nnnn nn nnnnnnnnnnnnnnnnnnnnnnnnnnnnnnnnnnnnnnnnnnnnnnnnnnnnnnnnnnnnnnnnnnnnnnnnnnnnnnnnnnnnnnnnnnnnnnnnnnnnnnnnnnnnnnn
(1)
,79:nnn nn n nn nn nn nn nn nn, AUTO IN Tn nn nn nn
.5noinin
(17) 5 noin
"1000 5 5 5 5 5 5 5 5 5 5 5 5 5 5 5 5 5 5 5 5 5 5 5 5 5 5 5 5 5 5 5 5 5 5 5 5 5 5 5 5 5 5 5 5
.7n7n7n7n7
79
JyNn JyNn JyNn JyNn JyNn JyNn JyNn
n nn nnnnnnnnnnnnnnnnnnnnnnnnnnnnnnnnnnnnnnnnnnnnnnnnnnnnnnnnnnnnnnnnnnnnnnnnnnnnnnnnnnnnnnnnnnnnnnnnnnnnnnnnnnnnnnnnn
nTn by nnnn T-ynnx "79" nnvN
yun nn nn nn nn nn
ynnnyn 5
nhy
"nnn nnnnnnnnnnnnnnnnnnnnnnnnnnnnnnnnnnnnnnnnnnnnnnnnnnnnnnnnnnnnnnnnnnnnnnnnnnnnnnnnnnnnnnnnnnnnnnnnnnnnnnnnnnnnnnnnnnnnn
.
#
100000000000000000000000000000
n nn nnnn nn nnnn nn nnnn nn nnnn
1
ywn by 1n7
Nn nn nnnnnnnnnnnnnnnnnnnnnnnnnnnnnnnnnnnnnnnnnnnnnnnnnnnnnnnnnnnnnnnnnnnnnnnnnnnnnnnnnnnnnnnnn
nnnnnnnn nn nnon nnn
TnXyIyN7,nyy7yynu"
.
111 111 111 111
n7nnn117
Sixn noun
1 111111111111111111111111111111
nnn nn nnn nnn nnn nnn nnn nnn nnn nnn nnn nnn nnn nnn nnn nnn nnn nnn nnn nnn nnn nnn nnn nnn nnn nnn nnn nnn nnn nnn nnn nnn nnn nnn nnn nnn nnn nnn nnn nnn nnn nnn nnn nnn nnn nnn nnn nnn nnn nnn nnn
nni nnnn nn nnnnnnnnnnnnnnnnnnnnnnnnnnnnnnnnnnnnnnnnnnnnnnnnnnnnnnnnnnnnnnnnnnnnnnnnnnnnnnnnnnnnnnnnnnnnn
777777777777777777777777777
n nn n nn nn nn nn
D'9TN 'NIN NIN ON DY TIN NIN
n nn n nn nn nn nn nn nn nn nn nn nn nn nn nn nn nn nn nn nn nn nn nn nn nn nn nn nn nn nn nn nn nn nn nn nn nn nn nn nn nn nn nn nn nn nn nn nn nn nn nn nn nn nn nn nn nn nn nn nn nn nn nn nn nn nn nn nn nn nn nn nn nn nn nn nn nn nn nn nn nn nn nn nn nn nn nn nn nn nn nn nn nn nn nn nn nn nn nn nn nn nn
Tn nD T

IX DNIY NINANNNNHNH JX - 3, nIOIIN IITIINIINNNNNNNNNNNNNNNNNNNNNNNNNNNNNNNNNNNNNNNNNNNNNNNNNNNNNNNNNNNNNNNNNNNNNNNNNNNNNNNNNNNNNNNNNNNNNNNNNNNNNNNNNNNNNNNNNNNNNNNNNNNNNNN
yDyDyDyDyDyDyDyDyDyDyDyDyDyDyDyDyDyDyDyDyDyDyDyDyDyDyDyDyDyDyDyDyDyDy
"SENSOR"
"SENSOR"-n n n n n n n n n n n n n n n n n n n n n n n n n n n n n n n n n n n n n n n n n n n n n n n n n n n n n n n n n n n. AI SENSOR
:7179
nnnSENSOR-n nniy nn nnnnnnnnnnnnnnnnnnnnnnnnnnnnnnnnnnnnnnnnnnnnnnnnnnnnnnnnnnnnnnnnnnnnnnnnnnn
"SENSOR" nii iipnn:wnn nn nn nn nn nn nn nn nn nn nn nn nn nn nn nn nn nn nn nn nn nn nn nn nn nn nn nn nn nn nn nn nn nn nn nn nn nn nn nn nn nn nn nn nn nn nn nn nn nn nn nn nn nn nn nn nn nn nn nn nn nn nn nn nn nn nn nn nn nn nn nn nn nn nn nn nn nn nn nn nn nn nn nn nn nn nn nn nn nn
17 17 17 17 17 17 17 17 17 17 17 17 17 17 17
"YIINN NNNN NNNN NNNN NNNN NNNN NNNN NNNN NNNN NNNN NNNN NNNN NNNN NNNN NNNN NNNN NNNN NNNN NNNN NNNN NNNN NNNN NNNN NNNN NNNN NNNN NNNN NNNN NNNN NNNN NNNN NNNN NNNN NNNN NNN
y 179
D'NTXN NNNNINN INNINNNNNNNNNNNNNNNNNNNNNNNNNNNNNNNNNNNNNNNNNNNNNNNNNNNNNNNNNNNNNNNNNNNNNNNNNNNNNNNNNNNNNNNNN

y
y
1.25-nyu 1.5 Pyro Autol

.
nyn,ny:Pyro Express

n nn n nn n nn nn nn nn nn nn nn nn nn nn nn nn nn nn nn nn nn nn nn nn nn nn nn nn nn nn nn nn nn nn nn nn nn nn nn nn nn nn nn nn nn nn nn nn nn nn nn nn nn nn nn nn nn nn nn nn nn nn nn nn nn nn nn nn nn nn nn nn nn nn nn nn nn nn nn nn nn nn nn nn nn nn nn nn nn nn nn nn nn nn nn nn nn nn nn nn nn nn nn nn
Jn nn nnnn nn nn nn nn nn nn nn nn nn nn nn nn nn nn nn nn nn nn nn nn nn nn nn nn nn nn nn nn nn nn nn nn nn nn nn nn nn nn nn nn nn nn nn nn nn nn nn nn nn nn nn nn nn nn nn nn nn nn nn nn nn nn nn nn nn nn nn nn nn nn nn nn nn nn nn nn nn nn nn nn nn nn nn nn nn nn nn nn nn nn nn nn nn nn nn nn nn nn nn nn gn nnnn nnnn nnnn nnnn nnnn nnnn nnnn nnnn nnnn nnnn nnnn nnnn nnnn nnnn nnnn nnnn nnnn nnnn nnnn nnnn nnnn nnnn nnnn nnnn nnnn nnnn nnnn nnnn nnnn nnnn nnnn nnnn nnnn nnnn
Pyro 2H

TIO