
DPI4332BP - Hob DE DIETRICH - Free user manual and instructions
Find the device manual for free DPI4332BP DE DIETRICH in PDF.
| Product type | Induction hob |
| Brand | De Dietrich |
| Model | DPI4332BP |
| Number of cooking zones | 5 (including one Horizone zone) |
| Zone diameters (cm) | 16, 18, 23, 28, 30 and Horizone (18 - oval zone) |
| Maximum total power | 7.4 kW (adjustable 3.6 / 4.6 / 5.7 / 7.4 kW) |
| Electrical supply | 230 V / 400 V (depending on connection), 50/60 Hz |
| Recommended fuse | 32 A (for 7.4 kW) |
| Hob dimensions (W x D cm) | Approx. 56 x 49 cm (check according to cutout) |
| Approximate weight | 12 kg |
| Control type | Touch controls with digital display and keypad |
| Main functions | Boost, Keep warm, Simmer, Sear, Timer, Lock, Switch (move), ICS, Recall, Cooking assistant, Favorites, Boil, Grill, Blanch, Sous-vide, Autolink |
| Safety | Child lock, Automatic shut-off, Residual heat indicator (H), Overflow protection, Temperature limiter |
| Surface material | Ceramic glass |
| Care and cleaning | Clean with non-abrasive sponge and special ceramic glass cleaner; scraper for stubborn stains; white vinegar for limescale |
| Energy class | A (estimated) |
| Manufacturing | France (Origine France Garantie certified) |
| Consumer services | 0 892 02 88 04 (€0.50/min + call charges); After-sales service: 09 69 39 34 34 (free service + call charges) |
Frequently Asked Questions - DPI4332BP DE DIETRICH
User questions about DPI4332BP DE DIETRICH
0 question about this device. Answer the ones you know or ask your own.
Ask a new question about this device
Download the instructions for your Hob in PDF format for free! Find your manual DPI4332BP - DE DIETRICH and take your electronic device back in hand. On this page are published all the documents necessary for the use of your device. DPI4332BP by DE DIETRICH.
USER MANUAL DPI4332BP DE DIETRICH
RELATIONS CONSOMMATEURS FRANCE
You have just purchased a De Dietrich product. This choice reflects your high standards and taste for the French way of life.
Resulting from over 300 years' know-how, the De Dietrich creations embody the fusion between design, authenticity and technology at the service of culinary arts. Our appliances are manufactured using noble materials and offer an irreproachable quality of finish.
We are certain this high-quality product will enable cooking enthusiasts to express all their talents.
The De Dietrich Customer Service Department is at your disposal for all your questions and suggestions to always better meet your expectations.
We are honoured to be your new partner in the kitchen and thank you for your trust.

With its factories based in France, in Orléans and Vendôme, De Dietrich cultivates a constant search for excellence, perpetuating exceptional know-how in the design of perfectly finished products. Many of our electrical appliances are certified by the "Origine France Garantie" label, an acknowledgement which certifies they are manufactured in France.
This label both ensures the quality and durability of our appliances, as well as their traceability, thus offering a clear and objective indication of their provenance.
www.de-dietrich.com
·1 ENVIRONMENT 7
2 INSTALLATION 8
Unpacking 8
Fitting 8
Electric connection. 10
3 PRESENTATION OF YOUR APPLIANCE 11
Control panel glossary 11
Display glossary 12
4 USING THE OVEN 13
Settings management. 13
Power management 14
Choice of cookware 14
Cooking ring selection 13
Powering On/Off 15
Adjusting the power 15
Horizone (depending on model) 16
Adjusting the timer 16
Locking the controls. 17
Switch FUNCTION 17
ICS FUNCTION 17
Recall FUNCTION 17
Elapsed time FUNCTION 18
Cooking assistant function 19
Favourites function 25
Safety and recommendations 25
·5 CARE 26
6 TROUBLESHOOTING AND SOLUTIONS 27
·7ECODesignTABLE 28
8 CUSTOMER SERVICE 29
IMPORTANT SAFETY ADVICE AND PRECAUTIONS
IMPORTANT SAFETY INSTRUCTIONS - READ CAREFULLY AND KEEP FOR FUTURE USE.
This user guide is available for download on the brand's website.
Your appliance complies with applicable European Directives and regulations.
This appliance may be used by children aged 8 years and older, and by persons with impaired physical, sensory or mental capacities, or without experience or knowledge, if they are correctly supervised or have received prior instructions on how to use the appliance safely and have understood the risks involved.
Children must not be allowed to play with the appliance.
Cleaning and maintenance operations must not be carried out by children without supervision.
Children under 8 years of age should not be allowed near the appliance, unless they are constantly supervised.
Your hob is equipped with a child safety device that locks its operation after use or during cooking (See "Child Safety use" section).

The appliance and its accessible parts become hot during use.
Precautions must be taken to avoid touching the heating elements. Metal objects such as knives, forks, spoons and lids must not be placed on the cooking surface as they may become hot.

CAUTION: cooking must be monitored. Short cooking requires constant surveillance.
Danger of fire: do not store objects in the cooking zones.
Leaving oil or fat to cook unattended on a hob can be dangerous and lead to fire. NEVER attempt to extinguish a fire with water. Instead, switch off the appliance and cover the flame with a lid or a fire blanket.
IMPORTANT SAFETY ADVICE AND PRECAUTIONS
If the surface is cracked, disconnect the appliance to avoid the risk of electric shock.
Do not use your hob until you have replaced the glass top.
These hobs must be connected to the mains via an all-pole cut-off device that complies with current installation regulations. A disconnection device must be incorporated into the fixed wiring. Your hob is designed to work at a frequency of 50Hz or 60Hz (50Hz/60Hz), without you having to do anything.
The appliance must be connected via a standardised power supply cable with the suitable number of conductors for the type of connection wanted (see installation chapter)
If the power cable is damaged, it should be replaced by the manufacturer, its after-sales service department or a similarly qualified person, so as to avoid danger.
Ensure that the power cables of any electrical appliances plugged in close to the hob are not in contact with the cooking zones.
WARNING : In order to avoid interference between your cooking hob and a heart pacemaker, the pacemaker must be designed and programmed in compliance with the regulations that apply to it. Ask the pacemaker manufacturer or your GP.
Only use hob protectors designed by the manufacturer of the cooking appliance or listed as suitable in the user guide, or included with the appliance. The use of unsuitable protectors could cause accidents.
Avoid hard shocks from cookware: although the vitroceramic glass worktop is very sturdy, it is not unbreakable.
Do not place any hot lids flat on your cooking hob. A suction effect may damage the vitroceramic surface. Avoid dragging cookware across the surface, which could damage the decorative finish on the vitroceramic top in the long term.
IMPORTANT SAFETY ADVICE AND PRECAUTIONS
Never use aluminium foil for cooking. Never place items wrapped in aluminium foil or packaged in aluminium dishes on your cooking hob. The aluminium will melt and permanently damage your appliance.
Do not store cleaning products or flammable products in the cabinet underneath the hob.
Never use a steam cleaner to clean your cooking hob.
The appliance is not designed to be switched on using an external timer or separate remote control system.
After use, turn off the hob using its control device and do not rely on the pan sensor to do this.
PROTECTING THE ENVIRONMENT

This symbol indicates that this appliance must not be treated as household waste. Your appliance contains a large amount of recyclable
material. This logo indicates that used appliances must be taken to a special waste collection point. Contact your local authority or retailer for details of your nearest used equipment collection points. Recycling of appliances organised by your manufacturer is carried out under the best conditions, in accordance with the European regulation on waste disposal of electronic and electrical equipment.
Some of the packaging material used for this appliance can also be recycled. Recycle and contribute towards protecting the environment by disposing of packaging in local waste containers designed for this purpose. We thank you for your help in protecting the environment.
Advice on how to save energy
Cooking with the correctly sized lid saves energy. If you use a glass lid, you can control your cooking perfectly.
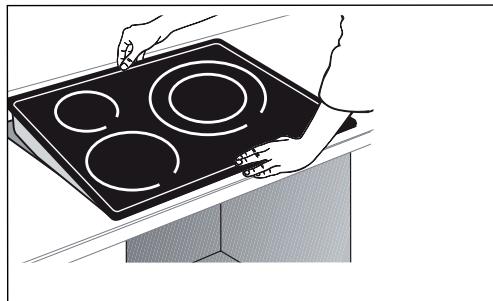
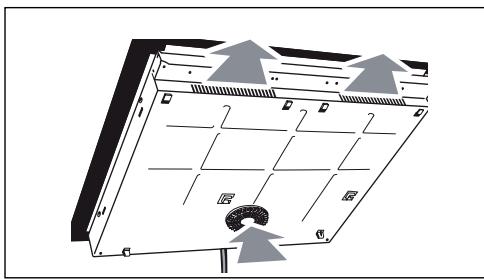
UNPACKING
Remove all the protective elements from the hob.
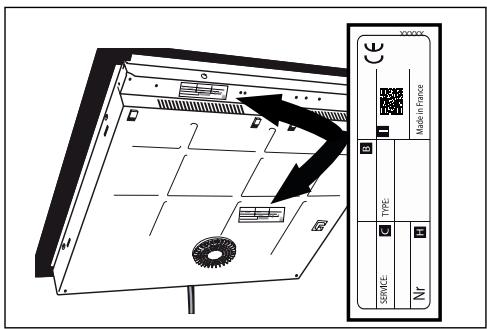
Check and respect the appliance's characteristics that appear on the nameplate. Note the service and standard references shown on this plate in the boxes below for future reference.
| Service: | Type: |
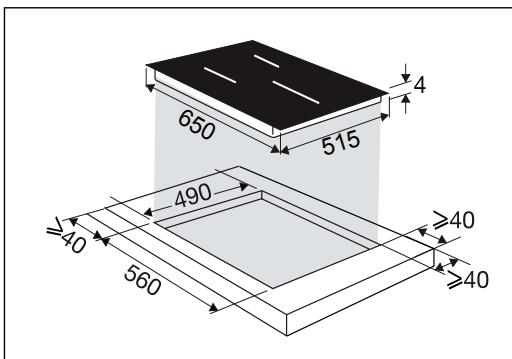
FITTING THE HOB
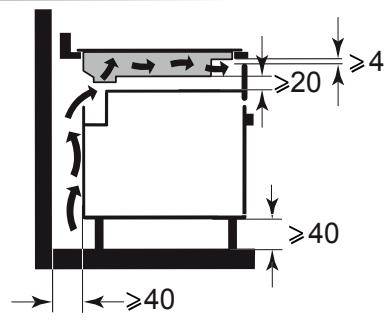
Check that the air intakes and outlets are unobstructed.
Comply with the information concerning the fitting dimensions (in millimetres) of the work top destined to receive the hob. Check that air can flow correctly between the front and back of your hob.
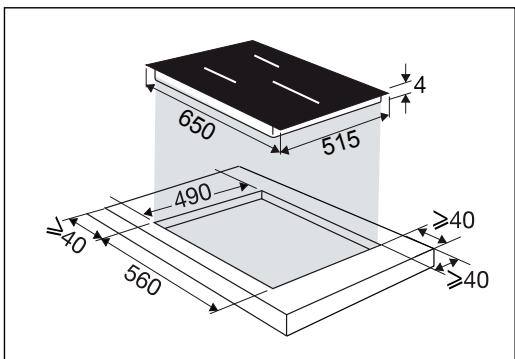
Fitting into the worktop

Fitting flush with the worktop
.2 INSTALLATION
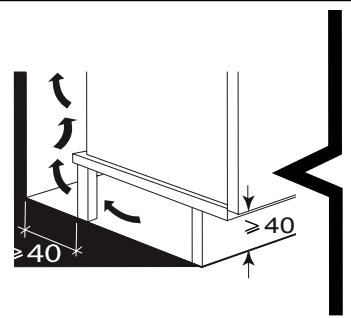
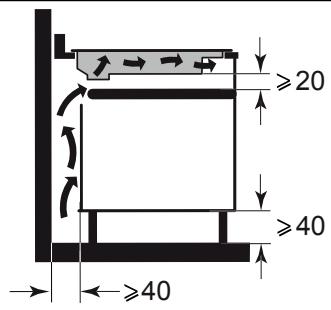
If installing the hob above a drawer,


or above a built-in oven, comply with the dimensions provided on the illustrations to ensure a sufficient outlet air flow.
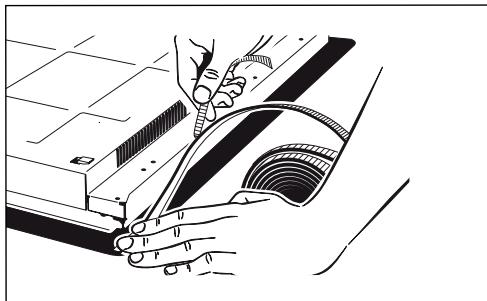
Apply a seal all around the edge of the hob before fitting it.


Important
If your hob is located above your oven, the hob's thermal safety devices can impede the simultaneous use of the hob and the oven's pyrolysis programme, display code "F7" in the control zones. In such circumstances we recommend that you increase the hob's ventilation by creating an opening in the side of the cabinet (8cm x 5cm).
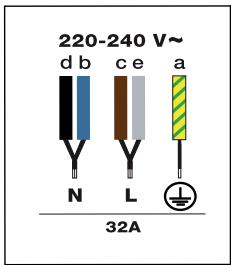
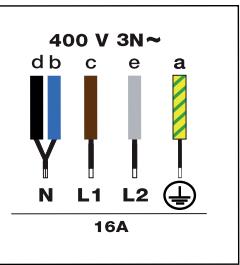
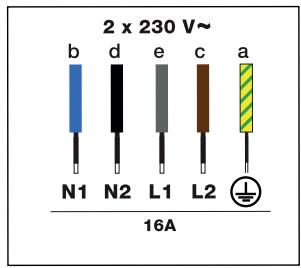
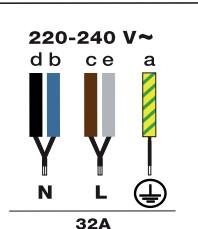
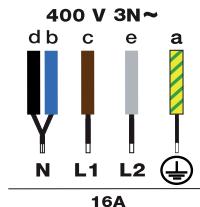
ELECTRIC CONNECTIONS
These hobs must be connected to the mains via an all-pole cut-off device that complies with current installation regulations. A disconnection device must be incorporated into the fixed wiring.
Identify the cable for your hob:
a) green-yellow
b) blue
c) brown
d) black
e) grey
When power is first supplied to your hob, or after an extended power outage, an indicator light will appear on the control panel. Wait approximately 30 seconds or press any touchkey on the control panel to make the information disappear and use your hob (this display is normal and is reserved for use by After-Sales Service, where applicable). In all cases, it should be disregarded.

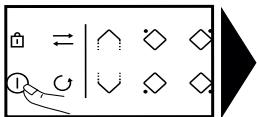
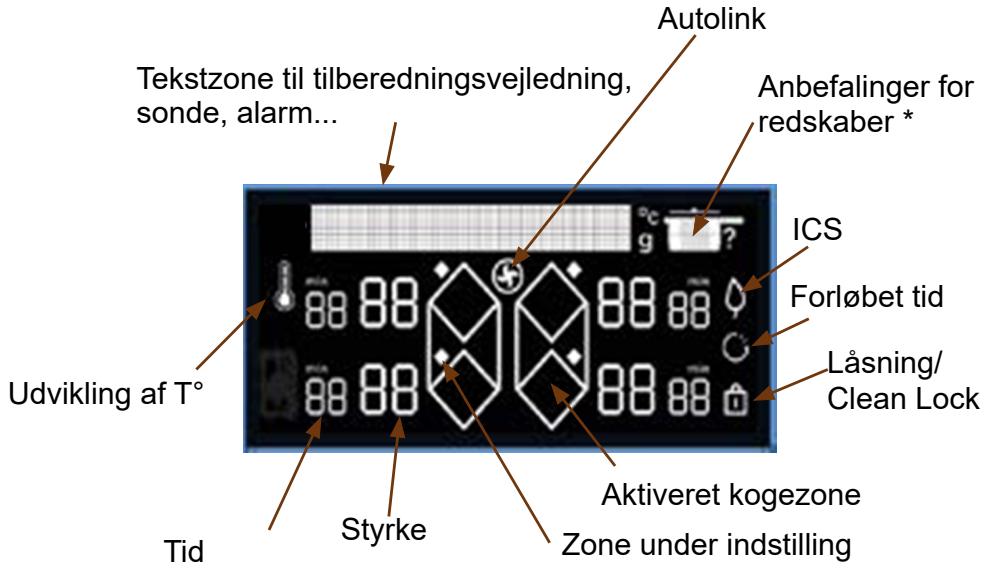
Control panel glossary

Parameters

: Validation / ok

Back


: Navigation (top / bottom menus)
On/Off
: Locking / Clean Lock


: Choice of cooking ring


: Horizone (depending on model)
- : Power / time setting
: Power / Time selection numeric keypad

:Timer
Direct access

: Keep warm
: Simmer

: Sear

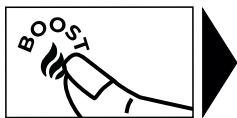
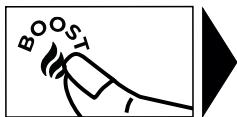
:Boost
Functions

: Switch function
: ICS function

: Recall function

: Elapsed time function

: Cooking assistant

Favourites
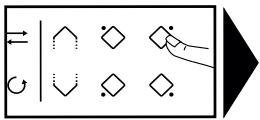
Display glossary
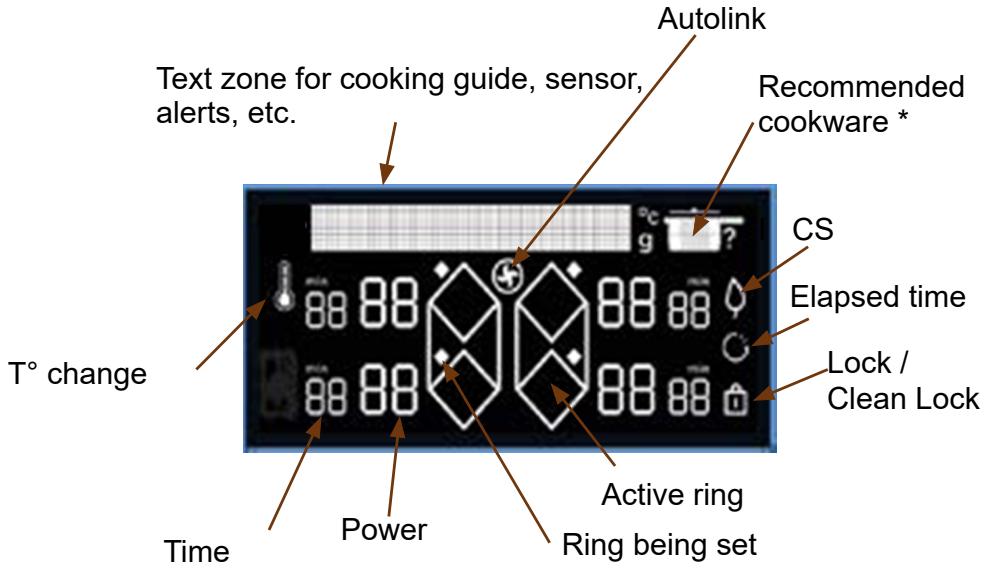
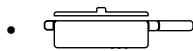
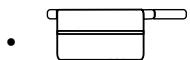
Recommended cookware:

Frying pan
Frying pan with lid
Pan
Pan with lid
When switching your hob on for the first time, you can personalise different functions.

Settings management
Press the key to access the settings:
- Language (French by default)
- Brightness (5 levels possible)
- Autolink: The hob autonomously communicates its power levels to the hood, which automatically adjusts its speed and switches the light on or off. There is no need to adjust the settings on the hood. The hood automatically remains at speed 1 for about 2 minutes after the hob is switched off before also switching off.
The function is deactivated by default, you can activate it by selecting ON in the menu using the "top and bottom keys (insert symbol)
- Power limitation (4 power levels available, see Power management chapter)
- Demo mode: By default, the appliance is set to normal heating mode. If it is switched on in DEMO mode (ON position), your appliance will not heat up. You can exit the demo mode by pressing and holding the settings key
- Maintenance: If a problem occurs, you can access the Maintenance menu. If you contact the After-Sales Service, you may be asked to provide the product codes displayed in the diagnostic. The "Reinitialise" option lets you reset your appliance to factory settings.
The and keys enable you to navigate through the menu.
Press the key to go back to the previous menu without changes.
Press OK to confirm your choice.
4.1 POWER MANAGEMENT
The total power of your hob must be consistent with the power of your electrical installation.
By default, the hob's power is set to its highest level.
Make sure the value of the circuit breaker in your electrical installation is correctly calibrated (see table below).
| Hob power (kW) | Fuses / Circuit breaker (A) |
| 7.4 | 32 |
| 5.7 | 25 |
| 4.6 | 20 |
| 3.6 | 16 |
Make sure the selected power level is compatible with the electric panel's breakers.
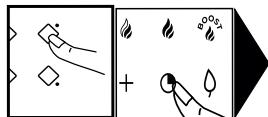
4.2 CHOOSING YOUR COOKWARE
Most cookware is compatible with induction. Only glass, terracotta, aluminium without a special base, copper and some non-magnetic stainless steels do not work with induction cooking.
We suggest that you choose cookware with a thick, flat bottom. The heat will be better distributed and cooking will be more uniform. Never leave an empty pan to heat unattended.
Avoid putting cookware on the control panel or display.
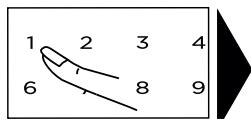
4.3 COOKING RING SELECTION
You have several cooking rings available. Select the one most suited to the size of the pan. If the base of the cookware is too small, the power indicator will start to flash and the cooking ring will not work, even if the cookware's material is recommended for induction. Avoid using pans which are smaller in diameter than the cooking ring (see table).
| Burner diameter (cm) | Maximum power of cooking ring (Watts) | Diameter of bottom of cookware (cm) |
| 16 | 2400 | 10 - 18 |
| 18 | 2800 | 11 - 22 |
| 23 | 3700 | 12 - 24 |
| 28 | 3700 / 4600(*) | 15 - 32 |
| 30 | 5500 | 15 - 32 |
| Horizone | 3700 / 4600(*) | 18 - Oval - fish dish |
| 1/2 zone | 2800 | 11 - 22 |
(*) depending on model
When several cooking rings are used at the same time, the hob manages the power distribution, so as not to exceed its total power.
When you use maximum power (Boost) on several cooking rings at the same time, position pans to achieve the best positioning and avoid the configurations below:
No Boost
No Boost
4.4 ① SWITCHING ON/OFF
Press the On / Off key ①. A "0" displays in each zone available for 8 seconds. The hob automatically detects your pans. When a pan is detected, the "0" flashes with a dot over the ring detected. You can then adjust the power. If you do not select a power level, the cooking ring will automatically switch itself off.

If no pan is detected, select your cooking ring.

Switching off a zone on the hob
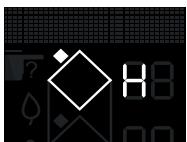
Press and hold the key for the ring, a long beep sounds and the display switches off or the "H" symbol (residual heat) appears.
Press the On / Off key to switch the hob off completely.
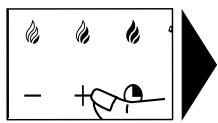
4.5 SETTING THE POWER
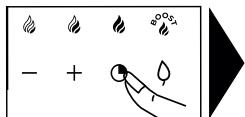
Press the + or - keys or use the numeric keypad to set your power level between 1 and 19. In this case you can enter the number corresponding the desired power setting directly. Pressing the "0" key switches the hob off.
When switching on, you can go directly to maximum power (apart from boost) by pressing the "-" key for the ring, or with the numeric keypad
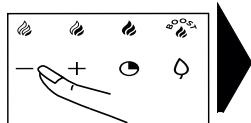


Direct access:
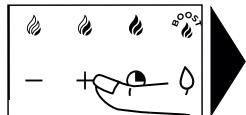
There are four touchkeys available that provide direct access to pre-set power levels:
=level2-Keepwarm
= level 10 - Simmer
±b = power 19 - Sear
= maximum power setting.

All these power values apart from BOOST can be modified. Proceed as follows:
The hob must be switched on.

Select or or by pressing and holding it.
- Set the new power level by pressing the + or - key.
- After a few moments, a beep confirms your action.
Note: Power levels must be between
1 and 3 for
4 and 11 for
12 and 19 for

4.6 HORIZONE (DEPENDING ON MODEL)
The Horizone ring can be used as 2 separate zones or as 1 full zone. To
select the full zone, press the key.


The power and timer are adjusted as for a normal cooking ring.
4.7 SETTING THE TIMER
Each cooking ring has a dedicated timer. This can be set once the relevant cooking ring is on. To activate or adjust the timer, press the timer key

then the + or - keys

or use the numeric keypad. In this case you can enter the figures for the desired time directly, one after the other. Pressing the "0" key switches off the timer.
To make setting a very long time easier, you can go straight to 8 hours by pressing the - key from the start. Press - again to reduce the time hour by hour up to 2 hours and 99 minutes.
At the end of cooking, the display indicates 0 and a warning beep sounds. To cancel the timer, press any key for the cooking ring being used. Otherwise, the beeps will stop after a few seconds. To stop the timer during cooking, press the + and - keys at the same time or return to 0 using the - key or enter "0" on the numeric keypad.
Independent timer
With this function, you can time an event without cooking.
- Select a free ring.
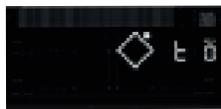
Press the 0 key.
Set the time with the + or - keys. A "t" flashes in the display.

- When you have set the time, the "t" becomes fixed and the timer starts.
You can stop the timer by pressing and holding down the cooking ring selection key.
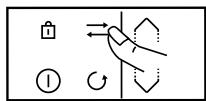
4.8 LOCKING THE CONTROLS
Child safety lock
Your hob has a child safety device which locks the controls when the hob is not in use or during cooking (to maintain the current settings). For safety reasons, only the stop and ring selection keys are still active, allowing the hob or a cooking ring to be switched off.
Locking
Press the key padlock) until the lock symbol appears the displays and a beep confirms the operation.
Table locked in operation
When you press the power or timer controls for the operating rings, the symbol starts to flash.
UnlockING
Press the key until the lock symbol disappears from the display and a beep confirms your operation.
CLEAN LOCK function
This function allows you to temporarily lock your hob while cleaning it.
To activate Clean lock :
Press the key briefly. A beep sounds and the symbol flashes in the display.
After a predefined time, the lock will automatically disengage. A double beep sounds. You can stop Clean Lock at any time by pressing and holding the touchkey.
4.9 ⇌ SWITCH FUNCTION
This function allows a pan to be moved from one ring to another while retaining the original settings (power and time).
Press the key briefly,
the = = = = symbols scroll along the text line. Select the ring to which you wish to move the pan. The settings will be transferred to the selected zone and you can now move the pan.
4.10 ICS FUNCTION Intelligent Cooking System
This function optimises the choice of cooking zone for the diameter of cookware used.
Proceed as follows:
Place the pan on a cooking ring (e.g.: 28 cm dia.).
Select Boost power and possibly a cooking time.
Press the key. The symbol appears in the display.
- either the zone chosen is the best one for the pan and disappears, leaving the initial cooking parameters in the display.
- or the selected ring is not the best one for the pan and the display then indicates which ring should be used and the settings are transferred to it automatically NOTE: The hob must be cold to use this function.
4.11 URECALL FUNCTION
This function lets you display the last "power and timer" settings for all the burners which were switched off less than 3 minutes previously.
To use this function, the hob must be unlocked. Press the On / Off key then briefly press the key .
When the hob is operating, this function lets you see the power and timer settings for the ring(s) that have been switched off for less than 30 seconds.
4.12 GELAPSED TIME
FUNCTION
This function displays the time since the power setting was last changed for a selected cooking ring. To use this function, press the G key.
The time elapsed flashes on the timer display for the chosen burner.
If you want cooking to end within a specific time, press the G key and, within 5 seconds, press + on the timer to increase it to the desired cooking time.
The elapsed time is displayed fixed for 3 seconds and then the remaining time is displayed. A beep sounds to confirm your choice.
This function is available with or without the timer function.
Note: if a time is displayed on the timer, wait for 5 seconds before modifying the cooking time.
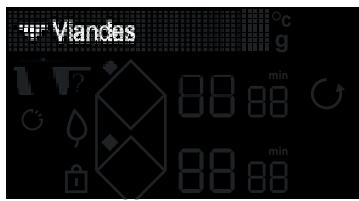
4.13 COOKING ASSISTANT FUNCTION
Under this function are gathered: Recipes / Vacuum Cooking / Boil / Grill / Blanch. This cooking mode selects for you the suitable cooking parameters based on the food to be prepared.
The hob must be switched on, press to access the different functions.
When using your hob in Recipe mode, we recommend you use the recommended utensils according to the recipe.
Recipe selection
To obtain optimal cooking results, you need to use stainless steel cookware for all recipes, excluding the crepe and pancake recipes which were optimised for utensils with applied bottoms.
We offer you a selection of food items for which the hob recommends and automatically sets a power level and cooking time according to the type and desired quantity.
| Ingredients | Type |
| Meat | |
| Beef | Thin / Medium / Thick |
| Burger patties | Fresh / Frozen |
| Lamb | Cutlets |
| Pork | Medium ribs / Thick ribs |
| Duck | Duck breast / Aiguillettes |
| Poultry | White meat / Legs |
| Seafood | |
| Filletts | |
| Fish steaks | |
| Fish fillet | |
| Whole fish | Small / Round < 350g / Flat > 350g |
| Crabs | Poach / Poach ECO* |
| Shrimps | Grill / Poach / Poach ECO* |
| Mussels / Cockles | |
| Scallops | |
| Vegetables | |
| Tomatoes | |
| Courgettes | |
| Aubergines | |
| Peppers | |
| Onions | |
| Mushrooms | Sliced / Whole |
| Blanched potatoes | |
| Spinach |
| Ingredients | Type | Quantity |
| Desserts | ||
| Melted chocolate | ||
| Crêpes | ||
| Pancakes | ||
| Brioche / Pain perdu | ||
| Caramel | ||
| Eggs | ||
| Fried | 2 / 4 | |
| Omelette | 2 / 4 / 6 | |
| Scrambled | 2 / 4 / 6 | |
| Hard boiled | 2 / 4 / 6 | |
| Soft boiled | 2 / 4 / 6 | |
| Boiled | 2 / 4 / 6 | |
| Quail | ||
| Pasta / Rice | ||
| Fresh pasta | 100 / 150 / 200 / 300 / 400g | |
| Dried pasta | Penne | 100 / 150 / 200 / 300 / 400g |
| Penne ECO* | 100 / 150 / 200 / 300 / 400g | |
| Spaghetti | 100 / 150 / 200 / 300 / 400g | |
| Spaghetti ECO* | 100 / 150 / 200 / 300 / 400g | |
| Tagliatelle | 100 / 150 / 200 / 300 / 400g | |
| Tagliatelle ECO* | 100 / 150 / 200 / 300 / 400g | |
| Pasta shells | 100 / 150 / 200 / 300 / 400g | |
| Pasta shells ECO* | 100 / 150 / 200 / 300 / 400g | |
| Rice | White | 100 / 150 / 200 / 300 / 400g |
| Whole wheat | 100 / 150 / 200 / 300 / 400g | |
| Black | 100 / 150 / 200 / 300 / 400g |
The ECO recipes refer to passive cooking, which makes it possible to save energy by using residual heat. Thanks to a lid, heat remains concentrated inside the pan after stopping the hob, which makes it possible to continue cooking for a time predetermined by the ECO function.
-
The vacuum function enables you to cook food at low temperatures in vacuum-sealed bags while preserving the culinary and nutritional properties. The water temperature must be at ambient temperature at the start of cooking or the final result will be distorted.
-
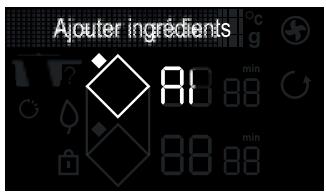
The Boil function enables you to boil water and keep it boiling without overflowing to cook pasta, for example. Place your pan on a cooking ring. Set the quantity of water required (from 0.5 to 6 litres) using the the / keys.
The hob proposes the most suitable ring.
Confirm by pressing OK
Cooking starts.
A beep sounds when the water is boiling and a message on the display prompts you to add the ingredients. When it is done, press OK to confirm. The time and power display. You can however adjust them at your convenience. A beep sounds out when cooking is finished.
NOTE: The water temperature must be at ambient temperature at the start of cooking or the final result will be distorted.
Do not use a cast iron pan or a lid with this function. You can also use this function to cook any food that needs to be cooked in boiling water.
The Grill function This function enables you to use the De Dietrich grill accessory on the twin cooking ring to grill food while avoiding overcooking and using excess fat. The grill accessory is not provided with the hob and is available at your retailer.
The Blanch function enables you to cook vegetables in boiling water for a few minutes, then immerse them in ice-cold water to interrupt cooking (start with cold water).
This preserves the vivid colour of vegetables as well as their texture. Select the quantity of water in which to immerse the vegetables. Place your pan with the ingredients on a cooking ring.
Recipe example for a Beef cut:
» Switch the table on ①
》Press

» Select the “Recipes” menu with the / keys
» Press the OK key to confirm the “Recipes” selection

» Select the "Meat" menu with the / keys
Press the OK key to confirm the "Meat" selection
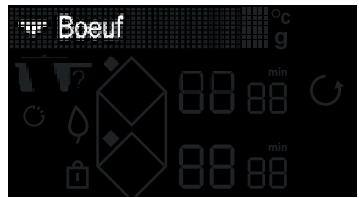

» Select the “Beef” menu with the / keys
Press the OK key to confirm the "Beef" selection
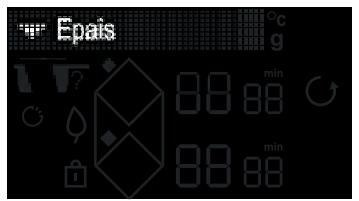

» Select the thickness of your Beef cut with the / keys
Press the OK key to confirm the thickness
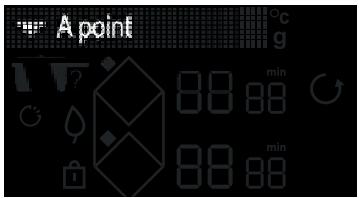

» Select the desired doneness with the / keys
Press the OK key to confirm the doneness

» The hob's display recommends the best cookware for an optimal result, as well as the suitable ring to cook your food on.

» Once you have placed the utensil on the ring, confirm with the key OK
» An empty preheating phase initiates.
» Once preheated, the hob's display prompts you to place your beef cut.
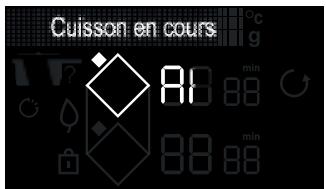
» After placing the ingredient, press the key OK
» The cooking time for the first side of the beef cut starts to count down.
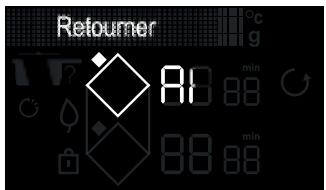
» Once this time is up, the display prompts you to turn the meat over.
» After turning it over, press the key OK
The second cooking phase starts.
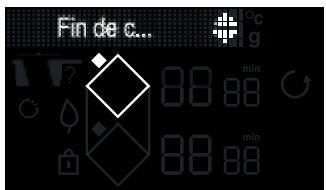
» Once cooked, the hob emits several beeps.
» Press to extend the cooking time.
Note: Before the cooking ends, if "min" flashes, you can add the cooking time by pressing then + or -.
4.14 FAVOURITES FUNCTION
The "FAVOURITES" function lets you save 5 Cooking assistant functions that you use frequently. At the end of a Cooking assistant function, before stopping your appliance, you can add the recipe conducted to your favourites by selecting the option with the scroll keys and confirm with OK.
Your cooking assistant function and any changes you make to it will then be saved in your favourites.
You can view your favourites by pressing the key and scrolling with the / keys.
NB: If the 5 favourites are already used, any new memorisation will replace the first one."
4.15 SAFETY PRECAUTIONS AND RECOMMENDATIONS
Residual heat
After intensive use, the cooking ring you have just used may remain hot for several minutes, A "H" symbol is displayed during this time.
Avoid touching the areas concerned.
Temperature limiter
Each cooking ring is fitted with a safety sensor that continuously monitors the temperature of the bottom of the pan. In the event that an empty pan is left on a zone that is switched on, the sensor automatically adapts the power
delivered by the hob and limits the risk of damaging the cookware or the hob.
Spillage protection
The hob may be switched off in the following three cases:
- Spillage covering the control keys.
- Damp cloth placed over the keys.
- Metal object placed on the control keys.
Remove the object or clean and dry the
control keys to restart cooking.
In these cases, the symbol is displayed accompanied by an audible signal.
"Auto-Stop" System
If you forget to switch off a pan, your hob has an "Auto-Stop" safety function that automatically switches off the forgotten cooking ring after a pre-set time (between 1 and 10 hours based on the power level setting). If the safety system is triggered, the cooking ring is shown as switched off with "AS" displayed on the control panel and a beep sounds for about 2 minutes. To stop it, simply press any of the control keys.

Sounds similar to the ticking of a clock may be heard.
These sounds occur when the hob is in operation and disappear or decrease according to the heating configuration. There may also be whistling sounds depending on the model and quality of your cookware. Such noises are a normal part of induction technology and do not indicate a fault.

We do not recommend using hob protection mechanisms.

CARE
LOOKING AFTER THE HOB
For light soiling, use a kitchen sponge. Use hot water to wet the area to be cleaned and then wipe dry.
For burnt-on food deposits, sugary spills, melted plastic, use a scouring sponge and/or a special glass cleaning scraper. Use hot water to wet the area to be cleaned, use a special glass cleaning scraper to remove the dirt, finish off with a scouring sponge and then wipe dry.
For rings and hard water residue, apply warm white vinegar to the stain, let stand, then wipe with a soft cloth.
For shiny metal streaks and weekly maintenance, use a special vitroceramic glass product. Apply the special product (which contains silicon and preferably has a protective effect) to the vitroceramic glass.
Important note: do not use abrasive powders or scourers. Use cleaning creams and special gentle washing up sponges.
When using for the first time
You notice that something appears in the display. This is normal. It will disappear after 30 seconds.
The circuit breaker trips/blows a fuse or only one side of the hob works. The hookup of your hob is faulty. Verify its compliance (see connexion chapter).
The hob produces an odour during the first cooking sessions. The appliance is new. Heat each zone for half an hour with a pan full of water.
When powering on
The hob does not work and the lights on the panel stay off.
There is no power to the hob. The electrical supply or the connection are faulty. Inspect the fuses and the circuit-breaker.
The hob does not work and another message is displayed. The electronic circuit is faulty. Call the After-Sales service.
The hob does not work, the "bloc" information is displayed. Unlock the child safety lock.
Fault code F9 : voltage less than 170 V.
Fault code F0: temperature less than 5^ .
During use
The hob does not operate. The panel displays and a beep can be heard.
There was a spillage or an object obstructing the control panel. Clean or remove the object and resume cooking.
Code F7 is displayed.
The electronic circuits have overheated (See "Fitting" chapter).
While a heating area is on, the control panel's illuminated symbols continue to flash.
The pan being used is not suitable.
The pans make a noise and the hob emits a clicking noise during cooking (see the "safety and recommendations" tip). This is normal. With certain types of pan, heat passing from the hob to the pan causes this clicking.
The ventilation continues to operate after the hob is switched off.
This is normal. It cools the electronics.
In the event of a persistent fault,
switch off your hob for 1 minute. If the problem persists, contact the After-Sales Service.
| Symbol | Value | ||||||||||||||||||||||||||||||||||||||||||||||||||||||||||||||||||||||||||||||||||||||||||||||||||||||||||||||||||||||||||||||||||||||||||||||||||||||||||||||||||||||||||||||||||||||||||||||||||||||||||||||||||||||||||||||||||||||||||||||||||||||||||||||||||||||||||||||||||||||||||||||||||||||||||||||||||||||||||||||||||||||||||||||||||||||||||||||||||||||||||||||||||||||||||||||||||||||||||||||||||||||||||||||||||||||||||||||||||||||||||||||||||||||||||||||||||||||||||||||||||||||||||||||||||||||||||||||||||||||||||||||||||||||||||||||||||||||||||||||||||||||||||||||||||||||||||||||||||||||||||||||||||||||||||||||||||||||||||||||||||||||||||||||||||||||||||||||||||||||||||||||||||||||||||||||||||||||||||||||||||||||||||||||||||||||||||||||||||||||||||||||||||||||||
| LUMOXY | LUMOXY | LUMOXY | LUMOXY | LUMOXY | LUMOXY | LUMOXY | LUMOXY | LUMOXY | LUMOXY | LUMOXY | LUMOXY | LUMOXY | LUMOXY | LUMOXY | LUMOXY | LUMOXY | LUMOXY | LUMOXY | LUMOXY | LUMOxy | LUMOxy | LUMOxy | LUMOxy | LUMOxy | LUMOxy | LUMOxy | LUMOxy | LUMOxy | LUMOxy | LUMOxy | LUMOxy | LUMOxy | LUMOxy | LUMOxy | LUMOxy | LUMOxy | LUMOxy | LUMOxy | LUMOxy | LUMOoxy | LUMOxy | LUMOxy | LUMOxy | LUMOxy | LUMOxy | LUMOxy | LUMOxy | LUMOxy | LUMOxy | LUMOxy | LUMOxy | LUMOxy | LUMOxy | LUMOxy | LUMOxy | LUMOxy | LUMOxy | LUMOxy | LUMOxy | LUMO oxy | LUMOxy | LUMOxy | LUMOxy | LUMOxy | LUMOxy | LUMOxy | LUMOxy | LUMOxy | LUMOxy | LUMOxy | LUMOxy | LUMOxy | LUMOxy | LUMOxy | LUMOxy | LUMOxy | LUMOxy | LUMOxy | LUMOxy | LUMO xy | LUMOxy | LUMOxy | LUMOxy | LUMOxy | LUMOxy | LUMOxy | LUMOxy | LUMOxy | LUMOxy | LUMOxy | LUMOxy | LUMOxy | LUMOxy | LUMOxy | LUMOxy | LUMOxy | LUMOxy | LUMOxy | LUMOxy | LUMOx | LUMOxy | LUMOxy | LUMOxy | LUMOxy | LUMOxy | LUMOxy | LUMOxy | LUMOxy | LUMOxy | LUMOxy | LUMOxy | LUMOxy | LUMOxy | LUMOxy | LUMOxy | LUMOxy | LUMOxy | LUMOxy | LUMOxy | LUMO | LUMOxy | LUMO | LUMOxy | LUMO | LUMO | LUMO | LUMO | LUMO | LUMO | LUMO | LUMO | LUMO | LUMO | LUMO | LUMO | LUMO | LUMO | LUMO | LUMO | LUMO | LUMO | LUMO | LUMO | LUMO | LUMO | LUMO | LUMO | LUMO | LUM0 | LUMO | LUMO | LUMO | LUMO | LUMO | LUMO | LUMO | LUMO | LUMO | LUMO | LUMO | LUMO | LUMO | LUMO | LUMO | LUMO | LUMO | LUMO | LUMO | LUMO | LUMO | LUMO | LUMO | LUMO | LUMo | LUMO | LUMO | LUMO | LUMO | LUMO | LUMO | LUMO | LUMO | LUMO | LUMO | LUMO | LUMO | LUMO | LUMO | LUMO | LUMO | LUMO | LUMO | LUMO | LUMO | LUMO | LUMO | LUMO | LUMO | LUMOO | LUMO | LUMO | LUMO | LUMO | LUMO | LUMO | LUMO | LUMO | LUMO | LUMO | LUMO | LUMO | LUMO | LUMO | LUMO | LUMO | LUMO | LUMO | LUMO | LUMO | LUMO | LUMO | LUMO | LUMO | LUM O | LUMO | LUMO | LUMO | LUMO | LUMO | LUMO | LUMO | LUMO | LUMO | LUMO | LUMO | LUMO | LUMO | LUMO | LUMO | LUMO | LUMO | LUMO | LUMO | LUMO | LUMO | LUMO | LUMO | LUMO | LUM.O | LUMO | LUMO | LUMO | LUMO | LUMO | LUMO | LUMO | LUMO | LUMO | LUMO | LUMO | LUMO | LUMO | LUMO | LUMO | LUMO | LUMO | LUMO | LUMO | LUMO | LUMO | LUMO | LUMO | LUMO | LUMOD | LUMO | LUMO | LUMO | LUMO | LUMO | LUMO | LUMO | LUMO | LUMO | LUMO | LUMO | LUMO | LUMO | LUMO | LUMO | LUMO | LUMO | LUMO | LUMO | LUMO | LUMO | LUMO | LUMO | LUMO | LUMD | LUMO | LUMO | LUMO | LUMO | LUMO | LUMO | LUMO | LUMO | LUMO | LUMO | LUMO | LUMO | LUMO | LUMO | LUMO | LUMO | LUMO | LUMO | LUMO | LUMO | LUMO | LUMO | LUMO | LUMO | LUMOM | LUMO | LUMO | LUMO | LUMO | LUMO | LUMO | LUMO | LUMO | LUMO | LUMO | LUMO | LUMO | LUMO | LUMO | LUMO | LUMO | LUMO | LUMO | LUMO | LUMO | LUMO | LUMO | LUMO | LUMO | LUMOF | LUMO | LUMO | LUMO | LUMO | LUMO | LUMO | LUMO | LUMO | LUMO | LUMO | LUMO | LUMO | LUMO | LUMO | LUMO | LUMO | LUMO | LUMO | LUMO | LUMO | LUMO | LUMO | LUMO | LUMO | LUMOs | LUMO | LUMO | LUMO | LUMO | LUMO | LUMO | LUMO | LUMO | LUMO | LUMO | LUMO | LUMO | LUMO | LUMO | LUMO | LUMO | LUMO | LUMO | LUMO | LUMO | LUMO | LUMO | LUMO | LUMO | LUMOS | LUMO | LUMO | LUMO | LUMO | LUMO | LUMO | LUMO | LUMO | LUMO | LUMO | LUMO | LUMO | LUMO | LUMO | LUMO | LUMO | LUMO | LUMO | LUMO | LUMO | LUMO | LUMO | LUMO | LUMO | LUMOT | LUMO | LUMO | LUMO | LUMO | LUMO | LUMO | LUMO | LUMO | LUMO | LUMO | LUMO | LUMO | LUMO | LUMO | LUMO | LUMO | LUMO | LUMO | LUMO | LUMO | LUMO | LUMO | LUMO | LUMO | LUMOI | LUMO | LUMO | LUMO | LUMO | LUMO | LUMO | LUMO | LUMO | LUMO | LUMO | LUMO | LUMO | LUMO | LUMO | LUMO | LUMO | LUMO | LUMO | LUMO | LUMO | LUMO | LUMO | LUMO | LUMO | LUMI | LUMO | LUMO | LUMO | LUMO | LUMO | LUMO | LUMO | LUMO | LUMO | LUMO | LUMO | LUMO | LUMO | LUMO | LUMO | LUMO | LUMO | LUMO | LUMO | LUMO | LUMO | LUMO | LUMO | LUMO | LUMIO | LUMO | LUMO | LUMO | LUMO | LUMO | LUMO | LUMO | LUMO | LUMO | LUMO | LUMO | LUMO | LUMO | LUMO | LUMO | LUMO | LUMO | LUMO | LUMO | LUMO | LUMO | LUMO | LUMO | LUMO | LUMOX | LUMO | LUMO | LUMO | LUMO | LUMO | LUMO | LUMO | LUMO | LUMO | LUMO | LUMO | LUMO | LUMO | LUMO | LUMO | LUMO | LUMO | LUMO | LUMO | LUMO | LUMO | LUMO | LUMO | LUMO | LUMOA | LUMO | LUMO | LUMO | LUMO | LUMO | LUMO | LUMO | LUMO | LUMO | LUMO | LUMO | LUMO | LUMO | LUMO | LUMO | LUMO | LUMO | LUMO | LUMO | LUMO | LUMO | LUMO | LUMO | LUMO | LUMΟ | LUMO | LUMO | LUMO | LUMO | LUMO | LUMO | LUMO | LUMO | LUMO | LUMO | LUMO | LUMO | LUMO | LUMO | LUMO | LUMO | LUMO | LUMO | LUMO | LUMO | LUMO | LUMO | LUMO | LUMO | LUMOE | LUMO | LUMO | LUMO | LUMO | LUMO | LUMO | LUMO | LUMO | LUMO | LUMO | LUMO | LUMO | LUMO | LUMO | LUMO | LUMO | LUMO | LUMO | LUMO | LUMO | LUMO | LUMO | LUMO | LUMO | LUMOL | LUMO | LUMO | LUMO | LUMO | LUMO | LUMO | LUMO | LUMO | LUMO | LUMO | LUMO | LUMO | LUMO | LUMO | LUMO | LUMO | LUMO | LUMO | LUMO | LUMO | LUMO | LUMO | LUMO | LUMO | LUMOH | LUMO | LUMO | LUMO | LUMO | LUMO | LUMO | LUMO | LUMO | LUMO | LUMO | LUMO | LUMO | LUMO | LUMO | LUMO | LUMO | LUMO | LUMO | LUMO | LUMO | LUMO | LUMO | LUMO | LUMO | LUMOU | LUMO | LUMO | LUMO | LUMO | LUMO | LUMO | LUMO | LUMO | LUMO | LUMO | LUMO | LUMO | LUMO | LUMO | LUMO | LUMO | LUMO | LUMO | LUMO | LUMO | LUMO | LUMO | LUMO | LUMO | LUMOC | LUMO | LUMO | LUMO | LUMO | LUMO | LUMO | LUMO | LUMO | LUMO | LUMO | LUMO | LUMO | LUMO | LUMO | LUMO | LUMO | LUMO | LUMO | LUMO | LUMO | LUMO | LUMO | LUMO | LUMO | LUMC | LUMO | LUMO | LUMO | LUMO | LUMO | LUMO | LUMO | LUMO | LUMO | LUMO | LUMO | LUMO | LUMO | LUMO | LUMO | LUMO | LUMO | LUMO | LUMO | LUMO | LUMO | LUMO | LUMO | LUMO | LUMOd | LUMO | LUMO | LUMO | LUMO | LUMO | LUMO | LUMO | LUMO | LUMO | LUMO | LUMO | LUMO | LUMO | LUMO | LUMO | LUMO | LUMO | LUMO | LUMO | LUMO | LUMO | LUMO | LUMO | LUMO | LUMOID | LUMO 2654 2654 2654 2654 2654 2654 2654 2654 2654 2654 2654 2654 2654 2654 2654 2654 2654 2654 2654 2654 2655 2655 2655 2655 2655 2655 2655 2655 2655 2655 2655 2655 2655 2655 2655 2655 2655 2655 2655 2655 2656 2656 2656 2656 2656 2656 2656 2656 2656 2656 2656 2656 2656 2656 2656 2656 2656 2656 2656 2656 2655 2655 2655 2655 2655 2655 2655 2655 2655 2655 2655 2655 2655 2655 2655 2655 2655 2655 2655 2658 2658 2658 2658 2658 2658 2658 2658 2658 2658 2658 2658 2658 2658 2658 2658 2658 2658 2658 2658 2655 2655 2655 2655 2655 2655 2655 2655 2655 2655 2655 2655 2655 2655 2655 2655 2655 2655 2655 2653 2653 2653 2653 2653 2653 2653 2653 2653 2653 2653 2653 2653 2653 2653 2653 2653 2653 2653 2653 2655 2655 2655 2655 2655 2655 2655 2655 2655 2655 2655 2655 2655 2655 2655 2655 2655 2655 2655 2654 2654 2654 2654 2654 2654 2654 2654 2654 2654 2654 2654 2654 2654 2654 2654 2654 2654 2654 2653 2653 2653 2653 2653 2653 2653 2653 2653 2653 2653 2653 2653 2653 2653 2653 2653 2653 2653 2654 2654 2654 2654 2654 2654 2654 2654 2654 2654 2654 2654 2654 2654 2654 2654 2654 2654 2654 2651 2651 2651 2651 2651 2651 2651 2651 2651 2651 2651 2651 2651 2651 2651 2651 2651 2651 2651 2651 2653 2653 2653 2653 2653 2653 2653 2653 2653 2653 2653 2653 2653 2653 2653 2653 2653 2653 2653 2651 2651 2651 2651 2651 2651 2651 2651 2651 2651 2651 2651 2651 2651 2651 2651 2651 2651 2651 2652 2652 2652 2652 2652 2652 2652 2652 2652 2652 2652 2652 2652 2652 2652 2652 2652 2652 2652 2652 2653 2653 2653 2653 2653 2653 2653 2653 2653 2653 2653 2653 2653 2653 2653 2653 2653 2653 2653 2652 2653 2653 2653 2653 2653 2653 2653 2653 2653 2653 2653 2653 2653 2653 2653 2653 2653 2653 2654 2653 2653 2653 2653 2653 2653 2653 2653 2653 2653 2653 2653 2653 2653 2653 2653 2653 2653 2654 2651 2651 2651 2651 2651 2651 2651 2651 2651 2651 2651 2651 2651 2651 2651 2651 2651 2651 2653 2651 2651 2651 2651 2651 2651 2651 2651 2651 2651 2651 2651 2651 2651 2651 2651 2651 2651 2653 2654 2653 2653 2653 2653 2653 2653 2653 2653 2653 2653 2653 2653 2653 2653 2653 2653 2653 2651 2651 2653 2653 2653 2653 2653 2653 2653 2653 2653 2653 2653 2653 2653 2653 2653 2653 2653 2651 2651 2650 2651 2651 2651 2651 2651 2651 2651 2651 2651 2651 2651 2651 2651 2651 2651 2651 2651 2651 2651 2650 2651 2651 2651 2651 2651 2651 2651 2651 2651 2651 2651 2651 2651 2651 2651 2651 2650 2651 2651 2650 2651 2651 2651 2651 2651 2651 2651 2651 2651 2651 2651 2651 2651 2651 2651 2651 2653 2653 2653 2651 2651 2651 2651 2651 2651 2651 2651 2651 2651 2651 2651 2651 2651 2651 2651 2653 2653 2653 2654 2653 2653 2653 2653 2653 2653 2653 2653 2653 2653 2653 2653 2653 2653 2653 2651 2651 2651 2651 2653 2653 2653 2653 2653 2653 2653 2653 2653 2653 2653 2653 2653 2653 2653 2651 2651 2651 2651 2650 2651 2651 2651 2651 2651 2651 2651 2651 2651 2651 2651 2651 2651 2651 2650 2651 2651 2651 2651 2650 2651 2651 2651 2651 2651 2651 2651 2651 2651 2651 2651 2651 2651 2651 2653 2653 2653 2653 2653 2651 2651 2651 2651 2651 2651 2651 2651 2651 2651 2651 2651 2651 2651 2650 2651 2651 2651 2651 2653 2653 2653 2653 2653 2653 2653 2653 2653 2653 2653 2653 2653 2653 2653 2650 2651 2651 2651 2651 2651 2651 2651 2651 2651 2651 2651 2651 2651 2651 2651 2651 2651 2651 2650 2650 2650 2650 2650 2650 2650 2650 2650 2650 2650 2650 2650 2650 2650 2650 2650 2650 2650 2650 2651 2650 2650 2650 2650 2650 2650 2650 2650 2650 2650 2650 2650 2650 2650 2650 2650 2650 2650 2651 2651 2651 2651 2651 2651 2651 2651 2651 2651 2651 2651 2651 2651 2651 2651 2651 2651 2653 2650 2650 2650 2650 2650 2650 2650 2650 2650 2650 2650 2650 2650 2650 2650 2650 2650 2650 2650 2653 2650 2650 2650 2650 2650 2650 2650 2650 2650 2650 2650 2650 2650 2650 2650 2650 2650 2650 2651 2653 2650 2650 2650 2650 2650 2650 2650 2650 2650 2650 2650 2650 2650 2650 2650 2650 2650 2651 2650 2651 2650 2650 2650 2650 2650 2650 2650 2650 2650 2650 2650 2650 2650 2650 2650 2650 2650 2651 2650 2653 2650 2650 2650 2650 2650 2650 2650 2650 2650 2650 2650 2650 2650 2650 2650 2650 2650 2651 2651 2650 2650 2650 2650 2650 2650 2650 2650 2650 2650 2650 2650 2650 2650 2650 2650 2650 2651 2651 2653 2650 2650 2650 2650 2650 2650 2650 2650 2650 2650 2650 2650 2650 2650 2650 2650 2651 2650 2650 2651 2650 2650 2650 2650 2650 2650 2650 2650 2650 2650 2650 2650 2650 2650 2650 2650 2651 2650 2650 2653 2650 2650 2650 2650 2650 2650 2650 2650 2650 2650 2650 2650 2650 2650 2650 2650 2651 2650 2651 2651 2650 2650 2650 2650 2650 2650 2650 2650 2650 2650 2650 2650 2650 2650 2650 2650 2651 2650 2651 2653 2650 2650 2650 2650 2650 2650 2650 2650 2650 2650 2650 2650 2650 2650 2650 2650 2651 2651 2651 2650 2650 2650 2650 2650 2650 2650 2650 2650 2650 2650 2650 2650 2650 2650 2650 2651 2651 2650 2651 2650 2650 2650 2650 2650 2650 2650 2650 2650 2650 2650 2650 2650 2650 2650 2650 2651 2651 2651 2653 2650 2650 2650 2650 2650 2650 2650 2650 2650 2650 2650 2650 2650 2650 2650 2651 2650 2650 2650 2651 2650 2650 2650 2650 2650 2650 2650 2650 2650 2650 2650 2650 2650 2650 2650 2651 2650 2650 2650 2653 2650 2650 2650 2650 2650 2650 2650 2650 2650 2650 2650 2650 2650 2650 2650 2651 2650 2650 2651 2651 2650 2650 2650 2650 2650 2650 2650 2650 2650 2650 2650 2650 2650 2650 2650 2651 2650 2650 2651 2653 2650 2650 2650 2650 2650 2650 2650 2650 2650 2650 2650 2650 2650 2650 2650 2651 2650 2651 2650 2651 2650 2650 2650 2650 2650 2650 2650 2650 2650 2650 2650 2650 2650 2650 2650 2651 2650 2651 2650 2653 2650 2650 2650 2650 2650 2650 2650 2650 2650 2650 2650 2650 2650 2650 2650 2651 2650 2651 2653 2651 2650 2650 2650 2650 2650 2650 2650 2650 2650 2650 2650 2650 2650 2650 2650 2650 2650 2650 2653 2651 2650 2650 2650 2650 2650 2650 2650 2650 2650 2650 2650 2650 2650 2650 2650 2650 2650 2651 2653 2651 2650 2650 2650 2650 2650 2650 2650 2650 2650 2650 2650 2650 2650 2650 2650 2651 2650 2650 2653 2651 2650 2650 2650 2650 2650 2650 2650 2650 2650 2650 2650 2650 2650 2650 2650 2651 2650 2651 2653 2653 2651 2650 2650 2650 2650 2650 2650 2650 2650 2650 2650 2650 2650 2650 2650 2650 2650 2650 2653 2653 2651 2650 2650 2650 2650 2650 2650 2650 2650 2650 2650 2650 2650 2650 2650 2650 2650 2651 2650 2653 2653 2651 2650 2650 2650 2650 2650 2650 2650 2650 2650 2650 2650 2650 2650 2650 2650 2651 2650 2653 2653 2653 2651 2650 2650 2650 2650 2650 2650 2650 2650 2650 2650 2650 2650 2650 2650 2650 2650 2653 2653 2651 2653 2651 2650 2650 2650 2650 2650 2650 2650 2650 2650 2650 2650 2650 2650 2650 2650 2650 2651 2649777777777777777777777777777777777777777777777777777777777777777777777777777777777777777777777777777787777777777777777777777777777777777777777777777777777777777777777777777777777777777777777777777777779777777777777777777777777777777777777777777777777777777777777777777777777777777777777777777777777778888888888888888888888888888888888888888888888888888888888888888888888888888888888888888888888888888 | ||
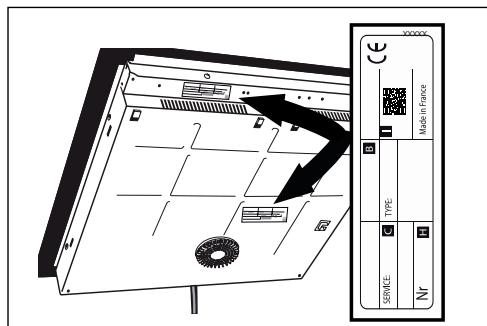
Any repairs made to your appliance must be carried out by a qualified professional authorised to work on the brand. When making contact, mention the complete reference of your appliance (model, type, serial number). This information appears on the manufacturer's nameplate attached to your equipment.


VAŽENA ZAKAZNICE, VAŽENY ZAKAZNIKU
- 3 PRÅSENTATION AF APPARATET. 11
Forklaring til tastatur 11
Forklaring til display 12
- 4 BRUG AF APPARATET. 13
: Kulinarisk assistant

Favoritter
Forklaring til display
VEDLIGEHOLDELSAF KOGEPLADEN
| Symbol | Value | |||||||||||||||||||||||||||||||||||||||||||||||||||||||||||||||||||||||||||||||||||||||||||||||||||||||||||||||||||||||||||||||||||||||||||||||||||||||||||||||||||||||||||||||||||||||||||||||||||||||||||||||||||||||||||||||||||||||||||||||||||||||||||||||||
| LUMOXY | LUMOXY | LUMOXY | LUMOXY | LUMOXY | LUMOXY | LUMOXY | LUMOXY | LUMOXY | LUMOXY | LUMOXY | LUMOXY | LUMOXY | LUMOXY | LUMOXY | LUMOXY | LUMOXY | LUMOXY | LUMOXY | LUMOXY | LUMOxy | LUMOxy | LUMOxy | LUMOxy | LUMOxy | LUMOxy | LUMOxy | LUMOxy | LUMOxy | LUMOxy | LUMOxy | LUMOxy | LUMOxy | LUMOxy | LUMOxy | LUMOxy | LUMOxy | LUMOxy | LUMOxy | LUMOxy | LUMOoxy | LUMOxy | LUMOxy | LUMOxy | LUMOxy | LUMOxy | LUMOxy | LUMOxy | LUMOxy | LUMOxy | LUMOxy | LUMOxy | LUMOxy | LUMOxy | LUMOxy | LUMOxy | LUMOxy | LUMOxy | LUMOxy | LUMOxy | LUMO oxy | LUMOxy | LUMOxy | LUMOxy | LUMOxy | LUMOxy | LUMOxy | LUMOxy | LUMOxy | LUMOxy | LUMOxy | LUMOxy | LUMOxy | LUMOxy | LUMOxy | LUMOxy | LUMOxy | LUMOxy | LUMOxy | LUMOxy | LUMOx | LUMOxy | LUMOxy | LUMOxy | LUMOxy | LUMOxy | LUMOxy | LUMOxy | LUMOxy | LUMOxy | LUMOxy | LUMOxy | LUMOxy | LUMOxy | LUMOxy | LUMOxy | LUMOxy | LUMOxy | LUMOxy | LUMOxy | LUMO xy | LUMOxy | LUMOxy | LUMOxy | LUMOxy | LUMOxy | LUMOxy | LUMOxy | LUMOxy | LUMOxy | LUMOxy | LUMOxy | LUMOxy | LUMOxy | LUMOxy | LUMOxy | LUMOxy | LUMOxy | LUMOxy | LUMOxy | LUMO | LUMOxy | LUMO | LUMOxy | LUMO | LUMOxy | LUMO | LUMOxy | LUMO | LUMOxy | LUMO | LUMOxy | LUMO | LUMOxy | LUMO | LUMOxy | LUMO | LUMOxy | LUMO | LUMOxy | LUMO | LUMOxy | LUMO | Energy consumption per cooking zone or area calculated per kg | ECuetico 10 | 182.5 | 175.1 | 175.1 | 175.1 | 175.1 | 175.1 | 175.1 | 175.1 | 175.1 | 168.9 | 175.1 | 168.3 | ||||||||||||||||||||||||||||||||||||||||||||||||||||||||||||||||||||||||||||||||||||||||||||||||||||||
| 2ECuetico 10 | 169.2 | 170.2 | 170.2 | 170.2 | 170.2 | 170.2 | 170.2 | 170.2 | 170.2 | 170.2 | 170.2 | 170.2 | 170.2 | 170.2 | 170.2 | 170.2 | 170.2 | 170.2 | 210.2 | 210.2 | 210.2 | 210.2 | 210.2 | 210.2 | 210.2 | 210.2 | 210.2 | 210.2 | 210.2 | 210.2 | 210.2 | 210.2 | 210.2 | 210.2 | 210.2 | |||||||||||||||||||||||||||||||||||||||||||||||||||||||||||||||||||||||||||||||||||||||||||||||||||||||||||||||||||||||||||||||||||||||||||||||||||||||||||||||||||||||||||||||||||||||||||||||||||||||||||||||||||||||||||||||
| 3ECuetico 10 | 169.2 | 161.1 | 168.9 | 168.3 | 170.2 | 170.2 | 170.2 | 170.2 | 170.2 | 170.2 | 170.2 | 170.2 | 170.2 | 170.2 | 170.2 | 170.2 | 170.2 | 170.2 | 170.2 | 170.2 | 171.2 | 170.2 | 170.2 | 170.2 | 170.2 | 170.2 | 170.2 | 170.2 | 170.2 | 170.2 | 170.2 | 170.2 | 170.2 | 170.2 | 170.2 | |||||||||||||||||||||||||||||||||||||||||||||||||||||||||||||||||||||||||||||||||||||||||||||||||||||||||||||||||||||||||||||||||||||||||||||||||||||||||||||||||||||||||||||||||||||||||||||||||||||||||||||||||||||||||||||||
| 4ECuetico 10 | 170.2 | 170.2 | 170.2 | 170.2 | 170.2 | 170.2 | 170.2 | 170.2 | 170.2 | 170.2 | 170.2 | 170.2 | 170.2 | 170.2 | 170.2 | 170.2 | 175.2 | 170.2 | 170.2 | 170.2 | 170.2 | 170.2 | 170.2 | 170.2 | 170.2 | 170.2 | 170.2 | 170.2 | 170.2 | 170.2 | 170.2 | 170.2 | 170.2 | 075.2 | ||||||||||||||||||||||||||||||||||||||||||||||||||||||||||||||||||||||||||||||||||||||||||||||||||||||||||||||||||||||||||||||||||||||||||||||||||||||||||||||||||||||||||||||||||||||||||||||||||||||||||||||||||||||||||||||||
| 5 | 0.9 | 0.9 | 0.9 | 0.9 | 0.9 | 0.9 | 0.9 | 0.9 | 0.9 | 0.9 | 0.9 | 0.9 | 0.9 | 0.9 | 0.9 | 0.9 | 0.9 | 0.9 | 0.9 | 0.9 | 0.9 | 0.9 | 0.9 | 0.9 | 0.9 | 0.8 | 0.8 | 0.8 | 0.8 | 0.8 | 0.8 | 0.8 | 0.8 | |||||||||||||||||||||||||||||||||||||||||||||||||||||||||||||||||||||||||||||||||||||||||||||||||||||||||||||||||||||||||||||||||||||||||||||||||||||||||||||||||||||||||||||||||||||||||||||||||||||||||||||||||||||||||||||||||
| 6 | LW | 0.9 | 0.9 | 0.9 | 0.9 | 0.9 | 0.9 | 0.9 | 0.9 | 0.9 | 0.9 | 0.9 | 0.9 | 0.9 | 0.9 | 0.9 | 0.9 | 0.9 | 0.9 | 0.9 | 0.9 | 0.9 | 0.9 | 0.9 | 0.9 | 0.6 | 0.6 | 0.6 | 0.6 | 0.6 | 0.6 | 0.6 | ||||||||||||||||||||||||||||||||||||||||||||||||||||||||||||||||||||||||||||||||||||||||||||||||||||||||||||||||||||||||||||||||||||||||||||||||||||||||||||||||||||||||||||||||||||||||||||||||||||||||||||||||||||||||||||||||||
| 7 | LW | 0.9 | 0.9 | 0.9 | 0.9 | 0.9 | 0.9 | 0.9 | 0.9 | 0.9 | 0.9 | 0.9 | 0.9 | 0.9 | 0.9 | 0.9 | 0.9 | 0.9 | 0.9 | 0.9 | 0.9 | 0.9 | 0.9 | 0.9 | 0.6 | 0.5 | 0.5 | 0.5 | 0.5 | 0.5 | 0.5 | |||||||||||||||||||||||||||||||||||||||||||||||||||||||||||||||||||||||||||||||||||||||||||||||||||||||||||||||||||||||||||||||||||||||||||||||||||||||||||||||||||||||||||||||||||||||||||||||||||||||||||||||||||||||||||||||||||
| 8 | LW | 0.9 | 0.9 | 0.9 | 0.9 | 0.9 | 0.9 | 0.9 | 0.9 | 0.9 | 0.9 | 0.9 | 0.9 | 0.9 | 0.9 | 0.9 | 0.9 | 0.9 | 0.9 | 0.9 | 0.9 | 0.9 | 0.9 | 0.9 | 0.6 0.6 | 0.6 | 0.6 | 0.6 | 0.6 | 0.6 | 0.6 | |||||||||||||||||||||||||||||||||||||||||||||||||||||||||||||||||||||||||||||||||||||||||||||||||||||||||||||||||||||||||||||||||||||||||||||||||||||||||||||||||||||||||||||||||||||||||||||||||||||||||||||||||||||||||||||||||||
| 9 | ECuetico 10 | 182.5 | 175.1 | 175.1 | 175.1 | 175.1 | 175.1 | 175.1 | 168.9 | 175.1 | 168.3 | |||||||||||||||||||||||||||||||||||||||||||||||||||||||||||||||||||||||||||||||||||||||||||||||||||||||||||||||||||||||||||||||||||||||||||||||||||||||||||||||||||||||||||||||||||||||||||||||||||||||||||||||||||||||||||||||||||||||||||||||||||||||
| 2ECuetico 10 | 169.2 | 170.2 | 170.2 | 170.2 | 170.2 | 170.2 | 170.3 | 170.2 | 170.2 | 170.2 | 170.2 | 170.2 | 170.2 | 170.2 | 170.2 | 170.2 | 170.2 | 170.2 | 170.2 | 170.2 | 170.2 | 170.2 | 170.2 | 211.2 211.2 | 211.2 211.2 | 211.2 211.2 | 211.2 211.2 | 211.2 211.2 | 211.2 211.2 | 211.2 211.2 | 211.2 211.2 | 211.2 211.2 | ||||||||||||||||||||||||||||||||||||||||||||||||||||||||||||||||||||||||||||||||||||||||||||||||||||||||||||||||||||||||||||||||||||||||||||||||||||||||||||||||||||||||||||||||||||||||||||||||||||||||||||||||||||||||||||||||||
| 3ECuetico 10 | 169.2 | 161.1 | 168.9 | 168.3 | 170.2 | 170.2 | 170.3 | 170.2 | 170.2 | 170.2 | 170.2 | 170.2 | 170.2 | 170.2 | 170.2 | 170.2 | 170.2 | 170.2 | 170.2 | 170.2 | 171.2 171.2 | 170.2 170.2 | 170.2 170.2 | 170.2 170.2 | 170.2 170.2 | 170.2 170.2 | 170.2 170.2 | 170.2 170.2 | 170.2 170.2 | 170.2 170.2 | ||||||||||||||||||||||||||||||||||||||||||||||||||||||||||||||||||||||||||||||||||||||||||||||||||||||||||||||||||||||||||||||||||||||||||||||||||||||||||||||||||||||||||||||||||||||||||||||||||||||||||||||||||||||||||||||||||||
| 4ECuetico 10 | 170.2 | 170.2 | 170.2 | 170.2 | 170.2 | 170.2 | 170.3 | 170.2 | 170.2 | 170.2 | 170.2 | 170.2 | 170.2 | 170.2 | 170.2 | 170.2 | 170.2 | 075.2 | 075.2 | 075.2 | 075.2 | 075.2 | 075.2 | 075.2 | 075.2 | 075.2 | 075.2 | 075.2 | 075.2 | 075.2 | ||||||||||||||||||||||||||||||||||||||||||||||||||||||||||||||||||||||||||||||||||||||||||||||||||||||||||||||||||||||||||||||||||||||||||||||||||||||||||||||||||||||||||||||||||||||||||||||||||||||||||||||||||||||||||||||||||||
| 5ECuetico 10 | 170.2 | 170.2 | 170.2 | 170.2 | 170.2 | 170.2 | 170.3 | 170.2 | 170.2 | 170.2 | 170.2 | 170.2 | 170.2 | 170.2 | 170.2 | 168.9 | 175.1 | 168.9 | 175.1 | 168.3 | ||||||||||||||||||||||||||||||||||||||||||||||||||||||||||||||||||||||||||||||||||||||||||||||||||||||||||||||||||||||||||||||||||||||||||||||||||||||||||||||||||||||||||||||||||||||||||||||||||||||||||||||||||||||||||||||||||||||||||||||
| 6ECuetico 10 | 170.2 | 168.8 | 171.4 | 171.2 | 175.1 | 175.1 | 175.1 | 175.1 | 175.1 | 175.1 | 175.1 | 175.1 | 175.1 | 175.1 | 175.1 | 175.1 | 175.1 | 175.1 | 175.1 | 175.1 | 175.1 | 174.3 | 174.3 | 174.3 | 174.3 | 174.3 | 174.3 | 174.3 | 174.3 | 174.3 | 174.3 | 174.3 | 174.3 | 174.3 | 174.3 | 174.3 | ||||||||||||||||||||||||||||||||||||||||||||||||||||||||||||||||||||||||||||||||||||||||||||||||||||||||||||||||||||||||||||||||||||||||||||||||||||||||||||||||||||||||||||||||||||||||||||||||||||||||||||||||||||||||||||||
| 7ECuetico 10 | 169.2 | 175.1 | 175.1 | 175.1 | 175.1 | 175.1 | 175.1 | 175.1 | 175.1 | 175.1 | 175.1 | 175.1 | 175.1 | 175.1 | 175.1 | 175.1 | 175.1 | 075.2 | 075.2 | 075.2 | 075.2 | 075.2 | 075.2 | 075.2 | 075.2 | 075.2 | 075.2 | 075.2 | 075.2 | 075.2 | 075.2 | 075.2 | ||||||||||||||||||||||||||||||||||||||||||||||||||||||||||||||||||||||||||||||||||||||||||||||||||||||||||||||||||||||||||||||||||||||||||||||||||||||||||||||||||||||||||||||||||||||||||||||||||||||||||||||||||||||||||||||||||
| 8ECuetico 10 | 169.2 | 175.1 | 168.8 | 171.4 | 175.1 | 175.1 | 175.1 | 175.1 | 175.1 | 175.1 | 175.1 | 175.1 | 175.1 | 175.1 | 175.1 | 175.1 | 175.1 | 175.1 | 175.1 | 175.1 | 176.3 | 176.3 | 176.3 | 176.3 | 176.3 | 176.3 | 176.3 | 176.3 | 176.3 | 176.3 | 176.3 | |||||||||||||||||||||||||||||||||||||||||||||||||||||||||||||||||||||||||||||||||||||||||||||||||||||||||||||||||||||||||||||||||||||||||||||||||||||||||||||||||||||||||||||||||||||||||||||||||||||||||||||||||||||||||||||||||||
4.10 FUNC TIE ICS Intelligent Cooking System
| Symbol | Value | |||||||||||||||||||||||||||||||||||||||||||||||||||||||||||||||||||||||||||||||||||||||||||||||||||||||||||||||||||||||||||||||||||||||||||||||||||||||||||||||||||||||||||||||||||||||||||||||||||||||||||||||||||||||||||||||||||||||||||||||||||||||||||||||||
| LUMOXY | LUMOXY | LUMOXY | LUMOXY | LUMOXY | LUMOXY | LUMOXY | LUMOXY | LUMOXY | LUMOXY | LUMOXY | LUMOXY | LUMOXY | LUMOXY | LUMOXY | LUMOXY | LUMOXY | LUMOXY | LUMOXY | LUMOXY | LUMOxy | LUMOxy | LUMOxy | LUMOxy | LUMOxy | LUMOxy | LUMOxy | LUMOxy | LUMOxy | LUMOxy | LUMOxy | LUMOxy | LUMOxy | LUMOxy | LUMOxy | LUMOxy | LUMOxy | LUMOxy | LUMOxy | LUMOxy | LUMOoxy | LUMOxy | LUMOxy | LUMOxy | LUMOxy | LUMOxy | LUMOxy | LUMOxy | LUMOxy | LUMOxy | LUMOxy | LUMOxy | LUMOxy | LUMOxy | LUMOxy | LUMOxy | LUMOxy | LUMOxy | LUMOxy | LUMOxy | LUMO oxy | LUMOxy | LUMOxy | LUMOxy | LUMOxy | LUMOxy | LUMOxy | LUMOxy | LUMOxy | LUMOxy | LUMOxy | LUMOxy | LUMOxy | LUMOxy | LUMOxy | LUMOxy | LUMOxy | LUMOxy | LUMOxy | LUMOxy | LUMOx | LUMOxy | LUMOxy | LUMOxy | LUMOxy | LUMOxy | LUMOxy | LUMOxy | LUMOxy | LUMOxy | LUMOxy | LUMOxy | LUMOxy | LUMOxy | LUMOxy | LUMOxy | LUMOxy | LUMOxy | LUMOxy | LUMOxy | LUMO xy | LUMOxy | LUMOxy | LUMOxy | LUMOxy | LUMOxy | LUMOxy | LUMOxy | LUMOxy | LUMOxy | LUMOxy | LUMOxy | LUMOxy | LUMOxy | LUMOxy | LUMOxy | LUMOxy | LUMOxy | LUMOxy | LUMOxy | LUMO | LUMOxy | LUMO | LUMOxy | LUMO | LUMOxy | LUMO | LUMOxy | LUMO | LUMOxy | LUMO | LUMOxy | LUMO | LUMOxy | LUMO | LUMOxy | LUMO | LUMOxy | LUMO | LUMOxy | LUMO | LUMOxy | LUMO | Energy consumption per cooking zone or area calculated per kg | ECuetico 10 | 182.5 | 175.1 | 175.1 | 175.1 | 175.1 | 175.1 | 175.1 | 175.1 | 175.1 | 168.9 | 175.1 | 168.3 | ||||||||||||||||||||||||||||||||||||||||||||||||||||||||||||||||||||||||||||||||||||||||||||||||||||||
| 2ECuetico 10 | 169.2 | 170.2 | 170.2 | 170.2 | 170.2 | 170.2 | 170.2 | 170.2 | 170.2 | 170.2 | 170.2 | 170.2 | 170.2 | 170.2 | 170.2 | 170.2 | 170.2 | 170.2 | 210.2 | 210.2 | 210.2 | 210.2 | 210.2 | 210.2 | 210.2 | 210.2 | 210.2 | 210.2 | 210.2 | 210.2 | 210.2 | 210.2 | 210.2 | 210.2 | 210.2 | |||||||||||||||||||||||||||||||||||||||||||||||||||||||||||||||||||||||||||||||||||||||||||||||||||||||||||||||||||||||||||||||||||||||||||||||||||||||||||||||||||||||||||||||||||||||||||||||||||||||||||||||||||||||||||||||
| 3ECuetico 10 | 169.2 | 161.1 | 168.9 | 168.3 | 170.2 | 170.2 | 170.2 | 170.2 | 170.2 | 170.2 | 170.2 | 170.2 | 170.2 | 170.2 | 170.2 | 170.2 | 170.2 | 170.2 | 170.2 | 170.2 | 171.2 | 170.2 | 170.2 | 170.2 | 170.2 | 170.2 | 170.2 | 170.2 | 170.2 | 170.2 | 170.2 | 170.2 | 170.2 | 170.2 | 170.2 | |||||||||||||||||||||||||||||||||||||||||||||||||||||||||||||||||||||||||||||||||||||||||||||||||||||||||||||||||||||||||||||||||||||||||||||||||||||||||||||||||||||||||||||||||||||||||||||||||||||||||||||||||||||||||||||||
| 4ECuetico 10 | 170.2 | 170.2 | 170.2 | 170.2 | 170.2 | 170.2 | 170.2 | 170.2 | 170.2 | 170.2 | 170.2 | 170.2 | 170.2 | 170.2 | 170.2 | 170.2 | 175.2 | 170.2 | 170.2 | 170.2 | 170.2 | 170.2 | 170.2 | 170.2 | 170.2 | 170.2 | 170.2 | 170.2 | 170.2 | 170.2 | 170.2 | 170.2 | 170.2 | 075.2 | ||||||||||||||||||||||||||||||||||||||||||||||||||||||||||||||||||||||||||||||||||||||||||||||||||||||||||||||||||||||||||||||||||||||||||||||||||||||||||||||||||||||||||||||||||||||||||||||||||||||||||||||||||||||||||||||||
| 5 | 0.9 | 0.9 | 0.9 | 0.9 | 0.9 | 0.9 | 0.9 | 0.9 | 0.9 | 0.9 | 0.9 | 0.9 | 0.9 | 0.9 | 0.9 | 0.9 | 0.9 | 0.9 | 0.9 | 0.9 | 0.9 | 0.9 | 0.9 | 0.9 | 0.9 | 0.8 | 0.8 | 0.8 | 0.8 | 0.8 | 0.8 | 0.8 | 0.8 | 0.8 | ||||||||||||||||||||||||||||||||||||||||||||||||||||||||||||||||||||||||||||||||||||||||||||||||||||||||||||||||||||||||||||||||||||||||||||||||||||||||||||||||||||||||||||||||||||||||||||||||||||||||||||||||||||||||||||||||
| 6 | LW | 0.9 | 0.9 | 0.9 | 0.9 | 0.9 | 0.9 | 0.9 | 0.9 | 0.9 | 0.9 | 0.9 | 0.9 | 0.9 | 0.9 | 0.9 | 0.9 | 0.9 | 0.9 | 0.9 | 0.9 | 0.9 | 0.9 | 0.9 | 0.9 | 0.6 | 0.6 | 0.6 | 0.6 | 0.6 | 0.6 | 0.6 | 0.6 | |||||||||||||||||||||||||||||||||||||||||||||||||||||||||||||||||||||||||||||||||||||||||||||||||||||||||||||||||||||||||||||||||||||||||||||||||||||||||||||||||||||||||||||||||||||||||||||||||||||||||||||||||||||||||||||||||
| 7 | LW | 0.9 | 0.9 | 0.9 | 0.9 | 0.9 | 0.9 | 0.9 | 0.9 | 0.9 | 0.9 | 0.9 | 0.9 | 0.9 | 0.9 | 0.9 | 0.9 | 0.9 | 0.9 | 0.9 | 0.9 | 0.9 | 0.9 | 0.9 | 0.6 | 0.5 | 0.5 | 0.5 | 0.5 | 0.5 | 0.5 | 0.5 | ||||||||||||||||||||||||||||||||||||||||||||||||||||||||||||||||||||||||||||||||||||||||||||||||||||||||||||||||||||||||||||||||||||||||||||||||||||||||||||||||||||||||||||||||||||||||||||||||||||||||||||||||||||||||||||||||||
| 8 | LW | 0.9 | 0.9 | 0.9 | 0.9 | 0.9 | 0.9 | 0.9 | 0.9 | 0.9 | 0.9 | 0.9 | 0.9 | 0.9 | 0.9 | 0.9 | 0.9 | 0.9 | 0.9 | 0.9 | 0.9 | 0.9 | 0.9 | 0.9 | 0.65 | 0.5 | 0.5 | 0.5 | 0.5 | 0.5 | 0.5 | |||||||||||||||||||||||||||||||||||||||||||||||||||||||||||||||||||||||||||||||||||||||||||||||||||||||||||||||||||||||||||||||||||||||||||||||||||||||||||||||||||||||||||||||||||||||||||||||||||||||||||||||||||||||||||||||||||
| 9 | ECuetico 10 | 182.5 | 175.1 | 175.1 | 175.1 | 175.1 | 175.1 | 175.1 | 168.9 | 175.1 | 168.3 | |||||||||||||||||||||||||||||||||||||||||||||||||||||||||||||||||||||||||||||||||||||||||||||||||||||||||||||||||||||||||||||||||||||||||||||||||||||||||||||||||||||||||||||||||||||||||||||||||||||||||||||||||||||||||||||||||||||||||||||||||||||||
| 2ECuetico 10 | 169.2 | 170.2 | 170.2 | 170.2 | 170.2 | 170.2 | 170.3 | 170.2 | 170.2 | 170.2 | 170.2 | 170.2 | 170.2 | 170.2 | 170.2 | 170.2 | 170.2 | 170.2 | 170.2 | 170.2 | 170.2 | 170.2 | 170.2 | 211.2 | 211.2 | 211.2 | 211.2 | 211.2 | 211.2 | 211.2 | 211.2 | 211.2 | 211.2 | |||||||||||||||||||||||||||||||||||||||||||||||||||||||||||||||||||||||||||||||||||||||||||||||||||||||||||||||||||||||||||||||||||||||||||||||||||||||||||||||||||||||||||||||||||||||||||||||||||||||||||||||||||||||||||||||||
| 3ECuetico 10 | 169.2 | 161.1 | 168.9 | 168.3 | 170.2 | 170.2 | 170.2 | 170.2 | 170.2 | 170.2 | 170.2 | 170.2 | 170.2 | 170.2 170.2 | 170.2 | 170.2 | 170.2 | 170.2 | 170.2 | 170.2 | 170.2 | 170.2 | 170.2 | 170.2 | 170.2 | 170.2 | 170.2 | 170.2 | 170.2 | 170,2 | ||||||||||||||||||||||||||||||||||||||||||||||||||||||||||||||||||||||||||||||||||||||||||||||||||||||||||||||||||||||||||||||||||||||||||||||||||||||||||||||||||||||||||||||||||||||||||||||||||||||||||||||||||||||||||||||||||||
| 4ECuetico 10 | 170.2 | 170.2 | 170.2 | 170.2 | 170.2 | 170.2 | 170.2 | 170.2 | 170.2 | 170.2 | 170.2 | 170.2 | 170.2 | 170.2 | 075.2 | 075.2 | 175.2 | 170.2 | 170.2 | 170.2 | 170.2 | 170.2 | 170.2 | 170.2 | 170.2 | 170.2 | 170.2 | 170.2 | 170.2 | 170.2 | 170.2 | |||||||||||||||||||||||||||||||||||||||||||||||||||||||||||||||||||||||||||||||||||||||||||||||||||||||||||||||||||||||||||||||||||||||||||||||||||||||||||||||||||||||||||||||||||||||||||||||||||||||||||||||||||||||||||||||||||
| 5ECuetico 10 | 170.2 | 170.2 | 170.2 | 170.2 | 170.2 | 170.2 | 170.2 | 170.2 | 170.2 | 170.2 | 170.2 | 170.2 | 170.2 | 170.2 | 170.2 | 168.3 | 175.2 | 170.2 | 170.2 | 170.2 | 170.2 | 170.2 | 170.2 | 170.2 | 170.2 | 170.2 | 170.2 | 170.2 | 170.2 | 170.2 | ||||||||||||||||||||||||||||||||||||||||||||||||||||||||||||||||||||||||||||||||||||||||||||||||||||||||||||||||||||||||||||||||||||||||||||||||||||||||||||||||||||||||||||||||||||||||||||||||||||||||||||||||||||||||||||||||||||
| 6ECuetico 10 | 170.2 | 170.2 | 170.2 | 170.2 | 170.2 | 170.2 | 170.2 | 170.2 | 170.2 | 170.2 | 170.2 | 170.2 | 170.2 | 170.2 | 170.2 | 180.2 | 180.2 | 180.2 | 180.2 | 180.2 | 180.2 | 180.2 | 180.2 | 180.2 | 180.2 | 180.2 | 180.2 | 180.2 | 180.2 | |||||||||||||||||||||||||||||||||||||||||||||||||||||||||||||||||||||||||||||||||||||||||||||||||||||||||||||||||||||||||||||||||||||||||||||||||||||||||||||||||||||||||||||||||||||||||||||||||||||||||||||||||||||||||||||||||||||
| 7ECuetico 10 | 170.2 | 170.2 | 170.2 | 170.2 | 170.2 | 170.2 | 170.2 | 170.2 | 170.2 | 170.2 | 170.2 | 170.2 | 170.2 | 170.2 | 170.2 | 190.2 | 190.2 | 190.2 | 190.2 | 190.2 | 190.2 | 190.2 | 190.2 | 190.2 | 190.2 | 190.2 | 190.2 | 190.2 | 190.2 | |||||||||||||||||||||||||||||||||||||||||||||||||||||||||||||||||||||||||||||||||||||||||||||||||||||||||||||||||||||||||||||||||||||||||||||||||||||||||||||||||||||||||||||||||||||||||||||||||||||||||||||||||||||||||||||||||||||
| 8ECuetico 10 | 170.2 | 170.2 | 170.2 | 170.2 | 170.2 | 170.2 | 170.2 | 170.2 | 170.2 | 170.2 | 170.2 | 170.2 | 170.2 | 170.2 | 170.2 | 145.2 | 175.2 | 175.2 | 175.2 | 175.2 | 175.2 | 175.2 | 180.2 | 180.2 | 180.2 | 180.2 | 180.2 | 180.2 | 180.2 | |||||||||||||||||||||||||||||||||||||||||||||||||||||||||||||||||||||||||||||||||||||||||||||||||||||||||||||||||||||||||||||||||||||||||||||||||||||||||||||||||||||||||||||||||||||||||||||||||||||||||||||||||||||||||||||||||||||
| 9ECuetico 10 | 170.2 | 168.8 | 171.4 | 171.4 | 171.4 | 171.4 | 171.4 | 171.4 | 171.4 | 171.4 | 171.4 | 171.4 | 171.4 | 171.4 | 171.4 | 171.4 | 171.4 | 171.4 | 171.4 | 178.3 | ||||||||||||||||||||||||||||||||||||||||||||||||||||||||||||||||||||||||||||||||||||||||||||||||||||||||||||||||||||||||||||||||||||||||||||||||||||||||||||||||||||||||||||||||||||||||||||||||||||||||||||||||||||||||||||||||||||||||||||||
:Matlagingsassistant

Favoritter
Forklaring på displayet
4.7 INNSTILLING AV TIDSURET
VEDLIKEHOLD AV PLATETOPPEN
m = 311
m = 311
m = 311
m = 311
1 + u7 = 70%
m = 311
m = 311
m = 311
m = 311
m = 311
m = 311
m = 311
m = 311
m = 311
m = 311
m = 311
m = 311
m = 311
1 + u7 = 70%
m = 311
m = 311
( x - 2x) t - xy^2 = ( x - 2x) f^ t
m = 311
m = 311
m = 311
1 + u7 = 74
( x - 2x) t - xy^2 = ( x - 2x) f^ t
1 + u7 = 74
1 + u7 = 74
1 + u7 = 74
m = 311
( x - 2x) t - xy^2 = ( x - 2x) f^ t
m = 311
m = 311
m = 311
m = 311
m = 311
m = 311
m = 311
m = 311
m = 311
m = 311
m = 311
Oh rapaHTnpyET He ToIbKO KaueCTBO I DOJIROBeHOCt HaIIN pIn6OpOB, Ho IN IX OTCJeKINBaEMocTb, To eCTb Yka3bIbae TOTHoe N YeTKOE MeCTO IN IIPOINCXOXJDeHn.
www.de-dietrich.com
-1 OKPYXIAIOUCA PEDA 7
- 2 YCTAHOBKA .8
PacnaKobBaHne 8
BcTpaBbHne B Me6eIb. 8
IopKJIIOUeHne K 3JIeKTPoCetn. 10
·3 OINCAHNE BAUERO IPNBOPA 11
UcIobHbIe 6o3HaueHnHa nHaJIy UnpaBHeHn. 11
UcnoBhie 603HaueHnHa dncnnee. 12
·4PABINLA3KCPNLYATAUIN 13
UnpaBHeHne npametpamn 13
UnpaBHeHne MoUcHoCTbIO 14
BbI6op noCyIbI 14
BbI6op KOHΦOpKn. 13
BkJIIOueHne N BbIKIIOueHne 15
PerynilpoBka MoUHocTn 15
Horizone (B 3aBncnmoctn OT moeJIu) 16
Hacrpoika taimepa 16
Бл_OKуровka панелу уразьменя... 17
ФункцяпереклоченSWITCH. 17
Функця уMHон системbl пи��товлиения пиши ICS 17
Функця установин насторik n3namrRECALL. 17
Функця Инданци IncTeKwero BpeMeHn ELAPSED TIME 18
Функця Клинарно помошниka 19
Функця «ИЗбразноe» 25
Be3oNaChocTh npekomEndaun 25
·5yXoI 26
-6 HENCNPABHOCTN IN CNOCObI INX YCTPAHEHIN. 27
·7 TÁBЛИЦА ЗЛЕКТРОЗHEPRETINUÇECKNX PACYETOB. 28
-8 OTDEJ NO PABOTE C NOTPENEJIaMn 29
БЕЗПАС"HOBЖHbI MEРы ПЕДО-CTОРЖHOCTN
BAJHbIE INHCTPYKcIIN IO TEXHnke B3OpACHOCTN: BHIMATEJIbHOIIPOHTITEuCOXPAHNTeДЯИСПОЛь3OBAHnB DAJIbHEIShEM.
Bo n36exaHne HarpeBa MeTaJIInueckne IpeDMeTbI, HApPIMep HOxN, BnIKN, J0XKN N KpbIShK, He DOnJXHbI pa3MeUaTbcS Ha NOBepXHOCTN PINTbI.

BHIMAHNE! PnHrTOBJIeHne NIIu Tpe6yeT NOCTOHHoro KOH-
TpOJa. B cIyae HeIpoIoJXnTeIbHOro IpoUecca npIroTOBJIeHna KOHTpOJIpyuTe erO HeppepbIBHO.
OnacHocTb noXapa: He ocTaBnIe Te npEiMeTbI Ha KOHΦOpKaX.
PpIroTOBJIeHHe NIIuC pIpIMHeHEm Jnpa IIN MacJa Ha IJIInTe 6e3 npICMOtpa MoKet PpeIcTaBnAeTb ONaChOCTb I PrNBOJNTb K NoXapy. HIKOgDA He NbItaIteCb IOTUShnTb NOxap BODo; HeoBXOJIMO BvIKJIIOuHTb PnITy HAKpbITb ee, HApIMep KpbIshKO JIN HeGropUoym NOKpbIBaJOM.
БЕЗПАС"HОCTь И BAЖHьE MEPы ПРЕДО-CTОРЖHOCTN
EcnI NOBepxHocTb NNITbI pacTpeckaJacb, OTKJIIOHTe ee OT 3JeK- TPOPITaHn BO n36eXaHHe
IopaxeHn 3JIeKTPuYeCKIM TOKOM.
He noIb3yIteCb PnIToI Do 3aMeHbI CTeKJIaHHoI CTOJIeUHNUcbl.
3Ty pIHTy cIeDyET IOKJIIOUHTb K CTeT Upe3 OJHOJIOHCHbI aBTOMaTNUeCKn BbIKIIOuAteJIb, COOTBETCTBYIOUm DeIcTBYIOUIm npaBUNaM IOKJIIOUeHnra 3JeKTPoPnp6OpOB. BbIKIIOuAteJIb DOJXKeH 6bITb CTaUNOHApHO yCTaHOBLeH B CNTeMe 3JeKTPoPnpOBoDKn. PJIHTa dJa npriTOBHeHn IINs 6yDet NcPpABHo pa6oTaB Prn YacToTe 50 INn 60 Tc (50 T/60 T) 6e3 KaKOr-OJIbO BMeWAteJIbCTBa C BaSeI cTOPOHbl.
UcTpoIcTBO CNeDyeT NOdkNIOuA Tb Uepe3 cTaHdapTHbI Ka6eIb NITaHnI, KOJIInueCTBO KIN KOTOpO 3aBNCIT OT TUNa BblIOJHReMOrO NODKIIouHeHn (CM. rIaby «YcTaHOBka»).
EcnnoBpeDnCkabEnb3neKtpOnHtAnHnToBo n36exHaHe onacHbIX CNTyaCn erO 3aMeHy DoJXeH BblONHrTb TexHnueckn nepcoHaN pON3BOInTeI, nepcoHaJI CnyX6bl NocJeNpOdaXHOro o6cLyXHBANHn IIN JnIO C COOTBeTCTByIOSeI KBaIIΦnKaUnei.
Y6eIHTecb, YTO Ka6eIb NITaHnA 3JIeKTpUcEckOro yCTpOiCTBa, NOI-KIIOueHHOro BO3JIe PIINTbl, He KacaetcKOHΦopOK.
I PPEOCTEPEXEHNE. YTo6bI PnIta He Bbl3bIBaHa NOMex B pa-6oTe KapDIOOCtMUYJrTopa, NocJeHn DOnJKeH 6bITb pa3pa6oTaH n HAcTpoEH B COOTBeTCTBn C NaJIpeKAsmN Tpe6oBaHnA Mn. CBxN-TEcB c eRo IPOIN3BOIDHTeJem INI BAuIM JeuaSIm BpaQOM.
Для 3auntbI ПЛNTbI ИСПОЛь3уИTe TOЛьКВ BCTpoEHHbIe ПрON3BOdnteJIem 3auntHbIe yCTpoIcTBA ИП 3auntHbIe yCTpoIcTBA, pa3pa6oTaHbIe ee PpON3BOdnteJIem ИП peKOMeHIOBaHHbIe PpON3BOdnteJIem B INHCTpyKcII N O EKcPlyaTaUIN KaK PpNIOHbIe ДЯ DAHHOJ ПЛNTbl. ИспОЛьЗOBaHInе HeCOOTBETcTBYIOUx 3auntHbIX yCTpoIcTB MOKeT npINBeCTn K BblOxOy ПЛNTbI И3 CTpoI.
I36eaiTe yapOB nocydoi: cTKIO-KepaMuecka NOBepxHocTb 6bIaTe BbICOKo IPOUHOCTbIO, OHaKO He ABLJeTcR He6bIooJeC. He KpAInTe ropayne KpbIshKn PIIaSMHa PIIHTy. 3ΦΦeKT «PnpcoCKN» MOKeT pINBeCTN K NOBpeJDeHNIO KepaMueckO NOBepxHocTn. I36eaiTe B3aIMHOrO TpeHn MaKdy PIIrToN INOCyDo, TaK KaK 3TO MoKeT pINBeCTN K NOBpeJDeHNIO DeKopa Ha cTEKNO-KepaMueckO NOBepxHocTn.
БЕЗПАС"HOBHbI MEРБI ПЕДОCTОПОЖHOCTN
HnkOrda He nCnOJb3yIte aJIHOMnHneByIO fOjIBy dJIra npriROTOBJeHna nnHa 3ToI nnTe. HnkOrda He cTaNBe Ha nnTy npOdyKtbl, o6epHyTbie aJIHOMnHneBOI fOJbRoI, IJIIN B aJIHOMnHneBOM JOTke. AJIHOMnHm MoKeT paCnJaBnTBcA n HaHeCTN HeONpaBIMbI yUepeBaWe nnTe.
He xpaHnTe B shkaФuNke pOd pIHToY uCTaUe cpeCTBa nIJI neKOBoc- PIIaMeHryUOuIeScr npOdyKTbl.
HnkOrda He nCnoB3yIe NapooOuNCTnTeJIb IJRA NcTKn PInTbl.
Данны пибор He претна3нayeh Дя Вкюченя рпnomои Bheш-нero таймера Или OTдьнов сnteMbI ДИСТацноногу упраВлени.
Iocne nCNoB3OBAHnB BbIKNHOaIte PIIHTy C NOMoUbIO pEryJrTopa; He cNeDyET NOHOCTBIO NOIraTbCS Ha DeTeKTop KaCTpOJIb.
OXPAHA OKPYXKAIOUEN CPEIbI
3TOT CnMBOJ NOKa3bIBAeT, YTO npnbop He OTHOCNTcK 6bItOBbIM OTXoJam. Pnpob coedeKINT TAKKe 6oJIbIooe KOnNueCTBO MaTePnaIOB, Pnpirohblx
ДЯВТОПУСHОЕРЕРАБOTКI.ПОТOMYHaHEMIMeETcAMapKINPOBka,COrJIaCHOKOTOPOINCNoJIb3OBaHHbI INPOnJIeKaUHyUTNInI3aUHNpIN6Op DOJNXEh6bITBDOCTABnEH B CneUaNbHbIpyHKTc6opaTexHnueeCKNXOTXoDOb.Y3HaTbObINKaiuNXKBaSeMy DomyPyHKTaXc6opaTexHnueeCKNXOTXoDObMOxHOYnpOaBuaTeXnIKINIIBTOPOdCKNXZeHTpaxTexHnueeCKORO O6cnyXBAnHra.TakIMobpa3OM,yTNIN3aUINpIN6opa6yDeTpON3BOIDtBcRBAIOHNOMCOOTBeTCTBnIC Tpe6OBaHNAMN3rOToBnTEJIyNTpe6OBaHNAMNEBPoneckOINPeKTHBbIobYtINI3aUHN3JIeKTPnueeCKOTOINJIeKTPoHNOBO6OpUDOBAHNA.
HeKoTOpbIe MaTePnAJIbI yPaKOBKn npi-6opa npiroDnbl IdI BToPnUHoi nepe-pa6OtKn. PpIMnte yuactne B 3OM, 3a6O7cB Tem caMbIM o6 OkpykaIoUe CpeDe, - NOMEuAte INX B COOTBeTCTByIOUme MyNUnPaNbHbIe KOHTeHepbl. BlaIarOdaPm Bac 3a CoJeCTBVe B 3aUInTe OkpyKaIoUe CpeBl.
PekomeHdaCnB OTHOWeHn 3KOHOMN 3Heprn
PpoceC npiroTOBJIeHn C xopoSo nOdo6paHHo KpbIkoN 3KOHOMT 3HeRnIO.EcIN BblncnoJb3yeTe CTekJnHHyO KpbIshky,BblMOKeTe OTNIuHO KOHTpOJIPOBaT PpoceC npiroTOBJIeHn.
PACNAKOBbIBAHNE
N3BNeKInTe BCE 3aUHTHbIe npncnOco6JIeHnI dIaTpaHCnOpTnpOBKn pIITbI. O3HaKOMbTEcB c XapaKTepNCtHKamn pIITbI, yKa3aHHbIMn Ha 3aBOdCKoT Ta6JIuYe, n yuHTbIbAitE nx. B noJnx HIXKe OTMeTbTe 3KcNpyaTaunOHhble DaHHbIe I daHHbIe O TIne CTAHdApTa, yKa3aHHbIe Ha TabNIuYe. OHI npuroDЯrTcBAM B 6yDuIeM.
| Услыra: | Тип: |
YCTAHOBKA
Y6eIntecb, yTO Bo3dyxO3a6OpHbIe N BblT8KhBIE OTBepCTnIe He 3a6IOKnPOBaHbI. YuHTbIbAIte MOHTaXHbIe pa3Mepbl (B MmIIINMeTpax) pa6Oey IOBepXHOcTn, B KOTOpU BCTpanBaETcN pINTa. PpOBepbTe, yTO6bl BO3dYx npabUNbHo cIpKyInPobAIm MeJdy NepeDHeN 3aHN He qactrMa BAsWe PIITbI.
YcTaHOBka Ha pa6ooye IOBepxHocTn

MOHTaX 3aOpIINIO
Ecnn nnta yctHaBnBaetc Hnd KxOHbIM RUKOM
HnHaBMOHTNPOBaHHbIM DyXOBbIM
UkaΦom, CO6JIoJaIe yKa3aHHbIe
Ha HIIIOCTpaunix pa3Mepbl, YTO6bl
OBeCneuTb DoCTaToCHoe paCCTOJHHe
DnA BbInycka BO3dYxa.
TsqaTeIbHo npKJneIte yNtHTeIbHyIO npokJaKy no Bcei NOBepxHOCTn PNTbIpeD yCTaHOBKO.


Baxho!
Ecn nyxoboi kkaf haoonTcno nnTO, Tepmo3aunTA nnTb moKet orpaHnHTb OndOBpeMeHHoe nCNOJb3OBAHne ee N dyXOBKn B peXnme npOn3a; torda Ha naHeN ynpabLeHna NOBnEeTcKa Kd «F7». B 3tOM clyae Mbl peKomeHdyem Bam yBeJIuHTb BEHTNJauIIO nnTbI pyTeM Bblpe3aHnA OTBepCTnHa 60koB O CTOPOHE KcuXOHHO Me6eJI (8 cm x 5 cm).
ПОДКЛIOЧЕНК ЗЛЕKTPOCETN
3Ty pINTy cNeIyET NOKIIHouHTb K CetN Upe3 OJHOONIOCHbI aBTOMaTHUeCKn BbIKHouaTeJIb, COOTBeTCTByOuIeI CTByUoIIM npaBnIam NOkJIHoueHn EJIeKTPoPnp6OpOB. BbIKHouaTeJI bONXeH 6bITb cTaIHOHApHO yCTaHOBJIeH BCNCTeMe 3JIeKTPoPpOBOdKn.
HaundTe Ka6ebIbnPiNTbI:
a) 3eJIeHO-KeJTbIi
b) CnHn
C) KOpNChEByBm
d) uehbl
e) cepbii
Iocne noaun Hnnpjxehna nIInTu IINIOcJIe DInTeJbHOrO OTKluoyehna 3JeKTPo3HeprnHa naHeuyn ynpabHeHnna IOBJRETC COOTBeTCTBYUOuaC BcTOBaa INDnKaun. Pn6n3nteJbHo Upe3 30 cekynd nnIOcNe HaxaTna Ha KNaBnUy 3Ta INOpMaun Ncye3Het nIIHTa 6ydt roTOBa KNCNOb3OBaHnO (3To HopMaJbHa NHDnKaun, N OHa 3ape3epBvropoBaHa Ha cnya, ecnn 3TO Heo6xoDmO BaWei cepBncHOn clyX-6e).B JIObOM cnuae, NOlb3ObaTeNb IINtbl He DoJxeh npHHMaTb ee BO BHIMaHne.

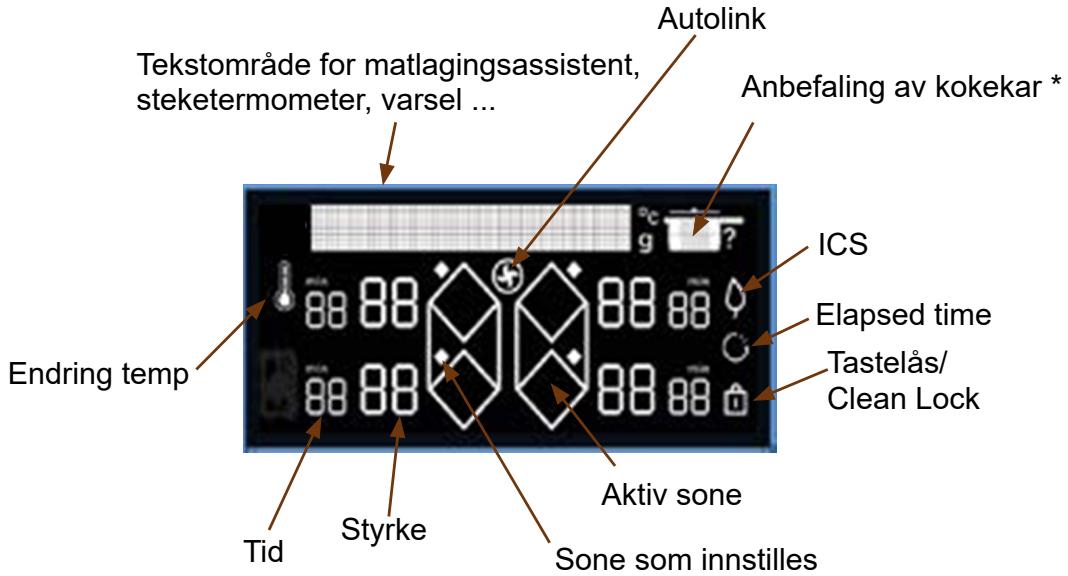
YcIobHbIe 063NaueHnHa nHaHeNy npaBJeHn

:napaMeTpbl.

:NoDTBepKdEHNc/OK.

:BO3BpaTHa3a.


:HaBnIaZna(BepXHee N HIXKHe MeHIO).
BKNIOUeHne N BbIKIOUeHne.

6bokinpobka n 6bokinpobka dny ouncTk Clean Lock.

: BbI6Op BapOuHoi 30Hbl.


Horizone (B 3aBnCmOCTn OT MoJeN).
:HaCtpoKa MoUHOCTu/BpeMeHn.

: cnppoBa nHeB dIa BbIbopa MoIcHocTn IIN BpeMeH.

TaMep
HenocpeDCTBHeHbI Doctyn

PondepkaHne tenna

Tyuhen

Kapka

pekmBoost.
Фуннкин

品 yHkzna nepeknuehenya Switch.

品 yHKnyaUMHOcTeMbI nprirotobJeHnna ICS.

Функця установский Habtpoek n3namyrn Recall.

: yHKZnI INDnKauIN NcTeKJero BpeMeHn Elapsed time.

: KyIINHapHbI NOMOUsHK.

U36paHHoe
.3 OIIHCAHNE BAIIIErO IIPNEOPA
YcIOBhIe O6O3HaueHnHa IINCnIee
* Pekomehdobahna nocya:

CkoBopoDa
CkoBopoJa c KpbIuKoJ
Kactpion
KacrtpOJIa c KpbIuKoI
Bo Bpemr nepBoro BKJIIOueHnI PIIITbI B CeTb MOxHOr nepcoHaJIIN3uPObaTb pa3HbIe cyHKcun.

UnpaBHe napaMeTpamn
HaxmTe KhoNky , yTo6bl OTKpbItb npNBedeHHbIe HnKe npaMeTpbl.
-3bIK (no yMOJuaHHIO fpaHcy3cKn).
- RaKoCTb (PnTb BO3MOXHbIX yPoBHei).
- Autolink: ПЛNTа NepeFDAeT BbITЯЖke ИнфОрмацио 6 ob ypoBнx MoUHocTN B aВTOHOMHOM pexnme. BbITЯЖka aBTOMaTHueCKn peRyInpuyET cKOpocTB n BKJIQUaet nIN N BbIKJIQUaet CBet. BbITЯЖky HacTpaNBaTb He hJxHo. IocNe BbIKJIQUeHn PIINTbI BbITЯЖka aBTOMaTHueCKn npOДЛЖaET pa6OtaTb Ha cKOpocTn 1 B TeueHne OKOJNo DByX MINHyT, 3aTeM BbIKJIQUaETcra.
IyoMOnuHnIO 3aФyHKUINoTOKJIIOUeHa.BbMOKeTe ee BkJIIOUHTb,BbIbpaB ON MeHIO C NOMOUsbIO KHOJOK «BBepX» I «BHN3» (BCTaBNTb 3HaYOK).
OrpaHnueHne MoUHOCTn (YeTbIpe DoCTyINbIX yPOBnRA MOUHOCTn CM. B rJaBe «YnpaBJIeHne MOUHOCTbIO»).
- DEMOHCTpaHOnHHbI peXIM: no yMOJuaHnIO ycTpoiCTBO HAcTpoEHO Ha HopMaJIbHbI pexIM HArpeBa. Ecnn OHO BkJIoueHo B peXIMe DEMO (noJoxKeHne ON), ycTpoiCTBO He 6yDet HArpeBaTbcr. Bbl MoKTe BbItnu3 deMOHCTpaHOnHHo peXIMa, HaxaB uYdePxNBaHaxaToI KHNkY napaMeTPOB.
- TexHnueckoe 06cIyXnBaHne: B cIyuae Bo3HnKHOBeHnna Ipo6JIembl Bbl MoKeTe npeiTn B MeHIO «TexHnueckoe 06cIyXnBaHne». Prn o6paUeHNn B cIyK6b yocIe npOdaJxHOrO 06cIyXnBaHnBam HuxHo 6yJeT npeoCTaBnTB KoIbI, OTo6paXaEMbIe Ha eKpaHe dHaarHocTnKn. FUnKzra «Ipe3anyck» no3BOJareT BepHyTb ycTpoiCTBO K 3aBOIDCKIM HacTpoiKaM.
KHOPIKU N AIO3BOJIAOT IpeMeuTaBcB MeHIO.
HaKaTne KHOJKN IIO3BOJRAET BepHyTbCra Ha IpeIbIyUyIO CTpaHnUy MeHIO 6e3 N3MeHeHn.
Haxatne Ha OK no3B0JraT noDTBepdntb Bby6op.
4.1 YNPABJIeHHe MOnCHoCTbIO
O6za MoHocTb NNITb DOJXHa COOTBeTCTBOBaT MoHOCTN BaSei 3JIeKTPocETn.
YoMOnJuaHnIO MoUHocTb BaUeI pIInTbI OTpeRyIpObaHa Ha cAmbl BbICOKN yPoBeHb.
Y6eIntecb, yTO 3NaueHne npedeoxpaHnTeJIaNeKTPuYeCKoYCTaHOBKn 6blIO dOJIxHbIM o6pa3OM OTKaJIIn6pOBaHo (cM. Ta6nUy HnKe).
4.5 HACTPOIKA MOUHOCTN
Haxmnte KhoNky + nIIN - nIIN nCNoJIb3yIte cnpoByu paHeJIb dJa HaCTpOKn CBOero yPOBnMoUHOCTn OT 1do 19. B 3tOM cIyuae Bbl MoKeTe HeNocpeDCTBeHHO BBecTn cInpbI, COOTBeTCTBvUOUIne XeJMaEMoM OUsHOCTn. Haxatne Ha KnaBnuy «0» OTMeHNT pa60Ty KOHOpKn.
B BaWeM pacnopjXeHn YeTbIpe KHOKNI JIJI pIyMOrO DoCTyNa K IpeI-BaPITeJIbHO yCTaHOBJIeHHbIM yPOBHAM MOUHOCTN:
=MOUHOCTB2:noDOrpeB;
=MOUHOCtB 10: npuROTOBJeHne «Ha MeIeHHOM ORHe»;
=MOUHOCTB19:O6xapNBaHne 00=MaKcIMaJIbHaJ MOUHOCTB.

HauhnaeTc npiroTOBHeHne.
Korda Boda 3aKnHnT, pa3dactc3ByKOBo CnHaI, a Ha 3kpaHe OTo6pa3ntc coo6eHHe o Heo6xOIMOCt Ndo6aBnTb INrpeDIneHTbl. IocJIe TORO KAK Bbl 3TO cDeJaTe, haxMITE OK,
YTO6bI NOITBepNTb BbIbOp. OTo6pa3rTcBpeMn MoUHocTb. Tem He MeHee Bbl MOKeTe INX OTpeRyINpOBaTb NcBOEmy yCMOTpeHnIO. N0 OKOHuaHN npuroTOBNeHn pa3daetc 3ByKOBoi CnHaJI.
3aunTa OT npoINBaHnHa nIHTy
OTKIIIOUeHHe PIIITbI MOKeT IpOIN3oI-TN B CNeDyUOuX 3 CnyuaJx:
-проллась кИДКОCTь И пona Л Кнорк па Heи упраВNeHЯ;
-ВлжнаяТрпка ЛжNTHa KhoIGNKaX;
- NaHONKAX NaHEnyynpaBHeNCTOIT MeTaJIInueckn IpeDMeT.
YdaNTe ppeMTe nnn OunchTe N BbICyUInTe
KHOKNI NaHeJIynpaBLeHnI,3aTeM BO3o6HOBInTe PnIroTOBLeHne NIIuN.
B 3Tnx Cnyuayx OTO6paxkaetc yCMBOJ -, COnpoBOXdaembl 3ByKObblM CnHajom.
CnCTema «ABTO-CTOn» (Auto-Stop)
EcnBb3abbln BbIKJIOHTb BaIe 6HIOo, Baa aNTa OchauHa cyHKcnei 3aunTb CNTEmoj ATO-CTON》,KOTOPa ABTomaTueckn OTKIOUaET 3abityo KOHOpKy npoOeCTBm 3aDaHHOro BpeMeHN (OT 1do10acOB COOTBeTCTBEHNO nONoB3yEMOMy pexIMy MoUHOctN).B cnyae cpaTaibBaHn 3Toi CNTembl 6e3oNaCHOCTN OTKIOUeHne KOHOpKn OTo6pKaetc H DaNCJIeee CMBONOM «AS» B OKHe TeKCTa, N CnIHan 3ByuHT B TeueHne PrimePHO 2 MInHyT. Bam DoCTaTOUHO HaKaTb Ha IIO6yIO KHOKNy NaHeIN YnpabNeHnry, YTO6bIO OCTaHOBt b erO.

B03MOxHNO IIOABLHeHne 3ByKOB, OMHaOuXn 3ByKn XoJa cTpe- yacob.
3TN 3ByKN pa3daOTcT TOJbKO TOrDa, KOrda PnIITa HaxoINTcB Pa6Oyem pexnme, NpekpaaaOT 3ByuATb INN CTaHOBtC TnWe B 3aBNCMOCTN OT KOHfNrgauqnn HarpeBa. TaKxe Mo- ryt pa3daBaTbCn OCBnCTbIBaHN B 3aBNCMOCTN OT MOneIN N KaueCTBa BaSei NocSybl. OncsAHhble 3ByKn HopMaJIbHbI, OHN JABLIOTcY aCTbIO TexHOJOrm INHyKcIN N He CBnDE- TeJIbCTBYIOT O HenCnPaBHOCTN.

Mbl He pekomeHnyem nCNoIb- aTb 3aunTHoe yctpoiCTBO dIy Tbl.
.5 yXoJ
CEPBUNCHOE OBCJYKINBAHNE PINTbI
Дя Oунstkn JIeKnx 3aIrp3HeHn Ic- noIb3yIte ry6ky. XopoIo cMoOHTe Te- nIOI BODOI OCHUaEMy IOBepxHOCTb, 3aTeM HacYxo Bbltpnte.
Icnojbl3yemaNoCyda He noDxOaNT.
Iocya npoN3BOOHT 3ByKn, n BaSha IJI-ta Dpe6e3KNT BO Bpemr npnroTOBneHnIu (cm. rnaBy «Be3onacHocTb n peKoMeHndaqun) ). 3To HopMaJbHo. B cnyuae HeKOtOpbIX TINOB Nocdybl 3To nepexod 3HeprnOt PJIITbIKnocyde.
Bentnlaun npoDolkaet pa60taB noCJIe BbIKJIOHcHn nnTbl.
3To HopMaJIbHO. 3To o6ecneuBaet OXJaKdHeHne 3NeKtpOnHbIX yCtpoiCTB.
B clyuae noBtopaHxCnHapuHn pa60TbI.
OTKJIIOUHTe BaUy PIIITy OT 3JIeKTPoINtAHnHa 1 MInHyTy. EcIN HeNCnPabHocTb HeIcye3aET, O6paTntEcB B CInyKbY IocJIepoJaXHOro O6CInyKuBaHnry.
7 TABJIINU A 3JIeKTPO3HEPRTHueCKHX PACHTOB
FR Informations concernant les plaques de cuisson domestiques electriques -UE n*66/2014
Informace tkyajci se elektrickych varmch desek pro domacnost - UE n° 66/2014 NL Informatie met Informatie met betreking tot huishoudelijke elektrische kookplaten - UE n° 66/2014
P 1024
Informations zu elektronischen Hausnalskochinmodus - 06-2017 (in German)
Information for domestic electric hobs:1JUE n6/2014
ES Información sobre las plácas de cocina domesticas electricas - UE n°66/2014
| Symbol | Value | Unit | ||||||||||||||||||||||||||||||||||||||||||||||||||||||||||||||||||||||||||||||||||||||||||||||||||||||||||||||||||||||||||||||||||||||||||||||||||||||||||||||||||||||||||||||||||||||||||||||||||||||||||||||||||||||||||||||||||||||||||||||||||||||||||||||||||||||||||||||||||||||||||||||||||||||||||||||||||||||||||||||||||||||||||||||||||||||||||||||||||||||||||||||||||||||||||||||||||||||||||||||||||||||||||||||||||||||||||||||||||||||||||||||||||||||||||||||||||||||||||||||||||||||||||||||||||||||||||||||||||||||||||||||||||||||||||||||||||||||||
| Model identification | LACKY | LACKY | LACKY | LACKY | LACKY | LACKY | LACKY | LACKY | LACKY | LACKY | LACKY | LACKY | LACKY | LACKY | LACKY | LACKY | LACKY | LACKY | LACKY | LACKY | LACKY | LACKY | LACKY | LACKY | LACKY | LACKLY | LACKLY | LACKLY | LACKLY | LACKLY | LACKLY | LACKLY | LACKLY | LACKLY | LACKLY | LACKLY | LACKLY | LACKLY | LACKLY | LACKLY | LACKLY | LACKLY | LACKLY | LACKLY | LACKLY | LACKLY | LACKLY | LACKLY | LACKLY | LACKLY | LACKY | LACKLY | LACKLY | LACKLY | LACKLY | LACKLY | LACKLY | LACKLY | LACKLY | LACKLY | LACKLY | LACKLY | LACKLY | LACKLY | LACKLY | LACKLY | LACKLY | LACKLY | LACKLY | LACKLY | LACKLY | LACKLY | LACKLY | LACKLY | LACKL | LACKLY | LACKLY | LACKLY | LACKLY | LACKLY | LACKLY | LACKLY | LACKLY | LACKLY | LACKLY | LACKLY | LACKLY | LACKLY | LACKLY | LACKLY | LACKLY | LACKLY | LACKLY | LACKLY | LACKLY | LACKLY | LACKLY | LACKLY | LACKLY | LACKL | LACKL | LACKLY | LACKLY | LACKLY | LACKLY | LACKLY | LACKLY | LACKLY | LACKLY | LACKLY | LACKLY | LACKLY | LACKLY | LACKLY | LACKLY | LACKLY | LACKLY | LACKLY | LACKLY | LACKLY | LACKLY | LACKLY | LACKLY | LACKLY | LACKL | LACKLL | LACKLY | LACKLY | LACKLY | LACKLY | LACKLY | LACKLY | LACKLY | LACKLY | LACKLY | LACKLY | LACKLY | LACKLY | LACKLY | LACKLY | LACKLY | LACKLY | LACKLY | LACKLY | LACKLY | LACKLY | LACKLY | LACKLY | LACKLY | LACKLY | LACKLI | LACKLY | LACKLY | LACKLY | LACKLY | LACKLY | LACKLY | LACKLY | LACKLY | LACKLY | LACKLY | LACKLY | LACKLY | LACKLY | LACKLY | LACKLY | LACKLY | LACKLY | LACKLY | LACKLY | LACKLY | LACKLY | LACKLY | LACKLY | LACKLY | LACKLL | LACKLY | LACKLY | LACKLY | LACKLY | LACKLY | LACKLY | LACKLY | LACKLY | LACKLY | LACKLY | LACKLY | LACKLY | LACKLY | LACKLY | LACKLY | LACKLY | LACKLY | LACKLY | LACKLY | LACKLY | LACKLY | LACKLY | LACKLY | LACKLL | LACKLL | LACKLY | LACKLY | LACKLY | LACKLY | LACKLY | LACKLY | LACKLY | LACKLY | LACKLY | LACKLY | LACKLY | LACKLY | LACKLY | LACKLY | LACKLY | LACKLY | LACKLY | LACKLY | LACKLY | LACKLY | LACKLY | LACKLY | LACKLY | LACKLI | LACKLL | LACKLL | LACKLY | LACKLY | LACKLY | LACKLY | LACKLY | LACKLY | LACKLY | LACKLY | LACKLY | LACKLY | LACKLY | LACKLY | LACKLY | LACKLY | LACKLY | LACKLY | LACKLY | LACKLY | LACKLY | LACKLY | LACKLY | LACKLY | LACKLI | LACKLL | LACKLY | LACKLY | LACKLY | LACKLY | LACKLY | LACKLY | LACKLY | LACKLY | LACKLY | LACKLY | LACKLY | LACKLY | LACKLY | LACKLY | LACKLY | LACKLY | LACKLY | LACKLY | LACKLY | LACKLY | LACKLY | LACKLY | LACKLY | LACKLE | LACKLY | LACKLY | LACKLY | LACKLY | LACKLY | LACKLY | LACKLY | LACKLY | LACKLY | LACKLY | LACKLY | LACKLY | LACKLY | LACKLY | LACKLY | LACKLY | LACKLY | LACKLY | LACKLY | LACKLY | LACKLY | LACKLY | LACKLY | LACKLY | LACKLE | LACKLI | LACKLL | LACKLL | LACKLY | LACKLY | LACKLY | LACKLY | LACKLY | LACKLY | LACKLY | LACKLY | LACKLY | LACKLY | LACKLY | LACKLY | LACKLY | LACKLY | LACKLY | LACKLY | LACKLY | LACKLY | LACKLY | LACKLY | LACKLY | LACKLI | LACKLL | LACKLL | LACKLL | LACKLY | LACKLY | LACKLY | LACKLY | LACKLY | LACKLY | LACKLY | LACKLY | LACKLY | LACKLY | LACKLY | LACKLY | LACKLY | LACKLY | LACKLY | LACKLY | LACKLY | LACKLY | LACKLY | LACKLY | LACKLY | LACKLY | LACKLE | LACKLI | LACKCC | LACKLL | LACKLL | LACKLL | LACKLL | LACKLL | LACKLL | LACKLL | LACKLL | LACKLL | LACKLL | LACKLL | LACKLL | LACKLL | LACKLL | LACKLL | LACKLL | LACKLL | LACKLL | LACKLL | LACKLL | LACKLL | LACKLL | LACKLL | LACKLL | LACKLL | LACK LL | LACKLL | LACKLL | LACKLL | LACKLL | LACKLL | LACKLL | LACKLL | LACKLL | LACKLL | LACKLL | LACKLL | LACKLL | LACKLL | LACKLL | LACKLL | LACKLL | LACKLL | LACKLL | LACKLL | LACKLL | LACKLL | LACKLL | LACKLL | LACKLL | LACKSS | LACKLL | LACKLL | LACKLL | LACKLL | LACKLL | LACKLL | LACKLL | LACKLL | LACKLL | LACKLL | LACKLL | LACKLL | LACKLL | LACKLL | LACKLL | LACKLL | LACKLL | LACKLL | LACKLL | LACKLL | LACKLL | LACKLL | LACKLL | LACKLL | LACKTT | LACKLL | LACKLL | LACKLL | LACKLL | LACKLL | LACKLL | LACKLL | LACKLL | LACKLL | LACKLL | LACKLL | LACKLL | LACKLL | LACKLL | LACKLL | LACKLL | LACKLL | LACKLL | LACKLL | LACKLL | LACKLL | LACKLL | LACKLL | LACKLL | LACKll | LACKLL | LACKLL | LACKLL | LACKLL | LACKLL | LACKLL | LACKLL | LACKLL | LACKLL | LACKLL | LACKLL | LACKLL | LACKLL | LACKLL | LACKLL | LACKLL | LACKLL | LACKLL | LACKLL | LACKLL | LACKLL | LACKLL | LACKLL | LACKLL | LACK LLC | LACKLL | LACKLL | LACKLL | LACKLL | LACKLL | LACKLL | LACKLL | LACKLL | LACKLL | LACKLL | LACKLL | LACKLL | LACKLL | LACKLL | LACKLL | LACKLL | LACKLL | LACKLL | LACKLL | LACKLL | LACKLL | LACKLL | LACKLL | LACKLL | LACKCC | LACKLL | LACKLL | LACKLL | LACKLL | LACKLL | LACKLL | LACKLL | LACKLL | LACKLL | LACKLL | LACKLL | LACKLL | LACKLL | LACKLL | LACKLL | LACKLL | LACKLL | LACKLL | LACKLL | LACKLL | LACKLL | LACKLL | LACKLL | LACKCC | LACKCC | LACKCC | LACKCC | LACKCC | LACKCC | LACKCC | LACKCC | LACKCC | LACKCC | LACKCC | LACKCC | LACKCC | LACKCC | LACKCC | LACKCC | LACKCC | LACKCC | LACKCC | LACKCC | LACKCC | LACKCC | LACKCC | LACKCC | LACKCC | LACKcc ZnO ZnO ZnO ZnO ZnO ZnO ZnO ZnO ZnO ZnO ZnO ZnO ZnO ZnO ZnO ZnO ZnO ZnO ZnO ZnO ZnO ZnO ZnO ZnO ZnO Zn0 ZnO ZnO ZnO ZnO ZnO ZnO ZnO ZnO ZnO ZnO ZnO ZnO ZnO ZnO ZnO ZnO ZnO ZnO ZnO ZnO ZnO ZnO ZnO ZnO Zn O ZnO ZnO ZnO ZnO ZnO ZnO ZnO ZnO ZnO ZnO ZnO ZnO ZnO ZnO ZnO ZnO ZnO ZnO ZnO ZnO ZnO ZnO ZnO ZnO ZnD ZnO ZnO ZnO ZnO ZnO ZnO ZnO ZnO ZnO ZnO ZnO ZnO ZnO ZnO ZnO ZnO ZnO ZnO ZnO ZnO ZnO ZnO ZnO ZnO ZnN ZnO ZnO ZnO ZnO ZnO ZnO ZnO ZnO ZnO ZnO ZnO ZnO ZnO ZnO ZnO ZnO ZnO ZnO ZnO ZnO ZnO ZnO ZnO ZnO ZnC ZnC ZnC ZnC ZnC ZnC ZnC ZnC ZnC ZnC ZnC ZnC ZnC ZnC ZnC ZnC ZnC ZnC ZnC ZnC ZnC ZnC ZnC ZnC ZnC ZnO ZnO ZnO ZnO ZnO ZnO ZnO ZnO ZnO ZnO ZnO ZnO ZnO ZnO ZnO ZnO ZnO ZnO ZnO ZnO ZnO ZnO ZnO ZnO ZnON ZnON ZnON ZnON ZnON ZnON ZnON ZnON ZnON ZnON ZnON ZnON ZnON ZnON ZnON ZnON ZnON ZnON ZnON ZnON ZnON ZnON ZnON ZnON ZnON ZnNON ZnNON ZnNON ZnNON ZnNON ZnNON ZnNON ZnNON ZnNON ZnNON ZnNON ZnNON ZnNON ZnNON ZnNON ZnNON ZnNON ZnNON ZnNON ZnNON ZnNON ZnNON ZnNON ZnNON ZnNON Zn NON ZnNON ZnNON ZnNON ZnNON ZnNON ZnNON ZnNON ZnNON ZnNON ZnNON ZnNON ZnNON ZnNON ZnNON ZnNON ZnNON ZnNON ZnNON ZnNON ZnNON ZnNON ZnNON ZnNON ZnNON ZnNon ZnNON ZnNON ZnNON ZnNON ZnNON ZnNON ZnNON ZnNON ZnNON ZnNON ZnNON ZnNON ZnNON ZnNON ZnNON ZnNON ZnNON ZnNON ZnNON ZnNON ZnNON ZnNON ZnNON ZnNON ZnNN ZnNN ZnNN ZnNN ZnNN ZnNN ZnNN ZnNN ZnNN ZnNN ZnNN ZnNN ZnNN ZnNN ZnNN ZnNN ZnNN ZnNN ZnNN ZnNN ZnNN ZnNN ZnNN ZnNN ZnNN Zn NN ZnNN ZnNN ZnNN ZnNN ZnNN ZnNN ZnNN ZnNN ZnNN ZnNN ZnNN ZnNN ZnNN ZnNN ZnNN ZnNN ZnNN ZnNN ZnNN ZnNN ZnNN ZnNN ZnNN ZnNN ZnNO ZnNO ZnNO ZnNO ZnNO ZnNO ZnNO ZnNO ZnNO ZnNO ZnNO ZnNO ZnNO ZnNO ZnNO ZnNO ZnNO ZnNO ZnNO ZnNO ZnNO ZnNO ZnNO ZnNO ZnNO ZnNN ZnNN ZnNN ZnNN ZnNN ZnNN ZnNN ZnNN ZnNN ZnNN ZnNN ZnNN ZnNN ZnNN ZnNN ZnNN ZnNN ZnNN ZnNN ZnNN ZnNN ZnNN ZnNN ZnNN ZnN ZnNN ZnNN ZnNN ZnNN ZnNN ZnNN ZnNN ZnNN ZnNN ZnNN ZnNN ZnNN ZnNN ZnNN ZnNN ZnNN ZnNN ZnNN ZnNN ZnNN ZnNN ZnNN ZnNN ZnNN ZnIN ZnIN ZnIN ZnIN ZnIN ZnIN ZnIN ZnIN ZnIN ZnIN ZnIN ZnIN ZnIN ZnIN ZnIN ZnIN ZnIN ZnIN ZnIN ZnIN ZnIN ZnIN ZnIN ZnIN ZnIN Zn IN ZnIN ZnIN ZnIN ZnIN ZnIN ZnIN ZnIN ZnIN ZnIN ZnIN ZnIN ZnIN ZnIN ZnIN ZnIN ZnIN ZnIN ZnIN ZnIN ZnIN ZnIN ZnIN ZnIN ZnIN ZnN ZnIN ZnIN ZnIN ZnIN ZnIN ZnIN ZnIN ZnIN ZnIN ZnIN ZnIN ZnIN ZnIN ZnIN ZnIN ZnIN ZnIN ZnIN ZnIN ZnIN ZnIN ZnIN ZnIN ZnIN ZnIn ZnIN ZnIN ZnIN ZnIN ZnIN ZnIN ZnIN ZnIN ZnIN ZnIN ZnIN ZnIN ZnIN ZnIN ZnIN ZnIN ZnIN ZnIN ZnIN ZnIN ZnIN ZnIN ZnIN ZnIN ZnINI ZnIN ZnIN ZnIN ZnIN ZnIN ZnIN ZnIN ZnIN ZnIN ZnIN ZnIN ZnIN ZnIN ZnIN ZnIN ZnIN ZnIN ZnIN ZnIN ZnIN ZnIN ZnIN ZnIN ZnIN ZnIM ZnIN ZnIN ZnIN ZnIN ZnIN ZnIN ZnIN ZnIN ZnIN ZnIN ZnIN ZnIN ZnIN ZnIN ZnIN ZnIN ZnIN ZnIN ZnIN ZnIN ZnIN ZnIN ZnIN ZnIN ZnI ZnIN ZnIN ZnIN ZnIN ZnIN ZnIN ZnIN ZnIN ZnIN ZnIN ZnIN ZnIN ZnIN ZnIN ZnIN ZnIN ZnIN ZnIN ZnIN ZnIN ZnIN ZnIN ZnIN ZnIN Znin ZnIN ZnIN ZnIN ZnIN ZnIN ZnIN ZnIN ZnIN ZnIN ZnIN ZnIN ZnIN ZnIN ZnIN ZnIN ZnIN ZnIN ZnIN ZnIN ZnIN ZnIN ZnIN ZnIN ZnIN ZnS ZnS ZnS ZnS ZnS ZnS ZnS ZnS ZnS ZnS ZnS ZnS ZnS ZnS ZnS ZnS ZnS ZnS ZnS ZnS ZnS ZnS ZnS ZnS ZnS Zn S ZnS ZnS ZnS ZnS ZnS ZnS ZnS ZnS ZnS ZnS ZnS ZnS ZnS ZnS ZnS ZnS ZnS ZnS ZnS ZnS ZnS ZnS ZnS ZnS ZnSS ZnSS ZnSS ZnSS ZnSS ZnSS ZnSS ZnSS ZnSS ZnSS ZnSS ZnSS ZnSS ZnSS ZnSS ZnSS ZnSS ZnSS ZnSS ZnSS ZnSS ZnSS ZnSS ZnSS ZnSS ZnS ZnS ZnS ZnS ZnS ZnS ZnS ZnS ZnS ZnS ZnS ZnS ZnS ZnS ZnS ZnS ZnS ZnS ZnS ZnS ZnS ZnS ZnS ZnS ZnSD ZnSD ZnSD ZnSD ZnSD ZnSD ZnSD ZnSD ZnSD ZnSD ZnSD ZnSD ZnSD ZnSD ZnSD ZnSD ZnSD ZnSD ZnSD ZnSD ZnSD ZnSD ZnSD ZnSD ZnSD Zn SD ZnSD ZnSD ZnSD ZnSD ZnSD ZnSD ZnSD ZnSD ZnSD ZnSD ZnSD ZnSD ZnSD ZnSD ZnSD ZnSD ZnSD ZnSD ZnSD ZnSD ZnSD ZnSD ZnSD ZnSD ZnS ZnS ZnS ZnS ZnS ZnS ZnS ZnS ZnS ZnS ZnS ZnS ZnS ZnS ZnS ZnS ZnS ZnS ZnS ZnS ZnS ZnS ZnS ZnS ZnSN ZnSN ZnSN ZnSN ZnSN ZnSN ZnSN ZnSN ZnSN ZnSN ZnSN ZnSN ZnSN ZnSN ZnSN ZnSN ZnSN ZnSN ZnSN ZnSN ZnSN ZnSN ZnSN ZnSN ZnSN ZnS ZnS ZnS ZnS ZnS ZnS ZnS ZnS ZnS ZnS ZnS ZnS ZnS ZnS ZnS ZnS ZnS ZnS ZnS ZnS ZnS ZnS ZnS ZnS ZnSR ZnS ZnS ZnS ZnS ZnS ZnS ZnS ZnS ZnS ZnS ZnS ZnS ZnS ZnS ZnS ZnS ZnS ZnS ZnS ZnS ZnS ZnS ZnS ZnS ZnSE ZnS ZnS ZnS ZnS ZnS ZnS ZnS ZnS ZnS ZnS ZnS ZnS ZnS ZnS ZnS ZnS ZnS ZnS ZnS ZnS ZnS ZnS ZnS ZnS ZnSF 1000000000000000000000000000000000000000000000000000000000000000000000000000000000000000000000000000010000000000000000000000000000000000000000000000000000000000000000000000000000000000000000000000000015000000000000000000000000000000000000000000000000000000000000000000000000000000000000000000000000000250000000000000000000000000000000000000000000000000000000000000000000000000000000000000000000000000012500000000000000000000000000000000000000000000000000000000000000000000000000000000000000000000000001550000000000000000000000000000000000000000000000000000000000000000000000000000000000000000000000000085000000000000000000000000000000000000000000000000000000000000000000000000000000000000000000000000002450000000000000000000000000000000000000000000000000000000000000000000000000000000000000000000000000065555555555555555555555555555555555555555555555555555555555555555555555555555555555555555555555555555 555555555555555555555555555555555555555555555555555555555555555555555555555555555555555555555555555.555555555555555555555555555555555555555555555555555555555555555555555555555555555555555555555555555. 24555555555555555555555555555555555555555555555555555555555555555555555555555555555555555555555555555-3455555555555555555555555555555555555555555555555555555555555555555555555555555555555555555555555555 7455555555555555555555555555555555555555555555555555555555555555555555555555555555555555555555555555-4455555555555555555555555555555555555555555555555555555555555555555555555555555555555555555555555555. 4245555555555555555555555555555555555555555555555555555555555555555555555555555555555555555555555555 7245 724 724 724 724 724 724 724 724 724 724 724 724 724 724 724 724 724 724 724 724 724 724 724 724 724 722 724 724 724 724 724 724 724 724 724 724 724 724 724 724 724 724 724 724 724 724 724 724 724 724 723 724 724 724 724 724 724 724 724 724 724 724 724 724 724 724 724 724 724 724 724 724 724 724 724 721 724 724 724 724 724 724 724 724 724 724 724 724 724 724 724 724 724 724 724 724 724 724 724 724 729 724 724 724 724 724 724 724 724 724 724 724 724 724 724 724 724 724 724 724 724 724 724 724 724 726 724 724 724 724 724 724 724 724 724 724 724 724 724 724 724 724 724 724 724 724 724 724 724 724 728 724 724 724 724 724 724 724 724 724 724 724 724 724 724 724 724 724 724 724 724 724 724 724 724 72A 724 724 724 724 724 724 724 724 724 724 724 724 724 724 724 724 724 724 724 724 724 724 724 724 72B 724 724 724 724 724 724 724 724 724 724 724 724 724 724 724 724 724 724 724 724 724 724 724 724 72M 724 724 724 724 724 724 724 724 724 724 724 724 724 724 724 724 724 724 724 724 724 724 724 724 72N 724 724 724 724 724 724 724 724 724 724 724 724 724 724 724 724 724 724 724 724 724 724 724 724 72K 724 724 724 724 724 724 724 724 724 724 724 724 724 724 724 724 724 724 724 724 724 724 724 724 72R 724 724 724 724 724 724 724 724 724 724 724 724 724 724 724 724 724 724 724 724 724 724 724 724 72H 724 724 724 724 724 724 724 724 724 724 724 724 724 724 724 724 724 724 724 724 724 724 724 724 72V 724 724 724 724 724 724 724 724 724 724 724 724 724 724 724 724 724 724 724 724 724 724 724 724 72IV 724 724 724 724 724 724 724 724 724 724 724 724 724 724 724 724 724 724 724 724 724 724 724 724 72I 724 724 724 724 724 724 724 724 724 724 724 724 724 724 724 724 724 724 724 724 724 724 724 724 72II 724 724 724 724 724 724 724 724 724 724 724 724 724 724 724 724 724 724 724 724 724 724 724 724 72AI 724 724 724 724 724 724 724 724 724 724 724 724 724 724 724 724 724 724 724 724 724 724 724 724 72F 724 724 724 724 724 724 724 724 724 724 724 724 724 724 724 724 724 724 724 724 724 724 724 724 72#1 724 724 724 724 724 724 724 724 724 724 724 724 724 724 724 724 724 724 724 724 724 724 724 724 731 724 724 724 724 724 724 724 724 724 724 724 724 724 724 724 724 724 724 724 724 724 724 724 724 718 724 724 724 724 724 724 724 724 724 724 724 724 724 724 724 724 724 724 724 724 724 724 724 724 736 724 724 724 724 724 724 724 724 724 724 724 724 724 724 724 724 724 724 724 724 724 724 724 724 738 724 724 724 724 724 724 724 724 724 724 724 724 724 724 724 724 724 724 724 724 724 724 724 724 719 724 724 724 724 724 724 724 724 724 724 724 724 724 724 724 724 724 724 724 724 724 724 724 724 739 724 724 724 724 724 724 724 724 724 724 724 724 724 724 724 724 724 724 724 724 724 724 724 724 713 724 724 724 724 724 724 724 724 724 724 724 724 724 724 724 724 724 724 724 724 724 724 724 724 733 724 724 724 724 724 724 724 724 724 724 724 724 724 724 724 724 724 724 724 724 724 724 724 724 716 724 724 724 724 724 724 724 724 724 724 724 724 724 724 724 724 724 724 724 724 724 724 724 724 711 724 724 724 724 724 724 724 724 724 724 724 724 724 724 724 724 724 724 724 724 724 724 724 724 781 724 724 724 724 724 724 724 724 724 724 724 724 724 724 724 724 724 724 724 724 724 724 724 724 761 724 724 724 724 724 724 724 724 724 724 724 724 724 724 724 724 724 724 724 724 724 724 724 724 791 724 724 724 724 724 724 724 724 724 724 724 724 724 724 724 724 724 724 724 724 724 724 724 724 7/24 724 724 724 724 724 724 724 724 724 724 724 724 724 724 724 724 724 724 724 724 724 724 724 724 8/16 724 724 724 724 8/16 724 724 8/16 724 8/16 8/16 8/16 8/16 8/16 8/16 8/16 8/16 8/16 8/16 8/16 8/16 8/16 8/16 8/16 8/16 8/16 8/16 8/16 8/16 8/1G16161616161616161616161616161616161616161616161616161616161616161616161616161616161616161616161616161G1616161616161616161616161616161616161616161616161616161616161616161616161616161616161616161616161G1G1616161616161616161616161616161616161616161616161616161616161616161616161616161616161616161616161 G1G1G1G1G1G1G1G1G1G1G1G1G1G1G1G1G1G1G1G1G1G1G1G1G1G1G1G1G1G1G1G1G1G1G1G1G1G1G1G1G1G1G1G1G1G1G1G1G1G1G1 G1G1G1G1G1G1G1G1G1G1G1G1G1G1G1G1G1G1G1G1G1G1G1G1G1G1G1G1G1G1G1G1G1G1G1G1G1G1G1G1G1G1G1G1G1G1G1G1G1 G1 G1 G1 G1 G1 G1 G1 G1 G1 G1 G1 G1 G1 G1 G1 G1 G1 G1 G1 G1 G1 G1 G1 G1 G1 G1 G1 G1 G1 G1 G1 G1 G1 G1 G1 G1 G1 G1 G1 G1 G1 G1 G1 G1 G1 G1 G1 G1 G1 G1G1 G1 G1 G1 G1 G1 G1 G1 G1 G1 G1 G1 G1 G1 G1 G1 G1 G1 G1 G1 G1 G1 G1 G1 G1 G1 G1 G1 G1 G1 G1 G1 G1 G1 G1 G1 G1 G1 G1 G1 G1 G1 G1 G1 G1 G1 G1 G1 G1G1G1G1G1G1G1G1G1G1G1G1G1G1G1G1G1G1G1G1G1G1G1G1G1G1G1G1G1G1G1G1G1G1G1G1G1G1G1G1G1G1G1G1G1G1G1G1G1C3333333333333333333333333333333333333333333333333333333333333333333333333333333333333333333333333333.333333333333333333333333333333333333333333333333333333333333333333333333333333333333333333333333333 | |
TEXOBCJIYUKINBAHNE
Bo3mOxHoe TexnueeKoe 6cnykuaHne BaWei PInIbI DoJIXHO OcyuieCTBnTbcr KBaINΦNtropoBaHHbIMn CneuiaNtctAmn, NOnyUWBmm Ha 3TO pa3peSeHHe dJa DaHHoT ToproBOm MapKn. YTo6bI yckOpntb 6cnykuaHne BaWei PInIbI, BO Bpem3 3BOHka Coo6UnTe ee ndeHTnΦKaaIOHhIe daHHbIe (TexnueeNe n 3KcPnyaTaioHhIe daHHbIe, cepinHbI Homep). 3TN daHHbIe yka3aHbI Ha 3aBOdCKo Ta6nHKe.
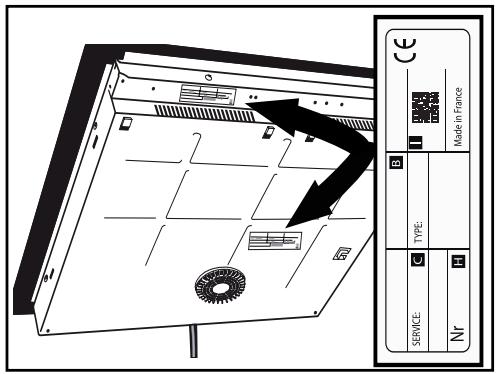
B: Kommerpecka cnpaBka
C: CcbIka Ha cepBnC
H: CepiHbI HOMep
I:QR-koA

VÁŽENÁ ZÁKAZNÍČKA,
4 ANVANDA APPARATEN 13
Ordlda for manoverpanelen

:Installingingar

:Bekräfta/OK

:Gà tillbaka


: Navigering (uppat/nerat i menyer)
On/Off
Lasa/Clean Lock


:Väljakokzon


C: Referens for tjansten
H: Serienummer
I: QR-kod

IIAHOBHNI KJIIEHTE!
Bn npi6bn Bnip6 kompaH De Dietrich. Taikn Bn6ip cbiuHb npo Bauy BmOrnBiCt b i cMaK do fpaHcy3bKOrO MInCTBa KHTT.
Bnpo6n KomnaH De Dietrich 3aBdAkn 6iIbH hIX 300-pHOMy DocBHy BTJIHOITb MaNCTepHo pO3pOBeHn Dn3aH, camObyTHicTb i TexHONorIHIO DocrHeHHa IcLyKHHa KylIHaPHomY MInCTeUcTBy. IJra npucTpoIB MN BnKOpNCTOByeMo MaTepiAni BIDMinHOI JAKoCTI rapaHTyeMO 6e3DoRaHHy JaICtB BnROTOBJeHHa.
Mn nepekoHaH, 10 taKa BncoKa kicTB Bnpo6HnTBA cnprae po3KpTTTO TaNaHTiB noziHOByBaiv KyniHapHoro MnCTeTBA.
Cnyk6a nItpmkn kIeHTB Komnaii De Dietrich 3aBXn roToBa BiNobicTu Ha Bci BaSi 3aNTaHn Ta BucLyxataT npOno3u, iKi DOnomaraTmMyt b Ham Ie Kpaue 3aIOBOJbHnTa BaSi notpe6n.
Дян Нас YeCb STaTN BaShIM HOBIM NapTpHepOM Ha KuxHi. ДяКуЕМо 3a DoBipy.

BVCert.601.1825
Ha 3aBoDax y ΦpaHci, B OpIeAni B aHdomi, kOMpania De Dietrich 6e3yUnHHo npaIoo He dOscrHeHNm DocKoHaIocTi, yBivHIOUHy BInHATKOBy MaICTepHicTB y dN3aHi 6e3DoarHOi KINcEBOI npOdykci. Hawi eNeKTponobyoBi npicTpoB iD3NaYeHO ceptnΦikatom Origine France Garantie, kYn 3acBidyeix φpaHcy3bke Bnpo6HnTBO.
Ley 3nak rapaHTye He TiIbKn Jkictb i DoBROiHicTb Haunx npncTroiv, aJe iix BiIcTeKyuBaHicTb, HadaIOUH uITke Ta o6'ekTINBHe cBiJeHHn Ipo ix NOXoJKeHHn.
www.de-dietrich.com
1.HABKOLIshC CEPEIOBNIe 7
·2.YCTAHOBJIENHJ 8
Po3nakyBaHHa 8
y6yIOvBaHH8
Пд'еданнда оелктрөрөхл. 10
- ONIC PUNCTPOIO 11
PozhaeHHa KaiaTypi 11
PozhaueHnHa nDinCpIe1 12
·4.EKCIJYATAUJII IPINCTPOIO 13
KepyBaHH npaMeTpamn 13
KepyBaHH noTyXHicTIO 14
Bn6ip emhocti 14
Bn6ip konΦopkn 13
YbIMKHeHHBIMKHeHH 15
HanauTyBaHHn noTuXHoCTi 15
3oHa Horizone (3aIeKntb BiD MoJeTI) 16
Hanautybanna TaMepa 16
Блokувнг Кнорок Керувнг 17
ФункцSwitch 17
Функця ICS 17
ФункцЯ RECALL 17
Функця ELAPSED TIME 18
Pomuchik i3 npiroToyBaHHa 19
Функця «Улоблени» 25
IpaBnJIaTexHikn6e3neKnipekomEndaui 25
·5.Доглд.. 26
·6. HecnPABHOCTI TA IX yCyHeHHra 27
7. KIAC EHEPFOEΦEKTUBHOCTI 28
·8.IICJIPIPOJAXHEOBCSUYROBYAHNHA 29
BAJKJIINBI IIPABUNIATEXHIKNBE3IIENKNI 3AIIOBJKH13AXOJN
BAXJIINBI INPABUNA TEXHIKN 6E3NEKN - YBAXHO INPOUHTAITE N 3BEPEXITb IJN PONAJlbWTO BUKOPUCTAHN.
LcienoicbHKKopncTyBaayMOxHa3aBaHTaxHITN3Be6caTyrKomnaHii.
LcE npncptiBviDIOBidae EBpOeNCbKIM DnpeKTHBaM i HopMaM, kHa HbOro NOnHrpOITbcra.
LIM npncToeM MOKyTb KOpncTyBaTnCra DiTu y BiCi BiD 8 pOKiB, OCO6n 3 ObmExKeHMM Φi3NCHMM, CeHCOPHMn a6o PO3yMOBMM MOKJINBOCTaMn, a TAKOx Oco6n, kKi He BOJODIOb DOCTaTHIM DOCBiDom i3HaHHaMn, kIso BOHn Nepe6yBaOTb PiD HaJIeXHM HArJaDOM, kIso BOHn Bynn HaleXHMM YInHom nPoIHΦopMOBaHi a6o nPoIHCTpyKTOBaHi 5oDo 6e3neuHOro BVKOpNCtAHHЯ nPrcTePO Ta JkIo BOHn PO3yMIOTb IOB'3aHI 3 LIM pN3NKn.
MeTaJIeBi IpeIMeTn, HApriKJaI HoXi, BInDeIKN, IOnKt Ta KpNShKn, He MoXHa KJNaCTn Ha NOBepxHIO, OCKIbKn BOH NMOxyTb HarpiBaTusc.

YBAGA!Пдчаспготуваньix Heo6xIDHO CTeKHTn 3a npOceCOM.
JaKIO npOceC npInroTyBaHnHa HeTpNbAInn, He BiXoDbTe BiD npNcTpoU. E p3nk BUnHKHeHn PoKexi: He 36epiraiTe JxOndi npedMeTu Ha 3ohax npInroTyBaHHa.
ПригOTуВаньixi 3 ВИКОпСТаннЯМ onii abo xиpy Ha Bapиьній NOBepxHi 6e3 haTЯДу може byTu He6e3neuHIM i Moже приЗБecтNi Do noJoxeKi. HIKOЛN He hamaraItecraCtNi BOroHb BOdoU, HATOMicTb BVMKHITb npinCTpii, a Notim NaKpniTe nOlym'я, NaPnKJaD, KprSiKOIO abo npOTInNoJoxeKHOU KOVBdpoU.

JaKuo Ha noBepxHi yTBOpuIncra TpiUHN, BmKhItb npncTpi, 0o6IKHytn pN3NKy ypaXeHHa
eNeKTpHnM Ctpymom.
He BmkaTe npicctpi, DOKn He 6yde 3aMIneHo cKJHy NOBepxHIO.
Bapnilbhi nobepxhi cnili ndHyBaTn do eNeKtpomepexi 3a donomoroo baratonoIIOCHoro BIMnKaaya BiIOBIDHO do YHHNX npabNl yCTaHOBenneHn. PpiCtpi BIDKnOChenn Tpe6a B6yBaTu y fIKcoBAnn Ka6eIepoBid. LIO BapnilbHu nobepxHIO npn3NaYeHO dJra po6OTn 3 qacToTO 50 Tc a6o 60 Tc (50 Tc/60 Tc) 6e3 b-ykoTcneiaJIb-Horo BTPuHaHN KOpNCTyBaUa.
(3AJIEXKHTB BID MODEJI)
KoHΦopka Horizone MoKe BnKOpNCToBvBaTncsЯk DiBi OkpeMi 3OHN a6o JaOna ciNicHa 3OHa. JIy Bn6opy
Lijinichoi30HnHaTNCiHb KHONky
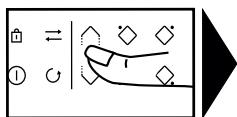

HanaTyBaHHnIOTyXHocTi N TaMepa Taki cami, kI dIra 3BnuaHHO KoHOpKn.
4.7. HAJALITYBAHHI TAIIMEPA
KoKHy 3OHy npiroTyBaHH OChaUeHo CneuIaIbHnM TaIMePOM. Ioro MoXHa BBIMKHyTN OJpa3y NiCJy BBIMKHeHH BIDNOBIdHOi 3OHi npiroTyBaHH. Uo6 yBIMKHyTN NOrO a60 3MiHHTN 3HaueHH, HATNCHIb KHONKy TaIMePa
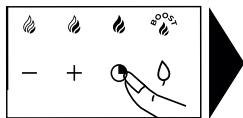

Iotpim HaTnCiHtB KHOnKy «+» a60 «-».


A60 ckopncTaItecraIΦpOBOIO KnaBiaTpyoU. UcbOMy pa3i MoXHa 6e3nocepEnbO BBOAnITu IcPn, 10 BiINOBiJaIOb 6aKaHOMy Yacy, OHa 3a OndHO. HatNCHTb KhoNkY «0», 10b BmKHyT TaMep.
Lio6 cnpoctntn HaIaIHTyBaHnT TpINBaIIOrO
acy npriroTyBaHH, MoKHa 6e3nocepEnHbO
peeytn Do 3NaueHn8 8 roDInH),
HaTNCHyBUn OJpa3y «-> .HaTNCiTB KONkY
<-> Ie pa3, Lio6 3MeHUnTn Yac NOroDInHNo
do 2 roDInH, a NotIM do 99 XBnInH.
Picna 3aBepueHH npiroToyBaHnHa
HdnCnpei BiO6pa3ntbcs 3NaueHH «0» i
Inpolyhae 3BykOBn CnHan. Uo6 BmKHyTn,
HaTnCHiTb 6yd-b-ky KHOKNy KepyBaHH
Ha BiNobiDHi 3Oni npiroToyBaHH. JaKuo
ZbOrHe 3pO6nTn, 3BykOBn CnHAn
BmKHeTbcra Ycepe3 KJIbKa XBnIH.
Lio6 BnMKHyTN NOTOCh TaNMeP npriTOyBaHHa, HATNCiTb ODHouacHO KHONKI + i - a6o BiHOBiTb 3HaueHHA 0 , HATNCHbUHN KHONKy - , a6o HATNCiTb 0 Ha cnpobii KnaBiaAtyi.
He3aJIeKHiN TaIMepe
LIO yHkciIO npn3NayeHO InnaBn3HaueHHaCy nOdi 6e3 BnacHe npnroTsyBaHHI iXi.
- Bn6epiTb 30Hy, 50 He BnKOpNCTOByeTbcra.

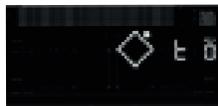
HaTnCiTiB KbONkOy O.
Haatayteac3a donomoroKHO nKn + a6o - .Ha dincnnei MurotiTUME CnMBOJ t.


- Picn 3aBepWeHH HaNaWtYBaHHcNMBoI t nepeTaHe 6JImaTn TaNoHETbcra 3BOpOTn BiDnIK.
Uo6 3ynHHTn 3BOpOTn BidNik, HATNCHiTb i yTpmyTe KHOKNy BnOpy KOHΦopKn.
4.8. БLOKYBAHHKHOPOK KEpyBAHH
Бл_OKувань Вд дiteи
BapinbHy NOBepxHIO OchauSeHo fynkciio 6bOKyBaHH BID iTei, jka 6bOKye KhoNk KepyBaHH, KOJI npictpiBumKHeHOa6oPiuAcnpoecy npiroTyBaHH (ДЯ 36epeXeHHa HaJauStYBaHb). 3 MIPkyBaHb 6e3neKn akTINBHMn 3aIINsAHTbcr TlNbKN KHONka BUMKHeHH N KhoNk Bn6Opy 3OHN, 3a DoIonomoTO JKnx MOxHa BIMKHyTN NOBepxHIO a6o BUMKHyTN 3OHy HarpiBaHH.
Бл_OKуВання
HaTnCKaIte KHONKy (CnMBOJ 3amka),doKN Ha DNcPiJe I He 3'ABNTbcj CnMBoN 6lokyBaHH JHe npolyhae 3ByKOBni CNrHaJ,IO NiITBepdJxye DiIO.
BapnIbHy noBepxHIO 3a6JNOKOBaHO nID Yac ekcnnyatauii
IicJHaTnCKaHHKHOHOK NOTyXHocTi a6o TaMepa NiJ Yac pO6OTn 3OH NOuHaE MInOTITN CmB0N
Po36JokyBaHHa
HaTnCKaIte KHOJKy 1, DOKN CnMBOJI 6bNoKyBaHHHe 3HnKHe 3 DnCnJIeR i He npOlyHae 3ByKObN CnHaN, LIO nIiTBePdKxye DiIO.
Функця CLEAN LOCK
LIO yHkuio npn3NaeHo dIa TmUacOBOrO 6lOkyBaHHn NOBepxHi NiJ Yac YnueHHN.
Uo6 yBIMKHyTN cyHKciIO Clean lock, BnKOHaIte HabeHeni HxKye iI.
KopoTkoUacHo HaTnCHiB KHONky I. PponyHae 3ByKOBn CnHaJ, i Ha DnCnIeI NOHe MInOTiTn CmBOJ I.
IicjraToro JK MInHe 3aJaHn Yac, 6bOkyBaHHa 6yde aBTOMaTHUHO cKacOBaHO. PpOlyHaE NOdBiHn 3BykOBn CnHaJ. FyHKciIO Clean (OuHSeHHa) MoXHa BUMKHutyN B 6yDb-8Kn MOMeHT, HATNCYBUn
yTpmyuOu KhoNky
4.9. ΦYHKLIJA SWITCH
3HaueHHa cacy, 0 MuHyB, 6Mae Ha dncnle TaMepa BbpaHO KoHΦopKn.
JaKuo Heo6xioHn, 06 npiroToyBaHHa3AbePunIOB B 3a3HaueHn Yac, HATNCiTB KhoNky O a Notim, 3a 5 cekyH, HATNCiTB KhoNky «+» Ha TaImePi 06 36JbUHTN 6axaHe 3HaueHHaCy npiroToyBaHH. 3HaueHHaCy, 0o MNHyB, 6lImatime npotraom 3 cekyHd, a Notim BiO6pa3ntbc4 Yac, 0o 3aIIuINBCB. Bn6pahe 3HaueHHaNDtBePNTbc3ByKOBIM CnIHaONM
Lya yHKiia DocTyHa RaK 3 cyHKciio TaMepa, taKi6e3 Hei.
Примітka.Якwo Ha TaMepi BiOobpaKaæTbcyaac, 3aueKaITe 5 cekyHd, nepu Hixk 3MiHOBaTu qac npuroToBaHHra.
4.13. リOMIчнК I3 ПИГOTУBAHHЯ
Lc yHKzma taki pexnmi: Recettes (Peentn), Sous-vide (PpiroToyBaHHy y Bakyymi), Boil (BapHH) Gril (rnilb), Blanchir (BnaHsyBaHH). Y cbomy pexnmi npiroToyBaHH moKha B6paTn Heo6xidi npametpr npiroToyBaHH 3aJIeXHO BiCTpaBN.
BapnIbHa NOBepxH MaE 6yTN BmKHeHa. HaTnCHiTb I, uo6 nepeuTn do pi3HomaHiTHnx fynkui.
Плд уас ВИКОпСТаHHЯ ВариьноюВоверхиВ ржIMi Recette (Peцent) peKOMeHДуETся ВИКОрСТоВaВТи NOcUД,peKOMeHДоВaHи ДЯЦboro peцentTa.
Bn6ip peceentiB
IooB DoocrTn ONTImaIbHnx pe3yIbTaTIB npriroTyBaHH, Heo6xIDHO BVKOpncTOByBatN EMHOCTi 3 HeipXaBHOI CTaJI dNRA BCIX peCenTIB, OKPIM MInHcIB i ONaKIB, kI bYIIN ONTUMi3OBaHI dNRA BVKOpncTAHH NOCyDOM i3 NOTOBueHIM DHom.
IponohyEmo Bam Do6ipKy npOdykTIB, IJIa KINX BapNJbHa NOBepxHra ABTomaTHHO peKomeHdye Ta nporpaMye NotyKHiCTb, a TAKOX Yac PnroTyBaHHra BiIOBIDHO do TUny abo KiJbKocTi Heo6XiDHNx npOdykTIB.
Bn6epiTb 6aKaHn CTyniHb roTOBHOCTi 3a DOnOMOrOHO KHOIOK / A.

》ПдтевпьтЕ Вибip CTупеню roTOBHOCTI 3aДОПOMORЮ KHONКИ OK.
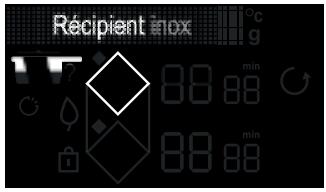
»HaДиспл eiВарьнoi nobepxHi BiIOбpa3ntbcsiHΦopMaця npo peKOMeHIOBaHy EmHicTb ДЯdoСгIHHeHHrОТIMaJIbHOrOpe3yIbTaTynpriROTuBaHHa, a TAKOK peKOMeHIOBaHa 30Ha npriROTuBaHHa.
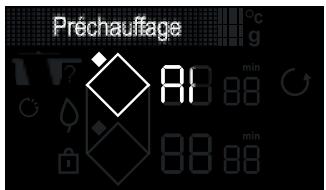
He TopkaItecBIDIOBIDHINX 3OH.
06mexkyBaT TempepaTyprn
KoxHy 30Hy npriroTyBaHHo OchaueHo DaTtHKOM 6e3neKN, knn NoCTiHo
KoHTpOJIHoe TeMnepaTpy DHa
EMHOCTI. JaKIo Ha yBIMKHeHi 30Hi
PnIroTyBaHHra 3aIIuHaeTbcra NopoXHHa
EMHicTB, cEi DaTcHK aBTOMaTHUHO
peRyJIHoe nOTyXHlCtB BapNbHOi
NoBepxHi, o6MeJxUOHT TaKIM YHOM
pN3NK POnIKoJxHnRA NOcyDu a6o
NoBepxHi.
3axnct BiD nepenBaHHa
BapnIbHy IOBepXHIO MOxHa BmKHyTn B TaKnx 3 BnnaKaX:
-y paizi nepeINBaHHa KaHOpKn KepyBaHHa;
- Ha KhoIpaX JIeKNTb BOJOra RaHUpka;
- Na KhoNkax KepyBaHHa 3HaXoDHTbcr MeTaJIeBn IpeDMeT.
PnpiBpIb ppeMTe a6o ouHCTbTe Ta BncyuiTb
KHOPIKKepyBaHHa,NotIM 3anyctiTb npoec npriroTyBaHHa.
Y zbomy pa3i BiDIO6pa3ntbcra CmB0n
- i npOnyHae 3ByKOBn CnHaNJ.
CnCTema «ABTOCTON»
BapnIbHy NOBepxHIO OChaUeHO 3axnchoO cyHKciEIO «ABTOcTOn》, 霍Ka,JaKzO BV 3a6yJN II BmKHyTu, ABToMaTnUHO BmUKaC KOHΦOpKy uee3 3aDaHn Yac (BiD 1do 10 roDInH, 3aJeXHO BiD BnKOpNCtOBvBaHOI NOTjXHoCTi).Y pa3i cnpaCbOBoVBaHnA ZeiΦyHKciB 6e3neKn KOHΦOpKa BmUKaETbcra, PPO 50 CBIDuHTb CmBOJ AS y 3oHi BiDo6paKeHHa TEKCTy, a TAKOX 3ByKOBn CnHaJ, 50 JyHaE IpOTaROM pnp6Jn3HO 2 XBVInH. Lio6 BmKHyTu, HATncITb 6yd-b-ky KhONkY Ha naHeJI KepyBaHHa.

MoxyTb BnHnKaTn 3ByKn, CXOxK 3ByK CTpiNk RoDnHHnKa.
Li 3ByKn BHNKAOTb Jnwe nic yapc po6Ot NOBepxHi Ta 3HnKaOTb a6o CTnSyOTbc 3aJexKHO BiD KOHphiRypauii HarpiBy. 3aJexKHO BiD MoDeni Ta JKOCTI cMHOCTi MOxyTb BHNKA- TN CBNCTaYi. Li 3ByKn c HopMaJIbHMn; BOH c qACTnHOIO IHdYkciHoi TEXHOJorii i He c O3HaKOIO HecnpabHocTi.

He pekomehnyctbcs Bnko-OByBaTN 3axncn npnstpiBapnilhoIO nobepxhi.
5. IOIJIaI
OБСЛУГОВУBAHHA ВAPИльноюВЕРХHI
Дя усуненя Лergкх 3абрдньВИКОПСТОВУЛTe ririHicHy ry6ky. PeTeNBHO 3MочiTb 3OHy,ЯкnotpiбHo OунCTHTI, rapaYIO BODIO, a NOTIM BuTpITb Hacyxo.
Y pa3i HAKONUeHn 3aneueHoro 6pydy, po3cunHoro cykpy a6o po3nlaBneHoro pIaCTNky BnKOpNCbOByTe ririeHnHy r6ky i (a6o) cneiaJIbHn CKpe6ok dJa cKnJa. PeTJIbHO 3MoOitb DiJInHKy, kNy nOtpi6Ho OChNTn, rapraHO BOIO, 3a DonomOrHO cneiaJIbHO CKe6ka dJa cKnJa o6pOItb NOBepXHIO, npOTpiTB ririEHHO r6KOHO, a NOTIM BVtPbH Hacyxo.
Дя ВидаLEHнЯ ПЯМ i CЛДIBaINHЯнО HaJIbOTy HaHEciTb Ha ПЯMy rapaун 6iIn OcET, 3aueKaIte Ta npOTpiTb M'ЯKOIO rAHyipKoI.O.
Длг Досгннгь 6иckучогo MeTaIeBOrO KOIbOpy IOTnKHeBOrO DOrJMy 3a CkIOkepaMikoB BnKOpNCToByTe CneiaJIbHn 3ac6 dIg cKIOkepaMikn. HaNeci b CpeiaJIbHn 3ac6 (Akn MICTHTb cnIkoH i 6axaHO MaE 3axncHy epeKT) Na cKIOkepaMiy NOBepxHIO.
BaxnBa npimItka. He BnKOpNCToBvIe a6pa3uBHi nopoUkN a6o ry6Kn. BnKOpNCToBvIe cneiaJbHi Kpemn Ta ry6Kn dJa KpnXkoT Oocydu.
Nicra BBeDeHHB Eeknnyatauio
Ha DnCnIe 3'ABNTbcB CBITIOBm iHdkaTOp. Lc HOpMaJIbHO. BiH BIMKHeTbcr chep3 30 cekyHd.
YctaHOky BiD'cHaHo, a6o npaHoc TilbKn Odn H 6ik. Pid'edHaHHn NOBepxHi
HecnpaBHe. IpebipTe npabnIbHiCtB nID'eHaHHa
IN INN NININN 19N 00,NNN
.
Tn nn nnnnnnnnnnnnnnnnnnnnnnnnnnnnnnnnnnnnnnnnnnnnnnnnnnnnnnnnnnnnnnnnnnnnnnnnnnnnnnnnnnnnnnnnnnnnnnnnnnnnn
TIN TIN
n nn nnnnnnnnnnnnnnnnnnnnnnnnnnnnnnnnnnnnnnnnnnnnnnnnnnnnnnnnnnnnnnnnnnnnnnnnnnnnnnnnnnnnnnnnnnnnnnn
n nn nnnnnnnnnnnnnnnnnnnnnnn
ynnn nn nnnnnnnnnnnnnnnnnnnnnnnnnnnnnnnnnnnnnnnnnnnnnnnnnnnnnnnnnnnnnnnnnnnnnnnnnnnnnnnnnnnnnnnnnnnnn
n nn nnnn nn nnnnnnnnnnnnnnnnnnnnnnnnnnnnnnnnnnnnnnnnnnnnnnnnnnnnnnnnnnnnnnnnnnnnnnnnnnnnnnnnnnnnnnnnnnnnnnnnnnnnnnnnn
.
. 777777777777777777777777777
.0"onnnn7 1n nnun
n nn n nn nn nn nn nn nn nn nn nn nn nn nn nn nn nn nn nn nn nn nn nn nn nn nn nn nn nn nn nn nn nn nn nn nn nn nn nn nn nn nn nn nn nn nn nn nn nn nn nn nn nn nn nn nn nn nn nn nn nn nn nn nn nn nn nn nn nn nn nn nn nn nn nn nn nn nn nn nn nn nn nn nn nn nn nn nn nn nn nn nn nn nn nn nn nn nn nn nn nn nn
.0111n D'On In
n nn n nn
n nn nnnn
Jn n nn noon noon nn nn nn nn nn nn nn nn nn nn nn nn nn nn nn nn nn nn nn nn nn nn nn nn nn nn nn nn nn nn nn nn nn nn nn nn nn nn nn nn nn nn nn nn nn nn nn nn nn nn nn nn nn nn nn nn nn nn nn nn nn nn nn nn nn nn nn nn nn nn nn nn nn nn nn nn nn nn nn nn nn nn nn nn nn nn nn nn nn nn nn nn nn nn nn nn nn nn nn nn noon noon noon noon noon noon noon noon noon noon noon noon noon noon noon noon noon noon noon noon noon noon noon noon noon noon noon noon noon noon noon noon noon noon noon noon noon noon noon noon noon noon noon noon noon noon noon noon noon noon noom noom noom noom noom noom noom noom noom noom noom noom noom noom noom noom noom noom noom noom noom noom noom noom noom noom noom noom noom noom noom noom noom noom noom noom noom noom noom noom noom noom noom noom noom noom noom noom noom noom noemnoe
n nn nn nn nn nn nn nn nn nn nn nn nn nn nn nn nn nn nn nn nn nn nn nn nn nn nn nn nn nn nn nn nn nn nn nn nn nn nn nn nn nn nn nn nn nn nn nn nn nn nn nn nn nn nn nn nn nn nn nn nn nn nn nn nn nn nn nn nn nn nn nn nn nn nn nn nn nn nn nn nn nn nn nn nn nn nn nn nn nn nn nn nn nn nn nn nn nn nn nn nn
ywnn nn nnnn nn nnnnnnnnnnnnnnnnnnnnnnnnnnnnnnnnnnnnnnnnnnnnnnnnnnnnnnnnnnnnnnnnnnnnnnnnnnnnnnnnnnnnnnnnnnnnnnnnnnnnnnnnnnnnnnnnnnnnnnnnnnnnnnnnnnnnnnnnnnnnnnnnnnnnnnnnn
1
JINION JN NNNN NNNN NNNN NNNN NNNN NNNN NNNN NNNN NNNN NNNN NNNN NNNN NNNN NNNN NNNN NNNN NNNN NNNN NNNN NNNN NNNN NNNN NNNN NNNN NNNN NNNN NNNN NNNN NNNN NNNN NNNN NNNN NNNN NNN
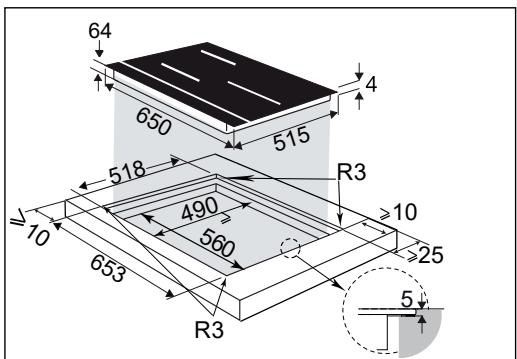
nnn nn
wn nn

nynnnnnnn
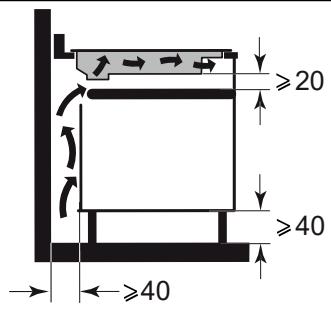
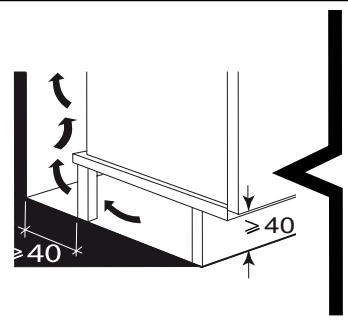
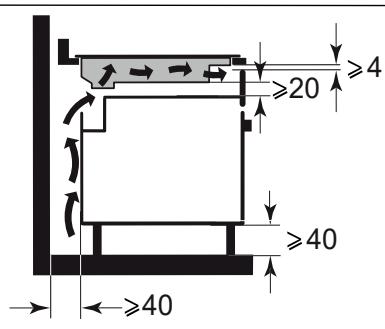
nTOn"nn7 1, nTn nn nn IN
TnNn7 Tn nn nn nn nn nn.
n7 700000000000000000000000000000
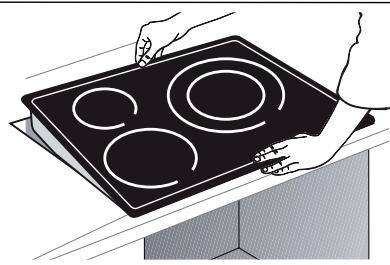

LUN

n"o X 5 n"o 8)
nunn
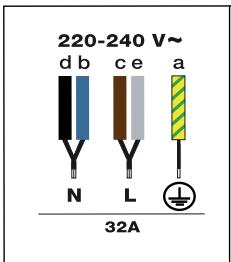
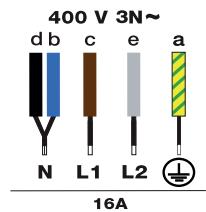
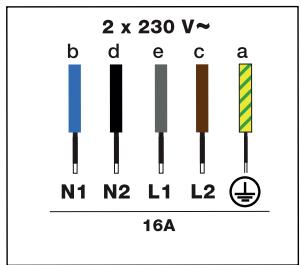
wnnn nn n nn nn nn nn nn nn nn nn nn nn nn nn nn nn nn nn nn nn nn nn nn nn nn nn nn nn nn nn nn nn nn nn nn nn nn nn nn nn nn nn nn nn nn nn nn nn nn nn nn nn nn nn nn nn nn nn nn nn nn nn nn nn nn nn nn nn nn nn nn nn nn nn nn nn nn nn nn nn nn nn nn nn nn nn nn nn nn nn nn nn nn nn nn nn nn nn nn nn nn nn
yin n nn nnnn nn nn nn nn nn nn nn nn nn nn nn nn nn nn nn nn nn nn nn nn nn nn nn nn nn nn nn nn nn nn nn nn nn nn nn nn nn nn nn nn nn nn nn nn nn nn nn nn nn nn nn nn nn nn nn nn nn nn nn nn nn nn nn nn nn nn nn nn nn nn nn nn nn nn nn nn nn nn nn nn nn nn nn nn nn nn nn nn nn nn nn nn nn nn nn nn nn nn nn nn
n (1
DIN (a
T
nX (n
wn nn n 1x nn n .n nn nn nn nn nn nn nn nn nn nn nn nn nn nn nn nn nn nn nn nn nn nn nn nn nn nn nn nn nn nn nn nn nn nn nn nn nn nn nn nn nn nn nn nn nn nn nn nn nn nn nn nn nn nn nn nn nn nn nn nn nn nn nn nn nn nn nn nn nn nn nn nn nn nn nn nn nn nn nn nn nn nn nn nn nn nn nn nn nn nn nn nn nn nn nn nn nn nn nn nn.


npan n7n nn
ok/1i:
n:


(n/ny)
On / Off

Clean Lock /nju:
ynnn

():

n/nnny


n / nniy nn nn nn nn nn :
0 9 8 7 6
n:

in yin:

nuny

:

Boost :

1119
Switch n:

ICS n:

Recall:

Elapsed time:

YX

D9Tyrin:

x7n
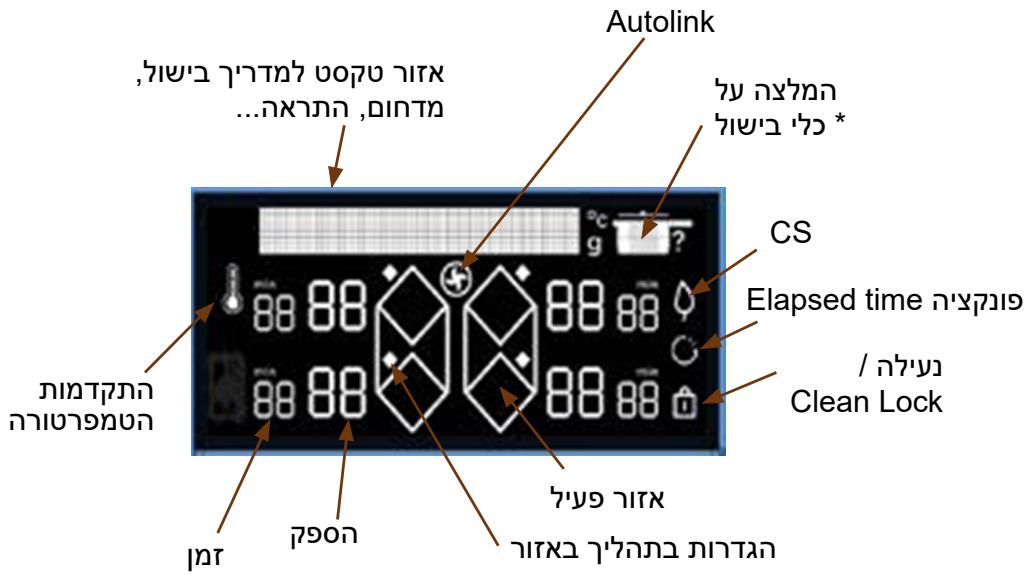
:y
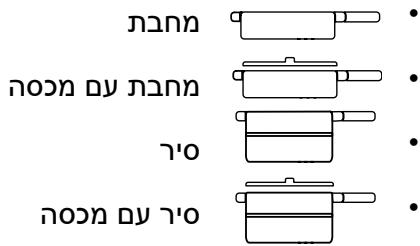
nion n 7 nnnnnnnnnnnnnnnnnnnnnn
y
(nnnn) now
(πιατ 5) πηκη
Autolink
077 nn 117 7 nX .nN nn nn nn nn nn nn nn nn nn nn nn nn nn nn nn nn nn nn nn nn nn nn nn nn nn nn nn nn nn nn nn nn nn nn nn nn nn nn nn nn nn nn nn nn nn nn nn nn nn nn nn nn nn nn nn nn nn nn nn nn nn nn nn nn nn nn nn nn nn nn nn nn nn nn nn nn nn nn nn nn nn nn nn nn nn nn nn nn nn nn nn nn nn nn nn nn nn nn nn nn
.
ON nnnn nn nnnn nn nnnnnnnnnnnnnnnnnnnnnnnnnnnnnnnnnnnnnnnnnnnnnnnnnnnnnnnnnnnnnnnnnnnnnnnnnnn
(nonnO")"unniyn"o
.(nniynnnn nn nnnn 4)nnnnn
n nn nnnnnnnnnnnnnnnnnnnnnnnnnnnnnnnnnnnnnnn
wn nn nnnn 7 nnnnnnnnnnnnnnn (ON) ysin
JNTAN
nni nnn nn nnn nnn nnn nnn nnn nnn nnn nnn
n nn "inn" nnn .nyn JINN 70 TIN NIONI IINNI IN
ywnnnnynnnn
.079n111DyNnA-1V D'y
1
4.3
Oo nnnn nn nn nn nn nn nn nn nn nn nn nn nn nn nn nn nn nn nn nn nn nn nn nn nn nn nn nn nn nn nn nn nn nn nn nn nn nn nn nn nn nn nn nn nn nn nn nn nn nn nn nn nn nn nn nn nn nn nn nn nn nn nn nn nn nn nn nn nn nn nn nn nn nn nn nn nn nn nn nn nn nn nn nn nn nn nn nn nn nn nn nn nn nn nn nn nn nn nn nn nn aan aan aan aan aan aan aan aan aan aan aan aan aan aan aan aan aan aan aan aan aan aan aan aan aan aan aan aan aan aan aan aan aan aan aan aan aan aan aan aan aan aan aan aan aan aan aan aan aan aan aan aan aan aan aan aan aan aan aan aan aan aan aan aan aan anan anan anan anan anan anan anan anan anan anan anan anan anan anan anan anan anan anan anan anan anan anan anan anan anan anan anan anan anan anan anan anan anan anan anan anan anan anan anan anan anan anan anan anan anan anan anan anan anan anan anann ann ann ann ann ann ann ann ann ann ann ann ann ann ann ann ann ann ann ann ann ann ann ann ann ann ann ann ann ann ann ann ann ann ann ann ann ann ann ann ann ann ann ann ann ann ann ann ann ann ann ann ann ann ann ann ann ann ann ann ann ann ann ann ann ann ann ann ann ann ann ann ann ann ann ann ann ann ann ann ann ann ann ann ann ann ann ann ann ann ann ann ann ann annannannannannannannannannannannannannannannannannannannannannannannannannannannannannannannannannannannannannannannannannannannannannannannannannannannannannannannannannannannannannannannannannannannannannannannannannannannannannannannannannannannannannannannannannannannannannannannannannannannannannennannannannannannannannannannannannannannannannannnnnnnnnnnnnnnnnnnnnnnnnnnnnnnnnnnnnnnnnnnnnnnnnnnnnnnnnnnnnnnnnnnnnnnnnnnnnnnnnnnnnnnnnnnnnnnnnnnnnnnnnnnnnnnnnnnnnnnnnnnnnnnnnnnn
.07y 1xN xN,79xN NxN
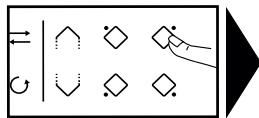

/
n nn nn nn nn nnn nnn nnn nnn nnn nnn nnn nnn nnn nnn nnn nnn nnn nnn nnn nnn nnn nnn nnn nnn nnn nnn nnn nnn nnn nnn nnn nnn nnn nnn nnn nnn nnn nnn nnn nnn nnn nnn nnn nnn nnn nnn nnn
.1n (n)
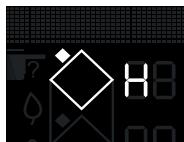
On / Off
.
-IX+ynn npnn
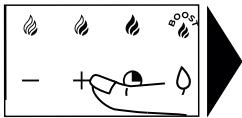

n nn nn nn nn nn nn nn nn nn nn nn nn nn nn nn nn nn nn nn nn nn nn nn nn nn nn nn nn nn nn nn nn nn nn nn nn nn nn nn nn nn nn nn nn nn nn nn nn nn nn nn nn nn nn nn nn nn nn nn nn nn nn nn nn nn nn nn nn nn nn nn nn nn nn nn nn nn nn nn nn nn nn nn nn nn nn nn nn nn nn nn nn nn nn nn nn nn nn nn nn
TINN 1n nnn nn nnnn nn nnnn nn nnnn nn nnnnn nn nnnnn nn nnnnn nn nnnnn nn nnnnn nn nnnnn nn nnnnn nn nnnnn nn nnnnn nn nnnnn nn nnnnn nn nnnnn nn nnnnn nn nnnnn nn nnnnn nn nnnnn nn nnnnn nn nnnnn nn nnnnn nn nnnnn nn nnnnn nn nnnnn nn nnnnn nn nnnnn nn nnnn nn nnnn nn nnnn nn nnnn nn nnnn nn nannn nn nannn nn nannn nn nannn nn nannn nn nannn nn nannn nn nannn nn nannn nn nannn nn nannn nn nannn nn nannn nn
99 ty np nn
yynnnn y0ynnnn nn nnnn nn nnnn nn nnnnnnnnn
.190n
177,777n77n77n77y 177nX-77n+77n
0
X7 7nO dnt TITN7 NwON n719 .7wn
.
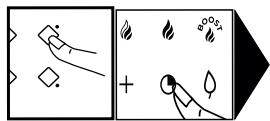

Uwnyixn
"t" nXn - IX + D'psiDy IIN Nk DII - ay ny nn

n nn nnnn nn nn nn nn nn nn nn nn nn nn nn nn nn nn nn nn nn nn nn nn nn nn nn nn nn nn nn nn nn nn nn nn nn nn nn nn nn nn nn nn nn nn nn nn nn nn nn nn nn nn nn nn nn nn nn nn nn nn nn nn nn nn nn nn nn nn nn nn nn nn nn nn nn nn nn nn nn nn nn nn nn nn nn nn nn nn nn nn nn nn nn nn nn nn nn nn nn nn
y n n 1-ynnnn nn n 110 -n +7n
Dy nynn nnynnn nnny
n nn nnnn nn
3-1 1 11-4 19-1 12
(4.6
111 111 111 111 111 111 111 111 1
VnT-nynnn nn
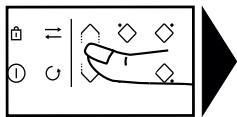

y
7
4.7
yynn nn nnn nn nn nn nn nn nn nn nn nn nn nn nn nn nn nn nn nn nn nn nn nn nn nn nn nn nn nn nn nn nn nn nn nn nn nn nn nn nn nn nn nn nn nn nn nn nn nn nn nn nn nn nn nn nn nn nn nn nn nn nn nn nn nn nn nn nn nn nn nn nn nn nn nn nn nn nn nn nn nn nn nn nn nn nn nn nn nn nn nn nn nn nn nn nn nn nn nn nn nn nn


CLEAN LOCK
7nnn nn nn n nn nn nn nn nn
1
:Clean lock nyn
yynn yynnnn
19 19 19 19 19 19 19 19 19 19 19 19 19 19 19 19 19 19 19 19 19 19 19 19 19 19 19 19 19 19 19 19 19 19
wn nn nnnn
SWITCH nyn4.9
TNTNNTNTOYNNNNTNNTNNTN
n nn nnn nn nn
.(nnnny)
→wnnynnnn
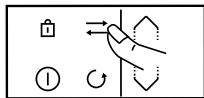
17 yDyDyNo = = = =
JINN JIN.0070
y7 nynnn nn nn
nnnnn nn nnnn nn
y
ICS 4.10
Intelligent Cooking System
Dn
n7 n9in "t" n, nnn oO DY -
nnnnnn n90nl
y nn nn nnnn nn nn nn nn nn
n nn n nn nn nn nn nn nn nn nn nn nn nn nn nn nn nn nn nn nn nn nn nn nn nn nn nn nn nn nn nn nn nn nn nn nn nn nn nn nn nn nn nn nn nn nn nn nn nn nn nn nn nn nn nn nn nn nn nn nn nn nn nn nn nn nn nn nn nn nn nn nn nn nn nn nn nn nn nn nn nn nn nn nn nn nn nn nn nn nn nn nn nn nn nn nn nn nn nn nn nn nn
4.8
D
N NNNN NNNN NNNN NNNN
.
ELAPSED TIME 04.12
ywn yynnnn nn nynn 19
nyyn7 .nnyn nnynnnnnn
Cynnnn nn nnnn
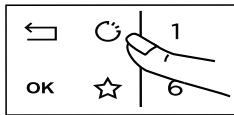
n nn nnnnnnnnnnnnnnnnnnnnnnnnnnnnnnnnnnnnnnnnnnnnnnnnnnnnnnnnnnnnnnnnnnnnnnnnnnnnnnnnnnnnnnnnnnnnnnnnnnnnnnnnnnnnnnn
5 1n nnnn nn nnnn nn nnnn nn nnnn nn nnnn nn nnnn nn nnnn nn nnnn nn nnnn nn nnnn nn nnnn nn nnnn nn nnnn nn nnnn nn nnnn nn nnnn nn nnnn nn nnnn nn nnnn nn nnnn nn nnnn nn nnnn nn nnnn nn nnnn nn nnnn nn nnnn
y nnnn nn nnnnnnnnnnnnnnnnnnnnnnnnnnnnnnnnnnnnnnnnnnnnnnnnnnnnnnnnnnnnnnnnnnnnnnnnnnnnnnnnnnnnnnnnnnnnnnnnnnnnnnnnnnnnnnnnn
Jn nn nnnn
n nn nnn
(028)
Jn79 n7 7,Boost nn7nn 7 no 7
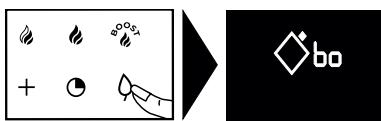
-
nnnnnnnnn
y
.17
RECALL 4.11
nynnnn nnnnnnnnnnnnnnnnnnnnnnnnnnnnnnnnnnnnnnnnnnnnnnnnnnnnnnnnnnnnnnnnnnnnnnnnnnnnnnnnnnn
3-n nin 97
yNnN7yIITnNnNnNnNnNnNnNnNnNnNnNnNnNnNnNnNnNnNnNnNnNnNnNnNnNnNnNnNnNnNnNnNnNnNnNnNnNnNnNnNnNnNnNnNnNnNnNnNnNnNn
Gwn ny nni nnn
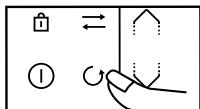
n nn nnnn nnnn nn nnnn
30-n nnnn 1/

4.13
y 10 / y
y
- nuiun yin7n7 7y 7y yin7,0"yn nn 7n7
100000000000000000000000000000000000000000
.
D
n nnnnnnnnnnnnnnnnnnnnnnnnnnnnnnnnnnnnnnnnnnnnnnnnnnnnnnnnnnnnnnnnnnnnnnnnnnnnnnnnnnnnnnnnnnnnnnnnnnnnnnn
yio 00000000000000000000
nniin nnnnnn nn nnnnnnnnnnnnnnnnnnnnnnnnnnnnnnnnnnnnnnnnnnnnnnnnnnnnnnn
n nn nnnnnnnnnnnnnnnnnnnnnnnnnnnnnnnnnnnnnnnnnnnnnnnnnnnnnnnnnnnnnnnnnnnnnnnnnnnnnnnnnnnnnnnnnnnnn
OK yin7, nn nnnn nn nn
7y .DIOIN DIOIN 100000000000000000000000000000000000000000
.
n nn nnnnnnnnnnnnnnnnnnnnnnnnnnnnnnnnnnnnnnnnnnnnnnnnnnnnnnnnnnnnnnnnnnnnnnnnnnnnnnnnnnnnnnnnn
JINION
IITnNnnn nnnn nn nnnn nn nnnn nnnn nnnn nn nnnn nn nnnn
nnon nnnnnnnnnnnnnnnnnnnnnnnnnnnnnnnnnnnnnnnnnnnnnnnnnnnnnnnnnnnnnnnnnnnnnnnnnnnnnnnnnnnnnnnnnnnnnnnnnnnnnnnnnnnnnnnnnnnnnnnnnnnnnnnnnnnnnnnnnnn
197, nT T 70n7 Dnnn nn nnnn nn nnnn nn nnnn nn nnnn nn nnnn nn nnnn nn nnnn nn nnnn nn nnnn nn nnnn nn nnnn nn nnnn nn nnnn nn nnnn nn nnnn nn nnnn nn nnnn nn nnnn nn nnnn nn nnnn nn nnnn nn nnnn nn nnnn nn nnnn nn nnnn nn
"0000" 17 17 OK
nnnnnnnnnn ① nn n nn n nn
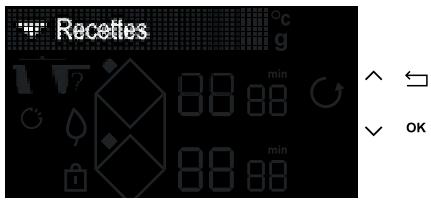
A/V D'uynnnnyDuy"uynnny 000 OK Duynnny Duy"uynnny
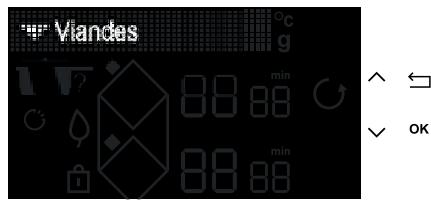
A/√"n" "n" n" n" n" n" n" n"
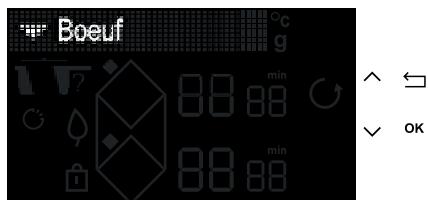
A/OK
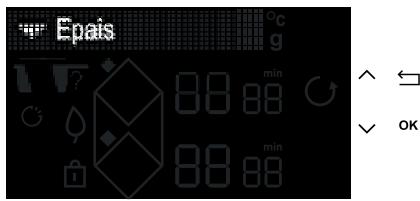
Dynnn nn nynnnynnnn nn NnN 1/OK nn nn nn nn nn nn
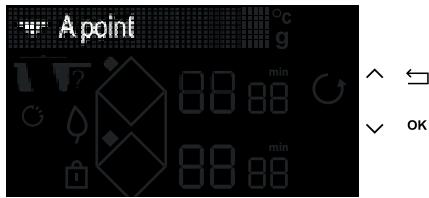
ynnn nn nnnnnnnnnnnnnnnnnnnnnnnnnnnnnnnnnnnnnnnnnnnnnnnnnnnnnnnnnnnnnnnnnnnnnnnnnnnnnnnnnnnnnnnnnnnnnnnnnnnnnnnnnnnnnnnnnnnnnnnnnnnnn
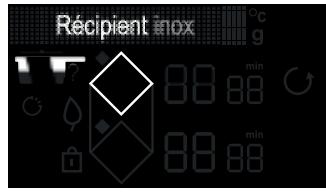
OOK
nnn nn nnn nn nn nn nn
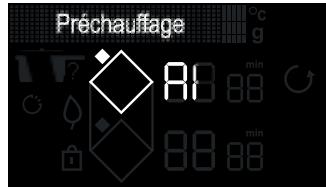
n nn nn nn nn nn nn nn nn nn nn nn nn nn nn nn nn nn nn nn nn nn nn nn nn nn nn nn nn nn nn nn nn nn nn nn nn nn nn nn nn nn nn nn nn nn nn nn nn nn nn nn nn nn nn nn nn nn nn nn nn nn nn nn nn nn nn nn nn nn nn nn nn nn nn nn nn nn nn nn nn nn nn nn nn nn nn nn nn nn nn nn nn nn nn nn nn nn nn nn nn
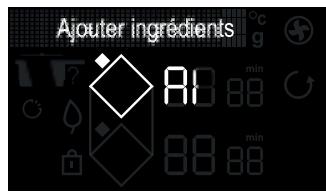
OK wyn yin,innn nn nnnn nn nn nn nn nn nn nn nn nn nn nn nn nn nn nn nn nn nn nn nn nn nn nn nn nn nn nn nn nn nn nn nn nn nn nn nn nn nn nn nn nn nn nn nn nn nn nn nn nn nn nn nn nn nn nn nn nn nn nn nn nn nn nn nn nn nn nn nn nn nn nn nn nn nn nn nn nn nn nn nn nn nn nn nn nn nn nn nn nn nn nn nn
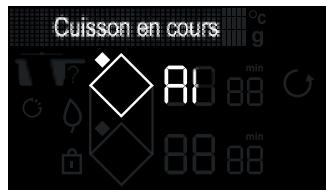
OK 1y 1n nn
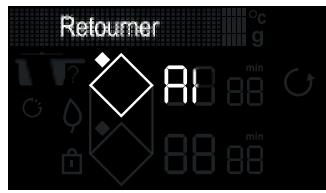
JIOIIOOIO

n n nn nnn nnnn nnnn nnnn nnnn nnnn nnnn nnnn nnnn nnnn nnnn nnnn nnnn nnnn nnnn nnnn nnnn nnnn nnnn nnnn nnnn nnnn nnnn nnnn nnnn nnnn nnnn nnnn nnnn nnnn nnnn nnnn nnnn nnnn nnnn nn
19 107 107 107 107 107 107
n
yynn nn nnn nn y 3-2 .yynn nn nn noon nn - .yynn nn nn nn nn nn - .yynn nn nn nn nn nn - nn nn nn nn nn nn nn nn nn nn nn nn nn nn nn nn nn nn nn nn nn nn nn nn nn nn nn nn nn nn nn nn nn nn nn nn nn nn nn nn nn nn nn nn nn nn nn nn nn nn nn nn nn nn nn nn nn nn nn nn nn nn nn nn nn nn nn nn nn nn nn nn nn nn nn nn nn nn nn nn nn nn nn nn nn nn nn nn nn
"Auto-Stop" nnnn nn nnnn Auto Stopnin nnnn nn nnnn 10-7 nnnn (nnnnn nn nn nn nn nn nn nn nn nn nn nn nn nn nn nn nn nn nn nn nn nn nn nn nn nn nn nn nn nn nn nn nn nn nn nn nn nn nn nn nn nn nn nn nn nn nn nn nn nn nn nn nn nn nn nn nn nn nn nn nn nn nn nn nn nn nn nn nn nn nn nn nn nn nn nn nn nn nn nn nn nn nn nn nn nn nn nn nn nn nn nn nn nn nn nn nnnn
D'9TyIn n'Yn19 4.14
"O'9yin" 5
n 10000000000000000000000000000000000000000000000000000000000000000000000000000000
yynnnynnn nnnn nn
5 10000000000000000000000000000000000000000000000000000000
nynnnn 4.15
DIN
nwn nn nnnnnnnnnnnnnnnnnnnnnnnnnnnnnnnnnnnnnnnnnnnnnnnnnnnnnnnnnnnnnnnnnnnnnnnnnnnnnnnnnnnnnnnnnnnnnnnnnnnnnnnnnnnnnnnnnnnnnnnnnnnnnnnnnnnnnnnnnnnnnnnnnnnnnnn
n
n nn nnn nn nn nn nn nn nn nn nn nn nn nn nn nn nn nn nn nn nn nn nn nn nn nn nn nn nn nn nn nn nn nn nn nn nn nn nn nn nn nn nn nn nn nn nn nn nn nn nn nn nn nn nn nn nn nn nn nn nn nn nn nn nn nn nn nn nn nn nn nn nn nn nn nn nn nn nn nn nn nn nn nn nn nn nn nn nn nn nn nn nn nn nn nn nn nn nn nn nn nn nn
n nn nnnnnnnnnnnnnnnnnnnnnnnnnnnnnnnnnnnnnnnnnnnnnnnnnnnnnnnnnnnnnnnnnnnnnnnnnnnnnnnnnnnnnnnnnnnnnnnnnnnnnnn
y 1111111111111111111111111111111
5.
nirnn
n nn nnnnnnnnnnnnnnnnnnnnnnnnnnnnnnnnnnnnnnnnnnnnnnnnnnnnnnnnnnnnnnnnnnnnnnnnnnnnnnnnnnnnnnnnnnnnnnnnnnnnnnnnnnnnnnnnnnnnnnnnnnnnnnnnnnnnnnnnnnnnnnnnnnnnnnnnnnn
IXIINJN7X :nun nn DIOIOI 19Tyn .DNIY DINO
777 777
777
777
777
777
777
777
777
777
777
777
777
777
777
777
777
777
777
777
777
777
777
777
777
777
777
wnnnn
yynn nn nnnn, nnnn nn
IN 17n n nn nn nn nn nn nn nn nn nn nn nn nn nn nn nn nn nn nn nn nn nn nn nn nn nn nn nn nn nn nn nn nn nn nn nn nn nn nn nn nn nn nn nn nn nn nn nn nn nn nn nn nn nn nn nn nn nn nn nn nn nn nn nn nn nn nn nn nn nn nn nn nn nn nn nn nn nn nn nn nn nn nn nn nn nn nn nn nn nn nn nn nn nn nn nn nn nn nn nn nn
.F7
n nn nnnnn
()
Dxnnn nn, nynnyn nn.
.
yynnnn nn nnnnnnnnnnnnnnnnnnnnnnnnnnnnnnnnnnnnnnnnnnnnnnnnnnnnnnnnnnnnnnnnnnnnnnnnnnnnnnnnnnnnnnnnnnnnnnnnnnnnnnnnnnnnnnnnnnnnnnnnnnnnnnnnnnnnnnnnn
ynnn nn nnnnnnnnnnnnnnnnnnnnnnnnnnnnnnnnnnnnnnnnnnnnnnnnnnnnnnnnnnnnnnnnnnnnnnnnnnnnnnnnnnnnnnnnnnnnnnnnnnnnnnnnnnnnnnnnnnnnnnnnn
nannnnn nn nnnn
nwn nn n .nnnnnn
nini7 nni7 19
n
nyn nn nyin nn nnn nn
30
ytnx nynn nnyn
n) nnn nn nnn
()
n nn nnnn
Tn nn.yn nnn nn nn
n nn n nn nn
n
1
y
.709nn
yannnnnnynnnnynnn nnnn nn nnnnnnnnnnnnnnnnnnnnnnnnnnnnnnnnnnnnnnnnnnnnnnnnnnnnnnnnnnnnnnnnnnnnnnnnnnnnnnnnnnnnnnnnnnnnnnn
nni nnnn nn nnnnnnnnnnnnnnnnnnnnnnnnnnnnnnnnnnnnnnnnnnnnnnnnnnnnnnnnnnnnnnnnnnnnnnnnnnnnnnnnnnnnn
"bloc" nyin nyin nHy jn
n nn nnnnnnnnn
.170V-n nnnnF9
.5°C-n nnnn nn:FO 17
| BENOM | |||||||||||||||||
| BENOM | |||||||||||||||||
| BENOM | |||||||||||||||||
| BENOM | |||||||||||||||||
| BENOM | |||||||||||||||||
| BENOM | |||||||||||||||||
| BENOM | |||||||||||||||||
| BENOM | |||||||||||||||||
| BENOM | |||||||||||||||||
| BENOM | |||||||||||||||||
| BENOM | |||||||||||||||||
| BENOM | |||||||||||||||||
| BENOM | |||||||||||||||||
| BENOM | |||||||||||||||||
| BENOM | 2014 | 2015 | 2016 | 2017 | 2018 | 2019 | 2020 | ||||||||||
| BENOM | |||||||||||||||||
| BENOM | |||||||||||||||||
| BENOM | |||||||||||||||||
| BENOM | |||||||||||||||||
| BENOM | |||||||||||||||||
| BENOM | |||||||||||||||||
| BENOM | |||||||||||||||||
| BENOM | |||||||||||||||||
| BENOM | |||||||||||||||||
| BENOM | |||||||||||||||||
| BENOM | |||||||||||||||||
| BENOM | |||||||||||||||||
| BENOM | |||||||||||||||||
| BENOM | |||||||||||||||||
| BENOM | |||||||||||||||||
| BENOM | |||||||||||||||||
| BENOM | |||||||||||||||||
| BENOM | BENOM | ||||||||||||||||
| BENOM | BENOM | ||||||||||||||||
| BENOM | BENOM | ||||||||||||||||
| BENOM | BENOM | ||||||||||||||||
| BEN0M | BEN0M | ||||||||||||||||
| BEN0M | BEN0M | ||||||||||||||||
| BEN0M | BEN0M | ||||||||||||||||
| BEN0M | BEN0M | ||||||||||||||||
| BEN0M | BEN0M | ||||||||||||||||
| BEN0M | BEN0M | ||||||||||||||||
| BEN0M | BEN0M | ||||||||||||||||
| BEN0M | BEN0M | BEN0M | |||||||||||||||
| BEN0M | BEN0M | ||||||||||||||||
| BEN0M | BEN0M | ||||||||||||||||
| BEN0M | BEN0M | ||||||||||||||||
| CERMAISIOA BANCO DE PAPER DE PAPER DE PAPER DE PAPER DE PAPER DE PAPER DE PAPER DE PAPER DE PAPER DE PAPER DE PAPER DE PAPER DE PAPER DE PAPER DE PAPER DE PAPER DE PAPER DE PAPER DE PAPER DE PAPER DE PAPER DE PAPER DE PAPER DE PAPER DE PAPER DE PAPER DE PAPER DE PAPER DE PAPER DE PAPER DE PAPER DE PAPER DE PAPER DE PAPER OF PAPER OF PAPER OF PAPER OF PAPER OF PAPER OF PAPER OF PAPER OF PAPER OF PAPER OF PAPER OF PAPER OF PAPER OF PAPER OF PAPER OF PAPER OF PAPER OF PAPER OF PAPER OF PAPER OF PAPER OF PAPER OF PAPER OF PAPER OF PAPER OF PAPER OF PAPER OF PAPER OF PAPER OF PAPER OF PAPER OF PAPER OF PAPER OF PAPER OFPAPER OF PAPER OF PAPER OF PAPER OF PAPER OF PAPER OF PAPER OF PAPER OF PAPER OF PAPER OF PAPER OF PAPER OF PAPER OF PAPER OF PAPER OF PAPER OF PAPER OF PAPER OF PAPER OF PAPER OF PAPER OF PAPER OF PAPER OF PAPER OF PAPER OF PAPER OF PAPER OF PAPER OF PAPER OF PAPER OF PAPER OF PAPER OF PAPER OF PPaper of PAPER OF PAPER OF PAPER OF PAPER OF PAPER OF PAPER OF PAPER OF PAPER OF PAPER OF PAPER OF PAPER OF PAPER OF PAPER OF PAPER OF PAPER OF PAPER OF PAPER OF PAPER OF PAPER OF PAPER OF PAPER OF PAPER OF PAPER OF PAPER OF PAPER OF PAPER OF PAPER OF PAPER OF PAPER OF PAPER OF PAPER OF PAPER OF PAPER OF 3.5 (unpublished) | |||||||||||||||||
CZ5703900 00 ML
#
yix T'U xcan n nn rnu rucac nrcan n
nax rxc .rnoan Jaoon dUC XINu raOla uXs
nx xcn ,raVsc cieun yu nd TC,ruY
a"rnnon iCiaO) rnu rucan uy nxAn nncen
tuXizn Icnt U. (rr'O reo, niv'ciO
. ayn nni

nrrnna nnonnn:8
mnyd my rain : x
rrrreaa :H
Rg:

- RELATIONS CONSOMMATEURS FRANCE
- IMPORTANT SAFETY ADVICE AND PRECAUTIONS
- IMPORTANT SAFETY INSTRUCTIONS - READ CAREFULLY AND KEEP FOR FUTURE USE.
- PROTECTING THE ENVIRONMENT
- Advice on how to save energy
- UNPACKING
- FITTING THE HOB
- .2 INSTALLATION
- Important
- ELECTRIC CONNECTIONS
- Control panel glossary
- Direct access
- Functions
- Display glossary
- Recommended cookware:
- Settings management
- POWER MANAGEMENT
- CHOOSING YOUR COOKWARE
- COOKING RING SELECTION
- ① SWITCHING ON/OFF
- Switching off a zone on the hob
- SETTING THE POWER
- Direct access:
- HORIZONE (DEPENDING ON MODEL)
- SETTING THE TIMER
- Independent timer
- LOCKING THE CONTROLS
- Child safety lock
- Locking
- Table locked in operation
- UnlockING
- CLEAN LOCK function
- ⇌ SWITCH FUNCTION
- ICS FUNCTION Intelligent Cooking System
- URECALL FUNCTION
- GELAPSED TIME
- FUNCTION
- COOKING ASSISTANT FUNCTION
- Recipe selection
- Do not use a cast iron pan or a lid with this function. You can also use this function to cook any food that needs to be cooked in boiling water.
- Recipe example for a Beef cut:
- FAVOURITES FUNCTION
- SAFETY PRECAUTIONS AND RECOMMENDATIONS
- Residual heat
- Temperature limiter
- Spillage protection
- "Auto-Stop" System
- LOOKING AFTER THE HOB
- When using for the first time
- When powering on
- During use
- Code F7 is displayed.
- VAŽENA ZAKAZNICE, VAŽENY ZAKAZNIKU
- Forklaring til display
- VEDLIGEHOLDELSAF KOGEPLADEN
- FUNC TIE ICS Intelligent Cooking System
- Forklaring på displayet
- INNSTILLING AV TIDSURET
- VEDLIKEHOLD AV PLATETOPPEN
- БЕЗПАС"HOBЖHbI MEРы ПЕДО-CTОРЖHOCTN
- BAJHbIE INHCTPYKcIIN IO TEXHnke B3OpACHOCTN: BHIMATEJIbHOIIPOHTITEuCOXPAHNTeДЯИСПОЛь3OBAHnB DAJIbHEIShEM.
- БЕЗПАС"HОCTь И BAЖHьE MEPы ПРЕДО-CTОРЖHOCTN
- БЕЗПАС"HOBHbI MEРБI ПЕДОCTОПОЖHOCTN
- OXPAHA OKPYXKAIOUEN CPEIbI
- PekomeHdaCnB OTHOWeHn 3KOHOMN 3Heprn
- PACNAKOBbIBAHNE
- YCTAHOBKA
- Baxho!
- ПОДКЛIOЧЕНК ЗЛЕKTPOCETN
- YcIobHbIe 063NaueHnHa nHaHeNy npaBJeHn
- HenocpeDCTBHeHbI Doctyn
- Фуннкин
- .3 OIIHCAHNE BAIIIErO IIPNEOPA
- * Pekomehdobahna nocya:
- UnpaBHe napaMeTpamn
- YNPABJIeHHe MOnCHoCTbIO
- HACTPOIKA MOUHOCTN
- 3aunTa OT npoINBaHnHa nIHTy
- CnCTema «ABTO-CTOn» (Auto-Stop)
- .5 yXoJ
- CEPBUNCHOE OBCJYKINBAHNE PINTbI
- Bentnlaun npoDolkaet pa60taB noCJIe BbIKJIOHcHn nnTbl.
- B clyuae noBtopaHxCnHapuHn pa60TbI.
- TABJIINU A 3JIeKTPO3HEPRTHueCKHX PACHTOB
- TEXOBCJIYUKINBAHNE
- VÁŽENÁ ZÁKAZNÍČKA,
- Ordlda for manoverpanelen
- IIAHOBHNI KJIIEHTE!
- BAJKJIINBI IIPABUNIATEXHIKNBE3IIENKNI 3AIIOBJKH13AXOJN
- BAXJIINBI INPABUNA TEXHIKN 6E3NEKN - YBAXHO INPOUHTAITE N 3BEPEXITb IJN PONAJlbWTO BUKOPUCTAHN.
- (3AJIEXKHTB BID MODEJI)
- HAJALITYBAHHI TAIIMEPA
- He3aJIeKHiN TaIMepe
- БLOKYBAHHKHOPOK KEpyBAHH
- Бл_OKувань Вд дiteи
- Бл_OKуВання
- BapnIbHy noBepxHIO 3a6JNOKOBaHO nID Yac ekcnnyatauii
- Po36JokyBaHHa
- Функця CLEAN LOCK
- ΦYHKLIJA SWITCH
- リOMIчнК I3 ПИГOTУBAHHЯ
- Bn6ip peceentiB
- 06mexkyBaT TempepaTyprn
- 3axnct BiD nepenBaHHa
- CnCTema «ABTOCTON»
- IOIJIaI
- OБСЛУГОВУBAHHA ВAPИльноюВЕРХHI
- Nicra BBeDeHHB Eeknnyatauio
- YctaHOky BiD'cHaHo, a6o npaHoc TilbKn Odn H 6ik. Pid'edHaHHn NOBepxHi
- n nn n nn
- n nn nnnn
- nunn
- 4.3
- /
- CLEAN LOCK
- SWITCH nyn4.9
- ICS 4.10
- Intelligent Cooking System
- D
- ELAPSED TIME 04.12
- RECALL 4.11
- n
- D'9TyIn n'Yn19 4.14
- nynnnn 4.15
- nirnn
- wnnnn
- .F7
- #
Brand : DE DIETRICH
Model : DPI4332BP
Category : Hob