
DOH4334B - Built-in oven DE DIETRICH - Free user manual and instructions
Find the device manual for free DOH4334B DE DIETRICH in PDF.
| Product type | Built-in oven |
| Brand | De Dietrich |
| Model | DOH4334B |
| Dimensions (W x H x D) | 595 x 595 x 550 mm (estimated) |
| Weight | 33 kg |
| Power supply | 220-240 V, 50/60 Hz, 16 A |
| Maximum power | Not specified (estimated 3 kW) |
| Oven capacity | 70 L (estimated) |
| Cooking modes | Tradi ventilé, Traditionnel, Sole pulsé, Eco, Gril fort, Grill pulse, Bread, Auto poultry, Auto fish, Auto white meats |
| Cleaning | Pyrolysis and steam cleaning |
| Interior lighting | 25 W bulb, 220-240 V, G9 base |
| Child safety | Yes (key lock) |
| Supplied accessories | Anti-tilt grill, 45 mm multi-purpose tray, 8 mm baking tray, telescopic rails (depending on model) |
| Manufacturing | Origin France Guarantee |
| Energy efficiency index | 0.77 kWh/cycle (conventional mode) |
| After-sales service | Brandt Consumer Service: 0892 028 804 (€0.50/min) |
Frequently Asked Questions - DOH4334B DE DIETRICH
User questions about DOH4334B DE DIETRICH
0 question about this device. Answer the ones you know or ask your own.
Ask a new question about this device
Download the instructions for your Built-in oven in PDF format for free! Find your manual DOH4334B - DE DIETRICH and take your electronic device back in hand. On this page are published all the documents necessary for the use of your device. DOH4334B by DE DIETRICH.
USER MANUAL DOH4334B DE DIETRICH
- Plat multi usages 45mm
RELATIONS CONSOMMATEURS
EN Information for domestic cows (UE n7 602014)
FR 5 Informations concernant les four domestiques (UE n° 68/2014)
CSI Inforrmance lykajic se lub pro domicnost (UE n° 862014)
DAN Ophysinger for gve III hushokningsbrug (UE n56/2014)
( xt^2 - 5x^2) t + xy^2 = ( x) f^
| Symbol | Init Value | EN Symbol: FR. Symbbole CE: Znadek-DA. Symbbole DE: Symbole ES. Simbo10-IT: Simbo10-NL: Simbo10-PL: Oznaczejny PT. Simbo10-SK: Simbo10-EL: Zufäbko-Fi: Symboll SV: Symbol EN: Valer-PS: Hrodola-DA: Vardé-DE: Wert-ES: Valer-IT: Valer-IL: Wards-PL: Wards-PL: Wards-PL: Hrodola-EL: Apifuyuwi rui-PL: Arvo-5V: Värd. EN: Unit-FR: Units-CS: Jednokka-DA: Enhed-DE: Einheit-ES: Unitad-IT: Unita di misura-NL: Einheit-PI: Jodinokka-PT: Unitad-IT: Unita di misura-NL: Einheit-PI: Jodinokka-PT: Unitad-IT: Unita di misura-NL: Einheit-PI: Jodinokka-PT: Unitad-IT: Unita di misura-NL: Einheit-PI: Jodinokka-PT: Unitad-IT: Unita di misura-NL: Einheit-PI: Jodjinokka-PT: Unitad-IT: Unita di misura-NL: Einheit-PI: Jodjinokka-PT: Unitad-IT: Unita di misura-NL: Einheit-PI: Jodjinokka-PT: Unitad-IT: Unita di misura-NL: Einheit-PI: Jodjinokka-PT: Unitad-IT: Unita di misura-NL: Einheit-PE: Enerikoviteln-EN: 2018-03-20 EN: Valer-PS: Hrodola-DA: Vardé-DE: Wert-ES: Valer-IT: Valer-IL: Wards-PL: Wards-PL: Wards-PL: Apluyuwi rui-PL: Arvo-5V: Värd. EN: Unit-FR: Units-CS: Jednokka-DA: Enhed-DE: Einheit-ES: Unitad-IT: Unita di misura-NL: Einheit-PI: Jodinokka-PT: Unitad-IT: Unita di misura-NL: Einheit-PI: Jodinokka-PT: Unitrad-IT: Unita di misura-NL: Einheit-PI: Jodinokka-PT: Unitad-IT: Unita di misura-NL: Einheit-PI: Jodinokka-PT: Unitad-IT: Unita di misura-NL: Einheit-PI: Jodinokka-PT: Unitad-IT: Unita di misura-NL: Einheit-PI: Jodinokka | |||||||
| Type norme | ORZANME | EN Type norme-FR. Type norme-CS: Model-DA: Norm type-DE: Model-ITS: Model-IT: Typ ed norming normy-PT: Typ ed norming normy-PT: Typ ed norming normy-PT: Typ ed norming normy-PT: Typ ed norming normy-PT: Typ ed norming normy-PT: Typ ed norming normy-PT: Typ ed norming normy-PT: Typ ed norming normy-PT: Typ ed norming normy-PT: Typ ed norming normy-PT: Typ ed norming normy-PT :Model-Exkivirakirin. -Enkel. | |||||||
| Model identification | SIMPLE = FR: simple-CS: Jednoduchá-DA: Enkel-DE:Einfach-ES: Simple-DA: Entropy-DE: Apparatus masse de la modèle-CS: Identificacao modelo CS: Identificacao modelo CS: Identificacao modelo CS: Identificacao modelo CS: Identificacao modelo CS: Identificacao modelo CS: Identificacao modelo CS: Identificacao modelo CS: Identificacao modelo CS: Identificacao modelo CS: Identificacao modelo CS: Identificacao modelo CS: Identificacao modelo CS: Identificacao modelo CS: Identificacao modelo CS:Identificacao modelo CS: Identificacao modelo CS: Identificacao modelo CS: Identificacao modelo CS: Identificacao modelo CS: Identificacao modelo CS: Identificacao modelo CS: Identificacao modelo CS: Identificacao modelo CS: Identificacao modelo CS: Identificacao modelo CS: Identificacao modelo CS: Identificacao modelo CS: Identificacao modelo CS: IdentificACG: ID: TópoA-DS: TópoA-DS: TópoA-DS: TópoA-DS: TópoA-DS: TópoA-DS: TópoA-DS: TópoA-DS: TópoA-DS: TópoA-DS: TópoA-DS: TópoA-DS: TópoA-DS: TópoA-DS: TópoA-DS:TópoA-DS: TópoA-DS: TópoA-DS: TópoA-DS: TópoA-DS: TópoA-DS: TópoA-DS: TópoA-DS: TópoA-DS: TópoA-DS: TópoA-DS: TópoA-DS: TópoA-DS: TópoA-DS: TóPOA-DS: TóPOA-DS: TóPOA-DS: TóPOA-DS: TóPOA-DS: TóPOA-DS: TóPOA-DS: TóPOA-DS: TóPOA-DS: TóPOA-DS: TóPOA-DS: TóPOA-DS: TóPOA-DS: TóPOA-DS: TóPOA-TóPOA-TóPOA-TóPOA-TóPOA-TóPOA-TóPOA-TóPOA-TóPOA-TóPOA-TóPOA-TóPOA-TóPOA-TóPOA-TóPOA-TóPOA-TóPOA-TóPOA-TóPOA-TóPOA-TóPOA-TóPOA-TóPOA-TóPOA-TóPOA-TóPOA-DS: TópoA-DS: TópoA-DS: TópoA-DS: TópoA-DS: TópoA-DS: TópoA-DS: TópoA-DS: TópoA-DS: TóPOA-DS: TóPOA-DS: TóPOA-DS: TóPOA-DS: TóPOA-DS: TóPOA-TóPOA-TóPOA-TóPOA-TóPOA-TóPOA-TóPOA-TóPOA-TóPOA-TóPOA-TóPOA-TóPOA-TóPOA-TóPOA-TóPOA-DS: TópoA-DS: TópoA-DS: TópoA-DS: TópoA-DS: TóPOA-DS: TóPOA-DS: TóPOA-DS: TóPOA-DS: TóPOA-DS: TóPOA-DS: TóPOA-DS: TóPOA-DS: TóPOA-DS: TóPOA-TóPOA-TóPOA-TóPOA-TóPOA-TóPOA-TóPOA-TóPOA-DS: TópoA-DS: TópoA-DS: TóPOA-TóPOA-TóPOA-TóPOA-TóPOA-TóPOA-TóPOA-TóPOA-TóPOA-TóPOA-TóPOA-TóPOA-TóPOA-TóPOA-TóPOA-TóPOA-TóPOA-TóPOA-TóPOA-TóPOA-TóPOA-TóPOA-TóPOA-TóPO ARIO-FT: YIINKONNOMINARIA (SAH) KILOU-TEKOLIKA (SAH) KILOU-TEKOLIKA (SAH) KILOU-TEKOLIKA (SAH) KILOU-TEKOLIKA (SAH) KILOU-TEKOLIKA (SAH) KILOU-TEKOLIKA (SAH) KILOU-TEKOLIKA (SAH) KILOU-TEKOLIKA (TA) KILOU-TEKOLIKA (TA) KILOU-TEKOLIKA (TA) KILOU-TEKOLIKA (TA) KILOU-TEKOLIKA (TA) KILOU-TEKOLIKA (TA) KILOU-TEKOLIKA (TA) KILOU-TEKOLIKA (TA) KILOU-TEKOKAL (TA) KILOU-TEKOKAL (TA) KILOU-TEKOKAL (TA) KILOU-TEKOKAL (TA) KILOU-TEKOKAL (TA) KILOU-TEKOKAL (TA) KILOU-TEKOKAL (TA) KILOU-TEKOKAL (TA) KILOU-TEKOKAL (TA)KILOU-TEKOKAL (TA) KILOU-TEKOKAL (TA) KILOU-TEKOKAL (TA) KILOU-TEKOKAL (TA) KILOU-TEKOKAL (TA) KILOU-TEKOKAL (TA) KILOU-TEKOKAL (TA) KILOU-TEKOKAL (TA) KILOU-KILOU-TEKOKAL (TA) KILOU-KILOU-TEKOKAL (TA) KILOU-KILOU-TEKOKAL (TA) KILOU-KILOU-TEKOKAL (TA) KILOU-KILOU-TEKOKAL (TA) KILOU-KILOU-TEKOKAL (TA) KILOU-KILOU-KILOU-KILOU-KILOU-KILOU-KILOU-KILOU-KILOU-KILOU-KILOU-KILOU-KILOU-KILOU-KILOU-KILOU-KILOU-KILOU-KILOU-KILOU-KILOU-KILOU-KILOU-KILOU-KILOU-KILOU/KILOU-KILOU-KILOU-KILOU-KILOU-KILOU-KILOU-KILOU-KILOU-KILOU-KILOU-KILOU-KILOU-KILOU-KILOU-KILOU-KILOU-KILOU-KILOU-KILOU-KILOU-KILOU-KILOU-KILOU-KILOU.KILOU-KILOU-KILOU-KILOU-KILOU-KILOU-KILOU-KILOU-KILOU-KILOU-KILOU-KILOU-KILOU-KILOU-KILOU-KILOU-KILOU-KILOU-KILOU-KILOU-KILOU-KILOU-KILOU-KILOU-KILOU,KILOU-KILOU-KILOU-KILOU-KILOU-KILOU-KILOU-KILOU-KILOU-KILOU-KILOU-KILOU-KILOU-KILOU-KILOU-KILOU-KILOU-KILOU-KILOU-KILOU-KILOU-KILOU-KILOU-KILOU-KILOU | ||||||||
| Mass of the appliance | M | 33 | EN Mass of the appliance FR.Masse de l'appliante FR.Masse de l'appliante FR.Masse de l'appliante FR.Masse de l'appliante FR.Masse de l'appliante FR.Masse de l'appliante FR.Masse de l'appliante FR.Masse de l'appliante FR.Masse de l'appliante FR.Masse de l'appliante FR.Masse de l'appliante FR.Masse de l'applianteFR.Masse de l'appliante FR.Masse de l'appliante FR.Masse de l'appliante FR.Masse de l'appliante FR.Masse de l'appliante FR.Masse de l'appliante FR.Masse de l'appliante FR.Masse de l'appliante FR.Masse de l'appliante FR.Masse de l'appliante FR.Masse de l'appliante FR. | ||||||
| Number of cavities | 1 | EN Number of cavities FR.Nomine de cavities FR.Nomine de cavities FR.Nomine de cavities FR.Nomine de cavities FR.Nomine de cavities FR.Nomine de cavities FR.Nomine de cavities FR.Nomine de cavities FR.Nomine de cavities FR.Nomine de cavities FR.Nomine de cavities FR.Nomine de cavities FR.NomINE DE PAPER 14. | |||||||
| Heat source per cavity (electricity or gas) | FR.Electricity-CS:Elektrónica-DA:Strom-ES:Elektrónica-IT:Energia electrica-nL:Eléctricidad-SK:Eléctricidad-SK:Eléctricidad-SK:Eléctricidad-SK:Eléctricidad-SK:Eléctricidad-SK:Eléctricidad-SK:Eléctricidad-SK:Eléctricidad-SK:Eléctricidad-SK:Eléctricidad-SK:Eléctricidad-SK:Eléctricidad-SK:EléCTE:YKLAMCOS, CAVITY: CAVITY: CAVITY: CAVITY: CAVITY: CAVITY: CAVITY: CAVITY: CAVITY: CAVITY: CAVITY: CAVITY: CAVITY: CAVITY: CAVITY: CAVITY: CAVITY: CAVITY: CAVITY: CAVITY: CAVITY: CAVITY: CAVITY: CAVITY: CAVITY: CAVITY:TÉCO: TÉCO: TÉCO: TÉCO: TÉCO: TÉCO: TÉCO: TÉCO: TÉCO: TÉCO: TÉCO: TÉCO: TÉCO: TÉCO: TÉCO: TÉCO: TÉCO: TÉCO: TÉCO: TÉCO: TÉCO: TÉCO: TÉCO: TÉCO: TÉCO: TÉCO:TÉCO: TÉCO: TÉCO: TÉCO: TÉCO: TÉCO: TÉCO: TÉCO: TÉCO: TÉCO: TÉCO: TÉCO: TÉCO: TÉCO: TÉCO: TÉCO: TÉCO: TÉCO: TÉCO: TÉCO: TÉCO: TÉCO: TÉCO: TÉCO: TÉCO: | ||||||||
| Volume per cavity | V | 73 | EN Volume per cavity (electricity) required to heat a standardised load in a cavity of an electrical heated oven during a cycle in conventional mode of operation. The capacity of the device is based on a capacity of a single unit in a standardised mode of operation. The capacity of the device is based on a capacity of a single unit in a standardised mode of operation. The capacity of the device is based on a capacity of a single unit in a standardised mode of operation. The capacity of the device is based on a capacity of a single unit in a standardised mode of operation. The capacity of the device is based on a capacity of a single unit in a standardised mode of operation. The capacity of the device is based an operation of a single unit in a standardised mode of operation. The capacity of the device is based an operation of a single unit in a standardised mode of operation. The capacity of the device is based an operation of a single unit in a standardised mode of operation. The capacity of the device is based an operation of a single unit in a standardised mode of operation. The capacity of the device is based an operation of a single unit in a standardised mode of operation. The capacity of device is based an operation of a single unit in a standardised mode of operation. The capacity of device is based an operation of a single unit in a standardised mode of operation. The capacity of device is based an operation of a single unit in a standardised mode of operation. The capacity of device is based an operation of a single unit in a standardised mode of operation. The capacity of device is based an operation of a single unit in a standardised mode of operation. The capacity device is based an operation of a single unit in a standardised mode of operation. The capacity device is based an operation of a single unit in a standardised mode of operation. The capacity device is based an operation of a single unit in a standardised mode of operation. The capacity device is based an operation of a single unit in a standardised mode of operation. The capacity device is based an operation of a single unit in a standardised mode of operation. The capacity device is based an operatived in a standardised mode of operation. The capacity device is based an operation of a single unit in a standardised mode of operation. The capacity device is based an operation of a single unit in a standardised mode of operation. The capacity device is based an operation of a single unit in a standardised mode of operation. The capacity device is based an operation of a single unit in a standardised mode of operation. The capacity device is based an operation of a single unit in a standardisedmode of operation. The capacity device is based an operation of a single unit in a standardised mode of operation. The capacity device is based an operation of a single unit in a standardised mode of operation. The capacity device is based an operation of a single unit in a standardised mode of operation. The capacity device is based an operation of a single unit in a standardised mode of operation. The capacity device is based an operation of a single unit in a standardised mode of operation. The Capacity Device is based an operation of a single unit in a standardised mode of operation. The Capacity Device is based an operation of a single unit in a standardised mode of operation. The Capacity Device is based an operation of a single unit in a standardised mode of operation. The Capacity Device is based an operation of a single unit in a standardised mode of operation. The Capacity Device is based an operation of a single unit in a standardised mode of operation. The Capacity Device is based an operationof a single unit in a standardised mode of operation. The Capacity Device is based an operation of a single unit in a standardised mode of operation. The Capacity Device is based an operation of a single unit in a standardised mode of operation. The Capacity Device is based an operation of a single unit in a standardised mode of operation. The Capacity Device is based an operation of a single unit in a standardised mode of operation. The Capacity Device is based an operation of a single unit ina standardised mode of operation. The Capacity Device is based an operation of a single unit in a standardised mode of operation. The Capacity Device is based an operation of a single unit in a standardised mode of operation. The Capacity Device is based an operation of a single unit in a standardised mode of operation. The Capacity Device is based an operation of a single unit in a standardised mode of operation. The Capacity Device is based an operation of a single unit in a standardised mode ofoperation. The Capacity Device is based an operation of a single unit in a standardised mode of operation. The Capacity Device is based an operation of a single unit in a standardised mode of operation. The Capacity Device is based an operation of a single unit in a standardised mode of operation. The Capacity Device is based an operation of a single unit in a standardised mode of operation. The Capacity Device is based an operation of a single unit in a standardised mode of operation. The Capacity Deviceis based an operation of a single unit in a standardised mode of operation. The Capacity Device is based an operation of a single unit in a standardised mode of operation. The Capacity Device is based an operation of a single unit in a standardised mode of operation. The Capacity Device is based an operation of a single unit in a standardised mode of operation. The Capacity Device is based an operation of a single unit in a standardised mode of operation. The Capacity Device is based an operation ofa single unit in a standardised mode of operation. The Capacity Device is based an operation of a single unit in a standardised mode of operation. The Capacity Device is based an operation of a single unit in a standardised mode of operation. The Capacity Device is based an operation of a single unit in a standardised mode of operation. The Capacity Device is based an operation of a single unit in a standardised mode of operation. The Capacity Device is based an operation of a single unit in astandardised mode of operation. The Capacity Device is based an operation of a single unit in a standardised mode of operation. The Capacity Device is based an operation of a single unit in a standardised mode of operation. The Capacity Device is based an operation of a single unit in a standardised mode of operation. The Capacity Device is based an operation of a single unit in a standardised mode of operation. The Capacity Device is based an operation of a single unit in a standardised mode of operation | ||||||
BRANDT FRANCE, Etablissement de CERGY, 5/7 avenue des Béthunes, 95310 SAINT OUEN L'AUMONE. SAS au capital social de 100.000.000 euros RCS NANTERRE 801 250 531.

DEAR CUSTOMER,
You have just purchased a De Dietrich product. This choice reflects your high standards and taste for the French way of life.
Resulting from over 300 years' know-how, the De Dietrich creations embody the fusion between design, authenticity and technology at the service of culinary arts. Our appliances are manufactured using noble materials and offer an irreproachable quality of finish.
We are certain this high-quality product will enable cooking enthusiasts to express all their talents.
The De Dietrich Customer Service Department is at your disposal for all your questions and suggestions to always better meet your expectations.
We are honoured to be your new partner in the kitchen and thank you for your trust.
With its factories based in France, in Orleans and Vendôme, De Dietrich cultivates
B
a constant search for excellence, perpetuating exceptional know-how in the design of perfectly finished products. Many of our electrical appliances are certified by the "Origine France Garantie" label, an acknowledgement which certifies they are manufactured in France.
This label both ensures the quality and durability of our appliances, as well as their traceability, thus offering a clear and objective
indication of their provenance.
www.de-dietrich.com
De Dietrich
CREATEURD'EMOTIONS DEPUIS 1684
IMPORTANT SAFETY ADVICE AND PRECAUTIONS. 4
1 INSTALLATION 7
Choice of location and fitting. 7
Electrical connection 7
2 ENVIRONMENT 8
Caring for the environment 8
3 DESCRIPTION OF YOUR APPLIANCE 9-11
Presentation of the oven 9
Display and control buttons 10
Accessories (depending on model) 11
4 USING YOUR APPLIANCE. 12-16
Settings. 13
Settings menu 14
Cooking mode 15
Start a cooking programme 16
5 CARE 18-19
Cleaning the inner and outer surfaces 18
6 TROUBLESHOOTING AND SOLUTIONS 20
7 COOKING TIPS 21-23
IMPORTANT SAFETY INSTRUCTIONS - READ CAREFULLY AND KEEP FOR FUTURE USE.
This user guide is available for download on the brand's website.
Once you receive the appliance, unpack it or have it unpacked immediately. Give it an overall inspection. Make a note of any reservations on the delivery slip and keep a copy.

Important
This appliance may be used by children aged 8 years and older, and by persons with impaired physical, sensory or mental capacities, or without experience or knowledge, if they are supervised or have received prior instructions on how to use the appliance safely and have understood the risks involved.
-
Children must not play with the appliance. The appliance should not be cleaned or maintained by unsupervised children.
-
Children should be supervised to prevent them from playing with the appliance.

WARNING:
The appliance and its accessible parts become hot during use. Be careful not to touch the heating elements inside the oven. Children under 8 years
old must be kept away from the hob unless they are supervised at all times.
This appliance is designed to cook with the door closed.
Before pyrolytic cleaning of your oven, remove all accessories and any thick deposits.
During cleaning, the surfaces may become warmer than under normal conditions of use.
It is advisable to keep children away from the appliance.
-
Do not use a steam cleaner.
-
Do not use abrasive cleaners or hard metal scrapers to clean the oven's glass door; they could scratch the surface and cause the glass to.

WARNING:
Make sure the appliance is disconnected from the power before replacing the lamp in order to avoid the risk of electric shock. Change the lamp only when the appliance has cooled down. To unscrew the view port and the light, use a rubber glove, which will make disassembly easier.

It must be possible to
disconnect the appliance from the power supply by fitting a switch on the fixed wiring system in accordance with installation rules.
the power cable is damaged, it should be replaced by the manufacturer, its after-sales service department or by a similarly qualified person in order to avoid danger.
- This appliance may be installed either under a worktop or in a column as shown in the installation diagram.
Centre the oven in the cabinet so as to ensure a minimum gap of 10mm between the appliance and the surrounding unit. The material of the unit supporting the appliance must be heat-resistant (or covered with a heat-resistant material). For greater stability, attach the oven to the unit with
2 screws through the holes provided on the side panels.
The appliance must not be installed behind a decorative door to prevent overheating.
This appliance is designed to be used for domestic and similar applications such as kitchen areas for the staff of shops, offices and other professional premises; farms; use by clients of hotels, motels and other residential type establishments; guest house type environments.
The oven must be turned off when cleaning inside the oven.
Do not modify the characteristics of this appliance; doing so could be dangerous.
Do not use your oven as a larder or to store any items after use.
Depending on the model, your oven may be equipped with a meat probe. Only use the temperature probe recommended for this oven.


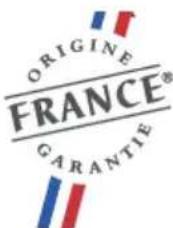
CHOICE OF LOCATION AND FITTING
The diagrams show the dimensions of a cabinet that will be able to hold your oven. This appliance may be installed either under a worktop (fig. A) or in a column (fig. B).
Caution: if the back of the furniture is open (under a worktop or in a column), the space between the wall and the surface on which the oven rests must be no more than 70mm^* (fig. C).
If the furniture is closed at the back, make a 50 × 50 mm opening through which to route the electrical cable.
Install the oven in the cabinet. To do this, remove the rubber stops and pre-drill a 2-mm diameter hole in the wall of the furniture to avoid splitting the wood. Attach the oven with the two screws. Re-position the rubber stops.

Tip
To be certain that you have properly installed your appliance, do not hesitate to call on a household appliance specialist.
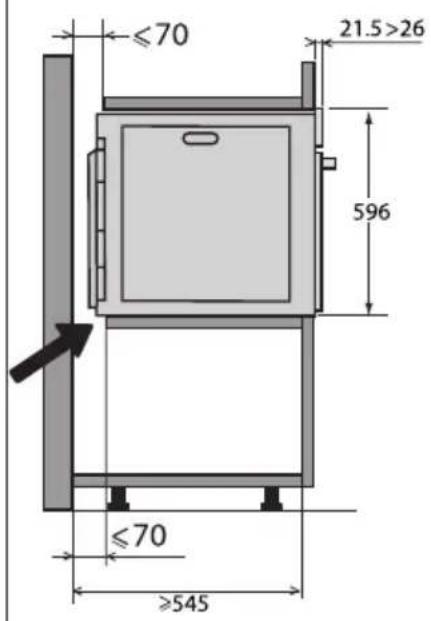
ELECTRICAL CONNECTION
The oven is supplied with a standardised power cable with 3 conductors of 1.5mm^2 (1 live + 1 neutral + earth) which must be connected to a 220-240V single-phase system by means of an IEC 60083 standard power socket or via an all-pole cut-off device in compliance with the installation rules.
The safety wire (green-yellow) is connected to the appliance's terminal and must be connected to the installation's earth. The
fuse in your set-up must be 16 amperes. We cannot be held responsible for any accident or incident resulting from nonexistent, defective or incorrect earthing or non-compliant connection.
Your appliance is designed to work as is, at a frequency of 50Hz or 60Hz , without you having to do anything.

Important:
If the electrical installation of your home requires a modification to connect the appliance, call a qualified electrician. If the oven malfunctions in any way, unplug the appliance or remove the fuse for the oven's connection line.
CARING FOR THE ENVIRONMENT
The packaging material of this appliance is recyclable. Please recycle it and help protect the environment by depositing it in municipal containers provided for this purpose.
Your appliance also contains many recyclable materials. It is therefore marked
with this logo to indicate that used appliances should not be mixed with other waste.
Recycling of appliances organised by your manufacturer is carried out under the best
conditions, in accordance with the European regulation on waste disposal of electronic and electrical equipment.
Contact your local authority or retailer for information on used appliance collection points close to your home.
We thank you for your help in protecting the environment.
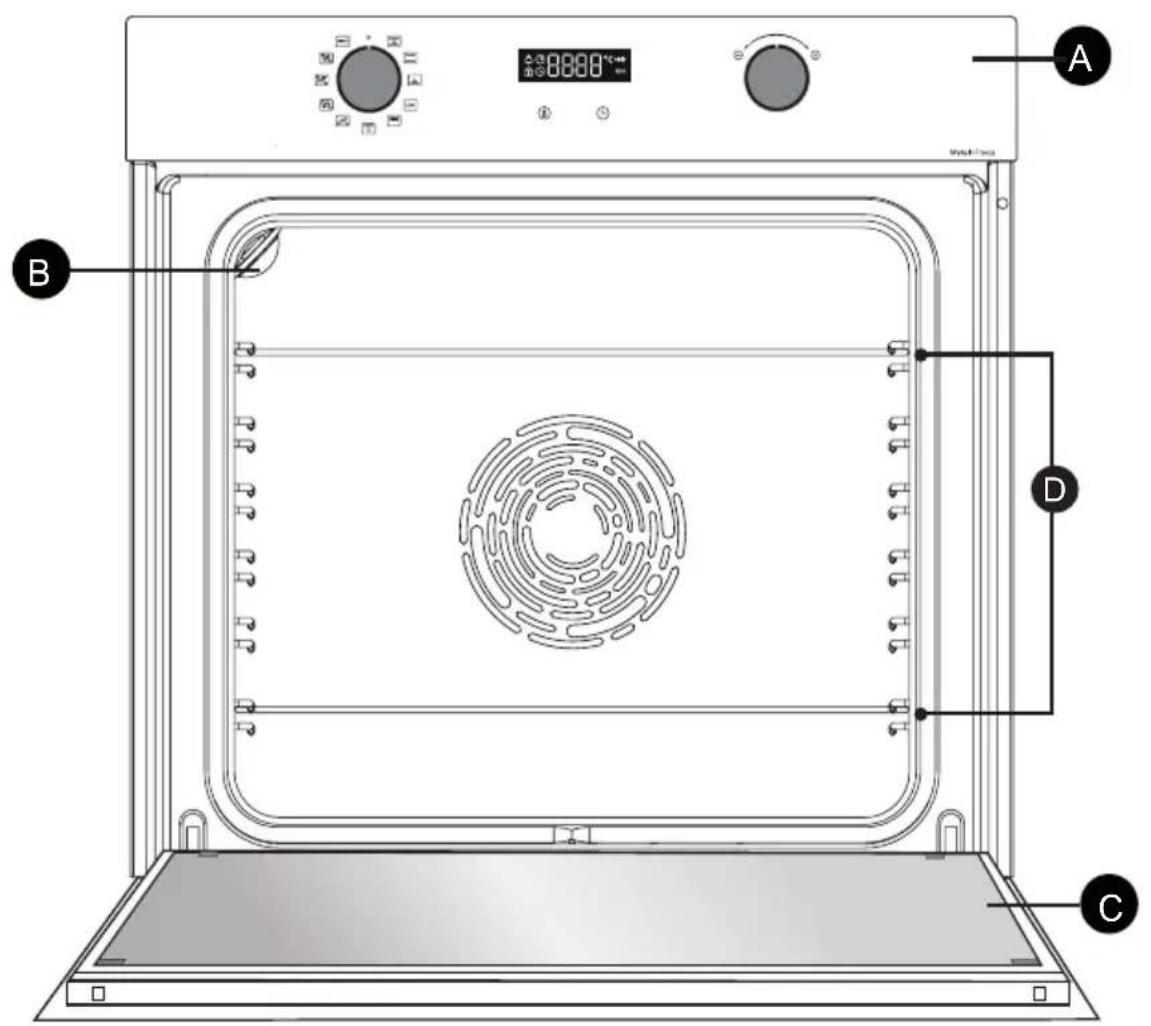

Control panel

Light

Door

Shelf runners (this oven has 6 shelf positions for the accessories)
2 DESCRIPTION OF YOUR APPLIANCE
THE CONTROLS AND DISPLAY
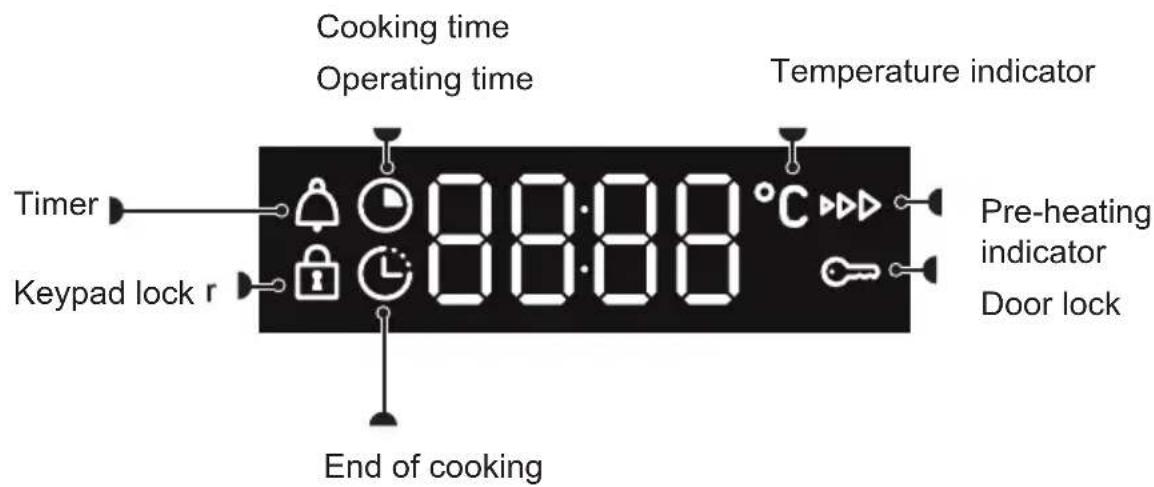
Display
Keys

Set temperature

Set clock and cooking time
2 DESCRIPTION OF YOUR APPLIANCE
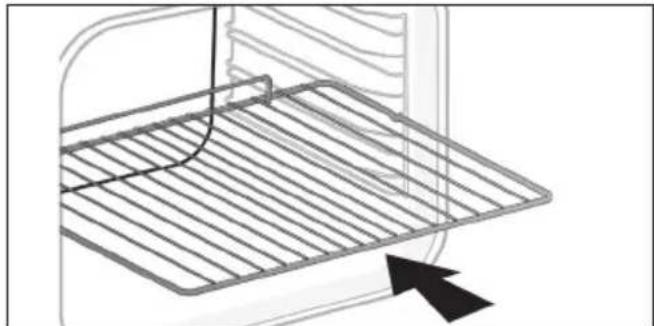
ACCESSORIES (DEPENDING ON MODEL)
- Anti-tip safety rack
The rack can be used to support all dishes and moulds containing food for cooking or browning. It can be used for barbecues (to be placed directly on the grill).
Insert the anti-tip safety grid towards the back of the oven.
- 45 mm multi-purpose drip tray
To be inserted into the runners below the wire rack. It collects juice and fat from grilling, and can be used half-filled with water as a double-boiler.
8 mm pastry sheet
Insert in the shelf runners. Ideal for baking cookies, shortbread and cupcakes.
The tilted surface makes it easier for you to place your preparations on a dish. Can also be inserted into the supports under the rack to collect juice and fat from grilling.


TIP:
To avoid fumes when cooking fatty meats, we recommend you add a small amount of water or oil to the bottom of the 45mm multi-purpose drip tray.
2 DESCRIPTION OF YOUR APPLIANCE
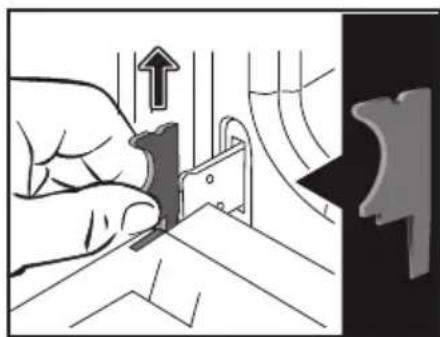
SLIDING RAIL SYSTEM (DEPENDING ON MODEL)
The new sliding rail system makes food more practical and easier to handle as the trays can be effortlessly pulled for simpler handling. The trays can be completely removed, providing full access. Their stability ensures that food can be handled safely, reducing the risk of burns. This means that you can take food out of the oven far more easily.
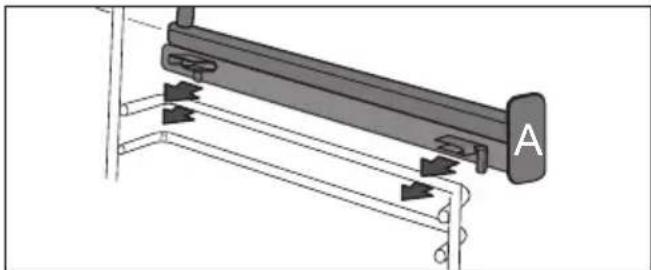
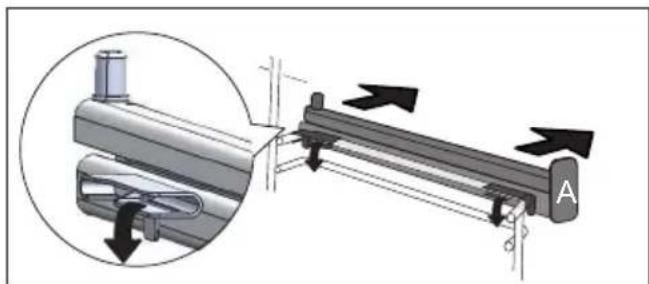
INSTALLING AND REMOVING THE SLIDING RAILS
After removing the 2 shelf runners, choose the height (2 to 5) at which you want to fit your rails. Snap the left rail against the left shelf runner by applying enough pressure to the front and back of the rail so that the 2 tabs on the side of the rail slot into the shelf runner. Do the same for the right-hand rail.
NOTE: the telescopic sliding part of the rail must unfold towards the front of the oven, with the stop A opposite you.
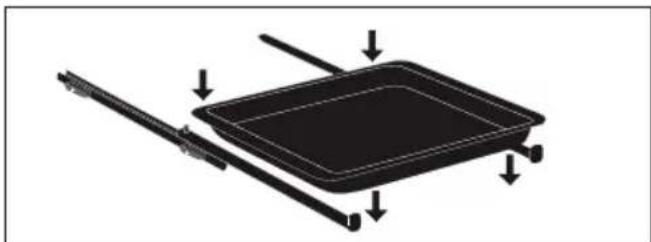
Insert your 2 shelf runners and then put your tray on the 2 rails. The system is now ready to use.
To remove the rails, remove the shelf runners again.
Slightly pris apart the bottom of the tabs fixed on each rail to release them from the shelf runner. Pull the rail towards you.

2 USING YOUR APPLIANCE
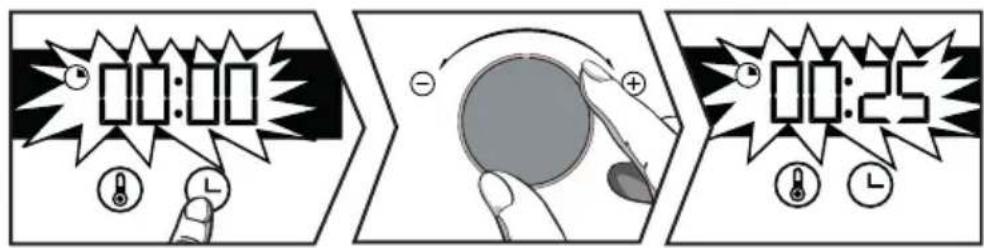
SETTINGS
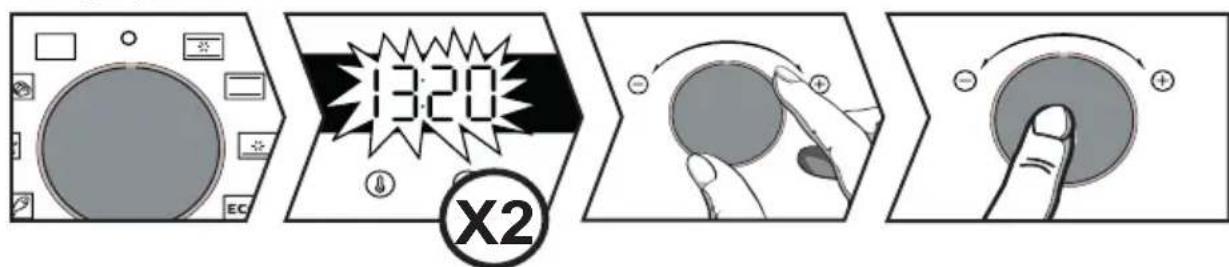
Setting the clock

When switching on, the display flashes at 12:00. Set the clock with + and - knob.
Confirm by pressing the knob.
If there is a power cut, the clock flashes. Reset it as above.
Changing the time
The function selector must be in position 0.
Press the key, the symbol appears. Press again.
Set the clock with the + and - knob. Confirm by pressing the knob.
Timer
This function can only be used when the oven is off.

The function selector must be in position 0.
Press the key, the symbol appears. The minute minder flashes. Set the timer with the + and - knob. Confirm by pressing the knob, the timer will then start and the current time reappears. Once the time has lapsed, there is a sound signal. To stop it, press any key.
NB: You can modify or cancel the timer at any time. To cancel, return to the timer's menu and set it to 00:00.
KEYPAD LOCK (CHILD SAFETY DEVICE).
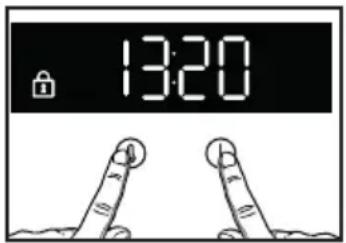
Press 6 and at the same time until the symbol 1 appears on the screen. To unlock it, press the 0 and keys until the symbol disappears from the screen.
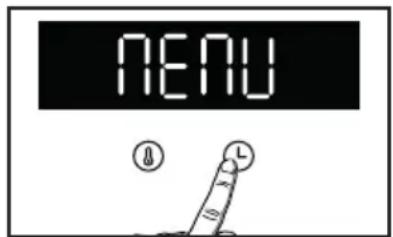
SETTINGSMENU
You can adjust different settings on your oven. To do so:
press the key until "MENU" displays to access the settings mode.
Use the knob to select the different settings. Confirm your choice by pressing the knob, activate and deactivate the different parameters with the + and - knob, and confirm with the knob; see table:
| 1-51 | AUTO: In cooking mode, the light inside the oven automatically turns off after 90 seconds. ON: In cooking mode, the light stays on all the time, except in ECO mode. |
| 2-5b | Activate/de-activate the beeping sound of the buttons |
| 3-5c | Activate/de-activate pre-heating mode |
| 4-5d | Activate/de-activate demonstration mode |
| 5-cd | After-sales information |
To exit the "MENU", press again on

Trad ventilated*
Min. temperature 35^ , max. 275^
Recommendation: 200^
Recommended for meat, fish, vegetables, preferably in an earthenware dish.

Traditional
Min. temperature 35^ , max. 275^
Recommendation: 200^
This cooking mode is not compatible with double-boiler cooking.
Recommended for slow, gentle cooking: rich game, etc. For retaining the juices in red meat roasts. For simmering in a covered casserole, dishes that were begun on the hob (coq au vin, stew).

Pulsed bottom
Min. temperature 75^ , max. 250^
Recommendation: 180^
Recommended for moist dishes (quiches, tarts with juicy fruits, etc.). The pastry will be thoroughly cooked on the bottom.
Recommended for recipes which rise (cake, brioche, kügelhopf, etc.) and for soufflés which will not be stopped by a crust forming on top.

Eco*
Min. temperature 35^ , max. 275^
Recommendation: 200^
This cooking mode is not compatible with double-boiler cooking.
This setting saves energy while maintaining the quality of the cooking.
All types of cooking are done without preheating.
*Cooking mode as per standard EN 60350-1: to demonstrate compliance with requirements of the energy label of European regulation UE/65/2014.

High grill
Positions 1 to 4
Recommendation: Position 4
Recommended for toast, gratin dishes, browning crème brûlée, etc.

Pulsed grill
Min. temperature 100^ , max. 250^
Recommendation: 200^
Juicy poultry and roasts, crisp on all sides. Place the 45mm multi-purpose drip tray on the bottom shelf.
Recommended for all spit-roasted poultry or meat, for sealing and thoroughly cooking a leg or a rib of beef. To retain the moist texture of fish steaks.

Bread
Min. temperature 35^ , max. 220^
Recommendation: 205^
Recommended cooking sequence for bread making. Do not forget to place a dish of water in the bottom to obtain a crisp, golden crust.
Automatic functions:
Your over offers 3 new cooking functions which automatically combine two cooking modes to preserve the nutritional qualities of your food and cook faster.

Poultry
Recommended to cook chicken.

Fish
Recommended to cook whole fish ( Salmon, Sea Bass, Cod, etc.).

White meat
Recommended to preserve the juiciness and tenderness of veal roasts.
2 USING YOUR APPLIANCE
To use these 3 functions, simply add 500ml of warm water in your 45mm multi-purpose drip tray and place it on the bottom shelf of your oven, and the dish you want to cook on level 3.
Adjust the weight on your display with the +/- knob and confirm it by pressing it
When steam cooking, condensation forms on the inside of the glass.
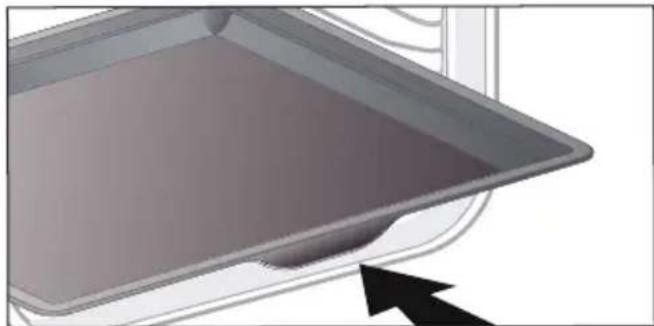
It is possible for water resulting from this condensation to be retained by the chute (^*) . In this case, this water must be soaked up with a sponge after cooking to avoid building up.
(*) The channel is underneath the door seal, at the bottom of the oven's frame.
START A COOKING PROGRAMME
Start a cooking programme immediately

The time displayed by the programmer is not flashing.
Turn the function selector to any position.
For manual functions:
The temperature starts to increase at once. Your oven suggests a temperature which can be modified. The oven heats up and the temperature indicator flashes. A series of beeps sounds when the oven has reached the programmed temperature.
Changing the temperature

Press ①
Set the temperature with the + and - knob. Confirm by pressing the knob.
2 USING YOUR APPLIANCE
Changing the cooking time

"Smart Assist" system
Your oven has the "Smart Assist" function which, when setting a cooking programme, will suggest a cooking time which can be modified depending on the selected cooking mode (see table).
If you change the time, confirm by pressing the knob. The time starts to count down as soon as the cooking temperature is reached.
| COOKING FUNCTION | COOKING TIME |
| 30 min | |
| 30 min | |
| 30 min | |
| ECO | 30 min |
| 7 min | |
| 15 min |
Press ① . Your oven suggests a cooking time which can be modified. Set the cooking time with the + and - knob. Confirm by pressing the knob.
Changing the cooking end time

After setting the cooking time, press ; the cooking end time flashes. Set the new cooking end time with + and - knob.
Confirm by pressing the knob.
The cooking end time display stops flashing.
Your oven will start later on to finish cooking at the selected time.
NB: This function is not available with the Grill setting.
5 CARE
CLEANING THE INSIDE AND OUTSIDE
Cleaning the cavity
With this function you will spend less time cleaning your oven, and be eco-responsible.
To do so, spray the oven cavity with 300ml water and launch the steam cleaning function by positioning the knob on depending on model) for 35 min.
Cleaning the outer surfaces
Use a window washing product applied to a soft cloth. Do not use abrasive creams or scouring sponges.
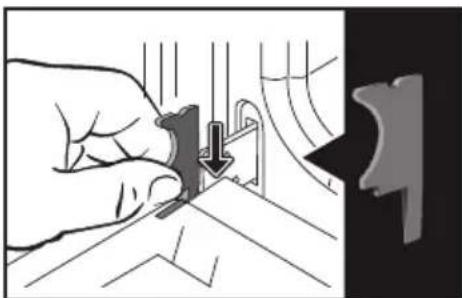
Cleaning the shelf runners
Remove the shelf runners to clean them. Lift the front part of the shelf runner upwards, push the shelf runner assembly and release the front hook from its housing.
Then gently pull the whole shelf runner towards you to release the rear hooks from their housing. Pull out the two shelf supports.

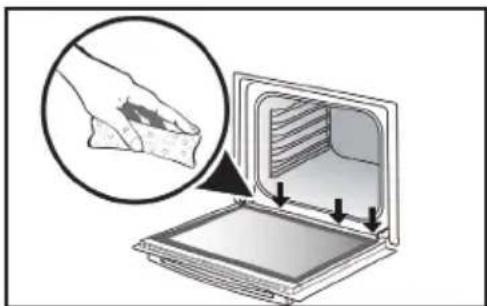
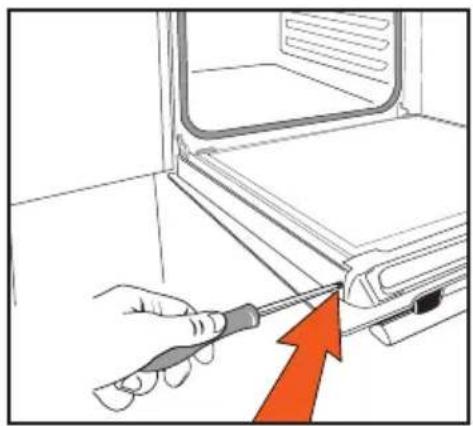
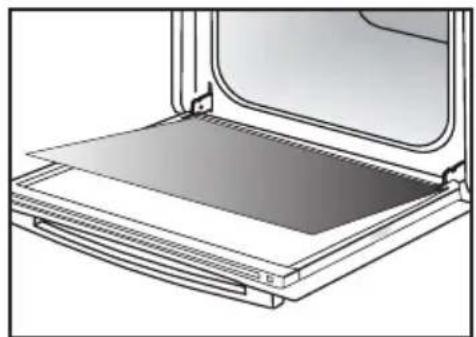
Removing the oven door glass panels
Open the door fully and block it with the plastic wedge provided with your appliance.
Unscrew the two screws on either side of the door mounts using a torx screwdriver (T20), then pull the rail out towards you.
Cleaning the outer surfaces
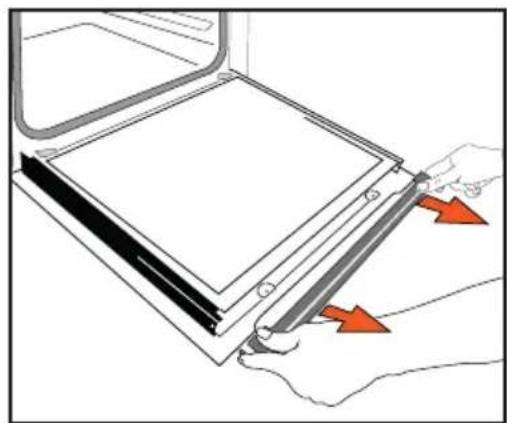
Remove the first glass panel: Do not soak the glass panels in water. Rinse with clean water and dry off with a lint-free cloth.
Re-assembling the door
After cleaning, reposition the glass pane and rail and screw it back in. Remove the plastic wedge before closing the door. Your appliance is now ready to use again.
Replacing the light bulb

Important:
Make sure the appliance is disconnected from the power supply before replacing the bulb in order to avoid the risk of electric shock. Change the lamp only when the appliance has cooled down.

Bulbdetails:
25W, 220-240 V\~, 300^ G9 cap. You can replace the bulb yourself. Unscrew the view port and remove the bulb (use a rubber glove, which will make it easier to remove). Insert the new bulb and replace the view port. This product contains a light source with energy rating G.
PROBLEMS AND SOLUTIONS
| Questions Troubleshooting and Solutions | |
| The oven is not heating. | Check that the oven is correctly connected and that your installation's fuse is not out of service. Increase the selected temperature. |
| The oven light is not working. | Replace the bulb or the fuse. Check that the oven is correctly connected. |
| The cooling fan continues to operate after the oven stops. | This is normal; the fan may continue running until a maximum of 1 hour after cooking to lower the temperature inside and outside the oven. If the fan runs for over an hour, contact the After Sales Service. |
| The pyrolysis cleaning cycle does not begin | Check that the door is closed. There may be a door locking or temperature sensor fault. If the fault persists, contact the Customer Service Department. |
| The symbol flashes in the display | Door locking fault. Contact the Customer Services Department. |
| Double-boiler cooking | Use ventilation cooking modes for double-boiler cooking. |
| Vibration noise. | Make sure the power cord is not in contact with the rear surface of the oven. This will not have any impact on your appliance's operation, however it may cause a vibration noise when the fan is running. Remove your appliance and move the cord away. Reposition your oven. |
7 COOKING TIPS
| TYPE OF FOOD | * | * | * | * | * | * | * | ||||||||
| c | c | c | c | c | c | c | min. | ||||||||
| Meat | |||||||||||||||
| Roast pork (1 kg) | 200 | 2 | 180 2 | 60 | |||||||||||
| Roast veal (1 kg) | 200 2 | 180 2 | 60-70 | ||||||||||||
| Roast beef | 240 2 | 30-40 | |||||||||||||
| Lamb (leg, shoulder 2.5 kg) | 220 1 | 220 | 200 2 | 60 | |||||||||||
| Poultry (1kg) | 200 2 | 220 | 180 2 | 210 3 | 60 | ||||||||||
| Large pieces of poultry | 180 1 | 60-90 | |||||||||||||
| Chicken thighs | 220 3 | 210 3 | 20-30 | ||||||||||||
| Pork/veal chops | 210 3 | 20-30 | |||||||||||||
| Beef ribs (1 kg) | 210 3 | 210 3 | 20-30 | ||||||||||||
| Mutton ribs | 210 3 | 20-30 | |||||||||||||
| Fish | |||||||||||||||
| Grilled fish | 275 4 | 15-20 | |||||||||||||
| Cooked fish | 200 3 | 180 3 | 30-35 | ||||||||||||
| Fish papillotte | 220 3 | 200 3 | 15-20 | ||||||||||||
| Vegetables | |||||||||||||||
| Gratins (precooked ingredients) | 275 2 | 30 | |||||||||||||
| Potato gratins | 200 2 | 180 2 | 45 | ||||||||||||
| Lasagne | 200 3 | 180 3 | 45 | ||||||||||||
| Stuffed tomatoes | 170 3 | 160 2 | 30 | ||||||||||||
| Pastries | |||||||||||||||
| Sponge cake - Génoise | 180 2 | 35 | |||||||||||||
| Swiss roll | 220 3 | 5-10 | |||||||||||||
| Brioche | 180 1 | 210 | 35-45 | ||||||||||||
| Brownies | 180 2 | 175 3 | 20-25 | ||||||||||||
| Cake - Pound cake | 180 1 | 80 | 45-50 | ||||||||||||
| Clafoutis | 200 2 | 180 3 | 30-35 | ||||||||||||
| Creams | 165 2 | 30-40 | |||||||||||||
- Depending on model
| TYPE OF FOOD | * | * | * | * | * | * | * | |||||||
| °C | °C | °C | °C | °C | °C | °C | °C | °C | °C | °C | °C | °C | min. | |
| Pastries | ||||||||||||||
| Cookies - Shortbread | 175 3 | 15-20 | ||||||||||||
| Kugelhopf | 180 2 | 40-45 | ||||||||||||
| Meringues | 100 2 | 60-70 | ||||||||||||
| Madeleines | 220 3 | 200 3 | 5-10 | |||||||||||
| Choux pastry | 200 3 | 180 3 | 30-40 | |||||||||||
| Individual puff pastry | 220 3 | 200 3 | 5-10 | |||||||||||
| Savarin cake | 180 3 | 30-35 | ||||||||||||
| Shortcrust pastry tart | 200 1 | 195 1 | 30-40 | |||||||||||
| Thin puff pastry tart | 215 1 | 200 1 | 20-25 | |||||||||||
| Tart made with yeast-based pastry | 210 1 | 200 1 | 10-30 | |||||||||||
| Other | ||||||||||||||
| Skewers | 220 3 | 210 4 | 10-15 | |||||||||||
| Terrine pâté | 200 2 | 190 2 | 80-100 | |||||||||||
| Shortcrust pizza | 200 2 | 30-40 | ||||||||||||
| Bread dough pizza | 15-18 | |||||||||||||
| Quiches | 35-40 | |||||||||||||
| Soufflé | 50 | |||||||||||||
| Savoury pies | 200 2 | 40-45 | ||||||||||||
| Bread | 220 | 200 | 220 | 30-40 | ||||||||||
| Toasted bread | 180 | 275 4 | 5 | 2-3 | ||||||||||
| Casseroles (stews) | 180 2 | 90-180 | ||||||||||||
- Depending on model

All the T°C and cooking times are given for preheated ovens
Note: Before putting them in the oven, all meats must be kept at room temperature for at least one hour.
| EQUIVALENT: GAS MARKS T°C | |||||||||
| °C | 30 | 60 90 | 120 | 150 | 180 | 210 | 240 | 275 | |
| Gas marks | 1 | 2 | 3 | 4 | 5 | 6 | 7 | 8 | 9 and max |
| FUNCTION PERFORMANCE TESTS CEI STANDARD 60350 | ||||||
| FOOD | Cooking mode | LEVEL A | Accessories °C Min. | TIME | PRE-HEAT | |
| Short-bread (8.4.1) | 5 45-mm pan 150 30-40 yes | |||||
| Short-bread (8.4.1) | 5 45-mm pan 150 25-35 yes | |||||
| Short-bread (8.4.1) | 2+ 5 45 mm pan + wire rack | 150 25-45 yes | ||||
| Short-bread (8.4.1) | 3 45-mm pan 175 25-35 yes | |||||
| Short-bread (8.4.1) | 2+ 5 45 mm pan + wire rack | 160 30-40 yes | ||||
| Small cakes | 5 45-mm pan 170 25-35 yes | |||||
| Small cakes | 5 45-mm pan 170 25-35 yes | |||||
| Small cakes | 2+ 5 45 mm pan + wire rack | 170 20-40 yes | ||||
| Small cakes | 3 45-mm pan 170 25-35 yes | |||||
| Small cakes | 2+ 5 45 mm pan + wire rack | 170 25-35 yes | ||||
| Fat-free sponge cake (8.5.1) | 4 wire rack 150 30-40 yes | |||||
| Fat-free sponge cake (8.5.1) | 4 wire rack 150 30-40 yes | |||||
| Fat-free sponge cake (8.5.1) | 2+ 5 | 45 mm pan + wire rack | 150 30-40 yes | |||
| Fat-free sponge cake (8.5.1) | 3 | 150 30-40 yes | ||||
| Fat-free sponge cake (8.5.1) | 2+ 5 | 45 mm pan + wire rack | 150 30-40 yes | |||
| Apple pie (8.5.2) | 1 wire rack 170 90-120 yes | |||||
| Apple pie (8.5.2) | 1 wire rack 170 90-120 yes | |||||
| Apple pie (8.5.2) | 3 wire rack 180 90-120 yes | |||||
| Browned surface (9.2.2) | 5 wire rack 275 3-6 yes | |||||
Depending on
model
NOTE: When cooking on 2 levels, dishes can be removed at different times.
informace dotyczac domowych pekarnikow (UE n° 662014)
Informaties relatives a formos domesticos (UE n° 68/2014)
Formacie v priade fur na peceie pre domicnst (UE n' 66/2014)
Information on hushallsignar (UE n° 56/2014)

Informationen zu Haushattsbackofen (UE n° 662014)
Informacion sobre los homos domesesticos (UE n° 662014)
Informacion relative to fomir per use domestico (UE n° 662014)
Informacion met te bekeckling lid hushuodelle cves (UE n° 662014)
Kotlikoluksen uunien tiodet (UE n° 662014)
END Information for domestic coven (UE n7 66/2014) FR Informations concenantie la foure domestiques (UE n6 68/2014) CSIT Inlarmace lykajic: le lub pro dominost (UE n6 66/2014) DAN Opyniger for ovne ill hushholdningstrug (UE n6 66/2014) EL Npnpopoepe yao kaoiaokoi qipovou (UE n7 68/2014)
| Symbol | Init Value | EN Symbol-FR. Symbole-CS: Znäka DA; Symbol DE: Symbol ES. Simboi-IT: Simboi-NL. Symbol PL: Oznacenzne PT. Simboi-SK: Symbol EL: Šäβöko-Fl: Symbol SV: Symbol. EN Value-FR. Value-CS: Hrodola-DA: Vardé-DE: Weit-ES: Vaidy-IT: Valore-NL: Wards-PL: Warid-PS: Valo-SC: Hrodola-EL: Apiljumjuri rur-FL: Arvo-SV: Vädde. EN Unit-FR. Unit-CS: Jednokka-DA: Enhod-DE: Einhol-ES: Unidad-IT: Unidad-IT: Unidad de misure-NL: Eneol-PL: Jodinost-PL: Jodinost-PL: Jodinost-PL: Jodinost-PL: Jodinost-PL: Jodinost-PL: Jodinost-PL: Jodinost-PL: Jodinost-PL: Jodinost-PL: Jodinost-PL: Jodinost-PL: Jodinost-PL: Jodinost-PL: Jodinost-ML: Yvukovadu-FL: Yvukovadu-FL: Yvukovadu-FL: Yvukovadu-FL: Yvukovadu-FL: Yvukovadu-FL: Yvukovadu-FL: Yvukovadu-FL: Yvukovadu-FL: Yvukovadu-FL: Yvukovadu-FL: Yvukovadu-FLY | |||||||||||||||
| Type norme | OR724M7 | EN Type norme-FR. Type norme-CS: Model-DA: Normtype-DE: Model-IT: Typo de norma-IL: Type standard-PL: Typ wedg indormy-PT: Typo de norma-IL: Type standard-PL: Typ wrg indormy-PT: Typo de norma-IL: Type standard-PL: Typ wrg indormy-PT: Typo de norma-IL: Type standard-PL: Typ wrg indormy-PT: Typo de norma-IL: Type standard-PL: Typ wrg indormy-PT: Typo de norma-IL: Type standard-PL: Typ wrg indormy-PT: Typo de norma -IL: Typo de norma-IL: Typo de norma-IL: Typo de norma-IL: Typo de norma-IL: Typo de norma-IL: Typo de norma-IL: Typo de norma-IL: Typo de norma-IL: Typo de norma-IL: Typo de norma-IL: Typo de norma-IL: Typo de norma-IL: Typo de norma-IL: TypO: Yvukovadu-FL: Yvukovadu-FL: Yvukovadu-FL: Yvukovadu-FL: Yvukovadu-FL: Yvukovadu-FL: Yvukovadu-FL: Yvukovadu-FL: Yvukovadu-FL: Yvukovadu-FL: Yvukovadu-FL :Yvukovadu-FL: Yvukovadu-FL: Yvukovadu-FL: Yvukovadu-FL: Yvukovadu-FL: Yvukovadu-FL: Yvukovadu-FL: Yvukovadu-FL: Yvukovadu-FL: Yvukovadu-FL: Yvukovadu-FL: YVukovadu-FL: Yvukovadu-FL: Yvukovadu-FL: Yvukovadu-FL: Yvukovadu-FL: Yvukovadu-FL: Yvukovadu-FL: Yvukovadu-FL: Yvukovadu-FL: Yvukovadu-FL: Yvukovadu-FL: YvUKOVADU-FL: YVUKOVADU-FL: YVUKOVADU-FL: YVUKOVADU-FL: YVUKOVADU-FL: YVUKOVADU-FL: YVUKOVADU-FL: YVUKOVADU-FL: YVUKOVADU-FL: YVUKOVADU-FL: YVUKOVADU-FL: YVUKOVADU-FL: YVOKOVADU-FL: YVOKOVADU-FL: YVOKOVADU-FL: YVOKOVADU-FL: YVOKOVADU-FL: YVOKOVADU-FL: YVOKOVADU-FL: YVOKOVADU-FL: YVOKOVADU-FL: YVOKOVADU-FL: YVOKOVADU-FL: YVOKOHADU-FL: YVOKOHADU-FL: YVOKOHADU-FL: YVOKOHADU-FL: YVOKOHADU-FL: YVOKOHADU-FL: YVOKOHADU-FL: YVOKOHADU-FL: YVOKOHADU-FL: YVOKOHADU-FL: YVOKOHADU-FL: YVOKOH ADU-FL: YVOKOHADU-FL: YVOKOHADU-FL: YVOKOHADU-FL: YVOKOHADU-FL: YVOKOHADU-FL: YVOKOHADU-FL: YVOKOHADU-FL: YVOKOHADU-FL: YVOKOHADU-FL: YVOKOHADU-FL: YVOKOHAD U-FL: YVOKOHADU-FL: YVOKOHADU-FL: YVOKOHADU-FL: YVOKOHADU-FL: YVOKOHADU-FL: YVOKOHADU-FL: YVOKOHADU-FL: YVOKOHADU-FL: YVOKOHADU-FL: YVOKOHADU-FL: YVOKOHADU | EN Model Identification-FR. Identificatio modelle-CS: Identificatio modele-DS: Identificatio modele-DS: Identificatio modele-DS: Identificatio modele-DS: Identificatio modele-DS: Identificatio modele-DS: Identificatio modele-DS: Identificatio modele-DS: Identificatio modele-DS: Identificatio modele-DS: Identificatio modele-DS: Identificatio modele-DS: Identificatio modele-DS: IdentificATIO-DS: Identificatio modele-DS: Identificatio modele-DS: Identificatio modele-DS: Identificatio modele-DS: Identificatio modele-DS: Identificatio modele-DS: Identificatio modele-DS: Identificatio modele-DS: Identificatio modele-DS: Identificatio modele-DS: Identificatio modele-DS: Identificatio modele-DS: IDENTIFICATIO-DS: Identificatio modele-DS: Identificatio modele-DS: Identificatio modele-DS: Identificatio modele-DS: Identificatio modele-DS: Identificatio modele-DS: Identificatio modele-DS: Identificatio modele-DS: Identificatio modele-DS: Identificatio modele-DS: Identificatio modele-DS: Identificatio modele-DS :Yvukovadu-FL: Yvukovadu-FL: Yvukovadu-FL: Yvukovadu-FL: Yvukovadu-FL: Yvukovadu-FL: Yvukovadu-FL: Yvukovadu-FL: Yvukovadu-FL: Yvukovadu-FL: Yvukovadu-FL :YVUKOVADU-FL: YVUKOVADU-FL: YVUKOVADU-FL: YVOKOHADU-FL: YVOKOHADU-FL: YVOKOHADU-FL: YVOKOHADU-FL: YVOKOHADU-FL: YVOKOHADU-FL: YVOKOHADU-FL: YVOKOHADU-FL: YVOKOHADU-FL: YVOKOHADU-FL: YVOKOADU-FL: YVOKOHADU-FL: YVOKOHADU-FL: YVOKOHADU-FL: YVOKOHADU-FL: YVOKOHADU-FL: YVOKOHADU-FL: YVOKOHADU-FL: YVOKOHADU-FL: YVOKOHADU-FL: YVOKOHADU-FL: YVOKOHABU-FL: YVOKOHADU-FL: YVOKOHADU-FL: YVOKOHADU-FL: YVOKOHADU-FL: YVOKOHADU-FL: YVOKOHADU-FL: YVOKOHADU-FL: YVOKOHADU-FL: YVOKOHADU-FL: YVOKOHADU-FL: YVOKOHADUA-FL: YVOKOHADU-FL: YVOKOHADU-FL: YVOKOHADU-FL: YVOKOHADU-FL: YVOKOHADU-FL: YVOKOHADU-FL: YVOKOHADU-FL: YVOKOHADU-FL: YVOKOHADU-FL: YVOKOHADU-FL: YVOKOHADU-YVOKOHADU-YVOKOHADU-YVOKOHADU-YVOKOHADU-YVOKOHADU-YVOKOHADU-YVOKOHADU-YVOKOHADU-YVOKOHADU-YVOKOHADU-YVOKOHADU-YVOKOHADU-YVOKOHADU-YVOKOHADU-YVOKOHADU-YVOKOHADU-YVOKOH ADU-YVOKOHADU-YVOKOHADU-YVOKOHADU-YVOKOHADU-YVOKOHADU-YVOKOHADU-YVOKOHADU-YVOKOHADU-YVOKOHADU-YVOKOHADU-YVOKOHADU-YVOKOHADU-YVOKOHADU-YVOKOHADU-YVOKOHADU-YVOKOHADU-YV OKOHADU-YVOKOHADU-YVOKOHADU-YVOKOHADU-YVOKOHADU-YVOKOHADU-YVOKOHADU-YVOKOHADU-YVOKOHADU-YVOKOHADU-YVOKOHADU-YVOKOHADU-YVOKOHADU-YVOKOHADU-YVOKOHADU-YVOKOHADU-YVOKOHADU.YVOKOHADU-YVOKOHADU-YVOKOHADU-YVOKOHADU-YVOKOHADU-YVOKOHADU-YVOKOHADU-YVOKOHADU-YVOKOHADU-YVOKOHADU-YVOKOHADU-YVOKOHADU-YVOKOHADU-YVOKOHADU-YVOKOHADU-YVOKOHADU-YVOKOHABU-YVOKOHADU-YVOKOHADU-YVOKOHADU-YVOKOHADU-YVOKOHADU-YVOKOHADU-YVOKOHADU-YVOKOHADU-YVOKOHADU-YVOKOHADU-YVOKOHADU-YVOKOHADU-YVOKOHADU-YVOKOHADU-YVOKOHADU-YVOKOHADU-YV | EN Type norme-FR. Identificatio modelle-CS: Identificatio modelle-DS: Identificatio modelle-DS: Identificatio modelle-DS: Identificatio modelle-DS: Identificatio modelle-DS: Identificatio modelle-DS: Identificatio modelle-DS: Identificatio modelle-DS: Identificatio modelle-DS: Identificatio modelle-DS: Identificatio modelle-DS: Identificatio modelle-DS: Identificatio modelle-DS: IdentificATIO-DS: Identificatio modele-DS: Identificatio modele-DS: Identificatio modele-DS: Identificatio modele-DS: Identificatio modele-DS: Identificatio modele-DS: Identificatio modele-DS: Identificatio modele-DS: Identificatio modele-DS: Identificatio modele-DS: Identificatio modele-DS: IdentIFICATIO-DS: Identificatio modele-DS: Identificatio modele-DS: Identificatio modele-DS: Identificatio modele-DS: Identificatio modele-DS: Identificatio modele-DS: Identificatio modele-DS: Identificatio modele-DS: Identificatio modele-DS: Identificatio modele-DS: Identificatio modele-DS: Identificatio modele- DS: Identificatio modele-DS: Identificatio modele-DS: Identificatio modele-DS: Identificatio modele-DS: Identificatio modele-DS: Identificatio modele-DS: Identificatio modele-DS: Identificatio modele-DS: Identificatio modele-DS: Identificatio modele-DS: Identificatio modele-DS: Identificatio modele-DS: IdentificAO-DS: IdentificAO-DS: IdentificAO-DS: IdentificAO-DS: IdentificAO-DS: IdentificAO-DS: IdentificAO-DS: IdentificAO-DS: IdentificAO-DS: IdentificAO-DS: IdentificAO-DS: IdentificAO-DS: IdentificAO-DS: IdentificAO-DS: IdentificAO-DS: IdentificAO-DS: IdentificAO-DS: IDENTIFICATIO-DS: Identificatio modele-DS: Identificatio modele-DS: Identificatio modele-DS: Identificatio modele-DS: Identificatio modele-DS: Identificatio modele-DS: Identificatio modele-DS: Identificatio modele-DS: Identificatio modele-DS: Identificatio modele-DS: Identificatio modele-DS: IdentificATIO-DS: IdentificATIO-DS: IdentificATIO-DS: IdentificATIO-DS: IdentificATIO-DS: IdentificATIO-DS: IdentificATIO-DS: IdentificATIO-DS: IdentificATIO-DS: IdentificATIO-DS: IdentificATIO-DS: IdentificATIO-DS: IdentificATIO-DS: IdentificATIO-DS: IdentificATIO-DS: IdentificATIO-DS: IdentificATIO-DS: IDENTIFICATIO-DS: IdentificATIO-DS: IdentificATIO-DS: IdentificATIO-DS: IdentificATIO-DS: IdentificATIO-DS: IdentificATIO-DS: IdentificATIO-DS: IdentificATIO-DS: IdentificATIO-DS: IdentificATIO-DS: IdentificATIO-DS: IdentificATIO-DS: IdentificATIO-DS: IdentificATIO-DS: IdentificATIO-DS: IdentificATIO-DS :Yvukovadu-FL: Yvukovadu-FL: Yvukovadu-FL: Yvukovadu-FL: Yvukovadu-FL: Yvukovadu-FL: Yvukovadu-FL: Yvukovadu-FL: Yvukovadu-FL: Yvukovadu-FL: Yvukovadu | EN Type norme-FR. Identificatio modelle-CS: Identificatio modelle-DS: Identificatio modelle-DS: Identificatio modelle-DS: Identificatio modelle-DS: Identificatio modelle-DS: Identificatio modelle-DS: Identificatio modelle-DS: Identificatio modelle-DS: Identificatio modelle-DS: Identificatio modelle-DS: Identificatio modelLE: Identificatio modelle-DS: Identificatio modelle-DS: Identificatio modelle-DS: Identificatio modelle-DS: Identificatio modelle-DS: Identificatio modelle-DS: Identificatio modelle-DS: Identificatio modelle-DS: Identificatio modelle-DS: Identificatio modelle-DS: Identificatio modelle-DS: Identificatio modelle-DS: IdentificAO-DS: IdentificAO-DS: IdentificAO-DS: IdentificAO-DS: IdentificAO-DS: IdentificAO-DS: IdentificAO-DS: IdentificAO-DS: IdentificAO-DS: IdentificAO-DS: IdentificAO-DS: IdentificAO-DS: IdentificAO-DS: IdentificAO-DS: IdentificAO-DS: IdentificAO-DS :Yvukovadu-FL: Yvukovadu-FL: Yvukovadu-FL: Yvukovadu-FL: Yvukovadu-FL: Yvukovadu-FL: Yvukovadu-FL: Yvukovadu-FL: Yvukovadu-FL: Yvukovadu-FL: Yvukovadu-YVOKOHADU-YVOKOHADU-YVOKOHADU-YVOKOHADU-YVOKOHADU-YVOKOHADU-YVOKOHADU-YVOKOHADU-YVOKOHADU-YVOKOHADU-YVOKOHADU-YVOKOHADU-YVOKOHADU-YVOKOHADU-YVOKOHADU-YVOKOHADU-YVOKOADU-YVOKOHADU-YVOKOHADU-YVOKOHADU-YVOKOHADU-YVOKOHADU-YVOKOHADU-YVOKOHADU-YVOKOHADU-YVOKOHADU-YVOKOHADU-YVOKOHADU-YVOKOHADU-YVOKOHADU-YVOKOHADU-YVOKOHADU-YVOKOHADU-YWOKOHADU-YWOKOHADU-YWOKOHADU-YWOKOHADU-YWOKOHADU-YWOKOHADU-YWOKOHADU-YWOKOHADU-YWOKOHADU-YWOKOHADU-YWOKOHADU-YWOKOHADU-YWOKOHADU-YWOKOHADU-YWOKOHADU-YWOKOHADU-YWOKOHAD UYOKOHADU-YWOKOHADU-YWOKOHADU-YWOKOHADU-YWOKOHADU-YWOKOHADU-YWOKOHADU-YWOKOHADU-YWOKOHADU-YWOKOHADU-YWOKOHADU-YWOKOHADU-YWOKOHADU-YWOKOHADU-YWOKOHADU-YWOKOHADU-YWOKOHADLUYOKOHADU-YWOKOHADU-YWOKOHADU-YWOKOHADU-YWOKOHADU-YWOKOHADU-YWOKOHADU-YWOKOHADU-YWOKOHADU-YWOKOHADU-YWOKOHADU-YWOKOHADU-YWOKOHADU-YWOKOHADU-YWOKOHADU-YWOKOHADU-YWOKOH ADU-YWOKOHADU-YWOKOHADU-YWOKOHADU-YWOKOHADU-YWOKOHADU-YWOKOHADU-YWOKOHADU-YWOKOHADU-YWOKOHADU-YWOKOHADU-YWOKOHADU-YWOKOHADU-YWOKOHADU-YWOKOHADU-YWOKOHADU-YWOKOHADU-YW OKOHADU-YWOKOHADU-YWOKOHADU-YWOKOHADU-YWOKOHADU-YWOKOHADU-YWOKOHADU-YWOKOHADU-YWOKOHADU-YWOKOHADU-YWOKOHADU-YWOKOHADU-YWOKOHADU-YWOKOHADU-YWOKOHADU-YWOKOHADU-YWOKOHADU.YWOKOHADU-YWOKOHADU-YWOKOHADU-YWOKOHADU-YWOKOHADU-YWOKOHADU-YWOKOHADU-YWOKOHADU-YWOKOHADU-YWOKOHADU-YWOKOHADU-YWOKOHADU-YWOKOHADU-YWOKOHADU-YWOKOHADU-YWOKOHADU-YWOKOH ADLUYOKOHADU-YWOKOHADU-YWOKOHADU-YWOKOHADU-YWOKOHADU-YWOKOHADU-YWOKOHADU-YWOKOHADU-YWOKOHADU-YWOKOHADU-YWOKOHADU-YWOKOHADU-YWOKOHADU-YWOKOHADU-YWOKOHADU-YWOKOHADU-YWOKOADU-YWOKOHADU-YWOKOHADU-YWOKOHADU-YWOKOHADU-YWOKOHADU-YWOKOHADU-YWOKOHADU-YWOKOHADU-YWOKOHADU-YWOKOHADU-YWOKOHADU-YWOKOHADU-YWOKOHADU-YWOKOHADU-YWOKOHADU-YWOKOHADU-Y WOKOHADU-YWOKOHADU-YWOKOHADU-YWOKOHADU-YWOKOHADU-YWOKOHADU-YWOKOHADU-YWOKOHADU-YWOKOHADU-YWOKOHADU-YWOKOHADU-YWOKOHADU-YWOKOHADU-YWOKOHADU-YWOKOHADU-YWOKOHADU-YWOKOHADUPY-KTCHNCKDAPKTHI-POTCIPKTHI-POTCIPKTHI-POTCIPKTHI-POTCIPKTHI-POTCIPKTHI-POTCIPKTHI-POTCIPKTHI-POTCIPKTHI-POTCIPKTHI-POTCIPKTHI-POTCIPKTHI-POTCIPKTHI-POTCIPKTHI-POTCIPKTHI-POTCIPK THYKONCCHPOMT | EN Type norme-FR. Identificatio modelle-CS: Identificatio modelle-DS: Identificatio modelle-DS: Identificatio modelle-DS: Identificatio modelle-DS: Identificatio modelle-DS: Identificatio modelle-DS: Identificatio modelle-DS: Identificatio modelle-DS: Identificatio modelle-DS: Identificatio modelle-DS: Identificatio modelL: Yvukovadu-FL: Yvukovadu-FL: Yvukovadu-FL: Yvukovadu-FL: Yvukovadu-FL: Yvukovadu-FL: Yvukovadu-FL: Yvukovadu-FL: Yvukovadu-FL: Yvukovadu-FL: Yvukovadu-FL:Yvukovadu-YVOKOHADU-YVOKOHADU-YVOKOHADU-YVOKOHADU-YVOKOHADU-YVOKOHADU-YVOKOHADU-YVOKOHADU-YVOKOHADU-YVOKOHADU-YVOKOHADU-YVOKOHADU-YVOKOHADU-YVOKOHADU-YVOKOHADU-YVOKOH ADU-YWOKOHADU-YWOKOHADU-YWOKOHADU-YWOKOHADU-YWOKOHADU-YWOKOHADU-YWOKOHADU-YWOKOHADU-YWOKOHADU-YWOKOHADU-YWOKOHADU-YWOKOHADU-YWOKOHADU-YWOKOHADU-YWOKOHADU-YWOKOHAD UYOKOCDALYKINOWCCHPOMT | EN Type norme-FR. Identificatio modelle-CS: Identificatio modelle-DS: Identificatio modelle-DS: Identificatio modelle-DS: Identificatio modelle-DS: Identificatio modelle-DS: Identificatio modelle-DS: Identificatio modelle-DS: Identificatio modelle-DS: Identificatio modelle-DS: Identificatio modelle-DS :Yvukovadu-FL: Yvukovadu-FL: Yvukovadu-FL: Yvukovadu-FL: Yvukovadu-FL: Yvukovadu-FL: Yvukovadu-FL: Yvukovadu-FL: Yvukovadu-FL: Yvukovadu-FL: Yvukovad u L'YvOKOHADU-YVOKOHADU-YVOKOHADU-YVOKOHADU-YVOKOHADU-YVOKOHADU-YVOKOHADU-YVOKOHADU-YVOKOHADU-YVOKOHADU-YVOKOHADU-YVOKOHADU-YVOKOHADU-YVOKOHADU-YVOKOHADU-YVOKOHADU-YVOKOHAD UYOKOCDALYKINOWCCHPOMT | EN Type norme-FR. Identificatio modelle-CS: Identificatio modelle-DS: Identificatio modelle-DS: Identificatio modelle-DS: Identificatio modelle-DS: Identificatio modelle-DS: Identificatio modelle-DS: Identificatio modelle-DS: Identificatio modelle-DS: IdentificATIO-DS: IdentificATIO-DS: IdentificATIO-DS: IdentificATIO-DS: IdentificATIO-DS: IdentificATIO-DS: IdentificATIO-DS: IdentificATIO-DS: IdentificATIO-DS: IdentificATIO-DS: IdentificATIO-DS: IdentificATIO-DS: IdentificATIO-DS: IdentificATIO-DS: IdentificATIO-DS: IdentificATIO-DS : Yvukovadu-FL: Yvukovadu-FL: Yvukovadu-FL: Yvukovadu-FL: Yvukovadu-FL: Yvukovadu-FL: Yvukovadu-FL: Yvukovadu-FL: Yvukovadu-FL: Yvukovadu-FL: Yvukovadu-FL:Yvukovadu-YVOKOHADU-YVOKOHADU-YVOKOHADU-YVOKOHADU-YVOKOHADU-YVOKOHADU-YVOKOHADU-YVOKOHADU-YVOKOHADU-YVOKOHADU-YVOKOHADU-YVOKOHADU-YVOKOHADU-YVOKOHADU-YVOKOHADU-YVOKOCDALYKINOWCCHPOMT | EN Type norme-FR. Identificatio modelle-CS: Identificatio modelle-DS: Identificatio modelle-DS: Identificatio modelle-DS: Identificatio modelle-DS: Identificatio modelle-DS: Identificatio modelle-DS: Identificatio modelle-DS: Identificatio modelle-DS: Identificatio modelle-DS :Yvukovadu-FL: Yvukovadu-FL: Yvukovadu-FL :Yvukovadu-FL :Yvukovadu-FL :Yvukovadu-FL :Yvukovadu-FL :Yvukovadu-YVOKOHADU-YVOKOHADU-YVOKOHADU-YVOKOHADU-YVOKOHADU-YVOKOHADU-YVOKOHADU-YVOKOHADU-YVOKOHADU-YVOKOHADU-YVOKOHADU-YVOKOHADU-YVOKOHADU-YVOKOHADU-YVOKOHADU-YVOKOLNCHPOMT | EN Type norme-FR. Identificatio modelle-CS: Identificatio modelle-DS: Identificatio modelle-DS: Identificatio modelle-DS: Identificatio modelle-DS: Identificatio modelle-DS: Identificatio modelle-DS: Identificatio modelle-DS: Identificatio modelle-DS: Identificatio modelle-DS: Identificatio modelle-DS: IDENTIFICATIO-DS: IDENTIFICATIO-DS: IDENTIFICATIO-DS: IDENTIFICATIO-DS: IDENTIFICATIO-DS: IDENTIFICATIO-DS: IDENTIFICATIO-DS: IDENTIFICATIO-DS: IDENTIFICATIO-DS: IDENTIFICATIO-DS: IDENTIFICATIO-DS: IDENTIFICATIO-DS: IDENTIFICATIO-DS: IDENTIFICATIO-DS: IDENTIFICATIO-DS: IDENTIFICATIO-DS: IDENTIFICATIO-DS: IdentificATIO-DS: IdentificATIO-DS: IdentificATIO-DS: IdentificATIO-DS: IdentificATIO-DS: IdentificATIO-DS: IdentificATIO-DS: IdentificATIO-DS: IdentificATIO-DS: IdentificATIO-DS: IdentificATIO-DS: IdentificATIO-DS: IdentificATIO-DS: IdentificATIO-DS: IdentificATIO-DS :Yvukovad u FL :Yvukovad u FL :Yvukovad u FL :Yvukovad u FL :Yvukovad u FL :Yvukovad u FL :Yvukovad u FL :Yvukovad u FL :Yvukovad u FL :Yvukovad u FL :Yvukovad u FL :Yvukovad u FL :Yvukovad u FL :Yvokohedu | EN Type norme-FR. Identificatio modelle-CS: Identificatio modelle-DS: Identificatio modelle-DS: Identificatio modelle-DS: Identificatio modelle-DS: Identificatio modelle-DS: Identificatio modelle-DS: Identificatio modelle-DS: Identificatio modelle-DS: Identificatio modelle-DS: Identificatio modelle-DS: Identificatio modiele-DS: Identificatio modiele-DS: Identificatio modiele-DS :Yvukovadu-FL: Yvukovadu-FL: Yvukovadu-FL: Yvukovadu-FL: Yvukovadu-FL: Yvukovadu-FL: Yvukovadu-FL: Yvukovadu-FL: Yvukovadu-FL: Yvukovadu-FL: Yvukovad'u FL :Yvukovad u FL :Yvukovad u FL :Yvukovad u FL :Yvukovad u FL :Yvukovad u FL :Yvukovad u FL :Yvukovad u FL :Yvukovad u FL :Yvukovad u FL :Yvukovad u FL :Yvukovad u FL :Yvukovad u FL :YwOKOHADU-YWOKOHADU-YWOKOHADU-YWOKOHADU-YWOKOHADU-YWOKOHADU-YWOKOHADU-YWOKOHADU-YWOKOHADU-YWOKOHADU-YWOKOHADU-YWOKOHADU-YWOKOHADU-YWOKOHADU-YWOKOHADU-YWOKOHADU-YWOKOHAD/U YWOKOHADU-YWOKOHADU-YWOKOHADU-YWOKOHADU-YWOKOHADU-YWOKOHADU-YWOKOHADU-YWOKOHADU-YWOKOHADU-YWOKOHADU-YWOKOHADU-YWOKOHADU-YWOKOHADU-YWOKOHADU-YWOKOHADU-YWOKOHADU-YWOKOH | ||||||
BRANDT FRANCE, Etablissement de CERGY, 5/7 avenue des Béthunes, 95310 SAINT OUEN L'AUMONE. SAS with a share capital of 100.000.000 euro RCS NANTERRE 801 250 531.
Domestic Electric Oven - Product Fiche As per the Commission Delegated Regulation (EU) N^ 65/204
| Trade Mark | DE DIETRICH |
| Commercial code | DOH4334* |
| Energy Efficiency Index (EEI cavity) | 89,5 |
| Energy Efficiency Class | A |
| Energy consumption per cycle in conventional mode | 0,77kWh |
| Energy consumption per cycle in fan-forced convection mode | 0,92kWh |
| Number of cavities | 1 |
| Heat source(s) per cavity | Electric |
| Volume of the cavity | 73l |
| European Union eco-label |

Information for domestic coven (UE n°60/2014)
TILBEHØR (IFØLGE MODELLEN)
- Sikker rist, der/DDke vipper
AEndring at temperature

Tryk pa ①
Juster temperaturen med + / - drejeknappen. Godkend ved at trykke pa drejeknappen.
"Smart Assist" system
ZUBEHÖR (JE NACH MODELL)
Information for domestic covers (UE n7 60/2014)
Information concerning les four domestices (UE n° 68/2014)
Informaticy hajicse lub prdoomost (UE n' 86/2014)
Oplysinger for ovne ill hushholdingsbrug (UE n 562014)
1
1.2.1.1. The application of the following formulae for the solution of the problem (1.1.1) is given in Appendix A.
Inforzation relative to form per lisc domestico (UE n'68/2014)
Information met belastung von huishohdujelle Kotlukausen umen fiedel (UNE 369/2014)
Informacao dotyczao domovich pekarnikov (US n° 662014)
mnnnne nnnnne nnnnne nnnnne nnnnne nnnnne nnnnne nnnnne nnnnne nnnnne nnnnne nnnnne nnnnne nnnnne nnnnne nnnnne nnnnne nnnnne nnnnne nnnnne nnnnne nnnnne nnnnne nnnnne nnnnne nnnnne
diamide v propide fur ni pecenie pre doanlost (UE n 662014)
Information on hushallsignar (UE n° 56/2014)
| Symbol | Init Value | EN Symbol: FR. Symbiole CE: Znake-DA, Symbiole DE: Symbiole ES: Simbo10-IT: Simbo10-NL: Simbio-PL: Oznaczejny PT: Simbio-SC: Simbio-EL: Zaufbice-FI: Symbioll SV: Symbioll EN: Valur-FR: Valur-CS: Hrodola-DA: Vardil-DE: Wert-ES: Valur-IT: Valur-NE: Wards-PL: Wards-PL: Wards-PL: Wards-PL: Apluy-PrjF: Arvo-SV: Värd. EN: Unit-FR: Unit-CS: Jednokka-DA: Enhed-DE: Einheit-ES: Unit-IT: Unit-IT: Unit-IT: Unit-IT: Unit-IT: Unit-IT: Unit-IT: Unit-IT: Unit-IT: Unit-IT: Unit-IT: Unit-IT: Unit-IT: Unit-IT: Unit-IT: Unit-IT: Unit-IT: Unit-IT: Unit-IT: Unit-IT: Unit-IT: Unit-IT: Unit-IT: Unit-IT: Unit-IT: Unit-ITA: Yildiz-EN: Enel-ERF: Energelik-DA: Energelik-ES: Energelik-IT: Energelik-IT: Energelik-IT: Energelik-IT: Energelik-IT: Energelik-IT: Energelik-IT: Energelik-IT: Energelik-IT: Energelik-IT: Energelik-IT: Energelik-IT: Energelik-IT: Energelik-IT: Energelik-IT: EN: EN: EN: EN: EN: EN: EN: EN: EN: EN: EN: EN: EN: EN: EN: EN: EN: EN: EN: EN: EN: EN: EN: EN: EN: EN: EN: EN: EN: EN: EN: EN: EN: EN: EN: EN: EN: EN: EN: EN: EN: EN: EN: EN: EN: EN: EN: EN: EN: EN: Energiy-FA: Energiy-FA: Energiy-FA: Energiy-FA: Energiy-FA: Energiy-FA: Energiy-FA: Energiy-FA: Energiy-FA: Energiy-FA: Energiy-FA: Energiy-FA: Energiy-FA: Energiy-FA: Energiy-FA: EN: EN: EN: EN: EN: EN: EN: EN: EN: EN: EN: EN: EN: EN: EN: EN: EN: EN: EN: EN: EN: EN: EN: EN: EN: EN: EN: EN: EN: EN: EN: EN: EN: EN: EN: EN: EN: EN: EN: EN: EN: EN: EN: EN: EN: EN: EN: EN: EN: 2018-2019-2020-2021-2022-2023-2024-2025-2026-2027-2028-2029-2030-2031-2032-2033-2034-2035-2036-2037-2038-2039-2040-2041-2042-2043-2044-2045-2046-2047-2048-2049-2050-2051-2052-2053-2054-2055-2056-2057-2058-2059-2100-2101-2102-2103-2104-2105-2106-2107-2108-2109-2110-2111-2112-2113-2114-2115-2116-2117-2118-2119-2120-2121-2122-2123-2124-2125-2126-2127-2128-2129-2130-2131-2132-2133-2134-2135-2136-2137-2138-2139-2140-2141-2142-2143-2144-2145-2146-2147-2148-2149-2150-2151-2152-2153-2154-2155-2156-2157-2158-2159-2160-2161-2162-2163-2164-2165-2166-2167-2168-2169-2170-2171-2172-2173-2174-2175-2176-2177-2178-2179-2180-2181-2182-2183-2184-2185-2186-2187-2188-2189-2190-2191-2192-2193-2194-2195-2196-2197-2198-2199-2200-2201-2202-2203-2204-2205-2206-2207-2208-2209-2210-2211-2212-2213-2214-2215-2216-2217-2218-2219-2220-2221-2222-2223-2224-2225-2226-2227-2228-2229-2230-2231-2232-2233-2234-2235-2236-2237-2238-2239-2240-2241-2242-2243-2244-2245-2246-2247-2248-2249-2250-2251-2252-2253-2254-2255-2256-2257-2258-2259-2300-2301-2302-2303-2304-2305-2306-2307-2308-2309-2310-2311-2312-2313-2314-2315-2316-2317-2318-2319-2320-2321-2322-2323-2324-2325-2326-2327-2328-2329-2330-2331-2332-2333-2334-2335-2336-2337-2338-2339-2340-2341-2342-2343-2344-2345-2346-2347-2348-2349-2350-2351-2352-2353-2354-2355-2356-2357-2358-2359-2400-2401-2402-2403-2404-2405-2406-2407-2408-2409-2410-2411-2412-2413-2414-2415-2416-2417-2418-2419-2420-2421-2422-2423-2424-2425-2426-2427-2428-2429-2430-2431-2432-2433-2434-2435-2436-2437-2438-2439-2440-2441-2442-2443-2444-2445-2446-2447-2448-2449-2450-2451-2452-2453-2454-2455-2456-2457-2458-2459-2500-2501-2502-2503-2504-2505-2506-2507-2508-2509-2510-2511-2512-2513-2514-2515-2516-2517-2518-2519-2520-2521-2522-2523-2524-2525-2526-2527-2528-2529-2530-2531-2532-2533-2534-2535-2536-2537-2538-2539-2540-2541-2542-2543-2544-2545-2546-2547-2548-2549-2600-2601-2602-6003-6004-6005-6006-6007-6008-6009-6010-6011-6012-6013-6014-6015-6016-6017-6018-6019-6020-6021-6022-6023-6024-6025-6026-6027-6028-6029-6030-6031-6032-6033-6034-6035-6036-6037-6038-6039-6040-6041-6042-6043-6044-6045-6046-6047-6048-6049-6050-6051-6052-6053-6054-6055-6056-6057-6058-6059-6060-6061-6062-6063-6064-6065-6066-6067-6068-6069-6070-6071-6072-6073-6074-6075-6076-6077-6078-6079-6080-6081-6082-6083-6084-6085-6086-6087-6088-6089-6090-6091-6092-6093-6094-6095-6096-6097-6098-6099-6100-6101-6102-6103-6104-6105-6106-6107-6108-6109-6110-6111-6112-6113-6114-6115-6116-6117-6118-6119-6120-6121-6122-6123-6124-6125-6126-6127-6128-6129-6130-6131-6132-6133-6134-6135-6136-6137-6138-6139-6140-6141-6142-6143-6144-6145-6146-6147-6148-6149-6150-6151-6152-6153-6154-6155-6156-6157-6158-6159-6160-6161-6162-6163-6164-6165-6166-6167-6168-6169-6170-6171-6172-6173-6174-6175-6176-6177-6178-6179-6180-6181-6182-6183-6184-6185-6186-6187-6188-6189-6190-6191-6192-6193-6194-6195-6196-6197-6198-6199-6200-6201-6202-6203-6204-6205-6206-6207-6208-6209-6210-6211-6212-6213-6214-6215-6216-6217-6218-6219-6220-6221-6222-6223-6224-6225-6226-6227-6228-6229-6230-6231-6232-6233-6234-6235-6236-6237-6238-6239-6240-6241-6242-6243-6244-6245-6246-6247-6248-6249-6250-6251-6252-6253-6254-6255-6256-6257-6258-6259-6260-6261-6262-6263-6264-6265-6266-6267-6268-6269-6300-6301-6302-6303-6304-6305-6306-6307-6308-6309-6310-6311-6312-6313-6314-6315-6316-6317-6318-6319-6320-6321-6322-6323-6324-6325-6326-6327-6328-6329-6330-6331-6332-6333-6334-6335-6336-6337-6338-6339-6340-6341-6342-6343-6344-6345-6346-6347-6348-6349-6350-6351-6352-6353-6354-6355-6356-6357-6358-6359-6360-6361-6362-6363-6364-6365-6366-6367-6368-6369-6370-6371-6372-6373-6374-6375-6376-6377-6378-6379-6380-6381-6382-6383-6384-6385-6386-6387-6388-6389-6390-6391-6392-6393-6394-6395-6396-6397-6398-6399-6400-6401-6402-6403-6404-6405-6406-6407-6408-6409-6410-6411-6412-6413-6414-6415-6416-6417-6418-6419-6420-6421-6422-6423-6424-6425-6426-6427-6428-6429-6430-6431-6432-6433-6434-6435-6436-6437-6438-6439-6440-6441-6442-6443-6444-6445-6446-6447-6448-6449-6450-6451-6452-6453-6454-6455-6456-6457-6458-6459-6460-6461-6462-6463-6464-6465-6466-6467-6468-6469-6470-6471-6472-6473-6474-6475-6476-6477-6478-6479-6480-6481-6482-6483-6484-6485-6486-6487-6488-6489-6490-6491-6492-6493-6494-6495-6496-6497-6498-6499-6500-6501-6502-6503-6504-6505-6506-6507-6508-6509-6510-6511-6512-6513-6514-6515-6516-6517-6518-6519-6520-6521-6522-6523-6524-6525-6526-6527-6528-6529-6530-6531-6532-6533-6534-6535-6536-6537-6538-6539-6540-6541-6542-6543-6544-6545-6546-6547-6548-6549-6550-6551-6552-6553-6554-6555-6556-6557-6558-6559-6560-6561-6562-6563-6564-6565-6566-6567-6568-6569-6570-6571-6572-6573-6574-6575-6576-6577-6578-6579-6580-6581-6582-6583-6584-6585-6586-6587-6588-6589-6590-6591-6592-6593-6594-6595-6596-6597-6598-6599-6600-6601-6602-6603-6604-6605-6606-6607-6608-6609-6610-6611-6612-6613-6614-6615-6616-6617-6618-6619-6620-6621-6622-6623-6624-6625-6626-6627-6628-6629-6630-6631-6632-6633-6634-6635-6636-6637-6638-6639-6640-6641-6642-6643-6644-6645-6646-6647-6648-6649-6650-6651-6652-6653-6654-6655-6656-6657-6658-6659-6660-6661-6662-6663-6664-6665-6666-6667-6668-6669-6670-6671-6672-6673-6674-6675-6676-6677-6678-6679-6680-6681-6682-6683-6684-6685-6686-6687-6688-6689-6690-6691-6692-6693-6694-6695-6696-6697-6698-6699-6700-6701-6702-6703-6704-6705-6706-6707-6708-6709-6710-6711-6712-6713-6714-6715-6716-6717-6718-6719-6720-6721-6722-6723-6724-6725-6726-6727-6728-6729-6730-6731-6732-6733-6734-6735-6736-6737-6738-6739-6740-6741-6742-6743-6744-6745-6746-6747-6748-6749-6750-6751-6752-6753-6754-6755-6756-6757-6758-6759-6700-6701-6702-6703-6704-6705-6706-6707-6708-6709-6710-6711-6712-6713-6714-6715-6716-6717-6718-67 | ||||||
ENC Information for domestic covers (UE n7 60/2014)
Information for domestic cows (UE n7 60/2014)
Informaties relative as fornos domesticos (UE n° 68/2014)
Formacie v tripe rur na penerie pre domicnst (UE n° 6)
Information on hushallsignar (UE n° 56/2014)

Informazioni zu Haushaltsbackofen (UE n° 66/2014)
Información sobre los homos doménticos (UE n° 66/2014)
Information relative to form per use domestico (UE n'68/2014)
Informatie met befeekte tot huishoudelseke Kottalouksien unan tiedot (UE n° 662014)
END Information for domestic ovens (UE n7 66/2014)
FRF Informations concernant les four domestiques (UE n7 68/2014)
CST Informace lykajic je trab pro domicirost (UE n7 66/2014)
DAN Opsininger for ovite ill hashotindrisbrug (UE n7 66/2014)
ELF Npnpopoepe yia kaoiokoi spolipovce (UE n7 68/2014)
| Symbol | Init Value | EN Symbol: FR. Symbbole CE: Znadekda-DA. Symbbole DE: Simbo10-IT: Simbo10-NL: Simbo10-PL: Oznaczejne PT. Simbo10-SK: Simbo10-EL: Zufäbke-Fi: Symboll SV: Symboll EN: Valer-LS: Hrodola-DA: Vardé-DE: Wert-ES: Valer-IT: Valer-NL: Wards-PL: Wards-PL: Wards-PL: Hrodola-EL: Apifuyuwi rui-PL: Arva-SV: Värdé. EN: Unit-FR: Unit-ES: Jednokka-DA: Enhed-DE: Einheit-ES: Unit-IT: Unit-IT: Unit-IT: Unit-IT: Unit-IT: Unit-IT: Unit-IT: Unit-IT: Unit-IT: Unit-IT: Unit-IT: Unit-IT: Unit-IT: Unit-IT: Unit-IT: Unit-IT: Unit-IT: Unit-IT: Unit-IT: Unit-IT: Unit-IT: Unit-IT: Unit-IT: Unit-IT: Unit-IT: Unit-ITA: Valinckia-FL: Mavilnielle SV: Enel. | ||||||||
| Type norme | ORZANME | EN Type norme-FR. Type norme-CS: Model:DA: Normtype-DE: Model:IT: Typo of normal-IL: Type standard-PL: Typ o avg. norm. | ||||||||
| Model identification | JAHAN KARMAK | JAHAN KARMAK | JAHAN KARMAK | JAHAN KARMAK | JAHAN KARMAK | JAHAN KARMAK | EN Model identification: FR. Identification du mode: CS: Identifiéance du mode: CA: Model:Identification: RE: Model:Identification: ES: Identification du mode: IT: Identifiéance du mode: I: Identifiéance du mode: NL: Identifiéance du mode: PL: Identifiéance du mode: PL: Identifiéance du mode: PL: Identifiéance du mode: PL: Identifiéance du mode: PL: Identifiéance du mode: PL: Identifiéance du mode: PL: Identifiéance du mode: PL: Identifiéance du mode: PL: Identifiéance du mode: PL: Identifiéance du mode: PL: Identifiéance du mode: PL :Identifiéance du mode: PL: Identifiéance du mode: PL: Identifiéance du mode: PL: Identifiéance du mode: PL: Identifiéance du mode: PL: Identifiéance du mode: PL: Identifiéance du mode: PL: Identifiéance du mode: PL: Identifiéance du mode: PL: Identifiéance du mode: PL: Identifiéance du mode: PL: IdentIFI: EN: Unit-FR: Unit-ES: Jednokka-DA: Enhed-DE: Einheit-ES: Unit-IT: Unit-IT: Unit-IT: Unit-IT: Unit-IT: Unit-IT: Unit-IT: Unit-IT: Unit-IT: Unit-IT: Unit-IT: Unit-IT: Unit-IT: Unit-IT: Unit-IT: Unit-IT: Unit-IT: Unit-IT: JAHAN KARMAK | EN Model identification: FR. Identification du mode: CS: Identifiéance du mode: CA: Model:Identification: RE: Model:Identification: Model:Identification: ES: Identification du mode: IT: Identifiéance du mode: I: Identifiéance du mode: NL: Identifiéance du mode: PL: Identifiéance du mode: PL: Identifiéance du mode: PL: Identifiéance du mode: PL: Identifiéance du mode: PL: Identifiéance du mode: PL: Identifiéance du mode: PL: Identifiéance du MODE: E: Identifiéance du MODE: F: Identifiéance du MODE: G: Identifiéance du MODE: H: Identifiéance du MODE: I: Identifiéance du MODE: I: Identifiéance du MODE: I: Identifiéance du MODE: I: Identifiéance du MODE: I: Identifiéance du MODE: I: Identifiéance du MODE: I: Identifiéance du MODE: I: Identifiéance du MODE: I: Identifiéance du MODE: I: Identifiéance du MODE: I: Identifiéance du MODE: I :Identifiéance du MODE: I :Identifiéance du MODE: I :Identifiéance du MODE: I :Identifiéance du MODE: I :IdentifiéANCE du MODE: I :IdentifiéANCE du MODE: I :IdentifiéANCE du MODE: I :IdentifiéANCE du MODE: I :IdentifiéANCE du MODE: I :IdentifiéANCE du MODE: I :IdentifiéANCE du MODE: I :IdentifiéANCE du MODE: I :IdentifiéANCE du MODE: I :IdentifiéANCE du MODE: I :IdentifiéANCE du MODE: I :IdentifiéANCE Du MODE: I :IdentifiéANCE Du MODE: I :IdentifiéANCE Du MODE: I :IdentifiéANCE Du MODE: I :IdentifiéANCE Du MODE: I :IdentifiéANCE Du MODE: I :IdentifiéANCE Du MODE: I :IdentifiéANCE Du MODE: I :IdentifiéANCE Du MODE: I :IdentifiéANCE Du MODE: I :IdentifiéANCE Du MODE: I :IdentifiéANCE DuMODE: I :IdentifiéANCE Du MODE: I :IdentifiéANCE Du MODE: I :IdentifiéANCE Du MODE: I :IdentifiéANCE Du MODE: I :IdentifiéANCE Du MODE: I :IdentifiéANCE Du MODE: I :IdentifiéANCE Du MODE: I :IdentifiéANCE Du MODE: I :IdentifiéANCE Du MODE: I :IdentifiéANCE Du MODE: I :IdentifiéANCE Du MODE :Elektrikett. | EN Type: of even-FR. Type of four-DS: Type ofty-DS:Type of two-DS:Type of three-DS:Type of four-DS:Type of two-DS:Type of three-DS:Type of four-DS:Type of two-DS:Type of three-DS:Type of four-DS:Type of two-DS:Type of three-DS:Type of four-DS:Type of two-DS:Type of three-DS:Type of four-DS:Type of two-DS:Type of three-DS:Type of four-DS:Type of two-DS:TYPE OF ELECTRICIAT-PL: Elecricity-PL: Elecricity-PL: Elecricity-PL: Elecricity-PL: Elecricity-PL: Elecricity-PL: Elecricity-PL: Elecricity-PL: Elecricity-PL: Elecricity-PL: Elecricity-PL: Elecricity-PL: Elecricity-PL: Elecricity-PL: Elecricity-CL:Mingzi-PL: Jingzhi-PL: Jingzhi-PL: Jingzhi-PL: Jingzhi-PL: Jingzhi-PL: Jingzhi-PL: Jingzhi-PL: Jingzhi-PL: Jingzhi-PL: Jingzhi-PL: Jingzhi-PL: Jingzhi-PL: Jingzhi-PL: Jingzhi-PL: Jingzhi-PL: Jingzhi-PL: Jingzhi-PL: Lingzhi-PL: Lingzhi-PL: Lingzhi-PL: Lingzhi-PL: Lingzhi-PL: Lingzhi-PL: Lingzhi-PL: Lingzhi-PL: Lingzhi-PL: Lingzhi-PL: Lingzhi-PL: Lingzhi-PL: Lingzhi-PL: Lingzhi-PL: Lingzhi-PL: Lingzhi-PL: Lingzhi-ML:Omicron-PL: Micropor###-PL: Micropor###-PL: Micropor###-PL: Micropor###-PL: Micropor###-PL: Micropor###-PL: Micropor###-PL: Micropor###-PL: Micropor###-PL: Micropor###-PL: Micropor###-PL: Micropor###-PL: Micropor###-PL: Micropor###-PL: Micropor###-ML:Omicron-PL: Micropor###-PL: Micropor###-PL: Micropor###-PL: Micropor###-PL: Micropor###-PL: Micropor###-PL: Micropor###-PL: Micropor###-PL: Micropor###-PL: Micropor###-PL: Micropor###-PL: Micropor###-PL: Micropor###-PL :Elektrikett. | |
| Volume per cavity | V | 73 | EN Volume per cavity-FR. Volume per cavity-DS: Object-IDirectional/PEPdich. Prosthesa-DP: Overground of cavity (electricity and gas) -CS,Zdozki lepa jodny-Elektrika 802,450,600,600,600,600,600,600,600,600,600,600,600,600,600,600,600,600,600,600,600,600,600,600,600,600,600,6 | EN Energy consumption (electricity) required to heat a standardised load in a cavity of an electric heated oven during the period of operation of the current energy efficiency (energy efficiency of the current): EN Energy consumption (electricity) necessary for each cavities of the current and/or the next period of operation of the current and/or the next period of operation of the current and/or the next period of operation of the current and/or the next period of operation of the current and/or the next period of operation of the current and/or the next period of operation of the current and/or the next period of operation of the current and/or the next period of operation of the current and/or the next period of operation of the current and/or the next period of operation of the current and/or the next period of operations of the current and/or the next period of operation of the current and/or the next period of operation of the current and/or the next period of operation of the current and/or the next period of operation of the current and/or the next period of operation of the current and/or the next period of operation of the current and/or the next period of operation of the current and/or the next period of operation of the current and/or the next period of operation of the current and/or the next period ofOperation of the current and/or the next period of operation of the current and/or the next period of operation of the current and/or the next period of operation of the current and/or the next period of operation of the current and/or the next period of operation of the current and/or the next period of operation of the current and/or the next period of operation of the current and/or the next period of operation of the current and/or the next period of operation of the current and/or the next period ofoperation of the current and/or the next period of operation of the current and/or the next period of operation of the current and/or the next period of operation of the current and/or the next period of operation of the current and/or the next period of operation of the current and/or the next period of operation of the current and/or the next period of operation of the current and/or the next period of operation of the current and/or the next period of operation of the current and/or the next period of Operation of the current and/or the next period of operation of the current and/or the next period of operation of the current and/or the next period of operation of the current and/or the next period of operation of the current and/or the next period of operation of the current and/or the next period of operation of the current and/or the next period of operation of the current and/or the next period of operation of the current and/or the next period of operation of the current and/or the next period ofoperatio of the current and/or the next period of operation of the current and/or the next period of operation of the current and/or the next period of operation of the current and/or the next period of operation of the current and/or the next period of operation of the current and/or the next period of operation of the current and/or the next period of operation of the current and/or the next period of operation of the current and/or the next period of operation of the current and/or the next period of operatio of the current and/or the next period of operation of the current and/or the next period of operation of the current and/or the next period of operation of the current and/or the next period of operation of the current and/or the next period of operation of the current and/or the next period of operation of the current and/or the next period of operation of the current and/or the next period of operation of the current and/or the next period of operation of the current and/or the next periodof operation of the current and/or the next period of operation of the current and/or the next period of operation of the current and/or the next period of operation of the current and/or the next period of operation of the current and/or the next period of operation of the current and/or the next period of operation of the current and/or the next period of operation of the current and/or the next period of operation of the current and/or the next period of operation of the current and/or the next periodof Operation of the current and/or the next period of operation of the current and/or the next period of operation of the current and/or the next period of operation of the current and/or the next period of operation of the current and/or the next period of operation of the current and/or the next period of operation of the current and/or the next period of operation of the current and/or the next period of operation of the current and/or the next period of operation of the current and/or the next periodofOperation of the current and/or the next period of operation of the current and/or the next period of operation of the current and/or the next period of operation of the current and/or the next period of operation of the current and/or the next period of operation of the current and/or the next period of operation of the current and/or the next period of operation of the current and/or the next period of operation of the current and/or the next period of operation of the current and/or the next periodof Operations of the current and/or the next period of operation of the current and/or the next period of operation of the current and/or the next period of operation of the current and/or the next period of operation of the current and/or the next period of operation of the current and/or the next period of operation of the current and/or the next period of operation of the current and/or the next period of operation of the current and/or the next period of operation of the current and/or the next period of opération de la cieurite en relation au type d'elecetique et des propriétaires de la cieurite en relation au type d'elecetique et des propriétaires de la cieurite en relation au type d'elecetique et des propriétaires de la cieurite en relation au type d'elecetique et des propriétaires de la cieurite en relation au type d'elecetique et des propriétaires de la cieurite en relation au type d'elecetrique et des propriétaires de la cieurite en relation au type d'elecetique et des propriétaires de la cieurite en relation au type d'elecetique et des propriétaires de la cieurite en relation au type d'elecetique et des propriétaires de la cieurite en relation au type d'elecetique et des propriétaires de la cieurite en relation au type D'elecetique et des propriétaires de la cieurite en relation au type D'elecetique et des propriétaires de la cieurite en relation au type D'elecetique et des propriétaires de la cieurite en relation au type D'elecetique et des propriétaires de la cieurite en relation au type D'elecetique et des propriétaires de la cieurime en relation au type D'elecetique et des propriétaires de la cieurime en relation au type D'elecetique et des propriétaires de la cieurime en relation au type D'elecetique et des propriétaires de la cieurime en relation au type D'elecetique et des propriétaires de la cieurime en relation au type D'elecetique et des propriétairesde la cieurime en relation au type D'elecetique et des propriétaires de la cieurime en relation au type D'elecetique et des propriétaires de la cieurime en relation au type D'elecetique et des propriétaires de la cieurime en relation au type D'elecetique et des propriétaires de la cieurime en relation au type D'elecetique and des propriétaires de la cieurime en relation au type D'elecetique and des propriétaires de la cieurime en relation au type D'elecetique and des propriétaires de la cieurime en relation au type D'elecetique and des propriétaires de la cieurime en relation au type D'elecetique and des propriétaires de la cieurime en relation au type D’elecetique and des propriétaires de la cieurime en relation au type D’elecetique and des propriétaires de la cieurime en relation au type D’elecetique and des propriétaires de la cieurime en relation au type D’elecetique and des propriétaires de la cieurime en relation au type D’elecetique and des propriétaires de la cieurime in relation to the operation of the current operation of the current operation of the current operation of the current operation of the current operation of the current operation of the current operation of the current operation of the current operation of the current operation of the current operation of the current operation of the current operation of the current operation of the current operation of the current operation of the current operation of the current operation of the current operation of the current operation of the current operation of the current operation of the current operation of the current operation of the current operation of the cieurme in relation to the operation of the current operation of the current operation of the current operation of the current operation of the current operation of the current operation of the current operation of the current operation of the current operation of the current operation of the current operation of the current operation of the current operation of the current operation of the current operation of the current operation of the current operation of the current operation of the current operation of the current operation of the current operation of the current operation of the current operation of the cieurmein relation to the operation of the current operation of the current operation of the current operation of the current operation of the current operation of the current operation of the current operation of the current operation of the current operation of the current operation of the current operation of the current operation of the current operation of the current operation of the current operation of the current operation of the current operation of the current operation of the current operation of the current operation of the current operation of the current operation of the current operation of the currentoperation of the current operation of the current operation of the current operation of the current operation of the current operation of the current operation of the current operation of the current operation of the current operation of the current operation of the current operation of the current operation of the current operation of the current operation of the current operation of the current operation of the current operation of the current operation of the current operation of the current operation of the current operation of the current operation of the current operation of the current operation of the currentoperation of the cieurme in relation to the operation of the current operation of the current operation of the current operation of the current operation of the current operation of the current operation of the current operation of the current operation of the current operation of the current operation of the current operation of the current operation of the current operation of the current operation of the current operation of the current operation of the current operation of the current operation of the current operation of the current operation of the current operation of the current operationof the cieurme in relation to the operation of the current operation of the current operation of the current operation of the current operation of the current operation of the current operation of the current operation of the current operation of the current operation of the current operation of the current operation of the cieurme in relation to the operation of the current operation of the current operation of the current operation of the cieurme in relation to the operation of the current operation of the cieurme in relation to the operation of the cieurme in relation to the operation of the cieurme in relation to the operation of the cieurme in relation to the operation of the cieurme in relation to the operation of the cieurme in relation to the operation of the cieurme in relation to the operation of the cieurme in relation to the operation of the cieurme in relation to the operation of the cieurme in relation to theoperation of the cieurme in relation to the operation of the cieurme in relation to the operation of the cieurme in relation to the operation of the cieurme in relation to the operation of the cieurme in relation to the operation of the cieurme in relation to the operation of the cieurme in relation to the operation of the cieurme in relation to the operation of the cieurme in relation to the operationof the cieurme in relation to the operation of the cieurme in relation to the operation of the cieurme in relation to the operation of the cieurme in relation to the operation of the cieurme in relation to the operation of the cieurme in relation to the operation of the cieurme in relation to the operation of the cieurme in relation to the operation of the cieurme in relation to the operation ofthe cieurme in relation to the operation of the cieurme in relation to the operation of the cieurme in relation to the operation of the cieurme in relation to the operation of the cieurme in relation to the operation of the cieurme in relation to the operation of the cieurme in relation to the operation of the cieurme in relation to the operation of the cieurme in relation to the operation of thecieurme in relation to the operation of the cieurme in relation to the operation of the cieurme in relation to the operation of the cieurme in relation to the operation of the cieurme in relation to the operation of the cieurme in relation to the operation of the cieurme in relation to the operation of the cieurme in relation to the operation of the cieurme in relation to the operation of the cIEc in relation to the operation of the cIEc in relation to the operation of the cIEc in relation to the operation of the cIEc in relation to the operation of the cIEc in relation to the operation of the cIEc in relation to the operation of the cIEc in relation to the operation of the cIEc in relation to the operation of the cIEc in relation to the operation of the cIEc in relation to the operation of the cIEe in relation to the operation of the cIEe in relation to the operation of the cIEe in relation to the operation of the cIEe in relation to the operation of the cIEe in relation to the operation of the cIEe in relation to the operation of the cIEe in relation to the operation of the cIEe in relation to the operation of the cIEe in relation to the operation of the cIEe in relation to the operation of the cIEc in relation to the operation of the cIEc in relation to the operation of the cIEc in relation to the operation of the cIEc in relation to the operation of the cIEc in relation to the operation of the cIEc in relation to the operation of the cIEc in relation to the operation of the cIEc in relation to the operation of the cIEc in relation to the operation of the cIEC in relation to the operation of the cIEc in relation to the operation of the cIEc in relation to the operation of the cIEc in relation to the operation of the cIEc in relation to the operation of the cIEc in relation to the operation of the cIEc in relation to the operation of the cIEc in relation to the operation of the cIEc in relation to the operation of the cIEc in relation to the operation of the cIEce in relation to the operation of the cIEc in relation to the operation of the cIEc in relation to the operation of the cIEc in relation to the operation of the cIEc in relation to the operation of the cIEc in relation to the operation of the cIEc in relation to the operation of the cIEc in relation to the operation of the cIEc in relation to the operation of the cIEc in relation to the operation of the cIEcc in relation to the operation of the cIEcc in relation to the operation of the cIEcc in relation to the operation of the cIEcc in relation to the operation of the cIEcc in relation to the operation of the cIEcc in relation to the operation of the cIEcc in relation to the operation of the cIEcc in relation to the operation of the cIEcc in relation to the operation of the cIEcc in relation to the operation of the cIEc in relation to the operation of the cIEc in relation to the operation of the cIEc in relation to the operation of the cIEc in relation to the operation of the cIEc in relation to the operation of the cIEc in relation to the operation of the cIEc in relation to the operation of the cIEc in relation to the operation of the cIEc in relation to the operation of the cIEec in relation to the operation of the cIEc in relation to the operation of the cIEc in relation to the operation of the cIEc in relation to the operation of the cIEc in relation to the operation of the cIEc in relation to the operation of the cIEc in relation to the operation of the cIEc in relation to the operation of the cIEc in relation to the operation of the cIEc in relation to the operation of the cIEoc in relation to the operation of the cIEoc in relation to the operation of the cIEoc in relation to the operation of the cIEoc in relation to the operation of the cIEoc in relation to the operation of the cIEoc in relation to the operation of the cIEoc in relation to the operation of the cIEoc in relation to the operation of the cIEoc in relation to the operation of the cIEoc in relation to the operation of the cIEc in relation to the operation of the cIEc in relation to the operation of the cIEc in relation to the operation of the cIEc in relation to the operation of the cIEc in relation to the operation of the cIEc in relation to the operation of the cIEc in relation to the operation of the cIEc in relation to the operation of the cIEc in relation to the operation of the cIEac in relation to the operation of the cIEac in relation to the operation of the cIEac in relation to the operation of the cIEac in relation to the operation of the cIEac in relation to the operation of the cIEac in relation to the operation of the cIEac in relation to the operation of the cIEac in relation to the operation of the cIEac in relation to the operation of the cIEac in relation to the operation of the cIEa in relation to the operation of the cIEa in relation to the operation of the cIEa in relation to the operation of the cIEa in relation to the operation of the cIEa in relation to the operation of the cIEa in relation to the operation of the cIEa in relation to the operation of the cIEa in relation to the operation of the cIEa in relation to the operation of the cIEa in relation to the operation of the cIEac in relation to the operation of the cIEac in relation to the operation of the cIEac in relation to the operation of the cIEac in relation to the operation of the cIEac in relation to the operation of the cIEac in relation to the operation of the cIEac in relation to the operation of the cIEac in relation to the operation of the cIEac in relation to the operation of the cIEc in relation to the operation of the cIEc in relation to the operation of the cIEc in relation to the operation of the cIEc in relation to the operation of the cIEc in relation to the operation of the cIEc in relation to the operation of the cIEc in relation to the operation of the cIEc in relation to the operation of the cIEc in relation to the operation of the cIEa in relation to the operation of the cIEa in relation to the operation of the cIEa in relation to the operation of the cIEa in relation to the operation of the cIEa in relation to the operation of the cIEa in relation to the operation of the cIEa in relation to the operation of the cIEa in relation to the operation of the cIEa in relation to the operation of the cIEc in relation to the operation of the cIEc in relation to the operation of the cIEc in relation to the operation of the cIEc in relation to the operation of the cIEc in relation to the operation of the cIEc in relation to the operation of the cIEc in relation to the operation of the cIEc in relation to the operation of the cIEc in relation to the operation of the cIEca in relation to the operation of the cIEca in relation to the operation of the cIEca in relation to the operation of the cIEca in relation to the operation of the cIEca in relation to the operation of the cIEca in relation to the operation of the cIEca in relation to the operation of the cIEca in relation to the operation of the cIEca in relation to the operation of the cIEca in relation to the operation of the cIEc in relation to the operation of the cIEc in relation to the operation of the cIEc in relation to the operation of the cIEc in relation to the operation of the cIEc in relation to the operation of the cIEc in relation to the operation of the cIEc in relation to the operation of the cIEc in relation to the operation of the cIEc in relation to the operation of the cIEic in relation to the operation of the cIEc in relation to the operation of the cIEc in relation to the operation of the cIEc in relation to the operation of the cIEc in relation to the operation of the cIEc in relation to the operation of the cIEc in relation to the operation of the cIEc in relation to the operation of the cIEc in relation to the operation of the cIEc in relation to the operation of the cIEbc in relation to the operation of the cIEbc in relation to the operation of the cIEbc in relation to the operation of the cIEbc in relation to the operation of the cIEbc in relation to the operation of the cIEbc in relation to the operation of the cIEbc in relation to the operation of the cIEbc in relation to the operation of the cIEbc in relation to the operation of the cIEbc in relation to the operation of the cIEc in relation to the operation of the cIEc in relation to the operation of the cIEc in relation to the operation of the cIEc in relation to the operation of the cIEc in relation to the operation of the cIEc in relation to the operation of the cIEc in relation to the operation of the cIEc in relation to the operation of the cIEc in relation to the operation of the cIEb in relation to the operation of the cIEb in relation to the operation of the cIEb in relation to the operation of the cIEb in relation to the operation of the cIEb in relation to the operation of the cIEb in relation to the operation of the cIEb in relation to the operation of the cIEb in relation to the operation of the cIEb in relation to the operation of the cIEb in relation to the operation of the cIEbc in relation to the operation of the cIEbc in relation to the operation of the cIEbc in relation to the operation of the cIEbc in relation to the operation of the cIEbc in relation to the operation of the cIEbc in relation to the operation of the cIEbc in relation tothe operation of the cIEbc in relation tothe operation of the cIEbc in relation tothe operation of the cIEbc in relation tothe operation ofthe cIEbc in relation tothe operation ofthe cIEbc in relation tothe operation ofthe cIEbc in relation tothe operation ofthe cIEbc in relation tothe operation ofthe cIEbc in relation tothe operation ofthe cIEbc in relation tothe operation ofthe cIEbc in relation tothe operation ofthe cIEbc in relation tothe operation ofthe cIEbc in relation tothe operation ofthe cIEbc in relation tothe operation ofthcIEbc in relation tothe operation ofthcIEbc in relation tothe operation ofthcIEbc in relation tothe operation ofthcIEbc in relation tothe operation ofthcIEbc in relation tothe operation ofthcIEbc in relation tothe operation ofthcIEbc in relation tothe operation ofthcIEbc in relation tothe operation ofthcIEbc in relation tothe operation ofthcIEbc in relation tothe operation ofthCIEbc in relation tothe operationofthcIEbc in relation tothe operationofthcIEbc in relation tothe operationofthcIEbc in relation tothe operationofthcIEbc in relation tothe operationofthcIEbc in relation tothe operationofthcIEbc in relation tothe operationofthcIEbc in relation tothe operationofthcIEbc in relation tothe operationofthcIEbc in relation tothe operationofthcIEbc in relation tothe operationofthCIEbc in relation tothe operationofthCIEbc in relation tothe operationofthCIEbc in relation tothe operationofthCIEbc in relation tothe operationofthCIEbc in relation tothe operationofthCIEbc in relation tothe operationofthCIEbc in relation tothe operationofthCIEbc in relation tothe operationofthCIEbc in relation tothe operationofthCIEbc in relation tothe operationofth CIEbc in relation tothe operationofthCIEbc in relation tothe operationofthCIEbc in relation tothe operationofthCIEbc in relation tothe operationofthCIEbc in relation tothe operationofthCIEbc in relation tothe operationofthCIEbc in relation tothe operationofthCIEbc in relation tothe operationofthCIEbc in relation tothe operationofthCIEbc in relation tothe operationofthCEbc in relation tothe operationofthCEbc in relation tothe operationofthCEbc in relation tothe operationofthCEbc in relation tothe operationofthCEbc in relation tothe operationofthCEbc in relation tothe operationofthCEbc in relation tothe operationofthCEbc in relation tothe operationofthCEbc in relation tothe operationofthCEbc in relation tothe operationofthCEbc in relation tothe operationofthCEBC in relation tothe operationofthCEbc in relation tothe operationofthCEbc in relation tothe operationofthCEbc in relation tothe operationofthCEbc in relation tothe operationofthCEbc in relation tothe operationofthCEbc in relation tothe operationofthCEbc in relation tothe operationofthCEbc in relation tothe operationofthCEbc in relation tothe operationofthCEbc in relation tothe operationofthCEbcin relationtotheoperationofthCEbcin relationtotheoperationofthCEbcin relationtotheoperationofthCEbcin relationtotheoperationofthCEbcin relationtotheoperationofthCEbcin relationtotheoperationofthCEbcin relationtotheoperationofthCEbcin relationtotheoperationofthCEbcin relationtotheoperationofthCEbcin relationtotheoperationofthCEbcin relationtotheoperationofthCEbcin relationtotheoperationfFCA-1 | JAHAN KARMAK | |||||
BRANDT FRANCE, Stabilimento di CERGY, 5/7 avenue des Béthunes, 95310 SAINT OUEN L'AUMONE. SAS con capitale sociale di 100.000.000 di euro RCS NANTERRE 801 250 531.
3 BESCHRIJVING VAN UW APPARAAT
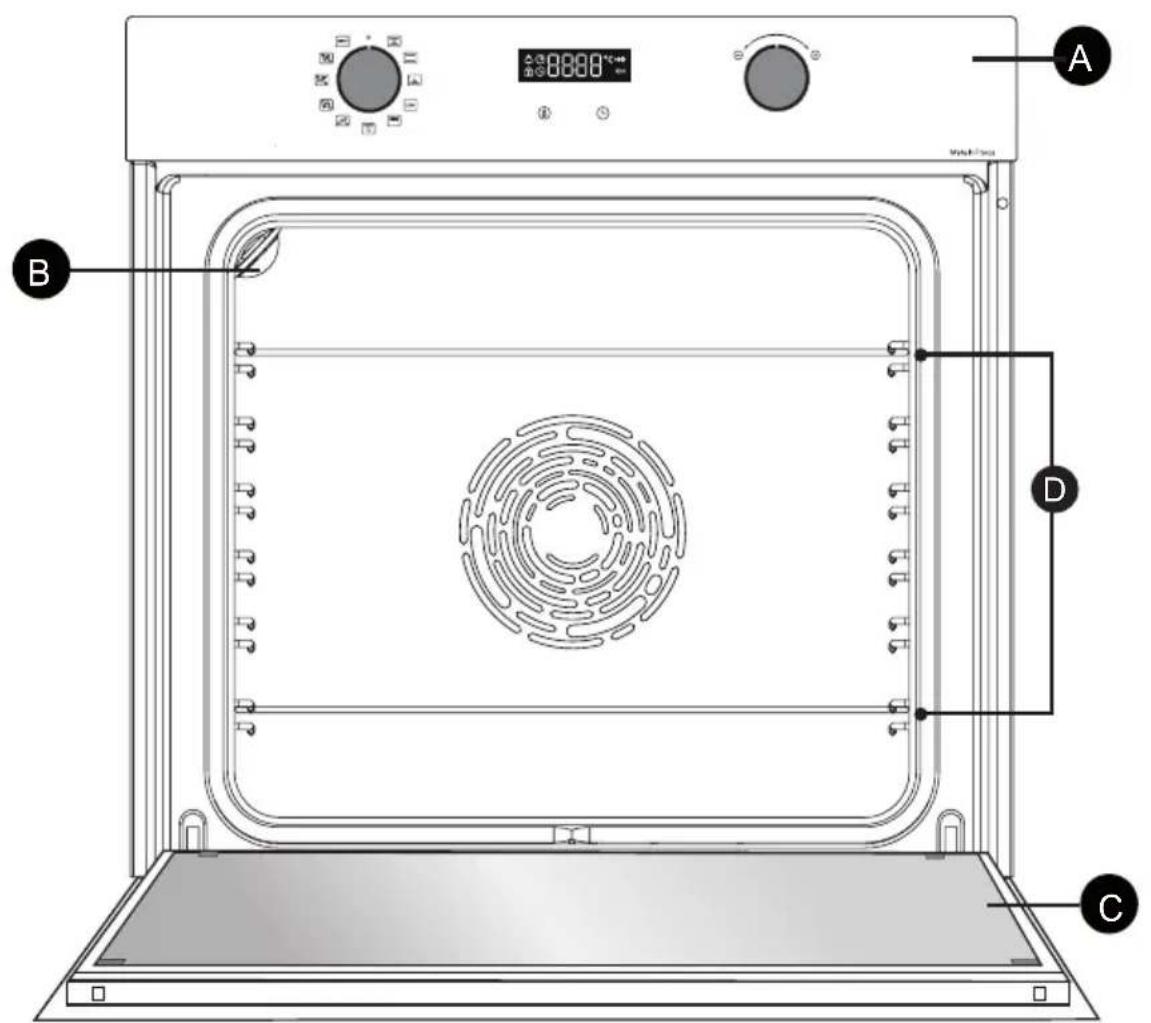
3 BESCHRIJVING VAN UW APPARAAT
DE BEDIENINGSKNOPPEN EN HET DISPLAY
Display
Toetsen
3 BESCHRIJVING VAN UW APPARAAT
DE ACCESSOIRES (AFHANKELIJK VAN HET MODEL)
"Smart Assist" system
EN Information for domestic coven (UE n7 602014)
FR 5 Informations concernantes foures domestiques (UE n° 68/2014)
CSI Informare lykajic se lub pro domicinost [UE n° 86/2014]
DAN Ophysinger for gory ll hushdningbrug URe n56/2014
| Symbol | Init Value | EN Symbol: FR. Symbiole CE: ZnadekDA. Symble DE: Symbiole ES. SimboIO IT: SimboIO NL: Symbiole PL. OZanaczierie PT. Simblio SK: Symble EL. Zuflofko FI. Symbioll SV: Symbioll EN: Valer-DS. Hrodola-DA: Vardil-DE: Wert-ES: Valer-IT: Valer-NL: Wards-PL: Wards-PL: Valer-PS: Valer-SD: Hrodola-EL: Apigaujounguiŋjnl: Arvo-SV: Värde. EN: Unit-FR: Unit-CS: Jednokla-DA: Enhed-DE: Einheit-ES: Unitad-IT: Unita di misura-NL: Enebi-PI: Jednoksta-PI: Unitad-IT: Unita di misura-NL: Enebi-PI: Jednoksta-PI: Unitad-IT: Unita di misura-NL: Enebi-PI: Jednoksta-PI: Unitad-IT: Unita di misura-NL: Enebi-PI: Jednoksta-PI: Unitad-IT: Unita di misura-NL: Enebi-PT: Jednoksta-PI: Unitad-IT: Unita di misura-NL: Enebi-PT: Jednoksta-PI: Unitad-IT: Unita di misura-NL: Enebi-PT: Jednoksta-PI: Unitad-IT: Unita di misura-NL: Enebi-PT: Jednoksta-PI: Unitad-IT: Unita di misURA-NT: Yskovsko-IV: Yskovsko-IV: Yskovsko-IV: Yskovsko-IV: Yskovsko-IV: Yskovsko-IV: Yskovsko-IV: Yskovsko-IV: Yskovsko-IV: Yskovsko-IV: Yskovsko-IV: Yskovsko-IV: Yskovsko-IV: YskOVKo-IV: Yskovsko-IV: Yskovsko-IV: Yskovsko-IV: Yskovsko-IV: Yskovsko-IV: Yskovsko-IV: Yskovsko-IV: Yskovsko-IV: Yskovsko-IV: Yskovsko-IV: Yskovsko-IV: Yskovsko-IV :Yskovsko-IV: Yskovsko-IV: Yskovsko-IV: Yskovsko-IV: Yskovsko-IV: Yskovsko-IV: Yskovsko-IV: Yskovsko-IV: Yskovsko-IV: Yskovsko-IV: Yskovsko-IV: Yskovsko-IV: YskovskOv: Yskovsko-IV: Yskovsko-IV: Yskovsko-IV: Yskovsko-IV: Yskovsko-IV: Yskovsko-IV: Yskovsko-IV: Yskovsko-IV: Yskovsko-IV: Yskovsko-IV: Yskovsko-IV: Yskovsko-IV: YskOvKo-IV: Yskovsko-IV: Yskovsko-IV: Yskovsko-IV: Yskovsko-IV: Yskovsko-IV: Yskovsko-IV: Yskovsko-IV: Yskovsko-IV: Yskovsko-IV: Yskovsko-IV: Yskovsko-IV: Yskovsko-III: Yskovsko-IV: Yskovsko-IV: Yskovsko-IV: Yskovsko-IV: Yskovsko-IV: Yskovsko-IV: Yskovsko-IV: Yskovsko-IV: Yskovsko-IV: Yskovsko-IV: Yskovsko-IV: Yskovsko-IV: Ysko-IV: Yskovsko-IV: Yskovsko-IV: Yskovsko-IV: Yskovsko-IV: Yskovsko-IV: Yskovsko-IV: Yskovsko-IV: Yskovsko-IV: Yskovsko-IV: Yskovsko-IV: Yskovsko-IV: Yskovsko-III:S: Yskovsko-IV: Yskovsko-IV: Yskovsko-IV: Yskovsko-IV: Yskovsko-IV: Yskovsko-IV: Yskovsko-IV: Yskovsko-IV: Yskovsko-IV: Yskovsko-IV: Yskovsko-IV: Yskovsko-IV: Yskovsky-IV: Yskovsko-IV: Yskovsko-IV: Yskovsko-IV: Yskovsko-IV: Yskovsko-IV: Yskovsko-IV: Yskovsko-IV: Yskovsko-IV: Yskovsko-IV: Yskovsko-IV: Yskovsko-IV: Yskovsko-IV:Yskovsko-IV: Yskovsko-IV: Yskovsko-IV: Yskovsko-IV: Yskovsko-IV: Yskovsko-IV: Yskovsko-IV: Yskovsko-IV: Yskovsko-IV: Yskovsko-IV: Yskovsko-IV: Yskovsko-IV: YskovSKo-IV: Yskovsko-IV: Yskovsko-IV: Yskovsko-IV: Yskovsko-IV: Yskovsko-IV: Yskovsko-IV: Yskovsko-IV: Yskovsko-IV: Yskovsko-IV: Yskovsko-IV: Yskovsko-IV: Yskovsko-IV; Yskovsko-IV: Yskovsko-IV: Yskovsko-IV: Yskovsko-IV: Yskovsko-IV: Yskovsko-IV: Yskovsko-IV: Yskovsko-IV: Yskovsko-IV: Yskovsko-IV: Yskovsko-IV: Yskovsko-IV: YskovSKO:Yskovsko-IV: Yskovsko-IV: Yskovsko-IV: Yskovsko-IV: Yskovsko-IV: Yskovsko-IV: Yskovsko-IV: Yskovsko-IV: Yskovsko-IV: Yskovsko-IV: YskovSKO:Yskovsko-IV: Yskovsko-Ⅲ:S: Yskovsko-Ⅲ:S:Yskovsko-Ⅲ:S:Yskovsko-Ⅲ:S:Yskovsko-Ⅲ:S:Yskovsko-Ⅲ:S:Yskovsko-Ⅲ:S:Yskovsko-Ⅲ:S:Yskovsko-Ⅲ:S:Yskovsko-Ⅲ:S:Yskovsko-Ⅲ:S:Yskovsko-Ⅲ:S:YN:Yskovsko-Ⅲ:S:Yskovsko-Ⅲ:S:Yskovsko-Ⅲ:S:Yskovsko-Ⅲ:S:Yskovsko-Ⅲ:S:Yskovsko-Ⅲ:S:Yskovsko-Ⅲ:S:Yskovsko-Ⅲ:S:Yskovsko-Ⅲ:S:Yskovsko-ⅢS:Yskovsko-Ⅲ:S:Yskovsko-Ⅲ:S:Yskovsko-Ⅲ:S:Yskovsko-Ⅲ:S:Yskovsko-Ⅲ:S:Yskovsko-Ⅲ:S:Yskovsko-Ⅲ:S:YskovskOv:Yskovsko-IV:Yskovsko-IV:Yskovsko-IV:Yskovsko-IV:Yskovsko-IV:Yskovsko-IV:Yskovsko-IV:Yskovsko-IV:Yskovsko-IV:Yskovsko-IV:Yskovsko-IV:Yskovsko-IV:Yskovsko-IV:YskOVKo-IV:Yskovsko-IV:Yskovsko-IV:Yskovsko-IV:Yskovsko-IV:Yskovsko-IV:Yskovsko-IV:Yskovsko-IV:Yskovsko-IV:Yskovsko-IV:YskovskOv:Yskovsko-IV:Yskovsko-IV:Yskovsko-IV:Yskovsko-IV:Yskovsko-IV:Yskovsko-IV:Yskovsko-IV:YskovskOv:Yskovsko-IV:Yskovsko-IV:YskovskOv:Yskovsko-IV:YskovskOv:Yskovsko-IV:YskovskOv:Yskovsko-IV:YskovskOv:YskovskOv:YskovskOv:YskovskOv:YskovskOv:YskovskOv:YskovskOv:YskovskOv:YskovskOv:YskovskOv:YskovskOv:YskovskOv:YskovskOv:YskovskOv:YskovskOv:YN:YskovskOv:YskovskOv:YskovskOv:YskovskOv:YskovskOv:YskovskOv:YskovskOv:YskovskOv:YskovskOv:YskovskOv:YskovskOv:YskovskOv:YskovskOv:YskovskOv: | |||||||||||
| Type norme | ORZAMRE | EN Type norme FR. Symbiole CS. Nortym type DE. Model ID. Credible source of the model. The model is used for the purpose of the model. The model is used for the purpose of the model. The model is used for the purpose of the model. The model is used for the purpose of the model. The model is used for the purpose of the model. The model is used for the purpose of the model. The model is used for the purpose of the model. The model is used for the purpose of the model. The model is used for the purpose of the model. The model is used for the purpose fC. The model is used for the purpose of the model. The model is used for the purpose of the model. The model is used for the purpose of the model. The model is used for the purpose of the model. The model is used for the purpose of the model. The model is used for the purpose of the model. The model is used for the purpose of the model. The model is used for the purpose of the model. The model is used for the purpose of the model | EN Type norme FR. Symbiole CS. Nortym type DE. Model ID. Credible source of the model. The model is used for the purpose of the model. The model is used for the purpose of the model. The model is used for the purpose of the model. The model is used for the purpose of the model. The model is used for the purpose of the model. The model is used for the purpose of the model. The model is use for the purpose of the model. The model is used for the purpose of the model. The model is used for the purpose of the model. The model is used for the purpose of the model. The model is used for the purpose of the model. The model is used for the purpose of the model. The model is used for the purpose of the model. The model is used for the purpose of the model. The model is used for the purpose of the model. The model is used fC. The model is used for the purpose of the model. The model is used for the purpose of the model. The model is used for the purpose of the model. The model is used for the purpose of the model. The model is used for the purpose of the model. The model is used for the purpose of the model. The model is used for the purpose of the model. The model is used for the purpose of the model. The model is used for the purpose of fC. The model is used for the purpose of the model. The model is used for the purpose of the model. The model is used for the purpose of the model. The model is used for the purpose of the model. The model is used for the purpose of the model. The model is used for the purpose of the model. The model is used for the purpose of the model. The model is used for the purpose of the model. The model is used for the purpose of 10000000000000000000000000000000000000000000000000000000000000000000000000000000000000000000000000000 | EN Type norme FR. Symbiole CS. Nortym type DE. Model ID. Credible source of the model. The model is used for the purpose of the model. The model is used for the purpose of the model. The model is used for the purpose of the model. The model is used for the purpose of the model. The model is used for the purpose of the model. The model is used for the purpose of the model. The model is usd for the purpose of the model. The model is used for the purpose of the model. The model is used for the purpose of the model. The model is used for the purpose of the model. The model is used for the purpose of the model. The model is used for the purpose of the model. The model is used for the purpose of the model. The model is used for the purpose of the model. The model is used for the purpose of the model. The model is used 10000000000000000000000000000000000000000000000000000000000000000000000000000000000000000000000000 | ENType norme FR. Symbiole CS. Nortym type DE. Model ID. Credible source of the model. The model is used for the purpose of the model. The model is used for the purpose of the model. The model is used for the purpose of the model. The model is used for the purpose of the model. The model is used for the purpose of the model. The model is used for the purpose of the model. The model is used for the purposes of the model. The model is used for the purposes of the model. The model is used for the purposes of the model. The model is used for the purposes of the model. The model is used for the purposes of the model. The model is used for the purposes of the model. The model is used for the purposes of the model. The model is used for the purposes of the model. The model is used for the purposes of the model. The model is used for the purposes fC. The model is used for the purpose of the model. The model is used for the purpose of the model. The model is used for the purpose of the model. The model is used for the purpose of the model. The model is used for the purpose of the model. The model is used for the purposes of the model. The model is used for the purposes of the model. The model is used for the purposes of the model. The model is used for the purposes of the model | EN Type norme FR. Symbiole CS. Nortym type DE. Model ID. Credible source of the model. The model is used for the purpose of the model. The model is used for the purpose of the model. The model is used for the purpose of the model. The model is used for the purpose of the model. The model is used for the purpose of the model. The model is used for the purposes of the model. The model is used for the purposes of the model. The model is used for the purposes of the model. The model is used for the purposes fC. The model is used for the purpose of the model. The model is used for the purposes of the model. The model is used for the purposes of the model. The model is used for the purposes of the model. The model is used for the purposes of the model. The model is used for the purposes of the model. The model is used for the purposes of the model. The model is used for the purposes of the model. The model is used for the purposes of the model | EN Type norme FR. Symbiole CS. Nortym type DE. Model ID. Credible source of the model. The model is used for the purpose of the model. The model is used for the purpose of the model. THE model is used for the purpose of the model. The model is used for the purposes of the model. The model is used for the purposes of the model. The model is used for the purposes of the model. The model is used for the purposes of the model. The model is used for the purposes of the model. The model is used for the purposes of the model. The model is used for the purposes of the model. The model is used for the purposes of the model. The modIe is used for the purposes fC. The model is used for the purpose of the model. The model is used for the purposes of the model. The model is used for the purposes of the model. The model is used for the purposes of the model. The model is used for the purposes fC. The model is used for the purpose of the model. The model is used for the purposes of the model. The model is used for the purposes fC. The model is used for the purpose of the model. The model is used for the purposes fC. The model is used for the purpose of the model. The model is used for the purposes fC. The model is used for the purpose of the model. The model is used for the purposes fC. The model is used for the purpose of the model. The model is used for the purposes fC. The model is used for the purpose of the model. The model is used for the purposes fC. The modIe is used for the purposes fC. The modIe is used for the purpose fC. The modIe is used for the purpose fC. The modIe is used for the purpose fC. The modIe is used for the purpose fC. The modIe is used for the purpose fC. The modIe is used for the purpose fC. The modIe is used for the purpose fC. The modIe is used for the purpose fC. The modIe is used for the purpose fC. | ||||||
KJAERE KUNDE,
GLIDESKINNER (AVHENGIG AV MODELL)
| Symbol | Init Value | EN Symbol-FR. Symbole-CS: Znäka DA; Symbol DE: Symbol ES. Simboi-IT: Simboi-NL. Symbol PL: Oznacenzne PT. Simboi-SK: Symbol EL: Šäβöko-Fl: Symbol SV: Symbol. EN Value-FR. Value-CS: Hrodola-DA: Vardé-DE: Weit-ES: Vaidy-IT: Valore-NL: Wards-PL: Warid-PT: Valo-SC: Hrodola-EL: Apiljumjuri rur-FL: Arvo-SV: Vädde. EN Unit-FR. Unit-CS: Jednokka-DA: Enhod-DE: Einhol-ES: Unidad-IT: Unidad-IT: Unidad de misure-NL: Eneol-PL: Jodinost-PL: Jodinost-PL: Jodinost-PL: Jodinost-PL: Jodinost-PL: Jodinost-PL: Jodinost-PL: Jodinost-PL: Jodinost-PL: Jodinost-PL: Jodinost-PL: Jodinost-PL: Jodinost-PL: Jodinost-PL: Jodinost-ML: Yvukovadu-KF: Yvukovadu-SV: Enel | |||||||
| Type norme | OR724M7 | EN Type norme-FR. Type norme-CS: Model-DA: Normtype-DE: Model-IT: Typo de norma-IL: Type standard-PL: Typ wedg indormy-PT: Tipo de norma-SK: Standardny typ EL: Tiro; tponinou-Fl: Standardly-spl-SV: Typ av norm. | |||||||
| Model identification | SINHOSOLO | EN Model Identification-FR. Identification du modele-CS: Identificatice modell: DAModelindidentifikation: DDModelinkennung: ESIdentifikation de modele-IT: Identificatio del modello-IL: Identificatio van het model-PL: Identifikator modell-PL: Identificacao do modele SK: Identificacao modal-EL: Tourismoponp vourkou-Fl: Mallunimile-SV: Modelskriving. | |||||||
| Type of oven | Simple = FR: simple-CS: Jednoduchá-DA: Enkel-DE:Einfach-ES: Simple-PE: Pejódynekz-y-PT: Simples-SK: Jednopostefova-EL: Anlçoc-Fl: Ysksinkertainen-SV: Enkel. | EN Type of oven-FR: type of four-CS:Typo of two-DS:Overtype-DE:Arts des Baskofans-EL: Tiro, potovou-ES: Tipo de hom-IT: Tipologia di fmo-NT: Type of oven-PL:Typo elektrika-PT:Tipo de fmo-ST: Tiro, potovou-PS: Ustin typ-SV: Typ av gvn. | |||||||
| Mass of the appliance | M | 33 | EN Mass of the appliance FR: Masse de l'apparéte CS:Hotnottet spofftado de A: Apparate siste masse DE: Masse des Gerätes ES: Masa del asparato IT: Masa dell'apparectio-CL: Massa van hei Iontel-PL: Massa urapétoria-PT: Massa da apapéthra-SS: Hotnottet spofftada EL:Mto/10, ouro kuciu, FL: Laitinen massa-SV: Apparates masta. | ||||||
| Number of cavities | 1 | EN Number of cavities FR: Nomere de cavities CS:Podet pediclich protado DA: Antal hulum DE:Anzahl der Garantie ES: Nstream de cavidades IT: Nstream de cavidades-CL: Nstream de casca-CL: Nstream of cavities-CL: Nstream of cavities-CL: Nstream of cavities-CL: Nstream of cavities-CL: Nstream of cavities-CL: Nstream of cavities-CL: Nstream of cavities-CL: Nstream of cavities-CL: Nstream of cavities-CL: Nstream of cavities-CL: Nstream of cavities-CL: Nstream of cavities-CL: Nstream of cavities-CL:Nstream of cavities-CL: Nstream of cavities-CL: Nstream of cavities-CL: Nstream of cavities-CL: Nstream of cavities-CL: Nstream of cavities-CL: Nstream of cavities-CL: Nstream of cavities-CL: Nstream of cavities-CL: Nstream of cavities-CL: Nstream of cavities-CL: Nstream of cavities-CL: Nstream of cavories-CL: Nstream of cavities-CL: Nstream of cavities-CL: Nstream of cavities-CL: Nstream of cavities-CL: Nstream of cavities-CL: Nstream of cavities-CL: Nstream of cavities-CL: Nstream of cavities-CL: Nstream of cavities-CL: Nstream of cavities-CL: Nstream of cavities-CL: Nstream of cavities-CL: IN: Eleclétrica-PS: Eleclétrica-TE: Eleclétrica-TE: Eleclétrica-TE: Eleclétrica-TE: Eleclétrica-TE: Eleclétrica-TE: Eleclétrica-TE: Eleclétrica-TE: Eleclétrica-TE: Eleclétrica-TE: Eleclétrica-TE: Eleclétrica-TE: Eleclétrica-TE: Eleclétrica-TE: Eleclétrica-TE: Eleetriktet. | |||||||
| Heat source per cavity (electricity or gas) | FR:Electricity-CS:Elektrifina-DA:Strom-ES:Eleclicidad-IT:Energia electrica-NE:Elektricité-Electricity = PL:Energia elecricza-PT:Eléctricidado-SKE:Elektrickas-EL: Hxcpnk#i# cyfpycn-Fl: Sihko-Fl: Elektricité. | EN Heat source per cavity (electricity or gas)-FR:Source de chaleur par cavité (electructo ou gaz)-CS:Zdoje lepla jednollych pédicich prostre du (elektrifina nebo pyn)-CL:VAleme pr. ovum (el ogine-gas) DE:Wärmequille je Garmau (Strom ogine) ES:Flare de calor par cavidade (electructo e gas) IT:Flare de calor de casca-CL:NAstian auvermitten-CL:NAstian auvermitten-CL:NAstian auvermitten-CL:NAstian auvermitten-CL:NAstian auvermitten-CL:NAstian auvermitten-CL:NAstian auvermitten-CL:NAstian auvermitten-CL:NAstian auvermitten-CL:NAstian auvermitten-CL:NAstian auvermatten-CL:NAstian auvermatten-CL:NAstian auvermatten-CL:NAstian auvermatten-CL:NAstian auvermatten-CL:NAstian auvermatten-CL:NAstian auvermatten-CL:NAstian auvermatten-CL:NAstian auvermatten-CL:NAstian auvermatten-CL:NAstian auvermitten-CL:NAstian auvermitten-CL:NAstian auvermitten-CL:NAstian auvermitten-CL:NAstian auvermitten-CL:NAstian auvermitten-CL:NAstian auvermitten-CL:NAstian auvermitten-CL:NAstian auvermitten-CL:NAstian auvermessen-CL:NAstian auvermessen-CL:NAstian auvermessen-CL:NAstian auvermessen-CL:NAstian auvermessen-CL:NAstian auvermessen-CL:NAstian auvermessen-CL:NAstian auvermessen-CL:NAstian auvermessen-CL:NAstian auvermessen-CL:NAstian auvermussen-CL:NAstian auvermessen-CL:NAstian auvermessen-CL:NAstian auvermessen-CL:NAstian auvermessen-CL:NAstian auvermessen-CL:NAstian auvermessen-CL:NAstian auvermessen-CL:NAstian auvermessen-CL:NAstian auvermessen-CL:NAstian auvermatten-CL:NAstian auvermatten-CL:NAstian auvermatten-CL:NAstian auvermatten-CL:NAstian auvermatten-CL:NAstian auvermatten-CL:NAstian auvermatten-CL:NAstian auvermatten-CL:NAstian auvermatten-CL:NAstian auvermatten-CL:NAstian auvermatten-CL:NAstian auvermatten-CL:NAstian auvermatten-CL:NAstian auvermatten-CL:NAstian auvermatten-CL:NAstian auvermatten-CL:NAstian auvermatten-CL:NAstian auvermatten-CL:NAstian auvermatten-CL:NAstian auvermatter-CL:NAstian auvermatten-CL:NAstian auvermatten-CL:NAstian auvermatten-CL:NAstian auvermatten-CL:NAstian auvermatten-CL:NAstian auvermatten-CL:NAstian auvermatten-CL:NAstian auvermatten-CL:NAstian auvermatten-CL:NAstian auvermattern-CL:NAstian auvermatten-CL:NAstian auvermatten-CL:NAstian auvermatten-CL:NAstian auvermatten-CL:NAstian auvermatten-CL:NAstian auvermatten-CL:NAstian auvermatten-CL:NAstian auvermatten-CL:NAstian auvermatten-CL:NAstian auverm attenu-CL:NAstian auverm attenu-CL:NAstian auverm attenu-CL:NAstian auverm attenu-CL:NAstian auverm attenu-CL:NAstian auverm attenu-CL:NAstian auverm attenu-CL:NAstian auverm attenu-CL:NAstian auverm attenu-CL:NAstian auverm attenu-CL:NAstian auverm attenuation-CL:NAstian auverm attenuation-CL:NAstian auverm attenuation-CL:NAstian auverm attenuation-CL:NAstian auverm attenuation-CL:NAstian auverm attenuation-CL:NAstian auverm attenuation-CL:NAstian auverm attenuation-CL:NAstian auverm attenuation-CL:NAstian auverm attenuation-CL:NAstian auverm attenu-CL:NAstian auverm attenuation-CL:NAstian auverm attenuation-CL:NAstian auverm attenuation-CL:NAstian auverm attenuation-CL:NAstian auverm attenuation-CL:NAstian auverm attenuation-CL:NAstian auverm attenuation-CL:NAstian auverm attenuation-CL:NAstian auverm attenu-CL:NAstian auverm attenu-CL:NAstian auverm attenuation-CL:NAstian auverm attenuation-CL:NAstian auverm attenuation-CL:NAstian auverm attenuation-CL:NAstian auverm attenuation-CL:NAstian auverm attenuation-CL:NAstian auverm attenuation-CL:NAstian auverm attenu-CL:NAstian auverm attenuation-CL:NAstian auverm attenu-CL:NAstian auverm attenuation-CL:NAstian auverm attenuation-CL:NAstian auverm attenuation-CL:NAstian auverm attenuation-CL:NAstian auverm attenuation-CL:NAstian auverm attenuation-CL:NAstian auverm attenuation-CL:NAstian auverm attenu-CL:NAstian auverm attenu-CL:NAstian auverm attenu-CL:NAstian auverm attenuation-CL:NAstian auverm attenuation-CL:NAstian auverm attenuation-CL:NAstian auverm attenuation-CL:NAstian auverm attenuation-CL:NAstian auverm attenuation-CL:NAstian auverm attenu-CL:NAstian auverm attenuation-CL:NAstian auverm attenuation-CL:NAstian auverm attenu-CL:NAstian auverm attenuation-CL:NAstian auverm attenuation-CL:NAstian auverm attenuation-CL:NAstian auverm attenuation-CL:NAstian auverm attenuation-CL:NAstian auverm attenuation-CL:NAstian auverm attenu-CL:NAstian auverm attenuation-CL:NAstian auverm attenu-CL:NAstian auverm attenu-CL:NAstian auverm attenuation-CL:NAstian auverm attenuation-CL:NAstian auverm attenuation-CL:NAstian auverm attenuation-CL:NAstian auverm attenuation-CL:NAstian auverm attenuation-CL:NAstian auverm attenu-CL:NAstian auverm attenu-CL:NAstian auverm attenuation-CL:NAstian auverm attenu-CL:NAstian auverm attenuation-CL:NAstian auverm attenuation-CL:NAstian auverm attenuation-CL:NAstian auverm attenuation-CL:NAstian auverm attenuation-CL:NAstian auverm attenuation-CL:NAstian auverm attenu-CL:NAstian auverm attenu-CL:NAstian auverm attenu-CL:NAstian auverm attenu-CL:NAstian auverm attenuation-CL:NAstian auverm attenuation-CL:NAstian auverm attenuation-CL:NAstian auverm attenuation-CL:NAstian auverm attenuation-CL:NAstian auverm attenu-CL:NAstian auverm attenuation-CL:NAstian auverm attenuation-CL:NAstian auverm attenuation-CL:NAstian auverm attenu-CL:NAstian auverm attenuation-CL:NAstian auverm attenuation-CL:NAstian auverm attenuation-CL:NAstian auverm attenuation-CL:NAstian auverm attenuation-CL:NAstian auverm attenu-CL:NAstian auverm attenuation-CL:NAstian auverm attenuation-CL:NAstian auverm attenu-CL:NAstian auverm attenu-CL:NAstian auverm attenuation-CL:NAstian auverm attenuation-CL:NAstian auverm attenuation-CL:NAstian auverm attenuation-CL:NAstian auverm attenuation-CL:NAstian auverm attenu-CL:NAstian auverm attenuation-CL:NAstian auverm attenu-CL:NAstian auverm attenuation-CL:NAstian auverm attenu-CL:NAstian auverm attenuation-CL:NAstian auverm attenuation-CL:NAstian auverm attenuation-CL:NAstian auverm attenuation-CL:NAstian auverm attenuation-CL:NAstian auverm attenu-CL:NAstian auverm attenuation-CL:NAstian auverm attenu-CL:NAstian auverm attenu-CL:NAstian auverm attenu-CL:NAstian auverm attenuation-CL:NAstian auverm attenuation-CL:NAstian auverm attenuation-CL:NAstian auverm attenuation-CL:NAstian auverm attenuation-CL:NAstian auverm attenu-CL:NAstian auverm attenu-CL:NAstian auverm attenuation-CL:NAstian auverm attenuation-CL:NAstian auverm attenu-CL:NAstian auverm attenuation-CL:NAstian auverm attenuation-CL:NAstian auverm attenuation-CL:NAstian auverm attenuation-CL:NAstian auverm attenuation-CL:NAstian auverm attenu-CL:NAstian auverm attenu-CL:NAstian auverm attenuation-CL:NAstian auverm attenu-CL:NAstian auverm attenu-CL:NAstian auverm attenuation-CL:NAstian auverm attenuation-CL:NAstian auverm attenuation-CL:NAstian auverm attenuation-CL:NAstian auverm attenuation-CL:NAstian auverm attenu-CL:NAstian auverm attenu-CL:NAstian auverm attenu-CL:NAstian auverm attenuation-CL:NAstian auverm attenu-CL:NAstian auverm attenuation-CL:NAstian auverm attenuation-CL:NAstian auverm attenuation-CL:NAstian auverm attenuation-CL:NAstian auverm attenuation-CL:NAstian auverm attenu-CL:NAstian auverm attenu-CL:NAstian auverm attenu-CL:NAstian auverm attenu-CL:NAstian auverm attenu-CL:NAstian auverm attenuation-CL:NAstian auverm attenuation-CL:NAstian auverm attenuation-CL:NAstian auverm attenuation-CL:NAstian auverm attenu-CL:NAstian auverm attenuation-CL:NAstian auverm attenuation-CL:NAstian auverm attenuation-CL:NAstian auverm attenuation-CL:NAstian auverm attenu-CL:NAstian auverm attenuation-CL:NAstian auverm attenuation-CL:NAstian auverm attenuation-CL:NAstian auverm attenu-CL:NAstian auverm attenu-CL:NAstian auverm attenuation-CL:NAstian auverm attenuation-CL:NAstian auverm attenuation-CL:NAstian auverm attenuation-CL:NAstian auverm attenu-CL:NAstian auverm attenuation-CL:NAstian auverm attenuation-CL:NAstian auverm attenu-CL:NAstian auverm attenuation-CL:NAstian auverm attenu-CL:NAstian auverm attenuation-CL:NAstian auverm attenuation-CL:NAstian auverm attenuation-CL:NAstian auverm attenuation-CL:NAstian auverm attenu-CL:NAstian auverm attenuation-CL:NAstian auverm attenuation-CL:NAstian auverm attenu-CL:NAstian auverm attenu-CL:NAstian auverm attenu-CL:NAstian auverm attenuation-CL:NAstian auverm attenuation-CL:NAstian auverm attenuation-CL:NAstian auverm attenuation-CL:NAstian auverm attenu-CL:NAstian auverm attenuation-CL:NAstian auverm attenu-CL:NAstian auverm attenuation-CL:NAstian auverm attenuation-CL:NAstian auverm attenu-CL:NAstian auverm attenuation-CL:NAstian auverm attenuation-CL:NAstian auverm attenuation-CL:NAstian auverm attenu-CL:NAstian auverm attenuation-CL:NAstian auverm attenuation-CL:NAstian auverm attenu-CL:NAstian auverm attenuation-CL:NAstian auverm attenuation-CL:NAstian auverm attenu-CL:NAstian auverm attenuation-CL:NAstian auverm attenuation-CL:NAstian auverm attenuation-CL:NAstian auverm attenu-CL:NAstian auverm attenu-CL:NAstian auverm attenuation-CL:NAstian auverm attenu-CL:NAstian auverm attenuation-CL:NAstian auverm attenuation-CL:NAstian auverm attenu-CL:NAstian auverm attenuation-CL:NAstian auverm attenuation-CL:NAstian auverm attenuation-CL:NAstian auverm attenuation-CL:NAstian auverm attenu-CL:NAstian auverm attenuation-CL:NAstian auverm attenu-CL:NAstian auverm attenuation-CL:NAstian auverm attenu-CL:NAstian auverm attenu-CL:NAstian auverm attenuation-CL:NAstian auverm attenuation-CL:NAstian auverm attenu-CL:NAstian auverm attenuation-CL:NAstian auverm attenuation-CL:NAstian auverm attenuation-CL:NAstian auverm attenu-CL:NAstian auverm attenuation-CL:NAstian auverm attenu-CL:NAstian auverm attenuation-CL:NAstian auverm attenuation-CL:NAstian auverm attenu-CL:NAstian auverm attenu-CL:NAstian auverm attenuation-CL:NAstian auverm attenu-CL:NAstian auverm attenuation-CL:NAstian auverm attenu-CL:NAstian auverm attenuation-CL:NAstian auverm attenu-CL:NAstian auverm attenuation-CL:NAstian auverm attenu-CL:NAstian auverm attenuation-CL:NAstian auverm attenu-CL:NAstian auverm attenu-CL:NAstian auverm attenuation-CL:NAstian auverm attenu-CL:NAstian auverm attenuation-CL:NAstian auverm attenu-CL:NAstian auverm attenuation-CL:NAstian auverm attenu-CL:NAstian auverm attenu-CL:NAstian auverm attenuation-CL:NAstian auverm attenuation-CL:NAstian auverm attenuation-CL:NAstian auverm attenuation-CL:NAstian auverm attenu-CL:NAstian auverm attenuation-CL:NAstian auverm attenu-CL:NAstian auverm attenu-CL:NAstian auverm attenuation-CL:NAstian auverm attenu-CL:NAstian auverm attenuation-CL:NAstian auverm attenu-CL:NAstian auverm attenu-CL:NAstian auverm attenuation-CL:NAstian auverm attenu-CL:NAstian auverm attenuation-CL:NAstian auverm attenuation-CL:NAstian auverm attenu-CL:NAstian auverm attenuation-CL:NAstian auverm attenu-CL:NAstian auverm attenuation-CL:NAstian auverm attenuation-CL:NAstian auverm attenu-CL:NAstian auverm attenuation-CL:NAstian auverm attenu-CL:NAstian auverm attenuation-CL:NAstian auverm attenu-CL:NAstian auverm attenuation-CL:NAstian auverm attenuation-CL:NAstian auverm attenu-CL:NAstian auverm attenuation-CL:NAstian auverm attenuation-CL:NAstian auverm attenu-CL:NAstian auverm attenuation-CL:NAstian auverm attenu-CL:NAstian auverm attenuation-CL:NAstian auverm attenu-CL:NAstian auverm attenu-CL:NAstian auverm attenuation-CL:NAstian auverm attenu-CL:NAstian auverm attenu-CL:NAstian auverm attenuation-CL:NAstian auverm attenu-CL:NAstian auverm attenuation-CL:NAstian auverm attenu-CL:NAstian auverm attenuation-CL:NAstian auverm attenuation-CL:NAstian auverm attenuation-CL:NAstian auverm attenuation-CL:NAstian auverm attenu-CL:NAstian auverm attenu-CL:NAstian auverm attenuation-CL:NAstian auverm attenuation-CL:NAstian auverm attenuation-CL:NAstian auverm attenu-CL:NAstian auverm attenuation-CL:NAstian auverm attenuation-CL:NAstian auverm attenuation-CL:NAstian auverm attenuation-CL:NAstian auverm attenu-CL:NAstian auverm attenu-CL:NAstian auverm attenuation-CL:NAstian auverm attenu-CL:NAstian auverm attenuation-CL:NAstian auverm attenu-CL:NAstian auverm attenuation-CL:NAstian auverm attenuation-CL:NAstian auverm attenu-CL:NAstian auverm attenuation-CL:NAstian auverm attenu-CL:NAstian auverm attenu-CL:NAstian auverm attenuation-CL:NAstian auverm attenu-CL:NAstian auverm attenuation-CL:NAstian auverm attenuation-CL:NAstian auverm attenuation-CL:NAstian auverm attenuation-CL:NAstian auverm attenu-CL:NAstian auverm attenuation-CL:NAstian auverm attenu-CL:NAstian auverm attenu-CL:NAstian auverm attenu-CL:NAstian auverm attenu-CL:NAstian auverm attenuation-CL:NAstian auverm attenu-CL:NAstian auverm attenuation-CL:NAstian auverm attenu-CL:NAstian auverm attenuation-CL:NAstian auverm attenu-CL:NAstian auverm attenuation-CL:NAstian auverm attenuation-CL:NAstian auverm attenuation-CL:NAstian auverm attenu-CL:NAstian auverm attenuation-CL:NAstian auverm attenuation-CL:NAstian auverm attenuation-CL:NAstian auverm attenu-CL:NAstian auverm attenuation-CL:NAstian auverm attenu-CL:NAstian auverm attenu-CL:NAstian auverm attenuation-CL:NAstian auverm attenu-CL:NAstian auverm attenu-CL:NAstian auverm attenuation-CL:NAstian auverm attenuation-CL:NAstian auverm attenu-CL:NAstian auverm attenuation-CL:NAstian auverm attenu-CL:NAstian auverm attenuation-CL:NAstian auverm attenu-CL:NAstian auverm attenuation-CL:NAstian auverm attenu-CL:NAstian auverm attenuation-CL:NAstian auverm attenuation-CL:NAstian auverm attenu-CL:NAstian auverm attenu-CL:NAstian auverm attenuation-CL:NAstian auverm attenuation-CL:NAstian auverm attenu-CL:NAstian auverm attenuation-CL:NAstian auverm attenuation-CL:NAstian auverm attenu-CL:NAstian auverm attenuation-CL:NAstian auverm attenuation-CL:NAstian auverm attenu-CL:NAstian auverm attenu-CL:NAstian auverm attenuation-CL:NAstian auverm attenu-CL:NAstian auverm attenuation-CL:NAstian auverm attenuation-CL:NAstian auverm attenu-CL:NAstian auverm attenu-CL:NAstian auverm attenuation-CL:NAstian auverm attenu-CL:NAstian auverm attenu-CL:NAstian auverm attenuation-CL:NAstian auverm attenu-CL:NAstian auverm attenuation-CL:NAstian auverm attenuation-CL:NAstian auverm attenu-CL:NAstian auverm attenu-CL:NAstian auverm attenu-CL:NAstian auverm attenuation-CL:NAstian auverm attenu-CL:NAstian auverm attenu-CL:NAstian auverm attenu-CL:NAstian auverm attenu-CL:NAstian auverm attenu-CL:NAstian auverm attenu-CL:NAstian auverm attenu-CL:NAstian auverm attenu-CL:NAstian auverm attenu-CL:NAstian auverm | |||||||
BRANDT FRANCE, Etablissement de CERGY, 5/7 avenue des Béthunes, 95310 SAINT OUEN L'AUMONE. SAS forenklet aksjeselskap med kapital pa 100.000.000 euro RCS NANTERRE org. nr. 801 250 531.
SZANOWNI KLIENCI!
WYBÓR MIEJSCA INSTALACJI I WBUDOWANIA
Information for domestic covers (UE n7 60/2014)
Oh rapaHTnpyET He ToIbKO KaueCTBO I DoJIROBeHuOCTb HaIINx npIbOpOB, Ho IN IX OTCJExKIBaEMoCTb, To ectb yKa3bIBaEt ToUHoe N YeTKOE MeCTO IN pONCXOXKeHn.
www.de-dietrich.com
De Dietrich
CREATEURD'EMOTIONS DEPUIS 1684
BAXHBIE INHCTPYKUNI NO TEXHNKE BE3ONACHOCTN IN IPEDOCTEPEXEHNA 4
1 YCTAHOBKA 7
BbI6Op MeCTa N yCTaHOBka 7
3neKtpnueckoe nodknoueHne 7
2 OKPYKAAIOUeI CPEbl 8
Oxpana okpykaioe ipebl 8
3 OINCAHNE BALSEIIO PNIIBOPA 9-11
OnncanHe dYxOBoI 8kaFa 9
Iscnnei KhoNk ynpabHeHna 10
PnHaIeXHOCTN (B COOTBeTCTBmC MoJeBIO) 11
4IPABNIA 3KcIyATAU.. 12-16
HacrpoKu 13
MeHIO HacTpoek 14
PexkmbipnroTOBneHnPiu 15
HauJIIO npriROToBHeHnI 16
5 yXoI 18-19
OuHCTka BHyTpN n ChapyKn 18
6 HENCINPABHOCTN IN CNOCObI INX YCTPAHEHNA 20
7 PEKOMEHDAUINIPOIPNIGOTOBHEHIOIII 21-23
BAKHBIE INHCTPYKUNI NO TEXHNIKE B3OJACHOCTN: BHIMATEJIbHO IPOYTTE N COXPAHNTE JIЯ NCIOJIb3OBAHNA B DAJIbHEIShEM.
3Tu INHCTpyKcIIO MOXHO cKaaTaB Ha Be6-caTe KOMNaHn.
B MOMENT NOJUyeHnЯ prn6bopa cpa3y je pacnakyte ero nIIN nonpocnte 3TO cdeNaTb KOrO-Jn6O dpyrO. IpoBepbTe BHeuHn BvI. Pn Heo6xOIMOCtN OOnuHTe HeIOCTaTKn Ha KBNTaHcUN O DOCTaBKe i COxpaHnte OOnH 3K3eMnJIrp.

BaxHo!
3TOT np60bOp MOKeT nCNoIb3OBAtbcr DeTbMn OT 8 let n CTapWe, IIOdbMn C OpraHnueHHbIMN fN3nueCKmN, CEHCOPHbIMN uYMCTBeHHbIMN BO3MOXHOCTaMn, a TaKKe JIODbMn C HexBaTKoN ONbTa N 3HaHn NOk KOHTPOEm OTBETCTBEHHORO 3a IN 6e3OpacHOCTb IuCa NocJe npoxOJdEHnI pReiBapntEJIbHOro INHCTpyKTaja N O 6e3OpacHomy NCNoIb3OBaHNIO np60pa I NOlyeHnI HOpMaun O pncKaX, KOTOpbIM OH N IOBvepraIOTcra.
— DeTЯm 3aπpeuεHo nɪrpɑt b c npúbopom. He cIeŋyET pa3peuataB DeTЯm 6e3 npncMOtpa OcyuεCTBnA Tb OunchkU y N TexO6cJIyXnBaHne.
— Cneinte 3a Tem, YTO6bI DeTu He nIrpann c npnbopom.

ПЕДОCTEPEХЕНЕ.
—Pnp6op n erO qactn, HaxoJusneB OTKpbITOM DoCTyNe, MOryt CInbHO HArpeBaTbcr BO Bpempa60tbl. ByIbTe BHIMATEJIbHbI IN He PnITpaINBaIteCb K HArpeBaTeJIbHbIM 3JeMeHTam, KOToPbIE HaxoJATcBHyTpN dYxOBOrO ShkaΦa. DeTn MnaDlwe 8 let MOryT haxoJITbcR BO3JIe dYxOBOrO ShkaΦa TOnbKO NOI NOCTOJHHbIM Ha6IIODeHHeM.
-3TOT np60p npedHa3NaueH dIra IOTOBKc 3aKpbToi DBepeI.
—Ipeed hauaIom nipoJIHTueckOuNCTKn DuxOBoro 1kaΦa N3BJIeKInTeN3 HeRo BCE pInHaJNeJXHOCTN ydaJIte OCHOBHbIe PANTHa N 6pbI3rN.
—BoBpeMgOuNCTKnIOBepXHocTmMOrYT HArpeBaTbC8 6oJIbWe, YemIprn HopMaJbHOM pexIme pa60tbl.
PekomeHnyetc Hne noDnyckaTb K yctpoiCTBy dTei.
He nCnoJb3yIte np6Opbl qnCTkn napom.
He nCnoIb3yIte a6pa3nBhIe cpeIcTBa IJIa 06cIyXuBaHnA, a TAKKe JecTKe MeTaNIIuYeCKne CKpe6Kn IJIa YNCTKN CTekJHHOI DBepCuI DuxOBOTo WkaΦa, NocKoJIbKy I3-3a 3TOrO Ha NOBepXHOCTN MOrYT NOBuTBcApaAnHHI N CTeKNo MOxET NOTpeCKaTbcra.

ПЕДОCTEPEЖЕНЕ.
Ipejde yem npntyntb K 3ame He Iamnochn BO n36eXaHne OnacHOCTn Nopaxheny 3JIeKTPnueCKM TOKOM yBeiTeCb, YTO np6Op OTKnIOUeyen OT CETN NiTaHn. BblOnHnYe 3AmEny TOnbKO Ha OCTbIBWeM np6ope.ДЯ CHrTnA CTeKna I NaMNoCHn NCNoJb3yIte pe3INHOByo nepaTkY, KOtOpaO6JeHT npOceCC demOHTaJa.

Долхна 6ыть п dedусмOTpeha
BO3MOXHOCTb OTKJIUOyeHnI np6opaOT 3JIeKTPocETn C NOMOuBbOBKIIIOyATEJ, yCTaHOBJIeHHOROBΦHKcnpoBaHHbIX Ka6eJIeNpOBoDax BCOTBETCTBnC nPaBnIamN yCTaHOBKn.
-Bo n36eXaHne onacHocTn npi NOBpeXdEHHn Ka6eJI NITAHn erO 3aMeHa DOJXHa BbIOnHrTbcr PpON3- BOINTeIeM, COTpydHnKaMn CJIyK6bl NocIeNpOdaJxHOro OcClyXnBaHn JIn6o nepcoHaIOM C COOTBeTCTByIOUeN KBaIIuΦnKaUeN.
- 3TOT npnbop moKet yCTaHaBnIBaTbCk KaK NOd pa6Oey NOBepxHOcTBIO, TAK I HaI HeB B COOTBETCTBUNCO CXEMoM MoHTaJa.
—PacnoJoxnTe dYxOBoN uKaΦ B Me6eIi No ΚeHTpy TaK, YTObI Mekdy NeybIO N COCEHIM IpeDMETOM Me6eIN OCTaBaNc 3a3Op He MeHee 10 MM. MaTePnaI Me6eIi, B KOTopyu BCTpaInBaETcA dYxOBoN uKaΦ, DoJIKeH 6bITb
yCTOuHBbIM K BO3DeIcTBIO BbICOKoTEmpeaTypbI (nIIM Me6eJIb DOJXHa6bITb NOKpbITA TaKIM MaTePnaJOM).ДЯobecneueHnBOLbWei yCTOuYBOCTN3aKpeNTe Neyb B Me6eJI, BBInHTNB2BnHTa B OTBepCTn, PpeDyCMOTpeHHbIeДЯ 3Tnx ZeJeI.
BCTaBnraTcB HnnpabNraUoune. NdeanbHO NOxOAnT IJI npiroTOBneHn neueHb, KEKCOB.
Blaorapnokato nobepxhoCTN Bc CMOKeTe Ierko noloxntb Baun 3arotobKn Ha npOTNBHeB. MoXHO TaKke BCTabnTb HnpaBnIOuNe NOI rPInem dnn c6opa coka n Knpa npn Jkapke.
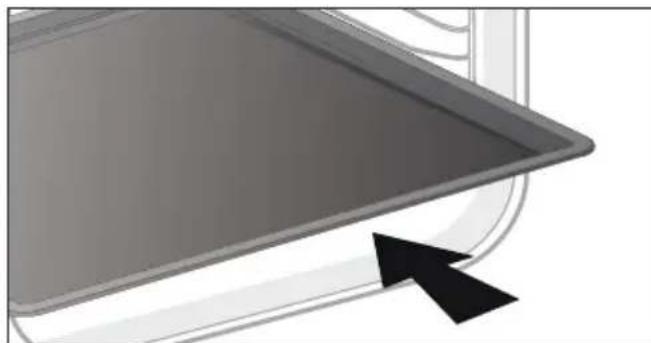

PEKOMEHДAUJIY.
YTo6bI N36ExaTb BbIeJeHnA DbIMa BO BpeM npiroTOBHeHn XHPHO Mca, MbI COBeTyem Bam Do6aBHTb HEMHO BoDbI INn pAcTeJIbHOrO Macna Ha dHO MHORoФyHKUHOHaJIbHOrO IpOTNBHr TOJUNHO 45 MM.
.3 OIIINCAHNE BAIIIEIIO IIPNBEOPA
CNCTEMA BbIDBnKhbIX HANPABJIIOUx (B 3ABCIMOCTN OT MODEJIIN)
Blaorapra cnteMe BbIBNXHbIX HnpaBnaKoUnx MaHnnyInpOBaHne npOyKTamn CtaHOBNTc60Jee yOobHIM IN JERKIM, T.K. IpOTNBMOrT BbIBNrTaBcR PnABHO, YTO MAKcMnAbHOynpoaet 6paueHne c HmN. IpOTNBMOxHO n3BNeKaTb NOnHOCTbO, YTO oBeCneuBaET DOctyn KOBcemy 6blNDy. Kpome TOrO, IxYCTOuHBOcTB oBeCneuBAeT NOHyo 6e3OnacHOCTb pa60tbc npOyKTAMN, YTO yMeHbwaet OnaCHOCTb OXOROB. TaKIM o6pa3OM, n3BneueHne npOyKTOB n3 DuxOBKn CTAHOBNTcR HaMHoro 60Jee yOobHbIM.
YCTAHOBKA IN DEMOHTAX BbIDBnKhblx HANPABJIIOUx
Iocne ydaJeHn2 npOBOnOHybIX peWetOK Bbl6epnte ypoBeHb BbcOTbI (ot 2 do 5),Ha KOTOpOM Bbl XOTnTe 3aΦNKcNPOBaTb Baun HAnpaBnIOUne. BCTaBbTe JEBYIO HApabJIaKoUyIO B yCTyn JbeON PeWETKN, BblONHINB DOCTaTOOHoe DaBHeHne Ha nepeDHIO N 3aHNIOU qACTn HApabJIHOSei, YTO6bI 2 NaKN Ha 6OKy HApabJIIOUe BOWIN B npOBOnOHyO peWETKY. BblONHIne aHAnOrnHbIe DeNCTBnA DnI npABOn HApabJIIOUeI.
PekomeHdyetcI nI npiroTOBJIeHnMЯca, pbl6bl, OBOUeI, XeIaTeIbHO B KepamNuecko Nocyde.

KoHBeKzNoHHbI peXIM
Munmabha ternepatypa 35 ^ C MaKcImaBHa—275°C
Pekomehdaun:200°C
3TOT peKIM npIroTOBHeH He noDxOaNT dJa npIroTOBHeHn Ha BOdHaOH 6aHe.
PekomeHdyetcIy MeIeHHoro n deJIHKaTHORO npiroTOBHeHn: MraKar dNv. IJra 3aneKaHn KpacHO rca. IJra NocneDyUoJero TomHeHn Ha MeIeHHOM OrHe B 3akpbToiN nocye 6nIoD, KOtOpbIe HauHahIn rOtOBHTbcr Ha BapouHOn NOBepxHOctn (NeTyX B BVHe, pary n3 dNUn).

BepxHnHaRpeB
Munmabha ternepatypa 75^ Makmabha 250°C
Pekomehdaun:180°C
PekomeHdyetcIaBnaXhIx 6nIO (KIN, npornc cooHbIMN ppykTAMN T. d.). Tecto xopowo nponeyETc CHN3y. PekomeHdyetcIaBnO, KOtOpbIe DOJXHbI NOHHTbcr (TopTbI, 6ynOuKN, KynuH N T. d.) nI dy cyfne 6e3 KopouKn cBepxv.

3ko\*
MunHmAbbHa TaemepaTypa 35 ^ C MaKcMaJIbHa—275°C
Pekomehdaun:200°C
3TOT pexnmpiroTOBJeHn He nOxOHT dI npiroTOBJeHn Ha BOJHO6aHe.
3To noJoxHe n03BOJareT 3KOHOMtB 3HepnIO, He Tepra B kaueCTBe npiroTOBJIeHHa.
PnroToBneHne Bcex 6nOd oCyueCTBnaeTc8e3 npedBaupntbHoro HarpeBaHna.
- Pexim npirotoOBHeHn, COOTBeTCTBkyOu n peKomeHdaCnM cTaHapTa EN 60350-1:ДЯ DeMoHcTpaun CoOTBeTCTBn Tpe6oBaHnM 3TNKeTnpoBaHn 3JIeKTpUnecknx np6opob no perIamenty Ebponeckoro CoO3a UE/65/2014.

PnIb BbICOKO MOHOCTH
IonoKeHHa 1-4
PekomeHdyeTcIy npriroTOBneHnKypubl.

Pb16a
PekomeHnyetcIJI npiroTOBneHnIeNoI py6bl (IOOCsC, C6aca, Tpeckn).

Bénoe Mýco
PekomeHdyeTcIy coXpaHeHn HeKHOCTN MraKoCTN 3aneHHo TELaTHbI.
4 IIPABNJA 3KCIJYATAIIN
Дя ИСПОЛБОВАнЯ 3ТИХ ТЕРСФУHKПИНEOБXODIMO HAJIITB B MHOROФуHKQUHAnbHbI INPOTINBEHb TOLUHNO45 MM 500 MЛ TENIOI BObl I yCTaHOBNTB eRO B DuxOBoi UIkaΦ Ha HIXHNI yPOBeHb, a nprirotabnBaemoe 6LIOO — Ha TpeTNI yPOBeHb.
YCTaHOBnTe BeC Ha DnCnIe C NOMOu bIpyKu +/— I NOITBePdIte 3HaueHne, HaxaB pyKy +/-.
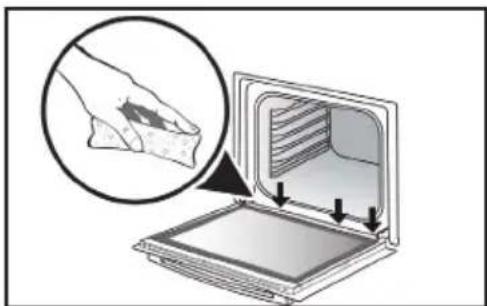
Bo Bpem npirotoBneHna napy Ha BHyTppeHHem CTeKne 6pa3yeTcKoHDeHcT.
Boa,obpa3yUoJcAraC Bpe3yIbTaTe KOHdeHcata,MOKeT OCTaTbcB XeNo6e (^*) .B 3tOM cnyae ee cneDyET CO6paTb ry6KoN OKOHNn npiroTOBHeHn BO n36exHaHne HAKONJIeHn BObl.
(*) Kenob pacnoonoxen no npoknaeko DBepbBn3y paMbI dYXOBOrO uKaΦa.
HauJIO PnIroTOBJIeHnJ
Hauano 6e3oTnaIaTeIbHoro npnroToBJeHnra
Ha nucnnee oTo6paxaetc BpeM. OHO He doJXHo MmraTb.
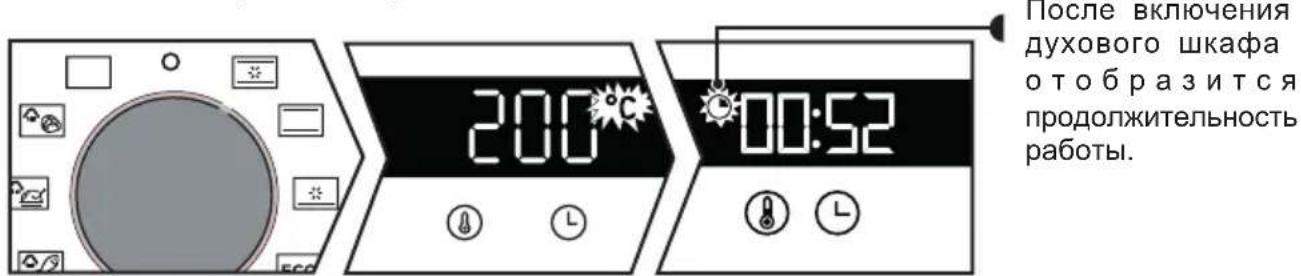
IpebeDnte pyky nepeKluyeHnA yHKuB HyKHOe nooKeHne.
INdkaTOp OKOHuaHn npiroToBJeHn ppeKpaaaet MmraTb.
DyXOBoI ShkaΦ HauHET npriROBJIeHne No3Xe, YTO6bI 3aBepuNTb npriROBJIeHne B 3aDaHHoe Bpem.
PIMMEUAHNE. 3Ta yHKnna He doctynHa B peKmepnla.
.5yXoI
OuNCTKA BHYTPN IN CHAPYXIN
OuNTka KaMepbl
3Ta 0yHKnO uNCTKn DyxOBOro 3aHmaeT MehBwe BpeMeHN n CHXkaet OTpuataelbHOe BO3dienCTBne Ha OKpyKaIOUyIO CpeDy.
Ie ee nCnoJIb3OBAHnra pacnbInTe B kamepe 300 Mn BOdbI N BKIOUHTe ONUCTKy napOM, yCTaHOBnB pyKy B INOJXeHne (nn B 3aBNCIMOCtN OT MOJeN)Ha 35 MNH.
OuNCTka BHeUHeN NOBepXHOCTN
IcnoJb3yIte MraKyIO TkaHb, CMOueHHyIO cpeCTBOM Inra YnCTKn CTeKoJI. He nCNoJIb3yIte HN YnCTAUX NaCT, HN a6pa3NBbIX ry60K.
OuNCTka npOBJIoUHbIX peWeTOK
CHIMNE npoBOJOnHbIe peWetKn IIN IX ONUCTKn. POnHMNTe nepeDHIIOU qAcTb peWetKn BBepx, TOJKNITE 6JOK npoBOJOnHoi peWetKn IN BbITaUNTE nepeDHN KpOvOK n3 erO rHe3da.
3aTeM cIeRka nOHTHe 6nOK npOBOnoHoi peWetKn Ha ce6y, YTO6bI BbIHytb 3aHne KpOChK n3 INrHe3d. N3BNeKeTte TAKIM o6pa3OM 2 npOBOnoHbIe peWetKn.
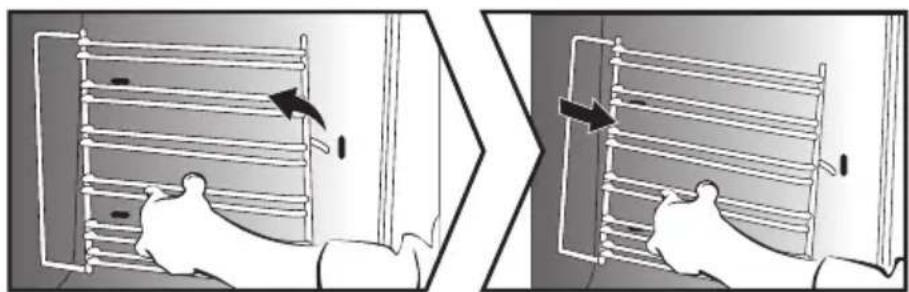
OuNcTkca cTeKoJ DBePcbI
IOnHocTbIO OTKpoIe DBepy I 3a6JoknpyIe ee C NOMOuO OJHOrO N3 PJIaCTMaCCOBbIX KJIINHbeB, NOCTaBnIeMbIX BMeCTe C npIbOpom.

Otkpynte DBA BnHTa, pacnoIooKeHHbIX C KaJdoi CTopoHbI KpeIeHnA DBepuB, C NOMoIbIO OTBeptKc CO 7nIoum Torx (T20), 3aTeM cHIMnTe nepembyky, NotraHyB ee K ce6e.
.5yXoI
OuNCTka BHeUHHei NOBepXHocTn
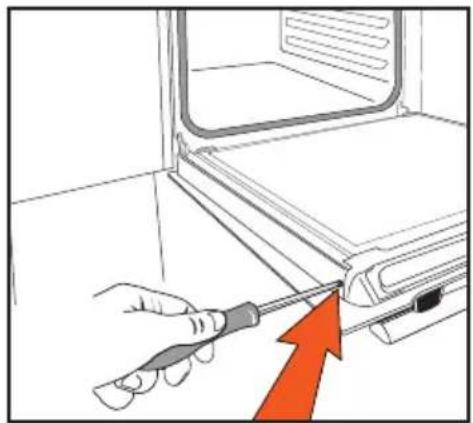
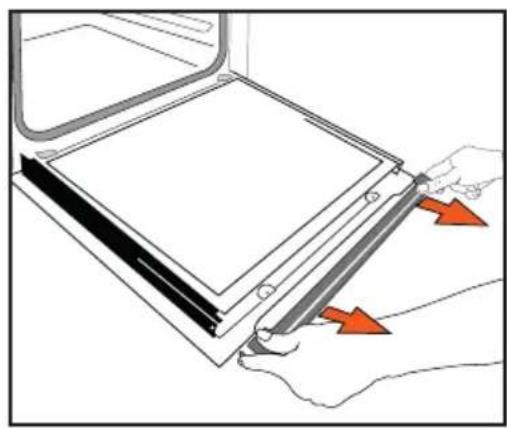
I3BnKeHTe nepBoe cTeKnO. He onyckaiTe cTeKna B BoDy. OnoNoCHte YnCToB BoDoN I npoTpnte HEBOJOKHCTOn TkaHbIO.
YctaHOBka DBepuHa MeCTO
Iocne ouhctkn yctahOBnTe cTeKNO n nepeMbuyu Ha MeCTO u 3akpyTnte. BbTaunTe pnaCTMaCCOBBI KInH nepeD TeM, KaK 3akpbItb DBepy. BaW npnbop cHOBA rTOB K pa6ote.
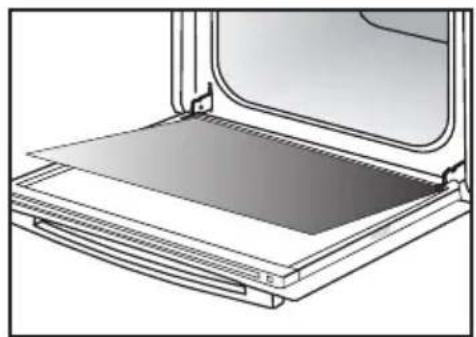
3aMeHa JAmNoKIn

Baxho!
Ipeed Tem kak npnctyntb K 3ame He lamnoch N BO n36exaHne OnachoCTn nopaxeHna 3JIektpnueckm TOKOM, y6eHTecb, YTO np6op OTKJIIOUeH OT cETN nITaHn. BblonHnTe 3aMeHy TOnbKO Ha ocTbIBWem np6ope.
IapametpbI lamnoykN:
25 B, 220-240 B~, 300 °C, NaTPOH G9. Bb MoXeTe camn 3aMeHntb NaMNoUky, T.K. OHa yXe He pa6OtaeT. OTkpyTnte CBETnIbHnK I DoCTaHbTe NaMNoUky (Nc- nOJIb3yIte pe3INHOByU npEpaTky IInr oBneHEnra npoecca demontaxa). BCTABTe HOByU NaMNoUky I NOCTaBBTe Ha MecTo CBETnIbHnK. 3TO N3dJIne OcHaSeHo NcTOUHnKOM CBeTa KNaCCa 3HEpro3ΦΦekTNBHOCTnG.
HENCPABHOCTN IN CNOCObI INX YCTPAHEHNA
He MeHee Yaca npKOMHaTHoN TemnepaType.
Information for domestic coven (UE n7 68/2014)
Information for domestic covers (UE n7 60/2014)

Valean
| Symbol | Unit | Value | EN Symbol: FR. Symbie: ES. ZnaOx: DA. Symbie: ES. Simbo: IT. Simbo: NL. Symbie: PL. Czaznace: PT. Simbo: SK. Simbo: EL. Za#p#o: FI. Symbie: EL. Za#p#o: FI. Symbie: EL. Za#p#o: FI. Symbie: EL. Za#p#o: FI. Symbie: EL. Za#p#o: FI. Symbie: EL. Za#p#o: FI. Symbie: EL. Za#p#o: FI. Symbie: EL. Za#p#o : FL. Za#p#o : FL. Za#p#o : FL. Za#p#o : FL. Za#p#o : FL. Za#p#o : FL. Za#p#o : FL. Za#p#o : FL. Za#p#o : FL. Za#p#o : FL. Za#p#o : FL. Za#p#o : FL.Za#p#o : FL. Za#p#o : FL. Za#p#o : FL. Za#p#o : FL. Za#p#o : FL. Za#p#o : FL. Za#p#o : FL. Za#p#o : FL. Za#p#o : FL. Za#p#o : FL. Za#p#o : FL. ZA#p#o : FL. Za#p#o : FL. Za#p#o : FL. Za#p#o : FL. Za#p#o : FL. Za#p#o : FL. Za#p#o : FL. Za#p#o : FL. Za#p#o : FL. Za#p#o : FL. Za#p#o : FL. Za4p#o : FL. Za4p#o : FL. Za4p#o : FL. Za4p#o : FL. Za4p#o : FL. Za4p#o : FL. Za4p#o : FL. Za4p#o : FL. Za4p#o : FL. Za4p#o : FL. Za4p#o : FL. Za4P : FL. Za4P : FL. Za4P : FL. Za4P : FL. Za4P : FL. Za4P : FL. Za4P : FL. Za4P : FL. Za4P : FL. Za4P : FL. Za4P : FL. Za4P : FL. Za4P : FL. Za4P : FL. Za4P :FLZa4P : FL. Za4P : FL. Za4P : FL. Za4P : FL. Za4P : FL. Za4P : FL. Za4P : FL. Za4P : FL. Za4P : FL. Za4P : FL. Za4P : FL. Za4P : FL. Za4P : FL. Za4P : FL. Za 10200015731111111111111111111111111111111111111111111111111111111111111111111111111111111111111111111111111111 | ||||||||||
| Type norme | ORF25AWF | EN Type: Norme-FR: Type: Norme-CS: Model:DA:Norme-DE:Type: DE:AN: Model:DA:Model:EL:Model:DA:Model:EL:Model:DA:Model:EL:Model:DA:Model:EL:Model:DA:Model:EL:Model:DA:Model:EL:Model:DA:Model:EL:Model:EL:Model:EL:Model:EL:Model:EL:Model:EL:Model:EL:Model:EL:Model:EL:Model:EL:Model:EL:Model:EL:Model:EL:Model:EL:Model:EL:Model:EL:Model:EL:Model:EL:Model:EL:Model:EL:Model:EL:Model:EL:Model:EL:Model:EL:Model:EL:Model:FL:Model:EL:Model:FL:Model:FL:Model:FL:Model:FL:Model:FL:Model:FL:Model:FL:Model:FL:Model:FL:Model:FL:Model:FL:Model:FL:Model:FL:Model:FL:Model:FL:Model:FL:Model:FL:Model:FL:Model:FL:Model:FL:Model:FL:Model:FL:Model:FL:Model:FL:Model:FL:Model:CL:Model:CL:Model:CL:Model:CL:Model:CL:Model:CL:Model:CL:Model:CL:Model:CL:Model:CL:Model:CL:Model:CL:Model:CL:Model:CL:Model:CL:Model:CL:Model:CL:Model:CL:Model:CL:Model:CL:Model:CL:Model:CL:Model:CL:Model:CL:Model:CL:Model:FL:Model:FL:Model:FL:Model:FL:Model:FL:Model:FL:Model:FL:Model:FL:Model:FL:Model:FL:Model:FL:Model:FL:Model:FL:Model:FL:Model:FL:Model:FL:Model:FL:Model:FL:Model:FL:Model:FL:Model:FL:Model:FL:Model:FL:Model:FL:Model: | EN Type: Norme-FR: Type: Norme-CS: Model:DA:Norme-DE:Type: DE:AN: Model:DA:Model:EL:Model:DA:Model:EL:Model:EL:Model:EL:Model:EL:Model:EL:Model:EL:Model:EL:Model:EL:Model:EL:Model:EL:Model:EL:Model:EL:Model:EL:Model:EL:Model:EL:Model:EL:Model:EL:Model:EL:Model:EL:Model:EL:Model:EL:Model:EL:MODEL:LE:Model:LE:Model:LE:Model:LE:Model:LE:Model:LE:Model:LE:Model:LE:MODEL:LE:Model:LE:MODEL:LE:MODEL:LE:MODEL:LE:MODEL:LE:MODEL:LE:MODEL:LE:MODEL:LE:MODEL:LE:MODEL:LE:MODEL:LE:MODEL:LE:MODEL:LE:MODEL:LE:MODEL:LE:MODEL:LE:MODEL:LE:MODEL:LE:MODEL:LE:MODEL:LE:MODEL:LE:MODEL:LE:MODEL:LE:MODEL:LE:MODEL:LE:MODEL:LE: MODEL:FL:Model:FL:Model:FL:Model:FL:Model:FL:Model:FL:Model:FL:Model:FL:Model:FL:Model:FL:Model:FL:Model:FL:Model:FL:Model:FL:Model:FL:Model:FL:Model:FL:Model:FL:Model:FL:Model:FL:Model:FL:Model:FL:Model:FL:Model:FL:Model:FL:MODEL:LE:Model:LE:Model:LE:Model:LE:MODEL:LE:MODEL:LE:MODEL:LE:MODEL:LE:MODEL:LE:MODEL:LE:MODEL:LE:MODEL:LE:MODEL:LE:MODEL:LE:MODEL:LE:MODEL:LE:MODEL:LE:MODEL:LE:MODEL:LE:MODEL:LE:MODEL:LE:MODEL:LE:MODEL:LE:MODEL:LE:MODEL:LE:MODEL:LE:MODEL:LE: MODEL:FL: Model:FL: Model:FL: Model:FL: Model:FL: Model:FL: Model:FL: Model:FL: Model:FL: Model:FL: Model:FL: Model:FL: Model:FL: Model:FL: Model:FL: Model:FL: Model:FL: Model:FL: Model:FL: Model:FL: Model:FL: Model:FL: Model:FL: Model:FL: Model:FL: Model:FL: MODEL:FL: Model:FL: Model:FL: Model:FL: Model:FL: Model:FL: Model:FL: Model:FL: Model:FL: Model:FL: Model:FL: Model:FL: Model:FL: Model:FL: Model:FL: Model:FL: Model:FL: Model:FL: Model:FL: Model:FL: Model:FL: Model:FL: Model:FL: Model:FL: Model: | EN Type: Norme-FR: Type: Norme-DE:Type: DE:AN: Model:DA:Model:DE:AN: Model:DE:AN: Model:DE:AN: Model:DE:AN: Model:DE:AN: Model:DE:AN: Model:DE:AN: Model:DE:AN: Model:DE:AN: Model:DE:AN: Model:DE:AN: Model:DE:AN: Model:DE:AN: Model:DE:AN: Model:DE:AN: Model:DE:AN: Model:DE:AN: Model:DE: AN: Model:DE:AN: Model:DE:AN: Model:DE:AN: Model:DE:AN: Model:DE:AN: Model:DE:AN: Model:DE:AN: Model:DE:AN: Model:DE:AN: Model:DE:AN: Model:DE:AN: Model:DE:AN: Model:DE:AN: Model:DE:AN: Model:DE:AN: Model:DE:AN: Model: DE:AN: Model:DE:AN: Model:DE:AN: Model:DE:AN: Model:DE:AN: Model:DE:AN: Model:DE:AN: Model:DE:AN: Model:DE:AN: Model:DE:AN: Model:DE:AN: Model:DE:AN: Model:DE:AN: Model:DE:AN: Model:DE:AN: Model:DE:AN: Model:DE:AN: MODEL:FL:Model:FL:Model:FL:Model:FL:Model:FL:Model:FL:Model:FL:Model:FL:Model:FL:Model:FL:Model:FL:Model:FL:Model:FL:Model:FL:Model:FL:Model:FL:Model:FL:Model:FL:Model:FL:Model:FL:Model:FL:Model:FL:Model:FL:Model:FL:Model: | EN EN Type: Norme-FR: Type: Norme-DE:Type: DE:AN: Model:DA:Model:DE:Anteil der Halal de Garganu ES Masa del asparo IT Massa dell a cava d'el calvado e la cava d'el calvado e la cava d'el calvado e la cava d'el calvado e la cava d'el calvado e la cava d'el calvado e la cava d'el calvado e la cava d'el calvado e la cava d'el calvado e la cava d'el calvado e la cava d'el calvado e La cava d'el calvado e La cava d'el calvado e La cava d'el calvado e La cava d'el calvado e La cava d'el calvado e La cava d'el calvado e La cava d'el calvado e La cava d'el calvado e La cava d'el calvado e La cava d'el calvado e LA cava d'el calvado e LA cava d'el calvado e LA cava d'el calvado e LA cava d'el calvado e LA cava d'el calvado e LA cava d'el calvado e LA cava d'el calvado e LA cava d'el calvado e LA cava d'el calvado e LA cava d'el calvado e LCA VAMC VAMC VAMC VAMC VAMC VAMC VAMC VAMC VAMC VAMC VAMC VAMC VAMC VAMC VAMC VAMC VAMC VAMC VAMC VAMC VAMC VAMC VAMC VAMC VAMC VAMC VAMC VAMC VAMC VAMC VAMC VAMC VAMC VAMC | EN EN Type: Norme-FR: Type: Norme-DE:Type: DE:AN: Model:DA:Model:DE:Anteil der Halal de Garganu ES Masa del asparo IT Massa dell a cava d'el calvado e la cava d'el calvado e la cava d'el calvado e la cava d'el calvado e la cava d'el cal vado e la cava d'el cal vado e la cava d'el cal vado e la cava d'el cal vado e la cava d'el cal vado e la cava d'el cal vado e la cava d'el cal vado e la cava d'el cal vado e la cava d'el cal vado e la cava d'el cal vado e la cava d'el calvado e La cava d'el calvado e La cava d'el calvado e La cava d'el calvado e La cava d'el calvado e La cava d'el cal vado e La cava d'el cal vado e La cava d'el cal vado e La cava d'el cal vado e La cava d'el cal vado e La cava d'el cal vado e La cava d'el cal vado e La cava d'el cal vado e La cava d'el cal vado e La cava d'el cal vado e La cava d'el calvado e La cava d'el cal vado e La cava d'el cal vado e La cava d'el cal vado e La cava d'el cal vado e La cava d'el cal vado e La cava d'el cal vado e La cava d'el cal vado e La cava d'el cal vado e La cava d'el calvado e La cava d'el calvado e La cava d'el cal vado e La cava d'el cal vado e La cava d'el cal vado e La cava d'el cal vado e La cava d'el cal vado e La cava d'el cal vado e La cava d'el cal vado e La cava d'el calvado e La cava d'el cal vado e La cava d'el calvado e La cava d'el cal vado e La cava d'el cal vado e La cava d'el cal vado e La cava d'el cal vado e La cava d'el cal vado e La cava d'el cal vado e La cava d'el cal vado e La cava d'el calvado e La cava d'el calvado e La cava d'el calvado e La cava d'el cal vado e La cava d'el cal vado e La cava d'el cal vado e La cava d'el cal vado e La cava d'el cal vado e La cava d'el cal vado e La cava d'el calvado e La cava d'el cal vado e La cava d'el cal vado e La cava d'el calvado e La cava d'el cal vado e La cava d'el cal vado e La cava d'el cal vado e La cava d'el cal vado e La cava d'el cal vado e La cava d'el cal vado e La cava d'el calvado e La cava d'el cal vado e La cava d'el calvado e La cava d'el calvado e La cava d'el cal vado e La cava d'el cal vado e La cava d'el cal vado e La cava d'el cal vado e La cava d'el cal vado e La cava d'el cal vado e La cava d'el calvado e La cava d'el calvado e La cava d'el cal vado e La cava d'el calvado e La cava d'el cal vado e La cava d'el cal vado e La cava d'el cal vado e La cava d'el cal vado e La cava d'el cal vado e La cava d'el cal vado e La cava d'el calvado e La cava d'el calvado e La cava d'el calvado e La cava d'el calvado e La cava d'el cal vado e La cava d'el cal vado e La cava d'el cal vado e La cava d'el cal vado e La cava d'el cal vado e La cava d'el calvado e La cava d'el cal vado e La cava d'el cal vado e La cava d'el cal vado e La cava d'el calvado e La cava d'el cal vado e La cava d'el cal vado e La cava d'el cal vado e La cava d'el cal vado e La cava d'el cal vado e La cava d'el calvado e La cava d'el cal vado e La cava d'el cal vado e La cava d'el calvado e La cava d'el calvado e La cava d'el cal vado e La cava d'el cal vado e La cava d'el cal vado e La cava d'el cal vado e La cava d'el cal vado e La cava d'el calvado e La cava d'el cal vado e La cava d'el calvado e La cava d'el cal vado e La cava d'el calvado e La cava d'el cal vado e La cava d'el cal vado e La cava d'el cal vado e La cava d'el cal vado e La cava d'el cal vado e La cava d'el calvado e La cava d'el cal vado e La cava d'el calvado e La cava d'el calvado e La cava d'el calvado e La cava d'el cal vado e La cava d'el cal vado e La cava d'el cal vado e La cava d'el cal vado e La cava d'el cal vado e La cava d'el calvado e La cava d'el calvado e La cava d'el cal vado e La cava d'el cal vado e La cava d'el calvado e La cava d'el cal vado e La cava d'el cal vado e La cava d'el cal vado e La cava d'el cal vado e La cava d'el cal vado e La cava d'el calvado e La cava d'el calvado e La cava d'el cal vado e La cava d'el calvado e La cava d'el calvado e La cava d'el cal vado e La cava d'el cal vado e La cava d'el cal vado e La cava d'el cal vado e La cava d'el cal vado e La cava d'el calvado e La cava d'el calvado e La cava d'el calvado e La cava d'el cal vado e La cava d'el calvado e La cava d'el cal vado e La cava d'el cal vado e La cava d'el cal vado e La cava d'el cal vado e La cava d'el cal vado e La cava d'el calvado e La cava d'el calvado e La cava d'el calvado e La cava d'el calvado e La cava d'el calvado e La cava d'el cal vado e La cava d'el cal vado e La cava d'el cal vado e La cava d'el cal vado e La cava d'el cal vado e LCA VAMC VAMC VAMC VAMC VAMC VAMC VAMC VAMC VAMC VAMC VAMC VAMC VAMC VAMC VAMC VAMC VAMC VAMC VAMC VAMC VAMC VAMC VAMC VAMC VAMC VAMC VAMC VAMC VAMC VAMC VAMC VAMc VAMC VAMC VAMC VAMC VAMC VAMC VAMC VAMC VAMC VAMC VAMC VAMC VAMC VAMC VAMC VAMC VAMC VAMC VAMC VAMC VAMC VAMC VAMC VAMC VAMC VAMC VAMC VAMC VAMC VAMC VAMC VAMC VAMCVAMC VAMC VAMC VAMC VAMC VAMC VAMC VAMC VAMC VAMC VAMC VAMC VAMC VAMC VAMC VAMC VAMC VAMC VAMC VAMC VAMC VAMC VAMC VAMC VAMC VAMC VAMC VAMC VAMC VAMC VAMC VAMC VAMC VAHM VAMC VAMC VAMC VAMC VAMC VAMC VAMC VAMC VAMC VAMC VAMC VAMC VAMC VAMC VAMC VAMC VAMC VAMC VAMC VAMC VAMC VAMC VAMC VAMC VAMC VAMC VAMC VAMC VAMC VAMC VAMC VAMC VAMC | |||||||
| Volume per cavity | V | 73 | EN EN EN EN EN EN EN EN EN EN EN EN EN EN EN EN EN EN EN EN EN EN EN EN EN EN EN EN EN EN EN EN EN EN EN EN EN EN EN EN EN EN EN EN EN EN EN EN EN EN EN EN EN EN EN EN EN EN EN EN EN EN EN EN EN EN EN EN EN EN EN EN EN EN EN EN EN EN EN EN EN EN EN EN EN EN EN EN EN EN EN EN EN EN EN EN EN EN EN EN EN E N EN EN EN EN EN EN EN EN EN EN EN EN EN EN EN EN EN EN EN EN EN EN EN EN EN EN EN EN EN EN EN EN EN EN EN EN EN EN EN EN EN EN EN EN EN EN EN EN EN EN EN EN EN EN EN EN EN EN EN EN EN EN EN EN EN EN EN EN EN EN EN EN EN EN EN EN EN EN EN EN EN EN EN EN EN EN EN EN EN EN EN EN EN EN EN EN EN EN EN IN IN IN IN IN IN IN IN IN IN IN IN IN IN IN IN IN IN IN IN IN IN IN IN IN IN IN IN IN IN IN IN IN IN IN IN IN IN IN IN IN IN IN IN IN IN IN IN IN IN IN IN IN IN IN IN IN IN IN IN IN IN IN IN IN IN IN IN IN IN IN IN IN IN IN IN IN IN IN IN IN IN IN IN IN IN IN IN IN IN IN IN IN IN IN IN IN IN IN INININININININININININININININININININININININININININININININININININININININININININININININININININININININININININININININININININININININININININININININININININININININININININININININININININININ INININININININININININININININININININININININININININININININININININININININININININININININININININININININININININININININININININININININININININININININININININININININININININININININININININ INNINININININININININININININININININININININININININININININININININININININININININININININININININININININININININININININININININININININININININININININININININININININININININININININININININININNININININININININININININININININININININININININININININININININININININININININININININININININININININININININININININININININININININININININININININININININININININININININININININININININININ IN IN IN IN IN IN IN IN IN IN IN IN IN IN IN IN IN IN IN IN IN IN IN IN IN IN IN IN IN IN IN IN IN IN IN IN IN IN IN IN IN IN IN IN IN IN IN IN IN IN IN IN IN IN IN IN IN IN IN IN IN IN IN IN IN IN IN IN IN IN IN IN IN IN IN IN IN IN IN IN IN IN IN IN IN IN IN IN IN IN IN IN IN IN IN IN IN IN IN IINININININININININININININININININININININININININININININININININININININININININININININININININININININININININININININININININININININININININININININININININININININININININININININININININININin IN IN IN IN IN IN IN IN IN IN IN IN IN IN IN IN IN IN IN IN IN IN IN IN IN IN IN IN IN IN IN IN IN IN IN IN IN IN IN IN IN IN IN IN IN IN IN IN IN IN IN IN IN IN IN IN IN IN IN IN IN IN IN IN IN IN IN IN IN IN IN IN IN IN IN IN IN IN IN IN IN IN IN IN IN IN IN IN IN IN IN IN IN IN IN IN IN IN IN IIINININININININININININININININININININININININININININININININININININININININININININININININININININININININININININININININININININININININININININININININININININININININININININININININININININIMINININININININININININININININININININININININININININININININININININININININININININININININININININININININININININININININININININININININININININININININININININININININININININININININININININITININININININININININININININININININININININININININININININININININININININININININININININININININININININININININININININININININININININININININININININININININININININININININININININININININININDI | EN EN EN EN EN EN EN EN EN EN EN EN EN EN EN EN EN EN EN EN EN EN EN EN EN EN EN EN EN EN EN EN EN EN EN EN EN EN EN EN EN EN EN EN EN EN EN EN EN EN EN EN EN EN EN EN EN EN EN EN EN EN EN EN EN EN EN EN EN EN EN EN EN EN EN EN EN EN EN EN EN EN EN EN EN EN EN EN EN EN EN EN EN EN EN EN EN EN E N E N E N E N E N E N E N E N E N E N E N E N E N E N E N E N E N E N E N E N E N E N E N E N E N E N E N E N E N E N E N E N E N E N E N E N E N E N E N E N E N E N E N E N E N E N E N E N E N E N E E N E N E N E N E N E N E N E N E N E N E N E N E N E N E N E N E N E N E N E N E N E N E N E N E N E N E N E N E N E N E N E N E N E N E N E N E N E N E N E N E N E N E N E N E N E N E N E N E N E A N N N N N N N N N N N N N N N N N N N N N N N N N N N N N N N N N N N N N N N N N N N N N N N N N N N N N N N N N N N N N N N N N N N N N N N N N N N N N N N N N N N N N N N N N N N N N N N N N N N N NO N N N N N N N N N N N N N N N N N N N N N N N N N N N N N N N N N N N N N N N N N N N N N N N N N N N N N N N N N N N N N N N N N N N N N N N N N N N N N N N N N N N N N N N N N N N N N N N N N N NN N N N N N N N N N N N N N N N N N N N N N N N N N N N N N N N N N N N N N N N N N N N N N N N N N N N N N N N N N N N N N N N N N N N N N N N N N N N N N N N N N N N N N N N N N N N N N N N N N N N D I I I I I I I I I I I I I I I I I I I I I I I I I I I I I I I I I I I I I I I I I I I I I I I I I I I I I I I I I I I I I I I I I I I I I I I I I I I I I I I I I I I I I I I I I I I I I I I I I I I I II I I I I I I I I I I I I I I I I I I I I I I I I I I I I I I I I I I I I I I I I I I I I I I I I I I I I I I I I I I I I I I I I I I I I I I I I I I I I I I I I I I I I I I I I I I I I I I I I I I I i I I I I I I I I I I I I I I I I I I I I I I I I I I I I I I I I I I I I I I I I I I I I I I I I I I I I I I I I I I I I I I I I I I I I I I I I I I I I I I I I I I I I I I I I I I I I I I I I I I I | | |||||||||
KoMaHnBaPAnDrΦaHcHn—BRANDT FRANCE, Etablissement de CERGY, 5/7 avenue des Béthunes, 95310 SAINT OUEN L'AUMONE (CEHT Y3H JIAMOH) AO ynpoueHHoro Tnna
c KaHtAnOM 100 000 000 ebpo, apernctpnpoBaHHoe B TropOBm peeeCTpe KOMMepcaHToB n o6uεCTB HAHTEPA noHomepom 801 250 531.
Information for domestic covers (UE n7 60/2014)
Information concerning les four domestices (UE n° 68/2014)
Informaticy kajicse lub prdoimost (UE n' 86/2014)
Oplysinger for ovne ill hushholdingsbrug (UE n 562014)
| Symbol | Init Value | EN Symbol: FR. Symbbole CE: Znadekda DA. Symbbole ES: Simbo1-IT: Simbo1-NL: Simbo1-PL: Oznaczejne PT. Simbo1-SK: Simbo1-EL: Zufärbko-Fi: Symboll SV: Symboll EN: Valur-FR. Valur-CS: Hrodola-DA: Vardé-DE: Wert-ES: Valur-IT: Valur-NE: Wards-PL: Wards-PL: Wards-PL: Hrodola-EL: Apifuyuwi rui-PL: Arva-5V: Värdie. EN: Unit-FR. Unit-CS: Jednokka-DA: Enhed-DE: Einheit-ES: Unit3d-IT: Unita di misura-IL: Einheit-PL: Jednokka-PT: Unit3d-IT: Unita di misura-IL: Jauvukko-FL: Mavilinnae EN: Model identification: FR. Identification du mode de CS: Identifiéce du mode de CS: Identifiéce du mode de CS: Identifiéce du mode de CS: Identifiéce du mode de CS: Identifiéce du mode de CS: Identifiéce du mode de CS: Identifiéce du mode de CS: Identifiéce du mode de CS: Identifiéce du mode de CS: Identifiéce du mode de CS: Identifiéce du mode de CS: Identifiéce del mode de CS: Identifiéce del mode de CS: Identifiéce del mode de CS: Identifiéce del mode de CS: Identifiéce del mode de CS: Identifiéce del mode de CS: Identifiéce del mode de CS: Identifiéce del mode de CS: Identifiéce del mode de CS: Identifiéce del mode de CS: Identifiéce del mode de CS: Identifiéce del MODE DE: Tampicke-NL: Tampicke-NL: Tampicke-NL: Tampicke-NL: Tampicke-NL: Tampicke-NL: Tampicke-NL: Tampicke-NL: Tampicke-NL: Tampicke-NL: Tampicke-NL: Tampicke-NL: Tampicke-NL: Tampicke-NL: Tampicke-NL: | ||||||||||
| Type norme | EN Type norme-FR. Type norme-CS: Model D/A: Norm type-DE: Model-ITS: Model-ITS: Model-ITS: Model-ITS: Model-ITS: Model-ITS: Model-ITS: Model-ITS: Model-ITS: Model-ITS: Model-ITS: Model-ITS: Model-ITS: Model-ITS: Model-ITS: Model-ITS: Model-ITS: Model-ITS: Model-ITS: Model-ITS: Model-ITS: Model-ITS: Model-ITS: Model-ITS: Model-ITS: Model-ETS: Model-ETS: Model-ETS: Model-ETS: Model-ETS: Model-ETS: Model-ETS: Model-ETS: Model-ETS: Model-ETS: Model-ETS: Model-ETS: Model-ETS: Model-ETS: Model-ETS: Model-ETS: Model-ETS: Model-ETS: Model-ETS: Model-ETS: Model-ETS: Model-ETS: Model-ETS: Model-ETS: Model-ETS: Model-ITS: Model-ITS: Model-ITS: Model-ITS: Model-ITS: Model-ITS: Model-ITS: Model-ITS: Model-ITS: Model-ITS: Model-ITS: Model-ITS: Model-ITS: Model-ITS: Model-ITS: Model-ITS: Model-ITS: Model-ITS: Model-ITS: Model-ITS: Model-ITS: Model-ITS: Model-ITS: Model-ITS: Model-ATS: Model-ATS: Model-ATS: Model-ATS: Model-ATS: Model-ATS: Model-ATS: Model-ATS: Model-ATS: Model-ATS: Model-ATS: Model-ATS: Model-ATS: Model-ATS: Model-ATS: Model-ATS: Model-ATS: Model-ATS: Model-ATS: Model-ATS: Model-ATS: Model-ATS: Model-ATS: Model-ATS: Model-ATS: Model-AT: Mauikunne EN: Model identification: FR. Identification du mode de CS: Identifiéce du mode de CS: Identifiéce du mode de CS: Identifiéce du mode de CS: Identifiéce du mode de CS: Identifiéce du mode de CS: Identifiéce du mode de CS: Identifiéce du mode de CS: Identifiéce du mode de CS: Identifiéce du mode de CS: Identifiéce del mode de CS: Identifiéce du mode de CS: Identifiéce du mode de CS: Identifiéce du mode de CS: Identifiéce du mode de CS: Identifiéce du mode de CS: Identifiéce du mode de CS: Identifiéce du mode de CS: Identifiéce du mode de CS: Identifiéce du mode de CS: Identifiéce du mode de CS: Identifiéce du MODE DE: Tampicke-NL: Tampicke-NL: Tampicke-NL: Tampicke-NL: Tampicke-NL: Tampicke-NL: Tampicke-NL: Tampicke-NL: Tampicke-NL: Tampicke-NL: Tampicke-NL: Tampicke-NL: Tampicke-NL: Tampicke-NLE: Tampicke-NL: Tampicke-NL: Tampicke-NL: Tampicke-NL: Tampicke-NL: Tampicke-NL: Tampicke-NL: Tampicke-NL: Tampicke-NL: Tampicke-NL: Tampicke-NL: Tampicke-NL: Tampicke-NL: Tampicke-NL:Tampicke-NL: Tampicke-NL: Tampicke-NL: Tampicke-NL: Tampicke-NL: Tampicke-NL: Tampicke-NL: Tampicke-NL: Tampicke-NL: Tampicke-NL: Tampicke-NL: Tampicke-NL: Tampicke-NL: Tampicke-NL: TampIC: Tampicke-NL: Tampicke-NL: Tampicke-NL: Tampicke-NL: Tampicke-NL: Tampicke-NL: Tampicke-NL: Tampicke-NL: Tampicke-NL: Tampicke-NL: Tampicke-NL: Tampicke-NL: Tampicke-NL: Tampicke-NL: 10000000000000000000000000000000000000000000000000000000000000000000000000000000000000000000000000000 EN: Model identification: FR. Identification du mode de CS: Identifiéce du mode de CS: Identifiéce du mode de CS: Identifiéce du mode de CS: Identifiéce du mode de CS: Identifiéce du mode de CS: Identifiéce du mode de CS: Identifiéce du mode de CS: Identifiéce du mode de CS: Identifiéce du mode de CS: Identifiéce da coulois-PSO: Ptolemy EN: Heat source per cavity (electricity or gas) Electricity = PL-Energia elektrónica-PE: Sistronic-PE: Elektrárica-PE: Elektrárica-PE: Elektrárica-PE: Elektrárica-PE: Elektrárica-PE: Elektrárica-PE: Elektrárica-PE: Elektrárica-PE: Elektrárica-PE: Elektrárica-PE: Elektrárica-PE: Elektrárica-PE: Elektrárica-PE: Elica tronite (2014) | EN: Heat source per cavity (electricity or gas)FR. Source de chaleur par cavité (electructo ou gaz)-CS.Zdo lepia jodhiyich pichisch (elektrifina nebo pylon)-DA: Vaidmikalne pr ouvré-Gas; EN: Model identification: FR. Number of cavities in the cavities of the cavities of the cavities of the cavities of the cavities of the cavities of the cavities of the cavities of the cavities of the cavities of the cavities of the cavities of the cavities of the cavities of the cavities of the cavities of the cavities of the cavities of the cavities of the cavities of the cavities of the cavities of the cavities of the cavities of the cavities of the cavities f. Kunkin pesinianl marmiara - SV: Vamoy pr kawet-EL-Timec-OLokovip-FI: Pesien luka-marua-SV: Antai kavetier EN: Energy consumption (electricity) required to heat a standardised load in a cavity of an electric heated oven during a cycle of operation in a standardised load in a cavity of an electric heated oven during a cycle of operation in a standardised load in a cavity of an electric heated oven during a cycle of operation in a standardised load in a cavity of an electric heated oven during a cycle of operation in a standardised load in a cavity of an electric heated oven during a cycle of operation in a standardised load in a cavity of an electric heated oven during a cycle of operation in a standardised load in a cavity of anElectricity (electricity): 0,92 | EN: Energy consumption (electricity) required to heat a standardised load in a cavity of an electric heated oven during a cycle of operation in a standardised load in a cavity of an electric heated oven during a cycle of operation in a standardised load in a cavity of an electric heated oven during a cycle of operation in a standardised load in a cavity of an electric heated oven during a cycle of operation in a standardised load in a cavity of an electric heated oven during a cycle of operations in a standardised load in a cavity of an electric heated oven during a cycle of operation in a standardised load in a cavity of an electric heated oven during a cycle of operation in a standardised load in a cavity of an electric heated oven during a cycle of operation in a standardised load in a cavity of an electric heated oven during a cycle of operation in a standardised load in a cavity of an electric heated oven during a cycle of operation in a standardised load in a cavity of and operation in a standardised load in a cavity of operation in a standardised load in a cavity of operation in a standardised load in a cavity of operation in a standardised load in a cavity of operation in a standardised load in a cavity of operation in a standardised load in a cavity of operation in a standardised load in a cavity of operation in a standardised load in a cavity of operation in a standardised load in a cavity of operation in a standardised load in a cavity of operation in a standardised load in a cavityof operation in a standardised load in a cavity of operation in a standardised load in a cavity of operation in a standardised load in a cavity of operation in a standardised load in a cavity of operation in a standardised load in a cavity of operation in a standardised load in a cavity of operation in a standardised load in a cavity of operation in a standardised load in a cavity of operation in a standardised load in a cavity of operation in a standardised load in a cavity EN: Energy efficiency index per cavity (electricity): A | EN: Energy efficiency index per cavity (electricity): A | EN: Energy efficiency index per cavity (electricity): A | |||||||
VAL AV PLACERING OCH INBYGGNAD
I ritningarna anges matten for den mobelsom skainrymma ugnen.
Information for domestic coven (UE n°60/2014)
Informations concernant les four domestiques (UE n° 65/2014)
Inforrmace lykajicse trub pro donontost (UErn'662014)
Optysinger for ovne th hushdrolningsbrg (UE n 662014)
Informaci dotycz oomwch pekarnikow (Ue n' 60/2014)
Informations relatives a formos domesticos (UE n° 65/2014)
Formicide v tripade rur no pederie pre doanieriost (UE n° 66/2014)
Information on hushallsugar (UE n° 56/2014)
N. Symbol-FR. Symbole-CS. ZnaCxa DA:Symbol DE. Symbol ES. SI
N. Symbol:FR. Symbol:CS. Znακα DA. Symbol:DE. Syml
| Symbol | Init Value | EN Symbol-FR. Symbole-CS: Znake DA; Symbol DE: Symbol ES. Simbo1-IT: Simbo1-IL. Simbo1-PL: Czomazene PT. Simbo1-SC: Symbol EL: Čižpók-Fl: Symbol SV; Symbol EN: Valve-FR. Valve-CS: Hodrola-DA: Vardil-DE: Wert-ES: Valar-IT: Valore-NL: Wards-PL: Warlo-PT: Valor-SK: Hodrola-EL: Apiljumjuri rur-FL: Arvo-SV: Vädde. EN: Unit-FR: Unit-CS: Jednokka-DA: Enhod-DE: Einhol-ES: Unitard-IT: Unità di misure-NL: Eneol-PL: Jedrnost-PL: Undade-IT: Undade-IT: Valo-Pl: Mavollmeu-EL: Mavollmeu-EL: Mavollmeu-EL: Mavollmeu-EL: Mavollmeu-EL: Mavollmeu-EL: Mavollmeu-EL: Mavollmeu-EL: Mavollmeu-EL: Mavollmeu-EL: Mavollmeu-EL: Mavollmeu-EL: Mavollmeu-EL: Mavolls-EL: Mavollmeu-EL: Mavollmeu-EL: Mavollmeu-EL: Mavollmeu-EL: Mavollmeu-EL: Mavollmeu-EL: Mavollmeu-EL: Mavollmeu-EL: Mavollmeu-EL: Mavollmeu-EL: Mavollmeu-EL: Mavollmeu-EL: | |||||||||
| Type norme | OR724M7 | EN Type norme-FR. Type norme-CS: Model-DA: Normtype-DE: Model-IT: Typo de normal-IL: Type standard-PL: Typo meding normy-PT: Typo de forma-NT: Typo de norma-SC: Standard-ty p ETL: Tiro; Tropotroitou-FT: Typo avr. norma-NT: Typo de forma-NT: Typo de norma-NT: Tiro; Tropototou-FT: Tiro; Tropototou-FT: Tiro; Tropototou-FT: Tiro; Tropototou-FT: Tiro; Tropototou-FT: Tiro; Tropototou-FT: Tiro; Tropototou-FT: Tiro; Tropototou-FT: Tiro; Tropototou-FT: Tiro; Tropototou-FT:Tiro; Tropototou-FT: Tiro; Tropototou-FT: Tiro; Tropototou-FT: Tiro; Tropototou-FT: Tiro; Tropototou-FT: Tiro; Tropototou-FT: Tiro; Tropototou-FT: Tiro; Tropototou-FT: Tiro; Tropototou-FT: Tario; Tropototou-FT: Tiro; Tropototou-FT: Tiro; Tropototou-FT: Tiro; Tropototou-FT: Tiro; Tropototou-FT: Tiro; Tropototou-FT: Tiro; Tropototou-FT: Tiro; Tropototou-FT: Tiro; Tropototou-FT: Tiro | EN Model Identification-FR. Identification du mode-CE: Identifiéce modèle: D'A: ModelIdentifiéce modèle: D'ModelIdentifiéce modèle: D'ModelIdentifiéce modèle: D'ModelIdentifiéce modèle: D'ModelIdentifiéce modèle: D'ModelIdentifiéce modèle: D'ModelIdentifiéce modèle: D'ModelIdentifiéce modèle: D'ModelIdentifiéce modèle: D'ModelIdentifiéce modèle: D'ModelIdentifiéce modèle: D'MODEL IDENTIFICTION: D'MODEL IDENTIFICATION: D'MODEL IDENTIFICATION: D'MODEL IDENTIFICATION: D'MODEL IDENTIFICATION: D'MODEL IDENTIFICATION: D'MODEL IDENTIFICATION: D'MODEL IDENTIFICATION: D'MODEL IDENTIFICATION: D'MODEL IDENTIFICATION: D'MODEL IDENTIFICATION: D'MODEL IDENTIFICATION: D'MODEL IDENTIFICATION: D'MODEL IDENTIFICATION: D'MODEL IDENTIFICATION: D'MODEL IDENTIFICATION: D'MODEL IDENTification: D'MODEL IDENTIFICATION: D'MODEL IDENTIFICATION: D'MODEL IDENTIFICATION: D'MODEL IDENTIFICATION: D'MODEL IDENTIFICATION: D'MODEL IDENTIFICATION: D'MODEL IDENTIFICATION: D'MODEL IDENTIFICATION: D'MODEL IDENTIFICATION: D'MODEL IDENTIFICATION: D'MODEL IDENTIFICATION: D'MODEL IDENTIFICATION: D'MODEL IDENTIFICATION: D'MODEL IDENTIFICATION: | ||||||||
| Model identification | EN Model Identification-FR. Identification du mode-CE: Identifiéce modèle: D'A: Identifiéce modèle: D'ModelIdentifiéce modèle: D'ModelIdentifiéce modèle: D'ModelIdentifiéce modèle: D'ModelIdentifiéce modèle: D'ModelIdentifiéce modèle: D'ModelIdentifiéce modèle: D'ModelIdentifiéce modèle: D'ModelIdentifiéce modèle: D'ModelIdentifiéce modèle: D'ModelIDENTIFI: IDT: Tiro; Tropototou-FT: Tropototou-FT: Tropototou-FT: Tropototou-FT: Tropototou-FT: Tropototou-FT: Tropototou-FT: Tropototou-FT: Tropototou-FT: Tropototou-FT: Tropototou-FT: Tropototou-FT: Tropototou-FT: Tropotatotou-FT: Tropototou-FT: Tropototou-FT: Tropototou-FT: Tropototou-FT: Tropototou-FT: Tropototou-FT: Tropototou-FT: Tropototou-FT: Tropototou-FT: Tropototou-FT: Tropototou-FT: Tropototou-FL: Tiro; Tropototou-FT: Tropototou-FT: Tropototou-FT: Tropototou-FT: Tropototou-FT: Tropototou-FT: Tropototou-FT: Tropototou-FT: Tropototou-FT: Tropototou-FT: Tropototou-FT: Tropototou-FT:Tropototou-FT: Tropototou-FT: Tropototou-FT: Tropototou-FT: Tropototou-FT: Tropototou-FT: Tropototou-FT: Tropototou-FT: Tropototou-FT: Tropototou-FT: Tropototou-FT: Tropototou-FT: Tropototau-FT: Tropototau-FT: Tropototau-FT: Tropototau-FT: Tropototau-FT: Tropototau-FT: Tropototau-FT: Tropototau-FT: Tropototau-FT: Tropototau-FT: Tropototau-FT: Tropototau-FT: Tropototau-FT: | ||||||||||
| Type of oven | Simple = FR:simple-CS:E-jednuduch-dA:Enkel-DE:Einfach-ES:Simple-PS:Pejrodyn-cy-T:Simps-SK:Jednudstefova-EL:Anch-fcF:Prinncial-Trotof-PL:Leioz-dA:Energiia elatrica-IL:Elektroje-elektroje-IL:Sikic-pocito-FI:Sikh-kc-Sikic-Pocito-FI:Sikh-kc-Sikic-Pocito-FI:Sikh-kc-Sikic-Pocito-FI:Sikh-kc-Sikic-Pocito-FI:Sikh-kc-Sikic-Pocito-FI:Sikh-kc-Sikic-Pocito-FI:Sikh-kc-Sikic-Pocito-FI:Sikh-kc-Sikic-Pocito-FI:Sikh-kc-Sikic-Pocito-FIF | Simple = FR:simple-CS:E-jednuduch-dA:Enkel-DE:Einfach-ES:Einfach-ES:Einfach-ES:Einfach-ES:Einfach-ES:Einfach-ES:Einfach-ES:Einfach-ES:Einfach-ES:Einfach-ES:Einfach-ES:Einfach-ES:Einfach-ES:Einfach-ES:Einfach-ES:Einfach-ES:Einfach-ES:Einfach-ES:Einfach-ES:Einfach-ES:Einfach-RES:Einfach-RES:Einfach-RES:Einfach-RES:Einfach-RES:Einfach-RES:Einfach-RES:Einfach-RES:Einfach-RES:Einfach-RES:Einfach-RES:Einfach-RES:Einfach-RES:Einfach-RES:Einfach-RES:Einfach-RES:Einfach-RES:Einfach-RES:Einfach-RES:Einfach-RES:Einfach-RESS:Einfach-RES:Einfach-RES:Einfach-RES:Einfach-RES:Einfach-RES:Einfach-RES:Einfach-RES:Einfach-RES:Einfach-RES:Einfach-RES:Einfach-RES:Einfach-RES:Einfach-RES:Einfach-RES:Einfach-RES:Einfach-RES:Einfach-RES:Einfach-RES:Einfach-RES:Einfach-DES:Einfach-RES:Einfach-RES:Einfach-RES:Einfach-RES:Einfach-RES:Einfach-RES:Einfach-RES:Einfach-RES:Einfach-RES:Einfach-RES:Einfach-RES:Einfach-RES:Einfach-RES:Einfach-RES:Einfach-RES:Einfach-RES:Einfach-RES:Einfach-RES:Einfach-RES:Einfach-PLUS-Einfach-RES:Einfach-RES:Einfach-RES:Einfach-RES:Einfach-RES:Einfach-RES:Einfach-RES:Einfach-RES:Einfach-RES:Einfach-RES:Einfach-RES:Einfach-RES:Einfach-RES:Einfach-RES:Einfach-RES:Einfach-RES:Einfach-RES:Einfach-RES:Einfach-RES:Einfach-RES:Ampelun | EN Mass of the appliance FR:Masse de l'appliement CS:Hnottecht spoflafie de la melle de cerite (C) Appaisant des 300 de cinquitoies de la melle de cerite (C) Appaisant des 300 de cinquitoies de la melle de cerite (C) Appaisant des 300 de cinquitoies de la melle de cerite (C) Appaisant des 300 de cinquitoies de la melle de cerite (C) Appaisant des 300 de cinquitoies de la mille de cerite (C) Appaisant des 300 de cinquitoies de la melle de cerite (C) Appaisant des 300 de cinquitoies de la melle de cerite (C) Appaisant des 300 de cinquitoies de la melle de cerite (C) Appaisant des 300 de cinquitoies de la melle de cerite( C) Appaisant des 300 de cinquitoies de la melle de cerite (C) Appaisant des 300 de cinquitoies de la melle de cerite (C) Appaisant des 300 de cinquitoies de la melle de cerite (C) Appaisant des 300 de cinquitoies de la melle de cerite (C) AppaisANT Oculare (C) Tropototou-FT: Tropototou-FT: Tropototou-FT: Tropototou-FT: Tropototou-FT: Tropototou-FT: Tropototou-FT: Tropototou-FT: Tropototou-FT: Tropototou-FT: Tropototou-FT: TropOTOTOTOTOTOTOTOTOTOTOTOTOTOTOTOTOTOTOTOTOTOTOTOTOTOTOTOTOTOTOTOTOTOTOTOTOTOTOTOTOTOTOTOTOTOTOTOTOTOTOTOTOTOTOTOTOTOTOTOTOTOTOTOTOTOTOTOTOTOTOTOTOTOTOTOTOTOTOTOTOTOTOTOTOTOTOTOTOTOTOTOTOTOTOTOTOTOTOTOTTOTOTOTOTOTOTOTOTOTOTOTOTOTOTOTOTOTOTOTOTOTOTOTOTOTOTOTOTOTOTOTOTOTOTOTOTOTOTOTOTOTOTOTOTOTOTOTOTOTOTOTOTOTOTOTOTOTOTOTOTOTOTOTOTOTOTOTOTOTOTOTOTOTOTOTOTOTOTOTOTOTOTOTOTOTOTOTOTOTOTOTOTOTOTOTOTOTOTOTOTototototototototototototototototototototototototototototototototototototototototototototototototototototototototototototototototototototototototototototototototototototototototototototototototototototOTOTOTOTOTOTOTOTOTOTOTOTOTOTOTOTOTOTOTOTOTOTOTOTOTOTOTOTOTOTOTOTOTOTOTOTOTOTOTOTOTOTOTOTOTOTOTOTOTOTOTOTOTOTOTOTOTOTOTOTOTOTOTOTOTOTOTOTOTOTOTOTOTOTOTOTOTOTOTOTOTOTOTOTOTOTOTOTOTOTOTOTOTOTOTOTOTOTOTOTPOTOTOTOTOTOTOTOTOTOTOTOTOTOTOTOTOTOTOTOTOTOTOTOTOTOTOTOTOTOTOTOTOTOTOTOTOTOTOTOTOTOTOTOTOTOTOTOTOTOTOTOTOTOTOTOTOTOTOTOTOTOTOTOTOTOTOTOTOTOTOTOTOTOTOTOTOTOTOTOTOTOTOTOTOTOTOTOTOTOTOTOTOTOTOTOTOTOTOTATOTOTOTOTOTOTOTOTOTOTOTOTOTOTOTOTOTOTOTOTOTOTOTOTOTOTOTOTOTOTOTOTOTOTOTOTOTOTOTOTOTOTOTOTOTOTOTOTOTOTOTOTOTOTOTOTOTOTOTOTOTOTOTOTOTOTOTOTOTOTOTOTOTOTOTOTOTOTOTOTOTOTOTOTOTOTOTOTOTOTOTOTOTOTOTOTOTOTOTOTOTOTOTOTOTTOTOTTOTTOTTOTTOTTOTTOTTOTTOTTOTTOTTOTTOTTOTTOTTOTTOTTOTTOTTOTTOTTOTTOTTOTTOTTOTTOTTOTTOTTOTTOTTOTTOTTOTTOTTOTTOTTOTTOTTOTTOTTOTTOTTOTTOTTOTTOTTOTTOTTOTTOTTOTTOTTOTTOTTOTTOTTOTTOTTOTTOTTOTTOTTOTTOTTOTTOTTOTTOTTOTTOTTOTTOTTOTTOTTOTTOTTOTTOTTOTTOTTOTTOTTOTTOTTOTTOTTOTTOTTOTTOTTOTTOTTOTTOTTOTTOTTOTTOTTOTTOTOTA | ||||||||
| Volume per cavity | V | 73 | 1 | 1 | EN Volume per cavity FR=FR. Volume per cavity (E)Erdgth, volur, or vourmétrie d'air, ou vourmétrie en clera, ou vourmétrie en clera, ou vourmétrie en clera, ou vourmétrie en clera, ou vourmétrie en clera, ou vourmétrie en clera, ou vourmétrie en clera, ou vourmétrie en clera, ou vourmétrie en clera, ou vourmétrie en clera, ou vourmétrie en cléra, ou vourmétrie en clera, ou vourmétrie en clera, ou vourmétrie en clera, ou vourmétrie en clera, ou vourmétrie en clera, ou vourmétrie en clera, ou vourmétrie en clera, ou vourmétrie en clera, ou vourmétrie en clera, ou vourmétrie en clERA; Erdgth, volur, or vourmétrie d'air, ou vourmétrie en clera, ou vourmétrie en clera, ou vourmétrie en clera, ou vourmétrie en clera, ou vourmétrie en clera, ou vourmétrie en clera, ou vourmétrie en clera, ou vourmétrie en clera, ou vOURO, or vourmétrie en clera, or vourmétrie en clera, or vourmétrie en clera, or vourmétrie en clera, or vourmétrie en clera, or vourmétrie en clera, or vourmétrie en clera, or vourmétrie en clera, or vourmétrie en clera, or vourmétrie en clera, or vourmétrie en cleras, or vourmétrie en clera, or vourmétrie en clera, or vourmétrie en clera, or vourmétrie en clera, or vourmétrie en clera, or vourmétrie en clera, or vourmétrie en clera, or vourmétrie en clera, or vourmétrie en clera, or vourmétrie en cl era, or vourmétrie en clera, or vourmétrie en clera, or vourmétrie en clera, or vourmétrie en clera, or vourmétrie en clera, or vourmétrie en clera, or vourmétrie en clera, or vourmétrie en clera, or vourmétrie en clera, or vourmétrie en clERA; Erdgth, volur, or vourmétrie d'air, ou vourmétrie en clera, ou vourmétrie en clera, ou vourmétrie en clera, ou vourmétrie en clera, ou vourmétrie en clera, ou vourmétrie en clera, ou vourmétrie en clera, or vourmétrie en clera, or vourmétrie en clera, or vourmétrie en clera, or vourmétrie en clera, or vourmétrie en clera, or vourmétrie en clera, or vourmétrie en clera, or vourmétrie en clera, or vourmétrie en clera, OR1695;Erdgth, volur, or vourmétrie d'air, ou vourmétrie en clera, ou vourmétrie en clera, ou vourmétrie en clera, ou vourmétrie en clera, or vourmétrie en clera, or vourmétrie en clera, or vourmétrie en clera, or vourmétrie en clera, or vourmétrie en clera, or vourmétrie en cleras, or vourmétrie en clera, or vourmétrie en clera, or vourmétrie en clera, OR1695;Erdgth, volur, or vourmétrie d'air, ou vourmétrie en clera, ou vourmétrie en clera, or vourmétrie en clera, or vourmétrie en clera, or vourmétrie en clera, or vourmétrie en clera, or vourmétrie en clera, or vourmétrie en clera, or vourmétrie en clera, or vourmétrie en cleras, or vourmétrie en clera, OR1695;Erdgth, volur, or vourmétrie d'air, ou vourmétrie en clera, ou vourmétrie en clera, or vourmétrie en clera, or vourmétrie en clera, or vourmétrie en clera, or vourmétrie en clera, or vourmertie en clera, or vourmertie en clera, or vourmertie en clera, or vourmertie en clera, or vourmertie en clera, or vourmertie en clera, or vourmertie en clera, or vourmertie en clera, or vourmertie en clera, or vourmertie en clera, or vourmertia enclara, or vourmertia enclara, or vourmertia enclara, or vourmertia enclara, or vourmertia enclara, or vourmertia enclara, or vourmertia enclara, or vourmertia enclara, or vourmertia enclara, or vourmertia enclara, or vourmertia enclora, or vourmertia enclara, or vourmertia enclara, or vourmertia enclara, or vourmertia enclara, or vourmertia enclara, or vourmertia enclara, or vourmertia enclara, or vourmertia enclara, or vourmertia enclara, or vourmertia enclARA, or vourmertia enclARA, or vourmertia enclARA, or vourmertia enclARA, or vourmertia enclARA, or vourmertia enclARA, or vourmertia enclARA, or vourmertia enclARA, or vourmertia enclARA, or vourmertia enclARA, or vourmertia enclara, or vourmertia enclara, or vourmertia enclARA, or vourmertia enclARA, or vourmertia enclARA, or vourmertia enclARA, or vourmertia enclARA, or vourmertia enclARA, or vourmertia enclARA, or vourmertia enclara, or vourmertia enclara, or vourmertia enclara, or vourmertia enclARA, or vourmertia enclARA, or vourmertia enclARA, or vourmertia enclARA, or vourmertia enclARA, or vourmertia enclARA, or vourmertia enclara, or vourmertia enclara, or vourmertia enclARA, or vourmertia enclara, or vourmertia enclARA, or vourmertia enclARA, or vourmertia enclARA, or vourmertia enclARA, or vourmertia enclARA, or vourmertia enclARA, or vourmertia enclARA, or vourmertia enclARA, or vourmertia enclara, or vourmertia enclARA, or vourmertia enclARA, or vourmertia enclARA, or vourmertia enclARA, or vourmertia enclARA, or vourmertia enclARA, or vourmertia enclARA, or vourmertia enclara, or vourmertia enclARA, or vourmertia enclara, or vourmertia enclARA, or vourmertia enclARA, or vourmertia enclARA, or vourmertia enclARA, or vourmertia enclARA, or vourmertia enclARA, or vourmertia enclara, or vourmertia enclARA, or vourmertia enclARA, or vourmertia enclara, or vourmertia enclARA, or vourmertia enclARA, or vourmertia enclARA, or vourmertia enclARA, or vourmertia enclARA, or vourmertia enclARA, or vourmertia enclara, or vourmertia enclara, or vourmertia enclara, or vourmertia enclara, or vourmertia enclARA, or vourmertia enclARA, or vourmertia enclARA, or vourmertia enclARA, or vourmertia enclARA, or vourmertia enclara, or vourmertia enclARA, or vourmertia enclARA, or vourmertia enclARA, or vourmertia enclara, or vourmertia enclARA, or vourmertia enclARA, or vourmertia enclARA, or vourmertia enclARA, or vourmertia enclARA, or vourmertia enclara, or vourmertia enclARA, or vourmertia enclARA, or vourmertia enclara, or vourmertia enclara, or vourmertia enclARA, or vourmertia enclARA, or vourmertia enclARA, or vourmertia enclARA, or vourmertia enclARA, or vourmertia enclara, or vourmertia enclARA, or vourmertia enclara, or vourmertia enclARA, or vourmertia enclara, or vourmertia enclARA, or vourmertia enclARA, or vourmertia enclARA, or vourmertia enclARA, or vourmertia enclARA, or vourmertia enclara, or vourmertia enclARA, or vourmertia enclara, or vourmertia enclara, or vourmertia enclARA, or vourmertia enclARA, or vourmertia enclARA, or vourmertia enclARA, or vourmertia enclARA, or vourmertia enclARA, or vourmertia enclara, or vourmertia enclARA, or vourmertia enclara, or vourmertia enclara, or vourmertia enclara, or vourmertia enclARA, or vourmertia enclARA, or vourmertia enclARA, or vourmertia enclARA, or vourmertia enclARA, or vourmertia enclara, or vourmertia enclara, or vourmertia enclARA, or vourmertia enclARA, or vourmertia enclara, or vourmertia enclARA, or vourmertia enclARA, or vourmertia enclARA, or vourmertia enclARA, or vourmertia enclARA, or vourmertia enclara, or vourmertia enclara, or vourmertia enclARA, or vourmertia enclara, or vourmertia enclara, or vourmertia enclARA, or vourmertia enclARA, or vourmertia enclARA, or vourmertia enclARA, or vourmertia enclARA, or vourmertia enclara, or vourmertia enclara, or vourmertia enclara, or vourmertia enclARA, or vourmertia enclara, or vourmertia enclARA, or vourmertia enclARA, or vourmertia enclARA, or vourmertia enclARA, or vourmertia enclARA, or vourmertia enclara, or vourmertia enclara, or vourmertia enclara, or vourmertia enclara, or vourmertia enclara, or vourmertia enclARA, or vourmertia enclARA, or vourmertia enclARA, or vourmertia enclARA, or vourmertia enclara, or vourmertia enclARA, or vourmertia enclARA, or vourmertia enclARA, or vourmertia enclARA, or vourmertia enclara, or vourmertia enclARA, or vourmertia enclARA, or vourmertia enclARA, or vourmertia enclara, or vourmertia enclara, or vourmertia enclARA, or vourmertia enclARA, or vourmertia enclARA, or vourmertia enclARA, or vourmertia enclara, or vourmertia enclARA, or vourmertia enclARA, or vourmertia enclara, or vourmertia enclARA, or vourmertia enclara, or vourmertia enclARA, or vourmertia enclARA, or vourmertia enclARA, or vourmertia enclARA, or vourmertia enclara, or vourmertia enclARA, or vourmertia enclARA, or vourmertia enclara, or vourmertia enclara, or vourmertia enclara, or vourmertia enclARA, or vourmertia enclARA, or vourmertia enclARA, or vourmertia enclARA, or vourmertia enclara, or vourmertia enclARA, or vourmertia enclara, or vourmertia enclARA, or vourmertia enclARA, or vourmertia enclara, or vourmertia enclARA, or vourmertia enclARA, or vourmertia enclARA, or vourmertia enclARA, or vourmertia enclara, or vourmertia enclARA, or vourmertia enclara, or vourmertia enclARA, or vourmertia enclara, or vourmertia enclara, or vourmertia enclARA, or vourmertia enclARA, or vourmertia enclARA, or vourmertia enclARA, or vourmertia enclara, or vourmertia enclARA, or vourmertia enclara, or vourmertia enclara, or vourmertia enclARA, or vourmertia enclara, or vourmertia enclARA, or vourmertia enclARA, or vourmertia enclARA, or vourmertia enclARA, or vourmertia enclara, or vourmertia enclARA, or vourmertia enclara, or vourmertia enclara, or vourmertia enclara, or vourmertia enclara, or vourmertia enclARA, or vourmertia enclARA, or vourmertia enclARA, or vourmertia enclARA, or vourmertia enclara, or vourmertia enclara, or vourmertia enclARA, or vourmertia enclARA, or vourmertia enclARA, or vourmertia enclara, or vourmertia enclARA, or vourmertia enclARA, or vourmertia enclARA, or vourmertia enclARA, or vourmertia enclara, or vourmertia enclara, or vourmertia enclARA, or vourmertia enclARA, or vourmertia enclara, or vourmertia enclara, or vourmertia enclARA, or vourmertia enclARA, or vourmertia enclARA, or vourmertia enclARA, or vourmertia enclara, or vourmertia enclara, or vourmertia enclARA, or vourmertia enclara, or vourmertia enclARA, or vourmertia enclara, or vourmertia enclARA, or vourmertia enclARA, or vourmertia enclARA, or vourmertia enclARA, or vourmertia enclara, or vourmertia enclara, or vourmertia enclARA, or vourmertia enclara, or vourmertia enclara, or vourmertia enclara, or vourmertia enclARA, or vourmertia enclARA, or vourmertia enclARA, or vourmertia enclARA, or vourmertia enclara, or vourmertia enclara, or vourmertia enclara, or vourmertia enclARA, or vourmertia enclARA, or vourmertia enclara, or vourmertia enclARA, or vourmertia enclARA, or vourmertia enclARA, or vourmertia enclARA, or vourmertia enclara, or vourmertia enclara, or vourmertia enclara, or vourmertia enclARA, or vourmertia enclara, or vourmertia enclara, or vourmertia enclARA, or vourmertia enclARA, or vourmertia enclARA, or vourmertia enclARA, or vourmertia enclara, or vourmertia enclara, or vourmertia enclara, or vourmertia enclara, or vourmertia enclARA, or vourmertia enclara, or vourmertia enclARA, or vourmertia enclARA, or vourmertia enclARA, or vourmertia enclARA, or vourmertia enclara, or vourmertia enclara, or vourmertia enclara, or vourmertia enclara, or vourmertia enclara, or vourmertia enclara, or vourmertia enclARA, or vourmertia enclARA, or vourmertia enclARA, or vourmertia enclara, or vourmertia enclARA, or vourmertia enclARA, or vourmertia enclARA, or vourmertia enclara, or vourmertia enclARA, or vourmertia enclara, or vourmertia enclARA, or vourmertia enclARA, or vourmertia enclARA, or vourmertia enclara, or vourmertia enclARA, or vourmertia enclARA, or vourmertia enclARA, or vourmertia enclara, or vourmertia enclara, or vourmertia enclara, or vourmertia enclARA, or vourmertia enclARA, or vourmertia enclARA, or vourmertia enclara, or vourmertia enclARA, or vourmertia enclARA, or vourmertia enclara, or vourmertia enclARA, or vourmertia enclARA, or vourmertia enclara, or vourmertia enclARA, or vourmertia enclARA, or vourmertia enclARA, or vourmertia enclara, or vourmertia enclARA, or vourmertia enclARA, or vourmertia enclara, or vourmertia enclARA, or vourmertia enclara, or vourmertia enclara, or vourmertia enclARA, or vourmertia enclARA, or vourmertia enclARA, or vourmertia enclara, or vourmertia enclARA, or vourmertia enclARA, or vourmertia enclara, or vourmertia enclara, or vourmertia enclARA, or vourmertia enclara, or vourmertia enclARA, or vourmertia enclARA, or vourmertia enclARA, or vourmertia enclara, or vourmertia enclARA, or vourmertia enclARA, or vourmertia enclara, or vourmertia enclara, or vourmertia enclara, or vourmertia enclara, or vourmertia enclARA, or vourmertia enclARA, or vourmertia enclARA, or vourmertia enclara, or vourmertia enclARA, or vourmertia enclara, or vourmertia enclARA, or vourmertia enclARA, or vourmertia enclara, or vourmertia enclara, or vourmertia enclARA, or vourmertia enclARA, or vourmertia enclARA, or vourmertia enclara, or vourmertia enclARA, or vourmertia enclara, or vourmertia enclARA, or vourmertia enclara, or vourmertia enclARA, or vourmertia enclara, or vourmertia enclARA, or vourmertia enclARA, or vourmertia enclARA, or vourmertia enclara, or vourmertia enclARA, or vourmertia enclara, or vourmertia enclARA, or vourmertia enclara, or vourmertia enclALA, or vourmertia enclALA, or vourmertia enclALA, or vourmertia enclALA, or vourmertia enclALA, or vourmertia enclALA, or vourmertia enclALA, or vourmertia enclALA, or vourmertia enclALA, or vourmertia enclALA, or vourmertia enclARA, or vourmertia enclARA, or vourmertia enclARA, or vourmertia enclARA, or vourmertia enclARA, or vourmertia enclARA, or vourmertia inCLT; Einfach-RES; Einfach-RES; Einfach-RES; Einfach-RES; Einfach-RES; Einfach-RES; Einfach-RES; Einfach-RES; Einfach-RES; Einfach-RES; Einfach-RES; Einfach-RES; Einfach-RES; Einfach-RES; Einfach-RES; Einfach-RES; Einfach-RES; EinfACH; Einfach-RES; Einfach-RES; Einfach-RES; Einfach-RES; Einfach-RES; EinfACH; Einfach-RES; Einfach-RES; Einfach-RES; EinfACH; Einfach-RES; Einfach-RES; EinfACH; Einfach-RES; EinfACH; EinfACH; EinfACH; EinfACH; EinfACH; EinfACH; EinfACH; EinfACH; EinfACH; EinfACH; EinfACH; EinfACH; EinfACH; EinfACH; EinfACH; EinfACH; EinfACH; EinfACH; EinfACH; EinfACH; EinfACH; EinfACH; EinfACH; EinfACH; EinfACH; EinfACT; EinfACT; EinfACT; EinfACT; EinfACT; EinfACT; EinfACT; EinfACT; EinfACT; EinfACT; EinfACT; EinfACT; EinfACT; EinfACT; EinfACT; EinfACT; EinfACT; EinfACT; EinfACT; EinfACT; EinfACT; EinfACT; EinfACT; EinfACT; EinfACT; EinfAC; EinfAC; EinfAC; EinfAC; EinfAC; EinfAC; EinfAC; EinfAC; EinfAC; EinfAC; EinfAC; EinfAC; EinfAC; EinfAC; EinfAC; EinfAC; EinfAC; EinfAC; EinfAC; EinfAC; EinfAC; EinfAC; EinfAC; EinfAC; EinfAC; EinfACT; EinfACT; EinfACT; EinfACT; EinfACT; EinfACT; EinfACT; EinfACT; EinfACT; EinfACT; EinfACT; EinfACT; EinfACT; EinfACT; EinfACT; EinfACT; EinfACT; EinfACT; EinfACT; EinfACT; EinfACT; EinfACT; EinfACT; EinfACT; Einfact; EinfACT; EinfACT; EinfACT; EinfACT; EinfACT; EinfACT; EinfACT; EinfACT; EinfACT; EinfACT; EinfACT; EinfACT; EinfACT; EinfACT; EinfACT; EinfACT; EinfACT; EinfACT; EinfACT; EinfACT; EinfACT; EinfACT; EinfACT; EinfACT; Einf ACT; EinfACT; EinfACT; EinfACT; EinfACT; EinfACT; EinfACT; EinfACT; EinfACT; EinfACT; EinfACT; EinfACT; EinfACT; EinfACT; EinfACT; EinfACT; EinfACT; EinfACT; EinfACT; EinfACT; EinfACT; EinfACT; EinfACT; EinfACT; EinfACT; EinfCT; EinfACT; EinfACT; EinfACT; EinfACT; EinfACT; EinfACT; EinfACT; EinfACT; EinfACT; EinfACT; EinfACT; EinfACT; EinfACT; EinfACT; EinfACT; EinfACT; EinfACT; EinfACT; EinfACT; EinfACT; EinfACT; EinfACT; EinfACT; EinfACT; EinfATA; EinfACT; EinfACT; EinfACT; EinfACT; EinfACT; EinfACT; EinfACT; EinfACT; EinfACT; EinfACT; EinfACT; EinfACT; EinfACT; EinfACT; EinfACT; EinfACT; EinfACT; EinfACT; EinfACT; EinfACT; EinfACT; EinfACT; EinfACT; EinfACT; EinfA; EinfACT; EinfACT; EinfACT; EinfACT; EinfACT; EinfACT; EinfACT; EinfACT; EinfACT; EinfACT; EinfACT; EinfACT; EinfACT; EinfACT; EinfACT; EinfACT; EinfACT; EinfACT; EinfACT; EinfACT; EinfACT; EinfACT; EinfACT; EinfACT; EinfAB; EinfACT; EinfACT; EinfACT; EinfACT; EinfACT; EinfACT; EinfACT; EinfACT; EinfACT; EinfACT; EinfACT; EinfACT; EinfACT; EinfACT; EinfACT; EinfACT; EinfACT; EinfACT; EinfACT; EinfACT; EinfACT; EinfACT; EinfACT; EinfACT; EinfAG; EinfACT; EinfACT; EinfACT; EinfACT; EinfACT; EinfACT; EinfACT; EinfACT; EinfACT; EinfACT; EinfACT; EinfACT; EinfACT; EinfACT; EinfACT; EinfACT; EinfACT; EinfACT; EinfACT; EinfACT; EinfACT; EinfACT; EinfACT; EinfACT; EinfAct; EinfACT; EinfACT; EinfACT; EinfACT; EinfACT; EinfACT; EinfACT; EinfACT; EinfACT; EinfACT; EinfACT; EinfACT; EinfACT; EinfACT; EinfACT; EinfACT; EinfACT; EinfACT; EinfACT; EinfACT; EinfACT; EinfACT; EinfACT; EinfACT; EinfFACT; EinfACT; EinfACT; EinfACT; EinfACT; EinfACT; EinfACT; EinfACT; EinfACT; EinfACT; EinfACT; EinfACT; EinfACT; EinfACT; EinfACT; EinfACT; EinfACT; EinfACT; EinfACT; EinfACT; EinfACT; EinfACT; EinfACT; EinfACT; EinfACT; EinfRACT; EinfACT; EinfACT; EinfACT; EinfACT; EinfACT; EinfACT; EinfACT; EinfACT; EinfACT; EinfACT; EinfACT; EinfACT; EinfACT; EinfACT; EinfACT; EinfACT; EinfACT; EinfACT; EinfACT; EinfACT; EinfACT; EinfACT; EinfACT; EinfACT; EinfART; EinfACT; EinfACT; EinfACT; EinfACT; EinfACT; EinfACT; EinfACT; EinfACT; EinfACT; EinfACT; EinfACT; EinfACT; EinfACT; EinfACT; EinfACT; EinfACT; EinfACT; EinfACT; EinfACT; EinfACT; EinfACT; EinfACT; EinfACT; EinfACT; EinfECT; EinfACT; EinfACT; EinfACT; EinfACT; EinfACT; EinfACT; EinfACT; EinfACT; EinfACT; EinfACT; EinfACT; EinfACT; EinfACT; EinfACT; EinfACT; EinfACT; EinfACT; EinfACT; EinfACT; EinfACT; EinfACT; EinfACT; EinfACT; EinfACT; EinfCA; EinfACT; EinfACT; EinfACT; EinfACT; EinfACT; EinfACT; EinfACT; EinfACT; EinfACT; EinfACT; EinfACT; EinfACT; EinfACT; EinfACT; EinfACT; EinfACT; EinfACT; EinfACT; EinfACT; EinfACT; EinfACT; EinfACT; EinfACT; EinfACT; EinfACYL; EinfACT; EinfACT; EinfACT; EinfACT; EinfACT; EinfACT; EinfACT; EinfACT; EinfACT; EinfACT; EinfACT; EinfACT; EinfACT; EinfACT; EinfACT; EinfACT; EinfACT; EinfACT; EinfACT; EinfACT; EinfACT; EinfACT; EinfACT; EinfACT; EinfAXL; EinfACT; EinfACT; EinfACT; EinfACT; EinfACT; EinfACT; EinfACT; EinfACT; EinfACT; EinfACT; EinfACT; EinfACT; EinfACT; EinfACT; EinfACT; EinfACT; EinfACT; EinfACT; EinfACT; EinfACT; EinfACT; EinfACT; EinfACT; EinfACT; EInfACT; EinfACT; EinfACT; EinfACT; EinfACT; EinfACT; EinfACT; EinfACT; EinfACT; EinfACT; EinfACT; EinfACT; EinfACT; EinfACT; EinfACT; EinfACT; EinfACT; EinfACT; EinfACT; EinfACT; EinfACT; EinfACT; EinfACT; EinfACT; EinfACT; EInfAC; EinfACT; EinfACT; EinfACT; EinfACT; EinfACT; EinfACT; EinfACT; EinfACT; EinfACT; EinfACT; EinfACT; EinfACT; EinfACT; EinfACT; EinfACT; EinfACT; EinfACT; EinfACT; EinfACT; EinfACT; EinfACT; EinfACT; EinfACT; EinfACT; EInfact; EinfACT; EinfACT; EinfACT; EinfACT; EinfACT; EinfACT; EinfACT; EinfACT; EinfACT; EinfACT; EinfACT; EinfACT; EinfACT; EinfACT; EinfACT; EinfACT; EinfACT; EinfACT; EinfACT; EinfACT; EinfACT; EinfACT; EinfACT; EinfACT; EInfA; EInfACT; EInfACT; EInfACT; EInfACT; EInfACT; EInfACT; EInfACT; EInfACT; EInfACT; EInfACT; EInfACT; EInfACT; EInfACT; EInfACT; EInfACT; EInfACT; EInfACT; EInfACT; EInfACT; EInfACT; EInfACT; EInfACT; EInfACT; EInfACT; EInfACT; EInfAC; EInfACT; EInfACT; EInfACT; EInfACT; EInfACT; EInfACT; EInfACT; EInfACT; EInfACT; EInfACT; EInfACT; EInfACT; EInfACT; EInfACT; EInfACT; EInfACT; EInfACT; EInfACT; EInfACT; EInfACT; EInfACT; EInfACT; EInfACT; EInfACT; EInfact; EInfACT; EInfACT; EInfACT; EInfACT; EInfACT; EInfACT; EInfACT; EInfACT; EInfACT; EInfACT; EInfACT; EInfACT; EInfACT; EInfACT; EInfACT; EInfACT; EInfACT; EInfACT; EInfACT; EInfACT; EInfACT; EInfACT; EInfACT; EInfACT; EInf ACT; EInfACT; EInfACT; EInfACT; EInfACT; EInfACT; EInfACT; EInfACT; EInfACT; EInfACT; EInfACT; EInfACT; EInfACT; EInfACT; EInfACT; EInfACT; EInfACT; EInfACT; EInfACT; EInfACT; EInfACT; EInfACT; EInfACT; EInfACT; EInfACT; EInfCT; EInfACT; EInfACT; EInfACT; EInfACT; EInfACT; EInfACT; EInfACT; EInfACT; EInfACT; EInfACT; EInfACT; EInfACT; EInfACT; EInfACT; EInfACT; EInfACT; EInfACT; EInfACT; EInfACT; EInfACT; EInfACT; EInfACT; EInfACT; EInfACT; EInfAct; EInfACT; EInfACT; EInfACT; EInfACT; EInfACT; EInfACT; EInfACT; EInfACT; EInfACT; EInfACT; EInfACT; EInfACT; EInfACT; EInfACT; EInfACT; EInfACT; EInfACT; EInfACT; EInfACT; EInfACT; EInfACT; EInfACT; EInfACT; EInfACT; EInfA; EInfACT; EInfACT; EInfACT; EInfACT; EInfACT; EInfACT; EInfACT; EInfACT; EInfACT; EInfACT; EInfACT; EInfACT; EInfACT; EInfACT; EInfACT; EInfACT; EInfACT; EInfACT; EInfACT; EInfACT; EInfACT; EInfACT; EInfACT; EInact A | Erfacte/RES: Excep. de normality (E)Erfacte/RES: Excep. de normality (E)Erfacte/RES: Excep. de normality (E)Erfacte/RES: Excep. de normality (E)Erfacte/RES: Excep. de normality (E)Erfacte/RES: Excep. de normality (E)Erfacte/RES: Excep. de normality (E)ErfactErfacte/RES: Excep. de normality (E)Erfacte/RES: Excep. de normality (E)Erfacte/RES: Excep. de normality (E)Erfacte/RES: Excep. de normality (E)Erfacte/RES: Excep. de normality (E)Erfacte/RES: Excep. de normality (E)Erfact eftacte/RES: Excep. de normality (E)Erfacte/RES: Excep. de normality (E)Erfacte/RES: Excep. de normality (E)Erfacte/RES: Excep. de normality (E)Erfacte/RES: Excep. de normality (E)Erfacte/RES: Excep. de normality (E)Erfacte/Resc. | Erfacte/RES: Excep. de normality (E)Erfacte/RES: Excep. de normality (E)Erfacte/RES: Excep. de normality (E)Erfacte/RES: Excep. de normality (E)Erfacte/RES: Excep. de normality (E)Erfacte/RES: Excep. de normality (E)Erfxacte/RES: Excep. de normality (E)Erfacte/RES: Excep. de normality (E)Erfacte/RES: Excep. de normality (E)Erfacte/RES: Excep. de normality (E)Erfacte/RES: Excep. de normality (E)Erfacte/RES: Excep. de normality (E)Erfacte/ RES: Excep. de normality (E)Erfacte/RES: Excep. de normality (E)Erfacte/RES: Excep. de normality (E)Erfacte/RES: Excep. de normality (E)Erfacte/RES: Excep. de normality (E)Erfacte/RES: Excep. de normality (E)Erfacte/RES: Excep.Erfacte/RES: Excep. de normality (E)Erfacte/RES: Excep. de normality (E)Erfacte/RES: Excep. de normality (E)Erfacte/RES: Excep. de normality (E)Erfacte/RES: Excep. de normality (E)Erfacte/RES: Excep. de normality (E)Erfacte /RES: Excep. de normality (E)Erfacte/RES: Excep. de normality (E)Erfacte/RES: Excep. de normality (E)Erfacte/RES: Excep. de normality (E)Erfacte/RES: Excep. de normality (E)Erfacte/RES: Excep. de normality (E)Erfacte/RES: Exexp. | Erfacte/RES: Excep. de normality (E)Erfacte/RES: Excep. de normality (E)Erfacte/RES: Excep. de normality (E)Erfacte/RES: Excep. de normality (E)Erfacte/RES: Excep. de normality (E)Erfacte/RES: Excep. de normality (E)Erlattacnabla (E)Erlattacnabla (E)Erlattacnabla (E)Erlattacnabla (E)Erlattacnabla (E)Erlattacnabla (E)Erlattacnabla (E)Erlattacnabla (E)Erlattacnabla (E)Erlattacnabla (E)ErlattacnabLA (E)ErlattacnabLA (E)ErlattacnabLA (E)ErlattacnabLA (E)ErlattacnabLA (E)ErlattacnabLA (E)ErlattacnabLA (E)ErlattacnabLA (E)ErlattacnabLA (E)ErlattacnabLA (E)Erlattacnab LA (E)ErlattacnabLA (E)ErlattacnabLA (E)ErlattacnabLA (E)ErlattacnabLA (E)ErlattacnabLA (E)ErlattacnabLA (E)ErlattacnabLA (E)ErlattacnabLA (E)ErlattacnabLA (E)ErlattacnabLAS: TIRNOLIN - TIRNOLIN - TIRNOLIN - TIRNOLIN - TIRNOLIN - TIRNOLIN - TIRNOLIN - TIRNOLIN - TIRNOLIN - TIRNOLIN - TIRNOLIN - TIRNOLIN - TIRNOLIN - TIRNOLIN - TIRNOLIN - TIRNOLIN - TIRNOLIN - TIRNDLIN - TIRNDLIN - TIRNDLIN - TIRNDLIN - TIRNDLIN - TIRNDLIN - TIRNDLIN - TIRNDLIN - TIRNDLIN - TIRNDLIN - TIRNDLIN - TIRNDLIN - TIRNDLIN - TIRNDLIN - TIRNDLIN - TIRNDLIN - TIRNDLIN - T IRNDLIN - TIRNDLIN - TIRNDLIN - TIRNDLIN - TIRNDLIN - TIRNDLIN - TIRNDLIN - TIRNDLIN - TIRNDLIN - TIRNDLIN - TIRNDLIN - TIRNDLIN - TIRNDLIN - TIRNDLIN - TIRNDLIN - TIRNDLIN - TIRNDLIN- TIRNDLIN - TIRNDLIN - TIRNDLIN - TIRNDLIN - TIRNDLIN - TIRNDLIN - TIRNDLIN - TIRNDLIN - TIRNDLIN - TIRNDLIN - TIRNDLIN - TIRNDLIN - TIRNDLIN - TIRNDLIN - TIRNDLIN - TIRNDLIN - TIRN DLIN - TIR NDLIN - TIR NDLIN - TIR NDLIN - TIR NDLIN - TIR NDLIN - TIR NDLIN - TIR NDLIN - TIR NDLIN - TIR NDLIN - TIR NDLIN - TIR NDLIN - TIR NDLIN - TIR NDLIN - TIR NDLIN - TIR NDLIN - TIR NDLIN - TIR NDLIN - T IRNDLIN - TIRNDLIN - TIR NDLIN - | |||
Brandt France, Etablissement de Cergy, 5/7 avenue des Béthunes, FR-95310 Saint Ouen L'Aumone. SAS med ett bolagskapital pa 100 000 000 euro, RCS Nanterre 801 250 531.
IIAHOBHNI KJIIEHTE!
Bn npnd6aHn Bnpi6 kompani De Dietrich. Taki Bn6ip cbiuhtb npo Bauy BmOrnBiCTb i cMaK do fpaHcy3bkoro MncTeTBA XHTT.
Bnpo6n KomnaH De Dietrich 3aB4Kn 6IbH hIX 300-piHOMy DocBiDy BtIIOHTb MaICTepHO po3pO6JIeHn Dn3aH, Camo6yTHICTb i TexHOJOriHi DOcRHeHHa IpnCzXIHn KynIHapHOMy MnCTeUBy. Jn npNCTpoIB Mn BnKOpNCTOByEmo MaTePiaHn BiIMInHOI YKOCTI n rapaHTyEmo 6e3dOraHHy kICTb BnROTOBNeHHra.
Mn nepekoHaH, 0 taKa BncoKa JaKCTb Bnpo6HnTBA cnpnae po3kpTTIO TaIaHTIB noiHOByBaiv KyliHapHoro MNCTeuTBA.
Cnyk6a niIDtpmkn KnieHTIB KomnaHII De Dietrich 3abXdn roTOBa BiINObictn Ha Bci BaWi 3aINTaHH Ta BncIyXATN npOno3nii, kki DonomaraTtMyTb Ham Ie KpaJe 3aIOBOJbHrTn BaWi nOTpe6n.
Дянac Yeecb CTaTN Baunm HOBIM napTHepOM Ha KxHi.ДяКуЕМо 3a Довір.

aee
Ha 3aBodax y ΦpaHci, B Opneahi BaHdomi, komnaHia De Dietrich 6e3yHHHO npaIoe HAd DoCraHHeHHM DoCKoHaNocti, yBiuHIOUHy BnHrTKOBy MaIcTePHicTb y DN3aHi 6e3DoarHoi kiHcBoI npOdyKci. Hawi eNeKTpono6yTObi npncTpoi BiD3NaueHo ceptnΦikatom Origine France Garantie, kN 3acBIDyE ix φpaHcy3bke BnPo6HnCTBO.
Ley 3nak rapaHTye He TINbKn kictb i DOBRObiHicTb Haunx npncTroB, ane i ix BiDCTeKyuBaHicTb, HadaIOuN YITke Ta o6'ekTnBHe CbiDuHn npo ix NOXODKeHHa.
www.de-dietrich.com
De Dietrich
CREATEURD'EMOTIONS DEPUIS 1684
BAKJIINBI INPABUNA TEXHIKN 6E3NEKN 3ANOBIXHI 3AXOIN
- YCTAHOBJIENHRA
Bn6ip Micya dJa po3aUyBaHNa Ta B6yOnOByBaHHra 7
IiEHaHHa o eKeTpomepeki 7 - HABKOLINHCE CEPEIOBNIe 8
3axnCT HABKOINHbOTo cepeOBuHa 8 - ONIC PNPCTPOIO 9-11
Onnc dyxoboioaФn 9
Dincpne Ta KhoNKepyBaHH 10
Akecyapn (3anexno Bid moeJI) 11 - EKCIYATAUPIPNCPTPOIO 12-16
Hanautybanna 13
MeHIOHaJIaIbTaBb 14
PexnmpiroToyBaHHa 15
Початok пи�отуванг.. 16
5doTnA 18-19
OuHnHnBHyTpHbO Ta 3OBHiHbO nobepxhi. 18 - HECPABHOCTI TA IX YCYHEHHRA 20
- IOPADNI ⅢOIO PPINOTYBAHNA 21-23
BAJKINBI INPABUNA TEXHIKN 6E3NEKN - YBAJKHOPOCHNTAE N 3BEPEKITb IJIЯ NODAJBWOROBVKOPNCTAHNJa.
Ley nociHK KopncTyBaay MoXHa
Otpimabwn npicpti, odpa3y X po3napyte noro Bnachopyu a6o X nonpocitb po3napybatn noro. Ipebeipte noro 3OBhiHni BnIaI. 3anwiTb yci 3actepexHHB haknaDHi, 3po6iTb II KOniHO i 36epexiTb.

Baxnbo!
LIM npncTroem MOxytb KOpNCTyBaTnCra DITn He MoJOndwe 8 pOKi i Oco6n 3 cI3nHmM, CEHCOPHMn Ta PO3ymOBmN BaDAMn a6o 6e3 Heo6XiHoro DocBiHy N 3HaHb, 3a yMOBn IIO BOHN nepe6yBaIOTB NiD BiINOBiHNM HaTjAOM, ix 6yNo IONEpeHbO npoiHCTpyKTOBaHO 5ODo 6e3neuHOro BnKOpNCtAHnI pncTPOHO Ta BOHN PO3ymIOTB NOB'3aHI 3 ZIM Pn3nKn.
-ДiTЯМ 3a6bOpOHeNo rpaTnC4 3 npncTroeM.ДiTЯМdo3BOJeHO 6patu yatb B OUnsEHHi N TeXHiHOMy o6cIpyROByBaHHi npncTroo TjIbKn NiD HarJlDom DOpocInx.
Heo6xio ckiKyBaTu 3a Tm, i06 dItn He rpaIncs 3 npntpoem.

3ACTEPEXHEHHJ.
PekomeHdoBaHo He iDnyckatn DiTei Do npncToHO.
He BnKOpncToBvIte napoo-YNCHNK.
3a6bOpHeHO BnKOpNCToBvBaTn abpa3nBHi uNCTnIbHi 3acO6n a60 TBepdi MeTaJIeBi cKpe6Kn dIy OuHSeHHaCKJHnx DBePcT dyXoBOi IuaΦn, OckIbKn BOHn MoKyTb NopRanatn NOBepxHIO Ta npn3BecTn Do p03TpickyBaHHa CKJa.

3ACTEPEXEHHY
Ipeed 3amio Ho Iamnooy KBiD'edHaTe npictriB iD MepeKi, 3aNo6irtn pN3NKy ypaXeHHyeKeTprnHm cTpyMOM. BkoHyBaTN CIO OepauH NoobxIDHO NICJY OxOLOJXeHHN PrncTPOHO. 3HrTN 3axNCHe CKNO JAmNoOuy, BkOpNCOTByte rymOBy pyKaBnuKy, kA NOJIeRShYe nPouec DEMOHtAg Ky.

Maε 6ytn 3Mora BiДКЛЮЧТN
npiocptpi BID eJekTpomepekxi 3a DOnOMOrO BmNkaUa, y6ydoBaHoro y oikcoBaHni Ka6eJenpoBiD BiIOBIDHO Do npabNJ MOHTaJy.
—Y pa3i noxkoJxHnKa6eIIO XNBLeHHa, 06 yHnKHyTN He-6e3neKn, Ioro 3amHy NOBnHeN 3diinCHOBaTN BnPo6Hnk, CnyX6a NiCJnnpoJaXHOrO 6cJyROByBaHHa 60 oc6b 3 BiINOBiHDHO KBaJIΦikaicIcI.
—LeynpictiMoKHa BCTaHOBJIHOBaTn kPiD CTiINbHnCeIIO,TakIB WaaCy-NeHaJ,AK NOKa3aHO HaCXemMOHTaKy.
Bicntpyte Duxoby waphy B mici BCtAHOBJIeHNr TaK, 0o6 BiDCTaHb BiCyciHbOi wao n CTahOBnla 0oHaImeHwe 10 MM. B6yobahi Me6IIOBNHHI 6yTN BnroTOBJIeHi 3 TepMOCTiIKOTo MaTepiany (a6o NOKPITI TepMOCTiKNM MaTepiAnom).ДЯ 6Jbwoi CTIKOCTI npKpinitb npnstpiNdo
7aФn 3a DONOMOIO DOx TBNH-TIB uepe3 OTBOPn Ha 6iHnx CTiKax.
3a6oHEno BCTaHOBIOBaTn npntpi 3a DeKopatNBHMn DBepTaMn, OckiNbKu Ze MoKe npn3BeCTn Do nepeRpiBy.
—Ue npictpi npn3naheho IJIy BnKOpNCTaHHB NObyTOBnx i aHaIoriuHx yMObax, k-KOT KYXOHHI KyToUKN IJI npceHOy B Mara3uHax, ophiac Ta iHux npopeciHnx npmiiEHHx; fepMecbki roCnoapCTBa; KNI- EHTAMN B roTeJx, MOTEJx Ta iHux XHTNOBHX npmiiEHHx; B npmiiEHHx TIny RoCTboBnx KimHaT.
— Ppei npoBeHnM 6yIb- knx onepaui OunueneHHBcepeDnHi dYxOBoi waon II Heo6XiIdHo nonepedhbo BmKHyTu.
3a6bOpHeHO 3mHOBaTN XapakTepnCTnKn ZbOTo PnCTpOHo, OckiNbKn Ze MoKe 6yTu He6e3-NeuHO.
He BnKOpNCTOBuTe DuyOBy 7a4y dIy36epirAHnX xapUOBnx npOdyKTiB a60 6yDb-8kNx iHxNx npEpmetIB nicJx BnKOpNCTaHHJ.
Дяк модени духовoiшафи Oснашени Термошуnom ДлЯ M'яca. Викоростовиные тин Кер'mошуп, pekOMeHDoBaHni Для сic'dyxoboiшафи.
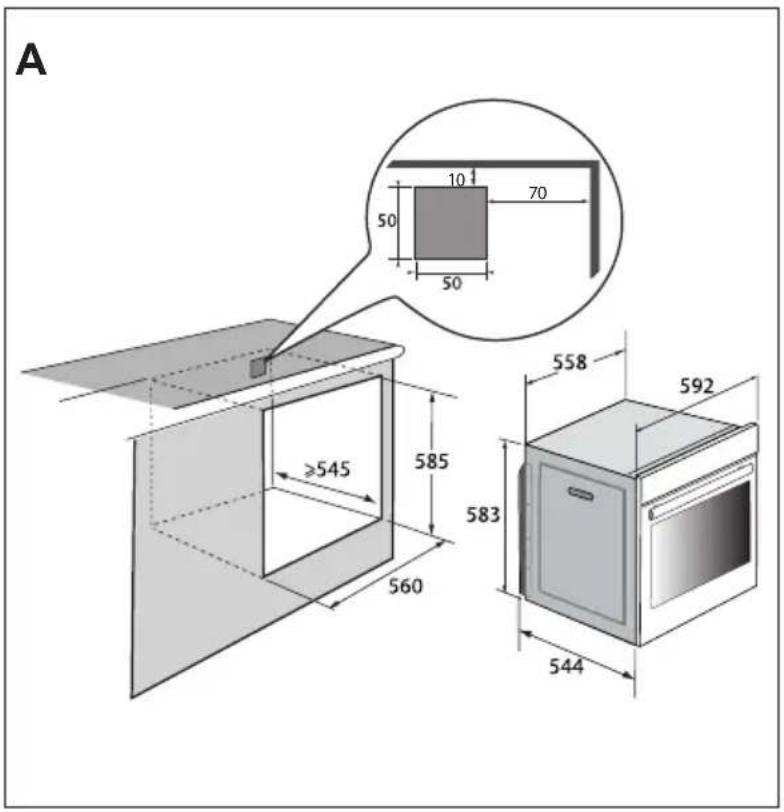
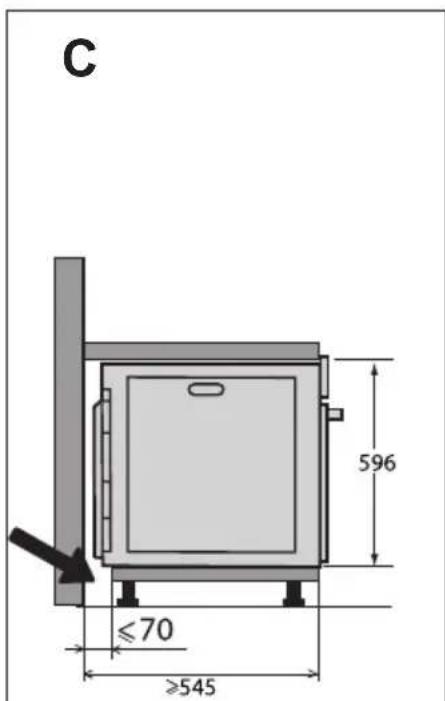
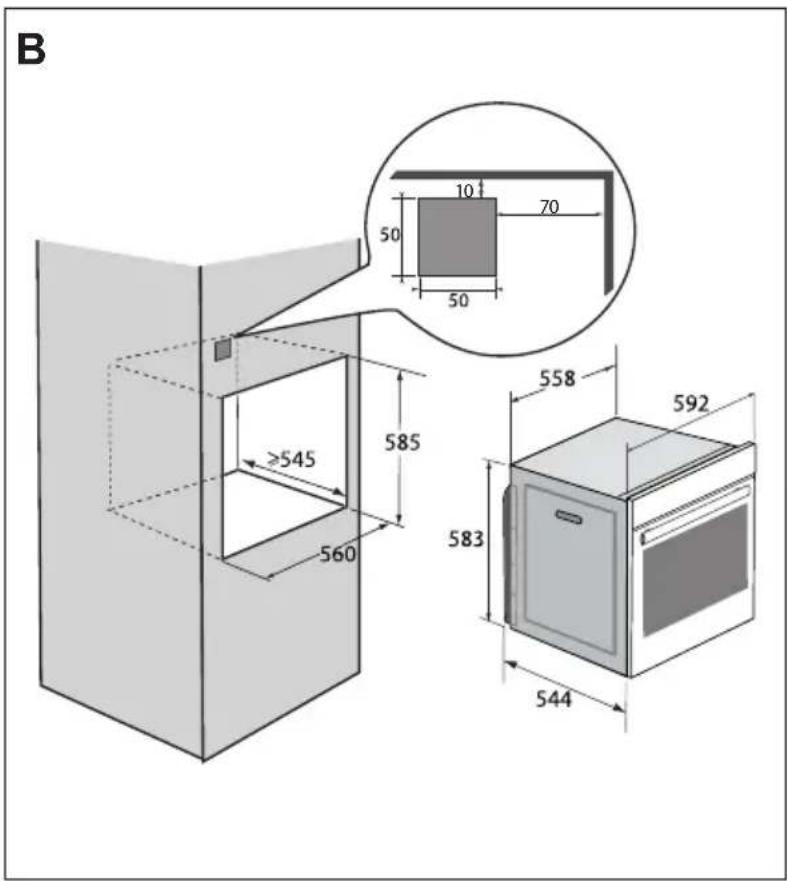
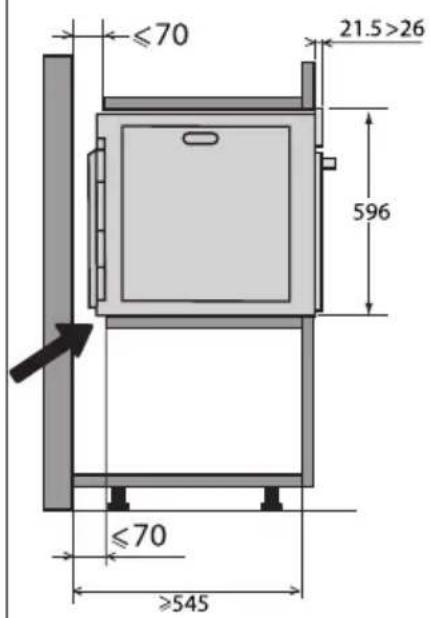
BMBIP MICZIДР O3TALUBAHNY UbOByAHN
Ha cxemax 306paXeHo, kipo3Mipn noBHHi MaTn Me6JI dJa BCTaHOBJeHHy duXOBoI wa.
IeH npncptiIMoXHa BCTaHOBIOBaTu 6e3nocepeHbO NiD CTiJbHNuO (pnc.A) a6o BVwady-neHaI (pnc.B).
Ybara! Ka 3aHn cTINKa Me6nIB 6yde BiKpTOIO (iD CTINbHnueo a6o B WAsi-NeHaJI), BiCTaHB MIX CTIKOIO Ta NOBepxHeIO, Ha kky CNIPAeTBcR dYXOBa Waopa, He NobHHa nepeBnUyBaTu 70 MM* (Pnc.C).
JaKo 3aHn YaCTnHa dYXOBoi waΦn 6yde 3akpTa, 3po6iTb OTBip po3Mipom 50× 50mm nIeKeTpHuHO Ka6eIIO.
3akpinitb duyoby wafy B Me6nax.
Ira zboRo 3Himitb rymoBi ynpu
n npocBepdntb OTBip 2 MM B CTiHci
Me6nib, 06 yHnKHyTu po3KOJIHOBaHHa
MacnBy depeBHH. 3akpinitb duyoby
wafy DbOMa TBnHTamN. YcTaHOBIb Ha
Micue rymoBi ynpu.
Iopada
Uo6 nepeBipuTn BiIDNOBIdHicTb MOHTaKy BmOram, 3BepHiTbcra DoΦaxiBua 3 eJekTpONo6yToBux npncTroob.
ПД'ЕДHAHHЯ DO ELEKTPOMEPEXI
Ipnctpi OcHaueHO cTaHdapTHm Ka6eJem XnBHeHHa 3 TpbOMa npoBiHNkAmN nepetHOM 1,5 MM² (1 φa3a + 1 HeiTpalb + 3emna), kki Heo6xIDHO nID'edHaTndo Mepeksi 220-240 B uepe3 po3eTKy
ctaHdapTy IEC 60083 a6o BceNoJIOChn pO3MnKaU BiINOBiIDHO Do npabN yCTaHOJIeHHra.
3axnchnn npoBid (3eJeHO-JKOBTuN) nID'EdHaHO Do KJIeMn npncTpoU, i Noro Heo6XiDHO 3'EDHaTN i3 3a3emJIIOBaueM. MoHTaxHn 3anO6ixHnK NOBHeH 6yTu np03paxOBAHn Ha 16 A.
KoMaHia He Hece BiDNoBiaIaIbHoCTi 3a 6yDb-ayi HeuacHi BnpaKn a6o IHuJeHTN, cnpuHHeHi BiCyTHicTIO 3a3eMHeHHa, Ioro HeCnpaBnHcTIO a6o HnpaBnHm BnKOHaHHa, a TakoX 3a 6yDb-ye He npaBnIbHe NiKlUoyehHra.
Cen npnctpi npn3naeHOn npo60n 3 yactoto 50 a6o 60 Tc 6e3 6yNb-koRo cneiaIbHOro BtpuHaHH KOpNCTyBaua.

JaKuo dIy nIDKJIOUeHHaBOro npncTpoHO do eJeKTPponpOBdKn B 6ydIBni, y kIi BN MeuKaCTe, Heo6XiDHO BHeCTN NeBHi 3MiHn, 3BepHITbcrdo KBaIΦIKOBaHoro eJeKTPnka. Y pa3i BnHnKHeHHa 6yDb- knx HecnpabHocTe dYxOBoi waΦn Bi'd'cHaIte npncTpiB iD MepeXi a6o BnIMtB 3anobixHHk Ha BiNObiDHi niHii ndHaHHaΦn.
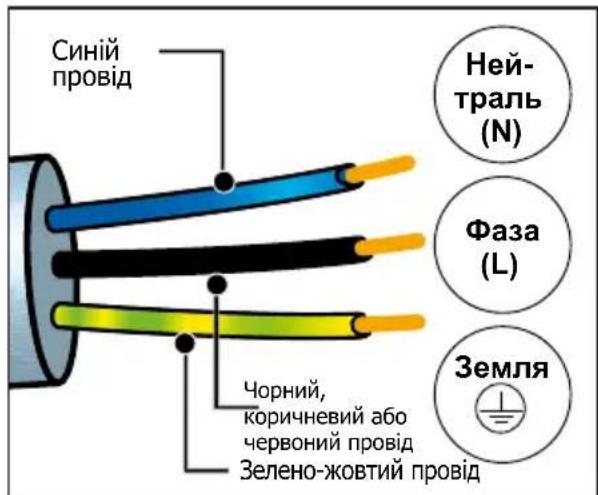
3AXNCT HABKOLINHbOTO CEPEIOBUNA
YnakOBky zboRo npncToHO BnroTOBneHo 3 MaTepiAniB, zo nIaIraIoTb nepepo6ci.
Taki matepiann cnid BiDatn Ha nepepo6ky dny 3axncty hABKOnHbOro cepeoBnua, nomictnbnn ix y cneiaIbHi MyiunabHi KOHTeHepn.
YncIeHHi MaTepiAIn, npuaTHi IaBv BToPunHooI nepepo6Kn.
Tomy Ioro no3haeHo zim IorotnOM, kN Bka3ye Ha Te, 0BVKOpncTahi npncTroi He MoXHa BKNDaTn pa3OM
3 iHUNM BiXOdaMn.
Ipepeo6ka npncTroob,oprani3ObaHa Bnpo6HnKOM,6yde 3diinCHOBaTnscB HnKpaUnx yMObax BiINOBiDn DO EBponeNcBkoI DnpeKTnBn 0do BIXOXID eNeKTpnHoro n eNeKTPOHHORO o6naHaHHra.
3B'jxitbc8 3 MicceBOIO BnaDOIO a6o po3dpi6Hm npOdaBcEm, 0o6 di3HaTnC8, De npuy i3 Baunm 6ydnHKom po3TaWOBaHO nyKTHN 36Opy BnKOpNCtAHnx npncTpoIB.
JaKyEmo 3a BaUy Donomory B 3axncti HABKOINHbOrcpeIOBua.
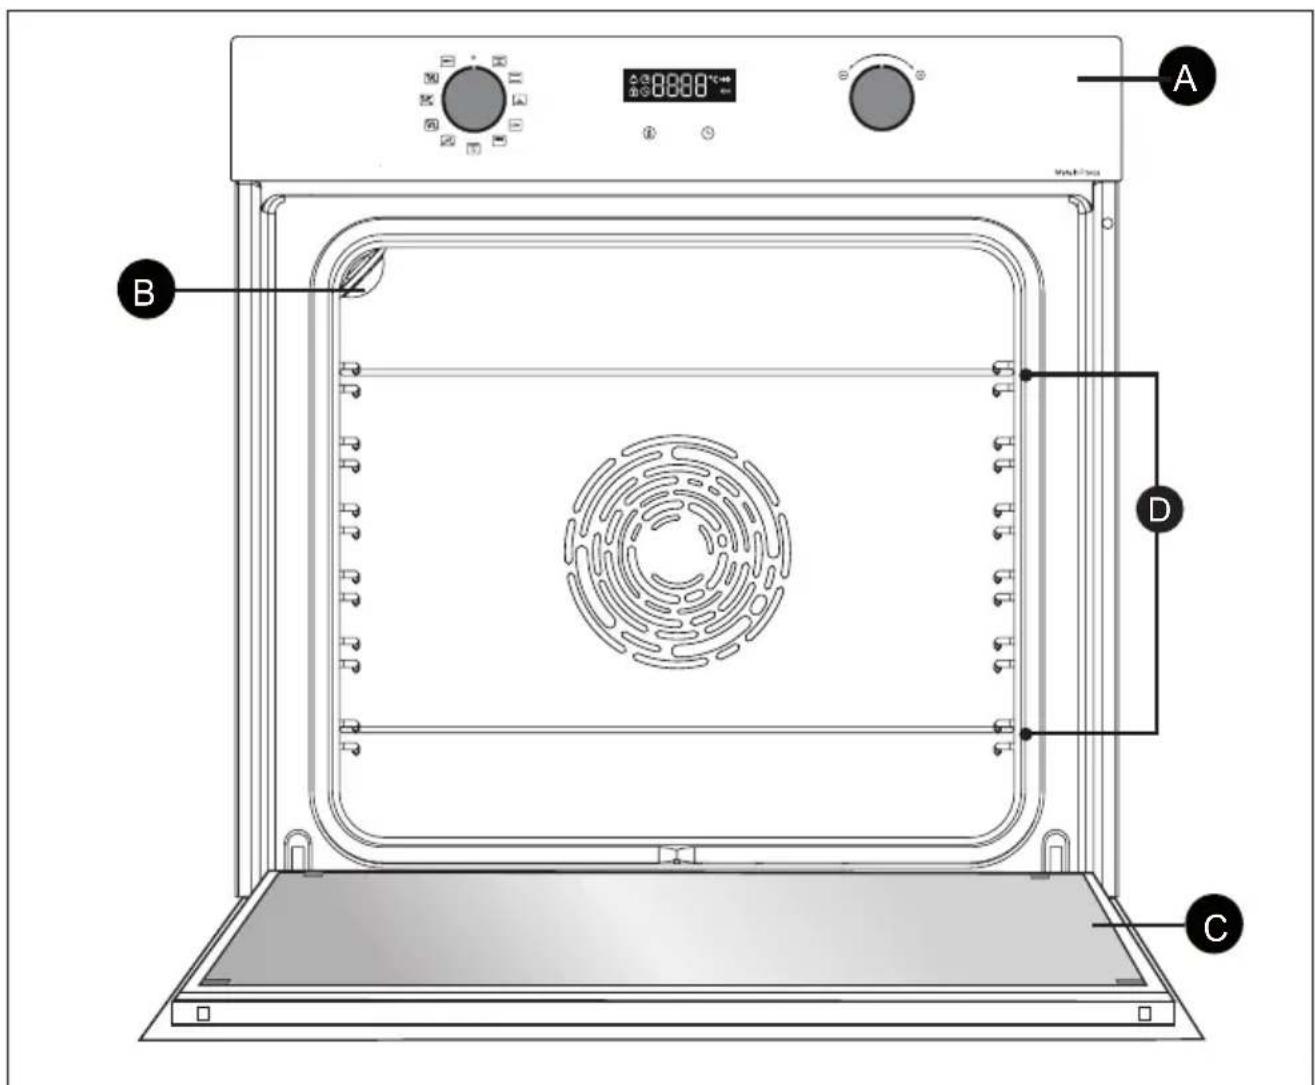
A PanaheIb KepyBaHHa
B JAmnoUka
C DbepuTa
D Rpycu (uayxoba uapa ma6 npyciB dna akcecyapib)
OPRAHNYPABJIHHYTAДИСПЛЕI
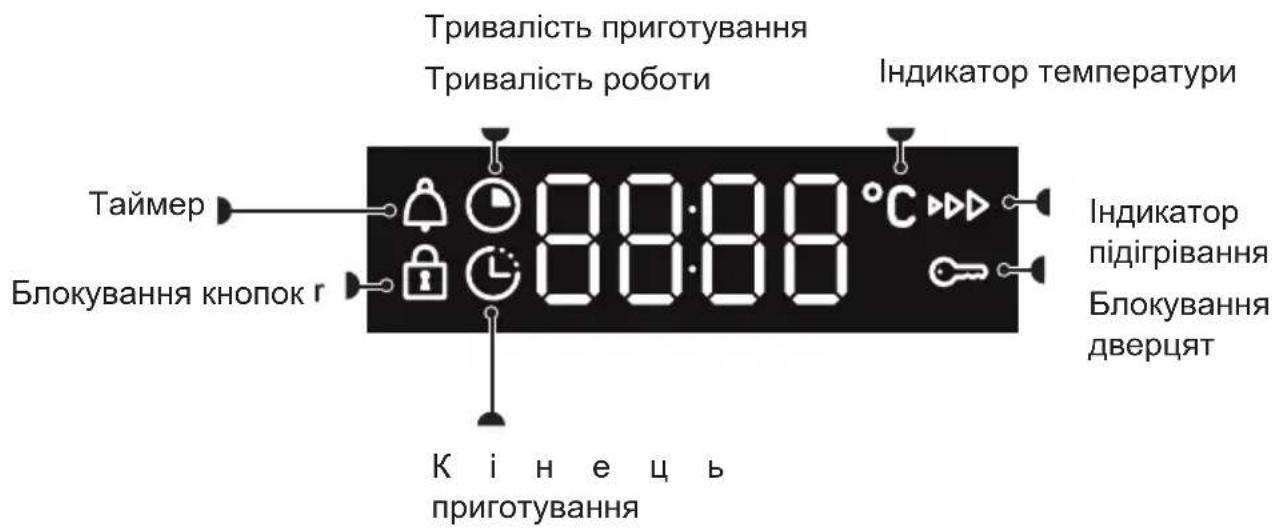
Диспел.
KhoPkn


AKCECYAPN (3AJEXKHO BID MODEJI)
- Pewitka i3 3axnctom Bid nepeknndaHna
PeWITky MoXHa BnKOpNCTOByBaTu DnA BCTaHOBJIeHHa 6yDb-IAkNX DeK iΦopM i3 IJKeIO a6o rPnIa. Ii MoXe BnKOpNCTOByBaTu DnA rPnIa (po3MiUyETbca 6e3NocepeHbO 3Bepxy).
YcTaHOBITb peWitKy i3 3axnCTOM BiI nepeKndaHna dHo dYxOBoi wa.
- BaratoicboBe Deko 3aBTOBukn 45 MM
BCTABNЯETbcB B apcH nID pewiTky. Ioro npn3NaYeHO dIra 36npaHHra COKy Ta KInpy nIq Yac npriroTyBaHHra Ha rpnI, BiH MOxE BnKOpNCTOByBaTnCRA HAnOJOBnHy 3aONBHeHm BOIOU dJIra npriroTyBaHHra Ha BoDHi 6aHI.
HaTnCHiTb KONky BiO6pa3ntbca 3Haoy KOHOBy HaTnCHiTb KONky
BidperyIIOte napameTp 3a donomoroio pukn «+» i «-».PiTBePbTe,HaTNCHyBm pyky.
Taimep
LIO cyHKUIO MOXHa BnKOpNCTOByBaTu JNUE ToDi, KOJI NiY BnMKHeHO.

Pyky MaE 6yTN o6OB'3KOBO BCTaHOBJeHO B IIOJOKeHHI O.
HaTnCHiB KhONKy BiO6pa3ntb8c3HaouK TaMep 3AmNroTHTb. HanaWtynTe TaMep 3a DonomoroIpyKn «+» i «-».PiTBePdbTe, HATNCHyBm pyuKy. NOpHeTBc8 3BOpOTHn BiDnik Yacy, a Ha DnCnnei 3HOBy BiO6pa3ntb8c8ac. Pic7a3akInH8n BCTaHOBJeHOITpINBaNoCTI npolyHae 3BykOBn CnRHaJ. 0o6 Nioro BMkHyTn, HATnCHiB 6yDb-ky KNOnKy.
Приимітka.Ви можete 3minHTaabo BIDMINHTnporpamy TaMepa B 6yd-b-akm MOMeHT.ДЯ BiDMiHn NOBepHiTbCBy MeHIO TaMepa Ta BCtahOBiTb 00:00.
БЛOKУBAHHЯ KHONOK (БЛOKУBAHHЯ BIDДITEИ)

OndohacHO haTNCHITb KHONK KNONKY aYtpmMyTe do nOBn Ha ekpaHI cIMBOny 1. 06 po36noKyBaTN KHONK, OndHocHo HA TNCHITb KHONK TaYtpmMyTe do 3HNKHeHHa ekpaHI cIMBONY 3amKa
MEHIO HAJIAUHTYBAHb
Bn mokeTe 3miHOBaTu pi3Hi npaMeTpnu duxOBoi wao. Jna cboRo HATNCHTb KhoNkU OOKn He BiIO6pa3ntbcra CNOBO MENU (MeHoo), oob nepeuTn B peKIM HaJaWtYBaHb.
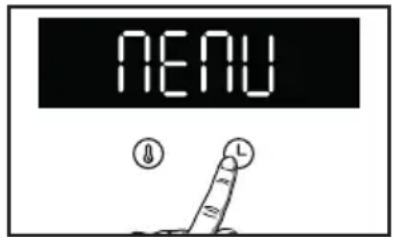
Bn6epiB pi3Hni napameTpni 3a donomoroio pych. PntBepdbte cbi Bn6ip, HATNCHyBwn pyky, yBIMKHITb a6o BnMKHITb napameTpni 3a donomoroio pych «+» i «-», niTBePdbTe Bn6ip pycho. NIBiTbcra Ta6nio:
Lcienocic6 npirotoybaHHn He cymichn i3 npirotoybaHHm Ha BOJHi 6aHI.
PekomeHdyEtbcI dIy nobilbHoro Ta DeJIkaTHoro npuroTyBaHHa: HIXHe M'rcO dUHN. IJra 06cmaxkyBaHH neeHi 3 YepBOHO rO M'ca. IJra TuykBuHHa B 3aKpnti Kactpyni CtpaB, npuroTyBaHHa knx nonepedhbo npoxoDnlo Ha BapnilbHi nobepxHi (IbeHb y BNi, pary).

IpepePbUaCTe HxHc HarpiBaHHa
MimmaHa TemnepaTypa 75 ^ C MaKcMaJIbHa-250°C
PekomeHdaui:180°C
PekomeHdyEcBcA DnBa BOJorHX CtpaB (KiWiB, COKOBNTnx 4pykTOBx Niporib Too).Ticto Do6pe nponeueTbc3Hn3y. PekomeHdyEcBcA DnBa BnIiYKn, 0o NiDhimaetbCra (TopT, 6piow, 6a6Ka Ttoo), a TAKOJKdJa cyfne, Ha JKNX He NOBHHO 6bytn cokupnHKn.

Eco*
MimmaBHa TemnepaTypa 35^ MaKmMaBHa-275°C
PekomeHda:200°C
Cenocic npurotybaHH He cymHn i3 npurotybaHHMa HbOJaHi 6aHI.
LcnoJoxeHHa03BOJAEKOHOMNTneheprio,36epiraoun kictb npOdyktB,IOROTyIOTbcra.
PnroToyBaHH BID6yBaCTbc8 6e3 nonepeHbOro po3irpiBaHH.
- Pexim npirotyBaHHra ppaioe BiNobiHDo do noloxehb cTaNapTy EN 60350-1:ДЯ demohctpauii BiNobiHocti BmOram eHepreTuHoro MapkyBaHHa CBponecbKoro perJaMeHTy EC/65/2014.

PnB BnCOKoI nOtYxHocTi
IonoXeHHa 1-4
PekomeHdaui: noJxHn4
PekomeHdyetbcraIg CmaxxeHHx16y,doabaHHxpycTKoi cKOpHHKnCTpaBi,doabaHH30JOTnctOi cKOpHHKn IpnKpem-6pIone Too.

IpeepBvactn rpnJIb
MimmaHa TemnepaTypa 100 ^ C MaKmMaBHa—250°C
PekomeHdaui:200°C
ПицяТапechеньИдутб pIBHomipHo npriROToBAHIMN, COKOBNTIMN XpYCTKIMN. Пoctabe 6araTOciIbOBe DeKO 3aBTOBswKn 45 MM Ha HnKHiЯPyc.
PekomeHdyetbcraIyBcixBnDIBNTuCi n neuehi, dnyobcmaxkyBaHHa Ta npiroTyBaHH6bapahyoHornJyOBnHX pebepe. IpyroTyBaHHnIX HIXHNX pn6hNX cTeKIB.

Xn
Mimimabha TemnepaTypa 35^ MaKImaBHa—220°C
PekomeHdaui:205°C
Pexm, pekomedobn nIy BNiKaHn xli6a. He 3a6ydbTe hAnITn Ha DHO CKJIAHKy BOnn dIy OTPMaHHxpyCTK0I 3OJOTNCToI CKOpHNKn.
ABTomatnuyi pexumn.
Lya dyxoba waapa Mae 3 HOBi pexumn, kai ABTomatnuHo NoeHyOtB Dba pexumn npirotoybaHHa, 0o Do3BOJAE 36epertn NOXNBHI BnaCTNBOCTI npOdyKTIB i WbNDwe npirotoyBatNi jky.

ПТИЦА
PekomeHnyetybce IJI npurotyBaHHa Kypkn.

Pn6a
PekomeHdyEcBcA DnI npiroTyBaHHa ZINOi p6n (NOCsO, MOpcbKoro OkyH, Tpickn Toio).

Bile m'roco
PekomeHnyetbcn 36epexeHHM'koCTTa HixKHOCT neueHi 3 TeJrTHN.
4 EKCIJYATAIII IIPNCTPOIO
Пд час ВИКОРИСТАНЯ 3 ржIMIB сдд ДODаВATN 500 Мн тплоI BODиВ 6baratoцльове д ekо завтшк 45 MM i CTaBnTи ИOrO B dYxOBy ShaФу Ha HIXHIIЯрс, a CTpaBn NotpiбHo CTaBnTи Ha rapc 3.
Ykaixtb Bary Ha nncnnei 3a donomoroio puykn «+»/«-» i niTBepebTe 3HaueHna, HATNCHyBwn puyky «+»/«-».
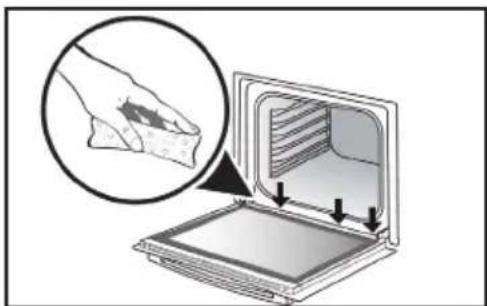
Пд часприroтуваима пapi на BHyтpiшьому ckniytBOPHOCTbCЯ KOнdeHcT.
Mоже статся tak, lo BODa BiD zuBOrO KOHdeHcAty 3aTpmaeTbCra B konoBi (^*) , Todi II cnID BVteptn HanpkiHci npiroToYBaHHa, zo6 yHnKHyTu II HAKONuHeHHa.
(^*) KoIob po3aOBoHn NiD yuJIbHeHHaM DBePcT, y HxKHi YactnHi paMn dYxOBKn.
ПОЧАТOK ПИГOTУBAHHЯ
3anyck pexmy HeBiknaHoro npnroTyBaHHa

Iporpamatop BiodobpaKae Yac, kHn He NOBHeH 6JIMaTn.
IobepHb nepemkaay pekimib i BCTaHOBt noRo Ha Bn6paHomy peKmI.
Дл рунх ржимь:
BIDpa3y nouHaetbca nIdbuueHnra TemnepaTpy. Dyxoba waopa peKomeHdye 3miHny Temnepatypy. Dyxoba waopa noUHe Harpibatnc, a iHdkatop Temnepatypn 6yde MroTit. Koln BOHa dOcRhe 3aDHOI TemnepaTpy, npolyhae Hn3ka 3BykOBx CnHanib.
3MiHeHHa TemnepaTpyn

HaTnChiTb ①.
BidperyIIOte Tempeatpy 3a donomoroio pukn «+» i «-».PiTBePbTe,HaTNCHyBm npky.
4 EKCIJIYATAIII IIPNCTPOIO
3mHeHHaNocti


Функци Smart Assist
Духовашафamae Функцio Smart Assist,яka пд чac nporpaMyBaHHaТрпвалocti npriroTuBaHHЯ nopekomeHdye 3MiHHyТрпВалicMb npriroTuBaHHaЗлжно BiD obpaHoro pexmmy npriroTuBaHHa (DNB. Ta6nIO).
KIO Bn 3MInOcTe TpNBaJIcTb, nITBepDbTe ue, HATNCHyBwN pyUky. IOnHO 6yde DoCraHryTO BCTaHOBNeHOI TEMnepaTyPiNroTyBaHHa, HeraiHo PO3NoUHeTbcra BiDNIk TpNBaJIoCTi.
| PEЖИМ ПРИГOTУBAH- ня | ТРИВАЛICTь |
| 30 XB. | |
| 30 XB. | |
| 30 XB. | |
| ECO | 30 XB. |
| 7 XB. | |
| 15 XB |
HaTnCHiB. DyXoBa 7aΦa peKoMeHdyE 3MiHHy TpNBaIicTb npriToTyBaHHa. BiDperyIouTe TpNBaIcTb npriToTyBaHHa 3a DonomoroIO pyuKN «+» i «-». NiIeTBepDbTe, HATnCHyBmpykY.
3mHeHHaCy 3aBepseHH npiroTyBaHH

Yac 3aBepWeHH npuroTyBaHH 6Ibwe He MroTtB.
Baawa duyoba 3aapha 3anycntbca n3hiue, o6 3aBepuNTn npoec npiroTuBaHHy y Bn6paHn qac.
OuHsEHnBHyTPiHbOiT A 3OBHIshHbOI NOBEPXHI
OuHHeHHaKepeN dYxOBoi wa
3aBdAkyiHkciBn BnTpaatme MeHwe yacy Ha OunuHn DaXOBoi waHn Ta BnTpmaTe BiNobiHicTh npHcHnam ekOJorHoiBiNobiDaIbHocTi.
Дя zufo ro po36pn3kyte B kamepi dyxoboio 300 mN BOIN Ta 3anyctitb pekm OunueneHn npoIO,
IepemictnBunpyuB noJoxeHHa (a6o 3anexHo BiD MoJei) dR BCTaHOBneHHa TpBaNocti 35 XbuiH.
OuHHeHHa 3OBHiHbOi nobepxhi
Information for domestic coven (UE n7 60/2014)
Oeepnneer for npe hushktnpsgh (UE 56/2314)
Mneppeee xg sngnncn ngupnu 1E n'66204
Inforambon zu Haushaltsbackofen (Ue n° 06/2014)
·s
Informa5es relatives a fosos domesticos (UE n° 65/2014)
marmacy prpndr na pncnne pre dnnn (UE n" 66
Information on hostallsugar (UE n° 86/2014)
| Symbol | Init Value | EN Symbol:FR. Symbol:CE. ZnakeA DA: Symbol:ES. Simbo IT. Simbo-IL: Symbol-PL. Czonacienie PT. Simbo-SC: Symbol:EL. Šújko-Fl: Symbol:SV: Symbol:EN. Valc:FR. Valeur-CS: Hrodola-DA: Vardé-DE: Weil-ES: Valer-IT: Valore-NL: Wards-PL: Wardas-PT: Valais-PT: Valais-SC: Hrodola-EL: Apigurjonngn ng-IF: Arvo-SS: Värdes:EN: Unit-FR: Units-CL: Jednokda DA: Enhed-DE: Einhert-ES: Unidad-IT: Unidad-III: Unidad-SC: Jednokda-PT: Unidad-SC: Jednokda-EL: Movilla-FL: Yskolski-SV:Enel | |||||||
| Type norme | ORTZAMME | EN Type norme:FR. Type norme:CS: Model:DA: Normtype:DE: Tys: ES: Model:JT: Tys: PI: Tys: PI: Tys: PI: Tys: PI: Tys: PI: Tys: PI: Tys: PI: Tys: PI: Tys: PI: Tys: PI: Tys: PI: Tys: PI: Tys: PI: Tys: PI: Tys: PI: Tys: PI: Tys: PI: Tys: PI: Tys: PI: Tys: PI: Tys:PI: Tys: PI: Tys: PI: Tys: PI: Tys: PI: Tys: PI: Tys: PI: Tys: PI: Tys: PI: Tys: PI: Tys: PI: Tys: PI: Tys: PI: Tys: PI: Tys: PI: Tys: PI: Tys: PI: Tys: PI: Tys: PI: Tys: PI: Tys: P | EN Value:FR. Valeur-CS: Hrodola-DA: Vardé-DE: Weil-ES: Valer-IT: Valore-NL: Wards-PL: Wardas-PT: Valais-PT: Valais-SC: Hrodola-EL: Apigurjonngn ng-IF: Arvo-SS: Värdes:EN: Unit-FR: Units-CL: Jednokda DA: Enhert-DE: Einhert-ES: Unidad-IT: Unidad-III: Unidad-SC: Jednokda-PT: Unidad-SC: Jednokda-EL: Movilla-FL: Yskolski-SV:Enel | ||||||
| Model identification | NOMOLOM NOOLONOO NOOLONO NOOLONO NOOLONO NOOLONO NOOLONO NOOLONO NOOLONO NOOLONO NOOLONO NOOLONO NOOLONO NOOLONO NOOLONO NOOLONO NOOLONO NOOLONO NOOLONO NOOLONO NOOLONO NOOLONO NOOLONO NOOLONO NOOLONO NOOLONO NOOLONO NOOLONo NOOLONO NOOLONO NOOLONO NOOLONO NOOLONO NOOLONO NOOLONO NOOLONO NOOLONO NOOLONO NOOLONO NOOLONO NOOLONO NOOLONO NOOLONO NOOLONO NOOLONO NOOLONO NOOLONO NOOLONO NOOLONO NOOLONO NOOLONO NOOLONO NOOLONNO NOOLONO NOOLONO NOOLONO NOOLONO NOOLONO NOOLONO NOOLONO NOOLONO NOOLONO NOOLONO NOOLONO NOOLONO NOOLONO NOOLONO NOOLONO NOOLONO NOOLONO NOOLONO NOOLONO NOOLONO NOOLONO NOOLONO NOOLONO NOOLONO NOOLOGNO NOOLONO NOOLONO NOOLONO NOOLONO NOOLONO NOOLONO NOOLONO NOOLONO NOOLONO NOOLONO NOOLONO NOOLONO NOOLONO NOOLONO NOOLONO NOOLONO NOOLONO NOOLONO NOOLONO NOOLONO NOOLONO NOOLONO NOOLONO NOOLONO NOOLE NOOLONO NOOLONO NOOLONO NOOLONO NOOLONO NOOLONO NOOLONO NOOLONO NOOLONO NOOLONO NOOLONO NOOLONO NOOLONO NOOLONO NOOLONO NOOLONO NOOLONO NOOLONO NOOLONO NOOLONO NOOLONO NOOLONO NOOLONO NOOLONO NOOLONE NOOLONE NOOLONE NOOLONE NOOLONE NOOLONE NOOLONE NOOLONE NOOLONE NOOLONE NOOLONE NOOLONE NOOLONE NOOLONE NOOLONE NOOLONE NOOLONE NOOLONE NOOLONE NOOLONE NOOLONE NOOLONE NOOLONE NOOLONE NOOLONE NOOLONLNO NOOLONLNO NOOLONLNO NOOLONLNO NOOLONLNO NOOLONLNO NOOLONLNO NOOLONLNO NOOLONLNO NOOLONLNO NOOLONLNO NOOLONLNO NOOLONLNO NOOLONLNO NOOLONLNO NOOLONLNO NOOLONLNO NOOLONLNO NOOLONLNO NOOLONLNO NOOLONLNo NOOLONLNO NOOLONLNO NOOLONLNO NOOLONLNO NOOLONLNO NOOLONLNO NOOLONLNO NOOLONLNO NOOLONLNO NOOLONLNO NOOLONLNO NOOLONLNO NOOLONLNO NOOLONLNO NOOLONLNO NOOLONLNO NOOLONLNO NOOLONLNO NOOLONLNO NOOLONL No NOOLONLNO NOOLONLNO NOOLONLNO NOOLONLNO NOOLONLNO NOOLONLNO NOOLONLNO NOOLONLNO NOOLONLNO NOOLONLNO NOOLONLNO NOOLONLNO NOOLONLNO NOOLONLNO NOOLONLNO NOOLONLNO NOOLONLNO NOOLONLNO NOOLONLNO NOOLONLNE NOOLONLNO NOOLONLNO NOOLONLNO NOOLONLNO NOOLONLNO NOOLONLNO NOOLONLNO NOOLONLNO NOOLONLNO NOOLONLNO NOOLONLNO NOOLONLNO NOOLONLNO NOOLONLNO NOOLONLNO NOOLONLNO NOOLONLNO NOOLONLNO NOOLONLNO NOOLOLNLNO NOOLONLNO NOOLONLNO NOOLONLNO NOOLONLNO NOOLONLNO NOOLONLNO NOOLONLNO NOOLONLNO NOOLONLNO NOOLONLNO NOOLONLNO NOOLONLNO NOOLONLNO NOOLONLNO NOOLONLNO NOOLONLNO NOOLONLNO NOOLONLNO NOOLONLNO NOOLOGNLNO NOOLONLNO NOOLONLNO NOOLONLNO NOOLONLNO NOOLONLNO NOOLONLNO NOOLONLNO NOOLONLNO NOOLONLNO NOOLONLNO NOOLONLNO NOOLONLNO NOOLONLNO NOOLONLNO NOOLONLNO NOOLONLNO NOOLONLNO NOOLONLNO NOOLONLNO NOOLOS NOL NOOLONLNO NOOLONLNO NOOLONLNO NOOLONLNO NOOLONLNO NOOLONLNO NOOLONLNO NOOLONLNO NOOLONLNO NOOLONLNO NOOLONLNO NOOLONLNO NOOLONLNO NOOLONLNO NOOLONLNO NOOLONLNO NOOLONLNO NOOLONLNO NOOLONLNO NOOLONLNG NOOLONLNO NOOLONLNO NOOLONLNO NOOLONLNO NOOLONLNO NOOLONLNO NOOLONLNO NOOLONLNO NOOLONLNO NOOLONLNO NOOLONLNO NOOLONLNO NOOLONLNO NOOLONLNO NOOLONLNO NOOLONLNO NOOLONLNO NOOLONLNO NOOLONLNO NOOLONLNEG NO OIN | EN Type norme:FR. Type norme:CS: Model:DA: Identificacao de modelo:DA: Identificacao de modelo:DA: Identificacao de modelo:DA: Identificacao de modelo:DA: Identificacao de modelo:DA: Identificacao de modelo:DA: Identificacao de modelo:DA: Identificacao de modelo:DA: Identificacao de modelo:DA: Identificacao de modelo:DA: Identificacao de modelo:DA: Identificacao de modelo:A#H:Al#C:Al#C:Al#C:Al#C:Al#C:Al#C:Al#C:Al#C:Al#C:Al#C:Al#C:Al#C:Al#C:Al#C:Al#C:Al#C:Al#C:Al#C:Al#C:Al#C:Al#C:Al#C:Al#C:Al#C:Al#C:Al#c:Al#C:Al#C:Al#C:Al#C:Al#C:Al#C:Al#C:Al#C:Al#C:Al#C:Al#C:Al#C:Al#C:Al#C:Al#C:Al#C:Al#C:Al#C:Al#C:Al#C:Al#C:Al#C:Al#C:Al#C:Al#CI:Al#C:Al#C:Al#C:Al#C:Al#C:Al#C:Al#C:Al#C:Al#C:Al#C:Al#C:Al#C:Al#C:Al#C:Al#C:Al#C:Al#C:Al#C:Al#C:Al#C:Al#C:Al#C:Al#C:Al#C:Al#Cl:Al#C:Al#C:Al#C:Al#C:Al#C:Al#C:Al#C:Al#C:Al#C:Al#C:Al#C:Al#C:Al#C:Al#C:Al#C:Al#C:Al#C:Al#C:Al#C:Al#C:Al#C:Al#C:Al#C:Al#C:Al#CL:Al#C:Al#C:Al#C:Al#C:Al#C:Al#C:Al#C:Al#C:Al#C:Al#C:Al#C:Al#C:Al#C:Al#C:Al#C:Al#C:Al#C:Al#C:Al#C:Al#C:Al#C:Al#C:Al#C:Al#C:Al#CS: Model:DA:Model:DA:Model:DA:Model:DA:Model:DA:Model:DA:Model:DA:Model:DA:Model:DA:Model:DA:Model:DA:Model:DA:Model:DA:Model:DA:Model:DA:Model:DA:Model:DA:Model:DA:Model:DA:Model:DA:Model:DA:Model:DA:Model:DA:Model:DA:Model:DA:Model:DA:MODEL:Model:Model:Model:Model:Model:Model:Model:Model:Model:Model:Model:Model:Model:Model:Model:Model:Model:Model:Model:Model:Model:Model:Model:Model:Model:Model:Model:Model:Model:Model:Model:Model:Model:Model:Model:Model:Model:Model:Model:Model:Model:Model:Model:Model:Model:Model:Model:Model:Model:Model:MODEL:Model:Model:Model:Model:Model:Model:Model:Model:Model:Model:Model:Model:Model:Model:Model:Model:Model:Model:Model:Model:Model:Model:Model:Model:Model:Model:Model:Model:Model:Model:Model:Model:Model:Model:Model:Model:Model:Model:Model:Model:Model:Model:Model:Model:Model:Model:Model:Model:MODEL:MODEL:MODEL:MODEL:MODEL:MODEL:MODEL:MODEL:MODEL:MODEL:MODEL:MODEL:MODEL:MODEL:MODEL:MODEL:MODEL:MODEL:MODEL:MODEL:MODEL:MODEL:MODEL:MODEL:MODEL:MODEL:MODEL:MODEL:MODEL:MODEL:MODEL:MODEL:MODEL:MODEL:MODEL:MODEL:MODEL:MODEL:MODEL:MODEL:MODEL:MODEL:MODEL:MODEL:MODEL:MODEL:MODEL:MODEL:MODEL:MODEL:MODES NOE EOCNOLNOLNOLNOLNOLNOLNOLNOLNOLNOLNOLNOLNOLNOLNOLNOLNOLNOLNOLNOLNOLNOLNOLNOLNOLNOLNOLNOLNOLNOLNOLNOLNOLNOLNOLNOLNOLNOLNOLNOLNOLNOLNOLNOLNOLNOLNOLNOLNOLNOLNDLNOLNOLNOLNOLNOLNOLNOLNOLNOLNOLNOLNOLNOLNOLNOLNOLNOLNOLNOLNOLNOLNOLNOLNOLNOLNOLNOLNOLNOLNOLNOLNOLNOLNOLNOLNOLNOLNOLNOLNOLNOLNOLNOLNOLNOLNOLNOLNOLNOLNOLS NOE NOE NOE NOE NOE NOE NOE NOE NOE NOE NOE NOE NOE NOE NOE NOE NOE NOE NOE NOE NOE NOE NOE NOE NOE NOE NOE NOE NOE NOE NOE NOE NOE NOE NOE NOE NOE NOE NOE NOE NOE NOE NOE NOE NOE NOE NOE NOE NOE NOE NOERNO NOLNOLNOLNOLNOLNOLNOLNOLNOLNOLNOLNOLNOLNOLNOLNOLNOLNOLNOLNOLNOLNOLNOLNOLNOLNOLNOLNOLNOLNOLNOLNOLNOLNOLNOLNOLNOLNOLNOLNOLNOLNOLNOLNOLNOLNOLNOLNOLNOLNOL NOL NOL NOL NOL NOL NOL NOL NOL NOL NOL NOL NOL NOL NOL NOL NOL NOL NOL NOL NOL NOL NOL NOL NOL NOL NOL NOL NOL NOL NOL NOL NOL NOL NOL NOL NOL NOL NOL NOL NOL NOL NOL NOL NOL NOL NOL NOL NOL NOL NOLNOLNOLNOLNOLNOLNOLNOLNOLNOLNOLNOLNOLNOLNOLNOLNOLNOLNOLNOLNOLNOLNOLNOLNOLNOLNOLNOLNOLNOLNOLNOLNOLNOLNOLNOLNOLNOLNOLNOLNOLNOLNOLNOLNOLNOLNOLNOLNOLNDLNLNLNLNLNLNLNLNLNLNLNLNLNLNLNLNLNLNLNLNLNLNLNLNLNLNLNLNLNLNLNLNLNLNLNLNLNLNLNLNLNLNLNLNLNLNLNLNLNLNLNLNLNLNLNLNLNLNLNLNLNLNLNLNLNLNLNLNLNLNLNLNLNLNLNLNLNLNLNLNLNLNLNLNLNLNLNLNLNLNLNLNLNLNLNLNLNLNLNLNL NLNLNLNLNLNLNLNLNLNLNLNLNLNLNLNLNLNLNLNLNLNLNLNLNLNLNLNLNLNLNLNLNLNLNLNLNLNLNLNLNLNLNLNLNLNLNLNLNLNLNLNLNLNLNLNLNLNLNLNLNLNLNLNLNLNLNLNLNLNLNLNLNLNLNLNLNLNLNLNLNLNLNLNLNLNLNLNLNLNLNLNLNLNLNLNLNLNLNLNLNLLNLNLNLNLNLNLNLNLNLNLNLNLNLNLNLNLNLNLNLNLNLNLNLNLNLNLNLNLNLNLNLNLNLNLNLNLNLNLNLNLNLNLNLNLNLNLNLNLNLNLNLNLNLNLNLNLNLNLNLNLNLNLNLNLNLNLNLNLNLNLNLNLNLNLNLNLNLNLNLNLNLNLNLNLNLNLNLNLNLNLNLNLNLNLNLNLNLNLNLNF NOL NOL NOL NOL NOL NOL NOL NOL NOL NOL NOL NOL NOL NOL NOL NOL NOL NOL NOL NOL NOL NOL NOL NOL NOL NOL NOL NOL NOL NOL NOL NOL NOL NOL NOL NOL NOL NOL NOL NOL NOL NOL NOL NOL NOL NOL NOL NOL NOL NOKI FIOFIOFIOFIOFIOFIOFIOFIOFIOFIOFIOFIOFIOFIOFIOFIOFIOFIOFIOFIOFIOFIOFIOFIOFIOFIOFIOFIOFIOFIOFIOFIOFIOFIOFIOFIOFIOFIOFIOFIOFIOFIOFIOFIOFIOFIOFIOFIOFIOFIOFIO FIOFIOFIOFIOFIOFIOFIOFIOFIOFIOFIOFIOFIOFIOFIOFIOFIOFIOFIOFIOFIOFIOFIOFIOFIOFIOFIOFIOFIOFIOFIOFIOFIOFIOFIOFIOFIOFIOFIOFIOFIOFIOFIOFIOFIOFIOFIOFIOFIOFFOFIOFIOFIOFIOFIOFIOFIOFIOFIOFIOFIOFIOFIOFIOFIOFIOFIOFIOFIOFIOFIOFIOFIOFIOFIOFIOFIOFIOFIOFIOFIOFIOFIOFIOFIOFIOFIOFIOFIOFIOFIOFIOFIOFIOFIOFIOFIOFIOFIOFFO FIOFIOFIOFIOFIOFIOFIOFIOFIOFIOFIOFIOFIOFIOFIOFIOFIOFIOFIOFIOFIOFIOFIOFIOFIOFIOFIOFIOFIOFIOFIOFIOFIOFIOFIOFIOFIOFIOFIOFIOFIOFIOFIOFIOFIOFIOFIOFIOFIOF IOE NOE NOE NOE NOE NOE NOE NOE NOE NOE NOE NOE NOE NOE NOE NOE NOE NOE NOE NOE NOE NOE NOE NOE NOE NOE NOE NOE NOE NOE NOE NOE NOE NOE NOE NOE NOE NOE NOE NOE NOE NOE NOE NOE NOE NOE NOE NOE NOE NOE NoE NOE NoE NoE NoE NoE NoE NoE NoE NoE NoE NoE NoE NoE NoE NoE NoE NoE NoE NoE NoE NoE NoE NoE NoE NoE NoE NoE NoE NoE NoE NoE NoE NoE NoE NoE NoE NoE NoE NoE NoE NoE NoE NoE NoE NoE NoE NoE NoE NoE NoE NoE NOE NoE NoE NoE NoE NoE NoE NoE NoE NoE NoE NoE NoE NoE NoE NoE NoE NoE NoE NoE NoE NoE NoE NoE NoE NoE NoE NoE NoE NoE NoE NoE NoE NoE NoE NoE NoE NoE NoE NoE NoE NoE NoE NoE NoE NoE NoE NoE NOE NoE NOE NoE NoE NoE NoE NoE NoE NoE NoE NoE NoE NoE NoE NoE NoE NoE NoE NoE NoE NoE NoE NoE NoE NoE NoE NoE NoE NoE NoE NoE NoE NoE NoE NoE NoE NoE NoE NoE NoE NoE NoE NoE NoE NoE NoE NoE NoE NOE NoE NoE NOE NoE NoE NoE NoE NoE NoE NoE NoE NoE NoE NoE NoE NoE NoE NoE NoE NoE NoE NoE NoE NoE NoE NoE NoE NoE NoE NoE NoE NoE NoE NoE NoE NoE NoE NoE NoE NoE NoE NoE NoE NoE NoE NoE NoE NoE NoE NOE NOE NoE NoE NoE NoE NoE NoE NoE NoE NoE NoE NoE NoE NoE NoE NoE NoE NoE NoE NoE NoE NoE NoE NoE NoE NoE NoE NoE NoE NoE NoE NoE NoE NoE NoE NoE NoE NoE NoE NoE NoE NoE NoE NoE NoE NoE NoE NoE NoE NOE NOE NoE NOE NoE NoE NoE NoE NoE NoE NoE NoE NoE NoE NoE NoE NoE NoE NoE NoE NoE NoE NoE NoE NoE NoE NoE NoE NoE NoE NoE NoE NoE NoE NoE NoE NoE NoE NoE NoE NoE NoE NoE NoE NoE NoE NoE NoE NoE NOE NoE NoE NoE NOE NoE NoE NoE NoE NoE NoE NoE NoE NoE NoE NoE NoE NoE NoE NoE NoE NoE NoE NoE NoE NoE NoE NoE NoE NoE NoE NoE NoE NoE NoE NoE NoE NoE NoE NoE NoE NoE NoE NoE NoE NoE NoE NoE NoE NoE NOE NoE NOE NoE NOE NoE NoE NoE NoE NoE NoE NoE NoE NoE NoE NoE NoE NoE NoE NoE NoE NoE NoE NoE NoE NoE NoE NoE NoE NoE NoE NoE NoE NoE NoE NoE NoE NoE NoE NoE NoE NoE NoE NoE NoE NoE NoE NoE NoE NoE NOE NOE NOE NOE NOE NOE NOE NOE NOE NOE NOE NOE NOE NOE NOE NOE NOE NOE NOE NOE NOE NOE NOE NOE NOE NOE NOE NOE NOE NOE NOE NOE NOE NOE NOE NOE NOE NOE NOE NOE NOE NOE NOE NOE NOE NOE NOE NOE NOE.NO EOCNOLNOLNOLNOLNOLNOLNOLNOLNOLNOLNOLNOLNOLNOLNOLNOLNOLNOLNOLNOLNOLNOLNOLNOLNOLNOLNOLNOLNOLNOLNOLNOLNOLNOLNOLNOLNOLNOLNOLNOLNOLNOLNOLNOLNOLNOLNOLNOLNDLNLDLNLDLNLDLNLDLNLDLNLDLNLDLNLDLNLDLNLDLNLDLNLDLNLDLNLDLNLDLNLDLNLDLNLDLNLDLNLDLNLDLNLDLNLDLNLDLNLDLNLDLNLDLNLDLNLDLNLDLNLDLNLDLNLDLNLDLNLDLNLDLNLDLNLDLNLDLNLDLNLDLNLDLNLDLNLDLNLDLNLDLNLDLNLDLNLDLNLDLDLNLDLNLDLNLDLNLDLNLDLNLDLNLDLNLDLNLDLNLDLNLDLNLDLNLDLNLDLNLDLNLDLNLDLNLDLNLDLNLDLNLDLNLDLNLDLNLDLNLDLNLDLNLDLNLDLNLDLNLDLNLDLNLDLNLDLNLDLNLDLNLDLNLDLNLDLNLDLNLDLNLDLNLDLNLDLNLDLNLDLNLDLNLDLNLDLNLDLNDLNLDLNLDLNLDLNLDLNLDLNLDLNLDLNLDLNLDLNLDLNLDLNLDLNLDLNLDLNLDLNLDLNLDLNLDLNLDLNLDLNLDLNLDLNLDLNLDLNLDLNLDLNLDLNLDLNLDLNLDLNLDLNLDLNLDLNLDLNLDLNLDLNLDLNLDLNLDLNLDLNLDLNLDLNLDLNLDLNLDLNLDLNLDLNLDLNLDRN | EN Type norme:FR. Type norme:DS: Model:CA: Model:CA: Model:CA: Model:CA: Model:CA: Model:CA: Model:CA: Model:CA: Model:CA: Model:CA: Model:CA: Model:CA: Model:CA: Model:CA: Model:CA: Model:CA: Model:CA: Model:CA: Model:CA: Model:CA: Model:CA: Model:CA: Model:CA: Model:CA: Model:CA: Model:BA: Model:BA: Model:BA: Model:BA: Model:BA: Model:BA: Model:BA: Model:BA: Model:BA: Model:BA: Model:BA: Model:BA: Model:BA: Model:BA: Model:BA: Model:BA: Model:BA: Model:BA: Model:BA: Model:BA: Model:BA: Model:BA: Model:BA: Model:BA: Model:BA: Model:NA | EN Term of the Standard of the Standard of the Standard of the Standard of the Standard of the Standard of the Standard of the Standard of the Standard of the Standard of the Standard of the Standard of the Standard of the Standard of the Standard of the Standard of the Standard of the Standard of the Standard of the Standard of the Standard of the Standard OF THE 1ST AND 2ND MONTHS OF THE YEAR 1ST AND 2ND MONTHS OF THE YEAR 1ST AND 2ND MONTHS OF THE YEAR 1ST AND 2ND MONTHS OF THE YEAR 1ST AND 2ND MONTHS OF THE YEAR 1ST AND 2ND MONTHS OF THE YEAR 1ST AND 2ND MONTHS OF THE YEAR 1ST AND 2ND MONTHS OF THE YEAR 1ST AND 2ND MONTHS OF THE YEAR 1STAND 2ND MONTHS OF THE YEAR 1ST AND 2ND MONTHS OF THE YEAR 1ST AND 2ND MONTHS OF THE YEAR 1ST AND 2ND MONTHS OF THE YEAR 1ST AND 2ND MONTHS OF THE YEAR 1ST AND 2ND MONTHS OF THE YEAR 1ST AND 2ND MONTHS OF THE YEAR 1ST AND 2ND MONTHS OF THE YEAR 1ST AND 2ND MOONSHALL 1ST AND 2ND MONTHS OF THE YEAR 1ST AND 2ND MONTHS OF THE YEAR 1ST AND 2ND MONTHS OF THE YEAR 1ST AND 2ND MONTHS OF THE YEAR 1ST AND 2ND MONTHS OF THE YEAR 1ST AND 2ND MONTHS OF THE YEAR 1ST AND 2ND MONTHS OF THE YEAR 1ST AND 2ND MONTHS OF THE YEAR 1ST and 2ND MONTHS OF THE YEAR 1ST AND 2ND MONTHS OF THE YEAR 1ST AND 2ND MONTHS OF THE YEAR 1ST AND 2ND MONTHS OF THE YEAR 1ST AND 2ND MONTHS OF THE YEAR 1ST AND 2ND MONTHS OF THE YEAR 1ST AND 2ND MONTHS OF THE YEAR 1ST AND 2ND MONTHS OF THE YEAR 1ST AND 2ND CHRONS OF THE YEAR 1ST AND 2ND CHRONS OF THE YEAR 1ST AND 2ND CHRONS OF THE YEAR 1ST AND 2ND CHRONS OF THE YEAR 1ST AND 2ND CHRONS OF THE YEAR 1ST AND 2ND CHRONS OF THE YEAR 1ST AND 2ND CHRONS OF THE YEAR 1ST AND 2ND CHRONS OF THE YEAR 1ST AND2ND CHRONS OF THE YEAR 1ST AND 2ND CHRONS OF THE YEAR 1ST AND 2ND CHRONS OF THE YEAR 1ST AND 2ND CHRONS OF THE YEAR 1ST AND 2ND CHRONS OF THE YEAR 1ST AND 2ND CHRONS OF THE YEAR 1ST AND 2ND CHRONS OF THE YEAR 1ST AND 2ND CHRONS OF THE YEAR1ST AND 2ND CHRONS OF THE YEAR 1ST AND 2ND CHRONS OF THE YEAR 1ST AND 2ND CHRONS OF THE YEAR 1ST AND 2ND CHRONS OF THE YEAR 1ST AND 2ND CHRONS OF THE YEAR 1ST AND 2ND CHRONS OF THE YEAR 1ST AND 2ND CHRONS OF THE YEAR 1ST AND 2ND CHRON S | EN Term of the Standard of the Standard of the Standard of the Standard of the Standard of the Standard of the Standard of the Standard of the Standard of the Standard of the Standard of the Standard of the Standard of the Standard of the Standard of the Standard of the Standard OF THE 1ST AND 2ND MONTHS OF THE YEAR 1ST AND 2ND MONTHS OF THE YEAR 1ST AND 2ND MONTHS OF THE YEAR 1ST AND 2ND MONTHS OFTHE YEAR 1ST AND 2ND MONTHS OF THE YEAR 1ST AND 2ND MONTHS OF THE YEAR 1ST AND 2ND MONTHS OF THE YEAR 1ST AND 2ND MONTHS OF THE YEAR 1ST AND 2ND MONTHS OF THE YEAR 1ST AND 2ND MONTHS OF THE YEAR 1ST AND 2ND MONTHS OF THE YEAR 1ST AND 2ND MONTHS OF THE YEAR 1st AND 2ND MONTHS OF THE YEAR 1ST AND 2ND MONTHS OF THE YEAR 1ST AND 2ND MONTHS OF THE YEAR 1ST AND 2ND MONTHS OF THE YEAR 1ST AND 2ND MONTHS OF THE YEAR 1ST AND 2ND MONTHS OF THE YEAR 1ST AND 2ND MONTHS OF THE YEAR 1ST AND 2ND MONTHS OF THE YEAR 1ST AND 2nd MONTHS OF THE YEAR 1ST AND 2ND MONTHS OF THE YEAR 1ST AND 2ND MONTHS OF THE YEAR 1ST AND 2ND MONTHS OF THE YEAR 1ST AND 2ND MONTHS OF THE YEAR 1ST AND 2ND MONTHS OF THE YEAR 1ST AND 2ND MONTHS OF THE YEAR 1ST AND 2ND MONTHS OF THE YEAR 1ST AND 2ND MONTHS OFTHE YEAR 1ST AND 2ND MONTHS OF THE YEAR 1ST AND 2ND MONTHS OF THE YEAR 1ST AND 2ND MONTHS OF THE YEAR 1ST AND 2ND MONTHS OF THE YEAR 1STAND 2ND MONTHS OF THE YEAR 1ST AND 2ND MONTHS OF THE YEAR 1ST AND 2ND MONTHS OF THE YEAR 1ST AND 2ND MONTHS OF THE YEAR 1st AND 2ND MONTHS OF THE YEAR 1ST AND 2ND MONTHS OF THE YEAR 1ST AND 2ND MONTHS OF THE YEAR 1ST AND 2ND MONTHS OF THE YEAR 1ST AND 2ND CHRONS OF THE YEAR 1ST AND 2ND CHRONS OF THE YEAR 1ST AND 2ND CHRONS OF THE YEAR 1ST AND 2ND CHRONS OF THE YEAR 1st AND 2ND CHRONS OF THE YEAR 1ST AND 2ND CHRONS OF THE YEAR 1ST AND 2ND CHRONS OF THE YEAR 1ST AND 2ND CHRONS OF THE YEAR 1ST AND 2ND CHRONS OF THE YEAR 1ST AND 2ND CHRONS OF THE YEAR 1ST AND 2ND CHRONS OF THE YEAR 1ST AND 2ND CHRONS OFTHE YEAR 1ST AND 2ND CHRONS OF THE YEAR 1ST AND 2ND CHRONS OF THE YEAR 1ST AND 2ND CHRONS OF THE YEAR 1ST AND 2ND CHRONS OF THE YEAR 1ST AND 2ND CHRONS OF THE YEAR 1ST AND 2ND CHRONS OF THE YEAR 1ST AND 2ND CHRONS OF THE YEAR 1ST AND 2NDCHRONS OF THE YEAR 1ST AND 2ND CHRONS OF THE YEAR 1ST AND 2ND CHRONS OF THE YEAR 1ST AND 2ND CHRONS OF THE YEAR 1ST AND 2ND CHRONS OF THE YEAR 1ST AND 2ND CHRONS OF THE YEAR 1ST AND 2ND CHRONS OF THE YEAR 1ST AND 2ND CHRONS OF THE YEAR 1STAND 2ND MONTHS OF THE YEAR 1ST AND 2ND MONTHS OF THE YEAR 1ST AND 2ND MONTHS OF THE YEAR 1ST AND 2ND MONTHS OF THE YEAR 1ST AND 2ND MONTHS OF THE YEAR 1ST AND 2ND MONTHS OF THE YEAR 1ST AND 2ND MONTHS OF THE YEAR 1ST AND 2ND MONTHS OF THEYEAR 1ST AND 2ND MONTHS OF THE YEAR 1ST AND 2ND MONTHS OF THE YEAR 1ST AND 2ND MONTHS OF THE YEAR 1ST AND 2ND MONTHS OF THE YEAR 1ST AND 2ND MONTHS OF THE YEAR 1ST AND 2ND MONTHS OF THE YEAR 1ST AND 2ND MONTHS OF THE YEAR 1ST AND 2ND MONTHS OF THE YEAR 1ST And 2ND MONTHS OF THE YEAR 1ST AND 2ND MONTHS OF THE YEAR 1ST AND 2ND MONTHS OF THE YEAR 1ST AND 2ND MONTHS OF THE YEAR 1ST AND 2ND MONTHS OF THE YEAR 1ST AND 2ND MONTHS OF THE YEAR 1ST AND 2ND MONTHS OF THE YEAR 1ST AND 2ND MONTHS OF THE YEAR 1ST AND 2ND CHARACTERISTICAL ENGLISH NAME (NAME) AND ENGLISH NUMBER (NUMBER) | EN Term of the Standard of the Standard of the Standard of the Standard of the Standard of the Standard of the Standard of the Standard of the Standard of the Standard of the Standard of the Standard of the Standard of the Standard of the Standard of the Standard OF THE 1ST AND 2ND MONTHS OF THE YEAR 1ST AND 2ND MONTHS OF THE YEAR 1ST AND 2ND MONTHS OF THE YEAR 1ST AND 2ND MONTHS OF THE YEAR 3RD MONTHS OF THE YEAR 3RD MONTHS OF THE YEAR 3RD MONTHS OF THE YEAR 3RD MONTHS OF THE YEAR 3RD MONTHS OF THE YEAR 3RD MONTHS OF THE YEAR 3RD MONTHS OF THE YEAR 3RD MONTHS OF THE YEAR 3RD MONTHS OF THE YEAR 3RD MONTHS OF THE YEAR 3RD MONTHS OF THE YEAR 3RD MONTHS OF THE YEAR 3RD MONTHS OFTHE YEAR 3RD MONTHS OF THE YEAR 3RD MONTHS OF THE YEAR 3RD MONTHS OF THE YEAR 3RD MONTHS OF THE YEAR 3RD MONTHS OF THE YEAR 3RD MONTHS OF THE YEAR 3RD MONTHS OF THE YEAR 3RD MONTHS OF THE YEAR 3RD MONTHS OF THE YEAR 3RD MONTHS OF THE YEAR 3RD MONTHS OF THE YEAR 3RD MONTHS OF THE YEAR 3rd MONTHS OF THE YEAR 3rd MONTHS OF THE YEAR 3rd MONTHS OF THE YEAR 3rd MONTHS OF THE YEAR 3rd MONTHS OF THE YEAR 3rd MONTHS OF THE YEAR 3rd MONTHS OF THE YEAR 3rd MONTHS OF THE YEAR 3rd MONTHS OF THE YEAR 3rd MONTHS OF THE YEAR 3rd MONTHS OF THE YEAR 3rd MONTHS OF THE YEAR 3rd MONTHS OFTHE YEAR 3rd MONTHS OF THE YEAR 3rd MONTHS OF THE YEAR 3rd MONTHS OF THE YEAR 3rd MONTHS OF THE YEAR 3rd MONTHS OF THE YEAR 3rd MONTHS OF THE YEAR 3rd MONTHS OF THE YEAR 3rd MONTHS OF THE YEAR 3rd MONTHS OF THE YEAR 3rd MONTHS OF THE YEAR 3rd MONTHS OF THE YEAR 3rd MONTHS OF THE YEAR 3d MONTHS OF THE YEAR 3d MONTHS OF THE YEAR 3d MONTHS OF THE YEAR 3d MONTHS OF THE YEAR 3d MONTHS OF THE YEAR 3d MONTHS OF THE YEAR 3d MONTHS OF THE YEAR 3d MONTHS OF THE YEAR 3d MONTHS OF THE YEAR 3d MONTHS OF THE YEAR 3d MONTHS OF THE YEAR 3d MONTHS OF THE YEAR 3d MONTHS OFTHE YEAR 3d MONTHS OF THE YEAR 3d MONTHS OF THE YEAR 3d MONTHS OF THE YEAR 3d MONTHS OF THE YEAR 3d MONTHS OF THE YEAR 3d MONTHS OF THE YEAR 3d MONTHS OF THE YEAR 3d MONTHS OF THE YEAR 3d MONTHS OF THE YEAR 3d MONTHS OF THE YEAR 3d MONTHS OF THE YEAR 3d MONTHS OF THE YEAR 3D MONTHS OF THE YEAR 3d MONTHS OF THE YEAR 3d MONTHS OF THE YEAR 3d MONTHS OF THE YEAR 3d MONTHS OF THE YEAR 3d MONTHS OF THE YEAR 3d MONTHS OF THE YEAR 3d MONTHS OF THE YEAR 3d MONTHS OF THE YEAR 3d MONTHS OF THE YEAR 3d MONTHS OF THE YEAR 3d MONTHS OF THE YEAR 3d MONTHS OF The YEAR 3d MONTHS OF THE YEAR 3d MONTHS OF THE YEAR 3d MONTHS OF THE YEAR 3d MONTHS OF THE YEAR 3d MONTHS OF THE YEAR 3d MONTHS OF THE YEAR 3d MONTHS OF THE YEAR 3d MONTHS OF THE YEAR 3d MONTHS OF THE YEAR 3d MONTHS OF THE YEAR 3d MONTHS OF THE YEAR 3d MONTHS OF THE YEAR 3dB MONTH NOS NOS NOS NOS NOS NOS NOS NOS NOS NOS NOS NOS NOS NOS NOS NOS NOS NOS NOS NOS NOS NOS NOS NOS NOS NOS NOS NOS NOS NOS NOS NOS NOS NOS NOS NOS NOS NOS NOS NOS NOS NOS NOS NOS NOS NOS NOS NOS NOS NOS NOSTS NOSTS NOSTS NOSTS NOSTS NOSTS NOSTS NOSTS NOSTS NOSTS NOSTS NOSTS NOSTS NOSTS NOSTS NOSTS NOSTS NOSTS NOSTS NOSTS NOSTS NOSTS NOSTS NOSTS NOSTS NOSTS NOSTS NOSTS NOSTS NOSTS NOSTS NOSTS NOSTS NOSTS | |||
BRANDT FRANCE, Etablissement de CERGY, 5/7 avenue des Béthunes, 95310 SAINT OUEN L'AUMÔNE. AT
CnpoüeHoro Túny 3 yctaHIM KaniTaIOM 100 000 000 εBpO, 3apecCTpoBaHe B ToproBOMy peecctpi KomepcaHTIB i
TOBAPICTB HAHTEPA πID HOMePOM 801 250 531.
n nn nnnnnnnnnnnnnnnnnnnnnnnnnnnnnnnnnnnnnnnnnnnnnnnnnnnnnnnnnnnnnnnnnnnnnnnnnnnnnnnnnnnnnnnnnnnnnnnnnnnnnnnnnnnnnnnnnnnnnnnnnnnnnnn
n nn nnnnnnnnnnnnnnnnnnnnnnnnnnnnnnnnnnnnnnnnnnnnnnnnnnnnnnnnnnnnnnnnnnnnnnnnnnnnnnnnnnnnnnnnnnnnnnnnnnnnnnnnnnnnnnnnnnnnnnnnnnnnnnnnn
n nn nnn nnn nnn nnn nnn nnn nnn nnn nnn nnn nnn nnn nnn nnn nnn nnn nnn nnn nnn nnn nnn nnn nnn nnn nnn nnn nnn nnn nnn nnn nnn nnn nnn nnn nnn nnn nnn nnn nnn nnn nnn nnn nnn nnn nnn nnn nnn nnn nnn nnn nann nann nann nann nann nann nann
www.de-dietrich.com
De Dietrich
CREATEURD'EMOTIONS DEPUIS 1684
4
7 1
7
7.
8 2
8.
11-9 3
- 1
10
11 (
16-12. 4
- 16.
19-18 5
18.
20 6
23-21 7
Tynwnnwny iynn - nian nnin
n nn nnnnnnnnnnnnnnnnnnnnnnnnn
inTuvuunnu nynnnn
y,nn nn n 197 1n nn nn nn nn .n
Dnwn ,nn nn nn - nn nn nn nn nn nn nn nn nn nn nn nn nn nn nn nn nn nn nn nn nn nn nn nn nn nn nn nn nn nn nn nn nn nn nn nn nn nn nn nn nn nn nn nn nn nn nn nn nn nn nn nn nn nn nn nn nn nn nn nn nn nn nn nn nn nn nn nn nn nn nn nn nn nn nn nn nn nn nn nn nn nn nn nn nn nn nn nn nn nn nn nn nn nn nn nn nn nn nn nn
D'NTN NNNN7X 1 X 1 NNIINN NNNN7X 1 X 1 NNTN NNNN NNNNIX 1 X 1 NNTN NNNN NNNN NNNN NNNN NNNN NNNN NNNN NNNN
Xxixin7 u,wnn ndy TIN 19N nn nn nn nn nn nn nn nn nn nn nn nn nn nn nn nn nn nn nn nn nn nn nn nn nn nn nn nn nn nn nn nn nn nn nn nn nn nn nn nn nn nn nn nn nn nn nn nn nn nn nn nn nn nn nn nn nn nn nn nn nn nn nn nn nn nn nn nn nn nn nn nn nn nn nn nn nn nn nn nn nn nn nn nn nn nn nn nn nn nn nn nn nn nn nn nn nn nn nn nn.

T T- y w 7 n nn 1 n D y d x T y,ny 8 nn ,nnnN nW IN NIN INNN,YYI O'ON IN Wn n n n nn n nn n nn n nn n nn n nn n nn n nn n nn n nn n nn n nn n nn n nn n nn n nn n nn n nn n nn n nn n nn n nn n nn n nn n nn n nn n nn n nn n nn n nn n nn n nn n nn n nn n nn n nn n nn n nn n nn n nn n nn n nn
Dy nnu D'77 yox 1X -
nnu D'77 wox 1X - .won
.ynwn x77 won nn pnn
Dxu XTI 177 y nxw 1
.ynwn D'77
:

nnnnn nn nnnn - nnnn nn nnnn .nnnnn nn nnnn nn nnnn nn nnnn nn nnnn nn nnnn nn nnnn nn nnnn nn nnnn nn nnnn nn nnnn nn nnnn nn nnnn nn nnnn nn nnnn nn nnnn nn nnnn nn nnnn nn nnnn nn nnnn nn nnnn nn nnnn nn nnnn nn nnnn nn nnnn nn nnnn nn
nTINXnNnNn7 n- .nnnnnnn nn7 ,n'niT DnDnInn7 Tn nTn - ninnnnn nn n 11, nTTI ninnnnn nn n n n n n n n n n n n n n n n n n n n n n n n n n n n n n n n n n n n n n n n n n n n nn.
77nnn nynn 097 - .Dna nny
wn nn nnnn nn nnnn nn nnnn nn nnnn nn nnnn nn nnnn nn nnnn nn nnnn nn nnnn nn nnnn nn nnnn nn nnnn nn nnnn nn nnnn nn nnnn nn nnnn nn nnnn nn nnnn nn nnnn nn nnnn nn nnnn nn nnnn nn nnnn nn nnnn nn nnnn nn nnnnn nn nnnn nn nnnn nn nnnn nn nnnn nn nnnn nn nnnn nn nnnn nn nnnn nn nnnn nn nnnn nn nnnn nn nnnn nn nnnn nn
IONX7 IN nnnn nn 1X .INn nn
DINTN 711,07 DINTN 77 unwnu .W7 .n nn yinn
:nn

wnnn nn nn nn nn nn nn nn nn nn nn nn nn nn nn nn nn nn nn nn nn nn nn nn nn nn nn nn nn nn nn nn nn nn nn nn nn nn nn nn nn nn nn nn nn nn nn nn nn nn nn nn nn nn nn nn nn nn nn nn nn nn nn nn nn nn nn nn nn nn nn nn nn nn nn nn nn nn nn nn nn nn nn nn nn nn nn nn nn nn nn nn nn nn nn nn nn nn nn nn nn gn nnnn nnnn nnnn nnnn nnnn nnnn nnnn nnnn nnnn nnnn nnnn nnnn nnnn nnnn nnnn nnnn nnnn nnnn nnnn nnnn nnnn nnnn nnnn nnnn nnnn nnnn nnnn nnnn nnnn nnnn nnnn nnnn nnnn nnnn
7 7
Xn,ynnn 7n nn - ninnn nnu ,ninn -y nnn -nn -nnn -nnn nn noin .n00
nwnnnn nix 1nnn-
Dnna Dnnu 9x nx
n 10 n97 w nn w u w w .nnon nn n nn ninn nn nn nn nn nn nn nn nn nn nn nn nn nn nn nn nn nn nn nn nn nn nn nn nn nn nn nn nn nn nn nn nn nn nn nn nn nn nn nn nn nn nn nn nn nn nn nn nn nn nn nn nn nn nn nn nn nn nn nn nn nn nn nn nn nn nn nn nn nn nn nn nn nn nn nn nn nn nn nn nn nn nn nn nn nn nn nn nn nn nn nn nn nn nn nn nn.
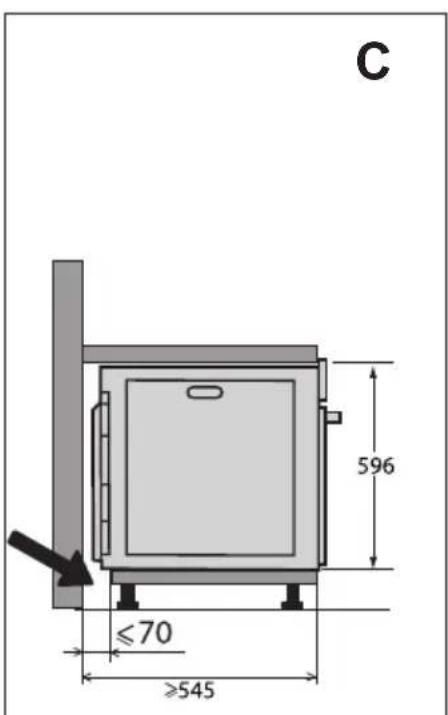
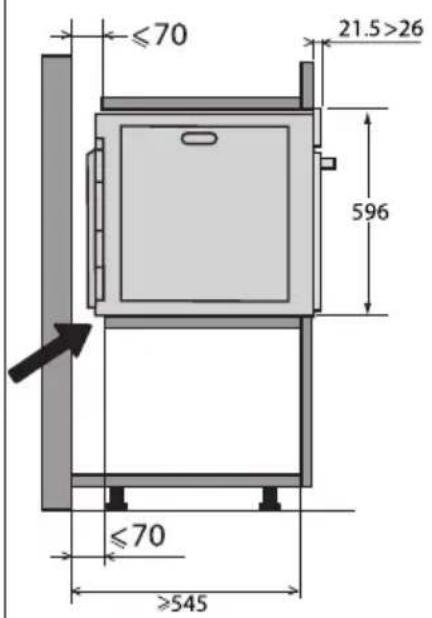
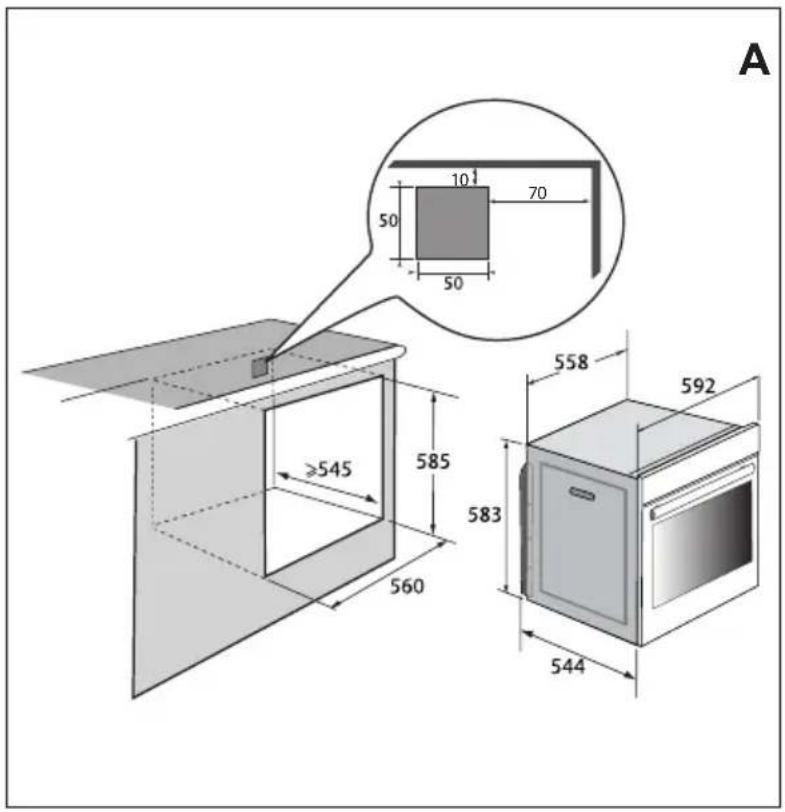

n nn (nn) n nn n nn nn nn nn nn nn nn nn nn nn nn nn nn nn nn nn nn nn nn nn nn nn nn nn nn nn nn nn nn nn nn nn nn nn nn nn nn nn nn nn nn nn nn nn nn nn nn nn nn nn nn nn nn nn nn nn nn nn nn nn nn nn nn nn nn nn nn nn nn nn nn nn nn nn nn nn nn nn nn nn nn nn nn nn nn nn nn nn nn nn nn nn nn nn nn nn nn nn nn nn
YIN IN NIN YN IN NNN ON IN IN IN IN IN IN IN IN IN IN IN IN
60Hz 50Hz
:

n nn nnnn nn nn nn nn nn nn nn nn nn nn nn nn nn nn nn nn nn nn nn nn nn nn nn nn nn nn nn nn nn nn nn nn nn nn nn nn nn nn nn nn nn nn nn nn nn nn nn nn nn nn nn nn nn nn nn nn nn nn nn nn nn nn nn nn nn nn nn nn nn nn nn nn nn nn nn nn nn nn nn nn nn nn nn nn nn nn nn nn nn nn nn nn nn nn nn nn nn nn nn nn
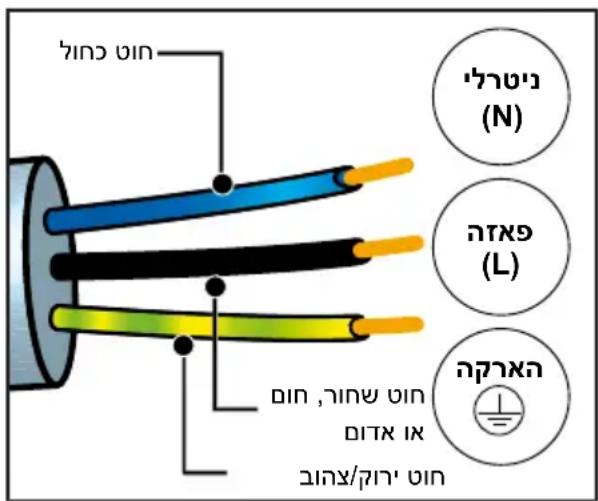
1
JONN NNN NNN NNN NNN NNN NNN NNN NNN NNN NNN NNN NNN NNN NNN NNN NNN NNN NNN NNN NNN NNN NNN NNN NNN NNN NNN NNN NNN NNN NNN NNN NNN NNN NNN NNN NNN NNN NNN NNN NNN NNN NNN NNN NNN NNN NNN NNN NNN NNN NNN NANN NNN NNN NNN NNN NNN NNN NNN NNN NNN NNN NNN NNN NNN NNN NNN NNN NNN NNN NNN NNN NNN NNN NNN NNN NNN NNN NNN NNN NNN NNN NNN NNN NNN NNN NNN NNN NNN NNN NNN NNN NNN NNN NNN NNN NNN NNN NNN NNN NNN Nnn
2 2n nnn nnn nnn nnn nnn nnn nnn nnn nnn nnn nnn nnn nnn nnn nnn nnn nnn nnn nnn nnn nnn nnn nnn nnn nnn nnn nnn nnn nnn nnn nnn nnn nnn nnn nnn nnn nnn nnn nnn nnn nnn nnn nnn nnn

100nn ,n nn nnnn nn nnnn nn nnnn
youn n
3 177n 77n 77n 77n (n+1ph+1N) 1.5 240~220 nnn nnn nnn nnn nnn nnn nnn nnn nnn nnn nnn
y 17 y 17 17 17 17 17 17 17 17 17 17 17 17 17 17 17 17 17 17 17 17 17 17 17 17 17 17
nnon nNx y nnw
n nn nnnnnnnnnnnnnnnnnnnnnnnnnnnnnnnnnnnnnnnnnnnnnnnnnnnnnnnnnnnnnnnnnnnnnnnnnnnnnnnnnnnnnnnnnnnnnnnnnnnnnnnnnnnnnnnnnnn
n nn nnnnnnnnnnnnnnnnnnnnnnnnnnnnnnnnnnnnnnnnnnnnnnnnnnnnnnnnnnnnnnnnnnnnnnnnnnnnnnnnnnnnnnnnnnnnnnnnnnnnnnnnnnnnnnnnnnnnnnnnnnnnnnnnnnnnnnnnnnnnnnnnnnnnnnnnn
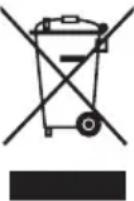
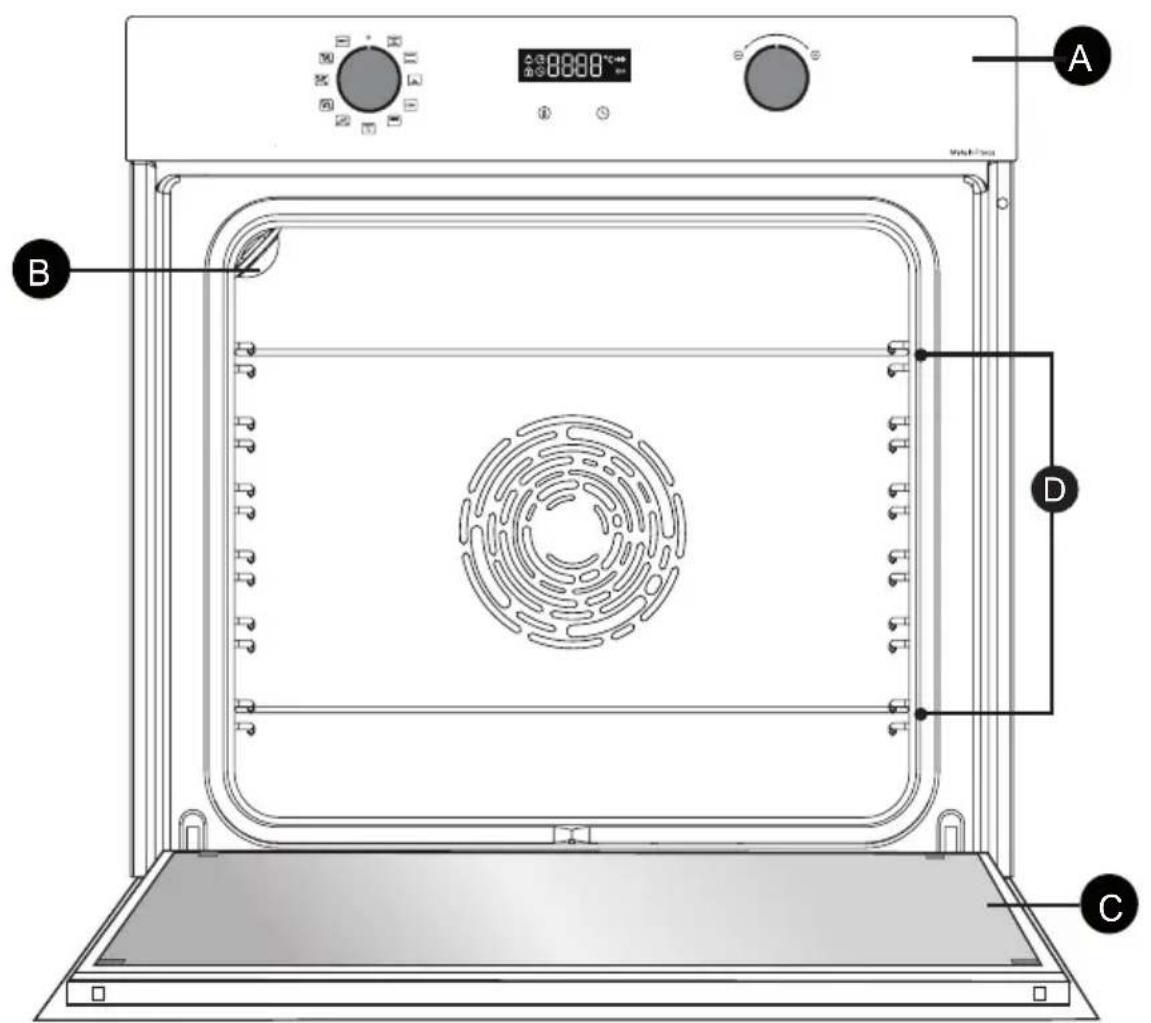
TIP'Nv

ninn

n7T

6 6
()

XnI D7
AA
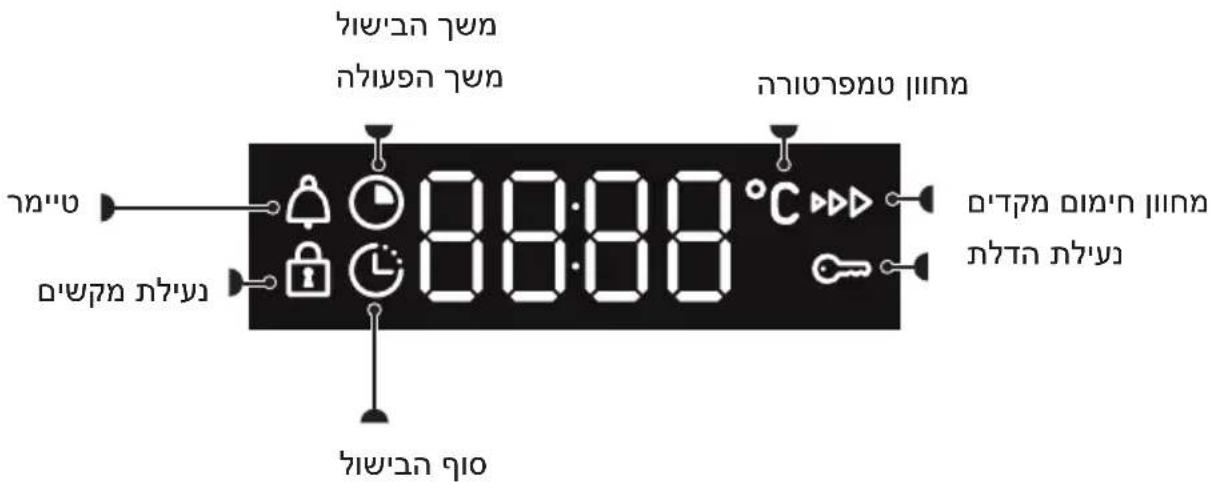
D

nniin

n nn nnnnnnn
()
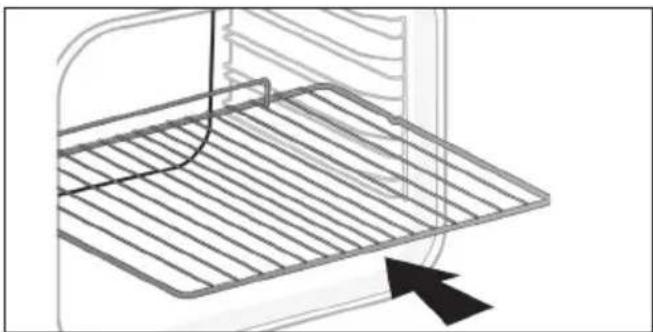
ninnnn ninn
n nn nnnn nnnn nnnn nnnn nnnn nnnn nnnn nnnn nnnn nnnn nnnn nnnn nnnn nnnn nnnn nnnn nnnn nnnn nnnn nnnn nnnn nnnn nnnn nnnn nnnn nnnn nnnn nnnn nnnn nnnn nnnn nnnn nnnn nnnn nn
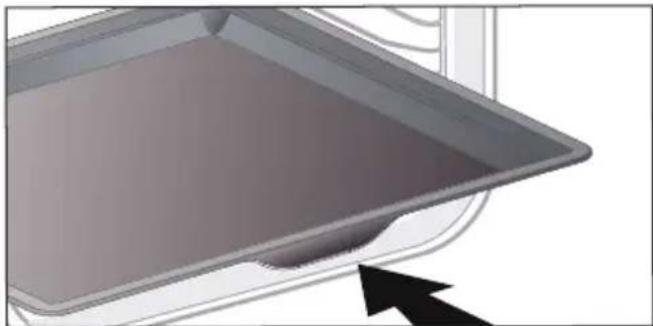
n"45 n'nn-
yXn nn nnn nn nn nn nn nn nn nn nn nn nn nn nn nn nn nn nn nn nn nn nn nn nn nn nn nn nn nn nn nn nn nn nn nn nn nn nn nn nn nn nn nn nn nn nn nn nn nn nn nn nn nn nn nn nn nn nn nn nn nn nn nn nn nn nn nn nn nn nn nn nn nn nn nn nn nn nn nn nn nn nn nn nn nn nn nn nn nn nn nn nn nn nn nn nn nn nn nn nn nn nn
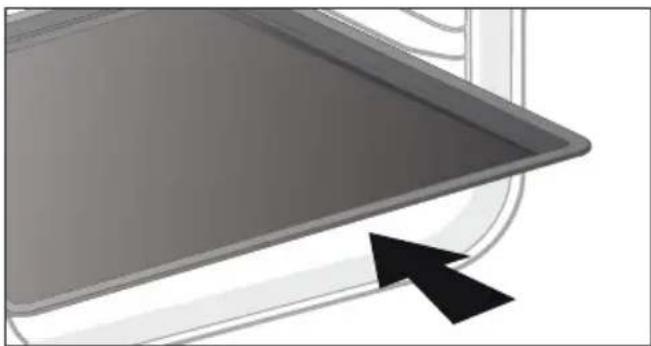
n"8nxnn
NnV,7177 7X T X .07nn nnn7 noonn .779x7,779
n nn nnn nn nnn nnn nnn nnn nnn nnn nnn nnn nnn nnn nnn nnn nnn nnn nnn nnn nnn nnn nnn nnn nnn nnn nnn nnn nnn nnn nnn nnn nnn nnn nnn nnn nnn nnn nnn nnn nnn
:xy

n"n 45
| AUTO 90 NNNN NNNN NNNN NNNN ON ON NNNN NNNN ECO | 1-5 |
| 2-5b | 3-5c |
| 4-5d | 5-cd |
y i n7, "i"n nn
n nn

471
4nn nn
,nnnn nnnn nn nnnn
nannnn
y

yinnn nn nnn 2019 nn pyn (1)
y, y, y
DnONN
.ynnn

275°C n'ynopn,35°C n'ynnnn
200°C: n7nn
777777777777
n nn nn nn nn nn nn nn nn nn nn nn nn nn nn nn nn nn nn nn nn nn nn nn nn nn nn nn nn nn nn nn nn nn nn nn nn nn nn nn nn nn nn nn nn nn nn nn nn nn nn nn nn nn nn nn nn nn nn nn nn nn nn nn nn nn nn nn nn nn nn nn nn nn nn nn nn nn nn nn nn nn nn nn
7
.
EN 60350-1 nnnn nn nnnn
nnn nn nnnnnnnnnnnnnnnnnnnnnnnnnnnnnnnnnnnnnnnnnnnnnnnnnnnnnnnnnnnnnnnnnnnnnnnnnnnnnnnnnnnnnnnnnnnnnnnnn
.EU/65/2014 nnnn
500 500 n nn nn nn nn nn nn nn nn nn nn nn nn nn nn nn nn nn nn nn nn nn nn nn nn nn nn nn nn nn nn nn nn nn nn nn nn nn nn nn nn nn nn nn nn nn nn nn nn nn nn nn nn nn nn nn nn nn nn nn nn nn nn nn nn nn nn nn nn nn nn nn nn nn nn nn nn nn nn nn nn nn nn nn nn nn nn nn nn nn nn nn nn nn nn nn nn nn nn nn
wn nn nn
-+ nTn by nx'ny 1y onnn nn nn -+ nTn nynxyn nn nn
n nn nnnnnnnnnnnnnnnnnnnnnnnnnnnnnnnnnnnnnnnnnnnnnnnnnnnnnnnnnnnnnnnnnnnnnnnnnnnnnnnnnnnnnnnnnnnnnnnnnnnnnnnnnnnnnnnnnnnnnnnnnnnnnnnnnnnnnnnnn
- DINX DIN NNNY 7D NINN NNNN
n7onnn 2-7
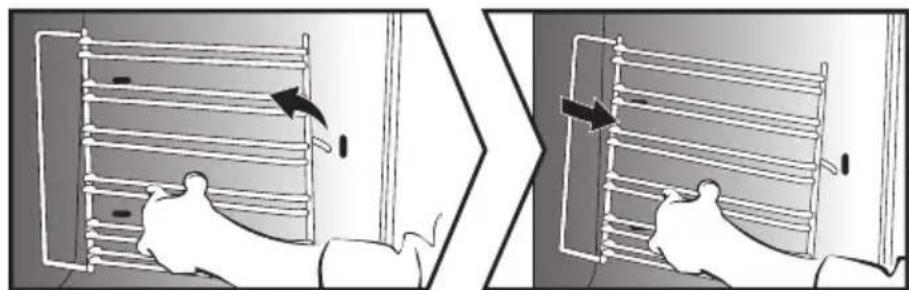
n7nn nOIOI p
n7 n7nn 007n nn nn nn nn nn nn
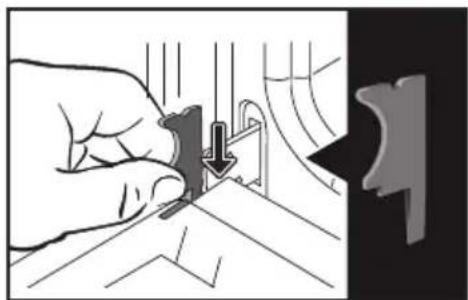
nNnNnNnT20)Ou nn nnnnnnnnnnnnnnnnnnnnnnnnnnnnn
.
iinnnnn

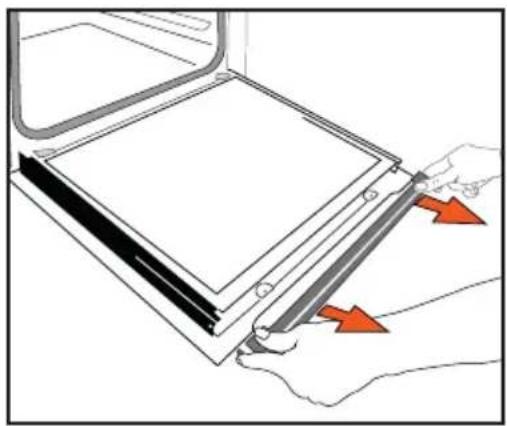
n nn n nn nn nn nn nn nn nn nn nn nn nn nn nn nn nn nn nn nn nn nn nn nn nn nn nn nn nn nn nn nn nn nn nn nn nn nn nn nn nn nn nn nn nn nn nn nn nn nn nn nn nn nn nn nn nn nn nn nn nn nn nn nn nn nn nn nn nn nn nn nn nn nn nn nn nn nn nn nn nn nn nn nn nn nn nn nn nn
nwnnn
n nn nnnnnnnnnnnnnnnnnnnnnnnnnnnnnnnnnnnnnnnnnnnnnnnnnnnnnnnnnnnnnnnnnnnnnnnnnnnnnnnnnnnnnnnnnnnnn
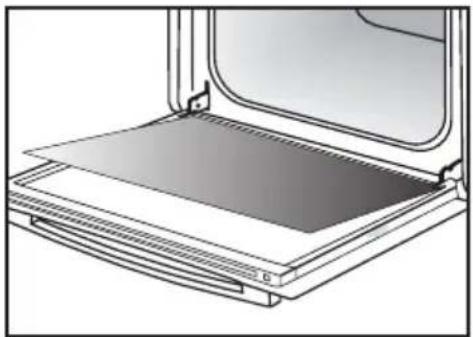
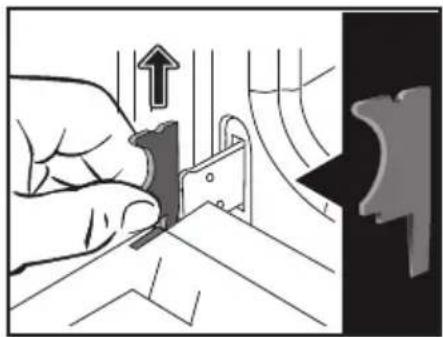
mnnn
:

yynnnn nn ynnn nnnnnnnnnnnnnnnnnnnnnnnnnnnnnnnnnnnnnnnnn
n nn
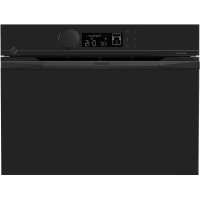
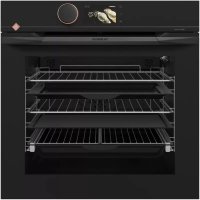
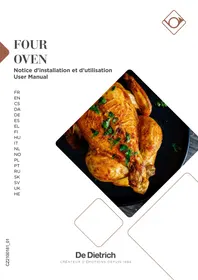
- - Plat multi usages 45mm
- RELATIONS CONSOMMATEURS
- DEAR CUSTOMER,
- IMPORTANT SAFETY ADVICE AND PRECAUTIONS. 4
- IMPORTANT SAFETY INSTRUCTIONS - READ CAREFULLY AND KEEP FOR FUTURE USE.
- Important
- WARNING:
- CHOICE OF LOCATION AND FITTING
- Tip
- ELECTRICAL CONNECTION
- Important:
- CARING FOR THE ENVIRONMENT
- DESCRIPTION OF YOUR APPLIANCE
- THE CONTROLS AND DISPLAY
- ACCESSORIES (DEPENDING ON MODEL)
- - Anti-tip safety rack
- - 45 mm multi-purpose drip tray
- mm pastry sheet
- TIP:
- SLIDING RAIL SYSTEM (DEPENDING ON MODEL)
- INSTALLING AND REMOVING THE SLIDING RAILS
- USING YOUR APPLIANCE
- SETTINGS
- Changing the time
- Timer
- KEYPAD LOCK (CHILD SAFETY DEVICE).
- SETTINGSMENU
- Trad ventilated*
- Traditional
- Pulsed bottom
- Eco*
- High grill
- Pulsed grill
- Bread
- Automatic functions:
- Poultry
- Fish
- White meat
- START A COOKING PROGRAMME
- For manual functions:
- Changing the temperature
- Changing the cooking time
- "Smart Assist" system
- Changing the cooking end time
- CARE
- CLEANING THE INSIDE AND OUTSIDE
- Cleaning the cavity
- Cleaning the outer surfaces
- Cleaning the shelf runners
- Removing the oven door glass panels
- Re-assembling the door
- COOKING TIPS
- TILBEHØR (IFØLGE MODELLEN)
- - Sikker rist, der/DDke vipper
- AEndring at temperature
- ZUBEHÖR (JE NACH MODELL)
- BESCHRIJVING VAN UW APPARAAT
- DE BEDIENINGSKNOPPEN EN HET DISPLAY
- DE ACCESSOIRES (AFHANKELIJK VAN HET MODEL)
- KJAERE KUNDE,
- GLIDESKINNER (AVHENGIG AV MODELL)
- SZANOWNI KLIENCI!
- WYBÓR MIEJSCA INSTALACJI I WBUDOWANIA
- BAXHBIE INHCTPYKUNI NO TEXHNKE BE3ONACHOCTN IN IPEDOCTEPEXEHNA 4
- BAKHBIE INHCTPYKUNI NO TEXHNIKE B3OJACHOCTN: BHIMATEJIbHO IPOYTTE N COXPAHNTE JIЯ NCIOJIb3OBAHNA B DAJIbHEIShEM.
- BaxHo!
- ПЕДОCTEPEХЕНЕ.
- ПЕДОCTEPEЖЕНЕ.
- PEKOMEHДAUJIY.
- .3 OIIINCAHNE BAIIIEIIO IIPNBEOPA
- CNCTEMA BbIDBnKhbIX HANPABJIIOUx (B 3ABCIMOCTN OT MODEJIIN)
- YCTAHOBKA IN DEMOHTAX BbIDBnKhblx HANPABJIIOUx
- KoHBeKzNoHHbI peXIM
- BepxHnHaRpeB
- 3ko\*
- PnIb BbICOKO MOHOCTH
- Pb16a
- Bénoe Mýco
- IIPABNJA 3KCIJYATAIIN
- HauJIO PnIroTOBJIeHnJ
- Hauano 6e3oTnaIaTeIbHoro npnroToBJeHnra
- .5yXoI
- OuNCTKA BHYTPN IN CHAPYXIN
- OuNTka KaMepbl
- OuNCTka BHeUHeN NOBepXHOCTN
- OuNCTka npOBJIoUHbIX peWeTOK
- OuNcTkca cTeKoJ DBePcbI
- OuNCTka BHeUHHei NOBepXHocTn
- YctaHOBka DBepuHa MeCTO
- VAL AV PLACERING OCH INBYGGNAD
- IIAHOBHNI KJIIEHTE!
- BAKJIINBI INPABUNA TEXHIKN 6E3NEKN 3ANOBIXHI 3AXOIN
- BAJKINBI INPABUNA TEXHIKN 6E3NEKN - YBAJKHOPOCHNTAE N 3BEPEKITb IJIЯ NODAJBWOROBVKOPNCTAHNJa.
- Baxnbo!
- 3ACTEPEXHEHHJ.
- 3ACTEPEXEHHY
- BMBIP MICZIДР O3TALUBAHNY UbOByAHN
- ПД'ЕДHAHHЯ DO ELEKTPOMEPEXI
- 3AXNCT HABKOLINHbOTO CEPEIOBUNA
- OPRAHNYPABJIHHYTAДИСПЛЕI
- AKCECYAPN (3AJEXKHO BID MODEJI)
- - Pewitka i3 3axnctom Bid nepeknndaHna
- - BaratoicboBe Deko 3aBTOBukn 45 MM
- Taimep
- БЛOKУBAHHЯ KHONOK (БЛOKУBAHHЯ BIDДITEИ)
- MEHIO HAJIAUHTYBAHb
- IpepePbUaCTe HxHc HarpiBaHHa
- PnB BnCOKoI nOtYxHocTi
- IpeepBvactn rpnJIb
- Xn
- ABTomatnuyi pexumn.
- ПТИЦА
- Pn6a
- Bile m'roco
- EKCIJYATAIII IIPNCTPOIO
- ПОЧАТOK ПИГOTУBAHHЯ
- 3anyck pexmy HeBiknaHoro npnroTyBaHHa
- Дл рунх ржимь:
- 3MiHeHHa TemnepaTpyn
- EKCIJIYATAIII IIPNCTPOIO
- 3mHeHHaNocti
- Функци Smart Assist
- 3mHeHHaCy 3aBepseHH npiroTyBaHH
- OuHsEHnBHyTPiHbOiT A 3OBHIshHbOI NOBEPXHI
- OuHHeHHaKepeN dYxOBoi wa
- OuHHeHHa 3OBHiHbOi nobepxhi
- Tynwnnwny iynn - nian nnin
- :
- 1
- youn n
- nnon nNx y nnw
- ()
- ninnnn ninn
- n"45 n'nn-
- n"8nxnn
Brand : DE DIETRICH
Model : DOH4334B
Category : Built-in oven