Canvio for Smartphone - External hard drive TOSHIBA - Free user manual and instructions
Find the device manual for free Canvio for Smartphone TOSHIBA in PDF.

User questions about Canvio for Smartphone TOSHIBA
0 question about this device. Answer the ones you know or ask your own.
Ask a new question about this device
Download the instructions for your External hard drive in PDF format for free! Find your manual Canvio for Smartphone - TOSHIBA and take your electronic device back in hand. On this page are published all the documents necessary for the use of your device. Canvio for Smartphone by TOSHIBA.
USER MANUAL Canvio for Smartphone TOSHIBA
User's Manual CANVIO for Smartphone
EN HR RU
CZ HU SE
DE IT SK
DK NL SL
ES NO TR
FI PL AR
FR PT
GR RS
Regulatory statements
CE Compliance

This product is CE marked in accordance with the requirements of the applicable EU Directives. Responsible for CE marking is Toshiba Electronics Europe GmbH, Hansaallee 181, 40549 Düsseldorf, Germany.
Working Environment
The Electromagnetic Compliance (EMC) of this product has been verified typically for this product category for a so called Residential, Commercial & Light Industry Environment. Any other working environment has not been verified by Toshiba and the use of this product in these working environments is maybe restricted or cannot be recommended. Possible consequences of the use of this product in non-verified working environments can be: Disturbances of other products or of this product in the nearby surrounding area with temporary malfunction or data loss/corruption as result. Example of non-verified working environments and related advices:
Industrial environment (e.g. where 3-phase 380V mains is being used mainly): Danger of disturbances of this product due to possible strong electromagnetic fields especially near to large machinery or power units.
■ Medical environment: Compliance with the Medical Product Directive has not been verified by Toshiba, therefore this product cannot be used as a medical product without further verification. Utilisation in usual office environments e.g. in hospitals should be no problem if there is no restriction imposed by the responsible administration.
■ Automotive environment: Please refer to owner instructions for the related vehicle for information regarding the use of this product (category).
Aviation environment: Please follow flight personnel instructions regarding restrictions on use.
Additional Environments not related to EMC
- Outdoor use: As typical home/office equipment this product has no special resistance against ingress of moisture and is not protected against shocks.
- Explosive atmosphere: The use of this product in an explosive working environment (Ex) is not allowed.
The following information is only valid for EU-member States:
REACH - Compliance Statement
The new European Union (EU) chemical regulation, REACH (Registration, Evaluation, Authorisation and Restriction of Chemicals), entered into force on 1 June 2007.
Toshiba will meet all REACH requirements and is committed to providing our customers with information about the chemical substances in our products according to REACH regulations.
Disposal of products
natural_image
Symbol of a trash bin crossed with no text or numbers, representing waste sorting or disposal (no text present)The use of the symbol indicates that this product may not be treated as household waste. By ensuring this product is disposed of correctly, you will help prevent potential negative consequences for the environment and human health, which could otherwise be caused by inappropriate waste handling of this product. For more detailed information about recycling of this product, please contact your local authority, your household waste disposal service or the shop where you purchased the product.
Safety icons
This manual contains safety instructions that must be observed to avoid potential hazards that could result in personal injuries, damage to your equipment, or loss of data. Safety information has been classified according to the seriousness of the risk, and icons highlight these instructions as follows:
| Signal Words Meaning | |
| DANGER | Indicates an imminently hazardous situation which, if not avoided, will result in death or serious injury. |
| WARNING | Indicate a potentially hazardous situation which, if not avoided, could result in death or serious injury. |
| CAUTION | Indicate a potentially hazardous situation which, if not avoided, could result in minor or moderate injury. |
| NOTICE | Indicates practices that may cause property damage and other problems, but not personal injury. |
| NOTE | Provides important information |
| *Serious injury including blindness, wounds, burns (low and high temperature), electric shock, fractures, and poisoning, etc. with long-lasting effects or that require hospitalisation and/or long-term hospital visits for treatment.*Minor or moderate injury includes wounds, burns, electric shock, etc. not requiring hospitalisation and/or long-term hospital visits for treatment.*Property damage means damage to device. | |
Other icons used
Additional icons highlight other helpful or educational information:
 | TECHNICAL NOTE: This icon indicates technical information about the device. |
 | HINT: This icon indicates helpful hints and tips. |
 | DEFINITION: This icon indicates the definition of a term used in the text. |
Table of Contents
Introduction...... EN-6
Overview...... EN-6
Features...... EN-6
Chapter 1 1-1 Check the components...... EN-7
1-2 Get to know your CANVIO for Smartphone...... EN-7
1-3 LED Indicator...... EN-8
Chapter 2 Get Started with your Android™ Smartphone ...... EN-9
2-1 Download & Install Android™ App ...... EN-9
2-2 Connect to your Android™ Device ...... EN-9
2-3 Start App ...... EN-10
2-4 Initial set up ...... EN-11
2-5 Top Menu ...... EN-13
2-6 Photo/Videos Menu EN-14
2-7 Music/Documents Menu....EN-18
2-8 Quick Phone to Phone Transfer Menu...... EN-22
2-9 Settings Menu / Help Menu...... EN-30
2-10 Auto Backup / Charge Function ...... EN-35
2-11 Manual Charge Function......EN-37
Chapter 3 Get Started with your Windows® PC...... EN-38
3-1 Connect with your Windows® PC ...... EN-38
3-2 Dismount and disconnect from your Windows® PC...... EN-39
Instructions for Safety and Comfort...... EN-40
TOSHIBA Support ...... EN-44
Notices...... EN-44
Introduction
Overview
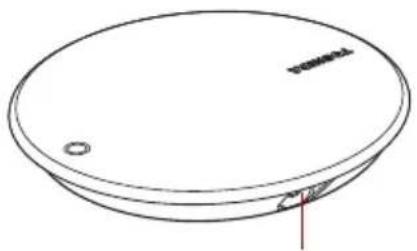
Toshiba CANVIO for Smartphone.
Components
The CANVIO for Smartphone includes the following components:
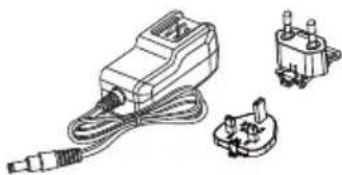
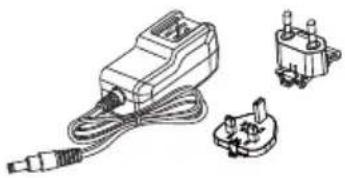
■ AC adapter, Plug (EU+UK)
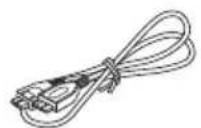
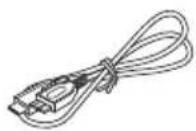
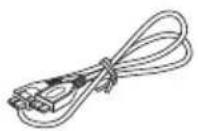
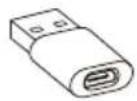
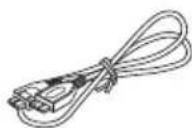
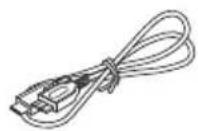
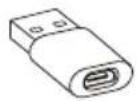
USB 2.0 Micro-B Cable
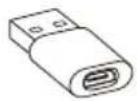
USB 2.0 Type-C™ Cable
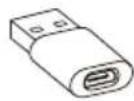
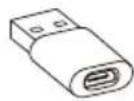
USB Micro-B - Type-A Adapter
Quick Start Guide
Features
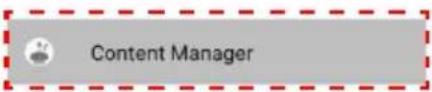
■ Backing up music, video, picture, contact data from your Android phone to CANVIO for Smartphone using the specified app, called Content Manager.
■ Access stored music, video, picture data in CANVIO for Smartphone using the specified App.
■ Charges your Android phone after Automatic Backup.
Hardware specifications
| Storage format NTFS | ||
| Compatibility PC | Windows® 7, 8.1, 10 | |
| Android smartphones | Refer to the URL belowwww.toshiba-personalstorage.net/rd/cfscomp | |
NOTICE
The operating method may differ from what is shown depending on the application version, your smartphone etc.
Chapter 1
1-1 Check the components
Please check the components.
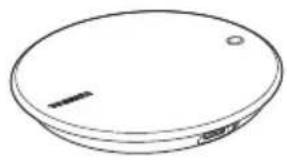
natural_image
Simple line drawing of a circular object with a small protrusion and a small hole, resembling a lid or cover (no text or symbols)CANVIO for Smartphone

USB 2.0 Micro-B cable

USB 2.0 Type-C™ cable

USB Micro-B - Type-A adapter

natural_image
Line drawing of a mechanical electrical connector with three components (no text or symbols)AC adapter (EU + UK)

Quick Start Guide
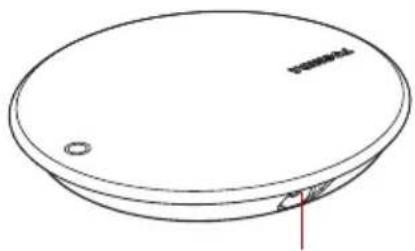
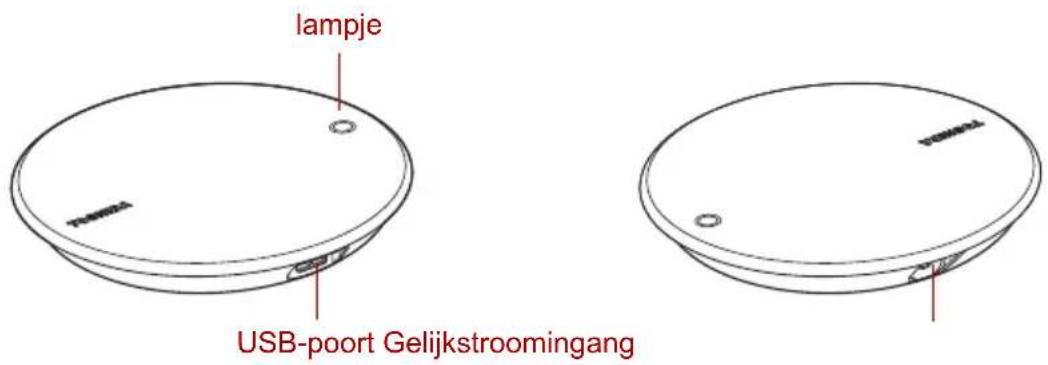
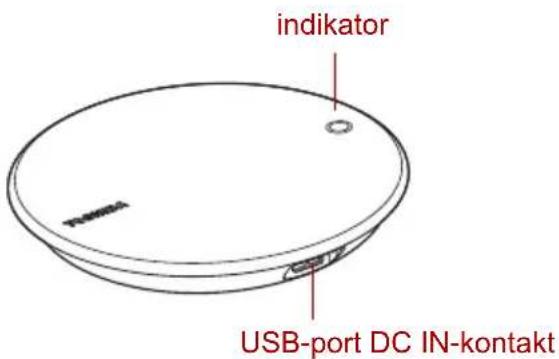
1-2 Get to know your CANVIO for Smartphone
Front Back
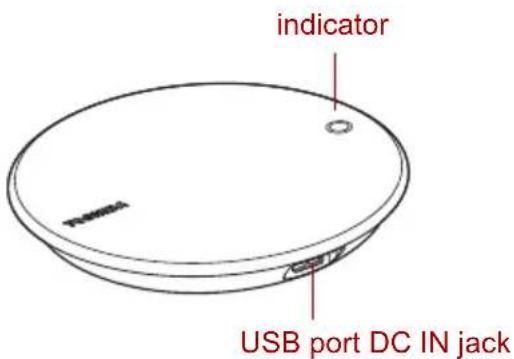
natural_image
Simple line drawing of a circular object with a small hole and a small mark, no text or symbols present.1-3 LED Indicator
The LED indicator lights as follows:
| LED indicator System status | |
| No lighting Power off / Sleep | |
| Blue / Steady (no blinking) Power on / Idle | |
| Blue / Blinking Accessing device | |
| Orange / Steady (no blinking) Charging your smartphone |
NOTICE
Do not disconnect the USB cable and AC adapter while the HDD is being accessed, as this may result in loss of data or damage to the drive.
Chapter 2
Get Started with your Android™ Smartphone
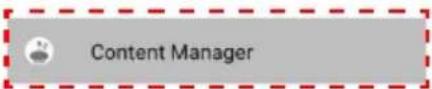
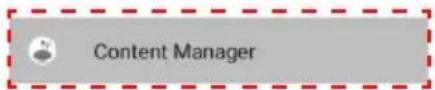
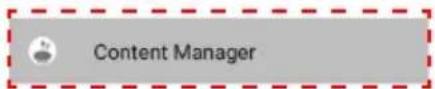
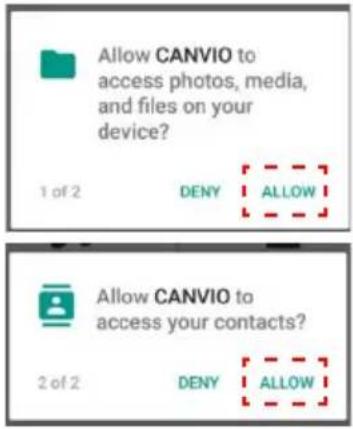
2-1 Download & Install Android™ App
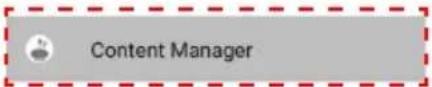
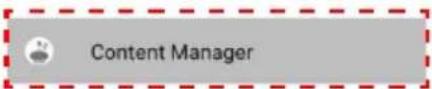
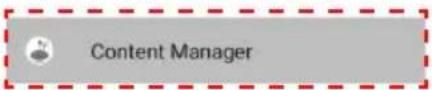
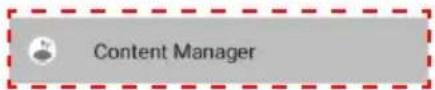
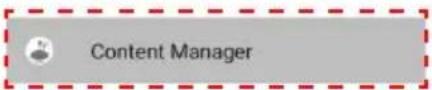
Please download the "Content Manager" app from the Google Play™ Store, and install it to your Android™ device.

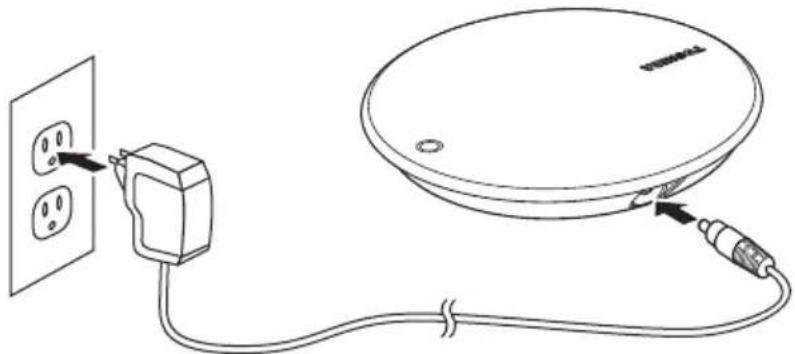
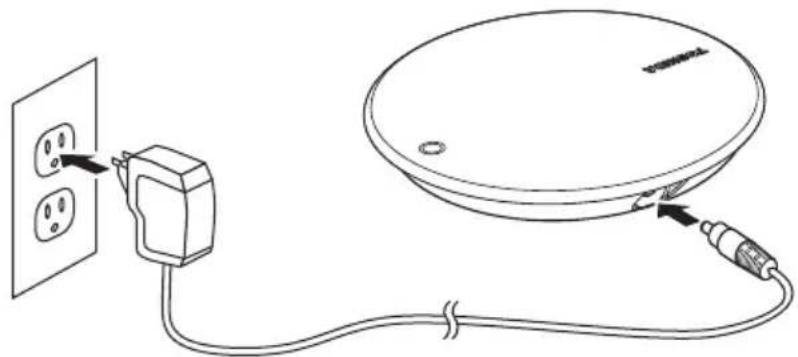
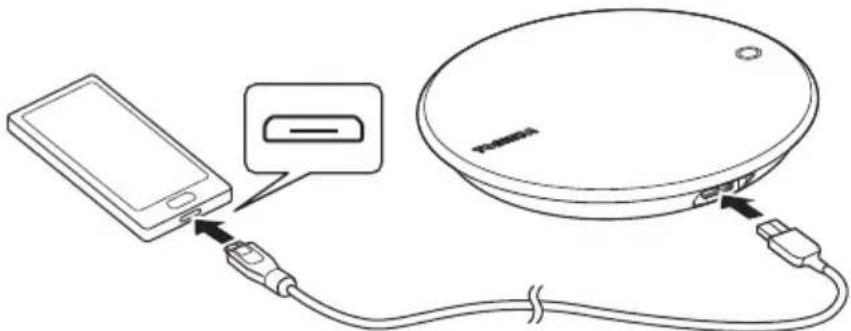
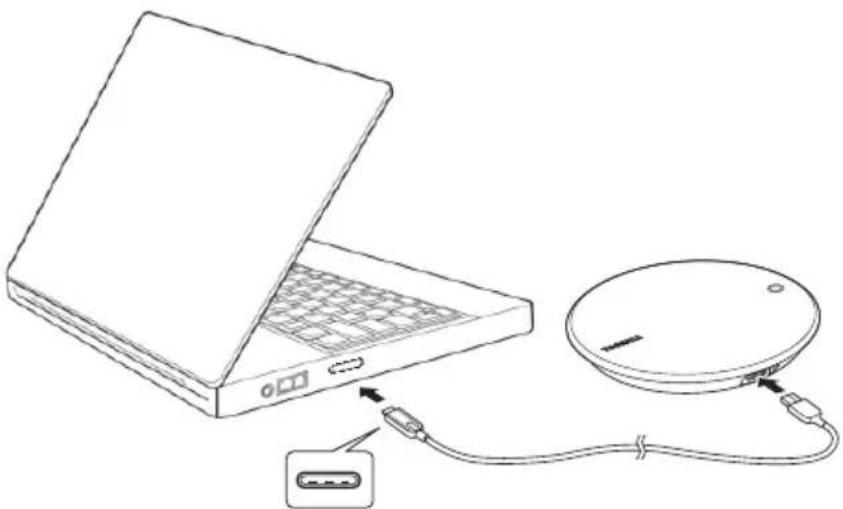
2-2 Connect to your Android™ Device
Basic Setup
- Plug the AC adapter into a power outlet.
- Plug the DC jack into a "CANVIO for Smartphone".
natural_image
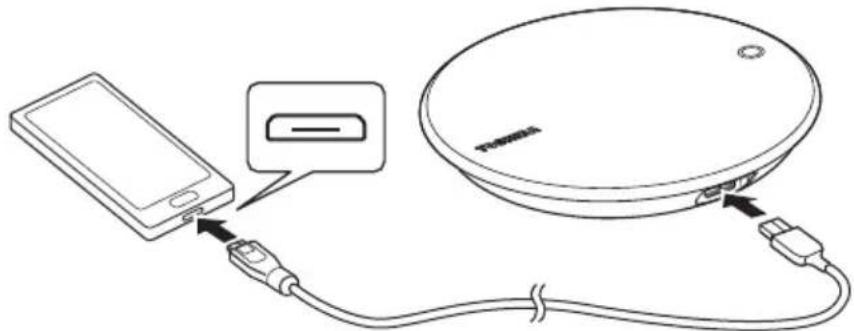
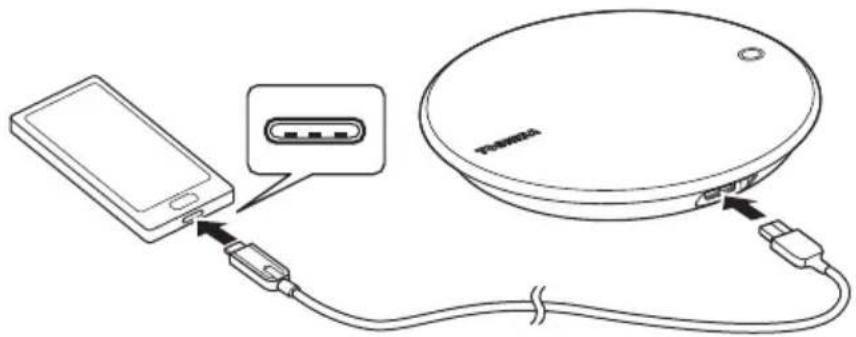
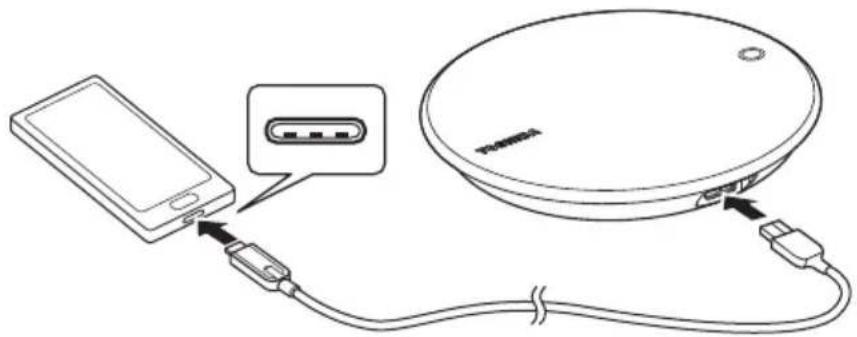
Line drawing of a cable and socket installation with an electrical outlet (no text or symbols)(a) If your Android™ device has a "Micro-B" type USB connector, connect to "CANVIO for Smartphone" with a USB 2.0 Micro-B cable.
natural_image
Diagram showing a smartphone connected to a circular device via cable, with no visible text or symbols.(b) If your Android™ device has a "Type-C" connector, connect to "CANVIO for Smartphone" with a USB 2.0 Type-C™ cable.

natural_image
Diagram showing a smartphone connected to a circular device via cable, with a separate connector pinout (no text or symbols present)2-3 Start App
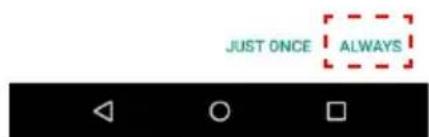
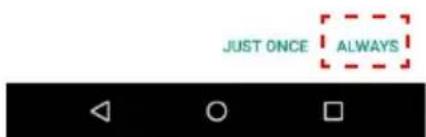
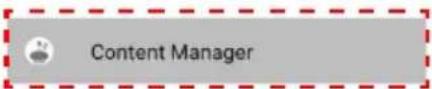
Tap the "Content Manager" app icon displayed in your smartphone.

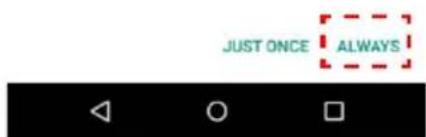
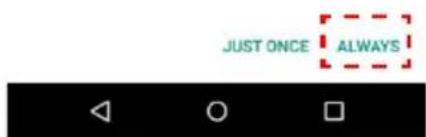
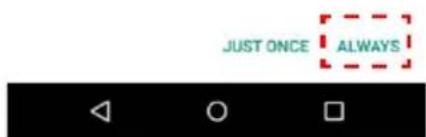
NOTICE
Toshiba recommends using "ALWAYS" as the "Content Manager" app setting.
Choose an app for the USB device
JUST ONCE ALWAYS

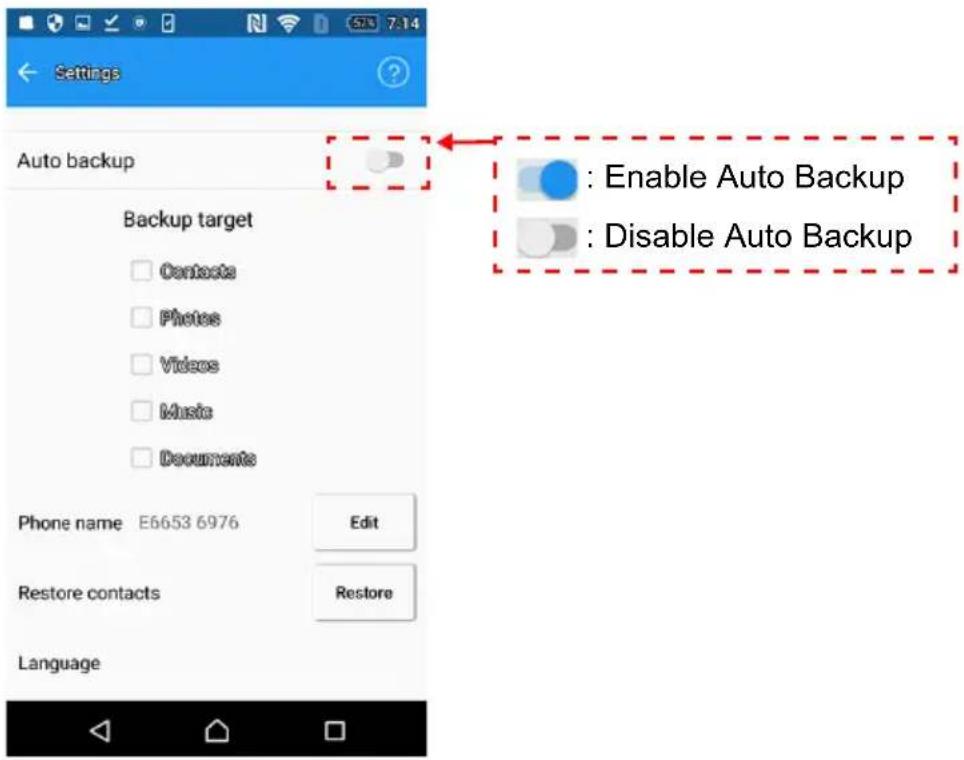
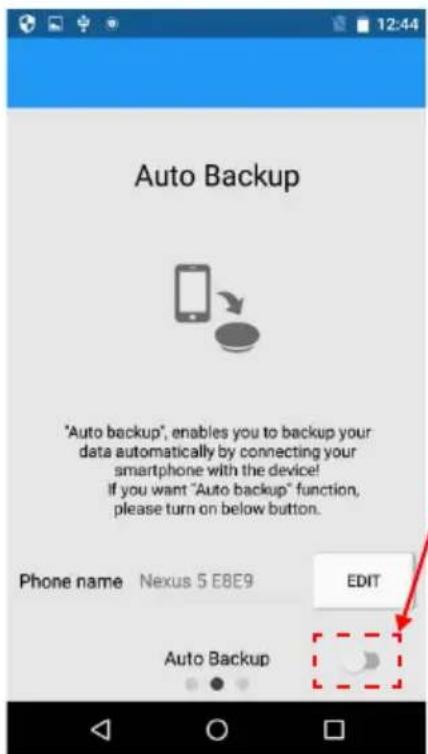
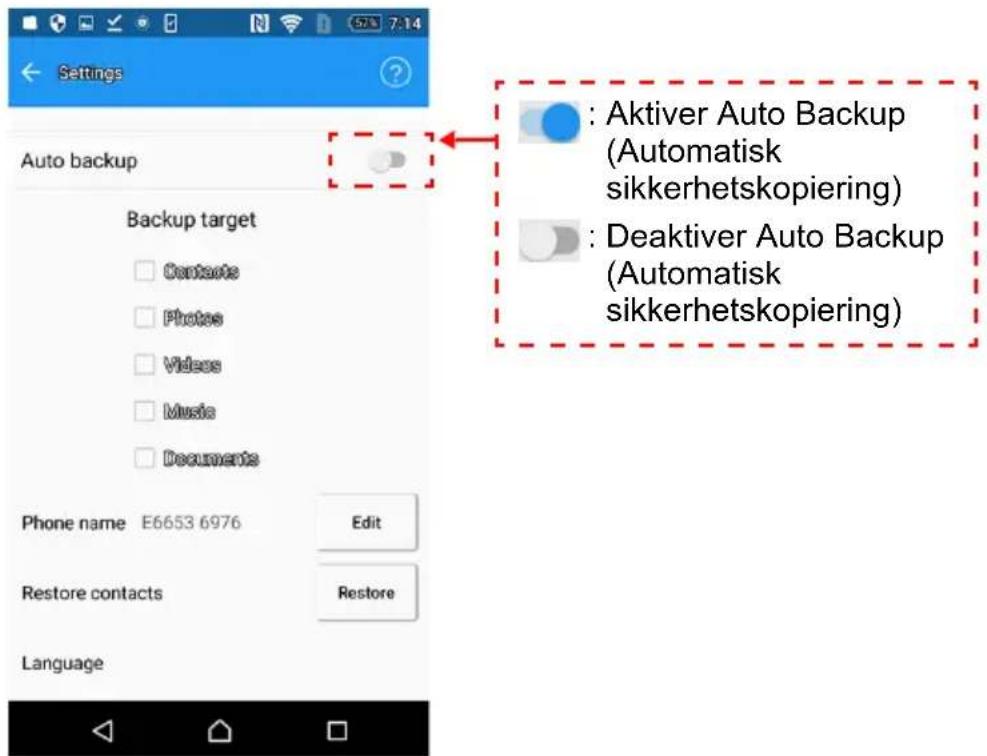
2-4 Initial set up
- Please read the message and swipe from right to left.
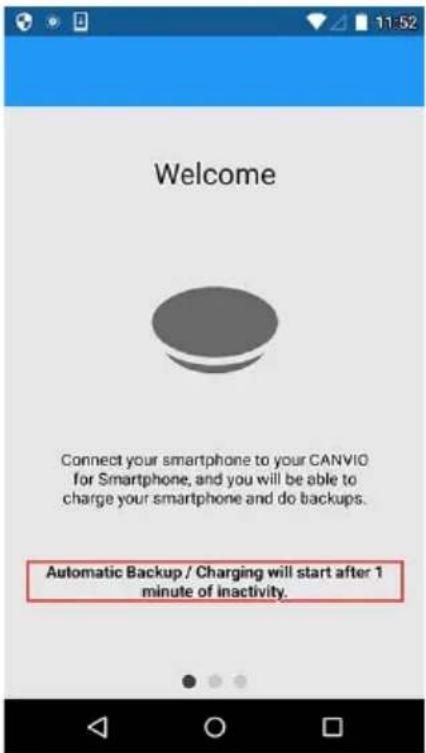
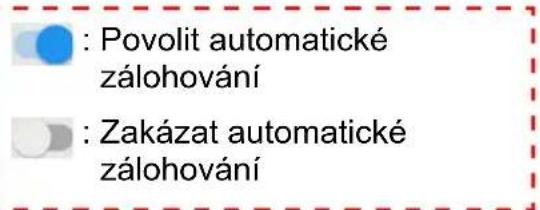
- Please read the message and choose the "Auto backup" setting.
If you do not select "Enable Auto Backup", this product won't charge your smartphone.
After initial setup it is possible to change the "Auto Backup" setting later in the "Settings" menu.
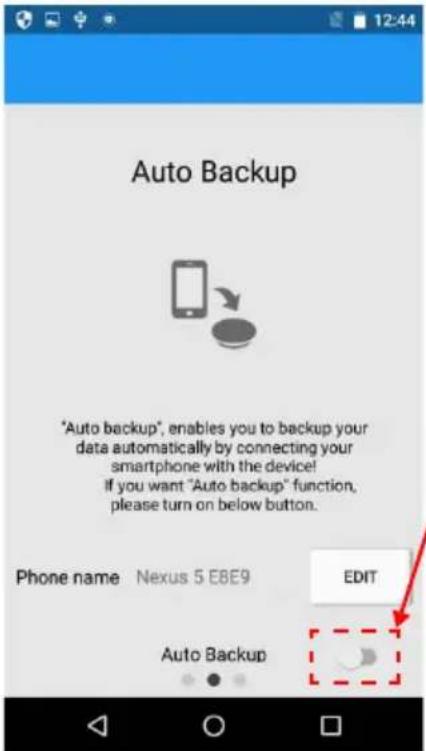
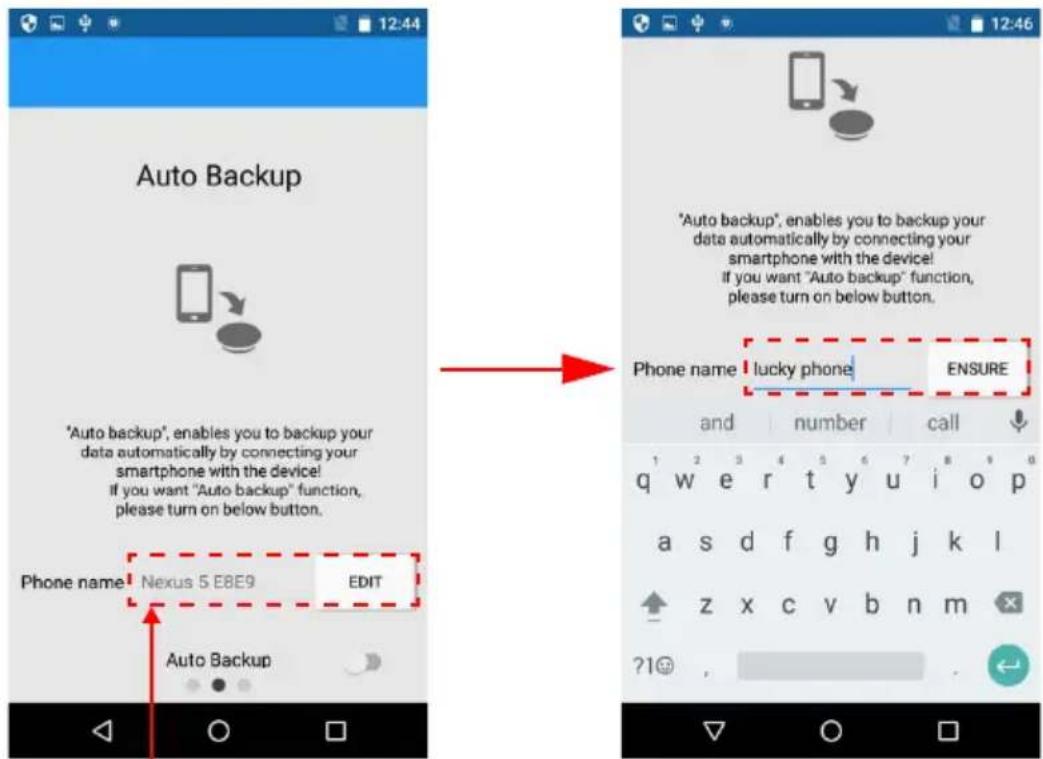
- If you want to change the phone name, tap "EDIT".
After editing your unique name, tap "ENSURE".
After selection, swipe from right to left.
*) Phone name is visible to other users.
You can change your unique phone name which is visible to other users. After initial setup it is possible to change the "Auto Backup" setting later in the "Settings" menu.
©
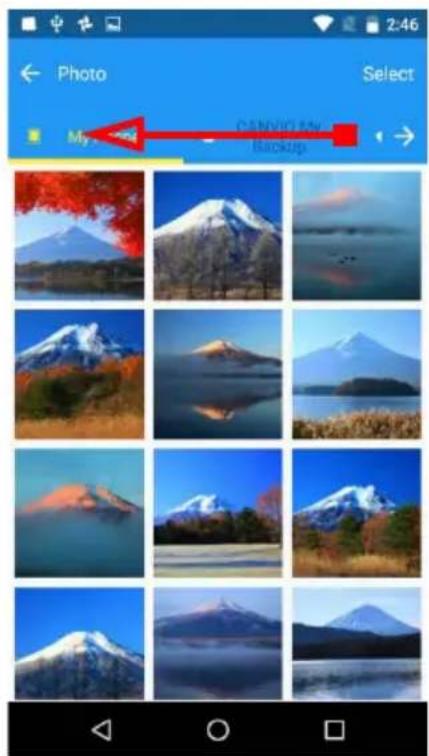
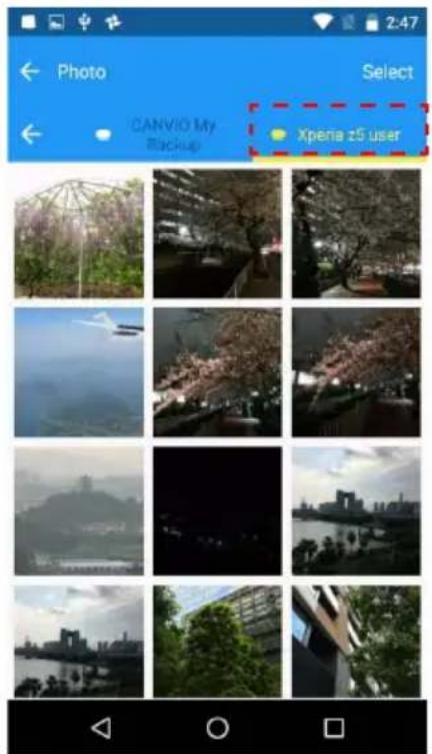
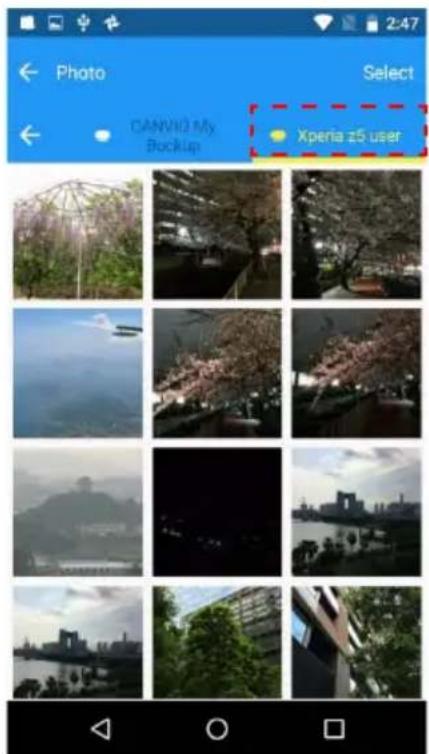
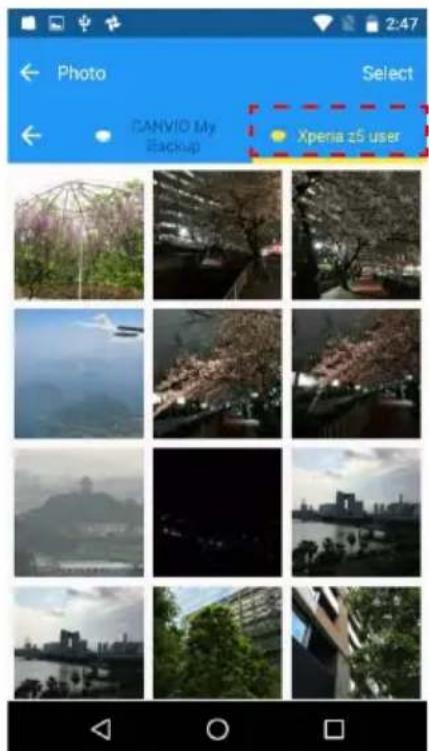
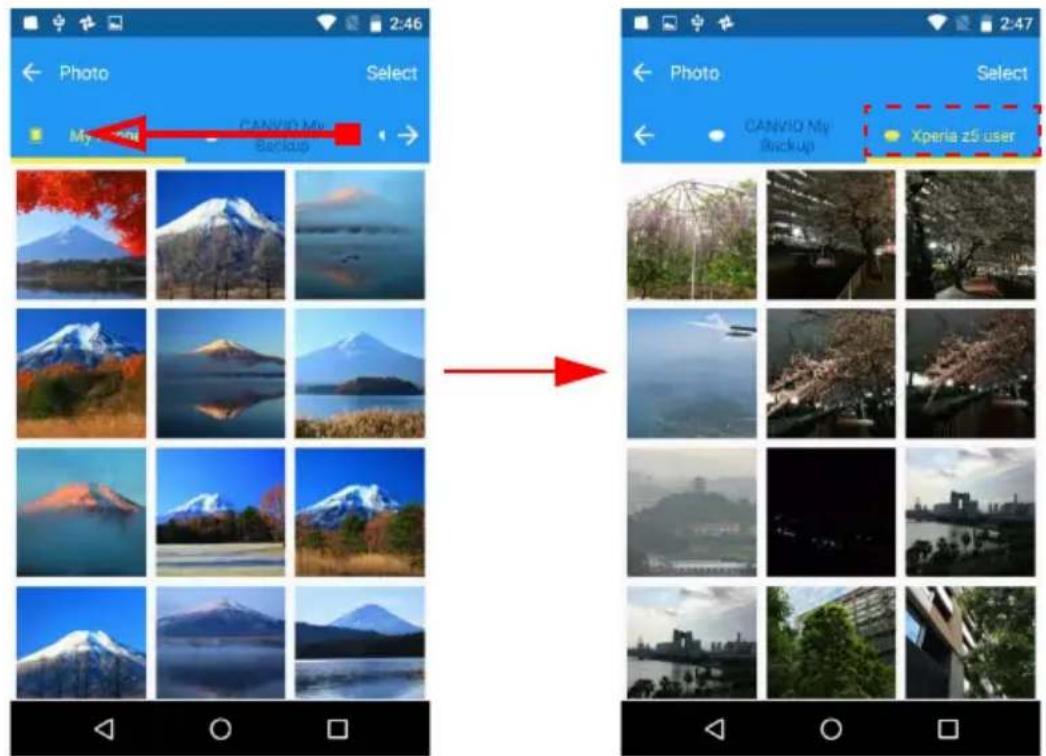
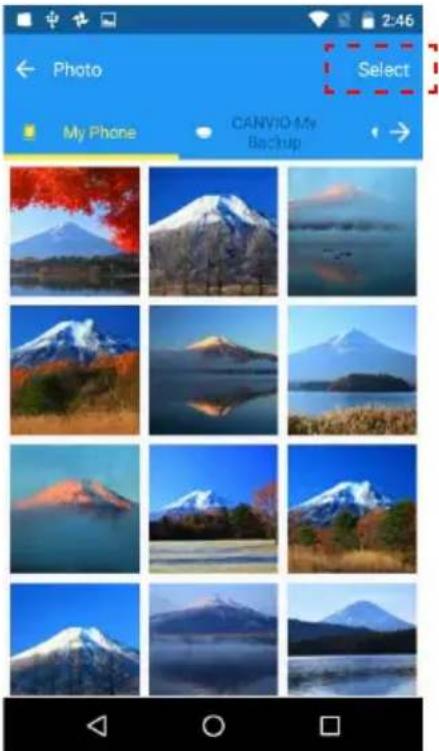
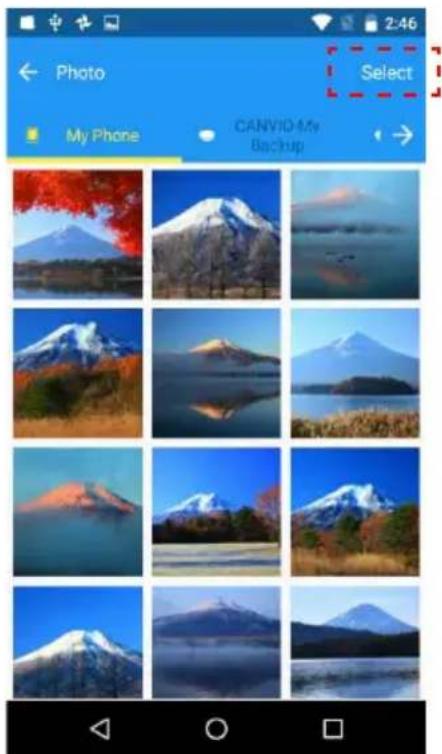
2-6 Photo/Videos Menu
1. Photo/Videos Menu
You can manage photo and video files on the Photos/Videos Menu.

-
Tap to select phone or backup folder
-
Photos/Videos thumbnails
To show hidden content, swipe from right to left in the selection tab area.

2. Open a file
To open the target file, tap thumbnail and select external app.
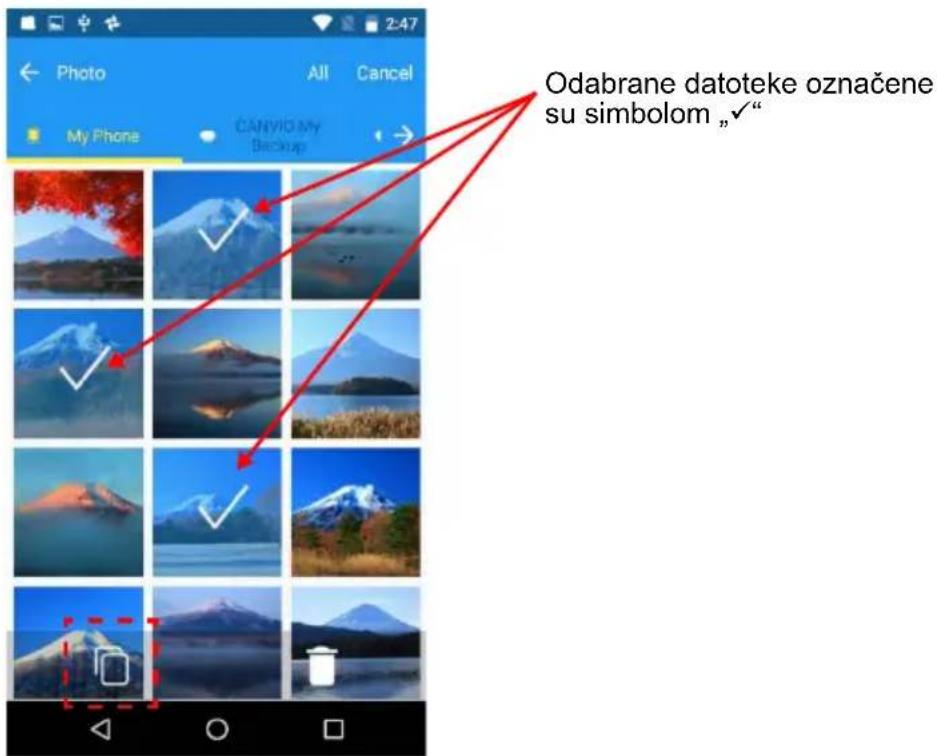
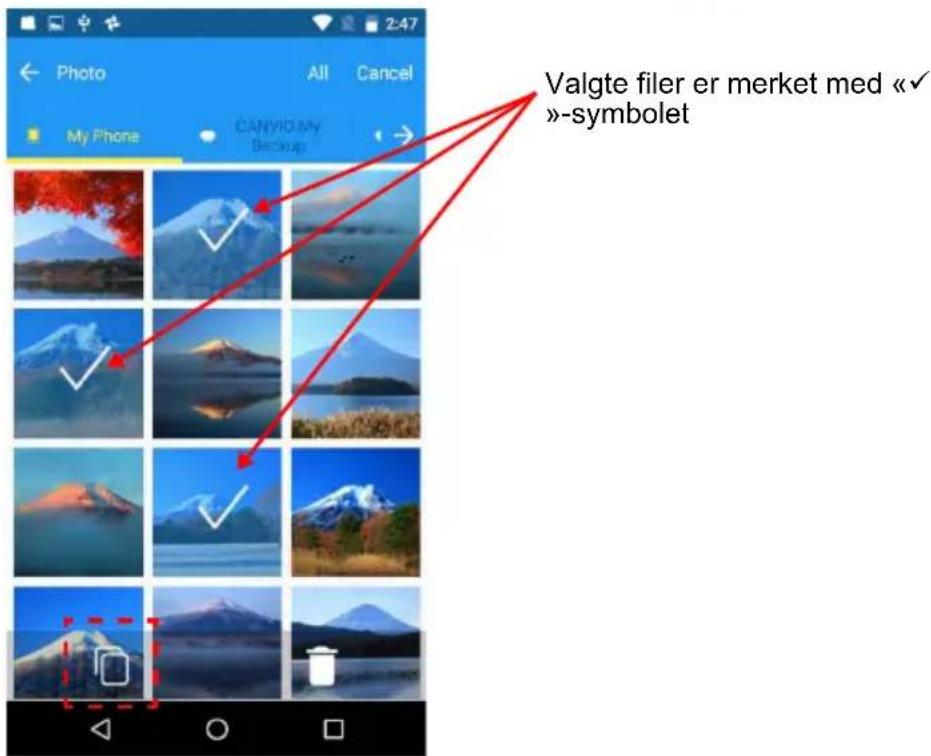
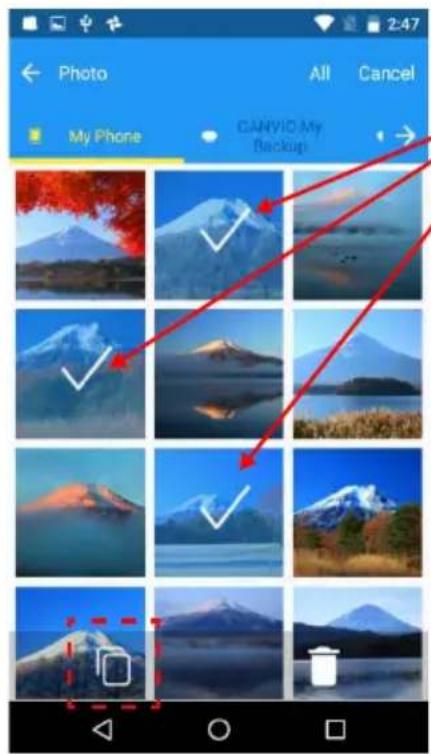
3. File Copy Operation
3.1. Tap Select button
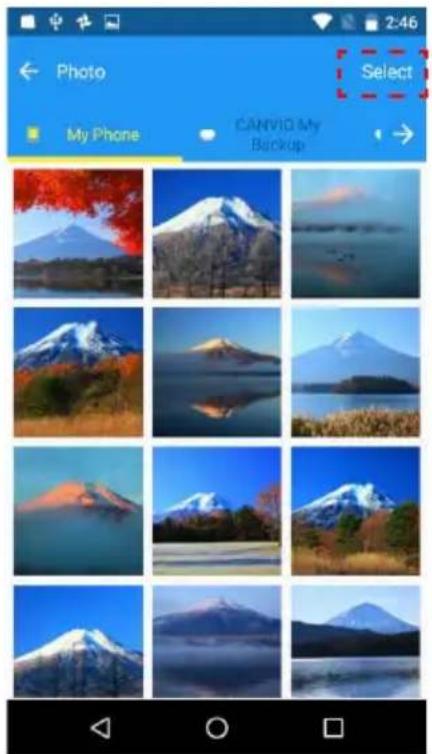
3.2. Tap thumbnails to select source files you wish to copy.
*) If you want to select all files, tap the "All" button.
After selecting, tap the “” Icon.

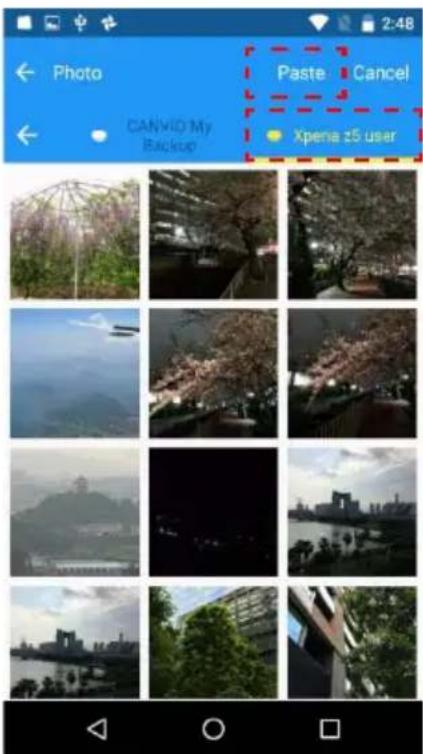
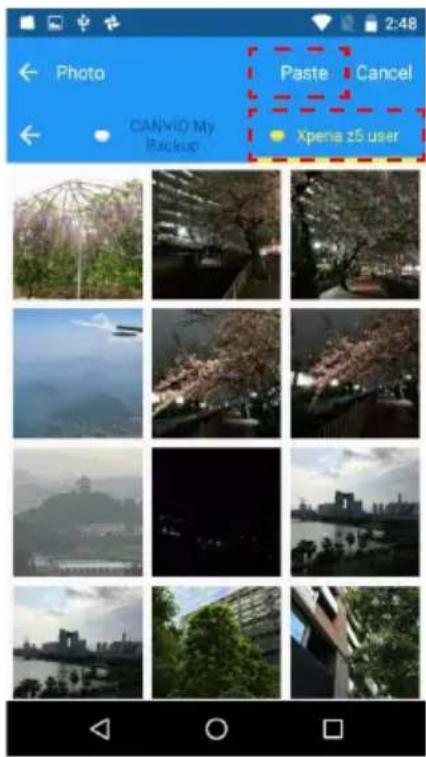
3.3. Select target storage of folder to copy.
After selecting, tap the "Paste" button to execute the copy operation.
4. File Delete operation
4.1. Tap Select button
4.2. Tap thumbnails to select target files.
*) If you want to select all files, tap the "All" button.
After selecting, tap the “” icon to delete the files.
2-7 Music/Documents Menu
1. Music/Documents Menu
You can manage music and document files on the Music/Documents Menu.
- Tab to select phone or backup folder
- Music/Documents lists.
To show hidden content, swipe from right to left in the selection tab area.
2. Open a file
To open the target file, tap thumbnail and select external app.
3. File Copy Operation
3.1. Tap Select button
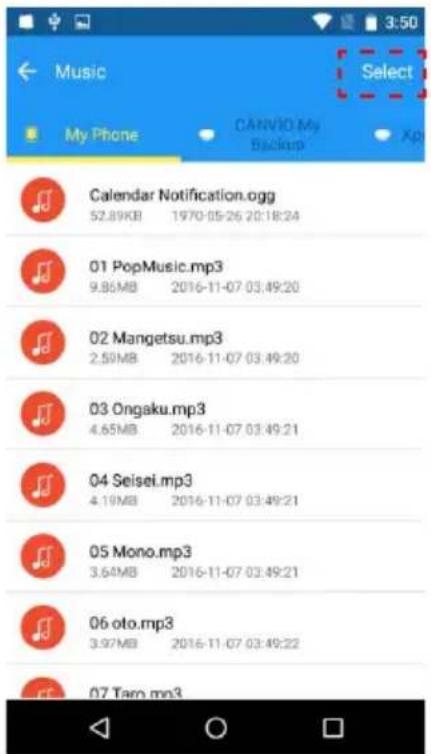
3.2. Tap the tick box to select source files you wish to copy.
*) If you wish to select all files, tap the "All" Button.
After selecting, tap the “” Icon.
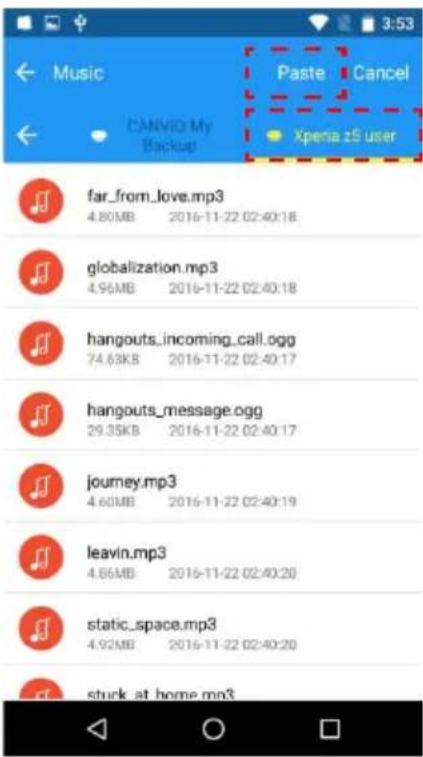
3.3. Select target storage of folder to copy.
After selecting, tap the "Paste" button to execute the copy operation.
4. File Delete operation
4.1. Tap Select button
4.2. Tap the tick box to select target files.
*) If you wish to select all files, tap the "All" Button.
After selecting, tap the “” icon to delete the files.

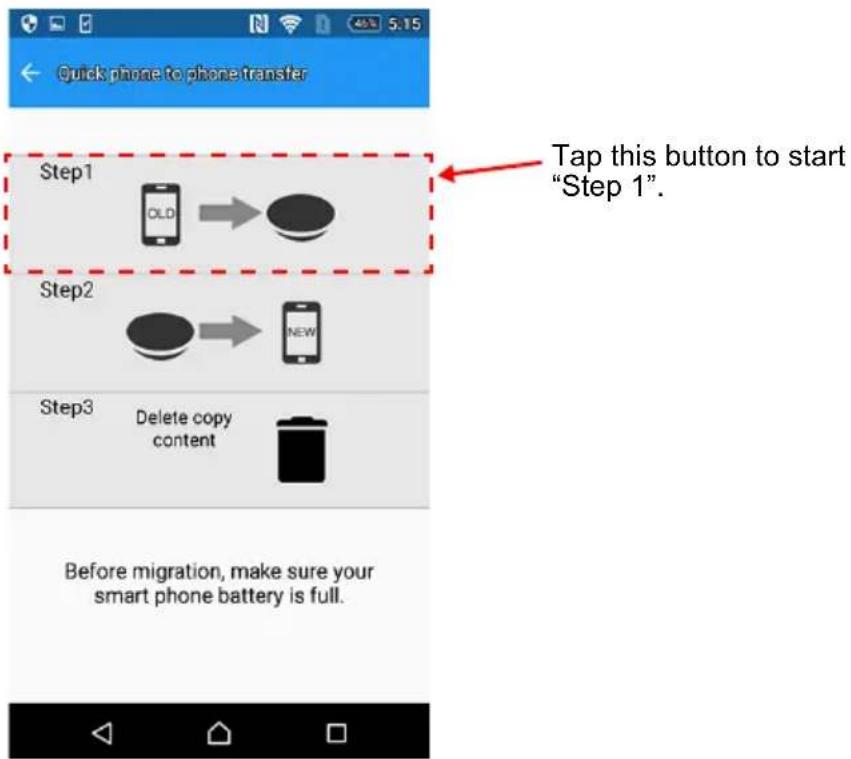
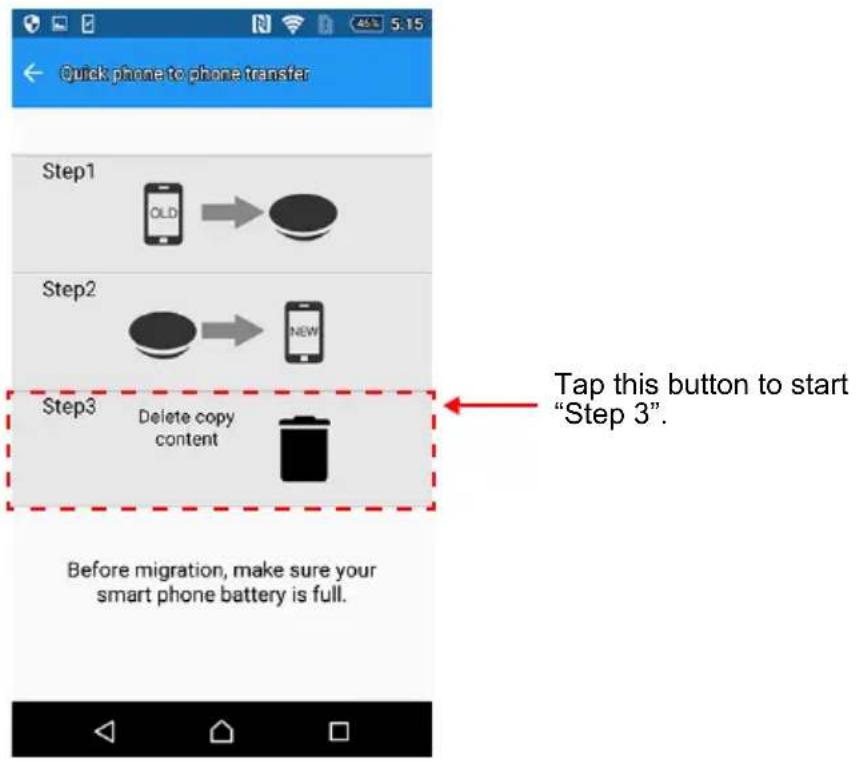
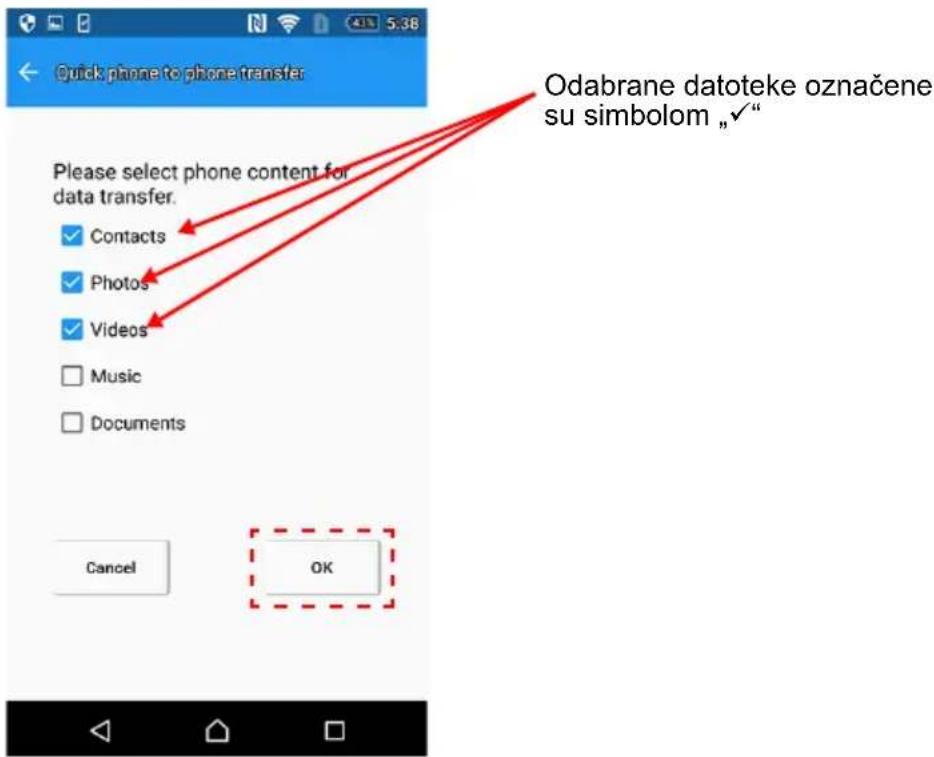
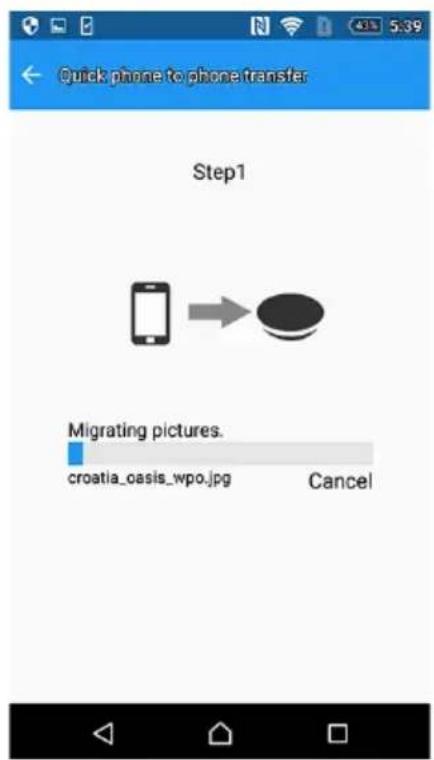
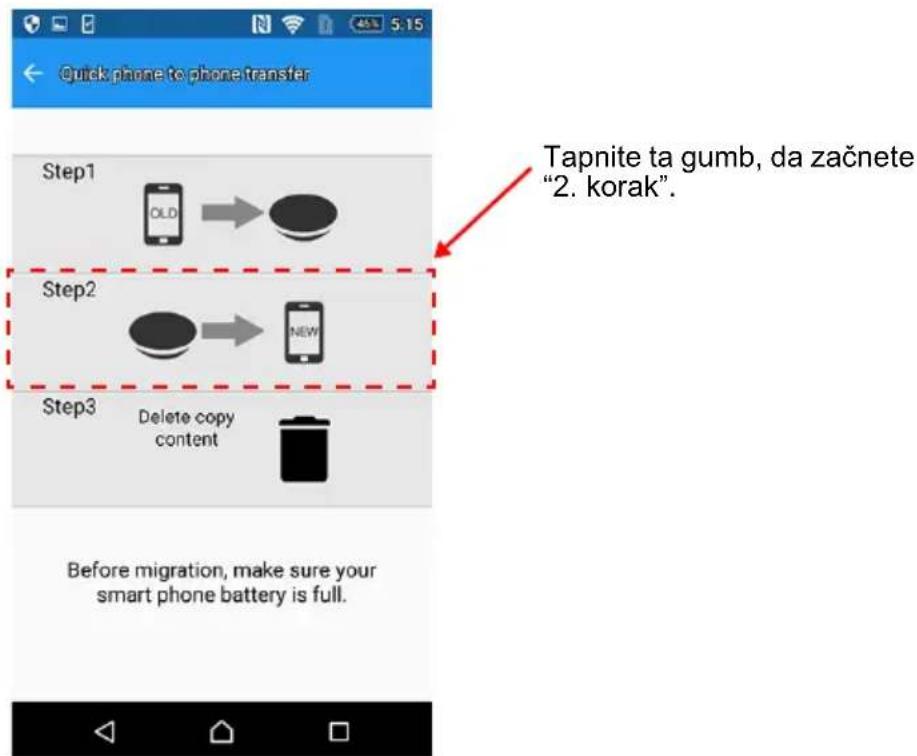
2-8 Quick Phone to Phone Transfer Menu
You can transfer personal data (contacts, photos, videos, music, and documents) from one smartphone (e.g. your old smartphone) to another smartphone (e.g. to a new smartphone) using "CANVIO for Smartphone".
1. Step 1
1.1. Connect your "old" smartphone (data source), and tap "Step 1".
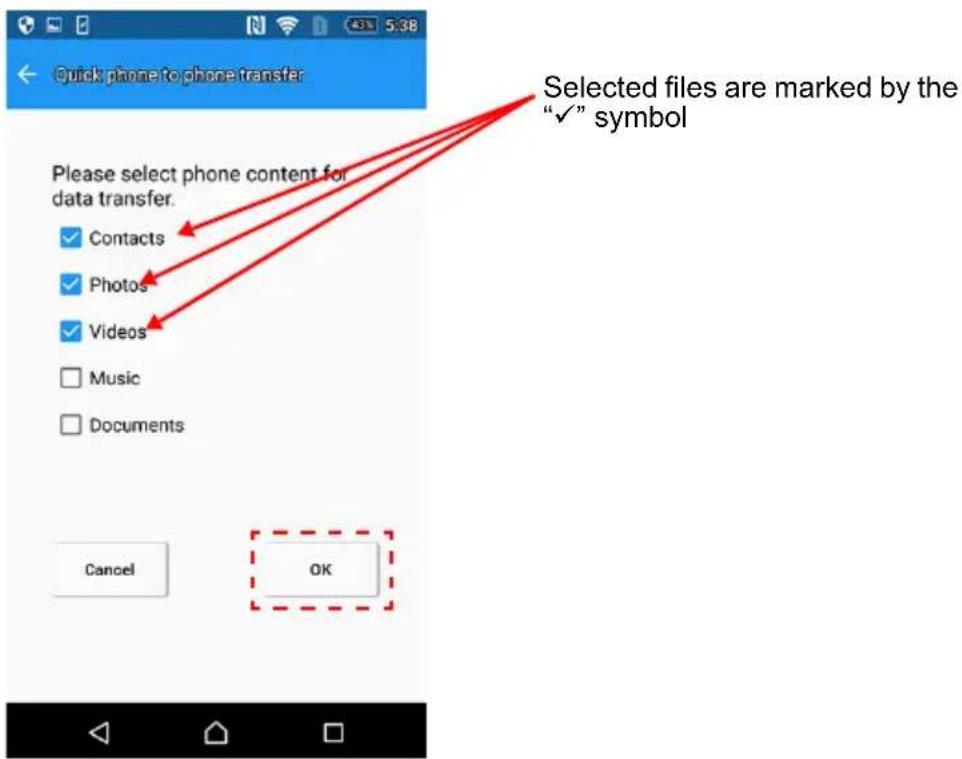
1.2. Select the personal data categories (contacts, photos, video, music, and documents) you wish to transfer.
After selecting, tap "OK".
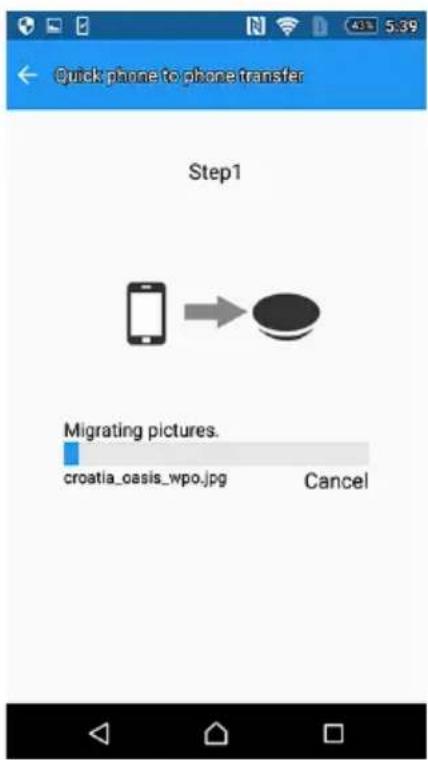
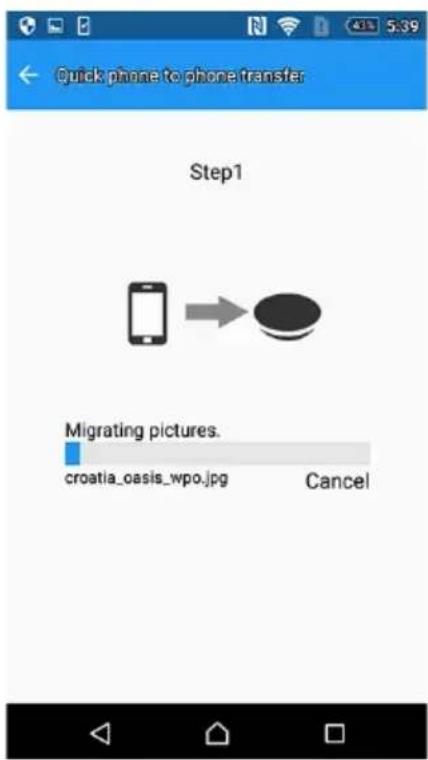
1.3. Data transfer from your data source (e.g. old smartphone) to CANVIO for Smartphone will start.
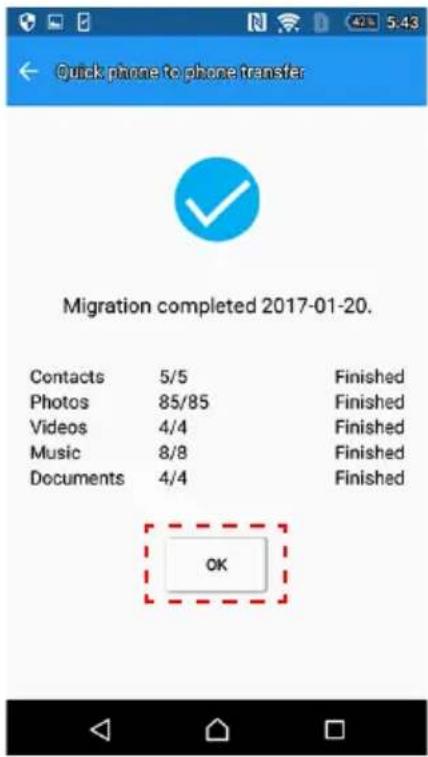
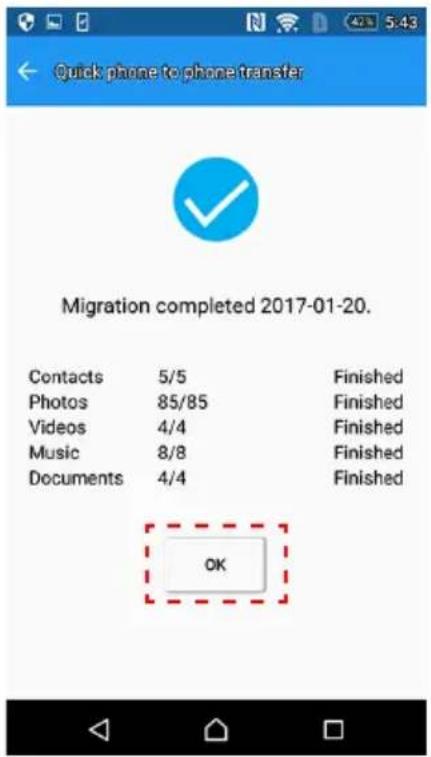
1.4. When the data copy is complete, the results are displayed. Please read the message, and tap "OK".
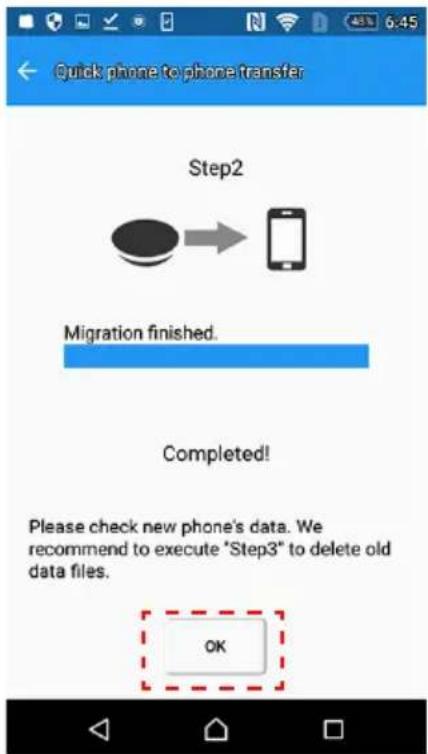
2. Step 2
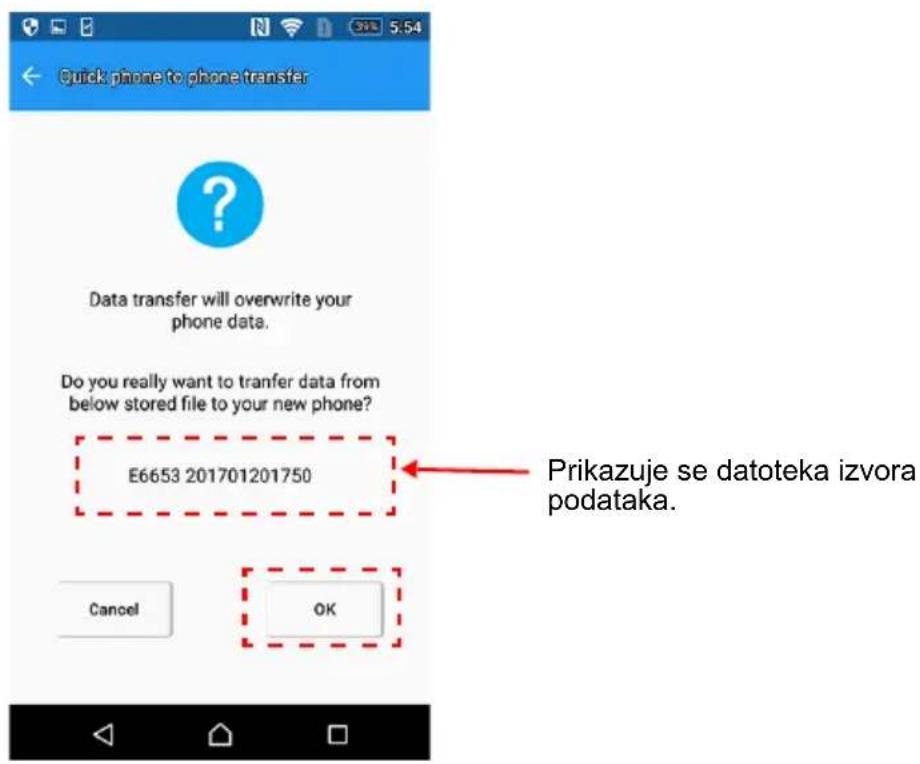
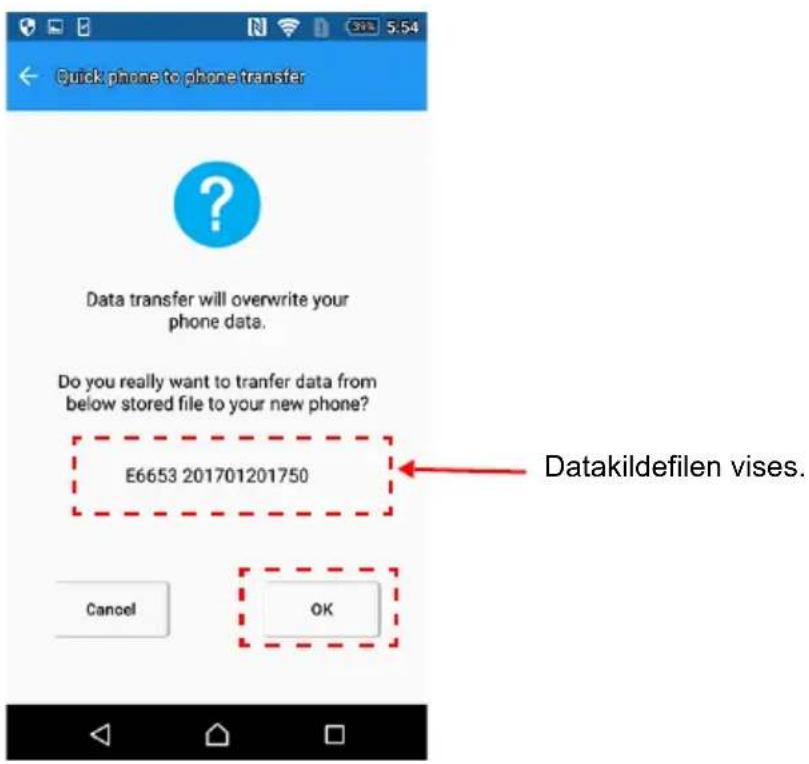
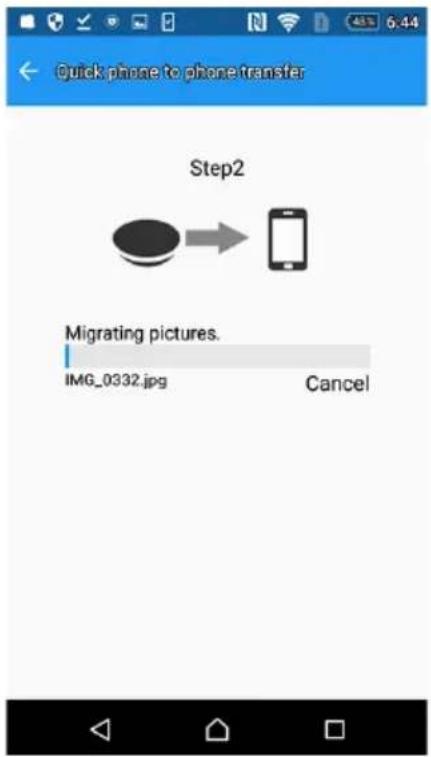
2.1. Connect your "new" smartphone, and tap "Step 2".
Tap this button to start "Step 2".
2.2. Please read the message, and confirm the data source file. After you have confirmed, tap "OK".
Data source file is displayed.
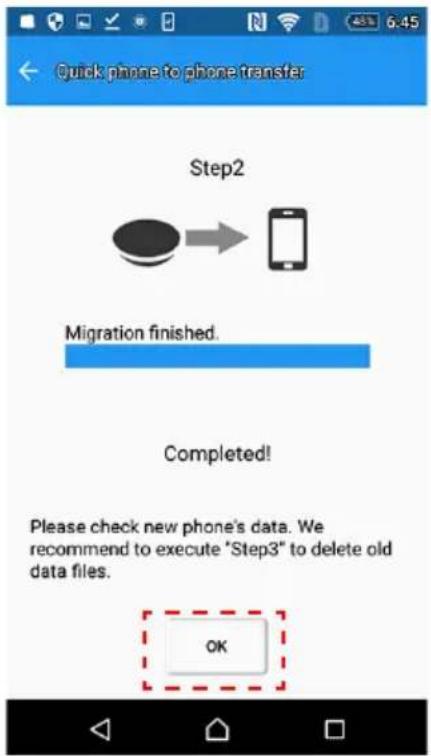
2.3. The data begins to transfer from "CANVIO for Smartphone" to your new smartphone.

2.4. When the data copy is complete, tap "OK" Please ensure that you verify the data on your new phone.
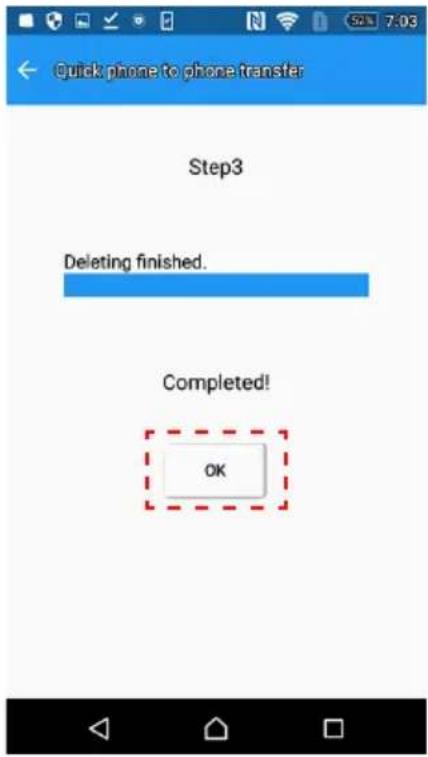
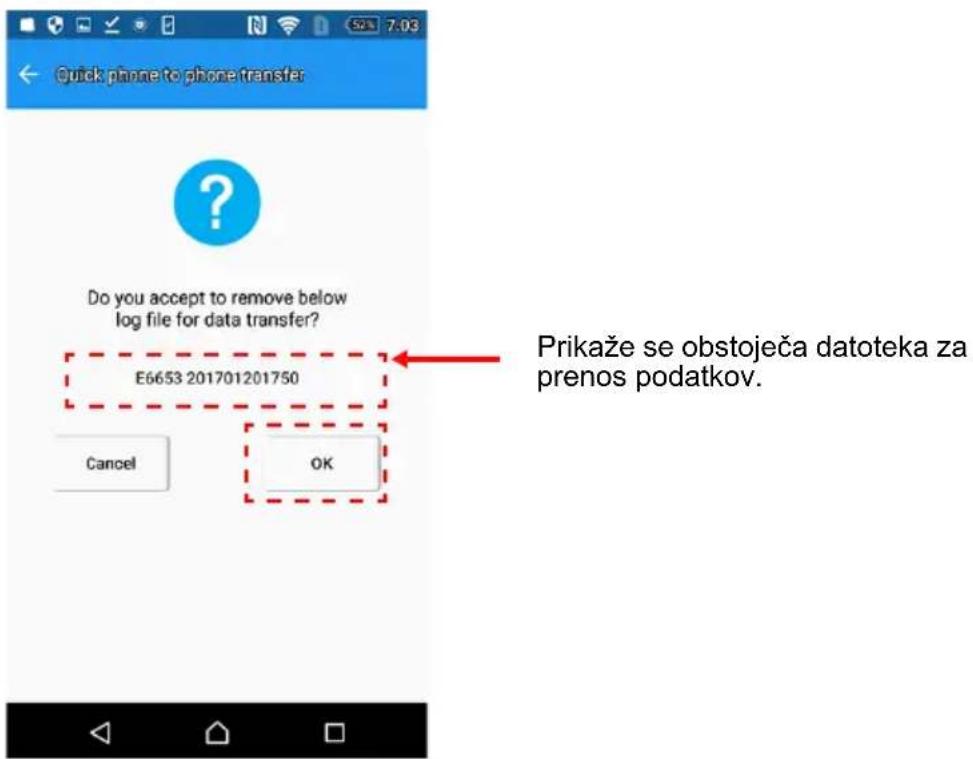
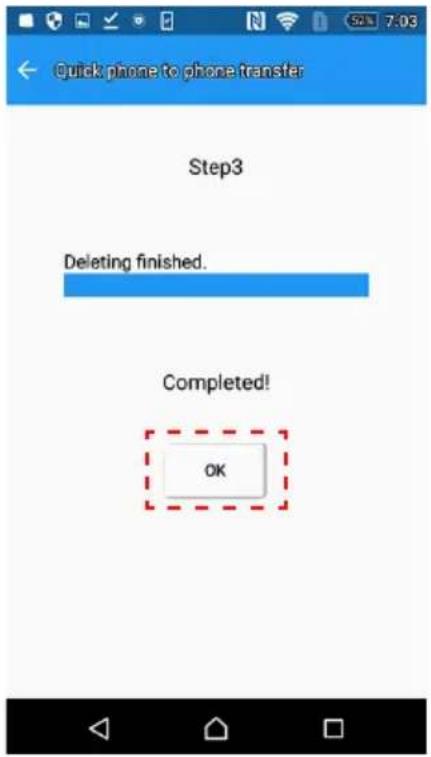
3. Step 3
NOTICE
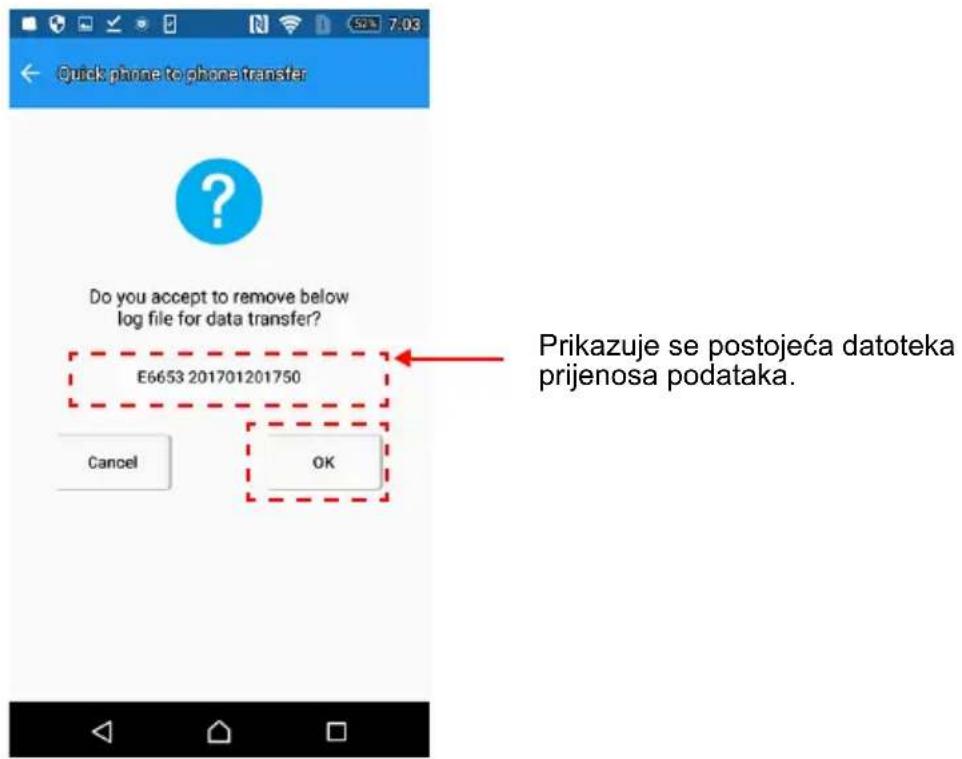
When you execute "Step 1", your smartphone's data is copied to the CANVIO for Smartphone.
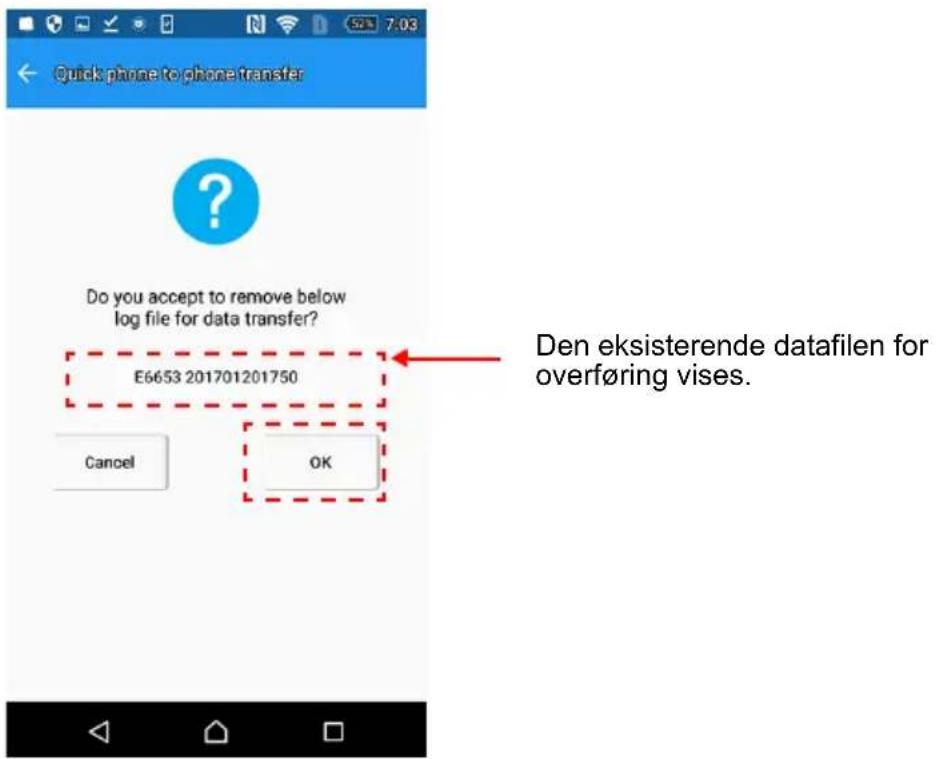
After "Step 2" is completed, we recommend you execute "Step 3" to delete the history.
3.1. Connect your new smartphone, and tap "Step 3".
3.2. Please read the message, and confirm the data transfer file. After confirming, tap "OK".

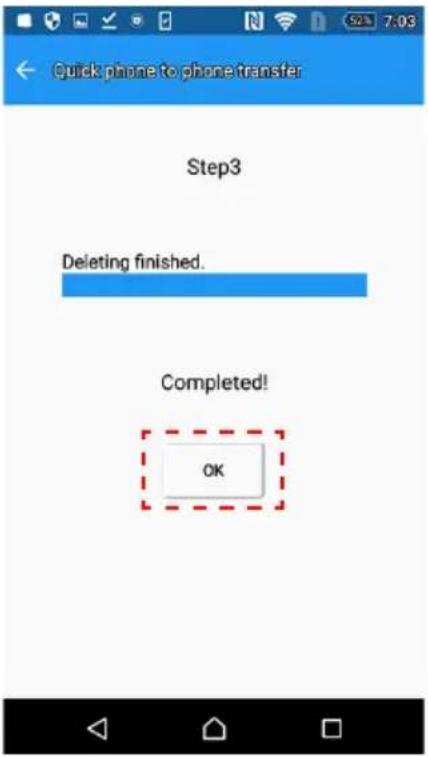
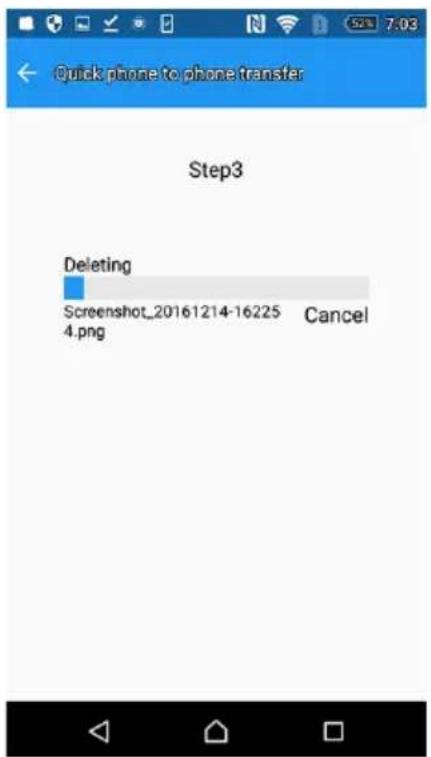
3.3. The data deletion process starts.

3.4. When deletion is complete, tap "OK"
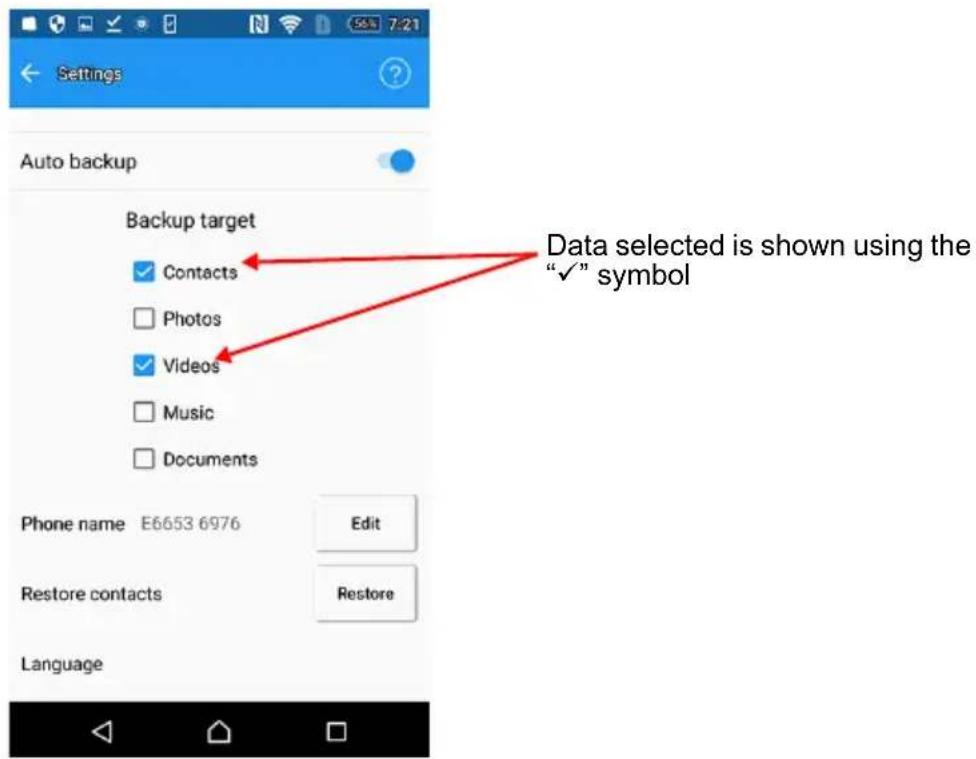
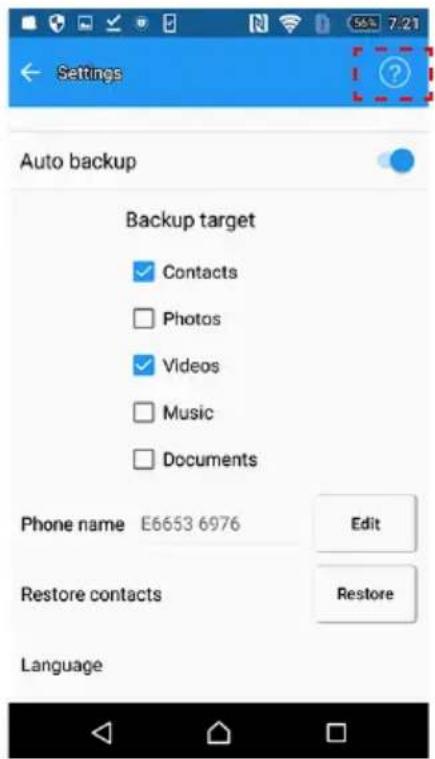
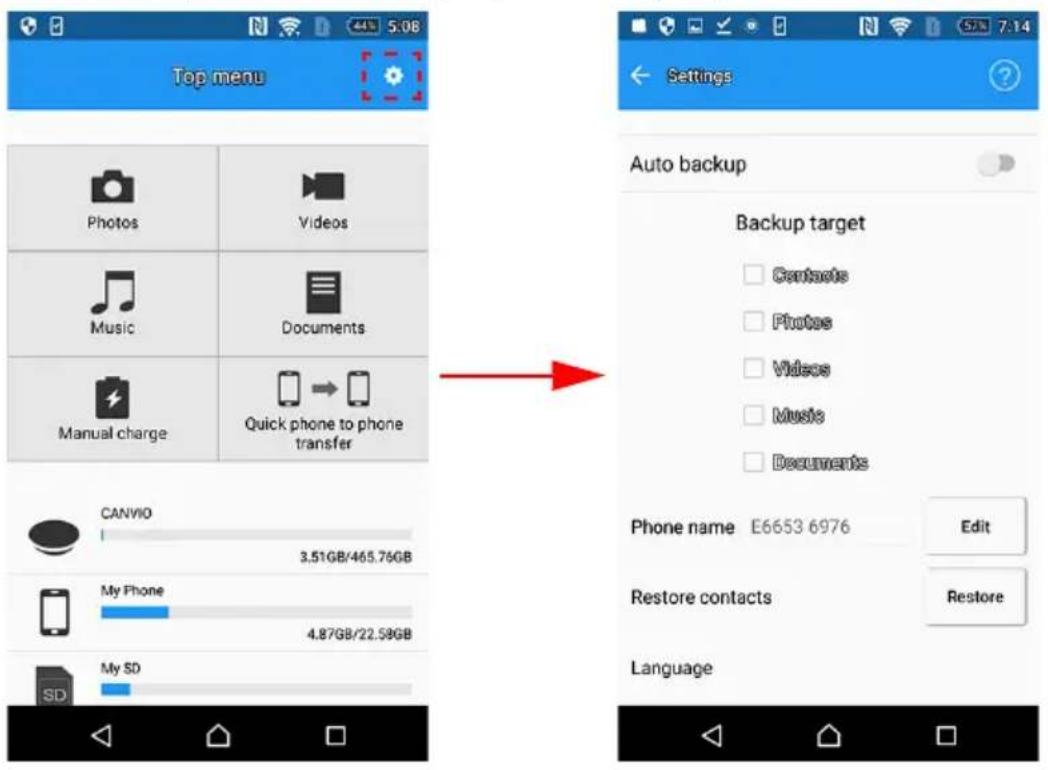
2-9 Settings Menu / Help Menu
To display the Settings Menu, tap the "Icon."
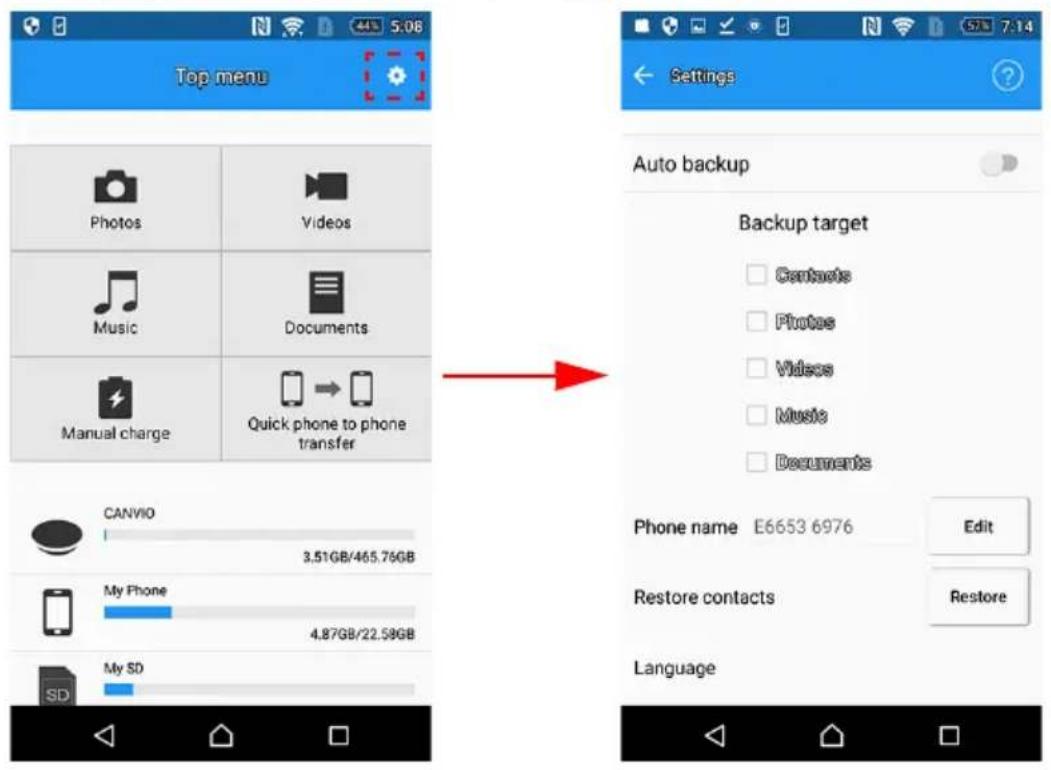
1. Auto Backup Setting
You can configure the Auto Backup Setting in this Menu.
1.1. Select Auto Backup Enable or Disable.
1.2. If you select Auto Backup Enable, then select target personal data. (Contacts, Photos, Videos, Music, and Documents)
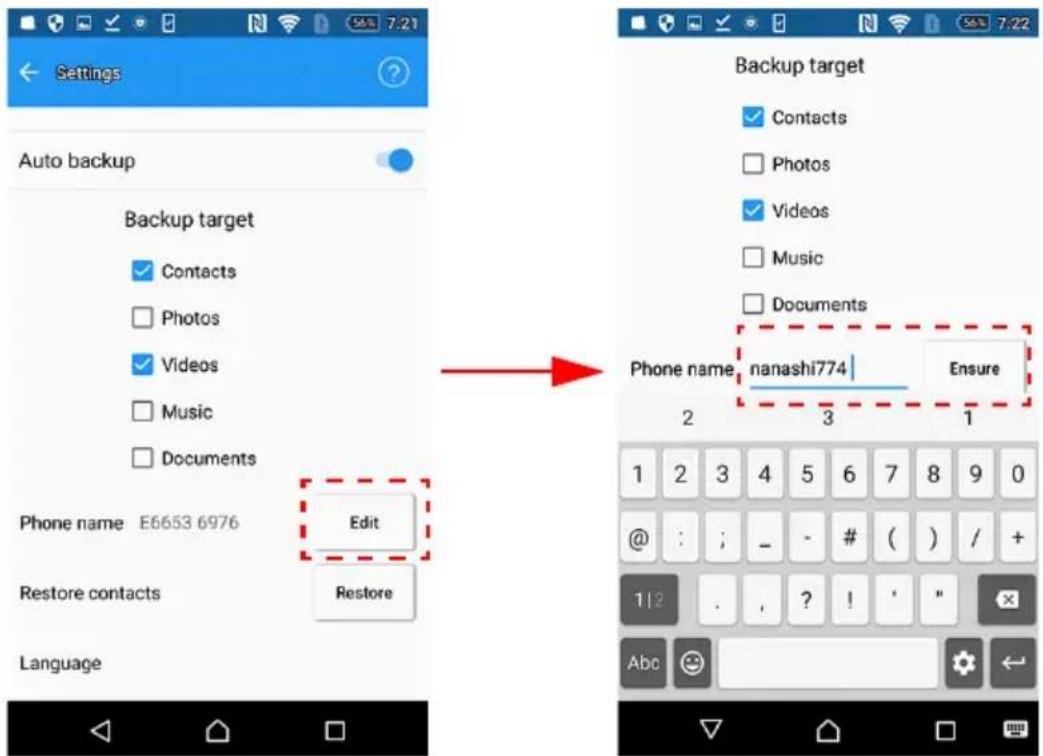
- Editing Phone Name
If you want to change the phone name, tap "EDIT". After editing your unique name, tap "ENSURE".
*) Phone name is visible to other users.
3. Restore Contacts
To restore your smartphone's contacts from the most recent auto backup data, tap "Restore".
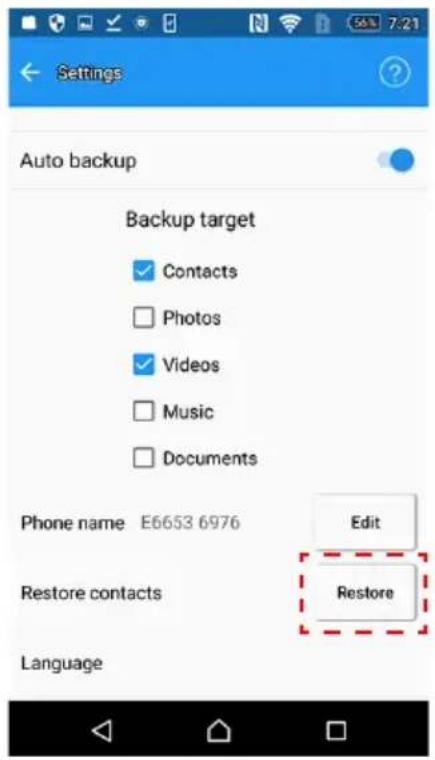
NOTICE
If a different smartphone is connected, you cannot restore contacts using this app.
If you want to restore contacts to a different smartphone, please copy the corresponding *.vcf file from "CANVIO for Smartphone" to your PC, and then to that smartphone using your PC.
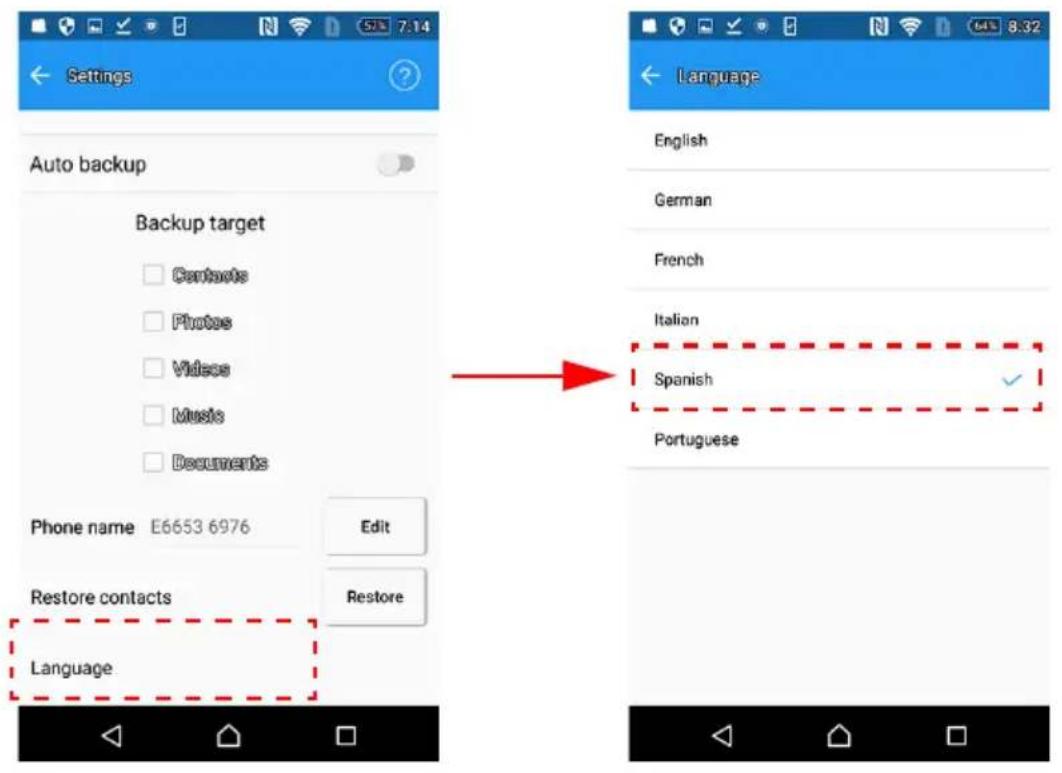
4. Language Setting
You can change the language setting.
To change the language setting, tap "language", and select your preferred language.
5. Help Menu
To display the help Menu, tap

You can view the app version number, online help information, OSS information (if used).
2-10 Auto Backup / Charge Function
The Auto Backup and Charge functions operate in the sequence shown below.
- Connect your smartphone.
- If you have enabled Auto Backup function, the backup process will start after a while, if you don't do any other operations.
If you have disabled Auto Backup function the process will continue with point 4, if you don't do any other operations.
2.1. If your smartphone battery level is low, it will pre-charge first.
After pre-charging for approximately 30 minutes, the backup will start.
2.2. If your smartphone battery level is sufficient, the backup will start.
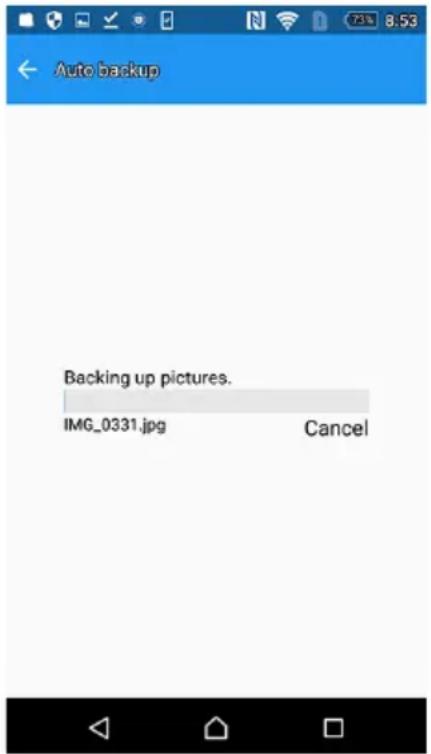
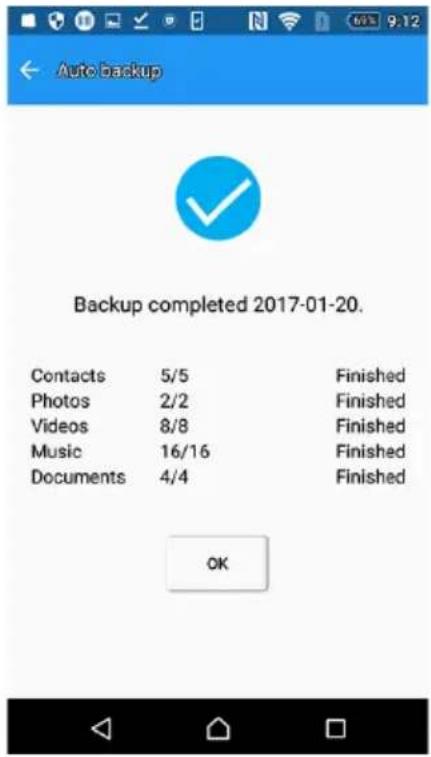
- After Auto Backup, the backup result is displayed.
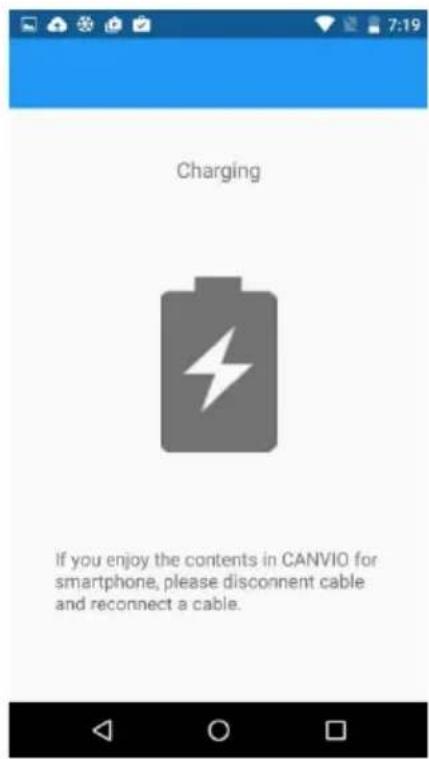
- CANVIO for Smartphone will start charging your phone.

NOTICE
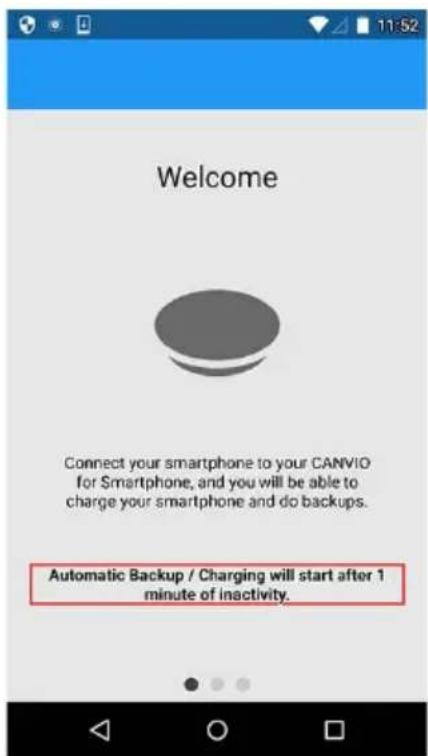
After connecting your phone to the CANVIO for Smartphone the device will start operation (charging or backup) after around one minute of inactivity. If you want to access data in CANVIO for Smartphone while charging your phone, please disconnect and reconnect the USB cable.
The backup may not run depending on the smartphone's remaining battery level.
If your smartphone is powered off, "CANVIO for Smartphone" cannot charge it.
2-11 Manual Charge Function
You can charge your smartphone immediately by following the steps below.
-
Connect your smartphone, and execute the "Content Manager" app.
-
Tap "Manual charge".
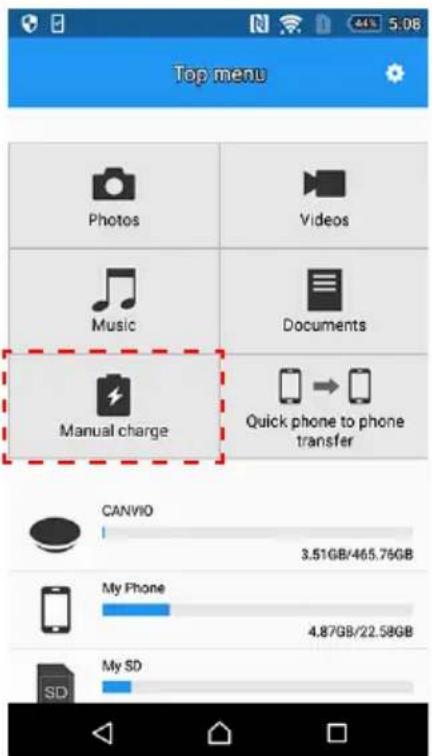
- Start charging your smartphone.

NOTICE
After connecting your phone to the CANVIO for Smartphone the device will start operation (charging or backup) after around one minute of inactivity. If you want to access data in CANVIO for Smartphone while charging your phone, please disconnect and reconnect the USB cable.
If your smartphone is powered off, "CANVIO for Smartphone" cannot charge it.
Chapter 3
Get Started with your Windows® PC
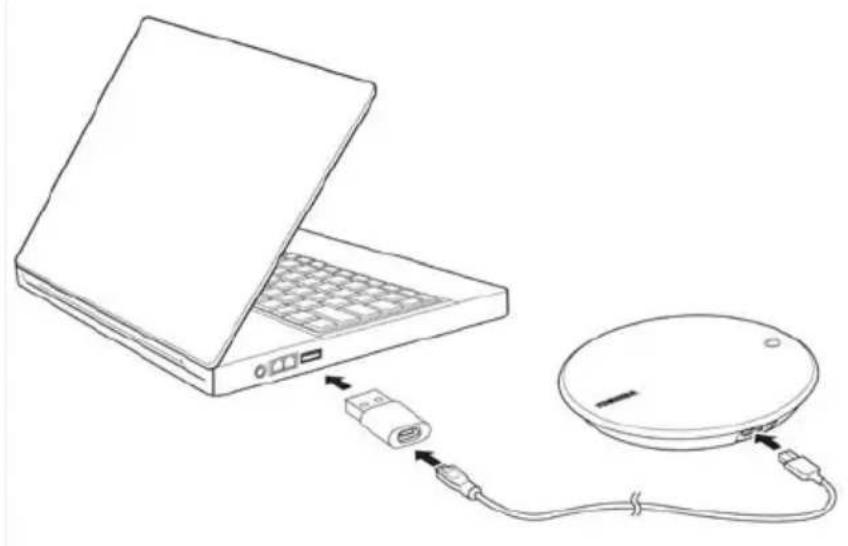
3-1 Connect with your Windows® PC
Basic Setup
- Plug the AC adapter into a power outlet.
- Plug the DC jack into a "CANVIO for Smartphone".
natural_image
Line drawing of a cable connection to a satellite dish with an electrical outlet (no text or symbols)- With your computer powered on and fully booted up, connect with "CANVIO for Smartphone" using the following procedure.
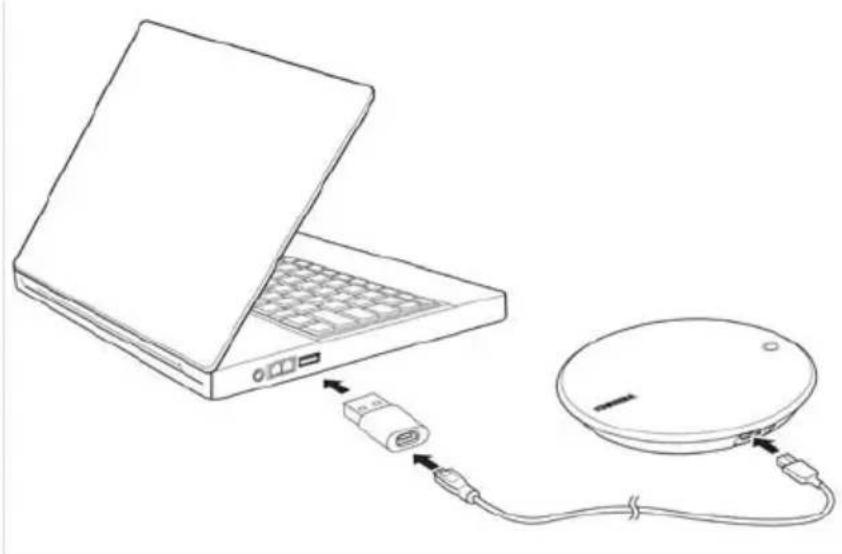
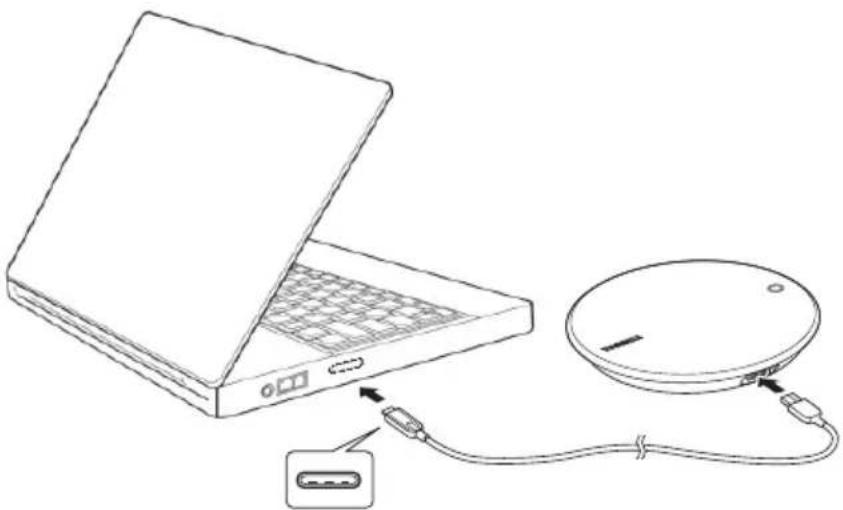
(a) If your Windows ^ PC has a "Type-A" USB connector, connect to "CANVIO for Smartphone" with a USB 2.0 Micro-B cable and a USB Micro-B - Type-A adapter.
natural_image
Line drawing of a laptop connected to a CD/DVD drive via cable (no text or symbols)(b) If your Windows ^ PC has a "Type-C" USB connector, connect to "CANVIO for Smartphone" with a USB 2.0 Type-C ^TM cable.

natural_image
Line drawing of a laptop connected to a CD-ROM via cable (no text or symbols)■ The power/data indicator light will illuminate.
The drive will power up.
The drive should mount and a new drive icon should appear in "My Computer".
3-2 Dismount and disconnect from your Windows® PC
We strongly recommend that you do not unplug the drive by simply unplugging the cable connection since data may be in the process of being written to the drive at that time.
Any such data will be lost and the drive may be damaged physically!
Please follow the steps below to safely dismount the drive.
-
Click the "Hardware and Eject Media" icon A pop-up message box will appear listing the external devices connected to your computer.
-
Select the TOSHIBA drive to eject. After a few seconds, you will get the notification that it is now safe to remove the device.
-
Click "OK" and you can unplug the "CANVIO for Smartphone".
Instructions for Safety and Comfort
1. Introduction
This section lists important precautions which users of our product(s) (and anyone else) should observe in order to avoid injury and damage to property, and to ensure safe and correct use of our products. Please be sure that you understand the meanings of the labels and graphic symbols described below before you move on to the detailed descriptions of the precautions, and comply with the precautions stated.
| Signal Words Meaning | |
| DANGER | Indicates an imminently hazardous situation which, if not avoided, will result in death or serious injury. |
| WARNING | Indicate a potentially hazardous situation which, if not avoided, could result in death or serious injury. |
| CAUTION | Indicate a potentially hazardous situation which, if not avoided, could result in minor or moderate injury. |
| NOTICE | Indicates practices that may cause property damage and other problems, but not personal injury. |
| NOTE | Provides important information |
| *Serious injury including blindness, wounds, burns (low and high temperature), electric shock, fractures, and poisoning, etc. with long-lasting effects or that require hospitalisation and/or long-term hospital visits for treatment.*Minor or moderate injury includes wounds, burns, electric shock, etc. not requiring hospitalisation and/or long-term hospital visits for treatment.*Property damage means damage to device. | |
2. Power and other safety precautions
WARNING
Do not leave parts such as plastic covers and electrical plug within the reach of children and pets. Misuse of the part including, without limitation, accidental swallowing the part may cause choking and suffocation resulting in death or serious injury. If you suspect a part has been swallowed, immediately take appropriate emergency action and consult a doctor.
Do not place the drive on a shaky table, uneven, tilted surface or other unstable location. The drive may fall, causing damage to the drive or possibly injury.
Do not do the improper maintenance or disassemble, as it may cause personal injury or may result in electric shock or fire.
Do not expose the drive to wet or damp conditions, as it may result in electric shock or fire.
Do not allow any liquids or metal objects such as screws, staples or paper clips to enter the drive. Foreign objects may create a short circuit, which may cause product damage and fire, possibly resulting in serious injury.
Do not use the drive when there is an abnormality in metal parts and plastic parts, as it may result in electric shock.
Do not use the drive when the metal parts and plastic parts exhibit abnormal characteristics, as this may result in electric shock.
If the Product produces an odour, overheats or generates smoke, immediately turn off the drive and disconnect the power cable from the outlet and disconnect the USB cable from the device. Failure to do so may result in fire, damage to the drive and/or personal injury including burns and electric shock. Do not use the drive again. Please contact the store from which you purchased it.
Do not plug the AC adaptor into a power source that does not correspond to the voltage, current and the frequency specified on the regulatory label of the unit. An overload on the socket and/or AC adaptor may cause a fire or electric shock, possibly resulting in serious injury.
Do not pull on the power cable/cord to remove a plug from a socket. Always grasp the plug directly. Pulling a power cable/cord may cause fracture resulting in a fire or electric shock and serious injury.
Always confirm that the power plug has been fully inserted into the socket, to ensure a secure electrical connection. An overload on the socket may cause a fire or electric shock, possibly resulting in serious injury.
Always make sure the drive and AC adaptor have adequate ventilation and are protected from overheating when the AC adaptor is connected to a power outlet. Inadequate ventilation may cause the drive and AC adaptor to overheat resulting in a fire or electric shock and serious injury.
If dust gets on the power plug connectors or connector base, turn the power off and disconnect the power plug. Then clean the connector and/or connector base with a dry soft cloth. Failure to do so may cause a fire or electric shock, possibly resulting in serious injury.
Please be sure to use this product with a USB cable attached. If you use without an attached USB cable, it may cause fire, electric shock or failure.
Please do not cause electrical short circuits across the terminals of the USB cable and AC adapter. It may cause a fire, electric shock or failure.
Please only connect and use this device with the Android smartphone models for which Toshiba confirmed compatibility. If you connect and use this device with Android smartphone models for which Toshiba has not confirmed compatibility, it may cause a fire, electric shock or failure.
NOTICE
Do not disconnect the USB cable and AC adaptor while operating, as this may result in loss of data or damage to the drive.
Do not touch the USB cable and AC adaptor while operating, as this may result in loss of data or damage to the drive.
Do not bump, drop or jar the drive, as it may result in loss of data or damage to the drive.
Do not use the drive at high or low temperatures or sudden temperature changes. This may result in loss of data or damage to the drive. (Operating temperature: 5°C - 35°C, Switch off: -40°C - 60°C)
Make sure that you backup all your data as much as you can on the drive to the other storage drive.
Do not use the drive in the dew condensation, as it may result in loss of data or damage to the drive.
Do not cover the drive during operating, as it may become overheated.
Do not use the drive during a thunderstorm. If you see lightning or hear thunder, immediately turn off the devices to which this drive is connected, computer and peripherals, and disconnect the power cable from the outlet, and disconnect the USB cable from the computer. An electric surge caused by lightning may result in loss of data or damage to the drive.
Do not clean the drive or any accessories with any chemicals. To clean the outside of the drive or the accessories, use a dry soft cloth.
Use of chemicals may result in deterioration, deformation or discoloration of those items and the loss of data.
When handling your Android smartphone, please follow the instruction manual supplied with yourAndroid smartphone.
To operate and connect the device to your Android smartphone, it must have the specified App for this device.
Before using for the first time, please fully charge your Android smartphone using its power adapter.
To charge your Android smartphone using “CANVIO for Smartphone”, you need to install the specified App on your Android device, and enable the Auto Backup function.
File Move functionality is not supported by this application. File Copying function is supported by this application.
If an error occurs, please re-insert the cable.
The backup may not run depending on the smartphone's remaining battery level.
If your smartphone is powered off, “CANVIO for Smartphone” cannot charge it.
NOTE
Compatibility may vary depending on the user's hardware configuration and operating system.
If the drive is not provided with enough power, the drive does not operate.
One Gigabyte (1GB) means 10^9 = 1,000,000,000 bytes and one Terabyte (1TB) means 10^12 = 1,000,000,000,000 bytes using powers of 10.
A computer operating system, however, reports storage capacity using powers of 2 for the definition of 1GB = 2^30 = 1,073,741,824 bytes and 1TB = 2^40 = 1,099,511,627,776 bytes, and therefore shows less storage capacity. Available storage capacity (including examples of various media files) will vary based on file size, formatting, settings, software and operating system and other factors.
Use only the accessories supplied by the manufacturer.
This drive requires a power supply from the AC adaptor supplied by the manufacturer.
Product specifications are subject to change without notice.
3. Immunity from Responsibility
Toshiba is not responsible for data corruption or data loss. (Toshiba will neither carry out any data recovery nor cover any data recovery costs.)
Toshiba is not responsible for any damage due to the failure or negligence of users, fire, earthquake, or other accident beyond the control of Toshiba.
Toshiba is not responsible under any circumstances if you do not follow the guidelines given in the user manual.
Toshiba is not responsible under any circumstances for misuse of the connection apparatus and software.
This product support is available only in the country where the Product was originally purchased.
4. Usage Restrictions
This drive is used in standard applications such as office work, personal drive and household appliances. Toshiba Corporation shall not be liable except for this type of use. Do not use for special purposes (atomic controls, aeronautic or space systems, mass transport vehicle operating controls, medical devices for life support, or weapons firing controls) where particularly high reliability requirements exist, where the pertinent levels of safety are not guaranteed, or where a failure or operational error could threaten a life or cause a physical injury.
TOSHIBA Support
Need help?
Please contact TOSHIBA\qs hard drive and storage products support page:
www.toshiba.eu/externalstorage/support
For warranty claims, please check: www.externalhdd.storrepair.de/
Notices
©2016 TOSHIBA Electronics Europe GmbH. All rights reserved.
TOSHIBA reserves the right to make technical changes. TOSHIBA assumes no liability for damages incurred directly or indirectly from errors, omissions or discrepancies between this product and the documentation.
The Toshiba name and its logos are registered trademarks of Toshiba.
Google Play, the Google Play logo and Android are trademarks of Google Inc.
Windows ^® is a registered trademark of Microsoft Corporation in the United States and/or other countries.
USB Type-C ^TM is a trademark of USB Implementers Forum.
Other trademarks mentioned or appearing in this document are the property of their respective owners. Errors and omissions excepted.
Regulační opatření
Splnění CE
CE
natural_image
Symbol of a trash bin crossed with no text or numbers, representing waste sorting or disposal (no text present)
natural_image
Simple line drawing of a circular object with a small protrusion and a small hole, resembling a lid or cover (no text or symbols)CANVIO for Smartphone

Kabel USB 2.0
Mikro-B

Kabel USB 2.0
Type-C™

Adaptér USB
Mikro-B - Typ-A
natural_image
Illustration of a small electric motor with attached wires and two terminal blocks (no text or symbols)AC adaptér (EU + UK)

Stručná příručka
natural_image
Simple line drawing of a circular object with a small hole and a small mark, no text or symbols present.1-3 LED indikátor
natural_image
Line drawing of a satellite dish connected to a power outlet, showing wiring and socket placement (no text or symbols)natural_image
Diagram showing a smartphone connected to a circular device via cable, with a separate connector pinout (no text or symbols present)Choose an app for the USB device

POZOR
2-5 Hlavní nabídka

2. Otevření souboru
2. Krok 2
3. Krok 3
POZOR
5. Nabídka Nápověda
POZOR
POZOR
natural_image
Line drawing of a cable connection to a satellite dish with two outlets and a plug (no text or symbols)natural_image
Line drawing of a laptop connected to a CD/DVD drive (no text or symbols)natural_image
Line drawing of a laptop connected to a CD-ROM via cable (no text or symbols)www.toshiba.eu/externalstorage/support
natural_image
Symbol of a trash bin crossed with no text or numbers, representing environmental restriction (no text present)
TOSHIBA-Support DE-43
Hinweise DE-43
Einführung
Überblick
Toshiba CANVIO for Smartphone
Komponenten
natural_image
Simple line drawing of a circular object with a small protrusion and a small hole, resembling a lid or cover (no text or symbols)CANVIO for Smartphone

USB-2.0-Micro-B-Kabel

USB 2.0 Type-C ^TM -Kabel

USB Micro-B-zu-Type-A-Adapter

natural_image
Line drawing of a mechanical electrical connector with wires and a separate socket (no text or symbols)Netzadapter (EU + UK)

Kurzanleitung
1-2 Canvio for Smartphone kennenlernen
natural_image
Line drawing of a cable and socket installation with a power outlet (no text or symbols)natural_image
Diagram showing a smartphone connected to a circular device via cable, with a separate connector pin inserted (no text or symbols present)2-3 App starten
Choose an app for the USB device
HINWEIS
2-5 Top-Menü
2. Schritt 2
3. Schritt 3
HINWEIS
5. Menü „Hilfe“
HINWEIS
HINWEIS
natural_image
Line drawing of a cable connection to a satellite dish with two outlets and a plug (no text or symbols)natural_image
Line drawing of a laptop connected to a CD/DVD drive (no text or symbols)natural_image
Line drawing of a laptop connected to a CD-ROM via cable (no text or symbols)www.toshiba.eu/externalstorage/support
natural_image
Symbol of a trash bin crossed with no text or numbers, representing waste sorting or disposal (no text present)
2-3 Start appen.... DK-9
2-4 Første konfiguration ...... DK-10
2-5 Topmenu DK-12
2-6 Menuen Foto/Videoer.... DK-13
2-7 Menuen Musik/Dokumenter ...... DK-17
natural_image
Simple line drawing of a circular object with a small protrusion and a small hole, resembling a lid or cover (no text or symbols)CANVIO for Smartphone

USB2.0 Micro-B-kabel

USB2.0 Type-C™-kabel

USB Micro-B - Type-A-adapter

natural_image
Line drawing of a mechanical electrical connector with three components (no text or symbols)Netadapter (EU + UK)
natural_image
Simple line drawing of a circular object with two small holes and a small mark on the side (no text or symbols)1-3 LED-indikator
natural_image
Line drawing of a cable and socket installation with an electrical outlet (no text or symbols)natural_image
Diagram showing a smartphone connected to a satellite dish via cable, with no text or symbols present.natural_image
Diagram showing a smartphone connected to a circular device via cable, with a separate connector pin inserted (no text or symbols present)2-3 Start appen
Choose an app for the USB device

Content Manager
JUST ONCE
ALWAYS

2-4 Første konfiguration
MEDDELELSE
2-5 Topmenu
2. Åbn en fil
4. Filsletningshandling
2. Trin 2
3. Trin 3
MEDDELELSE
3.3. Datasletningsprocessen starter.

5. Menuen Hjælp
- CANVIO for Smartphone begynder at oplade din telefon.

MEDDELELSE
MEDDELELSE
natural_image
Line drawing of a cable connection to a satellite dish with an electrical outlet (no text or symbols)natural_image
Line drawing of a laptop connected to a CD-ROM via cable (no text or symbols)natural_image
Line drawing of a laptop connected to a CD-ROM via cable (no text or symbols)natural_image
Symbol of a trash bin crossed with no text or numbers, representing waste sorting or disposal (no text present)
natural_image
Simple line drawing of a circular object with a small protrusion and a small circle on top (no text or symbols)CANVIO for Smartphone
Cable USB2.0 Micro-B

Cable USB2.0 Type-C™

Adaptador USB
Micro-B - Type-A

natural_image
Illustration of a small electric motor with attached wires and two terminal blocks (no text or symbols)natural_image
Line drawing of a cable connection to a satellite dish with two outlets and a plug (no text or symbols)(a) Si su dispositivo Android™ dispone de conector USB de tipo "Micro-B", conecte con "CANVIO for Smartphone" con un cable USB 2.0 Micro-B.

natural_image
Diagram showing a smartphone connected to a satellite dish via cable, with no text or symbols present.(b) Si su dispositivo Android™ dispone de conector "Type-C", conecte con "CANVIO for Smartphone" con un cable USB 2.0 Type-C™.

natural_image
Diagram showing a smartphone connected to a CD-ROM via cable, with a separate device labeled in Chinese (no text or symbols on the diagram itself)Choose an app for the USB device


AVISO
2-5 Menú superior
2. Abra un archivo
2. Paso 2
2.1. Conecte su "nuevo" smartphone y toque "Paso 2".

3. Paso 3
AVISO
5. Menú Ayuda
AVISO
- Comience a cargar su smartphone.
AVISO
natural_image
Line drawing of a cable connection with an electrical outlet and a circular device (no text or symbols)natural_image
Line drawing of a laptop connected to a CD-ROM via cable (no text or symbols)(b) Si su PC Windows ^ dispone de conector USB "Type-C", conecte con "CANVIO for Smartphone" con un cable USB 2.0 Type-C ^TM .

natural_image
Line drawing of a laptop connected to a CD-ROM via cable, showing internal components (no text or symbols)www.toshiba.eu/externalstorage/support
natural_image
Symbol of a trash bin crossed with two diagonal lines, representing no waste or discharge (no text or numbers present)natural_image
Simple line drawing of a circular object with a small protrusion and a small hole, resembling a lid or cover (no text or symbols)CANVIO for Smartphone

USB 2.0 Micro-B -johto
USB 2.0 Type-C™ -johto
USB Micro-B - Type-A -sovitin

natural_image
Line drawing of a mechanical electrical connector with wires and a separate socket (no text or symbols)natural_image
Simple line drawing of a circular object with two small holes and a small mark on the side (no text or symbols)1-3 Merkkivalo
Merkkivalot:
natural_image
Line drawing of a cable connection with an electrical outlet and a satellite dish (no text or symbols)natural_image
Diagram showing a smartphone connected to a satellite dish via cable, with no text or symbols present.natural_image
Diagram showing a smartphone connected to a circular device via cable, with a separate connector pinout (no text or symbols present)Choose an app for the USB device


2-4 Alkuasetukset
ILMOITUS
2-5 Ylävalikko
2. Vaihe 2
3. Vaihe 3
ILMOITUS
5. Ohje-valikko
ILMOITUS
ILMOITUS
natural_image
Simple line drawing of a wall-mounted power outlet connected to a satellite dish via cable (no text or symbols)natural_image
Line drawing of a laptop connected to a CD/DVD drive (no text or symbols)natural_image
Line drawing of a laptop connected to a CD-ROM via cable (no text or symbols)www.toshiba.eu/externalstorage/support
natural_image
Symbol of a trash bin crossed with no text or numbers, representing waste sorting or disposal (no text present)2-5 Menu principal FR-13
natural_image
Simple line drawing of a circular object with a small protrusion and a small hole, resembling a lid or cover (no text or symbols)CANVIO for Smartphone

Câble USB 2.0
Micro-B

Câble USB 2.0
Type-C™
natural_image
Line drawing of a mechanical electrical connector with three components (no text or symbols)natural_image
Line drawing of a cable connection to a satellite dish with two outlets and a plug (no text or symbols)natural_image
Diagram showing a smartphone connected to a circular device via cable, with a separate connector pin inserted (no text or symbols present)Choose an app for the USB device
2-4 Configuration initiale
AVIS
2-5 Menu principal
2. Etape 2
3. Etape 3
AVIS
5. Menu d'aide
AVIS
AVIS
natural_image
Line drawing of a cable connection to a satellite dish with two outlets and a plug (no text or symbols)natural_image
Line drawing of a laptop connected to a CD/DVD drive (no text or symbols)natural_image
Line drawing of a laptop connected to a CD-ROM via cable (no text or symbols)www.toshiba.eu/externalstorage/support
natural_image
Symbol of a trash bin crossed with no text or numbers, representing waste sorting or disposal (no text present)natural_image
Simple line drawing of a circular object with a small protrusion and a small hole, resembling a lid or cover (no text or symbols)CANVIO for Smartphone
natural_image
Line drawing of a mechanical electrical connector with three components (no text or symbols)natural_image
Simple line drawing of a circular object with two small holes and a small mark on the side (no text or symbols)natural_image
Line drawing of a wall-mounted power outlet connected to a satellite dish via cable (no text or symbols)natural_image
Diagram showing a smartphone connected to a satellite dish via cable, with no text or symbols present.natural_image
Diagram showing a smartphone connected to a circular device via cable, with a separate connector pin inserted (no text or symbols present)Choose an app for the USB device


2-4 Αρχική ρύθμιση

ΕΙΔΟΠΟΙΗΣΗ
2-5 Κεντρικό μενού
2. Άνοιγμα αρχείου
2. Βήμα 2
3. Βήμα 3
ΕΙΔΟΠΟΙΗΣΗ
5. Μενού Βοήθεια
ΕΙΔΟΠΟΙΗΣΗ
ΕΙΔΟΠΟΙΗΣΗ
natural_image
Line drawing of a cable connection to a circular device with two outlets and a plug (no text or symbols)natural_image
Line drawing of a laptop connected to a CD/DVD drive (no text or symbols)natural_image
Line drawing of a laptop connected to a CD-ROM via cable (no text or symbols)www.toshiba.eu/externalstorage/support
natural_image
Symbol of a trash bin crossed with no text or numbers, representing waste sorting or disposal (no text present)
Ovaj znak označava da se ovaj proizvod ne smije smatrati kućnim otpadom. Propisnim zbrinjavanjem ovog uređaja pomoći ćete u prevenciji mogućih negativnih posljedica po okoliš i ljudsko zdravlje, do kojih bi u protivnom moglo doći nepropisnim zbrinjavanjem ovog proizvoda u otpad. Više pojedinosti o recikliranju ovog proizvoda zatražite od lokalnih vlasti, vaše lokalne organizacije za zbrinjavanje otpada ili trgovine u kojoj ste kupili ovaj proizvod.
Ikone sigurnosti
TOSHIBA CANVIO for Smartphone.
Komponente
CANVIO for Smartphone sadrži sljedeće dijelove:
Adapter izmjeničnog napajanja, utikač (EU+UK)
Kabel USB 2.0 Micro-B
Kabel USB 2.0 Type-C™
Adapter USB Micro-B - Type-A
Vodič za brzi početak rada
Značajke
Arhiviranje podataka glazbe, videozapisa, slika i kontakata s Android telefona na CANVIO za pametni telefon koristeći navedenu aplikaciju, pod nazivom Upravitelj sadržaja.
■ Pristup pohranjenim podacima glazbe, videozapisa i slika u CANVIO za pametni telefon koristeći navedenu aplikaciju.
Puni se Android telefon nakon Automatskog arhiviranja.
natural_image
Simple line drawing of a circular object with a small protrusion and a small hole, resembling a lid or cover (no text or symbols)CANVIO for Smartphone

Kabel USB 2.0
Micro-B
Kabel USB 2.0
Type-C™

Adapter USB
Micro-B - Type-A

natural_image
Illustration of a small electric motor with attached wires and three terminal blocks (no text or symbols)AC adapter (EU + UK)
natural_image
Simple line drawing of a circular object with a small hole and a small mark, no text or symbols present.natural_image
Line drawing of a satellite dish connected to a power outlet, showing wiring and socket placement (no text or symbols)natural_image
Diagram showing a smartphone connected to a CD-ROM via cable, with a separate device labeled in Chinese (no text or symbols on the diagram itself)2-3 Pokretanje aplikacije
Choose an app for the USB device


2-4 Početno podešavanje
- Pročitajte poruku i prijeđite prstom zdesna na lijevo.
- Pročitajte poruku i odaberite postavku „Automatsko arhiviranje“.

OBAVIJEST
2-5 Osnovni izbornik
-
Kucnite za odabir telefona ili mape za arhiviranje
-
Minijature fotografija/videoozapisa
2. Otvorite datoteku
3.2. Kucnite minijature za odabir izvornih datoteka koje želite kopirati. *) Želite li odabrati sve datoteke, kucnite gumb „Sve“.
Nakon odabira kucnite ikonu „
4.2. Kucnite minijature za odabir ciljnih datoteka.
*) Želite li odabrati sve datoteke, kucnite gumb „Sve“. Nakon odabira kucnite ikonu „“ za brisanje datoteka.

1.2. Odaberite kategorije osobnih podataka (kontakti, fotografije, videozapisi, glazba i dokumenti) koje želite prebaciti.
Nakon odabira kucnite „U redu“.
1.3. Pokrenut će se prijenos podataka s izvora podataka (primjerice stari pametni telefon) na CANVIO for Smartphone.
2. Korak 2
2.2. Pročitajte poruku i potvrdite datoteku izvora podataka. Nakon potvrđivanje kucnite „U redu“.
2.3. Podaci će se početi prebacivati s „CANVIO for Smartphone“ na novi pametni telefon.

2.4. Kad se kopiranje podataka dovrši, kucnite „U redu“.
Molimo pobrinite se da provjerite podatke na novom telefonu.

3. Korak 3
OBAVIJEST
Kad izvršite „1. korak“, podaci pametnog telefona se kopiraju na CANVIO for Smartphone.
3.2. Pročitajte poruku i potvrdite datoteku za prijenos podataka. Nakon potvrđivanja kucnite „U redu“.
3.4. Po završetku brisanja kucnite „U redu“
5. Izbornik Pomoć
- CANVIO for Smartphone će početi puniti vaš telefon.

OBAVIJEST
Nakon povezivanja telefona na CANVIO for Smartphone, uređaj će početi raditi (punjenje ili arhiviranje) nakon približno jedne minute neaktivnosti. Želite li pristupiti podacima u uređaju CANVIO for Smartphone tijekom punjenja telefona, molimo odvojite i ponovno povežite USB kabel.
Arhiviranje se možda neće pokrenuti ovisno o preostaloj razini baterije pametnog telefona.
Ako je pametni telefon isključen, „CANVIO for Smartphone“ ga ne može puniti.
- Počnite punjenje pametnog telefona.

OBAVIJEST
Nakon povezivanja telefona na CANVIO for Smartphone, uređaj će početi raditi (punjenje ili arhiviranje) nakon približno jedne minute neaktivnosti. Želite li pristupiti podacima u uređaju CANVIO for Smartphone tijekom punjenja telefona, molimo odvojite i ponovno povežite USB kabel.
Ako je pametni telefon isključen, „CANVIO for Smartphone“ ga ne može puniti.
Poglavlje 3
natural_image
Line drawing of a cable connection to a satellite dish with two outlets and a plug (no text or symbols)natural_image
Line drawing of a laptop connected to a CD-ROM via USB cable (no text or symbols)(b) Ako Windows ^ računalo ima „Type-C“ USB priključak, povežite „CANVIO for Smartphone“ pomoću USB 2.0 Type-C ^TM kabela.
natural_image
Line drawing of a laptop connected to a CD-ROM via cable (no text or symbols)www.toshiba.eu/externalstorage/support
U vezi popravaka u jamstvenom roku potražite:
www.externalhdd.storrepair.de/
Napomene
©2016 TOSHIBA Electronics Europe GmbH. Sva su prava zadržana.
TOSHIBA zadržava pravo na tehničke izmjene. TOSHIBA ne snosi odgovornost za posrednu ili neposrednu štetu proizašlu iz grešaka, propusta ili proturječnosti između ovog uređaja i priručnika.
natural_image
Symbol of a trash bin crossed with no text or numbers, representing waste sorting or disposal (no text present)
natural_image
Simple line drawing of a circular object with a small protrusion and a small circle on top (no text or symbols)CANVIO for Smartphone

USB 2.0-s Mikro-B
kábel

USB 2.0-s
Type-C™ kábel
natural_image
Technical line drawing of a mechanical device with three separate components (no text or symbols)natural_image
Diagram showing a power outlet connected to a satellite dish via cable, with no text or symbols present.natural_image
Diagram showing a smartphone connected to a circular device via cable, with a speech bubble indicating the connection point (no text or symbols present)natural_image
Diagram showing a smartphone connected to a circular device via cable, with a separate connector pinout (no text or symbols present)Choose an app for the USB device

FIGYELMEZTETÉS
2-5 Fömenü
2. Fájl megnyitása
2. 2. lépés
3. 3. lépés
FIGYELMEZTETÉS
5. Súgó
- A CANVIO for Smartphone elkezdi tölteni a telefont.

FIGYELMEZTETÉS
FIGYELMEZTETÉS
natural_image
Line drawing of a cable being inserted into an electrical socket connected to a satellite dish (no text or symbols)natural_image
Line drawing of a laptop connected to a CD/DVD drive via USB cable (no text or symbols)natural_image
Line drawing of a laptop connected to a CD-ROM via cable (no text or symbols)www.toshiba.eu/externalstorage/support
natural_image
Symbol of a trash bin crossed with no text or numbers, representing waste sorting or disposal (no text present)
natural_image
Simple line drawing of a circular object with a small protrusion and a small circle on top (no text or symbols)CANVIO for Smartphone
Cavo USB2.0 micro-B
Cavo USB2.0
Type-C™
natural_image
Technical line drawing of a mechanical device with three separate components (no text or symbols)natural_image
Line drawing of a cable connection to a satellite dish with two outlets and a plug (no text or symbols)natural_image
Diagram showing a smartphone connected to a circular device via cable, with a separate connector pinout (no text or symbols present)2-3 Avviare l'app
Choose an app for the USB device


AVVISO
2-5 Menu superiore
2. Aprire un file
2. Fase 2
3. Fase 3
AVVISO
2-9 Menu Impostazioni / Menu Guida
5. Menu Guida
AVVISO
AVVISO
natural_image
Line drawing of a cable connection to a circular device with two outlets and a plug (no text or symbols)natural_image
Line drawing of a laptop connected to a CD/DVD drive (no text or symbols)natural_image
Line drawing of a laptop connected to a CD-ROM via cable (no text or symbols)www.toshiba.eu/externalstorage/support
natural_image
Symbol of a trash bin crossed with no text or numbers, representing environmental restriction (no text present)
2-9 De menu's Settings/Help....NL-30
natural_image
Simple line drawing of a circular object with a small protrusion and a small hole, resembling a lid or cover (no text or symbols)CANVIO for Smartphone

USB 2.0 Micro-B-kabel

USB 2.0 Type-C ^TM -kabel

USB Micro-B-naar-Type-A-adapter

natural_image
Illustration of a small electric motor with attached wires and three terminal blocks (no text or symbols)Netadapter (EU + VK)

Snelstartgids
1-2 Kennismaking met de CANVIO for Smartphone
Voorkant Achterkant
natural_image
Line drawing of a cable connection to a satellite dish with two outlets and a plug (no text or symbols)2-3 De app starten
KENNISGEVING
2-5 Hoofdmenu
3.2. Tik op de miniaturen om de bestanden te selecteren die u wilt kopieren.
2. Stap 2
3. Stap 3
KENNISGEVING
2-9 De menu's Settings/Help
5. Het menu Help
- De CANVIO for Smartphone laadt nu de telefoon op.

KENNISGEVING
KENNISGEVING
natural_image
Line drawing of a cable connection to a circular device with two outlets, no text or symbols presentnatural_image
Line drawing of a laptop connected to a CD/DVD drive (no text or symbols)natural_image
Line drawing of a laptop connected to a CD-ROM via cable (no text or symbols)www.toshiba.eu/externalstorage/support
natural_image
Symbol of a trash bin crossed with no text or numbers, representing waste sorting or disposal (no text present)
2-5 Toppmeny ...... NO-12
2-6 Photo/Videos-menyen...... NO-13
2-7 Music/Documents-menyen......NO-17
natural_image
Simple line drawing of a circular object with a small protrusion and a small dot on top (no text or symbols)CANVIO for Smartphone

USB2.0 Micro-B-kabel

USB2.0 Type-C ^TM -kabel
USB Micro-B – Type-A-adapter

natural_image
Illustration of a small electric motor with attached wires and three terminal blocks (no text or symbols)natural_image
Line drawing of a cable connection to a satellite dish with two outlets and a plug (no text or symbols)(a) Hvis Android™-enheten din har en USB-kontakt av typen «Micro-B», kobler du den til CANVIO for Smartphone med en USB 2.0 Micro-B-kabel.

(b) Hvis Android™-enheten din har en USB-kontakt av typen «Type-C», kobler du den til CANVIO for Smartphone med en USB 2.0 Type-C™-kabel.
natural_image
Diagram showing a smartphone connected to a circular device via cable, with a separate connector pinout (no text or symbols present)2-3 Start appen
Trykk på app-ikonet for «Content Manager» på smarttelefonen.

MERKNAD
Toshiba anbefaler at du bruker innstillingen «ALLTID» for «Content Manager»-appen.
Choose an app for the USB device


- Les meldingen, og velg innstillingen «Auto backup» (automatisk sikkerhetskopiering).
: Aktiver Auto Backup (Automatisk sikkerhetskopiering)
: Deaktiver Auto Backup (Automatisk sikkerhetskopiering)


MERKNAD
2-5 Toppmeny
2. Åpne en fil
3.2. Trykk på miniatyrer for å velge kildefilene du vil kopiere.
*) Hvis du vil velge alle filene, kan du trykke på «All»-knappen. Når du er ferdig med å velge, trykker du på «»-ikonet.
1.2. Velg de kategoriene av personlige data (kontakter, bilder, videoer, musikk og dokumenter) du vil overføre.
2. Trinn 2
2.2. Les meldingen og bekreft datakildefilen.
Trykk på «OK» etter at du har bekreftet.
3. Trinn 3
MERKNAD
3.2. Les meldingen og bekreft filen for dataoverføring. Trykk på «OK» når du har bekreftet.
3.3. Slettingen starter.
- Innstillingen «Auto Backup» (automatisk sikkerhetskopiering)
Du kan konfigurere innstillingen for automatisk sikkerhetskopiering i denne menyen.
1.1. Slå Auto Backup (automatisk sikkerhetskopiering) på eller av.
5. Hjelpemeny
- CANVIO for Smartphone begynner å lade telefonen.

MERKNAD
- Ladingen av smarttelefonen starter.

MERKNAD
natural_image
Line drawing of a cable connection to a circular device with two outlets, no text or symbols presentnatural_image
Line drawing of a laptop connected to a CD/DVD drive (no text or symbols)(b) Hvis Windows ^ -PC-en har en USB-kontakt av «Type-C», kobler du den til CANVIO for Smartphone med en USB 2.0 Type-C ^TM -kabel.

natural_image
Line drawing of a laptop connected to a CD-ROM via cable, showing internal components (no text or symbols)www.toshiba.eu/externalstorage/support
For garantikrav viser vi til www.externalhdd.storrepair.de/
Merknader
©2016 TOSHIBA Electronics Europe GmbH. Med enerett.
natural_image
Symbol of a trash bin crossed with two diagonal lines, representing waste sorting or restriction (no text present)
TOSHIBA CANVIO for Smartphone.
Składniki
natural_image
Simple line drawing of a circular object with a small protrusion and a small circle on top (no text or symbols)CANVIO for Smartphone
natural_image
Technical line drawing of a mechanical device with three separate components (no text or symbols)natural_image
Line drawing of a cable connection to a satellite dish with two outlets and a plug (no text or symbols)natural_image
Diagram showing a smartphone connected to a circular device via cable, with a separate connector pinout (no text or symbols present)
UWAGA!
2-5 Menu główne
2. Otwarcie pliku
2. Krok 2
3. Krok 3
UWAGA!
5. Menu Pomoc
UWAGA!
UWAGA!
natural_image
Line drawing of a cable connection to a satellite dish with two outlets and a plug (no text or symbols)natural_image
Line drawing of a laptop connected to a CD/DVD drive (no text or symbols)natural_image
Line drawing of a laptop connected to a CD-ROM via cable (no text or symbols)www.toshiba.eu/externalstorage/support
natural_image
Symbol of a trash bin crossed with no text or numbers, representing waste sorting or disposal (no text present)
natural_image
Simple line drawing of a circular object with a small protrusion and a small circle on top (no text or symbols)CANVIO for Smartphone

Cabo USB 2.0 Micro-B

Cabo USB 2.0 Type-C™
Adaptador USB
Micro-B - Type-A

natural_image
Technical line drawing of a mechanical device with three separate components (no text or symbols)Porta USB Tomada DC IN
natural_image
Simple line drawing of a circular object with a small hole and a small mark, no text or symbols present.1-3 Indicador LED
natural_image
Diagram showing a power outlet connected to a satellite dish via cable, with no text or symbols present.natural_image
Diagram showing a smartphone connected to a circular device via cable, with no visible text or symbols.natural_image
Diagram showing a smartphone connected to a circular device via cable, with a separate connector pinout (no text or symbols present)2-3 Iniciar a App
: Activar Cópia de segurança automática : Desactivar Cópia de segurança automática
AVISO
2-5 Menu Inicial
- Toque para seleccionar o telefone ou pasta para a cópia de segurança
- Miniaturas de fotografías/vídeos
2 Abrir um ficheiro
2. Passo 2
3. Passo 3
AVISO
5. Menu Ajuda
AVISO
AVISO
natural_image
Line drawing of a cable connection to a circular device with two outlets, no text or symbols presentnatural_image
Line drawing of a laptop connected to a CD-ROM via cable (no text or symbols)natural_image
Line drawing of a laptop connected to a CD-ROM via cable, showing internal components (no text or symbols)www.toshiba.eu/externalstorage/support
natural_image
Symbol of a trash bin crossed with no text or numbers, representing waste sorting or disposal (no text present)
Upotreba ovog simbola ukazuje na to da se ovaj proizvod ne sme smatrati otpadom domaćinstva. Starajući se da se ovaj proizvod pravilno odloži na otpad, pomoći ćete u sprečavanju mogućih negativnih posledica po prirodnu sredinu i ljudsko zdravlje, do kojih bi u suprotnom moglo doći nepravilnim rukovanjem otpadom ovog proizvoda. Više informacija u vezi s recikliranjem ovog proizvoda možete dobiti ukoliko se obratite lokalnom nadležnom telu, preduzeću koje odnosi vaš domaći otpad ili prodavnici u kojoj ste kupili ovaj proizvod.
Bezbednosne ikonice
2-5 Top Menu (Gornji meni) ......RS-12
2-6 Meni Fotografije/Videa ......RS-13
2-7 Meni Muzika/Dokumenta....RS-17
2-8 Meni Brzi prenos sa telefona na telefon....RS-21
2-9 Meni Settings (Postavke) / Meni Help (Pomoć) ......RS-29
2-10 Automatska rezervna kopija / Funkcija punjenja....RS-34
2-11 Funkcija Ručno punjenje....RS-36
Poglavlje 3 Početak korišćenja sa Windows® PC....RS-37
3-1 Povezivanje sa Windows® PC....RS-37
TOSHIBA CANVIO for Smartphone.
Komponente
natural_image
Simple line drawing of a circular object with a small protrusion and a small circle on top (no text or symbols)CANVIO for Smartphone

USB 0,667 Mikro-B
kabl

USB2.0 Type-C™ kabl

USB Mikro-B - Tip-A adapter
natural_image
Technical line drawing of a mechanical device with three separate components (no text or symbols)Adapter za struju (EU + UK)
natural_image
Line drawing of a satellite dish connected to a power outlet, showing wiring and socket placement (no text or symbols)(a) Ako vaš Android™ uređaj ima USB priključak tipa „Mikro-B“, povežite na „CANVIO for Smartphone“ sa USB 2.0 Mikro-B kablom.
natural_image
Diagram showing a smartphone connected to a satellite dish via cable, with no text or symbols present.(b) Ako vaš Android™ uređaj ima priključak tipa „Type-C“, povežite se na „CANVIO for Smartphone“ sa USB 2.0 Type-C™ kablom.

natural_image
Diagram showing a smartphone connected to a CD-ROM via cable, with a separate device labeled in Chinese (no text or symbols on the diagram itself)2-3 Pokretanje aplikacije
Pritisnite na ikonu aplikacije „Content Manager“ koja je prikazana u vašem pametnom telefonu.

BELEŠKA
Choose an app for the USB device


2-4 Početno podešavanje
- Pročitajte poruku i prevucite sa desna na levo.

- Pročitajte poruku i izaberite postavku „Auto backup“ (Automatska rezervna kopija).

Vaše jedinstveno ime telefona koje vide svi drugi korisnici možete da promenite.
Nakon početnog podešavanja, postavku „Automatska rezervna kopija“ možete kasnije da promenite u meniju „Settings“ (Postavke).
BELEŠKA
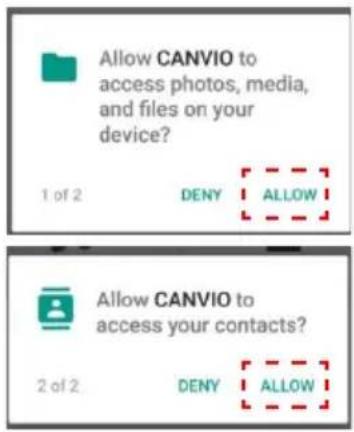
Ako je ispod prikazano polje za zahtev odobrenja, pritisnite na „ALLOW“ (Dozvoli).
*) Ako pritisnete na „DENY“ (Odbij), nećete moći da napravite rezervnu kopiju podataka sa pametnog telefona.
2-5 Top Menu (Gornji meni)
- Pritisnite na ovo dugme da pristupite meniju „Settings“ (Postavke).
- Pritisnite na ovo dugme da pristupite meniju „Photos“ (Fotografije).
- Pritisnite na ovo dugme da pristupite meniju „Videos“ (Video).
- Pritisnite na ovo dugme da pristupite meniju „Music“ (Muzika).
- Pritisnite na ovo dugme da pristupite meniju „Documents“ (Dokumenta).
- Pritisnite na ovo dugme da pristupite meniju „Manual Charge“ (Ručno punjenje).
- Pritisnite na ovo dugme da pristupite meniju „Quick phone to phone transfer“ (Brzi prenos sa telefona na telefon).
- Prikaz kapaciteta skladištenja na svakoj lokaciji.
- Pritisnite da izaberete telefon ili fasciklu za rezervnu kopiju
- Fotografije/videa/umanjene slike
Da biste prikazali sakriveni sadržaj, prevucite sa desna na levo u prostoru izabrane kartice.
2. Otvaranje datoteke
3.2. Pritisnite na sličicu da izaberete izvorne datoteke koje želite da kopirate.
*) Ako želite da izaberete sve datoteke, pritisnite na dugme „All“ (Sve).
4.2. Pritisnite na sličicu da izaberete ciljne datoteke.
*) Ako želite da izaberete sve datoteke, pritisnite na dugme „All“ (Sve).
1.2. Izaberite kategorije ličnih podataka (kontakti, fotografije, videa, muzika i dokumenta) koje želite da prenesete. Kada izvršite izbor, pritisnite na „OK“ (U redu).

1.3. Počeće prenos podataka iz vašeg izvora podataka (npr. stari pametni telefon) na CANVIO for Smartphone.
1.4. Kada se završi kopiranje podataka, prikazuju se rezultati. Pročitajte poruku i pritisnite na „OK“ (U redu).
2. Step 2 (2. korak)
2.1. Povežite vaš „novi“ pametni telefon (izvor podataka), i pritisnite na „Step 2“ (2. korak).

2.2. Pročitajte poruku i potvrdite datoteku izvora podataka. Kada potvrdite, pritisnite na „OK“ (U redu).

2.3. Podaci počinju da se prebacuju sa „CANVIO for Smartphone“ na vaš novi pametni telefon.

2.4. Kada se završi kopiranje podataka, pritisnite na „OK“ Obavezno proverite podatke na novom telefonu.
3. Step 3 (3. korak)
BELEŠKA
Kada izvršite „1. korak“, podaci sa vašeg pametnog telefona se kopiraju na CANVIO for Smartphone.
Kada se završi „2.korak“, preporučujemo da uradite „3. korak“ da biste obrisali istoriju.
3.1. Povežite vaš novi pametni telefon, i pritisnite na „Step 3“ (3. korak).
3.2. Pročitajte poruku i potvrdite datoteku prenosa podataka. Kada potvrdite, pritisnite na „OK“ (U redu).
3.4. Kada se završi brisanje, pritisnite na „OK“ (U redu).
2-9 Meni Settings (Postavke) / Meni Help (Pomoć)
Da bi se prikazao meni Settings (Postavke), pritisnite na ikonu „

- Postavka Auto Backup (Automatska rezervna kopija)
5. Meni Help (Pomoć)
Da bi se prikazao meni Help (Pomoć), pritisnite na „”
Možete da vidite broj verzije aplikacije, informacije pomoći na mreži, informacije o OSS (ako se koristi).
2-10 Automatska rezervna kopija / Funkcija punjenja
Funkcija Automatska rezervna kopija / Funkcija punjenja radu po redosledu prikazanim dole.
BELEŠKA
Kada se telefon priključi na CANVIO for Smartphone, uređaj će početi da radi (punjenje ili izrada rezervne kopije) nakon otprilike jednog minuta neaktivnosti. Ako želite da pristupite podacima u CANVIO for Smartphone dok se telefon puni, odvojite i ponovo priključite USB kabl.
- Počnite sa punjenjem pametnog telefona.

BELEŠKA
Kada se telefon priključi na CANVIO for Smartphone, uređaj će početi da radi (punjenje ili izrada rezervne kopije) nakon otprilike jednog minuta neaktivnosti. Ako želite da pristupite podacima u CANVIO for Smartphone dok se telefon puni, odvojite i ponovo priključite USB kabl.
Ako je pametni telefon isključen, „CANVIO for Smartphone“ ne može da ga napuni.
Poglavlje 3
Početak korišćenja sa Windows® PC
natural_image
Line drawing of a cable connection to a circular device with two outlets, no text or symbols presentnatural_image
Line drawing of a laptop connected to a CD/DVD drive (no text or symbols)(b) Ako vaš Windows ^ PC ima USB priključak tipa „Type-C“, povežite se na „CANVIO for Smartphone“ sa USB 2.0 Type-C ^TM kablom.

natural_image
Line drawing of a laptop connected to a CD-ROM via cable, showing internal components (no text or symbols)Zasvetleće indikatorska lampica za napajanje/podatke.
www.toshiba.eu/externalstorage/support
natural_image
Symbol of a trash bin crossed with no text or numbers, representing environmental restriction (no text present)
natural_image
Simple line drawing of a circular object with a small protrusion and a small hole, resembling a lid or cover (no text or symbols)CANVIO for Smartphone
Кабель USB 2.0
Micro-B

Кабель USB 2.0
Type-C™
Переходник USB
Micro-B – Type-A

natural_image
Illustration of a small electric motor with attached wires and two terminal blocks (no text or symbols)natural_image
Diagram showing a power outlet connected to a satellite dish via cable, with no text or symbols present.natural_image
Diagram showing a smartphone connected to a circular device via cable, with a separate connector pinout (no text or symbols present)Choose an app for the USB device
УВЕДОМЛЕНИЕ
2-5 Верхнее меню
2. Открывание файла
- Удаление файлов
2. Этап 2
3. Этап 3
УВЕДОМЛЕНИЕ
2-9 Меню Settings (Параметры) и Help (Справка)
УВЕДОМЛЕНИЕ
УВЕДОМЛЕНИЕ
natural_image
Diagram showing a power outlet connected to a satellite dish via cable, with no text or symbols present.natural_image
Line drawing of a laptop connected to a circular device via cable (no text or symbols)natural_image
Line drawing of a laptop connected to a CD-ROM via cable (no text or symbols)www.toshiba.eu/externalstorage/support
natural_image
Symbol of a trash bin crossed with two crossed lines, no text or numbers presentTOSHIBA Support ...... SE-43
Meddelanden.... SE-43
Inledning
Översikt
Toshiba CANVIO for Smartphone.
Komponenter
natural_image
Simple line drawing of a circular object with a small protrusion and a small hole, resembling a lid or cover (no text or symbols)CANVIO for Smartphone

USB2.0 Mikro-B-kabel
USB 2.0 Type-C ^TM -kabel

USB Micro-B – Type-A-adapter

natural_image
Line drawing of a mechanical electrical connector with three components (no text or symbols)Nätadapter (EU + UK)
Snabbstarthandbok
1-2 Lär känna din CANVIO for Smartphone
Framsidan Baksidan

natural_image
Simple line drawing of a circular object with a small hole and a small mark, no text or symbols present.1-3 LED-indikator
natural_image
Line drawing of a cable and socket installation with a power outlet (no text or symbols)(a) Om Android™-enheten har en USB-kontakt med en Micro-B-anslutning, ska du ansluta "CANVIO for Smartphone" med en USB 2.0 Micro-B-kabel.

natural_image
Diagram showing a smartphone connected to a satellite dish via cable, with no text or symbols present.(b) Om Android™-enheten har en USB-kontakt med en Type-C-anslutning, ska du ansluta "CANVIO for Smartphone" med en USB 2.0 Type-C-kabel.

natural_image
Diagram showing a smartphone connected to a satellite dish via cable, with a separate device inserted into the cable (no text or symbols present)2-3 Starta appen
Choose an app for the USB device


MEDDELANDE
2-5 Top Menu
2. Öppna en fil
4. Ta bort filer
4.1. Knacka på knappen Select
2. Steg 2
3. Steg 3
MEDDELANDE
5. Hjälpmenyn
MEDDELANDE
MEDDELANDE
natural_image
Line drawing of a cable connection to a satellite dish with an electrical outlet (no text or symbols)natural_image
Line drawing of a laptop connected to a CD-ROM via cable (no text or symbols)(b) Om Windows ^ -datorn har en "USB Type-C-kontakt", ansluter du "CANVIO for Smartphone" med en USB 2.0 Type-C-kabel.

natural_image
Line drawing of a laptop connected to a CD-ROM via cable (no text or symbols)www.toshiba.eu/externalstorage/support
natural_image
Symbol of a trash bin crossed with two crossed lines, no text or numbers presentnatural_image
Simple line drawing of a circular object with a small protrusion and a small hole, resembling a lid or cover (no text or symbols)CANVIO for Smartphone

Kábel USB 2.0
Micro-B

Kábel USB 2.0
Type-C™
Adaptér USB
Micro-B – Type-A
natural_image
Illustration of a small electric motor with attached wires and two terminal blocks (no text or symbols)natural_image
Line drawing of a cable connection to a satellite dish with two outlets and a plug (no text or symbols)(a) Ak má zariadenie so systémom Android™ konektor USB Micro-B, pripojte zariadenie CANVIO for Smartphone pomocou kábla USB 2.0 Micro-B.
(b) Ak má zariadenie so systémom Android™ konektor Type-C, pripojte zariadenie CANVIO for Smartphone pomocou kábla USB 2.0 Type-C™.

natural_image
Diagram showing a smartphone connected to a circular device via cable, with a separate connector pinout (no text or symbols present)
OZNÁMENIE
2-5 Hlavná ponuka
2. Otvorenie súboru
2. 2. krok
3. 3. krok
OZNÁMENIE
2-9 Ponuky Settings (Nastavenia) a Help (Pomocník)
Ak chcete zobrazit' ponuku Settings (Nastavenia), t'uknite na ikonu
OZNÁMENIE
OZNÁMENIE
natural_image
Line drawing of a cable connection to a circular device with two outlets, no text or symbols presentnatural_image
Line drawing of a laptop connected to a CD/DVD drive (no text or symbols)(b) Ak má počítač so systémom Windows® konektor USB Type-C, pripojte zariadenie CANVIO for Smartphone pomocou kábla USB 2.0 Type-C™.
natural_image
Line drawing of a laptop connected to a CD-ROM via cable (no text or symbols)Rozsvieti sa indikátor napájania/spracovania údajov.
Zapne sa jednotka.
Jednotka by sa mala pripojit' a v priečinku Tento počitač by sa mala zobrazit' ikona novej jednotky.
3-2 Odpojenie od počítača so systémom Windows®
www.toshiba.eu/externalstorage/support
natural_image
Symbol of a trash bin crossed with no text or numbers, representing waste sorting or disposal (no text present)2-8 Meni "Quick Phone to Phone Transfer"
(Hiter prenos med telefoni) ......SL-21
2-9 Menija "Settings" (Nastavitve) in "Help" (Pomoč) ...... SL-29
natural_image
Simple line drawing of a circular object with a small protrusion and a small hole, resembling a lid or cover (no text or symbols)CANVIO for Smartphone
Kabel USB 2.0 Micro-B

Kabel USB 2.0
Type-C™

USB Micro-B – adapter tipa A

natural_image
Line drawing of a mechanical electrical connector with three separate parts (no text or symbols)Napajalnik (EU + UK)
natural_image
Simple line drawing of a circular object with a small hole and a small mark on the side (no text or symbols)natural_image
Line drawing of a cable connection with an electrical outlet and a circular device (no text or symbols)(a) Če ima vaša naprava s sistemom Android™ priključek USB vrste "Micro-B", jo priključite na "CANVIO for Smartphone" s kablom USB 2.0 Micro-B.

natural_image
Diagram showing a smartphone connected to a satellite dish via cable, with no text or symbols present.(b) Če ima vaša naprava s sistemom Android™ priključek USB vrste "Type-C", jo priključite na "CANVIO for Smartphone" s kablom USB 2.0 Type-C™.
natural_image
Diagram showing a smartphone connected to a circular device via cable, with a separate connector pinout (no text or symbols present)Choose an app for the USB device
OBVESTILO
Če se prikaže spodnje okno z zahtevo za dovoljenje, tapnite "ALLOW" (DOVOLI).
*) Če tapnete “DENY” (ZAVRNI), ne boste mogli ustvariti varnostne kopije podatkov pametnega telefona.
2-5 Nadrejeni meni
- Tapnite ta gumb, da odprete meni "Settings" (Nastavitve).
- Tapnite ta gumb, da odprete meni "Photos" (Fotografije).
- Tapnite ta gumb, da odprete meni "Videos" (Videoposnetki).
- Tapnite ta gumb, da odprete meni "Music" (Glasba).
- Tapnite ta gumb, da odprete meni "Documents" (Dokumenti).
- Tapnite ta gumb, da odprete meni "Manual Charge" (Ročno polnjenje).
- Tapnite ta gumb, da odprete meni "Quick phone to phone transfer" (Hiter prenosi med telefoni).
- Prikaz zmogljivosti shrambe na posameznem mestu.
2-6 Meni "Photo/Videos" (Fotografije/videoposnetki)
- Meni "Photo/Videos" (Fotografije/videoposnetki)
V meniju "Photo/Videos" (Fotografije/videoposnetki) lahko upravljate datoteke s fotografijami in videodatoteke.

2. Odprite datoteko
3.2. Tapnite sličice, da izberete izvorne datoteke, ki jih želite kopirati. *) Če želite izbrati vse datoteke, tapnite gumb "All" (Vse).
Ko izberete datoteke, tapnite ikono “”.
Izbrane datoteke so označene s simbolom "√"
3.3. Izberite ciljno mesto za shranjevanje mape, ki jo želite kopirati. Ko izberete mesto, tapnite gumb "Paste" (Prilepi), da kopirate datoteke.
- Brisanje datotek
4.1. Tapnite gumb »Select« (Izberi)
4.2. Tapnite sličice, da izberete ciljne datoteke.
*) Če želite izbrati vse datoteke, tapnite gumb "All" (Vse). Ko izberete datoteke, tapnite ikono "", da izbrišete datoteke.

2-7 Meni "Music/Documents" (Glasba/dokumenti)
1. Meni "Music/Documents" (Glasba/dokumenti)
2. 2. korak
2.1. Priključite "novi" pametni telefon in tapnite "Step 2" (2. korak).
2.2. Preberite sporočilo in potrdite izbrano datoteko vira podatkov. Ko potrdite datoteko, tapnite "OK" (V redu).

2.3. Začne se prenos podatkov iz diska "CANVIO for Smartphone" v novi pametni telefon.
2.4. Po končanem kopiranju tapnite "OK" (V redu). Ne pozabite preveriti podatkov v novem telefonu.

3. 3. korak
OBVESTILO
Ko izvedete "1. korak", so podatki iz pametnega telefona kopirani na disk CANVIO for Smartphone.
3.2. Preberite sporočilo in potrdite izbrano datoteko za prenos podatkov.
Ko potrdite datoteko, tapnite "OK" (V redu).
3.4. Po končanem brisanju tapnite "OK" (V redu).
2-9 Menija "Settings" (Nastavitve) in "Help" (Pomoč)
Če želite odpreti meni "Settings" (Nastavitve), tapnite ikono "☐".
5. Meni "Help" (Pomoč)
Če želite prikazati meni "Help" (Pomoč), tapnite

OBVESTILO
- Začnite polniti pametni telefon.

OBVESTILO
natural_image
Diagram showing a power outlet connected to a satellite dish via cable, with no text or symbols present.- Ko se računalnik vklopi in dokonča postopek zagona, upoštevajte spodnja navodila, da priključite disk "CANVIO for Smartphone" na računalnik.
(a) Če ima računalnik s sistemom Windows® PC priključek USB vrste "Type-A", priključite disk "CANVIO for Smartphone" na računalnik s kablom USB 2.0 Micro-B in adapterjem USB Micro-B Type-A.
natural_image
Line drawing of a laptop connected to a CD-ROM via cable (no text or symbols)natural_image
Line drawing of a laptop connected to a CD-ROM via cable (no text or symbols)Lučka za napajanje/podatke zasveti.
Disk se zažene.
Disk se bo vpel, v mapi "Moj računalnik" pa se prikaže ikona za nov pogon.
www.toshiba.eu/externalstorage/support
natural_image
Symbol of a trash bin crossed with no text or numbers, representing waste sorting or disposal (no text present)natural_image
Simple line drawing of a circular object with a small protrusion and a small hole, resembling a lid or cover (no text or symbols)CANVIO for Smartphone

USB 2.0 Mikro B kablosu

USB 2.0 Tip-C™ kablosu

USB Mikro-B - Tip-A adaptörü

natural_image
Line drawing of a mechanical electrical connector with three separate parts (no text or symbols)natural_image
Line drawing of a cable and socket installation with an electrical outlet (no text or symbols)natural_image
Diagram showing a smartphone connected to a circular device via cable, with no visible text or symbols.natural_image
Diagram showing a smartphone connected to a circular device via cable, with a close-up of the device's connector (no text or symbols present)Choose an app for the USB device


2-4 İlk kurulum
UYARI
2-5 Üst Menü
2. Dosya açın
2. Adım 2
3. Adım 3
UYARI
5. Yardım Menüsü
UYARI
UYARI
natural_image
Line drawing of a cable connection to a circular device with two outlets, no text or symbols presentnatural_image
Line drawing of a laptop connected to a CD/DVD drive (no text or symbols)natural_image
Line drawing of a laptop connected to a CD-ROM via cable (no text or symbols)www.toshiba.eu/externalstorage/support
natural_image
Symbol of a trash bin crossed with no text or numbers, representing waste sorting or disposal (no text present)
أي捐款ات السلامة
natural_image
Simple line drawing of a circular object with a small protrusion and a small dot on top (no text or symbols)CANVIO for Smartphone

natural_image
Illustration of a small electronic device with wires and two separate plug connectors (no text or symbols)محول التيار المتردد
(الاتحاد الأوروبي +
المملكة المتحدة
USB Micro-B - محولType
CANVIO for Smartphone 1-2 تعرف على
natural_image
Simple line drawing of a circular object with a small hole and a small mark, no text or symbols present.natural_image
Line drawing of a cable connection to a circular device with two outlets and a plug (no text or symbols)natural_image
Diagram showing a smartphone connected to a satellite dish via cable, with no text or symbols present.natural_image
Diagram showing a smartphone connected to a circular device via cable, with a separate connector pinout (no text or symbols present)2-4 الإعداد الأولى
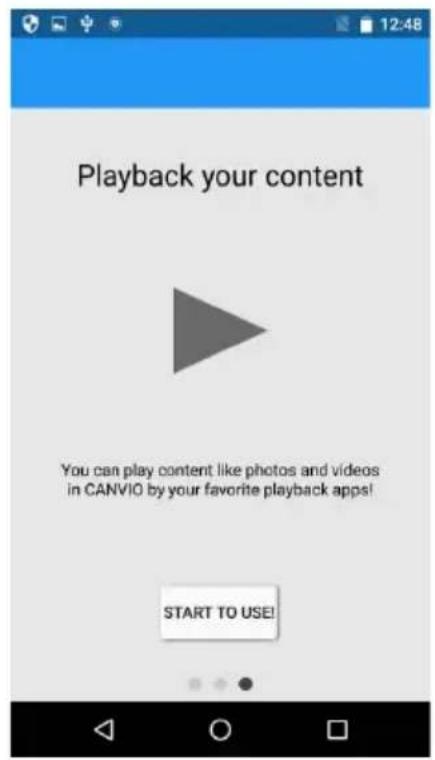
2-5 العلوية

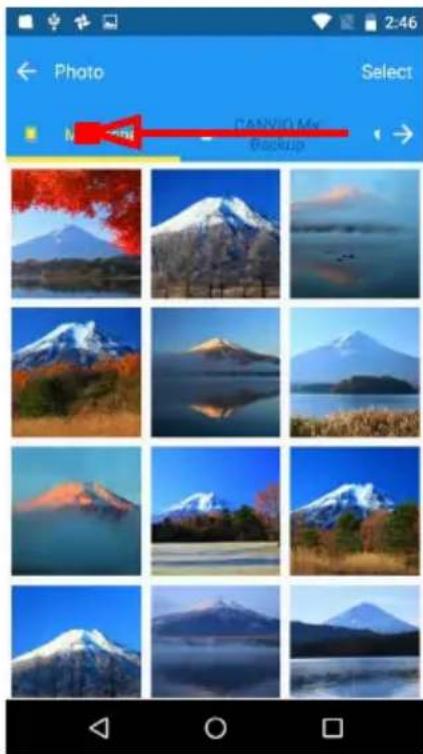
فتح ملف.
CANVIO for Smartphone.
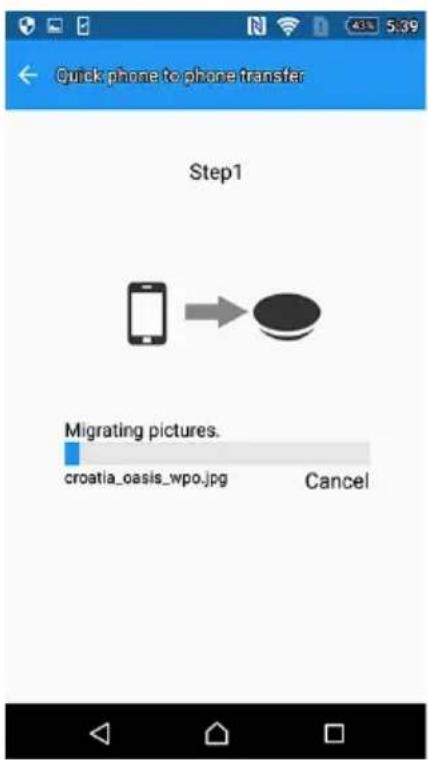
- الخطة
- الخطة
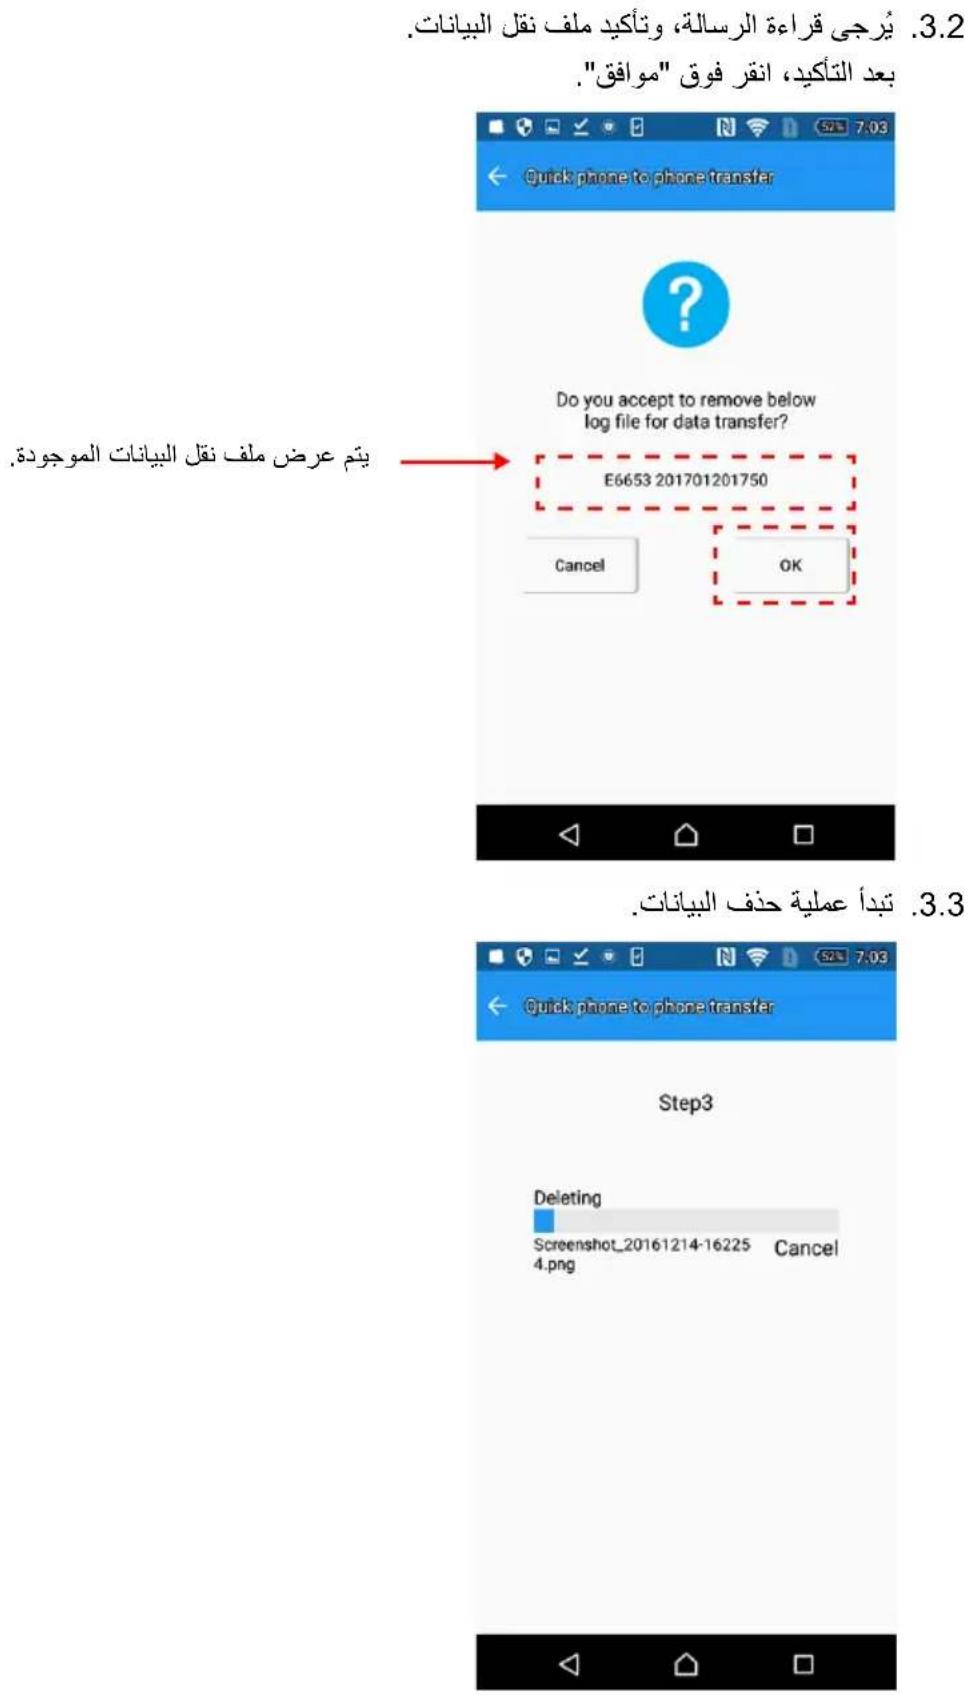
- قائمة التعليمات
الفصل الثالث
natural_image
Line drawing of a cable and socket installation with an electrical outlet (no text or symbols)natural_image
Line drawing of a laptop connected to a satellite dish via USB cable (no text or symbols)natural_image
Line drawing of a laptop connected to a CD-ROM via cable (no text or symbols)www.toshiba.eu/externalstorage/support