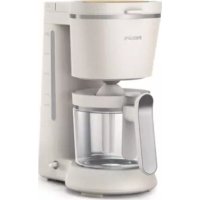
Eco Conscious Edition HD5120 - Coffee maker PHILIPS - Free user manual and instructions
Find the device manual for free Eco Conscious Edition HD5120 PHILIPS in PDF.



| Brand | Philips |
| Model | Eco Conscious Edition HD5120 |
| Product type | Drip coffee maker |
| Color | White / Silver (estimated) |
| Water tank capacity | 1.2 L (estimated for 10-15 cups) |
| Coffee type | Ground coffee for filter |
| Filter | Paper filter type 1x4 or size 4 |
| Carafe | Glass with pouring spout, capacity approx. 1.2 L |
| Hot plate | Yes, keeps warm |
| Drip-stop function | Yes, allows removing the carafe during brewing |
| Auto shut-off | Yes, after 30 minutes |
| Descaling | Recommended every 2 months with white vinegar (4% acetic acid) |
| Power supply | 220-240 V, 50-60 Hz (standard estimate) |
| Power | Approx. 700-1000 W (estimate) |
| Dimensions (W x D x H) | Approx. 25 x 20 x 35 cm (estimate) |
| Weight | Approx. 1.5 kg (estimate) |
| Maintenance | Clean exterior with a damp cloth; filter and carafe washable in warm soapy water |
| Materials | Plastic, glass, metal (hot plate) |
| Warranty | 2 years (Philips standard) |
| Recycling | Do not dispose of with household waste, follow local regulations |
Frequently Asked Questions - Eco Conscious Edition HD5120 PHILIPS
User questions about Eco Conscious Edition HD5120 PHILIPS
0 question about this device. Answer the ones you know or ask your own.
Ask a new question about this device
Download the instructions for your Coffee maker in PDF format for free! Find your manual Eco Conscious Edition HD5120 - PHILIPS and take your electronic device back in hand. On this page are published all the documents necessary for the use of your device. Eco Conscious Edition HD5120 by PHILIPS.
USER MANUAL Eco Conscious Edition HD5120 PHILIPS
| EN User manual 2 | |
| BG Ръководство за потребителя 14 | |
| CS Uživatelská příručka 26 | |
| DA Brugervejledning 38 | |
| DE Bedienungsanleitung 50 | |
| EL Еγχειρίδιο χρήσης 62 | |
| ES Manual de usuario 75 | |
| ET Kasutusjuhend 87 | |
| FI Käyttöopas 99 | |
| FR Mode d'emploi 111 | |
| HR Korisnički priručnik 123 | |
| HU Használati útmutató 135 | |
| IT Manuale dell'utente 147 | |
| KK Пайдаланушы нýsκαулығы 159 | |
| LT Naudotojo vadovas 171 |
| LV Lietošanas instrukcija 183 |
| MK Корисничко упатство 195 |
| NL Gebruiksaanwijzing 207 |
| NO Brukerhåndbok 219 |
| PL Instrukcja obsługi 231 |
| PT Manual do utilizador 243 |
| RO Manual de utilizare 255 |
| RU Руководство пользователя 267 |
| SK Príručka užívatela 279 |
| SL Uporabniški priročnik 291 |
| SQ Manuali i përdorimit 303 |
| SR Korisnički priručnik 315 |
| SV Användarhandbok 327 |
| UK Посібник користувача 339 |
| HE 351 |
2 English
Table of Contents
Introduction 3
Important safety information 3
Electromagnetic fields (EMF) 3
Device overview 4
Before first use 5
Brewing coffee 6
Drip stop function 9
Cleaning 9
Descaling 9
Ordering accessories 11
Warranty and support 11
Recycling 11
Troubleshooting 12
Introduction
Congratulations on your purchase and welcome to Philips! To fully benefit from the support that Philips offers, register your product at www.philips.com/welcome.
Important safety information
Read this important information carefully before you use the appliance and save it for future reference.
Danger
- Never immerse the appliance in water or any other liquid.
Warning
- Check if the voltage indicated on the appliance corresponds to the local mains voltage before you connect the appliance.
-Connect the appliance to an earthed wall socket.
- Do not use the appliance if the plug, the mains cord or the appliance itself is damaged.
- If the mains cord is damaged, you must have it replaced by Philips, a service center authorized by Philips or similarly qualified persons in order to avoid a hazard.
- This appliance can be used by children aged from 8 years and above and by persons with reduced physical, sensory or mental capabilities or lack of experience and knowledge if they have been given supervision or instruction concerning use of the appliance in a safe way and if they understand the hazards involved. Cleaning and user maintenance shall not be made by children unless they are older than 8 and supervised. Keep the appliance and its cord out of reach of children aged less than 8 years.
-Children shall not play with the appliance.
- Do not let the mains cord hang over the edge of the table or worktop on which the appliance stands.
- Only use this appliance for its intended purpose to avoid potential hazard or injury.
Caution
-Always flush the appliance with fresh water before first use.
- Do not place the appliance on a hot surface and do not let the mains cord come into contact with hot surfaces.
- Do not place the appliance in a cabinet when in use.
- Unplug the appliance before you clean it and if problems occur during brewing.
- During brewing and until you switch off the appliance, the filter holder, the lower part of the appliance, the hotplate, and the jug filled with coffee are hot.
-Do not put the jug on a stove or in a microwave to reheat coffee.
- This appliance is intended to be used in household and similar applications such as farm houses, bed and breakfast type environments, staff kitchen areas in shops, offices and other working environments, and by clients in hotels, motels and other residential type environments.
- Always return the appliance to a service centre authorised by Philips for examination or repair. Do not open the appliance or attempt to repair the appliance yourself.
Electromagnetic fields (EMF)
This Philips appliance complies with all applicable standards and regulations regarding exposure to electromagnetic fields.
4 English
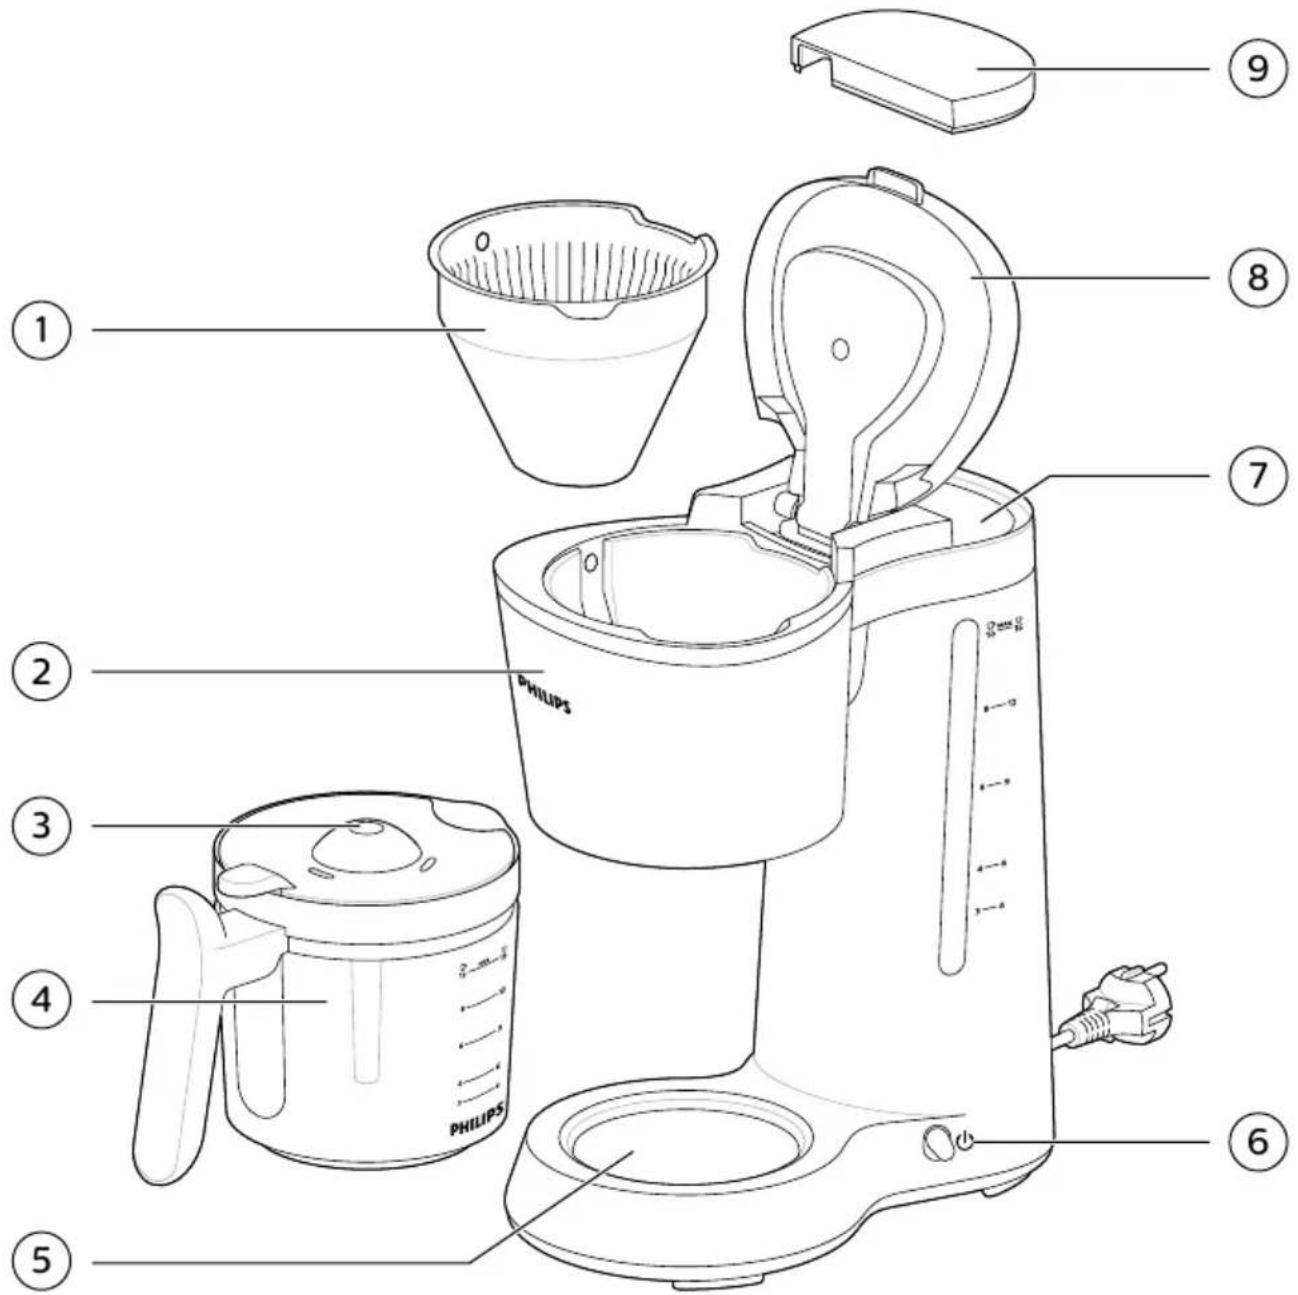
Device overview
1 Filter
2 Filter body
3 Jug lid
4 Glass jug
5 Hotplate
6 On/off switch
7 Water tank
8 Filter Lid
9 Water tank lid
Before first use
Note: Do not place a paper filter with ground coffee in the filter.
Note: Always flush the appliance with fresh water before first use.
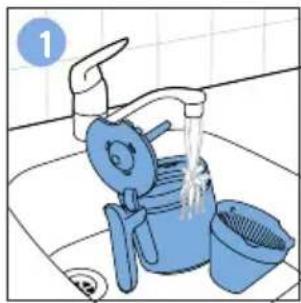
1 Clean the filter, the glass jug and the jug lid.

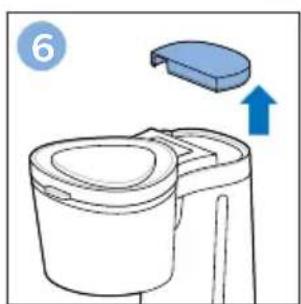
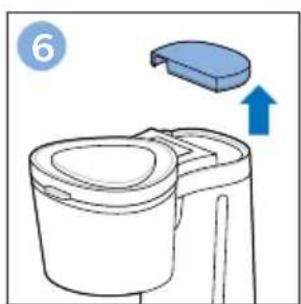
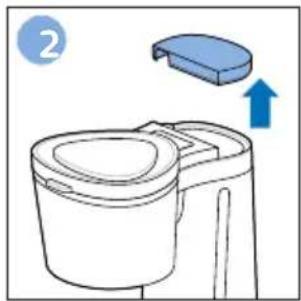
2 Remove the water tank lid.

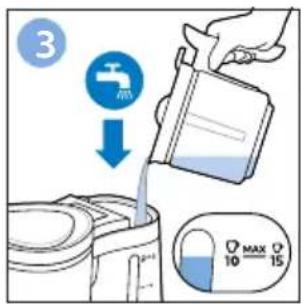
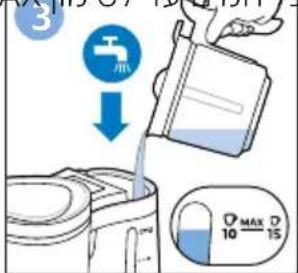
3 Fill the water tank to the MAX indication.
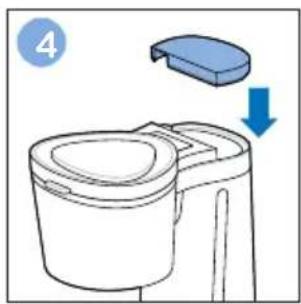
4 Put the water tank lid back onto the water tank.

5 Place the glass jug on the hotplate.
6 English

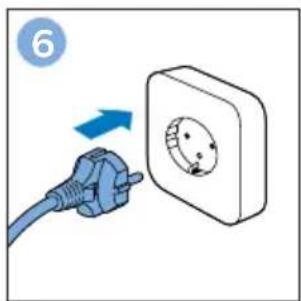
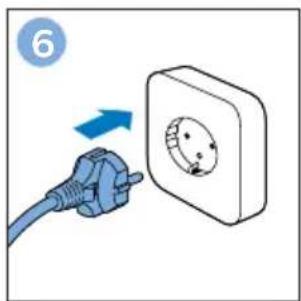
6 Put the plug into the wall outlet.

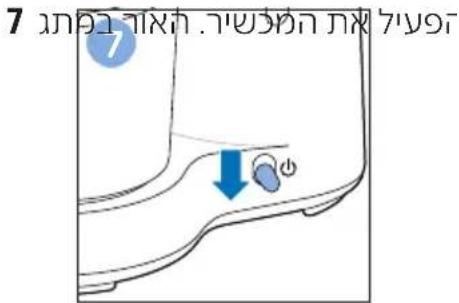
7 Press down the on/off switch to switch on the appliance. The light in the on/off switch lights up.
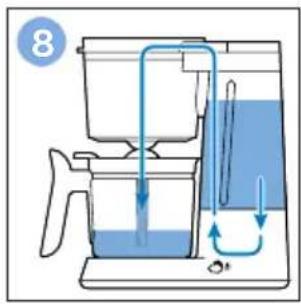
8 Let the appliance run until the water tank is empty.

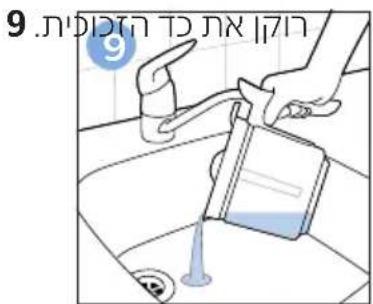
9 Empty the glass jug.
Brewing coffee
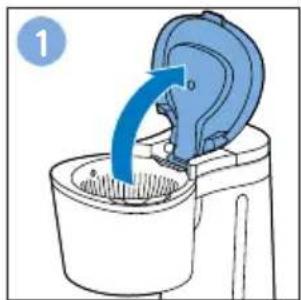
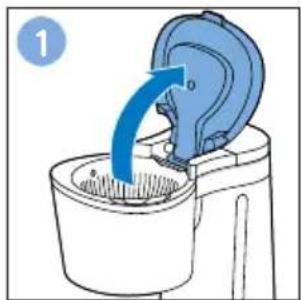
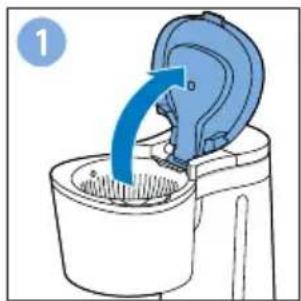
1 Open the filter lid.

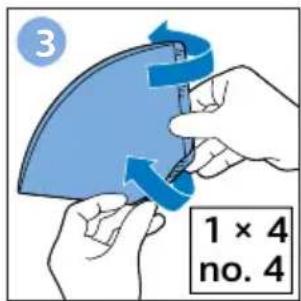
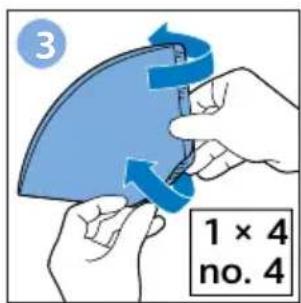
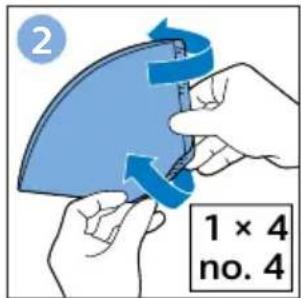
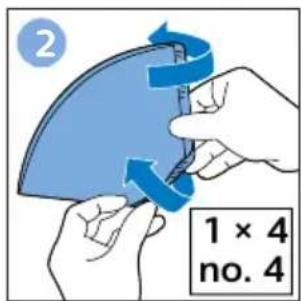
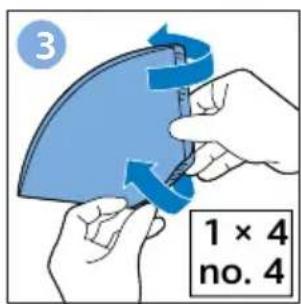
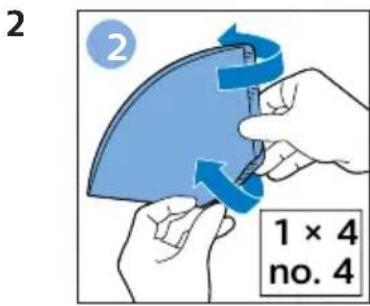
2 Take a paper filter (type 1x4 or no. 4) and fold the sealed edges to prevent tearing and folding.
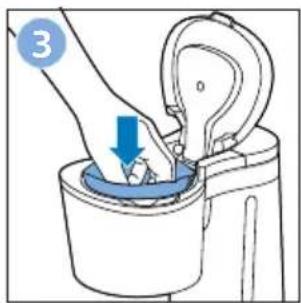
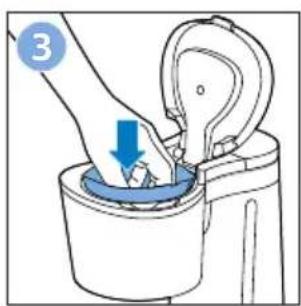
3 Put the paper filter in the filter.

4 Put ground coffee in the paper filter.
Note: Use filter-fine ground coffee. If you grind the coffee yourself, do not grind it so fine that it is almost powder-like.
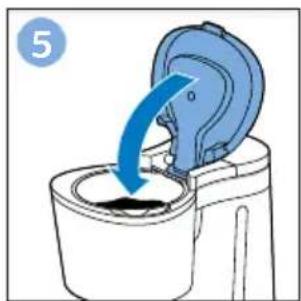
5 Close the filter lid.
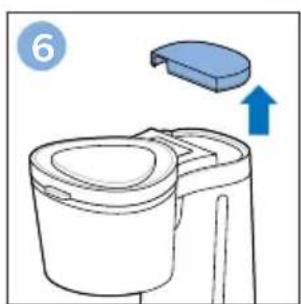
6 Remove the water tank lid.

7 Fill the water tank with the required amount of fresh cold water.
Note: Do not exceed the maximum capacity.
8 English

8 Put the water tank lid back onto the water tank.

9 Place the glass jug on the hotplate.
After brewing, the hotplate keeps the coffee at the right temperature.

10 Put the plug into the wall outlet.

11 Press down the on/off switch to switch on the appliance.
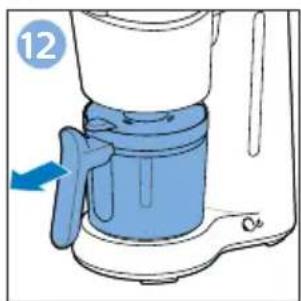
12 Remove the glass jug when the brewing is completed.

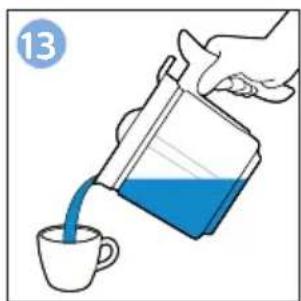
13 Pour the coffee into a cup.
Note: 30 minutes after brewing the coffee, the appliance switches off automatically for extra safety and to save energy.
Tip: If you want your coffee to stay hot longer, pour it into an insulated jug.
Drip stop function
The drip stop function enables you to remove the jug from the coffeemaker before the brewing process is finished. When you remove the jug, the drip stop stops the flow of coffee into the jug.
Note: The brewing process does not stop when you remove the jug. If you do not put the jug back into the appliance within 20 seconds, the filter overflows.
Cleaning

Caution: Always unplug the appliance before you start to clean it. Caution: Never immerse the appliance in water.

1 Clean the outside of the coffeemaker with a moist cloth.
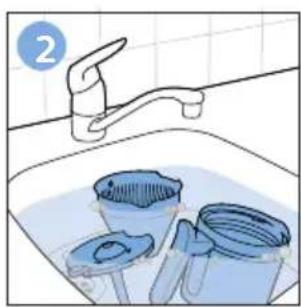
2 Clean the filter, the glass jug and the jug lid in hot water with some washing-up liquid.
Do not clean the water tank with a moist cloth. Regular descaling keeps the inside of the water tank clean.
10 English
Descaling
Descale the coffeemaker when you notice excessive steaming or when the brewing time increases. It is advisable to descale the coffeemaker every two months. Only use white vinegar to descale, as other products may cause damage to the appliance.
Warning: Never use vinegar with an acetic acid content of 8% or more, natural vinegar, powder descalers or tablet descalers to descale the appliance, as this may cause damage.
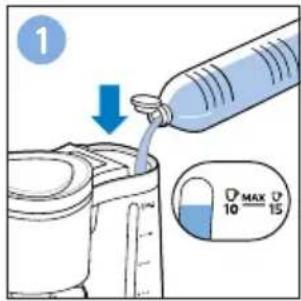
1 Fill the water tank up to MAX indication with white vinegar(4 % acetic acid).
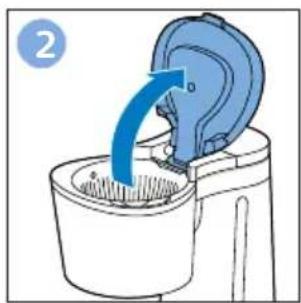
2 Open the filter lid.

3 Take a paper filter (type 1x4 or no. 4) and fold the sealed edges to prevent tearing and folding.
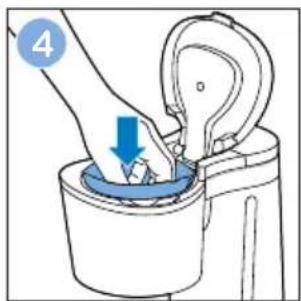
4 Put the paper filter in the filter.
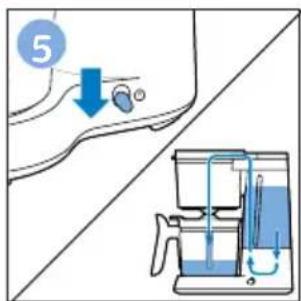
5 Switch on the appliance and let it complete a brewing cycle.

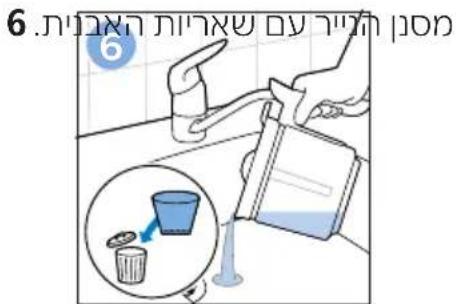
6 Empty the glass jug and remove the paper filter with the scale residues.

7 Fill the water tank with fresh cold water to MAX indication.

8 Switch on and let the appliance complete brewing process.
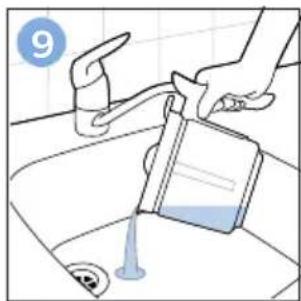
9 Empty the jug.
Note: repeat step 7,8,9 until the water that comes out of the appliance no longer tasters or smells of vinegar.
Ordering accessories
To buy accessories or spare parts, visit www.philips.com/parts-and-accessories or go to your Philips dealer. You can also contact the Philips Consumer Care Center in your country (see the international warranty leaflet for contact details).
Warranty and support
If you need information or support, please visit www.philips.com/support or read the international warranty leaflet.
Recycling
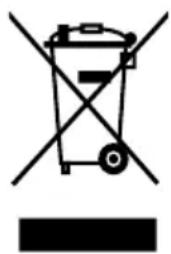
- This symbol means that this product shall not be disposed of with normal household waste (2012/19/EU).
- Follow your country's rules for the separate collection of electrical and electronic products. Correct disposal helps prevent negative consequences for the environment and human health.
Troubleshooting
This chapter summarises the most common problems you could encounter with the appliance. If you are unable to solve the problem with the information below, visit www.philips.com/support for a list of frequently asked questions or contact the Consumer Care Centre in your country.
Problem Solution
| The appliance does not work. • Plug in and switch on the appliance. | |
| Make sure that the voltage indicated on the appliance corresponds to the local mains voltage.Fill the water tank with water. | |
| Water leaks out of the appliance. | Do not fill the water tank beyond the MAX level. |
| The appliance takes a long time to brew coffee. | Descale the appliance. |
| The appliance produces a lot of noise and steam during the brewing process. | Make sure that the appliance is not blocked by scale. If necessary, descale the appliance. |
| Coffee grounds end up in the jug. | Do not put too much ground coffee in the filter.Make sure you put the jug on the hotplate with the spout facing into the appliance (i.e. not pointing sideways).Use the right size of paper filter (type 1x4 or no. 4).Make sure the paper filter is not torn. |
| The coffee is too weak. • Use the right proportion of coffee to water. | |
| Make sure the paper filter does not collapse.Use the right size of paper filter (type 1x4 or no. 4).Make sure there is no water in the jug before you start to brew coffee. | |
| The coffee does not taste good. | Do not leave the jug with coffee on the hotplate too long, especially not if it only contains a small amount of coffee. |
Problem Solution
| The coffee is not hot enough. | Make sure that the jug is properly placed on the hotplate.Make sure that the hotplate and the jug are clean.We advise you to brew more than three cups of coffee to ensure that the coffee has the right temperature.We advise you to use thin cups, because they absorb less heat from the coffee than thick cups.Do not use cold milk straight from the refrigerator.If your coffeemaker has an insulated jug, preheat the insulated jug with hot tap water before you start brewing coffee. |
| There is less coffee in the jug than expected. | Make sure you place the jug properly on the hotplate. If the jug is not placed properly on the hotplate, the drip stop prevents the coffee from flowing out of the filter. |
| The filter overflows while the appliance is brewing coffee. | Check if you placed the filter into the appliance properly. If the filter is not in the correct position, the drip stop does not work, which may cause the filter to overflow.If you remove the jug from the appliance for more than 20 seconds during brewing, the filter starts to overflow. |
14 Български
Съдържание
Въведение 15
Før første brug
9 Tøm glaskanden.
Kaffebrygning
1 Åbn filterlåget.

5 Luk filterlåget.

2 Åbn filterlåget.

9 Tøm kanden.
78 Español
9 Vacíe la jarra.
5 Sulgege filtri kaas.
2 Avage filtri kaas.
9 Tühjendage kann.
102 Suomi
Käyttöönotto
5 Sulje suodattimen kansi.
2 Avaa suodattimen kansi.
9 Tyhjennä kannu.
114 Français
126 Hrvatski
Prije prve uporabe
Napomena: u filtar ne stavljajte papirnati filtar s mljevenom kavom.
1 Očistite filtar, stakleni vrč i poklopac vrča.
2 Skinite poklopac spremnika za vodu.
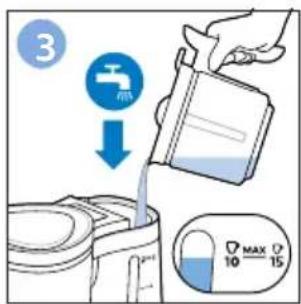
3 Napunite spremnik za vodu do oznake MAX.

4 Ponovno postavite poklopac na spremnik za vodu.

9 Ispraznite stakleni vrč.
Kuhanje kave

1 Otvorite poklopac filtra.
128 Hrvatski
5 Zatvorite poklopac filtra.

8 Ponovno postavite poklopac na spremnik za vodu.

12 Uklonite stakleni vrč kada se kuhanje dovrši.

1 Uredaj za kuhanje kave izvana očistite vlažnom krpom.

2 Filtar, stakleni vrč i poklopac vrča operite u vrućoj vodi koristeći malo sredstva za pranje posuda.
2 Otvorite poklopac filtra.

- Ovaj simbol znači da se proizvod ne smije odlagati zajedno s običnim kućanskim otpadom (2012/19/EU).
-Poštujte državne propise o zasebnom prikupljanju električnog i elektroničkog otpada. Pravilno odlaganje otpada pomaže u sprječavanju negativnih posljedica za okoliš i ljudsko zdravlje.
Rješavanje problema
Ovo poglavlje daje sažetak većine osnovnih problema s kojima se možete susresti s uredajem.
138 Magyar
150 Italiano
2 Сузгі какпафын ашыңыз.

174 Lietuviškai
2 Nuimkite bakelio dangtj.

5 Uždarykite filtro dangtelj.
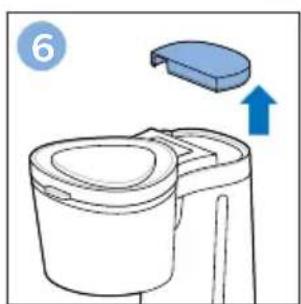
6 Nuimkite bakelio dangtj.

8 Vandens bakelio dangtelj uždėkite atgal ant vandens bakelio.
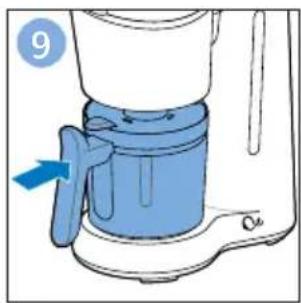
12 Kai baigia virti, nuimkite stiklinj asoti.
2 Atidarykite filtro dangtj.

6 Pievienojiet kontaktdakšu sienas kontaktligzdai.

9 Izlejiet stikla krūzes saturu.
Kafijas gatavošana

9 Izlejiet krūzes saturu.
210 Nederlands
9 Leeg de glazen kan.
212 Nederlands
Koffiezetten

9 Leeg de kan.
9 Tøm glasskannen.
224 Norsk
Kaffebrygging

12 Fjern glasskannen när bryggingen er fullført.

13 Hell kaffen i en kopp.
9 Tøm kannen.
-Dette symbolet betyr at dette produktet ikke skal kastes i vanlig husholdningsavfall (2012/19/EU).
9 Opróżnij dzbanek.
5 Coloque o jarro de vidro sobre a placa de aquecimento.
9 Coloque o jarro de vidro sobre a placa de aquecimento.
9 Evvazie o jarro.
Encomendar acessórios
9 Goliți vasul.
282 Slovenčina
Pred prvým použitím
1 Očistite filter, sklenenú kanvicu a veko kanvice.

1 Otvorte veko filtra.

2 Vezmite papierový filter (model 1x4, alebo číslo 4) a ohnite jeho zalepené hrany, aby sa neroztrhli a nepoohýbali.
3 Papierový filter vložte do filtra.

5 Zatvorte veko filtra.

2 Sklenenú kanvicu a filter umyte horúcou vodou s malým množstvom saponátu.
2 Otvorte veko filtra.

3 Vezmite papierový filter (model 1x4, alebo číslo 4) a ohnite jeho zalepené hrany, aby sa neroztrhli a nepoohýbali.

4 Papierový filter vložte do filtra.

Pred prvo uporabo
1 Očistite filter, stekleni vrč in pokrov vrča.

2 Odstranite pokrov zbiralnika za vodo.
3 Zbiralnik za vodo napolnite do oznake MAX.
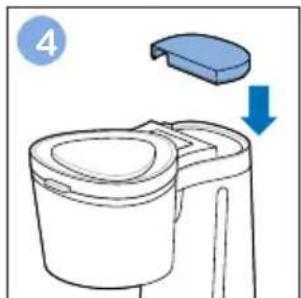
4 Pokrov zbiralnika namestite nazaj na zbiralnik za vodo.

5 Stekleni vrč postavite na grelno ploščo.
9 Izpraznite stekleni vrč.
296 Slovenščina
Priprava kave

1 Odprite pokrov filtra.
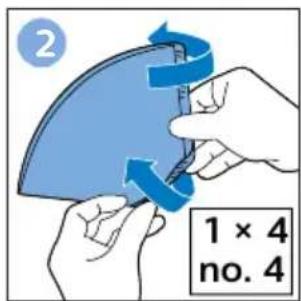
2 Vzemite papirni filter (vrste 1 x 4 ali št. 4) in preganite po zatesnjenih robovih, da preprečite trganje in mečkanje.

3 Vstavite papirni filter v filter.

4 V papirni filter dodajte mleto kavo.
5 Zaprite pokrov filtra.
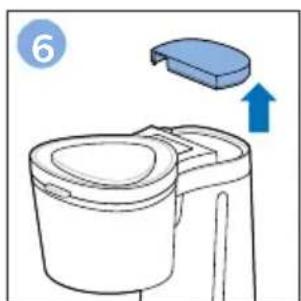
6 Odstranite pokrov zbiralnika za vodo.

7 Zbiralnik za vodo napolnite z ustrezno količino sveže hladne vode.
8 Pokrov zbiralnika namestite nazaj na zbiralnik za vodo.

9 Stekleni vrč postavite na grelno ploščo.
13 Kavo nalijte v skodelico.
2 Odprite pokrov filtra.
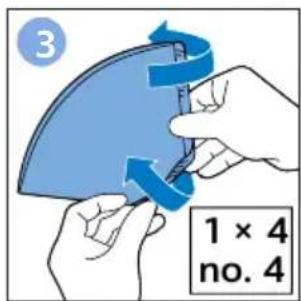
3 Vzemite papirni filter (vrste 1 x 4 ali št. 4) in preganite po zatesnjenih robovih, da preprečite trganje in mečkanje.

4 Vstavite papirni filter v filter.

5 Vklopite aparat in počakajte, da se cikel priprave kave konča.

8 Vklopite aparat in počakajte, da se cikel priprave kave konča.
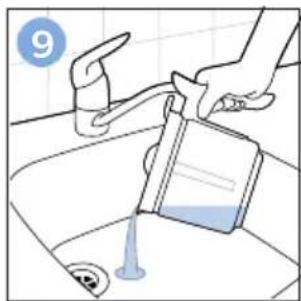
9 Izpraznite vrč.
306 Shqip
1 Hapni kapakun e filtrit.
5 Mbyllni kapakun e filtrit.

2 Hapni kapakun e filtrit.
9 Boshatisni kanën.
1 Očistite filter, stakleni bokal i poklopac bokala.
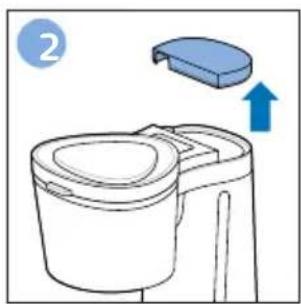
2 Skinite poklopac posude za vodu.

3 Napunite rezervoar vodom do oznake MAX.

4 Vratite poklopac na rezervoar za vodu.

5 Stavite stakleni bokal na grejnu ploču.

9 Ispraznite stakleni bokal.
Kuvanje kafe
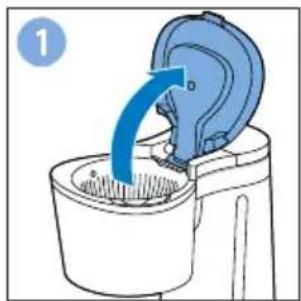
1 Otvorite poklopac filtera.

2 Uzmite papirni filter (tip 1x4 ili br. 4) i presavijte zapečaćene ivice da biste sprečili cepanje i savijanje.

3 Stavite papirni filter u filter.

4 Stavite mlevenu kafu u papirni filter.
Napomena: Koristite kafu samlevenu za filter. Ako kafu meljete sami, nemojte je samleti u prah.

5 Zatvorite poklopac filtera.

6 Skinite poklopac posude za vodu.

7 Napunite rezervoar za vodu potrebnom količinom sveže hladne vode.
Napomena: Nemojte da prekoračite maksimalan kapacitet.

8 Vratite poklopac na rezervoar za vodu.
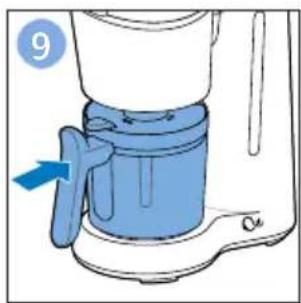
9 Stavite stakleni bokal na grejnu ploču.
Nakon kuvanja, grejna ploča održava odgovarajuću temperaturu kafe.

1 Očistite spoljnu stranu aparata za kafu vlažnom krpom.

2 Otvorite poklopac filtera.
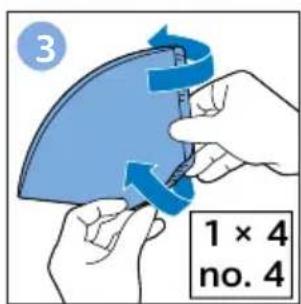
3 Uzmite papirni filter (tip 1x4 ili br. 4) i presavijte zapečaćene ivice da biste sprečili cepanje i savijanje.

4 Stavite papirni filter u filter.

5 Uključite aparat i pustite ga da završi ceo ciklus kuvanja.
324 Srpski

6 Ispraznite stakleni bokal i izvadite papirni filter sa ostacima kamenca.

7 Posudu napunite svežom hladnom vodom do oznake MAX.

9 Ispraznite bokal.
Napomena: Ponavljajte korake 7, 8 i 9 dok voda koja izlazi iz aparata ne prestane da ima ukus ili miris sirćeta.
- Ovaj simbol označava da se ovaj proizvod ne sme odlagati zajedno sa običnim kućnim otpadom (2012/19/EU).
- Pridržavajte se propisa vaše zemlje u vezi sa zasebnim prikupljanjem otpadnih električnih i elektronskih proizvoda. Pravilno odlaganje pomaže u sprečavanju negativnih posledica po zdravlje ljudi i životnu sredinu.
Rešavanje problema
U ovom poglavlju su u kratkim crtama navedeni najčešći problemi sa kojima možete da se susretnete dok koristite aparat. Ukoliko ne možete da rešite problem pomoću liste mogućih problema u nastavku, pogledajte listu čestih pitanja na stranici www.philips.com/support ili se obratite centru za korisničku podršku u svojoj zemlji.
Problem Rešenje
| Aparat ne radi. | Uključite utikač u zidnu utičnicu i uključite aparat.Proverite da li napon naznačen na aparatu odgovara naponu lokalne električne mreže.Napunite vodom rezervoar za vodu. |
| Iz aparata curi voda. | Nemojte da punite rezervoar za vodu iznad nivoa MAX. |
| Aparatu treba mnogo vremena da skuva kafu. | Očistite aparat od kamenca. |
| Aparat tokom kuvanja proizvodi mnogo pare i buke. | Uverite se da aparat nije začepljen kamencem. Po potrebi očistite aparat od kamenca. |
| Talog kafe ulazi u bokal. | Nemojte stavljati previše mlevene kafe u filter.Bokal obavezno postavite na grejnu ploču tako da grlić bude okrenut prema aparatu (tj. da ne bude okrenut u stranu).Koristite ispravnu veličinu papirnog filtera (tip 1x4 ili br. 4).Uverite se da papirni filter nije pocepan. |
| Kafa je preslaba.Koristite pravi odnos kafe i vode.Uverite se da se papirni filter ne pomera.Koristite ispravnu veličinu papirnog filtera (tip 1x4 ili br. 4).Pre nego što počnete da kuvate kafu, uverite se da u bokalu nema vode. | |
| Kafa nije dobrog ukusa. | Bokal sa kafom ne ostavljajte predugo na grejnoj ploči, posebno ako se u njemu nalazi manja količina kafe. |
Problem Rešenje
| Kafa nije dovoljno vruća. | Uverite se da je bokal pravilno postavljen na grejnu ploču.Uverite se da su grejna ploča i bokal čisti.Savetujemo vam da kuvate više od tri šoljice kafe da bi kafa bila odgovarajuće temperature.Savetujemo vam da koristite tanje šoljice jer one apsorbuju manje toplote iz kafe od debljih šoljica.Nemojte koristiti hladno mleko direktno iz frižidera.Ako aparat za kafu ima termos-bokal, prethodno zagrejte termos bokal vrućom vodom iz česme pre kuvanja kafe. |
| U bokalu ima premalo kafe. | Proverite da li ste bokal pravilno stavili na grejnu ploču. Ako bokal nije pravilno postavljen na grejnu ploču, funkcija za zaustavljanje kapanja će sprečiti da kafa ističe iz filtera. |
| Dolazi do prepunjavanja filtera dok je u toku kuvanje kafe. | Proverite da li ste pravilno postavili filter u aparat. Ako filter nije pravilno postavljen, funkcija za zaustavljanje kapanja ne radi, što može dovesti do prepunjavanja filtera.Ako bokal uklonite iz aparata na više od 20 sekundi tokom kuvanja, filter će početi da se prepunjava. |
9 Töm glaskannan.
332 Svenska
Brygga kaffe
9 Töm kannan.
www.philips.com/welcome. Philips - Philippines
הכלה
- MAX 107 70 70 70
.הכלה / אַרְׁבָה
תֹלָה בְרַע


- מַתְרָה לַעֹלְרָה לַעֹלְרָה לַעֹלְרָה לַעֹלְרָה לַעֹלְרָה לַעֹלְרָה לַעֹלְרָה לַעֹלְרָה לֵבְרִי

2
.תְרָבּ
תָרִיּאָה בְּרִיּ
4

5

www.philips.com/parts-and-accessories Philips 77-12-07-07, 97-12-07-07, 97-12-07-07, 97-12-07-07, 97-12-07-07, 97-12-07-07, 97-12-07-07, 97-12-07-07, 97-12-07-
תְקַרָה בְּרָה
.www.philips.com/support
.(EU/2012/19)
www.philips.com/support
תַרְבָּ
.הכלה.
. Observed for Israel
(4 1x4 7)
•
- 2 ENGLISH
- TABLE OF CONTENTS
- INTRODUCTION
- IMPORTANT SAFETY INFORMATION
- DANGER
- WARNING
- CAUTION
- ELECTROMAGNETIC FIELDS (EMF)
- 4 ENGLISH
- DEVICE OVERVIEW
- BEFORE FIRST USE
- 6 ENGLISH
- BREWING COFFEE
- 8 ENGLISH
- DRIP STOP FUNCTION
- CLEANING
- 10 ENGLISH
- DESCALING
- ORDERING ACCESSORIES
- WARRANTY AND SUPPORT
- RECYCLING
- TROUBLESHOOTING
- СЪДЪРЖАНИЕ
- FØR FØRSTE BRUG
- KAFFEBRYGNING
- 78 ESPAÑOL
- 102 SUOMI
- KÄYTTÖÖNOTTO
- 114 FRANÇAIS
- 126 HRVATSKI
- PRIJE PRVE UPORABE
- KUHANJE KAVE
- 128 HRVATSKI
- RJEŠAVANJE PROBLEMA
- 138 MAGYAR
- 150 ITALIANO
- 174 LIETUVIŠKAI
- KAFIJAS GATAVOŠANA
- 210 NEDERLANDS
- 212 NEDERLANDS
- KOFFIEZETTEN
- 224 NORSK
- KAFFEBRYGGING
- ENCOMENDAR ACESSÓRIOS
- 282 SLOVENČINA
- PRED PRVÝM POUŽITÍM
- PRED PRVO UPORABO
- 296 SLOVENŠČINA
- PRIPRAVA KAVE
- 306 SHQIP
- KUVANJE KAFE
- 324 SRPSKI
- REŠAVANJE PROBLEMA
- 332 SVENSKA
- BRYGGA KAFFE
- הכלה
- תֹלָה בְרַע
- תָרִיּאָה בְּרִיּ
- תְקַרָה בְּרָה
- תַרְבָּ
Brand : PHILIPS
Model : Eco Conscious Edition HD5120
Category : Coffee maker