HD 715 G - Pressure washer Kärcher - Free user manual and instructions
Find the device manual for free HD 715 G Kärcher in PDF.
| Device type | High-pressure cleaner |
| Brand | Kärcher |
| Model | HD 715 G |
| Engine | Honda GX160, 1 cylinder 4-stroke, 3.6 kW (4.8 HP) at 3600 rpm |
| Fuel | Unleaded gasoline (E10 compatible), tank 3.1 L |
| Operating pressure | 150 bar (15 MPa) |
| Max water flow | 624 L/h (10.4 L/min) |
| Water supply | 3/4" connection, max pressure 10 bar, max temperature 60 °C |
| Dimensions (L x W x H) | 790 x 608 x 1104 mm |
| Operating weight | 39.5 kg |
| Sound pressure level (L_pA) | 90 dB(A) |
| Guaranteed sound power level | 108 dB(A) |
| Hand-arm vibration | < 2.5 m/s² |
| Nozzles supplied | High-pressure nozzle (038) and low-pressure nozzle (250) EASY!Lock |
| Safety | Relief valve, safety valve, thermal valve, safety catch on gun |
| Routine maintenance | Cleaning water filter, draining pump and engine oil |
| Engine oil | 15W40, quantity 0.6 L |
| Pump oil | 15W40, quantity 0.3 L |
| Hose connection | EASY!Lock system for high-pressure hose |
| Transport | Push handle, wheels, hose and lance holder |
| Warranty | According to country conditions, contact your dealer |
Frequently Asked Questions - HD 715 G Kärcher
User questions about HD 715 G Kärcher
0 question about this device. Answer the ones you know or ask your own.
Ask a new question about this device
Download the instructions for your Pressure washer in PDF format for free! Find your manual HD 715 G - Kärcher and take your electronic device back in hand. On this page are published all the documents necessary for the use of your device. HD 715 G by Kärcher.
USER MANUAL HD 715 G Kärcher
natural_image
Technical line drawings of two identical industrial pressure pump machines with visible internal components and wheels (no text or labels)Deutsch 5
English 16
Français 27
Italiano 39
Nederlands 51
Español 63
Português 75
Dansk 87
Norsk 98
Svenska 109
Suomi 120
Ελληνικά 131
Türkçe 143
Русский 154
Magyar 167
Čeština 178
Slovenščina 189
Polski 200
Românește 212
Slovenčina 224
Hrvatski 236
Srpski 247
Български 259
Eesti 272
Latviešu 283
Lietuviškai 294
Українська 305
中文 318
العربية 3□□
Register and win! www.kaercher.com/register-and-win

001
EAC

59672350 05/19
text_image
1 HD 7/15 G 31 30 29 28 27 26 25 24 13 23 22 19 18 17 16 15 14 13 12 11 C D C B A
text_image
2 HD 8/20 G 1 2 3 4 5 6 7 8 9 10 11 11 12 13 14 15 15 16 17 18 19 20 21 22 23 24 25 26 27 28 29 30 313
natural_image
Technical line drawing of a grass lawn mower with three inset views showing mechanical components (no text or labels)4
natural_image
Technical line drawing of a vehicle chassis with two wheels and a central fan assembly (no text or symbols)
text_image
Technical diagram showing two mechanical assembly steps with numbered annotations indicating component identification.natural_image
Diagram showing a pair of scissors cutting a cylindrical object with an arrow indicating motion (no text or symbols)Chairman of the Board of Management

S. Reiser
Director Regulatory Affairs & Certification
71364 Winnenden (Germany)
Tel.: +49 7195 14-0
Fax: +49 7195 14-2212
Winnenden, 2019/05/01
HD 8/20 G
Chairman of the Board of Management
S. Reiser
Director Regulatory Affairs & Certification
71364 Winnenden (Germany)
Tel.: +49 7195 14-0
Fax: +49 7195 14-2212
Winnenden, 2019/05/01
Technische Daten
Please read and comply with these original instructions prior
to the initial operation of your appliance and store them for later use or subsequent owners.
- Before first start-up it is definitely necessary to read the operating instructions and safety indications Nr. 5.951-949.0!
– In case of transport damage inform vendor immediately. - Check the contents of the pack before unpacking.
Contents
| Environmental protection | EN 1 |
| Hazard levels | EN 1 |
| Device elements | EN 1 |
| Symbols on the machine | EN 2 |
| Proper use | EN 2 |
| Safety instructions | EN 3 |
| Safety Devices | EN 3 |
| Start up | EN 4 |
| Operation | EN 6 |
| Transport | EN 7 |
| Storage | EN 7 |
| Care and maintenance | EN 8 |
| Troubleshooting | EN 8 |
| Warranty | EN 9 |
| Accessories and Spare Parts | EN 9 |
| EU Declaration of Conformity | EN 10 |
| Technical specifications | EN 1 |
Environmental protection
| The packaging material can be recycled. Please do not throw the packaging material into household waste; please send it for recycling. | |
| Old appliances contain valuable materials that can be recycled; these should be sent for recycling. Batteries, oil, and similar substances must not enter the environment. Please dispose of your old appliances using appropriate collection systems. |
Electrical and electronic devices often contain components which could potentially pose a danger to human health and the environment if handled or disposed of incorrectly. However, these components are necessary for the proper operation of the device. Devices marked with this symbol must not be disposed of with regular household rubbish.
Please do not release engine oil, fuel oil, diesel and petrol into the environment Protect the ground and dispose of used oil in an environmentally-clean manner.
Notes about the ingredients (REACH)
You will find current information about the ingredients at:
www.kaercher.com/REACH
Hazard levels
⚠️DANGER
Pointer to immediate danger, which leads to severe injuries or death.
⚠ WARNING
Pointer to a possibly dangerous situation, which can lead to severe injuries or death.
△CAUTION
Pointer to a possibly dangerous situation, which can lead to minor injuries.
ATTENTION
Pointer to a possibly dangerous situation, which can lead to property damage.
Device elements
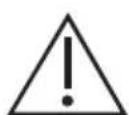
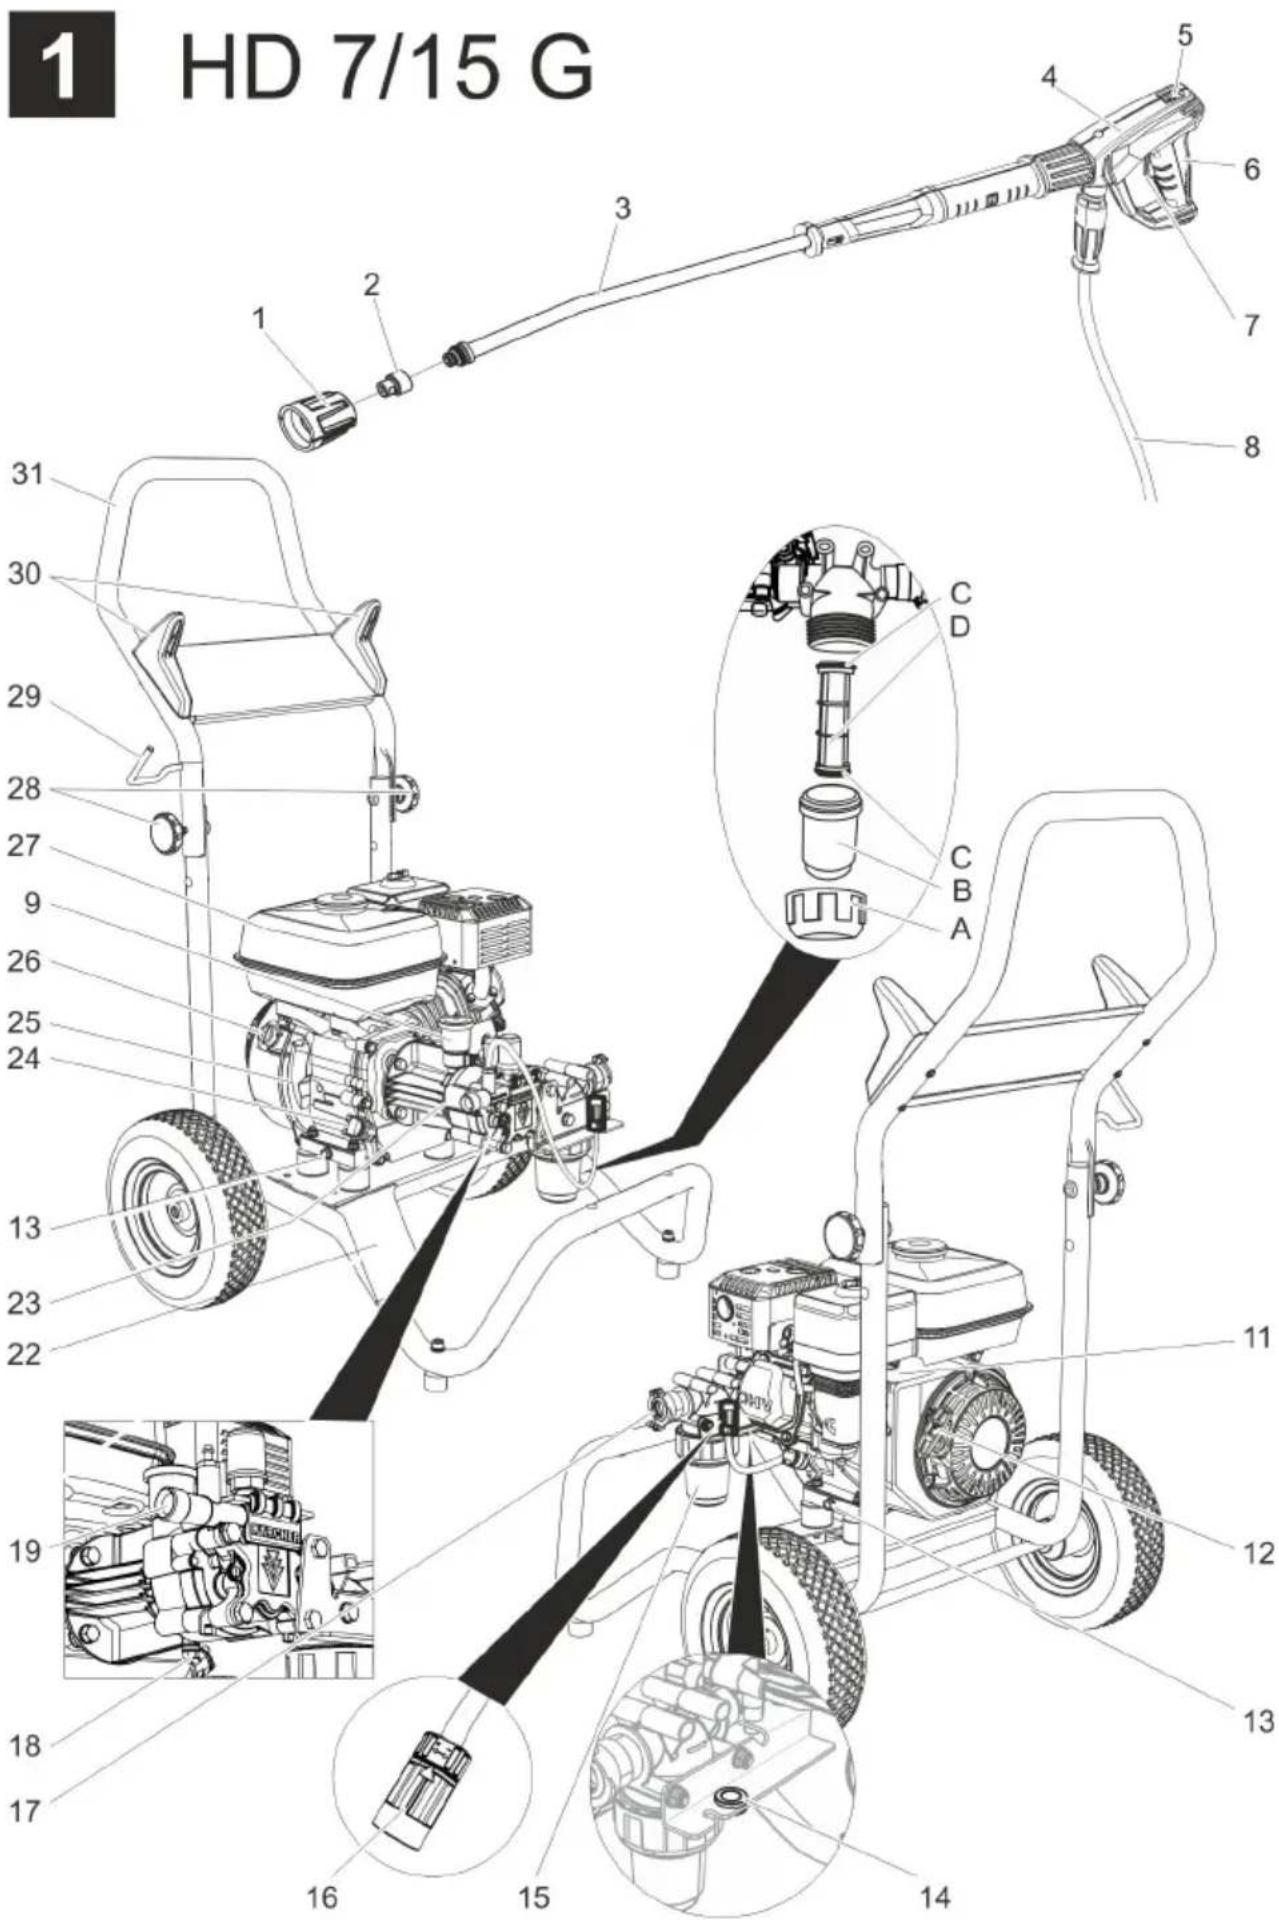
HD 7/15 G: Figure 1, see cover page HD 8/20 G: Figure 2, see cover page
1 Nozzle screws
2 Nozzle
3 Spray lance EASY!Lock
4 Trigger gun EASY!Force
5 Safety catch
6 Trigger
7 Safety lever
8 High pressure hose EASY!Lock
9 Oil tank
10 Pressure gauge *
11 Fuel cock
12 Device for manual start
13 Oil drain screw (engine)
14 Nozzle holder
for storing a nozzle
15 Water filter
16 Detergent suction hose with adjustable filter (dosing valve)
17 Water connection
18 Oil drain screw pump
19 High-pressure connection EASY!Lock
20 Oil sight glass *
21 Pressure/quantity regulation *
22 Storage for spray pipe
23 High pressure pump
24 Oil dip (engine)
25 Motor
26 Engine switch
27 Fuel tank
28 Star knob push handle
29 Trigger gun storage clip
30 Hose holder
31 Push handle
A Union joint
B Filter pot
C O ring
D Filter inlay
* not for HD 7/15 G
Colour coding
- The operating elements for the cleaning process are yellow.
– The controls for the maintenance and service are light gray.
Symbols on the machine
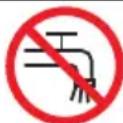
High-pressure jets can be dangerous if improperly used. The
jet may not be directed at persons, animals, live electrical equipment or at the appliance itself.
 | Risk of burns! Beware of hot components. |
 | Risk of poisoning! Do not breathe in the exhaust fumes. |
 |  | Petrol is highly prone to fire hazards and is explosive.Before tanking up, switch off the motor and allow it to cool down. |
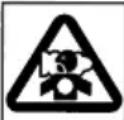 |  | The motor exhaust gas contains poisonous carbon monoxide.Do not run the engine in closed areas. |
 [IMAGE] [IMAGE] | 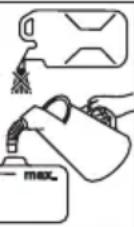 | Do not fill up when the motor is running.Do not smoke during fueling.Do not fill up directly from the can; use a funnel or suitable container. |
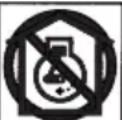
According to applicable regulations, the appliance must never be used on the drinking water net without a system separator. A suitable system separator by KÄRCHER or alternatively a system separator according to EN 12729 type BA must be used. Water that was flowing through a system separator is considered non-drinkable.
Proper use
High pressure cleaner to clean: Machines, Vehicles, Structures, Tools, Facades, Terraces, Gardening tools, etc.
- Cleaning using low pressure jet and detergent (for e.g. for cleaning machines, cars, buildings, tools),
- For cleaning using high pressure jet without detergent (for e.g. for cleaning facades, terraces, garden appliances).
- For stubborn dirt, we recommend the use of the dirt blaster as a special accessory.
⚠️DANGER
Risk of injury! Follow the respective safety regulations when operating at gas stations or other dangerous areas.
Please do not let mineral oil contaminated waste water reach soil, water or the sewage system. Perform engine cleaning and bottom cleaning therefore only on specified places with an oil trap.
Quality requirements for water:
ATTENTION
Only clean water may be used as high pressure medium. Impurities will lead to increased wear and tear or formation of deposits in the appliance.
If recycled water is used, the following limit values must not be exceeded.
| pH value 6,5...9,5 | |
| electrical conductivity * Conductivity fresh water +1200 μS/cm | |
| settleable solids ** < 0,5 mg/l | |
| total suspended solids *** < Hydrocarbons < 20 mg/l | 50 mg/l |
| Chloride < 300 mg/l | |
| Sulphate < 240 mg/l | |
| Calcium < 200 mg/l | |
| Total hardness < 28 °dH | < 50 °TH< 500 ppm (mg CaCO3/l) |
| Iron < 0,5 mg/l | |
| Manganese < 0,05 mg/l | |
| Copper < 2 mg/l | |
| Active chloride | < 0,3 mg/l |
| free of bad odours | |
| * Maximum total 2000 μS/cm** Test volume 1 l, settling time 30 min*** no abrasive substances | |
Safety instructions
→ Please follow the national rules and regulations for fluid spray jets of the respective country.
→ Please follow the national rules and regulations for accident prevention of the respective country. Fluid spray jets must be tested regularly and the results of these tests must be documented in writing.
→ The appliance/accessories must not be modified.
⚠️DANGER
- Do not use high pressure cleaners when there has been an oil spill; move the appliance to another spot and avoid any sort of spark formation.
- Do not store, spill or use fuel in the vicinity of open flames or appliances such as ovens, boilers, water heaters, etc. that have an ignition flame or can generate sparks.
- Keep even mildly inflammable objects and materials away from the muffler (at least 2 m).
- Do not start the engine without the muffler; check, clean and replace, if required, the muffler at regular intervals.
- Do not use the engine in forest, bushes or grassy areas without fitting a spark receiver at the exhaust
– Except for setting jobs, do not run the engine when the air filter is removed or there is no cover over the suction support. - Do not make any adjustments to the regulator springs, regulator bars or other parts that can bring forth an increase in the engine speed.
- Risk of burns! Do not touch hot mufflers, cylinders or radiator ribs.
- Do not put hands or feet close to moving or rotating parts.
- Risk of poisoning! The appliance should not be operated in closed rooms.
- Do not use unsuitable fuels, as they may be dangerous.
Safety Devices
Safety devices serve for the protection of the user and must not be put out of operation or bypassed with respect to their function.
Overflow valve
- If the hand spray gun is closed, the overflow valve opens and the high pressure pump diverts the water back to the pump suction side. Thus the permissible working pressure is not exceeded.
- The overflow valve is set by the manufacturer and sealed. Setting only by customer service.
Safety valve
The safety valve opens when the permissible operating pressure is exceeded (see Technical Data); water flows outside.
The safety valve is set by the manufacturer and sealed. Setting only by customer service.
Thermostat valve
The thermostat valve protects the high-pressure pump from unacceptable heating during circuit operation when the trigger gun is closed.
The thermostat valve opens when the permissible water temperature of 80^ C is exceeded and lets out the hot water into the open.
Start up
⚠️DANGER
Risk of injury! Device, tubes, high pressure hose and connections must be in faultless condition. If they are not in a perfect state then the appliance must not be used.
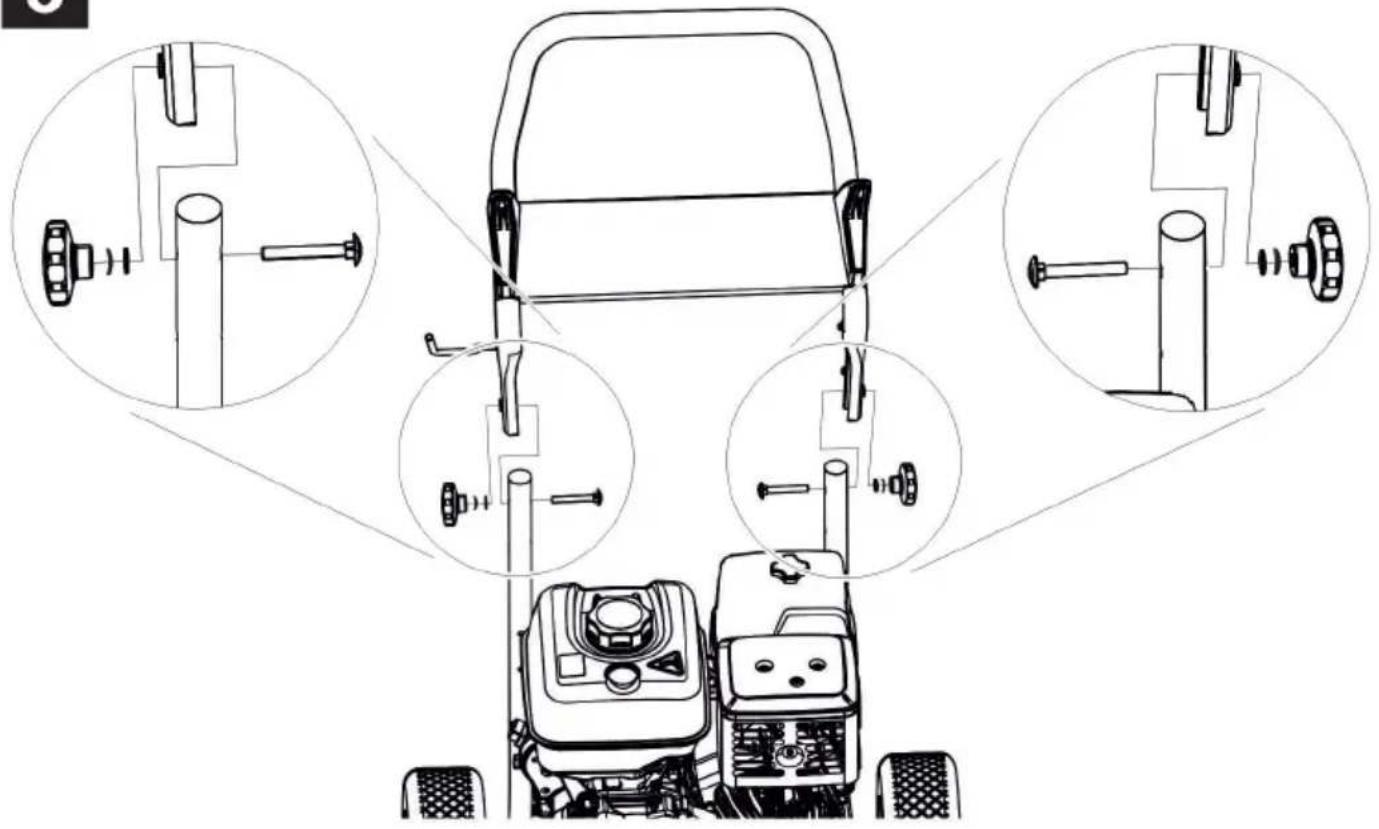
Installing the pushing handle
Figure 3, see cover page
→ Fasten the push handle by means of the fastening screws.
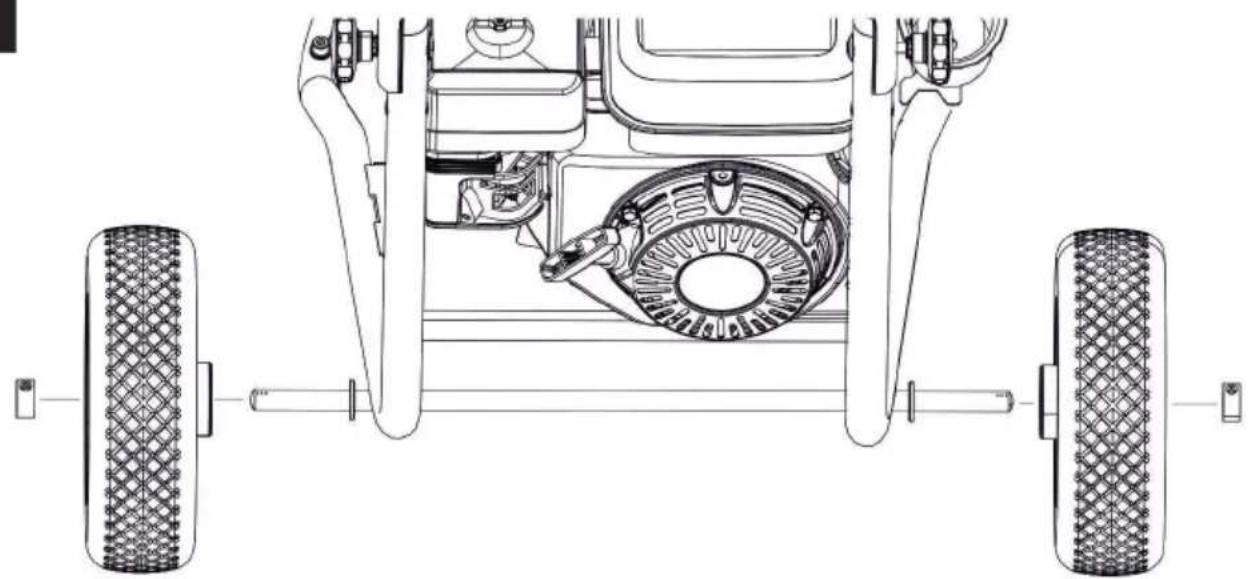
Install wheels
Figure 4, see cover page
→ Slide the wheel onto the axle.
→ Slide adjusting collar onto the shaft and tighten the screw.
Tightening torque 20 Nm.
→ Repeat process on the opposite side.
Install hand spray gun, spray lance and nozzle
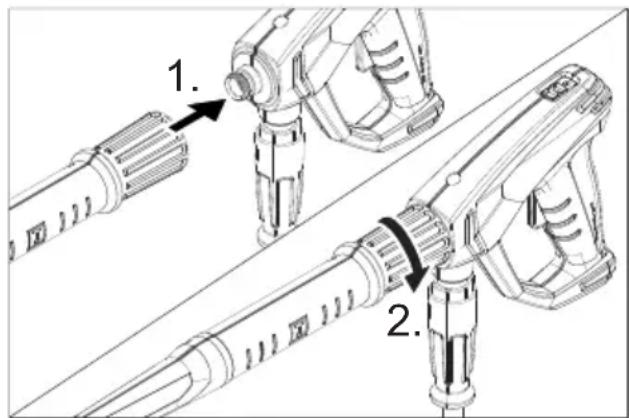
Note: The EASY!Lock system joins components with a quick-fasten thread solidly and securely with just one turn.
text_image
Technical diagram showing two mechanical assembly steps with numbered annotations indicating component placement.→ Insert the high pressure nozzle onto the spray lance.
→ Install union nut and hand-tighten it (EASY!Lock).
→ Join the spray lance with the trigger gun and tighten until hand-tight (EASY!Lock).
→ Tighten the screw connection of the spray lance finger tight.
→ Join the high-pressure hose with trigger gun and high-pressure connection of the appliance and tighten until hand-tight (EASY!Lock).
Check oil level of the high pressure pump
HD 7/15 G
→ The bottom of the oil tank must be covered with oil.
Do not operate the device if no oil is visible in the oil tank.
→ Add oil if required (see technical specifications).
HD 8/20 G
→ Check oil level of the high pressure pump at the oil sight glass. Do not operate the device if the oil level has fallen below the middle of the oil sight glass.
→ Add oil if required (see technical specifications).
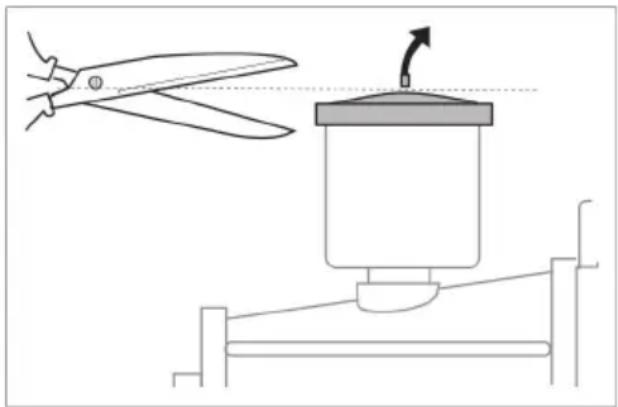
Ventilating the oil container
natural_image
Diagram showing a pair of scissors cutting a cylindrical object with an arrow indicating rotation (no text or symbols)→ Before using for the first time, cut off the tip of the lid of the oil tank on the water pump.
Motor
Follow the instructions given in the section "Safety Notes"!
→ Read the operating instructions of the engine manufacturer before start-up and follow the safety instructions carefully.
→ Check oil level of the engine.
Do not operate the appliance if the oil level has fallen below "MIN".
→ If required, top up oil carefully.
→ Fill the fuel tank with unleaded petrol. Do not use 2-speed mixture.
E10 fuel may be used.
Refuel
⚠️DANGER
Risk of fire and explosion!
- Never use the appliance in closed rooms; do not tank up when the engine is hot or running.
- Do not smoke during fueling.
- Never fill up in the vicinity of open flames or sparks.
- Do not spill any fuel – use a funnel.
- Wipe up spilled fuel.
- After refuelling, properly close the can and tank.
→ Fill the fuel tank with unleaded petrol. Do not use 2-speed mixture.
Water connection
For connection values refer to technical specifications.
→ Connect the supply hose (minimum length 7.5 m, minimum diameter 3/4") to the water connection point of the machine and at the water supply point (for e.g. a tap).
→ Open the water supply.
Note: The supply hose is not included.
Suck in water from vessel
⚠️DANGER
Never suck water from a drinking water container.
Never suck in liquids which contain solvents like lacquer thinner, petrol or oil. The spray mist of solvents is highly inflammable, explosive and poisonous.
→ Connect suction hose (minimum diameter 3/4") with filter (accessory) to the water connection point.
→ Set dosing value for detergent to "0".
→ Remove air from appliance before operation.
Deaerating the appliance
→ Unscrew nozzle screws and remove the nozzle.
→ Start the engine according to the operating instructions of the engine manufacturer.
→ Press the lever on the trigger gun many times.
→ Switch on the appliance and let it run until the water exiting from the spray pipe is bubble-free.
→ Switch off the appliance and fit the nozzle again.
Operation
⚠️DANGER
Risk of explosion!
Do not spray flammable liquids.
⚠️DANGER
Risk of injury! Hold the hand spray gun and the spray pipe firmly with both hands.
Risk of injury! The trigger and safety lever may not be locked during the operation.
Risk of injury! Contact Customer Service if the safety lever is damaged.
Risk of injury from high-pressure water jet.
Slide the safety catch on the trigger gun forward before performing any work with the appliance.
⚠️DANGER
- The device generates a high noise level. Risk of hearing impairment. Always use proper hearing protection while working with the device.
- Never direct the water jet on to persons, animals, the appliance itself or electrical components.
- The operator must wear proper safety gear to be protected against the water sprays.
– Pay attention to ensure that all screws of all connecting hoses are tightened properly.
Opening/closing the trigger gun
→ To open the trigger gun: Actuate the safety lever and trigger.
→ To close the hand spray gun: Release the safety lever and trigger.
Starting the machine
→ Open the water supply.
→ Start the motor with the trigger gun open according to the operating instructions of the motor manufacturer.
Note:
The spray lance can be removed to facilitate the start-up process.
→ Allow motor to warm up for 1 minute.
→ Release the trigger gun. To do so, push the safety catch towards the back.
→ Open the hand spray gun.
Set working pressure and flow rate
HD 7/15 G
Pressure and water quantity are permanently set on this device and cannot be changed.
HD 8/20 G
→ Set the working pressure and quantity by turning the pressure/quantity regulation mechanism at the pump unit.
Replace the nozzle
⚠️DANGER
Switch the appliance off prior to replacing nozzel and activate hand spray gun until device is pressureless.
→ Secure the trigger gun. To do so, push the safety catch towards the front.
→ Unscrew nozzle screws and remove the nozzle.
→ Put on a new nozzle.
→ Screw on the nozzle screws and tighten them by hand.
Operation with detergent
⚠ WARNING
Unsuitable detergents can cause damage to the appliance and to the object to be cleaned. Use only those detergents that have been approved by Kärcher. Observe the dosage and other instructions provided with these detergents. For considerate treatment of the environment use detergent economically.
Follow the safety instructions for using detergents.
Kärcher detergents ensure smooth functioning. Please consult us or ask for our catalogue or our detergent information sheets.
→ Adjust detergent dosing unit on the detergent suction filter (+/-).
→ Suspend end of suction hose in a container filled with detergent.
→ Replace the high-pressure nozzle with the low-pressure nozzle.
Recommended cleaning method
- Loosen the dirt:
Spray detergent economically and let it work for 1...5 minutes but do not let it dry up.
- Remove the dirt:
Spray off loosened dirt with the high pressure jet.
After operation with detergent
→ Set dosing value for detergent to "0".
→ Open the trigger gun and rinse the device with the motor running for at least 1 minute.
Interrupting operation
→ Release the lever on the trigger gun.
Note: When the lever of the hand spray gun is released, the engine continues to run at zero speed.
→ In case of extended interruptions (several minutes), switch off the engine.
→ Activate trigger gun until device is pressure-less.
→ Secure the hand spray gun using the safety catch so that it doesn't open accidentally.
Turn off the appliance
After operating the water using saline water (sea water), open the hand spray gun and rinse the appliance for at least 2 - 3 minutes using tap water.
→ Close the hand spray gun.
→ Turn the starter to "0/OFF".
→ Close fuel cock.
→ Shut off water supply.
→ Activate trigger gun until device is pressure-less.
→ Secure the hand spray gun using the safety catch so that it doesn't open accidentally.
→ Remove the water inlet hose from the appliance.
Transport
△CAUTION
Risk of personal injury or damage! Mind the weight of the appliance during transport.
→ Coil the high-pressure hose and hang it over the hose storage.
→ Insert the spray lance into the spray lance cart.
Place the trigger gun into the holder.
→ Use the pushing handle to push the appliance.
→ When transporting in vehicles, secure the device according to the guidelines from rolling away, slipping and tipping over.
→ To reduce the space requirement, loosen the star grips and swivel the push handle backwards.
Storage
△CAUTION
Risk of personal injury or damage! Consider the weight of the appliance when storing it.
This appliance must only be stored in interior rooms.
Frost protection
ATTENTION
Risk of damage! Freezing water in the appliance can destroy parts of the appliance.
In the winter, preferably store the device in a heated room
If storing it in unheated rooms, follow these instructions:
Drain water
→ Screw off water supply hose and high pressure hose.
→ Operate device for max. 1 minute until the pump and conduits are empty.
→ Unscrew the water filter and empty it.
Flush device with anti-freeze agent
Note: Observe handling instructions of the anti-freeze agent manufacturer.
→ Pump in conventional frost protection agents through the appliance.
A certain corrosion protection is achieved with this as well.
Care and maintenance
You can sign with your dealer a contract for regular safety inspection or even sign a maintenance contract. Please take advice on this matter.
Note: The maintenance plan given below only lists the maintenance tasks for the high-pressure pump. The maintenance tasks for the engine must also be done according to the details given in the operating instructions manual of the engine manufacturer.
⚠️DANGER
Risk of injury if the machine is left running in an unattended state.
Before working on the device, turn the starter to "0/OFF" and remove the spark plug connector.
Risk of burns! Do not touch hot mufflers, cylinders or radiator ribs.
Maintenance intervals
Daily
→ Check the high pressure hose for damages (risk of bursting). Please arrange for the immediate exchange of a damaged high-pressure hose.
Weekly
→ Check oil level.
Please contact Customer Service immediately if the oil is milky (water in oil).
Monthly
→ Clean water filter.
→ Clean filter at the detergent suck hose.
→ Check the fastening elements between the motor and frame for cracks; have cracked fastening elements replaced by Customer Service.
After 500 operating hours, at least annually
→ Have the maintenance of the device performed by the customer service.
→ Change the oil in the high pressure pump.
Maintenance Works
Clean water filter.
→ Shut off water supply.
→ Unscrew the covering nut.
→ Remove the filter cup towards the bottom.
→ Clean filter inlay and filter cup.
→ Check the O-rings for proper seating.
→ Insert the filter inlay into the filter cup.
→ Replace the filter cup.
→ Screw on and tighten the union nut.
Oil change in high pressure pump
→ Ready a catch bin for appr. 1 Liter oil.
→ Turn out the oil drain screw.
→ Drain the oil in a collection basin.
Dispose of old oil ecologically or turn it in at a collection point.
→ Screw in the oil drain screw.
HD 7/15 G: HD 8/20
→ Fill in new oil slowly to just below the fill neck of the oil fill container.
→ Fill in new oil up to the middle of the oil sight glass.
Add oil slowly so that air bubbles can escape.
For oil type refer to technical specifications.
Troubleshooting
⚠️DANGER
Risk of injury if the machine is left running in an unattended state.
Before working on the device, turn the starter to "0/OFF" and remove the spark plug connector.
Risk of burns! Do not touch hot mufflers, cylinders or radiator ribs.
Motor does not run
Follow operating instructions of the engine manufacturer!
Device is not building up pressure
- Operating speed of the engine is too low
→ Check operating speed of the engine (refer to technical data).
– Low-pressure nozzle is installed.
→ Install the high pressure nozzle.
- Nozzle is blocked/ washed out
→ Clean/ replace nozzle.
– Water filter contaminated
→ Clean water filter.
– Air within the system
→ Deaerate the appliance (see "Start-up")
– Amount of water supply is too low.
→ Check water supply level (refer to technical data).
– Pipe inlets to pump are leaky or blocked
→ Check all inlet pipes to the pump.
Device leaks, water drips from the bottom of the device
- Pump leaky
Note: 3 drops/minute are allowed.
→ With stronger leak, have device checked by customer service.
Detergent is not getting sucked in
– High pressure nozzle is installed
→ Install the low pressure nozzle.
- Detergent suction hose with filter is leaky or blocked
→ Check/ clean detergent suction hose with filter.
- Backflow valve in the connection of the detergent suction hose is jammed
→ Clean/ replace backflow valve in the connection of the detergent suction hose.
– Detergent dosing valve is closed or leaky/ blocked
→ Open or check/clean detergent dosing valve.
If malfunction can not be fixed, the device must be checked by customer service.
Warranty
The warranty terms published by our competent sales company are applicable in each country. We will repair potential failures of your accessory within the warranty period free of charge, provided that such failure is caused by faulty material or defects in fabrication. In the event of a warranty claim please contact your dealer or the nearest authorized Customer Service center. Please submit the proof of purchase.
Accessories and Spare Parts
Only use original accessories and spare parts, they ensure the safe and trouble-free operation of the device.
For information about accessories and spare parts, please visit www.kaercher.com.
Accessories
ABS hose reel
2.637-002.0
Hose reel for high-pressure hose for fastening to the tubular frame.
ABS frame cage narrow
2.637-008.0
Expansion of the tubular frame to protect the device and for crane loading.
EU Declaration of Conformity
HD 7/15 G
We hereby declare that the machine described below complies with the relevant basic safety and health requirements of the EU Directives, both in its basic design and construction as well as in the version put into circulation by us. This declaration shall cease to be valid if the machine is modified without our prior approval.
Product: High pressure cleaner
Type: 1.810-xxx
Relevant EU Directives
2006/42/EC (+2009/127/EC)
2000/14/EC
2014/30/EU
Applied harmonized standards
EN 60335-1
EN 60335-2-79
EN 55012: 2007 + A1: 2009
Applied conformity evaluation method
2000/14/EC: Appendix V
Sound power level dB(A)
HD 7/15 G
Measured: 105
Guaranteed: 108
The signatories act on behalf of and with the authority of the company management.
H. Jenner
Chairman of the Board of Management
S. Reiser
Director Regulatory Affairs & Certification
Documentation supervisor:
S. Reiser
Alfred Kärcher SE & Co. KG
71364 Winnenden (Germany)
Tel.: +49 7195 14-0
Fax: +49 7195 14-2212
Winnenden, 2019/05/01
HD 8/20 G
We hereby declare that the machine described below complies with the relevant basic safety and health requirements of the EU Directives, both in its basic design and construction as well as in the version put into circulation by us. This declaration shall cease to be valid if the machine is modified without our prior approval.
Product: High pressure cleaner
Type: 1.810-xxx
Relevant EU Directives
2006/42/EC (+2009/127/EC)
2000/14/EC
2014/30/EU
Applied harmonized standards
EN 60335-1
EN 60335-2-79
EN 55012: 2007 + A1: 2009
Applied conformity evaluation method
2000/14/EC: Appendix V
Sound power level dB(A)
HD 8/20 G
Measured: 106
Guaranteed: 108
The signatories act on behalf of and with the authority of the company management.
H. Jenner
Chairman of the Board of Management

S. Reiser
Director Regulatory Affairs & Certification
Documentation supervisor:
S. Reiser
Alfred Kärcher SE & Co. KG
71364 Winnenden (Germany)
Tel.: +49 7195 14-0
Fax: +49 7195 14-2212
Winnenden, 2019/05/01
Technical specifications
| HD 7/15 G HD 8/20 G | |||
| Motor | |||
| Type -- Honda | GX 160, 1 cylinder, 4-stroke | Honda GX 270, 1 cylinder, 4 stroke | |
| Maximum torque at 3600 rpm kW (PS) 3,6/4,8 6,3/8,4 | |||
| Operating speed 1/min 3600 3550 | |||
| Fuel tank l 3,1 5,3 | |||
| Fuel * Appliance is suitable to use E10 petrol | -- Petrol, unleaded | ||
| Type of protection -- IPX5 | |||
| Fuel consumption at full load l/h 1,4 2,4 | |||
| Oil quantity - motor | l 0,6 0,9 | ||
| Oil type - motor | Engine oil 15W40 | Order no. 6.288-050.0 | |
| Water connection | |||
| Max. feed temperature | °C | 60 | |
| Min. feed volume | l/h (l/min) | 750 (12,5) | 1000 (16,7) |
| Max. feed pressure | MPa (bar) | 1 (10) | |
| Inlet hose length (min.) | m | 7,5 | |
| Inlet hose diameter (min.) | Inch | 3/4 | |
| Suction height from open container | m | 1 | |
| Pump | |||
| Working pressure | MPa (bar) | 15 (150) | 2...20 (20...200) |
| Flow rate l/h (l/min) 624 (10,4) 160...750 | (2,7...12,5) | ||
| Nozzle size, high pressure | -- | 038 | 041 |
| Nozzle size, low pressure | -- | 250 | 250 |
| Max. excess operating pressure (safety valve) | MPa (bar) | 21 (210) | 27 (270) |
| Opening temperature, thermostat valve | °C | 80 | |
| Oil quantity - pump | l 0,3 | 0,35 | |
| Oil type - pump | Engine oil 15W40 | Order no. 6.288-050.0 | |
| Detergent suck in | l/h (l/min) | 0...45 (0...0,8) | |
| Max. recoil force of trigger gun | N | 30 | 41 |
| Dimensions and weights | |||
| Length x width x height | mm 790 x 608 x 1104 | ||
| Typical operating weight | kg | 39,5 | 54,7 |
| Values determined as per EN 60335-2-79 | |||
| Noise emission | |||
| Sound pressure level L_pA | dB(A) | 90 | 91 |
| Uncertainty K_pA | dB(A) | 3 | 3 |
| Sound power level L_WA + Uncertainty K_WA | dB(A) | 108 | 108 |
| Hand-arm vibration value | m/s^2 | <2,5 | <2,5 |
| Uncertainty K | m/s^2 | 0,6 0,7 | |

www.kaercher.com/REACH
Niveaux de danger
⚠️DANGER
Figure 3, cf. page de couverture
text_image
Technical diagram showing two mechanical assembly steps with numbered annotations indicating component placement.natural_image
Diagram showing a pair of scissors cutting a cylindrical object with an arrow indicating rotation (no text or symbols)2006/42/CE (+2009/127/CE)
2000/14/CE
2014/30/UE
H. Jenner
Chairman of the Board of Management

S. Reiser
Director Regulatory Affairs & Certification
Responsable de la documentation : S. Reiser
Alfred Kärcher SE & Co. KG
71364 Winnenden (Germany)
Tel.: +49 7195 14-0
Fax: +49 7195 14-2212
Winnenden, 2019/05/01
HD 8/20 G
2006/42/CE (+2009/127/CE)
2000/14/CE
2014/30/UE
H. Jenner
Chairman of the Board of Management

S. Reiser
Director Regulatory Affairs & Certification
Responsable de la documentation : S. Reiser
Alfred Kärcher SE & Co. KG
71364 Winnenden (Germany)
Tel.: +49 7195 14-0
Fax: +49 7195 14-2212
Winnenden, 2019/05/01
www.kaercher.com/REACH
Livelli di pericolo
⚠PERICOLO
text_image
Technical diagram showing two mechanical assembly steps with numbered annotations indicating component placement.natural_image
Diagram showing a hand operating a cutting tool and a mechanical device with an arrow indicating motion (no text or symbols)2006/42/CE (+2009/127/CE)
2000/14/CE
2014/30/UE
Chairman of the Board of Management

S. Reiser
Director Regulatory Affairs & Certification
71364 Winnenden (Germany)
Tel.: +49 7195 14-0
Fax: +49 7195 14-2212
Winnenden, 2019/05/01
HD 8/20 G
2006/42/CE (+2009/127/CE)
2000/14/CE
2014/30/UE
Chairman of the Board of Management

S. Reiser
Director Regulatory Affairs & Certification
71364 Winnenden (Germany)
Tel.: +49 7195 14-0
Fax: +49 7195 14-2212
Winnenden, 2019/05/01
Dati tecnici
www.kaercher.com/REACH
Gevarenniveaus
⚠ GEVAAR
text_image
Technical diagram showing two mechanical assembly steps with numbered annotations indicating component placement.natural_image
Diagram showing a hand operating a cutting tool next to a mechanical device with an arrow indicating motion (no text or symbols present)Chairman of the Board of Management
S. Reiser
Director Regulatory Affairs & Certification
71364 Winnenden (Germany)
Tel.: +49 7195 14-0
Fax: +49 7195 14-2212
Winnenden, 2019/05/01
HD 8/20 G
Chairman of the Board of Management

S. Reiser
Director Regulatory Affairs & Certification
71364 Winnenden (Germany)
Tel.: +49 7195 14-0
Fax: +49 7195 14-2212
Winnenden, 2019/05/01
Technische gegevens
www.kaercher.com/REACH
Niveles de peligro
⚠️ PELIGRO
text_image
Technical diagram showing two mechanical assembly steps with numbered annotations indicating component placement.natural_image
Diagram showing a pair of scissors cutting a cylindrical object with an arrow indicating motion (no text or symbols)2006/42/CE (+2009/127/CE)
2000/14/CE
2014/30/UE

H. Jenner
Chairman of the Board of Management

S. Reiser
Director Regulatory Affairs & Certification
71364 Winnenden (Germany)
Tel.: +49 7195 14-0
Fax: +49 7195 14-2212
Winnenden, 2019/05/01
HD 8/20 G
2006/42/CE (+2009/127/CE)
2000/14/CE
2014/30/UE

H. Jenner
Chairman of the Board of Management

S. Reiser
Director Regulatory Affairs & Certification
71364 Winnenden (Germany)
Tel.: +49 7195 14-0
Fax: +49 7195 14-2212
Winnenden, 2019/05/01
Datos técnicos
www.kaercher.com/REACH
Níveis do aparelho
⚠PERIGO
text_image
Technical diagram showing two mechanical assembly steps with numbered annotations indicating component identification.natural_image
Diagram showing a pair of scissors cutting a cylindrical object with an arrow indicating rotation (no text or symbols)2006/42/CE (+2009/127/CE)
2000/14/CE
2014/30/UE
Chairman of the Board of Management

S. Reiser
Director Regulatory Affairs & Certification
71364 Winnenden (Germany)
Tel.: +49 7195 14-0
Fax: +49 7195 14-2212
Winnenden, 2019/05/01
HD 8/20 G
2006/42/CE (+2009/127/CE)
2000/14/CE
2014/30/UE
Chairman of the Board of Management

S. Reiser
Director Regulatory Affairs & Certification
71364 Winnenden (Germany)
Tel.: +49 7195 14-0
Fax: +49 7195 14-2212
Winnenden, 2019/05/01
Dados técnicos
www.kaercher.com/REACH
Faregrader
⚠️FARE
text_image
Safety warning symbols and a hand holding a spray can with 'max' label, indicating hazardous or hazardous items.text_image
Technical diagram showing two mechanical assembly steps with numbered annotations indicating component placement.natural_image
Diagram showing a pair of scissors cutting a cylindrical object with an arrow indicating rotation (no text or symbols)2006/42/EF (+2009/127/EF)
2000/14/EF
2014/30/EU

Chairman of the Board of Management

S. Reiser
Director Regulatory Affairs & Certification
71364 Winnenden (Germany)
Tel.: +49 7195 14-0
Fax: +49 7195 14-2212
Winnenden, 2019/05/01
HD 8/20 G
2006/42/EF (+2009/127/EF)
2000/14/EF
2014/30/EU

Chairman of the Board of Management

S. Reiser
Director Regulatory Affairs & Certification
71364 Winnenden (Germany)
Tel.: +49 7195 14-0
Fax: +49 7195 14-2212
Winnenden, 2019/05/01
Tekniske data
www.kaercher.com/REACH
Risikotrinn
⚠️FARE
Anvisning om en umiddelbar truende fare som kan føre til store personskader eller til død.
ADVARSEL
text_image
Two safety symbols: triangular warning triangle with explosion icon and circular symbol without crossed-out boxtext_image
Warning symbols and a hand pouring liquid into a container labeled 'max'Ikke fyll på tanken med motoren i gang.
Ikke røyk ved tanking. Ikke fyll på tanken direkte fra kannen, bruk en trakt eller en egnet beholder.
text_image
Technical diagram showing two mechanical assembly steps with numbered components and directional arrows indicating assembly direction.natural_image
Diagram showing a pair of scissors cutting a cylindrical object with an arrow indicating rotation (no text or symbols)→ Skru inn oljeavtappingsskrue.
HD 7/15 G: HD 8/20 G:
2006/42/EF (+2009/127/EF)
2000/14/EF
2014/30/EU
2000/14/EF: Vedlegg V
Lydeffektnivå dB(A)
HD 7/15 G
Målt: 105
Garantert: 108
Chairman of the Board of Management

S. Reiser
Director Regulatory Affairs & Certification
71364 Winnenden (Germany)
Tel.: +49 7195 14-0
Fax: +49 7195 14-2212
Winnenden, 2019/05/01
HD 8/20 G
2006/42/EF (+2009/127/EF)
2000/14/EF
2014/30/EU
2000/14/EF: Vedlegg V
Lydeffektnivå dB(A)
HD 8/20 G
Målt: 106
Garantert: 108
Chairman of the Board of Management

S. Reiser
Director Regulatory Affairs & Certification
71364 Winnenden (Germany)
Tel.: +49 7195 14-0
Fax: +49 7195 14-2212
Winnenden, 2019/05/01
Tekniske data
www.kaercher.com/REACH
Risknivåer
⚠️FARA
text_image
Safety warning symbols and a hand holding a spray can with 'max' label, indicating hazardous or hazardous items.text_image
Technical diagram showing two mechanical assembly steps with numbered annotations indicating component placement.natural_image
Diagram showing a pair of scissors cutting a cylindrical object with an arrow indicating motion (no text or symbols)
Chairman of the Board of Management
S. Reiser
Director Regulatory Affairs & Certification
71364 Winnenden (Germany)
Tel.: +49 7195 14-0
Fax: +49 7195 14-2212
Winnenden, 2019/05/01
HD 8/20 G

Chairman of the Board of Management
S. Reiser
Director Regulatory Affairs & Certification
71364 Winnenden (Germany)
Tel.: +49 7195 14-0
Fax: +49 7195 14-2212
Winnenden, 2019/05/01
Tekniska data
www.kaercher.com/REACH
Vaarallisuusasteet
⚠ VAARA
text_image
Technical diagram showing two mechanical assembly steps with numbered annotations indicating component identification.natural_image
Diagram showing a pair of scissors cutting a cylindrical object with an arrow indicating motion (no text or symbols)
Chairman of the Board of Management

S. Reiser
Director Regulatory Affairs & Certification
71364 Winnenden (Germany)
Tel.: +49 7195 14-0
Fax: +49 7195 14-2212
Winnenden, 2019/05/01
HD 8/20 G

Chairman of the Board of Management

S. Reiser
Director Regulatory Affairs & Certification
71364 Winnenden (Germany)
Tel.: +49 7195 14-0
Fax: +49 7195 14-2212
Winnenden, 2019/05/01
Tekniset tiedot
www.kaercher.com/REACH
Επίπεδα ασφαλείας
⚠️KINDYNOΣ
natural_image
Diagram showing a hand operating a cutting tool and a mechanical device with an arrow indicating motion (no text or symbols)
Chairman of the Board of Management
S. Reiser
Director Regulatory Affairs & Certification
71364 Winnenden (Germany)
Tel.: +49 7195 14-0
Fax: +49 7195 14-2212
Winnenden, 2019/05/01
HD 8/20 G

H. Jenner
Chairman of the Board of Management

S. Reiser
Director Regulatory Affairs & Certification
71364 Winnenden (Germany)
Tel.: +49 7195 14-0
Fax: +49 7195 14-2212
Winnenden, 2019/05/01
www.kaercher.com/REACH
Tehlike kademeleri
TEHLIKE
text_image
Safety warning symbols and diagram showing hazard signs, a bottle, and a hand holding a device labeled 'max'text_image
Technical diagram showing two mechanical assembly steps with numbered annotations indicating component identification.natural_image
Diagram showing a pair of scissors cutting a cylindrical object with an arrow indicating rotation (no text or symbols)Chairman of the Board of Management

S. Reiser
Director Regulatory Affairs & Certification
71364 Winnenden (Germany)
Tel.: +49 7195 14-0
Fax: +49 7195 14-2212
Winnenden, 2019/05/01
HD 8/20 G
Chairman of the Board of Management

S. Reiser
Director Regulatory Affairs & Certification
71364 Winnenden (Germany)
Tel.: +49 7195 14-0
Fax: +49 7195 14-2212
Winnenden, 2019/05/01
Teknik Bilgiler
www.kaercher.com/REACH
Степень опасности
⚠️ ОПАСНОСТЬ
text_image
Safety warning symbols including hazard, explosion, and spray bottle with 'max' labeltext_image
Technical diagram showing two mechanical assembly steps with labeled components and directional arrowsnatural_image
Diagram showing a hand operating a cutting tool next to a mechanical device with an arrow indicating motion (no text or symbols present)Chairman of the Board of Management
S. Reiser
Director Regulatory Affairs & Certification
71364 Winnenden (Germany)
Tel.: +49 7195 14-0
Fax: +49 7195 14-2212
Winnenden, 2019/05/01
HD 8/20 G
Chairman of the Board of Management

S. Reiser
Director Regulatory Affairs & Certification
71364 Winnenden (Germany)
Tel.: +49 7195 14-0
Fax: +49 7195 14-2212
Winnenden, 2019/05/01
Технические данные
www.kaercher.com/REACH
Veszély fokozatok
⚠ VESZÉLY
text_image
Technical diagram showing two mechanical assembly steps with numbered components and directional arrows indicating assembly direction.natural_image
Diagram showing a hand operating a cutting tool and a mechanical device with an arrow indicating motion (no text or symbols)
H. Jenner
Chairman of the Board of Management

S. Reiser
Director Regulatory Affairs & Certification
71364 Winnenden (Germany)
Tel.: +49 7195 14-0
Fax: +49 7195 14-2212
Winnenden, 2019/05/01
HD 8/20 G
H. Jenner
Chairman of the Board of Management

S. Reiser
Director Regulatory Affairs & Certification
71364 Winnenden (Germany)
Tel.: +49 7195 14-0
Fax: +49 7195 14-2212
Winnenden, 2019/05/01
Műszaki adatok
www.kaercher.com/REACH
Stupně nebezpečí
⚠NEBEZPEČÍ
text_image
Technical diagram showing two mechanical assembly steps with numbered annotations indicating component placement.natural_image
Diagram showing a pair of scissors cutting a cylindrical object with an arrow indicating motion (no text or symbols)2006/42/ES (+2009/127/ES)
2000/14/ES
2014/30/EU
Chairman of the Board of Management
S. Reiser
Director Regulatory Affairs & Certification
71364 Winnenden (Germany)
Tel.: +49 7195 14-0
Fax: +49 7195 14-2212
Winnenden, 2019/05/01
HD 8/20 G
2006/42/ES (+2009/127/ES)
2000/14/ES
2014/30/EU
Chairman of the Board of Management

S. Reiser
Director Regulatory Affairs & Certification
71364 Winnenden (Germany)
Tel.: +49 7195 14-0
Fax: +49 7195 14-2212
Winnenden, 2019/05/01
Technické údaje
www.kaercher.com/REACH
Stopnje nevarnosti
⚠️NEVARNOST
text_image
Safety warning symbols and a hand holding a spray bottle labeled 'max'Goriva ne nalivajte pri delujočem motorju. Pri polnjenju rezervoarja ne kadite.
text_image
Technical diagram showing two mechanical assembly steps with numbered components and directional arrows indicating assembly direction.natural_image
Diagram showing a pair of scissors cutting a cylindrical object with an arrow indicating rotation (no text or symbols)2006/42/ES (+2009/127/ES)
2000/14/ES
2014/30/EU

Chairman of the Board of Management
S. Reiser
Director Regulatory Affairs & Certification
71364 Winnenden (Germany)
Tel.: +49 7195 14-0
Fax: +49 7195 14-2212
Winnenden, 2019/05/01
HD 8/20 G
S to izjavo potrjujemo, da spodaj omenjeni stroj zaradi svoje zasnove in načina izdelave ustreza temeljnim varnostnim in zdravstvenim zahtevam EU-standardov. Ta izjava izgubi svojo veljavnost, će kdo napravo spremeni brez našega soglasja.
Proizvod: visokotlačni čistilec
Tip: 1.810-xxx
Zadevne direktive EU:
2006/42/ES (+2009/127/ES)
2000/14/ES
2014/30/EU

Chairman of the Board of Management

S. Reiser
Director Regulatory Affairs & Certification
71364 Winnenden (Germany)
Tel.: +49 7195 14-0
Fax: +49 7195 14-2212
Winnenden, 2019/05/01
Tehnični podatki
| HD 7/15 G HD 8/20 G | |||
| Motor | |||
| Tip -- Honda | GX 160 1 cilinder 4-taktni | Honda GX 270, 1 valj, 4-taktni | |
| Nazivna kapaciteta pri 3600 1/min kW (PS) 3,6/4,8 6,3 | /8,4 | ||
| Obratovalno število obratov 1/min 3600 3550 | |||
| Rezervoar za gorivo I 3,1 5,3 | |||
| Gorivo* Naprava je primerna za gorivo E10 | -- Bencin, neosvinčen | ||
| Vrsta zaščite -- IPX5 | |||
| Poraba goriva pri polni obremenitvi | I/h | 1,4 2,4 | |
| Količina olja - motor | I 0,6 0,9 | ||
| Vrsta olja - motor | Motorno olje 15W40 | Naroč. št. 6.288-050.0 | |
| Vodni priključek | |||
| Temperatura dotoka (maks.) | °C | 60 | |
| Količina dotoka (min.) | I/h (I/min) | 750 (12,5) | 1000 (16,7) |
| Pritisk dotoka (maks.) | MPa (bar) | 1 (10) | |
| Dolžina dovodne cevi (min.) | m | 7,5 | |
| Premer dovodne cevi (min.) | Cola | 3/4 | |
| Sesalna višina iz odprte posode | m | 1 | |
| Črpalka | |||
| Delovni tlak | MPa (bar) | 15 (150) | 2...20 (20...200) |
| Pretok | I/h (I/min) | 624 (10,4) | 160...750 (2,7...12,5) |
| Velikost šobe, visoki tlak | -- | 038 | 041 |
| Velikost šobe, nizki tlak | -- | 250 | 250 |
| Maks. obratovalni nadtlak (varnostni ventil) | MPa (bar) | 21 (210) | 27 (270) |
| Temperatura odprtja termoventila | °C | 80 | |
| Količina olja - črpalka | I 0,3 | 0,35 | |
| Vrsta olja - črpalka | Motorno olje 15W40 | Naroč. št. 6.288-050.0 | |
| Sesanje čistila | I/h (I/min) | 0...45 (0...0,8) | |
| Povratna udarna sila ročne brizgalne pištole (maks.) | N | 30 | 41 |
| Mere in teža | |||
| Dolžina x širina x višina | mm | 790 x 608 x 1104 | |
| Tipična delovna teža | kg | 39,5 | 54,7 |
| Ugotovljene vrednosti v skladu z EN 60335-2-79 | |||
| Emisija hrupa | |||
| Nivo hrupa L_pA | dB(A) | 90 | 91 |
| Negotovost K_pA | dB(A) | 3 | 3 |
| Nivo hrupa ob obremenitvi L_WA + negotovost K_WA | dB(A) | 108 | 108 |
| Vrednost vibracij dlan-roka | m/s2 | <2,5 | <2,5 |
| Negotovost K | m/s2 | 0,6 0,7 | |
www.kaercher.com/REACH
Stopnie zagrożenia
⚠ NIEBEZPIECZEŃSTWO
natural_image
Diagram showing a pair of scissors cutting a cylindrical object with an arrow indicating motion (no text or symbols)2006/42/WE (+2009/127/WE)
2000/14/WE
2014/30/UE
Chairman of the Board of Management

S. Reiser
Director Regulatory Affairs & Certification
71364 Winnenden (Germany)
Tel.: +49 7195 14-0
Fax: +49 7195 14-2212
Winnenden, 2019/05/01
HD 8/20 G
2006/42/WE (+2009/127/WE)
2000/14/WE
2014/30/UE
Chairman of the Board of Management
S. Reiser
Director Regulatory Affairs & Certification
71364 Winnenden (Germany)
Tel.: +49 7195 14-0
Fax: +49 7195 14-2212
Winnenden, 2019/05/01
Dane techniczne
www.kaercher.com/REACH
Trepte de pericol
⚠PERICOL
24 Jojă ulei (motor)
25 Motor
text_image
Technical diagram showing two mechanical assembly steps with numbered components and directional arrows indicating assembly direction.natural_image
Diagram showing a hand operating a cutting tool and a mechanical device with an arrow indicating rotation (no text or symbols)Directive UE respectate:
2006/42/CE (+2009/127/CE)
2000/14/CE
2014/30/UE
Norme armonizate utilize:
EN 60335-1
EN 60335-2-79
EN 55012: 2007 + A1: 2009
Chairman of the Board of Management
S. Reiser
Director Regulatory Affairs & Certification
71364 Winnenden (Germany)
Tel.: +49 7195 14-0
Fax: +49 7195 14-2212
Winnenden, 2019/05/01
HD 8/20 G
Directive UE respectate:
2006/42/CE (+2009/127/CE)
2000/14/CE
2014/30/UE
Norme armonizate utilize:
EN 60335-1
EN 60335-2-79
EN 55012: 2007 + A1: 2009
Chairman of the Board of Management
S. Reiser
Director Regulatory Affairs & Certification
71364 Winnenden (Germany)
Tel.: +49 7195 14-0
Fax: +49 7195 14-2212
Winnenden, 2019/05/01
Date tehnice
www.kaercher.com/REACH
Stupne nebezpečenstva
⚠NEBEZPEČENSTVO
text_image
Technical diagram showing two mechanical assembly steps with numbered annotations indicating component placement.→ Vysokotlakovú dýzu nasad'te na pracovný nadstavec.
→ Namontujte a pevne utiahnite prevlečnú maticu (EASY!Lock).
→ Pracovný nadstavec spojte s ručnou striekacou pištol'ou a pevne utiahnite rukou (EASY!Lock).
→ Rukou pevne dotiahnite skrutkový spoj trysky.
→ Pracovný nadstavec spojte s ručnou striekacou pištol'ou a vysokotlakovou prípojkou prístroja a pevne utiahnite ru-kou (EASY!Lock).
natural_image
Diagram showing a pair of scissors cutting a cylindrical object with an arrow indicating rotation (no text or symbols)2006/42/ES (+2009/127/ES)
2000/14/ES
2014/30/EÚ
Uplatňované harmonizované normy:
EN 60335-1
EN 60335-2-79
EN 55012: 2007 + A1: 2009

Chairman of the Board of Management

S. Reiser
Director Regulatory Affairs & Certification
71364 Winnenden (Germany)
Tel.: +49 7195 14-0
Fax: +49 7195 14-2212
Winnenden, 2019/05/01
HD 8/20 G
2006/42/ES (+2009/127/ES)
2000/14/ES
2014/30/EÚ
Uplatňované harmonizované normy:
EN 60335-1
EN 60335-2-79
EN 55012: 2007 + A1: 2009

Chairman of the Board of Management
S. Reiser
Director Regulatory Affairs & Certification
71364 Winnenden (Germany)
Tel.: +49 7195 14-0
Fax: +49 7195 14-2212
Winnenden, 2019/05/01
Technické údaje
www.kaercher.com/REACH
Stupnjevi opasnosti
⚠ OPASNOST
text_image
Technical diagram showing two mechanical assembly steps with numbered annotations indicating component identification.→ Nataknite visokotlačnu mlaznicu na cijev za prskanje.
→ Montirajte slijepu maticu i zategnite je rukom (EASY!Lock).
→ Spojite cijev za prskanje s ručnom prskalicom i ručno ih pritegnite (EASY!Lock).
→ Rukom čvrsto pritegnite vijčani spoj cijevi za prskanje.
→ Spojite visokotlačno crijevo s ručnom prskalicom i priključkom visokog tlaka uređaja i ručno ih pritegnite (EASY!Lock).
Provjera razine ulja visokotlačne pumpe
HD 7/15 G
natural_image
Diagram showing a pair of scissors cutting a cylindrical object with an arrow indicating rotation (no text or symbols)2006/42/EZ (+2009/127/EZ)
2000/14/EZ
2014/30/EU
Chairman of the Board of Management

S. Reiser
Director Regulatory Affairs & Certification
Opunomoćeni za izradu dokumentacije: S. Reiser
Alfred Kärcher SE & Co. KG
71364 Winnenden (Germany)
Tel.: +49 7195 14-0
Fax: +49 7195 14-2212
Winnenden, 2019/05/01
HD 8/20 G
2006/42/EZ (+2009/127/EZ)
2000/14/EZ
2014/30/EU
Primijenjene uskladene norme:
EN 60335-1
EN 60335-2-79
EN 55012: 2007 + A1: 2009
Chairman of the Board of Management
S. Reiser
Director Regulatory Affairs & Certification
Opunomoćeni za izradu dokumentacije: S. Reiser
Alfred Kärcher SE & Co. KG
71364 Winnenden (Germany)
Tel.: +49 7195 14-0
Fax: +49 7195 14-2212
Winnenden, 2019/05/01
Tehnički podaci
| HD 7/15 G HD 8/20 G | |||
| Motor | |||
| Tip -- Honda | GX 160, 1-cilin-drični, 4-taktni | Honda GX 270, 1-cilin-drični, 4-taktni | |
| Nazivna snaga pri 3600 1/min kW (PS) 3,6/4,8 6,3/8,4 | |||
| Broj okretaja pri radu 1/min 3600 3550 | |||
| Spremnik goriva l 3,1 5,3 | |||
| Gorivo* Uređaj je prikladan za gorivo E10 | -- Bezolovni benzin | ||
| Zaštita -- IPX5 | |||
| Potrošnja goriva pri punom opterećenju l/h | 1,4 2,4 | ||
| Količina ulja - motor | l 0,6 0,9 | ||
| Vrsta ulja - motor | Motorno ulje 15W40 | Kataloški br. 6.288-050.0 | |
| Priključak za vodu | |||
| Dovodna temperatura (maks.) | °C | 60 | |
| Dovodni protok (min.) | l/h (l/min) | 750 (12,5) | 1000 (16,7) |
| Dovodni tlak (maks.) | MPa (bar) | 1 (10) | |
| Duljina dovodnog crijeva (min.) | m | 7,5 | |
| Promjer dovodnog crijeva (min.) | inč | 3/4 | |
| Visina usisavanja iz otvorenih posuda | m | 1 | |
| Pumpa | |||
| Radni tlak | MPa (bar) | 15 (150) | 2...20(20...200) |
| Protočna količina | l/h (l/min) | 624 (10,4) | 160...750(2,7...12,5) |
| Veličina mlaznica, visoki tlak | -- | 038 | 041 |
| Veličina mlaznica, niski tlak | -- | 250 | 250 |
| Maks. radni nadtlak (sigurnosni ventil) | MPa (bar) | 21 (210) | 27 (270) |
| Temperatura otvaranja termo-ventila | °C | 80 | |
| Količina ulja za pumpu | l 0,3 | 0,35 | |
| Vrsta ulja za pumpu | Motorno ulje 15W40 | Kataloški br. 6.288-050.0 | |
| Usisavanje sredstva za pranje | l/h (l/min) | 0...45 (0...0,8) | |
| Povratna udarna sila ručne prskalice (maks.) | N | 30 | 41 |
| Dimenzije i težine | |||
| Duljina x širina x visina | mm | 790 x 608 x 1104 | |
| Tipična radna težina | kg | 39,5 | 54,7 |
| Utvrdene vrijednosti prema EN 60335-2-79 | |||
| Emisija buke | |||
| Razina zvučnog tlaka L_pA | dB(A) 90 | 91 | |
| Nepouzdanost K_pA | dB(A) | 3 | 3 |
| Razina zvučne snage L_WA + nepouzdanost K_WA | dB(A) | 108 | 108 |
| Vrijednost vibracije na ruci | m/s ^2 | <2,5 | <2,5 |
| Nepouzdanost K | m/s ^2 | 0,6 0,7 | |
Pre prve upotrebe Vašeg uređaja pročitajte ove originalno
www.kaercher.com/REACH
Stepeni opasnosti
⚠ OPASNOST
Napomena koja ukazuje na neposredno preteću opasnost koja dovodi do teških telesnih povreda ili smrti.
⚠UPOZORENJE
Napomena koja ukazuje na eventualno opasnu situaciju koja može dovesti do teških telesnih povreda ili smrti.
△OPREZ
Napomena koja ukazuje na eventualno opasnu situaciju, koja može izazvati lakše telesne povrede.
PAŽNJA
Napomena koja ukazuje na eventualno opasnu situaciju koja može izazvati materijalne štete.
text_image
Technical diagram showing two mechanical assembly steps with numbered annotations indicating component identification.→ Visokopritisnu mlaznicu postaviti na cev za prskanje.
→ Montirati i rukom pritegnuti slepu navrtku (EASY!Lock).
→ Povezati cev za prskanje sa ručnom prskalicom i pritegnuti rukom (EASY!Lock).
→ Rukom čvrsto zategnite zavrtni spoj cevi za prskanje.
→ Visokopritisno crevo povezati sa ručnom prskalicom i priključkom visokog pritiska uređaja i pritegnuti rukom (EASY!Lock).
Provera nivoa ulja pumpe visokog pritiska
HD 7/15 G
→ Dno rezervoara za ulje mora da bude prekriveno uljem.
natural_image
Diagram showing a pair of scissors cutting a cylindrical object with an arrow indicating motion (no text or symbols)2006/42/EZ (+2009/127/EZ)
2000/14/EZ
2014/30/EU
Chairman of the Board of Management
S. Reiser
Director Regulatory Affairs & Certification
Opunomoćeni za izradu dokumentacije: S. Reiser
Alfred Kärcher SE & Co. KG
71364 Winnenden (Germany)
Tel.: +49 7195 14-0
Fax: +49 7195 14-2212
Winnenden, 2019/05/01
HD 8/20 G
Ovim izjavljujemo da ovde opisana mašina po svojoj koncepciji i načinu izrade, sa svim njenim modelima koje smo izneli na tržište, odgovara osnovnim zahtevima dole navedenih propisa Evropske Zajednice o sigurnosti i zdravstvenoj zaštiti. Ova izjava prestaje da važi ako se bez naše saglasnosti na mašini izvedu bilo kakve promene.
Proizvod: Uređaj za čišćenje pod visokim pritiskom
Tip: 1.810-xxx
2006/42/EZ (+2009/127/EZ)
2000/14/EZ
2014/30/EU
Chairman of the Board of Management

S. Reiser
Director Regulatory Affairs & Certification
Opunomoćeni za izradu dokumentacije: S. Reiser
Alfred Kärcher SE & Co. KG
71364 Winnenden (Germany)
Tel.: +49 7195 14-0
Fax: +49 7195 14-2212
Winnenden, 2019/05/01
Tehnički podaci
| HD 7/15 G HD 8/20 G | |||
| Motor | |||
| Tip -- Honda | GX 160, 1-cilindrični, 4-taktni | Honda GX 270, 1-cilindrični, 4-taktni | |
| Nominalna snaga pri 3600 1/min kW (PS) 3,6/4,8 6,3/8,4 | |||
| Broj obrtaja pri radu 1/min 3600 3550 | |||
| Rezervoar goriva I 3,1 5,3 | |||
| Gorivo* Uređaj je prikladan za gorivo E10 | -- Bezolovni benzin | ||
| Stepen zaštite -- IPX5 | |||
| Potrošnja goriva pri punom opterećenju l/h 1,4 2,4 | |||
| Količina ulja - motor I 0,6 0,9 | |||
| Vrsta ulja - motor Motorno ulje | 15W40 | Kataloški br. 6.288-050.0 | |
| Priključak za vodu | |||
| Dovodna temperatura (maks.) | °C | 60 | |
| Dovodni protok (min.) | l/h (l/min) | 750 (12,5) | 1000 (16,7) |
| Dovodni pritisak (maks.) | MPa (bar) | 1 (10) | |
| Dužina dovodnog creva (min.) | m | 7,5 | |
| Prečnik dovodnog creva (min.) | inč | 3/4 | |
| Visina usisavanja iz otvorene posude | m | 1 | |
| Pumpa | |||
| Radni pritisak | MPa (bar) | 15 (150) | 2...20(20...200) |
| Protočna količina l/h (l/min) 624 (10,4) 160...750 | (2,7...12,5) | ||
| Veličina mlaznice, visoki pritisak | -- | 038 | 041 |
| Veličina mlaznice, niski pritisak | -- | 250 | 250 |
| Maks. radni nadpritisak (sigurnosni ventil) | MPa (bar) | 21 (210) | 27 (270) |
| Temperatura otvora termo-ventila | °C | 80 | |
| Količina ulja za pumpu | I 0,3 | 0,35 | |
| Vrsta ulja za pumpu | Motorno ulje 15W40 | Kataloški br. 6.288-050.0 | |
| Usisavanje deterdženta | l/h (l/min) | 0...45 (0...0,8) | |
| Povratna udarna sila ručne prskalice (maks.) | N | 30 | 41 |
| Dimenzije i težine | |||
| Dužina x širina x visina | mm | 790 x 608 x 1104 | |
| Tipična radna težina | kg | 39,5 | 54,7 |
| Izračunate vrednosti prema EN 60335-2-79 | |||
| Emisija buke | |||
| Nivo zvučnog pritiska L_pA | dB(A) 90 | 91 | |
| Nepouzdanost K_pA | dB(A) | 3 | 3 |
| Nivo zvučne snage L_WA + nepouzdanost K_WA | dB(A) | 108 | 108 |
| Vrednost vibracije na ruci | m/s^2 | <2,5 | <2,5 |
| Nepouzdanost K | m/s^2 | 0,6 0,7 | |
www.kaercher.com/REACH
Степени на опасност
⚠️ ОПАСНОСТ
text_image
Safety warning symbols and spray bottle illustration with Chinese text labelsnatural_image
Diagram showing a hand operating a cutting tool and a mechanical device with an arrow indicating motion (no text or symbols)
Chairman of the Board of Management
S. Reiser
Director Regulatory Affairs & Certification
71364 Winnenden (Germany)
Tel.: +49 7195 14-0
Fax: +49 7195 14-2212
Winnenden, 2019/05/01
HD 8/20 G
H. Jenner
Chairman of the Board of Management
S. Reiser
Director Regulatory Affairs & Certification
71364 Winnenden (Germany)
Tel.: +49 7195 14-0
Fax: +49 7195 14-2212
Winnenden, 2019/05/01
Технически данни
www.kaercher.com/REACH
Ohuastmed
⚠️OHT
text_image
Safety warning symbols and a hand holding a spray bottle with 'max' label, indicating hazardous or hazardous items.text_image
Technical diagram showing two mechanical assembly steps with numbered annotations indicating component placement.natural_image
Diagram showing a hand operating a cutting tool next to a mechanical device with an arrow indicating rotation (no text or symbols present)Toode: Körgsurvepesur
Tüüp: 1.810-xxx
Chairman of the Board of Management

S. Reiser
Director Regulatory Affairs & Certification
71364 Winnenden (Germany)
Tel.: +49 7195 14-0
Fax: +49 7195 14-2212
Winnenden, 2019/05/01
HD 8/20 G
Toode: Körgsurvepesur
Tüüp: 1.810-xxx
Chairman of the Board of Management

S. Reiser
Director Regulatory Affairs & Certification
71364 Winnenden (Germany)
Tel.: +49 7195 14-0
Fax: +49 7195 14-2212
Winnenden, 2019/05/01
Tehnilised andmed
www.kaercher.com/REACH
Riska pakāpes
⚠ BĪSTAMI
text_image
Technical diagram showing two mechanical assembly steps with numbered annotations indicating component placement.natural_image
Diagram showing a pair of scissors cutting a cylindrical object with an arrow indicating rotation (no text or symbols)
Chairman of the Board of Management
S. Reiser
Director Regulatory Affairs & Certification
Pilnvarotais sagatavot dokumentāciju: S. Reiser
Alfred Kärcher SE & Co. KG
71364 Winnenden (Germany)
Tel.: +49 7195 14-0
Fax: +49 7195 14-2212
Winnenden, 2019/05/01
HD 8/20 G

Chairman of the Board of Management
S. Reiser
Director Regulatory Affairs & Certification
Pilnvarotais sagatavot dokumentāciju: S. Reiser
Alfred Kärcher SE & Co. KG
71364 Winnenden (Germany)
Tel.: +49 7195 14-0
Fax: +49 7195 14-2212
Winnenden, 2019/05/01
Tehniskie dati
www.kaercher.com/REACH
Rizikos lygiai
⚠PAVOJUS
text_image
Technical diagram showing two mechanical assembly steps with numbered annotations indicating component identification.natural_image
Diagram showing a pair of scissors cutting a cylindrical object with an arrow indicating rotation (no text or symbols)Chairman of the Board of Management

S. Reiser
Director Regulatory Affairs & Certification
71364 Winnenden (Germany)
Tel.: +49 7195 14-0
Fax: +49 7195 14-2212
Winnenden, 2019/05/01
HD 8/20 G
Chairman of the Board of Management

S. Reiser
Director Regulatory Affairs & Certification
71364 Winnenden (Germany)
Tel.: +49 7195 14-0
Fax: +49 7195 14-2212
Winnenden, 2019/05/01
Techniniai duomenys
www.kaercher.com/REACH
Рівень небезпеки
⚠️НЕБЕЗПЕКА
text_image
Technical diagram showing two mechanical assembly steps with numbered annotations indicating component placement.natural_image
Diagram showing a hand operating a cutting tool and a mechanical device with an arrow indicating motion (no text or symbols)Chairman of the Board of Management

S. Reiser
Director Regulatory Affairs & Certification
71364 Winnenden (Germany)
Tel.: +49 7195 14-0
Fax: +49 7195 14-2212
Winnenden, 2019/05/01
HD 8/20 G
Chairman of the Board of Management

S. Reiser
Director Regulatory Affairs & Certification
71364 Winnenden (Germany)
Tel.: +49 7195 14-0
Fax: +49 7195 14-2212
Winnenden, 2019/05/01
www.kaercher.com/REACH
危险程度
危险
text_image
Safety warning symbols and a hand pouring liquid into a container labeled 'max.'text_image
Technical diagram showing two mechanical assembly steps with numbered annotations indicating component identification.natural_image
Diagram showing a hand operating a cutting tool next to a mechanical device with an arrow indicating motion (no text or symbols present):HD 8/20 G :HD 7/15 G
← ملء الخزان بزيت
جديد بطاء حتى
natural_image
Diagram showing a hand using scissors to cut a cylindrical object with an arrow indicating motion (no text or symbols)ي قبل الالا
text_image
Technical diagram showing two mechanical assembly steps with numbered annotations indicating component placement.text_image
Safety warning symbols and a hand holding a spray can labeled 'MAX.'
www.kaercher.com/REACH
درجات الخطر
natural_image
Icon of a gear and wrench inside a square frame (no text or symbols)http://www.kaercher.com/dealersearch