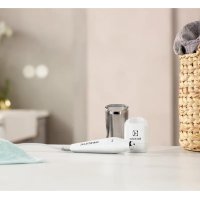
E4WMSTPN1 - Ultrasonic cleaner ELECTROLUX - Free user manual and instructions
Find the device manual for free E4WMSTPN1 ELECTROLUX in PDF.



| Product type | Ultrasonic cleaner (stain remover pen) |
| Brand | Electrolux |
| Model | E4WMSTPN1 |
| Color | White |
| Supply voltage | 220-230 V |
| Power | 7.0 W |
| Electrical frequency | 50-60 Hz |
| Ultrasonic frequency | 46,000 vibrations per second |
| Net weight | 2.2 g |
| Power supply type | Mains adapter included with interchangeable plugs (EU/UK) |
| Continuous operating time | 5 minutes before automatic shutdown |
| Cooling time | 1 minute |
| Maximum treatment area per stain | 3 cm diameter |
| Recommended liquid | Mixture of water and neutral, non-colored liquid detergent |
| Safety | Do not use on animals, people, worn clothing; do not immerse |
| Care | Clean tip with a damp cloth; no abrasive products |
| Warranty | 2 years from date of purchase |
| Package contents | Stain remover pen, base, container, connector, mains adapter |
Frequently Asked Questions - E4WMSTPN1 ELECTROLUX
User questions about E4WMSTPN1 ELECTROLUX
0 question about this device. Answer the ones you know or ask your own.
Ask a new question about this device
Download the instructions for your Ultrasonic cleaner in PDF format for free! Find your manual E4WMSTPN1 - ELECTROLUX and take your electronic device back in hand. On this page are published all the documents necessary for the use of your device. E4WMSTPN1 by ELECTROLUX.
USER MANUAL E4WMSTPN1 ELECTROLUX
STAIN REMOVER PEN Ultrasonic wave technology Model E4WMSTPN1
EN DE FR NL DK NO FI SE LV LT CZ SK SI
PL HU RO RS BG UA TR IT HR ES RU PT GR
Contents
- Safety Information 3 2 Safety Instruction 4
- Introduction 4
- Product description 4
- Getting Started 5
- Using Your Product 6
- Tips 7
- Cleaning and Maintenance
- What to do if...
- Technical data
- Environment concerns
- GUARANTEE
1. SAFETY INFORMATION
For your safety and correct operation of the appliance, read this manual carefully before installation and use. Always retain a copy of these instructions in the event of re-sale or moving home. Users must understand the operation and safety features of the appliance.
1.1 Children and vulnerable people safety
- The appliance can be used by children aged 8 years and above. People with reduced physical, sensory or mental capabilities, or who have not used the appliance previously, need to be supervised and understand the hazards involved.
- The Stain Remover Pen is not recommended for use by persons with pacemakers.
- Stop the unit immediately if you experience any physical discomfort.
- Ensure the appliance is kept out of reach of children.
- Keep all packaging away from children and dispose of it appropriately.
- Do not let children play with the appliance.
- Children shall not carry out cleaning and user maintenance of the appliance without supervision.
1.2 General Safety
- Do not use a damaged appliance.
- Make sure that the parameters on the Technical data are compatible with the electrical ratings of the mains power supply.
- Never attempt to attach the power adapter connector to other devices. This could damage the equipment.
- Never attempt to connect any other connector to the pen. The supplied connector is intended for use with this product ONLY and any unintended use could damage your Stain Remover Pen.
- Do not use the power cord to pull or drag the product.
- Do not place the power cord over sharp edges (e.g., a table edge) to avoid damage.
- Never pull on the power cord to remove the plug from the power outlet; remove using the mains adaptor instead.
- Do not pour water directly on the unit and never immerse it in water.
- Do not clamp, twist, stretch, or tie the power cord into a knot.
- Avoid electric shock hazards. Do not pour water onto the unit or handle it with wet hands. Never immerse the unit, power cord, plug, or connector in water or any other liquid or flammable material.
- Use original accessories only to prevent product damage or injury.
- The appliance should only be used with the power adaptor supplied.
- Unplug the unit before any cleaning, maintenance, and before changing accessories.
- Clean the appliance with a moist cloth. Use only neutral detergent.
- Do not use abrasive products, abrasive cleaning pads, solvents, or metal objects.
- This product is for household use only.
2 SAFETY INSTRUCTIONS
2.1 Use
- Avoid electric shock hazards. Do not pour water onto the unit or handle it with wet hands. Never immerse the unit, power cord, plug, or connector in water or any other liquid or flammable material.
- Risk of burns. Do not use the Stain Remover Pen directly on your hands, face, eyes, or any other part of your body. Never use the Stain Remover Pen on garments being worn.
- The Stain Remover Pen tip can become heated during operation. Be careful not to injure your skin while using the pen.
- If the pen becomes too hot, immediately switch the unit off and allow it to cool before resuming operation.
- Do not use the Stain Remover Pen without wetting the stain.
- Never use the wand on flammable fluids (alcohol, thinner, gasoline, etc.).
- Never use the Stain Remover Pen on animals.
3. INTRODUCTION
Thank you for purchasing the new Electrolux Stain Remover Pen. This device has been specially designed for quick stain pre-treatment before placing your clothes into the washing machine and washing them according to the care label. What is the secret of its power?
The ultrasound waves create microbubbles in the water solution, which expand and explode to remove the stain residue. Effective stain removing with 46.000 vibration per second (Hz).
4. PRODUCT DESCRIPTION
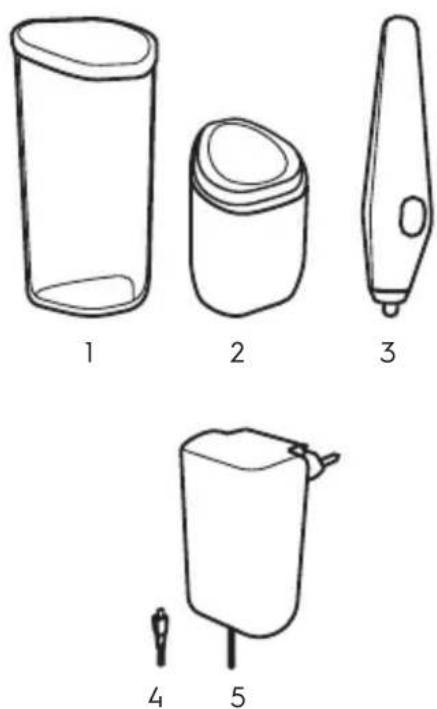
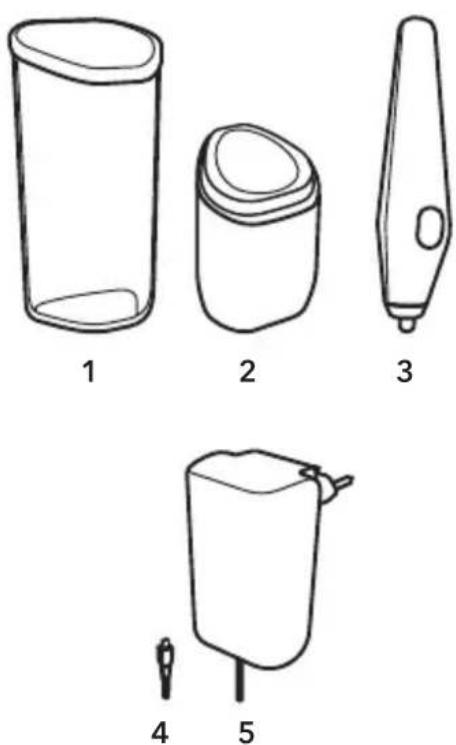
1.Cup 2. Base 3. Pen 4. Connector 5. Power supply with a plug
5. GETTING STARTED (READ CAREFULLY)
Perform the colour fastness test below before using your Stain Remover Pen:
- Moisten an inconspicuous area of the fabric with water.
- Apply colourless liquid detergent.
- Apply the Stain Remover Pen in this area following the instructions below.
- Allow the fabric to dry. If it has not faded, you are clear to use your Stain Remover Pen.
CAUTION!
The Stain Remover Pen will operate continuously for 5 minutes before it is switched off to allow the tip to cool. After 4 and a half minutes of use, the wand tip will begin to flash to indicate its maximum cycle time has nearly been reached.
After a 1 minute pause, the wand can again be used normally.
CAUTION!
Use only neutral and colourless liquid laundry detergent, which is chlorine-free. Never use coloured detergents or fabric softeners, as they can stain the fabric.
CAUTION!
This product is designed to remove stains up to 3 cm (about 1 inch) in diameter. It is not suitable for use on old stains or stains from chlorine bleaches, mustard, non-removable inks, solvents and other chemicals causing permanent damage.
CAUTION!
If the care label on your clothes says "wash separately" or "wash with similar colors", that usually means that the dye isn't stable and is going to bleed or even rub off. You should wash your garment at least 3 times according to the care label before applying the Stain Remover Pen to avoid a possible halo effect on unwashed dyed clothes. On darker fabrics reduce the application time.
6. USING YOUR PRODUCT
Follow the steps below to prepare your Stain Remover Pen for use.
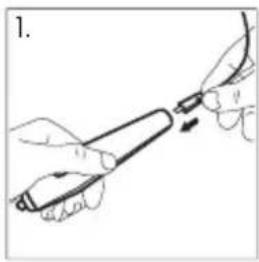
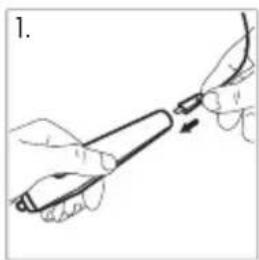
- Connect the power cable to the pen.
- Choose the correct plug and insert it into the power supply.
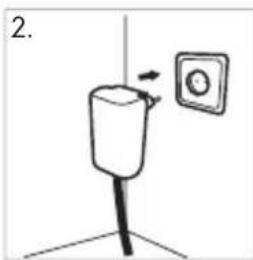
Plug the power supply into the outlet.
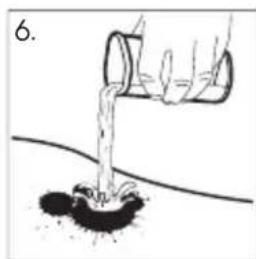
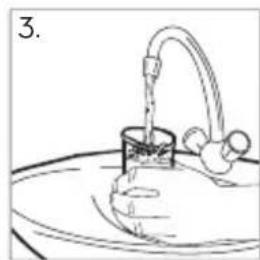
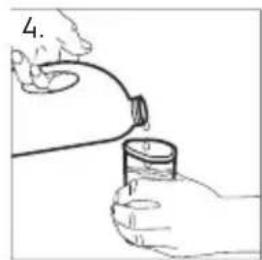
3-4. Mix some water and colorless fabric detergent (non-chlorine bleach).
The cap on the Stain Remover Pen can be used as a cup to fetch water.
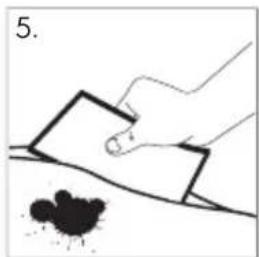
- Place a piece of cloth or clean paper under the garment to absorb the stain residuals.
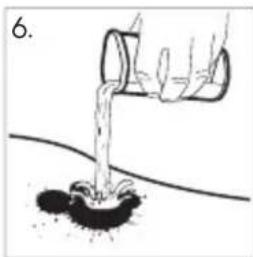
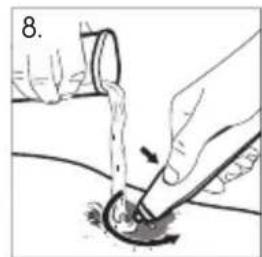
- Add the water-detergent mixture, soaking the fabric in the stained area.
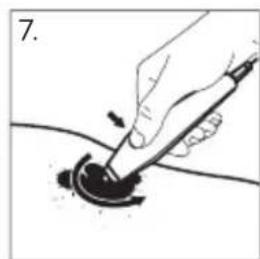
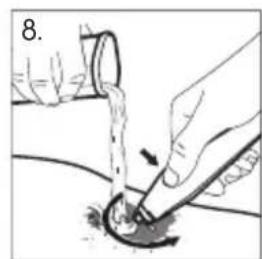
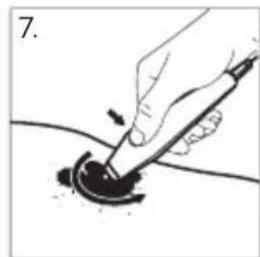
- Always hold the pen in an upright position with the pen tip gently pressed on the stained area. Do not use excessive force. Press and hold the button for as long as the tip is on the stain. Make circular movements, passing the tip gently across the full extent of the stain.
- Add more water-detergent mixture as needed for best results.
The stain must always be wet to ensure the efficiency of its removal.
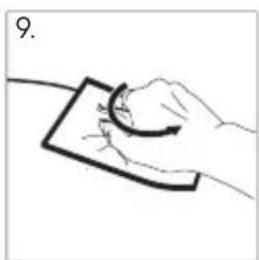
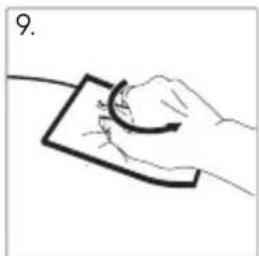
- Remove excess dirt from the cloth and the tip of the pen with absorbing paper or clean cloth.
- Repeat the process from step 5 until the stain has been satisfactorily removed or no further progress is made in removing the stain.
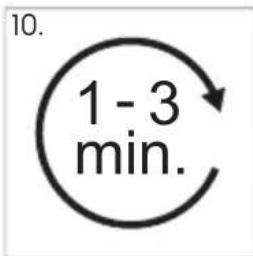
CAUTION! Don't use the device more than 1 minute on delicate and dyed fabrics.
- After completing the pre-treating process, clean your pen and store it in its housing.
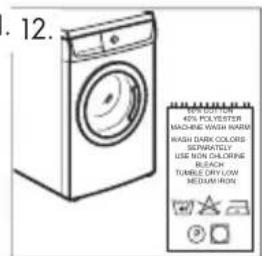
- Wash the garment according to the care label to remove the stain residue from the garment.
NOTE: Stain residues might remain on the garment after the pre-treatment with the pen. To be fully effective, the pre-treated garment has to be washed according to the care label.
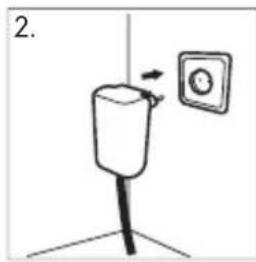
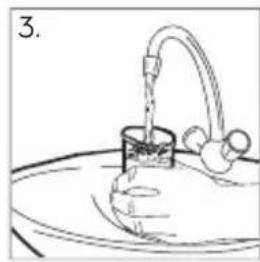
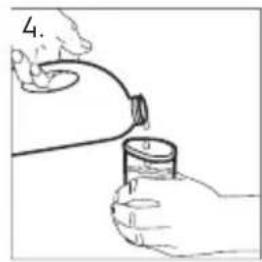
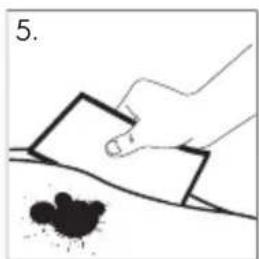
6.1 Observation
EU PLUG
UK PLUG
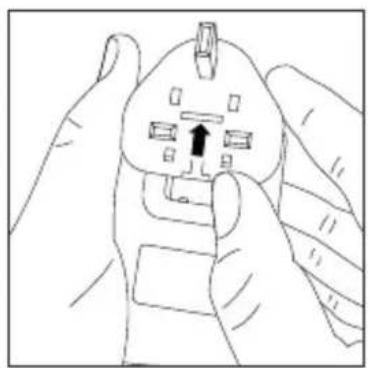
Changing the power plug
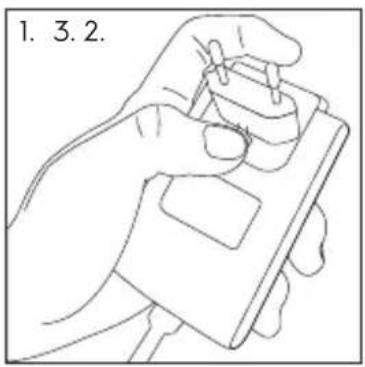
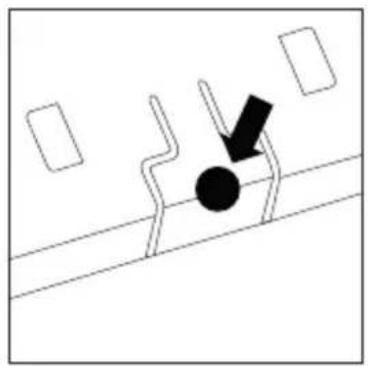
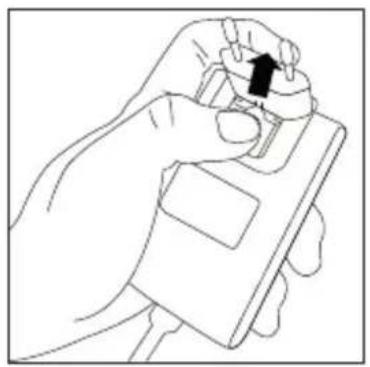
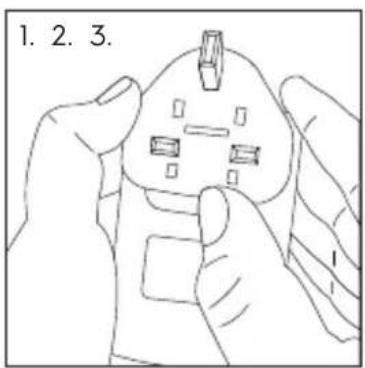
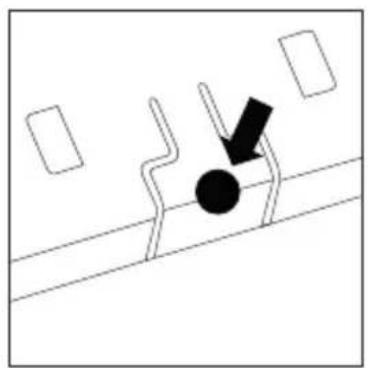
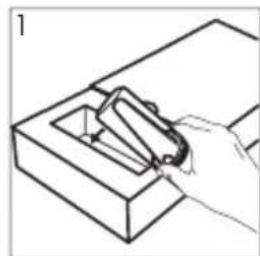
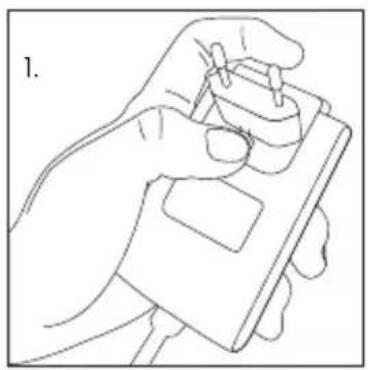
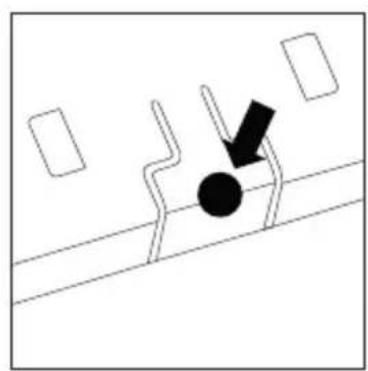
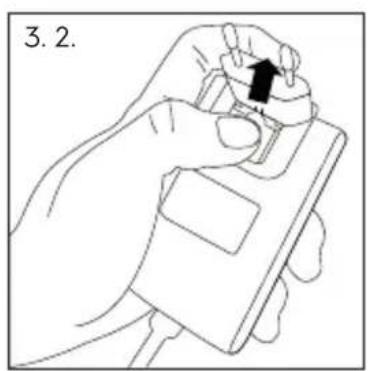
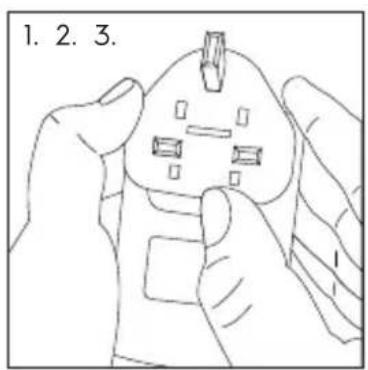
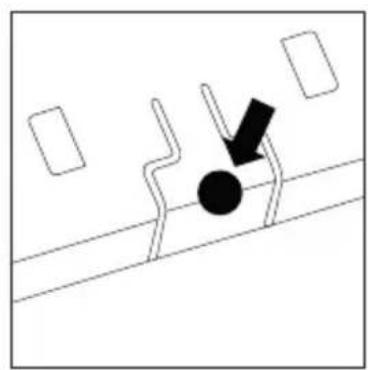
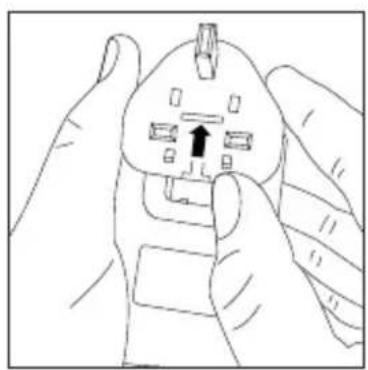
To release the plug, press downward the small key of the plug (images 1 and 2) while you slide the plug forward (image 3). The plug will separate from the housing, sliding forward, so pay attention to keep it under control and not drop it.
7. TIPS
- The more water applied to the stain, the more efficient the process.
- By changing the position of the paper towel or cloth, the stain will be absorbed more efficiently.
- Add detergent whenever necessary for persistent stains.
The difficulty in removing a stain will vary depending on the type of fabric, how long the stain has been allowed to set, temperature, pigmentation, and other factors.
Removal efficiency can be affected by factors that include the presence of water; mechanical action; chemical action; temperature; and time. Each of these factors can help make the process more effective, and some stains will be more responsive to one factor than to others. For example, pigmented soilings (fruit, wine, etc.) are more easily removed with chemicals such as bleaches (e.g., stain removal additives), while greasy (butter, chocolate, etc.) and particulate (grease, mineral oil, dust, etc.) soilings are more easily removed by a combination of mechanical action and heat. The Stain Remover Pen operates as a purely mechanical agent, using water as a medium to impart energy. Adding water in generous amounts and a colorless or neutral liquid detergent, and applying the wand for a sufficient amount of time on the fabric, are essential for effective stain removal.
Best results are achieved on:
- Fresh stains that have not completely set. Stains that have been previously washed but not dried in a dryer or ironed.
- Small stains confined to a small area of the garment.
Less efficient on:
- Set-in or old stains. Stains that have been previously washed and dried in a dryer or ironed. Large stains, spread across a large area of the garment.
8. CLEANING AND MAINTENANCE
Quick cleaning instructions:
- Disconnect the connector from the Stain Remover Pen.
- Dry the cup and the base if it has been filled with water.
- Clean the tip with a damp cloth.
- Store the Pen in its cradle and wind the power cord into a coil.
- Store the unit in a dry and well-ventilated area.
NOTE: Never use abrasives, alcohol, solvents or any other chemicals to clean the unit.
9. WHAT TO DO IF...
If there is a fault, first try to find a solution in the troubleshooting table below. If you cannot find a solution to the problem, contact an after sales customer service centre.
Troubleshooting table
Problem Causes Solutions
| The unit will not turn on or has stopped working | Pre-set cooldown activated. | Wait 1 min and resume operation. |
| Plug not properly inserted. | Plug the power cord into the unit and the plug into the power outlet. | |
| Power button defect. Cont | act an authorised Electrolux service center. |
10. TECHNICAL DATA
Product Stain Remover Pen
| Model E4WMSTPN1 | |
| Colour White | |
| Voltage (V) 220-230 | |
| Power rating (W) 7.0 | |
| Frequency(Hz) 50-60 | |
| Net weight (Kg) 0.34 | g (0.75 lbs) |
11. ENVIRONMENT CONCERNS
The symbol on the product or on its packaging indicates that this product may not be treated as household waste. Instead it shall be handed over to the applicable collection point for the recycling of electrical and electronic equipment. By ensuring this product is disposed of correctly, you will help prevent potential negative consequences for the environment and human health, which could otherwise be caused by inappropriate waste handling of this product. For more detailed information about recycling of this product, please contact your local city office, your household waste disposal service or the shop where you purchased the product.
Packaging materials
The materials with the symbol are recyclable. Dispose the packaging in suitable collection containers to recycle it.
12. GUARANTEE
This guarantee is valid for 2 years from the original date of purchase.
The original sales receipt is required as proof of purchase.
The guarantee covers faults of the appliance which have been caused by faulty construction or material faults from the date of purchase.
The Electrolux after sales customer service centre will assist you on the phone with basic trouble shooting for your appliance at the time of service call request. Please see the list below to find your local after sales customer service phone number.
Electrolux will examine the product and decide, at its sole discretion, if it is covered under this guarantee. If considered covered, Electrolux will then, at its sole discretion replace the defective product with a new one.
Table of contents
6. USING THE PRODUCT
5. INTRODUCTION (READ CAREFULLY)
8. CLEANING AND MAINTENANCE
Instructions 3a 6bp30 nouchtahe:
- Pa3kayeTe KOHeKTopa OT NscaKaTa 3a OTCTpaHЯBaHe Ha neTHa. 2.И3cywete yawkaTaN OCHobata,ako e 6nla nBHa C BOda. 3.Почистете Вьрха CBаЖна Кьрna. 4.ПиберетписакаяВ HeHOTO AeIIOИ HabnTe 3axpaHbuaЯKa6eA.
- CbxaHraBaIte ypeHa ha cyxo ndo6pe npoBeTpno MrcTo.
3A6EAEKKA: HnKora He n3Noa3BaIe a6pa3NBn MaTePnaA, aKoxo, pa3TbOpNTeAn nn dpYrN XmMkaA 3a NoocCTBaHe Ha ypeA.
9. KAK DA NOCTbNITE, AKO...
Ipn Heu3npaBHOCT Ha-HanpeA ce ONTaTe Da Hamepnte peweHne B Ta6nuaTa 3a OTcTpaHbAHe Ha Heu3npaBHOCTN NO-DoA. Ako He MoXeTe Da Hamepnte peweHne Ha npo6aema camn, ce o6bpHeTe KbM dUbpa Cn Nn KbM ueHTbpa 3a cAeApOdaX6eHo 06cayXBaHe Ha KAneHTn.
Ta6Auca 3a OTCTpaHbAhe Ha HEn3npaBHOCTn
PpO6AeM PpUcHn PeuHn
| Урекг.T He ce ВКЛЮЧва ил e спра.Lа pa6OTи | Актувирано прееварNTeLHо ЗадаDEн OXlaЖдAne. | ИзчakайTe 1 МInHyтaN Вь3СТановete pa6OТa. |
| Шенист He e постaven празвлиNo. | Посравete 3axpanBaшся ka6eλВ урека N Шенист В кONTakTa. | |
| Дeфekt Na 6уToHa 3a ЗхраНВаHe. | Свьржete ce c OTOPINИран серВИЗен цentыр на Electrolux. |
10. TEXHnueCKn DAHHN
PpOdykT NcaAka 3a npEmaxBaHe Ha netHa
| Модаел | E4WMSTPN1 |
| Цвай Баян | |
| Нар每一天е (V) | 220-230 |
| Номинално Зхраны (W) | 7,0 |
| Чеб耗费 (Hz) | 50-60 |
| Нетно Тergл (Kg) | 10.1 g (0,75 lbs) |
11. ONA3BAHE HA OKOANHATA CPEAA
CnmboIbT bbypxy npOdykTa nn Bbypxy herOBaTa onakOBka noka3Ba, ye To3n npOdyKT He Tpr6Ba Da ce TpeTnpa KaTO dOMaKInHcKn OTNaBk- . BmecTo TOBa, Toi Tpr6Ba Da ce npedaba B cneuaan3npaH nyHKT 3a peuKAnpaHe Ha eEeKtpuecko n eAekTporHH O6OpyDaBaHe. Ype3 ocNpyraBaHe Ha npabuHoTo -n3XBbPRAHe -Ha TO3n ypeD BVE DOpnHacTe 3a npedotbpaTbaHe Ha NOTeHUnaHn HeratNBn PocAeDuNu 3a OKoHaTa CpeDa N OBeWkoTO 3dpabe, KOHT BApYn CAYaH MoRaT Da 6bDat npuHneH ot HnPaBnHO n3XbPAAHe Ha TO3n npOdyKT. 3a no-noAo6Ha INΦopMaunr 3a peuKAnpaHeto Ha TO3n npOdyKT ce O6bpHete KbM MeCTHnte rpaACKn OpraHn, Cayx6aTa 3a OTnaDbuN nn MaRa3Ha, OTkbDeTO CTe Kynnn UpeDa.
OnakOBbUHmMaTePnaA
MaTePnaAnte CbC CnMBOI Ca RoAnH 3a peuKAnpaHe. N3XbPraYte ONaKOBknte B NOxOJaUNTe KOHTeHepn 3a cb6UnpaHe 3a TxAHOTo peuKAnpaHe.
12. TAPAHUN
This warranty is valid for 2 years from the date of purchase. As proof of purchase, the original sales receipt must be presented. The warranty covers defects in the device that are due to faulty construction, defects in materials, or parts, from the date of purchase. The Electrolux Customer Care Center will provide telephone assistance for basic malfunctions of your device at the time of requesting service. See the attached list to find the telephone number of your local Electrolux Customer Care Center. Electrolux may change the product range at its discretion, provided that it is covered by this warranty. If the product is accepted under warranty, Electrolux will, at its discretion, replace the defective product with a new one.
Contents
- Safety information 3
- Safety instructions 4 3. Introduction 4
- Product description 4
- Starting work 5
- Operating the device 6
- Advice
- Cleaning and maintenance 8
- What to do if 8
- Technical data 9
- Environmental protection 9 12. WARRANTY 9
1. SAFETY INFORMATION
Before installation and operation, read the instructions carefully for your safety and correct operation. Keep the instructions together with the device for future reference, even if you move or sell it. Users must be aware of all the features of the device and the correct safety techniques.
1.1 Safety of children and vulnerable persons
- It is not recommended to use the device for children under 8 years old and for persons with reduced physical, sensory or mental capabilities, or with insufficient experience and knowledge, unless they are supervised or have been instructed on the safe use of the device and understand the dangers involved. The remote control is not recommended for use by persons with pacemakers. Immediately unplug the device if any malfunction occurs. Keep the device out of reach of children.
- Keep all packaging materials away from children and dispose of them properly. Do not allow children to play with the device. Children must be supervised when performing cleaning and user maintenance.
1.2 General safety rules
- Do not use the device if it is damaged.
- Make sure that the parameters specified in the technical data table match the characteristics of the power supply. Do not connect the power adapter to other devices. This may lead to damage. Do not connect any other devices to the remote control. Only use the adapter supplied with the device. Any improper use may damage your remote control.
- Do not pull or carry the device by the power cord. Do not place the power cord near sharp edges (e.g., table edges) to avoid damage. Do not pull the cord to unplug the device; grasp the plug itself.
- Do not spill water on the device or immerse it in water. Do not pinch, crush, stretch, or twist the power cord.
- Avoid the danger of electric shock. Do not spill water on the device or touch it with wet hands. Never immerse the plug, power cord, or connector in water or any other liquid. Use only original accessories to avoid injury or damage to the device.
- Use only with the power adapter supplied in the kit. Unplug the device before cleaning, maintenance, and when replacing accessories. Wipe the device with a dry cloth. Use only neutral cleaning agents. Do not use abrasive materials, sharp objects, or metal items.
- The device is intended for household use only.
2. SAFETY INSTRUCTIONS
2.1. Operation
- Avoid the danger of electric shock. Do not spill water on the device or touch it with wet hands. Never immerse the plug, power cord, or connector in water or any other liquid. Risk of electric shock. Do not use the remote control directly on hands, face, eyes, or any other body part. Never use the remote control on yourself. The tip of the remote control may become hot during operation. When using the remote control, be careful not to injure the skin.
- Before starting work, carefully read the instructions and follow them to avoid damage. Use the steam brush only on wet fabric. Never use the brush on dry fabrics (silk, synthetic, gasoline). Never use the steam brush on animals.
3. INTRODUCTION
We welcome you to the new Electrolux steam brush. This device is specially designed for pre-treatment of stains before washing, to remove them in the washing machine and to clean them according to the instructions on the label. We hope you enjoy using it.
Ultrasonic vibrations create microbubbles in the water solution, which penetrate and burst, effectively removing dirt from the fabric. Effective removal with a frequency of 46,000 vibrations per second (Hz).
4. DESCRIPTION OF THE DEVICE
- Figure 2. Handle
- Handle
- Steam button
- Water tank
5. FIRST USE (PLEASE READ CAREFULLY)
Before using the steam brush, perform the following colorfastness test.
1. Moisten a small area of the fabric. 2. Apply a mild detergent. 3. Use the steam brush on the area according to the instructions below. 4. Let the fabric dry. If the color of the fabric remains, you can
use the steam brush.
WARNING!
The steam brush operates continuously for 5 minutes, then it switches off to cool down. After about 4 minutes, the handle will start to blink, indicating that the maximum usage time is almost reached. After a 7-minute pause, the brush can be used again.
WARNING!
Use neutral pH, chlorine-free detergent. Do not use fabric softeners or bleach, as they may damage the fabric.
WARNING!
The iron is designed for use with tap water (approximately 3 mm diameter). It is not suitable for use with old irons or irons with steam vents, steam, dry irons, sprayers, and other chemical agents that may cause damage.
WARNING!
If the garment label indicates 'Iron separately' or 'Iron with similar colors', it usually means that the dye may bleed and can stain or even ruin the fabric. It is necessary to perform a test at least 3 times according to the instructions on the garment label before using the iron, to avoid potential damage to the fabric. On dark fabrics, reduce the application time.
6. OPERATING THE IRON
APPLICATION OF THE IRON FOR USE FOLLOW THESE STEPS. 1. CONNECT THE POWER CORD. 2. SELECT THE DESIRED TEMPERATURE AND INSERT IT INTO THE WATER TANK. FILL THE WATER TANK TO THE RESERVOIR. 3-4. ADD A SMALL AMOUNT OF WATER AND CHLORINE-FREE DETERGENT FOR IRONING (SPRAY, NOT CONTAINING CHLORINE). THE CAP ON THE IRON CAN BE USED AS A MEASURING CUP FOR WATER. 5. PLACE THE FABRIC OR CLOTH ON THE IRONING BOARD. 6. MIX THE WATER AND DETERGENT SOLUTION, SOAKING THE FABRIC IN THE STAIN AREA. 7. HOLD THE IRON VERTICALLY, AND GENTLY PRESS THE IRON'S SOLEPLATE ON THE STAINED AREA. DO NOT APPLY EXCESSIVE FORCE. PRESS AND HOLD THE BUTTON WHEN THE SOLEPLATE IS ON THE STAIN. WITH CIRCULAR MOTIONS, CAREFULLY MOVE THE SOLEPLATE OVER THE ENTIRE SURFACE OF THE STAIN. 8. FOR OPTIMAL RESULTS, REPEAT THE WATER AND DETERGENT SOLUTION. THE STAIN SHOULD BE COMPLETELY REMOVED FOR EFFECTIVE CLEANING. 9. REMOVE ANY RESIDUE FROM THE FABRIC AND THE IRON'S SOLEPLATE USING ABSORBENT PAPER OR A CLEAN CLOTH. 10. REPEAT THE PROCESS FROM STEP 5 UNTIL THE STAIN IS REMOVED OR UNTIL SATISFACTORY PROGRESS IS MADE IN REMOVING THE STAIN.
WARNING! DO NOT USE THE IRON FOR MORE THAN 1 MINUTE ON DELICATE FABRICS.
11. AFTER COMPLETING THE PRE-TREATMENT, CLEAN THE IRON AND PLACE IT IN ITS STAND. 12. THEN PERFORM THE IRONING ACCORDING TO THE INSTRUCTIONS ON THE GARMENT LABEL, TO REMOVE THE STAIN.
NOTE. AFTER PRE-TREATMENT WITH THE IRON, SOME STAINS MAY REMAIN. FOR THE BEST RESULTS, THE IRONING SHOULD BE PERFORMED ACCORDING TO THE INSTRUCTIONS ON THE GARMENT LABEL.
6.1 Observation
EU PLUG
UK PLUG
Replacing the power cord
Remove the protective film from the surfaces (Fig. 1 and 2) and from the contents of the second drawer (Fig. 3). The drawer is removed from the housing in the changed position, so be careful that it does not fall.
7. TIPS
- The more water is applied to the stain, the more effective the treatment process.
- Stains will be more effectively removed from cotton or paper, if you periodically change the position of the fabric or paper.
- For stubborn stains, it may be necessary to pre-treat with a cleaning agent. The difficulty in removing stains depends on the type of fabric, the time during which the stain has been on the fabric, the temperature, the pigment, and other factors.
The effectiveness of removal may depend on factors such as the nature of the stain; mechanical action; chemical action; temperature, etc. Each of these factors can help make the process more effective, and some stains will be more responsive to one factor than to others. For example, coffee stains (fruits, wine, etc.) are easier to remove with chemical agents, such as bleaches, for example, agents for removing stains, while grease stains (fat, chocolate) and stains from solid particles (oil, mineral oil, etc.) are easier to remove with a combination of mechanical action and high temperature. The steam generator is a mechanical agent that uses water as a carrier of energy. Applying water in large quantities and a safe or correct amount of cleaning agent and using the nozzle for a sufficient amount of time on the fabric are important factors for effective stain removal.
Better results are achieved on:
10. TECHNICAL DATA
Steam generator iron
Packaging materials
Materials marked with the symbol are recyclable. Dispose of packaging in appropriate containers for separate waste collection (municipal waste).
12. WARRANTY
The warranty is valid for 2 years from the date of purchase. The warranty covers malfunctions of the device caused by manufacturing defects or material defects; it is effective from the moment of purchase. Authorized service centers of Electrolux will help you deal with the main problem related to the malfunction of the device. The addresses of authorized service centers can be found on our website www.electrolux.ru/support. Electrolux will carry out an expert examination of the device and decide whether the warranty applies to this case. If the warranty applies to this case, Electrolux will replace the faulty device with a new one.
Electrolux Group Ireland Ltd., Longmile Road, Dublin 12, Tel. 0818543000
Electrolux Home Products France SAS, 43 avenue F. Louat, 60307 Senlis Cedex, Tél. 08 09 100 100 (service gratuite + prix appel)
Electrolux Belgium NV, Raketstraat/Rue de la fusée 40, 1130 Brussels, tel. 02 716 26 00
Electrolux Luxembourg SARL, West Side Village Building F, 89F, rue Pafebruch, 8308 Capellen-Luxembourg, Tel: 42 43 13 01
www.electrolux.com/shop
902 979 809

- STAIN REMOVER PEN ULTRASONIC WAVE TECHNOLOGY MODEL E4WMSTPN1
- CONTENTS
- SAFETY INFORMATION
- 1.1 CHILDREN AND VULNERABLE PEOPLE SAFETY
- 1.2 GENERAL SAFETY
- 2 SAFETY INSTRUCTIONS
- 2.1 USE
- INTRODUCTION
- PRODUCT DESCRIPTION
- GETTING STARTED (READ CAREFULLY)
- CAUTION
- USING YOUR PRODUCT
- 6.1 OBSERVATION
- EU PLUG
- UK PLUG
- CHANGING THE POWER PLUG
- TIPS
- BEST RESULTS ARE ACHIEVED ON
- LESS EFFICIENT ON
- CLEANING AND MAINTENANCE
- QUICK CLEANING INSTRUCTIONS
- WHAT TO DO IF
- TROUBLESHOOTING TABLE
- TECHNICAL DATA
- ENVIRONMENT CONCERNS
- PACKAGING MATERIALS
- GUARANTEE
- TABLE OF CONTENTS
- USING THE PRODUCT
- INTRODUCTION (READ CAREFULLY)
- INSTRUCTIONS 3A 6BP30 NOUCHTAHE
- KAK DA NOCTBNITE, AKO
- TA6AUCA 3A OTCTPAHBAHE HA HEN3NPABHOCTN
- TEXHNUECKN DAHHN
- ONA3BAHE HA OKOANHATA CPEAA
- ONAKOBBUHMMATEPNAA
- TAPAHUN
- 1.1 SAFETY OF CHILDREN AND VULNERABLE PERSONS
- 1.2 GENERAL SAFETY RULES
- SAFETY INSTRUCTIONS
- OPERATION
- DESCRIPTION OF THE DEVICE
- FIRST USE (PLEASE READ CAREFULLY)
- WARNING
- OPERATING THE IRON
- REPLACING THE POWER CORD
- BETTER RESULTS ARE ACHIEVED ON
- WARRANTY
Brand : ELECTROLUX
Model : E4WMSTPN1
Category : Ultrasonic cleaner