
KF96RSBEA - Freezer SIEMENS - Free user manual and instructions
Find the device manual for free KF96RSBEA SIEMENS in PDF.
| Brand | Siemens |
| Model | KF96RSBEA |
| Product type | Combined freezer (refrigerator-freezer) |
| Dimensions (H x W x D) | 176 cm x 70 cm x 70 cm (estimated) |
| Weight | Approximately 80 kg (estimated) |
| Power supply | 220-240 V, 50/60 Hz |
| Energy class | A (estimated) |
| Freezer capacity | Approximately 100 L (estimated) |
| Refrigerator capacity | Approximately 200 L (estimated) |
| Main features | NoFrost, LED lighting, 0°C compartment, digital display |
| Refrigerant | R600a (estimated) |
| Noise level | 38 dB (estimated) |
| Climate class | SN-T (estimated) |
| Maintenance and cleaning | Auto defrost (NoFrost), interior cleaning with soft cloth |
| Safety | Door closure, child lock (estimated), electrical safety according to VDE 0701 |
| Spare parts and repairability | Door seals, handles, hinges, shelves, drawers, LED lamps, parts available at Siemens after-sales service |
| General information | User manual included, repair possible by the consumer according to guide |
Frequently Asked Questions - KF96RSBEA SIEMENS
User questions about KF96RSBEA SIEMENS
0 question about this device. Answer the ones you know or ask your own.
Ask a new question about this device
Download the instructions for your Freezer in PDF format for free! Find your manual KF96RSBEA - SIEMENS and take your electronic device back in hand. On this page are published all the documents necessary for the use of your device. KF96RSBEA by SIEMENS.
USER MANUAL KF96RSBEA SIEMENS
4.3 CmHa Ha dpbkkata Ha YekMeDkeTo 9
4.3.1 OToTpaHraBaHe Ha DpbKkTaHa YekMeDKeTe 9
4.3.2 MoHTnpaHe Ha dpbXkKaTa Ha YekMeJxKeTo. 9
4.4 CmHa Ha naHTte Ha JraBata Bpata 10
4.4.1 OTcpaHraBaHe Ha naHTMe Ha JnBaTa BpTa 11
4.4.2 MoHTpaHa Ha NaHTte Ha NraBata BpTa. 12
4.5 CmHa Ha nHTHe Ha JnCHaTa BpTa 13
4.5.1 OTcpaHraBaHe Ha naHTnTe Ha daChaTa Bpata 14
4.5.2 MoHTnpaHe Ha nAHTnte Ha IaIChATA BpTa 15
4.6 CmHa Ha cTeNaKa Ha BpaTata 16
4.6.1 OtctpaHraBaHe Ha CTeJaxa Ha BpaTata 16
4.6.2 MoHTnpaHe Ha cTeJaxKa Ha BpaTata 16
4.7 CmHa Ha paTa 17
4.7.1 OtctpaHbHa He paTa 17
4.7.2 MoHTnpaHepa paTa 17
4.8 CmHa Ha uHaTa 3a o6OpyDbaHe 18
4.8.1 OTeTpaHbAHe Ha ⅢHaTa 3a o6OpyDbAe 18
4.8.2 MoHTIpaHe Ha IINHaTa 3a O6OpyDbaHe 18
4.9 CmHa Ha n3dbpnaaue Ce KOHTeHep... 19
4.9.1 OTcTpaHraBaHe Ha n3DbpNaunCe KOHTeHep 19
4.9.2 MoHTpaHe Ha H3NbPbBaunCe KOHTeHep.. 19
4.10 CmHa Ha qKpaH paT 20
4.10.1 OTePaHReBaHe HaФнксuaH paФT 20
4.10.2 MoHTnpaHe Ha fNkCnpaHna paΦT 20
4.11 CMHa Ha KOHTeHepa 3a npraCHO oxlaedeHN npoUyTn 21
4.11.1 OtctpaHraBaHe Ha KOHTeHepa 3a npraCHO oxnaeHN npOdyKTn 21
4.11.2 MoHTnpaHe Ha KOHTeHepa 3a npcH OxlaJeH npOdykTn 21
4.12 CMHa Ha KOHTeHepa 3a 3ampa3EH XpaHHTeHN npOdykTN (MaIbK) 22
4.12.1 OToTpaHbAHe Ha KOHTeHepa 3a 3ampa3EHxpaHHTenHn npOdyK
TN (MaNbK) 22
4.12.2 MoHTnpaHe Ha KOHTeHepa 3a 3aMPa3EH XpaHNTeHN npOdykTN
(Малы). 22. 4.13.CMЯн ha KOHTeHepa 3a 3aMDa3EHn XpaHHTeHn IPOJyKTH (IIOcBk) . 23
4.13.1 OTePahRbAHe Ha KOHTeHepa 3a 3ampa3EHn XpaHNTENH INPOyK
TN (nnocbk) 23
4.13.2 MoHTnpaHe Ha KOHTeHepa 3a 3aMPa3EHn XpaHTeHN npOdykTN
(ПпocьК) 23
4.14 CMraHa Ha KOHTeHepa 3a 3ampa3ehn xpaHrTeHH npOdykTN (roJm) 24
4.14.1 OTeTpaHReBaHe Ha KOHTeHepa 3a 3ampa3EHn XpaHHTeHH npOdyK
TN (ronm) 24
4.14.2 MoHTnIpaHHe Na KOHTeJIHepa 3a 3aMPa3eHN XpAHIteHIn npOdyKTn (rony) 24
4.15 CmHa Ha KOHTeHepa 3a Ky6yeTa nei 25
4.15.1 3BaJdaHe Ha KOHTeHepa 3a Ky6eTa neI 25
4.15.2 MoHTnpaHe Ha KOHTeHepa 3a Ky6yeTa neI 25
4.16 CmHa Ha LED narnnte 26
4.16.1 OToTaPaHeTe roHaTa LED nAmna Ha otDeNeHMeTo Ha xnaunnka... 26
4.16.2 OTrpaHbAe Ha cTpaHHTa JAMNa Ha OTdeneHMeTo Ha Xna
dHnka 27
4.16.3 OTCTpaHBAHe Ha IaMnTa Ha OTeNeHMeTo 3a 0^ 28
4.16.4 OTCTpaHbAhe Ha IaMnITE OTe 3aHaTa CTeHa 29
4.16.5 MoHTnpaHe Ha LED JAMnTe 33
OTHOCHO To3n DokyMeHT
1.1 Baxha nHΦopMaζη
1.1.1 Uen
TeHc bHTn 3a peMOHT NOMarT Ha nOteBnTEIa depeMOHTnpa cam ypeIN B cboTBeCTBVE c pernAmEHTA 3a ekONOrOcBo6paHO npoeKTIpaHe Ha ypeDITe (OT 03.2021 r.).
Te cbdpkataHΦopmaIaKaJa cMaHeTae OnpedeeneHpeepBn qactN, BKIOHTeINHO npdynpckdeHn pncKOBe.
Ako IMATE HRAKAKB NLNPOSC, MOJLA CbPkTe CE c HauINr OToE 3a o6cnykBaHe Ha KInENTH. Hocm OTTOBOPHOCT 3a UeTn, cmo AKO cBETNTE 3a pEmOH T ca cna3EH npabnHO.
1.2 06aCHeHne Ha cHMBOJInTe
1.2.1 HbHa onaCHOCT
IpeynpeHnHnHe HbA ce cbctoT OT CmB0J n CnHnHa dMa.CnrHnHaTa yMa NOKa3Ba cepno3HOCTTa Ha onaCHOCTTa.
| Ниво на п dedурждени 3начени | |
| ОПАСHОCT | ЕспаЗВаHEТо на п dedурждени.TО сыбучени щide довеading do CBМьТ ил серноши Нараняваня. |
| ПРEDУПЕЖDEHIE | ЕспаЗВаHEТо на п dedурждени.TOTо сыбучени може до довеading do CBМьТ ил серноши Нараняваня. |
| ВИHMATEЛH0 | ЕспаЗВаHEТо на п dedурждени.TOTо сыбучени може до довеading do lekni нараняваня. |
| ВИHMAHINE! | ЕспаЗВаHEТо на п dedурждени.TOTо сыбучени може до довеading do IMy- шес委书记ни щideп. |
Tabuua 1: Hua Ha onachocm
1.2.2 Cnmbon3a onachoct
Cnmbonite 3a onachocT ca cnmbonmHn H3obpaXeHHN, KOHTO daBaT INDnKaunra 3a Bnda onachocT.
BTO3N DOKyMeHT Ce H3nON3BaT CNEHINTe CmBOJIn 3a OnaCHOCT:
NoBpeHa HpyrHacTn Ha ypeHa Nm BDOMa Ha KHeHTa, HAp. DbHO
TO.
3akpenete KOMNOHeHTa, Taka Ye da He naHe.

ONIACHOCT
Pnck OT TokOB yad npaHn qacTn noHanpeXeHne!
ACHOCT 3a KINBOTa OT TOKOB yDap B CnyaHa He npabuHep MOHT
EEnktpnKcTe NaCTn Tp8bA da ce peMOHTnpaT OT KBAIINHUNAHEN EEnktopeXHNI.
CnepemOnHaTpaBbPnIpOeRpa3a6E3oPaHcOTc bIpaHO VDE0701mBcOTBeTCTBne CbCneuΦmHTte 3a ctpanHata paNOpE6M.
OTIACHOCT
PnCK OT TOKOB ydap npaAnu qactn noD HanpeXeHne!
CmbptOTTOKOByap
JNIOHcIeYE pRdTe O t ENEKTrnEeCKOTO 3axpHaBaHe NOHE 60 ceKyHNi npEdi 3azoVaHe Na He pMOHTa.
H3nCKBaHe:
YpeIbTe n3KNIOUeH OT 3aXpaHbHeTO.
BbTpewHnTeΦHTuHnHa ypeJa ca OTCpaHeHn.

PemOH
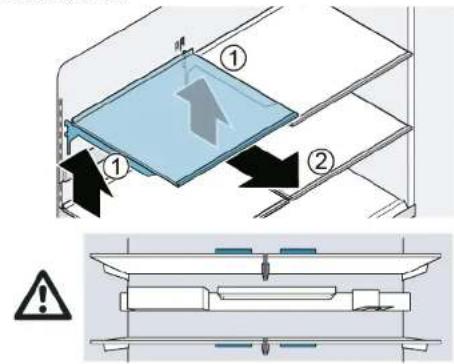
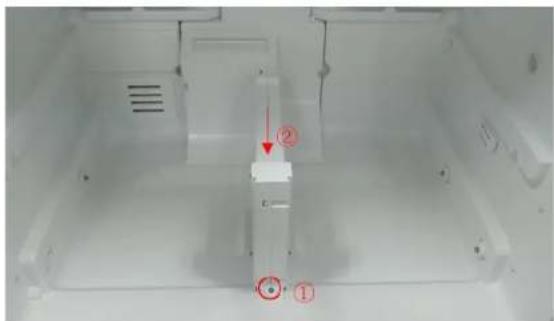
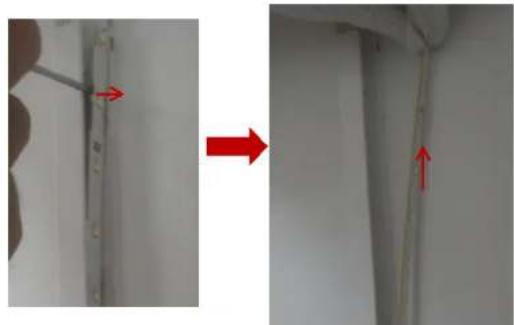
4.4.1 OTeTpaHbAe Ha naHTnte Ha JnBaTa Bpata
1.1.Pa3BnTe BnHTa
- OtcpaHeTe KaNaYeTo Ha roPHaTa naHTa
- INKIOUeTe eNEKTPMueckaTbPb3ka HbPaTaTa.
NoBpeHa HpyrHacTn Ha ypeHa Nm BDOMa Ha KHeHTa, HAp. DbHO
TO.
3akpenete KOMnoHEHTa, Taka Ye da He naHe.

ONIACHOCT
Pnck OT TokOB yad npaHn qacTn noHanpeXeHne!
ACHOCT 3a KINBOTa OT TOKOB Ydap B CnyaH Ha HnpaBUNeH peMOHT
Enktpnueckte Taactn Tp86ba Da ce peMOHTnpaT O KaanuHn PAnen enktpoTeXHHN.
CnepemOnTaTpa6BaJaCeIbBpUINPObEpcKa3a6eOanCHOCT cbTnacHO VDE0701nnBcOTBeTCTBne CbC cneuΦmHHTe 3a ctpnata PaNopoe6i

OTIACHOCT
PnCK OT TOKOB yIap npaIy qactn noI HanpeXeHne!
CmbptOTTOKOByap
13KIOHcTeYe yedite Ote JENKTPrHeCKOTo 3aXpaHaBeNohe 60 ce KyHNi npEiI a3OaOHBa He pEMOHa.
H3nCKBaHe:
YpeIbTe n3KNIOUeH OT 3aXpaHbHeTO.
BbTpewHHTe pHTHnHa ypeJa ca OcTpaHeHn.

PemOH
4.5.1 OTeTpaHbAe Ha naHTnte Ha DaChata Bpata
1.1.Pa3BnTe BnHTa
- OtcpaHeTe kanaeTo Ha roPHaTa naHTa

- INKIOUeTe eNEKTpuuecka Ta Bp3Ka Ha BpaTata
NobHHTeCTeJaKaHaBpaTaHarope.

CTenaxkbt Ha BpaTatae oTcTpaHeH.
4.6.2 MoHTnpaHc HcTeJaxHa BpTaTa
MoHTnpaIteB06paTeHpeI.

PemOH
4.7CMHaHa paΦTa
M3nCKBaHe:
BpaTaTa e oTbopeHa.
4.7.1 OTeTpaHbAbe Ha paTa
- Nobmhepe paTa Harope (1).
- OTeTpaHete paΦTa (2).

PaftbTe oTcpaHeH.
4.7.2 MoThInpaHe Ha paΦTa

He noKpBaIte BeHTnlaUHNOHHTe OTBOpN.

IocabeTe BnmatenHpaTa,3a Da n36BerHete HauPacKBaHe Ha ype- da.

YBepTeCe,Ye KYNKeTcBa BnE3mDOKpAINpaΦbTe xOpNsoHTanEH.
MoHTpaIte B o6paTeH peI.

PemOH
4.8 CmHa Ha uHaTa 3a o6OpyDbaHe
M3nCKBaHe:
BpaTaTa e OTBopeHa.
4.8.1 OTePraHbAe Ha uHaTa 3a o6OpyDbAe
POBdHHeTe WnHaTa 3a 06OpyBaHe.
HnHaTa 3a o6OpyDbaHe e OCTpaHeHa.
4.8.2 MoHTIpaHc Ha 11HaTa 3a o6OpyDbaHc
4.10 CmraHa Ha qKcnpa paT
M3nCKBaHe:
BpaTaTa e oTBopeHa.
4.10.1 OTeTpaHЯBaHe NaФИКсиран paФт
- OTBopTe KyTnTa.
2.1. NOBINHHeTe ΦHKCpAHnpaT B npedHata Yact(1). 2. OCTpaHete FHKcPAnHa paT (2).

ΦKcnpaHnT paTe oTcPaHnE.
4.10.2 MoHTnpaHHe Ha qKcnpaHn paΦT
MOHTnpaTBeBobpaTeHpeI.
PeMoHT
4.11 CmHa Ha KOHTeHepa 3a npraCHO oxnaedeHN npodykTN
M3nCKBaHe:
BpaTaTa e oTbopeHa.
4.11.1 OTeTpaHbAe Ha KOHTeHepa 3a npraCHO oxlaedeHH npodykTN
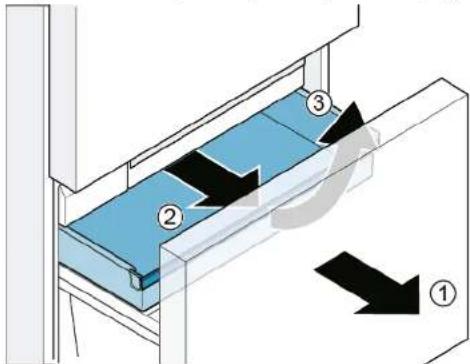
1.Издрпаite ueKmEdkeTo HABbH OdkpaI(1).
2. NOBdHHeTe KOHTeHepa OTnped (2).

KoHTeHepb3a npraCHO oxnaedn npodykn e oTpaHeN.
4.11.2 MoThIpaHae Ha KOHTeHepa 3a npcH Oxlaedn npOdykTn

IIO BpeMe Ha NoCTaBHe BOdAHT Ha peNcata NueKMeJxETo Tp6Ba Da ca 3aueHen 3aeHNo.
MOnTpaTBe Bo6paTeH peI.

PemOH
4.12 CMHa Ha KOHTeHepa 3a 3ampa3eHN XpaHHTeHH npOdyKtn (MaTbK)
N3nCKBaHe:
BpaTaTa e oTBopeHa.
4.12.1 OTePraHReBaHe Ha KOHTeHepa 3a 3ampa3EHn XpaHntEnn npOdykTN (MaJIbK)
1.Ⅰ3dpbnaiTe YekMeJKeTo BOTdeneHHeTo HaΦpN3epa DOKpa HABbH.
2.1.N3dbpnaTe HABbN KOHTeHepa DOKpaI(1). 2. NOBmHHeTc KOHTeHepa OTnped (2)

KoHTeHepb3a 3aMPa3eHN xpaHntEH npOdykTN (MaIbK) eOTcPaHe.
4.12.2 MoHTpaHe Ha KOHTeHepa 3a 3ampa3eHN XpaHNTEN npOdykTN (MaIbK)
1.ИЗдрпайтелескOnнчHITe peICnДOKрай.
2. NocTabeTe KytTnTa HA TeNEcKoNmHInHe peCN I PybXHete B ypeDa, DOKaTO CE 3aUeHN.

PemOH
4.13 CMHa Ha KOHTeHepa 3a 3ampa3eHN XpaHNTEN HnpOdyKtn (nNoCbK)
N3nCKBaHe:
BpaTaTa e oTBopeHa.
4.13.1 OTePraHReBaHe Na KOHTeHepa 3a 3ampa3EHn XpaHntEnn npOdykTN (nnocbK)
1.ИЗдрай Te ekmedжeto B OTdelenHneTo Ha Фпзера дokpай HabbH (1).
2.ИЗБРанITE KOHTE Hepe 3a 3ampaEnH xpaHITEN HPOyKTH (JIOcBk) DOKPAN HABHB(2).
3. NOBUNHETE KOHTEHepa 3a 3ampa3eHN xpaHNTENn npOdykTN (nnocbk) (3).
KoHTeHepbT 3a 3ampa3EHn XpaHntenHn npOyKtn (nnocbK) e oTcpaHe.
4.13.2 MoHTnpaHe Ha KOHTeHepa 3a 3ampa3EHn XpaHNTEN npOdykTN (nnocbK)
MoHTnpaIteB06paTeH peI.

PemOH
4.14 CMHa Ha KOHTeHepa 3a 3ampa3eHN XpaHHTeHH npOdykTN (roJAM)
N3nCKBaHe:
BpaTaTa e oTBopeHa.
4.14.1 OTePraHReBaHe Ha KOHTeHepa 3a 3ampa3eHN XpaHHTeHH npOdyKTI (roJAM)
BHIMAHHEI
IOBPEDA NO OBOPYDBAHETOI
HUKORA HE OTeCPaBAIe PA3dEJIENTHATA CTEAHO T KOHTEHepa 3a 3ampa3eHN XPAHNIETHN PNOyDTK.
1.ИЗлбразиTe YeKMeIKeTe B OТДeIeHNeTe HaФпзeрЯДOKрай Habbн OTOc-
TpaHeTe KOHTeHepa 3a 3aMpa3eHN XpaHtEN H npOdyKTN (nnoCbK) (1).
2. NOBUNHETe KOHTeHepa 3a 3aMPa3EH XpaHNTENn npOdyKTn (ronm) (2).
KoHTeHepb3 3a 3ampa3ehn XpaHntenHH npOyKTn (rOJm) e oTcpanHe.
4.14.2 MoHTnpaHe Ha KOHTeHepa 3a 3ampa3EH XpaHntEnn npOdyKTN (ronm)
1.ИЗдрnavTe TeleckonuHnTe peCn DoKpaN.
- NocTabeTe KytTnTa Ha TeNeecKoNmHnTe peCN n a TbXHeTe B ypeDa, DOKaTo ce 3auenn.

PemOH
4.15 CmHa Ha KOHTeHepa 3a Ky6eTa nei
N3nCKBaHe:
BpataTa e oTBopeHa.
4.15.1 3BaXdAne Ha KOHTeHepa 3a Ky6yTea nei
1.И3dpbnaTe YekmeJKeTo BOTDeIeHHeTo HaФpI3epaДOKpaHABbH.
2.1. N3dbpnaTe KOHTeHepa 3a 3ampa3EH XpaHNTEN npOdyKTn (nIOcbK) DOK-pan (1).
- OTePaHete KOHTeHepa 3a Ky6eTa neq (2)
KoHTeHepbT 3a ky6yeta e oTcpaHe.
4.15.2 MoHTnpaHe Ha KOHTeHepa 3a Ky6yeTa nei
MOHTnpaTBeB06paTeHpeA.
Pnck OT TKOB yap npaH nu Hane Hne!
Onachoc3a KIBOTA OT TOKOB ynap B cnyuah Ha HnpaBnneH peMOHT
Enektpnncnte Taactn Tp86Ba da ce pemOHTuP aT O KaannnH PAn H enektpoTeXnHn.
Cnep pemOnHa Tp6Ba da ce nBbPun npOepeka 3a 6EoNaHcOT CbIacHO VDE 0701 m B cbOTBeTCTBne CbC cneuHmHITe 3a cTpaHATA paNOpE6M.

ONACHOCT
Pnck OT TKOB yap npaH nu Hane Hne
CmbptOTTOKOByap
JNIOHcTHe ypeDInTe oE nEeKTPnHeckoto 3aXpaHbAne HOe 60 ceKyHNi npDeI 3azoAoeHa ne pEmoHTa.

BHIMATEJIHO
Octpnpb6oBe!
HapaHbHaONOTnop3BaHe
Hocete npedna3n pbkauu.
N3NCKBaHe:
YpeIbTe n3KNIOueH OT 3axpaHbaHeTo.
Bpatata e otbopeHa.
TopHNTe BbTpewHN pHTINrCe OcTpaHBaT.
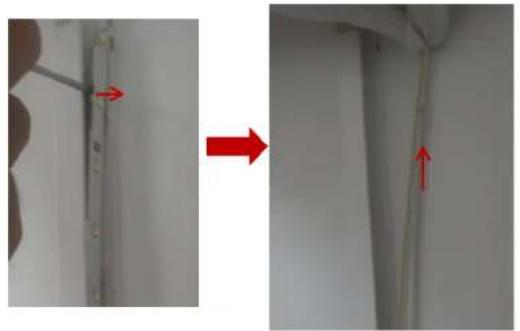
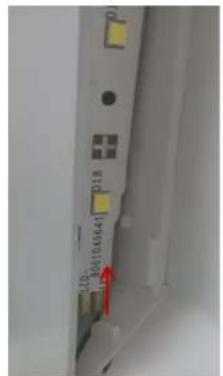
4.16.1 OTrpaHete ropHaTLEDaMaHa HaOTdeHeMeTo Ha XJaIMnHnKa
1.Cb3daiTe MeXJnHa C npbCTa cn Okono pb6a Ha LED lamnata.

- Bkapai Te nocka OtbepTkA B MekdInHata u otctpaHete rohpATA LED namna B nokazahata nocoka.

PemOH
- Nknoyete KneMaTa Ha LED naMaTa.
Tophata LED lamna Ha OTdeneHneTo Ha XnAunnHa e oTcPaHeHa.
4.16.2 OtrpaHbAHe Ha cTpaHnHaTa JAmna Ha OTdeneHneTo Ha Xlaaunnka
- 3n013BaIe IIIOCKA OTBePTKa 3a OTcPaHRAHe Ha rOpHH 3aIbpxaMEXAH-3bM HA CTpaHMyHATA lamna.
4.16.5 MoHTnpaHc Ha LED JAMnTe
MoHTpaTae BoopaTeH peI.
Sorg for at sikre apparater mod at glide.


PAS PAI
Fare for nedfaldende dele pga. Iosnede skruer!
rsonskade pga. nedfaldende dele
Sorg for at sikre componenten mod at falde ned.

BEM/ERK!
Fare for nedfaldende dele pga. Iosnede skruer!
Beskadigelse af andre apparatdele ellkundens hjem, f.eks. gulvet.
Sorg for at sikre componenten mod at falde ned.


FARE
Sorg for at sikre apparater mod at glide.


PAS PAI
Fare for nedfaldende deleg pga. Iosnedekruer!
rsonskade pga. nedfaldende dele
Sorg for at sikre componenten mod at falde ned.

BEMERKI
Fare for nedfaldende deleg pga. Iosnede skruer!
Beskadigelse af andre apparatdele ellkundens hjem, f.eks. gulvet.
Sorg for at sikre componenten mod at falde ned.


FARE
Self-repair hints - Fridge-freezer combination
1 Concerning this document. 163
1.1 Important information 163
1.1.1 Purpose 163
1.2 Explanation of symbols 163
1.2.1 Danger levels.. 163
1.2.2 Hazard symbols 163
1.2.3 Structure of the warnings.. 164
1.2.4 General symbols 164
Safety 165
2.1 General Safety instructions 165
2.1.1 All domestic appliances 165
Tools and aids. 166
Repair 167
4.3 Replacing drawer handle 169
4.3.1 Removing drawer handle 169
4.3.2 Installing drawer handle 169
4.4 Replacing left door hinges 170
4.6 Replacing door rack. 176
4.8 Replacing equipment bar 178
4.8.1 Removing equipment bar 178
4.8.2 Installing equipment bar 178
4.9 Replacing pull-out container 179
4.9.1 Removing pull-out container 179
4.9.2 179
4.10 Replacing fixed shelf 180
4.10.1 Removing fixed shelf 180
4.10.2 Installing fixed shelf 180
4.11 Replacing cool-fresh container 181
4.11.1 Removing cool-fresh container 181
4.11.2 Installing cool-fresh container 181
4.12 Replacing frozen food container (small) 182
4.12.1 Removing frozen food container (small) 182
4.12.2 Installing frozen food container (small) 182
4.13 Replacing frozen food container (flat) 183
4.13.1 Removing frozen food container (flat) 183
4.13.2 Installing frozen food container (flat) 183
4.14 Replacing frozen food container (large) 184
4.14.1 Removing frozen food container (large) 184
4.14.2 Installing frozen food container (large) 184
4.15 Replacing ice cube container 185
4.15.1 Removing ice cube container 185
4.15.2 Installing ice cube container 185
4.16 Replacing LED lamps 186
4.16.1 Removing refrigerator compartment LED top lamp 186
4.16.2 Removing refrigerator compartment side lamp 187
4.16.3 Removing 0^ compartment lamp 188
4.16.4 Removing back wall lamps 189
4.16.5 Installing LED lamps. 193
Concerning this document
1.1 Important information
1.1.1 Purpose
These repair hints support consumer to repair appliances by himself according to the applicable eco-design regulation (as of 03/2021).
They contain information how to exchange defined spare parts including warnings and risks.
In case of questions, please contact our customer service. We will only be liable for damages if the repair hints have been followed properly.
1.2 Explanation of symbols
1.2.1 Danger levels
The warning levels consist of a symbol and a signal word. The signal word indicates the severity of the danger.
Table 1: Danger levels
| Warning level Meaning | |
| Danger | Non-observation of the warning message will result in death or serious injuries. |
| Warning | Non-observation of the warning message could result in death or serious injuries. |
| Caution | Non-observation of the warning message could result in minor injuries. |
| Notice | Non-observation of the warning message could result in damage to property. |
1.2.2 Hazard symbols
Hazard symbols are symbolic representations which give an indication of the kind of danger.
The following hazard symbols are used in this document:
| Hazard symbol Meaning | |
| ! | General warning message |
| Danger from electrical voltage | |
| Risk of explosion | |
| Danger of cuts | |
| Danger of crushing |
Concerning this document
| Hazard symbol Meaning | |
| Danger from hot surfaces | |
| Danger from strong magnetic field | |
| Danger from non-ionizing radiation |
Table 2: Hazard symbols
1.2.3 Structure of the warnings
Warnings in this document have a standardised appearance and a standardised structure.
Danger
Type and source of danger!
Possible consequences of ignoring the danger / warning.
Measures and prohibitions for preventing the danger.
The following example shows a warning that warns against electric shock due to live parts. The measure for avoiding the danger is mentioned.
Danger
Risk of electric shock due to live parts!
Death by electrocution
- Disconnect appliances from electrical supply at least 60 seconds
before starting repairs.
1.2.4 General symbols
The following general symbols are used in this document:
| Gen. symbol Meaning | |
| 1 | Identification of a special tip (text and/or graphic) |
| i | Identification of a simple tip (only text) |
| Identification of a link to a video tutorial |
| Gen. symbol Meaning | |
| Identification of required tools | |
| Identification of required preconditions | |
| Identification of a condition (if ..., then ...) | |
| Identification of a result | |
| [Start]Identification of a key or button | |
| [00123456] Identification of a material number | |
| Status Identification of displayed text / window(in the appliance's display) | |
Table 3: General symbols
Safety
2.1 General Safety instructions
2.1.1 All domestic appliances
Risk of electric shock due to live parts!
- Errors by repairs involving electrical components can lead to electrical shock!
- Disconnect the appliance from the mains for at least 60 seconds before starting work.
After the repair have a safety test according VDE 0701 or country-specific regulations performed.
Risk of injury from sharp edges!
Wear protective gloves.
Risk of crushing during repair, maintenance, troubleshooting and service due to heavy and moving components
Wear protective shoes.
- Secure heavy components from falling down.
- Do not stick body parts into moving components.
Risk to the appliance's safety / function!
Only use original spare parts.
Risk of damage to electrostatically sensitive components (ESDs)!
- Do not touch the modules, including connections and conductor paths.

Tools and aids
| Designation Details Images | ||
| Hexagon socket wrench [00340820] | 2.5 mm | |
| Slotted screwdriver | Blade 2.4 mm x 0.4 mm x 60 mm, in the kit [00341820] | ① |
| Slotted screwdriver | Blade 10 mm x 1.6 mm x 200 mm | ① |
| Torx Bit TX20 [00340865] | 6,3 mm (1/4") | |
Prerequisite:
Door is open.

Repair
4.2 Replacing door handle
Suggested tools:
Hexagon socket wrench 2.5 mm [00340820]
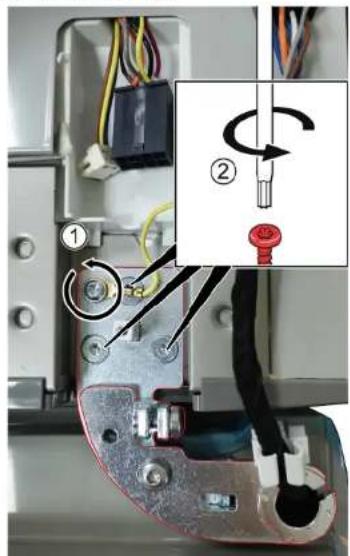
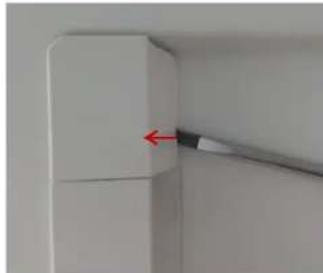
4.2.1 Removing door handle
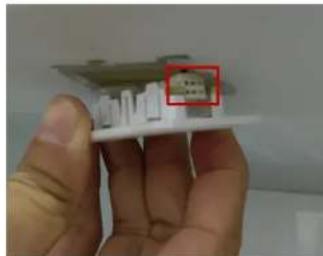
- Unscrew two screws (1).
- Remove door handle (2).

Door handle is removed.

Second door handle can be removed in the same manner.
- Fit handle vertically onto the pre-assembled bolts.
The holes in the handle must face up and down.
- Tighten the preassembled screws clockwise in the handle from the top and bottom.

Repair
4.3 Replacing drawer handle
Suggested tools:
Hexagon socket wrench 2.5 mm [00340820]
4.3.1 Removing drawer handle
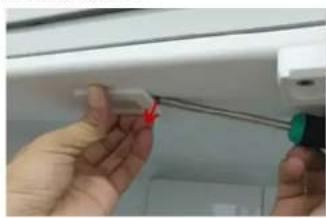
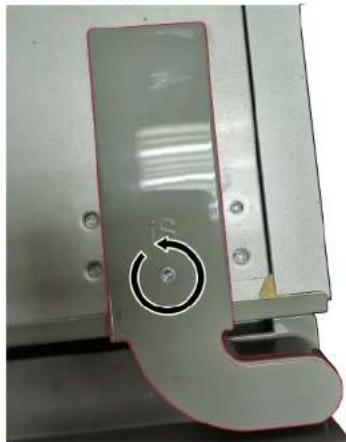
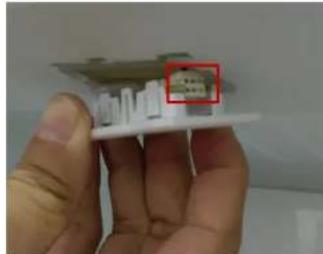
- Unscrew two screws (1).
- Removed drawer handle (2).
Drawnher handle is removed.
4.3.2 Installing drawer handle
- Insert the handle horizontally onto the preassembled bolts.
The holes in the handle must be facing down. - Tighten the preassembled screws in the handle clockwise from the bottom.

Repair
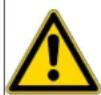
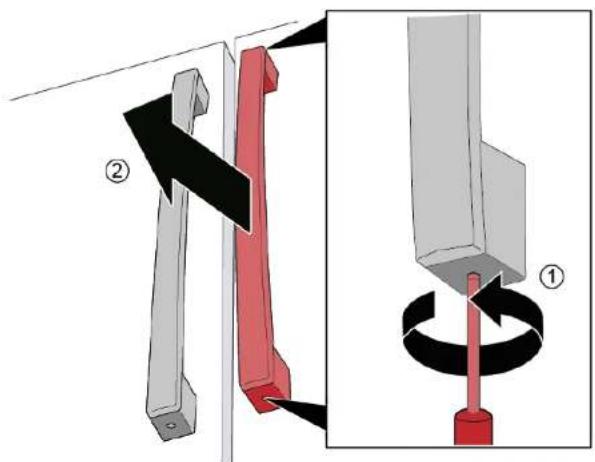
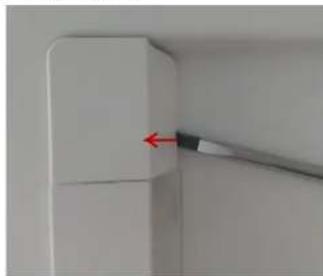
4.4 Replacing left door hinges
Suggested tools:
Torx Bit TX20 6,3 mm (1/4") [00340865]
Warning
Heavy, bulky appliances!
Back and muscle injuries
- Appliance door removal operation should only be carried out by trained specialists.
To move the appliance, two people are required.
Use only suitable tools and equipment.

Caution
Sharp edges!
Cut injuries
Wear protective gloves.

Warning
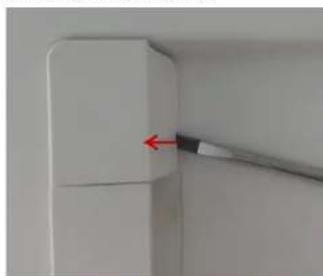
Slipping of tilted appliances!
Bone fractures / crush injuries
- Secure appliances against slipping
Caution
Risk of falling parts due to released screws!
ury because of falling parts.
- Secure component from falling down.
Notice
Risk of falling parts due to released screws!
Damage to other parts of the appliance or at customers home e.g. bot
tom.
- Secure component from falling down.
Danger
Risk of electric shock due to live parts!
anger to life through electric shock in case of improper repair
Electric parts should be repaired by a qualified electricians.
After the repair have a safety test according VDE 0701 or country-specific regulations performed.
Danger
Risk of electric shock due to live parts!
Death by electrocution
- Disconnect appliances from electrical supply at least 60 seconds
before starting repairs.
Prerequisite:
Appliance is disconnected from power supply.
Appliance interior fittings are removed.

Repair
-
- Unscrew the screw.
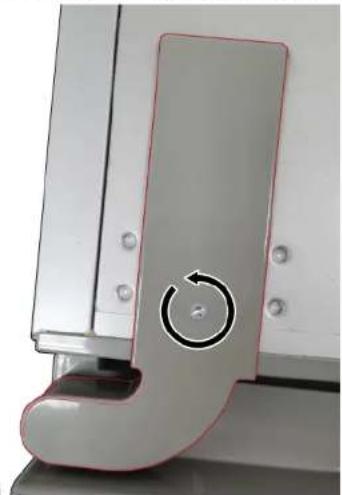
- Remove upper hinge cover.

- Disconnect door electrical connection.
3.1. Unscrew ground connection screw (1).
- Unscrew three screws (2).
- Remove upper hinge.
Upper hinge is removed.
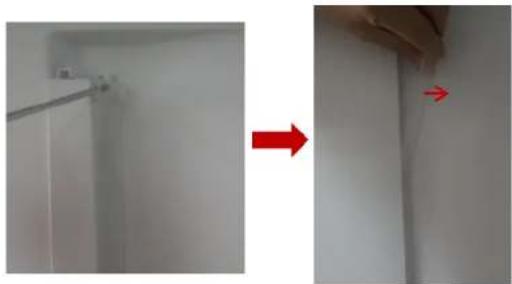
- Remove left door moving it up.
5.1. Unscrew three screws. - Remove lower hinge.
Lower hinge is removed.
- Install in reverse order.
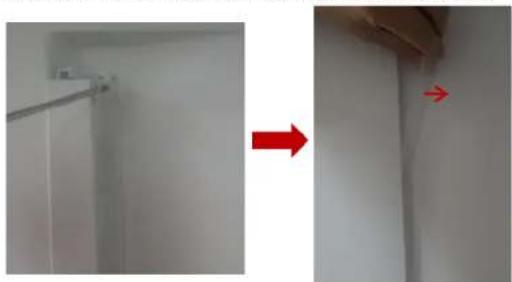
- Align refrigerator compartment doors. For details see User Manual (AGA).

Repair
4.5 Replacing right door hinges
Suggested tools:
Torx Bit TX20 6,3 mm (1/4") [00340865]

Warning
Heavy, bulky appliances!
Back and muscle injuries
- Appliance door removal operation should only be carried out by trained specialists.
To move the appliance, two people are required.
Use only suitable tools and equipment.
Caution
Sharp edges!
Cut injuries
Wear protective gloves.
Warning
Slipping of tilted appliances!
Bone fractures / crush injuries
- Secure appliances against slipping

Caution
Risk of falling parts due to released screws!
ury because of falling parts.
- Secure component from falling down.

Notice
Risk of falling parts due to released screws!
Damage to other parts of the appliance or at customers home e.g. bot
tom.
- Secure component from falling down.
Danger
Risk of electric shock due to live parts!
Danger to life through electric shock in case of improper repair
Electric parts should be repaired by a qualified electricians.
After the repair have a safety test according VDE 0701 or country-specific regulations performed.

Danger
Risk of electric shock due to live parts!
Death by electrocution
- Disconnect appliances from electrical supply at least 60 seconds before starting repairs.
Prerequisite:
Appliance is disconnected from power supply.
Appliance interior fittings are removed.

Repair
4.5.1 Removing right door hinges
-
- Unscrew the screw.
-
Remove upper hinge cover.
- Disconnect door electrical connection.


Repair
3.1. Unscrew ground connection screw (1).
- Unscrew three screws (2).
- Remove upper hinge.

Upper hinge is removed.
- Remove right door moving it up.
5.1.Unscrew three screws. 2.Remove lower hinge.

Lower hinge is removed.
4.5.2 Installing right door hinges
- Install in reverse order.
- Align refrigerator compartment doors. For details see User Manual (AGA).

Repair
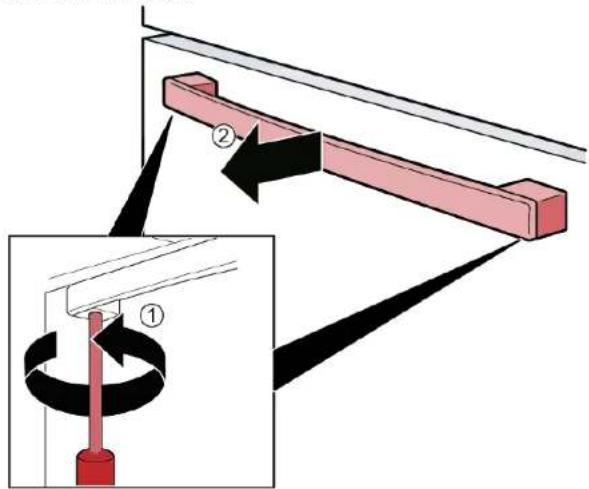
4.6 Replacing door rack
Prerequisite:
Door is open.
Door rack is removed.
Install in reverse order.

Repair
4.7 Replacing shelf
Prerequisite:
Door is open.
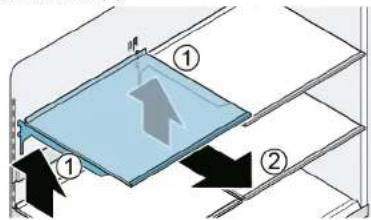
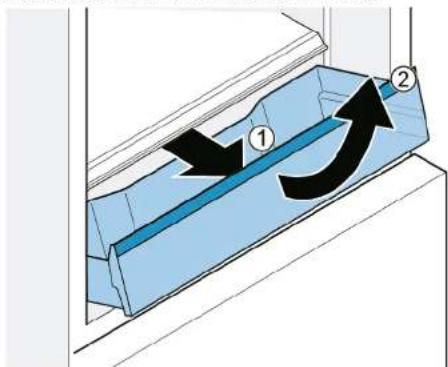
4.7.1 Removing shelf
- Lift up shelf (1).
- Remove shelf (2)
Shelf is removed.
4.7.2 Installing shelf
| Do not cover the ventilation openings. | |
| Insert shelf carefully to avoid scratching the appliance. | |
| Ensure that the hooks are fully inserted and the shelf is horizontal. |
Install in reverse order.

Repair
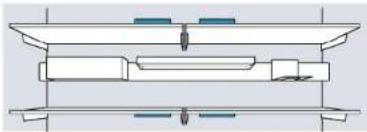
4.8 Replacing equipment bar
Prerequisite:
Door is open.
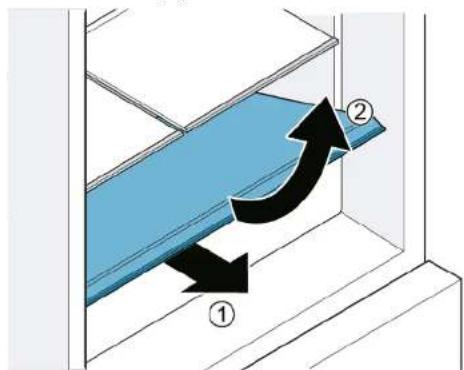
4.8.1 Removing equipment bar
Lift up equipment bar.

Equipment bar is removed.
4.8.2 Installing equipment bar
| i | Check that the hooks are fully inserted and the equipment bar is hori-zontal. |
| i | Insert the equipment bar carefully to avoid scratching the appliance. |
| i | Check that the hooks are fully inserted and the equipment bar is hori-zontal. |
Install in reverse order.

Repair
4.9 Replacing pull-out container
Prerequisite:
Door is open.
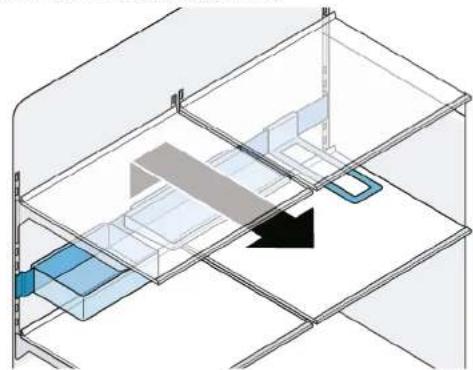
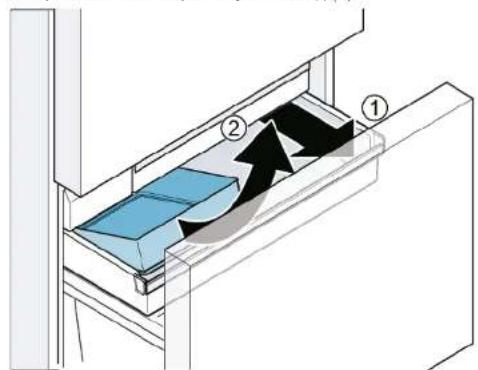
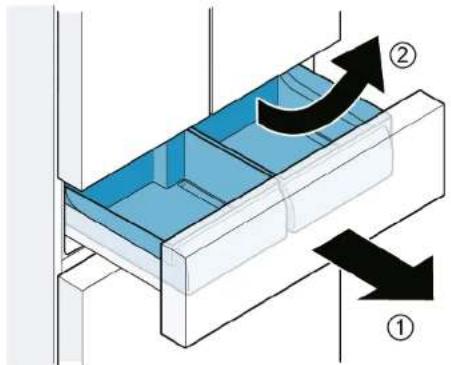
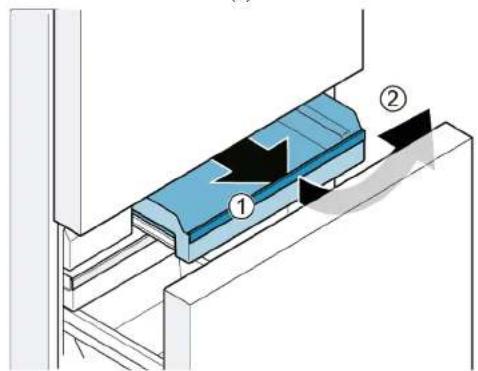
4.9.1 Removing pull-out container
1.Pull out the container all the way (1).
2. Lift pull-out container at the front and remove (2).

Pull-out container is removed.
4.9.2 Installing pull-out container
- Pull out the telescopic rails all the way.
- Place the container on the telescopic rails and push into the appliance until it engages.

Repair
4.10 Replacing fixed shelf
Prerequisite:
Door is open.
4.10.1 Removing fixed shelf
- Open the bin.
2.1.Lift fixed shelf at the front (1). 2.Remove fixed shelf (2).

Fixed shelf is removed.
4.10.2 Installing fixed shelf
Install in reverse order.

Repair
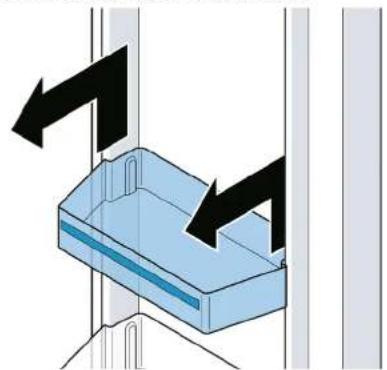
4.11 Replacing cool-fresh container
Prerequisite: Door is op
4.11.1 Removing cool-fresh container
1.Pull the drawer all the way out (1). 2.Lift the container at the front (2).

Cool-fresh container is removed.
4.11.2 Installing cool-fresh container

During insertion, the rail guide of the container and drawer must fit together.
Install in reverse order.

Repair
4.12 Replacing frozen food container (small)
Prerequisite:
Door is open.
4.12.1 Removing frozen food container (small)
- Pull freezer compartment drawer all the way out.
2.1.Pull out the container all the way (1). 2.Lift the container at the front (2).

Frozen food container (small) is removed.
4.12.2 Installing frozen food container (small)
- Pull out the telescopic rails all the way.
- Place the bin on the telescopic rails and push into the appliance until it engages.

Repair
4.13 Replacing frozen food container (flat)
Prerequisite:
Door is open.
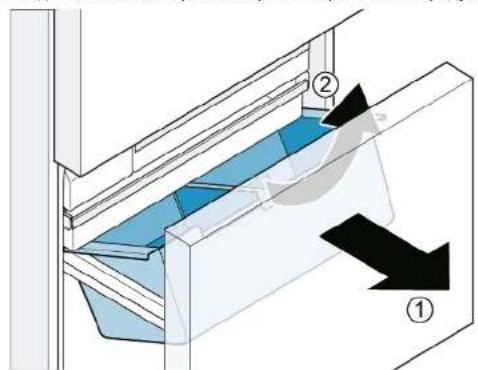
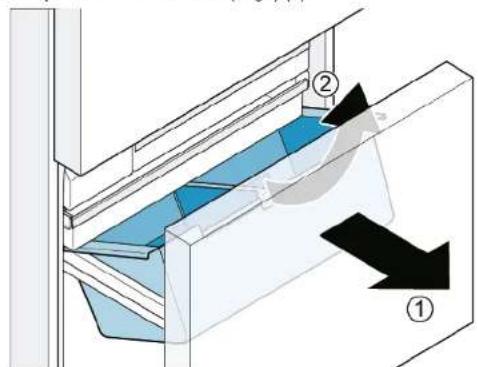
4.13.1 Removing frozen food container (flat)
1.Pull freezer compartment drawer all the way out (1).
2. Pull frozen food container (flat) out (2).
3. Lift up frozen food container (flat) (3).

Frozen food container (flat) is removed.
4.13.2 Installing frozen food container (flat)
Install in reverse order.

Repair
4.14 Replacing frozen food container (large)
Prerequisite: Door is op
4.14.1 Removing frozen food container (large)
Notice DAMAGE TO EQUIPMENT! Never remove the partition
- Pull freezer compartment drawer all the way out and remove the frozen food container (flat) (1).
- Lift up frozen food container (large) (2).

Frozen food container (large) is removed.
4.14.2 Installing frozen food container (large)
- Pull out the telescopic rails all the way.
- Place the bin on the telescopic rails and push into the appliance until it engages.
Repair
4.15 Replacing ice cube container
Prerequisite:
Door is open.
4.15.1 Removing ice cube container
- Pull freezer compartment drawer all the way out.
2.1.Pull out the frozen food container (flat) as far as it will go (1). 2.Remove ice cube container (2).

Ice cube container is removed.
4.15.2 Installing ice cube container
Install in reverse order.

Repair
4.16 Replacing LED lamps
Suggested tools:
Slotted screwdriver Blade 2.4 mm x 0.4 mm x 60 mm, in the kit [00341820]
Torx Bit TX20 6,3 mm (1/4") [00340865]
Slotted screwdriver Blade 10 mm x 1.6 mm x 200 mm

Your appliance features a maintenance-free LED light.
These lights may be repaired by customer service or authorised technicians only!

Danger
Risk of electric shock due to live parts!
Danger to life through electric shock in case of improper repair Electric parts should be repaired by a qualified electrician
After the repair have a safety test according VDE 0701 or country-specific regulations performed.

Danger
Risk of electric shock due to live parts!
Death by electrocution
- Disconnect appliances from electrical supply at least 60 seconds before starting repairs.

Caution
Sharp edges!
Cut injuries
Wear protective gloves.
Prerequisite:
Appliance is disconnected from power supply.
Door is open.
Upper interior fittings are removed.
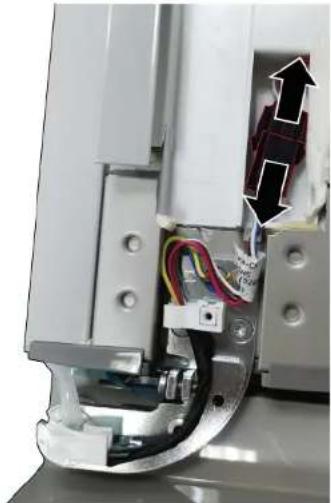
4.16.1 Removing refrigerator compartment LED top lamp
- Create gap by working finger around the rim of LED lamp.
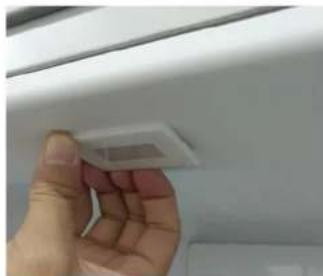
- Insert slotted screwdriver into the gap and remove LED top lamp in the direction shown.


Repair
- Disconnect LED lamp terminal.
Refrigerator compartment LED top lamp is removed.
4.16.2 Removing refrigerator compartment side lamp
- Use slotted screwdriver to remove side lamp upper retainer.
- Use slotted screwdriver to create gap on one side of the lamp cover and the other hand to remove the cover.

Repair
- Remove LED stripe in the same manner.
- Remove LED stripe from the socket.
Refrigerator compartment side lamp is removed.
4.16.3 Removing 0^ compartment lamp
- Remove lamp cover by inserting slotted screwdriver in the gap between lamp cover and door to pry them apart.
- Disconnect lamp terminal.

Repair
3.1. Release hook (1).
- Remove lamp (2).

0^ compartment lamp is removed
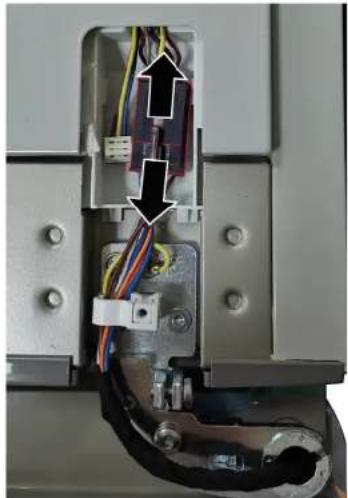
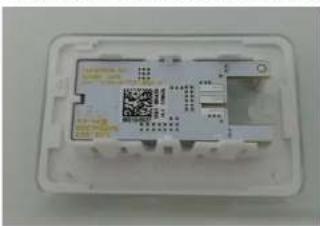
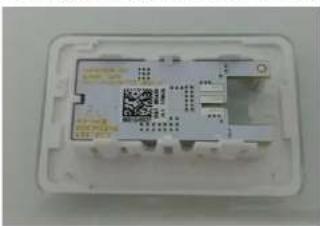
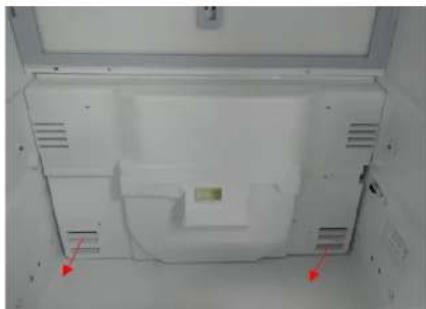
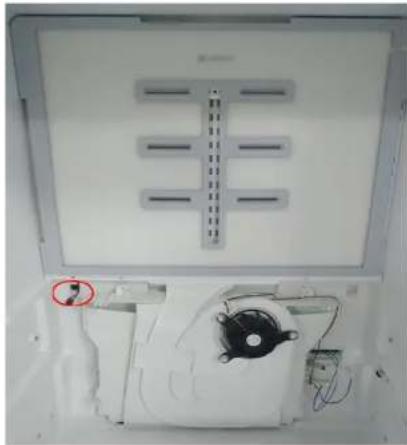
4.16.4 Removing back wall lamps

Due to technical structure back wall lamps cannot be exchanged separately. Lamps are included in back wall spare part set.
Prerequisite:
Door is open.
Refrigerator compartment interior fittings are removed.
0°C compartment interior fittings are removed.
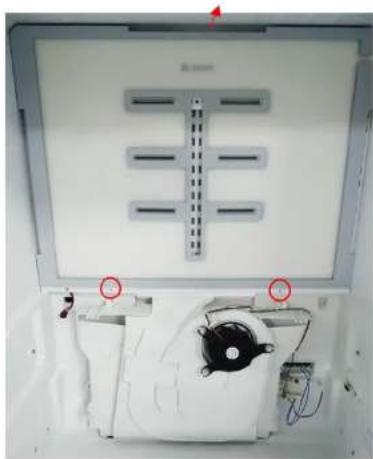
1. 1.Hold the rear of the humidity adjustment cover with one hand (1). 2. Release cover with the other hand (2).
- Remove second cover in the same manner.
3.1. Release two clips (1). 2. Pull out clips (2).

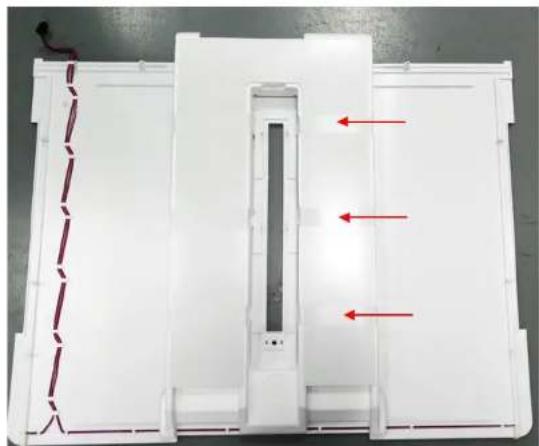
Repair
- Pull out the central partition.
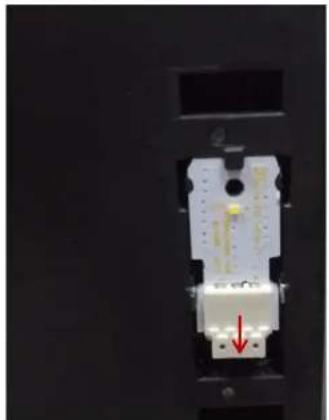
- Release four clips.
- Disconnect display module electrical connection.
7.1. Release two clips (1).
- Take out the frame (2).

Repair
8.1. Unscrew two screws (1).
2.Pull out middle board (2).
- Pull 0^ compartment evaporator cover outward.
"Click" will be sound while cover is released.
- Disconnected 0^ compartment temperature sensor.
- Disconnect electrical connections of 0^ compartment evaporator front cover group.
0°C compartment evaporator front cover group is removed.

Repair
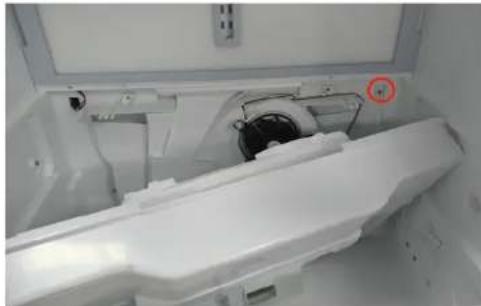
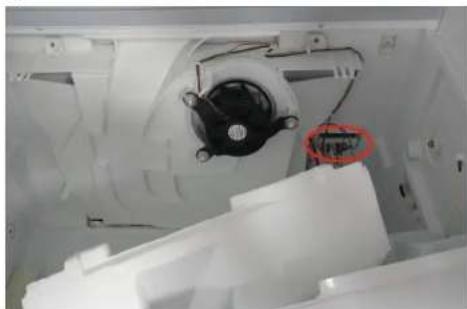
- Disconnect back wall lamps electrical connection. 13. 1. Unscrew two screws (1).
- Pull out back wall group (2).

Repair
- Tear off the tape and separate the foam duct from 0^ compartment evaporator front cover.

Back wall with integrated lamps is removed.
4.16.5 Installing LED lamps
Install in reverse order.
Tabel 1: Ohutasedmed
1.2.2 Ohusumbolid
Ohusumbolid on sumboolsed kujutised, mis viitavad ohu laidle. Selles dokumendis kasutatakse alljargnevaid ohusumboleid.
Outillage suggerese:
Embout Torx TX20 6,3 mm (1/4") [00340865]
A VERTISSEMENT
La lampe du compartment 0 °C est retiree.
Avaonkwate To papi Tpota TpoC ta Endw.

To papi npopac apapaei.
4.6.2 ToToBttnn paoiou Tóptac
EykaataoThee nTv avrtheoepa.

EMIOKEUN
4.7 AvtikataoTaon paiou
PouT6eOg:
H Tóptá εíval avoiXtN.
4.7.1 Apaipaeon paipou
1.Avaonkuote to paki(1).
2.ApaipoeTo pa(2).


To paqapapapeKε.
4.7.2 ToTOn8EtNo npapoiou
| i | Mny kalutte ta avolymata aepiomuou. |
| i | Eioyete to paqui tipooektiká yia va attoopuyete tics ypatoooviués otn ou-okeun. |
| i | Bebaiweite oni ta aykiotpa exouv eloaybei mnpwcs kai to paqui eivai oe opicovtna thcen. |
Eykaataotne 1nV aTfTe n eipa

EMIOKEUN
4.8 AvtikataaTaon paBou EoiAou
PouT6eOg:
H Tóptá éival avoiXtN.
4.8.1 Aqaipeo npaBou eoTlaoou
AvaonKwate n paofoe eoTiaou.


HpaBdoEgOanlmaouxεiαpapieBéi.
4.8.2 ToToeTnO npBou EoTIAOou
4.16.2 Aqaipeon nAeupikns Auxvias LED xwpou ouvtnpnons
- Xpnoiouoiaote IIO KAOTAOI YIA VA aqaipoeTe Tov ETVW OUYKpatnT Ns PAAEUPIKN LUXVlaS
- Xpnaiomoi nate iio katoaibi ia va onuupytoe Kevo otn pi taeupa tou ka Lmuatoxuxiaicai to aao xepi yia va apapoeote to kalmu.

EMIOKEUN
- Aepaepate Tn AevTotavia Te ToTio TpToIO.
Koble apparatate starts.
Forutsetting:
Apparatet kobles fra strormforsyningen.
Apparatets innvendige beslag er demontert.

Reparasjon
4.16 Substitur as lampadas LED 570
4.16.1 Remover a lampada LED superior do compartmento de refrigeracao 570
4.16.2 Remove a lampada lateral do compartmento de refrigeracao 571
4.16.3 Remover a lampada do compartmento de 0^ 572
4.16.4 Remover as lampadas da parede traseira 573
4.16.5 Instalar lampadas LED 577
m = 311 ;
PERIGO
m = 311 ;
Risco deCHOque eltrico devidao a partes sob tensao!
4.11.1 Remover o recipiente "cool-fresh"
4.11.2 Instalar o recipiente "cool-fresh"

4.16 SubstituiR as Iampadas LED
Ferramentas sugeridas:
Chave de fendas Lamina 2,4 mm x 0,4 mm x 60 mm, no kit [00341820]
Ponta Torx TX20 6,3 mm (1/4") [00340865]
Chave de fendas Lamina 10 mm x 1,6 mm x 200 mm

4.16.4 Remover as lampadas da parede traseira

- OTHOCHO To3n DokyMeHT
- Baxha nHΦopMaζη
- Uen
- 06aCHeHne Ha cHMBOJInTe
- HbHa onaCHOCT
- Cnmbon3a onachoct
- ONIACHOCT
- OTIACHOCT
- PemOH
- OTeTpaHbAe Ha naHTnte Ha JnBaTa Bpata
- OTeTpaHbAe Ha naHTnte Ha DaChata Bpata
- MoHTnpaHc HcTeJaxHa BpTaTa
- 4.7CMHaHa paΦTa
- OTeTpaHbAbe Ha paTa
- MoThInpaHe Ha paΦTa
- CmHa Ha uHaTa 3a o6OpyDbaHe
- OTePraHbAe Ha uHaTa 3a o6OpyDbAe
- MoHTIpaHc Ha 11HaTa 3a o6OpyDbaHc
- CmraHa Ha qKcnpa paT
- OTeTpaHЯBaHe NaФИКсиран paФт
- MoHTnpaHHe Ha qKcnpaHn paΦT
- PeMoHT
- CmHa Ha KOHTeHepa 3a npraCHO oxnaedeHN npodykTN
- OTeTpaHbAe Ha KOHTeHepa 3a npraCHO oxlaedeHH npodykTN
- MoThIpaHae Ha KOHTeHepa 3a npcH Oxlaedn npOdykTn
- CMHa Ha KOHTeHepa 3a 3ampa3eHN XpaHHTeHH npOdyKtn (MaTbK)
- OTePraHReBaHe Ha KOHTeHepa 3a 3ampa3EHn XpaHntEnn npOdykTN (MaJIbK)
- MoHTpaHe Ha KOHTeHepa 3a 3ampa3eHN XpaHNTEN npOdykTN (MaIbK)
- CMHa Ha KOHTeHepa 3a 3ampa3eHN XpaHNTEN HnpOdyKtn (nNoCbK)
- OTePraHReBaHe Na KOHTeHepa 3a 3ampa3EHn XpaHntEnn npOdykTN (nnocbK)
- MoHTnpaHe Ha KOHTeHepa 3a 3ampa3EHn XpaHNTEN npOdykTN (nnocbK)
- CMHa Ha KOHTeHepa 3a 3ampa3eHN XpaHHTeHH npOdykTN (roJAM)
- OTePraHReBaHe Ha KOHTeHepa 3a 3ampa3eHN XpaHHTeHH npOdyKTI (roJAM)
- BHIMAHHEI
- IOBPEDA NO OBOPYDBAHETOI
- MoHTnpaHe Ha KOHTeHepa 3a 3ampa3EH XpaHntEnn npOdyKTN (ronm)
- CmHa Ha KOHTeHepa 3a Ky6eTa nei
- 3BaXdAne Ha KOHTeHepa 3a Ky6yTea nei
- MoHTnpaHe Ha KOHTeHepa 3a Ky6yeTa nei
- ONACHOCT
- BHIMATEJIHO
- OTrpaHete ropHaTLEDaMaHa HaOTdeHeMeTo Ha XJaIMnHnKa
- OtrpaHbAHe Ha cTpaHnHaTa JAmna Ha OTdeneHneTo Ha Xlaaunnka
- PAS PAI
- BEM/ERK!
- FARE
- BEMERKI
- Self-repair hints - Fridge-freezer combination
- Concerning this document. 163
- Safety 165
- O Tools and aids. 166
- Repair 167
- Concerning this document
- Important information
- Purpose
- Explanation of symbols
- Danger levels
- Hazard symbols
- Structure of the warnings
- Danger
- General symbols
- Safety
- General Safety instructions
- All domestic appliances
- Tools and aids
- Repair
- Replacing door handle
- Removing door handle
- Replacing drawer handle
- Removing drawer handle
- Installing drawer handle
- Replacing left door hinges
- Warning
- Caution
- Notice
- Replacing right door hinges
- Removing right door hinges
- Installing right door hinges
- Replacing door rack
- Replacing shelf
- Removing shelf
- Installing shelf
- Replacing equipment bar
- Removing equipment bar
- Installing equipment bar
- Replacing pull-out container
- Removing pull-out container
- Installing pull-out container
- Replacing fixed shelf
- Removing fixed shelf
- Installing fixed shelf
- Replacing cool-fresh container
- Removing cool-fresh container
- Installing cool-fresh container
- Replacing frozen food container (small)
- Removing frozen food container (small)
- Installing frozen food container (small)
- Replacing frozen food container (flat)
- Removing frozen food container (flat)
- Installing frozen food container (flat)
- Replacing frozen food container (large)
- Removing frozen food container (large)
- Notice DAMAGE TO EQUIPMENT! Never remove the partition
- Installing frozen food container (large)
- Replacing ice cube container
- Removing ice cube container
- Installing ice cube container
- Replacing LED lamps
- Removing refrigerator compartment LED top lamp
- Removing refrigerator compartment side lamp
- Removing 0°C compartment lamp
- Release hook (1).
- Removing back wall lamps
- Prerequisite:
- Unscrew two screws (1).
- Installing LED lamps
- Ohusumbolid
- A VERTISSEMENT
- ToToBttnn paoiou Tóptac
- EMIOKEUN
- AvtikataoTaon paiou
- Apaipaeon paipou
- AvtikataaTaon paBou EoiAou
- Aqaipeo npaBou eoTlaoou
- ToToeTnO npBou EoTIAOou
- Aqaipeon nAeupikns Auxvias LED xwpou ouvtnpnons
- Reparasjon
- Remover o recipiente "cool-fresh"
- Instalar o recipiente "cool-fresh"
- SubstituiR as Iampadas LED
- Remover as lampadas da parede traseira
Brand : SIEMENS
Model : KF96RSBEA
Category : Freezer