
Regulus Aqua PowerVac - Vacuum Cleaner Leifheit - Free user manual and instructions
Find the device manual for free Regulus Aqua PowerVac Leifheit in PDF.
| Product type | Cordless vacuum mop |
| Brand | Leifheit |
| Model | Regulus Aqua PowerVac |
| Battery | Rechargeable Li-ion, 24 V, 2.5 Ah |
| Runtime | 22 min (eco mode) |
| Power | 120 W |
| Voltage | 24 V |
| Charging time | 3 h |
| Clean water tank capacity | 500 ml |
| Dirty water tank capacity | 400 ml |
| Weight | 3.3 kg |
| Power adapter | YLS0241A-E260092, input 100-240 V AC, output 26 V DC, 0.92 A |
| Cleaning system | Combination suction and washing with rotating roller |
| Water adjustment | Water lever for continuous adjustment |
| Full tank indicator | Tank Control Technology: orange light and roller stop |
| Self-cleaning program | AUTO-WASH program (60 seconds) |
| Filter | Removable and washable sponge filter |
| Docking station | Included to prevent water leaks |
| Safety | Automatic shut-off when tank is full, overflow protection, instructions for lithium-ion batteries |
| Cleaning and maintenance | Roller and filter washable under running water; complete drying before reinstalling |
| Included accessories | Floor nozzle, cleaning roller, docking station, charger |
Frequently Asked Questions - Regulus Aqua PowerVac Leifheit
User questions about Regulus Aqua PowerVac Leifheit
0 question about this device. Answer the ones you know or ask your own.
Ask a new question about this device
Download the instructions for your Vacuum Cleaner in PDF format for free! Find your manual Regulus Aqua PowerVac - Leifheit and take your electronic device back in hand. On this page are published all the documents necessary for the use of your device. Regulus Aqua PowerVac by Leifheit.
USER MANUAL Regulus Aqua PowerVac Leifheit
Additional page of images is available 146
Oa 8peite 1ia aoko n eaiia eikovwv 0tn oEla 146
Quality and Design by Leifheit AG
Leifheitsstraße 1
56377 Nassau / Germany
www.leifheit.com
Deutsch

D-56377 Nassau Germany
Please read the operating instructions carefully before using this appliance and store these for later reference or for the benefit of subsequent owners.
They will help you to use the device sensibly and correctly from the get go and avoid faulty operation.
Please pay particular attention to the safety instructions provided in this manual. The operating instructions can be found on the Leifheit homepage under www.leifheit.com.
Sincerely,
The Leifheit Team
Leifheit AG
Leifheitsstraße 1
56377 Nassau/Lahn
Deutschland
Table of contents
A Scope of supply 12
B Product overview 12
Technical specifications. 13
D Intended use 13
E Safety information. 13
FOperation. 14
Before use 14
Application 14
Cleaning and maintenance. 15
Troubleshooting 17
Important information. 18
Disposal. 18
M Conformity / Declaration of Conformity 18

Scope of supply
Leifheit cordless Vac & Wipe Operating instructions
Check the contents against the parts list for completeness and for any damage during shipping.
If you discover any shipping damage, do not use the appliance and contact Customer Service immediately.

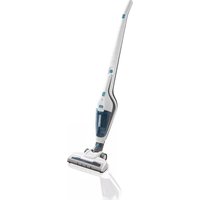
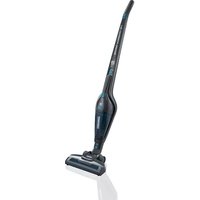
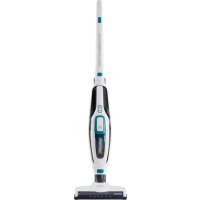
Product overview
[1] On/Off button
[2]Vacuum mode button I/II
[3] Water lever
[4] Handle
[5] Fresh water tank release lever
[6] Fresh water tank
[7] Dirty water tank
[8] Ventilation cover
[9] Floor head
[10] Operating display
[11] Dirty water tank release lever
[12] Cleaning roller cover
[13] Charger adapter
[14] Charger hollow connector
[15] Charge socket
[16] Vacuum Channel
[17] Transport wheels
[18] Water outlet nozzles
[19] Cleaning roller holder
[20] Cleaning roller
[21] Cleaning roller cover release button
[22] Park station
[23] Fresh water tank cover
[24] Fresh water tank handle
[25] Sponge filter holder
[26] Sponge filter
[27] Dirty water tank cover
[28] Float
[29] Dirty water tank handle
[30] Spilling protection adapter
Technical specifications
Model Regulus Aqua PowerVac
Rechargeable battery Li-Ion, 24V 2,5Ah
Operating time 22 min (Eco-Mode)
Output 120W
Voltage 24V
Charge time 3h
Fresh water tank volume .500 ml
Dirty water tank volume 400 mL
Weight 3,3k
Charge adapter
Model identifier YLS0241A-E260092
Input voltage AC 100-240 V
Input AC frequency 50/60 Hz
Output voltage DC 26,0 V
Output current 0,92 A
Output power 23,92 W
Average active efficiency 86,57%
Efficiency at low load (10%) 78,86%
No-load power consumption 0,09 W
Manufacturer's name or trade mark, commercial registration number and address
Leifheit AG
Leifheitsstraße 1
D-56377 Nassau Germany
Please note that this product is only intended for household use. Leifheit will not provide any manufacturer's warranty for commercial use.
- The appliance serves exclusively vacuum wiping of dry as well as moist vacuum material on water-resistant and sealed floors. These are tiles, PVC, linoleum, laminate and sealed wood.
- Do not use the application to vacuum flammable fluids, sharp-edged or tipped objects, hot or cold ash and burning cigarettes.
- The appliance must not be used to vacuum persons or animals.
- Never cover the air inlet openings or air outlet openings of the appliance switched on. Make sure that these are not clogged by dirt.
- Use the appliance only with Leifheit approved accessories and spare parts.
- Always position the appliance at the corresponding park station on a hard and level surface.
- When charging the appliance, ensure for sufficient distance to heat and moisture sources.
- Please take care that no tipped objects catch in the cleaning roller or the wheels that could damage the floor.
- Never operate the appliance without filter.
Any use beyond this is considered as not intended and may lead to damage or injury. The manufacturer shall not be liable for any damages resulting from such use; the user is solely responsible for damage from improper use.
Safety instructions
Fundamental safety measures must be observed when using an electrical appliance:
- Use the appliance only as described in these instructions.
- Never use the appliance if the cable, connector, housing or power supply unit are damaged.
- Repairs may only be carried out by authorised customer services technicians. Never open the basic unit single-handedly. The individual components of the basic unit must not be disassembled, repaired or altered.
- The appliance may only be charged using the charger supplied. Make sure that the voltage specified on the rating plate of the power supply unit corresponds with the mains voltage.
- Make sure that the appliance as well as the power supply unit do not get wet. Do not operate the appliance or power supply unit with moist or wet hands.
- Do not store, charge or use the appliance outdoors or in wet rooms such as bathrooms or similar, but always at room temperature and in a dry location.

Safety instructions
- Do not use the application in the vicinity of flammable gases.
- Protect the appliance against intensive heat and do not expose it to direct sunlight.
- This appliance is only suitable for users (also children aged 8 years and above) with limited physical, sensory or physical abilities or with lack of experience or knowledge if they are supervised appro priately or have been instructed in the use of the appliance by a responsible person.
- Make sure that children do not play with the appliance.
- Do not leave children unattended with the appliance.
- Unplug the appliance from the power outlet before cleaning or maintenance.
- Do not touch the rotating cleaning roller when the appliance is switched on.
- Make sure that the running cleaning roller does not make contact with body parts (e.g. hair, fingers) or items of clothing.
- During cleaning, make sure that no body parts (e.g. fingers) are trapped or crushed by the floor head.
- Make sure that no objects (e.g. cables, long fringes) catch in the cleaning roller otherwise there is a risk that this or the appliance are damaged.
- Store the appliance out of reach of children. Do not leave the appliance unattended when it is switched on.
- Keep packaging material such as plastic bags and similar away from children. There is a risk of suffocation.

Operation
The appliance combines vacuuming and wiping in one work step. It is equipped with a 2-tank system with a separate fresh and dirty water tank.
By actuating the water lever, the fresh water is spread over the cleaning roller. This allows the amount of water to be set for every floor type. The rotating cleaning roller removes dust, dry and moist dirt as well as dried stains.
The vacuum function sucks on the cleaning roller and transports the dirt into the dirty water tank. This allows you to always wipe with a clean cleaning roller and fresh water.

Figure 1
Before use
Insert the handle (4) and cable into the appliance until they engage.
CHARGING
During charging, do not clean or maintain the appliance. Fully charge the appliance before the first use and after each use.
Figure 2
Insert the hollow connector of the charger (14) supplied into the charging socket (15) of the appliance.
Insert the adapter of the charger (13) in the socket
Figure 3
Operating display (10) flashes green slowly during the charging process.
The appliance is fully charged after 3 hours. Then the operating display illuminates continuously for 2 minutes, then the light goes out.

Application
FILLING THE FRESH WATER TANK
Figure 4
Press release button (5) to remove the fresh water tank (6) on the handle (24).
Open the cover of the fresh water tank (23).
Figure 5
Fill the fresh water tank with max. 60^ hot water.
If required, add non-foaming cleaning agent with low dosage.
CAUTION: Observe the dosing specifications of the cleaning agent. We recommend Leifheit universal cleaner.
Figure 6
Close the tank cover (23) and insert the fresh water tank (6) until you hear it engaging.
The operating display illuminates green after switching on.
Optional: Press the vacuum mode button (2) once in order to the turbo mode if tiled / stone floors have more stubborn dirt. Then the operating display flashes green slowly. Switch back to Eco mode by pressing the vacuum button again.
Figure 8
Tilt the appliance to the rear to release it from the standard position.
Figure 9
Press the water lever (3) to moisten the cleaning roller (20) as needed
Before starting to clean the floor, keep the water lever pressed for several seconds without moving the appliance in order to quickly and evenly moisten the roller in advance.
To clean the floor, push the appliance back and forth in steady and equal movements.
If the moisture of the cleaning roller reduces, press the water lever again and keep it pressed until the desired moisture is reached again.
The fill level of the dirty water tank (7) must not exceed the maximum fill level.
Figure 10
During cleaning breaks, always place the appliance at the corresponding park station (22) in order to avoid the formation of water stains to the floor from the residual water in the appliance.
Figure 11
Once the dirty water tank (7) is filled to the Max. line, a notification system ( Tank Control Technology) is activated. As a result, the operating display (10) flashes orange and the cleaning roller stops 3 times for a few seconds and then the roller stops completely.
Now the dirty water tank must be emptied at the latest.
EMPTY THE DIRTY WATER TANK AND CLEAN THE FILTER
Figure 12
To switch off the appliance, press the On / Off button (1) once again.
Remove the dirty water tank (7).
For this purpose, press the release button (11) down and pull the tank out on handle (30).
Figure 13
Lift the cover (27) from the dirty water tank (7).
Empty the dirty water tank.
Figure 14
Remove the sponge filter holder (25) from the cover of the dirty water tank (27).
Remove the sponge filter (26) from the sponge filter holder.
Figure 15
Depending on the degree of soiling, rinse out all parts of the dirty water tank unit (7, 25, 26, 27, 28, 30) under running water.
Figure 16
Before putting back together and insertion of the parts removed, allow all parts to completely dry in the air.
Figure 7 To switch on the appliance, press the On / Off button (1) once.
Figure 17
Reassemble the sponge filter (26), sponge filter holder (25), cover (27) and dirty water tank (7).
Figure 18
Reinsert the dirty water tank back into the appliance until you hear it engaging.
REMOVING AND CLEANING THE CLEANING ROLLER
Figure 19
Remove roller cover (12) in order to remove the cleaning roller (20).
To remove the cover, press release button (21) and remove the cover.
Figure 20
Using the roller holder (19), remove the cleaning roller (20) at the edge.
For this purpose, pull the holder upwards out of the guide.
Figure 21
Rinse the cleaning roller (20) and, if necessary, the cleaning roller cover (12) under running water.
Allow the roller to completely dry before using again.
CLEANING THE VACUUM CHANNEL
Figure 22
When the cleaning roller is taken out, remove any soiling on the nozzles (18) and vacuum channel (16) using a moist cloth.
Special Leifheit cleaning brushes for the nozzles, the vacuum channel as well as the water tanks can be purchased in the trade or ordered from our customer services.
Make sure that the appliance is switched off and is not charging.
First insert the cleaning roller (20) in the round mount and then insert the roller holder (19) in the guide.
Figure 24
Insert the tabs of the roller cover (12) at the bottom end in the matching mount and close the cover until you hear it engaging
AUTO-WASH PROGRAM
In addition to cleaning your appliance, also use the AUTO-WASH PROGRAM at regular intervals. When using the program, some vinegar or vinegar cleaner can also be added to the fresh water tank.
Before using the AUTO-WASH PROGRAM, always empty the dirty water tank and put it tank back in. (7).
Figure 25
Fill the fresh water tank (6) with water up to the AUTO-WASH MAX line.
Close the tank cover (23) and insert the fresh water tank until you hear it engaging.
Figure 26
Place the appliance on the corresponding park position (22).
Keep the On / Off button (1) pressed together with the Vacuum mode button I/II (2) for 3 seconds and then let go as soon as the appliance starts the AUTO-WASH PROGRAM. Then the operating display flashes green.
Figure 27
After 60 seconds, the program ends and the appliance switches off.
Then remove the dirty water tank (7) and cleaning roller (20) and wash-out.
DISASSEMBLING THE HANDLE
After assembling, do not remove the handle. Disassembly of the handle is only intended if the appliance has to be sent in for service purposes.
Figure 28
Loosen and remove the screw on the rear side of the appliance.
Insert the screwdriver in the opening of the screw hole.
By applying slight pressure, the locking mechanism of the handle can be released and the handle can be pulled out.

TROUBLESHOOTING
| Malfunction Possible cause / Solution | |
| The appliance does not start. | → The rechargeable battery has not been charged. Charge the rechargeable battery. |
| The operating display flashes orange. | → The cleaning roller (20) is blocked. Please remove the roller and solve the blockage → The rechargeable battery is empty; recharge the appliance. |
| The operating display flashes orange and the cleaning roller stops 3 times for a few seconds and then the roller stops completely. | → Tank Control Technology: The dirty water tank (7) is full. Please empty the dirty water tank. |
| The dirty water tank cannot be reinserted in the appliance. | → Check if the cover (27) and the sponge filter (25) have been inserted correctly. |
| The float (28) has been tightened, the appliance has stopped suction, but the Tank Control Technology does not start | → The sponge filter (25) is blocked by excessive moisture or dirt particles. Please clean and dry the sponge filter. → The float (28) has been tightened and the appliance has been switched off and on too quickly. Please switch off the appliance for a moment and wait until the float is in the initial position before starting the appliance again. |
| The Tank Control Technology starts even though the waste water tank (7) is not yet full. | → The Tank Control Technology may react inadvertently in the event of jerky movements (e.g. strong bumping against furniture). Please switch off the appliance for a moment and wait until the float (28) is back in its original position before starting the appliance again. Take care not to bump too hard against furniture or other objects. |
| Malfunction Possible | cause / Solution |
| Water is running out of the ventilation cover. | → The dirty water (7) tank is full. Please empty the tank. |
| Little or no water can be added using the water lever. | → The fresh water (6) tank is empty. Refill with water. → The nozzles (18) are blocked. Please remove the stuck protection in front of the nozzles. Lime deposits can be carefully removed using a paper clip by inserting it through the openings. → Please use the AUTO-WASH PROGRAM at regular intervals in order to keep the channels and nozzles inside the appliance clean. |
| Foam remains on the floor. | → Please add less cleaning agent or use the Leifheit universal cleaner especially for the Regulus Aqua PowerVac. |
| The appliance does not absorb water from the floor | → The dirty water (7) tank is full. Please empty the tank. |
| The appliance switches off automatically after approx. 60 seconds. | → The AUTO-WASH PROGRAM has been started. Restart the appliance by briefly pressing the on / off button. |
| Other faults | → Please contact Leifheit Service. |
CUSTOMER SERVICES
If you have any questions or suggestions, our Leifheit Service is at your disposal:
Mon - Fri: 08:00 - 17:00
(tall-free)
Service hotline:
0080053737373
(D/F/NL/CZ/E/I/PL)
(liable for costs)
International phone number: 004926049770
Internet: www.leifheit.com


IMPORTANT INFORMATION
- The rechargeable battery must only be charged with the charger provided. The charger should only be used in conjunction with the Leifheit cordless Vac & Wipe.
- Fully charge the appliance before the first use and again directly after each use.
- Do not store the appliance after fully discharging the rechargeable battery unused over a period longer than 6 months.
Cleaning the filter
- Clean the cleaning roller, the sponge filter and other filter parts regularly after use.
- Allow the cleaning roller and all parts the filter to dry completely before reinserting them back into the cordless Vac & Wipe.
Cleaning the appliance
- The appliance contains electrical components. Never clean under running water!
- Clean the appliance with a moist cloth.
- Do not immerse the appliance in water under any circumstances.
Parking the appliance
- Only place the appliance on a flat and firm surface underground.
- To protect sensitive floors against remaining water running out of the appliance, always place the cordless Vac & Wipe on the park station during cleaning breaks and after cleaning.
Use of cleaning agents
- Where required, use only non-foaming cleaning agent with low dosage.
- Observe the dosing specifications of the cleaning agent. We recommend Leifheit universal cleaner.

CAUTION
The following instructions must always be observed with lithium-ion batteries: The rechargeable battery must not be damaged or opened; doing so can cause a short circuit. There is risk of fire. Toxic substances hazardous to health can escape. The rechargeable battery must not be put in a fire as well as exposed to direct, strong sun radiation and heat.
WARNING!
NEVER USE THE APPLIANCE IN ONLY PARTIALLY ASSEMBLED CONDITION!

Disposal
The symbol on the product or its packaging indicates that in accordance with Directive 2012/19 EU, this product and the integrated rechargeable battery must not be treated as normal household waste but should be handed over to a collection point for recycling electrical and electronic devices.
You can receive additional information from your municipality, municipal waste disposal company or the shop where you bought the product


Conformity / Declaration of Conformity
Leifheit hereby declares that this appliance is in conformity with the basic requirements of the German Product Safety Act and other applicable provisions and Directives. He EU Declaration of Conformity can be found under www.leifheit.com.
Français

D-56377 Nassau Germany
D-56377 Nassau Germany
gratis service hotline:
0080053737373
(D/F/NL/CZ/E/I/PL)
Vystupnnapeti DC 26,0 V
Vystupniproud 0,92A
VystupniVykon 23,92W
D-56377 Nassau Germany
NAPLNENI NADRZKY NA CISTOU VODU
Obrazek 4
Po stisknuti tlačitka pro odrokovani (5) odeberte za rukojet (24) nadržku na Čistou vodu (6).
Otevre te vko nadrzky na cistou vodu (23).
Obrázek 5
Naplnte nadrzku vodou teplou maximalne 60^
Podle potreby pridejte nepatrne mnozstv peniico h cisticicho prostredku.

Vystupné napatie DC 26,0 V
Vystupny prud. 0,92 A
D-56377 Nassau Germany
NAPLNENIE NADOBY NA CISTU VODU
Obrazok 4
Stlačte odblokovacie tlacidlo (5), aby ste vybrali nadobu na cistú vodu (6) za rukovat (24).
Otvorte uzáver nádoby na Čistú vodu (23).
Obrazok 5
Naplnte nadobu na cistu vodu vodou s maximnou teplotou 60^
V pripe de potreby pridajte nepenive cistiance prostriedky do spodneho davykovaça.

D-56377 Nassau Germany
Tensao de saida DC 26,0 V
Corrente de saida 0,92 A
D-56377 Nassau Germany
D-56377 Nassau Germany
D-56377 Nassau Germany
FYLDNING AF FERSKVANDSBEHOLDER
Fig. 4
Tryk på oplåsningstasten (5) for at udtage ferskvandsbehöderen (6) i grebet (24).
Abn ferskvandsbeholderens (23)lag.
Fig.5
Fyld ferskvandsbeholderen med maks. 60^ varmt vand.
gratis service-hotline:
0080053737373
(D/F/NL/CZ/E/I/PL)
eller gebyrpligtigt
Internationalt telefonnummer: 004926049770
Utgående spanning DC 26,0 V
Utgäende ström 0,92 A
Utgäende effekt. 23,92 W
D-56377 Nassau Germany
D-56377 Nassau Germany
Tensiune de iesire DC 26,0 V
Current de iesire 0,92 A
Putere de lesire 23,92 W
Randament mediu in mod activ. 86,57%
Randamentul la sarcina redusa (10%) .78,86%
Puterea absorbita in regim fara sarcina .09 W
D-56377 Nassau Germany
Isejimo jtampa. DC 26,0 V
Isejimo srove 0,92 A
Isejimo galia 23,92 W
D-56377 Nassau Germany
Izejas spriegums. DC 26,0 V
Izejas strava 0,92A
Izejas jauda 23,92 W
Videjä aktivä efektivitate 86,57%
Efektivitate pie zemas slodzes (10%) 78,86%
Jaudas izmantojums bezslodzes rezima (W) 0,09 W
Razotaja nosaukums vai precu zime, uzemuma registracijas numurs un adrese
Leifheit AG
Leifheitsstraße 1
D-56377 Nassau Germany
"AUTO-WASH" PROGRAMMA
Papildus ierices tirisanai regulari izmantot "AUTO-WASH" PROGRAMMU. Izmantojot programmu, tira udens tvertne var pievienot nedaudz etika vai etiki saturosa tirisanas lidzekla.
D-56377 Nassau Germany
Kimeno feszültseg DC 26,0 V
D-56377 Nassau Germany
D-56377 Nassau Germany
I3xoHn HapexKeHne DC 26,0 V
13xOeH ToK 0,92A
N3xOHa MoHocT 23,92W
Cpeen KIIBpa6oTeH peKIM 86,57%
KππππππTobap (10%) 78,86%
KohcymnpaHa MoUHocT Ha npaeh xoJ 0.09 W
HaMeHOBaHHe Nn TbProBcKa MapKa Ha npOn3BoDnteIa, Homep Ha TbproBckata pernctpauuN aDpec;
Leifheit AG
Leifheitsstraße 1
D-56377 Nassau Germany
yka3aHn8 3a 6e3oNaCHOCT
BHIMAHHE:3a da n36erHeTe mnpn3m, n3BaTe
nouchtaaia BalaK cneI ynotpe6a n ro n3mnTe. NocTabete HnBlno n3cyueneia nouchtaa BalaK o6patHO bYCTPOJCTBOTO.
NoucCTBAHE HA CMyKATEIHINKAHAI
Φurypa 22
OTCTpaHete BCaKaBn 3aMbpcBaHHa NaIIOHTe (18) n CmyKaTeHNHa KaHAn (16) c BnaJHa KbpNa npn CbaHeNo- qNCTBaA BaJIK.
CneuHaHnTe nouchTaBau nyeTkn Leifheit 3a IIO3nTe, cmyKaTeHnHa KaHaI n pe3epBoapnte 3a Boda Moarat da ce 3aKynrT B TbProBcKaTa MpeKa nn da Ce npbchat qpe NaheTo o6cnykBaHe.
IOCTABRHE HA IOUHCTBAUNB AIAK 3ATBAPRHE HA KANAKA HA BAJRAKA
Unrpya 23
Ybepete ce,Ye yctpoiCTBTOe n3KIOueHo n He ce 3apejka.
PpBO NoCTabete NoCTBaunB BnK (20) B KpBrln npEmHK n CneT OBA NoCTabete DbpxaHa H BAJka (19) BB BODaqa.
Durypa 24
Ioctabete ufoTobete Ha kanaka Ha polkata (12) B donnna Kpaia HnoXoJaTe OTbOpu n 3aTbOpTe Kanaka,doKaTo UpaKHe Ha Macto.
AUTO-WASH PROGRAM /nporpama 3a camonouctbahe/
BdoIbHHeHne KmNoocTbaHeTo Ha yctpoNCTBOTo,pe- doBHO n3no3BaTe AUTO-WASH PROGRAM /nporpama 3a camonoocTbaHe/. Korato n3no3BaTe nporpamata, KbM pe3epBoapa 3a npcHa Boda Moke da ce do6abu malko noocTbaAo CpeDCTBO C oet.
Binhar n3npa3BaIte pe3epBoapara 3a MpcbHa B0da (7), npde nn da n3no13BaTe nporpamata AUTO-WASH, n cnei toba ro noctabeTe OTHOBo Bypeda.
Фurypa 25
HanbIHeTe pe3epBoapa 3a qncta Boa (6)do nnHnra AUTO-WASH MAX.
3aTbopete Kanaka Ha pe3epBoapa (23) n noctabepe 3epBoapa 3a npcaHa BOda,doKaTo upaKHe Ha MCTO.
Durypa 26
Noctabete yctpojCTBOTo Ha cbbotbTHata noctabka(22).
HaTnchete 6yToHa 3a BKNI/NIKJI (1) 3aeJeHc 6yToHa 3a pe -JHM Ha 3acMcyKBaHe I / II (2)B npOdbJIkeHne Ha 3 cekyHdn i ro ocbo6oTe BeDhara CteJ KaTO yCTpoiCTBOT CTapTnpa AUTO-WASH PROGRAM. HndkaTopbT 3a 3axpaHbaHe ue Mnra B 3eJeHo.
Durypa 27
Cne60 cekyn nporpamata 3abpbwa n ypeT ce n3KnIOyBa.
CneTToBaCBaIepeepBoapaaMpbchBaOda(7)nno- qHCTBaunBaiK(20)n3mniTe.
ДЕМОHTAXHAДРБЖКATA
He cBaIaIte dpbKkata cneI crIIO6BaHaTe. dEmoHTnpaHTo Ha dpbKkata e npedBnEHO camo KOrato ypeBt Tp8Ba da 6bde doctaben 3a cepBn3Ho 06cnyKahe.
Durypa 28
Pa3xla6eTe nOTcTaPHeTe BnHTa Ha rbp6a Ha ypeia (4).
IocTabeTe OTBepTkata B OTbopa Ha OTbopa 3a BNHT.
CneK HATnCK,3axBaunaHeTo Ha dpbXkata MoKe da ce ocBo-6oDn n dpbXkata da Ce N3BaAn.
D-56377 Nassau Germany

- Deutsch
- Table of contents
- Scope of supply
- Product overview
- Technical specifications
- Charge adapter
- Safety instructions
- Fundamental safety measures must be observed when using an electrical appliance:
- Operation
- Before use
- CHARGING
- Figure 2
- Figure 3
- Application
- FILLING THE FRESH WATER TANK
- Figure 4
- Figure 5
- Figure 6
- Figure 8
- Figure 9
- Figure 10
- Figure 11
- EMPTY THE DIRTY WATER TANK AND CLEAN THE FILTER
- Figure 12
- Figure 13
- Figure 14
- Figure 15
- Figure 16
- Figure 17
- Figure 18
- REMOVING AND CLEANING THE CLEANING ROLLER
- Figure 19
- Figure 20
- Figure 21
- CLEANING THE VACUUM CHANNEL
- Figure 22
- Figure 24
- AUTO-WASH PROGRAM
- Figure 25
- Figure 26
- Figure 27
- DISASSEMBLING THE HANDLE
- Figure 28
- TROUBLESHOOTING
- CUSTOMER SERVICES
- IMPORTANT INFORMATION
- Cleaning the filter
- Cleaning the appliance
- Parking the appliance
- Use of cleaning agents
- CAUTION
- WARNING!
- Disposal
- Conformity / Declaration of Conformity
- Français
- NAPLNENI NADRZKY NA CISTOU VODU
- Obrazek 4
- Obrázek 5
- NAPLNENIE NADOBY NA CISTU VODU
- Obrazok 4
- Obrazok 5
- FYLDNING AF FERSKVANDSBEHOLDER
- Fig. 4
- Fig.5
- "AUTO-WASH" PROGRAMMA
- yka3aHn8 3a 6e3oNaCHOCT
- BHIMAHHE:3a da n36erHeTe mnpn3m, n3BaTe
- NoucCTBAHE HA CMyKATEIHINKAHAI
- Φurypa 22
- IOCTABRHE HA IOUHCTBAUNB AIAK 3ATBAPRHE HA KANAKA HA BAJRAKA
- Unrpya 23
- Durypa 24
- AUTO-WASH PROGRAM /nporpama 3a camonouctbahe/
- Фurypa 25
- Durypa 26
- Durypa 27
- ДЕМОHTAXHAДРБЖКATA
- Durypa 28
Brand : Leifheit
Model : Regulus Aqua PowerVac
Category : Vacuum Cleaner