
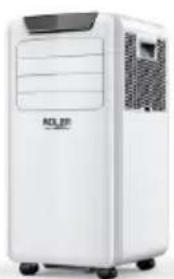
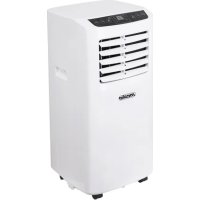
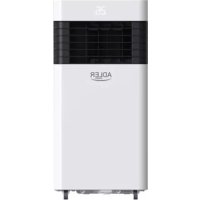
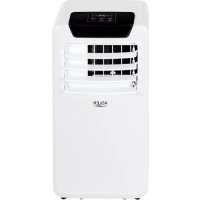
AD 7924 - Air Conditioning ADLER - Free user manual and instructions
Find the device manual for free AD 7924 ADLER in PDF.
| Product type | Mobile air conditioner |
| Brand | Adler |
| Model | AD 7924 |
| Power supply | 220-240 V ~ 50 Hz |
| Cooling capacity | 5000 BTU/h (1500 W) |
| Power consumption (cooling) | 575 W |
| Air flow | 220 m³/h |
| Dehumidification capacity | 0.6 L/h |
| Refrigerant | R290 (70 g) |
| Noise level | ≤ 63 dB |
| Energy class | A |
| Operating modes | Auto, Cooling, Dehumidification, Fan |
| Timer | 24 h |
| Remote control | Yes |
| Air filter | Washable |
| Filter maintenance | Every 2 weeks |
| Minimum distance to wall | 60 cm |
| Power plug | 3-pin with grounding |
| Protection devices | Frost protection, overheating, full water indicator (E4) |
| Condensate drain | Drain plug |
| Sleep mode | Yes |
| Error codes | E2 (temperature sensor), E3 (evaporator sensor), E4 (full water) |
Frequently Asked Questions - AD 7924 ADLER
User questions about AD 7924 ADLER
0 question about this device. Answer the ones you know or ask your own.
Ask a new question about this device
Download the instructions for your Air Conditioning in PDF format for free! Find your manual AD 7924 - ADLER and take your electronic device back in hand. On this page are published all the documents necessary for the use of your device. AD 7924 by ADLER.
USER MANUAL AD 7924 ADLER
SAFETY CONDITIONS. IMPORTANT INSTRUCTIONS ON SAFETY OF USE PLEASE READ CAREFULLY AND KEEP FOR FUTURE REFERENCE
- Before using the device, read the operating manual and follow the instructions contained in it. The manufacturer is not liable for damages caused by using the device contrary to its intended purpose or improper operation.
- The device is for home use only. Do not use for other purposes that are not for its intended purpose.
- The device should only be connected to an AC outlet with a grounded 220~240V 50Hz . To increase operational safety, multiple electrical devices should not be connected to one current circuit at the same time.
- Use extreme caution when using the device when children are nearby. Do not allow children to play with the device, do not allow children or people unfamiliar with the device to use it.
- WARNING: This equipment may be used by children over 8 years of age and people with limited physical, sensory or mental ability, or people who have no experience or knowledge of the equipment, if this is done under the supervision of a person responsible for their safety or have been granted them information on the safe use of the device and are aware of the dangers of using it. Children should not play with the equipment. Cleaning and maintenance of the device should not be performed by children, unless they are over 8 years old and these activities are carried out under supervision.
- Always disconnect the power plug by holding the socket with your hand after use. DO NOT pull on the power cord.
- Do not immerse the cable, plug and the whole device in water or any other liquid. Do not expose the device to atmospheric conditions (rain, sun, etc.) or use in conditions of high humidity (bathrooms, damp mobile homes).
- Periodically check the condition of the power cord. If the power cord is damaged, it should be replaced by a specialist repair shop to avoid danger.
- Do not use the appliance with a damaged power cord or if it has been dropped or damaged in any other way or if it is not working properly. Do not repair the device yourself, as there is a risk of electric shock. Take the damaged device to an appropriate service center for checking or repair. All repairs may only be carried out by authorized service points. Incorrectly performed repairs can cause serious danger for the user.
- Place the device on a cool, stable surface, away from hot kitchen appliances such as: electric stove, gas burner, etc.
- Make sure that nothing is blocking the air inlet and outlet of the device
- Use the device only on a level surface to prevent the condensation from spilling out
- To provide additional protection, it is advisable to install a residual current device (RCD) in the electric circuit with a rated residual current not exceeding 30mA . Ask an
electrician for this.
- Clean the air filter regularly. The frequency of cleaning depends on the cleanliness of the air.
- After turning off the machine, wait at least 5 minutes before turning it back on.
- Do not use the device in sunny places. When the device overheats, the overheat protection will switch on the device.
- To ensure effective cooling, a distance of at least 60~cm should be kept between the side walls of the device and the wall or furniture or curtains.
- Due to the limited performance of the device, if the difference between the target temperature and the ambient temperature is too great, the target temperature may not be reached.
- To reduce the risk of fire, electric shock or injury when using the air conditioner, observe the following basic precautions:
a) Connect to a grounded outlet with 3 pins.
b) Do not remove the grounding prong.
c) Do not use the adapter.
d) Do not use an extension cord.
e) Disconnect the air conditioner before servicing.
f) Use two or more people to move and install the air conditioner. - Do not use agents accelerating the defrosting or cleaning process other than those recommended by the manufacturer.
- The device should be stored in a room without constantly operating sources of ignition, for example: open fire, gas appliances or electric heaters.
BEFORE FIRST USE - (picture E)
Connect the connectors to the air exhaust duct as follows:
- Extend the air exhaust duct (9) by drawing out the two ends of the duct.
- Screw the air exhaust duct (9) into the connector of air exhaust duct (10).
- Connect the connector of air exhaust duct (11) to the device.
REMARKS:
- Keep the unit at least 1 meter away from TV or radios to avoid electromagnetic interference.
- Do not expose the unit under direct sun light to avoid surface color fading.
- Do not tilt the unit for more than 35^ or upside-down while transporting. If the device has been turned over during transport, put it down correctly and wait 2-4 hours before starting it.
- Place the unit on a flat surface with less than 5^ inclination.
-
The unit operates more efficiently in certain room locations, select the best location:
-
Beside a window, a door or a French window.
- Keep the required distance from the return air outlet to the wall or other obstacles at least 60~cm
- Extend the air exhaust duct (9) to ensure that other end of the air hose has clearance between the window door, or French window, or wall hole.
- Air outlet or intake cannot be blocked by protective grid or any obstacle.
To extend the life of the unit, drain the condensed water from the cooler drain port (8) before putting the unit into storage at the end of the season.
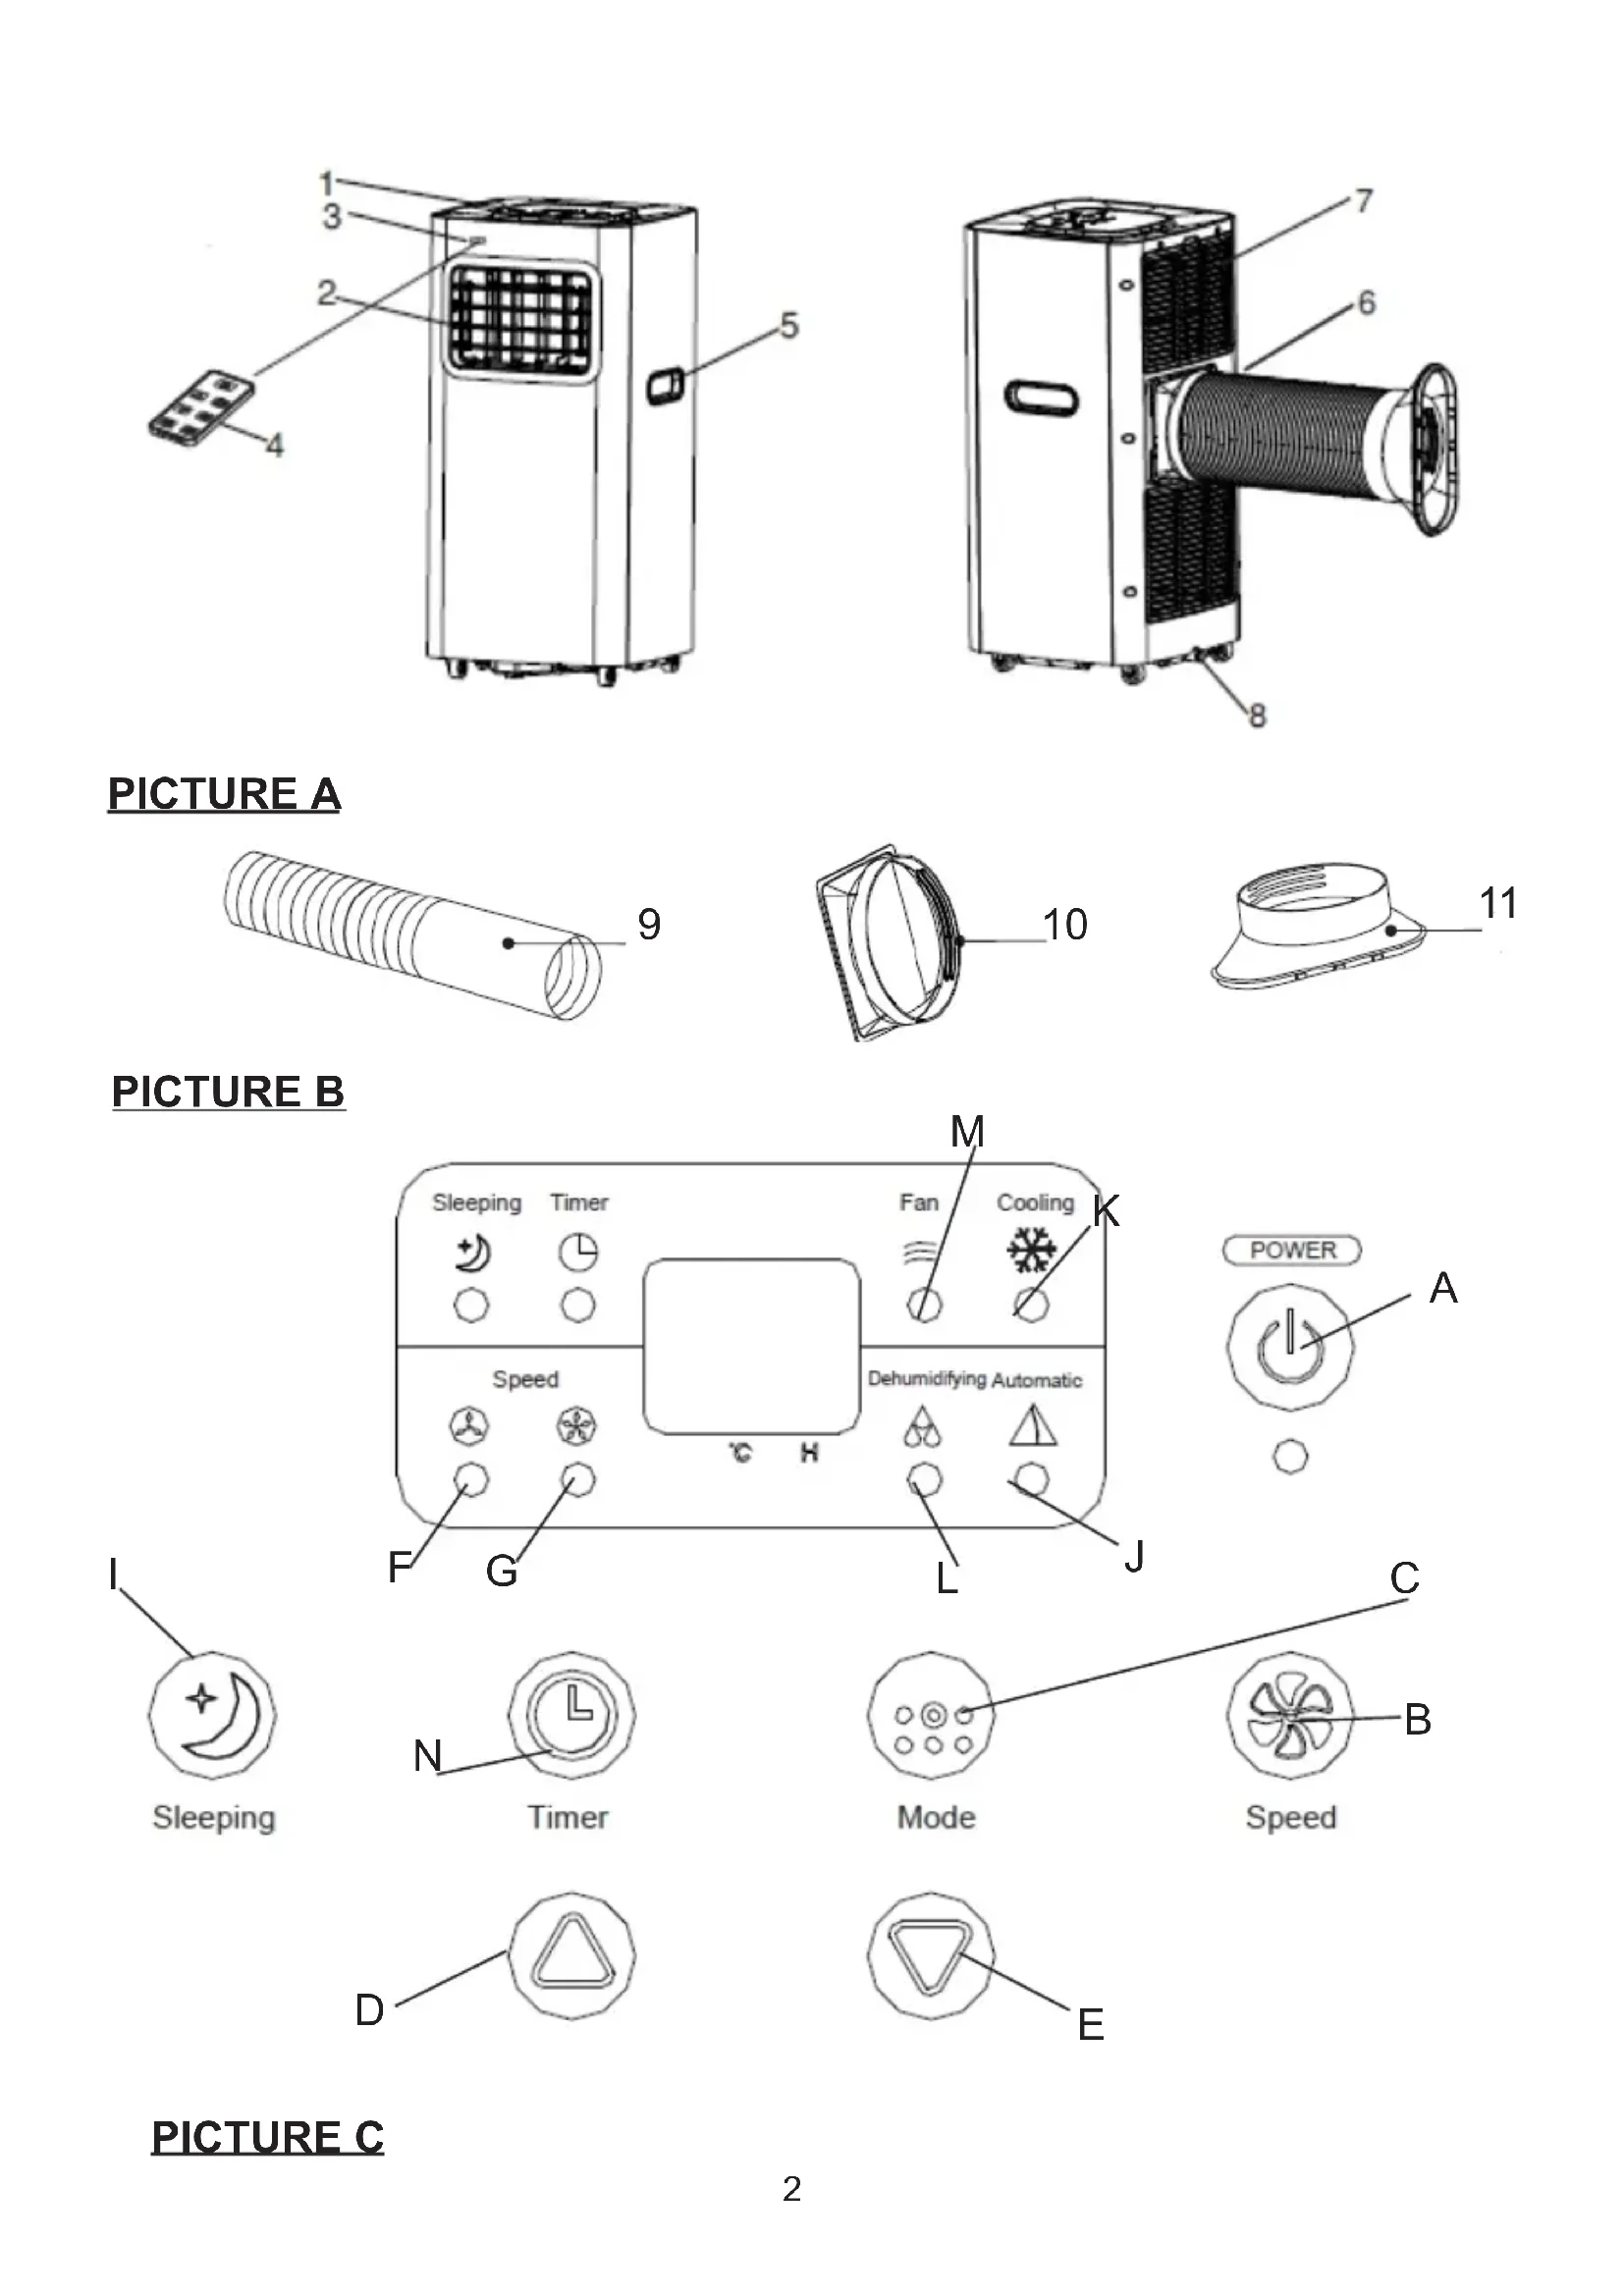
LOCAL AIR CONDITIONER - DEVICE DESCRIPTION (pictures A and B)
- Control panel
- Cold air outlet
-
Signal receptor
-
Remote controller
- Transport handle
- Exhaust duct
- Evaporator inlet
- Cooler drain port
- Air exhaust duct
- Connector of air exhaust duct
- Window exhaust adapter
CONTROL PANEL (picture C)
A. Power button ON/OFF
B. Fan speed button
C.Mode button D. Timer / Temperature up button
E. Timer / Temperature down button F. Low speed lamp
G. High speed lamp I. Sleeping button
J. Automatic mode K. Cooling mode
L. Dehumidifying mode M. Fan mode
N. Timer button
REMOTE CONTROLLER - picture D
The remote controller transmits signals to the system.
Button "A" - the appliance will be started when it is energized or will be stopped when it is in operation, if you press this button.
Button "C" - press it to select operation mode: "J", "K", "L" or "M".
Button "B" - press it to select fan speed in sequence.
Button "D" / "E" - press to adjust the room temperature and the timer.
Button "l" - press to set or cancel sleep mode.
Button "N" - press to set the time of automatic off and automatic on.
- Turn on the device.
a) Connect the device.
b) Press the "A" button, then the device beeps once and turn on.
c) LED diode displays room temperature and starts working in automatic mode.
2. Choose the operating mode
Press the "C" button to select the desired mode of operation by sequence:
Automatic mode "J" -> Cooling mode "K" -> Dehumidifying mode "L" -> Fan mode "M."
3. Adjust temperature
The temperature can be set within a range 15^ - 31^ . Press "D" or "E" button to increase or decrease the temperature by 1^ by pressing once. The device LED panel shows the target temperature for 5 seconds and then displays the room temperature.
4. Adjust fan speed
Press the button "B" to select a desired fan speed shows by sequence:
Low speed "F" -> High speed G
5. Power
When you press the "A" button again, the device will sound "di" and stop working.
- Press this button "I" to enter the sleep mode of device.
- Press this button "N" to set a timed shutdown.
Each mode working principle:
AUTOMATIC "J" mode:
Once the "J", operation is selected, the indoor temperature sensor operates automatically and it selects one of below operation modes:
- When the room temperature ≥ 24^ the unit will automatically select cool mode "K" mode.
or
- When the room temperature < 24^ C ,the unit will automatically select high fan speed mode "M. ".
DEHUMIDIFYING "L" mode:
- The up centrifugal fan will run at low speed, and the speed can't be adjusted.
- The compressor will stop after running 8 minutes, then run again after 6 minutes.
- The device adopts constant temperature dehumidifying mode, and the adjustment of temperature is no effective.
COOLING "K" mode:
- When the room temperature is higher than set temperature on control panel, the compressor starts to run.
- When the room temperature is lower than set temperature on control panel, the compressor stop and upper fan operates at original set speed.
Fan "M." mode.
- The up centrifugal fan runs at set speed, and the compressor does not run.
- The adjustment of temperature is no effective.
Timer operation "N":
- Press "N" button to set Automatic Off time while the unit is running.
- Press "N" button to set Automatic On time while the unit is ready.
- The time can be adjusted within a range of 1 hour to 24 hours by pressing the button "D" (+) or "E" (-).
Sleeping mode "I" operation:
- The sleeping mode operations when the unit is under cooling "K" mode.
- Press the button "I" in cooling mode "K", then the unit will work under sleeping mode and the up centrifugal fan will turn to low speed automatically. The set temperature will increase by 1^ after one hour, and increase 2^ after two hours. After six hours the unit will stop running.
Notice:
The main control board has memory function, when the device is ready to run but in stop status, the main control board can memorize the initialization of working mode. When you turn on the unit, it will work as the same enactment of working-mode as last time, no need to reset the working mode again. (This condition is not available when the unit is under AUTOMATIC mode "J".)
REMOTE CONTROLLER
- Slide the back cover to open and take off the isolating film on the batteries.
- Put the batteries inside the slot, must be corresponding to the signs of "+" and "-" on the remote control.
- For long time no use, take out the batteries.
- To prevent environmental pollution, take out the used batteries and dispose safety and appropriately.
To operate the device, aim the remote controller (4) at the signal receptor (3). The remote controller will operate the device at distance 5 meters when pointing at signal receptor of the device.
PROTECTIVE DEVICES
The protective device may trip and stop the appliance in the cases listed below:
- at cooling mode: indoor air temperature is over 43^ (109^)
- at cooling mode: room temperature is below 15^ (59^)
- at dehumidifying mode: room temperature is below 15^ (59^)
If the device runs in cooling "K" or dry "L" mode with door or window opened for a long time when relative humidity is above 80% , dew may drip down from the outlet.
The protective device will work in the following cases:
- Restarting the device immediately after stopping work or changing the selected mode while working, you must wait 3 minutes.
- If the plug has been removed, after restarting the device will return to the original mode, TIMER ON and TIMER OFF - must be set again.
REMARK: there is condensing water recycling hidden within this unit. The condensing water is partly kept recycling between the condenser and the water plate. When the water level rises to the upper level, the float switch and water full indicator (E4) lights on to remind draining water. Please cut off the power supply, move the appliance to a suitable place, remove the drain plug, drain water completely. After the drain, re-install the plug, or the appliance may leak and make your room wet. Drain pipe is added to kit, with inner diameter 9mm, outer diameter 12mm, material: PVC.
Troubleshooting
1) Trouble: Do not work.
Analysis:
a) maybe the protector trip or fuse is blown, please wait for 3 minutes and start again, protector device may be preventing device from working.
c) maybe batteries in the remote controller are exhausted.
d) maybe the plug is not properly plugged in.
2) Trouble: works for a short time only
Analysis:
a) if the set temperature is close to room temperature, you can lower the set temperature.
b) maybe air outlet is blocked by obstacle. Take the obstacle away.
3) Trouble: Works but not cools
Analysis:
a) maybe door or window are open.
b) maybe in close distance there is another appliance heat-working like heater or lamp, etc.
c) the air filter is dirty, please clean it.
d) air outlet or intake is blocked.
f) set temperature is too high.
4) Trouble: Water leak during moving.
Analysis:
a) drain the condensate before moving.
b) to avoid water leakage, please locate the device on flat ground.
5) Trouble: Do not work and water full indicator "E4"
Analysis:
a) pull out rubber plug to drain water.
b) if it is often in this state, please contact qualified service technical.
Troubleshooting
6) Trouble: Device fails to start up.
Analysis:
a) maybe not plugged. So, plug in it.
b) maybe plug or socket damages. Replace by service provider.
c) maybe fuse broken. Replace the fuse by service provider (specification: 3,15A/250VAC).
7) Trouble: Device automatically stops.
Analysis:
a) timing shut down or set temperature reached. Restart it or wait for auto-switch.
8) Trouble: no cold air under COOL "K" mode.
Analysis:
a) room temperature is lower than set temperature. It is a normal phenomenon, the machine will auto-switch while the room temperature is higher than the set temperature.
b) Device enters into anti-frost protection. The device will auto switch after anti-frost protection is over.
9) Trouble: LED displays failure code "E2"
Analysis:
a) room temperature sensor fails or damages. Replace the room temperature sensor by service provider.
10) Trouble: LED displays failure code "E3"
Analysis:
a) the evaporator oil pipe sensor fails or damaged. Replace the evaporator coil pipe sensor by service provider.
11) Trouble: LED displays failure code "E4"
Analysis:
a) water-full warning. Drain out the water.
CLEANING AND MAINTENANCE
Device maintenance
- Turn off the device first before disconnecting from power supply.
- Wipe with a soft and dry cloth. Use lukewarm water below 40C to clean if theappliance is very dirty.
- Never use volatile substance such as gasoline or polishing powder to clean the device.
Air filter maintenance
It is necessary to clean the air filter every 2 weeks if the device operates in an extremely dusty environment. Clean as follows:
- Stop the device first, push up the air filter (Picture F).
- Clean and reinstall the air filter.
- If the dirt is conspicuous, wash it with a solution of detergent in lukewarm water. After cleaning dry it in a shaded and cool place, then reinstall it.
Maintenance after using
- If the device will not use for longer time, be sure to pull out the rubber plug of the cooler drain port (8) in order to drain the water.
- Keep the appliance running with fan only for a half day during a sunny day to dry the appliance inside and prevent from going moldy.
- Stop the device and pull out the power cord plug, then take out the batteries of remote controller and store device properly.
- Clean the air filter and reinstall it.
- Remove the air hoses and store them properly, and cover the hole tightly.
TECHNICAL DATA:
Cooling capacity at BTU: 5000 BTU / hour
Cooling capacity in watts: 1500 W
Energy consumption (cooling) W: 575 W
Volume: <= 63dB
Air flow: 220m3 / h
Energy class: A
Timer: 24 hours
R290 coolant weight: max. 70 grams
Dehumidifying capacity: 0,6 liters per hour

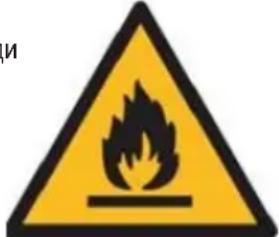
Caution, risk of fire.
Do NOT pierce or burn.
Be aware that the refrigerant may not contain an odour.
The maximum refrigerant charge amount: 70g.
To protect your environment: please separate carton boxes and plastic bags and dispose them in corresponding waste bins. Used appliance should be delivered to the dedicated collecting points due to hazardous components, which may effect the environment. Do not dispose this appliance in the common waste bin.
DEUTSCH
Zems atrums "F" -> Liels atrums G
- Jauda
Vēlreiz nospiéžot pogu "A", ierice skanes "di" un pārstaj darbodies.
- Nospiediet so pogu "I", lai parietu uz ierices miega rezimu.
- Nospiediet so pogu "N", lai iestatitu izslegtu laiku.
Ventilator "M." rezims.
TEXHUNECKNE DAHHBIE:
XoOnOpOnpOn3BODUHTeNBHOCTb B BTE:5000 BTE/uaC
XoOnOpOn3BODTeNbHOCTb B BAeTax: 1500 BT
3Hepronotpe6JIeHnE (oxIaxJeHnE) Bt: 575 Bt
TpOMKoCTb: < = 63d6
PacxoI Bo3dyxa: 220 m3/4
3HeprTeHueckn Klaacc:A
Taimep:24 yaca
Bec oxnaqndaioe kndkoctn R290: mKc. 70 rpaMM
Pon3BODNTeJIbHOCTbOcUWeHn:0,6JITpaBvac


OctopoxHo, onachocb noxapa.
HE npokajbibaT b HcKnraTb.
TOMHHTe, YTO XJaDaReHr He MoKet CopeXaTb 3anax.
MaKcMmaJIbHoe KOJIuYeCTBO 3aIpaBJIeMOrO xlaDareHTa:170r.
3a6078b 6bokyauoie cpe.ynakobky n3 kaptoha nepeaute, noxayuicta, ha makynatpy. Pnni3nneHOBbe Meu (PE) BbikdaB b pe3epByap dIraPiactMaccbl. N3HOseHnoe yctpoiCTBO hao nepeDaB B COOTBEcTBYIOU TOKY xpaHEnra, TAK KAKHXOJaueceB Aycptoeonachble coCTablaHouie moYrABnTBCs rpo3oD nIgOKyauoie cpebl. 3NeKtpueceKoe yctpoiCTBO hao nepeDaTakim o6p3om, yTObI orpAHmHt ero nobTophoe ynoTpe5ene Hncnlo3oBaHne. EcnB yctpoiCTBe haoJrTa6batapeH, Hn Hdo BbITryHb n peedeB b ToKy XPAHHe OTeJIbHo. YcptoeCTBO He BBkndA tB pe3epByap dIra KOMMyHaJIbHbIX OTXODB!
ITALIANO
Ventilator "M." -tilstand.
PIN PQTH XPHSH - (EIOVA E)
AyTOMaTCKn peKHM "J" -> peKHM xJaheBa "K" -> peKHM OdBlaaKHaBaHa "J" -> peKHM BeHTHaTopa "M"
Underhal after anvandning
Varning, risk for brand.
- BcTaHOBJIeHn BiDcEHTPoBn BeHTNJIaTOp npaIoo 3 aDaHOo WbUdKicTIO, a KOMnpecOp He npaIoo.
- PeryIIOBaHHaTeMnepaTpyH He epeKTHBHO.
Onepaia TaHmepa "N":
- Hatncitb Khonky "N", 06 BctahOBHTuac ABTomTuHOro BMKHeHHn iD uac po6Ot npictpoJ.
- Hatncitb Khonky «N», lo6 BctaHOHT Yac ABOTMaTHHOrO BBIMKHeHH, NOKI pncTpiI rTOBm.
- Yac moxha peryioBaTn B mexkax BiD 1 roDHH do 24 roDHH, HATNCKAQUH KHOIky "D" (+) a6o "E" (-).
Cππyπ npexim"J":
1.Cnnaynpexim npaioe, koi npinad 3naoxoTbcra B peximi oxoJdoXeHHa "K".
2. Y pexmi oxoIooJxHnR «K» HaTNCiB KHOJky «I», Todi npuad 6yde npaioBaTN B pexmi cHy, a Bropy BiJeHTpOBn BeHTnIaTOp abTomatNHO nepeJe Ha H3bky WbDkictb. BcTaHOBeHa UtempepaTypa 3pocTe Ha 1 ^ C chepe3 odHy roDInHy, a Ha 2 increase chepe3 dBi roDHN. Chee3 icTb rOHN npicTpi nepeCTaHe npaioBaTN.
3BepHb yBary:
OchOBHa nnata ynpabInHH MaC fynKcHIO nam'ATI, KOJI npucTpiR roTOBn Do pObotn, aIe B cTaHI 3yINHKN, rONOBHa nIATA ynpabInHH MoKe 3anam'Jattn iHiiaJiaIzauio poobOropeKmMy. KOJI BN YbIMKHeTe npNJad, BIIh 6yde npaIOBaTN TakIM Je YHOM, kI MInHyIoro pa3y, He notpi6HO NOBtOpHo cKnDatn poobu peKm. (Lr yMOBa HeoCTunHa, KOJI npucTpiR nepe6ByBa C b peKmI AUTOMATIC "J".)
1) Biia: He npaquoi.
AhaJIi3:
a) MoKnBO, 3axNCT BiKIIIOHEn a6o 3anobixHHK niipBaHn, 3aueKaIe 3 XBNIHN i 3anyctITb 3HOBy, npncTpii npoTeKTopa MoKe nepeWkoJkATn poBoi npucTpo.
B) MoxNIMBO 6aTapei B nyIbTi nCTaHuiHoro KepyBaHHn Buepnahi.
T)MOXJIINBO, WTeNCEJIb He NIKIIOUeHn HAnEXHNM YIHOM.
2)Пpo6лема:працюе Лше Короткий час
AhaJIi3:
a) kAIO BCTaHOBJIeHa TEmnepaTpya 6nn3bKa Do KIMHaTHoI, BN MOKeTe 3Hn3HTN 3aDahy TEMnpaTpy.
6) MoXnIBO BnIyck NoBITp3 3a6NoKOBaHn NepeuKOdo. 3HIMt b nepeuKOdy.
3) Biia: npauoε, aane He oxoiojxye
Ahaian3:
a)MOKJIINBO,ДВЕРИЧВИКHO BIДКРNTI.
6) MoKnIBo, Ha 6bn3bki BicCTaHI e IHsH npJlaI, IIO npaIe TepIIO, RaHarpBau aBO lamna Toio.
B) NOBITPRAHn pJIbTp 3a6pydHeHn, 6yDb JaCKa, OCHCTITb NOrO.
)BnynckNoBITpra6oBnyck3a6JIOKOBaHn.
f) 3aHaTEmnepatypa 3aHaTTO BnCoka.
4) Henpnemnocti: Bntik BoDi niD qac pyxy.
AhaJIi3:
a) 3ЛиTe KOндeнCatпepedпермiцeнHЯm.
6) 506 yHnKHyTN BnTOKy BoDn, 6yNb NaCkA, po3TaWnyTe npncTpri Ha pIBHI 3emNI.
5)Поблема: He npaioTe Ta HanOBHIOte iHdkaTop "E4"
AhaJI3:
a) BITrHiB rYMOBy npO6kI IJI 3JIuBY BOiN.
6)Якшо Вин чаTo 3нхоДиТбСВ ТаКOMу CTaHi, 3ВeрптбСД NO KBaIicIKOBaHOrO cepBICHOrO TexHiuHOrO nepcoHany. Bpiшенг прблелm
6)Поблема:прострий He 3anyckaetbcra.
AhaJIi3:
a)MOxHe niiKJIIOUeHO.OTKe,niKJIIOUHTb DO HbOrO.
6) MoKnIBO noIkoJKeHHaTekepa a6o po3eKn. 3amHtB nocTaaybHnka nocnyr.
B) MoxNIMBO 3aNo6iXnK 3JaMaHm. 3aMInIb 3aNo6iXnK nocTaJaBnKOM nocLyr (cneuΦikaia: 3,15A / 250VAC).
7)Поблема: Пистрий abTomatунно 3уняетьс.
AhaJI3:
a) yac BmKHeHH a6o BCTaHOBJIeHa TtempepaTypa. Ipe3anyctiTb Ioro a6o noeKaIte ATOMaTHUHOro nepeMnKaHHra.
8) Ipo6JIema: BiDCyTHiCTb xOJOnHOro noBITpBa B pexKmI COOL "K".
AhaJIi3:
a) KIMHaTHa TempepaTpa HnXue BCTaHOBneHTo TEMpepaTpy. Lc HOpMaIbHe RaNtge, MaunHa aBTOMaTuHNo NepemKAcTbcra, KOIN TEMpepaTpa B npMiuEHHi 6yde BnIe BCTaHOBneHTo TEMpepaTpy.
6)Ппст piB BxOДntb y 3axnCT BiD Mopo3y. Ппст piI abTOMaTHNo IepeMnKaetbCЯ NicIa 3akHueHnra 3axnCTy BiD Mopo3y.
9)Поблела:свитлдюд ВIDобрахкя кд ВIMOBN "E2"
AhaJIi3:
a) DaTnK TemnepaTpy KIMHaTHoI TemnepaTpyn BHXOAnTb 3 NaNy a6o noWKoJxyeTbcra. 3amHITb daTnK TemnepaTpyn B npMiuEHHIOCTaHbHKOM Nocnyr.
10)Поблема:свитлiodиов BiDobpaжк Кд BiIMOBN "E3"
AhaJI3:
a) DaTnK MaCJHoi Tpy6n BnnapHnKa BnIIOB 3 IaNy a6o noIKoJKeHn. 3aMIITb DaTnK Tpy6Kn KOTUKN BnnapHnKa y nocTaayhNka nocnyr.
11)Поблема:свитлpondиiod Biiodobpaacke Кд BiIMOBN "E4"
AhaJI3:
a) nonepedkeHH npo nobHy bOy 3nne B0y.
OuHJEHHIOBCLYTOBYAHHH
Texhuihe 06cnyroByBaHHn npncptoIB
- Nepw Hix BIDKNIOHTN XNBJIeHHRA, BIMKHiB npncTpii.
2.Потгь M'якю i cyхю raHчиркю.Для очицень виКористову Te ten ly Body nixue 40 °C,якю писчрий дуже 3a6pydнен.
3. Hikon He BnKopncToBnyTe dny ouHsEHH npCtpoJeTouy peObHy, Taky k6eH3nA bno pIpyBaJbHn noPoOoK.
Texnue He ocbnyroByaHnna nobitprHoro fInbtpa
Hcnttn noBtprn Hoi Koxhi 2 Tnxhi, kuo npncptpi npaue B hnd3nuahno 3anJleHomy cepedobu. Ouchitb TaK:
1.Cnepuy 3yHnHiTb npIcTpI, HATNCHIb Ha nobITpyHn fJIbTp (MaJIOHOK F).
2. Ouicti b I BCTaHOItb HAOBO NOBITpHm pIbTp.
3. JkUo 6pyd nomiHa, 3MnTe II po3uHOM MIOUOro 3acoby B TeNIOI BOIN. Iicna OunueHHBvCyuItb NOrO B 3aTIHeHOMy Ta npoxoJHOmy Micui, a NotIM BCtAHOBiTb HaHOBO.
Texhihe 06cyroBvBaHHn iicn BnKOpncTaHH
- Jkso npicpi 6iIbwe He 6yde KopncTyBaTnca, oob'3koB OITrrHtIb rmyoBy np6ky 3nIBHOrO OTbpy Kjlepa (8) dria 3nBuBoN.
- TpmaTe npnaad, knn npaoc 3 BeHTnIaTOpom Inne nibH npotarom coHryHOr dH, o6 BcCyuHtnpaad BCEpeHi i He
donycttnnoBn ubini.
3. BmKHiB npucpi i BnMItb BuIky uHpya XNBHeHH, nOTIM BnMIb 6aTaepeKn nybTa dN npucpi HANEXHM YNHOM.
4. OuHCTITb NOBITpHnIΦJIbTp I BCTaHOBIT NoTO HAHOBO.
5. 3HIMITb nobitprhi shaHn i ckndtbix HaneXHM YHOM, a OTBip zilbHO 3akpnTe.
TEXHIUHDAHI:
NotyKhictb OxonOxkeHHB BTY:5000BTU/hour
NotyKHeTb OxJIOxKeHHaYBaTax:1500BT
CnoxmbaHnneheepii (oxoJIOxdKeHHN) Bt: 575 B
06'EM:<=63D5
Tnik noBirpa: 220 m3 / roD
EhepretnuHm knaC:A
Taimep: 24 toinH
Bara tenllohocir R290: mKc. 70 rpaM
IotyXhHcTB ocUkN:0,6 Jitpa Ha roDnHy

06epeXHicTb, He6e3neKa nOKeXi.
HE npokoioute Ta He ropiB.
MaTe Ha yBa3i, 10 XO XoIooaReH MoKe He MICTHT 3aIaxy.
MaKcImaJIbHa KInbKiCTb 3apAyn xoIooareHtY:70r.
YiHTepecax HABKoJIuHbIOrO cepeIOBua.
Будл пасka, BiДдайт e KapToHn y npakOBky B micce 36bpy Mykynatypn. Поитиеловimii (PE) ВИКИнТВ CMITN K DЯ ППаCTNY. BiДпрацьован n pricTpI NOBIneH 6yTBIДправлелн y BiДпОВiDHy TOUKy 36epirAHn, TOM y ΣВnpICrpoI e He6e3neuHi INrpeiEHTN,як MOжУ b CTahOBtN 3aRpo3y HABKOIIshbOMy cepeOBOu.ЕнeKTpruHni npicrpi NOTpi6HNo nobepHyTu TAK, uO6 o6mexHTN Ioro NOBTopHe BnKOpNCtAnHry.ЯKuo y npicrpoI e 6baTepeRkn,TO noTpi6HIO IX BnTyrHu i BiДdAtn Do BiIDNOBIDHO rHTKy.
MAKeEOHCKN
ONIHTN YCIOBN 3A B6E3BENDHOCT
BAHIN HNCTPYKUN 3A BE3BENHOCT INPOUHTAJTE BHNMaTeJNO 3aWTeJeTe 3a INHINHA
- Ппд ду користу урет, почитajte ry ynatcBoTo 3a pa6ota n cnepeTe rnyatCTbata coDPxahn BO Hero. ПоиЗВODInTeJOT He OndroBapa 3a StTeTn PpeDn3BvKaHn OD KORiSTeHe Na ypeIOT cnpoTINBHO Ha HameHETATA HameHa NJIH HenpaBUNHO pa6oTeHe.
2.Урет ecamо 3a domaSHA ynotpe6a. He kopnstete 3a dpyn ceJIH StTo He ce 3a HameHeTata CEJ. - YpeodT Tpe6a da ce noBp3e camo co 7Tekep 3a HanojyBaHe co 3a3emjeH 220 240V ~ 50Hz. 3a da ce 3roJemn 6e36eHocTa BO pa6oTeHbeto, NOBeKe eJeKtpuHn ypeiH He Tpe6a da 6nDat noBp3aHn CO eDHO cTpyJHo KOLO BO NCTO BpeMe.
- KopinCTeTe roIema npetna3nBOcT kora ro KOpNCTuTe ypeDoT kora DeaTa ce BO 6n3Ha. He do3BOnyBaJte decaTa da cn nIgPaat co ypeDoT, He do3BOnyBaJte Deca nn IyRe kon He ce 3an03HaTu co ypeDoT da ro KopnCTaT.
- ПРЕДУПЕДУBAE: Obaa onpeMa можеда ja користд eca hab 8 rodnn n lica co orpaHueHaФИЗЧа, ceH3OphA Ил MeHTaJIHа cnOC6HocT, IIN Jyfe KOn HeMaat NCKYCTBO IIN I03HaBaHbe Ha onpeMaTa, DOKOLky Toa e HAnpaBeHo NOd HAd3Op Ha
ODROBOPHOJIUE 3a HINBHATA 6e36eHNOCT IINI M e DaJeHa INHΦOpMaUJia 3a 6e36eHNO KOpNCTeHe Ha ypeIoT I Ce CBeCHN 3a ONaCHOCTIte OD HerOBOT KOpNCTeHe. DeuTa He TpeBa Da cN Irpaat Co OnpeMa. YnCTeHbETo I ODPxUbaHbETo Ha ypeIoT He TpeBa Da ro BpShaT Deca, OCBEN Ako He Ce Na8 rOdHH N OBNe AKTNIBHOCTN Ce BpSaat ND HAd3Op.
6. Cekoraш Исклучы差别 go npikluyokot 3a habojuBaHe co Држе нашт ekpoT co paKaTa no ynotpe6ata. HE bneute go ka6eNoT 3a habojuBaHe.
7. He ro notobajte ka6eIOT, npKnyokot n ceIIOt ypei BO BODa nn dpyra TeuHocT. He ro n3noxybajte ro ypeoT Ha aTMocepckn ycNoBn (doxdi, coHce i cnHNO) nn KOpNCTeTe BO ycNoBn Ha BnCOKa BnaJXHOCT (baHn, BnaJHn DOMOBN 3a MObnHn TeJefoHN).
8. Перношино поверува对接а на КабелOT 3a наютугье. Ако КабелOT 3a наютугье оштeteн, Тов Треба да се заMuMuMuMuMuMuMuMuMuMuMuMuMuMuMuMuMuMuMuMuMuMuMuMuMuMuMuMuMuMuMuMuMuMuMuMuMuMuMuMuMuMuMuMuMuMuMuMuMuMuMuMuMuMuMuMuMuMuMuMuMuMuMuMuMuMuMuMuMuMuMuMuMuMuMuMuMuMuMuMuMuMuMuMuMuMuMuMuMuMuMuMuMuMuMuMuMuMuMuMuTuHaTHe ONaCHOCr.
9. He kopinCTeTo anapatot co oWTeTeH kabel 3a hanojyBaIbe nII aKO e nCnyTeH nII OwTeTeH Ha Koj 6nIO npyr Naun HauIN nII aKO He pa6OT npabNlHO. He nonpaBajTe ro ypeDTo Camn, 6nJeKn NocTOn OnaCHOCT OD eJekTpueH ydAp. POnecTe ro oWTeTeHNOT ypeD Bo COoDbTeH cepBvCeH ueHTap 3a npOBepKa nII nOpnbKa. CITE nonpaBkn MoKe da rN n3Bp7uYbaaT camO OBlaCTeHn cepBVCn TouKn. HenpaBnInHO n3BpSeHnte nOpnbKn MoKAt Da npedn3BnuKaat cepNo3Ha onaCHOCT 3a KopncHKOT.
10. NocTaBeTe ro ypeIoT ha IaHa, cTa6nHa NOBpHInHa, noJaIeKy OJ TOnJI KjHcN ypei KaKo 7To Ce: eJeKtpuyeH 7nOpet, rOpINHK 3a rac, nTH.
11. OcnrgypeTe ce deKa HnIto He ro 6Ioknpa Bne3OT Ha BO3dyXOT n I3JIe3OT Ha ypeDTo
12. KopinCTeTe ro ypeoT cmo Ha pamHa NOBpHnHa 3a da cnpeuTe n3JIeBaHe Ha KOHN3aunjata
13. 3a da ce obe36eNi dOnoHnTeHa 3aHTuTa, npenopauNBO e da ce nHcTaNpa ypei 3a npoeocTaHaTa cTpyja (RCD) BO eNeKtpNuHTo KOIo CO HOMnHaHa npeocTaHaTa cTpyja uTo He hAmnHyBa 30mA. 3a OBA npaawajte eNeKtpuap.
14. PeIDOBHO YIcTeTe ro fIIITepoT 3a BO3dyx. OpeKBeHcJjata Ha YIcTeHe 3aBnCn OJYIcCTOTATA Na BO3dYXOT.
15. Řtkaoko ke ja ncknyte MaunHaTa, noyekajTe HajmaJky 5 MInHyTn nped da ja BkIyUHTe NOBTOpHo.
16. He kopructete ro ypeot ha cohuebn mecta. Kora ypeot ce nperepee, 3aunrata o nperepebahe ke ce Bknyu ypeot.
17. 3a da ce obe36eNi ePhiKacHo NaIeIbe, TpeBa da ce CyBa pactoJHne od HajMaJIky 60 cm NOMEiCy CTrpaHnUHnTe wallsnIOBn Ha ypeDoT n thenIoT nIIM Me6eIOT nIIN 3aBeCnTe.
18. Поради орагинецда ИЗБдба на урею, akо разлесда поему целесда Temпература и Temператypа на okолинота e пемногу rolема, He може за ce постигенцелта.
19. 3a da ro hamaJIte pI3IKOT od noJap, eJeKtpnueH yIap nII NOBpeHa npu ynoTpe6a Ha KJIIMMaTnK, NOHTyBaJTe rN CJIeHNBE OCHOBN MepKn Ha IpeTna3JINBOCT:
a) Nobp3eTe ce co 3a3emjeH uTekep co 3 nHa.
6) He otctpaHyBajTe ro 3a3emjyBaayot.
B) He kopncTeTe ro aanTepoT.
r) He kopncTeTe npoDoJxKeH ka6eJ.
IcknyeTe ro KIma ypeoT nped cepBncnpahe.
r) KopucTeTe DBe nIin noBeke Iuca 3a da ro npemeCTnte NnHCTaIInpaTe KInMaTn3epoT.
20. He kopncTeTe cpeicTba 1TO ro 3a6p3yBaat npoecOT ha oDmp3HyBaHbe nIi nuCteHe, OCBeH OHne npenopaun Hi od npOn3BOIDnTeJOT.
21. Ypeodot Tpe6a da ce yBa BO npocToPjia 6e3 nocToJao Ha pa6oTn n3BOp Ha naneHe, Ha npimep: OTbOpeH oraH, rachn anapatn nn eJeKtpuHn rpejaH.
PPEI INPBA YNOTPBEA-(cNkaE)
Iobp3eTe Tn KOHeKTOpNTe CO KaHaJIOT 3a N3dYBHNrACOBH Na CJIeIHNOB HaINH:
- Порширете т саналот 3а n3dubn racobn (9) co n3BnekyBahe NaDbata Kapaja Ha Kahanot.
- 3aupapete ro kaHaoT 3a n3yBn racobn (9) BO KOHEKTOPO HA n3dyBnO T KaHAI Ha BO3dyXoT (10).
- NObp3eTe ro KOHeKToPOT Ha 13yBHNOT KaHAn HA BO3dyXoT (11) co ypeDoT.
3ABEJIELUKN:
- YyBaJte ja einnuata HajmaIky 1 metap noJaIeKy od TB nI npaIja 3a da n36erHete eJeKtpomarHETHO MeaHe.
- He n3noxybajte ja einnnucata noi dupektha coheba cbettnHa 3a da n36eHHe 3rachyBaHe ha 6ojaTa BO NOBpunHaTata.
- He ja HabanyBaJte eDHHuata naBoKe oD 35° nHn Haonaky DoNeKa npBe3yBaTe. Ako ypeoT e npeepnEn 3a Bpeme Ha TpaHCnOpTO, cnuyTeTe ro npabInHO nNoeKajTe 2-4 yaca nped da ro cTapTyBaTe.
- NocTabete ja eDHHuata Ha paMaHa NOBpuHnA co HAKIOH 5°
- Edinuata pa6oTn noeKacHo Ha opeDeHn Iokaun Bo npocToPnte, H36peTe ja HajdoBaPaIokaunja:
- POKpaJ np03opeoT, BpataTaNnN ppaunycknOT np03opeu.
- 3aDpxKeTe ro nOte6HTo pactoJahne oN n3Ie3HnOT B03dyx Do wallnOt nnI npyRn npueKn HajMaIky 60 cm.
- IpoDOnKTe ro KaHAnOT 3a n3dYBn racOBn (9) 3a da ocNpyrnte DeKa dpyrnoT kpaJ Ha UpeBOTo HA Bo3dyXoT mMa Do3BONa nomery BpataHa np03opeoT nn fpaHcUckNoT np03opeu nn dyNkata Ha wallindot.
-ИЗБОДТ ИИ ВЛЕЗOT HA BOЗДУХOT He може да се ьлOKира co 3aштITHa Мржа ИИ КАКВи 6Ино пechк.
3a da ro npoiojNKeIe pa6oTHnOt BeK Ha eINHnCata, nCueTe je KaOHDeH3nPaHaTa BOa OJ nopTaTa 3a Naede He Ha naDInHnKOT (8) nped Da ja cTabITE eINHnCata Bo CKnaDnPaHe Ha KpaJot Ha ce3OHaTa.
KOHINIOHEP 3A JOKAIHNOT BO3yX - ONIC HA YPEIOT (cNkA u B)
- KoHTpOJIeH nAHeI
2.ИЗВОДзаладEN BO3dUx
3.Cunhan peuentop
4.Далецнскуразьвay - PaçaKa 3a TpaHcNopt
6.ИЗдУВЕн канл
7.BIe3HaHcnpayBaOT - nopTa 3a JanaeHe Ha JanaJINHIKOT
- KaHaJI 3a H3dYBHN rAcOBn Ha BO3dyXOT
- KoheKtop Ha KaHaJ 3a N3dYBn racOBn
- AdaanTep 3a n3dyBn racobn Ha npo3opeoT
KoHTpOJIeH naHeJ (CNIka C)
A. Konque 3a BknyyBaBe / ncknyyBaBe
B..Konue 3a 6p3nHa Ha BeHTnJaTopoT
C.KoIue 3a peKIM
D. Tajmep / konue 3a nokayBahe Ha temnepaTypata
E. konue 3a Tajmep / TemnepaTpya HADONY
F. CBeTnJIka co MaJa 6p3nHa
G. cBeTnIka co roIema 6p3nHa
1. Konue 3a cnnehe
J.ABTOMATCKnPexKIM
K. NaHn Ha naJebe
L. pexim Ha dexnpupahe
M.PeKIMHa BeHTnJIaTOP
N.Konue N.Tajmep
3A6EJIeJKA KOHTPOJIeIeP - cJnka D
IaeneHcknOT ynpabyBa npheCyBa CnHaJI Ha CNCTeMOT.
KoIue "A"- anapatot Ke ce cTapTyBa Kora Ke ce HanojyBa nnKe ce 3aune KOra e BO cyHKunja, aKO r npntnche OBA KOHne.
KoIue "C"- npTncHete ro 3a da n36epepe pexm Ha pa6ota:"J", K", L" nnin"M".
Konue "B"- npntncheTe ro 3a da ja n36epete 6p3nHaTa Ha BeHTnAToPot BO Hn3a.
Konue "Д" / "E" - пиншете за ра пилагдпгутtemпега typа в посторида и тajмерот.
Konue "Jac" - npntncheTe 3a da noctabte nn OTkaxtepexMOT Ha cnnehe.
Konue "N"- npntncheTe 3a da ro BknyuHte BpeMeTo Ha aBtOMaTcKO NcknyuBaHe n aBtOMaTcKO BknyuBaHe.
PABOTEE HA KOHTPOJIA PAHEJI
ABTOMATNUKO / CBETCKN/ДEXUMINФИNJHΓ/ФАН
- BknyteTe ro ypeDoT.
a) Iobp3eTe ro ypeDoT.
6)ПричсichteTo konчeto"A",notoaypeodT3aUyka eHaN BknyteTo.
B)LEDIIOaTa ja npikaKaBybCo6HaTa TempePaTpa 3anoHyBa da pa6oTN BO aBTOMaTcN peXIM.
2.Изберете ro pexIMOT ha pa60Ta
PntncheTo KOnueTo "C" 3a da ro n36peTe nocakybaHnot pekim Ha pa60ta No cKeBHeHa:
ABTomatckn pekm "J"-Pekm Ha IaIeHe "K"-pekm Ha Iexnpapahe "L"-Pekm Ha BeHTnlaTopot "M."
3.Пилагодente ja temпатура-ta
Temnepatypata moxe da ce noctabu BO oncer 15^ - 31^ C. PnTnCHeTe FO KOnyeTo ^ NIN ^ 3a da ja 3roJemnte nn HamaNTe Temnepatypata 3a 1° C co npTnckahe eDnaI. LED naHEnOT ha ypeot ja nokxBya ceJHaTa Temnepatypa 5 cekyHn i noToa ja npKakjyBa cobHATA temnpatypa.
4.Ппагодente ja 6ринata Ha BeHTnIaTOpOT
PnTncheTe ro konyeto "B" 3a da n36pepe IocakyBaHa 6p3nHa HBeHTnIaTOPO T CNOpeHn3aTa:
Hncka 6p3nHa "F"->TOnema 6p3nHa G
- MOKHOCT
Kora noBtopHo Ke ro npTncHeTe konHeTo "A", ypeoT ke ce orJnacn "Dn" n ke pectaHc da pa60tn.
6.Пи捜снete ro Oba konue "Jac" 3a da Bne3eTe BO pexkmoT 3a cnneHe Ha ypeDoT.
7.ПиTuNchTe ro Oba konue "N" 3a da noCTaBnTE BpeMeHcKO nKluyBaHBe.
Cekoj npHHnHa pa6oTa Ha peKIMOT:
ABTOMATUUKINpexmJ
Ie ce n36pe, J, pa6oTa e n36paHa, cEH3OpOT 3a BHaTpeuHa TemnepaTypa pa60Tu ABOMatckn oD6npa eDen od noDony pexkmtte Ha pa6ota:
-Kora tempepatpata BO co6aTa ≥ 24^ eHnuaT a ABtOMaTcK Ke n36epe pexm Ha JaIHO pexm "K".
NIN
-Kora temnepaypata Bo co6bata < 24, einnHuaTa aBtOMaTcK Ke oDbepe pekim co roIema 6p3Ha Ha BENTInaTopot "M ..
DEHUMIDIFYING pexnM "L":
- HarojHHOT CEHTpUFOyraHEN BeHTnIaTOp Ke pa6OTo Co MaJa 6p3NuHa N 6p3NHaTa He MoXe Da ce npuNarOJn.
- Komnpecopot ke 3anpe otkako ke paBOTn 8 MInHyTN, a noToa nobTOpHO Ke paBOTn No 6 MInHyTN.
- YpeToYcBojyBa NoctoJaH peKIM Ha DeXnDpuraBe Ha TeMnepaTypaTa I npInarOyBaHbeto Ha TemnpaTypaTa He e cFikacHO.
COДРИHApeЖIMK
- Kora temnepatypata BO npoctopujata e noroilema od noctabehata TempepaTpa Ha KOHTPOJHNO TnaHeJI, KOMnPecOpOT NOHyBa da pa60tN.
- Kora Temnepatypata BO npocoptopjata e noHncka od noctabeHaTa TemnepaTpa Ha KOHTPOJHnot nanei, Komnpecopot 3actaHyBa n TropHnot BENTnATop pa60Tu CO opuHaHaNoCTabeHa 6p3Ha.
Pekim Ha BeHTnlaTopoT "M".
- HarojHHNOT cHTpUΦyraIe HBeHTnIaTOp pa60Tu CO nOCTaBHe 6p3Nu, a KOMnpecOpOT He pa60Tu.
2.ПилагуваьetoHa TeMnepaTypaTa He e epnkacHO.
Tajmep onepaujia "N":
- PnTcHETe ro konyeto, N" 3a da noCTabte aBtOMATCKO ncknyBaHe Ha BpeMeTo doEka edHHuata pa6oTu.
2.Пи捜снete ro konчetoN"3a da noctabite aBTOMATcko HABPemeHo IDeKa eINHncaTa e noIroTBeha.
3. BpemTo MoKe Da ce npunarOu Bo oncer od 1 cac do 24 yaca co npTnckaHe Ha konHeTo "D" +) nIn "E".
Onepauija 3a cnieneJc"Jac":
- Pekimot 3a cnpHe pe pa60n Kora eunHuaTa e Bo pekim Ha JapHe "K".
- ПиTNCHete ro koncheTo "I" BO pexHMOT 3a laJeBe "K", Toraaw eDInHuaTa Ke pa60Tu nOd peXMM Ha cPneHe N HaroHNOT ceHTpNphiYraJIeBn BeHTnJatop ABtOMaTcN Ce CBpyBa KOH mana 6p3Ha. NocTabeHata TempepaTypa Ke ce 3roJemn 3a 1 ^ C no eDen Yac, a Ke ce 3roJemn 3a 2 ^ C no Dba Yaca. No WeCT Yaca eDInHuaTa Ke npectaHe da pa60Tu.
N3BcTyaBaHe:
TnabHATA KOHTPOHHa TabJa HMa MemOpncka FyHKuJa, Kora ypeoTe eoIroTBEN da pa60Tu, HO BO CTATyc Ha cTOn, TnabHATA KOHTPOHHa TabJa MoKe Da ja 3aNaMeTu INHcJajn3aunjata Ha pexIMOT Ha pa60Ta. Kora Ke ja BknyuTe eINHuaTa, Taa Ke pa60Tu kako nCTO DoHeCyBaBe Ha pexIMOT Ha pa60Ta KaKO mHNAtNoT Na, Hema Notpe6a NobToPHO da ro peceTupate pa60THNt peKIM. (OBaa cocto6a He e doCTaHa KORA eINHcata Ta e NOD ABTomatckNt peXIM "J".)
DALEUHCKN UYPABYBAU
- Iin3rajte ro 3aHnOt kanak 3a da ce OTbOpn nNoIeTuBa nOJauOnHnO t nnM Ha 6aTePnnte.
- Ctabete r6aTePnnte BO cNoTOT, Mopa da odroBapaat Ha 3Haunte Ha "+" " n -" Ha daJeuHcknOt ynpabvBa.
3.Подоггвреме6e3унoТpe6a,иЗвадетe ГБаTePnITE. - 3a da cnpeuHTe 3araDyBaHe Ha XnBOTHaTc CpeiHa, N3BaTe rN KopncTeHnte 6aTePmN iFpIajTe ja 6e36eHocTa n COoDbETHO.
3a pakybahe co ypeoT, hacoheTe ro daJeunHcknOT ynpaByBaU (4) Ha peeentopot Ha cnHaNOT (3). DaJeunHcknOT ynpaByBaU Ke ynpaByBa co ypeoT ha pactoJahne od 5 metpn Kora nokakybaTe Ha peeentopot 3a cnHan Ha ypeoT.
3AWTNTA DEBUNU
3aHTHNOt ype Moke da naTyBa n da ro 3anpe anapaTOT BO clyaante HabeEnn noDony:
1.Bo pexim Ha IaIeHbe: TemnepaTypaTa Ha BO3dyXoT Bo 3aTbOpen npocTope Had 43^ (109^)
2.Bo pexim Ha naeHe: co6HaTa TempeaTpa e no1 15^ (59^)
3.Bo pexim Ha dExnDpnpaHbe: co6HaTa Tempepatya e noi 15^ (59^)
Ako ypeoT pa60Tu BO naebe peKIM K" nI cyBO L" peKIM CO BpTa nn npO3opeoT OTBpeH noOJIO BpeMe kora peNaTHaTA BnaXHOCT e Hd 80%, poCATA MoKe da ce cnUHT OJn 3ne3OT.
3aHTHnOT ypeKe pa60n BO cneHNBe cnyan:
- NOBTOB KIyBaHe Ha ypeoT BeHaH No npeKHyBaHe Ha paOta Ta Hn IpomeHa Ha 36paHOT peKm DoEka paOHTe, Mopa da noyeKaTe 3 MNHyTu.
- Ako npknnyokot e oTcpaHet, no pectaptnaheTo Ha ypeoT Ke ce BpaTN BO opunHaJIHIO T peKIM, TIMER ON n TIMER OFF - mopa NOBTOPO Da 6nDat NoCTaBeHN.
3A6EJIeUKA: Ima peuKnnpaHe Ha B0da 3a KOHdEHNpaBe cKpneHo BO OBaa eINHua. KoHdEHN3aOnHO Ta B0da eNymHO ce ODPXyBa peuKnnpaBe NOMEfY KOHdEHN3aTOPOrT INIOuTa 3a B0da. Kora HNBOTo HA BODaTe CE NCKaUByHa rOpHTo HNB, Ce NaIAT PpeKNHyBaOHT 3a IIOBn INDnKaTOPOrT 3a IIOH B0da (E4) 3a da NotcTeTA B0da 3a ODBo. Be MoIIMe, PpeKNHeTe Ro HANOJyBaBeTo, PpeMeCTeTe ro anapatOT Ha COoDBeTHO MeCTo, INBaTeTe Ro PnKluyOKOT 3a ODBo, INcSeTeTe Ja B0daTa CELOCHO. PO ODBOTo, NOBTOHO IHCTaJInpajTe RO PnKluyOKOT INI AnapatOT MOKe Da IVcTeue N da ja HAnpabN BaUata npocToPi BnaJha. Bo KOMnIeTOT ce DoJaba CEbKa 3a ODBo, CO BHaTpeSeH DInjAmETap 9MM, HAdBopeSeH DInjAmETap 12MM, MaTePnJaI: PBU.
CmeHa Ha npo6nemn
1)Поблемн: He pa6oTn.
AHaJIIm3a:
a) MoKe6n 3aWHTHToT NaTyBaHe nIIN OcnrypyBaYOT e pa3HeceHO, Be MOJIme NOeKaJTe 3 MInyTHN IOBTOPOHO 3aWHTHNOt ypeD MoKe Da rO cnpEn Pa6oTeHbTo Ha ypeDoT.
B)MOKe6n 6aTeepnnte BO daneuHcknoT ynpaByBaYc esucpneHn.
r) MoXe6n npKnyOkOT He e npaBnHO BKnYueH.
2)Пpo6JIeMn: pa6OTn cAmO 3a KpaTko BpeMe
AhaJn3a:
a) ako noctabehata tempepatya e 6n3y do co6ha Tempepatya, moKeTe da ja haMaJIIne noCTabehata Tempepatya.
6) Moxeи n3JIe3OT ha BO3dIyXOT e 6JIOKnpaH on IpeuKa. OJHeceTe ja IpeuKaTata.
3)Пpo6IeMn: pa6oTn, Ho He ce IaIu
AhaJn3a:
a)MOKe6n BpaTata NJIIN pO3OpEoT Ce OTBopeHn.
6)MOKe6n BO 6IInsKa dJIeUHnHa nMa dpYr anapat wTo pa6oTu KaK Opejuu nn JAm6a, mTH.
B)ФИNTepOT3aBO3dYxBaJIkaH,NCHNUCTeTe rO.
I) n3ne3 Ha BO3dUx ININ BNe3 e 6JIOKnpaH.
i) NOCTaBeHaTa TempePaTpa e npeBnCoka.
4)Поблел:Истекувае на ВODа ппдвижень.
AhaJn3a:
a) nCueTe ro KOHdEHNaTOT nped da ce dBNXnTE.
6) 3a da n36berHeTe n3eKyBaHb e Ha B0da, Be MOJIme IIOuipajTe ro ypeDoT Ha paMHO TJO.
5)Поблемн: He pa6OTи ИndkaTOp 3a noINB Oda „E4"
AhaJn3a:
a) n3BneyeTe rmyen npnKnyok 3a da nCceDu B0da.
6) ako e uecTo BO OBaa cocToj6a, KOHTaKtIupajTe CO KBaIIuΦnkyBaH TeXHHUKN CepBNC.
CmeHa Ha npo6nemn
KanaunTeHaJaedeBeBOBaTn:1500W
IotppouByBaUka Ha eHepnja (naehe) W: 575 W
06em: < = 63dB
ПрOTOK ha Bo3dux: 220 m3 / h
Klaca ha eheprija: A
Ce TpNIXME 3a npnpOHaTcpeHnHa. KApTOHCKNTe NAKOBMOJIMMe da ce HameHaT 3a peuKnIpaHe. POnIeTNHeOBHTe Kecn (PE) da ce pPnat BO KOHTeBep 3a PAnCTnKa. NcOKOpCTeHnOT ypeTpe6a Da ce PpeAaTe BO COoDBeTHnOT cKnIpaauK INyKT, BInJejKn He6e36eHNTE CoCTojKn KOI CE HAOaAT BO ypeoT MoXaT da 6nDat 3arpo3yBaHe 3a CpeHnATA. EneKTPnuHnOT ype Tpe6a Da ce PpeAaTe Ha NaunH KOJ Ke OHEBO3MOxN HerOBA NOBToPA HNOtpe6a n NcKOpCTyBaHe. DOKOLky BO ypeoT IMa 6bATEpHn, Tpe6a Da ce N3Baat n Noce6Ho Da ce PpeJaT Bo cKnIpaauKnOT nyHKT.
SLOVENSKY
VŠEOBECNÉ BEZPEČNOSTNÉ PODMIENKY
DOLEZITÉ BEZPECNOSTNÉ POKNY CITAJTE POZORNE A ULOZTE DO BUDUCNOSTI
aill all 1g 1 gall 5s aal (A.
-
60 s jilg jil blll j g j j j j j j j j j j j j j j j j j j j j j j j j j j j j j j
-
bilall aiei jaiy jaiy jaiy jaiy jaiy jaiy jaiy jaiy jaiy jaiy jaiy jaiy jaiy jaiy jaiy jaiy jaiy jaiy jaiy jaiy jaiy jaiy jaiy jaiy jaiy jaiy jaiy jaiy jaiy jaiy jaiy jaiy jaiy jaiy
-
jie 5i jai jia jia jia jia jia jia jia jia jia jia jia jia jia jia jia jia jia jia jia jia jia jia jia jia jia jia jia jia jia jia jia jia jia jia jia jia jia jia jia jia jia jia
aagall aegi jzill gdoall g 8(2yall yaiia iia no raal all alall ayaiy pao yae allby.
()j()
- 2 4x = 1
a a a a a a a a a a a a a a a a a a a a a a a a
aall jai aal al gail ay jilali jajll Jusu. aall aan aal all jjall Jdy
9) 90: kLED jzjE"E2
Jai:
a 1
10) 2:LED
J
a 1
11) aik: LED jz "E4"
山
clll j. Jolll clll 1
aill bill
jglll 1
-
aIalbI Juaa Juaa Juaa Juaa Juaa
-
1234567890123456789012345678901234567890123456789012345678901234567890123456789012345678901234567890123456789
-
jiei iuii gao yj jy jiy jiy jiy jiy jiy jiy jiy jiy jiy jiy jiy jiy jiy jiy jiy jiy jiy jiy jiy jiy jiy jiy jiy jiy jiy jiy jiy jiy jiy jiy jiy jiy jiy jiy jiy jiy jiy jiy jiy jiy jiy jiy jiy jiy jiy jiy jiy jiy jiy jiy j
glsljdi
yLs cbi Aaiiia aie i jao jilal J 1
-
cI gell 2. ( x,y) = ( ab,52xy)
-
a.s j 8s c1 g 9g 10
-
Li Si ji Pi, 2 Juyi Jilu jia jia lao gai liang liang liang liang liang liang liang liang
Jiaxuyiyidaiydi
-
all 8(2)all jai jai jai jai jai jai jai jai jai jai jai jai jai jai jai jai jai jai jai jai jai jai jai jai jai jai jai jai jai jai jai jai jai jai jai jai jai jai jai jai jai
-
jaiill gao jilally jieiil jiaii l uixu yuyu dui bssyuyuyu aayiyjglll jayiu
-
jki jj jai jai jai jai jai jai jai jai jai jai jai jai jai jai jai jai jai jai jai jai jai jai jai jai jai jai jai jai jai jai jai jai jai jai jai jai jai jai jai jai jai jai jai jai
-
S = S S = S S_
-
alal ailll laiy jg . Cauu kui jgs oall jai all jai
a. iioi cio
Btu:5000 1
1500 1
575:(y)aI
63<
4eLw/3p220:olgill
1,2,3 1,2
aLw 8 :
R290:70
aLl 0.6: aBpJ all j
UCIOBNA 3A BE3OJACHOCT. BAXHN INHCTPYKUN 3A BE3OJACHOCT HA N3NOJ3BAHE. MOJI, INPOYETETE BHIMATEJIHO IN PA3ETE 3A BbDEUIN PEΦEPEHCUIN
1.Прешида ИЗПОЛЗВATEnpODYКТа,Моля,почеTe BнIMaTeJHNo I BnHaRn Cna3BaIte cIeДНITEИСТPyKcUH.IроиЗБODиTeJIrT He HOCN OTROBOPHOCT 3a цETN,прчинEHNOT 3IoYIpOTpe6a.
2.ПрдуктгТгябВа да ce n3пол3Ва само Ha 3akpnto. He n3пол3Вaite npodukta 3a ueIN, KOnTO He ca CbBmecTUMC npINOJKeHneTo My.
3.YcTpoIcTBOTOp Tp6Ba Da 6bDe CbBp3aHO CamO KbM IpOMeHJIIBOTOKOB KOHTaKT CbC 3a3emeho HappeKeHne 220 240V ~ 50Hz. 3a Da ce nobuun 6e3oNaChocTTa npi pa6ota, HRAKOLko eJekTpueckn yCTpoIcTBa He Tp6Ba Da 6bDaT CbBp3aHn KbM eDINH KOHTaKT eDHOBpeMeHHO.
4. BhimabaTe n3KJIIOHTeJIHO MHO, KOrato n3PON3BaTe yCTPOIcTBOTO, KOrato DeaTa ca Ha6n3o. He no3BOJRABte Ha decaT da IrgaT C yCTPOIcTBOTO, He no3BOJBAIte Ha deca INXopa, KOITO He ca 3aNo3HaTN C yCTPOIcTBOTO, Da ro n3PON3BaT.
5. ПРЕДУПЕЖДEHИЕ: Това оборудвае може за се n3пол3ва OT Deца над 8- rodnша Вьзразсгихopa c оранчehи Финчески, сензорни плумстveни cnOCO6HocTN nIIx Opa, kONTO HЯМAT ONIT nII NIO3HaHЯ 3a yCTpoIcTBOTO, aKO TOBa CE npави по habлюдэнTo Ha OTROBOPHO Лице 3a TяХнATA be3ОпаСНоCTпОпДэвЕпа Инфорmaця 3a be3ОпаСНоТВАнe Ha yCTpoIcTBOTO И са НяСно C onapCHOCTITE OT n3ПОЛЗВанeto My. Deца特产 pr6Ва д IGраT C obopydВaHeto.
IounCTBaHeto I NOdIpBxKata Ha yctpoiCTBOTo He Tp6Ba Da ce N3BbPwBa OT Deca, OCBeH aKO ca Ha Bb3pact Na 8 rOuHH n Te3n DeHocTn Ce N3BbPWBaT PoD HabJIODeHne.
6. Binhari n3KIIouBaIte ⅢeNcena cIeI ynoTpe6a, KaTo IbpxInTe KOHTaKTa c pbKa. HE IbpraiTe 3axpaHbAunKa6eI.
7. He notanrte kaeba, uencena n cyaIOTO yctpoCTBO BbB BOda nIIN dpyra TeuHOCT. He n3naate yctpoCTBOTO Ha atmocphiepn ycNoBna (dJxD, CJIbHne n np.) He n3noJ3BaIte B ycNoBna Ha BnCOka BlaXHoCT (6aHn, BlaXHn MO6NJHn DomOBe).
8. Перношино правераяпсьстонею на зхранвашия кабел. Ако зхранвашият кабел e поре dedн, тов Тразба да бъдe 3амениг OT спецалларан серви3, за дa сениserhe onacnot.
9. He n3noI3BaIte ypeDa c nobpeDeH 3axpaHbAaKabeI aKO Toe e n3nychat IINI NOBpeDen IO HЯKaBb Dpyr NaHn, IIN aKO He pa6OT npabNlHo. He peMOHTnpaIte yCTPOJCTBOTO Camn, Tb' KaTO CbIeCTByBa pNCK OT TOKOB Udap. 3aHeceTe NOBpeDeHOTO yCTPOJCTBO B IOxOJaUcEBn3eH ueHTbp 3a npOBepka IIN peMOHT. BcUnkpeMOHTn MORaT Da Ce n3BbPWBat camo OT OToPi3npanH cepBn3Hn ZeHTpOBe. HenpaBnIHO n3BbPseHnTe peMOHTn MOrAT Da Cb3daIaT cepNo3Ha onaCHOCT 3a Notpe6nteJIa.
10. NocTaBete yCtpoiCTBOTo Ha XlaJaHa, Cta6nHa NOBbpxHocT, daJeu OT
ropeu KuxHeNcK ypei KaTo: eJeKtpnuecka neUka, Ra3OBn KOToHn I dp.
- YBepete ce,Ye HnIoo He 6Ioknpa BxOda N I3XoDa 3a Bb3dyx Ha yCTpoiCTBOTO
- Използваite устюговто само на павна польуховс, за на пpeдотьразитун STИЧАНТО на КОндeн3.
- 3a Да ce ocnrypn Доьнnteнha 3aunta, npenopbnyteHno e da ce nHCTaInpa yctpoiCTBO 3a OCTaTbueH ToK (RCD) B eIeKtpuyeckaTa Bepura C HOMHaJIeH OCTaTbueH ToK, KOITo He NaDbNtAba 30 mA. POnNTaIte eIeKtpoTeXnK 3a TOBa.
- Почистваite peIDOВно Вьздушни Фиптbp.ЧecТОТа Na почиствае 3abисн OT chntOTATA Na Вьздуха.
- CnéД кATO ИЗКЛЮЧИТЕ MaшиннаТа, ИЗчakайTe NOHe 5 МнHyТи, пеДи Дaя ВКЛЮЧИТe OTHOBO.
- He n3noI3BaIte yCTpoIcTBOTO Ha cIbHueBn MeCTa. Korato yCTpoIcTBOTO nperpee, 3auntata OT nperepRAhe ige n3KIOUHy yCTPOIcTBOTO.
- 3a da ce ocnrgyn efeKTNBHO oxlaJdane, Tp6Ba da ce cna3Ba pa3CTOHNe OT nohe 50 cm Mejdy NOBbpxHOCTTa Ha yCTpoiCTBOTO n CTeHaT, Me6JInte nn 3aBeCInTe.
- Поради оранчehа Тюньдтелноct Ha yctpoicTBOTO, akо pa3nkaTа Мжду целевая Temпература и Okолнata Temпература e TBырde Глma, цelевая tempepatура може дa He сьдe дoctnigha.Ta.
- 3a Да hamалпе риcke OT NOжар, TOKOB удap Илн Наразьане пр ИЗПОЛЗВане на Климатиka, СпаЗвайтс СпeДнчte OCHOВи ПpeДпa3HМ Мерк:
a) CbpxKeTe KbM 3a3eMeH KOHTaKT c 3 uioT Ta.
6) He otctpaHraBaiTe 3a3eMnteHnna uΦT.
B) He n3noJ3BaIte aIaITeP.
r) He n3noI3BaIte yIbIJIteJIeH Ka6eJ.
Д)ИЗКПЮЧЕТКЛМАТИКАпрази СЕВИЗИРаHe.
e) I3noJ3BaIte Dbama nnn noBuey 3a npemecTbaHe n HCTaIIPAhe Ha KInMaTnKa. - He n3noI3BaIte noUcTbaIe, cpeIcTba, yckopraIu npOceHa pa3Mpa3RAVe H pa3nUHn OT npENoPbUaHInTe OT npOn3BOJnteJIa.
- YcIpoiCTBOTO Tp6Ba Da ce CbXpaHraBa B NOMEeHne 6e3 NOCToHn eHeprHn H3TOUHnCn, HApPIMep: OTKpT OYh, Ra3OBn UpeDn IIn eJeKtpNueckn HaPeBaTeJI.
PENINbPBAYNOTPEBA-(CHMKA E)
CbpxTe CbeHNHTeNTe KbM 3npyKaTeHnHa KaHa 3a Bb3dyx, KaKTo cneDbA:
- YdbJnKTe Bb3dYxOBoDHaTa Tpb6a (9), KaTo pa3TerIIne DbaTc Kpa.
- 3aBnTe n3nyckateHnHa KaHa 3a Bb3dyx (9) B cBeHNHTeHa Ha n3nyckateHnHa KaHa 3a Bb3dyx (10).
3.CbpxkeTe CbeDHHTeNa Hb3dYxOBOda (11) KbM yCtpoiCTBOTO.
3ABEJIEXKN:
1.ДрьктустpoICTBOTO Ha noHE 1 MeTbpOT TeJIeBn3Opa IJIN paIaNTO,3aДаИЗБERHeTe eNEKTPOMaTHN CMUeHNA.
2. He n3naIaTe yCTpoCTBOTO Ha npra Ka CJIbHueBa CBETJInHa, 3a Da n36eHHe Tn36JIeHNrBAHe Ha UBeTa HIOBbpxHOCTTtA.
3. He naknaHnTe yctpoNCTBTO 3a nobuee ot 35^ nIn C rnaBata HAnOy, dOKaTo ro TpaHcnpTnPate. Ako yctpoNCTBTO e o6bpHATO BpeMe Ha TpaHcnpTnPape, noCTabete ro npabnIO n3uKaAte 2-4 Yaca npdeI da ro cTapTnPate.
4. NocTabeTe yCTpOINCTBOTO Ha paBHa NOBbpxHOCT c HAKIOH nOd 5°
5.YpeBt pa60Tu no-e6eKTHBHO Ha onpeDeneH MeCTa B NOMEuEHHa, n36epTe Hau-Do6pTo MRCTO:
-До порозец, Враета Илпфренckи порозец;
- CnazBaTe Heo6xOJIMOTO pa3cTOrHHe OT HaM-MaNko 60 cm MekDy cTeHaTa IIN dpYr NppePrtCTBnI IN3XoJa 3a BpbUaHe Hb3dyxa;
- YdbjkeTe B3dyxOboHaTa Tpb6a (9), 3a da ce yBepnte, ye dpynrt Kpaie HAMIPA BaN3XoJa Ha BpaTnKata Ha np03opeu, fpeHckn np03opeuc nIi OTbOp Ha cTeHa.
- 3xOdbT 3a Bb3dyx nnn npneBt He morat da 6bDat 6nokpaHn OT 3auTHa peWeTKa nn HkaKBO npenrTCTBVE.
3a da ydbjNknte jnBota Ha ypea, n3ToyeTe KOHdEHNpaHaTa BODa OT n3nyckaTeJHnry OTbOp Ha oxJaNTeJ (8), npedn da noctabnte ypea Ha cbxpaHeHne B kpar Ha ce30Ha.
BbTPEUHEK KINMATIK - OINCAHNE HA YCTPOICTBOTO (CHIMKAn B)
- Kohtponen nahanen
2.ИзхοДаСТуденВьздуx
3.CnHaneH peeentop
4.ДиuctaHUNOHy npabJIeHne - TpahcnopTnA npbXka
6.ИЗпунькATEЛЕн канал - BxOД ha n3napTeЯ
- O'TbOp 3a n3ToUbaHe Ha oxJaIuTeJIa
9.ИЗнүскATEелен KaHал 3a Вьздух - CbeHnTeHa n3nyckaTeJHHa KaHaJ 3a Bb3dyx
11.ИЗнуckeTeENаДАnteР
KOHTOJIENI PAHEJI (CHIMka B)
A. ByToH 3a BKNIOUBAHe / N3KNIIOUBAHe Ha 3axpaHbAHeTo
B. Bytoh 3a ckopoct Ha BeHTnataTopa
C. ByToH 3a peXKIM
D. Bytoh 3a TaImep / nobuwaBaHe Ha TempepaTypaTa
E. Bytoh 3a TaHmep / noHnKabHe Ha Temn. F. JAmna 3a HnCKa ckopoCT
G. JIaMna 3a BnCoka ckopoCT I. ByToH 3a 3acNBAHe
J.ABtOMaTnueH peXIM
K.PeXIM Ha oxJaXdAHe
L.PeKIMHaH3CyUaBaHe
M. Pexim Ha BeHTnlaTop
N. BytoH ha Taumepa
A B T O M A T N U E H P E K I M "J" -> P E K I M H A O X N A X D A H E "K" -> P E K I M H A N3 C Y S U A B A H E "L" -> P E K I M H A B E H T N I A T O P A "M."
3. PeryunpaTe tempepatpata
Temnepatypata moze da ce hactpon B dnaana30ha 15 -31 C. HATNCHEte 6yToHa ,D" nnn ,E", 3a da yBeneuHte nnn haMaJIte Temnpatypata c 1 C ue3 eHnokpatno HATnCKaHe. LED naneblT ha yctpoiCTBOTO noka3Ba zelbeBata tempepatya 3a 5 cekynn i CneI TOBA NOKa3Ba ctaHATA Temnepatypa.
4. PerynpaTe ckopocTt Ha BeHTnlaTopa
HaTnchete 6yToHa "B", 3a Da n36epete XeJHahata CKOpOCT Ha BeHTnlaTopa, Noka3BaUa nocneDoBaTeJIHO:
Hncka ckopoct "F" -> Bucoka ckopoct "G".
- MoUHOCr
Korato hatachete OTHOBO 6yToHa "A", yctpoiCTBtoIe n3daIe 3Byk "Dn" nIe cnpe da pa60tn. - HatncheTe 6yToH "I", 3a da Bne3eTe B pexIM Ha 3acnBaHe Ha ycTpoiCTBOTo.
- Hatnche 6byToN "N", 3a da 3aandaTe nKIOUbaHe cneI onpeJeHo BpeMe.
PpHnHa pa6oTa Ha BceKepeKIM:
ABTOMATUUEH pexm "J":
Cne KaTo e n36paHa onepaunra "J", cen30pT 3a BbTpueHa TeMnepaTypa pa6oTu ABTomauHOn u n36upa eINH OT peXmnte noDony:
-Korato ctaHata temepa type e ≥ 24^ yctpoictBOATO ABtOMaTHUHO ue n36epe pexm Ha oxlaXdane "K" iJin;
-Korato ctaHata temepatypa < 24^ ypeBt ABtomTuHO ue n36epe pexm Ha BnOcKa ckopocT Ha BEHTnIaTopa "M".
N3CYUJABAUPEKIM"
- TOpHnA rIeHTpOBeXeH BeHTnJIaTOp Ie paBOTn C HnCKa CkopoCt N CkopoCCTTa He MoKe Da ce perynnpa.
- Komnpeocobt ue cnpe cnepa 8 MNHyTN, cneT TOBa ue pa60TN OTHOBO cne6 MNHyTN.
- YcTpoIcTBOTOpnpMa pexmHa n3CyuBaHa C NOCTOARHHa TEmnepaTypa I peryIIPAHeTo Ha TemnepaTypaTa He e Bb3MOxHO.
OXIAKDAUPEKIM"K":
- Korato Staihata TemnepaTpa e no-BvcoKa OT 3anaeHata TemnepaTpa Ha KOHTpOJHnaHeN, KOMnpecOpbT 3anoBa da pa6oTH.
- Korato TemnepaTypata B NOMEUeHHeTo e NO-HNcKa OT 3aJaDeHaTa TemnepaTypa Ha KOHTpOHNr NaHeI, KOMPecOpbT CnIPA IN RopHnRT BeHTnIaTOP pa60Tu Pn PbPoHauaHHaTa HAcTpoiKa
CKOPOCT.
Pekim Ha BeHTnIaTOp "M".
- TOpHnA rIeHTpO6ExeH BeHTnlaTOp pa6oTu cBc 3aJaDeHa CKOpocT N KOMnPecOpbT He pa6oTu.
- HacpoKaTa Ha TempepaTpaTa He e HauuHa.
OnepaunHa TaMepa "N":
- Hatnche 6ytoHa "N", 3a da HactponTe BpeMeTo 3a aBtOMaTHUHO N3KJIIOUBAHe, DoKaTO ypeDbT pa6oTu.
- Hatnche 6yToHa "N", 3a da HactponTe ABtOMaTHHOTo Bpeme 3a BKIOUBAHe, KOrato yCTpoIcTBOTO da e rTOBO.
- BpemeTo MoKe Ia ce perynipa B dnaana3oHa ot 1 cac do 24 caca qpe3 HATnckaHe Ha 6yToHa "D" (+) nIn "E" (-).
Pekim Ha 3acnBaHe "I":
- PekimbT ha 3acnBahe pa60tN, koraTo ycTpoiCTBOTO e B pekm Ha oxJaXdahe "K".
- Hatnche 6byoHa "I" B pexm Ha oxlaqdahe "K", cnei Koeto ypebT ue paobTu B pexm Ha 3acnBaHe n ropHnrt ceHTpOBeKe H BeHTnIaTOp ige ce 3abptu Ha Hncka ckopoCT abTomatuHo. 3aadeneHata temepaTypa ue ce yBeliuC 1 ^ C cnei edin uac n iue ce yBeliuC 2 ^ C cned Dba Yaca. Cnei wect Yaca ypebT cnipa paobTa.
3a6eJexka:
OchOBHaT a KOHTponHa IIaTKa HMa cyHKnra NaMeT, KoraTo yCTpoNCTBOTo e roTOBO 3a pa6oTa, HO B cnpraNo cbctOraHne, OCHOBHaTa KOHTponHa IIaTKa MoKe Da 3aONMHN INHcuaHn3aun Ha pa6oTeH peKIM. Korato BKJIOnuHte yCTpoNCTBOTo, To ue pa6oTN Ha cbUmapeKIM kato nocPndHn IbT. Hma HyXda da ce Hynipa
OTHOBO pa6oTHnpeKm. (ToBa ycIOBne He e HaJIuHNo, KOrato yCTpOcnTBOTO e ABTOMATUeH peKm "J".)
DNTACTAHUOHHO
1.Пьзhte Задима Кад,зд оТВОпгИЕ CBALNTe Ппдпанота ЛНТА Вьрху OTДENHHeTO 3a 6atepIM.
2. NocTabete 6aTePnnte B cNoTa, Tp8Ba da OTROBaprT Ha 3HaunTe "+" " H aDnCTaHcNHOHOTo ynpabneHne.
3. Ako He n3noJ3BaTe DbIro BpeMe, n3BaTe 6aTePmnte.
4. 3a da npedotbpaTte 3ambpcaBaHeTo Ha OKoJIHaTa CpeDa, n3BaTee n3noJI3BaHnTe 6aTePmN n3XBpJIeTe no 6e3OJaCen N IOxODA HauHH.
3a da ynpabnbaTe yctpoCTBOTO, hacoote dntcaHIOHHOTy npabneHne (4) KbM cHnHaJIHHpeeNTOp (3).IcTAnHOHHTO ynpabHeHne ige npabnaBa yctpoCTBOTO Ha pa3ctoAHne 5 MeTpA, kOrato CoH KbM cHnHaHHpeeNTOp Ha yctpoCTBOTO.
3AUHTHNYCTPOINCTBA
3aunTHoTO yCTpoIcTBO MOKe Da ce N3KnOuN cnpe ypeBa N3bpoEHNTe No-doJy cnyaH:
- B pexim Ha oxnaJaHe: TempepaTpaTa Ha Bb3dyxa B nomeueHra Ta e Had 43^ (109°F).
- B pexim Ha oxnackdhe: ctaHaTa TemnepaTpe nO 15 °C (59 °F).
- npi pexim Ha n3cuabaHe: ctaHaTa TemnepaTpe noi 15^ (59^)
Ako yctpoictboto pa6to h Oxnaahe K" nI cyxo L c OTbpeHa Bpata nI np0euc 3a dIIO BpeMe, KOraTO oTHOCHTHATA BnaxhoCT e HAD 80% , Moke da ce noBn poca I Kanene Ha BOda ot IN3XoDa.
3aunTHOTO yctpoCTBO ue pa6oTn B cneHnTe cnyan:
- PecaptnpaIte yctpoiCTBOTo BeHara cIeI cIIpaHe Ha paBoTaTa IINI pOMHa Ha n36paHnpeKIM no BpeMe Ha paBoTa, Tp8Ba Da n3uKaTe 3 MInHyTn.
- Ako 1e n3BaDen, cne peCTnnpaHe yctpoiCTBOTo 1e ce BbpHe B IIbPBOHaJHnpeKIM, TIMER ON n TIMER OFF - Tp6Ba Da 6bDat HacTPOeHN OTHOBO.
3A6EJIEXKKA: B TOBA yCTPOIcTBO e CkPnTO NOMEHHe 3a peuKlnpaHa KaOHDeH3Ha BOda. KOHNHeH3npaTa BOda Ce cb6npa CBda 3a BOda. Korato HNBOTo Ha BOdAte Ce NOBUN Do Hau-TopHO T HNOB, NpNABbKbT N HNDKATOpbT 3a PbJNa HOda (E4) CBeTBaT, 3a Da HAnOMHrT 3a HeHOTo n3TOUbaHe. MoJ, IpKeKbChTe 3axpaHbAHeto, IpemeCTe YeJa Ha NDOxOJaO MAcTo, INBaTe Ta nata 3a n3TOUbaHe, n3TOUHTe HANbHIO BOdAte. Cnei n3TOUbaHe, INCTaJIpaTte OTHOBO Tanata, INIy UpeDbT MoKe da IpoTeYe I da Hamokpn CTaIa TBn. KbM KOMIIeKtA ce do6abra dpehaxHa Tpb6a C BbTpseH dnaMeTbp 9 MM, BbHSeH dnaMeTbp 12 MM, MaTePnAn: PVC.
OTCTpaHraBaHe Ha Hen3PpABHOCTn
1) Ipo6JIem: He pa6oTn.
AhaJIIn3:
a) Moke 6n npekcbaybT ha npedna3nte n nn npedna3nte e n3ropa, moJia, n3yaKaIte 3 MInHyTu oNtaiTe OTHOBO, 3aHTHOTo yCTpOcTBo MoKe da npeuHa ycTPOcTBOT Da pa60Tu.
B)MOKe 6n 6aTePunTe B DnCTaHIOHHOTO ynpabHeHne ca n3TOeHN.
r)MOKe 6n uenceBHe E BKnHoue HpaBnJHo.
2)Пpo6JIem: pa60Tu caMo 3a KpaTko BpeMe
AhaJIIn3:
a) ako 3anaedeHaTa Tempepatya e 6n3ka do cTahA, MoKeTe da Ra HAmalnte.
6)MOKe 6n H3XoDbT 3a Bb3dYx e 6bIokpHaN OT npenrTCTBne. OTCpaHete npenrTCTBneTo.
3)Пpo6лeM:Pa60tN,Ho He oxnajda
AHaJIIn3:
a)MOKe 6n BpaTaTaNJIN npO3OpEuBT ca OTBopeHn.
6) MoKe 6n Ha 6IIn3O nMa dpyr ypei,OTdJIeRt TOnnnHa KaTo HArpeBaTeJ nn JAmna nT.H.
B) Bb3dUHnA rΦnITbpe 3aMbpcen, MoIra, NOuCTeTe ro.
r) n3nyckaTeHHnT OTBOp Ha Bb3dyxa nn npneMbT ca 6nOKpaHn.
e) 3aadaeHaTa TemnepaTpa e TBbpde BnCoka.
4)Поблел:Тeu на Вда по Врeme на примecтваHE.
AHaJIIn3:
a) n3neIte KOHNDeH3npaIaTb BODa npeDn da npemecnte ypeDa.
6) 3a da n36erHeTe n3TuHa He HbOa, MoJa, pa3nOIOXKeTe yCTpOInCTBOTo Ha paBaHa 3emr.
5)Пpo6IeM: He pa60Tu n HnDnKaTOp 3a nbLnHa BOna "E4"
AHaJIIn3:
a)ИЗдьрnaite ГмehаТа Tana 3a ИЗTOУВаHe Na BOДаТa.
6) ako cheTo e B TOBa CbCTOarHne, MOJIa CBbPxTe Ce C KBAJIINΦuIUPaH cepBn3e H TeXHnK.
OTCTpaHbAhe Ha HEn3PpABHOCTN
6)Пpo6JIem: YcTpoIcTBOTHe cTapTupa.
AhaJIIN3:
a) MoKe 6n He e BkJIIOueHo. Ako e Taka, BkJIIOueTe ro.
6)MOKe 6n IMA NOBpeH eNcEe IIN KOHTaKT.3aMeHete c NOMOuTaHa JDCtABuNK Ha ycnyr.
B) Moke 6n npedna3nteIe noBpeHc. CmeHeTe npedna3nteIc docTabuHa yCnyr (cneunka:3,15A/250VAC).
7)Поблел:УсточьТВОАВТOMATИСНСИРа pa60ta.
AhaJIIm3:
a) BpemTo 3a n3KIOUVAhe nnn 3aIaIeHa TeMnepaTpa e DoCTnHata. PecTapnpaTe ro nn n3yakaTe ABTomatnuHO npEbkIOUBAHe.
8)Пpo6JIeM:нЯма cTuДeн Вb3dYxВpeЖIM COOL "K".
AhaJin3:
a) cTaNHaTe TEMNepaTpe no-HnCKa OT 3aJaHeHata TEMNepaTpe. TOb e HopMaHNO JaBHeHne, MaunHaTa Ue Ce BKNIOUBA ABTomatuHO, DOKATO cTaNHaTe TEMNepaTpe e NO-BnCoka OT 3aJaHeHata TEMNepaTpe.
6) YcTpoIcTBOTo BnH3a B 3aunTa CpeUy 3ampb3BaHe. YcTpoIcTBOTo Ue Ce BKnHou n ABToMaTHuHO, CneI KaTO 3aunTaTa CpeUy 3ampb3BaHe pNkJIOnuH.
9)Поблел: сбетоюдьт показа кд за поврда "E2"
AhaJIIn3:
a) ceH3OpbT 3a cTaiHa TemnepaTypa ce e noBpeDn nn Cuynn. CmeHeTe ceH3opa 3a cTaiHa TemnepaTypa ue3 doCTaBnK Ha ycnyr.
10) PpO6JIem: CBeToOnIObT NOKa3Ba KoI 3a noBpeDa "E3"
AhaJIIn3:
a) ceH3OpbT Ha Tpb6aTa Ha n3napTeIe e nobpeH nn cyuHc. CmeHeTe ceH3opa Ha Tpb6aTa Ha n3napTeIe ype3 doctabuHa ycJyHn.
11)PpO6JIem:CBeToDnIOBbT NOKa3Ba KoD 3a NOBpeJa "E4"
AhaJIIn3:
a) npedynpexkdeHne 3a nblHa BOda. N3cInete BOdata.
IPOUCTBAHE IIOIDPbJKA
IopdpbXkhaHa yctpoiCTBOTO
1.ПьрвиэклJOчЕусТРОИСТВОТ,пpeДидаиэнКЛJOчИte3axpaHBAHeTO.
2.ИзбьршeteСмекисухкьрna.Използвaiteхлада Вда под 40°CЗа почесвае,akOурдт eMHORO 3ambpceH.
3. HmKora He n3non3BaIte 3anaJIIMN BeIeCTBa KaTo 6eH3nH IIN IIOIIpaU npax 3a noHCtBaHe Ha yCtpoiCTBOTo.
IopdpbJkaHaBb3dyuHnHnФnTTbp
Heo6xoJmo e da noCtBaTe B3dyuHnA HcEKN 2 cEmnU, aKo yctpoNCTBOTo pa60TN Bn3KnOHTeHn OpaWHa CpeJa.
IounCTeTe, KaKTo CneDba:
1.Пьрбспетe устовото,натисHTe Bb3dUshnna Фнтbp Harope (KapTuHa F).
2.ПочирстЕинсталпайтЕ OTHOBO b3dUshnHФнТьр.
3. Ako 3ambpcbaHnra Ta ca 3a6eHexmM, n3mnTe rC npenapat B xnaIka Boda. CneD nouchte Ha ceHecTo I XnadoHO MRCTO. PpeHCTanipaTRe ro.
Iopnbjka cnei ynoTpe6a:
- Ako He n3no3BaTe ycTpoCtBTo NO-dbIro BpeMe, He 3a6paBnTe da n3BaAnTe rMaHaTa Tana Ha OTBopa 3a n3TOBaHe Ha BOData(8), 3a da n3TOuNte BOData.
- BkIIOUeTe ypeDa da pa6oTn B pexIM Ha BeHTnAToP 3a NOOBH DeH, npe3 CnBHeB DeH, 3a Da N3cbXHe OTbTpE Ia He MyxNraCa.
- Cnpete ycTpoiCTBOTO n 13BaTe 3axpaHbAunKa6eI, cneT TOBa 13BaTe 6aTePnnte Ha dNCTaHcNoHHOTo ynpabJIeHne n cbxpaHraBte yCToeCTBOTO npabUNHO.
4.Почирете Вьздушни Фнгтbpи ГИНСТАПИРаTe OTHOB.
5.ИЗbaTe TрьбITEа bВ3dUx Iи CBxpaHЯBaIte npaBUNHO nПьTHO NOKPnIe OTbopa.
TEXHUNECKN DAHHN:
KanaunTetaoxlaaJaHe npn BTU:5000BTU/ua
KanaunTHaOxJaBHeBBBaTOBe:1500W
Kohcymaunhaeheprn (oxnaqdahe):575W
CnnaHa3Byka: < = 63dB
Bb3dyuenotok:220m3/h
EheprnEHKnac:A
Taimep:24 yaca
Terno Ha oxnaaata TeuhoC R290: mKc. 70 rpa
KanaqtetHaH3cyuBaHe:0,6JntpaHa yac


BHHMaHHe, pNCK OT noXap.
HE npo6nBaIte nnnn3rapaTe.
ImaTe npedBnD, Ye XnaDNHnT aReHT MoKe Da He CbDbpka Mnpnc.
MaKcImaHnHO KOJIueCTBO 3apeXJaHe C XnaIeH aReHT:70g.
3a da 3aunntte OKonhata cn cpea: MOnr, OTdeneTe KAPTOHnTe KyTm n HauNoHOBtE Top6uKn n rN INxBbPneTe B CbOTBeTHnTE KOUHTe 3a OTNaDbu. N3noJ3BaHnT ypeD Tp6Ba Da 6bDe DoCTaBEN DO CNEuaHnTe NyHKTOBE 3a Cb6npaHe, KONTO MoRat da NOBnraT Ha OKoHnTa cpea. He IN3XBbPnIeTe To3n ypeD B O6NKOBen KoW 3a OTNaDbu.
ADLER
EUROPE

Electric Kettle AD 1282
Burr Coffee Grinding AD 4450
Milk Frother AD 4491
Sandwich Maker AD 3055
TOASTER 2 SLICE AD 3222
ELECTRIC GRILL AD 3052

CITRUS JUICER AD 4009

PERSONAL BLENDER AD4081
FOOD PROCESSOR AD 4224
MIXER AD 4225
AIR FRYER AD 6310
PASTEURIZATION POT AD 4496
AIR CONDITIONER AD 7916
AIR HUMIDIFIER AD 7966
FAN HEATER AD 7725
KITCHEN SCALE AD 3166

- SAFETY CONDITIONS. IMPORTANT INSTRUCTIONS ON SAFETY OF USE PLEASE READ CAREFULLY AND KEEP FOR FUTURE REFERENCE
- BEFORE FIRST USE - (picture E)
- REMARKS:
- LOCAL AIR CONDITIONER - DEVICE DESCRIPTION (pictures A and B)
- CONTROL PANEL (picture C)
- REMOTE CONTROLLER - picture D
- Choose the operating mode
- Adjust temperature
- Adjust fan speed
- Power
- Each mode working principle:
- AUTOMATIC "J" mode:
- DEHUMIDIFYING "L" mode:
- COOLING "K" mode:
- Fan "M." mode.
- Timer operation "N":
- Sleeping mode "I" operation:
- Notice:
- REMOTE CONTROLLER
- PROTECTIVE DEVICES
- Troubleshooting
- Analysis:
- CLEANING AND MAINTENANCE
- Device maintenance
- Air filter maintenance
- DEUTSCH
- TEXHUNECKNE DAHHBIE:
- ITALIANO
- Ventilator "M." -tilstand.
- PIN PQTH XPHSH - (EIOVA E)
- Underhal after anvandning
- Onepaia TaHmepa "N":
- Cππyπ npexim"J":
- 3BepHb yBary:
- OuHJEHHIOBCLYTOBYAHHH
- MAKeEOHCKN
- ONIHTN YCIOBN 3A B6E3BENDHOCT
- BAHIN HNCTPYKUN 3A BE3BENHOCT INPOUHTAJTE BHNMaTeJNO 3aWTeJeTe 3a INHINHA
- PPEI INPBA YNOTPBEA-(cNkaE)
- 3ABEJIELUKN:
- KOHINIOHEP 3A JOKAIHNOT BO3yX - ONIC HA YPEIOT (cNkA u B)
- KoHTpOJIeH naHeJ (CNIka C)
- 3A6EJIeJKA KOHTPOJIeIeP - cJnka D
- PABOTEE HA KOHTPOJIA PAHEJI
- Onepauija 3a cnieneJc"Jac":
- N3BcTyaBaHe:
- DALEUHCKN UYPABYBAU
- 3AWTNTA DEBUNU
- CmeHa Ha npo6nemn
- AhaJn3a:
- SLOVENSKY
- VŠEOBECNÉ BEZPEČNOSTNÉ PODMIENKY
- DOLEZITÉ BEZPECNOSTNÉ POKNY CITAJTE POZORNE A ULOZTE DO BUDUCNOSTI
- UCIOBNA 3A BE3OJACHOCT. BAXHN INHCTPYKUN 3A BE3OJACHOCT HA N3NOJ3BAHE. MOJI, INPOYETETE BHIMATEJIHO IN PA3ETE 3A BbDEUIN PEΦEPEHCUIN
- PENINbPBAYNOTPEBA-(CHMKA E)
- 3ABEJIEXKN:
- BbTPEUHEK KINMATIK - OINCAHNE HA YCTPOICTBOTO (CHIMKAn B)
- KOHTOJIENI PAHEJI (CHIMka B)
- PeryunpaTe tempepatpata
- PerynpaTe ckopocTt Ha BeHTnlaTopa
- DNTACTAHUOHHO
- 3AUHTHNYCTPOINCTBA
- IPOUCTBAHE IIOIDPbJKA
- ADLER
- EUROPE
Brand : ADLER
Model : AD 7924
Category : Air Conditioning