MS 7911 - Air Conditioning ADLER - Free user manual and instructions
Find the device manual for free MS 7911 ADLER in PDF.
| Product type | Monobloc mobile air conditioner |
| Brand | Adler |
| Model | MS 7911 |
| Cooling capacity | 5 000 BTU/h (1 465 W) |
| Power consumption (cooling) | 560 W |
| Energy class | A |
| Noise level | ≤ 65 dB |
| Airflow | 300 m³/h |
| Refrigerant | R290 (max 90 g) |
| Power supply | 220-240 V ~50 Hz, grounded plug |
| Operating modes | Cooling, dehumidification, ventilation |
| Special functions | Timer 1-24h, sleep mode, remote control, frost protection, overflow protection, compressor protection |
| Number of fan speeds | 2 (high and low) |
| Filter type | Removable and washable EVA filter |
| Filter cleaning frequency | Every 2 weeks |
| Drainage | Manual (collection tray) or continuous (hose not supplied) |
| Recommended operating temperature | 7 °C to 35 °C |
| Safety | Do not use extension cord, unplug before maintenance, for domestic use only |
| Maintenance and cleaning | Clean the casing with a soft, damp cloth; clean the filter with warm water and mild detergent |
| Refrigerant weight | 90 g (R290, flammable) |
| Included accessories | Remote control, window exhaust adapter, exhaust hose |
Frequently Asked Questions - MS 7911 ADLER
User questions about MS 7911 ADLER
0 question about this device. Answer the ones you know or ask your own.
Ask a new question about this device
Download the instructions for your Air Conditioning in PDF format for free! Find your manual MS 7911 - ADLER and take your electronic device back in hand. On this page are published all the documents necessary for the use of your device. MS 7911 by ADLER.
USER MANUAL MS 7911 ADLER
natural_image
White modular air conditioner unit with control panel and brand logo (no visible text or symbols on device body)MS 7911
text_image
Technical diagram of a mechanical device with numbered components labeled 1, 2, and 4.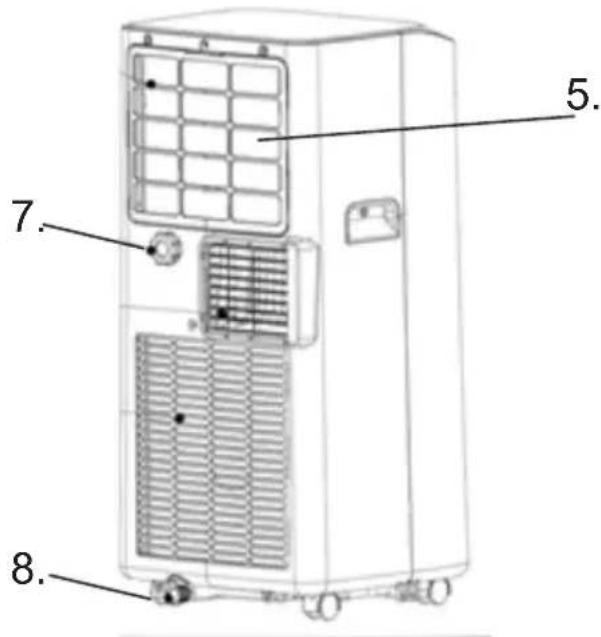
text_image
5. 7. 8.PICTURE A
text_image
10. 6. PUSH
text_image
9. 6. 10.PICTURE B
text_image
50 cm 50 cm
text_image
50 cm 50 cmPICTURE C
flowchart
graph TD
    A["TIMER"] --> B["FAN"]
    B --> C["▲"]
    C --> D["J"]
    D --> E["K"]
    E --> F["L"]
    F --> G["M"]
    G --> H["H"]
    H --> I["O"]
    I --> J["N"]
    J --> K["C"]
    K --> L["B"]
    L --> M["POWER"]
    style A fill:#f9f,stroke:#333
    style B fill:#f9f,stroke:#333
    style C fill:#f9f,stroke:#333
    style D fill:#ccf,stroke:#333
    style E fill:#ccf,stroke:#333
    style F fill:#ccf,stroke:#333
    style G fill:#ccf,stroke:#333
    style H fill:#ccf,stroke:#333
    style I fill:#ccf,stroke:#333
    style J fill:#ccf,stroke:#333
    style K fill:#ccf,stroke:#333
    style L fill:#ccf,stroke:#333
    style M fill:#ccf,stroke:#333
PICTURE D

text_image
F E A D B C G 3. meskoPICTURE E
natural_image
Technical line drawing of a portable air conditioner unit with a grid panel and a close-up of its internal structure (no text or symbols)PICTURE G

natural_image
Line drawing of a portable air conditioner unit with control panel and wheels (no text or symbols)
natural_image
Line drawing of an air conditioner unit with a bucket and hose, labeled F.2 (no text or symbols on the device itself)PICTURE F
ENGLISH
SAFETY CONDITIONS. IMPORTANT INSTRUCTIONS ON SAFETY OF USE PLEASE READ CAREFULLY AND KEEP FOR FUTURE REFERENCE
- Before using the device, read the operating manual and follow the instructions contained in it. The manufacturer is not liable for damages caused by using the device contrary to its intended purpose or improper operation.
- The device is for home use only. Do not use for other purposes that are not for its intended purpose.
- The device should only be connected to an AC outlet with a grounded 220 240V \~ 50Hz. To increase operational safety, multiple electrical devices should not be connected to one current circuit at the same time.
- Use extreme caution when using the device when children are nearby. Do not allow children to play with the device, do not allow children or people unfamiliar with the device to use it.
- WARNING: This equipment may be used by children over 8 years of age and people with limited physical, sensory or mental ability, or people who have no experience or knowledge of the equipment, if this is done under the supervision of a person responsible for their safety or have been granted them information on the safe use of the device and are aware of the dangers of using it. Children should not play with the equipment. Cleaning and maintenance of the device should not be performed by children, unless they are over 8 years old and these activities are carried out under supervision.
- Always disconnect the power plug by holding the socket with your hand after use. DO NOT pull on the power cord.
- Do not immerse the cable, plug and the whole device in water or any other liquid. Do not expose the device to atmospheric conditions (rain, sun, etc.) or use in conditions of high humidity (bathrooms, damp mobile homes).
- Periodically check the condition of the power cord. If the power cord is damaged, it should be replaced by a specialist repair shop to avoid danger.
- Do not use the appliance with a damaged power cord or if it has been dropped or damaged in any other way or if it is not working properly. Do not repair the device yourself, as there is a risk of electric shock. Take the damaged device to an appropriate service center for checking or repair. All repairs may only be carried out by authorized service points. Incorrectly performed repairs can cause serious danger for the user.
- Place the device on a cool, stable surface, away from hot kitchen appliances such as: electric stove, gas burner, etc.
- Make sure that nothing is blocking the air inlet and outlet of the device
- Use the device only on a level surface to prevent the condensation from spilling out
- To provide additional protection, it is advisable to install a residual current device (RCD) in the electric circuit with a rated residual current not exceeding 30mA. Ask an
electrician for this.
- Clean the air filter regularly. The frequency of cleaning depends on the cleanliness of the air.
- After turning off the machine, wait at least 5 minutes before turning it back on.
- Do not use the device in sunny places. When the device overheats, the overheat protection will switch on the device.
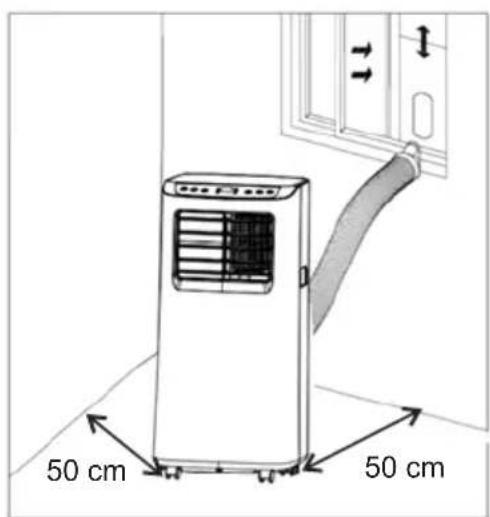
- To ensure effective cooling, a distance of at least 50 cm should be kept between the side walls of the device and the wall or furniture or curtains.
- Due to the limited performance of the device, if the difference between the target temperature and the ambient temperature is too great, the target temperature may not be reached.
- To reduce the risk of fire, electric shock or injury when using the air conditioner, observe the following basic precautions:
a) Connect to a grounded outlet with 3 pins.
b) Do not remove the grounding prong.
c) Do not use the adapter.
d) Do not use an extension cord.
e) Disconnect the air conditioner before servicing.
f) Use two or more people to move and install the air conditioner.
-
Do not use agents accelerating the defrosting or cleaning process other than those recommended by the manufacturer.
-
The device should be stored in a room without constantly operating sources of ignition, for example: open fire, gas appliances or electric heaters.
Device Description - Picture A
- Control panel 2. Cold air outlet
- Remote controller (picture E) 4. Transport handle
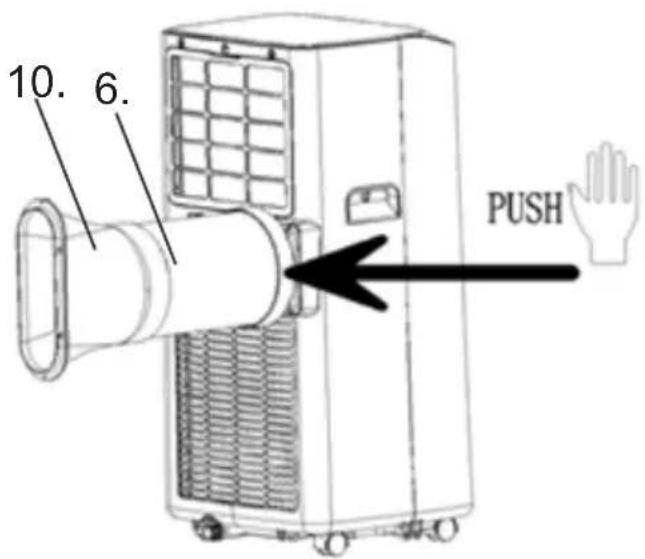
- Evaporator inlet with EVA filter 6. Air exhaust pipe
- Upper cooler drain hole 8. Down cooler drain hole
- Window exhaust adapter 10. Connector of air exhaust pipe
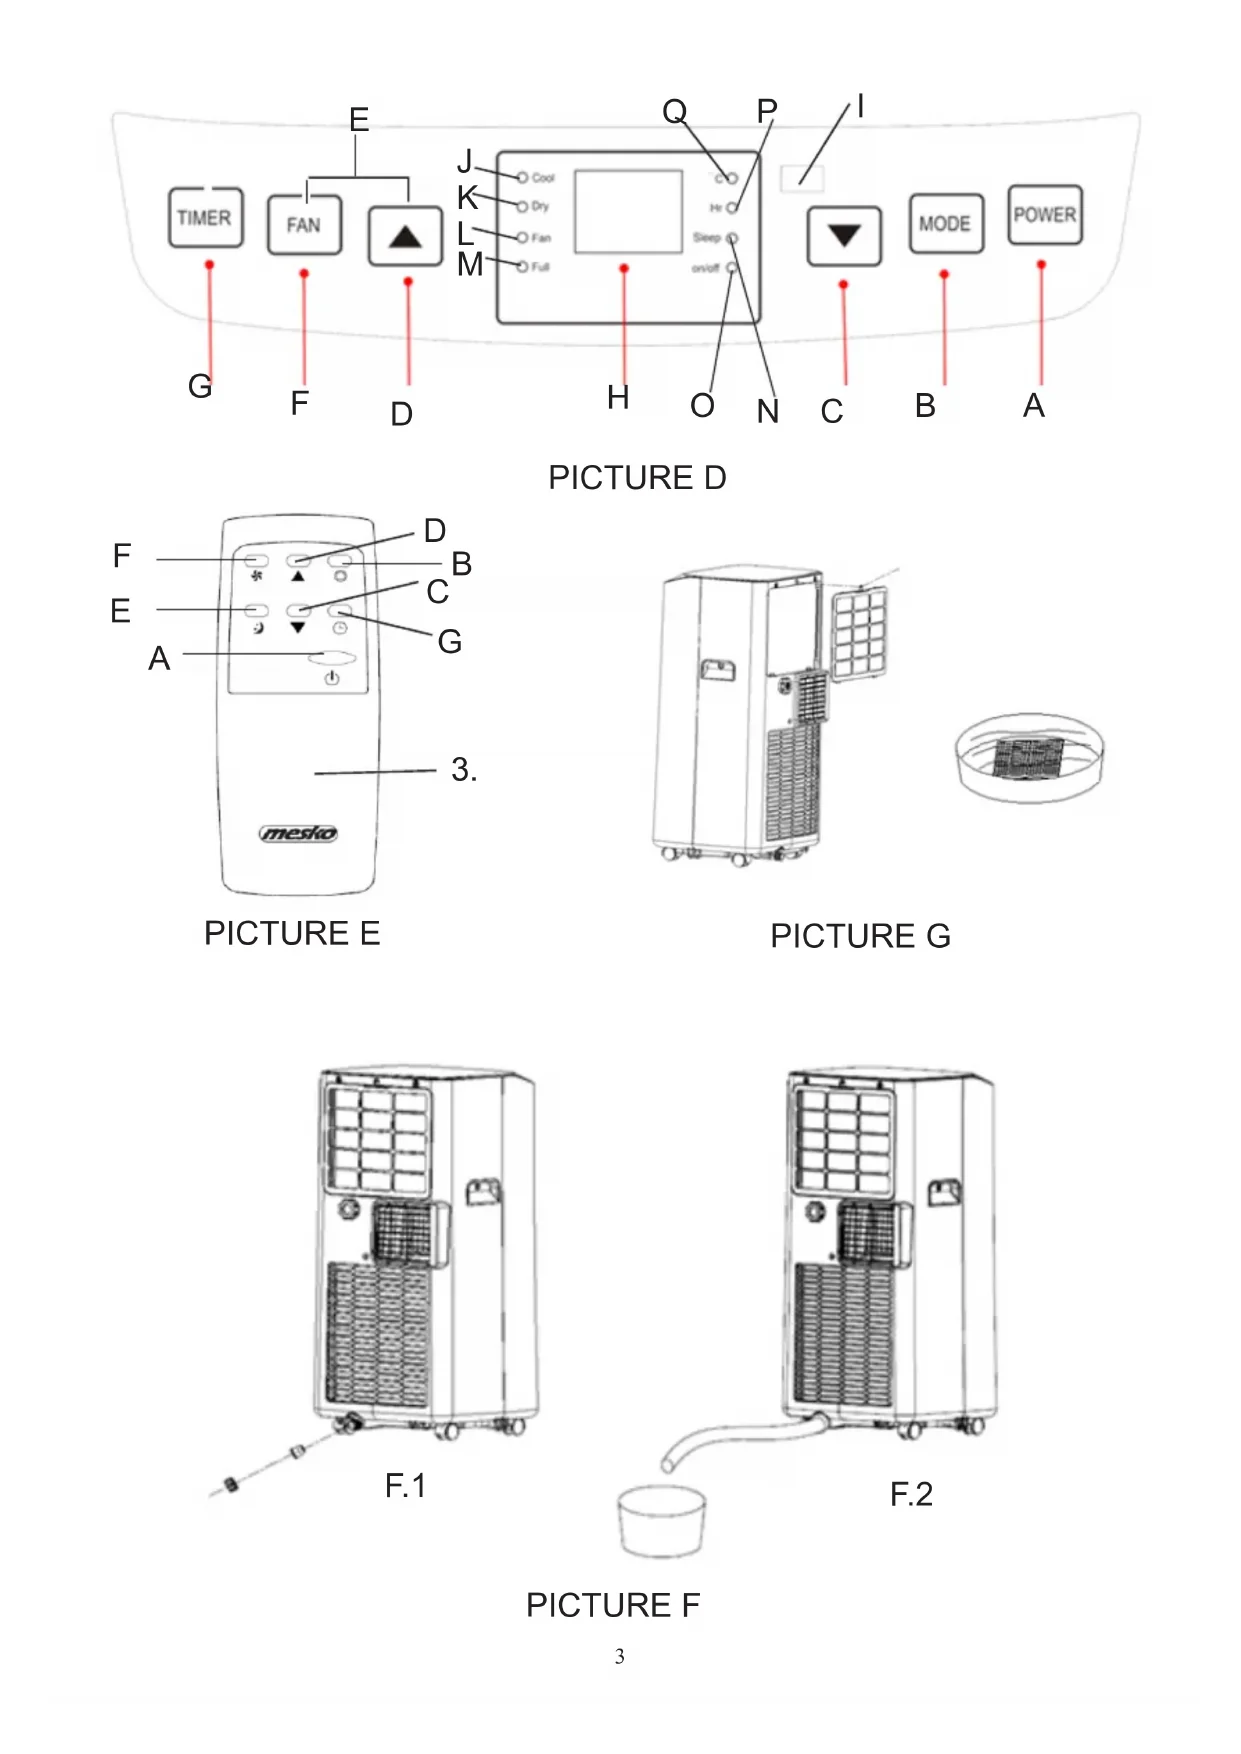
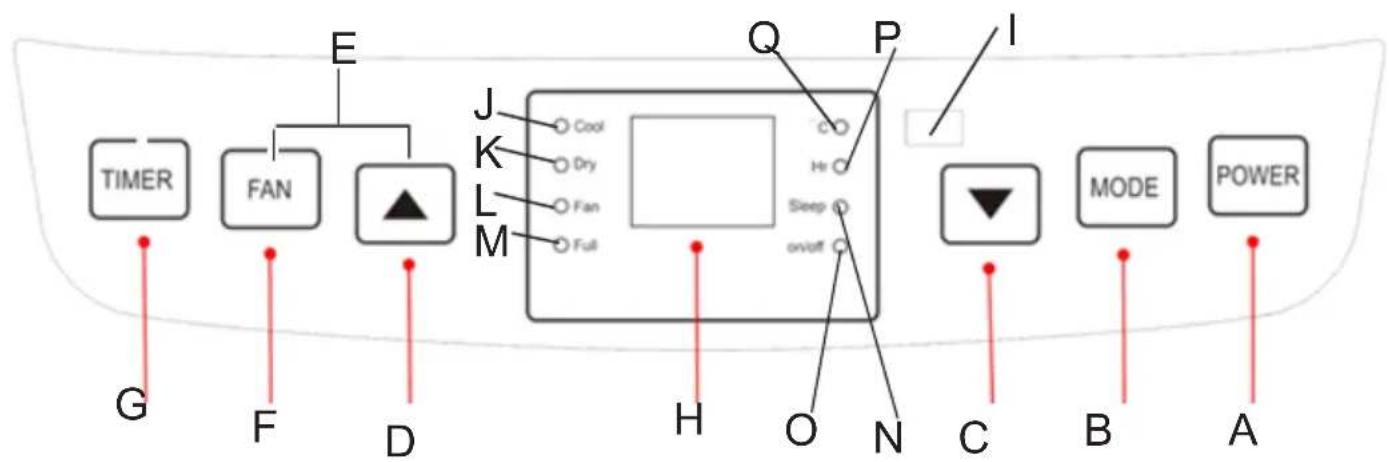
Control Panel Description - Picture D.
A. Power button B. Mode button
C. Timer / Temperature down button D. Timer / Temperature up button
E. Sleep model buttons (D&F pressed together on cooling mode) F. Fan speed button
G. Timer button H. LED screen
I. Signal receptor for remote controller J. Cool mode control lamp
K. Dry mode control lamp L. Fan mode control lamp
M. Full water control lamp N. Sleep mode control lamp
O. The switch on / off control lamp P. Time control lamp
Q. Temperature control lamp
Remote controller – Picture E
A. Power button B. Mode button
C. Timer / Temperature down button D. Timer / Temperature up button
E. Sleep model F. Fan speed button
G. Timer button
CONTROL PANEL operation – picture D
Press button "A" to turn on and turn off the machine, the buzzer will play signal once. The control lamp "O" will switch on the control panel.
Press button "B" to switch mode, between cooling mode → fan mode → dehumidifying mode.
Press button "D/C" Up / Down to change the setting temperature or setting time, operate as follows:
- While setting temperature, press button up or down button to select the required temperature (not available in fan or dehumidifying mode).
- While setting time, press up button or down button to select the required time.
Press button „F“ to select the Fan speed:
- In cooling and fan mode, press the button "F" to select high or low wind speed operation. In too cold conditions, it may not run according to the set wind speed.
- In dehumidifying mode, pressing the button "F" is invalid, and the fan will forcibly choose low wind speed operation.
Press button "E" to select the Sleep Mode:
- In the cooling mode, press both buttons "F" and "D" to turn on the sleep mode, then the unit will work on Energy - Saving and quiet type. The sleep model control lamp "N" will switch on the control panel.
Press button "G" to select operation period, when the LCD screen flashes, press up button "D" or down button "C" to select the required time range. Time setting range 1-24 hour and can be adjusted up or down by one hour.
Delay start function:
- Power ON delay setting:
Switch off the device and then press the button "G", next press up button "D" or down button "C" to select the required time value. The maximum power on delay time is 24 hours. The device will be switched on after the delay time has elapsed.
- Power OFF delay setting:
Switch on the device and then press the button "G", next press up button "D" or down button "C" to select the required time value. The maximum power off delay time is 24 hours. The device will be switched off after the delay time has elapsed.
Flashing will stop soon and LED screen come back to show required temperature.
REMOTE CONTROLLER operation – picture E
The remote controller transmits signals to the system.
Button "A" - the appliance will be started when it is energized or will be stopped when it is in operation, if you press this button.
Button "B" - press it to select operation mode: cool mode → dry mode → fan mode.
Button "C" / "D" - press to adjust the room temperature and the timer.
Button "E" - press to set or cancel sleep mode.
Button "F" - press it to select fan speed in sequence: low / high wind speed.
Button "G" - press to set the operation time from 1 to 24 hours.
PROTECTION DEVICES
- Frost Protection Function:
In cooling, dehumidifying or economic power saving mode, if the temperature of the exhaust pipe is too low, the machine will automatically enter protection status; if the temperature of the exhaust pipe rises to a certain temperature, it can automatically revert to normal operation.
- Overflow Protection Function "M":
When water in the water pan exceeds the warning level, the machine will automatically sound an alarm, and the "FULL" indicator light "M" will flash. At this time, drain the water according to drainage instructions. After the water is emptied, the machine will automatically return to the original state.
- Protection Function of the Compressor
To increase the service life of the compressor, it has a 3-minute delay booting protection function after the compressor is turned off.
DRAINAGE INSTRUCTIONS:
This machine has two drainage methods: manual drainage and continuous drainage.
- Manual drainage – picture F1.
When the device stops after the water is full, you see on control panel the "M" control lamp is flashing. Turn off the device power and unplug the power plug. Move the machine carefully, so as not to spill the water in the water pan at the bottom of the body. Place the water container below the water outlet behind the housing. Unscrew the down cooler drain hole (8) and unplug the water plug, the water will automatically flow into the water container. Keep the drainage cover and the water plug properly. During drainage, the body can be tilted slightly backwards. If the water container cannot hold all the water, before the water container is full, stuff the water outlet with the water plug as soon as possible to prevent water from flowing to the floor or the carpet. When the water is discharged, stuff the water plug, and tighten the drainage cover.
- Continuous drainage - option applicable to dehumidifying mode ONLY - shown on picture F2.
Unscrew the drainage cover, and unplug the water plug. Set the drainage pipe (not included in kit) into the water outlet. Connect the drainage pipe to the bucket.
CLEANING & MAINTENANCE
Cleaning: before cleaning and maintenance, turn off the machine and unplug the plug.
a) Housing cleaning
Clean with surface of device with a wet soft cloth. Don't use chemicals, such as benzene, alcohol, gasoline, otherwise, the surface of the device will be damaged or even the whole machine will be damaged.
b) EVA filter cleaning
If the filter screen is clogged with dust, and the effectiveness of the device is reduced, be sure to clean the filter screen once every two weeks.
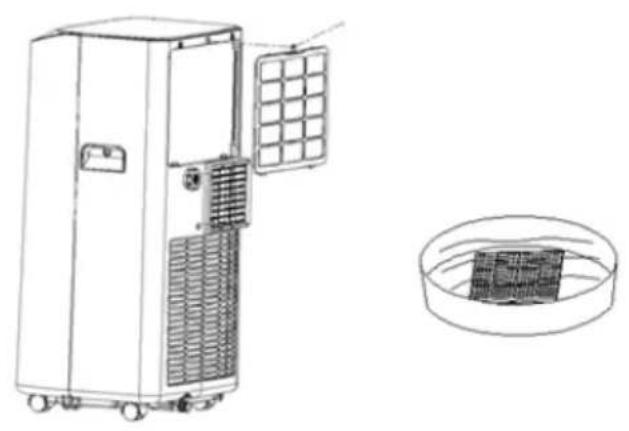
- Clean the upper filter screen frame – picture G.
- Loosen one screw in the back cover and remove the EVA filter mesh (5).
- Put the filter into warm water with neutral detergent (about 40^ C / 104^ F) and dry it in the shade after rinsing clean.
STORAGE
- Unscrew the drainage cover, unplug the water plug, and discharge the water in the water pan into other water containers or directly tilt the housing to discharge the water into other containers.
- Turn on the device, adjust it to low speed fan mode, and maintain this state until the drainage pipe (not included in kit) becomes dry, so as to keep the inside of the housing in a dry state and prevent it from mildewing.
- Turn off the device, remove the plug from the socket, install the plug and drain cover.
- Remove the air exhaust pipe elements.
- Cover the air conditioning with a plastic bag. Put the air conditioning in a dry place, keep it out of the reach of children, and take dust control measures.
- Remove batteries of the remote control and keep them properly.
TROUBLESHOOTING
Do not repair the device yourself. Qualified repair will void the warranty.
Problem I.: The air conditioning does not work.
Reason 1 : There is no electricity. So, turn it on after connecting it to a socket with electricity.
Reason 2: The overflow indicator displays "FL". So, discharge the water.
Reason 3: The ambient temperature is too low or too high. So, recommend to use the device in at the temperature of 7-35 °C (44-95 °F).
Reason 4: In cooling mode, the room temperature is lower than the set temperature. So, change the set temperature.
Reason 5: In dry mode, the ambient temperature is too low. So, the device should be placed in a room with an ambient temperature of greater than 17 °C ( 62 °F ).
Problem II.: The cooling effect is not good.
Reason 1: There is direct sunlight. So, pull the curtain.
Reason 2: Doors or windows are open; there are a lot of people; or in cooling mode, there are other sources of heat. So, close doors and windows, and add new air conditioner.
Reason 3: The EVA filter is dirty. So, clean it.
Reason 4: The air inlet or outlet is blocked. So, clear obstructions.
Problem III.: Big Noise
Reason: The device is not placed on a flat surface. So, put the device on a flat and hard place to reduce noise.
Problem IV.: Compressor does not work.
Reason: Overheat protection starts. So, wait for 3 minutes until the temperature is lowered, and then restart the machine.
Problem V.: The remote control does not work.
Reason 1: The distance between the machine and the remote control is too far. So, let the remote control get close to the device, and make sure that the remote control directly faces to signal receptor (I) at control panel.
Reason 2: The remote control is not aligned with the direction of the remote control receiver. So, do as above.
Reason 3: Batteries are exhausted. So, replace batteries.
Problem VI.: Displays 'E1'.
Reason: The pipe temperature sensor is abnormal. So, please contact an authorized service organization.
Problem VII.: Displays 'E2'
Reason: The room temperature sensor is abnormal. So, please contact an authorized service organization.
Note: If problems not listed in the table occur or recommended solutions do not work, please contact please contact an authorized service organization..
TECHNICAL DATA:
Cooling capacity at BTU: 5000 BTU / hour
Cooling capacity in watts: 1465W
Energy consumption (cooling) W: 560 W
Noise level: <= 65dB
Air flow: 300 m3 / h
Energy class: A
Timer: 24 hours
R290 coolant weight: maximum 90 grams

text_image
Warning sign depicting a flame symbol in yellow and black on a white background
Caution, risk of fire.
Do NOT pierce or burn.
Be aware that the refrigerant may not contain an odour.

To protect your environment: please separate carton boxes and plastic bags and dispose them in corresponding waste bins. Used appliance should be delivered to the dedicated collecting points due to hazarsous components, which may effect the environment. Do not dispose this appliance in the common waste bin.
DEUTSCH
text_image
Warning sign depicting a flame symbol in yellow and black, indicating hazard or hazard status.
INSTRUCTIONS DE DRAINAGE:
text_image
Warning sign depicting a flame symbol in yellow and black on white background
text_image
Warning sign depicting a flame symbol in yellow and black, indicating hazard or hazard status.
text_image
Warning sign depicting a flame symbol in yellow and black on white background
text_image
Warning sign depicting a flame symbol in yellow and black on white background
text_image
Warning sign depicting a flame symbol in yellow and black, indicating hazard or hazard status.sa
text_image
Warning sign depicting a flame symbol in yellow and black, indicating hazard or caution
INSTRUCTIUNI DE DRAINAGE:
text_image
i.e. Redescueable material Warning
Atentie, risc de incendiu.
text_image
Warning sign depicting a flame symbol in yellow and black, indicating hazard or hazard status.
Oprez, opasnost od požara
NE bušite i ne palite.
Imajte na umu da rashladno sredstvo ne sadrži miris.
Težina R290 rashladne tečnosti: max. 90 grama

Brinući za okoliš. Molimo Vas da kartonska pakovanja odnesete u otkup otpadnog papira. Polietilenske džakove (PE) bacajte u kontejner za plastiku. Iskorišćen uređaj treba odneti na odgovarajuću deponiju, jer opasni sastojci koji se u njemu nalaze, mogu biti opasni za okoliš. Električni uređaj treba odneti na način, koji ograničava njegovu ponovnu upotrebu i korištenje. Ako se u uređaju nalaze baterije, treba ih izvaditi i odvojeno predati na deponiju. Uređaj se ne smije bacati u kontejner za komunalni otpad!!
MAGYAR
ÁLTALÁNOS BIZTONSÁGI FELTÉTELEK
FONTOS BIZTONSÁGI UTASÍTÁSOK FIGYELMESEN OLVASSA EL ÉS TÖRVÉNYE JÖVÖBEN
text_image
Warning sign depicting a flame symbol in yellow and black, indicating hazard or hazard status.
Varo, tulipalon vaara.
text_image
Warning sign depicting a flame symbol in yellow and black, indicating hazard or hazard status.
text_image
Warning sign depicting a flame symbol with hazard symbol, commonly used in safety or hazard prevention.
text_image
Warning sign depicting a flame symbol in yellow and black on a white background
Oprez, opasnost od požara NE bušiti i ne paliti.
Imajte na umu da rashladno sredstvo ne sadrži neugodan miris.

Vodimo brigu o prirodnom okolišu. Kartonsku ambalažu molimo prenijeti na otpadni papir. Polietilen (PE) vreće bacati u kontejner za plastiku. Astrošena oprema treba biti premještena na prikladno mjesto za pohranu, jer sadrže u ureadju opasne tvari mogu predstavljati opasnost za okoliš. Električni uređaj mora biti predat u takvom stanju da se smanji mogučnost njegove ponovne upotrebe. Ako vaš uređaj ima baterije, treba njih ukloniti i predati na mjesto za pohranu odvojeno.
SLOVENŠČINA
SPLOŠNI VARNOSTNI POGOJI
POMEMBNA VARNOSTNA NAVODILA PREVIDNO PREBERITE IN PRIPRAVITE SE ZA PRIHODNOST
text_image
Warning sign depicting a flame symbol in yellow and black on white background
text_image
Warning sign depicting a flame symbol in yellow and black, indicating hazard or caution
text_image
Warning sign depicting a flame symbol in a yellow triangle with black border
Forsigtig, risiko for brand.
BESCHERMINGSAPPARATEN
text_image
Warning sign depicting a flame symbol with hazard symbol, commonly used in workplace safety.
text_image
Warning sign depicting a flame symbol in yellow and black on a white background
text_image
Warning symbol and open book icon: yellow triangle with flame and line, next to open booktext_image
Warning sign depicting a flame symbol in yellow and black, indicating hazard or electrical hazard.
text_image
Warning sign depicting a flame symbol in yellow and black on a white background
text_image
Warning sign depicting a flame symbol in yellow and black on white background
text_image
Warning symbol and open book icon: yellow triangle with flame and black border, next to open booktext_image
Warning sign depicting a flame symbol in yellow and black on white background
text_image
Warning symbol and icon: yellow triangle with flame and line, next to open booknatural_image
Black electric water heater with handle and side panel (no visible text or symbols)ELECTRIC KETTLE MS 1284

natural_image
Black and white photo of a Mexico 300 grater with a red and green button (no visible text or symbols)SANDWICH MAKER MS 3032

natural_image
Product photo of a white hand mixer with three smaller containers, one with a cap and one with a glass bottle (no text or symbols visible)HAND BLENDER MS 4624

natural_image
Black microwave oven with two baked goods on a glass tray (no visible text or symbols)ELECTRIC OVEN MS 6021

natural_image
Close-up of a black and white electronic device with a circular handle and metallic rim (no visible text or symbols)NUT MAKER MS 3041

natural_image
Exterior view of a modern stainless steel juiceizer with a side cup (no visible text or symbols)JUICE EXTRACTOR MS 4126

natural_image
White portable electronic device with a black panel and circular top (no visible text or symbols)CERAMIC FAN HEATER MS 7736

natural_image
White and black hair dryer with a single button, no visible text or symbols on the device body.HAIR DRYER MS 2262

natural_image
White industrial air conditioner unit with control panel and ventilation slots (no visible text or symbols)AIR CONDITIONER MS 7911
mesko

natural_image
White glass juice organizer with a white lid and orange liquid, no visible text or symbols on the main subject.CITRUS JUICER MS 4010

Milk Frother
MS 4493

natural_image
White blender with purple liquid and a metallic handle, no visible text or symbols on the device itself.BLENDER WITH JAR MS 4079

natural_image
Black kitchen stand mixer with whisk inside a bowl (no visible text or symbols)MIXER WITH BOWL MS 4217

natural_image
Digital kitchen scale with digital display showing 0.5A, no visible text or symbols on the bowl itselfKITCHEN SCALE MS 3165
natural_image
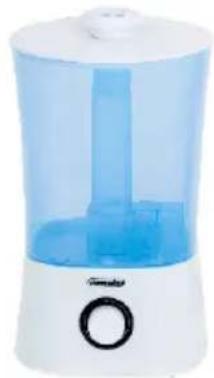
White water purifier with clear blue liquid and a black handle, no visible text or symbolsAIR HUMIDIFIER MS 7965

natural_image
Black metal bar magnet with grid pattern and 'medio' branding (no readable text or symbols beyond branding)MOSQUITO KILLER LAMP MS 7933

text_image
12:00 22:68. 29:68.Weather Station MS 1177
natural_image
Black and white photo of a faceless eyeshadow brush (no visible text or symbols)NOSE TRIMMER MS 2929
mesko

natural_image
Close-up of a black and red handheld electric shaver with three buttons (no visible text or symbols)ELECTRIC SHAVER MS 2926
natural_image
A textured gray pillow with a small object attached, no visible text or symbols.HEATED PAD MS 7429

natural_image
Modern stainless steel kettle with black handle and brand logo (no visible text or symbols on body)ELECTRIC KETTLE MS 1288

natural_image
White electric air conditioner unit with cooling fan and wheels (no visible text or symbols)AIR COOLER MS 7914

natural_image
Black and white photo of a microwave grater with a control knob (no visible text or symbols)SANDWICH MAKER 3IN1 MS 3045

natural_image
White electrician meat maker with handle and control knob (no visible text or symbols)MEAT MINCER MS 4805

natural_image
White hair dryer with gold cable and orange handle, no visible text or symbolsHAIR DRYER MS 2250
natural_image
Red and black hairbrush with a brush, resting on a black base with a metallic clip (no visible text or symbols)TRIMMER SET MS 2931
natural_image
Exterior view of a modern stainless steel steamer with three eggs inside (no text or symbols visible)Egg Boiler MS 4485