CR 4410 - Coffee machine CAMRY - Free user manual and instructions
Find the device manual for free CR 4410 CAMRY in PDF.
User questions about CR 4410 CAMRY
0 question about this device. Answer the ones you know or ask your own.
Ask a new question about this device
Download the instructions for your Coffee machine in PDF format for free! Find your manual CR 4410 - CAMRY and take your electronic device back in hand. On this page are published all the documents necessary for the use of your device. CR 4410 by CAMRY.
USER MANUAL CR 4410 CAMRY
natural_image
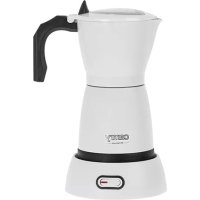
Exterior view of a modern espresso machine (no signage or text visible on the device body)CR 4410
text_image
Technical diagram of a coffee maker with numbered parts and exploded view, labeled 'camry'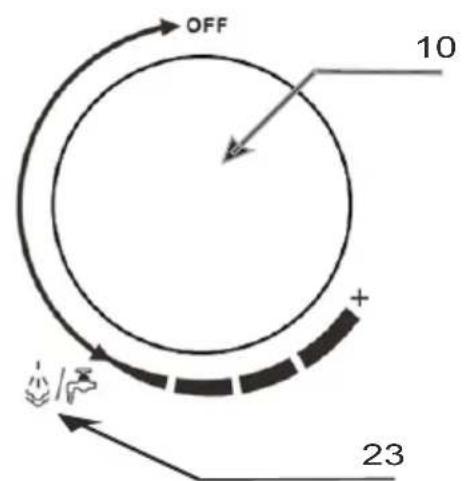
text_image
OFF 10 + - 23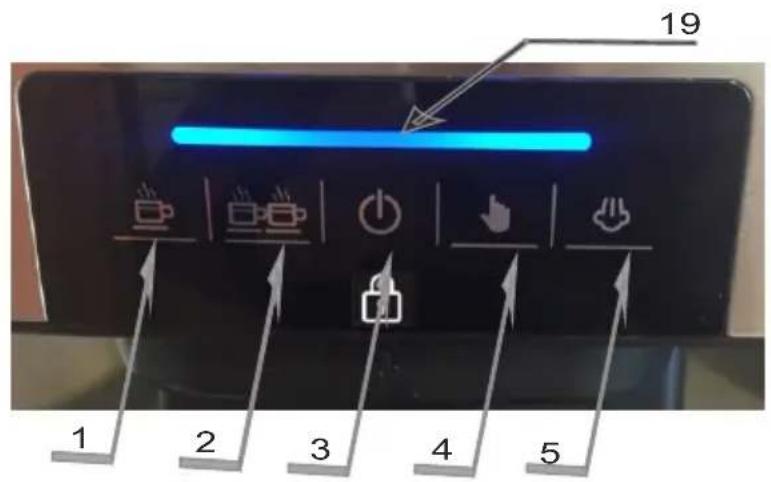
text_image
19 1 2 3 4 5ENGLISH
GENERAL SAFETY CONDITIONS IMPORTANT SAFETY INSTRUCTIONS. PLEASE READ CAREFULLY AND SAVE FOR FUTURE
- Before using the device, read the operating manual and follow the instructions contained in it.
- The device is for home use only. Do not use for other purposes that are not for its intended purpose.
- The device should only be connected to a 220-240 V \~ 50/60 Hz grounded socket. To increase operational safety, multiple electrical devices should not be connected to one current circuit at the same time.
- Use extreme caution when using the device when children are nearby.
- WARNING: This equipment may be used by children over 8 years of age and people with reduced physical, sensory or mental ability, or people who have no experience or knowledge of the equipment, if this is done under the supervision of a person responsible for their safety or have been granted them information on the safe use of the device and are aware of the dangers of using it. Children should not play with the equipment. Cleaning and maintenance of the device should not be performed by children, unless they are over 8 years old and these activities are carried out under supervision.
- Boil the water in the tank and pour it twice to get rid of the smell before first use.
- Always remove the plug from the power socket after use by holding the socket with your hand after use.
- When removing the plug from the socket, never pull the power cord but the plug.
- Do not expose the device to atmospheric conditions (rain, sun, etc.) or use in conditions of high humidity (bathrooms, damp mobile homes).
- Do not immerse the cable, plug and the device in water or any other liquid.
- Periodically check the condition of the power cord. If the power cord is damaged, it should be replaced by a specialist repair shop to avoid danger.
- Do not use the device with a damaged power cord or if it has been dropped or damaged in any other way or if it is not working properly. Do not repair the device yourself, as there is a risk of electric shock. Take the damaged device to an appropriate service center for checking or repair. All repairs may only be carried out by authorized service points. Incorrectly performed repairs can cause serious danger for the user.
- Place the device on a cool, stable surface, away from hot kitchen appliances such as: electric stove, gas burner, etc.
- Do not use the device near flammable materials.
- The power cord may not hang over the edge of a table or touch hot surfaces. The manufacturer is not liable for damages caused by using the device contrary to its intended purpose or improper operation. Do not allow children to play with the device, do not allow children or people unfamiliar with the device to use it.
-
Do not leave the device switched on or the adapter unattended when unattended.
-
To provide additional protection, it is advisable to install a residual current device (RCD) in the electric circuit with a rated residual current not exceeding 30 mA. Ask an electrician for this advice.
- Never use the device without water! It may be damaged.
- Never direct a stream of hot steam or water towards your body.
- Never use the device with sparkling water !!!
- Never leave the device at a temperature below 0 degrees Celsius, as it may damage it.
- Always unplug the machine before filling the tank with water.
- Regularly clean and inspect the machine to ensure the quality of coffee obtained and to extend the life of the machine.
- Always disconnect the power source before cleaning and allow all hot parts to cool down. The device should be cleaned with a mild non-abrasive detergent. Never use cleaning solvent as this could damage the paint layer.
- For descaling the machine, use a liquid descaler designed for pressure coffee makers.
- During use, never touch the filter housing or the milk frothing nozzle, as there is a risk of burns.
- Use only original accessories.
- Do not move or move the device during operation.
This machine has a classic function of Italian concentrated espresso and cappuccino coffee. Rich coffee aroma and foam, easy to operate and safe, easy to clean.
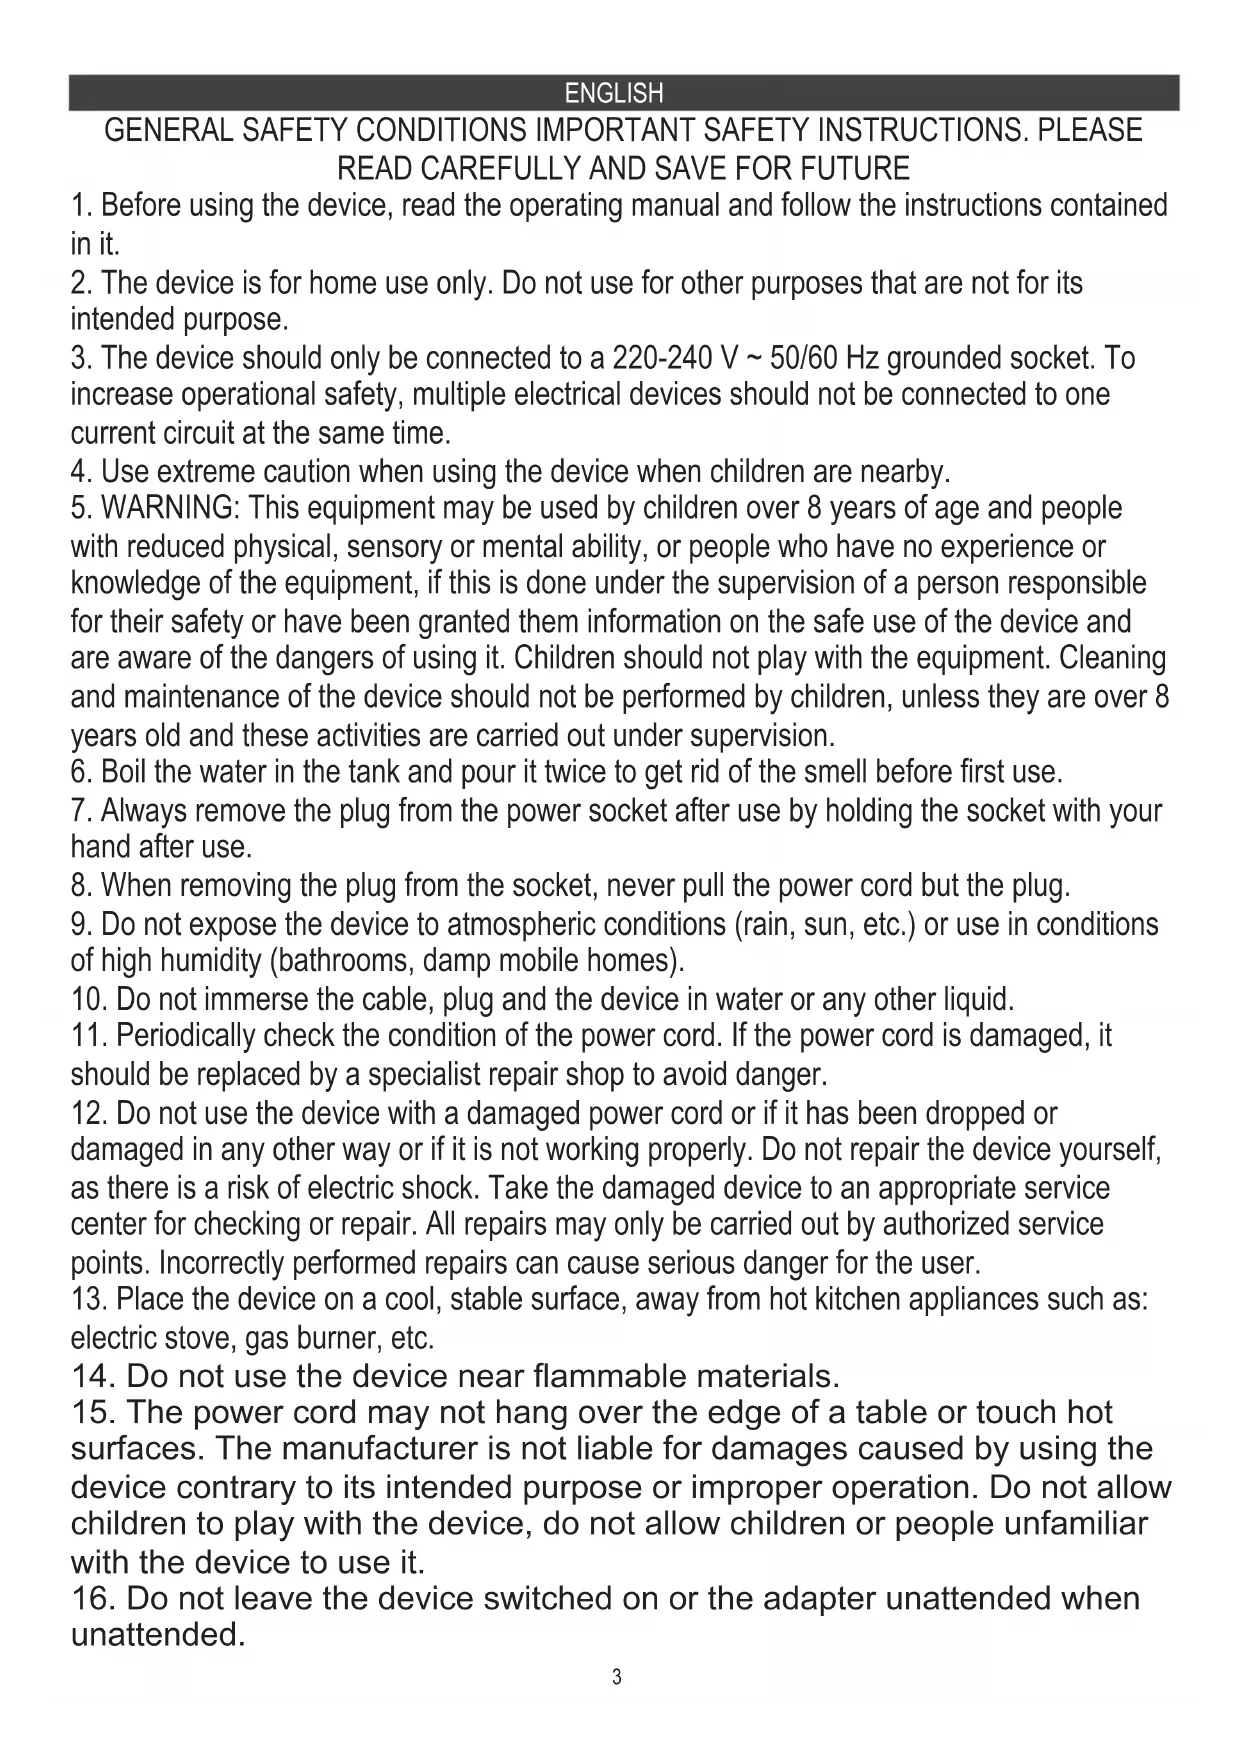
PRODUCT DESCRIPTION: COFFEE MACHINE Cr4410
- Auto Single Cup - button for automatic preparation of 1 cup of coffee
- Auto Double Cup – button for automatic preparation of 2 cups of coffee
- Power button 4. Manual Coffee Cup button
- Steam button 6. Drip grid
- Removable drip tray 8. Water tank lid
- Water tank 1600ml 10. Steam knob
- Main housing 12. Steam nozzle handle
- Steam nozzle 14. Measuring spoon
- Filter handle 16. Filter retaining clip
- Filter housing 18. Filter for ground coffee for 1 cup
- Light indicator 20. Funnel
- Unlock mark 22. Lock mark
- Hot water function mark 24. Filter for ground coffee for 2 cups
Operating Instruction
Before using for the first time
After unpacking the device, check with are all the buttons available and the steam knob (10) turned off in the "OFF" position. Before applying wipe the device (see Cleaning and maintenance).
- Remove the water tank (9), pour water into water tank (9), the water level should not exceed the "MAX" mark. It is recommended to use filtered water. This prevents lime build-up and improves the taste of the prepared coffee. Do not use soda water.
- Run hot water twice (instructions below) to remove the factory new odor before first use.
- Plug in and press the power button (3). At this time, the light indicator (19) flashes blue. Press the Manual Coffee Cup button (4) to work the pump, pumping water from the water tank to the device for heating.
-
The device starts to preheat, at this time, the light indicator (19) flashes blue; when the blue light stops blinking and turns on continuous blue lighting, the warm-up is completed, it takes about 2 minutes.
-
Press the Auto Single Cup button (1) to let the hot water out to wash the coffee filter (18).
- Repeat steps 3, 4, 5 above.
- Empty condensation from water and coffee from the removable drip tray (7).
How to make espresso coffee?
Connect the device to the power supply and press the power button (3). At this moment the indicator light (19) flashes blue, wait until it stops flashing, then the device will finish heating and will be ready for use.
- While the device is preheating, you can put the ground coffee powder (you should use the fine powder, not too thick or too thin) into the ground coffee filter (18). For one espresso cup use one measurement spoon (14) of your favorite ground coffee. For two espresso cup use 1,5 measurement spoon (14) of your favorite ground coffee. Then use the measuring spoon handle (14) to press it tightly; at the same time wipe the coffee powder on the edge of the filter (18). You can use the filter (24) suitable for 2 cups ground coffee capacity too.
- Insert the ground coffee filled filter (18) into the filter housing (17), keep it by filter handle (15). Fit filter with ground coffee under the unlock mark (21), then move it the right side to lock it, just under the lock mark (22), then place the coffee cup (or 2 cups) under the funnel (20).
- Adjust the position of the coffee cup (or 2 cups at the same time), let the coffee flow along the cup wall.
4. Press:
- the Auto Single Cup button (1), you will hear di-di sound, then it starts to flow out a coffee to your cup. Coffee stops flow out automatically, you will hear di-di-di-di-sound. Single coffee is around 100ml capacity.
- the Auto Double Cup button (2), you will hear di-di sound, then it starts to flow out the coffee to 2 cups at the same time. Coffee stops flow out automatically, you will hear di-di-di-di-di sound.
- the Manual Coffee Cup button (4) button to flow out coffee as long as you like. After the quantity of coffee will be your desired level, press the Manual Coffee Cup button (4) again to stop flow out of coffee. Do not leave the appliance unattended, it may overflow coffee.
- Wait a minute for coffee dripping and the coffee is ready.
Steam foaming function
- Press the Steam button (5), the light indicator (19) will turn red and it will flashing, when the red light changes from blinking to continuous red light, the preheating is complete.
- The amount of steam can be adjusted according to the individual's proficiency. Before froth the milk foam, you should release the water in the steam nozzle (13). It is recommended to pour the milk into the 1/3 high of the pitcher, insert the steam nozzle (13) into the milk at 1cm depth, and then slowly unscrew the steam knob (10) until steam starts to eject. You can sway the pitcher a little, but do not contact the bottom of the pitcher with the steam nozzle (13).
- When the temperature of milk reaches about 75 degrees of Celsius and the milk foam begins to expand, turn the steam knob (10) to "OFF" position, turn off the steam button (5) to make the light indicator (19) turns blue, press the power button (3) directly to turn off the device.
After the milk foam is completed, clean the milk on the surface of the steam nozzle with a damp cloth in time and spray the steam to prevent the milk from drying out and blocking the vent.
How to make cappuccino coffee?
- Prepare bigger volume cups suitable to cappuccino coffee.
- Prepare coffee according to points 1-5 described in part: How to make espresso coffee?
- Prepare the milk foam according to points 1-3 described in part: Steam foaming function.
- Then shake the pitcher on the table so that the milk foam is fully blended and pour it into the cup with coffee.
Hot water function
- Pressing the power button (3).
- The device starts to preheat, at this time, the light indicator (19) flashes blue; when the blue light stops blinking and turns on continuous blue lighting, the warm-up is completed, it takes about 2 minutes.
- Stand up the cup under the steam nozzle (13).
- Turn the steam knob (10) until the steam nozzle (13) flowing out hot water. Knob should exceed the position of hot water function mark (23).
5. Press:
- the Auto Single Cup button (1), you will hear di-di sound, then it starts to flow out hot water – around 150ml - to your cup. Water stops flow out automatically, you will hear di-di-di-di-di sound. If you have to stop water flow out immediately press the Auto Single Cup button (1) again.
- the Auto Double Cup button (2), you will hear di-di sound, then it starts to flow out the water – around 250 ml - to your cup. Water stops flow out automatically, you will hear di-di-di-di-sound. If you have to stop water flow out immediately press the Auto Double Cup button (2) again.
- the Manual Coffee Cup button (4) button to flow out hot water as long as need. Do not leave the device without control. After the quantity of hot water will be your desired level, press the Manual Coffee Cup button (4) again to stop flow out of hot water. If you have to stop water flow out immediately press the Manual Coffee Cup button (4) again.
-
When finished, turn off the Steam knob (10), then press the power button (3) off.
-
The hot water can be used for drinking, cleaning or heating cups before pouring your coffee.
Cleaning and Maintenance
- Turn off the power button (3), unplug it and clean the device after completely cooling.
- Always empty the water tank (9) after use. From time to time, clean the water tank (9) with a damp sponge or cloth.
- Detach the filter (18) and remove used coffee from the Filter. If the Filter holes are clogged with coffee, use a brush to clean it. You can unscrew the coffee funnel (20) and clean the coffee grounds in the filter housing (17).
- The cups, water tank (9), drip grid (6), removable drip tray (7), filter (15+16+17+18+20) may be washed in water with some mild detergent without abrasive substances or solvents. External parts should be cleaned with a soft cloth or sponge. Highly abrasive cleaners or brushes may cause surface scratches.
Note: Do not use alcohol or solvent cleaner and do not immerse the machine in water to clean.
DECALCIFICATION
If coffee brewing takes longer time than in the beginning of use or the steam nozzle (13) does not produce steam, the appliance should be decalcified. If hard water is used, the appliance should be decalcified after it has been used approximately 40 times. If soft water is used the machine can be decalcified after it has been used approximately 80 times. Espresso machine liquid decalcifier may be used for decalcifying the appliance. Before decalcifying, make sure that the device is disconnected from the power supply.
1) Pour approximately 250 ml of lukewarm water and then add 250 ml of espresso machine liquid decalcifier.
2) Place the filter (15+16+17+18+20) in locked position into the device. Then place a cup half-filled with cold water under the steam nozzle (13) and an empty cup under the filter funnel (20).
3) Connect the device to the power supply.
4) Press the power button (3).
5) Then press the Auto Single Cup button (1).
6) When the decalcifier starts to flow down into an empty cup, insert the tip of the steam nozzle (13) into a cup filled with cold water and press the steam button (5).
7) Wait for a few seconds and switch off the device. After decalcifying, the device must be rinsed three times with clean water. In order to do it, repeat steps 1 to 7 filling the water tank (9) with clean water only.
Troubleshooting
Symptom: No water / no steam
Reason 1: Whether the water tank (9) has got water inside / is in place?
Solution 1: Add water to the tank (9).
Reason 2: No water is added in advance in the machine.
Solution 2: Method of water adding: press the Manual Coffee Cup button (4), the pump starts pumping water into the device, press Manual Coffee Cup button (4) after few seconds.
Reason 3: The machine does not complete preheating.
Solution 3: Wait. The machine can make coffee after the warm-up is completed. Warm-up is completed when the light indicator (19) changes from blue flashing to always being on blue.
Symptom: No steam
Reason 1: Steam hole blocked
Solution 1: Use a small wire to poke the small hole in the bottom of the steam nozzle (13), clean it this way.
Solution 2. After the milk foam is finished, do a hot water function to clean the steam tube.
Symptom: Bad milk foam
Reason 1: Is it whole milk?
Solution 1: Use whole milk.
Symptom: Bad milk foam
Reason 1: The steam button (5) starts to froth milk foam before the device is warmed up completely.
Solution 1: Wait. Start steaming after the light indicator (19) changes color from red flashing to continuous red.
TECHNICAL DATA:
Capacity max: 1.6 liters
Voltage: 220-240V \~50/60Hz
Power: 850W
Power Max: 1000W
Pressure: 15 Bars

Please transfer cardboard packaging to waste paper. Pour the polyethylene bags (PE) into the plastic container Worn device should be returned to the appropriate point storage because it is dangerous in the device ingredients may pose a threat to the environment. The electrical device should be handed over to limit its reuse and use. If in the device there are batteries you have to take out and give to the point stored separately.
(DE) DEUTSCH
PRODUCTBESCHRIJVING: KOFFIEMACHINE CR4410
natural_image
Symbol of a trash bin crossed with no text or numbers, representing waste sorting or disposal (no text present)ت Connectivity Agricultural Policy is a good way to be able to support the policies of the government.
Mozambique Agricultural Affairs Department 27.