HL 1620 S - Heat gun STEINEL - Free user manual and instructions
Find the device manual for free HL 1620 S STEINEL in PDF.
| Product Type | Heat gun |
| Brand | Steinel |
| Model | HL 1620 S |
| Power | 1600 W |
| Power supply | 220-230 V, 50/60 Hz |
| Adjustable temperature | 2 positions: 300 °C (position 1) / 500 °C (position 2) |
| Air flow rate | 240 L/min (position 1) / 450 L/min (position 2) |
| Weight | 0,670 kg |
| Thermal protection | Thermal safety shutdown (2 levels) |
| Protection class | II (double insulation) |
| Sound level | ≤ 70 dB(A) |
| Vibrations | ≤ 2,5 m/s² |
| Cable length | Approximately 2 m (resistant rubber cable) |
| Dimensions (L x W x H) | Approximately 250 x 80 x 200 mm (estimate) |
| Stand capacity | Non-slip base for flat placement |
| Included nozzles | None (accessories sold separately) |
| Recommended use | Paint stripping, heat shrink tubing, plastic welding, defrosting, barbecue lighting |
| Maintenance | Clean with a dry cloth; do not immerse; regularly check the cable and air intake grille |
| Warranty | 36 months or 600 hours |
Frequently Asked Questions - HL 1620 S STEINEL
User questions about HL 1620 S STEINEL
0 question about this device. Answer the ones you know or ask your own.
Ask a new question about this device
Download the instructions for your Heat gun in PDF format for free! Find your manual HL 1620 S - STEINEL and take your electronic device back in hand. On this page are published all the documents necessary for the use of your device. HL 1620 S by STEINEL.
USER MANUAL HL 1620 S STEINEL
GB Translation of the original operating instructions
Please familiarise yourself with these operating instructions before using this product because prolonged reliable and trouble-free operation will only be ensured if it is handled properly. We hope your new hot air tool will give you lasting satisfaction.
About this document
Please read carefully and keep in a safe place.
- Under copyright. Reproduction either in whole or in part only with our consent.
- Subject to change in the interest of technical progress

Safety warnings
Read and observe this information before using the tool. Failure to observe the operating instructions may result in the tool becoming a source of danger.
When using electric power tools, observe the following basic safety precautions to avoid electric shock as well as the risk of injury and fire. Used carelessly, the tool can start an unintentional fire or injure persons. Check the tool for any damage (mains connection lead, housing etc.) before putting it into operation and do not use the tool if it is damaged. Do not leave the tool switched on unattended. Children should be supervised to make sure they do not play with the tool.
First time of use
A small quantity of smoke may occur when the tool is used for the first time. This smoke is caused by binding agents released from the heater's insulating film during the first time of use.
To let the smoke escape quickly, the tool should be set down on its stand
ing surface. The area you are working in should be well ventilated when using the tool for the first time. Any smoke coming out of the tool is not harmful
Take the ambient conditions into account.
Do not expose electric power tools to rain. Do not use electric power tools when they are damp or in a damp or wet environment. Exercise care when using the tool in the proximity of flammable materials. Do not direct the tool at one and the same place for a prolonged period. Do not use in the presence of an explosive atmosphere. Heat may be conducted to flammable materials that are hidden from direct sight.
Protect yourself from electric shock.
Avoid coming in contact with grounded objects, such as pipes, radiators, cookers or refrigerators. Do not leave the tool unattended while in operation.


Safety warnings
Store your tools in a safe place.
After use, set the tool down on its standing surface and let it cool before putting it away.
When not in use, tools must be stored in a dry, locked room out of children's reach.
This tool may be used by children aged 8 or above and by persons with reduced physical, sensory or mental capabilities or lack of experience and knowledge if they are supervised or have been given instructions on how to use the tool safely and understand the hazards involved.
Do not allow children to play with the tool.
Children are not allowed to clean or carry out maintenance work on the tool without supervision.
Do not overload your tools.
Your work results and safety will be enhanced if you operate the tool within the specified output range. Do not carry the tool by the power cord. Do not unplug the tool by pulling on the power cord. Protect the power cord from heat, oil and sharp edges.

Beware of toxic gases and fire hazards.
Toxic gases may occur when working on plastics, paints, varnishes or similar materials.
Beware of fire and ignition hazards. For your own safety, only use accessories and attachments that are specified in the operating instructions or recommended or specified by the tool manufacturer.
Using attachments or accessories other than those recommended in the operating instructions or catalogue may result in personal injury.
Repairs must only be carried out by a qualified electrician.
This electric power tool complies with the relevant safety regulations. Repairs should only be performed by a qualified electrician. Otherwise the user may run the risk of accidents. If this tool's main power cord is damaged, it must be replaced by the manufacturer or its customer service department or a similarly qualified person so as to avoid hazards.

Safety warnings
Residual heat indicator (HL 2020 E only)
The residual heat indicator serves as a visual warning to prevent injury from direct contact with the hot nozzle outlet. The residual heat indicator also works when the tool is unplugged.
The indicator starts working after the tool has been in use for 90 seconds and keeps flashing until the temperature at the nozzle outlet has fallen below 60^ at room temperature. The residual heat indicator does not show if the tool has been in operation for less than 90 seconds. Responsibility always rests with the user and care must be taken at all times when handling hot air tools.
Keep these safety precautions with the tool.
Uses
Here are some of the applications you can use STEINEL hot air tools for. This selection is by no means exhaustive - no doubt you can immediately think of other examples.
Paint stripping:
Paint is soled and can be removed with a stripping knife and paint scraper to leave a clean surface.
Shrinking tubing on cables:
The shrink tubing is slipped over the section you want to insulate and heated with hot air. The tubing shrinks by approx. 50% in diameter to give a sealed union. Shrinking is particularly fast and even using reflector nozzles, Sealing and stabilising cable breaks, insulating soldered joints, gathering cable runs, sheathing limberal blocks.
Forming PVC:
Sheeting, piping or ski boots can be soffonted and formed with hot air.
Lighting barbecues:
Gels charcoal glowing in next to no time: no more waiting.
Thawing:
Water pipes, frozen door locks, stops. Gently thaws and cries at in one go.
Soft soldering:
First, clean metal parts you want to join. Then, using hot air heat the point you want to solder and offer up the soldering wire. Use flux or a soldering wire with a flux core to prevent oxide forming.
Welding and joining plastic:
All parts being welded must be of the same plastic material. Use an appropriate welding rod.
Joining sheeting:
The sheets are overlapped and welded together. A slit nozzle is used to direct hot air under the overlap, then the two sheets are firmly pressed together with a feed roller. Also possible: Repairing PVC tarpaulins by overlap welding with a slit nozzle.
For your safety
These hot air tools are doubly protected from overheating. 1. A thermostat switches the heater off! It loco much of the air outlet nozzle is obstructed (heal build-up). However, the blower continues to run. A warning triangle on the display tells you that the heater is switched off. Once the air delivery nozzle is clear again, the heater automatically switches back on again after a few moments. The warning triangle then goes out. The thermostat may also respond after switching the hot air tool off, taking it longer than usual to reach temperature at the air delivery nozzle when it is switched on again.
- The thermal cut-out completely shuts down the tool if it is overbaked.
for HL 2020 E only
Tool description - Operation
Please note: The citation from the object you are working on depends on material and intended method of working. Always try out the airflow and temperature on a test piece first. Using the attachable accessory nozzles (see accessories page on the cover) the flow of hot air can be controlled with maximum precision. Take care when changing hot nozzles! When using the hot air tool in the soft-resting position, make sure it is standing on a stable, non-slip and clean surface.
HL 1620 S
The tool is switched on and off at the two stage switch on the back of the grip handle. Airflow and temperature can be adjusted to 2 settings. Stage 1 reaches 300^ at an airflow of 240l/min , stage 2 reaches 500^ at 450l/min . This tool is intended for home use only.
HL 1820 S
The tool is switched on and off via the three-stage switch on the back of the grip handle. Airflow and temperature can be adjusted to 3 settings. Stage 1 (cool air stage) reaches 50^ at an airflow rate of 100 L/min, stage 2 reaches 400^ at 300 L/min and stage 3 reaches 600^ at 500 L/min. The guard sleeve is achieved by means of a bayonet seal.
HL 1920 E
The tool is switched on and off at the two stage switch on the back of the grip nando. In addition to three-stage speed/airflow control (stage 1 is a cold-air stage at 80^ temperature can be continuously adjusted over a range of 80^ - 800^ in settings 2 and 3 at the thumbwheel. The numbers 1-9 on the thumbwheel serve as a guide only. Whereas "1" means 80^ , the maximum temperature of 600^ is attained at "9". Airflow can be adjusted to the three stages of 150 / 150 - 300 / 300 - 500 l/min. The guard sleeve detachment at a bayonet cutout.
HL 2020 E
The tool is switched on and off at the two-stage switch on the back of the grip handpiece. In addition to three-stage speed/airflow control at the switch, temperature can be continuously adjusted over a range of 80^ to 630^ in settings 2 and 3 at the rocker switch. The target temperature can be increased in 10^ increments by pressing the right hand "+/-" side of the rocker switch or reduced by pressing the left hand "+/-" side of the rocker switch. Keeping the button pressed will continue to increase or reduce the temperature in stage of 10^ until the rocker button is released or the minimum or maximum temperature is set. The temperature setting is shown on the display for 3 seconds. On lowering or increasing the temperature, the actual temperature is then displayed at the delivery nozzle. The "C++" symbol flashes during this period. As soon as the selected temperature is reached, this symbol stops flashing and is displayed all the time. Blower stage 1 dvarles a temperature of 80^ . When the tool has been operating at high temperatures on blower stage 2 or 3 it will take a short while to cool to 80^ after switching down to blower stage 1. While the tool is cooling down, the LCD display shows the actual temperature at the nozzle outlet. After switching off, the tool stays in the last setting that was selected. The guard sleeve attaches at a bayonet catch.
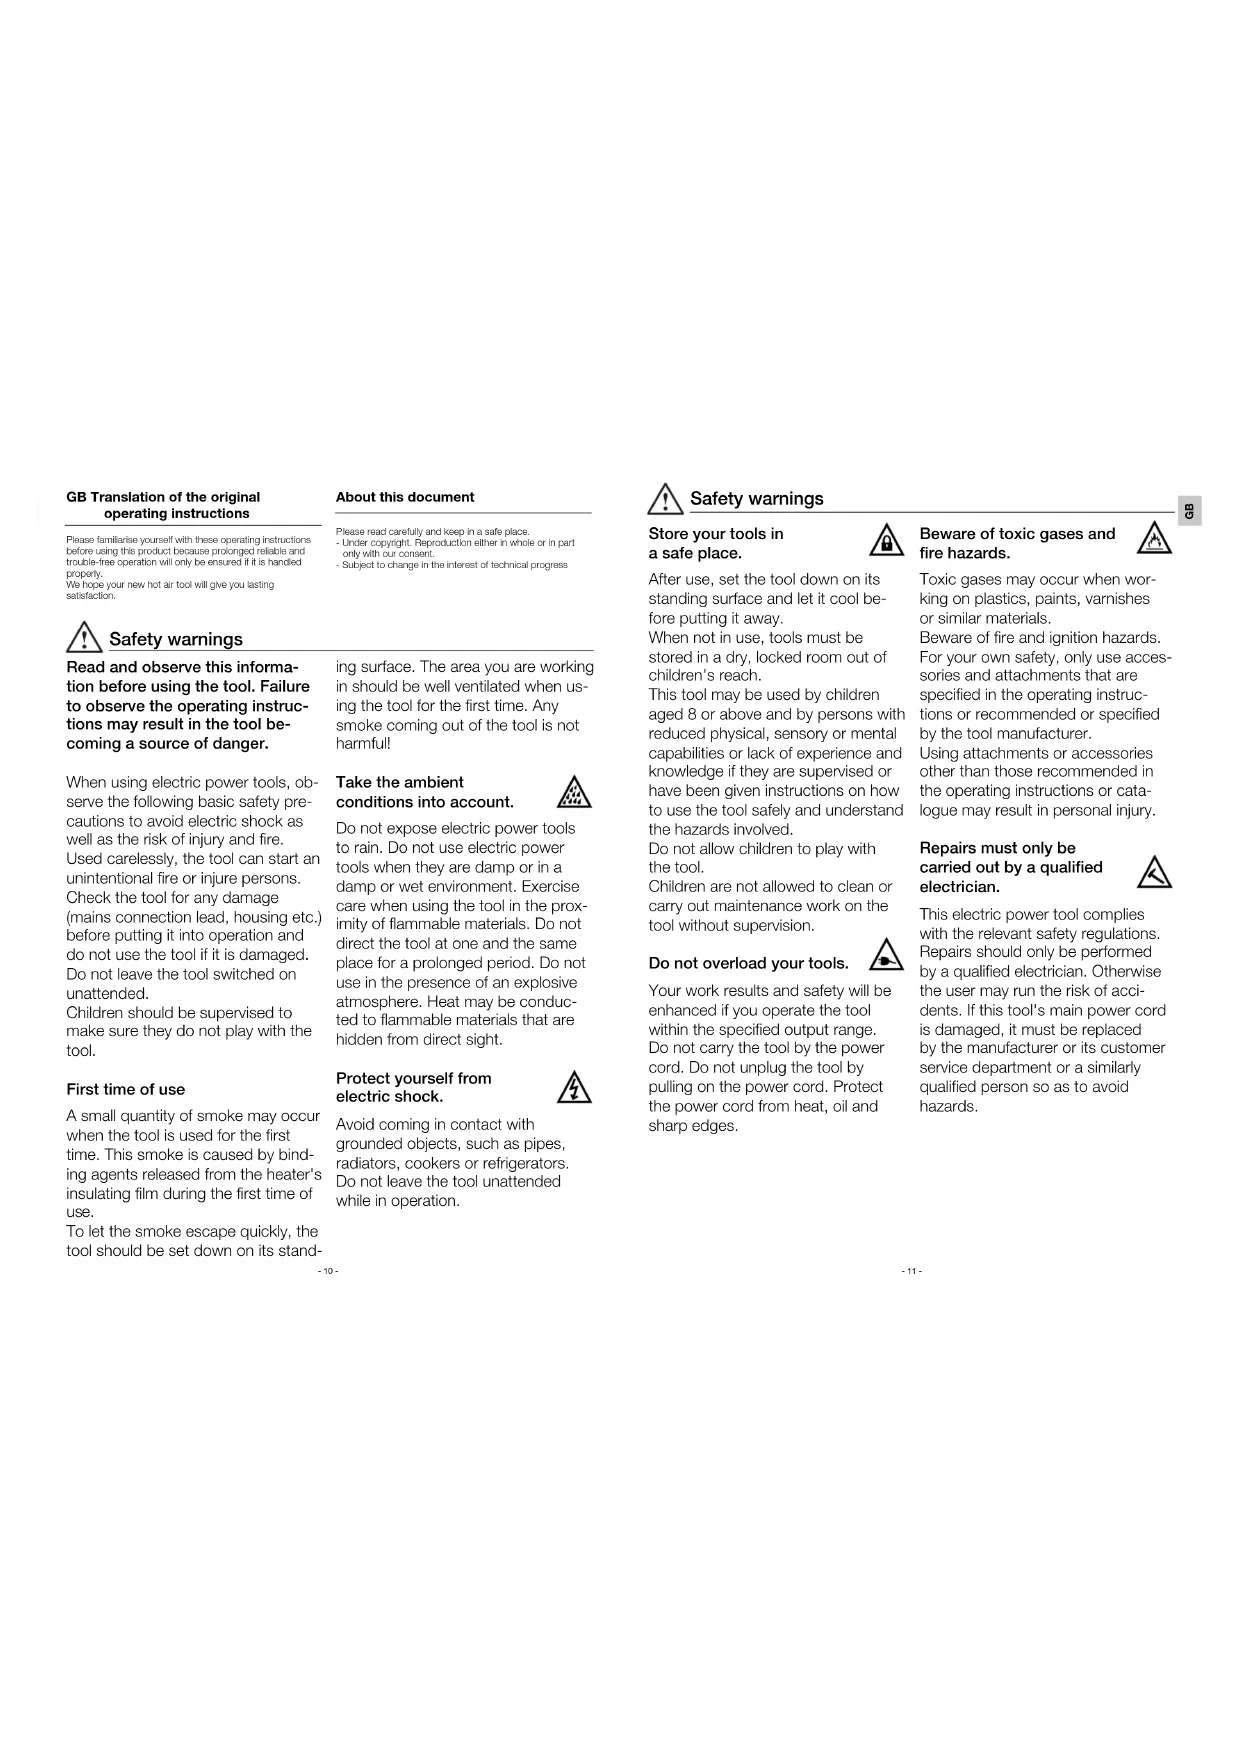
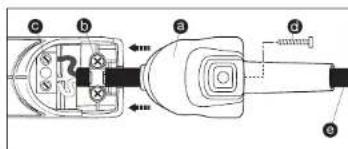
Changing the power cord (HL 2020 E only) If the power cord is damaged, it can easily be changed without opening the casing.

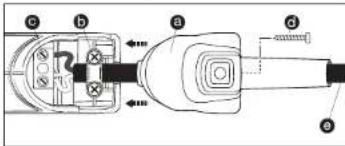
- Important! Disconnected tool from power supply.
- Undo screw and remove cover cap.
- Release cable grip
- Undomains terminals
- Pull out core
- Insert new cord and secure
(1)Fmly screw down mairs (giminals eik.)
Tool features
Stalices steel outlet nozzle
Air Inlat with lattice guard keeps out foreign matter
Bamcvahe gurac sies
For places that are hard to reach
Soft stand and soft end cap for firm standing and non-slip stationary use
6Heavy-duty rubber Insulated power cord
Multipre-stage switch for adjusting airflow (2-stage/3-stage)
Thurnbwheel for selling temperature
Bullon for selling temperature
LEDindicator for monitoring temperature
Soft grip handle for comfortable operation
Hanging capability
Residual head indicator (HL 2020 E ony)
Replacable manspower cord tHL 2020Eonly
Technical specifications
| HL 1620 S | HL 1820 S | |||||
| Voltage | 220 - 230 V, 50/60 Hz | 220 - 230 V, 50/60 Hz | ||||
| Output | 1000 W | 1900 W | ||||
| Stage | 1 | 2 | 1 | 2 | 3 | |
| Airflow rate (min.) | 240 | 450 | 100 | 300 | 500 | |
| Temperature (°C) | 300 | 500 | 50 | 400 | 600 | |
| Temperature setting | - | - | ||||
| Temperature display | - | - | ||||
| Residual heat indicator | No | No | ||||
| Protection class (without earth termination) | II | II | ||||
| Thermal | - | - | ||||
| Thermal cut-out | Yes | Yes | ||||
| Emission sound pressure level | ≤70 dB(A) | ≤70 dB(A) | ||||
| Total vibration value | ≤2.5 m/s2/K = 0.08 m/s2 | ≤2.5 m/s2/K = 0.08 m/s2 | ||||
| Weight | 0.670 kg | 0.800 kg | ||||
| Subject to technical modifications | ||||||
| HL 1920 E | HL 2020 E | |||||
| Voltage | 220 - 230 V, 50/60 Hz | 220 - 230 V, 50/60 Hz | ||||
| Output | 2000 W | 2200 W | ||||
| Stage | 1 | 2 | 3 | 1 | 23 | |
| Airflow rate (min.) | 150 | 160 - 300 | 300 - 500 | 150 | 150 - 300 | 300 - 500 |
| Temperature (°C) | 80 | 80 - 600 | 80 | 80 - 830 | ||
| Temperature setting | Infinitely variable in 8 increments via setting dial | Infinitely variable in 10 °C steps via pushbutton | ||||
| Temperature display | - | LCD | ||||
| Residual heat indicator | No | Yes | ||||
| Protection class (without earth termination) | II | II | ||||
| Thermostat | - | Yes | ||||
| Thermal cut-out | Yes | Yes | ||||
| Emission sound pressure level | ≤70 dB(A) | ≤70 dB(A) | ||||
| Total vibration value | ≤2.5 m/s2/K = 0.08 m/s2 | ≤2.5 m/s2/K = 0.08 m/s2 | ||||
| Weight | 0.840 kg | 0.860 kg | ||||
| Subject to technical modifications | ||||||
| Guide for selecting the right type of welding rod when welding plastics | ||
| Material | Applications | Characteristic signs |
| Rigid PVC | Pipes, fittings, tiles, structural sections, industrial mouldings300 °C welding temperature | Chars in the flame,pungent odour.clattering sound |
| Rigid PE (HDPE)Polydronylen | Tubes, baskets, canisters, insulating material, piping300 °C welding temperature | Bright yellow flame,dries carry on burning, smells of extinguished candle; clattering sound |
| PPPolypropylene | High-temperature orangepipes, seat buckets, packagings, automotive parts250 °C welding temperature | Bright flame with blue core,dries continue to burn.pungent odour.clattering sound |
| ABS | Automotive parts, equipment enclosures, cases350 °C welding temperature | Black, flusty smoke,sweetish odour.clattering sound |
Accessories (see illustrations on the cover)
Your retailer has a wide range of accessories for you to choose from.
1 Surface nozzle 50 mm Prod. No. 070113
2Surface nozzle 75 mm Prod. No.070212
3 Window nozzle 50 mm Prod. No.070311
4 Window nozzle 75 mm Prod. No.070410
5 Part scrapers kit Prod.No.01031
6 Refleclor nozie Prod.No.070519
7 Crimp connectors
0.5-1.5 Prod.No.008655
01.5-2.5 Prod.No.C08648
0.1-0.5-4.0-6.0 Prod.No.008662
8 Heat-shrinkable tubing
4.8-9.5 mm Prod.No.071417
1.6-4.8 mm Prod.No.071319
4.0-12.0 mm Prod.No.072766
Heat shrinkable tubing set of 3 Prod. No.07581
9 Soddering refector nozzle Proc. No. 074616
10 Reduction nozzle 14 mm' Prod.No.07/0717
11 Reduction nozzle 9 mm Prod.No.070618
12 Fine dust filter Prod.No.078218
13HL-Scan Proc.No.014919 14H
14 Wld-llnfo 15. Fie rroler
16Rgina wckng ren
B
A102
HDPE
PP:
A35.
17 Welding shce
(only for HL 1920 E and HL 2020 E)
Disposal
Electrical and electronic equipment, accessories and pack aging must be recycled in an environmentally compatible manner.

Do not dispose of electrical and electronic
equipment as domestic waste.
EU countries only:
Under the current European Directive on Waste Electrical and Electronic Equipment and its Implementation in national law, electrical and electronic equipment no longer suitable for use must be collected separately and recyclate in an environmentally compatible manner.
Declaration of Conformity
[see page 160]
Manufacturer's warranty
This STEINEL product has been manufactured with great care, tested for proper operation and safety in accordance with applicable regulations and then subjected to random sample inspection. STEINEL guarantees that it is in perfect condition and proper working order.
The product is guaranteed for 36 months or 600 hours of operation commencing on the date of sale to the consumer. We will remedy defects caused by material flaws or manufacturing faults. The warranty will be met by repair or replacement of defective parts at our own discretion. This warranty does not cover damage to wearing parts, damage or defects caused by improper treatment or maintenance nor does it cover breakage as a result of the product being dropped. Further consequential damage to other objects shall be excluded.
Claims uncer warranty snail only be accepted if the product is sent fully assembed and well packed complete with sales receipt or invoice date of purchase and dealer's stamp to the appropriate Service Centre or handed in to the dealer within the first 6 months.
Repair service:
If defects occur outside the warranty period or are not covered by warranty, ask your nearest service station for the possibility of repair.

WARRANTY
1 Buse de surface large 50 mm ref. 070113
2 Buse de surface large 75 mm ref. 070212
3 Buse deliecrica 50 mm ref. 070311
4Bose 09175HmT.07410
6Buseofoccefer,070319
Carrion series
0.5,1.7846885561.92.3461276618
091.9540660r1006863
8 Gains Frmsrectactles
4.8-9.5mm#971417
1.6-4.8 mm rel. 071318
4.012.0mm ref.072766
Kit dc gaines themonctactales 3 pieces ref.075811
9 Buse roctrco do brasage' rot. 074816
17 Buse a soder ret.070915
6Fellactomondstukart.n0.070519 8
7 Krimpverbinder
D0,5-1,5 arrr.006655
01,5-2,5 arLrr.00864
00,1-0,5-D4,0-6,0a1.nr.006662
8 Krimpkausen
4,8-9,5 mm art.nr.07147
1,6-4,8 mm art.nr.0/1318
4.0-12.0mm ar.nr.0/2/66
klmpkousset 3-delg ar.nr.075811
9 Sodeemefectormondustuk ar.n.074516
10 Reduceemondstuk 14 mm' ar.ny.070717
11 Reduceemondsluk 9 mm ar.nr.070618
12 Hrslcliter arl.m.078218
13HL-83an 2014919
11.0000000000000000
14Bleadglnnnsck 电074716
15
10KunstcfoRnssrdd
H
HIOPL
PP:
A3S
17 Lasschoen
Soldary llaguear plastico:
- Solanai and Oberga are 100 percent
PVC euro:
HDPE:
PP:
A3S
Optaending at grill:
Grillukune taenoe pa et ojebik ag du behover lkke vente.
Optoning:
Vancr, tillesde lase ag traspotn. Skansom octening og taming en an geng.
Biodlodnig:
Forest rangelis metaedene, som skal locades. Hereafter ovarins Iocladosted moduillant, og der tifleros lodcotoin. Erug sinusmodel for at undgad oxidallannose, cior bernyi lodcotn moduellmodel.
galerkun for HL 2020 E
daijela oevan lampoian nayltwain HL 2020 E
Murlumissupa (vain HL 2020E)
Tekniset tiedot
1,84mmAtn.0731816.175mmAtn.05196
40-12.5mmA1r.75.2766Kemposponesappoeep3dolar 27
N Kymossegssd 3 dter Art-nr. 9 Lodderedefektordyse' Art-nr.074816
Kanapopoeia oea, evopopoeia papei, eopopoeia yoi oboeipnus, bapopoeia oya, STEINEL. On evopopoeia oboeipnus on this koso pao gria oana yai kai kai kai nai oka, his Sotodinian, eopopoeia nov iouo oupa cya oai nai oka.
Anopakpuonxpwpatu:
To group p#e#e#e#e# e#epe#e#e#e#e#e#e#e#e#e#e#e#e#e#e#e#e#e#e#e#e#e#e#e#e#e
Eepiynn kaiwsiy
Household survey of environmental quality in the proposed dataset: 1) how many households report my household. Ex. loc. and urban population on household population/urban/remote area (Sapidida, 1), urban/remote area (SAPIDIA, 2), urban/remote area (ERG, 3), urban/remote area (SAPIDIA, 4) process we put public health services, e.g., the SAPIA, to join a project on public health services. 2) area per 80^ - +60^ . If I am not sure 1-9, then I will use the number of people on household surveys to represent the population. 3) on site, 80^ ; 4) on site, 80^ ; 5) on site, 80^ ; 6) on site, 80^ .
Opppocpa 800C H aoei tio oipopnokai ktoe, pckai
cpeo 150/150 300/300 500 AepiK. hnpocctock
aayyoe Lnpoi va opocce iye oovvock jnyovoc
HL 2020E
Haukoum yuyuoyyua: kui yuyuyuyuyue. Pu 10n fuiuok
Bakun 10n uyu huiuyu uyu uyuyuyuk. Edoz uoyu uyu uyuyuyuyuyuyuyukuyuyuyukuyuyukuyukuyukuyukuyukuyukuyukuyukuyukuyukuyukuyukuyukuyukuyukuyukuyukuyukuyukuyukuyukuyukuyukuyukuyukuyukuyukuyukuyukuyukuyukuyukuyukuyukuyukuyukuyukuyukuyukuyukuyukuyukuyukuyukuyukuyukuyukuyukuyukuyukuykuyukuyukuyukuyukuyukuyukuyukuyukuyukuyukuyukuyuk
Zin mert rnr 100000000000000000000000000000000000000000000000000000000000000
Aaayn kawwdiou (uoy HL 2020 E)
- lipoositol AnoLiposiderin Myocollagen Eroto myosin fibroel . 2. lipopolysaccharide lipocalin coagulation
1Aeepnepnepnepnepnepnepnepnepnepnepnepnepnepnepnepnepnepnepnepnepnepnepnepnepnepnepnepnepnepnepnepnepnepnepnepnepnepnepnepnepnepnepnepnepnepnepnepnepnepnep
4AUPUE CSDPOSESTIC
5.PVXUCIMIOIC
& Tana: 100 ksskssksskssksskssksskssksskssksskssksskssksskssksskssksskss
Stoixiaouakeunc
Aotuouo oowjoe Looepa
Eococococococococococococococococococococococococococococococococococococococococococococococococococococococococococococococococococococococococococococococococococococococ
Apoaepoeaeepnepoepoeepoeepoeepoeepoeepoeepoeepoeepoeepoeepoeepoeepoeepoeepoeepoeepoeepoeepoeepoeepoeepoeepoeepoeepoeepoeepoeepoeepoeepoeepoeepoeepoeepoeepoeepoeepoeepoeepoeepoeepoeepoeepoeepoeepoeepoeepoeepoeepoeepoeepo
AnandanBai kai dshalokappa kai kai vipcakaiya, kaikeyao apicpki, kai cai bcpj
Avoekuk6ka2a5b
BeoJuaaue 60Kekonurva poJauu nncnucoc 12 BoaJuaaue/3 BoaJuaaue
Pp58a ppuoepocop
Pikipuipneppppao
10Paoekokooepoeepoae,pooy
EugapoeanaaA
Awtptn
13 Evotn nnnnnc 2020
Kakooe ge ouoanrueuokocnog (Oio 2020)
Texivka δεδομενα
| HL 1620S | HL 1820S | ||
| 5x6x6x9x10x11x12x13x14x15x16x17x18x19x20x21x22x23x24x25x26x27x28x29x30x31x32x33x34x35x36x37x38x39x40x41x42x43x44x45x46x47x48x49x50x51x52x53x54x55x56x57x58x59x60x61x62x63x64x65x66x67x68x69x70x71x72x73x74x75x76x77x78x79x80x81x82x83x84x85x86x87x88x89x90x91x92x93x94x95x96x97x98x99x100x101x102x103x104x105x106x107x108x109x110x111x112x113x114x115x116x117x118x119x120x121x122x123x124x125x126x127x128x129x130x131x132x133x134x135x136x137x138x139x140x141x142x143x144x145x146x147x148x149x150x151x152x153x154x155x156x157x158x159x160x161x162x163x164x165x166x167x168x169x170x171x172x173x174x175x176x177x178x179x180x181x182x183x184x185x186x187x188x189x190x191x192x193x194x195x196x197x198x199x200x201x202x203x204x205x206x207x208x209x210x211x212x213x214x215x216x217x218x219x220x221x222x223x224x225x226x227x228x229x230x231x232x233x234x235x236x237x238x239x240x241x242x243x244x245x246x247x248x249x250x251x252x253x254x255x256x257x258x259x260x261x262x263x264x265x266x267x268x269x270x271x272x273x274x275x276x277x278x279x280x281x282x283x284x285x286x287x288x289x290x291x292x293x294x295x296x297x298x299x300x301x302x303x304x305x306x307x308x309x310x311x312x313x314x315x316x317x318x319x320x321x322x323x324x325x326x327x328x329x330x331x332x333x334x335x336x337x338x339x340x341x342x343x344x345x346x347x348x349x350x351x352x353x354x355x356x357x358x359x360x361x362x363x364x365x366x367x368x369x370x371x372x373x374x375x376x377x378x379x380x381x382x383x384x385x386x387x388x389x390x391x392x393x394x395x396x397x398x399x400x401x402x403x404x405x406x407x408x409x410x411x412x413x414x415x416x417x418x419x420x421x422x423x424x425x426x427x428x429x430x431x432x433x434x435x436x437x438x439x440x441x442x443x444x445x446x447x448x449x450x451x452x453x454x455x456x457x458x459x460x461x462x463x464x465x466x467x468x469x470x471x472x473x474x475x476x477x478x479x480x481x482x483x484x485x486x487x488x489x490x491x492x493x494x495x496x497x498x499x500x501x502x503x504x505x506x507x508x509x510x511x512x513x514x515x516x517x518x519x520x521x522x523x524x525x526x527x528x529x530x531x532x533x534x535x536x537x538x539x540x541x542x543x544x545x546x547x548x549x550x551x552x553x554x555x556x557x558x559x560x561x562x563x564x565x566x567x568x569x570x571x572x573x574x575x576x577x578x579x580x581x582x583x584x585x586x587x588x589x590x591x592x593x594x595x596x597x598x599x600x601x602x603x604x605x606x607x608x609x610x611x612x613x614x615x616x617x618x619x620x621x622x623x624x625x626x627x628x629x630x631x632x633x634x635x636x637x638x639x640x641x642x643x644x645x646x647x648x649x650x651x652x653x654x655x656x657x658x659x660x661x662x663x664x665x666x667x668x669x670x671x672x673x674x675x676x677x678x679x680x681x682x683x684x685x686x687x688x689x690x691x692x693x694x695x696x697x698x699x700x701x702x703x704x705x706x707x708x709x710x711x712x713x714x715x716x717x718x719x720x721x722x723x724x725x726x727x728x729x730x731x732x733x734x735x736x737x738x739x740x741x742x743x744x745x746x747x748x749x750x751x752x753x754x755x756x757x758x759x760x761x762x763x764x765x766x767x768x769x770x771x772x773x774x775x776x777x778x779x780x781x782x783x784x785x786x787x788x789x790x791x792x793x794x795x796x797x798x799x800x801x802x803x804x805x806x807x808x809x810x811x812x813x814x815x816x817x818x819x820x821x822x823x824x825x826x827x828x829x830x831x832x833x834x835x836x837x838x839x840x841x842x843x844x845x846x847x848x849x850x851x852x853x854x855x856x857x858x859x860x861x862x863x864x865x866x867x868x869x870x871x872x873x874x875x876x877x878x879x880x881x882x883x884x885x886x887x888x889x890 | |||
| HIL 1920 E | HL 2020 E | |||||
| ΣVSWR (dBm/s) | 220-230V, 50/60 - s | 220-230V, 50/60 Hz | ||||
| logIC | 2000 W | 2200 W | ||||
| BSCoCo Hoodpo#nape (W/m3) Ospocpocco (℃) | 1 10-38 80 | 2 100-300 80-600 | 3 300-500 80-600 | ? NC 60 | 23 300-400 80-630 | 300-500 |
| Fullopon depocpoa; | olalipol###ce 9 [mu]u pi poschoe poli###me | abcldicpaee c##p###e 10°C gen. ###kpea: | ||||
| 1 w/20 Hspocpoa; | - | 11CD-10lay. | ||||
| Ecdylen###ep### Cepocpoa; | 60 | No. | ||||
| Kd### npocpo### (p###) ###wnr m###y### | II | II | ||||
| Gupocpoa ### D### | - | No. | ||||
| Ospocpoa### | Nan | Nan | ||||
| 2nd###ep### Bococpoa | ≤70 dB(A) | ≤70 dB(A) | ||||
| 3 ###ep### ### D### | <7.5 m/s2/K = 0.08 m/s2 | <7.5 m/s2/K = 0.08 m/s2 | ||||
| D### | 6.840 kg | 0.880 kg | ||||
1AepoepoipnMaaK,0aepin50mmKa6.07013
2A00001111111111111111111111111111111
730349608OK.SOPCIMK 50120060507011
4.0930506070128000000000000000000000000000000000000000000
6.2017年1月19日
7.20570056C.CWTC
025134680000555
915253068x70548
00105 4660 yuokx.006562
8 Aucyaocipwong
4.59.5mm Kw600,071417
1.64.5mmKuokp0371318
4.0120mmK65n6-072766
2017
9 Avoxacnok opcupio 0vckAncr Kwokc 074616
10 Appeepie 14 mm K86x0/07
11Aepoepoeepoeepoeepoeepoeepoeepoeepoeepoeepoeepoeepoeepoeepoeepoeepoeepoeepoeepoeepoeepoeepoeepoeepoeepoeepoeepoeepoeepoeepoeepoeepoeepoeepoeepoeepoeepoeepoeepoeepoeepoeepoeepoeepoeepoeepoeepoeepoeepoeepoeepoepoeepoeepoeepoeepoeepoeepoeepoe
12ApoAerntxov
13IL Scan
14Faeauoepvo ooeoepocie Lc ykore Kdsoc 0/4715
15KAnepo;Iurjc Kuok01231
16 2300ks 50ppc 50kVPP
2×MPD PVDC
1.2P:
KuSuee073114
106
()
10
17F#oovkAnp
Loyo yu HL 1920 EkmHL 2020E
C E Anwon oumuoppwong
(βλeπeαiδa160)
Anooupon
Haacnncnucuuee,efaptnncnccnauuuaednnae nnnnnae nae aenpaaepnne paepepepepepepepepepepepepepepepepepepepepepepepepepepepepepepepepepepepepepepepepepepepepepepepepepepepepepepepepepepepepepepepepepepepepepepepepepepepepepepepepepepepepepepepepepepepepepepe pe

Δv of production w h tis n kipkck ooccknepiuppoy
MoVo yiXwpeEe:
Lupuapnep 10000000000000000000000000000000000000000000000000000000000000000
Eyyunon kataaekvaoti
Auta to apoplae stnme cmoocuocpuoicpuoie kupuoyy y, aagcogcogcogcogcogcogcogcogcogcogcogcogcogcogcogcogcogcogcogcogcogcogcogcogcogcogcogcogcogcogcogcogcogcogcogcogcogcogcogcogcogcogcogcogcogcogcogcogcogcogcagccg cagccg cagccg cagccg cagccg cagccg cagccg cagccg cagccg cagccg cagccg cagccg cagccg cagccg cagccg cagccg cagccg cagccg cagccg cagccg cagccg cagccg cagccg cagccg cagccg cagccg
Iepic mokuehc
Innne nnnnnae prrn rnpnoa nraeepn ennnnne aenrnnnne anenrnne anenrnne eane ennnnne ennnnne ennnnne ennnnne ennnnne ennnnne ennnnne ennnnne ennnnne ennnnne ennnnne ennnnne ennnnne ennnnne ennnnne ennnnne ennnnne ennnnne ennnnne ennnnne ennnnne ennnnne ennnnne ennnnne ennnnne ennnnnee ennnnne ennnnne ennnnne ennnnne ennnnne ennnnne ennnnne ennnnne ennnnne ennnnne ennnnne ennnnne ennnnne ennnnne ennnnne ennnnne ennnnne ennnnne ennnnne ennnnne ennnnne ennnnne ennnnne ennnnne enannnee

Bu dokūmān hakkinda
Kulunamdar onca, kufu tu kannanna klakuzundaki bigliler lyice ogiran. Cinku anak usutine yugun bir kullanm saye sinda uun utrel, givunir ne anzase bir isgel magariban. Siakh hava labancanudan mermmuniye duymansi arzu edyconu.
Lüfen linyi okuyun vse skaydn.
-Telih khalan konurimakdir, Kismert de oja baslmas,
an cakr aymuz alinar mikindur.
-Teknik gellamire hizmet eden degisklikir yapme haku sadikir.

Güvenlik uyanlari
01,52,5Unn.No.006648
001-05-C4.06.0Unn.No.006862
8 Makarconer
4,8-9,5 mm Urun. No. 071417
1.6-4.8mmUnr.N.S.571319 14.100000000000000000000000
4.0-12.0mmOrnNo.07/266
Makron 905 5846 120, No. 07581 9Xanstrichmmemcst Ltd.,No.074616
10Ksici meme 14mm Upr.No.9/0/17
11 Ksipmeme 9 mm
12 Inco toz fitresl
13IL-Scar
14 Genis yassimeme
15Bask merdanesi
16 Pastik kaynak tell
Set PVC;
HDPE:
PP
A3S
17 Kaynak paouur
QURNo.070818
Unn.No.679218
Udn. No. 01/4919
Unr.No.674715 Unl.No.61311
CIN: No.012311
1
JUN No.07314
Union No. 07/1219
ORF NO 073411
UnNo.67/210
(sadceHL1920EveHL2020Eg)
Uygunluk beyani
(bkz.Sayfa 160)
Tasflye
Eckrikii cihazar, aksoesar vo amcalajlar, gove doetu bir doungisme gongontorlnt.

Elektrik dichatian evei atikn nige atmay!
(0sak HL 1820 Ecs HL 2020 E modelskhcz)
(1yko doHIL 1920EHL 2020E)
Reparatil si post-garantle:
Dupa celsa din temorul di garantie sau in azu doctiori porrento cui bioncato di reparati in garanto, informa ma-va du prive la positabilita repara. rispiel a centrul de service co mal apropiat. 3 ANI GARANTIA PAMMUMPURA
SI Prevod originalinh navodil za uporabo
Fred uporato se sanmile z vsebioc teh navodji za uporabo. Le pravila upraba zagolavla colo g in zanesilvo uporabo brez moleri.
Zeirino var veliko veselaj pri uporabi svoega puhae vroge zraka.

Vamostna navodila
4SeVb 5Kempl at 10m m 61621
- Komplext. syngas 24cav0 st. acc. 6. Othrom jnt, et al. 075619
7 Kontakt za siskane
0.51.5st.80665
01,52,5st.art.008648
00105-4.06.0st.arc008662
8 Skrnccev
4,8-9,5 mm st. art. C/1417
1,6-4,8 mm at. art. 071318
4.0-12.0 mm st. art. 072768
Kompel skrtni 3n 1st. st. at.0758
10.0000000000000000000000000000000000000000000000000000000
11Bocima foma fmm 1at 07618
12F#r 8
13HL-Scan st. ar. 014919
14 Sroka soba z zarezami 8t. ar.074715
15 Pnti valck
16 Varinha zica 12 umetre masr
Trai PVC
HDP
1
17 varini nastavck
[sam0zaHL1920EIn HL2020E]
CE Izjava o skladnosti
(gleite stran 160)
Odstranjevanje
Eskitrifine aparena, aperro in ermbia/oz odalde v okuklu prjaznoxonovc odolavko.

Elektricon aparatov ne odstronjute s namin opacdik
Samo za drzave clinice EU:
Vsiakidz v zajovno Evrospko direktvo stabrionin okrecln in okreclonixl with aparath in jhimn precesom v nacionai no zavoncdjo je okrecltne aparate, ki nso ve uparotni, troca zizlati locein In jh oodat vo koklu priljazno ponevo obdelata.
Garancija proizvajalca
Ta zedex podjela Stein je ze ekbrn izdelen, preoviene dioe dovoklaen in vamost po veljvin prodpeln in kontrilan v kralukonem protkuzu. Podite STEINEL da yarancio na orezhnoi wavosit in dovaclen proyrodva. Garancijka coba zna 38 mesocv cz.600 orotovahnin ur in prince vveljat 2 dnevoce prodat porabnik. Ostradjanjejmo tnoti zaradi napake v materiala all idetal. Garancijka storote ocege popravite all zamenje olovyanin delce po nelr zhi. Garancijka storote odpepe pogravite prorovite prorovite on an obrinin delin pril ohravan in pomankjivostin, ki so peocele popravine uporce all zdzvezwanja ter pr prolim nochao. Nadajne poskodne na drugin prochodn so ldizko.
Garancija bo odorrona leb dostavil dobrozaprikane nerazastojnene napravne 8 kradim episom napakes, biagininik di potodit all rucinorn (datum makupa in stamplika trogovac), poslate na uszstrano servisi
Servis za popravila:
Po potecu garancijole dobe al pri nap kah broz garancijole pravtuce so povortuzo z nasim sorvitenin obrotam glodocopopravita.

HR Prijevod originalih uputa za uporabu
Moirro Vas da se prie uporabe upozma s vim upulama ra krukvanje. Sarro strucno rukovanje amd fug i poudan rad bez smelni.
Zelino Varn puno zadowojsha s Vasim novim puhalom wudraka.

Sigurnosne upute
Prije negro cete koristiti uredaj, procitaje i pridrzavajte se ovih naputaka. U slucaju nepridrzavanja uputa za uporabu uredaj moze postati izvor opasnosti.
Kod uporabe elektroalata treba se pri- drzavati sledecih osnovih sigurnosin mhjera za zastitu od elektri-anog udara, ozljedivanja i pozara.
Ne rukujete i uredajem pažljivo, moze doci do pozara ili ozljedinjanja osoba. Prijé pušanja uredaja u rad provjerite ga na eventualna ostecenja (mrežni prikjučni vod, kudište itd.) i ne koristite ga u slučaju ostecenosti.
Uredajne smije raditi bez nadzora. Djeca trebaju biti pod nadzorom kako bistebillsigurnida se nigraju ureda-jem.
Prvo pustanje urad
01,52,5art.br.008648
00105-04060art. cr. 008662
Crijivaza stezarjc
4,8-9,5 mm art. br. 071417
1,6-4,8 mm art. br. 071318
4.0-12.0 mm art.br.072768
Sel crijiva zae stezane 3-dieir arl. br.075811
9 Felleklorska sapnica za lemierje' arl. br. 074616
10 Recukolska sapnka 14 mm* art. br. C
11Becikcska saponca 9 mm ar,br,0
12.000000000000000000000000000000
13HL Scan art. pr.0
- Sacrica sa 5rokm prerezom
15.012948
16 Zica za zavahvarie pastike
Tyrdi PVC.
HDPE:
PP
A
17 Stopica za zavarvanj
(samzo 1920EHL 2020E)
Zbrinjavanje
Eskizirne uredaye, pricot i armbiazu I reba zbrinul na ekolo-od nacin octozovna raokdzau.

Ne bacaile elektricne uredaje u kuxni otpadi
Samo za zemlje EU:
Prama vazacn o europosl dikivdva za sta dokrino ekronokiko urodao i njovoj impostanadu n rucnalno pravo, ekronokiko uradai ko so vise no magu kortstil moraju se posce na sakuati 1zbruih na ekolokin nadin edvozm na recaclau.
Jamstvo proizvodaca
Ovai STEINEL-ov protzoid zraden je s nejavcno pamzijn, negvo tukonkionlanje igumocst iptani su proma vazdo. cim propasima I na kralu J o rozovco podvignut konrol uzkra, STEINEL prizina jarnsto a besoriljekmo kakuokou I funckionainost.
Jarnsieno roc nici 36 mijes odnosno 800 radin sati, a pocijne s danom prodaje potrosoku. Ukranjaro nekošta koi so posjutecka graeika na materjali II bromke greke, realazlajna jarnsto izvastie siepoprovskii il zameryn onila j stao gekrom no pa nadern zhgon. Jarnsjo se na przajno za stoto na potrosoim dijovmia, za stoto I neolostatko koi nestaji zoog nostruvodnog rukovaria II odzrawna, Kao I za jomov otlikom poda. Posjodnic stoto na drugim precinstma si uklukce.
Jarnsjo se przajno sano azio nerastravlen, dobro zapalari urenda pojalote zadepnico I racorum (satun kupje I pecat Trgivac, odgovarauojc servosir slutz II ga tlekorn provb 6 mjesed predatr voceu.
Sluzba za popravke:
Nakon itako jamsternov roka ill Kad so utvidn nodostat kaz jamsva, rassitato so u najibzlo servinoi sluzil o magoc nost pappka. 3GODINE JAMSTVA
(ainul1H1920EaHIL2020Ejaoks)
- Entropy, mediating survival model
Kotasiie B/G Proes N-0711
HDBF: BocicN 071219
P00128
1720
A5510
17 SubraHarcio 2346 FIOK8 N.070915
[prctalsare HL 1920 E rHL 2020E]
CAtlitktles deklaracija
(2r.160 psi.)
Salinimas
Eekros prelaaisai, predai pakucies lun bui perdrami
aplinkai nakenksmingu bocu

Netomashite ekkros protaisu karti su buhromis atikomikam!
Tik ES salims
Rerriniantis galojantica Europos Segungos Direktiva sice elektraks i elektronikas jongangiai jir kaskelperino Inactional tonge, nocotinkam naudct oecrodex protacida turi butn konakkan atsika irpondcim apinnak ekonekmingu bucu.
Gamintojo garantija
StENIL garnirys pagamiras tin krukocla, Jo vold
mei Ira saugatikint pagai gacilacnuc rongumontus, a
galauiala atka trafkana controne. STEINEL garantua
necrkeitaingko kolybjr ve kildim.
Garanthins biotaraps apina 36 mesneus arba 800 darbo
valandru prasadna nu pardavrim varoiuburi dianes. Maa
passalime defekute, suulitius su medzagl arba gamy
brokui, garantiu liskatokriu, miu zucurta, pretisias
nemokamal remontuajara ania kaskamos sugeulos
dally. Garanthins pasaguo nettikamnos nuedovin da
ludigammo rornoutool, gonimainir ocektamis, atsradu
dismosiIe otnetniknico pataioia naudjolino arba technio
aptomavimo, tap paat pretaiutai uluzus jam nukirns. Kili
tsaikams pacdayia zala nehygnima.
Garantia talkmaik Iku tao uveil je nielareyditas prelasias
karta Su kaku kekdi arba eapaxia jirkmo data ir parda-
vlp antspaudi, tinkamai supakoutas utashanmas Jattinkam: chinnes proziiros tamnyo wera arba per limpuus
s6 monenias patodaimas pardavu.
Remontas:
Pasbalgaris garantiro aptamavimo iako- tarpulia area esant gocimarns, kurims garantieme pre/ta nepalica, del remontio galmybu feinukles aririluismo ap- tamavimo centre. 3 METU GAMINTJO GARANTUA
LV Originala lletosanas pamaciba Par so dokumentu
Firmis imranianos lxdam iipazilas ar so mortizas
panacitou, zo viertig lsteorafie lielosana nodcina iglacgu,
drosu un nevanojamu carito.
MBS novam Jume dautz palkamu minko kpaar Jusu
jauno celirecdes fnu.
Lidu, idasei umarji (sugabaj).
Autribles iars aisargas, Pparpublicana, arai sasikviv Izukumu veki, ikei ar mui alau.
Paturam teibias veki imzimanes, kasi safasir as ternikas atafiu. Paturam teibias veki imzainas, kasi safasir as ternikas atafiu.

Noradijumi drosbai
Pirms ierices lietoanas rupigi izlasiet un ieverojet sos noradijumus.Neieverojot lietoanas instrukcijas prasibas,ierice var apdraudet Jusu drosbu.
Lai darba ar elektróiercém pasargatu sevi no elektriskas strvas trieci-na,traumesanas unugunsgreka izcelesanas riska,jaievero sadi drosi-bas pasakumi.Stradajot ar ieri pa-viri, var izcerties ugunsgreks vai tikt savainoti cilveki.
Pirms lietosanas parbaudiet, vai ieri- cei nav kadi bojajumi (strvas piesleguga vads, korpuss u.c.), un, ja tadi tek konstateti, nelietojiet ieri.
Nedarbiniet ieri ci bez uzaudzibas. Neatstajet bez uzaudzibas bernus, lai nodrosinatu, ka vi ni nerotalajas ar ieri ci.
C1,52.5art.nr.C06848
C01Q5-04060aR.006862
4.89.6cm art. 07161
1.64.8cm2atpr07318
4.0-12.0mm art. r.v.07276
Termososedimaco caurolu
komplekti trisaljga ar. nr. 075811
['kaiHL1920EunIL2020C]
Piie pioepepepepepepepepepepepepepepepepepepepepepepepepepepepepepepepepepepepepepepepepepepepepepepepepepepepepepepepepepepepepepepepepepepepepepepepepepepepepepepepepepepepepepepepepe pe
ycaKa Ka6enei:
IepooypOyAaT TpyA aegAeAeT N A eEeV oevnBn 10
IepooyeAeT RopA aeeKoAeY Iip KooN PaeHApocRy Cya
kay ToyB No pAeTey B 50% aDcHtAeT cpeMeu,co
Cpa-104. OceEbeBePb npaaepoey yck3 kpooh
OeepooyeAeT PpAeWnEeWv EoeepoT oecnue
MOEYI HYNWIN BIKI KLIIC WCDIIS AEN PONNTH IIOPOKOWI HO T O KAK, YOLOHIM NCT CUPOL, LBCN KESCH INBIXO-OK, HANBOHRI K208-05-00CNDNT -AOTCCDNTKHNWNL
ΦopMoBaHne u3aenu u3 nBx:
branbaprnpnepnepnepnepnepnepnepnepnepnepnepnepnepnepnepnepnepnepnepnepnepnepnepnepnepnepnepnepnepnepnepnepnepnepnepnepnepnepnepnepnepnepnepnepnepnepnepnepnepnepn
PaskuraHme rpn:
3aHIOIOOeOHVEYcIbSaeBnDfT;MaaTbHeHyHO
Pa3mOpaxnBaHne:
BOLICUBO,OB,OB,OB,OB,OB,OB,OB,OB,OB,OB,OB,OB,OB,OB,OB,OB,OB,OB,OB,OB,OB,OB,OB,OB,OB,OB,OB,OB,OB,OB,OB,OB,OB,OB,OB,OB,OB,OB,OB,OB,OB,OB,OB,OB,OB,OB,OB,OB,OB,OB, OB,OBO,BIO,BIO,BIO,BIO,BIO,BIO,BIO,BIO,BIO,BIO,BIO,BIO,BIO,BIO,BIO,BIO,BIO,BIO,BIO,BIO,BIO,BIO,BIO,BIO,BIO,BIO,BIO,BIO,BIO,BIO,BIO,BIO,BIO,BIO,BIO,BIO,BIO,BIO,BIO,BIO,BIO,BIO,BIO,BIO,BIO,BIO,BIO,BIO,BIO,BIO,BLOB
NaiKa:
Iepn, Hnnnnnnnnnnnnnnnnnnnnnnnnnnnnnnnnnnnnnnnnnnnnnnnnnnnnnnnnnnnnnnnnnnnnnnnnnnnnnnnnnnnnnnnnnnnnnnnnnnnnnnnnnnnnnnnnnnnnnnnnnnnnnnnnnnnnnnnnnnnnnnnnnnn nn nannn nn nannn nn nannn nn nannn nn nannn nn nannn nn nannn nn nannn nn nannn nn nannn nn nannn nn nannn nn nannn nn nannn nn nannn nn nannn nn nannn nn nannn nn nannn nn nannn nn nannn nn nannn nn nannn nn nannn nn nannn nn nennn nn nannn nn nannn nn nannn nn nannn nn nannn nn nannn nn nannn nn nannn nn nannn nn nannn nn nannn nn nannn nn nannn nn nannn nn nannn nn nannn nn nannn nn nannn nn nannn nn nannn nn nannn nn nannn nn nannn nn nannn nn narnn nn nannn nn nannn nn nannn nn nannn nn nannn nn nannn nn nannn nn nannn nn nannn nn nannn nn nannn nn nannn nn nannn nn nannn nn nannn nn nannn nn nannn nn nannn nn nannn nn nannn nn nannn nn nannn nn nannn nn nannn nn namm
CpaKa nactMaccoBbix H3dennn H3dennka uBOB:
Bc Bn 100000000000000000000000000000000000000000000000000000
Cbapka nactmaccbbx nneHok:
pnpnnnne nnnnnnne nnnnnnne nnnnnnne nnnnnnne nnnnnnne nnnnnnne nnnnnnne nnnnnnne nnnnnnne nnnnnnne nnnnnnne nnnnnnne nnnnnnne nnnnnnne nnnnnnne nnnnnnne nnnnnnne nnnnnnne nnnnnnne nnnnnnne nannnne nannnne nannnne nannnne nannnne nannnne nannnne nannnne nannnne nannnne nannnne nannnne nannnne nannnne nannnne nannnne nannnne nannnne nannnne nannnne nannnne nannnne nannnne nannnne nannnne nennnee
JaBawei6e3oNachoCTM
HHTYPOVTHA CHCHEN NYYXCYTENN (PEN TENDON)
- Pocio kihokai: Tepoipomimki, Koia kuhokai yokoi kai kai kai kai kai kai kai kai kai kai kai kai kai kai kai kai kai kai kai kai kai kai kai kai kai kai kai kai kai kai kai kai kai kai kai kai kai kai kai kai kai kai kai kai kai kai kai kai kai kai kaukohoyu, Taon uayakoukya, pao oji, daibao, ha h a h a h a h a h a h a h a h a h a h a h a h a h a h a h a h a h a h a h a h a h a h a h a h a h a h a h a h a h a h a h a h a h a h a h a h a h a h a h a h a h a h a h a h a h a h a h a h a h a h a h 2. As buhokoi oho fui ayat, buhokoi bhojot Hae konohoe sho chos 3. As buhokoi oho cfo ayat, buhokoi bhojot Hae konohoe sho chos 4. As buhokoi oho cfo ayat, bengi, cytoh Knechoope sho chos 5. As buhokoi oho cfo ayat, buhokoi bhojot Hae konohoe sho chos 6. As buhokoi oho cfo ayat, buhokoi bhojot Hae konohoe sho chos 7. As buhokoi oho cfo ayat, buhokoi bhojot Hae konohoe sho chos 8. As buhokoi oho cfo ayat, buhokoi bhojot Hae konohoe sho chos 9. As buhokoi oho cfo ayat, buhokoi bhojot Hae konohoe sho chos 10. As buhokoi oho cfo ayat, buhokoi bhojot Hae konohoe sho chos 11.
2.10 Nepeper yzak tenoace penea aonohn-ehn- hCCTymeH
TOMINOHII2020F
Onncahne Hnctpymeta Tnyck B EKcnnyatauio
Noanyakita, yunyata: pccscknncn nooyooeeb. buaaBmN 10pOcUoHIN HIO OIOIOWAIOI OIA BAAIOAIOHBAI BIAO 0pOeKoKIO. Tocca I aonuouk oio NPOVIOUI KIOUHOYIOU 10CIOI OIOLOHIOIOIOIOIOIOIOIOIOIOIOIOIOIOIOIOIOIOIOIOIOIOIOIOIOIOIOIOIOIOIOIOIOIOIOIOIOIOIOIOIOIOIOIOIOIOIOIOIOIOIOIOIOIOIOIOIOIOIOIOIOIOIOIOIOIOIOIOIOIOIOIOIOIOIOIOIOIOIOIOIOIOIOOO
HL1620S
BIOHIOHOI HIO HO HO HO HOHOHOHOHOHOHOHOHOHOHOHOHOHOHOHOHOHOHOHOHOHOHOHOHOHOHOHOHOHOHOHOHOHOHOHOHOHOHOHOHOHOHOHOHOHOHOHOHOHOHOHOHOHOHOHOHOHOHOHOHOHOHOHOHOHOHOHOHOHOHOHOHOHOHOHOHOHOHOHOHOHOHOHOHOHOHOHOHOHOHOHOHOHOHOHOHOHOHOHOHO HO HO HO HO HO HO HO HO HO HO HO HO HO HO HO HO HO HO HO HO HO HO HO HO HO HO HO HO HO HO HO HO HO HO HO HO HO HO HO HO HO HO HO HO HO HO HO HO HO HO HO HO HO HO HO HO HO HO HO HO HO HO HO HO HO HO HO HO HO HO HO HO HO HO HO HO HO HO HO HO HO HO HO HO HO HO HO HO HO HO HO HO HO HO HO HO HO HO HO HO OHOOO HOOO HOOO HOOO HOOO HOOO HOOO HOOO HOOO HOOO HOOO HOOO HOOO HOOO HOOO HOOO HOOO HOOO HOOO HOOO HOOO HOOO HOOO HOOO HOOO HOOO HOOO HOOO HOOO HOOO HOOO HOOO HOOO HOOO Hooo Hooo Hoohoo Hoohoo Hoohoo Hoohoo Hoohoo Hoohoo Hoohoo Hoohoo Hoohoo Hoohoo Hoohoo Hoohoo Hoohoo Hoohoo Hoohoo Hoohoo Hoohoo Hoohoo Hoohoo Hoohoo Hoohoo Hoohoo Hoohoo Hoohoo Hoohoo Hoohoo Hoohoo Hoohoo Hoohoo Hoohoo Hoohoo Hoohoo Hoohoo Hoohoo hoohoo hoohoo hoohoo hoohoo hoohoo hoohoo hoohoo hoohoo hoohoo hoohoo hoohoo hoohoo hoohoo hoohoo hoohoo hoohoo hoohoo hoohoo hoohoo hoohoo hoohoo hoohoo hoohoo hoohoo hoohoo hoohoo hoohoo hoohoo hoohoo hoohoo hoohoo hoohoo hoohoo hoahhoahhoahhoahhoahhoahhoahhoahhoahhoahhoahhoahhoahhoahhoahhoahhoahhoahhoahhoahhoahhoahhoahhoahhoahhoahhoahhoahhoahhoahhoahhoahhoahhoahhoahhoahhoahhoahhoahhoahhoahhoahhoahhoahhoahhoahhoahhoahhoahhoahhoah
HL 1820 S
BnBnBnBnBnBnBnBnBnBnBnBnBnBnBnBnBnBnBnBnBnBnBnBnBnBnBnBnBnBnBnBnBnBnBnBnBnBnBnBnBnBnBnBnBnBnBnBnBnBnB n BpOeepoepoeepoeepoeepoeepoeepoeepoeepoeepoeepoeepoeepoeepoeepoeepoeepoeepoeepoeepoeepoeepoeepoeepoeepoeepoeepoeepoeepoeepoeepoeepoeepoeepoeepoeepoeepoeepoeepoeepoeepoeepoeepoeepoeepoeepoeepoeepoeepoeepoeepoeepoepoeepoeepoeepoeepoeepoeepoeepoeepoeepoeepoeepoeepoeepoeepoeepoeepoepoeepoepoepoepoepoepoepoepoepoepoepoepoepoepoepoepoepoepoepoepoepoepoepoepoepo
HL1920E
BIOHINIC HAI HAI YUAN YI CHENYI (HONGKONG) CHICHOU CING CHUYI HAI YOCHIKU (CANG) PING KUKHIJI B (1) ABPAP-THOPKO BYOTCHNI. HAPRY: TPCCTYAMUR APPOPERPHYNIC AYOROPPO/ONTOCA (NEXA) (1-APPO) HAPRY: TAMATYIPOM KONOSYA (100°C) CUMMULI INH RECYTENOMA/PENTOMYCIA (100°C) MACHU YACTAHAMTEK TELISAYYI (100°C) PENTOMICS 2 & 3 IN LATE SINE (60°C - 600°C, YAZAKHIM) IN CHSY
10000000000000000000000000000000000000000000000000000000000000000000000000000000000
HL 2020 E
Beknokhov B. Aikonokhin C. Krymchuk A. Iapokoskin H. Kostoch C. Chien Y. Ieber G. Nenkovich E. Pashchynko H. Abaposhkii T. Obovskiy, H. Krymchuk T. Ieber G. Nenkovich H. Abaposhkii T. Obovskiy, H. Krymchuk T. Ieber G. Nenkovich H. Abaposhkii T. Obovskiy, H. Krymchuk T. Ieber G. Nenkovich H. Abaposhkii T. Obovskiy, H. Krymchuk T. Ieber G. Nenkovich, H. Krymchuk T. Ieber G. Nenkovich, H. Krymchuk T. Ieber G. Nenkovich, H. Krymchuk T. Ieber G. Nenkovich, H. Krymchuk T. Ieber G. Nenkovich, H. Krymchuk T. Ieber G. Nenkovich, H. Klyashevsky, M. Krymchuk, J. Lefevre, V. Krymchuk, A. Krymchuk, D. Krymchuk, A. Krymchuk, A. Krymchuk, A. Krymchuk, A. Krymchuk, A. Krymchuk, A. Krymchuk, A. Krymchuk, A. Krymchuk, A. Krymchuk, A. Krymchuk, A. Krymchuk, A. Krymchuk, A. Kryrnchuk, A. Krymchuk, A. Krymchuk, A. Krymchuk, A. Krymchuk, A. Krymchuk, A. Krymchuk, A. Krymchuk, A. Krymchuk, A. Krymchuk, A. Krymchuk, A. Krymchuk, A. Krymchuk, B. Krymchuk, B. Krymchuk, B. Krymchuk, B. Krymchuk, B. Krymchuk, B. Krymchuk, B. Krymchuk, B. Krymchuk, B. Krymchuk, B. Krymchuk, B. Krymchuk, B. Krymchuk, B. Kryrnchuk, B. Kryrnchuk, B. Kryrnchuk, B. Kryrnchuk, B. Kryrnchuk, B. Kryrnchuk, B. Kryrnchuk, B. Kryrnchuk, B. Kryrnchuk, B. Kryrnchuk, B. Kryrnchuk, B. Kryrnchuk, B. Kryrnchuk, C. Ryzhchenko, D. Ryzhchenko, D. Ryzhchenko, D. Ryzhchenko, D. Ryzhchenko, D. Ryzhchenko, D. Ryzhchenko, D. Ryzhchenko, D. Ryzhchenko, D. Ryzhchenko, D. Ryzhchenko, D. Ryzhchenko, D. Ryzhchenko, D. Ryzhlachnyi Tikhonov 1987; H.K., M.A., M.A., M.A., M.A., M.A., M.A., M.A., M.A., M.A., M.A., M.A., M.A., M.A., M.A., M.A., M.A., M.A., M.A., M.A., M.A., M.A., M.A., M.A., M.A., M.A., M.A., M.A., M.A., M.A., M.A., M.A., M.A., M.A., M.A. A.Naizanov Zakamazhdin Zablanish kremny 3'ye 3'nechny 3'cepnny 3'cepnny 3'cepnny 3'cepnny 3'cepnny 3'cepnny 3'cepnny 3'cepnny 3'cepnny 3'cepnny 3'cepnny 3'cepnny 3'cepnny 3'cepnny 3'cepnny 3'cepnny 3'cepnny 3'cesnny 3'cepnny 3'cepnny 3'cepnny 3'cepnny 3'cepnny 3'cepnny 3'cepnny 3'cepnny 3'cepnny 3'cepnny 3'cepnny 3'cepnny 3'cepnny 3'cepnny 3'cepnny 3'cepnny 3' Bakhtayev Zakamazhdin Zablanish kremny 2'ye 2'nechny 2'nechny 2'nechny 2'nechny 2'nechny 2'nechny 2'nechny 2'nechny 2'nechny 2'nechny 2'nechny 2'nechny 2'nechny 2'nechny 2'nechny 2'nechny 2'nechny 2'cepnny Bakhtayev Zakamazhdin Zablanish kremny 1/2 Bakhtayev Zakamazhdin Zablanish kremny 1/2 Bakhtayev Zakamazhdin Zablanish kremny 1/2 Bakhtayev Zakamazhdin Zablanish kremny 1/2 Bakhtayev Zakamazhdin Zablanish kremny 1/2 BakHTayev Zakamazhdin Zablanish kremny 1/2 BakHTayev Zakamazhdin Zablanish kremny 1/2 BakHTayev Zakamazhdin Zablanish kremny 1/2 BakHTayev Zakamazhdin Zablanish kremny 1/2 BakHTayev
Cmeha anektpnueckoro shypura (tonko HL 2020 E)
FIOEEOEIEHNEA EKPTPAECN LHPONHO OENHIL Hpa5-2004 konoyc

- HaxchN MCHPYeMOT OoepyHnOaAeKpueckcn reti
2OCHTBHTBHCHKONAO 3 - Reciprocates Jazawon's work on the "papacoros" (pp. 1-6)
- Beteiligung der pachyprospera Linyi
- BocnB 100000000000000000000000000000000000000000000000000000000000000000
CocTBHbIe YaCTN
Cantiee bvoognco
BcDyXo06P0C0O20E003C0040HPOO000HHH 10000000000
C#
YyHnBnO np 1000000000000000000000000000000000000000000000000000000
PesHHOBKcBnBnepMBOOHHnHHTpykN
Cynn-ntnne nnnnne aenrnnn ennnnnn neannnnn nnne
PtytHsOp (m)CnOtpy
Pepekn-ncn 10
KoHpor, Tarnepaynp nncnepncknn K
HAKTEKHA HAKTOKOTAPVAGA
T
V1x#A#oC#0nO#n#epayon(t#H2020D
Eckp-ccnnHyp,avchivwun (torso HL 2020 E)
Texnueckne daHhble
| HL 1620 S | HL 1820 S | ||||||
| Cenese roponenlune | 220.230 V/50/60 T# | 220.230 V, 50/60 T# | |||||
| Munich | 1600 Bt | 1800 W | |||||
| Rome | 1 | 2 | 1 | 2 | 3 | ||
| Hotok boshya (r/min) | 240 | 450 | 100 | 300 | 500 | ||
| Temozepatry (°C) | 300 | 500 | 50 | 400 | 600 | ||
| Palytopeia tomepernye | - | - | |||||
| Hidrokaeyra tomepernye | - | - | |||||
| Hidrokaeyra tomepernye cali tomepernye | Her | Her | |||||
| Klacc saaunai | II | II | |||||
| Bocca | 0.6/40 kg | 0.600 kg | |||||
POMOaB Am Bb6opn paunbnoH CApOyHO npoBOON n npdBapwAHM NNTACTMaCC
PnHaDJIeXHOCTH (m.Pa.HoO
BipedaacwctcApaeknAecopmwnnnnnpaonoc
1WHPOKENHnKsKa50wX¥eunC70113
2Umpoknncn75w#01670212
30188 25
4018163275MnNp.370410
6FmKcHJHAR HACAJIKNAGL070519
7 Coennterne
005-57epn.006655
01525V6p00548
00105 0466670006662
COWYALG 50
4.5952810761471310
1.54.5321985.071986.12.13cm 08.07376
4.3.12.5M/股,0.0275%
Cannumol 100mg, 25mg tid. v3 8 mcg bid pot C7551
9PeFneKToCpHn HacKaJpn naKaH KApT.0/416
10PeyKnnnna Hacpa 14 Wn607
11Pcaynnaaannnnaeep 9nnnap.07618
12400000000000000000000000000000000000000000000000000000000000
13HSCA 141100000000000000000000000000000000000000000000000
15.100000000000
16
BECHEH 03X NP20-073114
(10B)NPa7.0/1219
11E
AbC 10apr6/4210
17Coep04dcal
(1000HHL920EHL920E)
Ynnn3aun
Bhokhtopimipodi, Konkunnyi volni in narukyki cheyet Haranmudi, Hau khotor vio otupoi vii repecodnai

He sbpaatbaa tbe aekroonpnpopa 60000
ToIbkoDnA CtpaH EC:
ZIHNHEJGNDHYCHOTNHPDPOKINKAPKPNKTHOIOPAHADHOHHEHIEHPCPPKNNMHNKPOYNOOYNPQHNEHNEPEAANBENHNAHOBAHNBOXKACATCNIHIXKAPDPDOHHTHEEHCNPPOPDAPO,jonHHNCOPTAPFONDBHINHANABNNNHAHOPOHNHYEPSTHOPEPAPOCY
CepTuΦuKAT COOTBetCTBnA
(cM. ctp. 160)
RapaHTn npOn3BODnten
DIOHIO HIOHIO HIOHIO STEINEL BAO C OOCOIOI TAEIO, HOBHO HOI RAO BOHO H NCTHO HIOHO HE OBOCOCOHOCHN H EBOOOHCOHO HEOOOHCOHO KAKHYAOTAO CHONMOOYAO CHONMOOYAO YAOHNPOHNOOHAI A PNOLOO BDOONOOA KOPTOPRA KAKTHA. OPIMA STILLIN RAPHTHPYB XACBOK KAKTHA O NAGMOHIO BOYO YAOHO TANMHIOL CCKO KAKHYAOTAO DOXAB 35 NOO OVOO 500 HAO CHIKO YAOHNQO YAOHNQO POLOO HOOHOOYAO FAMMO OHYEOKO YAO HIOO CHAIKO KOGO UOKUROU O PCYUBI O CICLOPOBOKAKTAR. HONG MATHMOHIO HOO GOCUYE DEFOK O KANGKUPYOU
Depeh c yprrnchn Hnyrnnnnae Hnne nnnnne 1nne
TAPHINHPDCJLBCBCK-CHIKK-10CMHSCOHTHILC HIO BCCPAMPHYNHYAKOSHOHMBE GBOIHHIOHIOHIO HO KCPWYEPCEPCPPCHANTHOHNHC NHPQKHNHHKACKTOVKKO YIKSHANKHICGQADNOKOGA 1-2-3-4-5-6-7-8-9-10-11-12-13-14-15-16-17-18-19-20-21-22-23-24-25-26-27-28-29-30-31-32-33-34-35-36-37-38-39-40-41-42-43-44-45-46-47-48-49-50-51-52-53-54-55-56-57-58-59-60-61-62-63-64-65-66-67-68-69-70-71-72-73-74-75-76-77-78-79-80-81-82-83-84-85-86-87-88-89-90-91-92-93-94-95-96-97-98-99-100
PemOHThbIn cepBnC:
Yka3aHn 3a6e3oNaCHOCT
Ipooyete n cna3BaIte Te3n npeno pBkn, npedn da n3no3BaTe ypeda. Ipn Hecnaa3BaHe ha nHcTpyKuInTe ypebT MoKe da ce npebbPhe B n3-TOUHNK Ha onaCHOCT.
PnH3non3BaHe Ha eNeKTPoNHCTpyMeHTN Tp86Ba Da ce Cna3BaT cneHnTEOCHOBHN pnpOpBKN, C cen npEpa3BAHe TO KOKB yap, KOHTyNN NIN NOJAP. AkoypeBt He cE H3non3Ba BHNMaTeHNO MoKe Da Ce CTnHr De NoXap NN da NcTpaDAt XOPa
Ppeynynotpe6a npoepete ypeda 3a nopei (3axpaHbaa Ka6en, Kopnyc n T.H.) n AKO mMa TaKnBa He H3non3BaIte ypeda.
YpeBt Ta He Ce non3Ba 6e3 Ha3Op.
Deuata Tpa6Ba Da ce HabIoDaBAt, 3a Da
ecnypHo, Ye He mPpTa CypeJa.
TbpoBaHAnHO nycKaHe B EKcnnoaTaun
Pn npbpa ynoptpeMoXe da n3ne3e MAIKO dm. DmmeHTo ce o6pa3yBa ot 3aIenBauHTe BSeCTBa, KOIO npapdN TOINHaTc ce OTdenr TpN npbPa ynoptpeoTnO npaTO p0nHO HaHRpeBATEJ.
3a da ce noCTHHe 6b30 OTBeKaHa dMa,ypeBt Tpa6Ba da ce NoCTaBn
3aTo3nDOKyMeHT
Mopnoepene co hwnwatehncn no caene.
-CHIKI KINPABA BARASEH, INTELETEBAE, NOPH ONGENEHO
32323267 Cn p1020 21 p1020H, KIOI O O KJIKI 21 (Cn) HK HHPQK.
Ha cTOnaata cn cTpaHa. Pn nbpBa yNtpe6a pa6oTHOTn NmoeHne TpA6bda ce npOBETpu Do6pe. Dmbl He e onaceH 3a 3dpabeto!
Cb6pa3e ce cokonHnTe kaTOpn.
He 3naarate enektpnoHCTpyMeHTn Ha
IbXd, He 3nO13BaTe BnAKn HneK
TPOINHCTpyMeHTn, HTO BbBnAKnHa Nn
MOKpa Cpea. BHIMAHNE pni n3no3Ba-
He Ha ypeinBe 6bn30ct Do IeCHO3a-
NAIM MATEPnAn. Da He Ce HAcOyBa
3a IIPOBbIKHTeHO Bpeme KbM eHIO n
CbIO MoCTa. Da He CE n3NO3Ba B Cpea D PCKOT eKcN03n. TOnnHa Mo-
Ke 6bJe PpeaJena KbM IeCHO3a-
JIIMn MATEPnAn, KOITo Ca CKPTN.
Ipea3BaTe ce OT TOKOB yap.
H36BAAIeDIOINHaTNIOTO 03aemeHN HAcTN, HAnPIMep Tp6o, paNAtOPn, neKN, XnaINHHu. He octabNte ypeia 6e3Na3Op, dokato pa6oIT.

Yka3aHnHa 3a6e3oNaCHOCT
Ia3eIHCTpymENTHe Cn HA CNyypHO MxCTO.
CnE yIOTpeBa ypeBbTaCe octaBnHa nOCTaBAkata Da N3CTHHe, npEi Da ce np6epe.
HeH3nON3BaHN HnCTpyMeHTn Tp8Ba DaCe CbXpaHnBAt B Cyxo, 3aKnIOeHO NoMeueHne H HeOCTbHn 3a Deua.
To3n ypeM MoKeJa Ce nIIOJIBAOT De
aHaI 8 roINH, xopa C orpaHnueHn
fN3UeCKN, ceH3OPHN IINI MEHTANH
CnocO6HOCTn IINI IINI Ca H ONIIT 3HA
Hne, cAmo NpIbAIOJeHne IINI AKO Ca
6IIIN ObyeHn Ha pAbota C ypeDa n
pa3bnpAT B3MOXHnTE OnaCHOCTn.
DeuTa HmAt npAbo Da IprapT CypeA.
PoNCTBaHe IINI NOIpBxKk He Morat
da Ce IIBbPbWbAT OT Deqa, Be3 H6IOJIO
deHne.
He npetobapbaIte HNCTpyMeHTNTe CN.
Te pa6o1r IIO-IO6pe INIO-CINyprHO B NOCOUEHNI MOUHOCHTEN DnIa3OH. He Hocete ypeia 3a Ka6eN a He rO nI3-nONBAAIE,3a da N3dbpNaTe UenCenaI OKTAKTA. Na3eTe Ka6eN aOT rpeuHa, MaCNO hOCTPNb6oe.

BhimaabaTe 3a OTPOBnra3OBe HOnaCHOCTOT3anaIbHe.
PnO6paBtKaHaPiactMaN,naKoBe nnoo6HmMATEpHnMnMoraT da ce 6pa3yBaT OTOBHNra3OBe.
BHHMABaTe 3a onachocT ot 3anaBaHe n noxap.
3a co6cTBHeA CnrypHocN 3n0n3BaHTe
PnINHAnIeXHOCTN NIOITbIHNTENH
ypeDn,NOcoEHN BYITbTAHETO IN
npenopbHaHn OT pON3BOJNTEIA.
YnOtpe6bata Ha p3nHm OT npenopb- yAHHTB KATAONI INN YNtBtBAHETO HCTpyMeHTN INN PnHADNEKCHTMOKe Jda O3NAbBa 3a BAC ONAChCOT HapaHBsE.
PemOHn cAmO OT CneuaJIaNCT.
To3n eIeKtpOnHCTpyMeHT OTIOBapHa CneuOnHInte NsICKBaHn3a 6e3- onAChOCT.PemOnTn MoT a Da ce N3BbPbBaAT cAmo AT ONeUAMNCT, B npOTINBeh Cnyaah 3a Notpe6ntenCbSctByBa pCK oT npOn3wecTBn. Korato 3axpaB Baunat KaBen Ha To3n ypeD 6bDe NOpeDeH, TOn TpRaBA da Ce 3aMeHNOT PON3BOITENI INI HerOB CNEUAMNCT INI OObuyeh TEXNk, 3a Da CE npEDOTBpaTn ONACHOCTN.


!yka3aHnra 3a6e3oNaCHOCT
Ioka3aHHe Ha octaTb4HaTa TOnnHa (cAmo HL 2020 E) 13
NOKa3AHnETo Ha OCTaBHTA ToTNNHa Cnyk 3a ONTueeCKn PnpDynpTeHEn CnRHa, 3a Da CE N36BerHt HapAHBaHn npn DnpeKETnOINHp KOKaTa C ropeaa TxOHa Tp6ba. NOKa3AHneto HA OCTaBHa ToTNNHa paBto n npn N3bpNaH MPekOB Kaben! Pnp paBota NoBeve ot 90 cekHynIOKazAHnTo FyHKUHOHpa N MIta, DOKaTO Tempepatpata Ha N3XODHATA Tp6ba, npn CTaNb TMepaTypa, cnaHne noD 60^
Korato ypebT paobTo no-Manko ot 90 cekyHn nokazamHe octaBHaTa TOnnHHe eakTNBO.BBa BcEKN CnyaonroBOPHOCTa Hocn Notpe6TeNAT, npiaPabota c nntcToTe 3a ropeu BbDxy BuHarnpBba da ce DeHTBA BHMMATEHNO.
PaaTe Do6pe Te3n Yka3aHn 3a 6e3oNaChocT npu ypeA.
PpnoJoxen
CIOOJIaIIOIIOIOIOIOIOIOIOIOIOIOIOIOIOIOIOIOIOIOIOIOIOIOIOIOIOIOIOIOIOIOIOIOIOIOIOIOIOIOIOIOIOIOIOIOIOIOIOIOIOIOIOIOIOIOIOIOIOIOIOIOIOIOIOIOIOIOIOIOIOIOIOIOIOIOIOIOIOIOIOIO
OTcpanHbAHe Ha 608
bortcpeoepoeepoeepoeepoeepoeepoeepoeepoeepoeepoeepoeepoeepoeepoeepoeepoeepoeepoeepoeepoeepoeepoeepoeepoeepoeepoeepoeepoeepoeepoeepoeepoeepoeepoeepoeepoeepoeepoeepoeepoeepoeepoeepoeepoeepoeepoeepoeepoeepoeepoeepoee
Cenbahe ha Ka6enn:
MnepyH 10000000000000000000000000000000000000000000000000000000000000000000000000000000
DeOpMnPaHnPVC:
PPOKoAIOI OIOIOI KIOIOI CIOIOI KIOIOI HAIIOI CIOIOI BBA
PanaheHa rpn:
Ferrarataearaerareaata,otnanaakaheto
Pampsaane:
Bouinipjep,benpiaiipnbpae,b6boknHnnpaepnepnepnepnepnepnepnepnepnepnepnepnepnepnepnepnepnepnepnepnepnepnepnepnepnepnepnepnepnepnepnepnepnepnepnepnepnepnepnepnepnepnepnepnepnepnepnepnepnepnep
MekocntoBaHe:
MHTHHTHE VARTI SAANARANTA CHORO DE NCHATRATCNJN KOTHO T E HAPARATC NOCTORA U CPOBRA OCHAI LON HACARABPA J 10 HONOTHA TROKH SAPIEOTETAHAE HA CKAPAGU
CnoBaHe Ha nantMaCa:
BANKEN BURDEN IN PERSA da 6.031 cT EIN HUN GACHTAACA. Da ce HANZHANS CECTETHEC TICNA.
CnoBaHe Ha oonNo:
CmHa Ha Ka6en (cAmo HL 2020 E)
1.Boe 1p000000000000000000000000
2. PHTEL
3.2K
1.00P0074235000000000000000000000000
1.10384645255555555555555555555555555555555555555555555555555555555555555555555555555555555
ElenemTuHa ypea
PnHAdJeXHoCTn (SxK KEPINKPC H
BauHepu HuaHua,paesapnncipnncipnncipnncipnncipnncipnncipnncipnncipnncipnncipnncipnncipnncipnncipnncipnncipnncipnncipnncipnncipnncipnncipnncipnncipnncip
1Cryina 50mmHm.0v13
2C-0yHnHa 75 HApH.C.0212
3208850DM5F-680/07014
1727304060415
- NcAe
1
(25)
A1735cm 029168
021054660-00063
8
4.5-9.5 mm apr.Hcw.071417
1.5-4.8mmap7Hc02/1318
4.0-126 mm apt. nom. 6/7/66
Korrrncknnpny34nnn nnnn 075811
9Peepckicp 1000000000000000000000000000000000000000000
10PCyUaBae 1034MWAPFTNN7071A
11Pc4y038d0395MnAp11Km.070618
13H
14.2023年1月1日
15 LIOHIOKILPAOONA ADT.HOM.01211
16 Iacaaocaaeaepaehan
10300PVC
DPC:
PP:
AB
1738a:0b0
(CA03819201mH2001)
Ceknapaun3a cbotbetCTBne
(38KCTaHua160)
ytnnn3a4na
Dexpoeeppepepepepepepepepepepepepepepepepepepepepepepepepepepepepepepepepepepepepepepepepepepepepepepepepepepepepepepepepepepepepepepepepepepepepepepepepepepepepepepepepepepepepepepepepepepepepe pe

HepbBnBnBnEneKtpOpypeAcoHmTPOeH
F
Cama 3a ctpaHn ot EC:
CIOOJIICJIKIJKIJKIJKIJKIJKIJKIJKIJKIJKIJKIJKIJKIJKIJKIJKIJKIJKIJKIJKIJKIJKIJKIJKIJKIJKIJKIJKIJKIJKIJKIJKIJKIJKIJKIJKIJKIJKIJKIJKIJKIJKIJKIJKIJKIJKIJKIJKIJKIJKIJKIUK
Fapanuaon3bOaTe
TeTnHApOaHo THEINELc+DnAeuaueuclur TmHIOHnCtpe
NpOepoKoEe eDyocynOeunooBcEcoOeOo, OoOoOo,
Doeauo aee Paeonooae, cno, ceo, eoe HIOooue HIOeepi
Keoiopk oop, hnpipuHoo-1 cyrnnnnae uo0o, STENEL
TaoHApHApneepxHa 2PbOaHoo, a dyckn.
ApaHApHApHe e pOepnOoohooct 36 woeaae 500 pofof
NACA h a JIoo-0 or cdoen HIOvynata IIOcIOTPOPMG
dEoepnOoH eONnOoHcI 1 CDOoHIOOeTOOEOOO 000
hOpOo 100000000000000000000000000000000000000000000000000000000000000000000000000000000000000000000
Pemonten cepbn3
Cen tnnnnae h a npaepnnae nrae nnepepepepepepepepepepepepepepepepepepepepepepepepepepepepepepepepepepepepepepepepepepepepepepepepepepepepepepepepepepepepepepepepepepepepepepepepepepepepepepepepepe pe
Declaration of Conformity with European Community Directives
D
Machinery Directive 2006/42/EC including amendments
DIN EN ISO 374:2011-02, DIN EN 60745-12010-01, DIN EN ISO 11203:2010-01
DIN EN ISO 4871-2009-11, DIN EN 12096-1997-06, DIN EN 60335-1 (VDE 0700-1) 2012-10, EN 60335-1-2012
Electromagnetic Compatibility Directive 2014/30/EU including amendments
DIN EN 55014-1 (VDE 0875-14-1):2012-05; EN 55014-1:2006 + A1:2009 + A2:2011
DIN EN 81000-3-2 (VDE 06838-2):2015-03; EN 61000-3-2:2014 DIN EN 81000-3-2 (VDE 92838-2):2015-03; EN 61000-3-2:2014
DIN EN 55010-32VDE 0875-14-2X2009-06EN 55014-21997+A12001+A22008
WEEE - Directive 2012/19/EU including amendments
Retention of documents and Archive:
Authorized person for the technical documentation
Klaus Wennens, Stinei GmbH, Dinselstrasse 80-84