Arena 8IW - Pregnant JBL - Free user manual and instructions
Find the device manual for free Arena 8IW JBL in PDF.
User questions about Arena 8IW JBL
0 question about this device. Answer the ones you know or ask your own.
Ask a new question about this device
Download the instructions for your Pregnant in PDF format for free! Find your manual Arena 8IW - JBL and take your electronic device back in hand. On this page are published all the documents necessary for the use of your device. Arena 8IW by JBL.
USER MANUAL Arena 8IW JBL
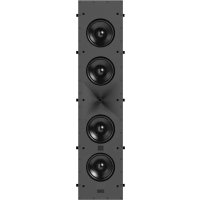
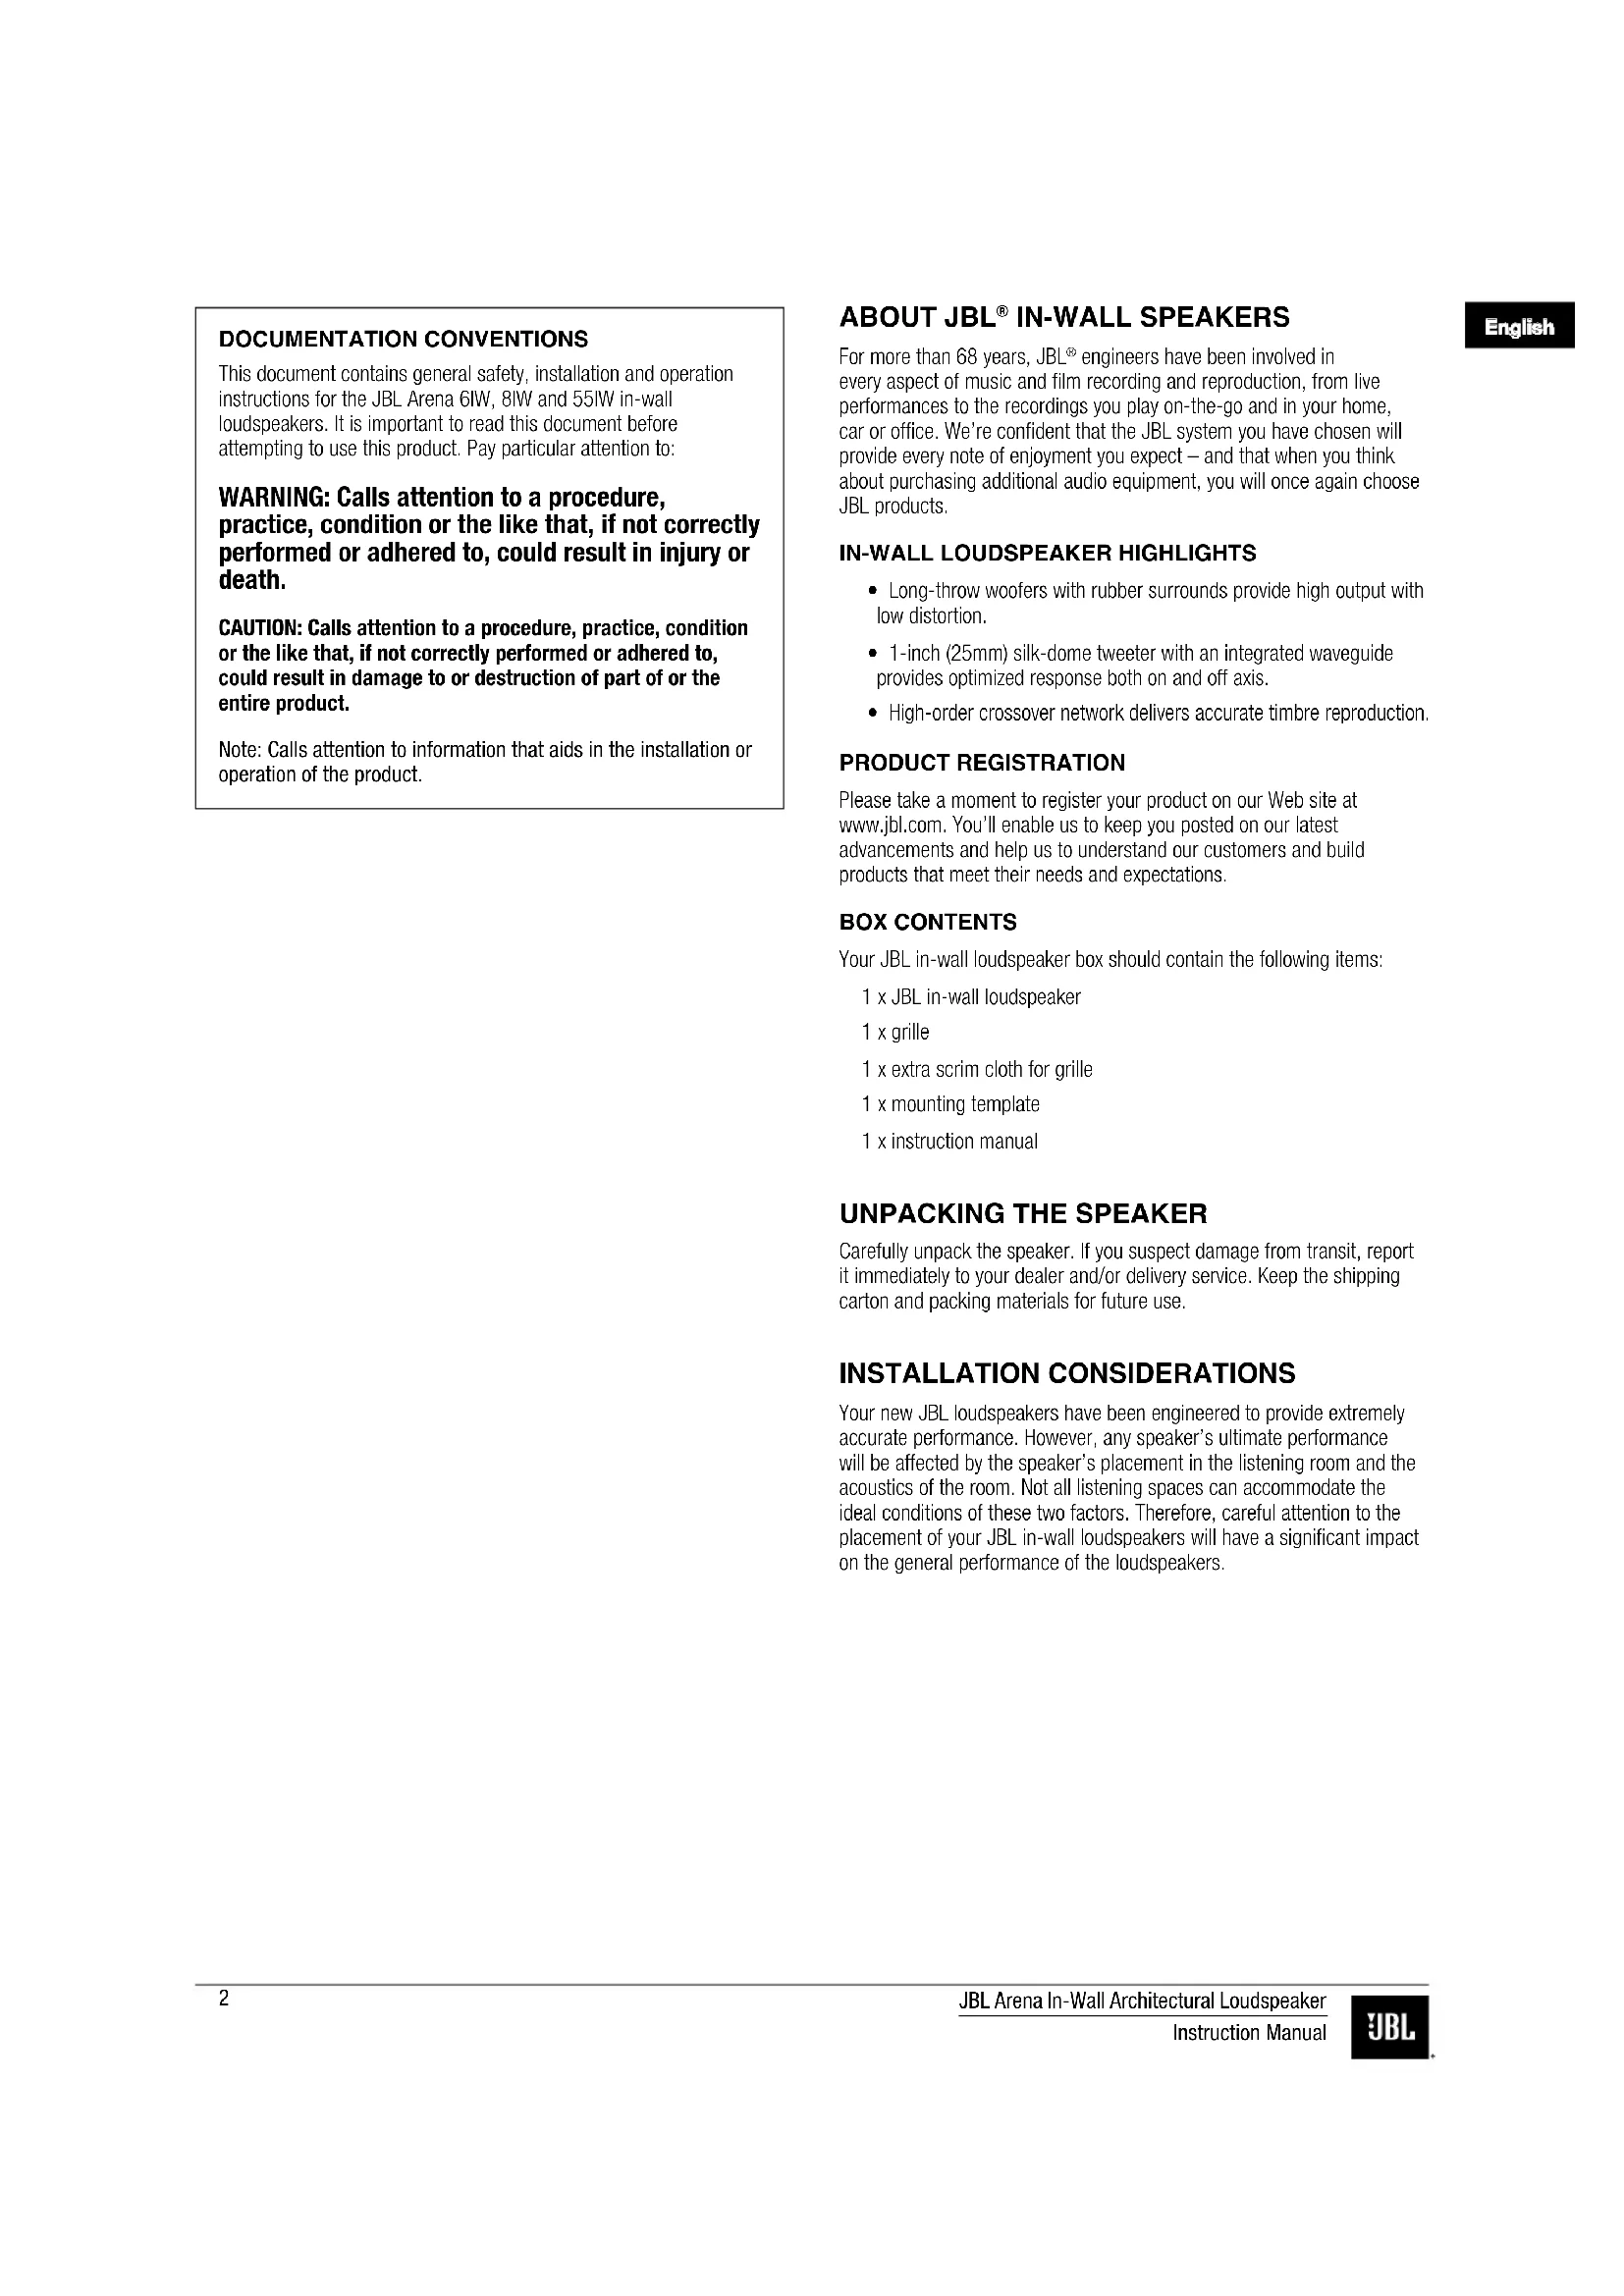
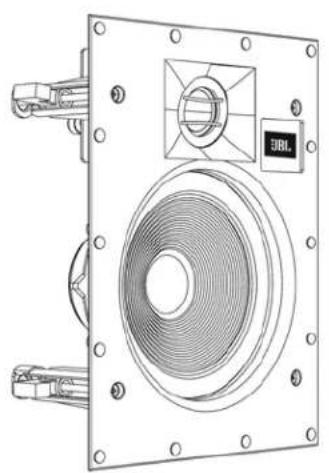
ARENA 6IW, ARENA 8IW, ARENA 55IW In-Wall Architectural Loudspeaker Instruction Manual

DOCUMENTATION CONVENTIONS
This document contains general safety, installation and operation instructions for the JBL Arena 61W, 81W and 551W in-wall loudspeakers. It is important to read this document before attempting to use this product. Pay particular attention to:
WARNING: Calls attention to a procedure, practice, condition or the like that, if not correctly performed or adhered to, could result in injury or death.
CAUTION: Calls attention to a procedure, practice, condition or the like that, if not correctly performed or adhered to, could result in damage to or destruction of part of or the entire product.
Note: Calls attention to information that aids in the installation or operation of the product.
ABOUT JBL® IN-WALL SPEAKERS
For more than 68 years, JBL engineers have been involved in every aspect of music and film recording and reproduction, from live performances to the recordings you play on-the-go and in your home, car or office. We're confident that the JBL system you have chosen will provide every note of enjoyment you expect - and that when you think about purchasing additional audio equipment, you will once again choose JBL products.
IN-WALL LOUDSPEAKER HIGHLIGHTS
- Long-throw woofers with rubber surrounds provide high output with low distortion.
- 1-inch (25mm) silk-dome tweeter with an integrated waveguide provides optimized response both on and off axis.
- High-order crossover network delivers accurate timbre reproduction.
PRODUCT REGISTRATION
Please take a moment to register your product on our Web site at www.jbl.com. You'll enable us to keep you posted on our latest advancements and help us to understand our customers and build products that meet their needs and expectations.
BOX CONTENTS
Your JBL in-wall loudspeaker box should contain the following items:
1 x JBL in-wall loudspeaker
1xgrille
1 x extra scrim cloth for grille
1 x mounting template
1 x instruction manual
UNPACKING THE SPEAKER
Carefully unpack the speaker. If you suspect damage from transit, report it immediately to your dealer and/or delivery service. Keep the shipping carton and packing materials for future use.
INSTALLATION CONSIDERATIONS
Your new JBL loudspeakers have been engineered to provide extremely accurate performance. However, any speaker's ultimate performance will be affected by the speaker's placement in the listening room and the acoustics of the room. Not all listening spaces can accommodate the ideal conditions of these two factors. Therefore, careful attention to the placement of your JBL in-wall loudspeakers will have a significant impact on the general performance of the loudspeakers.
LOUDSPEAKER PLACEMENT FOR DISTRIBUTED SOUND
- Since distributed sound is general sound throughout an area, place the loudspeakers as uniformly as possible for even sound coverage throughout the area.
- Place the left and right loudspeakers roughly the same distance from the primary listener locations.
- To avoid "hot spots" where the sound is too loud, plan to use more loudspeakers, with each set to play at a lower volume.
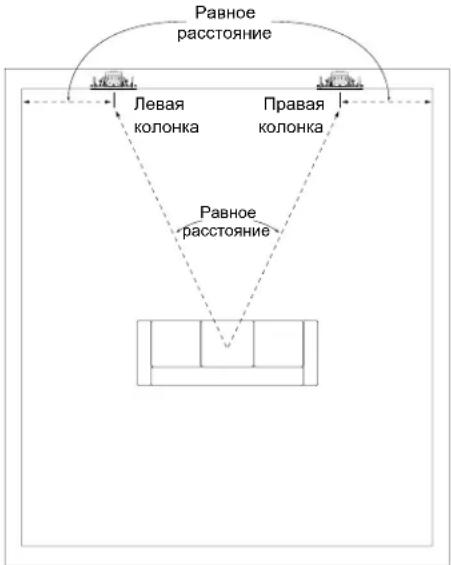
LOUDSPEAKER PLACEMENT FOR TWO-CHANNEL STEREO
Place the left and right loudspeakers the same distance from the primary listening area (or as close to the same distance as possible). The distance from each speaker to its nearest side wall should also be as close to the same distance as possible.
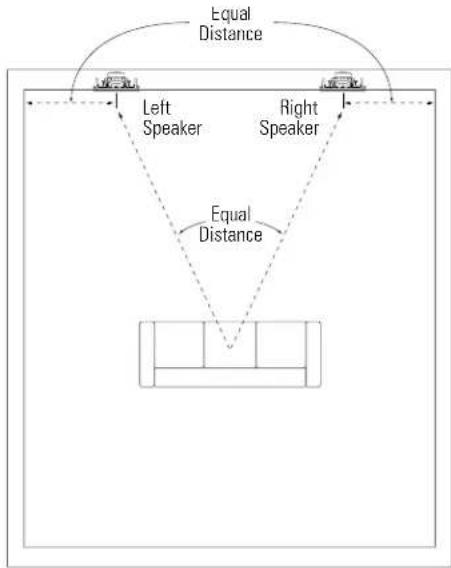
Ideally, the distance between the left and right loudspeakers should be slightly less than their distance from the primary listening area.
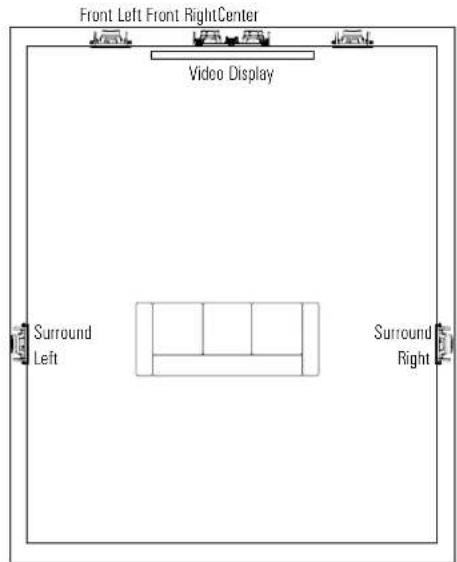
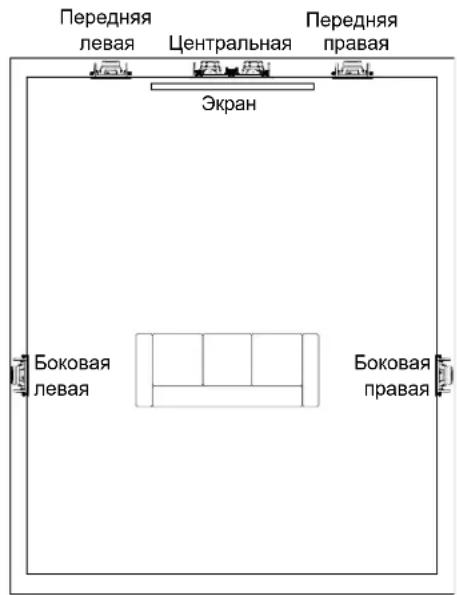
LOUDSPEAKER PLACEMENT FOR HOME THEATER
The front left and front right loudspeakers should be located on either side of the video display, with their tweeters as close to ear level as possible.
- The front left and front right loudspeakers should be relatively close to the sides of the video display. For example, front left and front right loudspeakers used with a 50-in (1.3m) video display should generally not be more than 80 in (2m) apart.
- The center loudspeaker should be aligned with the center of the video display. Its tweeter should be no more than 2 ft (0.6m) above or below the tweeters of the front left and front right speakers.
- The JBL HDI waveguide will maintain even sound dispersion and a high-performance listening experience even when the front in-wall loudspeakers are installed above ear-level. This permits more flexible speaker placement during installation.
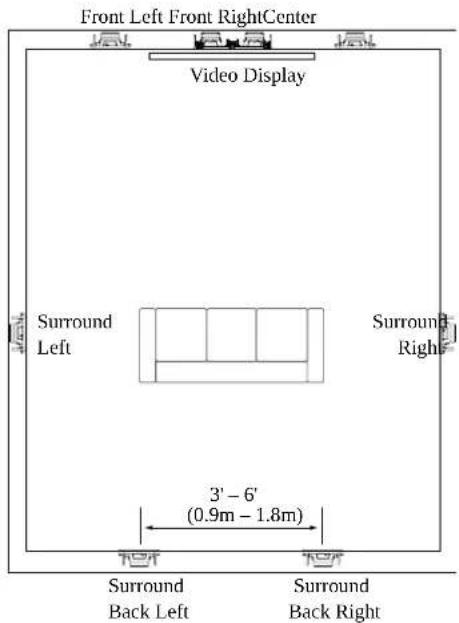
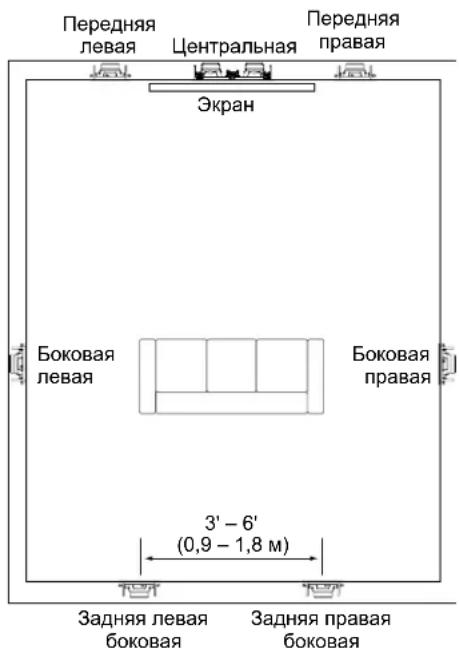
5.1-Channel Speaker Placement
In a 5.1-channel system, the surround left and surround right loudspeakers should be located to the sides of the main listening area, 5 ft - 7 ft (1.5m - 2.1m) from the floor.
7.1-Channel Speaker Placement
- In a 7.1-channel system, the surround left and surround right loudspeakers should be located directly to the sides of the main listening area, 5 ft - 7 ft (1.5m - 2.1m) from the floor.
- In a 7.1-channel system, the surround back left and surround back right loudspeakers should be located on the rear wall, 3ft - 6 ft (0.9m - 1.8m) apart and at 5ft - 7 ft (1.5m - 2.1m) from the floor.
UBL
JBL Arena In-Wall Architectural Loudspeaker
Instruction Manual
English
INSTALLATION INSTRUCTIONS
JBL architectural speakers are extremely easy to install. However, if you are unable to understand and follow the instructions in this manual clearly and fully, or if you are unsure of your ability to install these loudspeakers properly, please contact your dealer or a qualified installer.
WARNING: HARMAN International assumes no responsibility for improper installation of hardware or for any personal injuries or product damages resulting from improper installation or a fallen loudspeaker.
CONNECTING TO THE AMPLIFIER
CAUTION:REMOVE POWER
You must connect the speaker wires before the speaker is fully installed. To protect the audio system and yourself from damage or injury through accidental electrical shorting and surges during installation, turn all audio system power OFF before beginning the speaker installation.
Speaker Wire
Use high-quality speaker wire to obtain the best performance from your JBL in-wall speakers.
- For wire lengths of less than 50 ft (15m), use at least 16-gauge speaker wire.
- For wire lengths between 50 ft and 100 ft (15m - 30m), use at least 12-gauge speaker wire.
- For wire lengths of greater than 100 ft (30m), use at least 10-gauge speaker wire.
Note: All speaker wires must comply with all local building and safety codes for use in in-wall applications.
Making Connections
Connect each channel's positive (+) terminal on the back of the amplifier or receiver to the positive (red) terminal on the corresponding speaker; connect each channel's negative (-) terminal on the back of the amplifier or receiver to the negative (black) terminal on the corresponding speaker. Do not reverse polarities (that is, do not connect + to -, or - to +) when making connections. Doing so will cause poor imaging and diminished bass response.

Press down on the post to open the hole; insert the bare end of the wire into the hole and release the post to secure the wire.
CAUTION: To avoid short circuits that may damage your equipment, be certain that positive and negative wire strands do not touch each other and do not touch metal parts such as the speaker frame.
MOUNTING THE SPEAKERS
For New Construction
If you wish to pre-install a rough-in frame for the speakers before the drywall is installed in new construction, you will need to purchase the correct rough-in frame kit for your loudspeaker model from your authorized JBL dealer. Detailed mounting instructions are supplied with the rough-in kit. After the drywall is installed, follow the installation instructions in For Existing Construction, below.
For Existing Construction
Note: The installation procedure is the same for all models covered by this manual.
- Ensure that the drywall, plywood or other wall material is 1/2'' - 2'' (13mm - 51mm) thick and capable of withstanding the weight of the speaker being installed.
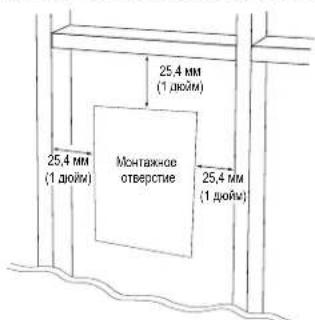
Make sure to allow at least 1" (25.4mm) between the edge of the supplied installation template and any rafters or other obstructions behind the wall, so the speaker's locking mechanism will have room to engage fully. Perform an obstruction survey to be sure that there are no studs, lengths of conduit, pipes, heating ducts or air returns in the wall cavity that will interfere with the speaker.

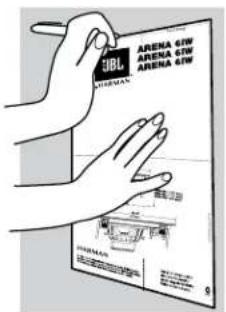
2.Determine the correct speaker location and use the template included with the speaker to mark the wall material.
- Cut the drywall along the mark you made in Step 2 to create the mounting opening.
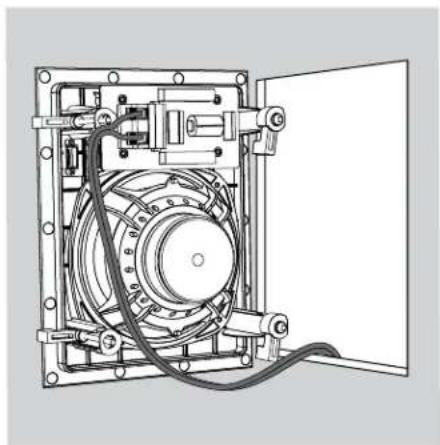
- Connect the speaker to the amplifier as explained in Connecting to the Amplifier, on page 4.
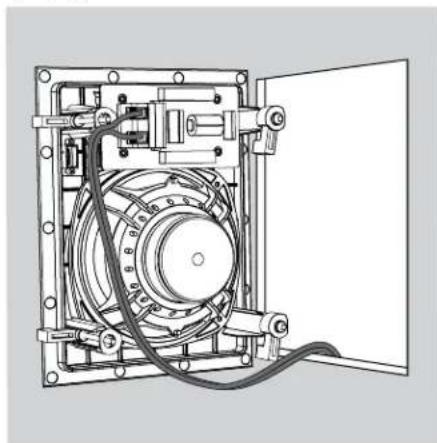
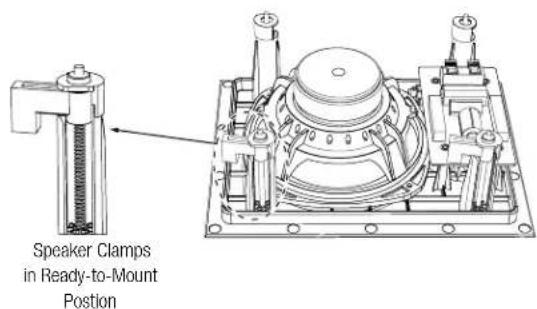
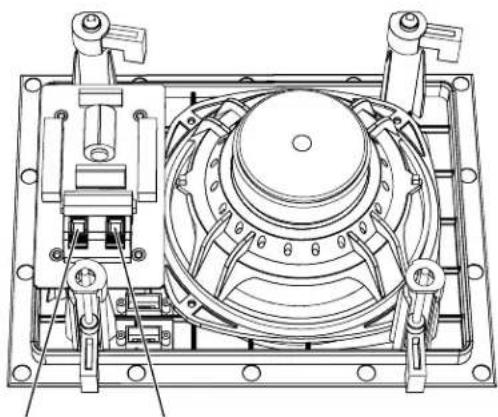
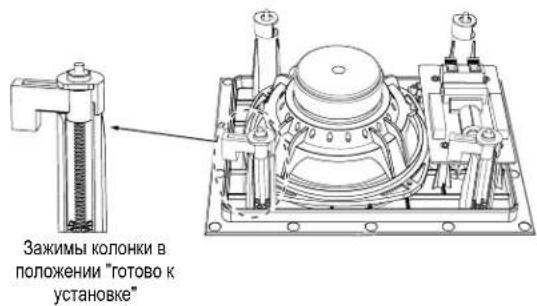
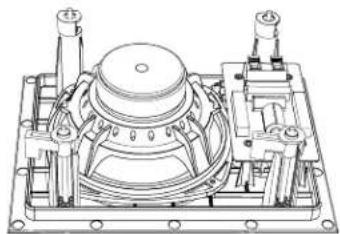
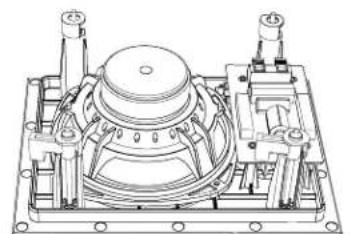
- Make sure all four speaker clamps are in their "ready-to-mount" position.
Speaker Clamps in Ready-to-Mount Position
UBL
JBL Arena In-Wall Architectural Loudspeaker
Instruction Manual
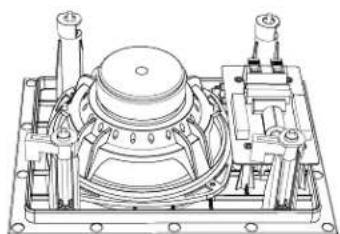
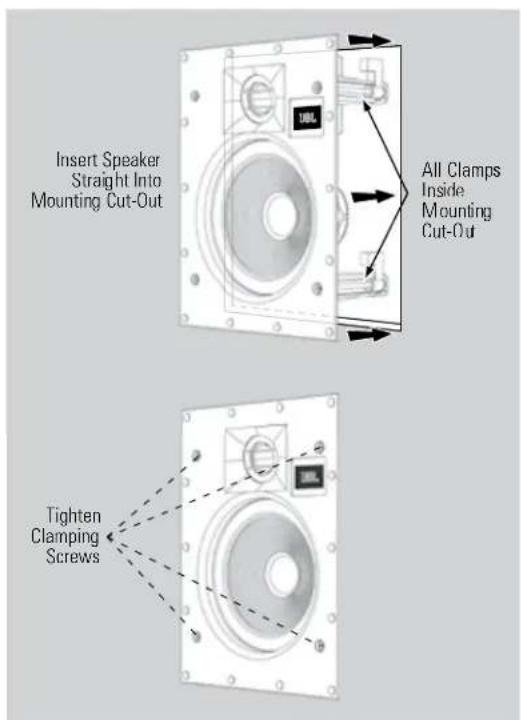
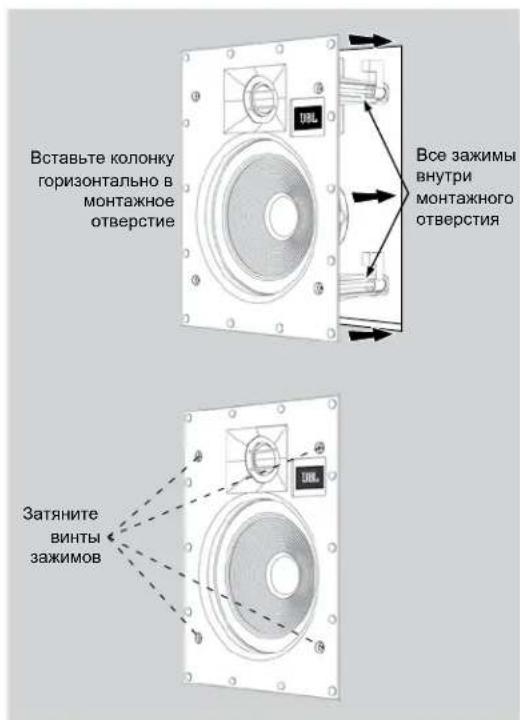
- Insert the speaker straight into the mounting opening. Tighten the speaker clamp screws on the front of the speaker baffle. The speaker clamps will automatically rotate into position and begin clamping the speaker.
- When you notice resistance on the screws the speaker has been clamped successfully.
IMPORTANT: Always use low-torque settings. NEVER over-tighten the clamp screws
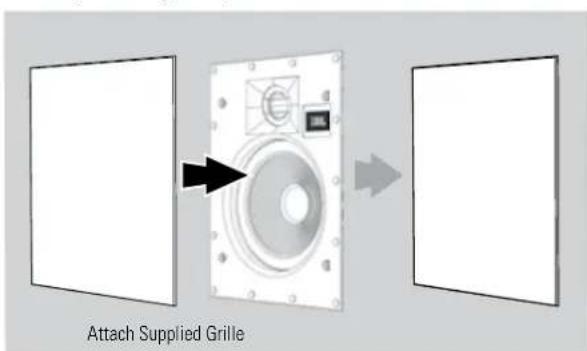
- Attach the supplied grille. Powerful magnets in the speaker frame will securely hold the grille in place.
Painting the Grille
JBL architectural loudspeaker grilles can be painted to match any décor. If you wish to change the grille's color, its satin finish will function as a primer coat. For the best results follow this procedure:
- Gently remove the scrim cloth from the back side of the grille before painting.
- Use a high-quality spray paint and apply a thin coat of color. Ensure that the grille perforations remain free of paint. Filling them with paint will diminish the speaker's sound quality. If any perforations are plugged, use compressed air to blow the paint out of the perforations.
Note: If you find any grille perforations that are plugged with paint after the paint has dried, carefully use a straight pin or sewing needle to remove the paint.
3. We have included replacement scrim cloths. After the paint has dried, apply a light coat of spray adhesive to the inside of the perforated grille and attach a new scrim cloth. IMPORTANT: Never spray adhesive on the cloth.
EXCESSIVE OUTPUT LEVELS
Your JBL loudspeakers feature custom-designed transducers and high-quality network components featuring high-order filters with steep cutoffs that reduce the potential of damage to individual speaker drivers and help the loudspeakers maintain their performance even under extreme operating conditions. However, all loudspeakers have limits when it comes to continuous playback. To extend these limits, avoid playback at volume levels that result in distorted or strained sound.
OBTAINING SERVICE
To obtain service, contact an authorized JBL dealer. Refer to Limited Warranty, below for more information.
DIMENSIONS
| Mounting Opening Dimensions | Mounting Depth | Overall Dimensions (w/grille) | |
| Arena 61W | (Hx W): 9-13/16" x 7-9/32" (249mm x 185mm) | 3-19/32" (91mm) | (Hx W): 10-7/8" x 8-11/32" (276mm x 212mm) |
| Arena 81W | (Hx W): 11-15/16" x 8-15/16" (303mm x 227mm) | 3-13/16" (97mm) (Hx W): 13" x 10" (330mm x 254mm) | |
| Arena 551W | (Hx W): 14-1/8" x 6-13/32" (359mm x 163mm) | 3.0" (76mm) (Hx W): 15-1/8" x 7-13/32" (384mm x 188mm) |
Dimensions are subject to change without notice.
For complete performance specifications, please go to the JBL Web site: www.jbl.com.
LIMITED WARRANTY
In the USA, this product is covered by a limited 5-year warranty. Other countries may have different product warranty periods, which are governed by local regulations. For more information about product warranty please visit www.jbl.com or contact your dealer.
English

ARENA 6IW, ARENA 8IW, ARENA 55IW
LIVELLI DI USCITA ECCESSIVI
INSTALLLASJONSHENSYN
PykoBODCTBO NOIb3ObaTeTn
PACNAKOBKA CNTEMbl
PacnakobBbA akyctneckyoc nCTemy, npoBnIte octopoxhocTb. Ecnbl b6napyknN NOBpeKdHnN, noLyehHbIe npn nepeB03ke, HeMeJnEHHo COO6uHTe o6 3OM npOaBly N/ nnB Cnyk6y DoCTabKn. CoxpanHTE TpaHCnOpTHyKO kAPToHNyO KopoKoKy y naKOB0ChIbe MaTePnaIb I dnNcNoIb3ObaHnB B 6dyueM.
PEKOMEHDAUIN NO YCTAHOBKE
3Tn akcytueckne cnCTembl JBL pa3pa6oTaHb ci eBHo
obecneuHTy 4pe3BbUaHNO TOHHe BOCpON3BeDeHne My3bIKN.
OdHako Ha pa60Tu KJOnHKN BCERda BNIMOT ee MecToPOnOKeHne
B NOMeUHMn AkyCTNa NOMeUHMn. He BCE NOMeUHMn
cnoc6bHb obecneuHTb IeAaNbHbIe YcNOBn DnI npocynuBaHnA.
PiOToMny TcKoe CcNIOUHeNe peKOMeHdaun Pnp Bbi6ope Mecta
dIy yCTAHOBKn BHyTPnCTeHNbIX AkyCTNeCKHX CNCTem JBL OyeHb
BaxkHO dIy oecneueHHn Obuero KaueCTBa 3ByaHn CNTeMbI.
BbIbOP MECTA YCTAHOBKN AKYCTNUECKOIN CNTEMbl IINIOCTNXEHNPAICPNEDEJEHHO3BYKA
PacnpedeHbI 3ByK-3To 3ByK, KOtopb paBHomepHo pacnpedeTcno BceB o6nactn npocnyuBaHna. YTO6bl o6ecneHTb npaBnHoe pacnpedeHHe 3ByKa, pa3MeuaTe KONOHKn KAK MOxHO Boone paBHomepHo.
Pa3MeaIe neBvIO npAByO KOONKn npMepHO Ha ODNHpaCCToAHNOT MeTa, IgeobHNO HAXOHTCR Cnyuatae.
- YTo6bI N36ExKaTb BO3HNKHOBEHnra "TopaNX ToeK", B KOTOpBx 3ByK CmUHKOM rPOMKn, paccMOTPiTe BO3MOXHOCTb NCIONb3OBAHnO BoNbIeFo WcNc KaONOHOKBOCNPON3BeHnna My3bKn Ha Boone Hn3KoR rPOMKoTn.
PA3MEUEHNE KOJIOHOK B DBYXKAHAJIbHOI CTEPEOCNCTEME
YcTaHOBnTe NeByIO npaByIO KOLOHky Ha OJHom pacCToHmOT MeCTa, rge o6bHIO HaxOJITcR cnyuataJIb (nnr Tak, YTO6bI 3TO pacCToHne OTnMauOcb kak MOKHO Mehbe).PacCToHne OT KaKdoN I3 KOLOHOK do 6nKkaJWe 60KOBOI cTeHb TaKke DoJHKHO 6bITb NO BO3MOXHOCTN OJINHAKOBBIM.
BIDEane pacctoHne Mekdy neBOn npabOK KOONHKAMM DOnJHO 6bIb HEMHO MeHbUMM, Yem pacCToHne OT KONOHO O MeCTa, rde Oe bOHO HaxoITcC cnYuaTeN.
PA3MEUJEHNE KOJIOHOK B CNTEME IOMAUHEKINHOTEATPA
Ipeepnnae npeepnnae npabaa KOIOHKn DOJIKNbHaXOHTbcra NO CTOpOHAm 3KpaHa, pni 3TOM BbICOKoAcToTHbIe DnHAMNK DOJNkhI NO BO3MOXHOCTn paCnOJaTaBcRa Ha ypOBHe yxa.
- NpeHnra neBa n nepeHnra npabar KOONKn DoJNkhBn HaxOndTbC OTHCNtEnbHO 6m3KO OT Kpa3KpAna. HannpMep,nepeHnra neBa n nepeHnra npabar KOONKn, NcOnlb3yEmbIe C50-DIOHMoBbIM (1,3M) 3KpaHOM,DOJXHBi B 06Uem cnYae pacNojaratcb He 6Oone Yem B 2 Metpax (80 DIOHMOB) dpyrOr dpyra.
-
UeHTpaIbHaKoJIOHka DoJNkHa CToTb Ha CEHTpaIbHoO cN 3KpHaA. Ee BICOKOyAcTOThb NINAMNK DoJNKe HxOaONtBcR He 60nee cem Ha 60 cm (2ФуТa) BIIwe INn HIXKe BicOKOyAcTOThbIX DInHAMIKOB NepeDeHneB IOpeDeH npabO KOnOHok.
Bolnobod JBL HDI noDepkmbaet paBHomephoe pacnpedeneHne 3Byka N BbICOKOE KauCTBO 3ByaHn DaKe ToTa, KOrDa nepeHnE BHyTPcHTeHHbIe KOLOHKn YcTaHOBHeBbIe yOPOBnY hxa.3To daTdoONHITbHyU CBO6Oy paMaueHnKoNOK HpNycTAHOBKe. -
Pa3MeIeHHe KOJIOHOK B 5.1-KaHaJIbHOH CnCTeMe
B 5.1-kaHbHcNCTeMe6okOBaJIeBaI6OKOBa npBaKa KOnOHKnDOnKbI 6blbpacnONKeHbNo CTOpOHAMOT MeCTa, rde obuHHOHXoNDTCnUwATEb,Ha ypoBHe 1,5-2,1M. OT nona.
Pa3meueHHe KOHOK B 7.1-KaHaJIbHOH CnCTeMe
B7.1-kaHbHcNCTeMe6OKOBaJIeBaI6OKOBa npBaKa KOnOHKnDOnKHeb6ItbpaCnONKeHbNo CTOpOHAMOT MeCTa, rde obuHHOHXoNDTCnUwTeNb,Ha ypoBHe 1,5-2,1M. OT nona.
B7.1-kaHbHcTeMe3aHnIeBa6koBaN3aHnI npabaa6koBaKoONHKOnJDKhbl6bItpaCNOJKeHbI NO cToPOHaMOTMeTa,ΓeObHuHOHXoNTcCnyuAteNb, Ha ypoBe 1,5-2,1 M.OTNoA.
Pyccnn
JBL
HNCTPYKUINIPOYCTAHOBKE
Akyctuueckme cncTeMbApxntkTpyhoCepm JBL ype3buaHno npocbl B ycTaHOBKe. Ondako ecn Bl He MoKeTe DO KOHca NOHTb HcTpyKUINB 3tOM PYKOBOCDte N CNeOBAbIM INe ECNI B He YebepeHb B CBoeN CnocObHOCTn PabInbHo YCTAHOBITb KONOHn, peKoMeHyem ObpaNTbcr K npoDaBu Ny INK KBaHnPhiuropoBaHHOMYycTAHOBUKy.
BHIMAHHE: Kompanha HARMAN
International He Hecet OTBcTcBHeHocTn 3a HeHaIeXaUyO yCTaHObky O6OpyIOBaHn I 3a TpaBMbl NIN IOBpeXdeHn npOdyKcN, Bbl3BaHHbIe HeHaIeXaUeY cTaHObKO nN NaDeHne KOLOHKn.
IOKJIIOUeHNE K YCNJNTENIO
PENEPYNPEXKDEHNE:OTKJIIOUHTE NITAHNE
Дя понун уctановки конокни Нобхдимо NOДCoeMHNTb K konOHke coedHHTeIbHbIe npOBOda. YTo6bl 3aunHTb AkyCTUneCKyO OTO NBPEXDEHIN N PpeDOTBpATNTb BO3MOxHbIe TpaBMbl, Bbl3BaHNbIe CnyaHbIM KOpOTKIM 3aMbIkaHHe N cKaYcAMn HAnpJKeHNo BO BpeM yCTahOBKN,петрд haayIOM uCTanovKRI KONOHOK NOINHOCTbIO OTKIIIOHTE nITAHne akCTTneCKoC nCTeMbI.
CoeHHTeHbHn npoBOd
TObbIoBtBc8OHTBYTpncTeHbIXaKCTMnCKHX CNTTEM JBL ONTMnAbHoI pOnBBOHTeHbOCTN, nCnOB3yTe BbICOKKaCTBeTHBIOE CoEDNHTeBbIE PNOBODa.
Ecnn dnnHa coeHnHTe hboro npObOa MeHee 15 MeTPOB (50ФуTOB),ncnoJIb3yIte npOBOd no MeHbWeMpe 16-ro kani6pa.
EcnI dHnHa coeHNHTeBHO rpoBOda coCTaBnReT O15 do 30 MeTPOB (50-100 FyTOB), HcNoJIb3yTe npoBOd no MeHbWe Mepe 12-ro KAnl6pa.
- Ecnn dnnHa npoBOn npebbuaeT 30 MeTpOB (100 cyTOB), nCNOJb3yTe npoBOn no MeHbWei Mepe 10-ro kaIIN6pa.
PpHMeaHHe: Bce coeHNHTbHbIe npOba Da nKoHOK OdoXbI COOTBETCTBOBAt DeNCTBYIOUMB CPTaHE/perNOHE npAbnam TexnKnBe3OnaCHOCTOn OTHCnTeBHO annapatypbl, yCTAHBNBaEMN B CTHe.
BbINOJIHeHne coeHNHeHn
CoeHNITe NONOKNETbHyIO (+) KNeMMy HA 3aHHe NOBEPXHOCTN yCNNTeYI INP pecINBepa C NOONKTbHNO (KpaCHNO KNEMMO HA COOTBeTCTBYOUE KONOHE; OTPNaTeNbHYIO (-) KNEMMY HA 3aHHe NOBEPXHOCTN yCNNTeYI INP pecINBepa CoeHNITe C OTPNaTeNbHOH (cHPoH) KNEMMO HA COOTBeTCTBYOUE KONOHE. He nepenytaTe NIONPHOCTB (T.e. He CoeDNHrTe + c -, a - c + ), BblONnHRe COeINHEHH. 3To yxUdNt AkyCTnCeckn O6pa3 n CH3NT eΦeK T bocB.
OTPMATeHbHa NkEMMa (YepHaa)
Nongkintelbha
Klemmma (Kpaacha)
YtObbl OTKpbTpa3bEM,HaIaBnTe Ha HAXMMHbE KJIeMMbl. BCTabte OOroENHHK BoHeu PNOBA B OBTpcTne IOTNCTNE HAXMHNYIO KMIEMY, YtObbl 3aФИNKUPOBAT npBOD.
PPEyIPEKHEHNE:Bo36eXaHne KopoTko 3AmbKaHn, cnocObHO NOpeINb OBOpDobAHne,y6eINTEcB,yTO noLoXHTbHbIE OTPuCaTeNbHbE XKNbI npoBOOB He kacaOTcApyra H MeaTTNuecknx YacteT, TAKNX KAK Kapkac KOJOhKn.
YCTAHOBKA AKYCTMNECKOINCTEMBI
Ha 3Tane cTpoKn
Ecnn BbXOTHe nepey cTaHOBKO rncOcKapTOHa yCTaHOBnBt B CTeHy cneuaJIbHbI Kopo6 nOd akCyTneckyU cnCTeMy, Heo6xOIMO npNo6pctyn O opuMaJIbHOrO dInepa JBL KoPo6, COOTBeCTByIOUs BaIeM moDeIN AkyCTNeCKO cnCTeMb. IIOdpOBHe IHCTpyKUnN O yCTaHOBKe pnpIraHOTcK Kopo6y. IIOce YCTaHOBKn rncOcKAPTOHa BblONJIHnTE IHCTpyKUn N o yCTaHOBKe n3 pa3dena B zomobBu unMepebp HnKe.
B roTobbi nHTepbep
PpmeaHne: PpoeDpya yCTaHOBKn cTaNapTHAra BCEx MOeNe, K KOToBPbIM OTHOCITc HAcTOIue pyKOBOCTBO.
- Y6eHNTecb, yTO TOniunHa rInnCokapToHa, fAnepbl nI INpyrO MaTePnAna, IcNb3yEmoRO B CTHe, COCTaBnAET O1 12 Do 2 IOuOB) uTO OH CNOCoBeH BbIepKJBaTt BEc YcTaHABINBaEMO KONOHKn.
OctabnIte He Mehee 25 MM (1 HouM) Mekdy Kpaem
PpinaeraMoro yCTaHOBQHOro WAbNoHa N BAnKAMN INN DpyHMN
NMexAm 3a CTeHO, TAK YTOb6y bZanPAHauero MExAHN3Ma
KONOHKn 6bIO NOCTaTOHNO MecTA, YTOb6c PcA6oTaTb. Y6eINTeCb
B OTCYCTBnTAKNX NOME, KAK CTOnIK, NPOBOJa, Tpy6b, KaHaNbI
OTONHTeBHNO INN BEHTINLAUINHOH CNCTeMb I Na3Xye CTeHB:
3TN ObekTb MOrT MEwATb NpaBnIBHo pa6ote KOJHOH.
- OnpeDenite, B kakom Mecte cneDeyet paononoKHTb KOONHy, nncnB3yTe npnilaraembl K KOONHe 7a6NoH, YTO6bl pa3MeNTb CTeHy.
3.ПорржьтгнсokapTOH NO MEТК,СДЕпаннОн Ha WARE 2. Y BAC NOJYUHTCOTBepCTHe B CTeHe.
4.Подсоeннгte KОLOHky K yCINHTeHIO cOrnACHO HNCTpyKUIMBpa3dene NodKnIOyHeue K ycunumEnHa CTp.4.
5.Y6eINTEcB,HTO BCE YeTbIpe 3aXnMa KOJIOHKn NepeBeDeHbI B NOJIOKeHMe "TOBOK yCTaHOBKe".
3aKIMbI B NOJIOKeHIN "TOTOBOKYCTAHOBKE"
JBL
- PacnoJIOKBN KOHOHky Ropn3oHTaIbHo, BCTaBbTe ee B MOHTaXHHe OTBepCTHe. 3aTnHHe BVNTbl 3aXHMOB KOJNOHKn CnepeDn 3kpaHa KONoHKn. 3aXmbl KONoHKn ABToMaTuYeCKn NOBepHyTcB H YxHoe NonoKeHne H NaHyf PknCpObaTb KOHOHky.
KordaBbI NOyBCTByTe CONPOTMBJIeHHe HA BnHTax, 3TO O3HaHaet, YTO KOJIOHKA 3aФNKCMPOBaHa.
BHIMAHHE:ФИКСАЦЯ KОЛОнК He Tpe6yET 6oIbwoCnbl. HE 3aTЯRnBaTe Upe3MepHO BnHTbl 3aXIMOB.
- PnKpEnNTe rPnB, BXOJAAuN B KOMJIeKT. MoUHbIe MaHHTbI Ha Kapkace KOLOHKn 6yDyT HAdEJxHO yDepxBaT rPnB Ha MeCTe.

Pokpacka rpnna
PnINOT AkyCTHuecknx CNTeM apxNtKeTpyhoi cepnn JBL MOKHO KpACNTb NOIIO6oB DN3aH INHTepBa. ECIN Bbl XOTnTE N3MeHnTB CBET PnIN, eO rA1aChra OTeJNa BblONHIT pOBy rYHTOBOHORc CNs. DnI ONTHMaNbBHX pe3yIbTaTOB PnpEpknBAHTECb CneDyoUe npOeUpybl:
- Npeed nokpackoakkypaTHO CHMNTe TkaHeByo cETky C 3aDnei NOBepxHOCnI rpnna.
2.Bo3bMnTe BbICOKKaHeCtBeHHyO a9p03oJIbHyIO Kpacky HHaHecnTe Ha rPnIb ToHkIM CNoEOM. OTBepCTN B rPnIe DoJXHbO OCTaBaTcBc CBO6ObHbIMc. EcNn OHN 3aIIbBy T KpackO, KaehctBO 3BvAHnA KOHOHKn YxDUnTcR.B cnYae, ecnKakne-Ni6o OTBePNr 3aKynOpHnucb, BblNyTe NnHX Kpacky NOTOKOM CKaTOrO Bo3dyxa.
PIMMeaHHe: Ecnn Bbl obhApkynte 3akynopeHHbIe kpaKoN OTBepCTNa yJce NoCte BbcIbxAHn KpKn, TuaTeNbHO bYNCNTNE KpaCKy UbeHNO rNn Nn6bnkO.
3.B KOMNJIeK T BKNIOHc HcMEnbIe TKaHeBbIe CeTKn. NocTe TOROKaK KpaCa BbCOxHET, HAnecnTe TOHKn CNO aP03o3NbHOKNe HA BHTpeHHIO NOBepXHOCTb NepΦopnpOBAHHOpeuTEKN INpIKpeINTE HOByIO TKAHeBHy cTeKy. BHIMAHHE:He paCbIyIeKeN He TKAHb.
N36bIToUHbIE YPOBHN BbIXOHO CnIHJAA
DaHHbIe akCyTneckn CNTembl JBLOHcHbIIN HAMKAMN
HmpeHHoON KOHTpykUIM N BILCOKOKaueCTBEHHbIMN
KOMHOHeHTAMN, B TOM YCnEe PUNbTpAMN BILCOKOTO npRJa
C YeTKMn OpHaHnTeJIaMn, CHXKAoUIMN BEPOrTHOcTB
NOBpeJHeN MEmBpaH KONOHO N cNoOc6CTByIOUIMN
BICOKPON3BOIDNTbHo PA6Ote KONOHO DAnke B CIOXHBIX
YCJOBHX. Tem He MeHee, OT HenpepbIBHO ROCpOn3BeDeHnra
JIb6beKOJONHO Co BPMeHEM NPOTrC. YTO6bI npOJNTb CpOK
CnykbI KOJONOH, CTapaJIteCB He BCOpON3BOIDt b My3bIKy Ha
YPOBHAX TpOMKoCTn, pRn KOToBbX 3ByK HAHNHaET NCKKaTaBC IIN
CTAHOBhTcB HeecTECTBeHHbIM.
TEXO6CJYKBAHNE
EcnBAM Tpe6yeTcayxKbAHne H3dJI,OBpaNTecb K OoHnAaHbHomy Dnepy JBL. DononHnteHbHle CBeHnma CM. B pa3Dene OapauueHHra zapaHmua Hnke.
T6APHTbIE PA3MEPbI
| Размени монтжного OTBERPCTN | Глубина уст- новки | Оьшпе размени (c гримен) | |
| Arena 61W | (B x Ⅲ): 249 x 185 MM (9-13/16 x 7-9/32 Дюма) | 91 MM (3-19/32 Дюма) | (B x Ⅲ): 276 x 212 MM (10-7/8 x 8-11/32 дюма) |
| Arena 81W | (B x Ⅲ): 303 x 227 MM (11-15/16 x 8-15/16 Дюма) | 97 MM (3-13/16 Дюма) | (B x Ⅲ): 330 x 254 MM (13 x 10 дюма) |
| Arena 551W | (B x Ⅲ): 359 x 163 MM (14-1/8 x 6-13/32 дюма) | 76 MM (3 дюма) | (B x Ⅲ): 384 x 188 MM (15-1/8 x 7-13/32 дюма) |
Pa3mepbMOnyI3MeHnTbC86e3 npdeynpeJxHn.
Полны ТЕХИЧЕСКЕ Х.apakТЕРИСКИ CM.На Be6-caIte JBL: www.jbl.com.
OPAHNUEHHA TAPAHNTY
Ha KonoHKn JBL npedocTabnreTc rapaHTn oTCyTcBn
deFeKTOB. PnpOAnKnteHbHOCTbeNCTbnr rapaHTmHa KonoHky
3aBNCNT ot 3aKoHDoTeJIbCTBa CTpaHbI, B KOTOp0 bJKN Kynnen
pnpOdyT. O6paUaIeTcB C BonPocAMn No npOdoKnTeJIbHOCTn
deIeCTBn rapaHTn K npOdaBu npOdykun JBL.

ARENA 6IW, ARENA 8IW, ARENA 55IW
OM JBL INBYGGNADSHÖGTALARE
FÖRDELAR MED INBYGGNADSHÖGTALARE
PACKA UPP HÖGTALAREN
HÖGTALARPLACERING FÖR TVÄKANALSSTEREO
高泽泽SπFJKJLJBLKJFJFJFJFJFJFJFJFJFJFJFJFJFJFJFJFJFJFJFJFJFJFJFJFJFJFJFJFJFJFJFJFJFJFJFJFJFJFJFJFJFJFJFJFJFJF
<|im_start|>assistant <|im_start|>assistant <|im_start|>assistant 5.
默社自中高自能自的
包合
UBL
HARMAN International Industries, Incorporated
8500 Balboa Blvd., Northridge, CA 91329
© 2015 HARMAN International Industries, Incorporated. All rights reserved.
JBL is a trademark of HARMAN International Industries, Incorporated, registered in the United States and/or other countries.
Features, specifications and appearance are subject to change without notice.
For questions, assistance or additional information concerning any of our products, call us at: (800) 336-4525.
For technical support, submit your detailed inquiry to:csupport@harman.com.