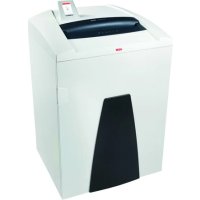
Securio P44c - Shredder HSM - Free user manual and instructions
Find the device manual for free Securio P44c HSM in PDF.

User questions about Securio P44c HSM
0 question about this device. Answer the ones you know or ask your own.
Ask a new question about this device
Download the instructions for your Shredder in PDF format for free! Find your manual Securio P44c - HSM and take your electronic device back in hand. On this page are published all the documents necessary for the use of your device. Securio P44c by HSM.
USER MANUAL Securio P44c HSM
natural_image
White HSM air conditioner unit with control panel and indicator lights (no visible text or symbols on body)SECURIO® P44
BETRIEBSANLEITUNG
OPERATING INSTRUCTIONS
NOTICE D'UTILISATION
MANUALE OPERATIVO
INSTRUCCIONES DE SERVICIO
natural_image
Interior view of a white electronic device with black plastic panels and labeled parts (6 and 7), no readable text or symbols beyond labels.
natural_image
Close-up of a red and yellow plastic component with a white connector, mounted on a white base with screws (no text or symbols visible)natural_image
Close-up of a ceiling-mounted fixture with three black arrows pointing to specific components (no text or symbols visible)natural_image
Close-up of hands handling a white paper sheet with a paper control device in the background (no visible text or symbols on the document)natural_image
Close-up of a circular electronic device with labeled buttons and a magnified inset showing green components (no readable text or symbols)natural_image
Paper printer with green cover and yellow cover, white paper holder, and black cover (no text or symbols visible)natural_image
Hand inserting a card into a printer (no visible text or symbols)1 Explanation of symbols and safety instructions

WARNING
The safety alert sign ▼ on the signal word WARNING and a text on a grey background alert you to the risk of serious to life-threatening injuries.
NOTICE
is used when property damage may occur by failure to comply.
Note
indicates information for the effective operation of the machine without risk of danger.
Safety instructions

Before using the machine for the first time, read the operating manual, and keep it for later use and to pass on to any subsequent users.
Observe all safety instructions onto the machine.

Risk of injury from sharp blades. Never reach into the slot of the paper feed.

Risk of injury from being pulled in!

Keep long hair, loose articles of clothing, ties, scarves, jewellery, etc. away from feed opening. Material with the tendency to form loops, e.g. tapes, strapping material, etc. must not be shredded.

Dangerous for children and others!
The machine may not be used by persons (including children under 14 years of age) with limited physical, sensory or mental capabilities or with a lack of experience and knowledge, unless they are supervised by a responsible person or are instructed by them on the use of the machine. Children must be supervised to ensure they do not play with the machine.
Do not leave the document shredder switched on when it is unattended.
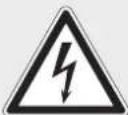
Dangerous mains voltage!
Improper handling of the machine can lead to an electric shock.
- Check the machine and cable regularly for damage.
Switch the shredder off if it is damaged or not working correctly or before relocating or cleaning it and disconnect it from the mains.
- Make sure that no water gets into the shredder. Do not immerse the power cable or the power plug in water. Never touch the power plug with wet hands.
- Never pull the plug out of the socket using the power cable. Always pull out the plug directly.
Check the name plate on the back of the machine to find out the cutting width and mains voltage for your document shredder and observe the applicable instructions in the operating manual.
The shredder is designed for destroying paper. Depending on the cutting type, it can also handle small quantities of the following materials:
| Shred width (mm) 5.8 3.9 3.9x40 1.9x15 | ||||
| Credit cards, CDs, fl oppy discs, USB sticks | ● | ● | ● | |
Its sturdy drive mechanism is not damaged by paper clips and staples. Only on machines with a cutting width of 1 x 5 mm can the paper not contain staples or paper clips.
Note
You can also shred CDs, diskettes and credit cards in the separate CD cutting unit (optional) without using the paper cutting unit.
The warranty period for the document shredder is 3 years. There is a special warranty for the HSM solid steel cutting rollers in the document shredder, which is provided independently of the guarantee, and remains valid for the entire service life of the machine (HSM Lifetime Warranty). This does not apply to document shredders with cutting widths of 0.78 x 11 mm and 1 x 5 mm. This warranty and guarantee exclude wear and damage caused by improper handling or actions taken by third parties.
HSM guarantees the delivery of spare parts for up to 10 years after the production of this model has been discontinued.
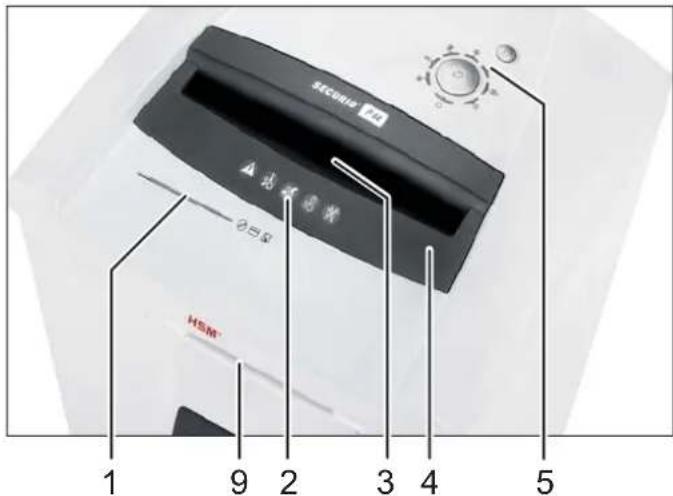
3 Overview2 Proper use, warranty
Note: Depending on the version, your machine may not include all the assemblies.
text_image
SCHINIS HSM* 1 9 2 3 4 5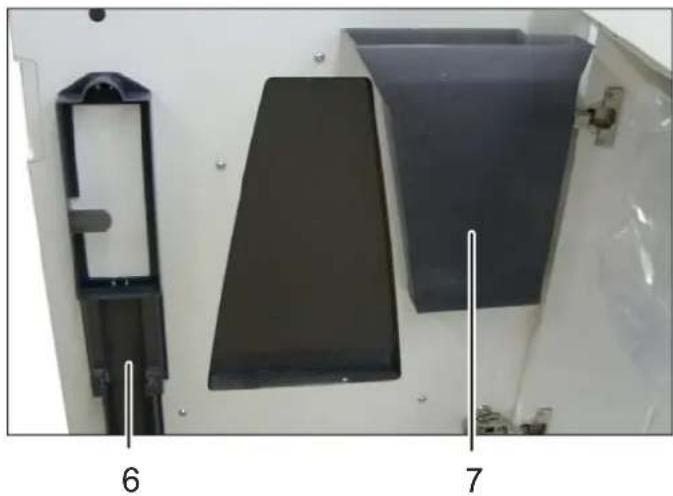
natural_image
Interior view of a device casing with two black plastic panels and labeled parts 6 and 7 (no text or symbols on the panels themselves)
natural_image
Close-up of a red and yellow plastic component with a white connector, mounted on a white base with screws (no visible text or symbols)1 Feed slot for CDs, fl oppy discs and credit cards (optional)
2 Safety instructions
3 Light barrier in the paper feed
4 Safety element
5 Operating and display unit
6 Holder for operating manual and oil bottle
7 Shredded material for CDs, fl oppy discs and credit cards (optional)
8 Filler opening for cutting apparatus oil (cross cut only)
9 PAPERcontrol
english
Operating and display elements
Note: Depending on the machine version, not all functions may be available.
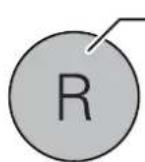
R button:
• Cutting unit runs in reverse
- Error acknowledgement
- Software version display (for service technicians only)
Indicator: PAPERcontrol
Indicator: door open or safety element not latched
Indicator: overload (paper jam)
Indicator: paper/CD container full
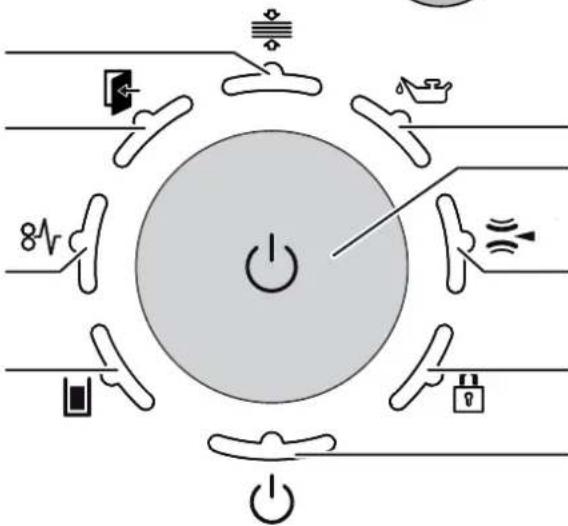
text_image
Diagram illustrating electrical circuit components around a power button, including switches, capacitors, and power lines.Indicator: oil reservoir empty
Function button
"On/off/start"
Indicator: metal detection
Indicator: button lock
Indicator: ready for operation / Stand-by
4 Initial start-up

WARNING
Dangerous mains voltage!
Improper handling of the machine can lead to an electric shock.
- Only use the machine in a dry room indoors. Never operate the machine in damp rooms or in the rain.
- Keep the machine, the plug and cable away from open fire and hot surfaces. The ventilation slots must not be blocked or covered and there must be at least 5 cm space between the shredder and any wall or furniture.
- Make sure that the power plug is easily accessible.
- Before you insert the power plug, make sure that the voltage and frequency of your power supply comply with the information on the name plate.
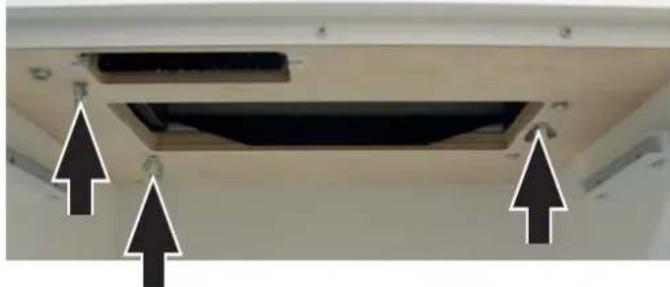
- Before starting up the machine for the first time, open the door and remove the three wing nuts of the transport locks from the base plate under the cutting unit.
natural_image
Close-up of a ceiling-mounted electronic component with two black arrows pointing to specific parts (no text or symbols visible)- Connect the power plug of the machine into a properly installed socket.
5 Operation
Switching on the shredder
- Only US-version: Set mains switch at rear of paper shredder to „I“.
- Check that no paper is in the paper feed slit.
- Press the operation button.
The "Ready for operation" indicator lights up.
Shredding paper
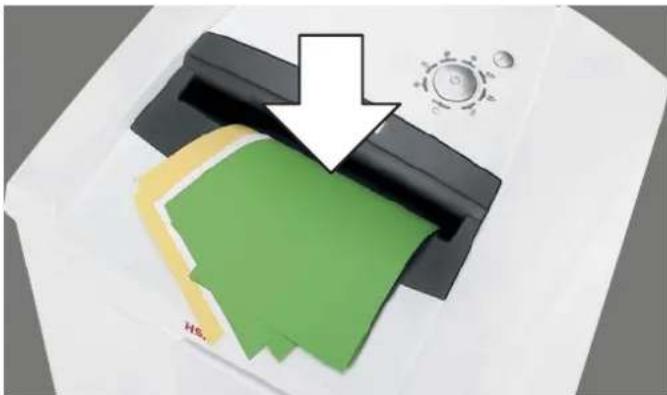
- Paper thickness measurement PAPERcontrol The document shredder features an integrated paper thickness measurement. This allows you to check whether a stack of paper can be shredded in a single go.
- Slide the stack of paper into the control slot.

natural_image
Close-up of hands handling a white paper sheet with a paper printer in the background (no visible text or symbols)▶ After a short time lag, the display on the operating control lights up:

natural_image
Close-up of a CD/DVD device with green and black buttons arranged around it, showing a circular dial (no text or symbols visible)in green: The stack of paper can be shredded.
in yellow: The amount of paper is within the machine's upper capacity range. Reduce the number of sheets in order not to damage the machine and prevent a paper jam.
in red: The number of sheets exceeds the maximum cutting capacity of the machine. Prevent the cutting unit from blocking by reducing the amount of paper.
Remove the stack of paper.
- Feed the paper into the centre of the paper slot.
natural_image
Paper printer with green cover and yellow cover, white paper holder, and a white arrow pointing to the cover (no text or symbols)The light barrier starts the cutting unit automatically. Therefore, with thin paper strips, make sure the light barrier detects them.
NOTICE
Do not shred paper in the CD cutting unit. This can cause damage.
Note
Paper and CD cutting unit cannot be used at the same time. Only shred one kind of material at a time.
3 seconds after the light barrier in the paper feed opening is free again, the cutting unit is switched off automatically and the shredder switches to standby.
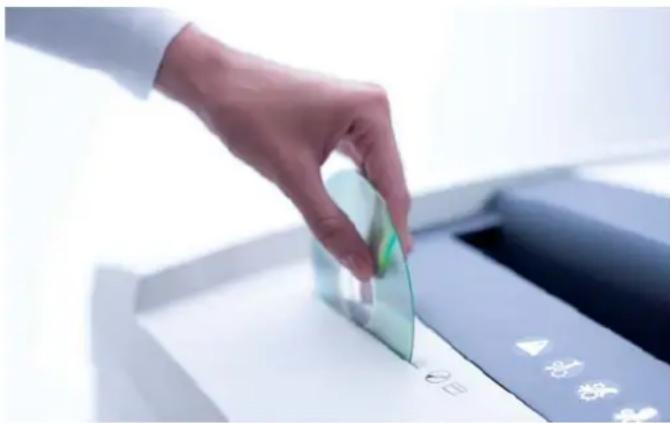
Shredding CDs, USB sticks, credit cards and fl oppy disks
- Check whether your machine is certified for destroying these materials (see "Proper use").
- For machines with a separate CD cutting unit (optional), put CDs, diskettes and credit cards in the feed slot of this cutting unit. This protects you from splinters.
natural_image
Hand inserting a green card into a printer (no visible text or symbols)For machines without a separate CD cutting unit, use the paper feed.
Note
Paper and CD cutting unit cannot be used at the same time. Only shred one kind of material at a time.
- Always use the paper cutting unit to destroy USB sticks.
- Dispose the shredded material and the waste paper separately.
Switching off the shredder
- Press the operation button.
The "Ready for operation" indicator goes out. - Only US-version: Set mains switch at rear of paper shredder to „0“.
Other function modes
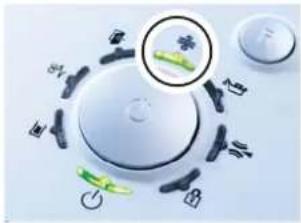
- Permanent mode
Function: Cutting unit runs continuously. If no material is fed in within a period of 2 minutes, the cutting unit shuts down and the shredder switches to standby.
Start: Press the operation button for three seconds.
Premature cancellation: Press the operation button.
- Stand-by mode
Function: Two minutes after the last paper feed operation, all consumers that are not required are switched off automatically.
The „Ready for operation“ indicator fl ashes briefl y at regular intervals.
The shredder starts automatically when paper is fed in.
• Automatic shutdown
Function: If the shredder is not used for 40 minutes, it shuts down completely and therefore does not consume any more electricity (at night, at the weekend).
Restart: Press the operation button.
Fault and function indicators
Display Problem Measure
| 8√Continuous lamp | Paper jamOverload | You have fed in too much paper.➢ The cutting unit runs in reverse for a few seconds and pushes the paper back out again.If necessary, press the reverse button “R” to remove the stack of paper.Take half the stack of paper.Feed the paper in portions.NoteYou can lift up the safety element in order to better remove paper. To do this, press the middle section of the front of the safety element and lift up the fl ap.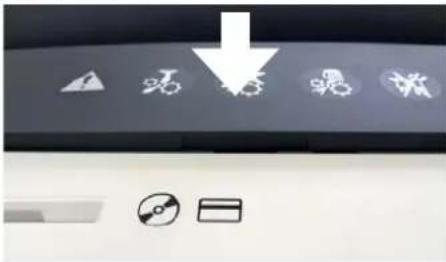 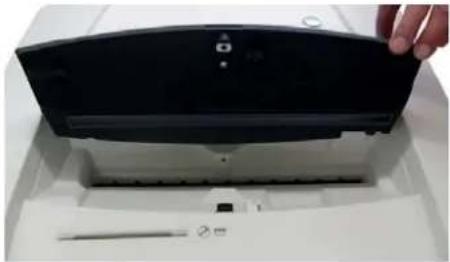 NoteThis indicator lamp also lights up when the motor is overloaded. In this case, let the shredder cool down for 20 minutes before using it again. NoteThis indicator lamp also lights up when the motor is overloaded. In this case, let the shredder cool down for 20 minutes before using it again. |
| Flashing light | Paper andCD fed atthe sametime | · Do not use both cutting units at the same time, but rather shred paper and CDs/diskettes/credit cards separately. |
| Press safetyelement | · The LED also flashes if you press the safety element or open the door while there is a paper jam. | |
| [58WA]Continuous lamp | Paper/shreddedmaterialcontainerfull | · Empty the paper/shredded material container.NoteIf you press the reverse button briefly before opening the door, part of the material is pulled back into the cutting apparatus. |
| Flashinglight | CD contain-er full | · Empty the CD container. To do so, lift it upwards out of the bracket. |
 | Door isopen orsafetyelement notlatched | · Close the door or latch in the safety element.NoteMovement of the safety element was detected during the shredding procedure. If your machine switches off without signalling an error, pull the paper out of the paper slit and feed it back in again. |
 | Metal detection | · Press the reverse button and pull the paper put of the feed slot.Remove any metal which is in the paper or on the safety element.Acknowledge the error by pressing the R button. |
| Problem | ||
| Cutting unit runs continuously even though the machine is not in the permanent mode. | The light barrier is soiled with paper dust.• Clean the light barrier in the paper feed using a dry brush or cloth. | |
| Display Indicator | ||
| Several indicators are lit The R button was pressed for more than 20 s.: Software version display (for service technicians only) | ||
| Display Problem Measure | ||
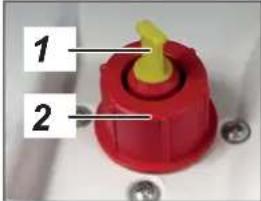
| Oil reservoir empty | • Fill the reservoir with cutting apparatus oil.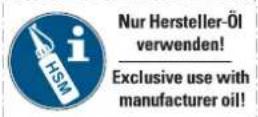 Only use HSM special oil.Reservoir volume: 250 mlPress the safety element and lift up the fl ap.The oil fi lling opening is to the right of the feed chute.You can fi ll the oil either through the small opening1 (take out the yellow plug) or the normal opening 2 (unscrew the red cap). Only use HSM special oil.Reservoir volume: 250 mlPress the safety element and lift up the fl ap.The oil fi lling opening is to the right of the feed chute.You can fi ll the oil either through the small opening1 (take out the yellow plug) or the normal opening 2 (unscrew the red cap). | |
 | ||
| Display Function Activate/deactivate | ||
 | Button lock is activated | To activate or deactivate the button lock• Press and hold the reverse button• Press the on/off button• Release the on/off button and then the R button |
Notes
Manual reversing
If you press the reverse button, the cutting unit runs in reverse and switches off after 2 seconds, even if you keep the button pressed. To reverse manually, release the button and press it again.
If the shredder is already running forward, pressing the button immediately reverses it.
Shredded material container
Both cutting units stop when the paper or CD container is full.
On machines with a separate CD cutting unit, the level in the CD container (see overview, item 7) is monitored. Empty the container after there is a signal on the operating and indicator element.
Please consider the environment and dispose of different materials separately.
Automatic oiler (cross cut only)
The cutting units are oiled for 1.5 seconds after:
• The cutting unit is in operation for 200 seconds (corresponding to 50 paper shreds)
- The cutting unit runs forwards after the reverse button has been pressed
The "Oil reservoir empty" signal is automatically deactivated after the reservoir is filled. The shredder remains operational even when the oil reservoir is empty.
Metal detection (optional)
The document shredder can be optionally equipped with a metal detector. The automatic switch-off allows damage to the cutting unit by paper clips or other metal objects to be avoided.
Safety element monitoring
Movement of the safety element was detected during the shredding procedure. If your machine switches off without signalling an error, pull the paper out of the paper slit and feed it back in again.
PAPERcontrol
The measuring of the paper thickness is regularly calibrated: the LED fl ashes for a short time after 400 seconds.
6 Cleaning and maintenance

WARNING
Dangerous mains voltage!
Improper handling of the machine can lead to an electric shock.

Switch the shredder off before relocating or cleaning it and disconnect the mains plug.

Service work which requires the housing covers to be removed may only be carried out by HSM Customer Service and service technicians of our contractual partners.
See page 202 for our customer service addresses.
Clean the document shredder only with a soft cloth and a mild soap-water solution. However, no water must enter the equipment.

text_image
DON'T FORGETStrip cut only:
Oil the cutting unit when cutting performance decreases or the device becomes noisy, or every
time you empty the waste container. Only use
HSM special lubricating oil for the cutting unit to do this:
- Spray the special cutting unit oil through the paper feed along the entire width of the cutting shafts.
- Let the cutting unit run in the permanent mode for about 10 seconds without any paper.
▶ Paper dust and particles are shaken off.
7 Disposal / Recycling
Electrical and electronic old devices contain a variety of valuable materials, but also hazardous substances which were required for function and safety. Incorrect disposal or handling can be dangerous to your health and
the environment. Never dispose of old devices in the household waste. Observe the current applicable regulations and use the collection points for returning and recycling electric and electronic devices. Dispose of all the packaging materials also in an environmentally-responsible way.
8 Scope of delivery
- Paper shredder, ready for connection, in carton packing, carton on pallet, tied with strapping tape
- 5 bags for shredded material
• Special cutting block oil (cross cut) - Operating instructions
Acces so ries
• 25 bags for shredded material, order No.: 1.452.995.000
• Special cutting block oil 250 ml, order No.: 1.235.997.403
See page 202 for our customer service addresses.
9 Technical data
| Cutting type Strip cut Cross cut | ||||||
| Shred size (mm) 5.8 3.9 3.9 x 40 1.9 x 15 0.78 x 11 1 x 5 | ||||||
| Sa fe ty ra ting DIN 66399 | P-2/O-2/T-2E-2 | P-2/O-2/T-2E-2 | P-4/O-3/T-4E-3/F-1 | P-5/O-4/T-5E-4/F-2 | P-6/F-3 P-7/F-3 | |
| Cutting ca pa ci ty* (sheets), DIN A4 70 g/m80 g/m2 | 76 - 7870 - 72 | 61 - 6356 - 58 | 43 - 4639 - 41 | 28 - 3023 - 25 | 18 - 1915 - 16 | 1210 |
| Cutting speed | 100 mm/s | |||||
| Lo ading width | 400 mm | |||||
| VoltagePower for the maximum number of sheets | 230 V, 50 Hz 120 V, 60 Hz2600 W | |||||
| Ambient conditions in operation:TemperatureRelative humidityHeight above sea-level (MSL) | -10°C to +25°Cmax. 90%, without condensationmax. 2,000 m | |||||
| Dimensions W x D x H (mm) | 700 x 592 x 1025 | |||||
| Weight | ca. 108 kg | |||||
| Volume of the shredded paper container | 205 l | |||||
| Sound pressure level emissions(Idle running/ load) | 64 - 67 dB(A) / 65 dB(A) | |||||
| Cutting size of the separate CD cutting unit (optional) | Order number +C, E ** | Order number +M, N ** | ||||
| 4 x 7 mm | 2 x 2 mm | |||||
| Security level of the CD cutting unit | O-4 / T-5 / E-4 | O-6 / T-6 / E-5 | ||||
* The maximum number of sheets (DIN A4, 70 g/m² or 80 g/m²), fed lengthways, which can be cut in one cycle. The performance data is determined when the motor is cold and the cutting device is freshly oiled. A weaker mains voltage or a different mains frequency to the one specified could result in less sheet capacity and increased noise during operation. The sheet capacity can vary depending on the structure and properties of the paper and on the way it enters.
** Identified by the letter after the 7-digit order number on the name plate on the back of the machine. e.g. 1873111C >> cutting size 4 x 7 mm

This document shredder meets the applicable harmonisation legislation of the European Union:
• Low Voltage directive 2006/95/EU
• EMC directive 2004/108/EU
• RoHS directive 2011/65/EU
The EU declaration of conformity can be requested from the manufacturer.
natural_image
Interior view of a device casing with two black plastic panels and a black plastic housing, labeled 6 and 7 (no text or symbols on the main components)
natural_image
Close-up of a red plastic component with yellow tip and white connector, mounted on a white base with screws (no visible text or symbols)natural_image
Close-up of a ceiling-mounted electronic component with mounting holes and mounting screws (no text or symbols visible)natural_image
Close-up of hands handling a white document with a paper airplane in the background (no visible text or symbols)natural_image
Close-up of a white circular device with green and black buttons, no visible text or symbolsnatural_image
Paper printer with green cover and yellow cover, white paper holder, and a white arrow pointing to the cover (no text or symbols on main image)natural_image
Hand inserting a card into a printer (no visible text or symbols)natural_image
Interior view of a white electronic device with two black plastic panels and labeled parts 6 and 7 (no text or symbols on the panels themselves)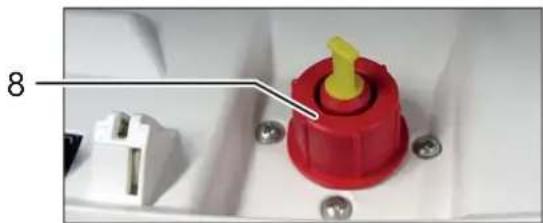
natural_image
Close-up of a red and yellow plastic component with a white terminal block, attached to a white housing (no text or symbols visible)Display: PAPERcontrol
text_image
Diagram illustrating power distribution and control symbols around a central power button, surrounded by icons for sensors, switches, and power lines.4 Messa in funzione

AVVERTENZA
natural_image
Close-up of a ceiling-mounted electronic component with three black arrows pointing to specific areas (no text or symbols visible)natural_image
Close-up of hands handling a white paper printer with a paper roll (no visible text or symbols)natural_image
Close-up of a circular device with mechanical components and a magnified inset showing a green cross symbol (no readable text or labels)natural_image
Paper printer with green cover and yellow cover, white paper roll, and a white arrow pointing to the cover (no text or symbols)natural_image
Hand inserting a card into a printer (no visible text or symbols)natural_image
Interior view of an electrical enclosure with two labeled components (6 and 7), showing internal casing and mounting hardware (no text or symbols on main subject)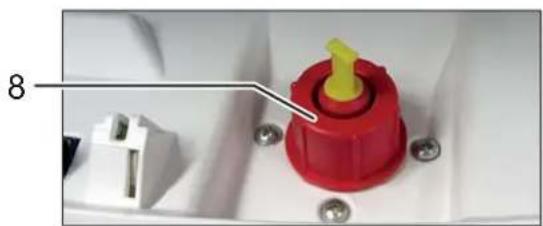
natural_image
Close-up of a red and yellow plastic component with pins, mounted on a white surface (no text or symbols visible)natural_image
Close-up of a ceiling-mounted electronic component with three black arrows pointing to specific areas (no text or symbols visible)natural_image
Close-up of hands handling a white paper airplane with a paper printer in the background (no visible text or symbols)natural_image
Close-up of a white circular device with green and black buttons arranged around it, no visible text or symbols.natural_image
Paper printer with green cover and yellow cover, white paper roll, and a white arrow pointing to it (no text or symbols on the covers)natural_image
Hand inserting a transparent card into a printer (no visible text or symbols)natural_image
Interior view of a device casing with labeled components (no readable text or symbols)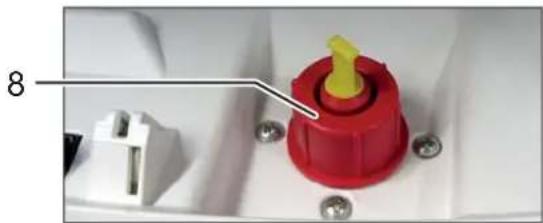
natural_image
Close-up of a red plastic component with yellow tip and white connector, mounted on a white surface with screws (no visible text or symbols)text_image
Diagram illustrating power switch mechanism with labeled components including power, switches, and battery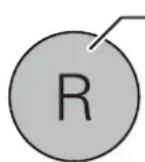
Botão R:
natural_image
Close-up of a ceiling-mounted electronic component with mounting holes and mounting screws (no text or symbols visible)- Insira a fi cha eléctrica da máquina numa tomada devidamente instalada.
português
5 Operação
natural_image
Close-up of hands handling a white paper sheet with a PAPER printer in the background (no visible text or symbols on the paper)natural_image
Close-up of a CD-ROM with green and black buttons around it, no visible text or symbolsnatural_image
Paper printer with green cover and yellow cover, white paper holder, and a white arrow pointing to the cover (no text or symbols on main image)natural_image
Hand inserting a card into a printer (no visible text or symbols)natural_image
Interior view of a device showing two black plastic panels and a transparent casing, with numbered annotations 6 and 7 pointing to specific components (no readable text or symbols beyond labels)
natural_image
Close-up of a red plastic component with yellow tip and white connector, mounted on a white base with screws (no visible text or symbols)natural_image
Close-up of a ceiling-mounted electronic component with three black arrows pointing to specific parts (no text or symbols visible)natural_image
Close-up of hands handling a white paper printer with a paper control unit visible (no text or symbols on the printer itself)natural_image
Close-up of a circular electronic device with labeled buttons and a green circular icon, no readable text or symbols present.natural_image
Paper printer with green cover and yellow cover, white paper clamped, and a white arrow pointing downward (no text or symbols)natural_image
Hand inserting a transparent card into a printer (no visible text or symbols)natural_image
Interior view of a white electronic device with black plastic panels and labeled parts 6 and 7 (no text or symbols on main subject)
natural_image
Close-up of a red and yellow plastic component with a white connector, mounted on a white base with screws (no visible text or symbols)text_image
Diagram illustrating electrical circuit components including power sources, switches, and grounding symbols around a central power button.Visning: Oliebeholder tom
Funktionstast
"til/fra/start"
Visning: Metalregistrering
Visning: Tastspærre
Visning: Driftsklar/Stand-by
4 Idrifttagning

ADVARSEL
Farlig netspænding!
natural_image
Close-up of a ceiling-mounted air duct or vent with two black arrows pointing to the opening and a central opening (no text or symbols visible)- Sæt maskinens netstik ind i en korrekt installeret stikdåse.
5 Betjening
Tilkobling af makulatoren
natural_image
Close-up of hands handling a white paper sheet with a PAPER printer in the background (no visible text or symbols on the paper)natural_image
Close-up of a circular device with green and black buttons arranged around it, no visible text or symbols.Grøn: Papirstablen kan makuleres.
natural_image
Paper filter with green paper and yellow filter, white arrow pointing downward (no text or symbols)natural_image
Hand inserting a card into a printer (no visible text or symbols)natural_image
Interior view of a white electronic device casing with black plastic panels and labeled parts 6 and 7 (no text or symbols on main subject)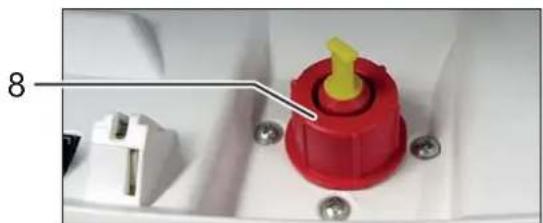
natural_image
Close-up of a red and yellow plastic component with a white connector, mounted on a white base with screws (no visible text or symbols)natural_image
Close-up of a ceiling-mounted device with two black arrows pointing to a component (no text or symbols visible)natural_image
Close-up of hands handling a white paper sheet with a PAPER printer in the background (no visible text or symbols on the paper)natural_image
Close-up of a circular device with labeled buttons and a magnified inset showing green components (no readable text or symbols)natural_image
Paper printer with green cover and yellow cover, white paper holder, and a white arrow pointing downward (no text or symbols)natural_image
Hand inserting a card into a printer (no visible text or symbols)natural_image
Interior view of a white industrial or mechanical enclosure with two black plastic panels and labeled components (6 and 7), no readable text or symbols beyond labels.
natural_image
Close-up of a red plastic component with yellow tip and white connector, mounted on a white surface with screws (no text or symbols visible)text_image
Diagram illustrating electrical circuit components including power, switches, capacitors, and meters with Chinese labelsnatural_image
Close-up of a ceiling-mounted electronic component with mounting holes and mounting screws (no text or symbols visible)natural_image
Close-up of hands handling a white paper sheet with a PAPER printer in the background (no visible text or symbols on the paper)natural_image
Close-up of a circular device with green and black buttons, no visible text or symbolsnatural_image
Paper filter with green paper and yellow filter, white arrow pointing downward (no text or symbols)natural_image
Hand inserting a card into a printer (no visible text or symbols)natural_image
Interior view of a device casing with two black plastic panels and labeled parts 6 and 7 (no text or symbols on the panels themselves)
natural_image
Close-up of a red plastic component with yellow tip and white connector, mounted on a white base with screws (no visible text or symbols)text_image
Diagram illustrating electrical circuit components around a power button, including switches, capacitors, and power lines.Indikering: Oljebeholder tom
natural_image
Close-up of a ceiling-mounted device with three black arrows pointing to the opening and side panels (no text or symbols visible)natural_image
Close-up of hands handling a document with a printer in the background (no visible text or symbols)▶ Etter en liten forsinkelse lyser indikatoren på betjeningselementet:
natural_image
Close-up of a circular electronic device with labeled buttons and a green indicator light (no readable text or symbols)Grønn: Papirbunken kan makuleres.
natural_image
Paper printer with green cover and yellow cover, white paper holder, and a white arrow pointing to the cover (no text or symbols on main image)natural_image
Hand inserting a card into a printer (no visible text or symbols)natural_image
Interior view of a white electronic device with black plastic components and numbered callouts (6 and 7) pointing to specific areas.
natural_image
Close-up of a red plastic component with yellow tip and white connector, mounted on a white base with screws (no text or symbols visible)natural_image
Close-up of a ceiling-mounted air vent with two black arrows pointing to the vent and a central opening (no text or symbols visible)natural_image
Close-up of hands handling a white paper sheet with a PAPER printer in the background (no visible text or symbols on the paper)natural_image
Close-up of a circular device with mechanical components and a magnified inset showing green and black parts (no text or symbols visible)natural_image
Paper printer with green cover and yellow cover, white arrow pointing downward (no text or symbols)natural_image
Hand inserting a green card into a printer (no visible text or symbols)natural_image
Interior view of a white electronic device with black plastic panels and labeled parts (6 and 7), no readable text or symbols beyond labels.
natural_image
Close-up of a red plastic component with yellow tip and white connector, mounted on a white base with screws (no visible text or symbols)natural_image
Close-up of hands handling a white paper sheet with a paper printer in the background (no visible text or symbols)natural_image
Close-up of a smart air conditioner with labeled buttons and a magnified inset showing green LED indicators (no text or symbols)natural_image
Paper printer with green cover and yellow cover, white paper clamped by a white arrow (no text or symbols)natural_image
Hand inserting a card into a printer (no visible text or symbols)natural_image
Interior view of a device casing with black plastic panels and labeled parts 6 and 7 (no text or symbols on main subject)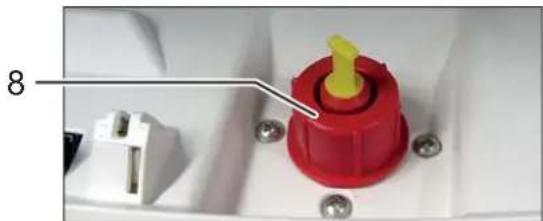
natural_image
Close-up of a red plastic component with yellow tip and white connector, mounted on a white base with screws (no visible text or symbols)natural_image
Close-up of a ceiling-mounted electronic device with two black arrows pointing to the mounting bracket (no text or symbols visible)natural_image
Close-up of hands handling a white paper sheet with a PAPER printer in the background (no visible text or symbols on the paper)natural_image
Close-up of a circular device with labeled buttons and a magnified inset showing green icons (no readable text or symbols)natural_image
Paper printer with green cover and yellow cover, white arrow pointing downward (no text or symbols)natural_image
Hand inserting a transparent card into a printer (no visible text or symbols)natural_image
Interior view of a device casing with black plastic panels and labeled parts 6 and 7 (no text or symbols on main subject)
natural_image
Close-up of a red plastic component with yellow tip and white connector, mounted on a white base with screws (no visible text or symbols)natural_image
Close-up of a ceiling-mounted air duct with three black arrows pointing to specific components (no text or symbols visible)natural_image
Close-up of hands handling a white paper airplane with a paper feeding machine in the background (no visible text or symbols)natural_image
Close-up of a computer control panel with buttons and a green indicator light (no readable text or symbols)Roheline: paberivirna saab hävitada.
natural_image
Paper printer with green cover and yellow cover, white arrow pointing downward (no text or symbols)natural_image
Hand inserting a card into a printer (no visible text or symbols)natural_image
Interior view of a white electronic device with black plastic panels and labeled parts 6 and 7 (no readable text or symbols beyond labels)
natural_image
Close-up of a red plastic component with yellow tip and white connector, mounted on a white base with screws (no visible text or symbols)natural_image
Close-up of a ceiling-mounted fixture with two black arrows pointing to specific components (no text or symbols visible)natural_image
Close-up of hands handling a white paper sheet with a PAPER printer in the background (no visible text or symbols on the paper)natural_image
Close-up of a white circular device with black and green buttons arranged around it, no visible text or symbols.natural_image
Paper printer with green cover and yellow cover, white paper roll, and a white arrow pointing to it (no text or symbols)natural_image
Hand inserting a card into a printer (no visible text or symbols)natural_image
Interior view of a white electronic device with black plastic panels and labeled parts (6 and 7), no readable text or symbols beyond labels.
natural_image
Close-up of a red plastic component with yellow tip and white connector, mounted on a white base with screws (no visible text or symbols)text_image
Diagram illustrating power distribution and control symbols around a central power button, surrounded by icons for switches, batteries, and lock.Prikaz: Posoda za olje prazna
natural_image
Close-up of a ceiling-mounted electronic component with two black arrows pointing to features (no text or symbols visible)natural_image
Close-up of hands handling a white paper sheet with a PAPER printer in the background (no visible text or symbols on the paper)natural_image
Close-up of a circular device with green and black buttons arranged around it, no visible text or symbols.natural_image
Paper filter with green paper and yellow filter, white arrow pointing downward (no text or symbols)natural_image
Hand inserting a transparent card into a printer (no visible text or symbols)natural_image
Interior view of a white electronic device casing with black plastic panels and labeled parts 6 and 7 (no text or symbols on main subject)
natural_image
Close-up of a red plastic component with yellow tip and white connector, mounted on a white base with screws (no visible text or symbols)natural_image
Close-up of a ceiling-mounted device with two black arrows pointing to the opening and a central opening (no text or symbols visible)natural_image
Close-up of hands handling a white paper airplane with a paper filter in the background (no visible text or symbols)natural_image
Close-up of a CD/DVD disc with mechanical components and a magnified inset showing green leaf-like elements (no text or symbols)natural_image
Paper printer with green cover and yellow cover, white arrow pointing downward (no text or symbols)natural_image
Hand inserting a card into a printer (no visible text or symbols)natural_image
Interior view of an open electrical enclosure with two black plastic panels and a black plastic cover, labeled 6 and 7 (no text or symbols on the panels themselves)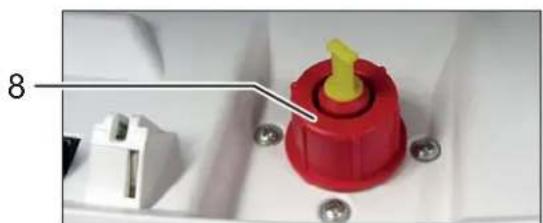
natural_image
Close-up of a red plastic component with yellow tip and white connector, mounted on a white surface with screws (no text or symbols visible)Indicator: recipient ulei gol
Tasta-functie
„Pornire / Oprire / Start“
natural_image
Close-up of a ceiling-mounted electronic component with two black arrows pointing to features (no text or symbols visible)natural_image
Close-up of hands handling a white paper sheet with a paper control scanner in the background (no visible text or symbols on the document)natural_image
Close-up of a circular device with labeled buttons and a magnified inset showing green components (no readable text or symbols)natural_image
Paper printer with green and yellow sheets, white paper, and a white arrow pointing to the cover (no text or symbols)natural_image
Hand inserting a green card into a printer (no visible text or symbols)natural_image
Interior view of an electrical enclosure with two black plastic panels and a black plastic cover, labeled 6 and 7 (no text or symbols on the panels themselves)
natural_image
Close-up of a red plastic component with yellow tip, attached to white electrical socket (no text or symbols visible)natural_image
Interior ceiling view showing a double door and a rectangular opening, with three arrows pointing to the sides (no text or symbols visible)natural_image
Close-up of hands handling a white paper airplane with a PAPER control scanner in the background (no visible text or symbols on the machine itself)natural_image
Close-up of a circular device with green and black buttons arranged around it, no visible text or symbols.natural_image
Paper filter with green paper and yellow filter, white arrow pointing downward (no text or symbols)natural_image
Hand inserting a card into a printer (no visible text or symbols)natural_image
Interior view of a device casing with two black plastic panels and a black plastic housing, labeled 6 and 7 (no text or symbols on the main components)
natural_image
Close-up of a red plastic component with yellow tip and white connector, mounted on a white surface with screws (no text or symbols visible)text_image
Diagram illustrating power distribution around a central power button with icons for switches, power lines, and battery symbols.natural_image
Interior ceiling view showing a double door and a rectangular opening, with three upward-pointing arrows pointing to the corners (no text or symbols visible)natural_image
Close-up of hands handling a white document with a printer in the background (no visible text or symbols)natural_image
Close-up of a circular device with green and black buttons arranged around it, no visible text or symbols.natural_image
Paper printer with green cover and yellow cover, white arrow pointing downward (no text or symbols)natural_image
Hand inserting a transparent card into a printer (no visible text or symbols)natural_image
Interior view of a white electronic device with black plastic panels and labeled parts (6 and 7), no readable text or symbols beyond labels.
natural_image
Close-up of a red plastic component with yellow tip and black connector, mounted on white base with screws (no visible text or symbols)Gösterge:PAPERcontrol
text_image
Diagram illustrating power distribution and control symbols around a central power button, surrounded by various electronic devices.natural_image
Close-up of a ceiling-mounted electronic component with two black arrows pointing to features (no text or symbols visible)natural_image
Close-up of hands handling a white paper printer with 'PAPERControl' branding (no visible text on printer or background)natural_image
Close-up of a circular electronic device with labeled buttons and a magnified inset showing a green star symbol (no readable text or numbers)natural_image
Paper printer with green cover and yellow cover, white arrow pointing downward (no text or symbols)natural_image
Hand inserting a card into a printer (no visible text or symbols)88699 Frickingen / Germany
Tel. +49 7554 2100-0
Fax +49 7554 2100 160
info@hsm.eu
www.hsm.eu
HSM (UK) Ltd.
14 Attwood Road / Zone 1
Burntwood Business Park
Burntwood · Staffordshire
WS7 3GJ
United Kingdom
Tel. +44 1543 272-480
Fax +44 1543 272-080
info@hsmuk.co.uk
www.hsm.eu
HSM of America LLC
419 Boot Road
Downingtown, PA 19335
USA
Tel. +1 484 237-2308
+1 800 613-2110
Fax +1 484 237-2309
customerservice@hsm.us
info@hsm.us
www.hsm.us
HSM Polska SP. z o.o.
ul. Emaliowa 28
02-295 Warszawa
Poland
Tel. +48 22 862 2369
Fax +48 22 862 2368
Handlowy@hsm.eu
www.hsm.eu
HSM France SAS
Parc de Genève
240, Rue Ferdinand Perrier
69800 Saint-Priest
France
Tél. +33 472 210580
Fax +33 472 517481
France@hsm.eu
www.hsm.eu