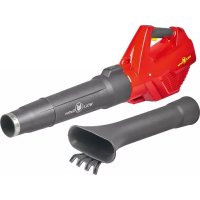
LYCOS 40480 V Set - Blower Wolf Garten - Free user manual and instructions
Find the device manual for free LYCOS 40480 V Set Wolf Garten in PDF.
User questions about LYCOS 40480 V Set Wolf Garten
0 question about this device. Answer the ones you know or ask your own.
Ask a new question about this device
Download the instructions for your Blower in PDF format for free! Find your manual LYCOS 40480 V Set - Wolf Garten and take your electronic device back in hand. On this page are published all the documents necessary for the use of your device. LYCOS 40480 V Set by Wolf Garten.
USER MANUAL LYCOS 40480 V Set Wolf Garten
(Original operating instructions)
FR Francais 26
(OpunHnHaBna HNcTpyKzma no 3kCnIyataa
Inhalt
Meaning of the symbols. 17
For your safety. 17
Safety information. 18
Intended use 20
Identification plate. 20
Operating controls 21
Start-up 21
Assembly 21
Operation 22
Servicing 23
Transport and storage 24
Troubleshooting 25
Warranty 25
CE Declaration of Conformity 25
Environmentally-friendly disposal 25
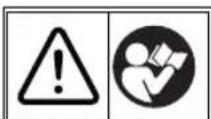
Meaning of the symbols
WARNING!
Read the instruction manual before using for the first time!
Caution!
Do not allow any other persons to enter the danger area.
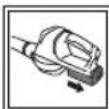
Always remove the power pack prior to working on the device!
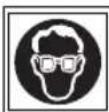
Wear safety goggles!

Wear ear defenders!
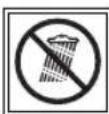
Do not leave the device in the rain!
For your safety

WARNING!
Before using your device for the first time, read this instruction manual carefully and observe the instructions.
Keep this instruction manual for later use or subsequent owners.
Before using for the first time, you must read the safety information!
Failure to observe the instruction manual and the safety instructions can result in damage to the device and danger for the operator and other persons.
All persons involved with the initial set-up, operation and servicing of the device, must have appropriate qualifications.
The making of unauthorised changes or conversions is not permitted
Do not make any changes to the device or convert it to make other machinery. Such changes can result in personal injury and incorrect operation.
Repairs to the device must only be performed by trained persons who have been instructed to do so. Always use original spare parts. This ensures that the safety of the device is maintained.
Information symbols in this manual
The signs and symbols in this manual should help you to use the manual and device quickly and safely.

Note
Information to ensure the most effective and practical use of the device.
Step
Requires you to perform an action.
√ Action result
This is the result of a sequence of steps.
[1]Item number
Item numbers are indicated in the text by square brackets [ ].
A Illustration label
Illustrations are numbered with letters and identified in the text.
Step number
The defined sequence of steps is numbered and identified in the text.
Safety information
Danger levels of warning information
The following danger levels are used in this instruction manual to indicate potentially dangerous situations:
DANGER!

A dangerous situation is highly likely and, if the measures are not followed, will result in severe injury and even death.
WARNING!

A dangerous situation may occur and, if the measures are not followed, will result in severe injury and even death.
CAUTION!

A dangerous situation may occur and, if the measures are not followed, will result in slight or minor injuries.
Attention!
A possibly harmful situation may occur which if not avoided will result in property damage.
Safety information content
DANGER!

Type and source of the danger!
Consequences of non-observation
Measure for preventing the danger
Protection of yourself and others
For safety reasons, children or persons who are not familiar with the instruction manual must not use the leaf vacuum/blower. The minimum age of users may be defined by local or national legislation.
Do not operate the leaf vacuum/blower when there are people (especially children) or animals in the immediate vicinity. Ensure children do not play with the leaf vacuum/blower.
Stop using the device if persons (especially children) or animals are nearby. Do not allow any other persons to enter the danger area.
This device must not be used by children or persons with reduced physical, sensory or mental capabilities or with inadequate experience and knowledge. Likewise persons must be familiar with this instruction manual before using the device. The minimum age for using the device may be specified by local or national legislation.
Cleaning and servicing may not be carried out by children.
Children are not allowed to play with the device. Keep children away from the device.
Always wear sturdy shoes and long trousers as well as other appropriate personal protective equipment (protective goggles, hearing protection, safety gloves etc.) when working with the leaf vacuum/blower. The wearing of personal protective equipment minimises the risk of injury.
Persons operating the device must not be under the influence of intoxicants (e.g. alcohol, drugs or medication).
The operator or user is responsible for accidents, injuries to other people or damage to their property.
Before use
Before use, make sure you are familiar with the leaf vacuum/blower, its functions and controls.
Do not use any leaf vacuum/blower whose switch is defective and which can no longer be switched on or off. It must be repaired by a qualified expert or workshop.
Read and observe the operating manual of the power pack and the power pack charger.
Before use, always check the device for damage and, if necessary, arrange for the device to be repaired by a workshop prior to use.
Tips for use
Never operate the device without the vacuum bag attached.
Never operate the device without attached vacuum/blowing tubes. Both vacuum/blowing tubes (top and bottom) must be fully and securely fitted on the device.
Safety information
> Remove the power pack from the device:
- Whenever you leave the device unattended.
- Before removing blockages.
- Before checking, cleaning or working on the device.
- After impacting a foreign body, to check the device for damage.
- For immediate checking, if the device starts to vibrate excessively.
Never leave the leaf vacuum/blower unattended during breaks and store it in a secure location.
Wear suitable safety goggles and ear defenders!
Adopt a normal posture. Ensure you are standing securely and that you maintain your balance at all times. Pay particular attention, if you are working on a slope. Do not run, rather walk forwards at a steady pace. This will ensure that you can maintain better control of the device if unexpected situations occur.
Take extra care if you are walking backwards. Risk of tripping!
Switch the motor off when carrying the device to or from separate working positions.
Never bypass or manipulate switching mechanisms installed on the device (e.g. by taping the push-button to the handle).
Never suck up or blow away substances other than leaves or dirt with the device in order to prevent the risk of injury and property damage. Other substances are for example:
Chemical products such as fertiliser or other substances - Damp objects or liquids
Solid objects such as metal, glass, etc. - Hot objects such as ash, embers, cigarettes, etc.
Never aim the device toward people, pets or windows. Always blow in a direction where there are neither people nor animals, nor where delicate solid objects are located (such as windows, walls, cars).
Always hold the device firmly with both hands. One hand on the handle, the other on the bow-shaped handle.
Do not wear any loose or dangling clothes or jewellery that could be sucked into the intake opening. Keep long hair away from the intake openings.
Keep hands, face and feet away from all rotating parts. Do not touch any rotating parts.
Information about vibrations:
Vibrations can cause nerve damage and impair the blood circulation in the hands and arms.
When working in the cold, wear warm clothing and keep your hands warm and dry.
Take breaks.
If you notice that the skin of your fingers or hands goes numb, tingles, hurts or goes white, stop working with the machine and, if necessary, consult a doctor.
The specified vibration emission values were measured according to a standardised testing procedure. These values make it possible to estimate the power tool emissions and compare them against different power tools.
Dependent on the conditions of use, the state of the power tool or tools inserted for use with it, the actual vibration load may be higher or lower. When estimating the emissions also take into consideration work pauses and phases of reduced load. Implement protective actions, e.g. organisational measures, based on appropriate estimates.
After use
Switch the device off, remove the power pack and check the device for damage.
If you need to clean or service the device, switch it off and remove the power pack.
Ensure that ventilation slots are free from dirt.
Do not clean the leaf vacuum/blower using water.
Safety information
Store the device in a safe, dry location out of the reach of children.
Do not repair the device yourself; it must be repaired by a qualified expert or workshop.
General safety information
Never use a device with damaged or missing guards or covers. They must be repaired or replaced by a qualified expert or workshop.
Spare parts must meet the requirements of the manufacturer. Therefore use only original spare parts or spare parts approved by the manufacturer. During replacement, always observe the supplied fitting instructions and first remove the power pack.
Repairs must only be performed by a qualified technician or service centre.
The device must not be used for purposes other than those intended because of the risk of bodily injury to the user or other persons.
Only use the leaf vacuum/blower in daylight or under bright artificial light. Keep your work area clean and well lit.
Only use the leaf vacuum/blower in dry weather conditions. Keep it away from rain or damp. The ingress of water into the leaf vacuum/blower increases the risk of an electric shock.
Do not touch any dangerous moving parts before the moving parts have come to a standstill and the power pack has been removed.
Even if all safety and operating instructions are heeded, there is always a residual risk of injury and property damage. Always bear this in mind.
Do not use the device if it is raining or there is a risk of storms.
Replace all worn or damaged information signs on the device.
Only use power packs and chargers approved by the manufacturer. The designations of the approved power packs/chargers are listed in the enclosed CE Declaration of Conformity.
Intended use
This device is designed exclusively for use:
- as a leaf vacuum/blower around the outside of the house and in the garden
- in accordance with the descriptions and safety information given in this instruction manual.
Any other use is classed as incorrect use. The user shall be liable for any damage arising from incorrect use.
Incorrect/abnormal use
The device should not be used in public facilities, parks, sports grounds, roads, etc. nor in agriculture or forestry.
Identification plate
Position
The identification plate is located on the device casing.

Note
The label has the status of a certificate. It must never be altered or obliterated.
Layout
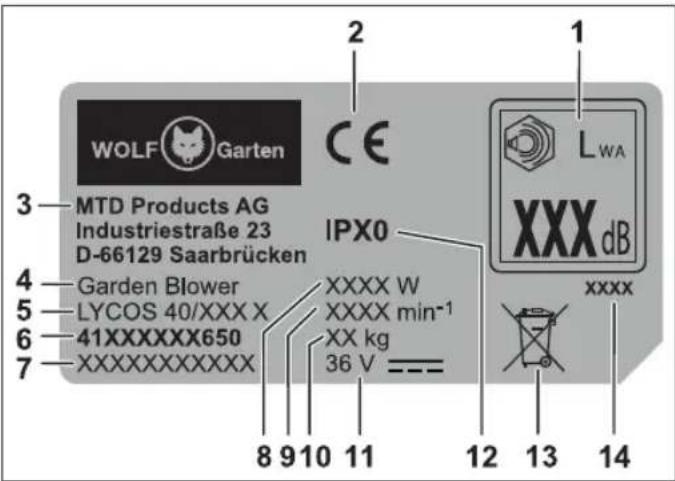
1 Guaranteed sound level
2 CE label
3 Manufacturer
4 Device group
5 Model name
6 Model number
7 Serial number
8 Power
9 Engine speed in rpm
10 Weight
11 Rated voltage, current type
12 Protection class /IP rating
13 Disposal instruction
14 Year of manufacture
Operating controls
Operating controls
1 Handle
2 Turbo button
3 Bow-shaped handle
4 Adjustment lever for bow-shaped handle adjustment
5 Top vacuum/blowing tube
6 Bottom vacuum/blowing tube
7 Intake opening
8 Blow opening
9 Carrying belt
10 Power pack release
11 Power pack compartment
12 Rotary switch with motor speed function
13 On/off switch
14 Leaf vacuum/leaf blower casing
15 Release mechanism for vacuum bag
16 Vacuum/blow selection lever
17 Vacuum bag with zip
18 Transport wheel
Start-up
Supplementary documentation

Make sure the supplied instruction manuals of the charger and the power pack are available. Please read and understand them before using the device.
Power pack charging

WARNING!

Risk of injuries or material damage
Charge the power pack using the charger approved by the manufacturer. The designations of the approved chargers are listed in the enclosed CE Declaration of Conformity.
Attention!
The power pack is supplied partially charged. Before first use, fully charge the power pack to ensure full capacity of the power pack.
Power pack charging must be carried out according to the instructions in the supplementary documentation.
Operating times
Observe the times stipulated in local byelaws.
Check with your local authorities to determine if there are any operating time limitations.
Assembly

WARNING!

Risk of injuries
- When using the tool, incorrectly fitted parts can lead to severe injuries up to and including death.
This tool can only be operated, if all parts are fully fitted and tightened and there are no damaged parts!
Therefore first read the entire chapter, before fitting the parts.
Fit the parts carefully and completely.
Use tools as specified.

WARNING!

Risk of injuries
Parts may only be fitted and removed when the motor is switched off and the power pack removed.
Assembly ABCDEF
Fitting the vacuum/blowing tube
Incline the top vacuum/blowing tube a at a slight angle and press it first into the lower and then the upper area of the device, until it audibly locks into place 1/2.
Screw the top vacuum/blowing tube securely in place using the screw B 3.

Note
Only tighten the screw by hand.
Press the bottom vacuum/blowing tube against the upper vacuum/blowing tube until it audibly locks into place C 1.
Using the screw, screw the bottom vacuum/ blowing tube tightly in place C 2.
Adjusting the bow-shaped handle
Pull the adjustment lever to adjust the bow-shaped handle B 4.
Select your preferred working an and release the adjustment lever.
Attaching the transport wheel
Insert the transport whAic in the mounting on the bottom vacuum/blowing tube D.
Attaching the vacuum bag
Hook the vacuum on the front part of the casing connection E 1/2.
Press the rear part of the vacuum bag adapter onto the connecting piece of the housing until it audibly locks into place E 3.
Attach the vacuum bag to the fastening hook E4/5.
Attaching the carrying belt
Attach the carrying to the fastening point provided F.

Note
For safety reasons only carry the device supported over your shoulder and never around your neck.
Adjusting the carrying belt
Adjust the carrying belt to the desired length. The attachment hook should be at hip height.

Note
In order that you have better control over the device and so that your arms and back do not tire too quickly, the carrying belt must always be used with the device.
Inserting the power pack H

WARNING!

Incorrect handling of the power pack and the charger
Risk of injuries and material damage
Read and observe the operating instructions of the power pack and charger.
The 2-stage latching mechanism is used to set operating or transport mode of the power pack.
Position 1
The power pack is in transport mode.
- The electric contacts are open to prevent the power pack from self-discharge during storage.
Position 2
The power pack is in operating mode.
- The electrical contacts are closed and the device is ready for use.
Operation
Selecting the operating mode 1
Set the selection lever to the desired operating mode.

NOTE
The selection lever can also be adjusted during operation. Turn the selection lever, always ensuring that it engages with the corresponding symbol. Never move the selection lever to an intermediate position.
Vacuum function: Set the selection lever to position
- Blow function: Set the selection lever to position ②.
Switching the device on J
The blowing/vacuum speed level can be set using the continuously adjustable adjustment wheel.
Set the desired blowing/vacuum speed using the adjustment wheel (1 - 5) ①.
Press the on/off switch
The device operates.
Turbo mode
The leaf vacuum/leaf blower has an additional turbo mode for extra high blowing/vacuum speeds.
Press the turbo button, to create a stronger air blast or vacuum ③.

Note
Turbo mode remains active after switching the device off and back on again. To switch turbo mode off, the turbo button must be pressed again so that the device can work in normal mode (slow motor speed).
Working with the device K
Attach the carrying belt to the device and wrap it round.
Hold the device with one hand on the handle and the other on the U-shaped grip.
Hold the vacuum/blow pipe a few centimetres above the ground or move it on the transport wheel.
Move slowly forwards in a controlled manner.

Note on the motor speed
Use a lower speed for light material and a higher speed for heavy material.
When to use the blow function
Use in areas which are difficult to clean: e.g. flowerbeds, shrubbery, trees, around house corners, grating and fences.
Perform movements from one side to another.
Keep the collected pile of waste in front of you.
Use turbo mode as necessary.
When to use the vacuum function
For areas which are difficult to clean, such as flowerbeds, shrubbery, house corners, etc.
Perform lateral movements or use the device on the transport wheel for collecting light material. Leaves and twigs are vacuumed up and crushed. The vacuum bag can then hold more material.
Empty the vacuum bag when full.
Switching the device off J
The device switches off as soon as you release the on/off switch on the handle 4.
Emptying the vacuum bag
WARNING!

Risk of injuries or material damage.
Before removing/emptying the vacuum bag, switch off the device and remove the power pack.
Emptying without removing the vacuum bag
Open the zip on the vacuum bag.
Empty the vacuum bag in accordance with local regulations.
Close the zip.
Removal of the vacuum bag for emptying L
Press the vacuum bag release mechanism
Pull off the vacuum bag
Release the vacuum bag fixing ho3s4.
Open the zip on the vacuum bag.
Empty the vacuum bag in accordance with local regulations.
After emptying the vacuum bag, shake it thoroughly to remove dust and dirt from the fabric.
Close the zip and reattach the vacuum bag to the device.
Removing the power pack M
Press the power pack release
Remove the power pack
Servicing
WARNING!

Risk of injuries or material damage.
Maintenance or cleaning work may only be performed on the device with the motor at a standstill, the blow/vacuum turbine stopped and the power pack removed.
Repair and service work as well as the replacement of safety elements must be performed by a qualified expert or workshop.
Cleaning
Keep the ventilation slots clean and free from dust.
Wipe down the casing only with a damp cloth.
Attention!
Do not clean the device with water.
Cleaning the vacuum bag
After using the device, always empty and shake out the dust bag.

Note
Wear protective goggles and a dust mask for this task.
Once per month (or more often if required) wash the vacuum bag:
Empty the vacuum bag thoroughly
- Turn the vacuum bag inside out
- Shake out vacuum bag
- Clean vacuum bag with a soap solution
- Leave the vacuum bag to dry
Cleaning the blowing/vacuum turbine B N
Undo the fixing screw on the casBg
Pull the entire blowing/vacuum tube assembly away from the casing B.
Remove deposits, soiling or clogging with a brush, a dry cloth or compressed air N.
- Press the entire blowing/vacuum tube assembly onto the casing, until it locks into place B.
- Fasten the complete blowing/vacuum tube with the previously released screw back on to the casing B.
Transport and storage
Transport
Secure the device sufficiently to prevent its unintentional slipping if you are transporting it in or on a motor vehicle.
Storage
Thoroughly clean your device at the end of each season.
Always store the device in a dry and safe location that is inaccessible to children.
Store the power pack and tool separately.
Store the power pack in a cool and dry location. Recommended storage temperature 0 - 23^
- Keep the device and especially its plastic components away from brake fluids, petrol, mineral oil containing products, penetrating oils etc. They contain chemical substances that can damage, attack or destroy the plastic components of the leaf vacuum/blower.
Fertilizers and other garden chemicals contain substances that may have a highly corrosive effect on the metal parts of the device. Therefore do not store your device near to these substances.
Troubleshooting

WARNING!

Risk of injuries or material damage
In case of doubt always consult a specialist workshop.
Before any inspection or any work on the device, switch off the motor and remove the power pack.
| Problem Possible cause Remedy | ||
| The device switches off. | The power pack is too hot. Allow the power pack to cool. | |
| The power pack is discharged. Charge the power pack. | ||
| The temperature of the device (electronics) is too high. | Allow the device too cool and if necessary, clean the air inlet. | |
| Overcurrent release If this occurs again take your device to a specialist workshop. | ||
| The device will not switch on. | The power pack is discharged. Charge the power pack. | |
| Overvoltage release If this occurs again take your device to a specialist workshop. | ||
| Overcurrent release If this occurs again take your device to a specialist workshop. | ||
| Power pack temperature too high or too low. Allow the power pack to cool down or warm up. | ||
| The power pack is defective. Replace the power pack. | ||
| Vibrations. The vacuum/blow turbine is heavily soiled. Clean the vacuum/blow turbine. | ||
| Strong vibrations | Damaged blowing turbine or other parts. | Switch off the device immediately. Have defective parts replaced by a workshop. |
| The motor has no power or the device is not vacuuming/blowing. | The vacuum bag is full. | Empty the vacuum bag. |
| The vacuum/blow pipe is blocked. | Remove and clean the vacuum/blow pipe. | |
| The vacuum/blow turbine is damaged. Have defective parts replaced by a workshop. | ||
Warranty
The warranty conditions of our local company or importer apply in all countries. Under the terms of the warranty we will repair faults on your device free of charge, insofar as material or manufacturing defects are the cause. To make a claim under warranty please contact your seller or your nearest branch.
CE Declaration of Conformity

Further details about the device are contained on the separately enclosed CE Declaration of Conformity, which forms part of this instruction manual.
Environmentally-friendly disposal
Power tools, accessories and packaging must be routed to an environmentally sound recycling chain.
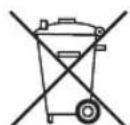
Power packs/batteries:
Do not dispose of power packs/batteries in domestic waste, by burning or throwing into water. Power packs/batteries must be collected, recycled or disposed of in an environmentally-friendly manner.
Power tools (without power packs/batteries):
Do not throw your old power tool away in the domestic waste. Take it to an appropriate disposal facility.
Table des matieres
Outils electriques (sans accumulateurs/batteries):
Satta in batteriet H

WARNING!

Skru skruen bare fast for hand.
Trykk det nedre suge-/blaserpa det ovre suge-/blaseroret sik at det gár horbart i las C 1.
Skru det nedre suge-/blaseroret fast med skruene A f C 2.
✓ Akkumulatoren stari transportstilling.
Mny EKHTETT N OOUKEUN OTN BPOxH!
TnV aopalεia oα

NPOEIAOIOIH!
Piv ano tv npwn xponn ts oukeuncsosiaaote nnapouoe osnyiesxponnckvepyeite aoei autwv.
Uklanjanesmetnji 169
Jamstvo 169
EZ izjava o sukladnosti 169
Ekološko zbrinjavanje 169
Značenje symbola
UPOZORENJE!
BvI INCTOHTHNI ONACHOCTN
TnocneCTBna IrhOpupobAHNA
Mepa no ppeDoTbpaueHnO onaChocTN
HnBnDyaIbHa 3aunTa
No coo6paXeHnM 6e30NaChOCTn DeTAM nHn
nUaM, He O3HaKOMNBUnMcra C pyKOBOdCTBOM
NO 3KcnNlyatauIN, NcNoJIb3OBaTb caOBBi
nbIneCoc/BO3dyxOyBky 3anpeueHo. MHNMaJbHbN BO3pact NOJIb3OBaTeJIa MOXET ONpeDeJIaTbCMAcTHbIMN HOpMaTINBaMn.
He 3anyckaIte caObBn nbIeCoc/BO3dyXoDyBky,ecnB HENOCpeCDTBeHHoN 6Hn30CTn HaxOaTcra IIOu (B Oco6eHHocn DeTu) nn XNBOTbIe.CneIte TaKke 3a Tem,HTo6bl C caO-BbIM nbIeCOCOM/BO3dyXoDyBKO He nIrpAHI DeTu.
BbIKIOHTe MaUNHy, ecn pAOM HxOaTcIIOHN (BOOCO6EHHOCTN-DETN) IIN DOMaHHeXNBOTHbIE. Hn B KOEM clyuae He dOnyckaIte B ONaCHyO 3OHY TpeTbx Niu.
3To yctpoicBO He doJXHO 3KcNlyaTnpoBAtbCnDeTbMn NlUaMn C OrpaHnueHHblMNΦn3NuecKMn, CeHCOPhIMn IINy UMCTBeHHbIMn CNOco6HOCTaMn, a TaKxpe - npuOTcyTCTBnN ONbITA n 3HaHn. TaKxpe 3To yctpoicBO He doJXHO 3KcNlyaTnpoBaTbcNlUaMn, He O3HaKOMNBUnmncs C HactOaMpyKOBoDcTBom NO 3KcNlyaataun. MeCThie npedncaHn MOrTy YcTaHaBnBaTb OrpaHnueHnRA Bo3pacta NoIb3OBaTeJe.
OuNTka n TexHnueckoe o6cnyxnbHne He DOJXHbI BblONHrTbCra DeTbMn.
TeH He DOJXHbI INpTaB C yCTPOINCBOM. H pa3pewaHTe DeTAM NOxOuNTb K yCTPOINCTBY.
Bo BpeMa pa6oTbI C caOBBIM nbIeNcoCOM BO3dyXoYbKO HnB03Ne Hero/Hee BcerDa HocHTe npOHyO 6yBb N dnnHhIe Wtahbl, a TaKKe nCNoJb3yIte NOxOJaUne CpeDCTBa INHnBnDyAaHbOH 3aunTbI (3aunTHbIe OUKN, npOTnBOwymHbIe HayuHNKn, pa6Oyne nep- yatKn n T. d.). IcNoJIb3OBaHHe CpeDCTB INHnBnDyAaHbON 3aunTbI CHNXaET ONaCHOCTb TpaBM.
3anpeuaeTcpa6oTaB c yctpoiCTBOM JIOIAM, KOTOpbIE HAXOJrTc IOD BO3JeICTBHeM ONbHnIOxN CpeIcTB (HaNPmEp, aIKoRJIb, HApKOTKn NIM MeNKaMeHTbl).
OTBeTCTBeHHocTb 3a HecuactHbIe CnyuaH yuep6, npuHHeHbI dpyrM IIOJMy NIN INx IMyueCTBy, BO3JaRaETcHa OnepaTopa NIN Ha NOJIb3OBaTeJI.
IpeepnpimmeHneHem
Перед наразом pa60тбI O3HaKOMbTecь c caO-BbIM nbInecocOM/BO3dYxOyBko, erO/eункиЯMu, a TAKKe C erO/e 3JemeHTamu ynpabLeHn.
He nCnoNb3yIte caDObBn nbinecoc/BO3- DxyOyBky,ecnn eroe/ee BbIKIOuataeNB HeNCnpaBeH npectaB KNIHOATbcN Nn BBIKIOUaTbcN. IopyHTe ee peMOHT KBaINoN CuPOBaHHOMy CneuaNNCTTy NN CneuaNN3IOPOBAHHoMaCTepCKoN.
Почтinteи co6nIOdaIte pyKOBoIDCTBO NO 3Kc- nIyatauIN aKKymJrTOpHoi 6aTapeN I 3apdHoro yCTpoiCtBa dIra aKKymJrTOpHoi 6aTapeN.
Ipepe KaKdbIM NcNoIb3OBAHHe m npOBepaTe yCTpoiCTBO Ha OTCyTCTBne NOBpeJKeHn, npu HauNpuN nOpyuAte peMOHT cneuaJIIN3npoBaHHo MaCTepckoN.
Yka3aHnno TExHnke 6e3onachOCTn
BoBpem npimHeHHa
Hn B Koem cnyae He nCnoJIb3yIte yctpoi-CTBO 6e3 yCTaHOBJIeHHORo MeuKa dIy Mycopa.
HnB Koem cnyuae He nCnoJb3yIte yCTpoi-CTBO 6e3 yCTaHOBJIeHHbIX Tpy60k nbInecoCa/BO3dyXoYbKN. O6e Tpy6Kn nbInecoCa/BO3dyXoYbKN (BepxHЯ N HxHЯ)doJXHbI 6blTb NOHOCbIO n IpOCHo yCTaHOBJIeHbI Ha yCTpoiCTBe.
N3BneKaIte aKKymyIaTpyo 6aTapeo n3 yCtpoiCTBa:
- Bcerda, korga Bbl octabJare yctpoNCTBO.
-
neped cHrTneM 6JoknpOBKn.
-пегд вллн HeHnem npOBepK, OYNCKn IJIpa60T ha yctpoiCTBe. -
NOCNE CTOJKNHOBENHc PpeNrTCTBnEM, DnI NPOBepKu yCTpOINCTBa Ha npeDMET NOBpeXeHn.
-ДЯ HEmeДлЕнHо ПpoВерки,КOrДа yСТpoИCTBO NaHHaeТ Ype3Мерн ВИбпupOBaTb.
Bo Bpem nepepbioB bpa6oTe Hn B Koem cnyuae He octabnIte caObbl nbIneCoc/ BO3dyxOyBky 6e3 npcmoTpa n xpaHnte ero/ ee B HaJeKHom MeCTe.NcnoIb3yIte nOxDxOJaIne 3aunTHbIe OuKN npOTnBOwMhIe HayHnKn!
N36eaiTe Heyo6hIx NOJoxHn TeJa. CneIaTe 3a XopoWeyCTOuNBOcTBIO N BcerdaNoIepKbAte paBHOBeCne. ByIbTe Oco6eHHO OCTOpOKHbI, nepeDnraRcB no CKNOHy. Hn B Koem clyuae He 6eraT, DnraTecB BnepeCnOKOHbIM WaROM. 3To No3BOiNT Bam lyuwe KOHTpONIpOBaTb yCTPOINCTBO B HEOXHDAHHbIX CNTyaUHX.
BybTe Oco6eHHO OCTOpXHbI, Dnuracb Ha3a. OnachOcTb cNOTbikaHna!
Bo Bpem TpaHcnpTnpOBKn yctpoNCTBa n npn nepexode Mekdy OTdEJIbHbIMM MeCTaMn pa60tbl Bcerda BbIKIOUaHTe DBIRatelb.
He nepembikaTe yctaHOBneHHbIe Ha ycTpoiCTBe ycTPOcTBa BKNIOUcHn I BblKIOUcHn I He BblONJIte C HmMn HnKaKx HeHaJNeXaunx DeIcTBn (HaNPmep, nyTem npMa-tbIbAHN KHOKN Ha pyKoTKe).
Hn B Koem cnyae He nbIeocbTe nHn He cDyBaIte C NOMOuBIO yCTpOcTBA dpyrHe MaTePnAJIbI, KpOME JNCTBbl IIN rpa3N, YTO6bl N36eKxA1b pNCK TpaBM N MaTePnaJbHoro yUep6a. KdpyrM MaTePnaJAM OTHOcTcR, HanpIMep:
XIMMueckne npoDyKTbI, TaKne KaK ydo6peHnHa IIN dpyrHe BeuectBa;
BnaxhblpepeMeTbI JINJXNDKoCTN;
TBepDble npedMeTbI, TaKne KaK MeTaJI, CTeKIO N T. D.;
- ropayne npedMeTbI, TaKne KaK 30Ja, KycnUyra, cnrapetbI n T. d.
He HappaBJIaIte ycTpoiCTBO Ha JIOdei, DomaunHX XINBOTbIX Nn OkHa. HNKoRda He HappaBJIaIte cTpyIO BO3dyxa B CTOPOHy JIOdei Nn XINBOTbIX, a TaKke YyBCTBNTeJIb-HbIX TBepDbIX NOBepxHOCTeN (HanpIMep, OKOH, CTeh, ABTomO6NJeI).
Bcerda kpenko ydepknBaute ycTpoNCTBO o6eHmnykam. Odnoy pko3a pyky, a dpyro3a Dyrobyo pyKoTky.
XpaHnTe yCtpoNCTBO B HaJeXHOM, cyXOM HeOCTyNHOM dJa DeTee MeCTe.
He pemOHtnpuIte yCTpOncTBO camocToTeIbHo, npuyaIte ero peMOHT ToIbKO KBaIIHnHcNpOBaHHOMy CneuaJIncTy HJN CNEuaJIIN3npOBaHHo MaCTepCKo.
Yka3aHna, kacaUounecBn6paun:
Bn6paun MoKeT npNBeCTn K NOBpeXdeHnM HepBHO CnCTeMbI N HApUWeHIO cIpKpyJz- CUN KPOBV B cocyDax pyk n PpePnLeuH.
Bo Bpempa6oTbI npn Hn3KoN Tempeatype Hocnte TennyIO Odekny n CneJNTe, YTO6bl Baun pykn 6bln B TeTne n cyxumn.
ДелайтenepepbIbbl.
B cnyae OHemHn KOHN pALbcE B Hn pyK, NOBHeHn B Hnx 3yda, 6OJIeBbIX OUsyeHn Hn NobEnHn PpeKpaTnte pa6Ot y Maun-HoN, B cnyae Heo6xOaHMoCTn, O6paTntEc b K BpaUy.
Yka3aHHbIe 3NaueHnBn6paCNOHHo3MnCSnn N3MepAOTcN NO CTaNdapTN3nPoBaHHoMeTOAnke NcblTaHn. 3Tn 3NaueHn PO3BOJnOuEHNBaTB yPOBeHb 3MNCCNN 3NeKTPOHNCTpymeHTa N BbINOJNHb CpaBHeHpePA3NIuHbIX 3NeKTPOHNCTpymeHTOB.B 3aBN-CmMOCTN OT YcNOBn PnpMeHnR, COCTOHNJ3NeKTPOHNCTpymeHTa Nn pa6OeRo INCHTpymeHTa PaKTNUeCKa Harpy3Ka MoKeT 6bTb 60JIbWeNn MeHbWe. Pnp BbINOJHnOceHKn UyNTbI-BaIne NepepbIBb I pa6Ote n nepNoDbI Hn3KOHNarpy3Kn. OnpeDeJIte Mepbl 3aUHTbl, COOTBeTCTByIOUne N3MepeHHbIM 3NaueHnM, HApPmepOPraHN3aCNOHHbIE Mepbl.
Pocne npmeHenra
BbIKIOHTe yCTPOINCTBO, CHIMTE aKKMyTnTOPHyO 6aTapeIO n IpOBepbTe yCTPOINCTBO Ha npedMeT NOBPexKeHn.
EcnBam Heo6xOJMo BbINOJHnTb pa60TbI NO TexHueckomy 06cJyXnBaHNIO N OChCTKe yCtpoiCTBa, BBIKJIOHTeero IN CHMNTe aKKyMyJrTOphHyO 6aTaapeIo.
CneiTe 3a TeM, YTO6bI BEHTnJIaUNOHHbIE 8eHN He 6bln 3arpa3HeHbl.
Yka3aHnno TExHnke 6e3OnachOCTn
He MoTe CaObI INbIeCoc/BO3dYxOyBky BOdoi.
He Hocnte Cbo6oHyU, CBncaIoUyU OdeKdy NnYkpaWeHnA, KOToPbIe MOryt 6bITb3aTaNtB1 BO BCacbIBaIOuSee OTBepCTne. He np6JInxKaIte DnHHbIe BONcbl Ko BCacbIBaIOuIM OTBepCTnM.
He np6nkaTe pyKn, nio n HOrn K BpaaIooImcA DeTaNm. He kacaTeCb BpaaIOxnxCdTaJeN.
06üne yka3aHnno texnke 6e3onacHocTn
He 3KcIpyuIte yCTpOJCTBO c NOBpeXKeH HbIMn IIN OTCyTCTBYUOMN 3aUNTHbIMN yCTpOJCTBaMn IN KpbIiKAMn. IopyuAHTe nx peMOHT INN 3aMeHy KBaIIIOuPobAHHomy CneUaJINCTy INN CNEuaJIIN3IpOBaHHoMaCTepCKoN.
3anactndoJXhBI COOTBeTCTBOBaTb Tpe6oBaHnM, yCTaHOBHeHHbIM npOn3BOdnteIeM.10aTOMy nCNoJIb3yIte ToJIbKO opnIHHaJIbHbIe 3anactn nnOdo6peHHbIe npOn3BOdnteIeM 3anactN. Ppr 3ameHe BcERda Co6JIoJaTe pnpIraaemblc HnCTpyKUnn No yCTaHOBKe n CHImaTe aKKymyTAToPHyIO 6atapeio.
Iopyuayte npoBeHne peMoHTa nckIouHTeBHO KBaIIuΦnUPOBaHHOMy cneuaJIInCTy INN CneuaJIN3npOBaHHo MaTepCKoN.
I3-3a onachocTn TpaBMnpOBaHnnoJIb3OBATeJIy IIN dpyrNx IIOJe BO3dYxoDyBky HeJIb3A NCNOJIb3OBAtB B HecBOIcTBeHHbIX en ueJIax.
NcnoIb3yIte caObBn nbIeoc/BO3dyXoDyBky TOJIbKO dHem NII npH HAnuHxOpoWeRo NCKycCTBeHHoro OCBeueHn. MeTo pa60tbldoJXHO 6bITb YIcTbIM I XopoWIO OCBEueHHbIM.
NcnoNb3yUte caObBn nbIeCoc/BO3dyXoDyBky TOnbKO B cyxu noRdy. BepeHnte ee OTdoJn nn cbipocTN. IonoJaHne BObl B caObBn nbIeCoc/BO3dyXoDyBky NOBbIaet ONaCHOCTb nopaxHeHn 3NeKtpnuecknM TOKOM.
He npnkaaTecb K onaChbIM NOdBHXHBIM qactm do cHra Tc yctpoNCTBa aKkymyTopHO B aTaPeu N Do NoHOBKn NOBHXbIX qacteI.
Дахе npс co6нюдень Сex yka3ани no texнke 6e3onacnoctn uynpaBneHNO cyueCTByET OCTaTOUHbI PNCK TpaBM N MaTePNaIbHorO yuep6a. Bcerda nomHnte o6 3Tom.
He 3KcIpyaTnpyTe yCTpOietBO BO BpeMa DOxJnI rpo3bl.
YcTaHaBnBaIte Ha ycTpOoiCTBO HOBbIe yKa3aTeIbHbIe Ta6JNcKn BMeCTo N3HOWeHHbIX ININ NOBpeXDeHHbIX.
NcnoNb3yIte TOnbKO aKKMyJrTopbI n 3apnHbIe yCTpoNCTBa, pa3peWeHHbIe npOn3BOJTeNem. O6o3HaueHnOdo6peHHbIX aKKMyJrTopOB n 3apnHbIX yCTPOINCTB yKa3aHbIB npInlaeraMoN DeKnapauu coOTBeTCTBnE EC.
PpIMMeHHeNoHa3HaueHnIO
3To yctpoiCTBO npedHa3HaueHo nckJIouHTeJIbHO dIg npimeHeHHa:
- B KaYeCTBe CaIIOBOrO NbIInecOca/BO3DyXoDyBKN B DOMaUHem XO3R'CTBe IJIH Ha PnIDOMOBbIX Ra3OHax.
-B COOTBETCTBUN C ONNCAHNNM N YkazAHHN M N ToxHnke 6e30NaChOCTN, CoepKaaUIMNCRA B DaH-HOM pyKOBOIDCTBE NO 3KCNJIyatauIN.
JIO6oe BbIXOJaUe 3a 3TN paMKN NcNOJIb3OBaHne CHTaETCnPIMHeHHeM He NO Ha3HaueHNo.
3a yue6, npou3oewdunB cnyyae npimeneHn He no Ha3hauehnIO,OTBeuayeTIOJIb3OBaTeJb.
PpimHeHne He no Ha3HaueHnIO
YcTpoIcTBo He DoJXHO IcNIOb3OBAbCBA MeCTAX
06UeRo NOnb3OBaHnra, NapKax, OBeKeTAX CnOpTNBHO INΦpactpykTypbl, Ha yJInCuX, a TaKke Ha
PpeDnPnTnX CeJIbCKOrO n IeCHOrO XO3RrCTBa.
PacnopTna Ta6nUka
NoJoxeHne
PacnpTnHa Ta6nUka HaxoNTcHa Kopnyce yctpoiCTBa.

yKa3aHue
Nacnpnna mabnuka Hocum xapakmep dokymehma - ee HeNb3a U3MeHmB UUN npubodumb b Heuumaembl bud.

Ctpyktypa
1「apaHTnIPOBaHHoe3HaueHne 3ByKOBoM OMOHOCTN
2 3HaK CE
3 PpOn3BODInTeJIb
4pynnyaycptpoicTB
5 Ha3BaHHe MoDeJIe
6 Homep moDenn
7 CepinHbIN HOMep
8 MoHOCTB
9 Yactota BpaueHnI DnIraTeIa, 06/MnH
10 Bec
11 Pauchethoe Hanpajxene, poToka
12 Klaacc 3aunTbI/CTepeHb 3aunTbI
13 Yka3aHne no yTnIIm3aUIM
14TOnBbInycka
3nemEnbIynpaBHeHn
3JIeMeHbI ynpaBneHnna 0
1 PykorTaKa
2 KhoNka «Typ6o»
3 DyroBa pyKoTka
4 Pbyar dЯpeynilpoBkn DyrroBo pykoTkn
5BepxHra Tpy6ka nblneococ/BO3dyxoodyBkn
6 HxHxra Tpy6ka nblneococa/BO3dyxoodyBkn
7 Bcacbibaouee OTBepctne
8 HarheTaTeIbHoe OTBepCTne
9 HanneuHbI peMeHb
10 Khonka pa36loKpOBKn akkyMnyTOpHoi 6aTapei
11 AkkymyIaTOpHbI OTcEK
12 NOBOPHTbI perynTOp c cyHKUmei perynpOBKn YactOTbIBpaueHn DnirataTeJI
13 BbIKIyOuTeJIb
14 Kopnyc caoBoro nbIeocca / Bo3dyxOyDyBkn
15 Khonka pa36JIOKnpOBKn MeJka dJa Mycopa
16 PyuHnepeKlueynA «IbIeCoc/BO3dyXoDyBka»
17 Meiok dny Mycopac mOnHnei
18 TpaHcnpOpTnpoBouHoe KOJIeCO
BBoD B 3KcIIpyaTuIO
DOnONHHTeJIbHaJ DOKyMeHTaUa

Beodume ycmpoucmeo 3kcnnyamauho luubemom cnyae,ecnuy Bac umeHomca npunasaembe pykooeodcmea no 3kcnnyamauu 3apdnozo ycmpoucmeu akkymynamopa u Bbl nohnu u co6nndaeme ux
3apdka akkymyIaTOPHO6atapeu
PPEyPPEXDEHNE!
Onachocb TpaBM N NOBpeKdHnN My-
3apjkaTb aKKMyJrTOpHyo 6aTaapeToJIbKO C NOMOUsbO ODo6peHHoro IpoIIN3BOUNTeJeM 3apJHoro yCTpoiCTBa.Ob03NaueHnO ODo6peHHbIX 3apJHbIXyCTpoiCTB yKa3Ahbl B pnpilaraemOn DeKnapaun COOTBeTCTBnE EC.
BhumaHue!
AkkymyIaTOPHa 6aTape NOCTabJIeTcB YactuH O3apJxehHom COCToHn. IJa oBeCneueHn nonHO MOUHOCTn AKKymyIaTOPHo 6aTape NOnHOCTbIO 3apJdnte ee nepeD nepBbIM NCNoIb3ObaHnEM.
3apraIte aKKymyIaTOpHyo 6aTaapeIO B COOTBeTCTBUN C INHCTpyKUmaMn, COdepKaUmMnCBA DOnONHTeBHOJ DOKymeHTaUIN.
Yacbl pa60Tbl
Co6nOdaTe pernoHaJIbHbIe npednicaHna.
→ Y3haIte o pa3peWeHHbIX Yacax pa6oTbIB MecTHOM opraHe 0BueCTBeHHoro npaBOponpaKa.
C6opka

PNEyPExKdHne!
OnachocTb TpaBMnpoBaHn
HeaIeXaUM 6pa3OM 3akpenJIeH HbIe DeTaN BO BpemN cNoJb3OBaHn yCTPOcTBa MOrY TcTaB npuHOn TJeIeIuNX N CMePTeNbHbIX TpaBM!
TO yCTPOINCTBO MOXHO BKNIOHATB TOJIbKO pN yCNOBN NONHO HADEXHOYCTAHOBK INCEX KOMNOHEHTOB IOTCYTCTBNA HNX NOBpeKDeHNI
ПОТOMY,праздусьясьиВаыКOM-ноHEТы,СЧада пpoчтITE BEcь pa3дeN. >МOTИРУTe KOMNOHETbI TuaTeNbHO IN NOJIHOCTbIO.
NcnoJb3yIte nHCTpyMeHT B npednicaHbIX cnyaX.
PNEynpKDeHNE!

Onachoctb TpaBMIpOBaHnA
KOMHOENTbMOXHO MOHTNPOBaTb N DEMOHTNPOBaTb TOIbKO PnBbIKIOueHHOM DBnraTeJe n C n3BNeueHHoAKKymJIA-TOPHO6atapee.
C6opka ABCDEF
YcTaHOBKa Tpy6Kn nbIneCocA/Bo3dyXoYbKn
→ CπeRka Hακηθινe Bερχιού Tpy6ky Πbɪnecoa/ BO3dYxOyBKN A a N BdaBnte ee cHaγaNa B HnKHe, a 3aTeM B BερχHe γactu B KOpNyc yCTpOιCTBa Do φικcauni B 1/2.
→PnBnHTnte BepxHIO Tpy6ky nbIeCocA/BO3dyxo- DyBKN BnHTOM ③.

Yka3aHue
3amHume BuHm moIbKO om pyku.
HacaIte HIXHIO Tpy6ky caIOBoro IbIeOca/ BO3dyXoDyBKN A b Ha BepxHIO Tpy6ky caIOBoro IIeOCa/BO3dyXoDyBKn IO QIKCaUN CO 1
→ПиВИNTIte HIXHIO Tpy6ky nbJIeCOca/BO3dYxO-уВКи BИHTaMn A fC ②.
PerynpoBka dyroBoi pyKoTkn
→YTo6bI OTperyInpoBaTdyroByIO pyKoRTKy,NOTaHnTe 3a pbUar peryInpOBKn 3 4.
BbI6epnte Heo6xoJnMbmy yron HaKnBa5 n OTnyCTnte pbIur perynipOBKn.
YctahOBka TpaHcnpTIpOboHOro Koneca
BCTaBBTe TpaHCnOpTnpoBOuHoe KOA B DepkaTeJIb Ha HxKHe Tpy6Ke nbIeCocA/BO3dyXoYbKnD.
HabeunBaHne Meuka dna Mycopa
3aKpeNITe MeIok dIy MycoA d Ha nepeHHe Yactn 7tuepa Ha Kopnyce yCTpOcTbA E1/2.
HacaNTe 3aHIOU qacb aanTepa MeuKa dmycopa Ha natpy6OK Kopnyca Do fNKcaun CO ueJyKOM E 3.
→ HabecbTe MewoK dIy Mycopa Ha KpeIeXhblkpoK E 4/5.
KpenneHHe HanLeuHoro peMHr
→ HabecbTe HAnJIeHbI peMa He HA COOTBeTCTByIOUeKoJIbUO F.

Yka3aHue
I3 coo6paqexHu 6e3onacHocMu nepeHocu me ycmpoucme, nepe6pocue pemehyepe3 npeo, a He uepe3 weio.
PerynpoBka HanneuHoro pemna
OtperynnpyIte Tpe6yEmyIO nnHy HanneuHoro peMHa. KapabHn noDBeCKn DOJKeH pacnoJa- rataBcHa ypOBHe 6edpa.

YKa3aHue
IЯ obecneueHua lyuweo KOhmpoHaHad ycmpoucmbom u chuxehua ymomnremocmu pyu cnuhbl 80 epma 3Kcnnyamauu ycmpoucmba eceda cnedyem ucnno3o- bamb Hanneybui peMehb.
YcTaHOBka aKKymyIaTOpHoi 6aTapeu H
PNEynpExdHne!

HenpaBnIbHoe o6paueHne c akKymyTOp-HoH 6aTaapeeN 3apAHyBIM yCTpoiCTBOM
OnachocTb TpaBM N NOBpeKdEHHN MyuectBa
ПочтITEи co6IIOdaTe pyKOBODCTBO NO 3KcIIpyatauIN aKKymyJrTOpHOI 6bATApEN n 3apAnHO rCTPOrCTBa IJIa aKKymyJrTOpHOI 6bATapEN.
Pn nomou 2-ctyneHcyatoro fikcaTopa moxho HactpanBaTb pa6oyn peXm uN pexm TpaHCnpTnpOBKn aKKymJrTOpHO 6aTapei.
CtyneHb 1
AkkymyIaTOPHa 6aTapeHaxoIITcBpeKIme TpaHCnOpTnpOBKn.
- ΘлктуческгоКТы pa3beДинeHbI,ЧмпсдOTВрацаetСу HeKeЯTeьнБИ сamopap3яд akKymларTopHoi 6aTapeN BO BpeMxpaHeHn.
CtyneHb 2
AkkymyIaTOPHa8 6atapeHaxoDntcB pa6oempeKIMe.
- Θл ektpnueckne KOHTaKtbl CoeHHeHb, yCTpoI CTBO rTOBO K 3KcNpyTaUu.
3Kcnnyatauia
Bb6op pexma pa60Tbi I
YctaHOBNTe pbuHr nepeKIOUcEHn Ha Heo6xoDnMbI peXIM pa60TbI.

yKa3aHue
Pbuaa nepeknioueHna Moxnno nepeknioyambu 8o epempaobm. Bce2da noopaueaume pbuaa nepeknioueHna 8 obo3haehnoe cumoJom nOJKeHue do fuKcauu.Hu e koem cnyae He ycmaHaJeuaume pbuaa nepeknioueHna npomexymouhoe nOJOKeHue.
-Функця nbinecoca: YctaHOBnte pbuar nepeKIOueHnB NOJoxEHe 1.
-Функи BAO3dyxOyBKn: YcTaHOBnTe pbIar nepeKIOUeHn B NOLOKeHne 2.
BkIIOUeHne yCTpoiCTBa J
C NOMOUIBPO peryIINPOBOUHORO KOJIeCNKa MOXHO 6ecCTypeHcATo HAcTpOnTb CKOpocTb BblDyBaHNr/ BCacsbAHn.
YCTaHOBNTe Tpe6yEmyIO CKOPoCTb NOTOKA BO3dyXa C NOMOuIbOperyNipOBOuHOrO KOJecnka (1-5) 1.
→HaxMMTe BbIKIOuAtb
√ YcTpoNCTBOpa6oTaeT.
Pexm «Typ6o»
Дя obecneueHЯ Oc60 BbICOKO KNKOPCTN NOTOKa BO3dyxa nbJIeCOC/BO3dyXoYbKa IMeET peJIM «Typ60».
→ YTo6bI nonyUHTb CInbHbI NOTOK BO3dyxa NJIIN BoJbWoe pa3peXeHne IIN BcAcBbAHnA, HAXMNTe KhONKy «Typ60» ③.

Yka3aHue
Ipu noemopHom eknoyehuu nocJe ebiknO- yehu ycmpoucmea myp6opexum omaemCra akmuehbl. Ymo6bI ebiknOuyummbyp6opexum, Heo6xodumo eue pa3 haxamb Ha KhoNky «Typ60», Komopar nepeeknooyum ycmpoucmeo 6 obHybI pexum (MeDneHHble o6opombl dbuzamena).
Pa6ota cycptpoiCTBOMK
3aKpeHnTe HAnIeHbI peMeHb Ha yCTpOInCTBe nHaDeHbTe erO.
YdepknBaIte yCtpoNCTBO OJHOpyKo3a pyKy, aDpyro-3a DyROByIO pyKOaTKy.
→ДерхиTe Tpy6ky nbIinecoca/BO3dyxOyBKN Ha paCCToHn HeCKoJIbKnx CaHTmEpTOB HaI 3eMne IINI nepemeuAte ee Ha TpaHCnopTnpOBOCHOM KONEc.
→HaunHe MeIeHoe I KOHTpOnpyEmoe DnKHeNBeBpeI.

Yka3aHue no nooody yacmombi epaue Hua deuameia
Ineko0Mamepuana mpebyemcmehwa yacmoma epauehena, a dnnmxeioo -6onee bicoka.
Ncnonb3ObaHne B kaueCTBe BO3dyXoYbKn
IcnoJIb3OBaHne IJn TpydHO OuNuaeMbIX MecT, TaKnx KaK KnyMbbl, KycTbI, DepeBbY, Yrbl DOMOB, peWetkn n H3roPODi.
→ДиURAyTe yCTpoNCTBO U3 CTOpOHbI B CTOpOHy.
Co6paHHa Kya Mycopa DoJxHa HaxoNTbcnpeB Bamn.
→Pn Hc0xOaMocTn nCNoJIb3yIe Tpy6opexm.
IcnoJIb3OBAHnE B KaueCTBe nbIeNecoca
Tpydno OuHaeMbIX MeCT, TaKnx KaK KnyM6bl, KcTbI yTbI DOMOB.
→Дигайт eусюпВВ CTOPOBHинИСПОЛь 3уte erO c TpaHcNOpTHbIM KOJecNKOM dЯсбopa JERKOTO MaTePnana. JNTBa N TOHKne BETBn BCacbIBaOTcNи N3MeJIbYaOTcR.Tak MeWOKdЯ MYCOPa MoKeT BMeCTHTb BoNbSeMaTePnana.
OnopoxHnTe noJIhBm MeWok dIy Mycopa.
BbIKJIIOueHne ycTpoiCTBa J
YcTpoIcTBo BBkNIOaTeCn NOcNe OTnyCKaHn BbIKIOuHa pyKoTKe 4.
OnopoxHeHne Meuka dMycopa
#
PNEyPExEHEIe!

Onachocb TpaBM n nobpeXdHnMyuceCTBa.