
Pixma iP4500 - Printer CANON - Free user manual and instructions
Find the device manual for free Pixma iP4500 CANON in PDF.
| Brand | Canon |
| Model | Pixma iP4500 |
| Category | Color inkjet printer |
| Print resolution | 9600 x 2400 dpi |
| Interface | USB 2.0 High speed |
| Supported paper sizes | A4, Letter, 4x6", 5x7", 8x10", credit card, wide |
| Supported paper types | Plain paper, glossy photo paper, satin, professional, sticker |
| Borderless printing | Yes |
| Direct PictBridge printing | Yes |
| Number of nozzles | 4608 (512 per color for Y, BK, Dye BK; 1536 for C and M) |
| Dimensions (W x D x H) | 445 x 303 x 160 mm |
| Weight | Approximately 6.9 kg (with print head and ink tanks) |
| Power supply | 100-240 V AC, 50/60 Hz |
| Power consumption (printing) | Approximately 13 W |
| Power consumption (standby) | Approximately 1.2 W |
| Noise level | Approximately 34.5 dB(A) |
| Operating temperature | 5 to 35 °C |
| Operating humidity | 10 to 90% without condensation |
| Ink cartridges | 5 individual tanks (pigment black, dye black, cyan, magenta, yellow) |
| Maintenance | Automatic print head cleaning and alignment |
| Safety | Do not touch the electrical contacts on the tanks, keep out of reach of children |
| Consumables availability | Ink tanks available 5 years after production stop |
| Compatible operating systems | Windows Vista/XP/2000, Mac OS X v.10.2.8 to 10.4 |
Frequently Asked Questions - Pixma iP4500 CANON
User questions about Pixma iP4500 CANON
0 question about this device. Answer the ones you know or ask your own.
Ask a new question about this device
Download the instructions for your Printer in PDF format for free! Find your manual Pixma iP4500 - CANON and take your electronic device back in hand. On this page are published all the documents necessary for the use of your device. Pixma iP4500 by CANON.
USER MANUAL Pixma iP4500 CANON
| Introduction 1 |
| How to Use the Documentation Provided 3 |
| Preparing the Printer 4 |
| Installing the Printer Driver 5 |
| Reading the On-Screen Manuals 7 |
| Loading Paper in the Cassette 8 |
| Printing from Your Computer 10 |
| Printing Photographs Directly from a Compliant Device 12 |
| Replacing an Ink Tank 16 |
| Specifications 18 |


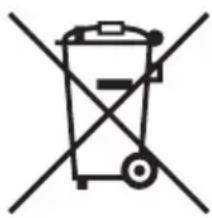
This symbol indicates that this product is not to be disposed of with your household waste, according to the WEEE Directive (2002/96/EC) and your national law. This product should be handed over to a designated collection point, e.g., on an authorized one-for-one basis when you buy a new similar product or to an authorized collection site for recycling waste electrical and electronic equipment (EEE).
Improper handling of this type of waste could have a possible negative impact on the environment and human health due to potentially hazardous substances that are generally associated with EEE. At the same time, your cooperation in the correct disposal of this product will contribute to the effective usage of natural resources. For more information about where you can drop off your waste equipment for recycling, please contact your local city office, waste authority, approved WEEE scheme or your household waste disposal service.
For more information regarding return and recycling of WEEE products, please visit www.canon-europe.com/environment.
(EEA: Norway, Iceland and Liechtenstein)
For Customers in Europe, Middle-East, Africa and Russia only
For Canon Customer Support contacts, please see the back cover of the European Warranty Systems (EWS) Booklet or visit www.canon-europe.com.


A846
Introduction
This Quick Start Guide uses the following symbols to indicate important information. Always observe the instructions indicated by these symbols.
Warning
Instructions that, if ignored, could result in death or serious personal injury caused by incorrect operation of the equipment. These must be observed for safe operation.
Caution
Instructions that, if ignored, could result in personal injury or material damage caused by incorrect operation of the equipment. These must be observed for safe operation.
Important
Instructions that must be observed for safe operation.
Depending on your application program, operations may differ. For details, refer to the instruction manual of your application. The steps described in this manual are in Windows Vista™ operating system Ultimate Edition (hereafter referred to as "Windows Vista") and Mac OS X v.10.4.x.
Trademark Notices
- "Microsoft" is a registered trademark of Microsoft Corporation.
- "Windows" is a trademark of Microsoft Corporation, registered in the U.S. and other countries.
- "Windows Vista" is a trademark of Microsoft Corporation.
- "Macintosh" and "Mac" are trademarks of Apple Inc., registered in the U.S. and other countries.
- "Adobe" and "Adobe RGB (1998)" are either registered trademarks or trademarks of Adobe Systems Incorporated in the United States and/or other countries.
© CANON INC.2007
All rights reserved. No part of this publication may be transmitted or copied in any form whatsoever without the express written permission.
Exif Print
This printer supports Exif Print.
Exif Print is a standard for enhancing the communication between digital cameras and printers. By connecting to an Exif Print-compliant digital camera, the camera's image data at the time of shooting is used and optimized, yielding extremely high quality prints.
International ENERGY STAR® Program

As an ENERGY STAR® Partner, Canon Inc. has determined that this product meets the ENERGY STAR® guidelines for energy efficiency.
Power Requirements
Be sure to use the power cable included with the printer. Never use a power supply voltage other than that supplied in the country of purchase. Using the incorrect voltage could cause a fire or electric shock. The correct power supply voltages and frequencies are as follows:
AC 100-240 V, 50/60 Hz
About Consumables
Consumables (ink tanks / FINE Cartridges) are available for 5 years after production has stopped.
Safety Precautions

Warning
- This product emits low level magnetic flux. If you use a cardiac pacemaker and feel abnormalities, please move away from this product and consult your doctor.
- Never attempt to plug the power cord into the power outlet or unplug the power cord when your hands are wet.
- Never damage, modify, stretch, or excessively bend or twist the power cord. Do not place heavy objects on the power cord.
- Never use any power supply other than the standard power supply available in the country of purchase. Using the incorrect voltage and frequency could cause a fire or electric shock.
Always push the plug all the way into the power outlet.

Caution
- For safety reasons, store ink tanks out of the reach of small children.
- Do not drop or shake ink tanks as this may cause the ink to leak out and stain your clothes and hands.
Also read the Safety Precautions in the User's Guide on-screen manual. Observe the warnings and cautions to avoid personal injury or damage to the printer.
How to Use the Documentation Provided

Printed Documentation
Setup Sheet
Be sure to read this sheet first.
This sheet includes instructions for setting up your printer and getting it ready for use.
Quick Start Guide (This guide)
Read this guide when starting to use the printer.
After following instructions in your setup sheet, we recommend you read this guide to familiarize yourself with the basic operations, for example, printing from your computer and a PictBridge compliant device.

On-screen Manuals
User's Guide
Read this guide when starting to use the printer.
If the Quick Start Guide does not provide you enough information, please refer to the User's Guide that can be installed from the Setup CD-ROM. This guide provides detailed instructions for:
- printing media
- printing from your computer
routine maintenance
troubleshooting
Additional guides are also available for advanced features.
PC Printing Guide
Refer to this guide for full instructions on printer driver setting.
PC Photo Printing Guide (Windows® only)
Refer to this guide for instructions on using the various application software included on the Setup CD-ROM.
DVD CD Print Guide
(For users in countries and regions outside the USA and Korea)
Refer to this guide for full instructions of printing on DVD/CDs.
Preparing the Printer
Be sure to read your setup sheet first for setting up your printer and getting it ready for use.
Unpack the printer
Please confirm the included items against the illustration printed on the lid of the packing box.

Important
A USB cable is necessary to connect the printer with your computer.
1 Turn on the printer.

Caution
Be sure to remove the tapes before you turn on the printer.

Note
The tape position is subject to change.
2 Install the Print Head.

Caution
Do not touch internal parts other than the Print Head Lock Lever.

Important
Do not reattach the protective cap once it has been removed.

Note
There may be some transparent or light blue ink on the inside of the bag the print head comes in, or the inside of the protective cap - this has no effect on print quality. Be careful not to get ink on yourself when handling these items.
3 Install the ink tanks.

Important
- If the Top Cover is open for more than 10 minutes, the Print Head Holder moves to the right side. In this case, close the Top Cover, and open it again.
- Make sure that all the ink tanks are installed in the correct position, matching the label. The printer cannot be used unless all the ink tanks are installed.
- Once you have installed the ink tanks, the POWER lamp will flash green. Wait for about 2 minutes, until the POWER lamp stops flashing and changes to steady, non-flashing green and the printer has stopped making operating noises, before proceeding.

Note
- Be sure to remove the clear film from the ink tank in the exact order as shown in step 3 of your setup sheet.
- Do not squeeze the side of ink tanks as this may cause the ink to leak out and stain your clothes and hands.
- Do not reattach the protective cap once you have removed it.
- The ALARM lamp on the printer still flashes orange if an ink tank is not installed properly. Open the Top Cover and make sure that position of all the ink tanks match the label.
4 Load printing paper.
In the following process, you will be required to perform the Print Head Alignment, and you will need two sheets of supplied paper (MP-101) loaded with the printing side (whiter side) facing UP in the Rear Tray.

Important
- When loading paper in the Rear Tray, make sure that the Rear Tray lamp is lit.
- Always load paper in portrait orientation. Loading paper in landscape orientation can cause the paper to be jammed.
4 Preparing the Printer
Installing the Printer Driver
Information Common to Windows and Macintosh®
Notes on the Installation Process
- If the Select Language screen appears, select a language, then click Next.
- If the Select Your Place of Residence screen appears, select your place of residence, then click Next.
- There are two ways of installing the printer driver and other software:
Easy Install: the items included on the Setup CD-ROM are installed automatically. Custom Install: you can select particular items to install
-
The available software programs included on the Setup CD-ROM may vary depending on the country or region of purchase.
-
When the User Registration screen appears, click Next. If your computer is connected to the Internet, the on-screen instructions to register your product will appear.
Registration can also be performed from the icon on the desktop after installation is completed. - The User Registration screen will only be displayed when Europe, Middle East, Africa is selected on the Select Your Place of Residence screen.
Notes on the Print Head Alignment
- Load two sheets of supplied paper (MP-101) with the printing side (whiter side) facing UP.
- Print Head Alignment will take about 13 minutes to complete. Do not open the Top Cover while printing.
- If the pattern is not printed successfully and the ALARM lamp on the printer flashes orange, press the RESUME/CANCEL button to clear the error, go ahead to the next procedure to install the printer driver and on-screen manuals, then refer to "Eleven flashes" in "ALARM Lamp Flashes Orange" in the User's Guide on-screen manual.
Information for Windows
- Log into a user account with the administrator privilege.
-
Before installing the printer driver, disable all anti-virus programs and automatically loading programs.
-
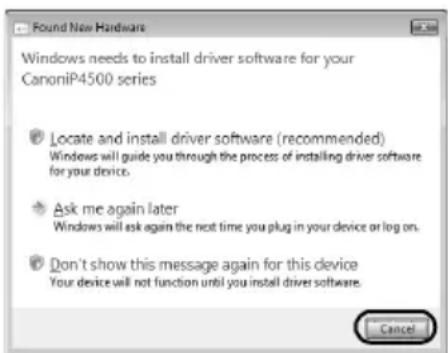
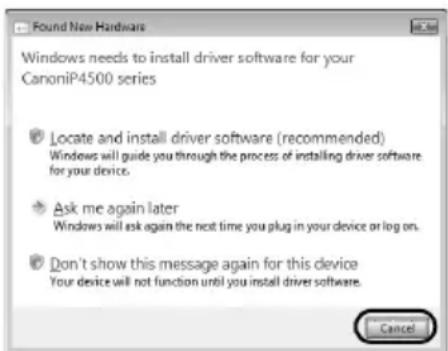
If the Found New Hardware or Found New Hardware Wizard screen appears automatically, remove the USB cable connected to your computer. Click Cancel to quit the screen. In Windows Vista, the screen may close automatically when the USB cable is unplugged. Then turn off the printer and start the installation process again. For details on the installation process, refer to your setup sheet.
-
If the AutoPlay screen appears, click Run Msetup4.exe. In Windows XP and Windows 2000, this screen will not appear.
-
If the User Account Control screen appears, click Continue. In Windows XP and Windows 2000, this screen will not appear.
To install Adobe RGB (1998), click Custom Install and follow the instruction on the screen. - When a message asking for your confirmation to restart your computer may appear during the installation process, click OK. The system is restarted automatically. While restarting, do not remove the Setup CD-ROM.
- We would appreciate it if you would take part in the PIXMA Extended Survey Program regarding the use of Canon printers. For details, refer to the on-screen instructions.
- If the connection is not recognized, refer to "Cannot Install the Printer Driver" in the User's Guide on-screen manual.
Information for Macintosh
- Since Mac OS 9, Mac OS X Classic environments, or Mac OS X v.10.2.7 or earlier are not supported, do not connect the printer to these.
- Do not remove or insert the USB cable during installation, as this may result in the computer or printer not operating normally.
- Before installing the printer driver, disable all anti-virus programs and automatically loading programs or remove them from your system folder.
- When a message asking your confirmation to restart your computer appears during the installation process, click Restart. The system is restarted automatically. While restarting, do not remove the Setup CD-ROM.
- When you perform the Print Head Alignment and cannot find your printer name in Printer List, click Add to add the printer. For details, refer to the Printer Setup Utility Help in the Mac Help.
Users in Asia
- To install the User's Guide on-screen manual in a language other than the installed one, double-click the Manual folder in the Setup CD-ROM, Canon folder, and then copy a language folder to your hard disk.
Reading the On-screen Manuals
For detailed instructions on installing the on-screen manuals, refer to your setup sheet.
You can view the on-screen manuals in the following way:
Windows
To view the on-screen manual, double-click the XXX On-screen Manual shortcut icon on the desktop, or click Start > All Programs (or Programs) > Canon XXX Manual > XXX On-screen Manual (where “XXX” is your printer’s name).
System Requirements
Browser: Windows HTML Help Viewer

Note
- Microsoft® Internet Explorer 5.0 or later must be installed.
- The on-screen manual may not be displayed properly depending on your operating system or Internet Explorer version. We recommend that you keep your system up to date with Windows Update.
Macintosh
To view the on-screen manual, double-click the XXX On-screen Manual alias (where "XXX" is your printer's name) on the desktop.

Note
Users in Asia If you installed the User's Guide from the Manual folder in the Setup CD-ROM, open the folder in which you copied the User's Guide and double-click top.htm.
System Requirements
Browser:HelpViewer

Note
- The on-screen manual may not be displayed properly depending on your operating system. We recommend that you keep your system up to date.
- We recommend using Safari as your Web browser to view the HTML format on-screen manuals. If Safari is not installed on your computer, download it from Apple Inc. website and install it.
Loading Paper in the Cassette
Some types and sizes of paper are not loadable in the Cassette and requires the use of the Rear Tray. If you intend to use only the Cassette, check for any usage restrictions in advance.

Important
- If you cut plain paper to 4'' × 6'' / 101.6 × 152.4 ~mm, 5'' × 7'' / 127.0 × 177.8 ~mm , or 2.13'' × 3.39'' / 54.0 × 86.0 ~mm (credit card-size) for a trial print, it can cause paper jams.
- Always load paper in portrait orientation. Loading paper in landscape orientation can cause the paper to be jammed.
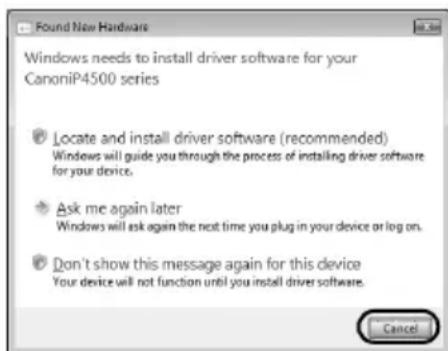
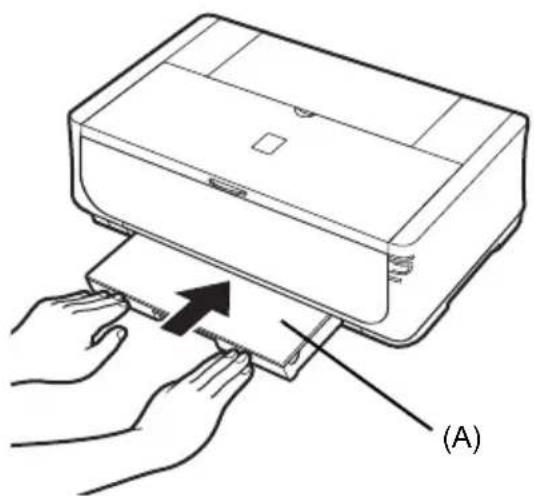
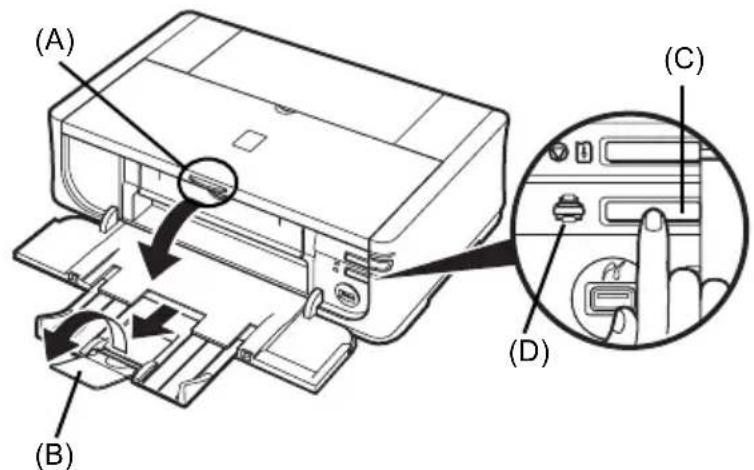
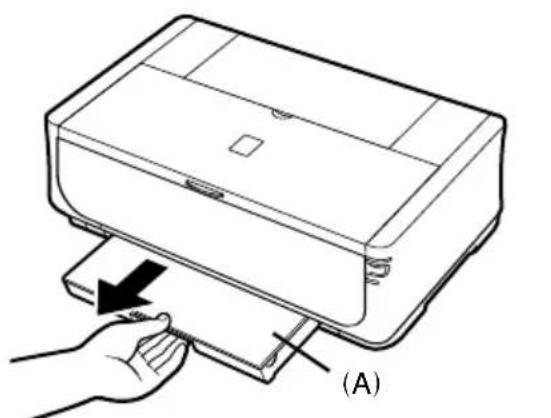
1 Pull out the Cassette from the printer and remove the Cover (A) on the Cassette.
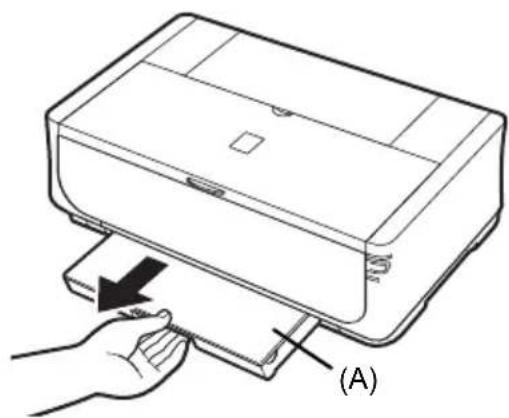
2 Adjust the size of the Cassette.
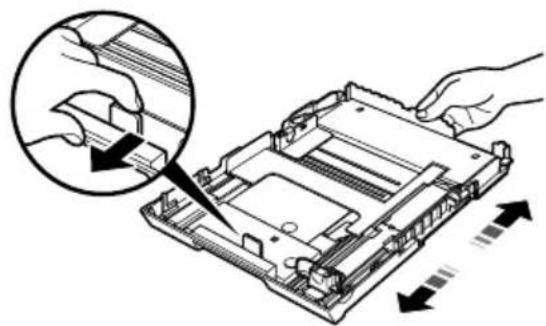
3 Load the paper into the Cassette with the print side facing DOWN, aligning the paper stack against the right side of the Cassette. Do not load higher than the Load Limit Mark (A).
4 Slide the paper guides (B) to fit to the loaded paper stack.

5 Set the Cover (A) on the Cassette and insert the Cassette into the printer.
Push the Cassette all the way into the printer. If the Cassette has been extended, the front edge of the Cassette will extend beyond the front of the printer.
6 Press the Open button (A) to open the Paper Output Tray, and pull out the Output Tray Extension (B) completely.
7 Press the Paper Feed Switch (C) so that the Cassette lamp (D) lights.

Printing from Your Computer
This section describes the procedure for basic printing.
Printing with Windows
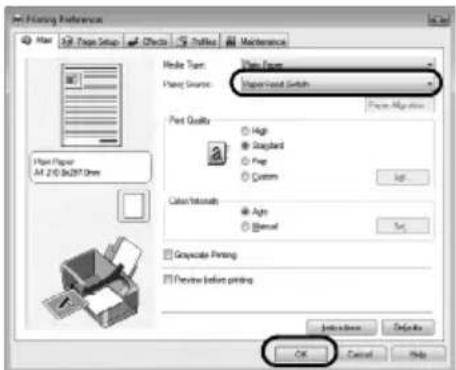
1 Turn on the printer and load the paper in the printer.
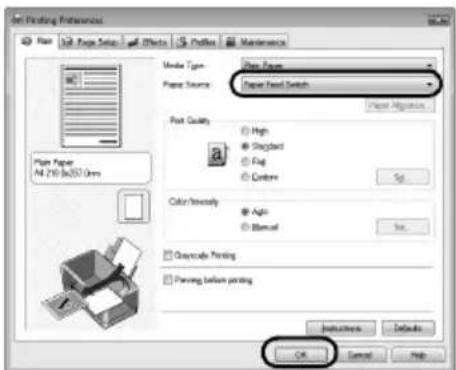
2 Make sure that the proper paper source is selected.
3 Create a document or open a file to print using an appropriate application software.
4 Select Print on the application software's File menu.
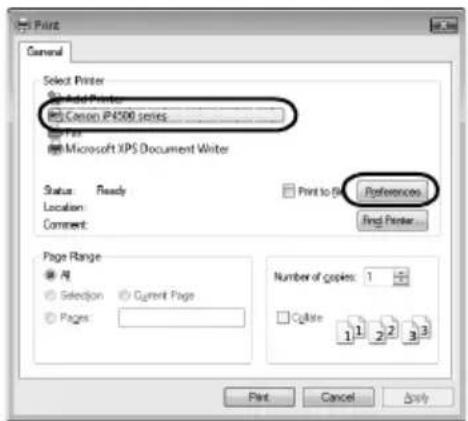
5 Make sure that Canon XXX (where "XXX" is your printer's name) is selected in Select Printer, and click Preferences (or Properties).

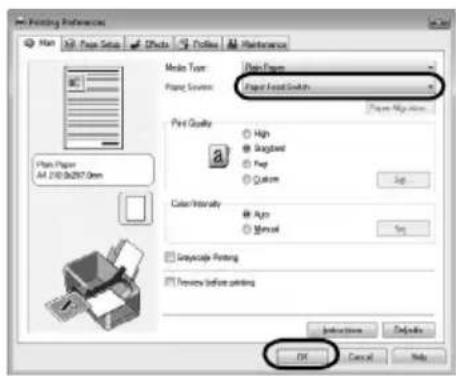
6 Specify the required settings and click OK. You can change the paper source to be used with the printer driver. For details, refer to "Changing the Paper Source" in the User's Guide on-screen manual.

Note
For details on other printer driver functions, click Help or Instructions to view the online help or the PC Printing Guide on-screen manual. Instructions is only displayed when the on-screen manuals are installed.
7 Click Print (or OK).
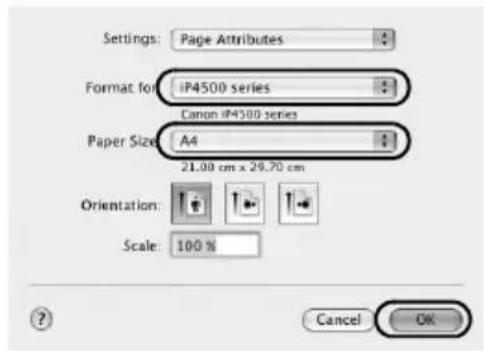
5 Make sure that your printer's name is selected in Format for.
6 Select the desired paper size in Paper Size.
7 Click OK.
8 Select Print on the application software's File menu.
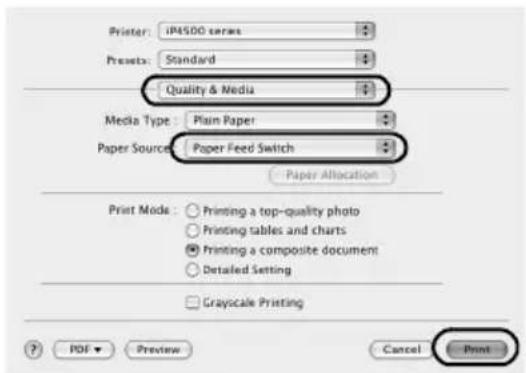
9 Select Quality & Media in the pop-up menu.
10 Specify the required settings.
1 Turn on the printer and load the paper in the printer.
2 Make sure that the proper paper source is selected.
3 Create a document or open a file to print using an appropriate application software.
4 Select Page Setup on the application software's File menu.
You can change the paper source to be used with the printer driver. For details, refer to "Changing the Paper Source" in the User's Guide on-screen manual.

Note
For details on other printer driver functions, click to view the PC Printing Guide on-screen manual. If the on-screen manuals are not installed, the PC Printing Guide on-screen manual is not displayed even if it is clicked.
11 Click Print.
Printing Photographs Directly from a Compliant Device
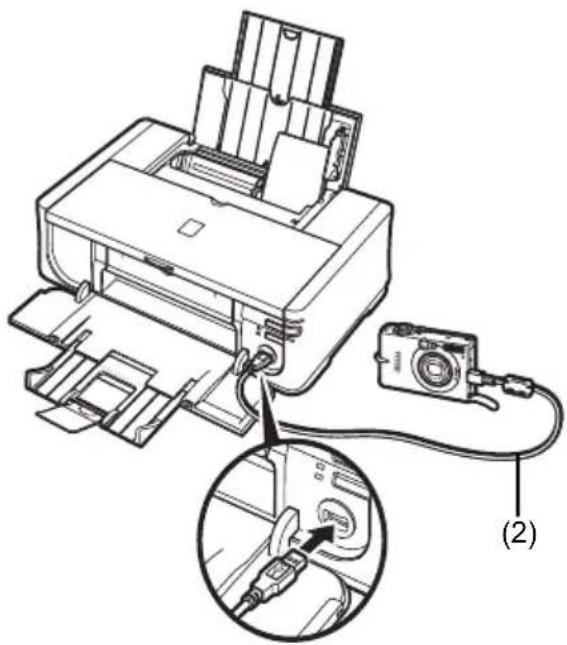
You can connect a PictBridge compliant device such as a digital camera, camcorder, or mobile phone using a USB cable recommended by the device's manufacturer, and print recorded images directly without using a computer.
Connectable Devices
PictBridge is an industry standard enabling a range of digital photo solutions, including the direct printing of photos from a digital still camera, camcorder or mobile phone* without the need to use a computer. A device can be connected to this printer for direct printing regardless of the manufacturer or the model as long as it complies with the PictBridge standard.
- PictBridge compatible digital still cameras, digital camcorders, and camera-equipped mobile phones are hereafter collectively referred to as "PictBridge compliant device".

A device with this mark is PictBridge compliant.
- Printable Image Data Format
This printer prints images taken with a DCF (Design rule for Camera File system) ver. 1.0/2.0-compatible digital camera (Exif ver. 2.2/2.21 compliant), as well as PNG files.
Printing Photographs Directly from a Compliant Device
To connect a PictBridge compliant device to this printer, use a USB cable recommended by the device's manufacturer.

Caution
Do not connect any equipment other than PictBridge compliant devices to the Direct Print Port of the printer. If you do so, electric shock, fire, or damage to the printer could result.

Important
Never disconnect the USB cable during printing unless when explicitly allowed to by the PictBridge compliant device. When disconnecting the USB cable between the PictBridge compliant device and printer, follow the instructions given in the device's instruction manual.

Note
When printing photos with the PictBridge compliant device connected to the printer, we recommend the use of the AC adapter supplied with the device. If you are using the device battery, be sure to charge it fully.
1 Prepare for printing.
(1) Turn on the printer.
(2) Load paper.
(3) Make sure that the proper paper source is selected.
2 Connect the PictBridge compliant device to the printer.

Note
Depending on the model or brand of your device, you may have to select a print mode compliant with PictBridge before connecting the device. You may also have to turn on the device or select Play mode manually after connecting the device to the printer.
Perform necessary operations on the PictBridge compliant device before connecting it to this printer according to instructions given in the device's instruction manual.
(1) Make sure that the PictBridge compliant device is turned off.
(2) Connect the PictBridge compliant device to the printer using a USB cable recommended by the manufacturer of the device. The device turns on automatically. If your device does not turn on automatically, turn it on manually.
(3) Set up the PictBridge compliant device for direct printing. will appear on the LCD of the device when the printer is correctly connected.

3 Specify the print settings such as paper type and layout.
See "About PictBridge Print Settings" on page 14.
You can make settings using the menu on the LCD of your PictBridge compliant device. Select the size and type of paper that you loaded in the printer.
4 Start printing from your PictBridge compliant device.
- Settings on a PictBridge Compliant Device
This section describes the print settings on a PictBridge compliant device. When operating the device, be sure to follow the instructions given in the instruction manual of your PictBridge compliant device.

Note
- In the following description, names of setting items are given according to those used in Canon-brand PictBridge compliant devices. Setting item names may be different depending on the brand or model of your device.
- Some setting items explained below may not be available on some devices. When you cannot change print settings on a device, the printer prints images as follows: - Paper size: 4'' × 6'' / 101.6 × 152.4 ~mm
- Paper type: Photo
- Layout: 1-up, Borderless
- Date/File No. Print: Off (not printed)
- Image Optimize: On (the shooting information will be used for optimized printing)
- Paper size and Paper type Settings
The following sizes and types of printing paper can be used when printing from a PictBridge compliant device.
- Paper size
4^ × 6^ / 101.6 × 152.4 ~mm, 5^ × 7^ / 127.0 × 177.8 ~mm^*1 ,
Credit card ^2 , 8" × 10" / 203.2 × 254.0 mm, A4, Letter, Wide ^*1
- Paper type
| Paper Type Setting | Loadable Paper*4 |
| Plain Paper*3 | Super White Paper or other plain paper |
| Photo Photo Paper Plus Glossy | |
| Glossy Photo Paper | |
| Glossy Photo Paper "Everyday Use" | |
| Photo Paper Glossy | |
| Photo Paper Plus Semi-gloss*5 | |
| Photo Stickers*2*6 | |
| Fast Photo Photo Paper Pro |
The available page sizes vary depending on the media type. For details, visit our website.
1 Can be selected only on certain Canon-brand PictBridge compliant devices.
2 Feeding this paper from the Cassette can damage the printer. Load in the Rear Tray.
3 Plain Paper can be selected for Paper type only when Paper size is set to A4 or 8.5" x 11" (Letter). When Paper type is set to Plain Paper, borderless printing will be disabled even when Layout is set to Borderless.
4 You may not be able to purchase some Canon genuine papers depending on the country or region of purchase.
5 When printing on Photo Paper Plus Semi-gloss 8" x 10" / 203.2 x 254.0 mm (SG-201), select 20 × 25 cm/8'' × 10'' for Paper size and Default for Paper type.
6 Exclusively used to print photo stickers. When printing on sticker paper, select 10 x 15 cm/4" x 6" in Paper size and Photo for Paper type. Do not set Layout to Borderless.
- Layout Setting
Various layout options are available.
- Bordered/Borderless: You can select whether or not to print an image with a border.
- N-up: You can use this option when printing on sticker paper, or A4- or Letter-sized paper. Sticker paper: When you select 10 × 15 cm/4'' × 6'' for Paper size, you can print 16 images on a single sheet of paper.
A4- or Letter-sized paper: When you select A4 or 8.5" x 11" (Letter) for Paper size, you can print 4 images on a single sheet of paper.
- Shooting Info (Exif Data): You can print shooting info (Exif Data) along with the image. The following two options are available.
1-up*1:Prints the shooting info (Exif Data) in the margin of selected individual images.
20-up ^2 : Prints 20 images specified with DPOF ^*3 and their shooting info (Exif Data) in list format on a single sheet of paper.
- 35 mm Film Style Layout (Contact Printing Layout) ^2 : You can print the multiple images specified with DPOF ^*3 in a list format that looks like a negative film.
Besides the above options, you can also specify to print an index of images in the DPOF print settings menu.
1 You can use this option only when 10 × 15 cm/4'' × 6^ ,13 × 18 cm/5'' × 7^ ,20 × 25 cm/8'' x 10", A4 or 8.5" x 11" (Letter) is selected for Paper Size.
2 You can use this option only when A4 or 8.5" x 11" (Letter) is selected for Paper size.
*3 DPOF (Digital Print Order Format) is a standard format to record the specified information regarding images, such as which image or number of copies to print.
- Date/File No. Print Setting
You can specify whether the date and/or file number will be printed.

Note
- If the images already have dates superimposed when shot, set this PictBridge setting item to Off. If you select Date, File No., or Both, the date and/or file number will be printed over the date printed by the camera's function.
- Depending on the paper size and layout, the date will only be printed even when Both is selected.
- Image Optimize Setting
You can select the optimization method to obtain high print quality. When you select On, the shooting information is used to print the optimized image.
If you are using a Canon-brand PictBridge compliant device, the following additional options may be available, depending on the model.
VIVID makes green and blue more lively.
- NR (Noise Reduction) reduces the noise on blue areas like the sky as well as on black areas.
- Face brightens a darkened face on the photo taken against the light.
- Red-Eye corrects red eyes in portraits caused by flash photography.
- Trimming Setting
You can select an area to print.
Replacing an Ink Tank
When ink tanks run out of ink, replace them using the following steps.
1 Open the Paper Output Tray and the Inner Cover.
2 Make sure that the printer is on, and then open the Top Cover.
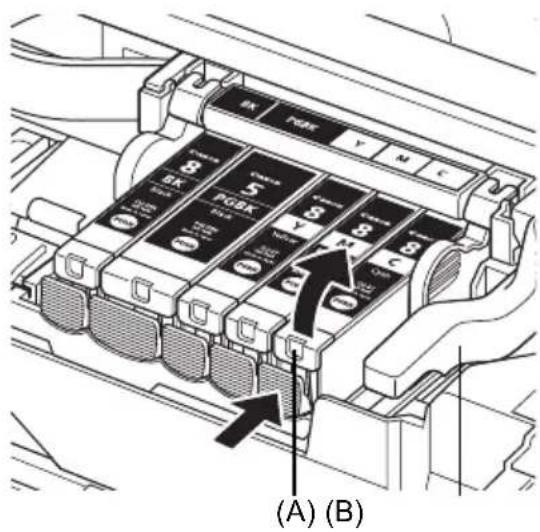
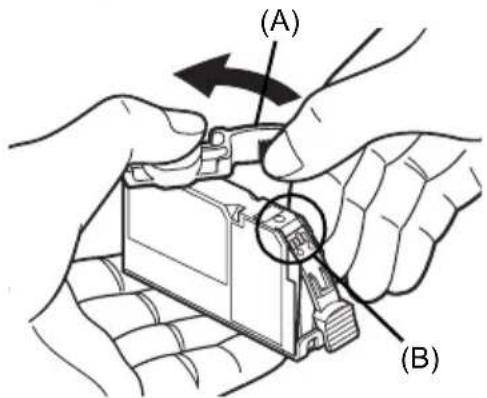
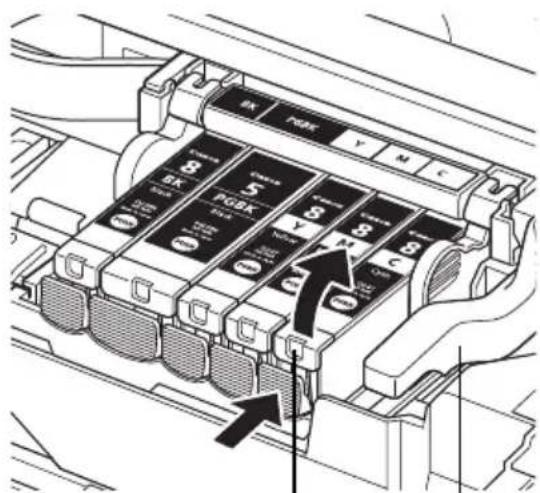
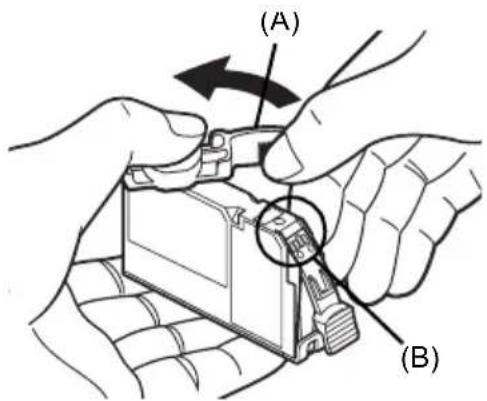
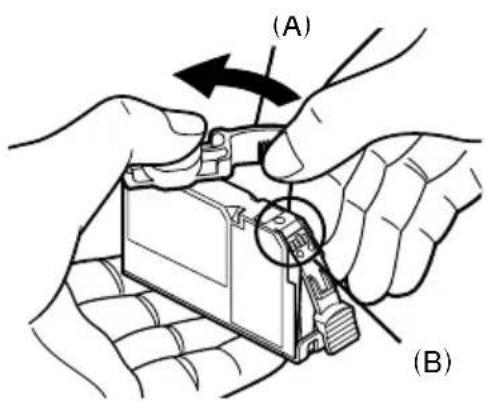
3 Push the tab of the ink tank whose lamp is flashing fast (A) and remove it. Do not touch the Print Head Lock Lever (B).
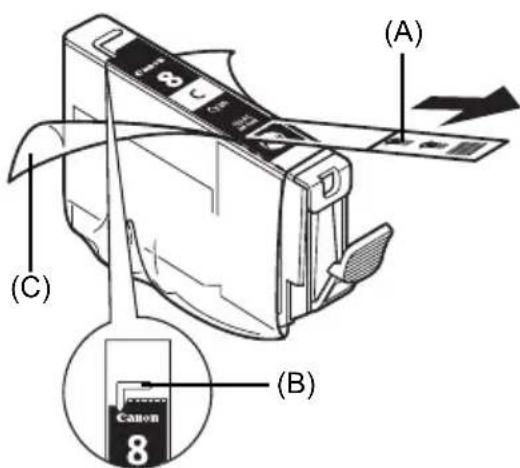
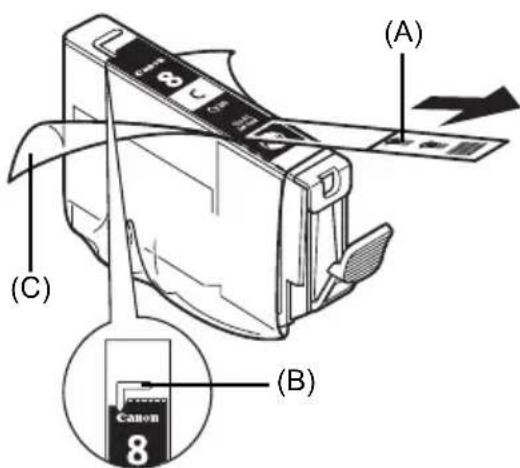
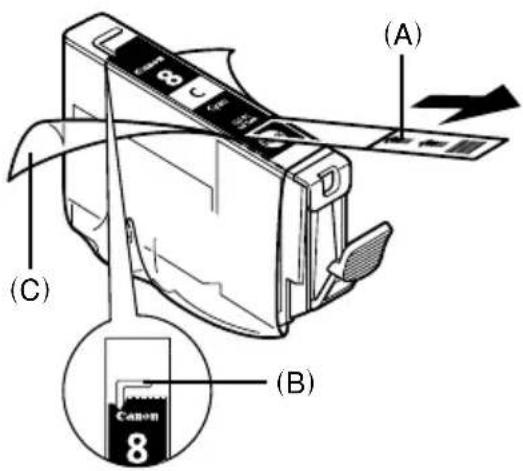
4 Remove the new ink tank from its packaging, then pull the orange tape in the direction of the arrow (A) so that the protective film does not remain on the air hole (B). Then remove the film completely (C).
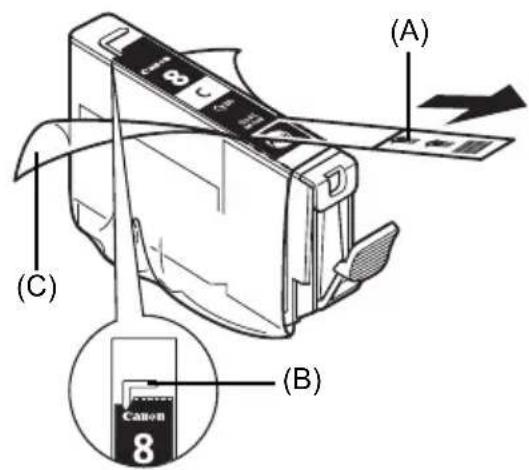
5 Remove the orange protective cap (A) from the bottom of the ink tank.
Carefully hold the protective cap when removing it to prevent the ink from staining your fingers.
Discard the cap once it is removed.

Important
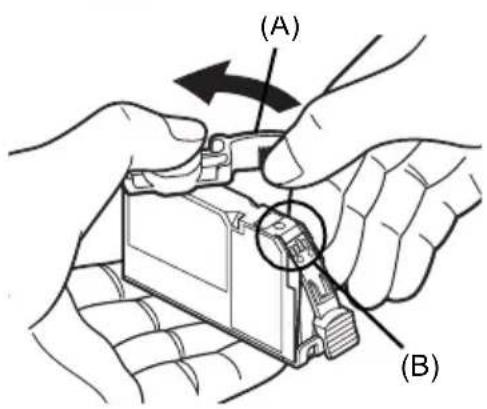
Do not touch the electrical contacts (B) on the ink tank. Doing so can cause the printer to malfunction or become unable to print.
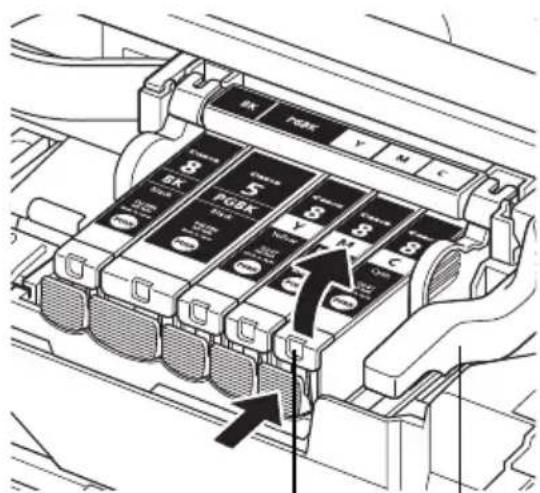
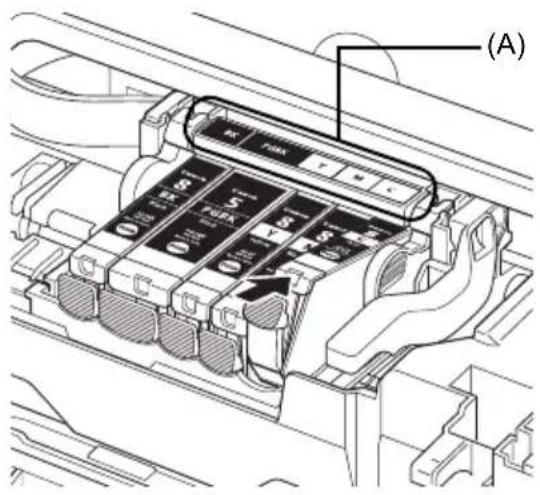
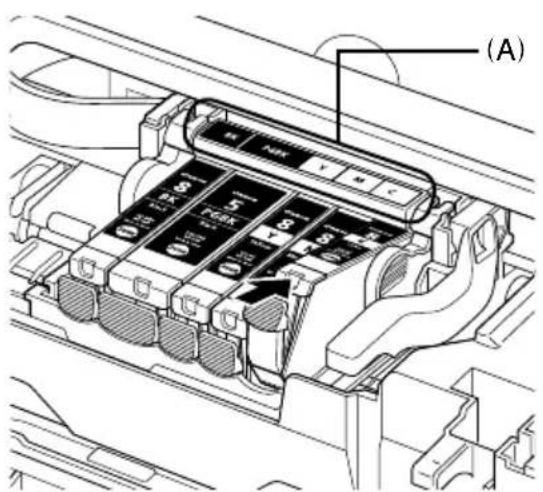
6 Insert the front end of the ink tank into the Print Head.
Make sure the position of the tank matches the label (A).
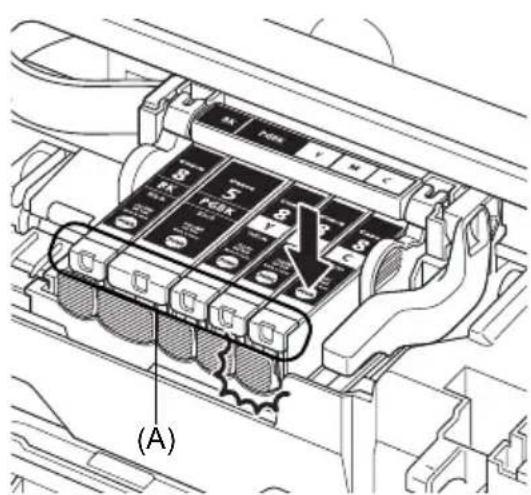
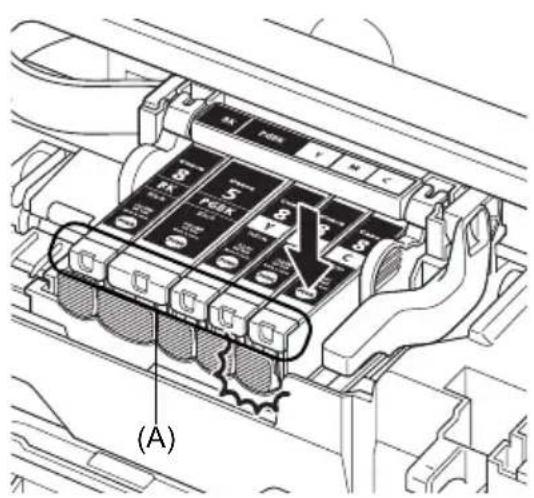
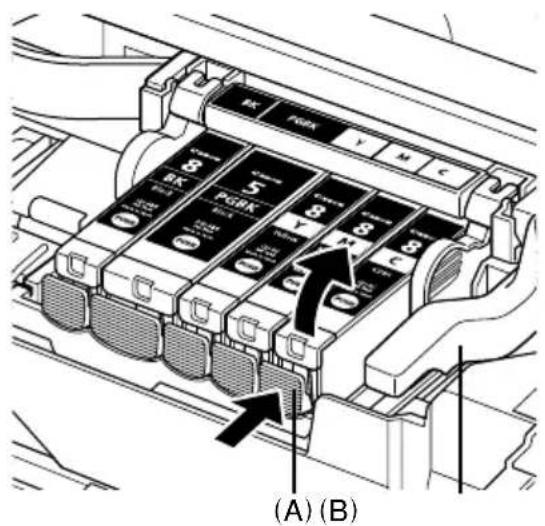
7 Press on the mark on the ink tank until the ink tank snaps firmly into place.
Confirm that the ink lamp (A) lights up red.

8 Close the Inner Cover and the Top Cover.

Note
When you start printing after replacing the ink tank, Print Head Cleaning is performed automatically. Do not perform any other operations until Print Head Cleaning finishes. The POWER lamp flashes green during cleaning.
Specifications
| General Specifications | |
| Printing resolution (dpi) | 9600 (horizontal)* x 2400 (vertical) * Ink droplets can be placed with a pitch of 1/9600 inch at minimum. |
| Interface USB 2.0 High | Speed* * A computer that complies with USB 2.0 Hi-Speed standard is required. Since the USB 2.0 Hi-Speed interface is fully upwardly compatible with USB Full-Speed (USB 1.1), it can be used at USB Full-Speed (USB 1.1). |
| Print width 8 inches / 203.2 mm max. (for Borderless Printing: 8.5 inches / 216 mm) | |
| Acoustic noise level | Approx. 34.5 dB (A) (when printing in the high print quality mode on Photo Paper Pro) |
| Operating environment | Temperature: 5 to 35°C (41 to 95°F) Humidity: 10 to 90% RH (no condensation) |
| Storage environment | Temperature: 0 to 40°C (32 to 104°F) Humidity: 5 to 95% RH (no condensation) |
| Power supply AC 100-240 V, 50/60 Hz | |
| Power consumption Printing: Approx. 13 W Standby: Approx. 1.2 W OFF: Approx. 1.0 W | |
| External dimensions | Approx. 17.5 (W) x 11.9 (D) x 6.3 (H) inches / Approx. 445 (W) x 303 (D) x 160 (H) mm * With the Paper Support and Paper Output Tray retracted. |
| Weight Approx. 6.9 kg | (Approx. 15.2 lb.) * With the Print Head and Ink Tanks installed. |
| Print Head Total 4,608 | nozzles (Y/DyeBK/PgBK: each 512 nozzles, C/M: each 1536 nozzles) |
| Camera Direct Print (PictBridge) | |
| Paper size 4" x 6" / 10 | 1.6 x 152.4 mm, 5" x 7" / 127.0 x 177.8 mm *1, Credit card *2, 8" x 10" / 203.2 x 254.0 mm, A4, Letter, Wide*1 *1 Can be selected only on certain Canon-brand PictBridge compliant devices. *2 Feeding this paper from the Cassette can damage the printer. Load in the Rear Tray. |
| Paper type Default (Photo Paper Plus Glossy), Photo (Photo Paper Plus Glossy, Glossy Photo Paper, Glossy Photo Paper "Everyday Use", Photo Paper Glossy, Photo Paper Plus Semi-gloss, Photo Stickers), Fast Photo (Photo Paper Pro), Plain Paper (A4/Letter only) | |
| Layout | Default (Borderless), Borderless, Bordered, N-up (2, 4, 9, 16)*1, 35-up*2 *1 Layout compatible with Canon-brand sticker above. See "Compatible Media Types" in the User's Guide on-screen manual. *2 Selected photos are printed in 35 mm film style layout (contact printing layout). This print setting is only available with certain Canon PictBridge compliant devices. |
| Image optimize | Default (ExifPrint), On, Off, “VIVID”, “NR” (Noise Reduction)*, “Face”, “Red eye”* * If using a Canon PictBridge compliant device, you can select it. |
| Print date & file no. Default (Off: No printing), Date, File No., Both, Off | |
| Trimming | Default (Off: No trimming), On (follow camera’s setting), Off |
Minimum System Requirements
Note
Conform to the operating system's requirements when higher than those given here.
| Windows | Macintosh | |
| Operating System Processor RAM | Windows Vista Pentium II (including compatible processors) 300 MHz 128 MB Windows XP SP1, SP2 Pentium II (including compatible processors) 300 MHz 128 MB Windows 2000 Professional SP2, SP3, SP4 Pentium II (including compatible processors) 300 MHz 128 MB Note Operation can only be guaranteed on a PC pre-installed Windows Vista, XP or 2000. | Mac OS X v.10.4 Intel processor PowerPC G3 256 MB Mac OS X v.10.2.8 - v.10.3 PowerPC G3 128 MB Note Hard disk must be formatted as Mac OS Extended (Journaled) or Mac OS Extended. |
| Browser Internet Explorer 6.0- Safari | ||
| Hard Disk Space 400 | MB Note For bundled software installation. | 200 MB Note For bundled software installation. |
| CD-ROM Drive Required | ||
| Other restrictions SVGA 800 x 600 | ||
- To upgrade from Windows XP to Windows Vista, first uninstall software bundled with the Canon inkjet printer.
Additional System Requirements for On-Screen Manuals

indows
Browser: Windows HTML Help Viewer
Note: Microsoft Internet Explorer 5.0 or later must be installed. The on-screen manual may not be displayed properly depending on your operating system or Internet Explorer version.
We recommend that you keep your system up to date with Windows Update.

acintosh
Browser:HelpViewer
Note: The on-screen manual may not be displayed properly depending on your operating system or Help Viewer version. We recommend that you keep your system up to date with Software Update.
Specifications are subject to change without notice.
PIXMA iP4500
Kurzanleitung
Inhaltsverzeichnis
m = 311 ;
Browser: Help Viewer
[Credit Card/Creditcard]*2, [203,2 x 254,0 mm/8 inch x 10 inch], A4, Letter, [Wide/Breed]*1
| Instellingen voor [Paper Type/papier type] | Plaatsbaar papier*4 |
| [Plain Paper/Gewoon papier]*3 | [Super White Paper/Super Wit Papier] of ander gewoon papier |
| [Photo] [Photo Paper Plus Glossy/Glossy Foto Papier Extra] | |
| [Glossy Photo Paper/Foto Glans Papier] | |
| [Glossy Photo Paper "Everyday Use"/Glanzend Fotopapier 'voor freiuent gebruik'] | |
| [Photo Paper Glossy/Foto Glans Papier] | |
| [Photo Paper Plus Semi-gloss/Photo Paper Plus Halfglans]*5 | |
| [Photo Stickers/Fotostickers]*2*6 | |
| [Fast Photo] [Photo Paper Pro/Professioneel Fotopapier] | |
Browser: Help Viewer

m = 311 ;
Sorg for at lase dette ark forst.
Installation of printerdriven
| Indstilling for [Paper type/Papirtype] | Papir, der kan ilægges *4 |
| [Plain Paper/ Alminderigt papir]*3 | [Super White Paper/Superhvidt papir] aller andet almindeligt papir |
| [Photo/Fotopapir] [Photo Paper Plus Glossy/Blankt Plus-fotopapir] | |
| [Glossy Photo Paper/Blankt fotopapir] | |
| [Glossy Photo Paper "Everyday Use"/Blankt fotopapir til "verdagsbrug"] | |
| [Photo Paper Glossy/Blankt fotopapir] | |
| [Photo Paper Plus Semi-gloss/Halvblankt Plus-fotopapir]*5 | |
| [Photo Stickers//Fotoklistermærker]*2*6 | |
| [Fast Photo/Div.] [Photo Paper Pro/Pro-Fotopapir] | |
De tilgengelige papirstorrelser varierer after medietypen. Besog vores websted for at fflere oplyninger.
Póvypμma TEPiynonc: [Help Viewer/Póvypμma Tpoβoλnβoθεiaç]
图 Σημείωση
To nAektpovikO eYxepio mTopei va unv eupavicetai oawta avaloya u To Aitoupyko aoc ouotma. Ipoteivoume va biatnpite to ouatnua aac evneepwuevo.
- Suviotoupe va xponoiopoite to Safari wc npoypauma nepinyonc oTo Web yia tvnpoBoaI twv nAektpovikw vexepiiodw v e nopfn HTML. Eav dEv ivai eykateotnuevo to Safari otov utloayiotn oac,lambdae to aTTO Tnv tnotheia nC Apple Inc. 0To Web kai eykataotne To.
Tontoétnon xaploió σtnv kασετa
Meikoi tuoi kai eeyeoh xapiou dev mtopouv va totoeetnoov otnv kaeta kai aataeiitai xphon tns iow oekn. Av okeueve va xpoaiopotiee movo tnV kaoet, eEyEe EK Tuv Tpotepwvi a tvxov Tepiopouc nou apopouv tn xphon.

Σημαντικό
Eav koyete to aTtAo xapti oE yEoC [4" x 6" / 101,6 x 152,4] xI.A., [5" x 7" / 127,0 x 177,8] xI.A. n [2,13" x 3,39" / 54,0 x 86,0] xI.A. (yEeEOG TIOOTIKKc KApTaC) yia OOKIPAOTIKk EKTUTWOn, MTOpei va TpOKaNtEi EITALokn Tou XapTiou.
ToTIOeTeIe navTa to xapti eKataKOpUPO TPOoavatoAioMu. H ToTIOeTnO n Tou XapTIO Oe oPiOvTiO TPOoavatoAioMu TPOeIva TPOkAeE I EUMokn Tou XapTIOu.
1 TpaβnξTe Tnv KασεTa Eξω aTó Tov EKTUTWTn Kai αφaipéσeTo Kaλuμμa (A) Tns KασεTac.

Nettleser: Windows HTML Help Viewer
Merk:
Nettleser: Help Viewer
Merk:
7 Trykk pa [Paper Feed Switch] (Arkaterbryter) (C) sik at lampen [Cassette] (Kassett) (D) lyser.
[Credit card / Kredittkort] ^*2 , [8" x 10" / 203,2 x 254,0 mm], A4, Letter, [Wide/Bred]
| Innstilling for [Paper Type / papirtype] | Papir som kan legges i*4 |
| [Plain Paper / Vanlig papir]*3 | [Super White Paper / Helt hvitt papir] aller annet vanlig papir. |
| [Photo/Foto] [Photo Paper | Plus Glossy / Plus-fotopapir, glanset] |
| [Glossy Photo Paper / Glanset fotopapir] | |
| [Glossy Photo Paper "Everyday Use" / Glanset fotopapir, hverbagsbruk] | |
| [Photo Paper Glossy / Glanset fotopapir] | |
| [Photo Paper Plus Semi-gloss / Plus-fotopapir, halvglanset]*5 | |
| [Photo Stickers / Fotoklistremeker]*2*6 | |
| [Fast Photo / Raskt Foto] [Photo Paper Pro / Pro-fotopapir] | |
Nettleser: Windows HTML Help Viewer
Nettleser: Help Viewer
Information for Macintosh
Stalla in [Trimming/Beskärning]
[DVD CD Print Guide]
HCTpykun, KOToPbIe DoJnxHbI co6nOaTbcI IJI 6e3oNaChOH 3KcNPyTaun.
Iopraok BblnoHHeHn Oepaun MoKeT pa3nuaTbC B 3aBNCMOCTN OT NcNoJb3yeMOro npinoxehn. Ioppo6hble CBeDeHn CM. B TexHnuecko INcTpyKuNN K npinloXeHIO. INcTpyKuNN, npInBeHnB HacToaMe PykoBOdCTBe, OTHocrTc K OepaunHOHn CnCTeme Windows VistaTM Ultimate Edition (daee Ha3bBaemov «Windows Vista») n Mac OS X v.10.4.x.
YBeDOMJIeHnO TOBapHbIX 3HaKaX
He npikacaiTecb Ko BHytpenHMM DeTaNAM, Kpome fNkCnpyUoJero pbuara neaTaIOe rnoBKn.

3anomhnte!
He nbtaTecb 3aHOBO yCTaHOBtB 3aunTHbIKoNNaOK nocne erO ydaJeHnA.

PpimmeaHne
BHytpn ynaKOBKn, B KOTopoN noCTaBnErcT neaTaHoua rOIOBka, HnHa BHyTppeHHeYacTn 3aIHTHO KOIINaUKa MOyT 6bITb Ipo3paHbIe Hn rOly6bIe YepHnla. 3TO HnKaKHe OtpaKaTeCn Ha KaueCTBe NeaTn. ByIbTe octOpoxHbI npn ObpaueHN C 3TmM DeTaIaMn, YTObI He NcPaKaTbcr YepHnlaMn.
3 YcTaHOBnTeYeepHnIbHnIcbl.

3anomHnte!
EcIn BepxHra KpbIka OCTaETcR OTKpBToT 6OJIe 10 MnH, DepeXaTeJb NeuTaIOUe TOnOBKn nepemEuaetcBnpaBO. B 3OTm CJIyae 3aKpoIte BepxHIOU KpbIku N CHOBA OTKPOITe ee.
- Y6eIITecb, yTO BCE YepHnIbHnIcbl yCTaHOBJIeHb Ha CBOI MecTa, B COOTBeTCTBnC MapKINPOBko. PpHTEp HeIb3r IcNOJb3OBaTb, ecIn He yCTaHOBJIeHb BCE YepHNJIbHnIcbl.
- Pocne yctahOBK YepHnJIbHnU INDkaTOp [POWER] (NITAHNE)Mnrae3eNeHbIM CBeTOM.
Pexkde yem npoOJKNb, NOIOXdIte pnpOJIN3NTeNbHO 2 MNH - INDkaTOp [POWER] (NITAHNE)doJKeH nepeCTaTB MIRaTb I NOCTOARHNO RopeTb 3eJeHbIM CBeTOM, a npInTeP doJKeH nepeCTaTBn3DaBaTb 3ByKn pa60Tbl.

PpimmeaHne
- Ipo3paHna JeHTa DoJnxHa 6bItb ydaJeHa C YepHNbHnCbI ToHO B COOTBETCTBm C yka3aHnMa 3 KpaTko IHcTpkyuIN NO yCTaHOBKe.
He cKImaIte 6oka YepHnIbHnIcbl, YTO6bl He Bbl3BaTb BblTeKaHne YepHJI, KOToPbIE MOryT nCnAChkAtb OJExKdU npKu.
He nbitaTecb 3aHOBO yCTaHOBNTb 3aUHTbI KOJNaQOK nOcNe erO ydaJeHna. - Ecnn YepHnJIbHnua yctaHOBneHa HEnpaBnIbHo, INHnKaTOp [ALARM] (TPEBOFA) Ha npInTepe npOJnJaet MmTaB opAnXeBBIM CBeTom. OTKpoNTe BepXHOIO KpbIuKy nYbeINTEcb, YTO NpOJOKeHHe BCEx YepHnJIbHnU COOTBETCTByET MapKnIpOBKe.
4 3arpy3nTe6ymary.
Далгпnotpe6уeTcBbINOHnTB BbIPaBnBaHne NeuTaIOxIx rOIOBOK,ДЯчero Heo6xOIMO 3aRpy3ntbВЗаднлNotokДВa IIncTa npUnaeraMoBбуmarN(MP-101)cTOpOHДЯпeTuN (6oJIee 6eNoI cTOpHOH) BBEPX.

3anomHnte!
- Пи загузke 6уmarи B 3aHnI NOtOK y6eINTecb, YTO rOpHT INHdNKaTOp [Rear Tray] (3aHnI NoToK).
Bcerda BCTabIe Te IcTbIB KHNKHOJ opNEHTaUN. 3arpy3ka IncTOB aIb6omHOn opNEHTaUN MOKeT Bbl3BaTb 3amrTne 6ymarn.
YcTaHOBka IpaIbepa npHTepa
06uine cBeHnna IJn noB3oBateeN Windows n Macintosh
PpimechnO npocece yctaHOBKn
- Пи появени диалогово окha [Select Language/BbI6opЯзka] Bbl6epnteЯ3bIK n Haxmnte KhoNky [Next/Danee].
- Пи появлени Диалогово окна [Select Your Place of Residence/Bыберпет Pernoh Bawero npoxnBaHn] Bbyберпет PernoH npoxnBaHn И НжмITE KhoNky [Next/DaIee].
CyuectbyoT dBa cnooc6a ycTaHOBKn dpaBepa npHTepa n dpyroro nporpamMHoro oecneueHn.
[Easy Install/Постая установka]:nporpaMMHoe obecneueHne c ducka
[Setup CD-ROM/YcmaHObOHyI KOMNaKm-duck] yCTaHaBnBaETcA BtOMaTnueckn.
[Custom Install/Bb6bOpouhna yTaHOBka]: MOXHO Bbl6paTb KOMIOHEHTbl, KOToPbIe Tpe6yeTcra YCTaHOBtB.
*B 3aBnCIMoCTn OT cTpaHbI npNo6peTeHnA annapaTa cocTab nporpaMMHO oBeceHeHnHa KOMNaKT-dUcKe [Setup CD-ROM/YcmaHOBOuHbI KOMNaKm-ducK] MoKet 6blb pa3NHybIM.
- Пи пояВеMuДиаNoRoBOrO OkHa [User Registration/PerncTpaunnoJb3OBaTeIa] HaxMnTe KhoNkY [Next /Danee]. EcnnoKJIIOUeHne K INHTepHety aKTNBHO, Ha 3KpaHe NOBBArTc IHTepaKTNbHbIe INHCTpyKuIN no perncTpaunn annapaTa.
Pernctpaun TaKke MoKet 6bItb BbInonHeHa C NOMOu3Ha Ka Ha pa6ooyem cToJe no OKOHuaHn ycTaHOBKn.
- Εκρaн [User Registration/PerictpaunnoB3oBaTe] OTo6paKaeTcA ToJIbKO B TOM Clyuae, ecnHa əkpaHe [Select Your Place of Residence/BbI6epnte pernoH BaWero npoxnBaHna] BbI6paH BapnAHT [Europe, Middle East, Africa/Ebpona, CpeHn BocToK, AφpNa].
Ppimechn o BbipabHbAHnn neaTaIOSeI roJOBKn
- 3arpy3nte DBA Jncta npjlaraoemoi 6ymaru (MP-101) ctopoHoi dIy neuATi (6oJIee 6eIoN ctopoHoi) BBEPX.
BbipabHnBaHne neaTaIOSeI roIOBKn 3aHmMaet OKOIO 13 MIn. He OTKpbBaJTe BepXHIO KpbIJKy BO BpeM NeaTN. - Ecni npi neaTn o6pa3ca npoN3OweJ c60i n HndkaTOp [ALARM] (TPEBORA) Na npInTepe MnaTae OpaHKeBbIM cBeTom, HaxMMte KhoNky [RESUME/CANCEL] (BO305HOBNTb/OTMEHA) dIra c6pOca oun6kn, nepexoJnte K cIeDyUoSei onepaun Dny yCTaHOBKn dpaBepa npHTepa N 3JIeKTPoHHbIX pyKOBoDCTB, 3aTeM CM. nyHKT «MnaTae OdnHnAduCaTb pa3» B pa3dene «HnDnKaTOp [ALARM] (TPEBORA) MnaTae OpaHKeBbIM cBeTom» 3JIeKTPoHHOrO Pykoedcmea nonb3oBamena.
CbeHnna nnoIb3oBaTeJe Windows
BoiDnte B cncTeMy C nOJIHOMOyMa aDMNHnCTpaTopa.
- Ipepe yctaHOBko dpaBepa npHTepa OTKIOHHTe BCE aHTNBpychbIe IpoIpaMMbl n aBTOMATUeCKn 3aNyckaemble npNILOXKeHna.
- Ecnn dnaIanoROBbie OKHa [Found New Hardware/ HauDeHO HOBoe o6OpydoBaHne] nIn [Found New Hardware Wizard/Mactep HOBOr o6OpydoBaHnra] NOABJIOTcA BtOMaTHUeCKN, USB-KabeNb cneDyeT OTcoeHNHTb OT KOMNbIOTepa. YTo6bl 3aKpbITb DnaIanoROBoe OKHO, HAnKMITE KHOKNy [Cancel/OTMeHa]. Ppi OTcoeINHeHm Ka6eY USB B OC Windows Vista DnaIanoROBbie OKHa MOrTy 6bITb 3aKpbITb ABTOMaTHUeCKN. 3aTeM BbIKIIOHTe pInHTep IN BHOb 3aNyCTNTe yCTaHOBky. IopnoBHee O npOceCe yCTaHOBKn CM. B KpaTKo INCHTrpyKcIMn NO yCTaHOBKe.
-
Пи появлесниалогово Okна [AutoPlay/Агтоануск] НжмITE [Run Msetup4.exe/3anyck Msetup4.exe].В OC Windows XP и Windows 2000 зто далогово okно He появляетс.
-
Пи появлий Диалоговоу Okha [User Account Control/KoHTponb yueTHbIX 3aHncei]нжмITE KhoNky [Continue/Прдолжи].В OC Windows XP n Windows 2000 eto duanorogoe OKHO He noRbIeTc.
- Дя установкиnporpaMMbl Adobe® RGB (1998) habKMITE KHONKY [Custom Install/ BbIbOpOuHa yCTaHOBA] n cIeDyIte HcHTpyKUINM, BBIBODIMbIM Ha 3KpaH.
- Пи появленни зараза на подеверждение посяарузкн komьютера нахмITE КНОКУ [OK].Систema посяарузпся ватоматиеск.Во врема посяарузкн He ИЗВлескайт кOMпakT-DИСК[Setup CD-ROM/YcmaHOBOчны кOMпakm-duck].
- Мыбудем пизнатьни за Baше усань погамме [PIXMA Extended Survey Program] (Pacширенья погамma onpopca noьзовaten PIXMA) B CBЯЗИ C ИСПОЛьЗОВАнем пинтегв Canon. Бolyп пою Инфорmaцю можно найТВ ЗЕКТРОНьх руковд.TВax.
- Ecni noiknouhe He pacno3haeTc, cm. pa3en «HeBO3MOxHO yCTaHOBtB dpaiBep npHTepa» B 3JneKtpOHHom Pykooeodcmee nonb30aeme.
CbeHnIa nIb3oBateJei Macintosh
He noDcoeHnHte daHHbI npHTep K kOMNbOtepy c Mac OS 9, Mac OS X Classic, Mac OS X v.10.2.7 nnn 6onee paHne, TAK KAK 3TN onepaunOHhie cnCTembl He noDdePKNBAOTcra.
He n3Bnekaite Hn He BCTabnIte Ka6eJb USB B npoucece yctaHOBKn, NOCKoNkY 3TO MOKeT npNBecTN K HenpaBnJbHo pa6ote KomnbTepe aHn npInTepe.
- Пешед установков драиьера пинтера оTKлчпге BCE aHTINBPychьгд пиюхеня
н ватоматиескн зусkaemьд пограмьилл удалite nx n3 cnCTeMHо пankn.
- EcINB IIpoceCE yCTaHOBKn IIOBHTc3aIPOC NOITBepXdEHNr Ipe3arpy3KN KOMNbIoTePa, HaxMnTE KHOKky [Restart/Pepe3arpy3NtB KOMnbIoTeP]. CnCTema nepe3arpy3ntcABTomatUeCKn. Bo Bpemr Ipe3arpy3Kn He n3BNeKaIte KOMNaKT-dnCK [Setup CD-ROM/YcmaHOEOOHyk KomnaKm-duck].
- EcNn npN BbINOJIHeH N BbIpaBHNBaH N neaTaIOUeI rOIOBKn He ydaeTcH HaNTN I Mm I npHTepa B CnncKe [Printer List/Cnncok npHTepoB], HaxMnte KHOKky [Add/IO6abntb], YTObbl O6aBnTB npHTep. DnI NOlyeH N DONoIHNTeJbHbIX CBeDeH N CM. CnpaBky npOrpamMbI [Printer Setup Utility/YcTaHOBka npHTepa] B cnpaBOOHcNCTeMe [Mac Help/CnpaBka Mac].
Дляпльбователв Азн
- Дя усановки салкгю Руковocmba noьбамея на дуrom язIKE двжды салкнчтеси пankу [Manual/PykoBoCTBO] на КOMпakT-DИСКЕ [Setup CD-ROM/YcmaHOBOчьй кOMпakm-duck], двжды салкнчтеси пankу [Canon], a заlem саллрунушпеси пankу hyжногу рзыka на чекни дис.
3 3aatae npametpbI neaTn, TaKne KaK TUN bymarn n MaKeT.
IMeHOTcpa3JIuHbIeBapHaHTbIMaKeTOB.
- [Bordered/C noJMaMn], [Borderless/Be3 noJeN]: Bo3MoXHoCTb Bbl6opa neaTn 13o6paKeHnC noJMy nn 6e3.
- [N-up/HeckoIbko] DaHnbI npaMeTp MoXHo IcNoIb3ObaTb npn neaTu Ha 6yMaTe φopMaTa A4, Letter nII npn neaTu hakneek.
HaJIeKn: PnB Bb6ope 3NaueHnra [10 x 15 cm/4" x 6"] nIa npaMeTpa [Paper size/ Pa3Mep 6ymar] Ha ODNOM JINCTe MOKeT 6bITb HaneuTaHO 16 foToRpaPm.
Формат A4 пи Letter: При Вьборе Зачени A4 пи [8,5" x 11" / 216 x 297 MM] (Letter) Дяпапаметра [Paper size/Pa3mep 6ymaru] на одом Лис может бытbacneуаго 4 Фотогради.
Kpome yka3aHHbIX Bblwe npaMeTpOB, B MeHIO HacTpoKN neaTN DPOF moKHO TaKKe 3aDaTb NeaTb INHeKca N3o6paXeHn.
^1 ΘTOT BapnAHT MOXET NcNoB3OBAbCRA TOJbKO B TOM CnyaE, ecNДЯ
napaMeTpA [Paper size/Pa3Mep 6yMaru] Bbl6paHO 3HaueHne [10 x 15 cm/4" x 6"], [13 x 18 cm/5" x 7"], [20 x 25 cm/8" x 10"], A4 nIIN [8,5" x 11" / 216 x 297 MM] (Letter).
^2 3TOT BapnaHT MoKeT HcNoIb3OBAbCra ToIbKO B TOM Cnyae, ecn n InpaMeTp a [Paper size/Pa3Mep 6ymarN] BB6paHo 3NaueHne A4 nnn [8,5" x 11" / 216 x 297 MM] (Letter).
*3 DPOF (Digital Print Order Format/ΦopMaT 3aKa3a ζινφροBoN neuATn) - ΘTO CTaHДapTHbI ΦopMaT dЯ 3aIncn INΦopMaци, OTHocяшся K n3O6paXeHnM, HApPIMep KaKoe IMeHHo n3O6paXeHne IJI N KOJIueCTBO erO KOJI N dЯ neuATn.
- Hac troponka neuatin [Date/Data]/[File No./No Файla]
P03BONJET 3aATb 6yDet Nn neyataTbcra daTa n/nnn Homep faiJa.
![CANON Pixma iP4500 - - Hac troponka neuatin [Date/Data]/[File No./No Файla] - 1](/content/2026/03/516000/images/7ecf780ce2a67da72a6de3a676e2332103868b335b826f311f55dd1a7cfe8d7c.jpg)
PpimmeaHne
- Ecni DaTbHaKaIaNbBaHOTcHa N3O6paKeHnI npu CbEmke, CneDyET Bb6paTb DnIa 3tOro PictBridge-napametpa 3NaueHne [Off/BbIKn.].PnpBb6ope BapnaHTa [Date/Data], [File No./No fai] nII [Both/O6a] nOBepx HAnOKeHHoB B Kamepe DaTb 6yDet paCneUaTBaTbCra DaTa N/NIHn Homep faiJa.
B 3aBnCmOCTn OT pa3Mepa 6ymaru MaKeTa, daXe npN BbIbope 3HaueHnra [Both/O6a] HaneuataHa 6ynd ToIbKO data.
- Napametp [Image Optimize/OnTmnaaunn n3o6paKeHn]
IpeyncmoTpeH Bb6op pa3nHbIX MeToOB ONTUMN3aun DJIa DOCTXKeHnB BICOKO KAueCTBa neat. Ecn BB6paho 3NaueHne [On/BKn.], dJIa neaTu ONTUMN3npoBaHHoro N306paJxHn HCNoB3yeTc HOpMaun O npaMeTpax CbeMkn.
Pn nncnoB3oBaHnn PictBridge-coBmecTUMoro yctpoiCtBa MapKn Canon B 3abncmoCTn OT moJeN MoYr 6bIb DoCTynHb CneDyUOuNe DOnONHHTeNbHbIe npaMeTpbl.
- [VIVID] npndaet 6oJIbIyU ecTeCTBeHHOCTb 3eJIeHOMy I CnHEMy UBeTaM.
- [NR] (Уменихуma) осябягшу m B cинх (нанример, нафотографиях He6a) И черных облacrх сotorpaфи.
- [Face/IIuio] yBeJIyHbAeT rpkocTb 3aTeMHeHHbIX IuI Ha foToRpaqnx, CdeJaHHbIX npOTNB CBeTa.
- [Red-Eye/Kpacn. rna3] ycTpaHReT aΦΦeKTe «KpaChbIX rna3», BbI3BaHHbI cBeMKoI CO BCIIuIKoI.
- Napametp [Trimming/KaДр neuropobka]
No3BONaT BblbpaTb 0bnaCTb neaTn.
3aMeHa YepHnJIbHnIcbl
EcInBueHnIbHnIaX3aKOHuINncbUepHnla,BbINOHNHeCneDyIOJIe DeIcTBnJdJIx 3aMeHbl.
1 OTKpoTe IOTOK npnema 6ymarn n BHyTpEHHIO KpbIiKy.
2 y6eIntecb, yTo npHTeBkIouhe, 3aTeM OTKpoTBe BepXHIO KpbIuKy.
3 HaKmTe 3aueIky cepHnIbHnIcbl, HndIkTop KOTOpOu qacto MnaeT (A), Nn3BJIeKeIte ee.
He npnkaacTecb K qnkcatopy neyatauoueI roJOBK (B).
(A) (B)
4 N3BNEKInTe HOByIO YepHnJIbHNuCy n3 yNaKObKn, 3aTEM NOTAHTE 3a opaHKeByIO NeHTy B HAnpabNeHn CTpeKN (A),YTO6bl CHrTB 3aUHTHyIO NNHeKc C OTBepCTnI DAJIyBO3dYxa (B). 3aTEM NOHOCbIO ydaJInte PHeKy (C).
5 CHIMITE opaHkeBbI 3aunTHbI KOJIpaOK (A) c HIXKHei NOBepxHOCTn YepHNbHNUcbl.
YdaTnHbKoNaO,epKeTeero octopxHO,TO6bHe 3aauKaTb naBcI.
Bb6pOcnte konnaQK, KaK ToIbKO OH 6yJeT CHrT.

3anomHnte!
He doTpaRnBaItecbdo 3neKtpnuecknx KOHTaKToB (B)Ha cepHnIbHnue. B npOTnbHom Cnyae BO3MOXhbl HEnoJaKn B paBoTe npHTepa nn neaTb 6yDet HeBO3MOxHa.
6 BcTaBbTe nepeHIOu qactb cheHNbHnCbI Bneue Ta u y u TOnOBky.
Y6eIITecb, YTO NOIOXKeHne YepHNJIbHNUcbl COOTBeTCTByET MapKnIpOBKe (A).
7 Haxmte Ha MeTky PUSH Ha YepHnIbHnIe TaK, Yo6bl OHa IIOTHO BOuJa B rHe3do n 3aΦHKpOBaJacb co UeJHKOM.
Y6eIntecb, YTO INHnKaTOp YepHnA (A) 3aropeJcKpaChbIM UBeTOM.
8 3akpoTe BHyTpEHHIOU IN BepXHIOU KpbIiKn.

PpimmeaHne
Pn nepBoN nocne 3aMeHbI ueHnIbHnCbI neaTn ABTOMaTNUeCKn 3aNyCKaETc npoueDpya ChCTKn neyataIOSeI rOIOBKn. Ioo 3aBepseHnA uNCTKn neyataIOSeI rOIOBKn BblONHeHne Dpynx onepaun He dOnyckaeTcR. Bo BpeM uNCTKn HnDnKaTOp [POWER] (INTAHNE) MInraet 3eJIeHbIM CBeTOM.
TexHnueckne XapakTepncTNKn
[PC Photo Printing Guide] (ainult Windows®)
[DVD CD Print Guide]
Satted [Date/File No. / Kuupaev/Faili nr]
Sate [Trimming/Loikamine]
Te saate valida prindiala.
Tindimahuti valjavahetamine
Brauser: spikrivataur Help Viewer
[PC Photo Printing Guide] (tikai Windows®)
[DVD CD Print Guide]
(Lietotajiem valstis un regionos arpus ASV un Korejas)
Skatiet so rokasgramatu, lai iegutu pilnigas norades par drukashanu uz DVD/ kompaktdiskiem.
Printera sagatavošana
Vispirms noteikti izlasiet uzstadijanas instrukcijas sniegtos noradijumus par printera uzstadiisan un sagatavoanu lietoisanai.
Izsaiojiet printeri
- [Paper type/Paper size]
| lestatijums [Paper type/Papiravaids] | levietojamais papirsr*4 |
| [Plain Paper/Gluds papirrs] 3* | [Super White Paper/ɪpaši balts papirrs] vai cits gludais papirrs |
| [Photo/Foto] | [Photo Paper Plus Glossy/ɪpaši glancëts fotopapirrs] |
| [Glossy Photo Paper/Glancëts fotopapirrs] | |
| [Glossy Photo Paper "Everyday Use"/Glancëts fotopapirrs "Lietosanai ikdienā"] | |
| [Photo Paper Glossy/Glancëts fotopapirrs] | |
| [Photo Paper Plus Semi-gloss/Pusglancëts fotopapirrs]*5 | |
| [Photo Stickers/Fotouzlimes]*2*6 | |
| [Fast Photo/Åtrais Foto] | [Photo Paper Pro/Fotopapirrs Pro] |
Pieejamie lappusu izmeri var atskirties atkaribana no drukasanas lidzekla veida. Sikaka informacija atrodama musu timekla vietne.

m = 311 ;
[DVD CD Print Guide]
Najprej preberite to strain.
[DVD CD Print Guide]
- [Trimming/Kesme] Ayari
Ley npnTepe nItpmye cTaHapr Exif Print.
Exif Print - ce cTaHdApT, 10 po3wupIOe MOxNlBOcTI 3B'3Ky MIXuΦpOBUMn φoToanapatam Ta npInTepaM. Ype3 NiKluOeHHra npInTepa Do BiDNoBIHorO uΦpOBoro foTOanapaty 3 NiTpumkoIO Exif Print npInTepe MoKe OTpUmYBaTu 3O6paXeHHa 3 foTOanapaty npocTo NiJ qac 3IOMKn Ta ONTmIm3yBaTu iX, CTBOpUOuBiD6NTKN HAd3BnuaHb BucOKOI RaOCTi.
MixnapoHa nporpama ENERGY STAR

3BepTaITeCbdo zuBoTo noci6Hnka 3a iHCTpyKuiaMn zoDo BnKOpNCTaHHp3HOMaHITHnx DoaATKObux npoRpaM, 10 Mo MICTaTbcra Ha [Setup CD-ROM/KomnaKm-ducky 3 npoaspMO ycmaHoeku].
[DVD CD Print Guide]
BcTaHOBJIeHnI dpaIbepa npHTepa
Cnibha iHopmaia dna komn'tepiB nid kepyBaHHaM Windows ta Macintosh
Ppimitkn 10do npoccy BcTaHOBneHHa
- RaKIO 3'ABNIEbC BIKHO [Select Language/Bu6epiMb MOBy], Bu6epiMb MoBy i HaTnCHiTb KhoNkY [Next/Dani].
- Ykso 3'YBnEbC BIKHO [Select Your Place of Residence/Bu6epitb micue npoxnBaHn] Bn6epiTb Micue npoxnBaHH i HATNCHTb KhoNky [Next/Dani].
- Ichyu dBa cnocobn BCTaHOBneHHra npaBepa npHTepa Ta iHwOro nporpaMHO 3a6e3neueHHra: [Easy Install/IpocTa yctAHOBka]: KOMnoHEHTN, rki MicTbCRA Ha KOMNaKT-DnCKy [Setup CD-ROM/KomnaKm-duck 3 npoapamO ycmaHO6ku] bdyTB BCTaHOBJIeHi aBTOMaTHNO [Custom Install/Bu6ipkoBa yCTAHOBka]: MOxHa Bn6paTN OKpeMi KOMNoHEHTN dIg BCTaHOBJIeHHra
* PporpamHe 3a6e3neueHHn, HaeBHe Ha KOMnakT-DnCKy [Setup CD-ROM/KomnaKm-duck 3 npo2paMOY ycmAoEku], MoKe BiDpi3HrTncs 3aIexHo BiD KpaIHn a6o perioHy npuD6aHHn.
- Konn 3'ЯВNTbC BIKHO [User Registration/PeecTpcaiz KOpncTyBaay], HATNCHITb [Next/Dani].
YKso Komn'tep NiDknHcHNo Do MepeXi IHTepHeT, Ha ekpaHi 3'YBnTmMyTbC iHCTpyKciI dnypeecTpcaii npOdykTu.
Peectpaio TakoK MoXHa BnKOHaTn, kIoo KnaCHyTu nIKTorpaMy Ha po6Omy cToJI niCJra 3aBepWeHHy yCTaHOBKn.
Bikho [User Registration/Pecctpaia KopncTybau] 3'ABnTmEtbcra Nlley BUnaKy, kso y BiKhi [Select Your Place of Residence/Bnbip KpaHn npoxnBaHH] 6yo NBpaHO 3Naehnra [Europe, Middle East, Africa/Cbpona, BnXhHi Cxid, Appka].
Ppimitkn 1o do peryIIOBaHnA pykyuOoi roJOBKn
3aBaHTaXTe Dba apKyuSi napepy 3 KOMnIeKTu nocTauaHnR (MP-101) cToPOHO JnA npky (6iNIO) DOrOPI.
BupibHOBaHHy dpykyoToI rOIOKn TpNBae np6n3Ho 13 xBNiIN. NiJ qac dpky He BiDkpBaTe BepxHIO KpnKy.
-Якшо зраэк He Дукусь са iHДиКаTOp [ALARM] (ПОЕРДЖEHн) Ha npintepi 6nmae xOBtorapaum KOJbOpOM,HaTncHITb KhoNkY [RESUME/CANCEL] (ПОДOBKHTN/CKACYBATN) Дя SCndaHn NOmIKN,прeйдтdo NaCTyNHOI npoцEDypn Дя BCTaHOBneHЯ dpaBepa INTeP a eKpaHHx NociбнкIB,notim Yntaite "Odlnaцгь салaxib" y po3di "INduKATOp [ALARM] (ПОЕРДЖEHн) 6nmae xOBtorapaum CBITlOM"В ekpaHHomу Nociбнky Kopucmyea.
InopmaiaIgKOpntyBaivWindows
- Ybiinb BcnCTemy nID obnikobm 3aHcOM KopncTyBaHa, oMae npaba admiHictpaTopa.
-
Persh Hix BCTaHOBIOBaTn DpaBep npHTEpa BUMKHITb yci aHTNBipychi nporpamu Ta nporpamu, 0o 3anyCKaOTbcr ABTOMaTHUHO.
-
RaKIO BIKHO [Found New Hardware/3HaIeHO HOBe yCTaTKyBaHn] a6o [Found New Hardware Wizard/MaICTep HOBOr yCTaTKyBaHn] 3'ABNIOcB abTOMaTHNO, BiD'EDHaIte Ka6eJIb USB, npEiHaHn Ido KOMn'IOTepa. KnaunHtB [Cancel/CkacyBAtn], 0o6 3akpITn BIKHO. B onepauiHi ciCTemI Windows Vista BIKHO MoKe 3akpHTncr ABTomaTHNo nicra BiD'EDHaHH USB-Ka6eII. Notim BmKHiB npInTEp Ta NoCHtB npOec BCtaHOBHeHH 3HOBy. DnI OTPMaHH DeTaIbHIoi iHOpMaUii 0ODO npOecCy BCTaHOBHeHH 3BepHiTbC Do KOPOTKOI IHCTpyKuII 3 HAcTPOKn.
-Якшо 3'яВьгЯБся ekран [AutoPlay/АВТOMATУЧИЗAN3aNYC],КlaциТь [Run Msetup4.exe/BиКонати Msetup4.exe].B onepaциHnx cncTeMax Windows XP Ta Windows 2000 ue BIKHO He 3'яВьгЯБся.
- RaKUO 3'YBnEeTbCBAiKHO [User Account Control/Cnyk6a 3axnCTy KopncTyBauiB], HATNCHITb [Continue/IpoobxTu]. B onepauiHnx cncTeMax Windows XP ta Windows 2000 ue BIKHO He 3'YBnEeTbCra.
- Κιοδ BCτaHOBιTи nporpamy Adobe® RGB (1998), ḤαΤιΝΗΙΤβ [Custom Install/Bu6ipKoBA yCTaHOBka] Ta BιΚΟΗΥΙTe BΚa3ιΒΚι Ḍа εκρaΗι.
- RaKiO NiJ Yac yCTaHOBKn Ha ekpaHl 3'ABNTbC3aNIT 0do nepe3aBAHTaKeHHa KOMnIOTepa, HATNCHTb [OK]. Nepe3aBAHTaKeHHcNCTeMn 3diINCHNTbC4 ABToMaTnHNo. Iid Yac nepe3aBAHTaKeHHa He BInMaIte [Setup CD-ROM/KomnaKm-duck 3 npoepamIo ycmaHOeKu].
- Мбудемо Вдячи, якшо Ви Bi3bMeTe yuacTb y [PIXMA Extended Survey Program] (Поширейни роррам дослджени PMXMA) CTOCOBHOBKOPINCTAHNЯ ппнтepiB Canon. Дokладиш у finopmaцю dinBITbcR B ekpaHHx inhctpykuiJx.
- YKsqo NiiknueHHe 3HaJeHO, 3BepHtbcrdo po3iny "HemoxnBO yCTaHOBTn DpaBep npHTepa" B eNeKtpOHomy NocibHuKy Kopucmyea.
IhopmaiaIgKOpntyBaivMacintosh
- Yepe3 Te, zu onepauihi ciCTeMn Mac OS 9, Mac OS X Classic, Mac OS X v.10.2.7 Ta nonepedhi Bepci He niTpmyoTbcra, He nID'EDHyTe npHTe pO KOMNIOTePIB 3 cIMN onepauiHHMN ciCTeMaMn.
He Bi'deHyTe Ta He npEduHte Ka6JIb USB nIac BCTaHOBNeHH, OCKJIbKu ce MOKe npn3BeCTn Do npuyueHH HOpMaJIbHOi po6Otn KOMN'IOTepa a6o npnHTepa. - Перш 키в Статовлобати драьер пинтур вимкніт bуci aHTNВipсhi поррамп Та поррами, уо 3аBAHTaЖуOTbса ABTOMaTNUH, abO bДаNTb iX i3 cnCTeMHOI nank.
- RaKuo niD yac yctaHObKn Ha ekpaHi 3'BAITbcra 3aNT 0do nepe3aBaHTaXeHHa KOMn'tepa, HATNCHTb [Restart/Nepe3anyck] CnCTema nepe3aBaHTaXyEcTBcA bTOMaTHuHo. NiD yac nepe3aBaHTaXeHHa He BnMaIte [Setup CD-ROM/KomnaKm-duck 3 npoapamO ycmahOBku].
- RaKuo niD yac peryIIOBaHH dpykyOoi rOIOBKN im' npnHTepa He BiIObpaXaETbcB [Printer List/CnNcKy npnHTepi], HATNCHITb KHOJkY [Add/Doatn], 0o6 DoaTn BiIOBIDHn npnTEp. DOKnaHiWy iHΦopMaJIO MOxHa 3HaTn B po3di [Printer Setup Utility Help/Dobidka do nporpamn BCtAHOBHeHH npnHTepa] DOBIDKn [Mac Help/Dobidka Mac].
Для корецьаivв A3ii
- Дя Востаноа Нь Посинka kopucmyea iHIO MOBOI DBiCi KnaHiTb nanky [Manual/Посинк] Ha komnakT-DnCKy [Setup CD-ROM/Komnakm-duck 3 npoepamoYcmaHO6ku], NOTIM nanky [Canon] ta ckonioHTe Ha JOpCTKm DnCK nanky BiINOIBHOI MOBn.
Чтаяня[elektroнх посihкib
Ioo6 OTpMaTn BnuepnHi BiDomocTi npo BcTaHOBneHna eJeKTPoHHnx Noci6HnKiB, 3BepHiTbcra do KopoTKoi iHCTpyKci 3 HacTpOuKn.
EneKtpoHHi noci6HnK moXHa nepeRJyHTB OOnH 3 HAcTyNHx cnOco6iB.
Windows
Ioo6 nepeTnHyTu nKpaHnN noCi6HnK, KnaCHiTb Dbiu niKTOrpamy [XXX On-screen Manual/ EkapHnN noCi6HnK XXX]Ha po6OcMy cToi a6o KnaCHiTb [Start/Pyck] > [All Programs/ Bci nporpamn](a6o [Programs/Iporpamn] > [Canon XXX Manual/Ioci6HnK Canon XXX] > [XXX On-screen Manual/EkapHnN noCi6HnK XXX] (de "XXX" o3NaUaE Ha3By BaIoTO npInTeP).
BnMOrn do cnCTemN
7 HaTnCHiTB KhoNky [Print/DpyK] (a6o [OK]).
1 Ybimkhitb npnHTepi 3aBaHTaxTe nanip.
2 IpekeKaHTeC8, 0o Bn6paHo HaleXHe DxepeNo nanepy.
3 CTbOpitb DOKymeH a6o BiDkPnIte faJI dpyky, BnKOpncTOBvOuN BiIDNoBIDHy nporpamy.
4 Bn6epitb nyHKT [Page Setup/ Napametpn ctopiKn] y MeHIO [File/ΦaIn] nporpaMn dJa dpyKy.
5 IpekeHaiTecb, y npametpi [Format for/Opmat ] Bn6paHo Ha3By BaIoro npHTepa.
6 Bn6epitb Heo6xidHn po3mip panepy B cnNcky [Paper Size/Po3mip nanepy].
7 HaTnCHiTB KhoNky [OK].
8 Bn6epiTb nyHKT [Print/DpyK] y MeHIO [File/ΦaIŋ] nporpaMn dIЯ dpyKy.
9 Bn6epitb [Quality & Media/Janictb Ta Hocii] 3 BnpuHaIOUO MeHIO.
10 BkaKItb Heo6xidHi napametpn. Bu moKeTe 3miHHTn DxepeNo panepy, 0u BnKOpNCTOByBaTmMetbcra, y dpaBepi npHtepa. IJa OTpMaHHa DeTaIbHOi IHopMaui 3BepHiTbcra Do NyHkTy "3MiHa DxepeNa panepy" B ekpaHOMy NocibHky Kopucmyea.

PnMItka
Дя OТРИМАнг ИФОРMAци npо Функцдраьера npintepa KlaunHtB 7, zuoB BiKpTN eKpaHHn nocibHK [PC Printing Guide].Якwo ekpanHi nociBHKn He BCTaHOBNeHo, [PC Printing Guide] He BiOb6paxaecTbcra, HabiTb KaIO HaTNCHTN 7.
11 HaTnCHiTB KHONKy [Print/DpyK].
* Y daHomy KoHTekcTi cHpOBI fOToKamepn, cHpOBI BiDeokamepn Ta MoibHi TelefoHN 3 cHpOBMn KaMepam pa30m Ha3NbaHObsc "PpncTpoJam 3 NiTpPMKOIO CtAndapTy PictBridge".

Pnncptpi,Ha komy ctoIb cy no3haUka, nIDtpmye cTaHaprt PictBridge.
- ΦopMaT rpaΦiUHnx dAHnx dIpyKy
Ley npntep dpykye 3o6paqehnna, 3nTi 3a donomoro kamepn, cymichoi 3 texhonorie DCF (Ppabina npoeKtyBaHnna dny faiNoBoi cncTeMn kamep) ver.1.0/2.0 (Exif ver.2.2/2.21), a takoX faann PNG.
1 IiIroTOBka Do npky.
(1) YbIMKhHtB npHTeP.
(2) 3aBaHTaXTe napi.
(3) NpebipTe, cn npabnIbHO Bn6paHo DxkepeNo nanepy.
2 PiiknHcHb npncTpi 3 niTpMkoo PictBridge do npntepa.

PnmiTka
3aIeXHO bID MoJeI a6o MapKn npcTpoU, MoKJIbO, nepei nIKnHeyHm KamepN Heo6xIdNo 6yde Bn6paTn peKIM dpyky, cymicn 3i cTaHapTom PictBridge. TakoN nicra nIKnHeyHn npncTpoU do npInTepa Moke 6ytu Heo6xIDHM yBIMKHyTu Kamepy a6o Bn6patu pexM BiITbOpEHn BpyHy. Ipeep NiiknOeyHnnm npcTpoU 3 niITprIMKOIO CTaHApTy PictBridge BkOHaIte Heo6xIdHi di, DotpmyuOncb IHcTpKciu, HadaHnx y noci6Hky 3 ekcnnyatauII npncTpoU.
(1)переконитеся,цо писчп 3пдгимкою сандару PictBridge BIMKHeHO.
(2)Пдкючы npucptiy 3 niTpumkoocTaHdapTy PictBridge do npntepa,BNKOpncTOByOuN Ka6eNB USBpeKOMeHDoBaHn BInpo6HnKOM npucTPOI.1PncTpiYBIMKHeTBcA ABTomaTuHO.JaKuo npucptiy aBTOMaTuHNo HeBMUKKaETbcRA,BBIMKHITb NOro BpyHy.
(3) HanaTnyTe npncpti3 niTpumkoocTaHdapTy PictBridge dna BnKoHaHHnpaMOrO Dpyky.3'ABNTbcra Ha PK-dncnpei npnctpoi, kso biN npabnlbHO niklNoeHn Do npntepa.
3 Bn3NaUTe npaMeTpni dpyky, taki kTn panepy abo KOMnoHyBaHHra.
ДиВ.“Пpo napamETpn Дуky PictBridge"Ha cTOp.14.
Moxha Bn3NaHTn npaMeTp n 3a DOnOMoTo MeHIO, 0o BiO6paXaetbcra Ha PK-dncnlei npictpo3 niDtpumkoio PictBridge.
Bn6epitb po3mip Ta Tnnpanepy, kyn 3aBaHTaxeHO B npntep.
4 Po3noHItb npK 3 npncToIO 3 niTpumkoIO PictBridge.
HactpoKn Ha npicTpoi 3 niTpMkoio PictBridge
Y zuomy pozdihi HABODHTbca iHΦopMaizia zo do napaMeTpiB dpyky Ha npicTpoi 3 niIDtpmKoio PictBridge. Pnpo6oti 3 npicTpoEM BIKOHyTe Bka3iBkn, HadaH B IHCTpykui 3 ekcnIyatauipnpicTpoio 3 niIDTpMkoIO cTAndapTy PictBridge.
图IpnMiTka
Haani Ha3Bn eJemeHtIB HAcTpoKn NODaIOTbcra 3riHO 3 TMM Ha3BaMn, 10 BHKOpNCTOByOTbcra PnCtPOMN 3 NiITpIMKOIO PictBridge BnPo6HnUcTa Canon. Ha3Bn npaAMeTpib MoKyTB BiDpi3HrTncra 3aJeXHO BiMapKn a6o MOnei IpnCTpoIO.
-
Dejki 3 napametpiB, Bka3aHnx HxKHe, MoKyTb He NiTpmyBaTnCra NeBHmnpCTpOAMN. Kaio 3MiHHTn napameTpN DpyKy Ha npuctpoi HEmoXnBO, npHTep DpyKyc 3o6paKeHHa i3 HAcTyNHmHaJaawTyBaHHMa:
-
[Paper Size/Po3mip nanepy]: [4^ × 6^ / 101,6 × 152,4 ~mm]
- [Layout/KomnohyBaHHa]: [1-up/MyIbTu 1], [Borderless/Be3 noniB]
-Друку [Date/File No. / ДаэтHomep Фаиу]: [Off/BmK.] (He ДрукуETься)
- Параметри [Paper Size/Po3mip nanepy] та [Paper Type/Tun nanepy]
Пид час дуку 3npictpoю 3 niTpIMKoi PictBridge moXHa BnKOpncToByBaTu NaCTynHi po3Mipu Ta TUnn panepy.
- [Paper Size/Po3mip nanepy]
[4" × 6'' / 101,6 × 152,4 ~mm] , [5" × 7'' / 127,0 × 177,8 ~mm]^1 ,[Credit card/KpeДиТна KapТka]2, [8" × 10'' / 203,2 × 254,0 ~mm] ,A4,Letter,[Wide/Широки]*
- [Paper Type/Tünn panepy]
Panip nIaHakneIOK: JaKIO Bn6paHO 3HaueHHN [10 x 15 cm/4" x 6"] dIy npaMeTpa [Paper size/Po3MIP cToPiKN], MoXHa NaDpyKyBaTI 16 3O6paKeHb Ha ODHOMy apkUWI panepy.
PanipФopMaTy A4 a6o Letter:Якso ВибpaHo 3HaueHЯ A4 a6o [8,5" x 11"/215,9 x 279,4 MM] (Letter) Дяп napaMeTpа [Paper size/Po3mip cToPiKn], MoxHa HApPyKbTaN 4 3o6paKeHHЯ Ha OndHomy apKyuli panepy.
- [Shooting Info/BiDomocTi npo 3nOMky] (dani Exif): Bu MoXeTe po3aPyKyBaTu BiDomocTi npo 3nOMky (Exif Data) pa30m i3 3o6paXeHHaM. E HacTyNHi DBi MoXJNuBOcTi.
[1-up/MyIbTn 1]1:Дуке BiIDomocTi npo 3iOMky (Exif Data) Ha noJx OkpeMnx 6paHnx 3O6paKeHb.
[20-up/MyIbTn 20]2:Дуке 20 зобрахень,заЗанчehихздопомою DPOF,Таixhi BiDOMocTi npo 3iOMky (Exif Data) y φормati спнicky ha odHomy apkuyi nahepy.
[35 mm Film Style Layout/KomnohyBaHHa 35 MM] (KoHTaKTnIpyk)2: MoXHa HApkyBaTN DekiBka foTOrpaqi, 3a3HaueHnx 3a DonomoroDPOF3, y fOpmati CnCKy, uO BnrrJaTtme Jk HeratNB PnIBKn.
Okpim HabeJeHnx Bnue npaMeTpib, MoXHa TaKoX Bn6paTn dpyk iHneKcy 3o6paxeHb y MeHIO npaMeTpib dpyky DPOF.
^1 LIO MOXJIINBICTb MOxHa BIKOPNCTOByBaTHI JINJE B TOMY BINNaIDKy, KOJI N IJnI npaMeTpA [Paper Size/Po3MIP cTOpiHKn] BIn6paHO 3HaueHnR [10 x 15 cm/4" x 6"] [13 x 18 cm/5" x 7"], [20 x 25 cm/8" x 10"], A4 a6o [8,5" x 11"/215,9 x 279,4 MM] (Letter).
^2 LIO MOXJIINBICTb MOXHa BIKOPNCTOBYBaTH NIIuhe B TOMy BUNaKU, KOJIN IJNAI npaMeTppa [Paper Size/Po3Mip cToPiKn] Bn6paHO 3NaueHHA4 a60 [8,5" x 11"/215,9 x 279,4 MM] (Letter)
*3 DPOF (Digital Print Order Format/Φopmat cheprobocti ucppoboro dpyky) -ce cTaHdapTnH φopmat dny 3aNcy neBHO iHφopMaui CTOCOBHO 3o6paKeHb. Hanpknad, ykecame 3o6paKeHHaDpyKByaTn a60 KInbKicTb Konii.
- Параметрируку [Date/File No. / Дata/Homep Файу]
MoxHa Bn3HaunTn, YI npkyBaTn DaTy Ta/a6o Homep qaiNy.
![CANON Pixma iP4500 - - Параметрируку [Date/File No. / Дata/Homep Файу] - 1](/content/2026/03/516000/images/6511c821513168a3ec245a490e07550fe4be29da24a08c21996ebc654ec4f861.jpg)
PpIMtka
- RaKuo 3o6paKeHH BKe MaHOb DaTn, Rki 6yIu HaKnadeH iN qac 3IOOMKn, BInBepeITb Dnra CboRn npaMeTp a PictBridge 3NaueHH [Off/BmK]. RaKuo BN BuBepeTe [Date/Data], [File No./Homep fay] abO [Both/O6uDba], To Ha Micci dOdaHOi nD qac 3IOOMKn DaTn DpyKyBaTMyTbcr BIDNOBIDHI daHi.
3aIexHo BID PO3mipy CTopiHKn Ta KOMNOHyBaHHa, HabiTb npu Bn6opi 3HaueHHe [Both/O6nDb], DpykyBaTUMETbcr TINbKn data.
MoxHa Bn6paTn 0bnaCTb npky.
3amHa YopHnJIbHnci
KoHnB OOpHnIbHnIcx 3aKiHcyIbTcB cyOpHnla, 3amHItb ix, DoTpmyuOuHncb HAcTyHNOI npOeDpyn.
1 BiKpnIe BHXiDn IOTOK IaI naepy i BHyTpIshHIO KpnIky.
2 IpekeHaiTeCay, npntep yBIMKHeHO i BIDkpniTe BepxHIO KpnuKy.
3 HaTnCHiTb Ha a3NvOK YOpHnIbHnci, NaMNoUka kOoi WbNdko 6JnMae (A), Ta BnIMtB II.
He TopkaTecra BaxeJ-phiKcaTopa dpykyuoyoi roNoBn (B).
(A) (B)
4 BnIMtB HOBy YOpHnIbHNu3 ynaKOBKn, NotrHITb XOBTorapAuy CtriuKy B HAnpMky, Bka3aHOMy CtripIKoIO (A), Ta 3HiMTb 3axNCHy nnIBky 3 OTBOPy dIy nobITpy (B).PiCJraBO rOBHICTO 3HIMtB nnIBky (C).
5 3HimiTb XOBTORapaun 3axnCHn KOBnaOK (A) yHn3y YOpHNlbHni.
3Himaoun 3axnCHN KOBnaOK, TpMaItecb 3a HbOro o6epexHo, 06 He 3a6pydHNTn PnIbci YOpHnIamn.
BnKnHbTe KObnaQok, 00H0 3N8BnI NOrO.

BaxklnBa iHOpmaia
He TopKaIteCra eNEKtpuHnx KOHTaKtIB (B) OOpHNbHnCi. Y npOTnEeXHomy BUNaKDy npINHTep MOKe NOsKOdNTncA 6o npINnHHTn dpyKyBaTn.
6 BcTaBTe nepeHNo yactnHy oOpHnIbHnCi Bdp KyuOy rOIOBky.
IpekeohaTece, 0o no3uia YopHnIbHuCi BiDnobIdac Haninci (A).

7 HaTnCKaIte Ha no3HaCyu PUSH Ha YOpHnJIbHnCi, DOKN BOHa He 3aΦikcyetbcra BCEpeHi.
Ipekehntec, 1o Iamnoka YopHnBnCi (A) CBITNTbcq YepBOHM.

8 3akpnTe BHyTpHIO KpUkky Ta BepXHIO KpUkky.

PnMItka
KoNn Bn nouHaTe npk nicJ 3aMHN cOpHnIbHniO, OunueHH aPykyHooI rnoBKn BnKOHyETbcra ABTomatNoHO. YtpMaInTecb BiD 6yNb-aynx IHxix dIN, DOKn He 3aBepuNTbcra OunueHH aPykyHooI rnoBKn. Pid qac uHneHH iHnkaTop [POWER] (XNBLEHH) 6nmae 3eJeHM.
Texhichi xapaKTepeNCTnKn
afofofofofofofofofofofofofofofofofofofofofofofofofofofofofofofofofofofofofofofofofofofofofofofofofofofofofofo
(A)
PUS
golil golil
+ = 2
图
aI sI aai 8 Ialai aclll w, a bui sl y aagby Jnnw w aclal aloc laic Loxic

J
aIgIgIgIgIgIgIgIgIgIgIgIgIgIgIgIgIgIgIgIgIgIgIgIgIgIgIgIgIgIgIgIgIgIgIgIgIgIgIgIgIgIgIgIg
1
1
aagbys Jhla LgJ1jAog(A)acswLg>
(B) acllJI JgJgJgJgJgJgJg
aaiagaiicn oaoaiaaiagbcsi 2x (A) aaiilolalaijlll
(C)JLoL J< 1
aagbs JwA (A) Jaalalalalalalalal
a 0 a 0
aagbgsgB) aLgS LwOu 8
aclbll
[10x15cm/4" x 6"] [a] aclalg g y lclbll sic g ylll caleo aclh] pssu [gJy/Paper type] jll Photo/[gJy/Paper size] [Bj/Borderless] [bLayout]
[Layout]
acgii hbsu 1Lj
XgJgDgDgDgDgDgDgDgDgDgDgDgDgDgDgDgDgDgDgDgDgDgDgDgDgDgDgDgDgDgDgDgDgDgDgDgDgDgDgDgDgDgDgDgDgDgDgDgDgDgDg
Letter -A4 8g g g g g g g g g g g g g g g g g g g g g g g g g g g g g g g g g g
Jc 11 aclb L<. [gJ /Paper size] JcLl [10x15cm/4" x 6"]
a>1g a<3g
/Paper size] (Letter) [215,9 x 279,4 mm/8,5" x 11"] A4 Letter g-A4
.0>1g aagc g 2 clb cll<
(Exif Data) 上 L _ 一 J ^ 2 1 一 L _ 一 L _ 一 L _ 一 L _ 一 L _ 一 L _ 一 L _ 一 L _ 一 (Exif Data)
1- up
Exif Data) Lg aLbLaJcLogLoogDPOF abwgg20-up
a>g a,g lca
DPOF abwgl aolll gall acldc (awlao acldo hbsj) 0 p
Lw 1jio g jaoi
DPOF aclb 1
Photo: [zjy] / Paper type]
[1/2] 1 / Borderless, 1-up].[Layout] -
[29] 131313 1/Borderless,1-up][huiLayout]
(aclbI psc)[J:1011/Off]:[L111,007/File No.]/[cUu/LDate]aclbsdcl
[Paper type] [Papers/Paper size]
PictBridge,
[Persize]
1VWAXV/V/awvXawg0.105x1.7awg1x2
" [y/ Wide].Letter A4 102. × 7.5 / aag 1 × X[Laal alu/Credit card]
[3g/Paper type]
/Paper size] [gJ/Paper type] [g/Plain Paper]
[Ja/Paper type] (Letter) [215,9 x 279,4 mm/8,5" x 11" A4 Lc [gJ]
[Layout]
[./Borderless]
Canon gg 2
- × A L [20X 2000]
[Paper Size] [20x25cm/8" x 10"] (SG-201)
[Jg/Papertype]JJ [JDefault]9
PictBridge gao gao gao aclbgs yjgtaLsLo jyHbog 1111111111111111111111111111
![CANON Pixma iP4500 - [Paper type] [Papers/Paper size] - 1](/content/2026/03/516000/images/a7bb4e4b9a2e74749d2bdaf30c789bedd47ee7e29d850823135ad1c984f5847a.jpg)
Joo gao jolil jg 1 Joo Joo Sli (1) PictBridge
PictBridge g0g11jglJgog (r)
4.2021 5JUUB J5 pLswiLy aIbIL jgsaaiilas
LlaJgJ 1
Lgds
PictBridge, 2000 gill jll lcl (r)
a2 + a3 + a_4 = 6 ②
aLLsll aLw LgB
h hllg g jg jia acl lla
"PictBridge Joc acll 1
golglssiLCD aLw lclall PictBridge
1
.PictBridge,1000000000000000000000000000000000000000000
![CANON Pixma iP4500 - [Paper type] [Papers/Paper size] - 2](/content/2026/03/516000/images/a9fb89e0888d8438c28f679f160f93817d0c9d000a552f5932fc75037029f212.jpg)
jgsn 1
Jg>0 g. 1sLg. Aa aal L Jio PictBridge,go go gagagagagagagagagagagagagagagagagagagagagagagagagagagagagagagagagagagagagagagagagagagagagagagagagagagagagagagagagagagagagag
JgU 1
PictBridge 1
.PictBridge JJIJ
aJg0s1 aJgJg. aAooLg. aIJI aAooJI JI JI JI L
"PictBridge g o jg Lg" Lg J clg PictBridge g aolglg|g|Lg|
PictBridge,
aclblllalllgss
DCF (Design rule for Camera File system)
PNG L221 Exif 1.0/2.0-
g jg jg jn nn nnnnnaa aagaae gaae aclb
JgLl aolll 5kUUB JpI PictBridge g o fag

Ji j 10000000000000000000000000000000000000000000000000000000000000000000000000
aL1g>g>g>g>

PictBridge J2000000000000000000000000000000000000000000000000000000000
JL LALALALALALALALALALALALALALALALALALALALALALAL

[LaLg/Quality&Media] aotll ao
ai a ai 分母最小值为 k .
J 10000000000000000000000000000000000000000000000000000
四四四 四四四
JcIyIgIgIgIgIgIgIgIgIgIgIgIgIgIgIgIgIgIgIgIgIgIgIgIgIgIgIgIgIgIgIgIgIgIgIgIgIgIgIgIgIgIgIgIgIgIgIgIgIgIgI g
[clb/Print] 1

g
aLwAclbllsljAaSpaalI
Windows
1g
2
pLwly aclbU Lalo gol mwo .WLi o
[File] aJl [aLb/Print] Jolx1 1c g jhll aJl
"XXX"[Canon XXX] /Select Printer] (1/Preferences][Properties]
/OK] g
J 100000000000000000000000000000000000000000000000000
四四四 四四四
Paper Feed] (g) [Switch C) (D) [Cassette]

J 1
PLo 1
(A) 1
g( x) = ( 1 + ax) - ( 1 - ax) - 2ax

J 1
gJgA (A) JaxI 20sLgj12
gJgJgOgOgB (B) gJgJgOgOg

aagjx1 aJx1 ocl
Jg
aJll a aBb b a Bg ySxI aSx I c Ebx x
Windows
JX/ XXX On-screen Manual]
/Programs]g))[JALLS/All Programs]<[I/Start]gjzjgl<12hwoJc>gU [XXX
Xx On-screen Manual] 11
11 chw Jc (a, [b]paw 0 "XXX" [XXX - oL31
OE = 23t
目
LwJgogosxixll
JalcXy, yolai logai/11 Jyai/11 Setup CD-ROM 2000 [JUJI/Manual] 11 jssssll Jjssssss s
[top.htm] gge Igge Jrae jai aepnssnnll Jz Cwi: ooi
pLJI Lio
Help Viewer:
4k > 3l < 0
目
J 1
L
HTML 1
Apple Inc. 5

(PiXMA JI) [PIXMA Extended Survey Program]
aJg<IXlLbXlJ. JauLaiJ Canon LbIe
y
Pt1( x - 1,0) .Pt2( y - 2,0)
Macintosh Jooa aol oLog
JMac OS X v.10.2.7 Mac OS X Classic 9 J
aaij81oig: ailll jooj pcc
aJgSll Jgss Pc 100000000000000000000000000000000000000000000000000000000000
aIalai cIolJI aIeSg ciIwgsaII anel So coIy aIeS Jlnnoi po aolbl JzcoIy coIy
ailll 100 no Lgjjj g jao
gag aJ 1aLac gjoo SJJ Joo oolc! Si Jll Jw Jw Jw Jw Jw Jw Jw
yallogai/SetupCD-ROM]xLolpIJI.(Jw)[Restart]
Jz 1
Ll/Printer List]
a>JcLc.1aLaJI JgauuAaUll Aalx [AeLb/Add] gagfzla. [LbJf
[Mac Loo/ Mac Help] [AeLulxOx Oxclu/ Loo/ Printer Setup Utility Help]
LwJgoo
/Manual] 1g ggsggsggsggsggsggsggsggsggsggsggsggsggsggsggsggsggs
[Canon] [Jb]
1
a
Macintosh® Windows
aoc 1c 1
[JI/Next] [ASelect Language]
Jolololololololololololololololololololololololololololololololololololololololololololololololololololololololololololololololololololololololololololololololol
[Next]
s21 coljgl aJbJ JcJ 1
Lal [la 1a 10 11/Setup CD-ROM] a ooggol
LgiiJaioojolicuLc:laS:yaosoc
I 111111111111111111111111111
a1 = 23 a2 = 43
JLJI/Next] [User Registration]
ciill Jxwi aolal 1gjx<JXl oLw yIiW .yix
1111 1111 1111 1111 1111 1111 11
Jic hao [pui/User Registration] auiu juec
Select Your Place of] Ls [Lg/ Europe, Middle East, Africa]
Residence
aLbJIJolJcLgJcLdSlo
(L)(MP-101)
1c81 aclbllslgllllgllll 2Ljyraaagaaalolaoaepg qe ean ane ynnn nlll llll (ALARM] clllll jgogaoaalalalalalal alal alal alal alal alal alal alal alal alal alal alal alal alal alal alal alal alal alal alal alal alal alal alal alal alal alal alal alal alal alal alal alal alal alal alal alal alal alal alal alal alal alal alal
Windows J 10
Jggl 10jLio1 a jgii po xu o LwS cIgds Jw
Lalal Lgol 1000000000000000000000000000000000000000000
Found New Hardware
Windows needs to install driver software for your Canonip4500 series
Locate and install driver software (recommended) Windows will guide you through the process of installing driver software for your device.
Ask me again later Windows will ask again the next time you plug in your device or log on.
Don't show this message again for this device. Your device will not function until you install driver software.

J/Found New Hardware] 13 J/Found New Hardware Wizard] [
JgUUSB JSLJIbI [d]gJcJgJL
P 1111 [Cae] gJgJL
E J1111 J. Windows Vista J.
C J1111 J. J. J. J. J. J. J. J. J. J. J. J. J. J. J. J. J. J. J. J. J. J. J. J. J. J. J. J. J. J. J. J. J. J. J. J. J. J. J. J. J. J. J. J. J. J. J. J. J. J. J.J.J.J.J.J.J.J.J.J.J.J.J.J.J.J.J.J.J.J.J.J.J.J.J.J.J.J.J.J.J.J.J.J.J.J.J.J.J.J.J.J.J.J.J.J.J.J.J.J.J.J.J.J.J.J.J.J.J.J.J.J.J.J.J.J.J.J.J.J.J.J.J.JJJJJJJJJJJJJJJJJJJJJJJJJJJJJJJJJJJJJJJJJJJJJJJJJJJJJJJJJJ
a
J. [JLJI JI JI/AutoPlay] aJUgab allJ G JI [MSetup4.exe JI/Run MSetup4.exe] gJ JI Windows 2000,Windows XP
[1000000000000000000000000000000000000000000]
Windows 2000 Windows XP [Lio/Continue]
Jr [C/Custom Install] .Adobe RGB (1998)
aL
[OK] ggej aLac sllg oJ 1s oLc JSLaLLwJ Lc aLLwJgLoic
aLac slilslc yolal logial/Setup CD-ROM 2 LsLal pIkl Jzss Lg.()
Joooo

A
pL 11111111111111111111111
aai
aiei gao sllc agai Jgai Lgai Lao Jdo aai jai gao
山Jgjg≤JL aJU JUJU USJBJ≤
S APQ = S AQP + S_ QPQ
4
a.1b.11 1j.13 j.o a.a.111 ab.21 a11j! o
ab = 12
图
yill ayoc
aclbJw,
4
acllJgIcIgIcLcLae aLalJgJxJnals
aJbI aJ bI LgJgJgLhJgJgJgJgX
a_b = 30
图
Lg aclll 1000000000000000000000000000000000000000000000000000
1
aI 100
p 1
L (A) [POWER] L 100000000000000000000000000000000000000000000000000000000000
a_1 = 25
目
alglsl 15c81 Luy, y aoghtl y caggll lrrn rnaaagbys no oaleill 0e 25
L 1
aJ1j! 2e jy aJ Lc sLc gOsc JgX
aagbys sallg jllasjll gllglaalllg (AJI) [ALARM] ciao aai
aclbglg
2
y
P
[Rear Tray]Looos
a
acgabll ggtg
aegwsl 12c
.8g1 2gj10o0000000000

pLwU Lgag g aLl aqll lsc! Jg> IaL,
()
aBbI pdsicg cddl dll l
JdI 1
2019 ≤ 3521 ≤ 4521
possum1
aBbI pds
0s sssssssssssssssssssssssssssssssssssssssssssssssssssssssssssssssssssss
LJ 1 JJJ 1 1 1 1 1 1 1 1 1 1 1 1 1 1 1 1 1 1 1 1 1 1 1 1 1 1 1 1 1 1 1 1 1 1 1 1 1 1 1 1
:g> a1a
acl.lhll hslwg
jooSJJ aclbll
aayjaiy
lg > L w.lg s|Lb>21 s|Ls>
a0aaii ojiolj aolj aoi jagj loS
jueosui 1c actai j
aJlJ 1e JcLolcs!e aLoLsLglc Jgann JdJdJg
(Windows® J. 1. 1. 1. 1. PC Photo Printing Guide)
aiaaiI aaiiJIyol yolioe oosn w neoLw! Jc Jnnu JndJdJg
[1]
DVD CD glacalall
(ygKgJXgJgJgJgJgJgJgJgJgJgJgJgJgJgJgJgJgJgJgJgJgJgJgJgJgJgJgJgJgJgJgJgJgJgJgJgJgJgJgJgJgJgJgJgJgJgJgJgJgJgJg
CD aIcIbJIy aIeJIaIolSJI oIeJxI JgssuJJ IJdI IJg
.DVD9

Exif Print
Exif Print,
Aa 1 a 1 1 1 1 1 1 1 1 1 1 1 1 1 1 1 1 1 1 1 1 1 1 1 1 1 1 1 1 1 1 1
a1 ≤ a2 ≤ a3 ≤ a4 且 a5 > a6 > a7 > a8 > ·s
ENERGY STAR
J. ENERGY STAR® Partner Lg: Canon Inc. 450000000000000000000000000000000000000000000000000000000000000

aIbJI Udbio
1 1
j2a17 · 10 · 1.125 = 12 - 1 · · 223 = 1
Jg:wwu Aulal 1j
(FINE Caridges)FINE
a0xwlll b
m = 311
#
g 111 111 111 111
J 11 J 11 J 11 J 11 J 11 J 11
Microsoft Corporation aS alj aLc oLc "Microsoft" aS 1000000000000000000000000000000000000000000000000000000000000000000
Microsoft Corporation aS J aJ L dL c o Jc "Windows Vista" ●
aJ J J J J J J J J J J J J J J J J J J J J J J J J J J J J J J J J J J J J J J J J J J J J J J J J J J J J J J J J J J J J J J J J J J J J J J J J J J J J J J J J J J J J J J J J J J J J J J J J J J J J
"Adobe" 19
© CANON INC. 2007
a aalgo gno JkXl no Jk w g wll 1n no s j z c w g Jai jg x . abga a

K10305 (iP4500)
Lag aJg. aJzll aolal g 2002/96/EC) WEEE Jg Lg
aJg Jg Jg Jg Jg Jg Jg Jg Jg Jg Jg Jg Jg Jg Jg Jg Jg Jg Jg Jg Jg Jg Jg Jg Jg Jg Jg Jg Jg Jg Jg Jg Jg Jg Jg Jg Jg Jg Jg Jg Jg Jg Jg Jg Jg Jg Jg Jg Jg Jg Jg

Lg g g g g g g g g g g g g g g g g g g g g
(EWS) 1JLlalalalalalalalalalalalalalalalalalalalalalalalalalalalalalalalalalalalalal

PIXMA iP4500
J
LgJg
Regulatory Information
FCC Notice (U.S.A. Only)
For 120V, 60Hz model
Model Number: K10305
This device complies with Part 15 of the FCC Rules. Operation is subject to the following two conditions: (1) This device may not cause harmful interference, and (2) this device must accept any interference received, including interference that may cause undesired operation.
Note: This equipment has been tested and found to comply with the limits for a Class B digital device, pursuant to Part 15 of the FCC Rules. These limits are designed to provide reasonable protection against harmful interference in a residential installation. This equipment generates, uses and can radiate radio frequency energy and, if not installed and used in accordance with the instructions, may cause harmful interference to radio communications.
However, there is no guarantee that interference will not occur in a particular installation. If this equipment does cause harmful interference to radio or television reception, which can be determined by turning the equipment off and on, the user is encouraged to try to correct the interference by one or more of the following measures:
Reorient or relocate the receiving antenna.
- Increase the separation between the equipment and receiver.
- Connect the equipment into an outlet on a circuit different from that to which the receiver is connected.
■ Consult the dealer or an experienced radio/TV technician for help.
Use of a shielded cable is required to comply with Class B limits in Subpart B of Part 15 of the FCC Rules.
Do not make any changes or modifications to the equipment unless otherwise specified in the manual. If such changes or modifications should be made, you could be required to stop operation of the equipment.
Canon U.S.A., Inc.
One Canon Plaza
Lake Success, NY 11042
1-516-328-5600
Users in Canada

Caution
The following ink tanks are compatible with this product.