KMM021 - Blender KENWOOD - Free user manual and instructions
Find the device manual for free KMM021 KENWOOD in PDF.
| Product Type | Multifunction Food Processor |
| Brand | Kenwood |
| Model | KMM021 |
| Dimensions (approx.) | 40 × 30 × 30 cm |
| Weight (approx.) | 8 kg |
| Power Supply | 220-240 V, 50/60 Hz |
| Power | 800 W |
| Variable Speeds | Minimum to maximum speed + pulse mode |
| Bowl Capacity | 4.6 L (stainless steel) |
| Included Accessories | K-beater, whisk, dough hook, spatula, adjustment key |
| Accessory Outlets | High-speed outlet, medium speed, slow, planetary |
| Main Functions | Beat, whisk, knead, mix |
| Multifunction Processor | Available as accessory (AT950A or AT955) |
| Juice Extractor | Available as accessory (AT641) |
| Blender | Available as accessory (AT337, AT358 or AT339) |
| Overload Protection | Automatic shut-off in case of overload |
| Splash Cover | Included |
| Care | Wipe motor unit; wash bowl and accessories by hand or in dishwasher |
| Spare Parts Available | Bowl, whisk, K-beater, hook, cover, etc. |
| Manufacturing | China |
| Warranty | 2 years (subject to conditions) |
Frequently Asked Questions - KMM021 KENWOOD
User questions about KMM021 KENWOOD
0 question about this device. Answer the ones you know or ask your own.
Ask a new question about this device
Download the instructions for your Blender in PDF format for free! Find your manual KMM021 - KENWOOD and take your electronic device back in hand. On this page are published all the documents necessary for the use of your device. KMM021 by KENWOOD.
USER MANUAL KMM021 KENWOOD
Chef and Major KMC010 - KMM020 series
Congratulations on buying a Kenwood. With such a wide range of attachments available, it's more than just a mixer. It's a state-of-the-art kitchen machine. We hope you'll enjoy it. Robust. Reliable. Versatile. Kenwood.
Français
0e1a 164 oyniecs xnooews
Suyxapntnpia yia thy ayopa mias ouakeunc Kenwood. Me tny meyaltnoiklaia eapntmuatw v Tou biatbetai n ouokeun autivai kati napattavw ato eva atlo miep, evai n teleutaria aegn Tns texvooloyias otis unxavecs kouzivae. Eantioume oti 0a thy attoalaucete. Avtoh.Ajotnia. Eukivnqia. Kenwood.
Slovencina
strana 174 poukny
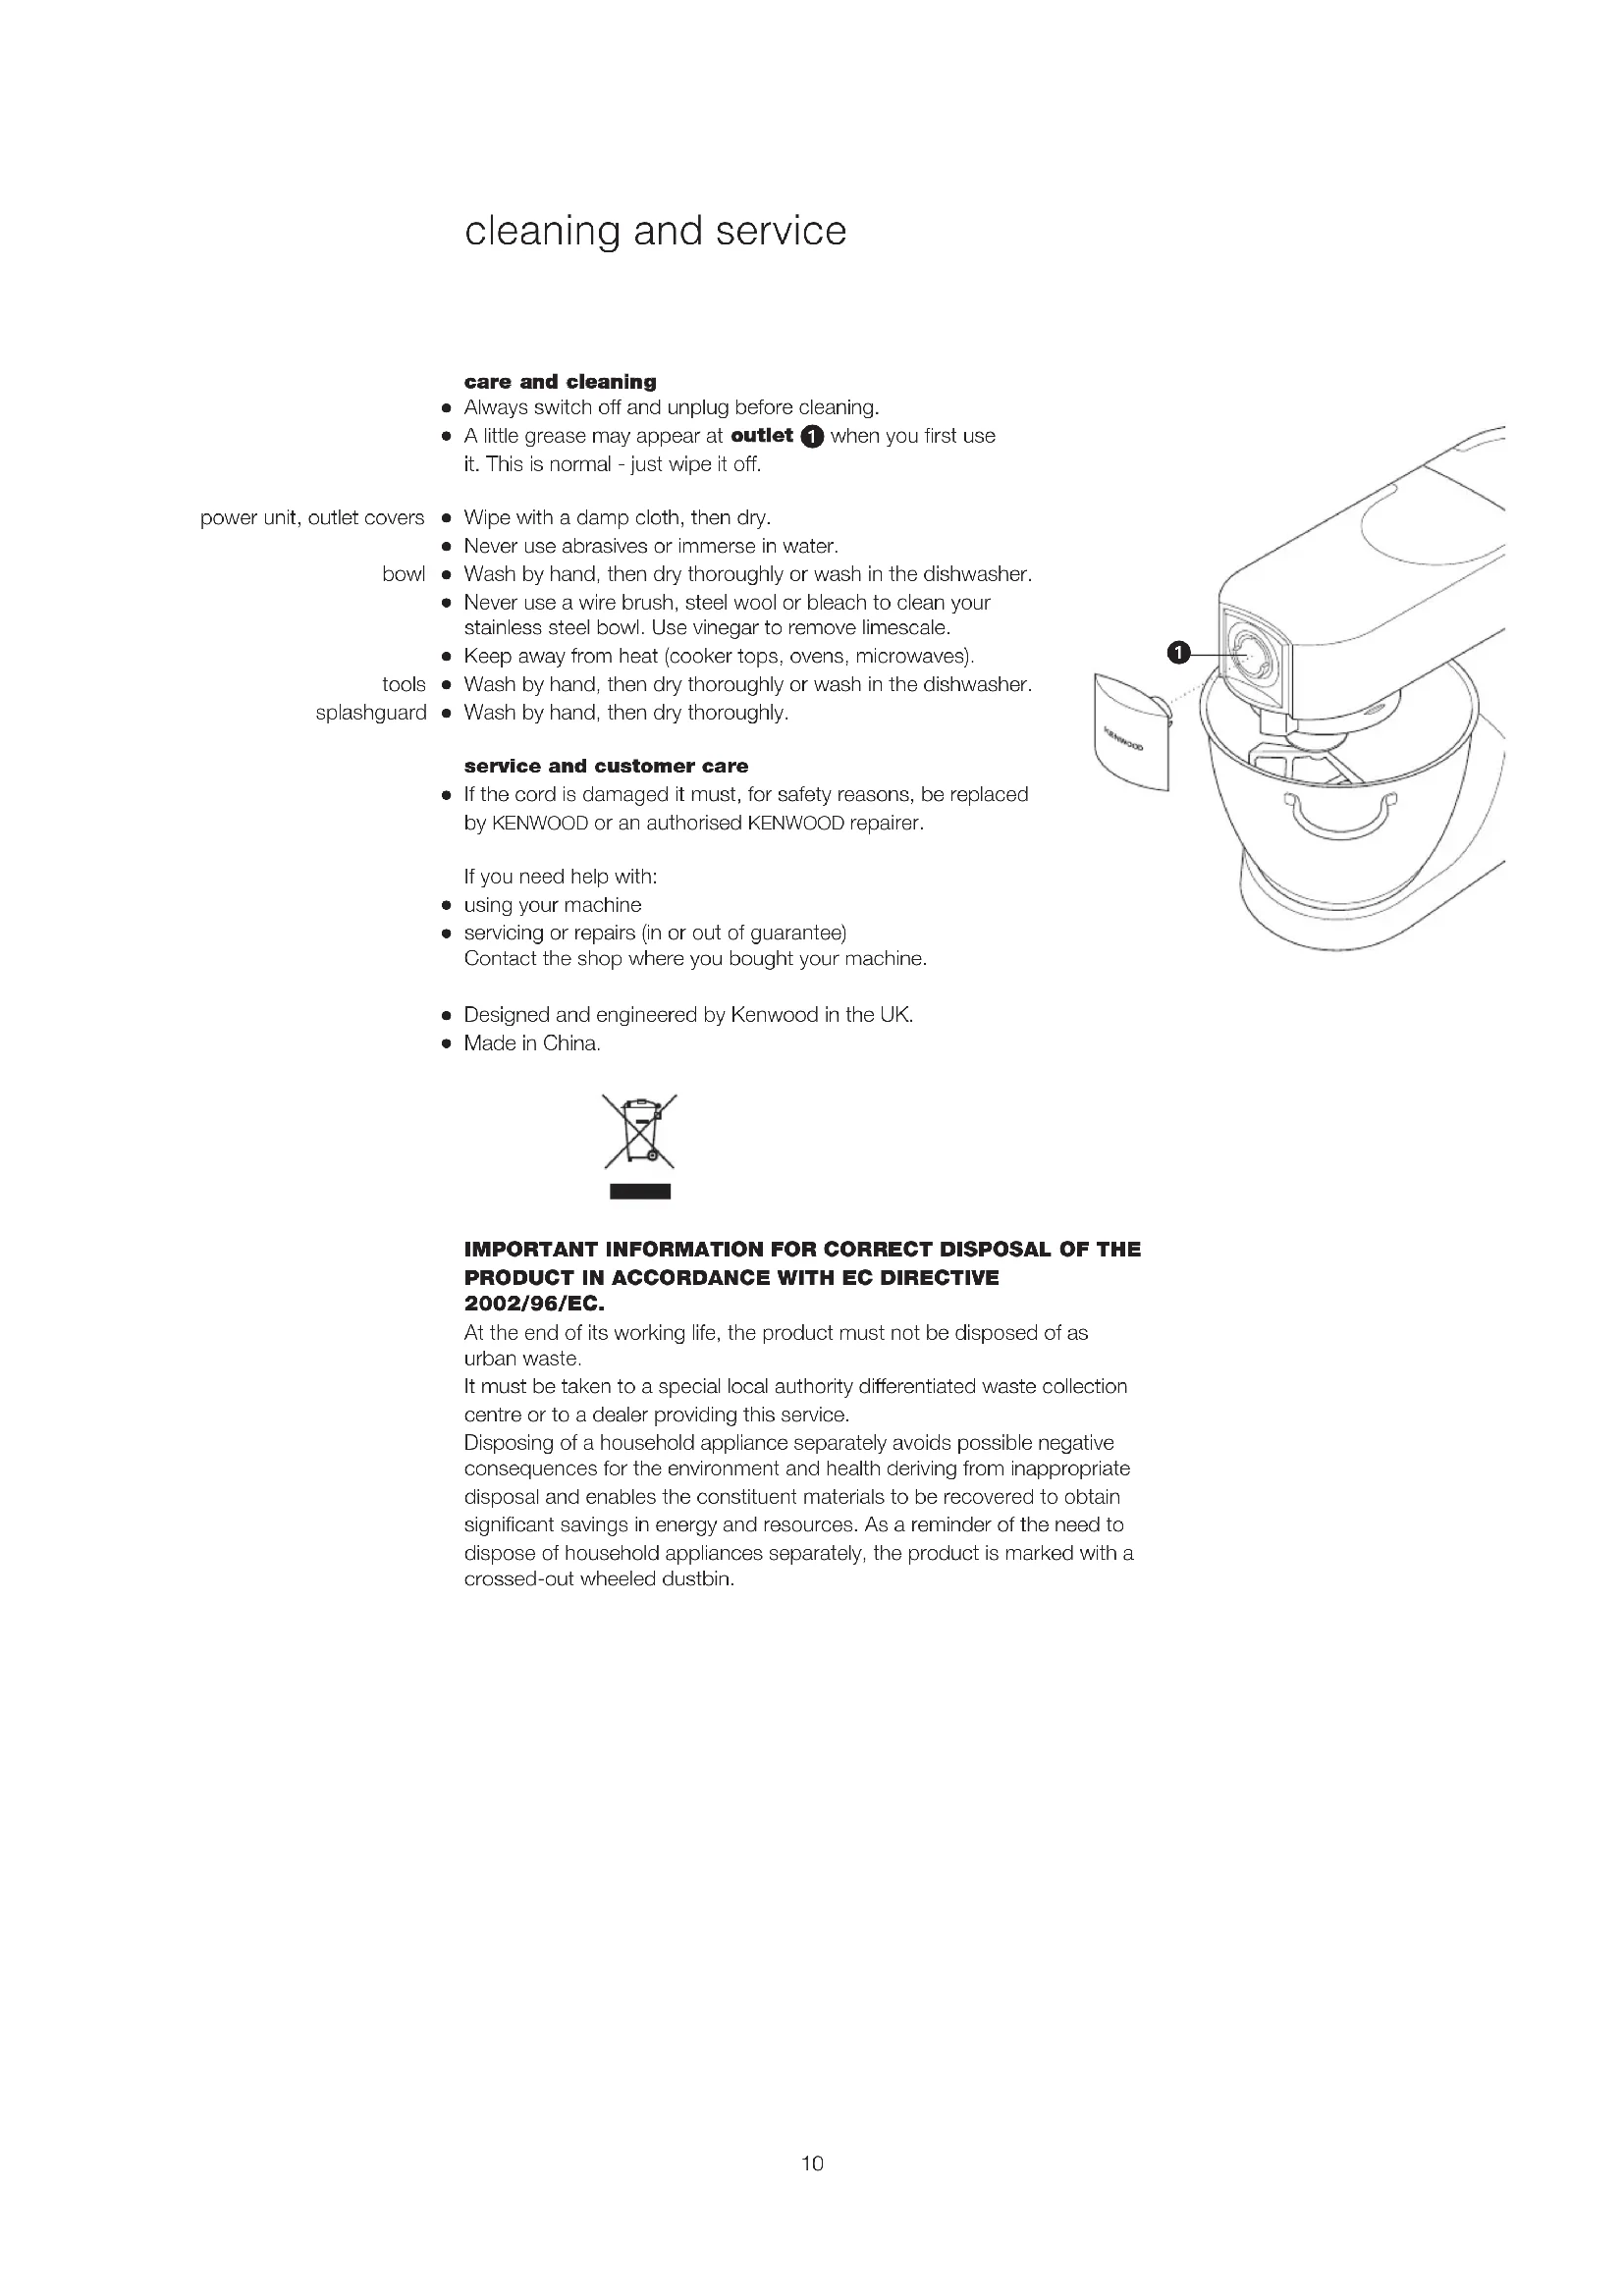
know your Kenwood kitchen machine
before using your Kenwood appliance
-
Read these instructions carefully and retain for future reference.
-
Remove all packaging and any labels.
safety
- Switch off and unplug before fitting or removing tools/attachments, after use and before cleaning.
- Keep your fingers away from moving parts and fitted attachments.
- Never leave the machine on unattended.
- Never use a damaged machine. Get it checked or repaired: see 'service and customer care'.
- Never operate the mixer with the head in the raised position.
- Never let the cord hang down where a child could grab it.
- Never let the power unit, cord or plug get wet.
- Never use an unauthorised attachment or more than one attachment at once.
- Never exceed the maximum capacities.
- When using an attachment, read the safety instructions that come with it.
Take care when lifting this appliance as it is heavy. Ensure the head is locked and that the bowl, tools, outlet covers and cord are secure before lifting. - This appliance is not intended for use by persons (including children) with reduced physical, sensory or mental capabilities, or lack of experience and knowledge, unless they have been given supervision or instruction concerning use of the appliance by a person responsible for their safety.
Children should be supervised to ensure that they do not play with the appliance. - Only use the appliance for its intended domestic use. Kenwood will not accept any liability if the appliance is subject to improper use, or failure to comply with these instructions.
before plugging in
Make sure your electricity supply is the same as the one shown on the underside of your machine.
- This appliance conforms to EC directive 2004/108/EC on Electromagnetic Compatibility and EC regulation no. 1935/2004 of 27/10/2004 on materials intended for contact with food.
before using for the first time
1 Remove all packaging.
2 Wash the parts: see 'care and cleaning'.
3 Push excess cord into the cord stowage compartment at the back of the machine.
know your Kenwood kitchen machine
the mixer
the mixing tools and some of their uses
K-beater For making cakes, biscuits, pastry, icing, fillings, éclairs and mashed potato.
whisk - For eggs, cream, batters, fatless sponges, meringues, cheeses, moustes, souffles. Don't use the whisk for heavy mixtures (eg creaming fat and sugar) - you could damage it.
dough hook For yeast mixtures.
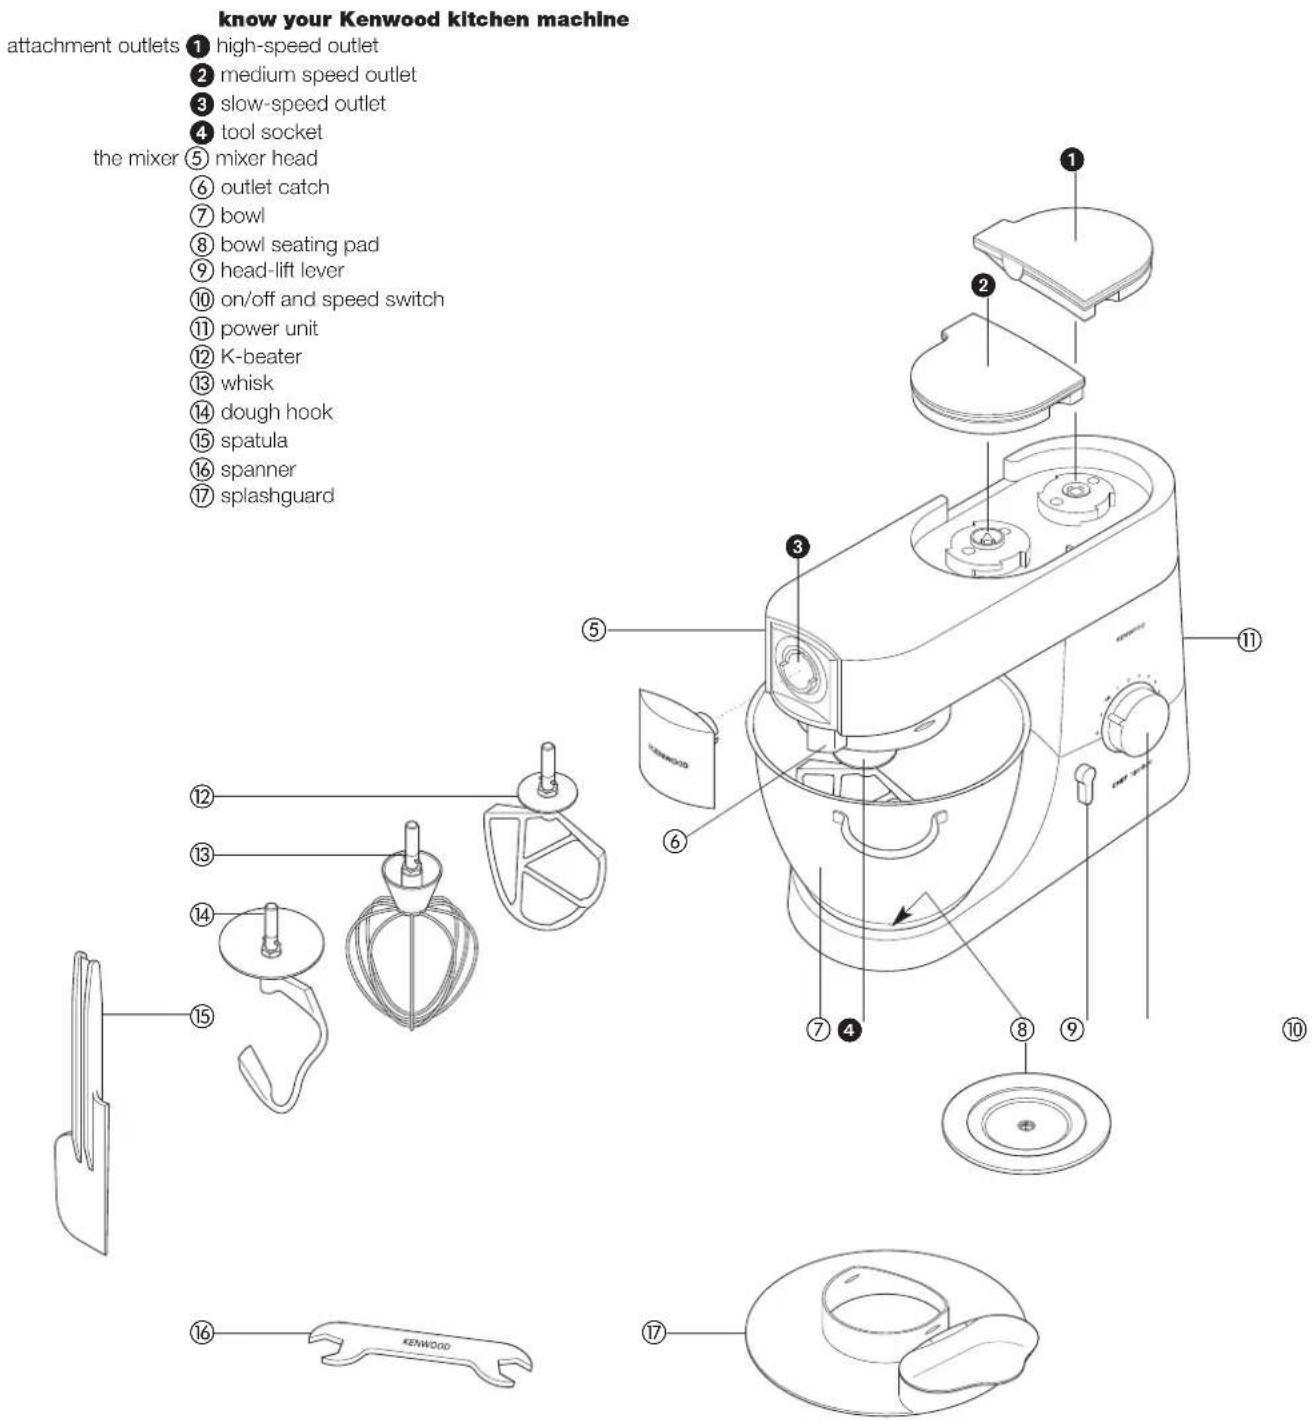
to use your mixer
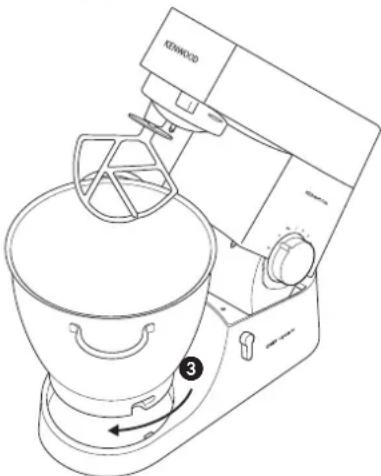
1 Turn the head-lift lever clockwise 1 and raise the mixer head till it locks. Ensure the bowl seating pad is correctly fitted with the symbol uppermost.
to insert a tool 2 Push up till it stops ② then turn.
3 Fit the bowl onto the base - press down and turn clockwise 3
4 Lift the mixer head slightly then turn the head-lift lever clockwise and lower the mixer head till it locks.
5 Switch on by turning the speed switch to the desired setting.
- Switch to pulse P for short bursts.
Switch off and unplug after use.
to remove a tool 7 Turn and remove.
Hints Switch off and scrape the bowl with the spatula frequently.
- Eggs at room temperature are best for whisking.
- Before whisking egg whites, make sure there's no grease or egg yolk on the whisk or bowl.
Use cold ingredients for pastry unless your recipe says otherwise.
points for bread making
important - Never exceed the maximum capacities below - you'll overload the machine.
- If you hear the machine labouring, switch off, remove half the dough and do each half separately.
The ingredients mix best if you put the liquid in first.
maximum capacities
CHEF
MAJOR
shortcrust pastry
Flour weight: 680g - 1lb 8oz
Flour weight: 910g - 2lb
stiff yeast dough
Flour weight: 1.36kg - 3lb
Flour weight: 1.5kg - 3lb 5oz
soft yeast dough
Total weight: 2.18kg - 4lb 13oz
Total weight: 2.4kg - 5lb 5oz
fruit cake mix
Flour weight: 1.3kg - 2lb 14oz
Flour weight: 2.6kg - 5lb 12oz
egg whites
Total weight: 2.5kg - 5lb 8oz
Total weight: 5kg - 11lb
Total weight: 4.55kg -10lb
egg whites
12
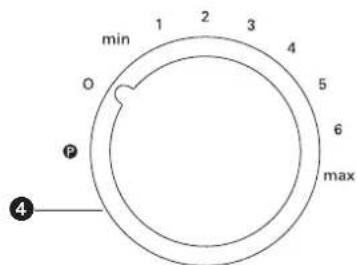
speed switch ④
K-beater - creaming fat and sugar start on 'min', gradually increasing to 'max'.
- beating eggs into creamed mixtures 4 - 'max'.
- folding in flour, fruit etc 'min' - 1
- all in one cakes start on 'min' speed, gradually increase to 'max'.
- rubbing fat Into flour 'min' - 2.
whisk Gradually increase to max
dough hook - Start on 'min', gradually increasing to 1.
important
Ensure that no bowl tool is fitted or stored in the bowl when using other outlets.


troubleshooting
problem
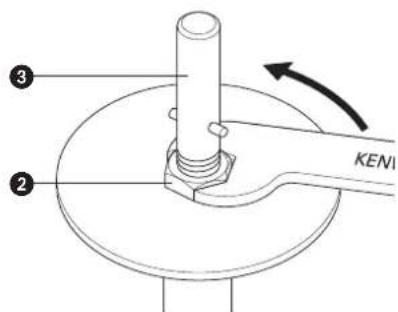
The whisk or K-beater knocks against the bottom of the bowl or isn't reaching the ingredients in the bottom of the bowl.
Option Adjust the height using the spanner provided. Here's how:
1 Unplug the appliance.
2 Raise the mixer head and insert the whisk or beater.
3 Lower the mixer head. If the clearance needs to be adjusted, raise the mixer head and remove the tool. Ideally the whisk and K-beater should be almost touching the bottom of the bowl
4 Using the spanner provided loosen the nut 2 sufficiently to allow adjustment of the shaft 3. To lower the tool closer to the bottom of the bowl, turn the shaft anti-clockwise. To raise the tool away from the bottom of the bowl turn the shaft clockwise.
5 Re-tighten the nut.
6 Fit the tool to the mixer and lower the mixer head. (Check its position see points above).
7 Repeat the above steps as necessary until the tool is set correctly. Once this is achieved tighten the nut securely.
dough hook - this tool is set at the factory and should require no adjustment.
problem
The mixer stops during operation.
solution - Your mixer is fitted with an overload protection device and will stop if overloaded to protect the machine. If this happens, switch off and unplug the mixer. Remove some of the ingredients to reduce the load, and allow the mixer to stand for a few minutes. Plug in and reselect the speed. If the mixer does not restart immediately allow to stand for additional time.

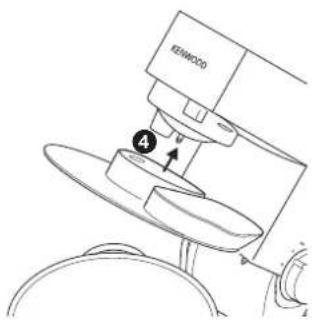
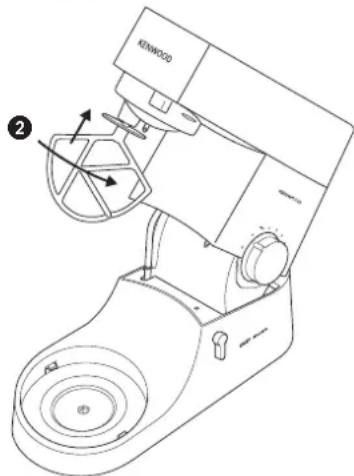
to fit and use your splashguard
1 Raise the mixer head until it locks.
2 Fit the bowl onto the base.
3 Push the splashguard onto the underside of the mixer head 4 until fully located. The hinged section should be positioned as shown.
4 Insert required tool.
5 Lower the mixer head.
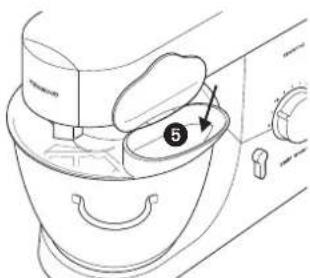
- During mixing, ingredients can be added directly to the bowl via the hinged section of the splashguard 5.
- You do not need to remove the splashguard to change tools.
6 Remove the splashguard by raising the mixer head and sliding it down.
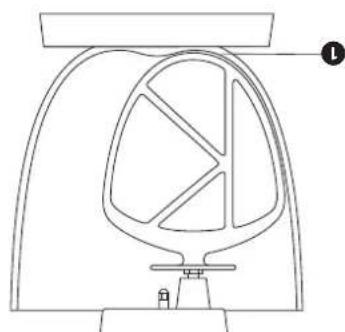
the attachments available
To buy an attachment not included in your pack, see service and customer care.
attachment attachment code
flat pasta maker ① AT970A
additional pasta attachments AT971A tagliatelle (not shown) used in conjunction AT972A tagliolini
with AT970A AT973A trenette
AT974A spaghetti
pasta maker ② AT910 comes with maccheroni rigati die (12 optional dies plus biscuit maker can be fitted)
roto food cutter ③ AT643 comes with 5 drums fruit press ④ AT644
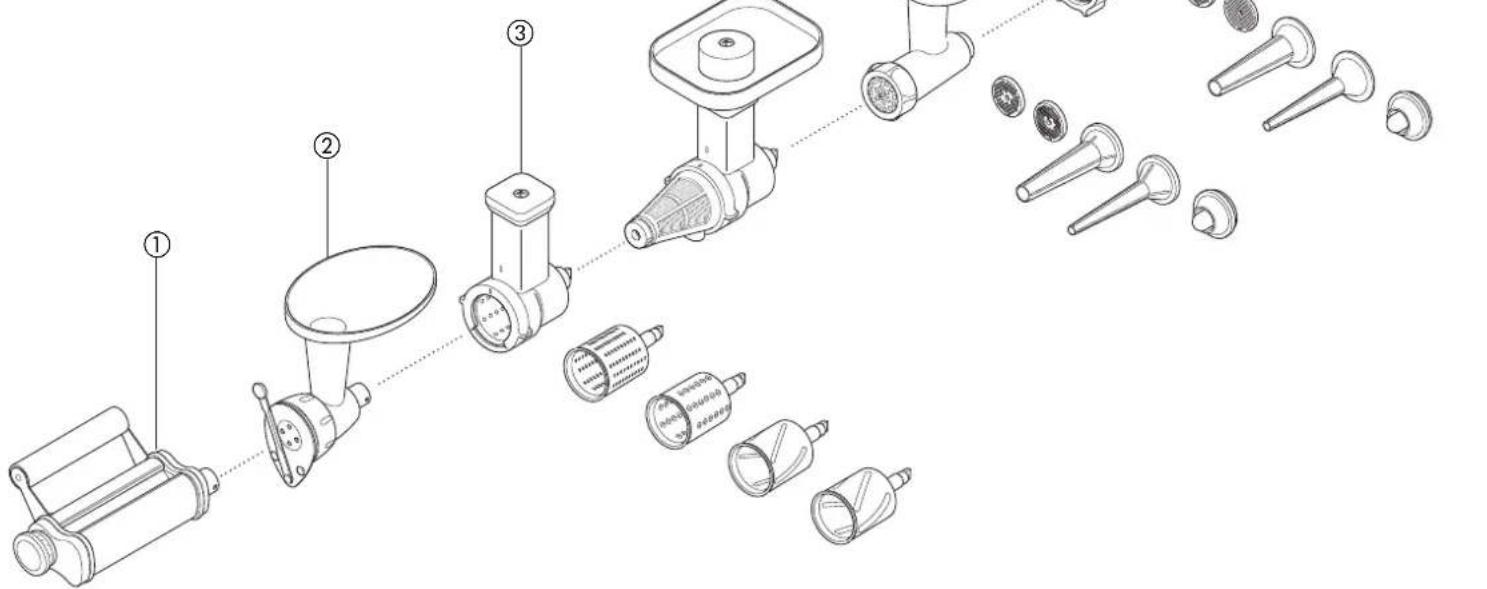
multi food grinder 5AT950A comes with a fine, medium and coarse screen, a small and large sausage nozzle and a kebbe maker
multi food grinder AT955 comes with a fine, medium and coarse screen, a small and large sausage nozzle and a kebbé maker
grain mill ⑦ AT941A
food processor AT647 includes 6 cutting discs and a knife blade
pro slicer/grater ⑨ AT340 includes 7 cutting discs citrus press ⑩ AT312
blender 1.5 acrylic AT337, 1.6 I thermo resist glass AT358, 1.5 I stainless steel AT339
mini chopper/mill ② AT320A comes with 4 glass jars and 4 lids for storage continuous juicer ③ AT641
ice-cream maker ④CHEF AT956A, MAJOR AT957A potato peeler ⑤CHEF AT444, MAJOR AT445
colander and sieve 16CHEF AT992A, MAJOR AT930A scale 17AT850B
stainless steel bowlsCHEF 36385A, MAJOR 36386A with handles
splashguardCHEF&MAJOR34445A flexible beater CHEFAT501,MAJOR AT502 coverCHEF,533722,MAJOR 606397

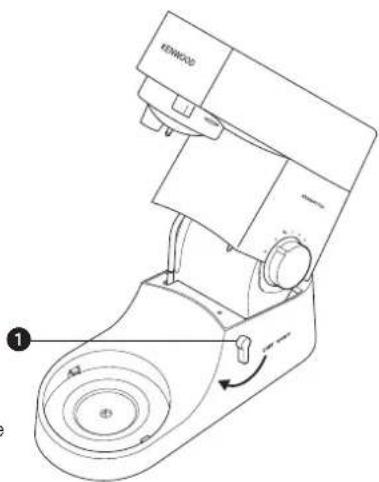
cleaning and service
care and cleaning
Always switch off and unplug before cleaning.
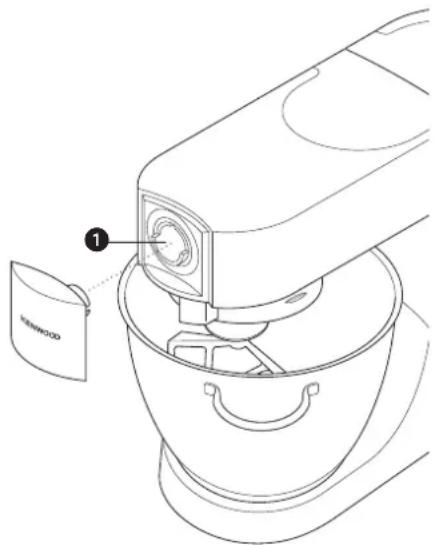
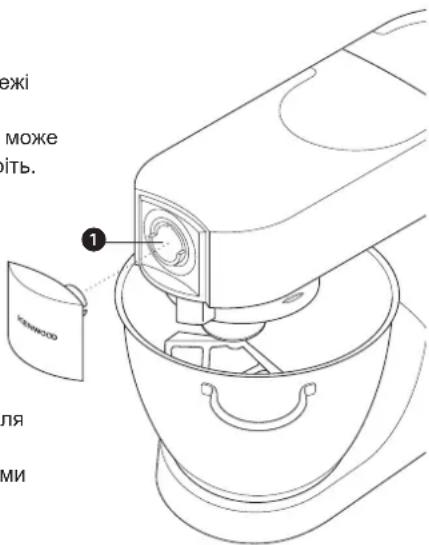
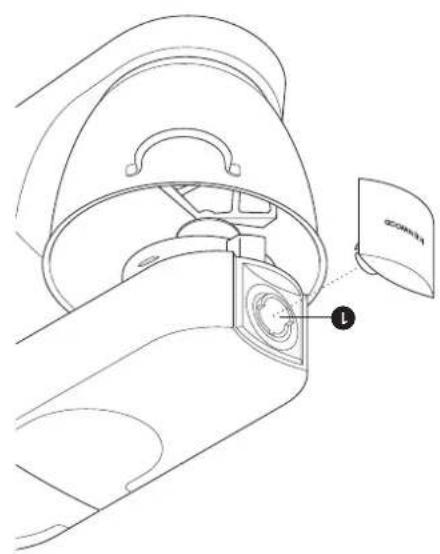
- A little grease may appear at outlet 1 when you first use it. This is normal - just wipe it off.
power unit, outlet covers
- Wipe with a damp cloth, then dry.
- Never use abrasives or immerse in water.
bowl
- Wash by hand, then dry thoroughly or wash in the dishwasher.
- Never use a wire brush, steel wool or bleach to clean your stainless steel bowl. Use vinegar to remove limescale.
- Keep away from heat (cooker tops, ovens, microwaves).
- Wash by hand, then dry thoroughly or wash in the dishwasher.
- Wash by hand, then dry thoroughly.
service and customer care
- If the cord is damaged it must, for safety reasons, be replaced by KENWOOD or an authorised KENWOOD repairer.
If you need help with:
using your machine
- servicing or repairs (in or out of guarantee)
Contact the shop where you bought your machine.
- Designed and engineered by Kenwood in the UK.
Made in China.
IMPORTANT INFORMATION FOR CORRECT DISPOSAL OF THE PRODUCT IN ACCORDANCE WITH EC DIRECTIVE 2002/96/EC.
At the end of its working life, the product must not be disposed of as urban waste.
It must be taken to a special local authority differentiated waste collection centre or to a dealer providing this service.
Disposing of a household appliance separately avoids possible negative consequences for the environment and health deriving from inappropriate disposal and enables the constituent materials to be recovered to obtain significant savings in energy and resources. As a reminder of the need to dispose of household appliances separately, the product is marked with a crossed-out wheeled dustbin.
recipes
See important points for bread making.
white bread stiff British-type dough
ingredients
1.36kg (3lb) strong plain flour
- 15ml (3tsp) salt
- 25g (1oz) fresh yeast; or 15g/20ml (%oz) dried yeast + 5ml (1tsp) sugar
- 750ml (1¼pts) warm water: 43^ (110^) . Use a thermometer or add 250ml (9floz) boiling water to 500ml (18floz) cold water
25g (1oz) lard
method 1 dried yeast (the type that needs reconstituting): pour the warm water into the bowl. Then add the yeast and the sugar and leave to stand for about 10 minutes until frothy.
fresh yeast: crumble into the flour.
other types of yeast: follow the manufacturer's instructions.
2 Pour the liquid into the bowl. Then add the flour (with fresh yeast if used), salt and lard.
3 Knead at minimum speed for 45 - 60 seconds. Then increase to speed 1, adding more flour if necessary, until a dough has formed.
4 Knead for 3 - 4 more minutes at speed 1 until the dough is smooth, elastic and leaves the sides of the bowl clean.
5 Put the dough into a greased polythene bag or a bowl covered with a tea towel. Then leave somewhere warm until doubled in size.
6 Re-knead for 2 minutes at speed 1.
7 Half fill four 450g (1lb) greased tins with the dough, or shape it into rolls. Then cover with a tea towel and leave somewhere warm until doubled in size.
8 Bake at 230^ / 450^ / Gas Mark 8 for 30 - 35 minutes for loaves or 10 - 15 minutes for rolls.
- When ready, the bread should sound hollow when tapped on the base.
shortcrust pastry
ingredients 450g (1lb) flour, sieved with the salt
- 5ml (1lsp) salt
- 225g (8oz) fat (mix lard and margarine straight from the fridge)
About 80ml (4tbsp) water
hint • Don't overmix
method 1 Put the flour into the bowl. Chop the fat up roughly and add to the flour.
2 Mix at speed 1 until it resembles crumbs. Stop before it looks greasy.
3 Add the water and mix at minimum speed. Stop as soon as the water is incorporated.
4 Cook at around 200^ / 400^/ Gas Mark 6, depending on the filling.
pavlova
ingredients
3 large egg whites
175g (6oz) caster sugar
275ml (10 fl.oz.) double cream
- fresh fruit eg raspberries, strawberries, grapes, kiwi fruit
method 1 Whisk the egg whites on a high speed until they form 'soft peaks'.
2 With the whisk operating on speed 5, gradually add the sugar one tablespoon at a time, whisking after each addition.
3 Line a baking tray with silicone paper, then spoon the meringue onto the paper forming a nest approximately 20cm / 8^ in diameter.
4 Place the baking tray into an oven preheated to 150^ / 300^ / Gas Mark 2, then immediately reduce the temperature to 140^ / 275^ / Gas Mark 1 and bake for 1 hour. Turn the heat off but leave the pavlova in the oven to cool down.
5 When ready to serve, peel off the silicone paper and place on a serving dish. Whip the cream until soft peaks form then spread over the top of the pavlova and decorate with the fruit.
recipes continued
scrumptious chocolate cake
ingredients 225g (8oz) butter, softened
250g (9oz) caster sugar
4 eggs
- 5ml (1tsp) instant coffee dissolved in 15ml (1tbsp) hot water
30ml (2tbsp) milk
- 5ml (1 tsp) almond essence
- 50g (2oz) ground almonds
100g (4oz) self raising flour
- 5ml (1 tsp) baking powder
- 50g (2oz) unsweetened cocoa powder
method 1 Cream the butter and sugar on a low speed gradually increasing to a higher speed until the mixture is light and fluffy. Scrape down the bowl and beater.
2 Beat the eggs in a jug and whilst the mixer is operating on a high speed, gradually add the egg a little at a time until incorporated. Switch off and scrape down.
3 Incorporate the dissolved coffee, milk and almond essence on a low speed. Add the ground almonds, sieved flour, baking powder and cocoa. Mix on a low speed to incorporate.
4 Divide the mixture between two 20cm / 8 cakes tins that have been lined with greased greaseproof paper. Level the tops then bake at 180^ / 350^ / Gas Mark 4 for approximately 30 minutes until springy to the touch.
5 Turn out and cool on a wire rack.
chocolate mousseline filling
ingredients 275g (10oz) plain chocolate, broken into pieces
225ml (8 fl.oz.) double cream
method 1 Melt the chocolate by placing in a bowl over a pan of barely simmering water.
2 Whisk the cream starting on a low speed gradually increasing to a higher speed until it forms soft peaks.
3 When the chocolate has melted remove the bowl from the heat and, using a large spoon fold into the cream.
4 Spread the chocolate filling between the cooled cakes.
chilli marinade
Ingredients · 200g (7oz) cold clear honey (refrigerated overnight)
1 green chilli (whole)
- 5ml (1 tsp) crunchy peanut butter
- seasoning
method 1 Place all the ingredients into the mini chopper/mill.
2 Fit the attachment to the mixer and allow the ingredients to settle around the blade.
3 Switch to pulse for 10 seconds.
4 Use as required.
continue fruitpers ③ AT641
ijsmaker CHF AT956A, MAJOR AT957A
aardappelschilapparaat 15CHEF AT444. MAJOR AT445
vergiet en zeef (6)CHEF AT992A, MAJOR AT930A
weegschaal AT850B
roestvrijstalenkommenCHEF36385A,MAJOR36386A
met handgrepen
spatschem 19CHEF & MAJOR 34445A
flexibele klopper 20 CHEF AT501, MAJOR AT502
deksel 533722. MAJOR 606397
reiniging en service
- Peso total: 2,5kg Peso total: 5kg
mezcla para pastel
de frutas
- Peso total: 2,72kg Peso total: 4,55kg
claras de huevos
1216
velocidades 4
batidor K
know your Kenwood kitchen machine
mixeren
- Mixer stander under drug.
linecké testo (shortcrust)
prisady 450g mouky prosete spolecné s
1 Izickou soli
225g tuku (smes sádla a margarínu prímo z lednice)
- asi 4 Izfe vody
rada Davejte pozor, abyste smes nepremichali.
Kak noB3ObaTbcMnKcepom
1 NOBepHnTe pbyar noDbema roNoBKn no yacobon cTpeKe 1 n NoDHmNte roNoBky MInKcepa do ynopa. YdoctOBePbTEcB, yTO onOpna npoknlaKa dny qaun yCTaHOBHeHa npabnlbHo - obo3haeHne HnueBoi cToPoHe.
KaK yCTaHOBt b HacAdKy
2 POnaTb ee Bvepx do ynpa 2, 3aTeM NOBepHyt.
3 YctaHOBNTe EMKOCb Ha OCHOBaHHe - HaxMNTe IN NOBepHNTe No YacBOB CTpeJIke 3
4 HeMHoro npnnoHmnte roNOBky MKNcepa, a 3aTe mNoBepHnTe pbuHa ngbema roNOBKn MKNcepaa no yacobO cTpeKe n onyctNe roNOBky MKNcepaa do ynopa.
5 BknoHte, yCTaHOBnB npeKIOuHaTeNb ckOpocTN B Tpe6yEmoe NOJoxHeH.
Дя paBoTb B 'MmnyIbCHOM' pexnme yCTaHOBNTe nepeKIOuHaTeNb B noJoxHe I
63aKoHnB pa6Oy, Bcerda BbIKIOuAte npIbOp n OTKIOUaTe erO ot cETNItAHn.
COKOBbIXMMAJIaДЯФpyKTOB ④ AT644
yHnBepCaJIbHbI
n3MeIbYuTeYb
⑤AT950A NOCTaBnEeTcpeWTeKAMN DnMa MeKnO, cpeDHei
I KpyHnHO Hape3Kn, C npuONHHbIMn HacaKaMn IJN KOJI6acbl
MaJIeHbKOro N 6oNbIoo rpoa3Mepa,aTaKKe HacAdkOJnI
PnroTOBneHna "Ke6e"
H3MeIbYTeIb 6AT955 NOCTaBnEeTcApeWSeTKAMM DnA MeNkoI, CpeDHei
I KpynHn Hape3Kn, C nopuzHOHHbIMn HacaKaMn IJN KoJI6acbl
MaJIeHbKOro 6oIbWoRo pa3Mepa, a TAKKe HacaKoJ dIra
npiroTOBneHn "Ke6e"
MeIbHnua dna 3epen AT941A
Kxohhki KOM6aHH AT647 BKNIOUaeT 6peKyuNX DNCOB N OIN HOK
TePKA ⑨ AT340 BKNIOUaet 7 pekyuix DNCKOB
COKOBBIXKIMAJika dna
ZntpycoBbIX AT312
6NeHep 1,5 n, akpn AT337, 1,6 n, TepmoctoKoe cTeKIO AT358
1,5 N/H/K CTanb AT339
MHH-N3MeJIbYHTeJIb/ 12 AT320A NOCTaJIReTc4 CTeKJIHHbIMN cocydamn 4
MeIbHnua KpbIkwKaMn IJIa XpaHeHn
npoeeccnoHaJIbHa
COKOBbIXMaNka
(npoOJXnTeHbHbI
pekmm pa60Tbi) ⑬ AT641
HacaKa-MopOKeHnua 14CHEF AT956A,MAJOR AT957A
CHEF AT444. MAJOR AT445
Dpywnar C CHTOM CHEF AT992A, MAJOR AT930A
Becbi ⑦ AT850B
YauHn3 HepKaBeIOuecCTaJI CHEF 36385A,MAJOR 36386A
cpykamn
KpbIuKa dJa 3aunTbI OT bpbI3r CHEF & MAJOR 34445A
H6KaB36NbaJIka 20CHEF AT501, MAJOR AT502
KpbiWka CHEF,533722,MAJOR 606397

OuNTKA I YXOD
YXoHnOuHcTka
Bcerda otKlouaTe kombHOTcTnepeo oocTkO.
Ha yctahOBoHOM aanTepe 1 npn nepbom nCnoB3ObaHN 3neKtpnpnbopa moKet noBHTbcra HEMHOro rYcToI CMA3KN.3TO HopMaJIbHOE RAJIeHHe -PiocTo ydaJIte CMA3Ky.
CINIOB06IOK,KpbIJKnHa yCTaHOBOUHbIX aanTepax
- PpOTepeTb BnAaXHo caIeKoN npocuYHtB.
Hikorda He nCnONb3yIte a6pa3NHBhIe MOIOUne cpeCTBa Hne nprykaTe erO B Body. - BbIMoTe yau pykamn NTaTeNbHO BbCyuWTe NIN BbIMoTe Yauy B nocydomoeHou MaunHe.
HnB KOem cnyae He noJIb3yIeTcB npBOIoNoHOn IeTKoM MeTALINueCKO MOaJIKo HNN OToBEnBaIOUIMM CpeDCTBaMn DnA YNCTkN HaUN N3 HEPXABeHOe cTaN. JnA yDAnEHn I3BeCtKOBOrHaNeTa IcNOJb3yIte BUNHHbYKCyc.
-ДеркнTe KxohHbI KOM6aHnB CToPoHE O T NCTOuHnKOB TeNIIa (BepXHeI NaHeJI 3JKeKTpONINITbI, 3JKeKTpOneYeMnKpOBoJHOBbIX Nee). - BbIMoTe pykamn n TuaTeNbHO BbCyuHrTe nn BBIMoTe B. NocyDmoeHNo MaunHe.
MoIte TOnbKO pykamN tuaTeNbHO npocuunBaaiTe.
npncocobnna
KpbIuKa dIa3aUITbI OT 6pbI3r
06cnykBaHne n 3a6oTa o nokyNaTeJx
- Pn noBpeKdHm Hhpy B cIeX 6e3oNaChocTn OH dONKeH 6bITb 3aMeHEn B pIeCTabNTeJIbCTBe KOMnaHm IIN B cIeuaN3npOBAHHo MaTePcKoNo peMOHTy arperatoB Kenwood.
EcnnBamHyKHa nOMOuB B:
-ПОЛБЗВАнИ ПИБОРМ ИИ
Texo6cnyKbAHn nn peMOHTe,
- 06paTntecb B Mara3HH, B KOtOpom Bbl npNo6pei npn6op.
CnpoeKtpoBaHo npa3pa6oTaHO KOMnHaHnei Kenwood, CoeHHeHoe KoponeBCTBO.
CdaNaHO B Kntae.

BAKHAR INHΦOPMAUINI NO IPIPABUNbHOY TNUJIN3AUINN3DEJINCOIJIACHO DIPKEKNTBE EC 2002/96/EC.
IIO nCTeueHn cpoKa cnJkbbln3dJIne HeJIb3a Bbl6paCbIBaTb KaK 6bIbObIe (rOpOcKne) OTOBbl.
I3dJIe nceJeT nepeDaTB CneuHaNbHbIK KOMMyHaNbHbIK nyHKT
pa3dJIbHoro c6opa OTxOIOB, MeCTHO ypeKJdeHne IIN B
IpeIprnTne, OKa3bIBaIOoee NIOObHbe Ycnyr. OTDeJIbHna
yTNIN3aIg 6bITOBxip np6obopOB NO3BOJnE TpeDtBpATNb BO3MOXHbIE
HeratNBhle nocTeCTBn DnI OKpyKaIOUe CpeDbI 3DOPOBBy,
KOTOpIM YuBeTa HeaNDkAuaaY TynlN3aIg, I No3BOJnE
BOcCTaHOBnTb MaTePnAbI, BXOJaUNe B COCTAB IN3dIin, oBeCneuHBa
3HaHTeMbHyO 3KOHOMIO 3Heprnn I pecypcoB. B KaueCTBe
HaONMHaHnO Heo6XoDMOCnT OTeJIbHO YtniN3aIuN 6blTOBbIX
np6obopBa HA IN3dJIe NHeceH 3NaK B VIne nepepeKHyTORO
MycOPHO 6aka Ha Konecax.
PEUENTbI
Heo6xOumble peKoMeHdaun no Bblneue Xne6a.
BenbXne6 (MraKoe mecmo KOHmUHeHaMaJIbHOzo muna)
HrpeDnEHTb 2,6KrObUHOn MyKIN
3TN KONHueCTBa Dn 1,3m MoIoka
CnOc06PnIroTOBJIeHIN
1 PaTOnIte MaprapnB MOnIOke N DoBeaNTe Cmecb Do TEmNepaTypb43°C.
2 Cyxne npokk: (Tnnpokke, nKOTOPOR Heo6xOIMOBOCCTaHOBJIeHHe BnaIcoOpEpaHn) DoabbTe pOJOKn I caxap BMOJOKO N OCTaBbTe Ha 10 MInHT Do NOBJIeHn NeHbl.
CbeXne ApoxxN: POKPOWNTe B Myky N Do6aBbTe caxap.
DpyrtnbI dpoxkKe: cJePyTe yKa3aHnM n3ROTOBtEnra.
3 BbIeTe MoIIOK O B EMKOCTb. DObaBbTe B36ntbIe Rnua n 2Kr MyKn.
4IpeMeuBaTe Ha MNHmAlbHoN CKOpOCTn B TeueHne 1 MNHyTbI, a 3aTEM Ha ckOpOCTn 1 B TeueHne eue 1 MNHyTbI. Cocko6nnte.
5 DoabbTe cOnb N OCTaBWeecsKaONuYeCTBO MyKn N nepeMeWaTHe Ma MNHmAbHbHOcKOPOCTN B TeChEne 1 MHyTbI, 3aTeM Ha CKOpocTn 1 eue 2-3 MNHyTbI dO nonyeHnOdHopoHn CMecn.
6 3aONHnTe TcTOM XeCTaHbIe fOpMbI dNBAInBeyeKn Ha 450r, cMa3aHHbIe KINpOM, HAnoNoBHy NIn CΦOpMyTe 6yNoUKN. 3aTe MakoPOnTe KxOHbIM NOnOTeHcEM IN OCTaBbTE B TeTIOM MeCe, NOKa TcTeO He yBeJIuHTcR B ObEme BdBOe.
7 BbIneKaIte 6amOnbI npn Tempepatye 200^ npn noJoxeHn 6' peryIaTopa dYXOBKn B TeueHne 20-25 MNHT, a bynouku -15 MNHT.
8 ToToBbI XnE6 n3daET npi NocTyKmbAHmN NO HxKHe KopoHKe 'nycToI 3ByK.
PeuenTb paCCuTaHbI np6n3nteJbHo Ha 10 6aToHOB.
Necouhoe Tecto
INHrpdeJeHNTbI
450r Mykn, npocerTb BmecTe C coIbIO
- 5Mn (1u.n.) coH
225r kupa (cmecb cBnHoro kupa n MaprapnHa, oxlaJeHHa)
- OKOJIIO 80MЛ BODJI
Ione3HbIe COBeTbI
He NepemMeuBaITe TecTo N3JIuHHe DoJIro.
cnoc6 nprirotobeneHH
1 PomeCTNe MyKy B EMKoCTb. HapeKbTe Knp KpynHbIMN Ky6nKaMn IdoaBbTe B MyKy.
23ameuBaTe Ha ckopocn 1 Do Tex np, noka Tecto He cTaHET rycbIM. OctahOBITE 3ameuBaHne Do TOrO, KaT Tecto npNo6peTET CAnBbHbI BND.
3 DobaBbTe BOy H nepMeMaTe Ha MNHmAlbHOI CKOpOCTN. OcTaHOBtE nepemeunBaHne, KAK TOIbKO BOa 6ydt NOrNoeHa TcTOM.
4 BbIneKaIte npi TemnepaType 200°C npn noJIOKeHmN '6' peryIaTopa dYXOBKn. BpemB bblneKu 3abNCIT O T haunHKn.
《naBnOBA》
INHrpEneHTbI
- 6eJIOK 3 KpyNbIX RnU
175 r caxapno npdpb
275MДВОИньСЛВОК
CBeXnE ppyKtbl, HApnPmep, MaHHa, Kny6hNka, rpeu npTybl, KNBn
CnOc06 nprirotOBneHn
1 B36ntb IyHbIe 6eKn Ha 60nbOu CKOpocTn Do COCToHn. 《BO3dyUHOCtN》.
2IpoDOnJXnTB B3bNBaHHe HaCKOpocTN 《5》,NEpHOJNuYeckn Do6aBnJaNo1 J0xke caxapHoN npdpbl. Pocne do6abJeHHn OuepeHNO J0xKn B3bntb.
3 PIOJXNTb Ha IPOITNBHeB NMC T CNIJKHOBOB 6yMaRn, 3aTeM IIOKoIpaCNOIOXNTb Ha 6yMaRe MepeHn, KOtOpBie DOJIKHbI O6pa3ObaTb KpyrIooE THe 3DO DnAmEtPOM OKIo 20 cm.
4 NomeCTnB npOTnBeHb Neyb, npeBaPnteHbHO Harpetyo Do 150°C (nonOxHeHne peryIaTopa dYXOBKn «2») i cpa3y Jx e CHN3NTb TeMnepaTyp y Do 140°C (noNoxHeHne peryIaTopa dYXOBKn «1»), npN KOtOpO BblNeKaTb npOdyKT bTeueHne 1 u. BbIKIOuHTb Neyb, Ho OCTaBnTb «NaBNOby» B neHy do ocTbBaHna.
5Korda npOyKT 6dyET rOToB,OTDeIINrB OT Hrero CnIKHObYIO 6ymary INepemecITb npOyKT Ha cepBnPOBOUHoe 6NIOo. B36NBaTb KpEm Do COCTOHNIA 一 0 3 2 D 山 U H O C T N ,NOCNE YERO NOKpbITb IM npOyKT 工 NaBIOBA" IN yKpacNTb ppykTAMN.
PEUENTbI (PPOOJIXKEHNE)
BOCXNTENbHbI WOKOJaHDhB KEK
INHrpdeJeHNTbI
225 r pa3mraHHeCnBouHoe MacNo
250
4yua
5M1(1aHnaIOKka)pactbopmoro Kope,pactbopntbB 15M1(1 CTONOBARIOKKa)rOpyeBODbl
30 MЛ (2 cToIOBbIX JOKK) MoJOKa
- 5 Mm (1 yαηнэя NOXKa) MmHdαnbHоN 3CCeHcHn
50MOIOTOROMHdA
100 rcamoOnOHNMaIOUSeiCra MyKIN
- 5 Mn (1淘汰赛 noXka) pa3pbxntenT Tecta
- 50 r Heçnwádkorokakao-nopoшka
cnoc06 npirotoBneHn
I PnroTOBnTb n3 CnNBOUHOrO MaCna I caxapHOI nyDpbI KpeM, HauAB B3bNAHHe Ha MaON CKOPoCTn I, NocTeENHo, YBeJIuYBaJ ee Do I ONyueHn JERKO IN PbIHHO CMecn. IV3BNeYb CmEcB n3 YaAIN ydaJIHTb ee co C6NBaKn.
2B3bntbraaBaaWe, BkHIOuNbMnKcepHa BbICOKO cKOPOCTN. B3bNaTb He6oNbIeMMN NOpCnMa, DoabnRy aWsy RnHyUcMecbdo nOJyuEHHoOHDopOHOH MaCCbl. BbIKIOuHTb MmKceP IN CHrTB oCTaTK TeCTa C Hacdkn.
3 CMeWaaTb pactBOpHmbl Kofo, MoIOKo MmHdaJIbHyIO 3ccEHIIO, BKJIOUHB MmKcep Ha MaIOn CKOPOCTN. Do6aBtB MoIOTb MmHdaJIb, npocerHHyIO MyKy, pa3pbIXNIteb TecTa N kakao-NopoWok. CMeuBaTb Ha MaIOn CKOPOCTN DO nOlyueHn OdHopOdHn Cmecn.
4 Pa3noKHTb Cmecb B DBe JkctTHeIe FOpMbI InBByBIneUKN KeKCa, pa3Mepom 20 cm KaJdaI, IHO KOTopbIX BbICTNaHO IpomacLeHHO macloHepponucaemoi MyarO. Pa3poBHb T Cmecb N BblKeKaTb KeKcb np1 180^ (noJoxehne peryJITopa dYxOBKn 4 ) npIMepHO B TeueHne 30 MIn., noka pni npNKoCHOBEn OHN He NaHyT «PpyKINHTb».
5 PeneBepHyTb oopMbI OxlaNTb Ha peWeTeK.
WOKOJaHHa HaunHka《MycceINH》
INHpeJeHneHTbI
275 r uHcTOrO pIHToHOrO 10KoHa, pa3nOMaHHoro Ha MeJKNe KycOuKn
225MЛДВОHBIXCINBOK
CnOcO6 npriTOBJIeHnI
PacToNtTe WOKoJaB VaIe, KOToPyIO C3ToIeJIbIO CneIyET NmecTnTB Ha KAcTpHOJIO C KINrIeIe BOIO (Ha MeDInHOM OrHe).
2Пи��罗ВИТьКРЕМ,начавсБИВАпHeMaЛоСКОРOCТИ, NOCTepeHNo,уБeЛИчИВаЯ ee,пOKA He 6удET ПONУЧЕН «ВОЗДУSHHA» CMECb.
3IocneToro,KakOkoJaPactaET,npkepatnte noOrpeBaHne qaun 6oJbwoi oKkOIO6abBte OkoJaB Kpem.
4BbINOKHTbIOKoJaHyuHaunHkyNopOBHyHaOCTbIBWne KeKCbl.
MapnHaI n3 nepueB ynn
InHpeJeHnTbI
200r(7yHcun)oxnaekdeHHoroXnKkoToMeHa(nocTaBntbHaHOyB XoJOnuNbHnK)
13eHbI nepeu Ynn(yEnb)
- 5 Mπ (1 chaHna NoXka) apaxncoboro macna c Kycockam np apxnca
- npnnpaBbl
Cnocob nprirotOBneHn
IonoXnTe Bce INHrpEnHeTb B MmHN-N3MeJbCHTeB/N3MeJbCHTeB.
2 YctaHOBNTe HacaKy Ha MmKcep N pacnPepEnTe BCE INHrpEnHTbI BOKpy HOxa.
3BKnHouInTe NmnybChbI peKIM Ha 10 cekyHd.
4PpOdyKTROTOB KynOpTe6JEnHIO.
Eληνικα
yywpiotε tη μnxavn kouζivaç tns Kenwood
Tpv xpoioptoiooetn oukeun Kenwood
YK BCTaHOBNTH HacaKy
2 BcTaHOBtB Ban HacaKn y BiDnOBiDn OTBip Do ynopy 2, a Notim nobepHtB dna pfikcaui.
3 YctaHObitb yawy ha niDcTABky,HaTNCHITb Ta nobepHITb 3a roHNHHKOBOO CTpINKOIO 3.
4 TpOwKnPiHimItb roNOBky MlKcepa, a NotIM NoBepHITb BaxInb NiIiOMy roNOBKn MlKcepa 3a RoINHHNKOBIO CTpiIKOIO onycTeB roNOBky MlKcepa Do ynpoy.
5YbIMKnHtbpnna,nepecyBaOu nperyIaTOp wBnKocTi y baxaHe noloxhen.
BnKOpNCToByIteIMnyIbChnpeXIM PHeIOBrNX IHTeHCNBHX nepemiuYBaHb.
6 Iicra 3abepeHnHpoBTo BmKHiTb npua Ta BiKnHoyitb Noro BiMepexi enekTpponocTaayHH.
3Hn HacaKy 7 NobepHiTb II Ta 3HIMtB.
Kopnci npaui
Yac Biyacy BmMkaTe MIkep Ta 3HimaTe 3aNnKn INrpeiEHTIB 3i CTIOK YAJI 3a DOnOMTOIO NOnaTKI.
-Дязиваннкрашпь ВИКОПСТОВВATNЯЦКIMHAТHOITtemпатур.
- Nepu HIX 36nBaTn YeHi 6iKn, NepeKoHaIeTecr, 10 Ha BiHnky Ta BCEpEnHi YaSi He Mae 3aInNkB Xmpy Ta YcHOrO XOBtKa.
-Дя nprirotybanna 3doBHO TicTa BnKOpncToByTe XoIoDi IHRpeJeHTN, Rkso y pecenTax He 3a3HaueHo iHaKeIe.
BaxkInbI npaDn CTocOBHO BnIkHnXli6a
ybara
Hikon He nepeBnuyTe MaKcImaJIbHnx NOKa3HKnIB, 3a3HaueHnx HnKHe, aJKe Ie MoKe Pn3BeCTN Do nepeBaHTaKeHHaMaUNHN.
KIO npnad ynoBInbHoe po6Oy, BmKHiTb NOrO, BmMItb NOOBHy Ticta Ta nepeMiawTe KoxHy nonOBHy OKPmo.
- IHRpeiEHTn nepemiuOyToBcKpaue, kkuo cnoaTuDOnaTu pinyu.
MaKcMaJIbHI NOKa3HnKn 3aBaHTaXeHHA CHEF MAJOR
KOHdntepcbki Bnpo6ni 3 nicouhoro ticra
KpyTe dpiXkOBe ticTo
- Bara 600nHa: 680 r Bara 600nHa: 910 r
- Bara 600ha: 1,36 Kr Bara 600ha: 1,5 Kr
- 3araanbHa Bara:2,18 Kr 3araanbHa Bara:2,4 Kr
- Bara 600ha: 1,3 Kr Bara 600ha: 2,6 Kr
- 3araanbHa Bara: 2,5 Kr 3araanbHa Bara: 5 Kr
3araIbHa Bara: 2,72 Kr 3araIbHa Bara: 4,55 Kr 12 16
PerynTop wBnKocti 4
36nBaHHJxHpIBi3uyKpOMnoHHaHTe 3 min (MHiMaJIbHOI WBIuKocTi) Ta NOCTyNoBO 36JIbUyIte Do max'MakcImaJIbHOI WBIuKocTi).
36nBaHHraecbdo KpeMonoiohoMacn4-max'MakcmaHa 1WBNdkiCTb).
BmuiybaHH Ticta, pkyTIB i. i. Min (miHimaIbHa WbUdkicTB) - 1
roTyBaHHyHBepcalbHoro Ticta dnyTopTIB nouHaTe 3 min (MIMAmbHOI WbUdkOCTi) i nocTynoBO 36ilbWyTe do max (MaKcImaNbHOI WbUdkOCTi).
- po3tnpaHHJXnpiB 360pOuHOM min (MIHImaNbHa WbNdkicTb) -2.
- NocTynoBO 36ilbwyIte do max'(MaKcImmaIbHa WbNkictb).
- NounHaIte 3 min' (MIMImaIbHOI WbUdKOcTi) i nocTyNOBO 36iNbWuYTe do 1.
ybara
Iiuc BnKOpncTahHr IHuNX OTBopIB y aHi He MoKyb 3hAxOHTNCb IHCPTymEn.


Nozyk Ta ycyHeHHa HeCnpabHocTei
npo6jema
BinHcyOKnN-Noi6Ha36bBaIkaTOpKaHObCgHaaI aOHe DoCTaHObDo IHpeJeHTIB,IOJNeKaTHaDHiaui.
BidpernyIOte BnCOTy 3a DonomoroTo raKOBOrO KIOUca, IO BXoNTb DO KOMIeKTy. HNKe 3a3NaHeHO, Ra CE 3po6uTn:
1 BiDknHouitb npnnaB Bd Mepekei eneKtponocTaaHHa.
2Пидимить т罗OBу MIKCEpa Ta BCTaHOBITb BiHnOCH uN 36nBaIky.
3Onyctitb roNoBky mKcepa. RaIoo Tpe6a BiDpyerIHOBatn npomixok, nHimtB roNoBky mKcepa Ta 3HIMtB hacaKy. B ideaIbHomy BnnaKy BInuOK u K-nod6ha 36NaBaKa NOBHHMaJxe TopkATncdHa aWsi
1
43a donomoro raikoboro KIOUca, 10 BXoNTb DO KOMnneKTy, BIDkpyTtB raiky 2 TAK, 106n moXHa 6yNo BIKoHATn perYIIOBaHHaBany 3. 106 onycnttu HacaKdy HxKye do nDa yaui, NOBepHiTB bAN npOTn roHHNKOBoi cTpiKN. 106n NiHrTu HacaKBy Bnue, NOBepHiTB bAN 3a roHHNKOBoi cTpiIKHO.
53akpyitbraky.
6 YctahOBiB Hacaiky Ta oncyitb roNobky Mkcepa. (Ipeepipe TII NOIOXeHHA (DnBiTcBa Bnue 3a3Haehi NyKTH).
7Повтори Te Bnue Ha3bani npoceDpyn,doKn HacaKy He 6yde BCtaHOBNeO npaBnIbHo.TiMbKn-Ho npaBnIbHe nIoXeHHaHacaKn 3HaJdeHo,3akpyTt Ta 3atrHiTaKy.
raKoNODHa HacaKa IaBbMIwYBaHnTicTa-HacaKy bI npabINbHO HanaWTOBaHO BnPObHnKOM i BOHa He notpe6ye HiaKnx peRyIIOBaHb.
npo6nema
- Mikcep 3ynnHЯeTbcn iId Yac pOboTu.
ycyhenn - Mikcep, knn Bn npd6aHn, obnadHaHn npncTroem nna 3axncTy Bi nepebaHTaxeHH. RaTpanNTbcn pepebaHTaxeHH, Mikcep 3ynHnTbCn, 06n He nookodtn npnnd. KaO ce TpaNTbcn, BIMKHT npnnd Ta BiDknIOHTB Bi Mepekei eektponocTaahnn. BImMTb qactHy IHPeDiEHTB, 06n 3meHunn HabaHTaxeHH Ta 3aNtmb Mikcep Ha deKInbKa XBnIN. 3HOBy niKnIOHTb Do mepeki enektponocTaahnn Ta o6epiNb Notpi6Hy WBNkictb. KaO mikcep He po3noue po6to yop3ny nicra YBMKHenn, 3aNilwIb Ioro ue He Deakn Yac.
MaKapOHnU ②AT910 nocTabnEbCpa3om 3 HacaIKOIO IJI npiroTyBaHH piriTi (MOxHa BCTaHOBNTu 12doaTKOBHX HacaOK Ta HacaIKy IJI npiroTyBaHH neHBA)
Oeptobn Hix ③ AT643 noCTabJIaTebC y KOMJIneKTI 3 5 6apa6aHaAMN
COKOBKIMaIIKa dIg ppykTIB ④ AT644
6araToOpyHKUioHaBn ⑤AT950A NoCTaBnEbCpa3OM i3 pewiTkAmn DnI dpiHoro, noDpi6HOBauchepedhboro Ta rpyboro pybaHHra, 3 MaIO TO Ta BeNkoIO npuiHmHn HacaKaMn DnRA KOBacn Ta HacaKoHO nI npiroTOBaHHN «Ke6e»
6araToOpyHKioHaJIbHn ⑥AT955 NOCTaBnIeTbcra pa3om i3 peuITkAmn IJn Api6HorO, noDpi6HOBaU cepedHbOro Ta rpy6oro pybaHH, 3 MAnIO To BENKOIO npuiHmHn HacaKAMn IJn KO6acn Ta HacaKoHO Jn npiroTOBaHH «Ke6e»
noDpiHOBaJdJIa3epHOBux ⑦AT941A
Hacadka nnn o6p06Kn ⑧AT647 BKNIOue 6 p3aIbHnx DnCKIB Ta HIX npoDyKtIB
TeptKa AT340 BkIIOUae 7 pIaIbHINn DnCKIB
COKOBKIMaIIKa dIAT312
CNTpycoBnx
COKOBKIMMaKa 1,5 n akpnn AT337,1,6 n, TepMoCTiKe CKNo AT358, 1,5 n HEPXABIOHcTaNb AT339
MIHIOp6HOBa/ ②AT320A NOCTABNIEETbC8 34CKJHIMNu yaWAMn Ta 4 KPNKAMn dIy nOdp6HOBa 36epirAH
COKOBKIMaJIka AT641
6e3nepepbHoi dii
HacaKa dIpaI npIROTyBaHHa 14CHEF AT956A, MAJOR AT957AMopo3HbA
KapToJIeUncTka ⑤CHEF AT444, MAJOR AT445
Дршлк Ta CITO 16CHEF AT992A, MAJOR AT930A BarN 17 AT850B
Yaui 3 H/K CTani CHEF 36385A, MAJOR 36386A 3 pyuKaMn
Kpnska dnn 3axncty CHF & MAJOR 34445A BiD 6pn3ok
THyUka 36BnBaNka 20 CHEF AT501, MAJOR AT502
Kpnska CHEF 533722, MAJOR 606397

Dorraj Ta uHueHHa
Dorla Ta YuueHHA
3aBmBnMkaTe npnaT Ta BiKIOuAte Noro Bi eNekTpomepeki nepe, HUeHHrM.
-Пдчспршугынннннннннннннннннннннннннннннннннннннннннннннннннннннннннн
3'ЯВNTNCR TPOXN MaCTnna. Lc -HOPMaJIbHe RaBnIe. IpOcTo IpoTpiTb.
6IOK eNeKToPDnBryHa, KPNiUKN OTBOPIB
- PpotpiB BONORO rAHHpKOHO, NOIM pocwyTb.
Hikon He BnKopncToByTe a6pa3NBHi MaTepiAIn He onyckai Te npnaD y BOdy. - POMNIte pykamn, nOIM peTeIbHO npocuWITb aBO nOMNIte y nocydomnHi MaunHi.
Hikon He BnKOpncTOByte DpoTMy cyIky, MeTanEBn BixOt b60 BiD6BIOBaBnH 3ac6Ig NmUeHHaWl i3 HepXabiooYcTani. Iy BnDaJeHH HaBoTy BnKOpncTOByte OcET. - He BCTaHOBJIIOte npnIad nopIaI3 IzJkepeIamN TeIJa (KOHΦOpKaMn PIIITN, eNEKTPoneayAMN, MIKPOXBUNBoBMN NeaAMN).
- POMnTe pykam, nOtim peTeIbHO npocuWitb a6o nomnTe y nocydomnHi MaunHi.
- POMnTe pykam, a not im peTebHo npocuyiTb.
06cnyroByBaHH Ta peMOHT
-ПошкдженишуржИВLEнги3metoI6e3neKINiДЯгсЗamHHa NiInpnemCTbaxфipMKNENWOODa60BaBTOpN3OBaHOMCyepBicHOMy ceHTpi KENWOOD.
KaBAM Heo6xHa KOHcybTaiz3 npBOy:
BVKOpNCTaHHn pnpnay a6o
- 06cnyroByBaHH, npu6aHH3aNaCHNX DeTaleA6o peMOHTy,
3BepHtbcyaMaraaHy,BRAKOMyBnPnpdAnuce npnaad.
CnpoeKToBaHO Ta po3po6JeHo KOMpaHicIO Kenwood, O6'edHaHe KoponibCTBO.
3po6neHO B Krtai.
BAJKIBA IHOPMAIIGCTOCOBHO HALEKHOYTNJI3AUII IPODYKTY 3IINHO 13 INPEKTOBOIO EC 2002/96/EC.
Iicra 3akHcHHe TepmiHy ecnnnyatauii He BnndaTe ue npnaad 3 iHmni NobTyOBmN BiXoamn.
BIDHecit npnlaDIO mcieBoro cneuaIbHoro aTOpnsObaHoro ceHTpy 3bnpaHHaixoIB a60do DNepa, knn MoKe Haatu TaKocnyr. BiOKpemHea ytni3aui noByTOBnx npnaIb D03BOJRE yNkHyTN MOKNBHX HeratNBHX HACNIKB IN RaHbKOINHbO rceOboNuTa Ta 3dopoB' IIOHN, Aki BUNKaIOY pa3I HenpabINbHOI ytni3aui, a TAKOX HAae MOnKnBicTB nepepoBtMATEpiAn, 3 Kx6yNo BnroTOBHeHO daHn npnaI, 10, B CBOIO UeRpy, 36epiraE eHepriTo Ta iHwi BaKInBi pecypcn. Ipo Heo6xidnicb BiokpemNeoi ytni3aui noboyTOBx npnadib Hara dyCneuaIbHa No3NaKa Ha npodykti y Bnrrndi nepeKpceneHOcMTNky Ha KOlecax.
peCNTn
Baxnbi npaeni cstocobHO BNiikannxli6a.
Binn xni6 pide micmo KOhmueHmabhnoe mny
IHRpeiEHTN
2,6 Kr (5 ΦyntiB 12 yHci) 3BnuaHoro 60pouHa
Ua KjIbKicTb po3paxoBaHa dna
1,3π(214nHtN)MOKα
moden KM600,800 Ta 810.
300r(10yhuui)uKypr
Дпmaодener KM300,400 ta
450r(1ΦyHT)MaprapnHy
410 3meHwTe KjIbKicTh Habnin
100r(4yHui)cbixnXdpjKxibao50r(2yHui)cynxipkxdiB
TaDoaBaiTeOppa3yBCIO
6reub,3bntn
Heo6xidyHy kInbKicTb 60poWHa
- 5 üjinok coji
PnroTuBaHHa 1 Po3ToNtB MaprapHm y MoLoCi Ta nirpiTe cyMiu Do 43^ (110^)
2 cyxipixk (TIN dpixkXIB, kI Heo6xIDHO po36aBNTn Do NOTpio HO KOHCNCTeHii): noklaitb dpixkTa Tu yKOp B MONOKIO 3aIIuItb np6ln3HO Ha 10 XBNH, DOKN He 3'ABNTcR niHa.
cbixipixk: nokpiitb y bopouho Ta daaTe uykop.
iHti Tnn DpiKxiv: BnKOHyTe IcHtpykuBnPo6nHa.
3 Hanne Me Monokoyauy. DoadTe 36nti rna Ta 2 Kr (4 yHTn 6 yHui) bopooha.
4 Nepemiiata He Ma HImaIbHi WbNkocTi npTcrom 1 XbHnH, Notim Ha WbNkocti 1 npTcrom 3e Ondie XbHnH. 3HIMtB ticTo 3i CTiHK aHI.
5 DoaTe YacTHy 60poUHa, 3aJIuINIacrTa nepeMiuaTe Ha MinImaJIbHi WbNdkOcTi npTARom 1 XBUNHn, noTIM Ha wBnDkoCTi 1 npoTARom 2-3XBUNH, DOKn He OTpIMaTe OndOpHpy, rnaKcy cyMI.
6 HanobHbIte KeiIbKa 3Mauehenx JnPOM fOpM IaBnIkaHH Ha 450 r (1 FyHT) Do nOIOBHN, afo cFopMyTe 6yNoUKN. Picra bTOrO HAKPNTE IX KXYOHHM pyuHkOM Ta noCTaTe y Tnenne Micse, o6o 6TcTa 36InbunBCB Bdvi.
7 Bünika Te npn Temnepatypi 200°C/400°F/nonoxeHH 6 perynatopy dxyobkn npotraom 20-25 xunun dn yuzomoeHH 6amohie, afo 15 xunun dn yunikannh 6bnook.
8TOTOBINxIbHadae npnNoctkyBaHHi no HxHki CkOpHci «Nopoxhni 3ByK».
- Peuert po3paxoBamn Ha 10 6aToHb.
KoHntepcbki Bnp6n 13 nicoohoro Ticta
inrrpeieHTn
450r(1fhynt)6bopo7Ha,npociatn i3 ciinio
- 5 MЛ (1淘汰HA IOXka) coJI
225r(8yHui)Kny(3muaaTe oxoJooKeHe caNo Ta MaprapnH)
- Pnp6n3HO 80 Mm (4 CTOIOBnx IOKKIN) BOIN
He nepemiuye Te 3aHaTDoBRO.
PnroTyBaHn 1 Hacnte 60poHo y aay. HapixTe Knp BEmKmN Ky6nKaMn Ta doaAnTe y 60puHo.
2 Nepemiyte Ha wBnKocti 1,doKHe OtpmaeTe cymiu, zo HaraNyex XnibH Kpnukn. PnnHtbpneMiyBaHHraTbKn Ticto Habye "caIbHorO" BnIydy.
3ДоанTe BODI Ta nepeMiwaIte Ha MINImaIbHIN WBNKocTi. 3ynHnTb npOec,ЯK TiNbKN TICTo B6epe Body.
4 BvnikaTe npn 200°C/400°F/nonoxeHHg 6 perynrTopy dYxOBKn, 3anekHo BiD HANOBHIOBAHa.
Topr《NabnoBa》
inrrpeiHTn
3 6iKn, yin noBHHi 6yTN BeNko ro po3mipy
175r(6yHui)UkyKpoBoi npDpi
275 m (10 piiknx yhui) noDbiHnX Bepkib
Cbxki ppykTN, Hanpknad, Manna, Nonynua, BnHORpa, Kibi
PnroTyBaHH
136nBaTe YeuHi 6iKn Ha BnCKoK iBnDkoCTi, DOKn He OTrpMaTe CTiKy niHy.
2YbIMKnHbpeKm36BaHHBnHcKOMHaWbNkOcTi5,ncTynoBOdoaouyKOp no OdHi cTOnOBi NoKu. Picn KOKHO DoaBaHHpeTeNbHo 36BaHte.
3 TocteniHa nCT dna Bnikannx xapOBn neprameH, notim 3a donomoroHO loKKn cfoopmyTe i cymi ki kpy np6n3Ho 20 cm/8" y diametpi.
4 NocTaBte InCT dIy BnikaiHH y dyxOBky nonepeHbO nidiRipity do 150^ / 300^ / noioxeHH 2 pernyTopy dyxOBKn, a nicra zboro HeaHo 3MeHHTb TemnepaTpy do 140^ / 275^ / noioxeHH 1 pernyTopy dyxOBKn Ta BnikaiTe npotrrom 1 roDHH. BmKHiTb dyxOBky, ane 3aJIuWitb Top T BCEpeHHi Do nobHoro oxJIOdXeHH.
5 BntTnHb TOpT, 3HIMITb XapOBN nePrameHT Ta nOKnAdITb Ha 6IIOdo. 36NIte BepKuN Do OTpMaHHa CInKOi NiH, 3MaxTe BepXHiN WaP Ta npNKpaCTe FpykTaMn.
peCNTn npodOxKeHHa
YapibHn WokOJaIaHn TopT
inrpeiHTn
225r(8yHuiM'KoroMacna
250r(9yHui)uykpOBoInydpn
4y
5 Mn (1 yaHa noKka) po3HHoI KabN, po3HHHTy 15 Mn (1 cTOnobi noKji) rapHoi BOIN
30 MЛ (2 CTOJIOBI JIOXKN) MOJIOKA
5M1(1yaHaNoXka)MnDaJIeBOI eceHui
- 50 r (2 yhüi) noŋpi6HeHx ropiXb Mmrdanio
100r(4yhui)6oopoHaIpaOnyeHH
- 5 MЛ (1 санна loжka) po3nyuWbau
- 50 r (2 yučij) Heconoško rok kakaо-nopouka
PnroTyBaHH
36BauTe MaCNo Ta uKOp Ha Hn3bki WbNdkocTi, NoCTynoBO 36InbSyuOuYi, DOKn He OTPMaTe Ierky KpemOnDiHy cyMiU. 3HIMtB 3aNNuKn cyMiU 3i CTiHOK uAusi Ta KOMNOHeHTIB 36BauKn.
236nTe RaCyB OKpemni Nocydi, a Notim NiD cac po60TN Mkcepa NoCTynoBO DoaBaAte cyMiTa peteIbHo nepeMluyTe. Yac BiD Yacy BmNkaTe npnaT Ta 3HimaTe 3aIIuKn IrPeJeHtB 3i CTIOH Kaui.
3Ha Hn3bkj WbNdkocTi DoaIte po3uHHy KaBy, MoNOKo Ta MmrdaneBy eceHIO. Nicna 1bOro IdoaiTe NoDpi6HeHm Mmrdanb, Ipociahe BopouHo, P03nyuBav Ta KaKao-nOpOwok. PeTebHo nepemiuaIte do OTPMAMHr OndhopidHOi Macn, yBIMKHyBUn Hn3bKy WbNdkicTb.
4 P03dInHb cymiu Ha dBi yacTnHa Ta HanOBHt bDi fOpM nIa BnIKaHHa 20 cm/8", BCEpeHHI kNIX Tpe6a NoCTeHTN 3Mauehen KINPOM KINPO-CTIKN nanip. Po3pIBHnTe BepxIBKn Ta BnIKaIte np1 180^ / 350^ / nO oKeHHa 4 peryIaTOpy dYXOBKn npOTARom np6bn3HO 30 XBnnH, DOKI TiCTo He cTaHe npyKHM.
5 BnmiTb, noknaiTb Ha rpaTacTy niCTaBky Ta 3aIIMTe OxonoHyTN.
HANOBHIOBau i3 wokonadHoro Mycy
iHrpdeiEHTN
275r(10yHui)3BnauHoro WOKoJaIy,po3noJINITb Ha MMaTOUKN
225 Ml (8 piiknx yHui) IOBbIMHX BepkIB
PnroTyBaHH
I Po3toniB wokolad. Ia nIbO rno knaIIT b Ioro y nocdyHy i nocTaBte II y kactpynIO Ha napoBy 6aHIO.
2 36nTe BepKn, noHnauOu n3 Hn3bKOi WBNkocTi NocTyNOBO 36IbWuyou nI, DOKn He OTpMaTe CTiKy niHy.
3KoNt wokonad po3TaHe, 3HIMITb NocyDnHy 3 BOrHIO Ta 3a DOnOMorHO JoxKn nepemiaute Do OTPMaHH KpeMonOio6HoI cymiu.
4 P03noDInnTb 10KoJaHm HAnOBHObaMIX OxOJIOKeHMM KOpXaMn.
Mapnad 3 nepuB yinl
IHRpeiHTN
200r7yHuiXoIoNHO ro pikkoRMeMy (nocTabHTNa HHiD oXoIoNlbHnky)
13eHnnepecbyini(iinn)
- 5 Mn (1 GaHa loXka) apaxicOBoro Macna 3i WMaTOckamr ropixIB
- PnncMaKIn
PnroTyBaHH
I Poknaditb yci ihrpeiEHTno mHi-nOpip6HOBaHa/nOpip6HOBaHa
2 YctaHObitb Hacaiky Ha mIKcep Ta po3nOdiNt iHrpeiEHTn HabKono Jea3.
3YBIMKHTbIMnybChnpeXmHa10ceKyHd.
4PpOdyKT rTOBmD0 BKNBaHHa
$$ \begin{array}{l} \begin{array}{r l} & {\frac {1}{2} \int_ {0} ^ {1} \frac {1}{x} \frac {1}{(1 + x) ^ {2}} \frac {1}{(1 + x) ^ {3}} \frac {1}{(1 + x) ^ {4}} \frac {1}{(1 + x) ^ {5}} \frac {1}{(1 + x) ^ {6}} \frac {1}{(1 + x) ^ {7}} \frac {1}{(1 + x) ^ {8}} \frac {1}{(1 + x) ^ {9}} \frac {1}{(1 + x) ^ {1 0}}} \ & {\frac {1}{2} \int_ {0} ^ {1} \frac {1}{(1 + x) ^ {2}} \frac {1}{(1 + x) ^ {3}} \frac {1}{(1 + x) ^ {4}} \frac {1}{(1 + x) ^ {5}} \frac {1}{(1 + x) ^ {6}} \frac {1}{(1 + x) ^ {7}} \frac {1}{(1 + x) ^ {8}}} \ & {\dots} \ & {\quad \dots} \ & {\quad \dots} \ & {\quad \dots} \ & {\quad \dots} \ & {\quad \dots} \ & {\quad \dots} \ & {\quad \dots} \ & {\quad \dots} \ & {\quad \dots} \ & {\quad \dots} \ & {\quad \dots} \ & {\quad \dots} \ & {\quad \dots} \ & {\quad \dots} \ & {\quad \dots .} \end{array} \ \begin{array}{r l} & 3 \mathrm {I r} ^ {2} \mathrm {S} ^ {2} \mathrm {S} ^ {2} \mathrm {S} ^ {2} \mathrm {S} ^ {2} \mathrm {S} ^ {2} \mathrm {S} ^ {2} \mathrm {S} ^ {2} \mathrm {S} ^ {2} \mathrm {S} ^ {2} \mathrm {S} ^ {2} \mathrm {S} ^ {2} \mathrm {S ^ {2}} \mathrm {S} ^ {2} \mathrm {S} ^ {2} \mathrm {S} ^ {2} \mathrm {S} ^ {2} \mathrm {S} ^ {2} \mathrm {S} ^ {2} \mathrm {S} ^ {2} \mathrm {S} ^ {2} \mathrm {S} ^ {2} \mathrm {S} ^ {2} \mathrm {S} ^ {2} \ & \quad \quad \quad \quad \quad \quad \quad \quad \quad \quad \quad \quad \quad \quad \quad \quad \quad \quad \quad \quad \quad \quad \quad \quad \quad \quad \quad \quad \quad \quad \quad \quad \quad \quad \quad \quad \quad \quad \quad \quad \quad \quad \quad \quad \quad \quad \quad \quad \quad \quad \mathrm {I r} ^ {2} \mathrm {I r} ^ {2} \mathrm {I r} ^ {2} \mathrm {I r} ^ {2} \ & 4 0 0 0 0 0 0 0 0 0 0 0 0 0 0 0 0 0 0 0 0 0 0 0 0 0 0 0 0 0 0 0 0 0 0 0 0 0 0 0 0 0 0 0 0 0 0 0 0 0 0 1 1 1 1 1 1 1 1 1 1 1 1 1 1 1 1 1 1 1 1 1 1 1 1 1 1 1 1 1 1 1 1 1 1 1 1 1 1 1 1 1 1 1 1 1 1 1 1 1 1 3. \ & \quad \quad \quad \quad \quad \quad \quad \quad \quad \quad \quad \quad \quad \quad \quad \quad \quad \quad \quad \quad \quad \quad \quad \quad \quad \quad \quad \quad \quad \quad \quad \quad \quad \quad \quad \quad \quad \quad \quad \quad \quad \quad \quad \quad \quad \quad \quad \quad \mathrm S I R S I R S I R S I R S I R S I R S I R S I R S I R S I R S I R S I R S I R S I R S I R S I R S I R S I R S I R S I R S I R S I R S I R S I R S I R S I R S I R S I R S I R S I R S I R S I R S I R S I R S L E P T O F A C T O N T H M A T H M A T H M A T H M A T H M A T H M A T H M A T H M A T H M A T H M A T H M A T H M A T H M A T H M A T H M A T H M A T H M A T H M A T H M A T H M A T H M A T H M A T H M A T H M A T H M A T H M a t h m a t h m a t h m a t h m a t h m a t h m a t h m a t h m a t h m a t h m a t h m a t h m a t h m a t h m a t h m a t h m a t h m a t h m a t h m a t h m a t h m a t h m a t h m a t h m a t h m a t h s i g n e d o f f o r m e d o f f o r m e d o f f o r m e d o f f o r m e d o f f o r m e d o f f o r m e d o f f o r m e d o f f o r m e d o f f o r m e d o f f o r m e d o f f o r m e d o f f o r m e d o f f o r m e d o F O F F F F F F F F F F F F F F F F F F F F F F F F F F F F F F F F F F F F F F F F F F F F F F F F F F F F F F F F F F F F F F F F F F F F F F F F F F F F F F F F F F F F F F F F F F F F F F F F F F F F E E E E E E E E E E E E E E E E E E E E E E E E E E E E E E E E E E E E E E E E E E E E E E E E E E E E E E E E E E E E E E E E E E E E E E E E E E E E E E E E E E E E E E E E E E E E E E E E E E E E D O D O D O D O D O D O D O D O D O D O D O D O D O D O D O D O D O D O D O D O D O D O D O D O D O D O D O D O D O D O D O D O D O D O D O D O D O D O D O D O D O D O D O D O D O D O D O D O D O D O D D O D O D O D O D O D O D O D O D O D O D O D O D O D O D O D O D O D O D O D O D O D O D O D O D O D O D O D O D O D O D O D O D O D O D O D O D O D O D O D O D O D O D O D O D O D O D O D O D O D Q G G G G G G G G G G G G G G G G G G G G G G G G G G G G G G G G G G G G G G G G G G G G G G G G G G G G G G G G G G G G G G G G G G G G G G G G G G G G G G G G G G G G G G G G G G G G G G G G G G G G C C C C C C C C C C C C C C C C C C C C C C C C C C C C C C C C C C C C C C C C C C C C C C C C C C C C C C C C C C C C C C C C C C C C C C C C C C C C C C C C C C C C C C C C C C C C C C C C C C C C c c c c c c c c c c c c c c c c c c c c c c c c c c c c c c c c c c c c c c c c c c c c c c c c c c c c c c c c c c c c c c c c c c c c c c c c c c c c c c c c c c c c c c c c c c c c c c c c c c c c . d e p t h e s i g n a l y i n g s i n g s i n g s i n g s i n g s i n g s i n g s i n g s i n g s i n g s i n g s i n g s i n g s i n g s i n g s i n g s i n g s i n g s i n g s i n g s i n g s i n g s i n g s i n g s i n g s i n gs i n g s i n g s i n g s i n g s i n g s i n g s i n g s i n g s i n g s i n g s i n g s i n g s i n g s i n g s i n g s i n g s i n g s i n g s i n g s i n g s i n g s i n g s i n g s i n g s i n g \ \begin{array}{l} {0. 5 \pi^ {2} \int_ {0} ^ {\infty} \frac {1}{x ^ {2}} \int_ {0} ^ {\infty} \frac {1}{y ^ {2}} \int_ {0} ^ {\infty} \frac {1}{z ^ {2}} \int_ {0} ^ {\infty} \frac {1}{w ^ {2}} d x d y d z} \ {\quad \cdot \int_ {0} ^ {\infty} \frac {1}{x ^ {2}} \int_ {0} ^ {\infty} \frac {1}{y ^ {2}} \int_ {0} ^ {\infty} \frac {1}{z ^ {2}} \int_ {0} ^ {\infty} \frac {1}{w ^ {2}} d x d y d z} \ {\quad \cdot \int_ {\pi / 2} ^ {\pi / 3} \frac {1}{x ^ {2}} \int_ {\pi / 3} ^ {\pi / 4} \frac {1}{y ^ {2}} \int_ {\pi / 3} ^ {\pi / 4} \frac {1}{z ^ {2}} \int_ {\pi / 3} ^ {\pi / 4} \frac {1}{w ^ {2}} d x d y d z} \ {3. 1 5 \pi^ {2} \int_ {0} ^ {\infty} \frac {1}{x ^ {2}} \int_ {0} ^ {\infty} \frac {1}{y ^ {2}} \int_ {0} ^ {\infty} \frac {1}{z ^ {2}} \int_ {0} ^ {\infty} \frac {1}{w ^ {2}} d x d y d z} & {\cdot \int_ {\pi / 2} ^ {\pi / 3} \frac {1}{x ^ {2}} \int_ {\pi / 3} ^ {\pi / 4} \frac {1}{y ^ {2}} \int_ {\pi / 3} ^ {\pi / 4} \frac {1}{z ^ {2}} \int_ {\pi / 3} ^ {\pi / 4} \frac {1 7}{w ^ {2}} d x d y d z} \ {\quad 6. 1 5 \pi^ {2} \int_ {0} ^ {\infty} \frac {1}{x ^ {2}} \int_ {0} ^ {\infty} \frac {1}{y ^ {2}} \int_ {0} ^ {\infty} \frac {1}{z ^ {2}} \int_ {0} ^ {\infty} \frac {1}{w ^ {2}} d x d y} & \cdot \int_ {\pi / 2} ^ {\pi / 3} \frac {1}{x ^ {2}} \int_ {\pi / 3} ^ {\pi / 4} \frac {1}{y ^ {2}} \int_ {\pi / 3} ^ {\pi / 4} \frac {1}{z ^ {2}} \int_ {\pi / 3} ^ {\pi / 4} \left[ r + 2 \right] _ - 1, - 1, - 1, - 1, - 1, - 1, - 1, - 1, - 1, - 1, - 1, - 1, - 1, - 1, - 1, - 1, - 1, - 1, - 1, - 1, - 1, - 1, - 1, - 1, - 1, - 1, + 2 ] _ - 1, - 1, - 1, - 1, - 1, - 1, - 1, - 1, - 1, - 1, - 1, - 1, - 1, - 1, - 1, - 1, - 1, - 1, - 1, - 1, - 1, - 1, - 1, - 1, - 2 ] _ {- 1, - 1, - 1, - 1, - 1, - 1, - 1, - 1, - 1, - 1, - 1, - 1, - 1, - 1, - 1, - 1, - 1, - 1, - 1, - 2 ] _ {- 1, - 1, - 1, - 1, - 1},} \ {\quad A. (r e s e c t i o n) [ r e s e c t i o n ] [ r e s e c t i o n ] [ r e s e c t i o n ] [ r e s e c t i o n ] [ r e s e c t i o n ] [ r e s e c t i o n ] [ r e s e c t i o n ] [ r e s e c t i o n ] [ r e s e c t i o n ] [ r e s e c t i o n ] ] [ r e s e c t i o n ] [ r e s e c t i o n ] [ r e s e c t i o n ] [ r e s e c t i o n ] [ r e s e c t i o n ] [ r e s e c t i o n ] [ r e s e c t i o n ] [ r e s e c t i o n ] [ r e s e c t i o n ],} \ {\quad S = S _ {0} + S _ {2}, S _ {0}, S _ {2}, S _ {0}, S _ {2}, S _ {0}, S _ {2}, S _ {0}, S _ {2}, S _ {0}, S _ {2}, S _ {0}, S _ {2}, S _ {0}, S _ {2}, S _ {0}, S _ {2}, S _ {0}, S _ {2}, S _ {0}, S _ {2}, S _ {0}.} \end{array} \ \begin{array}{r l} & {\mathrm {A l} \mathrm {I} _ {2} \mathrm {I} _ {3} \mathrm {I} _ {4} \mathrm {I} _ {5} \mathrm {I} _ {6} \mathrm {I} _ {7} \mathrm {I} _ {8} \mathrm {I} _ {9} \mathrm {I} _ {1 0} \mathrm {I} _ {1 1} \mathrm {I} _ {1 2} \mathrm {I} _ {1 3} \mathrm {I} _ {1 4} \mathrm {I} _ {1 5} \mathrm {I} _ {1 6} \mathrm {I} _ {1 7} \mathrm {I} _ {1 8}} \ & {\mathrm {I I I I I I I I I I I I I I I I I I I I I I I I I I I I I I I I I I I I I I I I I I I I I I I I I I I I I I I I I I I I I I}} \ & {\mathrm {I O E E E E E E E E E E E E E E E E E E E E E E E E E E E E E E E E E E E E E E E E E E E E E E E E E E E E E E E E E E E E E E E E E E E E E E E E E E E}} \ & {\bullet \mathrm {O O D F D F D F D F D F D F D F D F D F D F D F D F D F D F D F D F D F D F D F D F D F D F D F D F D F D F D F D F D F D F D F D F D F D F D F D F D F D F D F D F D F D F D F D F D F D F D F D F D F D F D}} \ & {\bullet \mathrm {O O T (I O A B S O R C S) O M M O S S O R C S}} \ & {\bullet \mathrm {O O T (I O A B S O R C S) O M M O S S O R C S}} \ & {\bullet \mathrm {O O T (I O A B S O R C S) O M M O S S O R C S}} \ & {\bullet \mathrm {O O T (I O A B S O R C S) O M M O S S O R C S}} \ & \bullet \mathrm {O O T (I O A B S O R C S) O M M O S S O R C S} \ & {\bullet \mathrm {O O T (I O A B S O R C S) O M M O S S O R C S}} \ & {\bullet \mathrm {O O T (I O A B S O R C S) O M M O S S O R C S}} \ & \bullet \mathrm {(I)} ^ {\prime} \mathrm {I} ^ {\prime} \mathrm {I} ^ {\prime} \mathrm {I} ^ {\prime} \mathrm {I} ^ {\prime} \mathrm {I} ^ {\prime} \mathrm {I} ^ {\prime} \mathrm {I} ^ {\prime} \mathrm {I} ^ {\prime} \mathrm {I} ^ {\prime} \mathrm {I} ^ {\prime} \mathrm {I} ^ {\prime} \mathrm {I} \end{array} \ \cos \theta = 1 \ \end{array} $$


0.02^1 - 1 - 1 - 1 - 1 - 1 - 1 - 1 - 1 - 1 - 1 - 1 - 1 - 1 - 1 - 1 - 1 - 1 - 1 - 1 - 1 - 1 - 1 - 1 - 1 - 1 - 1 - 1 - 1 - 1 - 1 - 1 - 1 - 1 - 0
1
15
.0AOTO7=18°:3+20000111000000000000000000000000000000000000000000
= 10^ ( 40^ OS ) 2^
1
1
x0 = - 12 y0 = - 14
1
1
11
110
1111111111111111111111111
106E 183966666663/962002
eepnne ennnnne nnnnne ennnnne ennnnne ennnnne ennnnne
poomuey
1
1
( 1 + u) + ·s + ( 1 + z) + ( 1 + 1) < 98 + 11 + 12 + ·s + 109 + 109 + 109 + 109 + ·s + 109 + 109 + ·s + 109 + 109 + ·s + 109 + 109 + ·s + 109 + 109 + ·s + 102 + ·s + 102 + ·s + 102 + ·s + 102 + ·s + 102 + ·s + 102 + ·s + 102 + ·s + 102
1
DOOMNEX
13 × 12 = 45
100000000000
075 155 6
18 × 5 = ② P_ AOB = 1 + ( 32) ^2 = 3 , 18 × 9 = ③ = 12 - 1 = 1
-1043 111
1000 100000000000000000000000000000
11 × 21
- 1
11111111 1
OMT
- 1
1
1
| 98 - 1| = 65 - 103
1
m'o o00000000000000000000000000000000000000000000000
100

1
·
15
- 1
( n - q1^2 - q2^2 - q3^2) x - 2q1x^2 = ( n - q1( nx - yq1) ) x - 2q_2x^2
3| r - c| = | r1 + r2| = | _1 - |
Sn = na1 + ( n - 1) 2 + ( n - 2) 2 + ·s + ( n - 1) 2 + ( n - 3) 2
1
2( 10^210^310 + 10^2210) ( 10^210^3210)
( 1,2,·s ,197) ( 198,·s ,199)
1^2 + 12 + 13 + ·s + 1n + 1 + 1n + 2 + ·s + 1n + n
11
| x - 2| = 1| x| .| r1^2 + r2^2 + r_3^2| = 1| x| | r| ^2
12018 新课标1卷16题 105
112
111
1
1
1 1
11007 11007 11007 11007 11007
A
00000181919191919191919191919191919191919191919191919191919191919191919191919
()
( 0,12 ) ± 1
1107 1
11111111111111111111111111111111
15^ 8^ C^ :
3nmmnnn2nnnnnnnnnnnnnnnnnnnnnnnnnnnnnnnnnnnnnnnnnnnnnnnnnnnnnnnnnnnnnnnnnnnnnnnnnnnnnnnnnnnn
1
11
1 1
110 + 1 = 16
111 111 111 111 111 111 111 111 11
- 1
1
1·s 2·s 7 18.97-61 < r <
1
111 1
11
m 1
1
- 1864 xue
1
111 2
IMO2019 x^2 - 5y^2 = 4
STRE 100
( 0,12) ± 1 . 若 x > - 1 ,则由 f( x) = - x^2 + x + 1 可知 f( 1) = - x^2 + x + 1 > 0
| - | = 1| | · 1| | ·
Sete 11reE 11nree - om nre: Lai S-od om nre: o
IMO2019 The must meet ( 1,2,3,4) ,or else
HON
15 × 20
1
111
2012 113
1
217 1000000000000000000000000000000
11000000000000000000000000000000000
ai Q. = P( 1 + i = 0^maik j = 1^ic_i^j( kp) ^j - 1)
- | x - 2| = 52 - | x + 3| = 112 .
1
011111111111111111111111111111111
111111111111111111111111
1111111111111111111111111111
Kr12196A11008 1Rc
( xt^2 + x) ( xt^2 + x) = - ( xt^2 + x) ^2 + ( xt^2 + x) ^2
15 1
A
HEAD OFFICE: Kenwood Limited, 1-3 Kenwood Business Park, New Lane, Havant, Hampshire PO9 2NH
kenwoodworld.com