
kMix BL700 - Blender KENWOOD - Free user manual and instructions
Find the device manual for free kMix BL700 KENWOOD in PDF.


| Product Type | Blender |
| Brand | Kenwood |
| Model | kMix BL700 |
| Jug Capacity | 1.5 liters |
| Jug Material | Glass |
| Motor Power | 700 watts |
| Speed Settings | 2 speeds + pulse |
| Blade Material | Stainless steel |
| Base Material | Die-cast metal |
| Dimensions (H x W x D) | Approx. 40 x 20 x 25 cm |
| Weight | Approx. 4.5 kg |
| Power Supply | 220-240 V, 50-60 Hz |
| Main Functions | Blending, mixing, pureeing, crushing ice, making smoothies |
| Care & Cleaning | Detachable jug and lid are dishwasher safe; wipe base with damp cloth |
| Safety Features | Safety lock system; non-slip feet; overload protection |
| Spare Parts & Repairability | Spare jug, lid, and blade assembly available; designed for easy disassembly |
| Warranty | 2 years (depending on region) |
| Color Options | Various (e.g., red, white, cream) |
Frequently Asked Questions - kMix BL700 KENWOOD
User questions about kMix BL700 KENWOOD
0 question about this device. Answer the ones you know or ask your own.
Ask a new question about this device
Download the instructions for your Blender in PDF format for free! Find your manual kMix BL700 - KENWOOD and take your electronic device back in hand. On this page are published all the documents necessary for the use of your device. kMix BL700 by KENWOOD.
USER MANUAL kMix BL700 KENWOOD


natural_image
Line drawing of a device with a conical lid and internal granular material, showing a step-down from top to bottom (no text or symbols)Use your blender for soups, drinks, pâtés, mayonnaise, breadcrumbs, biscuit crumbs, chopping nuts and crushing ice. Use your mill (if supplied) for milling herbs, nuts, coffee beans and purées.
before using your Kenwood appliance
- Read these instructions carefully and retain for future reference.
- Remove all packaging and any labels.
- Wash the parts: see 'care and cleaning'.
safety

IMPORTANT: HOT BLENDING INSTRUCTIONS
To minimise the possibility of scalding when blending hot ingredients keep hands and other exposed skin away from the lid to prevent possible burns. The following precautions must be observed:
- CAUTION: Blending very hot liquids may result in hot liquid and steam being forced suddenly past the lid or filler cap ①.
- We recommend that hot liquids are allowed to cool before blending.
- NEVER exceed 1200ml / 5 cups capacity if processing hot liquids, such as soups (refer to the markings on the goblet).
- ALWAYS commence blending at a low speed and gradually increase the speed. NEVER blend hot liquids by using the Pulse setting.
- Liquids which tend to foam such as milk, should be limited to a maximum capacity of 1000ml/4 cups.
- Take care when handling the blender as the goblet and its contents will be very hot.
- Take particular care when removing the lid. The lid is designed to be a tight fit to prevent leakage. If necessary protect your hands with a cloth or oven gloves when handling.
- Ensure the goblet is securely attached to the base and when removing from the appliance, guide the base and ensure it is removed together with the goblet.
- Ensure that the lid and filler cap are securely in place before every blending operation.
- Always ensure that the vents in the filler cap are clear before every blending operation ⑫.
- When fitting the lid to the goblet always ensure that the lid and goblet rim are clean and dry to ensure a good seal and prevent spillage.
general safety
- Switch off and unplug:
- before fitting or removing parts;
- when not in use;
- before cleaning.
- Never fit the blade unit to the power unit without the blender goblet or mill jar fitted.
● Always unplug the appliance before putting your hands or utensils in the goblet.
● Always take care when handling the blade assembly and avoid touching the cutting edge of the blades when cleaning.
- Only operate the blender with the lid and filler cap in place.
- Only use the goblet with the blade assembly supplied.
- Never let the power unit, cord or plug get wet.
- Never use a damaged appliance. Get it checked or repaired: see 'service and customer care'.
- Never use an unauthorised attachment.
- Never leave the appliance unattended when it is operating.
- When removing the blender or mill from the power unit:
- wait until the blades have completely stopped;
- don't accidentally unscrew the goblet or mill jar from the blade assembly.
- Never run the blender empty.
- Never blend more than the maximum capacity stated in the recommended speed chart.
- To ensure long life of your blender, do not run it for longer than 60 seconds or the mill for longer than 30 seconds.
- Smoothie recipes - never blend frozen ingredients that have formed a solid mass during freezing, break it up before adding to the goblet.
- Don't use the blender as a storage container. Keep it empty before and after use.
- Always use the blender on a secure, dry level surface.
- Never place this appliance on or near a hot gas or electric burner or where it could touch a heated appliance.
- Misuse of your blender can result in injury.
- This appliance is not intended for use by persons (including children) with reduced physical, sensory or mental capabilities, or lack of experience and knowledge, unless they have been given supervision or instruction concerning use of the appliance by a person responsible for their safety.
- Children should be supervised to ensure that they do not play with the appliance.
- Only use the appliance for its intended domestic use. Kenwood will not accept any liability if the appliance is subject to improper use, or failure to comply with these instructions.
- The maximum rating is based on the attachment that draws the greatest load. Other attachments may draw less power.
before plugging in
- Make sure your electricity supply is the same as the one shown on the underside of the appliance.
Important - UK only
- The wires in the cord are coloured as follows:
Blue = Neutral
Brown = Live .
- The appliance must be protected by a 13A approved (BS1362) fuse.
Note:
- For non-rewireable plugs the fuse cover MUST be refitted when replacing the fuse. If the fuse cover is lost then the plug must not be used until a replacement can be obtained. The correct fuse cover is identified by colour and a replacement may be obtained from your Kenwood Authorised Repairer (see Service).
- If a non-rewireable plug is cut off it must be DESTROYED IMMEDIATELY. An electric shock hazard may arise if an unwanted non-rewireable plug is inadvertently inserted into a 13A socket outlet.
- This appliance conforms to EC directive 2004/108/EC on Electromagnetic Compatibility and EC regulation no. 1935/2004 of 27/10/2004 on materials intended for contact with food.
key
blender
①filler cap
②lid
③goblet
④sealing ring
⑤blade unit
⑥base
⑦cord storage
⑧speed + pulse control
⑨soup button
⑩ice button
⑪power unit
⑫vents
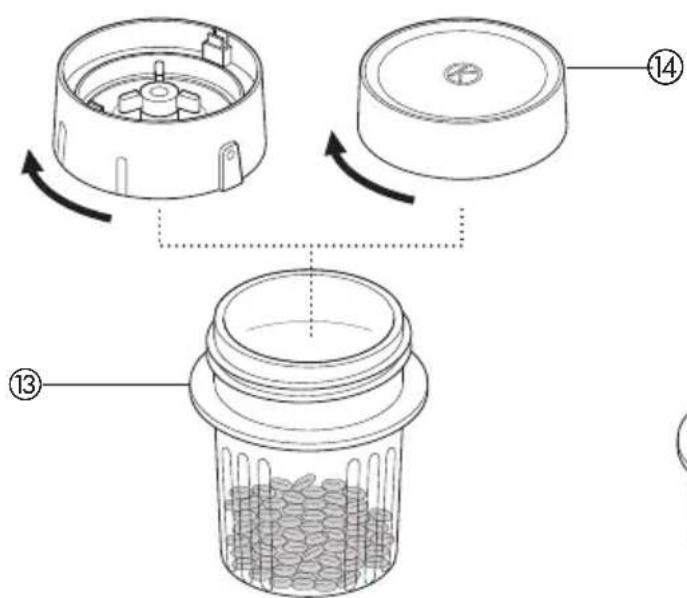
mill (if supplied)
⑬mill jar
⑭mill lid
to use your blender
1 Fit the sealing ring ④ into the blade unit ⑤ - ensuring the seal is located correctly in the grooved area.
- Leaking will occur if the seal is damaged or incorrectly fitted.
2 Clip the blade unit ⑤ into the base ⑥.
3 Screw the blade assembly onto the goblet – ensuring the blade assembly is fully tightened. Refer to the graphics on the underside of the blade unit as follows:

- unlocked position

- locked position
4 Put your ingredients into the goblet.
5 Fit the filler cap to the lid and push down to secure.
6 Fit the lid by pushing down until secure.
7 Place the blender onto the power unit.
- The appliance won't work if the blender is incorrectly fitted.
8 Plug in and the 2 pre-program buttons will light up. Select a speed (refer to the recommended speed chart).
9 Choose one of the following options:
- Select one of the 2 pre-programmed buttons. When the required program button is pressed the light on the other button will go out. The blender will switch off automatically at the end of the pre-set time. If you wish to stop before the pre-set time, press the selected program button again.
- Select speed 1 (low) to 5 (High) by turning the speed control. At the end of blending return the speed control to "0" before removing the blender.
- (P) Pulse – operates the motor in a start/stop action. The pulse will operate for as long as it is held in position.
NOTE: The pre-program lights will flash under the following circumstances
- The power unit is plugged in but the goblet is not fitted to the power unit.
- The goblet is removed from the power unit without switching the speed control to "0".
- The power unit will not operate until the control is turned to "0" and a speed is reselected.
hints
- To blend dry ingredients - cut into pieces, remove the filler cap, then with the machine running, drop the pieces down one by one. Keep your hand over the opening. For best results empty regularly.
- The processing of spices is not recommended as they may damage the plastic parts.
- When making mayonnaise, put all the ingredients, except the oil, into the blender. Remove the filler cap. Then, with the appliance running, add the oil slowly through the hole in the lid.
- Thick mixtures, e.g. pâtés and dips, may need scraping down. If the mixture is difficult to process, add more liquid.
to use your mill (if supplied)
1 Put your ingredients into the jar. Fill it no more than half full.
2 Fit the sealing ring ④ into the blade unit ⑤ - ensuring the seal is located correctly in the grooved area.
- Leaking will occur if the seal is damaged or incorrectly fitted.
3 Clip the blade unit ⑤ into the base ⑥.
4 Turn the mill blade assembly upside down. Lower it into the jar ⑬, blades down. Turn in a clockwise direction to lock.
5 Place the mill onto the power unit.
6 Select a speed or use the pulse control (refer to the recommended speed chart).
7 After milling, you can replace the blade assembly with the mill lid ⑭.
| recommended speed chart | |||
| speed usage/food items quantity recommended | max. operating time | ||
| 1 - 3 Frothing milk 1 litre 10 seconds | |||
| Light mixes e.g. batters and 1 litre 30 seconds milkshakes | |||
| 4 - 5 Cold liquids 1.6 litres 15-60 seconds Drinks and cocktails Thicker mixes e.g. pâtés | |||
| Mayonnaise 3 eggs + 60 seconds | 450ml oil | ||
| Smoothie drinks Place the fresh fruit and liquid ingredients in first (includes yoghurt, milk and fruit juices). Then add ice or frozen ingredients (includes frozen fruit, ice or ice cream) | 1 litre liquid | ||
| 5 Mill - use for Herbs, Nuts, coffee beans, baby food and fruit purées Uncooked meat Beef steak - cut into 21⁄2cm cubes | 10g 100g 100g | 10 seconds 30 seconds 5 seconds | |
 | Stock based soups | 1.2 litre | 30 seconds Pre-set operating time |
| Soups using milk | 1 litre | ||
| We recommend that hot liquids are allowed to cool before blending. However should you wish to process hot liquids please read the Hot Blending Safety instructions. | |||
 | Ice crushing - operate the pulse in short bursts until crushed to the desired consistency. Automatic pulsing action. A change in speed will be noted - this is normal. | 6 cubes 120g Pre-set operating time | 30 seconds pre-set operating time |
| (P) pulse | Operates the motor in a start/stop action. The pulse will operate for as long as it is held in position. | ||
care and cleaning
● Always switch off, unplug and dismantle before cleaning.
● Empty the goblet before unscrewing it from the blade unit.
- Don't immerse the blade unit in water.
- The goblet can be washed in your dishwasher.
power unit
● Wipe with a damp cloth, then dry.
- Don't immerse the power unit in water.
- Store excess cord in the storage area at the back of the power unit ⑦.
blade assembly
1 Unscrew the blender or mill base from the goblet/jar. Then remove the blade unit by pushing up from underneath.
- Care should be taken when removing the blade unit from the base.
2 Remove and wash the sealing ring.
3 Don't touch the sharp blades – brush them clean using hot soapy water, then rinse thoroughly under the tap. Don't immerse the blade unit in water.
4 Leave to dry upside down.
other parts
Wash by hand, then dry.
service and customer care
- If the cord is damaged it must, for safety reasons, be replaced by KENWOOD or an authorised KENWOOD repairer.
UK
If you need help with:
- using your appliance or - servicing, spare parts or repairs (in or out of guarantee)
call Kenwood customer care on 023 9239 2333. Have your model number (ie BL700) and date code (4 digit code ie 10N44) ready. They are on the underside of the power unit.
• spares and attachments
call 0844 557 3653.
- other countries
Contact the shop where you bought your appliance.
- Designed and engineered by Kenwood in the UK. - Made in China.

IMPORTANT INFORMATION FOR CORRECT DISPOSAL OF THE PRODUCT IN ACCORDANCE WITH EC DIRECTIVE 2002/96/EC.
At the end of its working life, the product must not be disposed of as urban waste.
It must be taken to a special local authority differentiated waste collection centre or to a dealer providing this service.
Disposing of a household appliance separately avoids possible negative consequences for the environment and health deriving from inappropriate disposal and enables the constituent materials to be recovered to obtain significant savings in energy and resources. As a reminder of the need to dispose of household appliances separately, the product is marked with a crossed-out wheeled dustbin.

HEAD OFFICE: Kenwood Limited, 1-3 Kenwood Business Park, New Lane, Havant, Hampshire PO9 2NH
kenwoodworld.com


- before using your Kenwood appliance
- safety
- IMPORTANT: HOT BLENDING INSTRUCTIONS
- general safety
- before plugging in
- Important - UK only
- Note:
- key
- blender
- mill (if supplied)
- to use your blender
- hints
- to use your mill (if supplied)
- care and cleaning
- power unit
- blade assembly
- other parts
- service and customer care
- UK
- IMPORTANT INFORMATION FOR CORRECT DISPOSAL OF THE PRODUCT IN ACCORDANCE WITH EC DIRECTIVE 2002/96/EC.
Brand : KENWOOD
Model : kMix BL700
Category : Blender