MDRB593FGE46 - Fridge MIDEA - Free user manual and instructions
Find the device manual for free MDRB593FGE46 MIDEA in PDF.
User questions about MDRB593FGE46 MIDEA
0 question about this device. Answer the ones you know or ask your own.
Ask a new question about this device
Download the instructions for your Fridge in PDF format for free! Find your manual MDRB593FGE46 - MIDEA and take your electronic device back in hand. On this page are published all the documents necessary for the use of your device. MDRB593FGE46 by MIDEA.
USER MANUAL MDRB593FGE46 MIDEA
Thank you for choosing Midea! Before using your new Midea product, please read this manual thoroughly to ensure that you know how to operate the features and functions that your new appliance offers in a safe way.
CONTENTS
THANK YOU LETTER 01
SPECIFICATIONS 02
PRODUCT OVERVIEW 03
PRODUCT INSTALLATION 05
OPERATION INSTRUCTIONS 11
CLEANING AND MAINTENANCE 16
TROUBLESHOOTING 18
APPENDIX 21
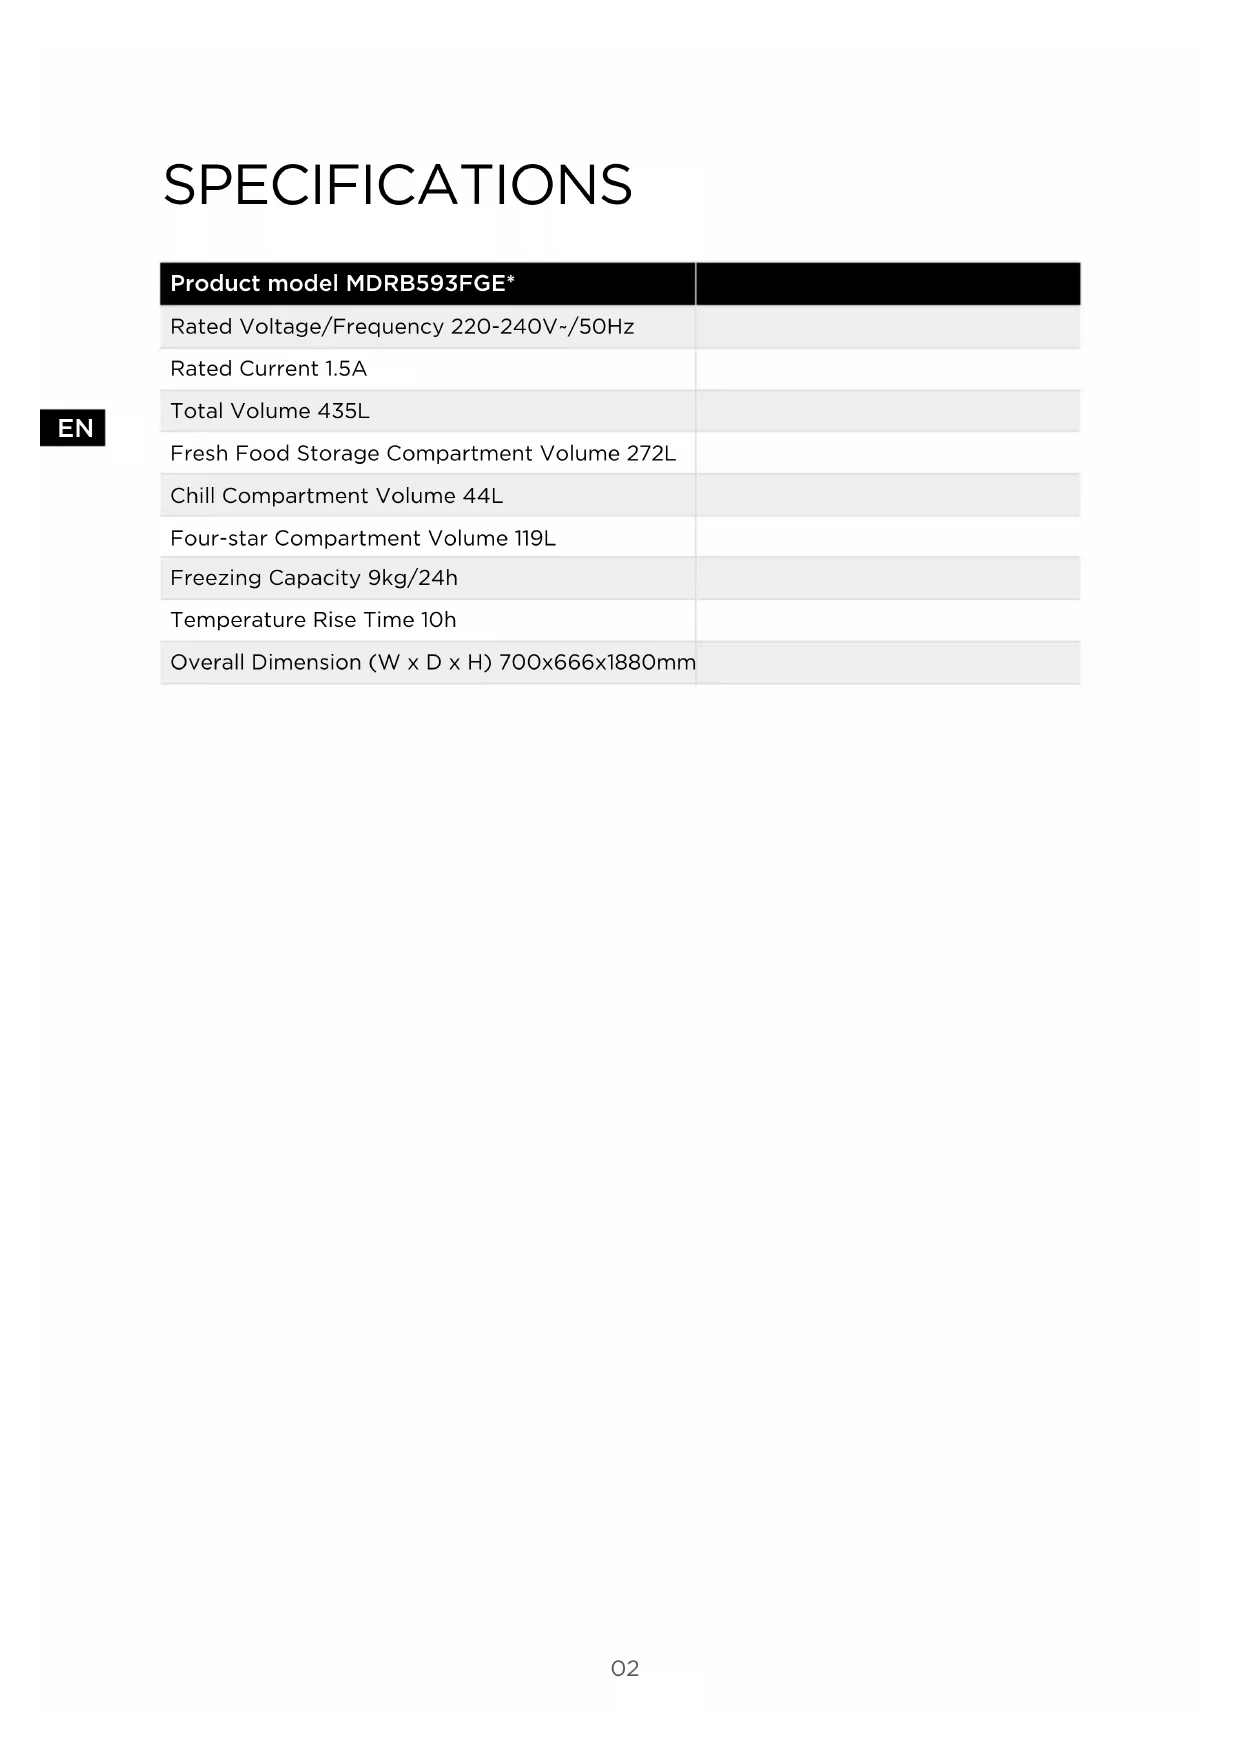
SPECIFICATIONS
EN
| Product model MDRB593FGE* | |
| Rated Voltage/Frequency 220-240V-/50Hz | |
| Rated Current 1.5A | |
| Total Volume 435L | |
| Fresh Food Storage Compartment Volume 272L | |
| Chill Compartment Volume 44L | |
| Four-star Compartment Volume 119L | |
| Freezing Capacity 9kg/24h | |
| Temperature Rise Time 10h | |
| Overall Dimension (W x D x H) 700x666x1880mm |
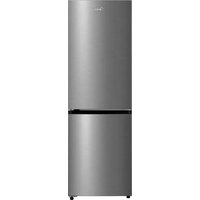
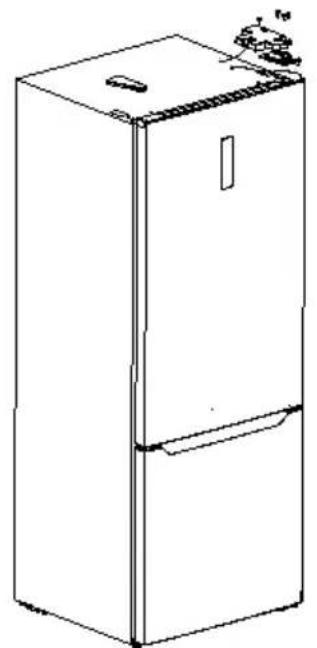
PRODUCT OVERVIEW
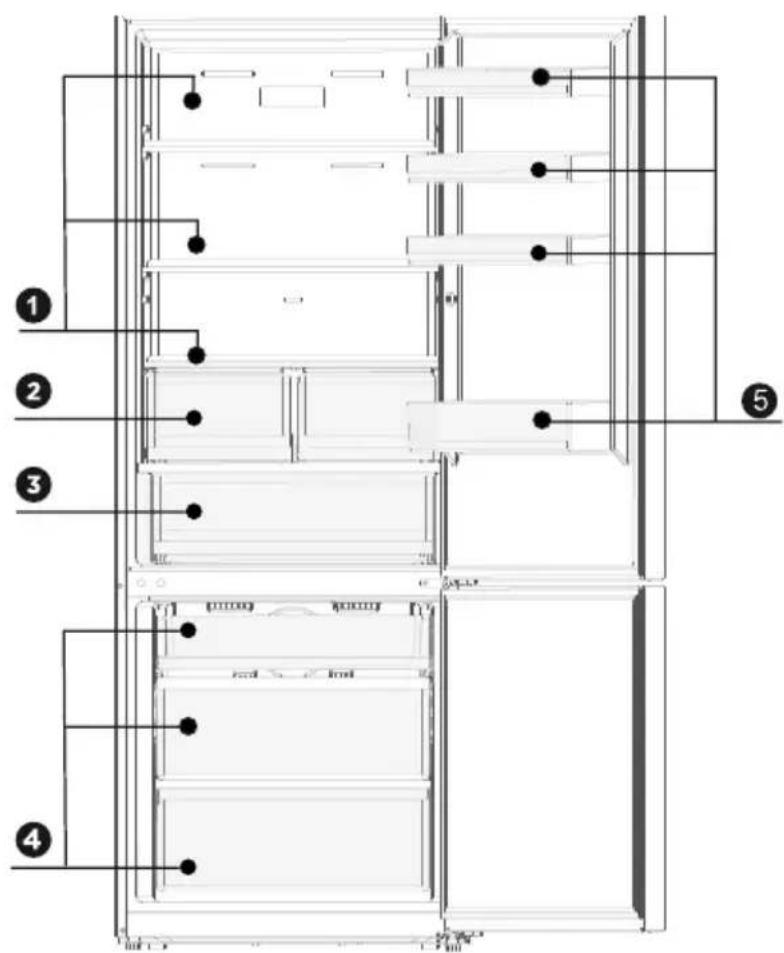
Names of components
Mode A
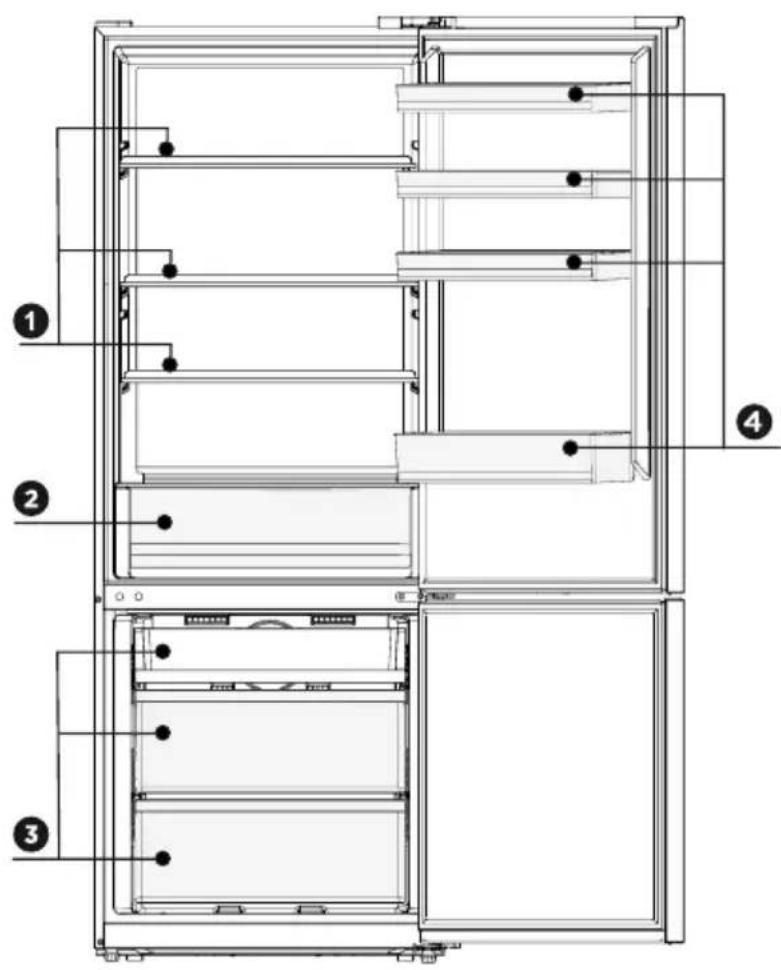
1 Shelf
3Drawer
2 Fish and meat box
4 Door tray

ATTENTION
The picture above is only for reference. The actual configuration will depend on the physical product or statement by the distributor.
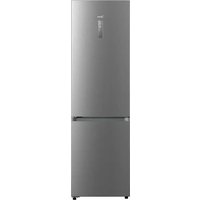
Names of components
Mode B
EN
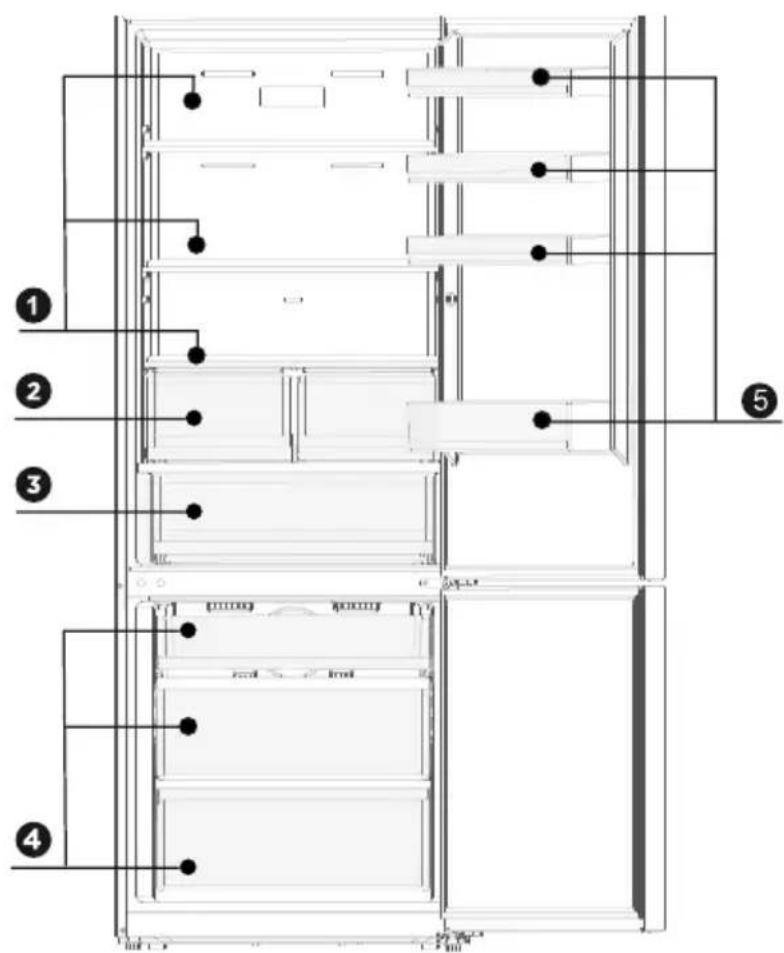
1 Shelf
4Drawer
2 Fruit and vegetable box
5 Door tray
3 Fish and meat box

ATTENTION
The picture above is only for reference. The actual configuration will depend on the physical product or statement by the distributor.
PRODUCT INSTALLATION
Install Instruction
For refrigerating appliances with climate class
- Depending on the climate class, this refrigerating appliance is intended to be used at ambient temperatures range as specified following table.
- The product may not operate properly at temperatures outside of the specific range.
- You can find the climate class on the product label.
| Class Symbol | Ambient temperature range °C | ||
| IEC 62552 (ISO 15502) | ISO 8561 | ||
| Extended temperate SN + 10 to + 32 + 10 to + 32 | |||
| Temperate N + 16 to + 32 + 16 to + 32 | |||
| Subtropical ST + 16 to + 38 + 18 to + 38 | |||
| Tropical T + 16 to + 43 + 18 to + 43 | |||
Dimensions and Clearances
- Keep the air circulation free around the cabinet. When installing the unit, ensure 10cm of free space at both sides, 10cm at the top of the unit, and not more than 7.5cm at the rear of the unit.
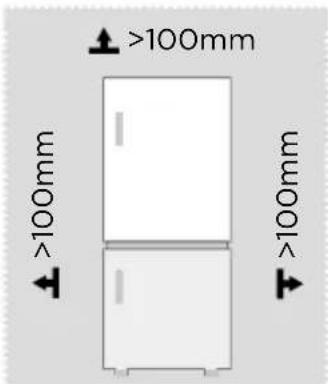

ATTENTION
The picture above is only for reference. The actual configuration will depend on the physical product or statement by the distributor.
Space requirement diagram (when the door is open and when the door is closed)
EN


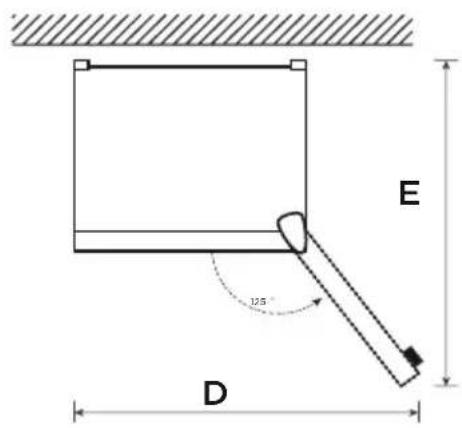
| Width | Overall Height | Depth | Width doors open 125° | Depth Without door | Depth doors open 125° |
| A B C D C1 E | |||||
| 700 1880 | 666 1112 | 600 1252 | |||
Notice: All dimensions in mm
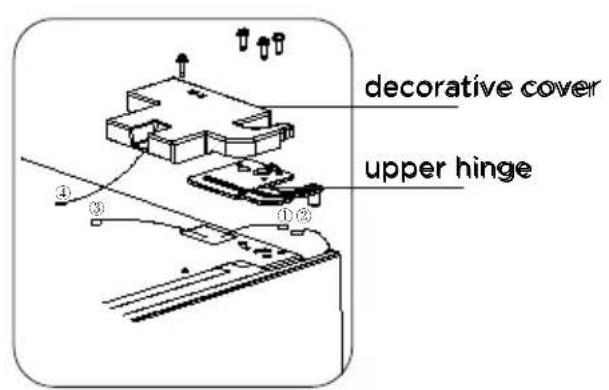
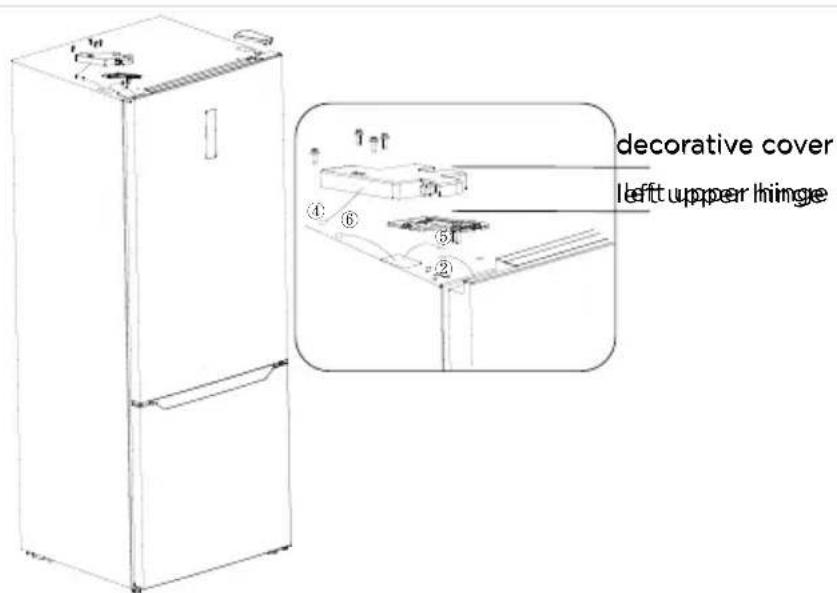
Door right-left change
- Please power off this appliance before conduct this operation. Remove all food from door shelves.
- Remove the decorative cover, hinge cover, upper hinge, screws, disconnect the top right signal line (① ② signal line terminal), disconnect the signal line (③ ④ signal line terminal).
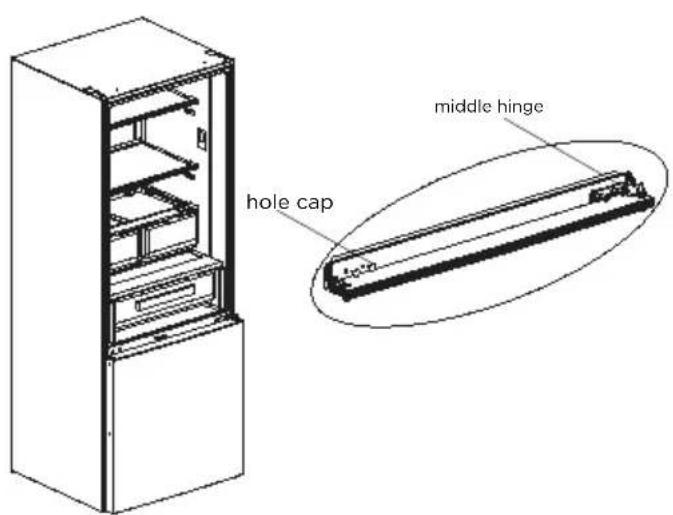
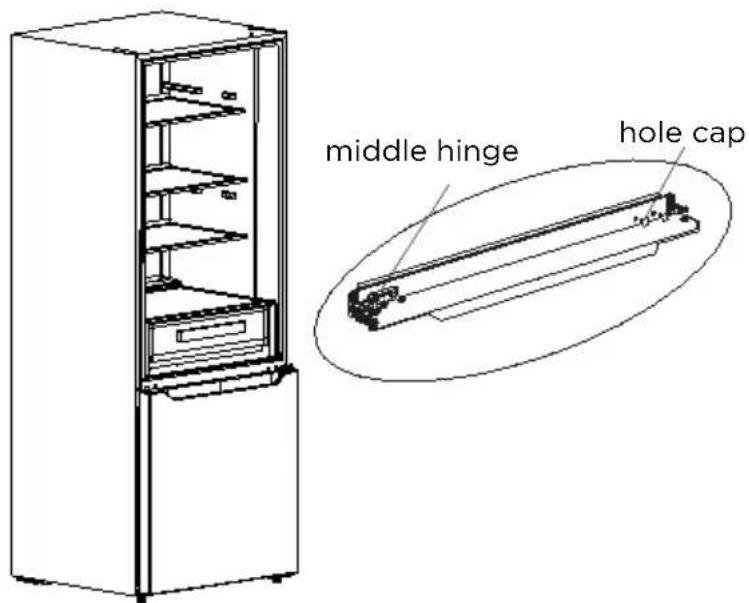
- Take off refrigerating chamber door, middle hinge (use a allen wrench to remove the middle hinge screw) and hole cap of other side.
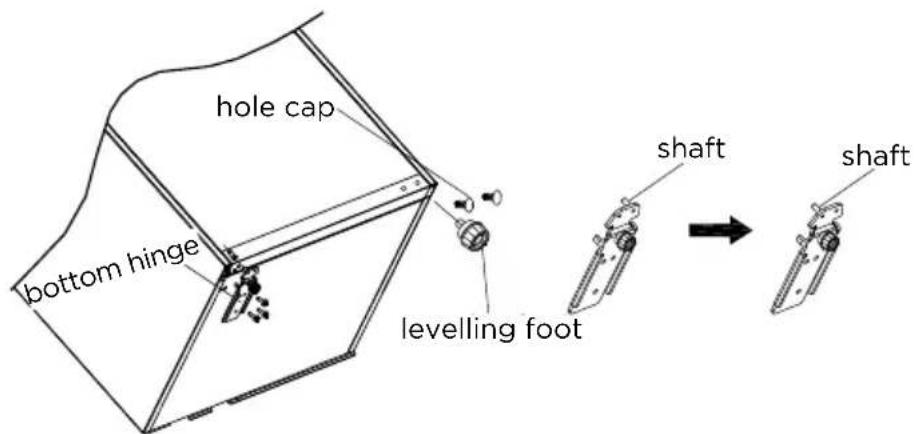
- Take off freezing chamber door, dismantle bottom hinge, hole caps, levelling foot, Install shaft of bottom hinge on the other side and install the bottom hinge on the other side.
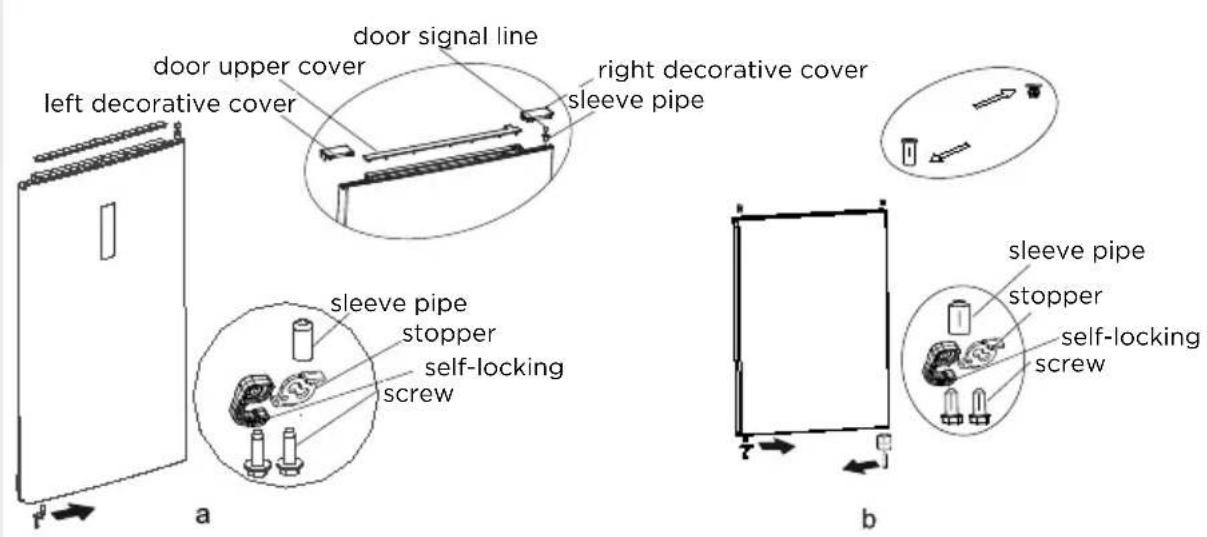
- Remove the upper cover of refrigerating chamber door and the left decorative cover, install the upper hinge sleeve, door signal line to the other side and install the door upper cover.
- Dismantle the stopper, self-locking and sleeve pipe of refrigerating chamber door. Take out left self-locking of refrigerating chamber door and right decorative cover from accessory bag, assemble the sleeve pipe, left self-locking and stopper on bottom left of door with screw, and then install the right decorative cover.
- Dismantle the stopper and sleeve pipe from the bottom right of freezing chamber door, assemble the sleeve pipe, left self-locking and stopper on bottom left of door by screw.
- Put freezing door on bottom hinge and install middle hinge, hole caps.
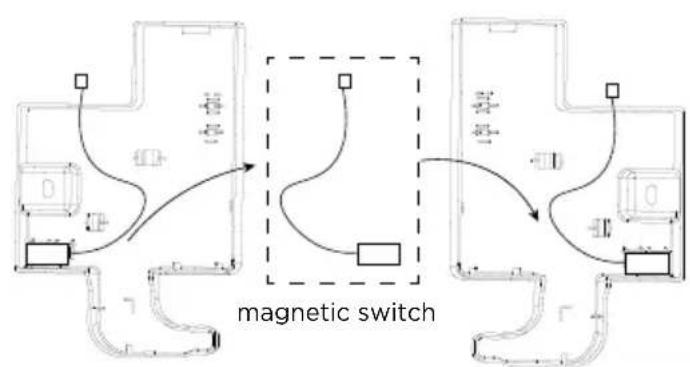
- Remove the magnetic switch of the right hinge cover and install it on the left hinge cover.
- Remove the upper left hinge from the accessory bag and place the door body on the middle hinge, and install the upper left hinge; connect the signal line ⑤ on the top of the refrigerator to the signal line ② on the door, Connect the signal cable ④ to the signal cable ⑥ and install the left hinge cover and decorative cover.
Leveling feet
- To avoid vibration, the appliance must be leveled.
- If required, adjust the leveling feet to compensate for the uneven floor.
- The front should be slightly higher than the rear to aid in door closing.
- Leveling feet can be turned easily by tipping the cabinet slightly.
- Turn the leveling feet counter clockwise to raise the unit, clockwise to lower it.
Changing the light
- Any replacement or maintenance of the LED lamps is intended to be made by the manufacturer, its service agent or similar qualified person.
ATTENTION
This product contains two light sources of energy efficiency class (F).(G).
Connecting the appliance
After installing the appliance, connect the power plug into a socket outlet.
ATTENTION
After connecting the power supply cord (or plug) to the outlet, wait 2 or 3 hours before you put food into the appliance. If you add food before the appliance has cooled completely, your food may spoil.
Tips for energy saving
- Do not place the appliance near cookers, radiators or other heat sources. If the ambient temperature is high, the compressor will run more frequently and for longer, resulting in increased energy consumption.
- Ensure that there is sufficient ventilation at the base of the appliance, on the sides of the appliance and at the back of the appliance. Never cover ventilation openings.
- Please also observe the spacing dimensions in the chapter "Installation".
- The arrangement of drawers, shelves and racks as shown in the illustration offers the most efficient use of energy and should therefore be retained as far as possible. All drawers and shelves should remain in the appliance to keep the temperature stable and save energy.
- To obtain a larger storage space (e.g. for large refrigerated/frozen goods), the middle drawers can be removed. The top and bottom drawers and shelves should be removed last if necessary.
- An evenly filled refrigerator/freezer compartment contributes to optimal energy use. Therefore, avoid empty or half-empty compartments.
- Allow warm food to cool before placing it in the refrigerator/freezer. Food that has already cooled down increases energy efficiency.
- Allow frozen food to defrost in the refrigerator. The coldness of the frozen food reduces the energy consumption in the refrigerator compartment and thus increases the energy efficiency.
- Open the door only as briefly as necessary to minimise cold loss. Opening the door briefly and closing it properly reduces energy consumption.
- The door seals of your appliance must be perfectly intact so that the doors close properly and energy consumption is not increased unnecessarily.
OPERATION INSTRUCTIONS
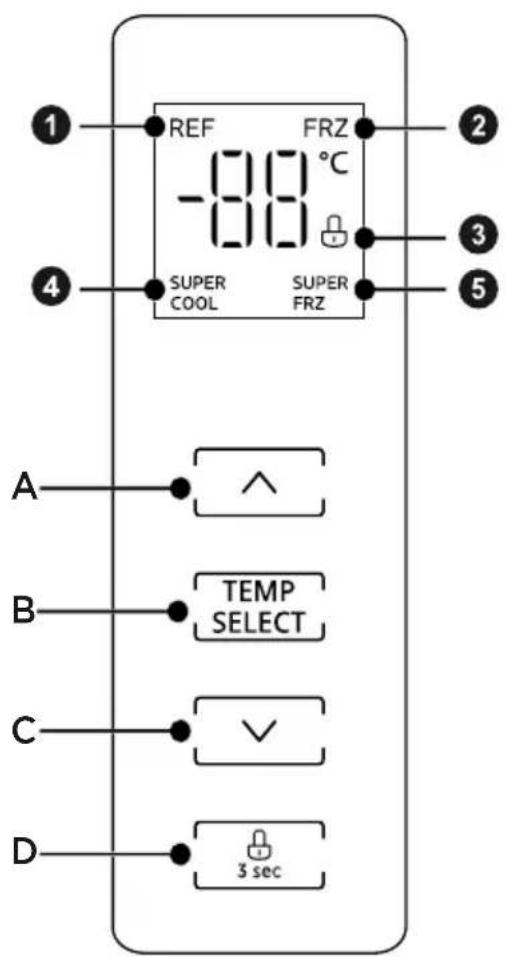
Control panel
| Display Button | |||
| 1 | Refrigerating compartment temperature | A | Temperature up |
| 2 | Freezer compartment temperature | B | Temperature compartment selection |
| 3 | Lock / unlock | C | Temperature down |
| 4 | Super Cool | D | Lock / unlock |
| 5 | Super Freeze |
ATTENTION
The actual control panel may differ from model to model. The control panel will turn off automatically for energy saving.
EN
Lock unlock
- In the unlocked state, long press the button for 3 seconds, enter the state; In the locked state, long press the button for 3 seconds, enter the state. All the following functions must be operated in the unlocking status.
Temperature setting of refrigerating chamber
- Click the button change the set temperature of refrigerator chamber, the icon will be displayed.
Each time click the or ,the set temperature will rise 1^ or will drop 1^ The temperature setting will take effect after the display panel is locked. - The setting range of refrigerator chamber is 2^ - 8^ .
- Press the temperature zone selection button to select the refrigeration temperature zone, and hold down the temperature zone selection button for 3 seconds until you hear three beeps to enter the refrigeration shutdown state. At this time, the digital display shows “- - ”
- When in refrigeration shutdown state, press the temperature zone selection button to select the refrigeration temperature zone, and hold down the temperature zone selection button for 3 seconds until you hear three beeps to exit the refrigeration shutdown state. The digital display returns to normal temperature display, and the default temperature for the refrigeration compartment is set to 5, entering normal operation mode.
Temperature setting of freezing chamber
- Click the button to change the set temperature of freezer chamber, the icon FRZ will be displayed.
Each time click the or ,the set temperature will rise 1^ will drop 1^ . The temperature setting will take effect after the display panel is locked. - The setting range of freezer chamber is -24 °C--16 °C.
Super cool mode
- When the refrigerating temperature is adjusted to 2^ , pressing the temperature down button will enter the super cooling mode. Icon up, the super cooling mode will start after locking the control panel.
- super cooling will exit automatically after 6 hours or pressing the temperature up button again.
Super freeze mode
- When the freezing temperature is adjusted to -24^ , pressing the temperature down button will enter the super freeze mode. Icon SUPERFights up, the Super freeze mode will start after locking the control panel.
- Super freeze will exit automatically after 40 hours or pressing the temperature up button again.
- It is suggested to turn on super freeze mode for 12 hours before placing large amount of frozen food in freezer compartment at one time.

ATTENTION
Recommended setting: Refrigerated chamber 4^ , freezing chamber - 18^ .
The Super freeze function is designed to maintain the nutritional value of the food in the freezer. It can freeze the food in the shortest time. If a large amount of food is frozen at one time, it is recommended that the user turn on the Super freeze function and put the food in. At this time, the freezing speed of the freezer compartment is increased, which can quickly freeze the food, effectively lock the nutrition of the food, and facilitate storage.
Door opening beep and alarm
- If the door is opened for more than 120 seconds, two buzzer alarms will sound first and then add one alarm every one minute. Press any button to briefly turn off the alarm. This alarm cannot be canceled, so please close the door as soon as possible.
Fault code
- The following warnings appearing on the display indicate corresponding faults of the refrigerator. Though the refrigerator may still have cold storage function with the following faults, the user shall contact a maintenance specialist for maintenance, so as to ensure optimized operation of the appliance.
Fault Code Fault Description
E1 Refrigerating temperature sensor fault
E2 Freezing temperature sensor fault
E3 Meat & Fish box temperature sensor fault
E5 Freezer defrost sensor fault
E6 Main control PCB and Display PCB communication fault
E7 Ambient temperature sensor fault
Tips on storing food
Freezer compartment
- The freezer is designated for the storage of food frozen at very low temperature, long-term storage of frozen food, and for the production of ice.
- Only use the shelves in the door of the freezer to store frozen food, not for storing hot food designated for freezing.
- Do not put fresh and frozen food next to each other. The frozen food may thaw.
- When freezing fresh food (such as meat, fish or chopped meat), cut them into parts that can be used at the same time.
- Storing frozen food: instructions are usually stated on the packages, which must be followed. If there is no information on the packaging, food should not be stored for longer than three months from the date of purchase.
- When purchasing frozen food, make sure that it was frozen at a suitable temperature and that the packaging is not damaged.
- Frozen food should be kept in suitable packages to retain the quality and should be returned to the freezer compartment as soon as possible.
- If a package of frozen food shows moisture or abnormal bulging, it is probable that it was stored at the wrong temperature and the content is spoiled.
- The storage period for frozen food depends on the room temperature, the thermostat setting, the frequency of opening the door of the freezer, the type of food and the time of transporting the product from the shop to the household. Always follow the instructions printed on the packaging and never exceed the maximum storage time stated on the package.
Cooling compartment
- To reduce moisture and subsequent ice build-up, never put liquid into the refrigerator in unsealed containers. Frost tends to concentrate in the coolest parts of the evaporator. Storing uncovered liquids results in a more frequent need for defrosting.
- Never put warm foods in the refrigerator. These should first cool down at room temperature and then be placed so as to ensure adequate air circulation in the refrigerator.
- Foods or food containers should not touch the back wall of the refrigerator because they could freeze to the wall. Do not keep regularly opening the door of the refrigerator.
- Meat and clean fish (packed in a package or plastic foil) can be placed in the refrigerator, which can be used in 1-2 days.
- Fruit and vegetables without packaging can be placed in the part designated for fresh fruit and vegetables.

ATTENTION
The optimal temperature setting of each compartment depends on the ambient temperature. Above optimal temperature is based on the ambient temperature of 25^
| Order | Compartments TYPE | Target storage temp. [°C] | Appropriate food |
| 1 | Fridge +2 x +8 | ≤ ≤ | Eggs, cooked food, packaged food, fruits and vegetables, dairy products, cakes, drinks and other foods are not suitable for freezing. |
| 2 | Four-star rating frozen | x ≤18 | With freezing capacity, fast freezing speed, can quickly freeze and store food. Suitable for frozen fresh food such as seafood (fish, shrimp, shellfish), freshwater aquatic products and meat products. Recommended for 3 - 6 months, the longer the storage time, the worse the taste and nutrition. |
| 3 | Three-star rating frozen | x ≤18 | With freezing capacity. Suitable for frozen fresh food such as seafood (fish, shrimp, shellfish), freshwater aquatic products and meat products. Recommended no more than 3 months. |
| 4 | Two-star rating frozen | x ≤12 | Only suitable for medium-term storage of already frozen food, e.g. ice cream. Recommended no more than 1 month. |
| 5 | One-star rating frozen | x ≤-6 | Only suitable for refrigeration, and short-term storage of small quantities of already frozen food. Recommended no more than 1 week. |
| 6 | 0-star -6 x 0 | ≤ ≤ | Fresh pork, beef, fish, chicken, some packaged processed foods, etc. (Recommended to eat within the same day, preferably no more than 3 days). Partially encapsulated processed foods (non-freezable foods). |
| 7 | Chill -2 x +3 | ≤ ≤ | Fresh/ frozen pork, beef, chicken, freshwater aquatic products, etc. (7 days below 0°C and above 0°C is recommended for consumption within that day, preferably no more than 2 days). Seafood less than 0 for 15 days, it is not recommended to store above 0°C. |
| 8 | Fresh food 0 x | +4 ≤ ≤ | Fresh pork, beef, fish, chicken, cooked food, etc.(Recommended to eat within the same day, preferably no more than 3 days) |
| 9 | Wine | +5 ≤ x ≤20 | Red wine, white wine, sparkling wine, etc. |

ATTENTION
Please note the manufacturer instructions on the packaging. Please store different foods according to the compartments or target storage temperature of your purchased.
CLEANING AND MAINTENANCE
Defrosting
- The refrigerator is made based on the air-cooling principle and thus has automatic defrosting function. Frost formed due to change of season or temperature may also be manually removed by disconnection of the appliance from power supply or by wiping with a dry towel.
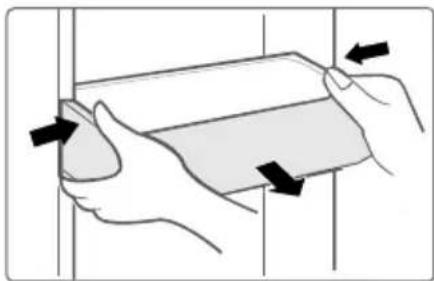
Cleaning of door tray
- According to the direction arrow in the figure below, use both hands to squeeze the tray, and push it upward, then you can take it out.
- After washing the tray having been taken out, you can adjust its installing height in accordance with your requirement.
Cleaning of glass shelf
- As the innermost part of the refrigerator liner where contacting the shelves has a backstop, you shall raise the shelves upward, then you can be able to take it out.
- Adjust or clean the shelves according to your requirement.

Cleaning the vegetable drawer
- Remove the contents of the drawer. Hold the handle of the vegetable drawer and pull it out completely until it stops.
- Lift the vegetable drawer up and remove it by pulling it out.


ATTENTION
Soft towels or sponge dipped in water and non-corrosive neutral detergents are suggested for cleaning. The freezer of shall be finally cleaned with clean water and dry cloth. Open the door for natural drying before the power is turned on. Do not use hard brushes, clean steel balls, wire brushes, abrasives, such as toothpastes, organic solvents (such as alcohol, acetone, banana oil, etc.), boiling water, acid or alkaline items clean refrigerator considering that this may damage the fridge surface and interior.
Stop using
Power failure:
In case of power failure, even if it is in summer, foods inside the appliance can be kept for several hours; during the power failure, the times of door opening shall be reduced, and no more fresh food shall be put into the appliance.
Long-time nonuse:
The appliance shall be unplugged and then cleaned; then the doors are left open to prevent odor.
Moving:
Before the refrigerator is moved, take all objects inside out, fix the glass partitions, vegetable holder, freezing chamber drawers and etc. with tape, and tighten the leveling feet; close the doors and seal them with tape. During moving, the appliance shall not be laid upside down or horizontally, or be vibrated; the inclination during movement shall be no more than 45^ .
ATTENTION
The appliance shall run continuously once it is started. Generally, the operation of the appliance shall not be interrupted; otherwise the service life may be impaired. Foods can be preserved for a couple of hours even in summer in case of power failure; it is recommended to reduce the frequency of opening door.
TROUBLESHOOTING
The following simple issues can be handled by the user. Please call the after-sale service department if the issues are not solved.
| Problem Possible Causes Solution | ||
| Not operate | The power supply is not turned on and the plug is not firmly inserted. Low voltage, power failure or part of the circuit tripped. | Insert the power cord plug firmly. Check the power supply at home. |
| Light not on | The appliance is not powered on. The light is broken. | Unplug and re-plug the power cord. Replace the light with a new one. |
| Fruits or vegetables are frozen | Has the food been placed at the back of the fridge? The area near the back wall is where the temperatures are coldest. Fruits or vegetables are stored in the Fresh/ Chill zone. | Not placing food which may freeze easily at the back of the fridge compartment. The Fresh/ Chill zone is only for meat/ fish. |
| Fridge/freezer is over-cooling | Temperature control is not set correctly. Set the temperature higher. | |
| Compressor working for a long time | High ambient temperature causing long working time. Putting too much food in at one time. Food is put in before it has cooled down. Opening the door too often. The frost layer inside is too thick. | This is normal. Do not put too much food in at one time. Wait until the food has cooled down before putting it in. Do not open the door too often. Need to defrost. |
| Door does not close properly | Door is stuck with objects. Too much food in. Door gasket deformed. | Do not put in too much food. Place the appliance stably. Heat the door gasket, then cool it for restoration (with an electrical drier or hot water for heating). |
| Outer wall is hot | When the appliance is operating, heat is dissipated to the outside through the metal tubes inside the cabinet. Higher ambient temperatures in the summer cause the temperature of the outer wall to rise. | Higher temperature on the outer wall is normal. Increase the heat dissipation space, or put the appliance in a ventilated and cool place. |
| Cross or vertical beams are hot | There are metal tubes inside the beams, and the heat released from the tubes prevents condensation. | This is normal. |
| Odors | Spoiled food Food with strong odors The interior compartment is dirty. | Clean and remove any spoiled food. Make sure strong smelling food is wrapped airtight. Clean the interior compartment. |
| The actual temperature differs from the set temperature | When warm food is put in, the temperature will rise temporarily. After setting a new temperature, it will take some time for the temperature in the compartment to reach the set temperature when the door is not opened. After the temperature stability, the actual temperatures at different locations within the compartment are different, with a deviation of about ±3°C. | This is normal. Wait for some time before testing the actual temperature. |
| Condensation forms on the outside | Condensation may form when the humidity in the room is high. | This is normal. Wipe off the condensation using a dry cloth. |
| Condensation forms inside the fridge and drawers | The fridge maintains a high humidity to keep vegetables and other food items fresh. Humidity is too high in the room and doors have been opened frequently. The door gasket are not tight. | Wipe off the condensation using a dry cloth. Do not open doors as frequently or do not keep them open too long. Check the door gasket, clean or correct position. |
| Frost around the vents | Door is not closed properly. The door gasket are not tight. | Make sure food does not block the door. Check the door gasket, clean or correct position. |
| Hard to open the door | The difference in air pressure between the inside and outside of the compartment may sometimes make it hard to open the freezer door. | Wait a few moments, and then try to open the door slowly. |
| Not making ice cubes (Only models with ice maker) | The ice making function not turned on. The appliance is not being supplied with water. The water pipe has kinks in it. The water pipe connection is installed incorrectly. Water pressure is too low. | Switch on the ice maker. Check whether the water supply is on. Straighten out the kinks. Check the water connection. Check the pressure of the water supply, or whether the filter is clogged. |
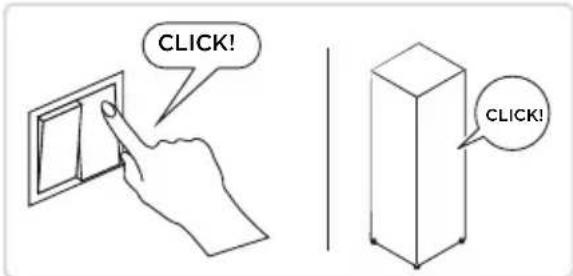
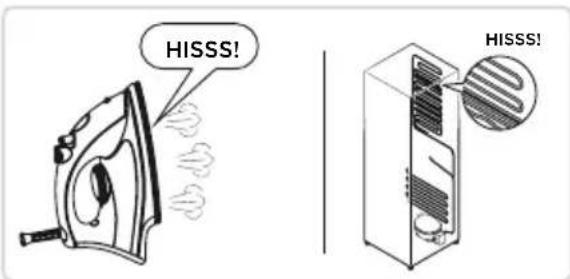
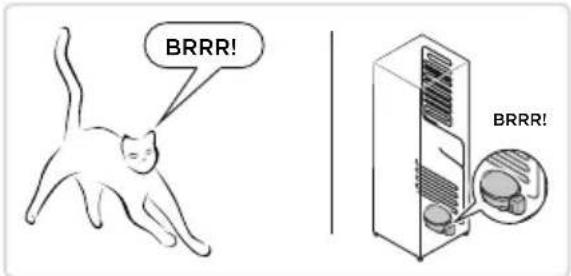
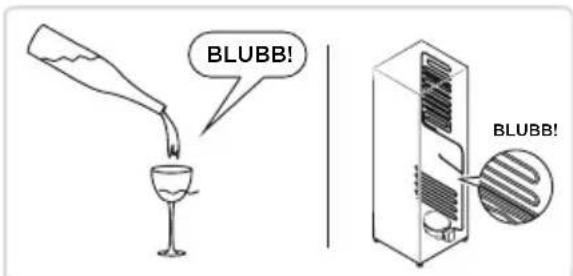
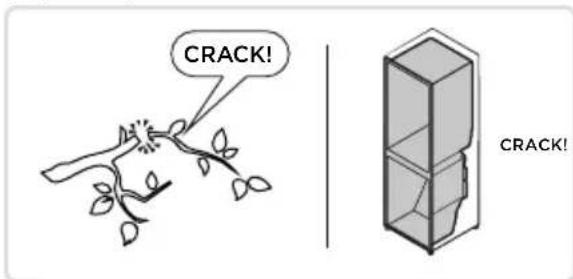
Do you hear these abnormal sounds as below? Usually these sounds are normal.
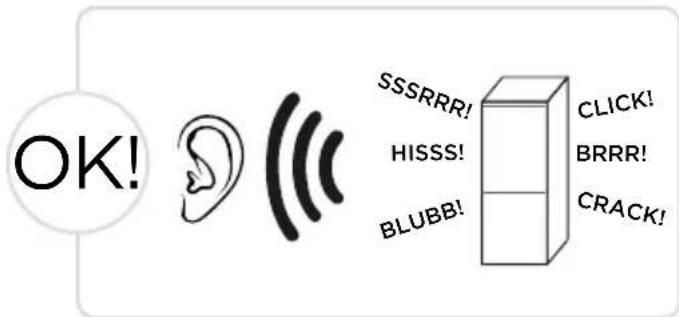
CLICK: Some electrical parts in the refrigerator, such as electric valve will make this noise when working. This is normal.
HISSS: When the refrigerant flows into the evaporator, it will make this noise. This is normal.
BRRR: The compressor will make this noise when working, and the buzzes are loud particularly upon start or stop. This is normal.
SSSRRR: The fan motor in the No frost refrigerator will make this noise when working. This is normal.
BLUBB: Refrigerant flowing through the pipes in the refrigerator will make this noise. This is normal.

CRACK: Cracking sound or broken ice sound: the overall structure of the refrigerator, air duct frost will be with the thermal expansion and contraction of the expansion sound, these are also normal physical phenomenon.
APPENDIX
Special for new European standard
The ordered parts in the following table can be acquired from Service provider channel
| Ordered part Provided by | Minimum time required for Provision | |
| Thermostats Professional maintenance personnel | At least 7 years after the last model is launched on the market | |
| Temperature sensors | Professional maintenance personnel | At least 7 years after the last model is launched on the market |
| Printed circuit boards | Professional maintenance personnel | At least 7 years after the last model is launched on the market |
| Light sources Professional maintenance personnel | At least 7 years after the last model is launched on the market | |
| Door handles Professional repairers and final users | At least 7 years after the last model is launched on the market | |
| Door hinges Professional repairers and final users | At least 7 years after the last model is launched on the market | |
| Trays Professional repairers and final users | At least 7 years after the last model is launched on the market | |
| Baskets Professional repairers and final users | At least 7 years after the last model is launched on the market | |
| Door gaskets Professional repairers and final users | At least 10 years after the last model is launched on the market | |
Dear customer
- If you want to return or replace the product, please contact the store where you buy.
(Remember to bring the purchase invoice) - If your product breaks down which needs to repair, please contact after-sales service provider.

ATTENTION
The model information in the product database, as well as the model identifier, can be obtained through a weblink scanned by a QR code, if any, on the energy efficiency label of the product.
For more information about the energy efficiency of the appliance, visit https://ec.europa.eu and search using the model name.
The model name can be found on the rating label of the appliance.
Coldest zone in the refrigerator
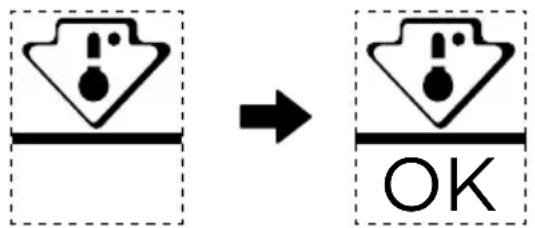
OPTIONAL: OK-temperature indicator
- The OK-temperature indicator can be used to determine temperatures below +4^ . Gradually reduce the temperature if the sign does not indicate "OK".

- To ensure the temperature in this area, do not change the positioning of the shelf. Inforced air refrigerators (equipped with a fan or No Frost models), the symbol of the coldest zone is not represented because the temperature inside is homogeneous.
Temperature indicator setting
- To help you set your refrigerator well, it is equipped with a temperature indicator that will monitor the average temperature in the coldest zone.
- WARNING: This indicator is intended to work only with your refrigerator, do not use it in another refrigerator (in fact, the coldest zone is not the same), or for any other use.
Checking the temperature in the coldest zone
- With the temperature indicator, you can check regularly that the temperature of the coldest zone is correct. Indeed, the internal temperature of the refrigerator depends on several factors such as the ambient temperature of the room, the amount of food stored and the frequency of door opening. Take these factors into consideration when setting the device.
- When the indicator shows « OK», this means that your thermostat is well adjusted and the internal temperature correct.
- If the indicator of temperature turns WHITE, this means that the temperature is too high; in this case, increase the refrigerator temperature control setting and wait for 12 hours before performing a new visual inspection of the indicator. When fresh food has been introduced or the door has been left open, it is possible for the indicator of temperature to turn WHITE after a while.
DANKSCHREIBEN
INSTALLATION DU PRODUIT 05
GUIDE D'UTILISATION 11
NETTOYAGE ET ENTRETIEN 16
DÉPANNAGE 18
ANNEXE 21
SPECIFICATIONS
INSTALLATION DU PRODUIT
Instructions d-installation
Mode Super congélation
LIMPEZA E MANUTENCAO 16
INFORMACJE OGÓLNE OURZADXENIU
Elementy
Tryb A

1 Pótka
3 Szuflada
PRODUKTA UZSTÄDīSANA
Uzstadīsanas instrukcija
Compartment de răcire
HaIMeHOBaHHa Ha KOMNoHeHTnTe
Pekum A

1 PaΦT
3 YekMegke
2 KyTu 3a pu6a u meco
4 PaTHaBpaTaTa
3A6EANKKA
TogHTo u3o6paXeHue e cAmo 3a cnpaBka. DeuCTBUteHaHaTa KOHouZpaUra 3abucu ot camu npogykTuU guctpu6yTopa.
HaIMeHOBaHHa Ha KOMNoHeHTnTe
Pekum B
BG
1 PaΦT
4 YekMegke
2 KyTu 3a nnogObe u 3eAnHuYu
5 PaΦT Ha BpaTaTa
3 KyTu 3a pu6a u Meco

3ABEAEKKKA
TogHTo u3o6paKeHue e cAmo 3a cnpaBka. DeuCTBUTeHaHaTa KOHfoZypauua 3aBuCu O T camu npogykTuU guctpu6yTopa.
MOHTAX HA ПОДУКТА
Ha-CTydeHa 3OHa Ha XlaAaHnKa
ОПЦИОHAΛΗΟ: ИндаукаТор за дόбpa TemnéраТура
- Ингulatorу вдддддддддддддддддддддддддддддддддддддддддддддддддддддддддддддддддддддддддддддддддддддддддддддддддддд徳.
- Дiversifikation der Wandel der Wandel der Wandel der Wandel der Wandel der Wandel der Wandel der Wandel der Wandel der Wandel der Wandel der Wandel der Wandel der Wandel der Wandel der Wandel der Wandel der Wandel der Wandel der Wandel der Wandel der Wandel der Wandel der Wandel der Wandel der Wandel der Wandel der Wandel der Wandel der Wandel der Wandel der Wandel der Wandel der Wandel DER
3a ga ocu2ypute npabuHaTa TempepaTpa Ta3u 30ha, He npomeHraTe pa3nooKeHueto Ha To3u paΦT. Ppu XlauguaHcupte c npunHyguteAen Bb3gux (MogeAUte, Ch6geHu C BeHTuaTop uAu o6e3ckpekabaHe) Hma cumBOA 3a Hau-cTygeHa 30Ha, TbKATO TempepaTpaTa B Tx e paBHomepHo pa3npegelaHa.
Hactpouka Ha TemnepaTpyHu uHdukaTop
- C ueA no-go6pa HacTpoUka Ha BaWua XlauguHuk, Tou e cHa6geH c Tempeatypen uHgKaTOp, Kouto clegu cpeHaTa Tempeatypa B HauchTygeHaTa 30Ha.
- ПЕДУПЕЖДЕНЕ: To3u unghukaTop e npegha3нayeh ga pa6oTu eguhcTBeHo c Baawua xlauguaHuk. He 20 u3noλ3Baute 3a gpy2 xlauguaHuk (KbgeTo hau-cTygeHaTa 3OHa e pa3AunHa) uAU no KaKbBTO u ga e gpy2 Hauch.
ПоберkaHaTeMnepaTypaTaBHa-CTydeHaTa30Ha
C nomouTa Ha TemnepaTyphu unHgukatop moKeTe pegOBHo ga npOBepBaTe gau TemnepaTypa Ta B ha-CTygeHaTa 30Ha e npabUHa. TemnepaTypa Ta BbB BbTpewHocTta Ha XaagUHaKa B geuctBUteAHOCT 3aBucu OT HraKoAko fakTopa, cpeg KouTo ca OKoAHaTa TemnepaTypa B NOMEueHueTo, KOUueCTBOTO CbXpaHЯBaHa XpHa u YecTOTaTa Ha OTBapJe Ha BpaTaTa. B3eMeTe npegBug Te3u fakTopu, Ko2aTo HactpoBate ypega.
- Ko2aTo uHgukatopbT noka3Ba ,OK", TOBA o3Haayaba, ye TepMoctTaTbTe HacTpoEH nogxograu O BbTpewHaTa TempepaTypa e npabUHa.
- Ако убевт на Temператуня унгukatop сане БЯ, Това ознива, чу Temпература в Тьрges bucoka.В тakьслчай уberluуete Habtpoukata 3a Tempepatypata Na xlaaguaHuka u u3yaKaute 12 yaca, npegu ga npobepute uhhukatopa OTHOB.Бьзможно e unghukatopbT ga cTaHe BЯ u3BecTHO BpeMe cAeg go6abRhe Ha HOBa xpaHa UU cAeg KaTO BpaTATA 6uHa octabeha OTBOpeHa.
PADEKOS LAISKAS
PAMJE E PERGJITHSHME E PRODUKTIT 03
INSTALLALIMI I PRODUKTIT 05
UDHEZIMETEPERDORIMIT 11
PASTRIMIDHE MIREMBAJTJA 16
ZGJIDHJA E PROBLEMEVE 18
SHTOJCE 21
AL
SPECIFIKIMET
INSTALIMI I PRODUKTIT
Udhezimet e instalimit
Pör pajisjet ftohëse me kategori klimaterike
make yourself at home