
V6540X2 - Tumble drier NEFF - Free user manual and instructions
Find the device manual for free V6540X2 NEFF in PDF.
| Product type | Condenser dryer |
| Brand | Neff |
| Model | V6540X2 |
| Maximum load capacity | 8 kg |
| Energy class | B (estimated) |
| Dimensions (H x W x D) | 85 cm × 60 cm × 60 cm |
| Net weight | Approximately 50 kg |
| Power supply | 230 V, 50 Hz, 16 A |
| Drying programs | Cotton, synthetics, delicates, quick, etc. |
| Special functions | Delayed start, anti-crease end of cycle |
| Noise level | 65 dB (A) |
| Maintenance and cleaning | Regular cleaning of the lint filter and condenser |
| Safety | Child lock, automatic shutdown, overheat protection |
| Spare parts and repairability | Control panel, door, door seal, hinge, front panel |
| General information | User and repair manual available in several languages |
Frequently Asked Questions - V6540X2 NEFF
User questions about V6540X2 NEFF
0 question about this device. Answer the ones you know or ask your own.
Ask a new question about this device
Download the instructions for your Tumble drier in PDF format for free! Find your manual V6540X2 - NEFF and take your electronic device back in hand. On this page are published all the documents necessary for the use of your device. V6540X2 by NEFF.
USER MANUAL V6540X2 NEFF
MHCTpyMeHTN I NOMOUIH CpeDcTBA. 6
PeMOHT. 7
4.1 CmHa Ha KOHTpOHHa naHn 7
4.1.1 CbanaHe Ha KOHTponHnaHn 7
4.1.2 MoHTIpaHe Ha KOHTpOJIHnnaHn 8
4.2 CmHa Ha Kanaka Ha ochoBaTa 9
4.2.1 CbanaHe Ha Kanaka Ha OCHOBata 9
4.2.2 MoHTIpaHe Ha KaIaka Ha OCHOBaTa 9
4.3 CmHa Ha npednnaen 10
4.3.1 CbIaJIHe Ha npEHHaHn 10
4.3.2 MoHTIpaHHe Ha npEHHaHaH.. 10
4.4 CmHa Ha Bparata 11
4.4.1 3BaKaHa He Ha BpaTaTa.. 11
4.4.2 MoHTpaHe Ha BpaTaTa 11
4.5 CmHa Ha ynnbTHeHneTo Ha BpaTaTa 12
4.5.1 CbaIHe Ha yIbTHHeHnTo Ha BpaTata 12
4.5.2 MoHTnpaHcHa yNtBTHHeHrTo Ha BpTaTa 13
4.6 CmHa Ha KInoua Ha BpaTaTa 14
4.6.1 CbānlaHe Ha KJIouyankata Ha BpaTata 14
4.6.2 MoHTIpaHHe Ha KInOuaKkata Ha BpTaTa 14
4.7 CMnHa Ha nHa rata Ha Bpaata 15
4.7.1 CbAraHe Ha naHTata Ha BpaTata 15
4.7.2 MoHTnpaHe Ha nAHTata Ha BpaTata 15
OTHOCHO To3n DokyMeHT
1.1 Baxha nHΦopMaζη
1.1.1 Uen
TeHc cBbETn 3a pEmOH T NOMarat Ha Ntpe6nTEnla DpemOHtnpa Cam ypeiB C bOeTBeTbVE C pernameHTa 3a ekONOrOcb6paHO npoeKtnpaHe Ha ypeiNe (OT 03.2021 r.).
Te cbIbpxk HnHOpMaunKa Ka Da CMeHrTe ONpeDeneHn pe3epBn YactN, BKIOHTENHO npdynpckdHn n PnCKOBE.
Ako IMATE HRAKAKINBbnpoC,MOJIa CbPkeTe Ce c HAUNO OTDeN 3a OBCNYBAHe Ha KIMENTH. Hne HOCIM OTTOBOPHOCT 3a UETn, CAMO AKO CbBeNTe 3a peMOHT ca cna3eHN npabInHo.
1.2 06aCHeHne Ha cHMBOJInTe
1.2.1 HnBa Ha onaCHOCT
IpeynpeintenHnBaCe cBcTOrT OT CmBOJ nCnHaHa Dyma.CnrHaHaTa yMa noka3Ba cepno3HOCTTA Ha onaCHOCTTA.
| Ниво на predecessorнiche 3наченie | |
| ОПАСHОCT | Есnasbaанeto на predecessorнechтелноTo сьобшени щеdoesde до сMbrt ип сериоши Нараловaning. |
| ПРЕДУПЕЖDEHNE | Есnasbaанeto на predecessorнechтелноTo сьобшени може da doesde до сMbrt ипсериоши Нараловaning. |
| ВИМATEЛНо | Есnasbaанeto на predecessorнechтелноTo сьobшени може da doesde до леси нараловaning. |
| ВИМАHINEI | Есnasbaанeto на predecessorнechтелноTo сьobшени може da doesde до Иму- шостеви щeети. |
Tabnua 1: Hua Ha onachocm
1.2.2 Cnmbon3a onachoct
CIMBOHTE3aONACHOCTCa CIMBOHNUH N3o6paXeHNA, KOHTO DaBaT INDINKAUHA 3a BnDa ONACHOCT.
BTo3n DOKyMeHCTe H3N013BaT CNEdHInTe CMBOIN 3a OnaCHOCT:
| Симboл за опасост 3начени | Овци поедуридатello сбобчине |
| Опасост от[eilektprucecco наржени | |
| Риск ot[eckллзий | |
| Опасost от[nорязвени |
OTHOCHO To3n DokyMeHT
| Симbol 3a onachoct 3начени | Опachoct ot пемарази Опachoct ot горец поьрхости |
| Опachoct ot симно магнисто поліe | |
| Опachoct ot неонисяць льчени |
Ta5nuu2: CumbOnu 3a onachocm
1.2.3 CtpyKtpa Ha npéDynpeXkDeHnra
PepynpexdHnraT BTO3N DOKMeHT MMAT CTAHapTN3nPAH BbHwEN BID NCTaHdAPTN3nPAH CTpykTypa.

ONACHOCT
BnHn3ToyHnK Ha onaCHOCTTla!
Bb3mOHHnocpeuHOnOTnHnOpupaHeHaonachocTt/npedynpexdHeHne
Mepkn 3a6paHn 3a npDoTbpaTbaHe Ha onaChocTta.
CneHnIy nPmep NOKaBA npEynpEKeHHe, KoTo yBcOMaBA 3a TOKOB Yapd, npEeIN3BnKAn OH tAcTn NoD HanpeKeHHe. CnOmeHabe Ce MApkata 3a N36RbAbe Ha onacHOCTA.

ONACHOCT
Pnck OT TokOB yap npaH nuactn noH anpekeHne!
CmbptOT TOKOB ynap
N3KIOHUYe TpeOte OENKTPOUeCKOTO 3aXpaHbAne NOE 60 CEyHJnnpDJI 3aONuBaHe naPEMOHa.
1.2.4 06uCNMBOJI
BTO3NIOKYMENTCEH3NON3BATCNEDHNTeO6UINCNMBONI:
MoHTnpaIteB06paTeHpeI.

PemOH
4.2CMraHa Ha kanaka Ha oCHOBaTa
N3nCKBaHe:
YpeIbTe n3KNIOueH OT 3aXpaHbaHeTo.
YpeBtE n3KNIOueH OT BOOCHa6nTENHa Mpeka.
4.2.1 CbānārHe Ha Kanaka Ha ochOBaTa
1.CBaIeTe BnHTOBeTe.

2.Canete OCHOBATA Ha KANAKA KATO 3aBbPTNTe OCHOBATA Ha KANAKA HADONY.
4.2.2 MoHTnpaHe Ha kanaka Ha oCHOBaTa
MoHTnpaIteB06paTeHpeI.

PemOH
4.3 CmHa Ha npednnaHn
M3nCKBaHe:
YpeBte N3KNIOueHOT 3aXpaHBAHeTO.
YpeBt E n3KIOUeH OT BOOChA6DnTeNHaT MpeXa.
YekmeKeTo 3a nepiHnna npenapaTe cBaIeHO.
KoHTpoHnTnAneJ e cBaaneH.
Bpatae cbaeneHa.
YnnbTHHeHnTo Ha BpaTaTa e CbaJeHO.
KanaKbT Ha ochobata e cBaJeh.
4.3.1 CbanyHe Ha npednnaHenn

BHIMATEJIHO
Octpn p6oBe Ha Kopnyca!
HapaHbAHnO Tnpa3BaHe
Hocete npedna3n pbkauu.
1.


BHIMATEJIHO
Pnck ot nadaun yactn nopadpa3xa6eHN BnHTOBe!
HapaRaBaHe npaDi naDaun qactn.
3akpenete KOMnoHeHTa, Taka Ye da He naHe.

BHIMAHHE!
Pnck ot nadaaun yactn nopadn pa3xna6ehn BNHTOBe!
NoBpeHa npyn HAcTn Ha ypea nn B Doma Ha KIneHTA, Hanp.
DbHOTO
3akpenete KOMnoHeHTa, Taka Ye da He naHe.
OTCTpaHETe BnHTOBete BCNEHnpe1(1-2-3-4-5-6-7).

2.Cbane npednnaHn
4.3.2 MoThnpaHe Ha npedHnaHn
MoHTnpaIteB06paTeHpeI.

PemOH
4.4 CmHa Ha BpaTaTa
N3nCKBaHe:
YpeBbTe H3KnIOueHOT 3axpaHBAHeTo.
YpeBt E n3KIOHcH OT BODOCHA6dITENHATA MpeXa.
4.4.2 MoTHnpaHe Ha BpaTata
MoHTnpaIteB06paTeHpeI.
4.4.1ИЗвадеHaВpaTaTa
CbaTeTpnteBuHTa.
MoHTnpaIteB06paTeHpeI.

PemOH
4.6CMHaHaKJIIOHaBaPaTaTa
M3nCKBaHe:
YpeBbTe H3KnIOueHOT 3axpaHBAHeTo.
YpeBt E n3KIOHcH OT BODOCHA6dITENHATA MpeXa.
4.6.1 CbanyHe Ha KInouyAnkata Ha BpataTa
- OTbOpTe npedHata Bpata.
2.

BHIMAHHEI
Pnck OT nobpeega NOBbpxHoc!
NoBpbXHOCTHa HyeJa MoKeJa ce HAppacka, aKo IINON3BaTEHENPAHNHINCHPTyEMTN.
U3non3BaIte cAmO nIacTmacOBu INHCTpyMeHTN.
N3BaTe npyKHHata n 136yTaIeYnTbTHHeHneTo.
3.CBaJIeTe BnHTOBeTe Ha KInOHaNkata Ha BpaTata.
4.Ocbo6oJeTe KIOHAnKaTa Ha BpaTaTa.
5. ⅢBaTe MexaHn3Ma 3a abapuHo OcB6oxJaBaHe Harope ot BoDaHa.
6.ИЗКИЧЕТе KOHEKTOPа Ha KaBena.
4.6.2 MoHTnpaHe Ha KInouaKata Ha BpaTaTa
KIOHANKATA HA Bpata Tpr6Ba Da E B npabHHOTo NONOKeHHe, 3a da OcIpyn fHyKUNrTa 3a ABapmHO OTbapHHe Ha Bpata Ha ypeHa.
MoHTnpaTBeBobpaTeHpeI.
PemOH
4.7CMraHa Ha NaHTaTa Ha BpaTaTa
BHIMATEIHO
OTBOpTe 06nactTa Ha naHTnte!
Ppema3BaHe/3axBaUaHHe Hn pbcTNTe
He nocaire Te KbM oBnaCTTa Ha naHTnte.
Hocete npedna3Hn pbkABuN.
N3nCKBaHe:
YpeBTe n3KnIOueH OTo 3aXpaHBAHeTO.
YpeBte n3KNIOueH OT BDOCHa6DITeHNHaTa Mpeka.
Me6enHnT naH e cBanE.
YekMeDkeTo 3a nepnHnnpenapat e cBaaneHO.
KoHTpoJIHHaT NaHeI e CBAJIeH.
Bparata e cbaneha.
YnnbTHEHmTo Ha BpaTatae cBaJeHO,
PpeHnT naHeI e CBAhen.
4.7.1 CBaJaHe Ha naHTaTa Ha BpaTaTa
1.CBaJTe DBaTBAHHTA.
- Cbane Ta HbpaTa.

4.7.2 MoHTnpaHe Ha naHTata Ha BpaTata
MoHTnpaTBeBopatEnpei.
4.3 Udskifting at frontpanel
Preindstilling:
Sorg for at sikre componenten mod at falde ned.

BEMAERK!
Fare for nedfaldende dele pga. Iosnede skruer!
Sorg for at sikre componenten mod at falde ned.
Preindstilling:

Sorg for at sikre componenten mod at falde ned.

BEMAERK!
Fare for nedfaldende deleg pga. lnsnede skruer!
Sorg for at sikre componenten mod at falde ned.
- Fjern saebeskuffen.
- Fjern betjeningspanelet (to skruer i hore side og fire skruer i dispensersomradet).
- Fjern doren.
- Fjern sukkelafdaekningen.
5.

BEMAERK!
Repair hints - Washing machine
1 Concerning this document. 73
1.1 Important information 73
1.1.1 Purpose 73
1.2 Explanation of symbols 73
1.2.1 Danger levels 73
1.2.2 Hazard symbols 73
1.2.3 Structure of the warnings 74
1.2.4 General symbols 74
Safety. 75
2.1 General Safety instructions 75
2.1.1 All domestic appliances 75
Tools and aids. 76
Repair 77
4.1 Replacing control panel 77
4.1.1 Removing control panel 77
4.1.2 Installing control panel 78
4.2 Replacing base cover 79
4.2.1 Removing base cover 79
4.2.2 Installing base cover 79
4.3 Replacing front panel 80
4.3.1 Removing front panel 80
4.3.2 Installing front panel 80
Concerning this document
1.1 Important information
1.1.1 Purpose
These repair hints support consumer to repair appliances by himself according to the applicable eco-design regulation (as of 03/2021).
They contain information how to exchange defined spare parts including warnings and risks.
In case of questions, please contact our customer service. We will only be liable for damages if the repair hints have been followed properly.
1.2 Explanation of symbols
1.2.1 Danger levels
The warning levels consist of a symbol and a signal word. The signal word indicates the severity of the danger.
| Warning level Meaning | |
| Danger | Non-observation of the warning message will result in death or serious injuries. |
| Warning | Non-observation of the warning message could result in death or serious injuries. |
| Caution | Non-observation of the warning message could result in minor injuries. |
| Notice | Non-observation of the warning message could result in damage to property. |
Table 1: Danger levels
1.2.2 Hazard symbols
Hazard symbols are symbolic representations which give an indication of the kind of danger.
The following hazard symbols are used in this document:
| Hazard symbol Meaning | |
| ! | General warning message |
| ! | Danger from electrical voltage |
| Risk of explosion | |
| Danger of cuts | |
| Danger of crushing |
Concerning this document
| Hazard symbol Meaning | |
| Danger from hot surfaces | |
| Danger from strong magnetic field | |
| Danger from non-ionizing radiation |
Table 2: Hazard symbols
1.2.3 Structure of the warnings
Warnings in this document have a standardised appearance and a standardised structure.
Danger
Type and source of danger!
Possible consequences of ignoring the danger / warning.
Measures and prohibitions for preventing the danger.
The following example shows a warning that warns against electric shock due to live parts. The measure for avoiding the danger is mentioned.
Danger
Risk of electric shock due to live parts!
Death by electrocution
- Disconnect appliances from electrical supply at least 60 seconds before starting repairs.
1.2.4 General symbols
The following general symbols are used in this document:
| Gen. symbol Meaning | |
| i | Identification of a special tip (text and/or graphic) |
| j | Identification of a simple tip (only text) |
| Identification of a link to a video tutorial |
Table 3: General symbols
| Gen. symbol Meaning | |
| Identification of required tools | |
| Identification of required preconditions | |
| Identification of a condition (if ..., then ...) | |
| Identification of a result | |
| [Start] Identification of a key or button | |
| [00123456] Identification of a material number | |
| Status Identification of displayed text / window(in the appliance's display) | |
Safety
2.1 General Safety instructions
2.1.1 All domestic appliances
Risk of electric shock due to live parts!
Errors by repairs involving electrical components can lead to electrical shock!
- Disconnect the appliance from the mains for at least 60 seconds before starting work.
After the repair have a safety test according VDE 0701 or country-specific regulations performed.
Risk of injury from sharp edges!
Wear protective gloves.
Risk of crushing during repair, maintenance, troubleshooting and service due to heavy and moving components
Wear protective shoes.
- Secure heavy components from falling down.
- Do not stick body parts into moving components.
Risk to the appliance's safety / function!
Only use original spare parts.
Risk of damage to electrostatically sensitive components (ESDs)!
- Do not touch the modules, including connections and conductor paths.

Tools and aids
| Designation Details Images | ||
| Auxiliary tool [15000155] | Tool for loosening out of plastic parts | |
| Screwdriver Torx T20 with bore hole [00340764] | 100 mm, for screws with safety pin | |
| Torque spanner [15000441] | Torque spanner 20 - 100 Nm | |
| Slot screwdriver [00340854] | Blade 3.5 mm x 0.6 mm x 100 mm, Protective Insulation 1000 V AC | |
| Slot screwdriver [00340855] | Blade 5.5 mm x 1.0 mm x 125 mm, Protective Insulation 1000 V AC | |
| Needle-nose pliers, angled pattern [00341269] | Length 200 mm | |
| Side-cutting pliers [00342182] | Length: 200 mm | |
| Designation Details Images | ||
| Combination wrench [00340811] | Wrench size 10°mm, M6 | |
| Combination wrench [00340814] | Wrench size 13°mm, M8 | |
| Combination wrench [00340817] | Wrench size 17 mm, M10 | |
| Combination wrench [15000459] | Wrench size 16°mm, M10 | |

Repair
4.1 Replacing control panel

Prerequisite:
Appliance is disconnected from power supply.
Appliance is disconnected from water supply.
Furniture panel has been removed.
4.1.1 Removing control panel
-
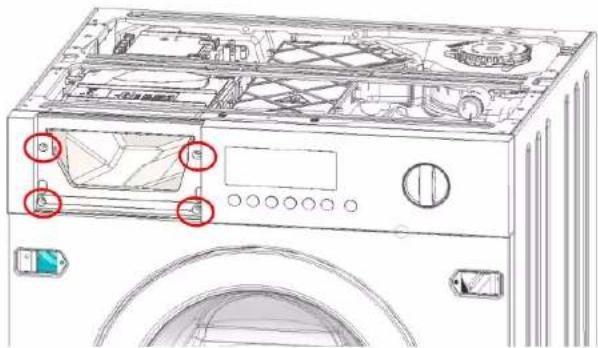
- Remove detergent drawer.
- Remove screws on metallic worktop and this last one.
- Remove the screws on control panel (1-2-3-4).

Repair
3.1. Grab control panel with hands on left and right side. 2. Slightly pull out control panel on left side (1).
- Slightly push control panel to the left (2).
- Lift control panel to the front and upwards (3).

4.1.2 Installing control panel
Install in reverse order.

Repair
4.2 Replacing base cover
Prerequisite:
Appliance is disconnected from power supply.
Appliance is disconnected from water supply.
4.2.1 Removing base cover
- Remove screws.
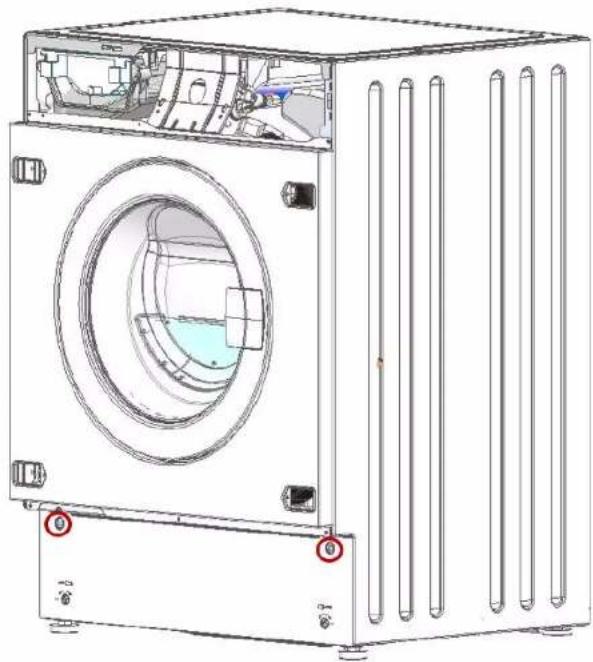
- Remove cover base by rotating base downward.
4.2.2 Installing base cover
Install in reverse order.

Repair
4.3 Replacing front panel
Prerequisite:
Appliance is disconnected from power supply.
Appliance is disconnected from water supply.
Detergent drawer has been removed.
Control panel has been removed.
Door has been removed.
Door seal has been removed.
Base cover has been removed.
4.3.1 Removing front panel

1.

Caution
Risk of falling parts due to released screws!
jury because of falling parts. Secure component from falling down.
Notice
Risk of falling parts due to released screws!
Damage to other parts of the appliance or at customers home e.g. bottom.
- Secure component from falling down.
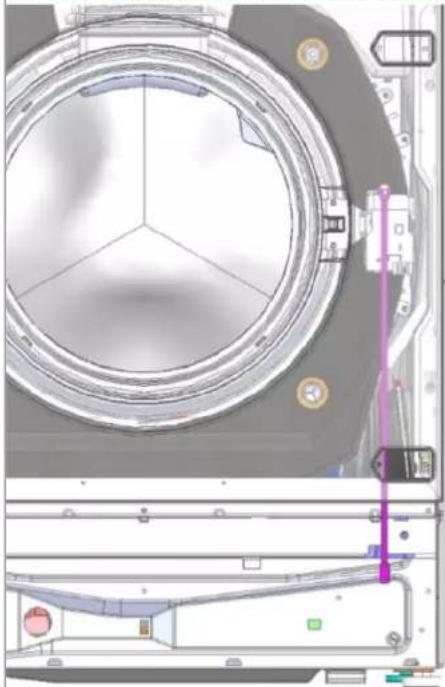
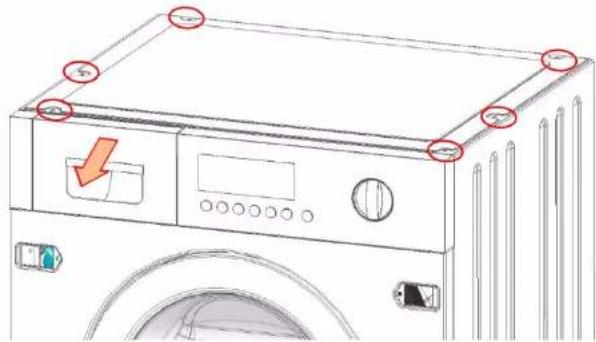
Remove screws from in following order (1-2-3-4-5-6-7).
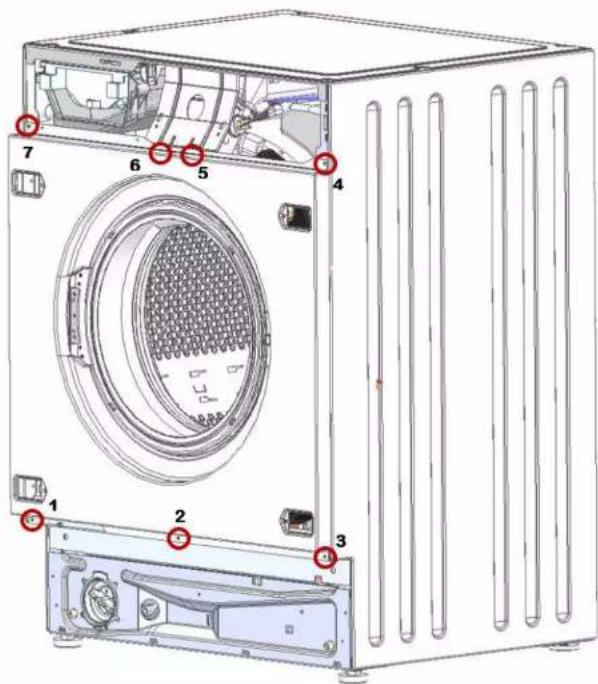
- Remove front panel.
4.3.2 Installing front panel
Install in reverse order.

Repair
4.4 Replacing door
Prerequisite:
Appliance is disconnected from power supply.
Appliance is disconnected from water supply.
4.4.1 Removing door
Remove three screws.
Install in reverse order.

Repair
4.5 Replacing door seal

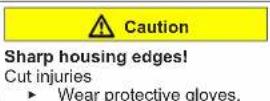
Caution
Sharp housing edges!
Cut injuries
Wear protective gloves.

Caution
Risk of falling parts due to released screws!
Injury because of falling parts.
- Secure component from falling down.
Notice
Risk of falling parts due to released screws!
Damage to other parts of the appliance or at customers home e.g. bot
om.
- Secure component from falling down.
Prerequisite:

Appliance is disconnected from power supply.

Appliance is disconnected from water supply.
4.5.1 Removing door seal
Caution
Risk of falling parts due to released screws!
Injury because of falling parts.
Secure component from falling down.
Notice
Risk of falling parts due to released screws!
Damage to other parts of the appliance or at customers home e.g. bot
om.
Secure component from falling down.
- Remove detergent drawer.
- Remove control panel (two screws on right side and four screws on dispenser area).
- Remove door.
4. Remove base cover.


Notice
Risk of damaged surface!
surface of appliance can be scratched by using wrong tools.
Only use plastic tools to replace the tension ring
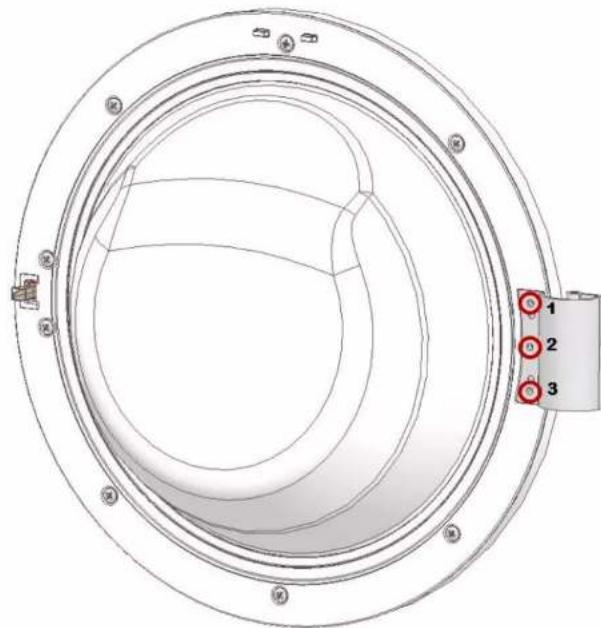
Remove tension ring from gasket on front panel with a plastic tool.
6. Remove front panel.

Repair
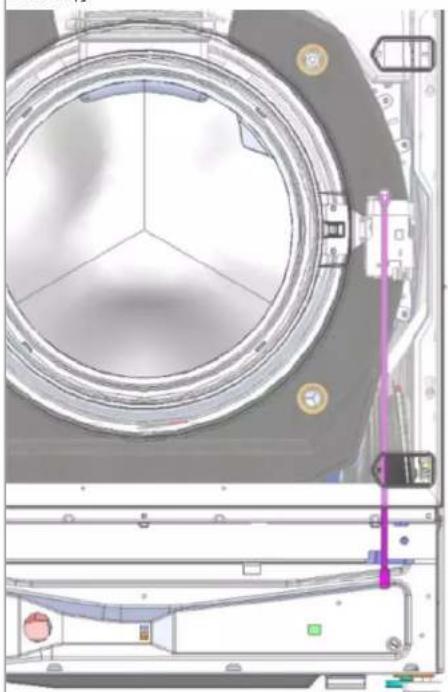
- Release gasket connection with dryer tunnel.
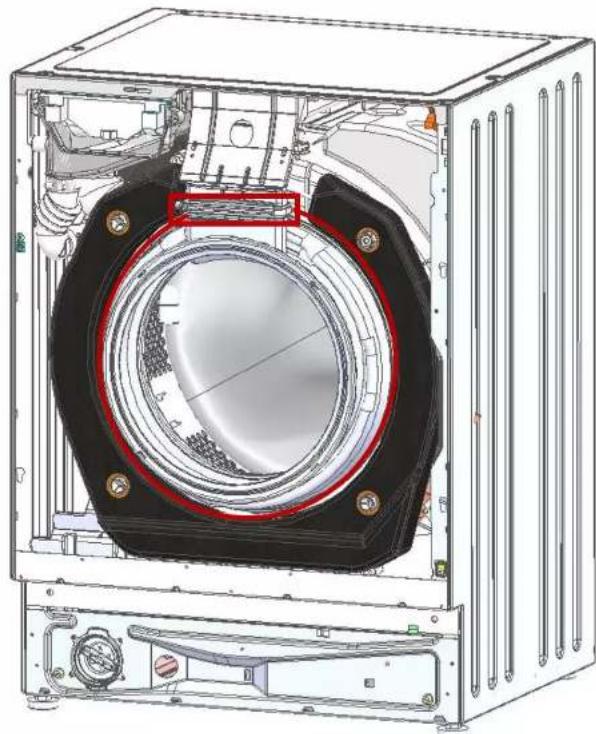
8. Remove fixation ring of gasket on plastic tub (7 mm socket wrench)
9. Remove gasket.
Install in reverse order.

Repair
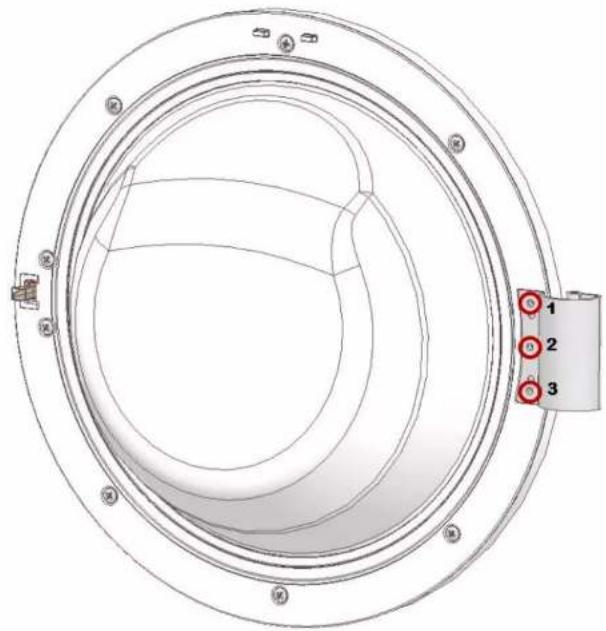
4.6 Replacing door lock
Prerequisite:
Appliance is disconnected from power supply.
Appliance is disconnected from water supply.
4.6.1 Removing door lock
- Open front door.
2.

Notice
Risk of damaged surface!
Surface of appliance can be scratched by using wrong tools.
Only use plastic tools.
Remove spring and push away seal.
- Remove screws on door lock.
- Release door lock.
- Remove opening line upwards form guide.
- Disconnect cable connector.
Door lock must be in the right position to ensure the emergency door opening function of the appliance.
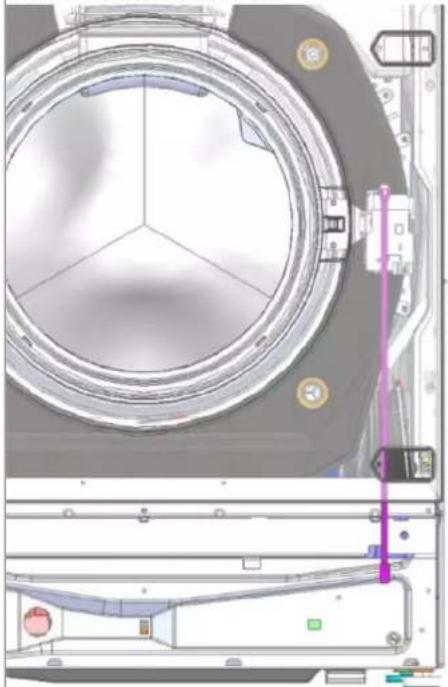
Install in reverse order.

Repair
4.7 Replacing door hinge
Ca
Open hinge area!
Finger crushing / entrapment
Do not reach into the hinge area.
Wear protective gloves.
Prerequisite:
Appliance is disconnected from power supply.
Appliance is disconnected from water supply.
Furniture panel has been removed.
Detergent drawer has been removed.
Control panel has been removed.
Door has been removed.
Door seal has been removed.
Front panel has been removed.
-
Remove two screws.
-
Remove door hinge.

Install in reverse order.
Remonditeave - Pesumasin
1 Selle dokumendiga seoses 87
1.1 Tahtis teave 87
1.1.1 Eesmark 87
1.2 Sumbolite selgitus 87
1.2.1 Ohutasemed.. 87
1.2.2 Ohusumbolid 87
1.2.3 Hoiatuste struktuur 88
1.2.4 Üldised sumbolid 88
Ohutus. 89
2.1 Üldised ohutusjuhised 89
2.1.1 Koki kodumasinad 89
Tabel 1: Ohutasedmed
1.2.2 Ohusumbolid
Ohusumbolid on sumboolsed kujutised, mis viytavad ohu laadile. Selles dokumendis kasutatakse alljargnevaid ohusumboleid.
1.2.3 Doun Twv TpoeiToiOneWv
OITPOEIOIIOAEiOe auto To eyypao exouv mua TUTOTOIINeVn EpaVion kai mia TUTOTOIINeVn boun.


KINADYNOE
EiOg KAI Tny KIVovou!
PiBavcs ouveteies edyayvonaeToV KIOUVO/THV TPOEOToln.
Mtpa kai aayopeuoeic yia tyn pOAnn tou Kivouou.
To napakutnapadeyia deixvei maipinoeodtoinn Tou pioeiotoei kat a n n n n n n n n n n n n n n n n n n n n n n n n n n n n n n n n n n n n n n n n n n n n n n n n n n n

KINADYNO
Kivouos nAekptponanlag Aoyw nAektpopopowepw!
Oavato nio nkeptipnia
AToouvdeTe Tc oukeuec aTTO nV npoxn nAekptikou peuatoC
Touaxiotov 60 deutepoaettna piv Eekivnoete Tc EITIOKEUEC.
1.2.4 Tevik
1.AvoIe Tny mTPOOTIVnOPTa
2.
PPOZOXHI
KivduvoC kATEoTpaμeyns EITIAPVEIOs!
HETIAPVEA tns ouakeuHc mTOpel va ypatouovioTei ato akataaanla epyaleia.
XpnoiptonoiTe movo TnataTikApyaleia.
Apaieote to 5aipnpio koi ottpwTe oTEyavovtoTko.
- ApaipéoTe nC BiEeO TnV aopαλεiA npTAC.
4.AaopaaioTe nay aopaiaia npotac. - Apaipoe TpaBuvTc TIV aoPaiion EKTAKNTs avayknS pOcs Ta Etnaw aTOV oyno.
- AIOAOVIDEATEOUVDEOkaWdiou
4.6.2 ToTOnTeTnAn aopaaIaS tropAs
Ha aepaiaeia troptac npetei va biopketa atn ouotn deon yia va evai BéBain n leitoupyia avoiyatos tsnpctac kxtaktnc avayknns tnc oukeunc.
Eykaataotne 1yntvntihtn eipa.
EπIOKεUN
4.7 AvikataoTaon eVTeTe npTac

IPOEOXH
Avolte mny Teipoxy me toue vEmTeoec! SuovthanyTayloEoun SokTuOu
MnV ayviTe TnV TEPIOXn ME TOUs CVETEOEDc.
ΦopATE TPOOTATEUTIKA yAvTiA.
PouT682q:
H ouokekun eliva aotouovdeevn an to nT npoxn Tpofooosiaac
Houakeun eivai aioouvdejeyn toy npoxh vepou.
Exiaapaei n npocoun tou vrouaatiou.
Exi aepie0 toupr atoppuavko.
To xeiipiai npio exiaqapae8ei.
H npiaeexiaapaeBc.
Exi aipiee fo oteyavotnoinko npotac.
Exiaopaie0ei o npootivoc nivaKaC.
4.7.1 Apaipoeon neveetne troptas
1.ApaipoeTe duo BiEc.
- Apaipate tov evtote tnpotac

4.7.2 ToToBcTnAn nOptaS
m = 311 ;

PERIGO
Risco deCHOque eltrico devidao partes sob tensao!
- Remova o painel frontal.
4.3.2 Instalar o painel frontal
- Remova o painel frontal.

Reparacao

- OTHOCHO To3n DokyMeHT
- Baxha nHΦopMaζη
- Uen
- 06aCHeHne Ha cHMBOJInTe
- HnBa Ha onaCHOCT
- Cnmbon3a onachoct
- CtpyKtpa Ha npéDynpeXkDeHnra
- ONACHOCT
- 06uCNMBOJI
- PemOH
- 4.2CMraHa Ha kanaka Ha oCHOBaTa
- CbānārHe Ha Kanaka Ha ochOBaTa
- MoHTnpaHe Ha kanaka Ha oCHOBaTa
- CmHa Ha npednnaHn
- CbanyHe Ha npednnaHenn
- BHIMATEJIHO
- BHIMAHHE!
- MoThnpaHe Ha npedHnaHn
- CmHa Ha BpaTaTa
- MoTHnpaHe Ha BpaTata
- 4.4.1ИЗвадеHaВpaTaTa
- 4.6CMHaHaKJIIOHaBaPaTaTa
- CbanyHe Ha KInouyAnkata Ha BpataTa
- BHIMAHHEI
- MoHTnpaHe Ha KInouaKata Ha BpaTaTa
- 4.7CMraHa Ha NaHTaTa Ha BpaTaTa
- BHIMATEIHO
- N3nCKBaHe:
- CBaJaHe Ha naHTaTa Ha BpaTaTa
- MoHTnpaHe Ha naHTata Ha BpaTata
- Udskifting at frontpanel
- BEMAERK!
- Preindstilling:
- Repair hints - Washing machine
- Concerning this document
- Important information
- Purpose
- Explanation of symbols
- Danger levels
- Hazard symbols
- Structure of the warnings
- Danger
- General symbols
- Safety
- General Safety instructions
- All domestic appliances
- Tools and aids
- Repair
- Replacing control panel
- Prerequisite:
- Removing control panel
- Installing control panel
- Replacing base cover
- Removing base cover
- Installing base cover
- Replacing front panel
- Removing front panel
- Caution
- Notice
- Installing front panel
- Replacing door
- Removing door
- Replacing door seal
- Removing door seal
- Remove base cover.
- Remove front panel.
- Replacing door lock
- Removing door lock
- Replacing door hinge
- Ca
- Open hinge area!
- Remonditeave - Pesumasin
- Ohusumbolid
- Doun Twv TpoeiToiOneWv
- KINADYNOE
- KINADYNO
- Tevik
- PPOZOXHI
- ToTOnTeTnAn aopaaIaS tropAs
- EπIOKεUN
- AvikataoTaon eVTeTe npTac
- IPOEOXH
- PouT682q:
- Apaipoeon neveetne troptas
- ToToBcTnAn nOptaS
- Instalar o painel frontal
- Reparacao
Brand : NEFF
Model : V6540X2
Category : Tumble drier