Spring 3212 - Barbecue BARBECOOK - Free user manual and instructions
Find the device manual for free Spring 3212 BARBECOOK in PDF.
| Product type | Gas barbecue |
| Brand | Barbecook |
| Model | Spring 3212 |
| Number of main burners | 3 (main burners) |
| Side burner | Yes, with dedicated power |
| Ignition | Electric by AA battery (not included) |
| Grid material | Chrome steel (recommended gentle maintenance) |
| Body material | Enamel (rust-resistant, easy to clean) |
| Thermometer | Yes, on the lid to monitor temperature |
| Gas type | Butane or Propane |
| Gas pressure | Butane: 28-30 mbar; Propane: 30-37 mbar (depending on country) |
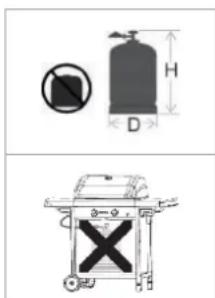
| Bottle capacity | 4.5 to 15 kg (max height 70 cm) |
| Power supply | 1 AA battery for the igniter |
| Cooking surface | Chrome steel grid, multiple heat zones |
| Preheating | Recommended 10 minutes with lid closed |
| Cleaning | Barbecook cleaner recommended for grid and tub |
| Burner maintenance | Regular cleaning of burners and venturis (at least 2 times per year) |
| Safety | Outdoor use only, mandatory leak test |
| Warranty | 2 years (subject to proper use and maintenance) |
| Spare parts | Available at www.barbecook.com or at point of sale |
| Product registration | Recommended on www.barbecook.com for after-sales benefits |
Frequently Asked Questions - Spring 3212 BARBECOOK
User questions about Spring 3212 BARBECOOK
0 question about this device. Answer the ones you know or ask your own.
Ask a new question about this device
Download the instructions for your Barbecue in PDF format for free! Find your manual Spring 3212 - BARBECOOK and take your electronic device back in hand. On this page are published all the documents necessary for the use of your device. Spring 3212 by BARBECOOK.
USER MANUAL Spring 3212 BARBECOOK
[EN] Go to barbecook.com, register your Barbecook and your Barbecook experience will be further improved!
[BG] Nocete barbecook.com, pernctpaTe cBor Barbecook, 3a da noJyute oue no-roJMyo ydoBJeTbOpene ot Barbecook!
[SL] Pobjite na spltetno stran barbecook.com, registirajte va so napravo Barbecook in vasa izkusnja Barbecook bo se boljsa!
[HR] Posjetite stranicu barbecook.com, registrirajte Vaš proizvod Barbecook i još vise uživajte u korištenju proizvod Barbecook.
EN-User guide 5
NL - Gebruiksaanwijzing 17
FR - Mode d'emploi 31
DE-Bedienungsanleitung 45
ES - Guía del usuario 59
IT - Guida all'uso. 73
PT - Manual do utiliser. 87
SV - Bruksanvising 101
DA - Brugervejledning 115
FI-Kayttöopas 127
NO-Brukerhandbok 139
HU-Hasznalatiutasitas 151
RO-Ghid de utilizes 163
CZ-Uzivatelska prirucka 175
EL-O8nyiec xprnnc 187
SK-Navod na pouzivanie 199
ET-Kasutusjuhend 211
LT - Naudotojo vadovas 223
LV-Lietosanaspamaciba 235
PL-Instrukcja uzytkownika 247
BG-PbkoBoDCTBO3a nOTope6nTeIa 259
SI - Priročnik za uporabo 271
HR - Korisnički priručnik 283
Illustrations 295
EN - USER GUIDE
1 Register your appliance. 6
2 About this manual. 6
3 Important safety instructions 6
Read and follow the instructions 6
- Be cautious with gas 6
- Select an appropriate location. 6
Safety warnings. 6
4 Recurrent concepts 6
- Venturis 6
- Burner hoods 7
Enamel 7
Flare-ups. 7
5Assembling the appliance. 7
- Safety instructions 7
To assemble the appliance. 7
6 Connecting gas to the appliance. 7
- Which cylinder, hose and regulator? 7
- Safety instructions 7
- Connecting the hose to the appliance. 7
- Connecting the hose and cylinder to the regulator. 8
- Replacing the cylinder 9
7 Checking for gas leaks 9
Why check for gas leaks? 9
- When check for gas leaks? 9
- Safety instructions 9
- Which materials do I need? 9
To check for gas leaks. 9
In case of a gas leak. 9
8 Getting the appliance ready for use. 10
Before each use. 10
Before first use (in a long time) 10
- Burning in the appliance. 10
9 Lighting the burners. 10
- Safety instructions 10
- Lighting the main burners. 10
- Lighting the side burner 11
- Switching the burners off. 11
Relighting the burners. 11 - Checking the flames. 11
10 Useful tips and tricks 12
Preheating the appliance 12
Preventing food form sticking. 12
- Direct and indirect grilling 12
Grilling with closed lid. 12
- Watching the temperature 12
Taking advantage of the heat zones 12
Avoiding flare-ups. 12
11 Maintaining the appliance. 12
Cleaning the grill 12
Cleaning the bowl 12
- Cleaning the burners and venturis 12
- Maintaining enamel, stainless steel, chrome and powder coated parts 13
- Storing the appliance. 13
- Storing gas cylinders 13
- Ordering spare parts 14
12 Warranty. 14
Covered 14
Not covered 14
13 Technical specifications. 14
Type label. 14
Injector diameters 14
14 Troubleshooting. 15
1 REGISTER YOUR APPLIANCE
Thank you for purchasing a Barbecook appliance! A whole new world is waiting for you to explore, whether it be in the peace and quiet of nature or amidst the hustle and bustle of the city. Become a grill master in our #barbecook community and let us put your grill skills in the spotlight.
Register your Barbecook appliance online and get some major benefits:
- You get access to the full user manual and get to know every bit of your appliance.
- You benefit from a personalized after sales service, allowing you to quickly find spare parts and to profit from an optimal warranty service.
- We inform you about product updates and give you tips, tricks and grillspiration to bring out the grill master in you.
Ready for an adventure? Register your product and join the #barbecook community!

For more information about registering your appliance, refer to www.barbecook.com.

Barbecook respects your privacy. Your data will not be sold, distributed or shared with third parties.
2 ABOUT THIS MANUAL
This manual is composed of two parts:
- The first part is what you are reading now. It includes instructions for the assembly, use and maintenance of your appliance.
- The second part starts on page 295. It includes all kinds of illustrations (exploded views, assembly drawings...) of the appliances that are described in this manual.
3 IMPORTANT SAFETY INSTRUCTIONS
3.1 Read and follow the instructions
Read the instructions before using the appliance. Always follow the instructions carefully. Assembling or using the appliance differently can cause fires and material damage.

Damages caused by not following the instructions (improper assembly, misuse, inadequate maintenance...) are not covered by the warranty.
3.2 Be cautious with gas
Working with gas is perfectly safe, but requires some extra caution:
Always store gas cylinders outdoors, in a well-ventilated area. Make sure they are not exposed to excessive heat or direct sunlight.
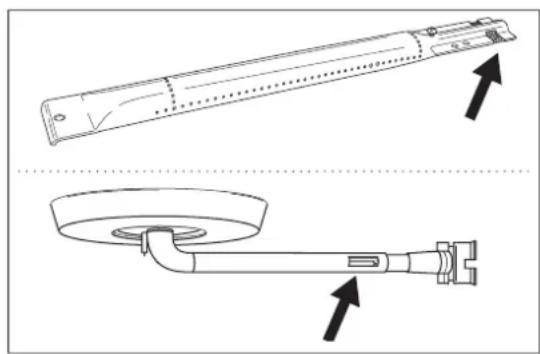
- Never store your gas cylinder or spare gas cylinder in the cabinet of your appliance.
- Never store your spare gas cylinder near a gas appliance in use.
- Turn off the gas supply at the gas cylinder after use.
- Never smoke near a gas appliance in use of near a gas cylinder (full/empty).

If you smell gas, immediately close the gas supply, extinguish all flames and open the lid of the appliance. If the smell lasts, call your gas supplier or the fire department.
3.3 Select an appropriate location
Use the appliance outdoors only. Using it indoors, even in a garage or shed, can cause carbon monoxide poisoning.
When selecting an outdoor location, always:
- Place the appliance at least three meters away from any building, in an open and well-ventilated area.
- Make sure there is a free air flow to the burners and the vent holes in the cabinet at all times.
- Make sure the appliance is not under an overhanging structure (a porch, a shelter ...) or under foliage.
- Put the appliance on a firm and stable surface. Never put it on a moving vehicle (a boat, a trailer ...).
3.4 Safety warnings
- Use outdoors only.
- Read the instructions before using the appliance.
- Do not move the appliance during use.
- Do not leave the appliance unattended during use, especially in the presence of children and animals.
- WARNING: accessible parts may be very hot. Keep young children away.
- Use appropriate protection when handling hot parts (lid, grill ...).
- This appliance must be kept away from flammable materials during use.
- Do not use wood, charcoal, lava rocks or ceramic briquettes on a gas appliance.
- Do not use the appliance when you have consumed alcohol or taken drugs.
- Tum off the gas supply at the gas cylinder after use.
- Do not modify the appliance.
4 RECURRENT CONCEPTS
This part includes definitions of some less familiar concepts. These concepts are used in several topics of the manual.
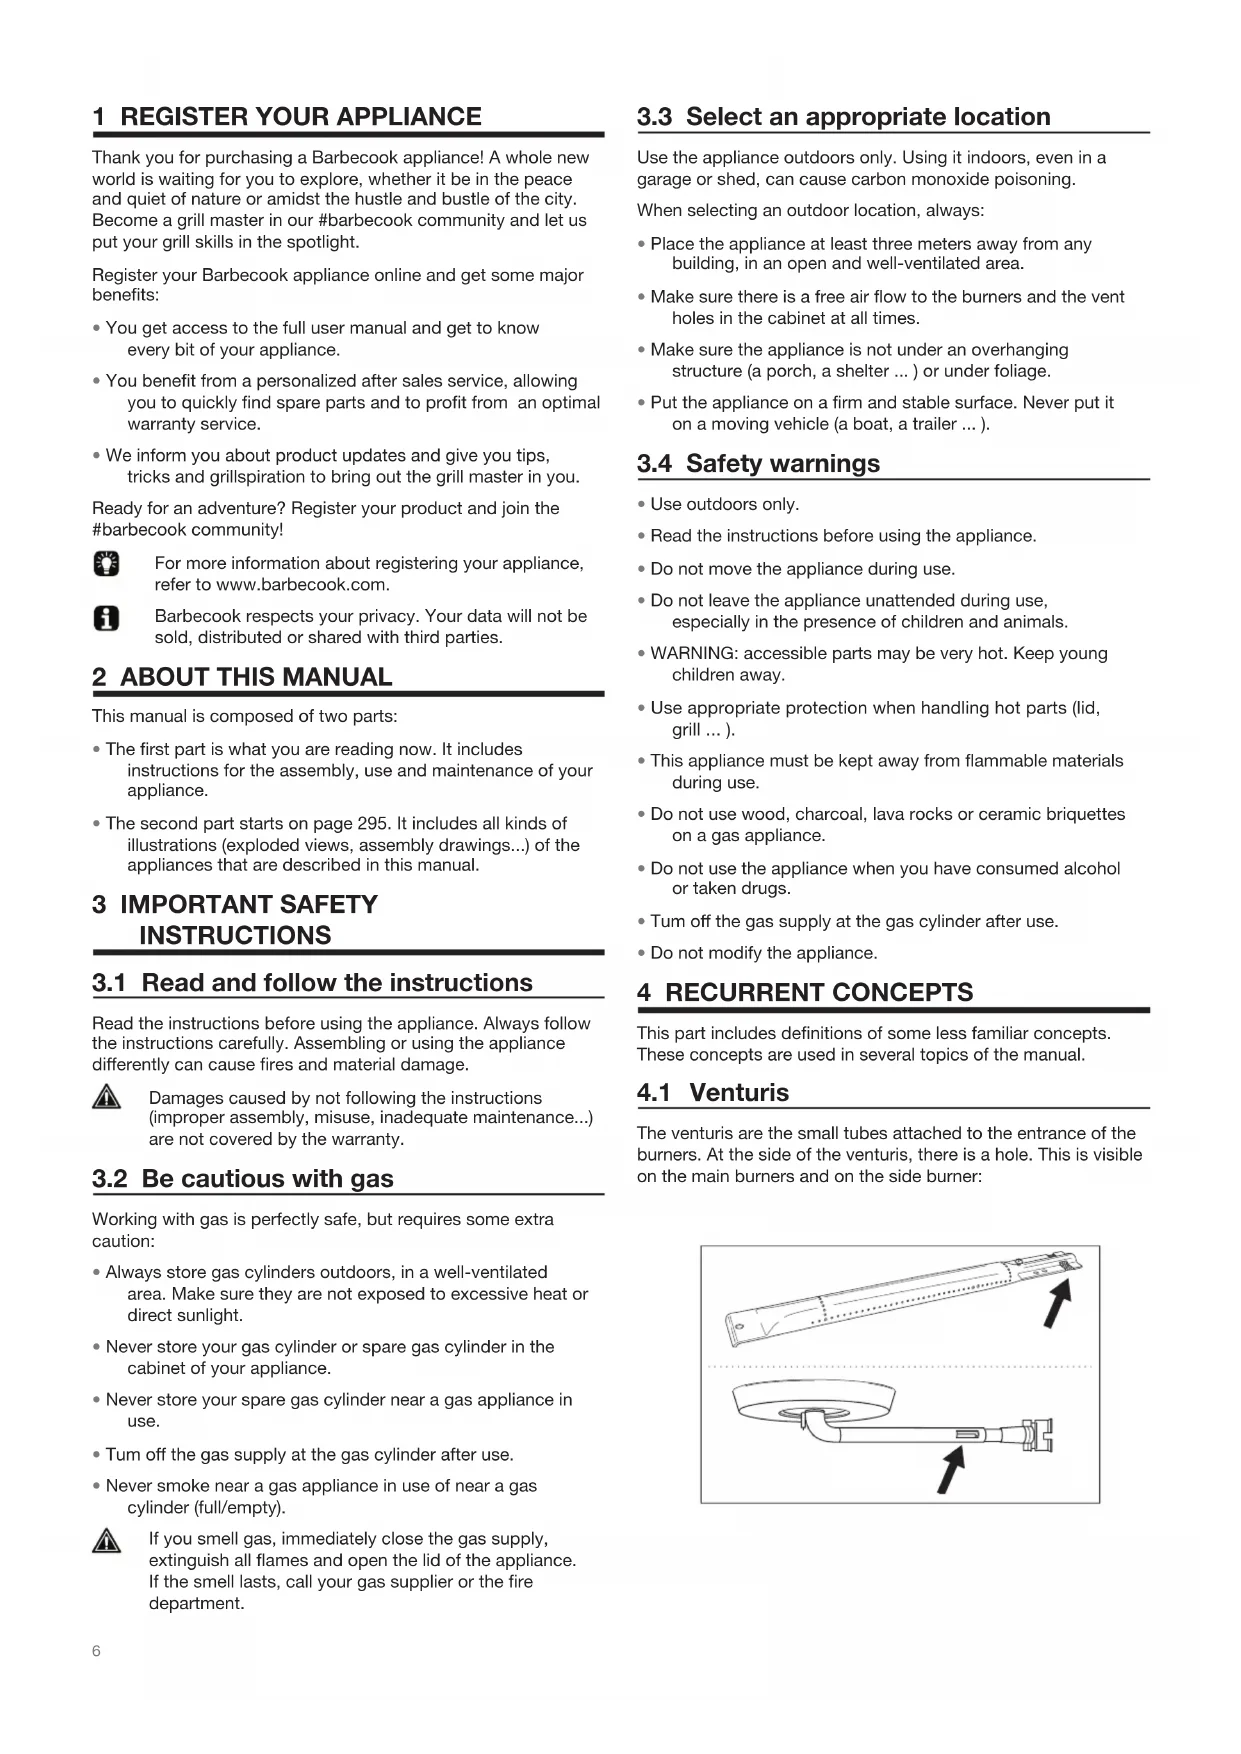
4.1 Venturis
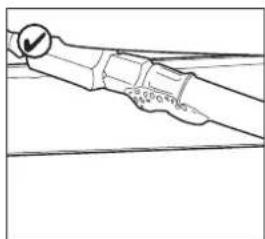
The venturis are the small tubes attached to the entrance of the burners. At the side of the venturis, there is a hole. This is visible on the main burners and on the side burner:
When the gas is on its way to the burners, it passes through the venturis. Thanks to the holes at the sides, the gas is then mixed with air and - as a result - with oxygen. This is necessary for a good ignition in the burners: only the correct mixture of gas and oxygen will ignite properly and will result in nice flames.
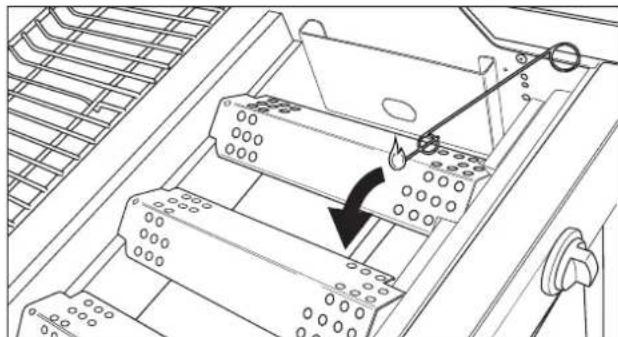
4.2 Burner hoods
The burner hoods are the hoods that you mount above the burners of your appliance. They protect the burners from dripping fat. The holes at the sides of the hoods also distribute the heat over the grill, so it is heated much taster and more evenly.
4.3 Enamel
Some parts of the appliance are covered in a layer of melted glass, called enamel. This enamel protects the underlying metal from corrosion. Enamel is a high-quality material: it is resistant to rust, does not fade under the influence of high temperatures and is very easy to maintain.

Because the enamel is less flexible than the metal which the appliance incorrectly. To avoid problems, be careful when assembling enamelled parts and always maintain the enamel as described further in this manual.
4.4 Flare-ups
Flare-ups are sudden flames that spark from the bowl when you are grilling. They are usually caused by dripping fat or marinade.
5 ASSEMBLING THE APPLIANCE
5.1 Safety instructions
- Do not modify the appliance when assembling it. It is very dangerous and not allowed to alter parts that are pre-assembled and/or sealed by the manufacturer.
- Always follow the assembly instructions carefully.
- The user is responsible for the correct assembly of the appliance. Damages caused by improper assembly are not covered by the warranty.
5.2 To assemble the appliance
You need a cross-slotted screwdriver, a flat-slotted screwdriver and an AA battery (electrical igniter). There are no batteries supplied with the appliance.
- Put the appliance on a flat and clean surface.
- Assemble the appliance as shown on the assembly drawings. You find them in the second part of this manual, after the exploded view of your appliance.

Be careful when assembling enamelled parts. The tools and screws may damage the enamel. Use the provided fiber washers to protect the enamel around the screws.

The blister packs can contain more screws than necessary. Screws can be left over after the assembly.

The package includes an emergency kit with spare assembly parts (screws, beits, fiber washers ...) You can use them in case you lost or broke some parts.
6 CONNECTING GAS TO THE APPLIANCE
6.1 Which cylinder, hose and regulator?
Before you can connect gas to the appliance, you have to buy a gas cylinder, hose and pressure regulator. The table below shows you which cylinder, hose and regulator you have to use. In Belgium (BE), for example, you have to use a propane cylinder with a hose and regulator for 37 mbar or a butane cylinder with a hose and regulator for 28-30 mbar.
| Country | Cylinder, hose and regulator |
| DK, GR, NO, SE, EE, LT, LV, CZ, PL, MT, HU, SI, SK, NL | Propane, 30 mbar / Butane, 30 mbar |
| ES, GB., IE, PT, BE, FR, LU, IT, CY | Propane, 37 mbar / Butane, 28-30 mbar |

This barbecue has been adjusted to be operate with 4,5 to 15kg butane/propane cylinders with an appropriate low pressure regulator. We recommend connecting the appliance to propane. Propane offers a high-quality combustion and is less sensitive to frost. The height H of the cylinder must be less than 70~cm , regardless of the cylinder's width or diameter D.

Buy your pressure regulator and gas cylinder together. Not all regulators fit all cylinders.

Use only a gas hose and regulator that is homologated for the country of use.
6.2 Safety instructions
- Never connect the cylinder directly to the appliance. Always mount a pressure regulator on the cylinder first.
- Never modify pre-assembled or sealed parts of the cylinder, the hose or the pressure regulator.
-
Keep the hose as short as possible (1,5 m maximum) to prevent it from dragging on the ground.
-
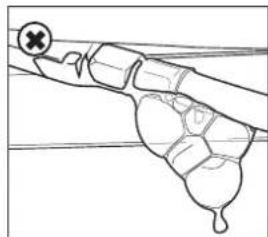
Never distort or twist the hose. Do not pull or pierce the hose. Keep the hose away from any parts of the barbecue that get hot. Check that the flexible hose stretches out normally, without twisting or pulling.
-
It should be replaced if it is damaged or cracked, when required by national regulations or at the end of the part lifecycle (f.ex France)
-
Never open the gas supply.
Always keep the cylinder in an upright position. - Check for leaks each time you make changes to the gas connection. See "7 Checking for gas leaks".
6.3 Connecting the hose to the appliance
France:
The equipment may be used with two types of flexible hose:
- Flexible hose designed to be joined onto ringed tailpieces on both the barbecue and regulator sides, held firm with collars (in accordance with standard XP D 36-110). recommended length 1.25m
- Flexible hose (according to standard XP D 36-112) fitted with a G 1/2 threaded nut for fixing to the barbecue and a M 20 x1.5 threaded nut for fixing to the regulator, recommended length 1.25 m.
Other countries:
It should be used with flexible hose that is suitable for use with butane and propane gas. Hose length should not exceed 1.50m
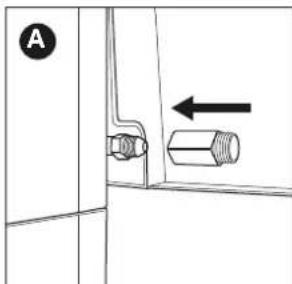
To connect the gas hose to the appliance, you have to mount a coupling on the gas tube of the appliance. The appliance comes with two couplings, both intended for particular countries:
| Country | Coupling |
| BE, CH, CZ, DK, ES, FI, GB, IE, IT, PT, SI | Coupling A |
| FR | Coupling B |

If your country is not in the table, use the coupling that complies with your national standards.
6.3.1 COUPLING A
You need a 19 mm spanner and a cross-slotted screwdriver.
- Screw the coupling on the gas tube of the appliance (A) and tighten it with a 19 mm spanner (B).
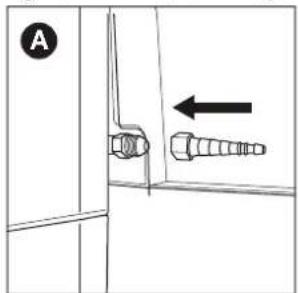

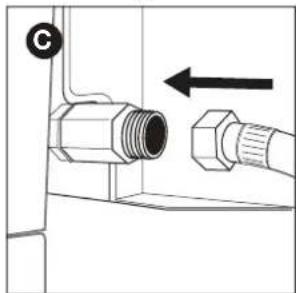
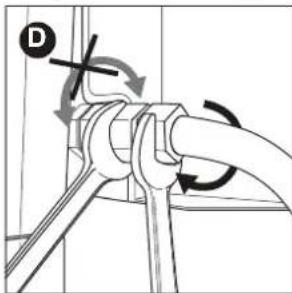
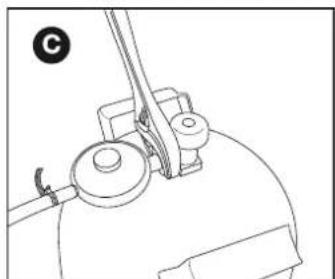
- Slide the hose over the coupling (C) and tighten the clamping ring with a cross-slotted screwdriver (D).

6.3.2 COUPLING B
You need a 22 mm spanner and an adjustable spanner.
- Screw the coupling on the gas tube of the appliance (A) and tighten it with a 22mm spanner (B).
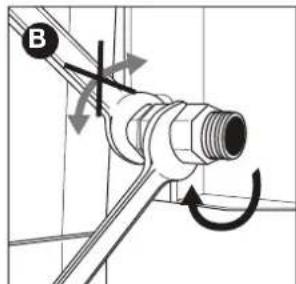
- Screw the gas hose on the coupling (C) and tighten it with two spanners. Hold the coupling with a 22mm spanner, while tuming the hose with an adjustable spanner (D).
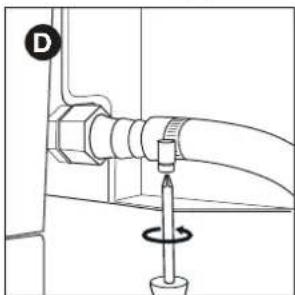
6.4 Connecting the hose and cylinder to the regulator
Depending on the type of pressure regulator you use, you need a cross-slotted screwdriver and/or an adjustable spanner.
-
Connect the hose to the pressure regulator. Do one of the following:
-
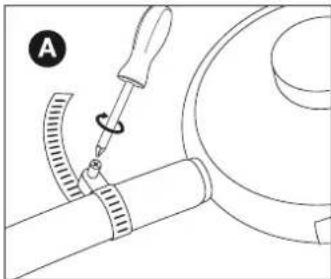
If the hose has a clamping ring, slide the hose over the regulator and tighten the clamping ring with a cross-slotted screwdriver (A).
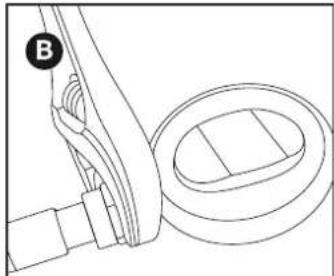
- If the hose has a nut, screw the hose on the regulator and tighten the nut with an adjustable spanner (B).
-
Connect the pressure regulator to the gas cylinder. Do one of the following:
-
If the regulator has a nut, screw the regulator clockwise on the cylinder and tighten the nut with an adjustable spanner (C).
- If the regulator has a screw thread, screw the regulator counter-clockwise on the cylinder (D).
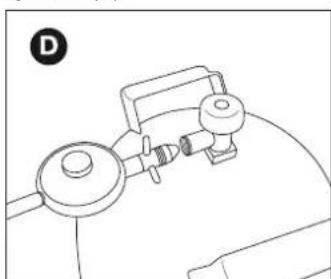

Use only regulators complying with EN 16129.
6.5 Replacing the cylinder
- Close the gas supply and set all control knobs to OFF.
- Disconnect the empty cylinder and connect the full cylinder.
- Check the cylinder, the hose and all gas connections for leaks. See "7 Checking for gas leaks".

Attention, when changing the gas cylinder, this should always be carried out away from any source of ignition.
7 CHECKING FOR GAS LEAKS
7.1 Why check for gas leaks?
Propane and butane are heavier than air. As a result, they do not float away when leaking from the appliance. Especially on windless days, a leak can cause the gas to collect in and around the appliance. That accumulated gas can then ignite and explode.
7.2 When check for gas leaks?
- Before the first use or before the first use after a long period of non-use.

Also check for gas leaks if your appliance was assembled by your dealer.
Each time you replace a gas component.
- At least once a year, preferably at the beginning of the season.
7.3 Safety instructions
- Put the appliance outdoors, in a well-ventilated area. Make sure there are no flames or heat sources near the appliance.
- Never use a lighter or match to check for gas leaks.
- Do not smoke and do not light the burners when checking for gas leaks.
7.4 Which materials do I need?
To check for gas leaks, you need:
- A testing liquid. You can use a ready-made leak spray or a mixture of water (50%) and dish-washing soap (50%).
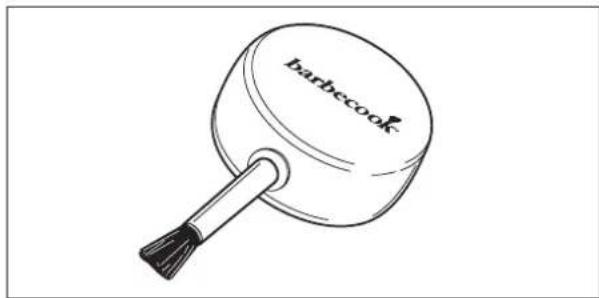
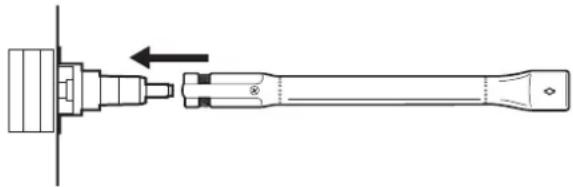
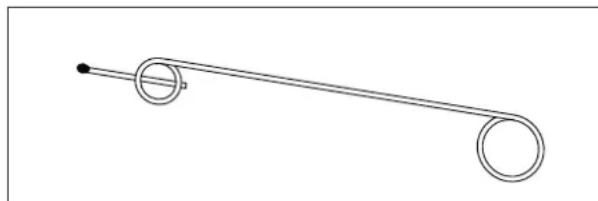
The leak test tool that came with your appliance. You use it to suck up the testing liquid and apply it to the gas component or connection that you want to check.
7.5 To check for gas leaks
You check for gas leaks by applying a testing liquid to all gas components and connections. If the bubbles on a particular component or connection grow, there is gas leak:
To check for gas leaks, proceed as follows:
- Put the appliance outside.
- Get your leak test tool and testing liquid (leak spray or water/soap mixture).
- Open the lid and set all control knobs to OFF.
- Open the gas supply slightly. Tum the valve of the gas cylinder only once.
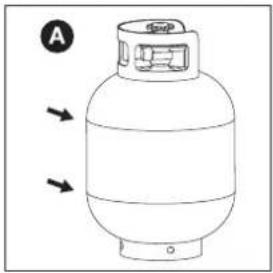
- Suck up some testing liquid with the leak test tool and apply it to the area that you want to check. You have to check:
The welds of the gas cylinder (A)
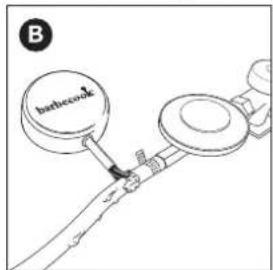
The hose (B)
The connections between the cylinder and the pressure regulator and between the pressure regulator and the hose (C)
The connection between the hose and the appliance (D)
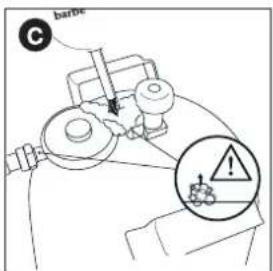
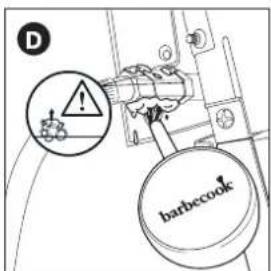

Your pressure regulator and coupling may be different from the ones in the illustrations.
- Do one of the following:
If you detect a leak, continue as described in "In case of a gas leak".
- If there are no leaks, close the gas supply, rinse all components thoroughly with water and dry them well.
7.6 In case of a gas leak
- Close the gas supply and do one of the following:
If you detected a leak on one of the connections, tighten that connection.
If you detected a leak on the cylinder or hose, replace the cylinder or hose.
- Recheck the connection or component on which you detected the leak.
- If the leak is not repaired, contact a Barbecook dealer. Do not use the appliance until the leak is repaired.

For a list of nearby Barbecook dealers, refer to www.barbecook.com.
8 GETTING THE APPLIANCE READY FOR USE
8.1 Before each use
Each time you use the appliance, make sure that:
- The appliance is in an appropriate location. See "3.3 Select an appropriate location".
- The gas hose does not drag on the ground and cannot come into contact with a hot surface or with dripping fat.
- The bowl is clean. We recommend cleaning the bowl after each use. See "11.2 Cleaning the bowl".
- The burners and venturis are not blocked by insect nests or spider webs. See "11.3 Cleaning the burners and venturis".
- The burners are assembled correctly. The venturis have to be placed over the openings of the gas valves.

If you want to be absolutely sure that your gas connection is okay, you can check your appliance on gas leaks before each use. See "7 Checking for gas leaks".
8.2 Before first use (in a long time)
If you use the appliance for the first time or for the first time after a long period of non-use, you have to execute some extra checks:
- Make sure that you have read, understood and checked all the instructions in this manual (only before first use).
- Check the appliance for gas leaks. See "7 Checking for gas leaks".

Also check for gas leaks if your appliance was assembled by your dealer.
- Clean the burners and venturis (only before first use in a long time). See "11.3 Cleaning the burners and venturis".
- Burn in the appliance before you put any food on it (only before first use). See "8.3 Burning in the appliance".
8.3 Burning in the appliance
By burning in the appliance before the first use, you remove remaining manufacturing greases from the appliance. Proceed as follows:
- Light the main burners and set their control knobs to HIGH. See "9.2 Lighting the main burners".
- Close the lid and let the appliance burn for 15 minutes. Do not put any food on the grill yet.
- After 15 minutes, open the lid and let the appliance burn for another 5 minutes (control knobs still set to HIGH).
- After 5 minutes, the appliance is ready for use. You can now put food on the grill.
To light the burners with the electrical igniter, you have to install an AA battery in the igniter. That battery is not supplied with the appliance. You find the battery case of the igniter on the control panel of your appliance.
9.1 Safety instructions
Before you light the appliance, execute all checks listed in "8 Getting the appliance ready for use".
- Make sure the lid is always open when you light a burner.
- Never bend directly over a burner when lighting it.
9.2 Lighting the main burners
9.2.1 U SING THE IGNITER
- Open the lid and set the control knobs of the main burners to OFF.
-
If no other burner is lit yet, open the gas supply and wait ten seconds. This allows the gas to stabilize.
-
Press the igniter until you hear sparks.
-
While holding the igniter, set the control knob of the middle burner to HIGH. Always light the middle burner first, never try to lit all main burners at the same time.
- If the burner does not light after three attempts, set its control knob to OFF, close the gas supply and wait 5 minutes. This allows any accumulated gas to escape.
- Retry lighting the burner. If it still does not light, try lighting it with a match or refer to "14 Troubleshooting" to determine the cause of the problem.
- Once one burner is lit, light the ether burners by setting their control knobs to HIGH.
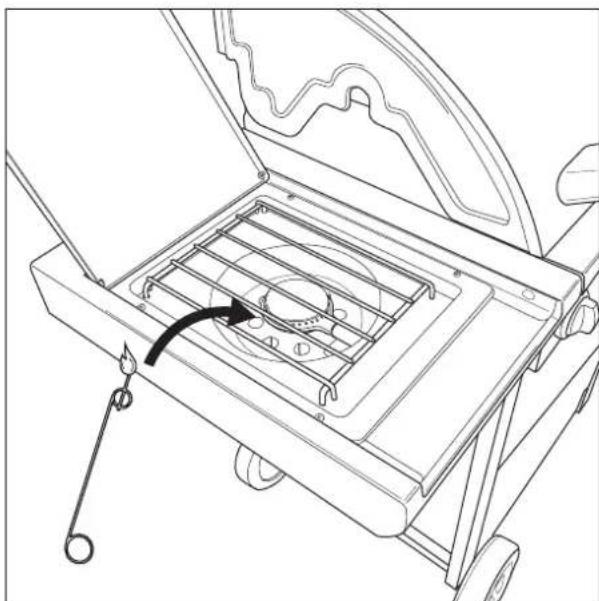
9.2.2 USING A MATCH
- Place a match in the match holder.
- Open the lid and set the control knobs of the main burners to OFF.
- If no other burner is lit yet, open the gas supply and wait ten seconds. This allows the gas to stabilize.
- Light the match and hold it about 13mm from the burner.
- Set the control knob of one burner to HIGH.

Always light one main burner to start with. Never light all main burners at the same time.
- If the burner does not light within 5 seconds, set its control knob to OFF, close the gas supply and wait 5 minutes. This allows any accumulated gas to escape.
- Retry lighting the burner. If it still does not light, refer to "14 Troubleshooting" to determine the cause of the problem.
- Once one burner is lit, light the other burners by setting their control knobs to HIGH.
9.3 Lighting the side burner

The side burner can only carry pots with a maximum weight of 9kg , maximum diameter of 220mm and minimum diameter of 120mm .
9.3.1 U SING THE IGNITER
- Open the lid and set the control knob of the side burner to OFF.
- If no other burner is lit yet, open the gas supply and wait ten seconds. This allows the gas to stabilize.
- Press the igniter until you hear sparks.
- While holding the igniter, set the control knob of the side burner to HIGH.
- If the burner does not light after three attempts, set its control knob to OFF, close the gas supply and wait 5 minutes. This allows any accumulated gas to escape.
- Retry lighting the side burner. If it still does not light, try lighting it with a match or refer to "14 Troubleshooting" to determine the cause of the problem.
9.3.2 U SING A MATCH
- Place a match in the match holder.
- Open the lid and set the control knob of the side burner to OFF.
- If no other burner is lit yet, open the gas supply and wait ten seconds. This allows the gas to stabilize.
- Light the match and hold it about 13mm from the side burner.
- Set the control knob of the side burner to HIGH.
- If the side burner does not light within 5 seconds, set its control knob to OFF, close the gas supply and wait 5 minutes. This allows any accumulated gas to escape.
- Retry lighting the side burner. If it still does not light, refer to "14 Troubleshooting" to determine the cause of the problem.
9.4 Switching the burners off
If you no longer use the burners, you have to switch them off. Proceed as follows:
- Close the gas supply.
- Set the control knobs of the burners to OFF.

By closing the gas supply first, you make sure there is no gas left in the appliance.
9.5 Relighting the burners
If a burner goes out while in use, proceed as follows:
- Open the lid and close the gas supply.
-
Set all control knobs to OFF and wait 5 minutes. This allows any accumulated gas to escape.
-
Relight the burner(s).
9.6 Checking the flames
Each time you light a burner, you have to check its flames. A perfect flame is almost completely blue, with some yellow at the top. Sporadic yellow flames are normal and not harmful.
If there is something wrong with the flames, do one of the following to solve the problem:
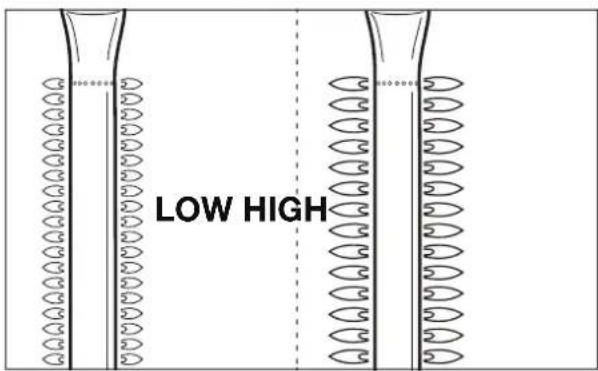
| If the flames are... Do | the following... |
| Low and entirely yellow | 1. Immediately close the gas supply and set all control knobs to OFF. 2. Refer to “Troubleshooting” to determine the cause of the problem. Most likely, the ventured are blocked. |
| Higher than the bowl | 1. Immediately close the gas supply and set all control knobs to OFF. 2. Wait 5 minutes to allow any accumulated gas to escape. 3. Relight the burner(s). 4. If the problem persists, refer to “Troubleshooting” to determine the cause of the problem. |
10.1 Preheating the appliance
By preheating your appliance, you make sure the grill is hot enough by the time you put food on it. Proceed as follows:
- Light the burner(s) and set their control knob(s) to HIGH.
- Close the lid and leave the appliance for ten minutes.
- After ten minutes, open the lid and put your food on the grill.
- If you need less heat now, set the control knob(s) to a lower position.
10.2 Preventing food from sticking
To prevent your food from sticking to the grill:
- Oil the food lightly with a brush before you put it on the grill. You can also oil the grill itself.
- Preheat the appliance. The warmer the grill when you put food on it, the less the food will stick.
- Do not turn the food too quickly. Let it catch some heat first.
10.3 Direct and indirect grilling
Depending on the type of food you are preparing and on how you want to prepare it, you can grill directly or indirectly:
| Method | Description | Use |
| Direct To sear | Place food directly above a lit burner, set that burner to a high position and keep the lid open. | vegetables |
| Indirect | Put your food next to a lit burner, set that burner to a medium/low position and close the lid. | To further cook seared meat |

When grilling under a closed lid, always keep an eye on the lid thermometer to make sure the appliance does not get too hot. See "10.5 Watching the temperature".
10.4 Grilling with closed lid
Closing the lid while grilling has some important advantages:
- The temperature of the grill is higher and remains more constant.
- You reduce the cooking time of your food and keep your food more moist.
- You reduce flare-ups and save gas.

When grilling under a closed lid, always keep an eye on the lid thermometer to make sure the appliance does not get too hot. See "10.5 Watching the temperature".
10.5 Watching the temperature
Your appliance is equipped with powerful burners, so it heats up rapidly and you can keep the temperature steady. When grilling under a closed lid, however, you have to make sure that the appliance does not get too hot. Keep an eye on the lid thermometer and take into account the following guidelines:
- A normal cooking temperature is about 210^ . At higher temperatures, dripping and accumulated fat can ignite.
- The temperature should never be over 300^ for more than five minutes. This can damage and deform the appliance.
If the appliance gets too hot, cool it down by opening the lid and setting the burners to a lower position.
10.6 Taking advantage of the heat zones
When all burners are lit, the burner hoods distribute the heat as evenly as possible over the grill. Despite this even heating, some zones are still hotter than others. You can take advantage of these heat zones to grill your food to perfection:
| Zone | Hot | Use to... |
| Front Grill | delicatadood (prawns, fish...) | |
| Center | Hotter | Prepare food that needs some time to cook (e.g. sausages,chicken ties ...) |
| Back | Hottest | Sear meat and vegetables |

You can also create heat zones by playing with the power of the burners. You can, for example, set a burner to a lower position and use the zone above that burner for delicate food or food that needs some time to cook.
10.7 Avoiding flare-ups
During grilling, some flare-ups are normal. Too many flare-ups, however, increase the temperature in the appliance and can ignite accumulated fat. To avoid flare-ups:
- Make sure the bowl is clean when you start grilling. We recommend cleaning the bowl after each use. See "11.2 Cleaning the bowl".
- Regularly check if the fat drain hole is not blocked and if the fat drip tray or cup is not full yet.
- When grilling fatty meat, trim excess fat, close the lid and set the burners to a medium or low position.
11 MAINTAINING THE APPLIANCE
11.1 Cleaning the grill
We recommend cleaning the grill after each use, with a Barbecook cleaner.

You can also clean the grill with a soft detergent or with sodium bicarbonate. Never use oven cleaners on the grill.
11.2 Cleaning the bowl
We recommend cleaning the bowl after each use, with a Barbecook cleaner. Use it the same way you do on the grill.
11.3 Cleaning the burners and venturis
11.3.1 WHY CLEAN THE BURNERS AND VENTURIS?
Spiders and insects can make webs and nests in the burners and venturis. This may block the gas supply to the burners. As a result:
- You cannot light the burners. If you manage to light them anyway, they will only produce smoky and yellow flames.
- The gas can start burning outside the venturis, at the control knobs. These fires are called flash-backs and can result in serious injuries and material damage.

i Damages caused by blocked burners and venturis are regarded as inadequate maintenance and are not covered by the warranty.
11.3.2 WHEN CLEAN THE BURNERS AND VENTURIS?
You have to clean the burners and venturis of your appliance:
Before the first use after a long period of non-use.
- At least twice a year, of which once at the beginning of the season.
11.3.3 TO CLEAN THE BURNERS AND VENTURIS
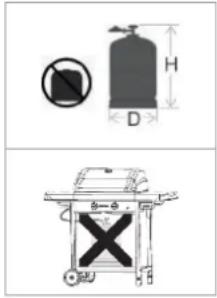
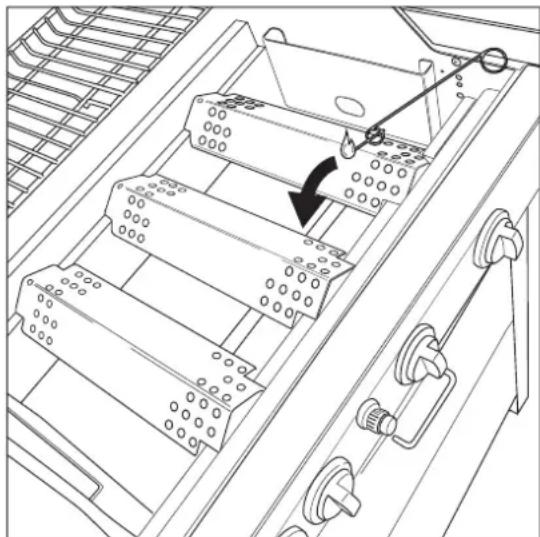
- Remove the burners from the appliance as shown on the illustrations. If you notice that a burner is damaged, you have to replace it.
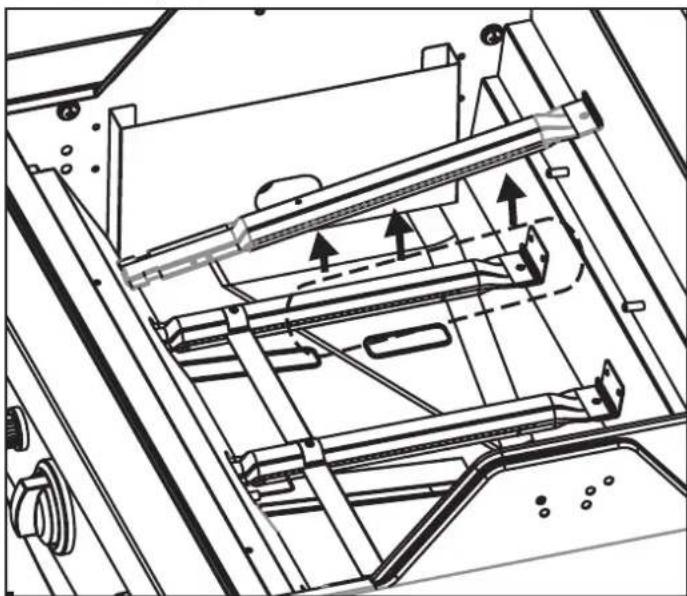
- Clean the burners and venturis with a small brush or a homemade pipe cleaner (an unfolded paperclip, a pipe brush ...).
- Put the burners back. Make sure to place the venturis over the openings of the gas valves.
11.4 Maintaining enamel, stainless steel, chrome and powder coated parts
The appliance is composed of enamelled, stainless steel, chromed and powder coated parts. Each material has to be maintained differently:
| Material How to maintain this material | |
| Enamel | Do not use sharp objects and do not knock against a hard surface. Avoid contact with cold liquids while still hot. You can use metal sponges and abrasive detergents. |
| Stainless steel and chrome | Do not use aggressive, abrasive or metal detergents. Use soft detergents and let them act on the steel. Use a soft sponge or cloth. Rinse thoroughly after cleaning and dry well before storing. |
| Powder coated | Do not use sharp objects. Use soft detergents and a soft sponge or cloth. Rinse thoroughly after cleaning and dry well before storing. |
To prevent formation of rust on stainless steel, avoid contact with chlorine, salt and iron. We recommend not using the appliance near the coast, near railways or near swimming pools.
Damages caused by not following these instructions are regarded as inadequate maintenance and are not covered by the warranty.
Below the exploded view of your appliance (second part of the manual), you find a list with all parts of which the appliance is composed. This list includes a symbol that specifies the material of each part, so you can use it to check how you have to maintain a particular part. The parts list uses the following symbols:
| Symbol | Material |
| ● | Enamel |
| ▲ | Chrome |
| ■ | Stainless steel |
| ★ | Powder coated |
11.5 Storing the appliance
If you do not use your appliance for a longer period of time, store it in a dry place. Before you store the appliance:
- Disconnect the gas cylinder. Never store your appliance indoors (not even in a garage or shed) as long as it is connected to the gas cylinder.
- Clean the burners and the grills, rub them with oil and wrap them in paper.
- Cover your appliance with a Barbecook cover. Register your appliance at www.barbecook.com to find out which cover you need.
11.6 Storing gas cylinders
These instructions apply to both empty and full gas cylinders.
Always store gas cylinders outdoors, in a well-ventilated area. Make sure they are not exposed to excessive heat or direct sunlight.
- Never store a gas cylinder in an area that can become very hot (in a car, on a boat...).
- Never store your gas cylinder or spare gas cylinder in the cabinet of your appliance.
- Never store your spare gas cylinder near a gas appliance in use.
Always store gas cylinders outside the reach of children.
- Always store and transport gas cylinders in upright position
11.7 Ordering spare parts
Parts that are directly exposed to fire or intense heat have to be replaced from time to time. To order a spare part:
- Look up the reference number of the part you need. You find a list of all reference numbers below the exploded views in the second part of this manual and on www.barbecook.com.

If you registered your appliance online, you will automatically be guided to the correct list in your MyBarbecook account. There you have the possibility to order your parts online.
- Order the spare part via www.barbecook.com or at your point of sale. Parts under warranty can only be ordered at your point of sale.
12 WARRANTY
12.1 Covered
Your appliance comes with a warranty of two years, starting from the date of purchase. This warranty covers all manufacturing defects, provided that:
- You used, assembled and maintained your appliance according to the instructions in this manual. Damages caused by misuse, incorrect assembly or inadequate maintenance are not regarded as manufacturing defects.
-
You can present the receipt and the unique serial number of your appliance. This serial number starts with a G, followed by 15 digits. You can find it:
-
On this manual.
- On the packaging of the appliance.
-
On the inside of the bottom front panel.
-
The Barbecook quality department confirms that the parts are defective and that they proved defective under normal use, correct assembly and adequate maintenance.
If one of the above conditions is not met, you cannot claim any form of contribution. In all cases, the warranty is limited to the repair or replacement of the defective part(s).
12.2 Not covered
The following damages and defects are not covered by the warranty:
- Normal wear and tear (rusting, distortion, discolouration...) of parts that are directly exposed to fire or intense heat. It is normal to replace these parts from time to time.
- Visual irregularities that are inherent to the manufacturing process. These irregularities are not regarded as manufacturing defects.
- All damages caused by inadequate maintenance, incorrect storage, improper assembly or modifications made to pre-assembled parts.
- All damages caused by misuse and abuse of the appliance (not using it according to the instructions in this manual, using it for commercial purposes, using it as a fire basket...).
- All consequential damages caused by careless or non-compliant use of the appliance.
- Rust or discolouration caused by external influences, the use of aggressive detergents, exposure to chlorine... These damages are not regarded as manufacturing defects.
13 TECHNICAL SPECIFICATIONS
13.1 Type label
The type label lists all the technical specifications of your appliance. You can find it:
In the second part of this manual.
- On the inside of the bottom front panel
13.2Injector diameters
Main burner: 1.00
- Side burner: 0.75
| Problem Probable cause(s) Solution(s) | ||
| Not enough heat | ·Gas supply not open ·Venturis not placed over openings of gas valves ·Burner openings blocked ·Gas cylinder (almost) empty ·Pressure regulator not connected correctly to cylinder and/or hose | ·Open gas supply ·Place venturis over openings of gas valves ·Clean burner openings or replace burners ·Replace gas cylinder ·Reconnect pressure regulator to cylinder and/or hose |
| Excessive heat and/or flare-ups | ·Food too fatty ·Fat drain hole blocked, fat in bowl and/or fat on burners ·Temperature too high | ·Trim excess fat or set burners to a low position ·Clean fat drain hole, bowl and burners ·Set burners to a lower temperature and/or grill food indirectly |
| Heat not distributed evenly over grill surface | Some heat differences are normal, see "1.7 Making optimal use of the heat" and "10.6 Taking advantage of the heat zones". Probable cause(s) for big heat differences: ·Appliance not preheated | ·Preheat appliance |
| Yellow flames | ·Burners or venturis blocked ·Salt on burners ·Appliance connected to butane | ·Clean burners and venturis ·Clean burners ·Connect appliance to propane, using an appropriate pressure regulator |
| Incomplete flame | ·Burner blocked, pierced or rusted | ·Clean or replace burner |
| Flash-backs (flames outside venturis/at control knobs) | ·Burners or venturis blocked | ·Close gas supply and set burners to OFF. ·Let appliance cool down. ·Clean burners and venturis. |
| Flames higher than edge of bowl | ·Lots of wind ·Gas cylinder (almost) empty ·Fat in bowl or on burners | ·Put appliance with rear side towards wind ·Replace gas cylinder ·Clean bowl or burners |
| Pressure regulator hums | ·Hot weather ·New (full) gas cylinder | ·Not a hazard or defect. Should stop automatically after a while. |
| Burner whistles when set to LOW | ·Gas injector, venturi and/or burner dirty | ·Clean gas injector, venturi and burner |
| Impossible to light burner (using either igniter or match) | ·Burner or venturi blocked ·No gas supply | ·Clean burner and venturi ·Open gas supply and press safety knob on pressure regulator (not present on all regulators) |
| Impossible to light burner with igniter | ·No battery installed or battery not installed correctly ·Middle burner not lit first ·Igniter wiring not mounted correctly ·Electrode damaged ·Faulty ground ·Faulty igniter | ·(Re)install battery, with terminals positioned correctly ·Light the middle burner first ·Check and re-assemble all igniter connections ·Replace electrode ·Check and re-assemble electrodes, burners and igniter ·Replace igniter |
| No sparks nor sound when pressing igniter | ·No battery installed or battery not installed correctly ·Empty battery ·Igniter button not assembled correctly ·Faulty spark generator | ·(Re)install battery, with terminals positioned correctly ·Replace battery ·Re-assemble igniter button ·Replace spark generator |
| Only sound (no sparks) when pressing igniter | ·Faulty ground ·Burner and electrode too far apart | ·Reconnect spark generator and electrodes ·Slightly bend electrode to bring it closer to the burner |
| Sparks present that do not originate from burners | ·Faulty wiring | ·Replace wiring |
| Sparks present, but not on all electrodes and/or not powerful enough | ·Faulty ground ·Low battery ·Wet or broken electrodes | ·Reconnect spark generator and electrodes ·Replace battery ·Dry electrodes with paper towels or replace electrodes |
- Pida la pieza de recambio a工程技术 de www.barbecook. com o en su punto de vente. Las piezas en garantía solo seSEOSEOSEOSEOSEOSEOSEOSEOSEOSEOSEOSEOSEOSEOSEOSEOSEOSEOSEOSEOSEOSEOSEOSEOSEOSEOSEOSEOSEOSEOSEOSEOSEOSEOSEOSEOSEOSEOSEOSEOSEOSEOSEOSEOSEOSEOSEOSEOSEOSEOSEOSEOSEOSEOSEOSEOSEOSEOSEOSEOSEOSEOSEOSEOSEOSEOSEOSEOSEOSEOSEOSEOSEOSEOSEOSEOSEOSEOSEOSEOSEOSEOSEOSEOSEOSEOSEOSEOSEOSEOSEOSEOSEOSEOSEOSEOSEOSEOSEOSEO SEO
12 GARANTÍA
12.1 Cubierto
9 ACCENSIONE DEI FORNELLI
9.2.1 USO DELL'ACCENSIONE ELETTRICA
9.2.2 USO DEI FIAMMIFERI
9.6 Verificar as chamas
8 Forbereda grillen for anvandning. 106
Forbereda grillen for anvandning 106
Foreforstaanvandningstillfallet(palange) 106
Genombränning i Produkten 106
9 Tanda brannarna. 106
| Land | Sammenkobling |
| BE, CH, CZ, DK, ES, FI, GB, IE, IT, PT, SI | Sammenkobling A |
| FR | Sammenkobling B |

6 TILKOBLING AV GASS TIL APPARATET
6.1 Hvilken flaske, slange, regulator
7 SJEKKING FOR GASSLEKKASJE
11 VEDLIKEHOLD AV APPARATET
9 ANAMMA TΩN KΛ'IBANΩN

Tia va avase Touc KlaIavouc XpnoIpoTowvTAC Tov
nEeKtpiko avaphektnpa, PpTei va TOnoTeTnOeTEmu
muTatapia AA OToV avaphektnpa. Autn n mTatapia 6ev
napexetai Me tn ouakeun. To diaepioa mTatapiaac
tou avaphektnpa Bpioketai OTov Nivaka ELevxou Tnc
ouokeunC oac.
9.5 AvaumaTwv kAiaawv (eav oBnoov)
Eav evac kaiiabavooc oBnoKata Tn xpno, npoxpwnpote wC ENC:
14 RIESENIE PROBLEMOV
13 TECHNICKE UDAJE
13.1 Typový Šitok
Typové stitok obsahuje vsetky technické udaje grilu. Najdete ho na nasledovnych miestach:
3 Olulised ohutusjuhised 212
3 OLULISED OHUTUSJUHISED
PernctpnpaTe cBoy ypei Barbecook, 3a da noJyUte HkoN OCHOBHn PpeDmCTBa:
- PONYUABATE DOCTbI NO PbHNOTO pBKOBOcTBO Ha
- NOTpe6nteN I CE 3aNo3Habate C BCraKa Yact OT ypeDa cn.
MaTe Ha pa3nOIOXeHne nepcoHaJIHa ycIyra 3a npoJaXbU, KoETo Bn I03BOLJBa 6bp3O da OTKpNBate pe3epBHN qactn n Bn daBa ONTImaIIHO rapaHcNIOHNO 06cIyKBAHe - IHHOpMnPame Bn 3a akTyajn3aun Ha npOyKtn n Bn DaBaMe CbBeTn, TpIKoBE N BdXHObeHne, KoTo da n3kapa HaeMaicTopa Ha cKapaTa BB Bac.
TOrOuN Li CTe 3a npKJIoueHn? PerncTpuaTe cBor npOduKT n Ce npCbeDuHeTe KbM coUmaHaTa MpeXa #barbecook!

3a noBHe uHΦopMaun OTHOCHO pernCTpnpaHTo Ha Baun ypeu BxKTe www.barbecook.com.

Barbecook yBaKaBa JIuHInTe Bn DaHHN. Te HMa da 6bDat npoabAHn, pa3npocTpaHraBHn nIN CnoDeJIHN C TpeTN CTpaHn.
2 3A TOBA PbKOBOCTBO
ToBa pBkoBOCTBO Ce cbCTOn OT DBe Yactn:
- Πьрватус e淘汰а, кая сеп e Т момента. Т вклочь внсчтукци 3a сглобяваhtу, Изnotяваhtу n noДпьжКаТа Ha BaшURApeD.
BtopaTach3anoYbHa cTpaHua 295. Ta BkIouBa BCNUBIOBE NIOCTpaUN (pa3bphATN YepTeK, MOHTAXHN YeptKn ... ) Ha ypeDa, KONTO ca ONNCAH B TOBa pbKOBOCTBO.
3 3A TOBA PbKOBOdCTBO
3.1 PpoyeTe n cIeDbaiTe nHCTpyKUInTe
Ipoohete HNCTpyKunTe, npedn da n3non3BaTe ypeDa. BnHaCn CneBaaTe BHNMaTeHNO HNCTpyKunTe. Crno6raBaHeTo nn 13noJ3BaHTo Ha ypeDa no pa3JnueH hauH, MoKe da npuHH noXkap u nobpeDa Ha MaTePnAna.

IobpeDnte, npuHHeH O T HeCnTa3BaHe Ha INCTpyKUInTe (He npaBnHO crJIo6BaHe, HnpaBnHa yNoTpe6a, HeIOCTaTbUHa NODpBxKa I dp.) He ce NOKpnBaT OT rapaHcYra.
3.2БbTeBnMaTeJIHcra3Ta
Pa6oTaTcra3eCbBcEm6e3oNaCha,HOu3nCKBa u3BeCTHa CTeNEH Ha NOBIWeHO BHMaHHe:
Bunharu cxbxpaHraBaIte ra3OBITE 6yTuJIKN Ha oTKpITO npoBeTpBO MRCTO. YBepTe Ce, Ye He ca N3IOXKeHN Ha npEkanHa RopeUHa N DpuKTHa CbHYeBa CBETnHa.
Hnkora He cbxpaHbAte ra3oBaTa 6ytnka nn pe3epBHaT a ra3Oba 6ytnka B WkaFa Ha BaIma ypeI.
Hikora He cbxpaHraBaTe Baawatape3epBHa ra3oBa 6ytuKa 6IIN3O do ra3OB ypeD, KOITc e IN3NON3BA.
BnHaHn n3KIOuBaIte ra3oN0daBaHeto npra3oBaTa 6yTuJka cJeI yNoTpe6a.
Hikora He nyuete 6n3o do ra3OB ype, KoTo ce n3non3Ba, nn6n3o do ra3Oba 6yTuJa (nbHa/npa3Ha).

Ako yceTne ra3, He3a6abHbNo 3KJIIOUeTe Ra3OIOdaBaHETO, KaTO yrACnTE BCNUKn PJIaMbCuN, N OTBOpTe KAnaka Ha ypeDa. Ako MmPn3MaTa Ha ra3 npoDbIjKaaba, Ce CbPjKeTe C IOCTaBUnka Cn Ha ra3 IIN C IpOTUNBOJoxkapHaTc cnjkb.
3.3 N36epete noDxOJaIo MrcTo
N3noI3BaIte ypeDa cAmo Ha OTKpIto. N3noI3BaHHeTo My Ha 3aKpIto, DOpN B rapax IIN HABec, MoKe Da npuHHn HAtpaBHe C BbTlepODeH OKNC.
Korato n36bupaTe MeCTOnoLIOxHne Ha OTKpuTo, BuHaRn:
- NoctabraIte ypeHa nOHe TprM MeTpa OT KaKbnto n da e crpaH, Ha OTBopeHO n PPOBETPnBO MRCTO.
Ocnrypbae Cbo6oDen npitOK Ha Bb3dyx Do ropejknte IN BeHTnlaaHNOHHTe OTBOpN B WkaF aNo BCraKO BpeMe. - I368BaIte noCTaBHeTo Ha ypeHa nOd HauBceHa cTpykTypa (BepaHda, HauBec u np.) nNn nopactnteHocT.
- NocTabaIte ypeHa TbPda nCTabnHa NOBpXHOCT. Hnkora He ro nocTabaIte BDbNxKeIo ce npEbo3Ho cpeICTBO (NoKa, KapabaHa u np.).
3.4Инструкцииза6e3onachoct
- Camo 3a BbHnHa ynoTpe6a.
- PpoheTe HNCTpyKcIMTe npedn da n3no13BaTe ypea.
- YpeBt Da He Ce MeCTn No BpeMe Ha yIOTpe6a.
- YpeBt Da He Ce octaB 6e3 Ha3Op No Bpeme Ha ynoTpe6a, Oo6eHO B pncbCTBnETo Ha daeua JxNBOTHN.
I PEPyIPEXKDEHVE:IOCTbNHITe yactn MORaTa cTaHaT MHOrO ropeu. Da ce bpxn daney ot deua.
-Да ce n3noI3Ba noIxOJa 3aunTa npu 6opabeHe c ropeu qacTu (Kanak, peuTeKa...).
To3n ypeI Tp86Ba Da ce Ibpxn JaJeu OT 3aapanmM MaTePuaHn No BpeMe Ha pa60Ta.
Cra3OBypeIaHeceu3noJI3BaTbPBO,BbIuua,BykKaHnHHKambHINnn6pKeTu. - YpeIbT Da He Ce I3IOn3Ba NOD Bb3JeNCTBne Ha anKoxoJ, MeDnKaMeHTu nn yNoBaaN BeIeCTBa.
- ɪəʌpɑnʌbærəcɪaɪsʌpɑnʌbærəcɪaɪsʌpɑnʌbærəcɪaɪsʌpɑnʌbærəcɪaɪsʌpɑnʌbærəcɪaɪsʌpɑnʌbærəcɪaɪsʌpɑnʌbærəcɪaɪsʌpɑnʌbærəcɪaɪsʌ
- YpeBt Da He ce MoDnΦuIpa.
4 IOBTAUNCE KOHCLN
Ta3n Yact BkIIOUyBa DeΦHnUuHa HЯKoN NO-HeNo3HaTN KOHcENu. Te3n KOHcENuCe N3PON3BaT B HЯKoNko TEmN OT TOBa pBKOBOCTBO.
4.1 Tpb6n Ha BeHTypn
Tp6nTe Ha BeHTpy ca MaJKN Tp6nUKn, 3aKpeHn 3a BxOJa Ha ropeKnTe. OTCpaHn Ha Tp6nTe nMa OTbOp. ToBa e BuDmO Ha rnaBHnTe ropeKn n CTpaHnHaTa ropeKnA:

Korato ra3ta npotuca KbM ropeIknite, Tn npemHaBa npes Tpb6nte. Bnaorapene Ha OTbOpTe OTcTpaHn, Ra3Ta ce CmecBa C b3dyx N B pe3yIaT Ha TOBa -C KncIopO. ToBa e Heo6xoJIMO 3a Do6pTo 3anaIbaHe B ropeIknite: cAmo npabInHaTa Cmec ot Ra3 n KncIopOJe Ce 3anaIi npabInHO u Je ce NoJyat Xy6aBn Pnambu.
4.2 Ko3nprKn Ha ropeJkKaTa
Ko3npKnTe Ha ropeJkata Ca Ko3npKnTe, KOIto ce MOHTnPaT NaIropeJkTe Ha Baun ypeI. Te npEJa3BaT ropeJkTe OT KaneuMaMaHHa. OTBOpTE OTCTpaHn Ha Ko3npKnTe CbIo TaKa pa3npedeJrT TOnHHata No CKapaTa, KOeTO N03BOJIyBa MHOrO No-6bp30 I NO-paBHomepHo HarpBaHe.
4.3 EmaiJ
HЯко ча'tи Нуpeда спokр'tи CплacrрtaToNEHcTBKЛ, Hapeун e'maД. To3n emaДnpa3Ba MeTana nO hero OT Kopo3n. EmaJIbTe BVCOKOKaYeCTBEN MaTePnA1: TOn e yCToYNHbHa pBXka, He n36JIeNHa bOd BInyHneTO Ha BVCOKI Tempepatu n e leceH 3a NODpBXka.

TbKATO eMaIbT He e ToIKOBA rBKBaB, KONKOTO MeTana, KOITNOKpNaBa, NapYeTa OT eMaJlma MoT a Da ce OTKbChat pNr HENpaBUNHO bOpabeHe c ypeJa. 3a da n36BerHeTe npo6IeMn, 6bJeTe BHIMATEJIHn npr CrIO6BaHe Ha eMaJInpuAHnte YacTn IN BINHarn NOIbPkaIte eMaJla, KaKTo e ONIcaHO TTOBa pbKOBOCTBO.
4.4Пламьсн
Uckpnte ca Bhe3aHn nnIambI, KOIO TU3JIu3aT OT Kynata, Korato neHeTe Ha cKapa. Te o6NKHOBeHo ca npuHHeHOT KaNeHa Ma3HnHa nIIM MapHaTa.
5 CΓIOБЯBAHE HA YPEDA
5.1 Инструкции за бezonachoct
He moi nphiuapaiyepa npn cno6baheTo my. Mhoro onaCHO e HHe e no3BOJeHO da Ce npomeHr Yactnte, KOnTO ca npedBapnteJHo crlo6eHn N/nn 3aneYataHn OT npon3BOUHTeJI.
Bunha nCneBaIte BnHMaTeJIHo INHCTpyKUInTE 3a crIIO6BaHe.
- Iotpe6nteJrHocn OTROBOPHOCT 3a npabunHOTO crno6raBe Ha ypeJa. NObpeuTe, npuHHeN O T He npabUNHO crno6raBe, He ce nokpNBat OT rapaHcTeta.
5.2 3a da crIIO6nTe ypeDa
Heo6xOuMa Bn e Kpbctata OTBepTk, npaba OTBepTk u AA 6bapey (eNeKtpnueckn 3aannten). C ypeHa He ce doctabrt 6bapeyn.
- NocTaBæTe UpeHa Ha paBHa n YnCTa NOBbpxHocT.
- Crno6eTe ypeDa, KaTTo e noka3aHo Ha YepTeKInTe 3a crNo6BaHe. MoKeTe Da rH HamePte BB BToPaTa YacT Ha TOBa pbKOBoDCTBO CneI pa3rNo6eHnT N3rNeI Ha ypeDa.

BnmaBaIte npn crIo6BaHe Ha emaJInpaHITe YacTn.
NCTpyMeHTe N BnHTOBETe MOrAT da NOBpeRt eMaJna.
N3noJ3BaIte npedocTaBeHITe BnakHeCTu Wai6n, 3a da
npedna3Ite emaJa OKOLO BnHTOBTe.

PaekTuTo C BuHTOBe MoKe Da cIbPka NoBce BuHTOBe,OTKoNkOTO ca Heo6xOuIMn.CneI crIo6BaHe MoKe Da OCTaHaT BuHTOBe.

PaketbTcbdpkKaKomnneK3aCneuHcnyan Cpe3epBHNacTN(BHNTOBe,6oTObe,ΦnbPOBuWai6nU dp.).Mokete Da HnN3noJ3BaTe Bcnya,ue N3ry6nte nnCuynTE HkON acTN.
6 CBbP3BAHE HA ΓA3TAC YPEDA
6.1 KaKbA 6ytNJIka, MapKyu n perylaTOp?
IpeNi CbBp3BaHe Ha ra3Ta KbM ypeDa, Tpr6Ba Da 3akynite ra3Oba 6yTnKa, Mapkyu n peryNaTop Ha HalaRaHeto. TaBniCaTa IIO-DOJy NOKa3Ba KaKBn Ra3Oba 6yTnKa, Mapkyu n peryNaTop Da n3No13BaTe.
BBeIgTnBE)Hapmep,tp6Ba da n3non3BaTe 6yTuNka C npoanC Mapkyu nperyatop 3a 37 mbar nn 6yTuNka c 6yToH C mapkyu nperyatop 3a 28-30 mbar.
| Дыржава | Бутникka, Маркуни р发电机хетор |
| DK, GR, NO, SE, EE, LT, LV, CZ, PL, MT, HU, SI, SK, NL | Пробан, 30 mbar/Бутан, 30 mbar |
| ES, GB., IE, PT, BE, FR, LU, IT, CY | Пробан, 37 mbar/Бутан, 28 - 30 mbar |


Toba 6ap6ekio hactpoeHO da pa6oTu c 6yTuKINpOanah/6ytah OH 4.5 Do 15 kg c npoxoJU perynataop 3aHnCKO HnIgane. PpenOpbYBaMe Bn Da CbPjKeTe ypeJa KbM npOAn. PpOanHbT npeJana BnCOKokaeCTBeHo ropeHe e no-MaIKO YBCTBnteJeH Ha HnCKNtemepaTyPi. BnCOuHnata H Ha 6yTuKata Tpr6Ba da e No-MaIKo OT 70 cm, He3abncMo OT uipHaTa nnDnAmetbpa D Ha 6yTuKata.

3akynete peryanaTopa Ha HnlaHeta 6ytuKaTa 3aeNo. He BCnKn peryataopn ca ndoXoJaun 3a BCnuKn 6ytuKa.

Ia ce n3no13Ba cAmo ra3OB Mapkyu nperylaTOp, noDxOyAa 3a cTpaHaTa Ha yNtpe6a.
3a cnucbk Ha TbproBn Ha Barbecook nocetete www. barbecook.com.
9.2.2 3NIOBAHE HA KINBPKT
- NocTabete KJIeUka KINbPITB CToIKAtA 3a KINbPIT.
- OTbopete Kanaka n Noctabete KOHTpolHnTe KOnyeta Ha rnaBHnTe ropeJKN B noNoKeHne OFF (U3Kn.).
- Ako BCE Oue He e 3anahe Ha pyra ropejka,OTbopete ra3oNODaBaHeTo Hn34aKaJTe Decet cekyHn. Toba N03BOJRA Cta6nn3npaHeTo Ha ra3Ta.
- 3anaIe TKeUkaTaNbPnT n a3aPbXkTe Ha OKoI O 13 MM OT rOpelkata.
- HactponTe KOHTponHTo KOnue Ha ropeIkaTa do noJoxKeHne HIGH (Bucoko).

Bnarn 3anaBaIte npBo eHa rnaBHa ropeKa. Hnkora He 3anaBaIte BCnKn rnaBnropeKn edHObpemHe.
- Ako ropejikata He ce 3anaB paMKITE Ha 5 cekyHn, HactpoTe KOHTPOJHOTo KONHe Ha noLOXKeHne OFF (N3KnI), pKbChete ra3ONoDaBaHTo n 3uKaaiTe 5 MNHyTu. TOBa No3BOJBA Ha HATpyNaHaTa ra3 da Ce n3napi.
- OnntaTe OTHOBa da 3anaJNTe rOpEnKaTa.AKO Bce oJe He ce nAn, BNKeTe "14 OTKpUBaHe nOTcTpaHraBaHe Ha HEn3npaBHOCTn", 3a da onpeDenTe npuHaTa 3a npo6Jema.
- Cnep 3anaBaHe Ha eHa ropEnka 3anaNeTe Dpyrnte ropeKn, KaTo HacTpOnte KOHTpOInHtE Nm KOnHeta Do noLoXKeHne HIGH (Bucoko).
9.3 3anaJbHe Ha cTpaHnUHaTa ropelKa

CtpaHnUHata ropeKna noDbpxKa cbIOBe c MaKcMauHOTerNo 9 kg, MaKcMaaJeH dAmEtbp 220 mm mHmamJeH dAmEtbp 120mm.
9.3.1 Ⅰ 3IOBAHE HA 3AIIAJNTENIA
- OTbOpTe Kanaka n NoCTaBeTe KOHTPOHTo KOnYe Ha cTpaHnHaTa ropeJa B noJoxKeHne OFF (M3Kn.).
- Ako BCE Oue He e 3anahe Ha pyra ropeIka, OTbopeTe ra3oNODaBAHeTo Hn3uKaAte DeceT CeKHyDn. Toba no3BOJRA CtaBnNImuraHcTo Ha ra3Ta.
- HatncheTe 3anaIInTeJ, DOKaTo yyeTe NcKpN.
4.ДOKATOIbpxKeTe 3aapanTeJn,noCTaBeTe KOHTPOHOTO KONHe Ha CtpaHnHaTa ropeJa B nNoXeHne HIGH (Bucoko). - Ako ropenkata He ce 3ana nclp Tpu onnTa, HacptpoTe KOHTPOJHOTo N KOnue Ha noIoxKeHne OFF (N3Kn.), npekbcheTe ra3onOdaBaHTo n 3uKaaTe 5 MNHyTu. ToBa NO3BOJRA Ba HAHpynHaTa Ra3 da Ce n3napi.
- OnntaTe OTHOBo Da 3anaIte CtpaHnHaTa rOpEnka. Ako ropeKkata Bce oue He MoKe Da ce 3anaI, onntaTe da a 3anaIte c KnbptuN BuXKe "14 OTkpBaHe n OTcPaHnBaHe Ha HennPabHocTn", 3a da onpeJeIte npuHaTa 3a npo6Jema.
9.3.2 Ⅰ 3ПОВАЕ HA KИБРКТ
- NocTaBeTe KJIeUka KI6pNT B CToIkaT 3a KI6pNT.
- OTBOpTe Kanaka N noCTaBeTe KOHTPOHTo KOnYe Ha cTpaHnUHaTa ropeJa B nONoXeHne OFF (M3Kn.).
- Ako BCE Oue He e 3anahe Ha pyra ropeIka,OTbopeTe ra3oNODaBAHeTo Hn3uKaAte Decet cekyHn. Toba no3BOJRA Cta6nHn3npaHETo Ha ra3Ta.
- 3anaIeTe KJIeYkATA KINbPNT N I 3aApbXTe Ha OKOIO 13 MM OT cTpaHnHaTa rOpEnKa.

- HacptpoTe KOHTpOHnHO To KOnYe Ha cTpaHnHaTa rOpEnKa do noloxHe HIGH (Bucoko).
- Ako cTpaHnHnHa TpeKna He ce 3anaN B pAMKeTe Ha 5 CekyHn, HAcTPOIe KOHTPOINHO To KOnHe Ha NIOXKeHne OFF (M3Kn.), npeKbChTe Ra3ONoDaBaHTo n N3aKaAte 5 MmHytn. Toba No3BOJRA Ba Ha HatpyNaHATA ra3 da Ce n3napi.
- OnntaTe OTHOBO Da 3anaJIte CTPaHHTa rOpEnka. Ako BCE OSe He Ce NaIN, BnKTe "14 OTKpNBaHe n OTCTpaHraBaHe Ha HEn3npaBHOCTN", 3a da onpeJeNTe npuHHata 3a npo6nema.
9.4 N3KJIIOUcBaHe Ha ropeJKeTe
Ako Beue He n3non3BaTe ropenKnte, Tp6Ba da rH u3KnIOuHTe. HanpaBeTe cneHTo:
- PpeKbcheTe ra3oNoDaBaHeTo.
- HactpoTe KOHTponHnTe KOnyeta Ha ropeJKeTepoNoJoxeHne OFF (M3Kn.).

Upe3 npeKcbHaTe Ha ra3oNoDaBaHaTe nbpBO, OcnrypaBte JInncata Ha octaHaJa ra3 B ypea.
9.5 NOBTOPHO 3anaJbAHe Ha ropejKnTe
Ako HraKoR rOpelKa n3rache No BpeMe Ha n3non3BaHe, HanpaBeTe CneHTo:
- OTBopete KaNaka n ppeKbChTe ra3oNoDaBaHeTo.
- HactpoTe KOHTpOHnTE KOHeta Do noJIOXeHne OFF (N3Kn.) n 3uKaaiTe 5 MmHyTn. Toba No3BOJIraBa Ha haTPyNaHaTa ra3 da ce n3napi.
- 3anaTe OTHO BO rOpEnKaTa(NTe)
Ako cTe peRnCTpnpaH npeda cn OHnaH, ABTomaTHHO 1ue 6bJeTe npEhacooyH KbM npaBnHnCnCbK BbB Baunr MyBarbecook npoqnl. Tam nMaTe BB3MOxHOCT da nopHuate CBOute Yacnt OHnaH.
2.Порьаite pezeрBNH qacTN ype3 www.barbecook.com Ил BБВ BaUNA mara3INH. FatapuHIOHHNTe qacTN ce nopbyBaT cmo OT mara3NHa.
12 TAPAHUN
12.1 KaKBO ce nokpmba ot rapaHnraTa
Baunr ypee ce npoaba c DberoDnHa rapaHua OT daTata Ha nokynka. Ta3n rapaHua BKIOHb BA BCNU pON3BOOCTBeHn defeKTn, npu yclobne, He:
CTe n3no3BaHn, crNoBnN noDdbPkaNN CBOA ypeB CBOTBECTBNE C INHCTpyKUnTE B TOBA pkoBOdCTBO. IopPeDNTe, npuHHeH N OT He npabunHa ynotpe6a, HnpabunHO crNo6BaHe Nn HnEOCTaTbUHa NoDpBxKa He ce CHITAT 3a npoN3BOdCTBeHN DeEkeTN.
Moxete da npedocTaBnTE KBUtAHnra Ta yHnKaHnA cepueH HOMep Ha Bauny ypei. To3n cepueH HOpE 3anoBa C G, nocJeDbaHo ot 15 uFPn. Moxete da ro Hamepnte:
B TOBa pBKOBOcTBO IN B KpaTKOTO yNtBAHe, BKIOueHO B pBKOBOcTBOTO.
Ha onakobkata Ha ypea.
HaBbTpewHata CtpaHa HaDolHnI npednnaHeJ.
Barbecook OtdeJeBt no KaueCTBOTO notBbpDn, ye yactnte ca DepeKTHn ca DepeKTIpaJn npu HopMaJIHata ynoTpe6a, npabUNHO crNo6BaHe n DoCTaTbUHa noDpBxxKa.
Ako eHIO OT rOpHnTe ycNoBn He e n3NbIHeHo, He MoKeTe da npTeHnUpate 3a KaKBaTO n da e fOpMa Ha KOMneHcaun. BbB BCnKn cnyu an rapaHnraT a e orpaHnueHa do peMOHTa nn IIOmHaTa Ha nepeKTHata(NTe) Yact(U).
12.2 KaKBo He ce nokpmba ot rapaHnraTa
CneHnTe nobpeu n DeeKTu He ce NOKpuBaT O rapaHuaTa:
HopmaHIO n3HocBaHe (pBxJcBAHe, n3KpNBraBe, o6e3uBeTBAHe n dp.) Ha cactte, KOnTo ca dupekTHO n3IooKeHN Ha ObH Nn CNHa TOnnHa. POnMaHaTa Ha Te3n Yactn OT BpeMe Ha BpeMe e HopmaJIHa.
Bn3yaJIHn HeCbOTBeCTBnA, KOINTO ca npncbIa 3a npOn3BOoCTBeHHn pOuec. Te3n HeCbOTBeTCTBnA He ce CHTat 3a npOn3BOoCTBeHH n DepeKtn.
BcunKIOBpeH, npuHHeHOT HeoctaTbHaNoDpBxKa, HnpabUNHO cbxpaHeHne, HnpabUNHO crIo6BaHe WIM MOINPikauHn, HnpaBeHn No ppeDbapTeHNO crIo6eHte Yactn.
BcunKn NobpeH, npuHHeHOn OT He npaBUNHO n3noJ3BaHe nn 3noynotpe6a cypeHa (ako He ce n3noJ3Ba cnoped INCTpyKUInTe B TOBA pbKOBoCDTO, aKO Ce n3noJ3Ba 3a TbproBCKn CEHN n dp.).
BcNknoBpeBnBCJIeCTBHe Na HeBHMMaTeHNO n3No13BaHe nn n3No13BaHe Ha ypeHa Ne InppeHa3HaueHne.
PbJda nnn 063UBeTBAHe, npuHHeH OT BbHnBnHn, n3noJI3BaHeTo Ha arpeCBHmMneu npenapaTu, n3laHaTe Ho XIop u dp. Teu noBpeHn He ce cHTat 3a npoIN3BODCTBeHn DepeKtn.
13 TEXHnueCKN CneluINΦnKALUIN
13.1 Etuket 3a TUN
EtuketbT 3a TIN N36poBa BCNUKn TexHnueckn CneuNpkaun Ha Baun ypeD. MoKeTe da ro HamepuTe:
BbB BToPaTa YacHT Ha ToBa pBkoBOJCTBO.
HaBbtpewhata CtpaHa Ha donHn npedn naHn.
13.2ДиametpnHa nHKeKTopTe
- TnaBHa ropeIka: 1.00
- CtrpaHnHa ropeJka: 0.75
14 OTKPNBAHE N OTCTPAHRABE HA HEN3INPABHOCTN
6.1 Katero jeklenko, gibko cev in regulator?
Preden priklopite plin na napravo, morate kupiti plinskogo jeklenko, cev in regulator tlaka. Spodnja tabela prikazuje, katero jeklenko, cev in regulator morate uporabiti.
V Belgiji (BE) morate na primer uporabiti propansko jeklenko s cevjo in regulatorjem za 37 mbar ali butansko jeklenko s cevjo in regulatorjem za 28-30 mbar.
| Država | Jeklenka, gibka cev in regulator |
| DK, GR, NO, SE, EE, LT, LV, CZ, PL, MT, HU, SI, SK, NL | Propan, 30 mbar/ Butan, 30 mbar |
| ES, GB., IE, PT, BE, FR, LU, IT, CY | Propan, 37 mbar/ Butan, 28 - 30 mbar |

Barbecook® is a registered trade mark of SAEY Home & Garden N.V.
Blokkestraat 41A, B-8550, Zwevegem, Belgium