TUFGaming450B - Motherboard ASUS - Free user manual and instructions
Find the device manual for free TUFGaming450B ASUS in PDF.
| Feature | Details |
|---|---|
| Model | ASUS TUF Gaming 450B |
| Motherboard type | ATX |
| Socket | AM4 |
| Chipset | AMD B450 |
| Memory support | DDR4, up to 3200 MHz (OC) |
| Maximum RAM capacity | 64 GB |
| PCIe slots | 1 x PCIe 3.0 x16, 2 x PCIe 2.0 x16, 3 x PCIe 2.0 x1 |
| USB ports | USB 3.1 Gen 2, USB 3.1 Gen 1, USB 2.0 |
| Network connectivity | LAN 1 Gb Ethernet |
| Audio | Realtek ALC887, 8 channels |
| Dimensions | 30.5 cm x 24.4 cm |
| Recommended use | Gaming, office, multimedia |
| Maintenance | Regularly check for BIOS and driver updates |
| Security | Surge protection, connection security |
| Warranty | 2 years |
Frequently Asked Questions - TUFGaming450B ASUS
User questions about TUFGaming450B ASUS
0 question about this device. Answer the ones you know or ask your own.
Ask a new question about this device
Download the instructions for your Motherboard in PDF format for free! Find your manual TUFGaming450B - ASUS and take your electronic device back in hand. On this page are published all the documents necessary for the use of your device. TUFGaming450B by ASUS.
USER MANUAL TUFGaming450B ASUS
TUF GAMING POWER SUPPLY UNIT
Quick Start Guide
快速使用指南(繁體中文)
快速使用指南(简体中文)
クイックスタートガイド(JP)
Conventions used in this guide
To ensure that you perform certain tasks properly, take note of the following symbols used throughout this manual.

DANGER/WARNING: Information to prevent injury to yourself when trying to complete a task.
NOTE: Tips and additional information to help you complete a task.
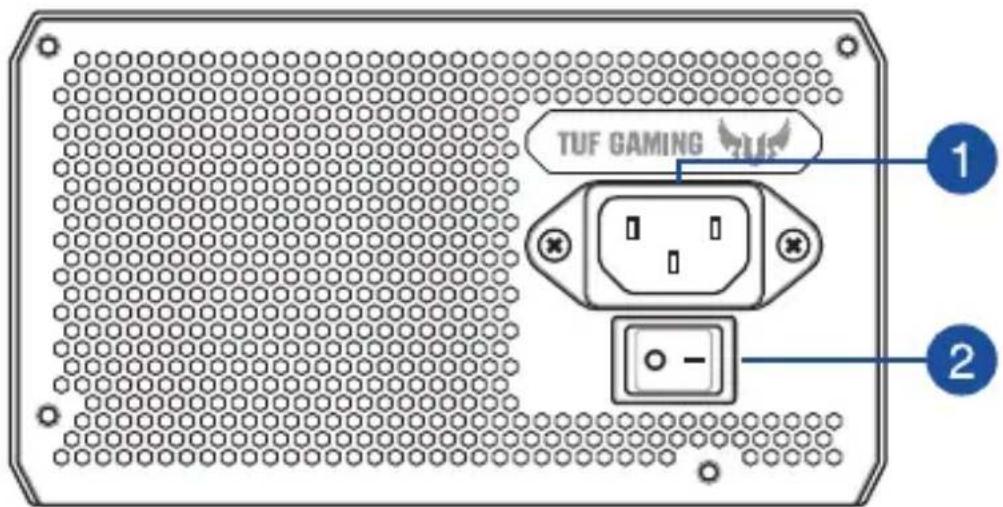
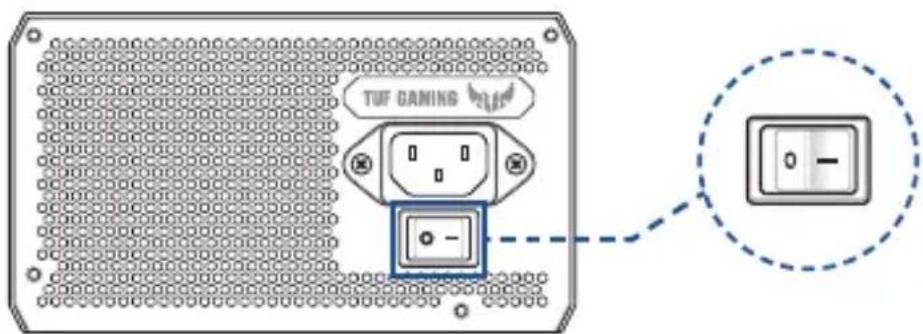
Product overview
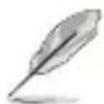
The device illustration is for reference only. Actual product specifications may vary with models.
text_image
TUF GAMING 1 21
Power connector Power switch
2
Installing your TUF GAMING Power Supply Unit

Before installing or removing cables, ensure that the system is turned off, and all power cables for the system and all attached devices are unplugged.
- Follow the directions of your chassis manual and secure your TUF GAMING power supply unit into your chassis using the mounting screws.
- Connect the bundled cables to your TUF GAMING power supply unit.
- Connect the power connectors to your motherboard and peripheral devices according to your preference. You may refer to the list below to check which devices each power connector can be connected to.
- The power connectors may vary between different models of TUF GAMING power supply units.
-
Refer to your motherboard's user manual for more information on the location and connecting the power connectors mentioned below.
-
Connect the 24-pin or 20-pin Main Power Connector to the motherboard's 24-pin or 20-pin power connector.
- Connect the 4+4 pin CPU +12V Power Connector to the CPU power socket on the motherboard.
- Connect the 4-pin Peripheral Power Connector to peripheral devices if needed.
- Connect the 6+2 pin PCI-E +12V Power Connector to the PCI-E graphics card.
-
Connect the SATA Power Connector to devices with a Serial ATA interface.
-
Connect your TUF GAMING power supply unit to a power source using the bundled power cord.
-
Flip the Power Switch to the "I" position to turn on your power supply unit.
text_image
TUF GANING 0 -Safety information
- High voltages are present in the power supply unit, it is extremely dangerous to open the power supply case or attempt to repair/clean the power supply unit. You should NEVER, under any circumstances, open the power supply unit.
- The Warranty will become void if the cover of the power supply unit is opened; there are no serviceable components inside the power supply unit.
• DO NOT insert any objects into the power supply unit. - DO NOT place any objects in front of the fan or the ventilation area of the power supply unit that may obstruct or restrict the airflow.
- USE ONLY the modular cables bundled with the power supply unit.
- DO NOT use the power supply unit near water, or in high temperature or high humidity environments.
- The power supply unit should be operated in suitable environment. (Operating temperature: 0^ to 40^ , Relative Humidity: 5% to 95% )
- The power supply unit is for integration into a computer, and not intended for external or outdoor usage.
- Failure to comply with any manufacturer instructions and any of the safety instructions will immediately void all warranties and guarantees.
Notice labels
text_image
100% Security C:\Program Files\2003\100%\2003\100%\2003\100%\2003\100%\2003\100%\2003\100%\2003\100%\2003\100%\2003\100%\2003\100%\2003\100%\2003\100%\infty CB C E EAC HI-POT OK Grounding OK RoHS 10 CCC R45625 RoHS
text_image
GREEN ASUS RoHS Compliant提示符號
text_image
TUF GAMING 1 21
電源插槽 電源開關
2
text_image
TUF GAMINO -安全性須知
text_image
C:\Program Files\N Copyright: C:\Program Files\N US CB FC Trend To Comply USB PCC Standards FOR JUMES OR OFFICE USE CE EAC HI-POT OK Grounding OK RoHS 10 CCC R45625 RoHS
text_image
GREEN ASUS RoHS Compliant提示符号
text_image
TUF GAMING 1 2
电源插槽 电源开关

安装您的 TUF GAMING 电源

text_image
C US CB C E EAC FOR HOME OR OFFICE US HI-POT OK Grounding OK RoHS 10 CCC R45625 RoHS
text_image
GREEN ASUS RoHS Compliantこのマニュアルの表記について
text_image
TUF GAMING 1 2
電源コネクター電源スイッチ

電源ユニットの取り付け

text_image
TUF GAMING -安全上のご注意
text_image
Hi-POT OK Grounding OK CB US C FC Durable To Comply WBS-POC Standards FOR LOMS OR OFFICE USE CE EAC 10 CCC R45625 RoHS
text_image
GREEN ASUS RoHS Complianttext_image
TUF GAMING 1 21
text_image
10th Anniversary HOTTER Development Safety Safety Standards 10th Anniversary HOTTER CB C E FOR HOME OR OFFICE USE HI-POT OK Grounding OK RoHS 10 CCC R45625 RoHS
text_image
GREEN ASUS RoHS Complianttext_image
TUF GAMING 1 2
text_image
TUF GAMING -text_image
FI-POUT OK HI-POT OK Grounding OK CB FC C E EAC 10 CCC R45625 RoHS
text_image
GREEN ASUS RoHS Complianttext_image
TUF GAMING 1 21
text_image
CB C E EAC HI-POT OK Grounding OK RoHS 10 CCC R45625 RoHS
text_image
GREEN ASUS RoHS Complianttext_image
TUF GAMING 1 21
text_image
TUF GAMING -text_image
FI-POUT AND C US CB FC Standard To Comply USB-PTC Standards C E EAC HI-POT OK Grounding OK RoHS 10 CCC R45625 RoHS
text_image
GREEN ASUS RoHS Complianttext_image
TUF GAMING 1 2text_image
TUF GAMING 1 2
text_image
TUF GAMING 0 -text_image
Company Copyright Copyright Copyright Copyright CB FC Used to comply With PCC standards FOR HOME OR OFFICE USE CE EAC HI-POT OK Grounding OK RoHS 10 CCC R45625 RoHS
text_image
GREEN ASUS RoHS CompliantKorištene konvencije u ovom vodiču
Da biste određene postupke ispravno proveli, pripazite na sljedeće simbole u priručniku.

text_image
TUF GAMING 1 21
text_image
TUF GAMING 0 0 -text_image
10th Anniversary HOTTER Development Safety Safety Standards Safety Standards CB C US C E EAC HI-POT OK Grounding OK RoHS 10 CCC R45625 RoHS
text_image
GREEN ASUS RoHS Complianttext_image
TUF GAMING 1 2
text_image
TUF GAMING -text_image
Total Equivalent Safety Safety Protection Safety Notes CB C E EAC HI-POT OK Grounding OK RoHS 10 CCC R45625 RoHS
text_image
GREEN ASUS RoHS Complianttext_image
TUF GAMING 1 21
text_image
10th Anniversary HOTTER Development Safety Safety Standards Safety Standards CB C US C E EAC HI-POT OK Grounding OK RoHS 10 CCC R45625 RoHS
text_image
GREEN ASUS RoHS Complianttext_image
TUF GAMING 1 2
text_image
TUF GAMING 1 21
text_image
TUF GANING 0 0 o -text_image
CB C E EAC HI-POT OK Grounding OK RoHS 10 CCC R45625 RoHS
text_image
GREEN ASUS RoHS Complianttext_image
TUF GAMING 1 2
Soket daya Tombol daya

Memasang Unit Catu Daya TUF GAMING

text_image
TUF GAMING 0 -text_image
TWO-POK www.jw.com R45625 OK HI-POT OK Grounding OK CB FC Tested To Comply WBS PCC Standards FOR COMPT OR OFFICE USB CE EAC 10 CCC R45625 RoHS
text_image
GREEN ASUS RoHS Compliant이 설명서에서 사용되는 표기 규칙
text_image
TUF GAMING 1 21
전원 커넥터 전원 스위치
2
text_image
CB C E EAC HI-POT OK Grounding OK RoHS 10 CCC R45625 RoHS
text_image
GREEN ASUS RoHS Complianttext_image
TUF GAMING 1 2
text_image
TUF GAMING 1 21
text_image
HITI-POT OK Grounding OK CB C US FC Tensed To Comply With PCC Standards FOR FROM OFFICE ON CE EAC 10 CCC R45625 RoHS
text_image
GREEN ASUS RoHS Complianttext_image
TUF GAMING 1 2
text_image
TUF GAMING -text_image
TUF GAMING 1 21
Konektor za struju Prekidač za napa
anj
Instaliranje vašeg TUF GAMING napajanja

Pre instaliranja ili uklanjanja kablova, proverite da je sistem isključen i da su svi kablovi za struju i svi priključeni uređaji izvučeni.
- Pratite uputstva za kućište i osigurajte svoje TUF GAMING napajanje u kućište koristeći zavrtnje.
- Povežite priključene kablove za TUF GAMING napajanje.
- Povežite priključke za napajanje za matičnu ploču i periferne uređaje u skladu sa svojim željama. Možete da pogledate spisak ispod da vidite za koje uređaje svaki od priključaka napajanja može da se poveže.
- Priključci napajanja mogu da se razlikuju u zavisnosti od modela TUF GAMING napajanja.
-
Pogledajte uputstvo za korišćenje matične ploče za više informacija i povezivanje priključaka navedenih ispod.
-
Povežite priključak sa 24-pinova ili 20-pinova, odnosno Glavni priključak za napajanje za priključak matične ploče sa 24-pinova ili 20-pinova.
- Povežite 4+4 pin CPU +12V priključak za ležište sa napajanjem za procesor na matičnoj ploči.
- Povežite priključak sa 4-pina, odnosno Priključak za periferije za periferne uređaje, ukoliko je potrebno.
- Povežite 6+2 pina PCI-E +12V priključak za napajanje za PCI-E grafičku karticu.
text_image
TUF GAMING 1 2
text_image
TUF GAMINGInformacije o varnosti
text_image
C:\Program Files\Outstanding\CPB GB US CB C E EAC FOR BOMB OR OFFICE USE HI-POT OK Grounding OK RoHS 10 CCC R45625 RoHS
text_image
GREEN ASUS RoHS Complianttext_image
TUF GAMING 1 21
Strömkontakt Strömbrytare
2
Installera din TUF GAMING-nätdel

text_image
TUF GAMING 0 0 -Säkerhetsinformation
text_image
TUF GAMING 1 2
text_image
TUF GAMING 1 21
text_image
TUF GAMING 1 2text_image
TUF GAMING -תְרָה בְרָה בְרָה
א אבַרְעֹת 790 אַרְעֹת אַרְעֹת אַרְעֹת אַרְעֹת אַרְעֹת אַרְעֹת אַרְעֹת אַרְעֹת אַרְעֹת אַרְעֹת אַרְעֹה
.הכלההוּרָהוּרָהוּרָהוּרָהוּרָהוּרָהוּרָהוּרָהוּרָהוּרָהוּרָהוּרָהוּרָהוּרָהוּרָה
text_image
TUF GAMING 1 21
text_image
CB C E EAC HI-POT OK Grounding OK RoHS 10 CCC R45625 RoHS
text_image
GREEN ASUS RoHS Complianttext_image
TUF GAMING 1 2
text_image
TUF GAMING -text_image
TUF GAMING 1 21
text_image
10th Anniversary HOTTER Development Safety Safety Standards Safety Standards CB C US C E EAC HI-POT OK Grounding OK RoHS 10 CCC R45625 RoHS