AiMesh AX6100 - Wireless Router ASUS - Free user manual and instructions
Find the device manual for free AiMesh AX6100 ASUS in PDF.
User questions about AiMesh AX6100 ASUS
0 question about this device. Answer the ones you know or ask your own.
Ask a new question about this device
Download the instructions for your Wireless Router in PDF format for free! Find your manual AiMesh AX6100 - ASUS and take your electronic device back in hand. On this page are published all the documents necessary for the use of your device. AiMesh AX6100 by ASUS.
USER MANUAL AiMesh AX6100 ASUS
Wireless AX6100 Tri band Gigabit Router
Quick Start Guide
Table of contents
English 3
Былгарский 13
Hrvatski 23
Cestina 33
Dansk 43
Nederlands 53
Eest 63
Francais 73
Suomi 83
Deutsch 93
Elambdavika. 103
Magyar 113
Italiano 123
Latviski 133
Lietuviu 143
Norsk. 153
Portugues. 163
Polski 173
Pycckn 183
Romana 193
Espanol 203
Srpski 213
Slovensky 223
Slovenscina 233
Svenska 243
Türkce 253
YkpaHcbKa. 263
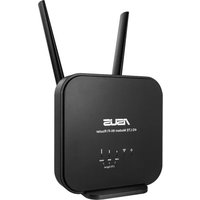
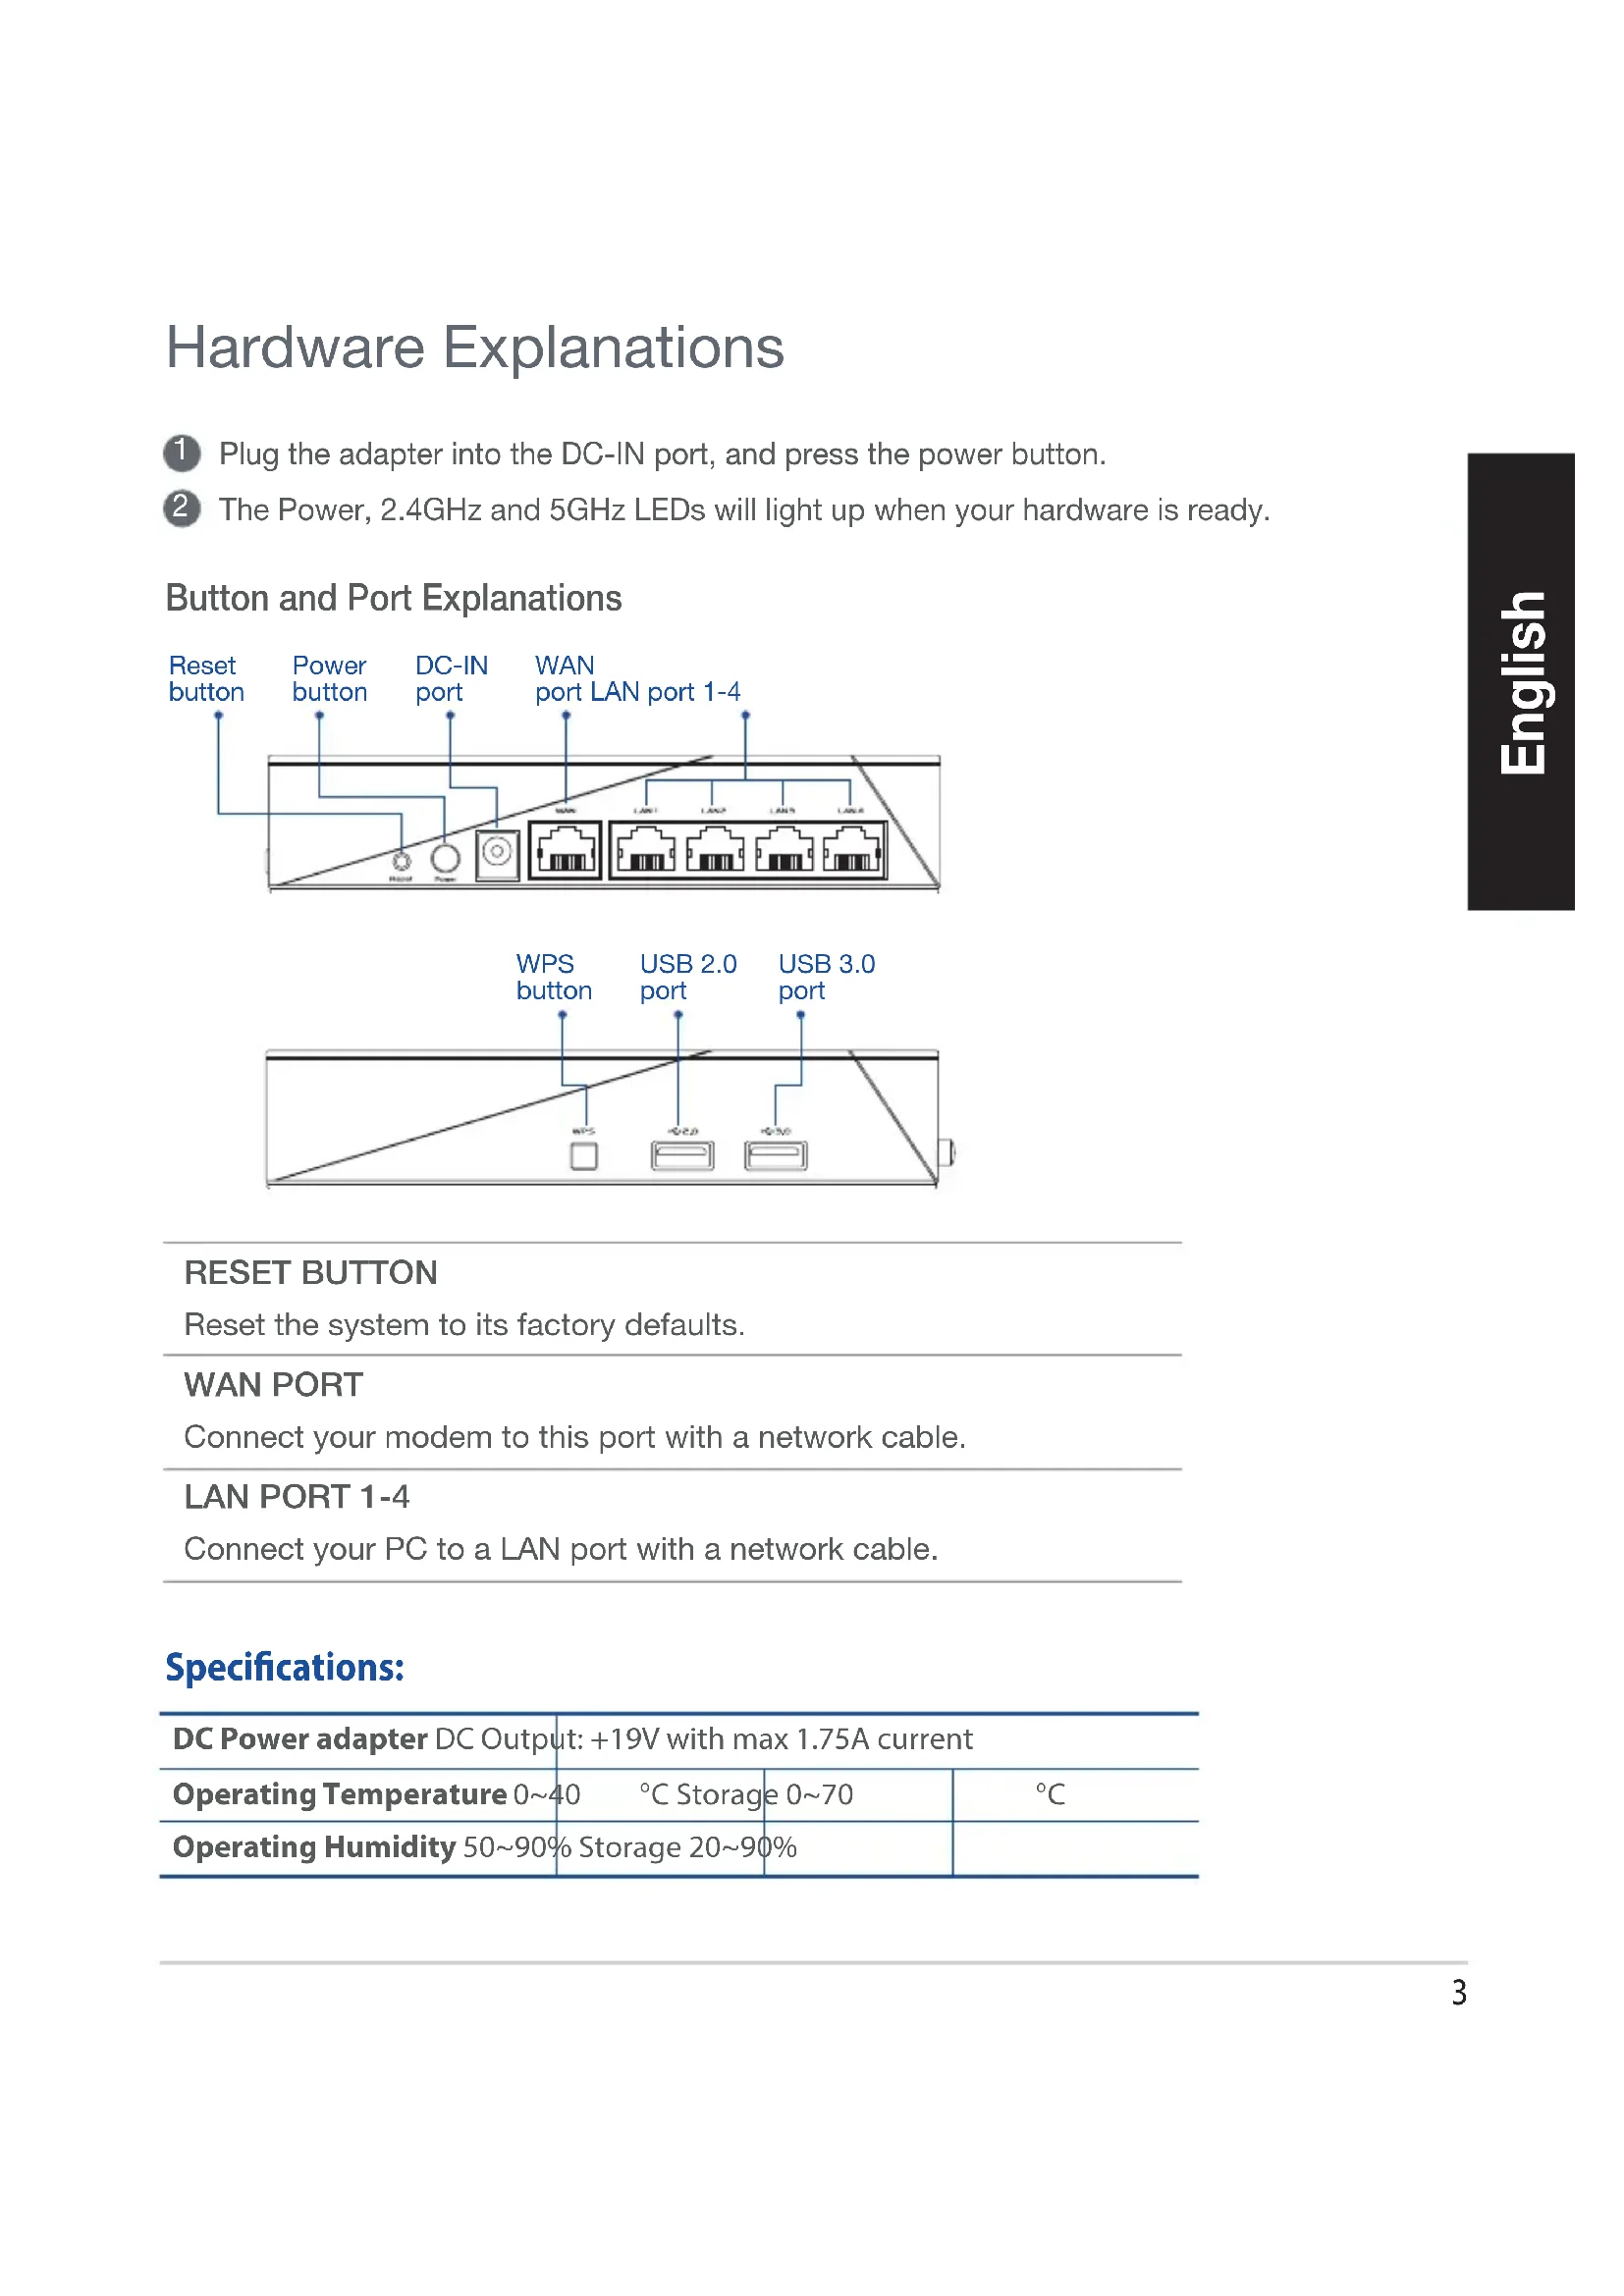
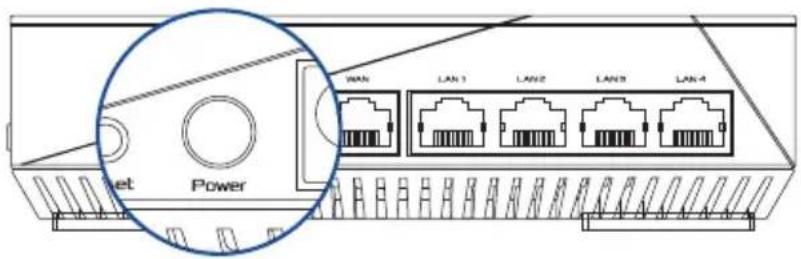
Hardware Explanations
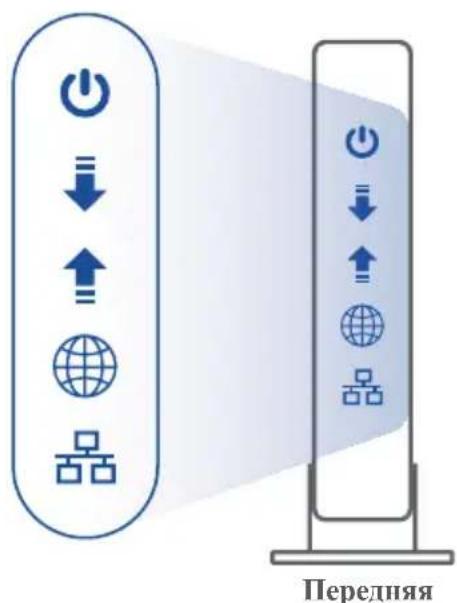
Plug the adapter into the DC-IN port, and press the power button.
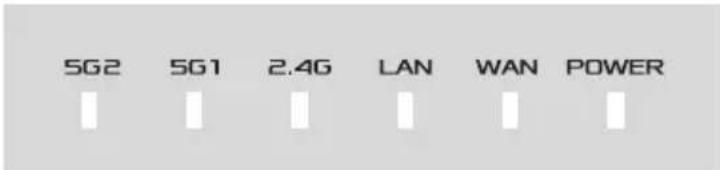
The Power, 2.4GHz and 5GHz LEDs will light up when your hardware is ready.
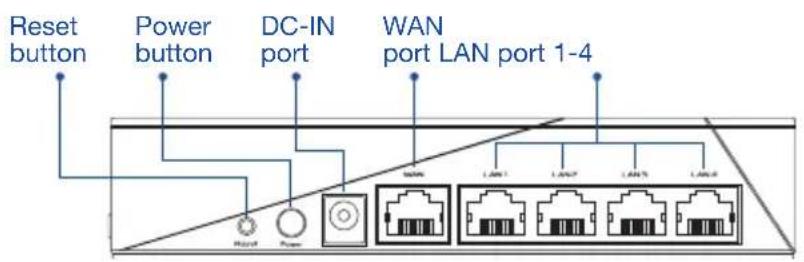
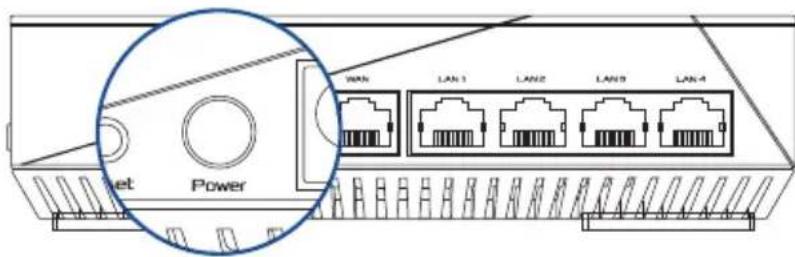
Button and Port Explanations
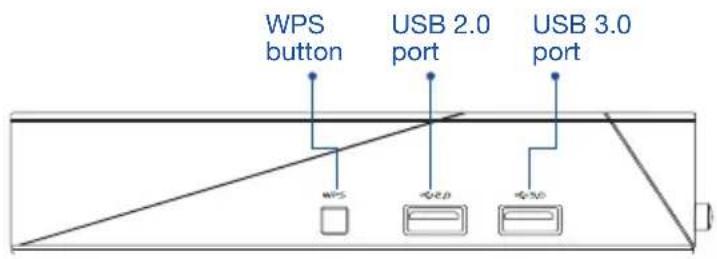
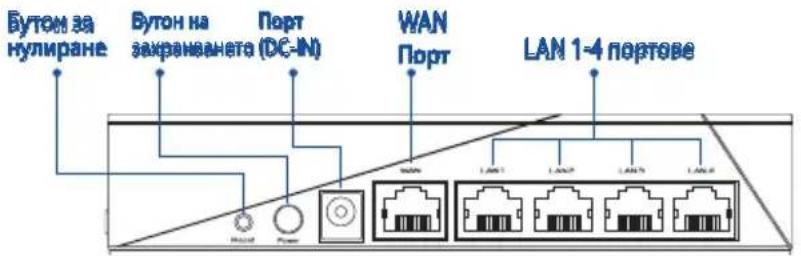
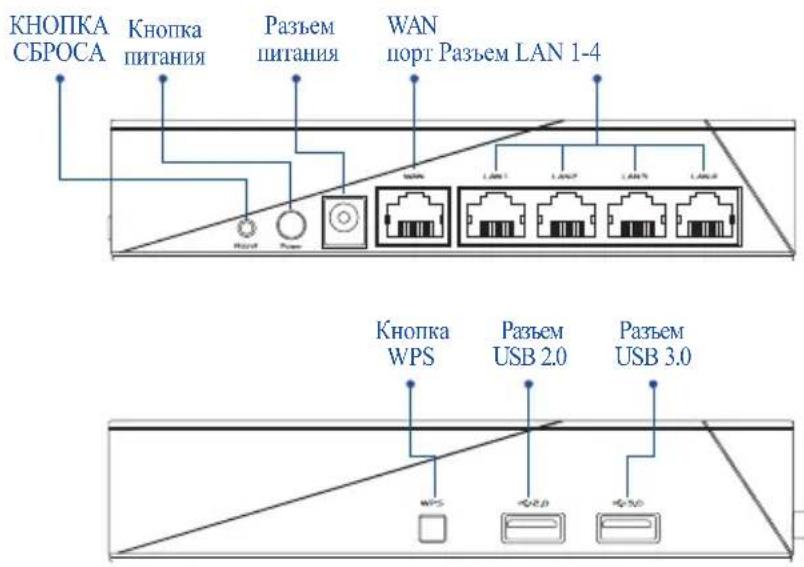
RESET BUTTON
Reset the system to its factory defaults.
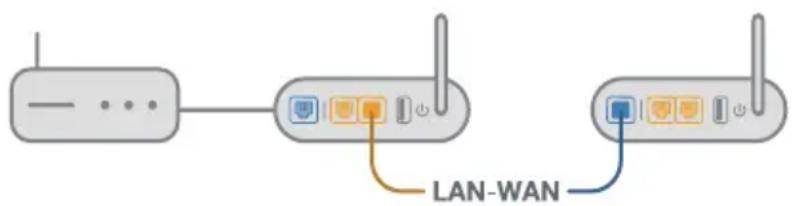
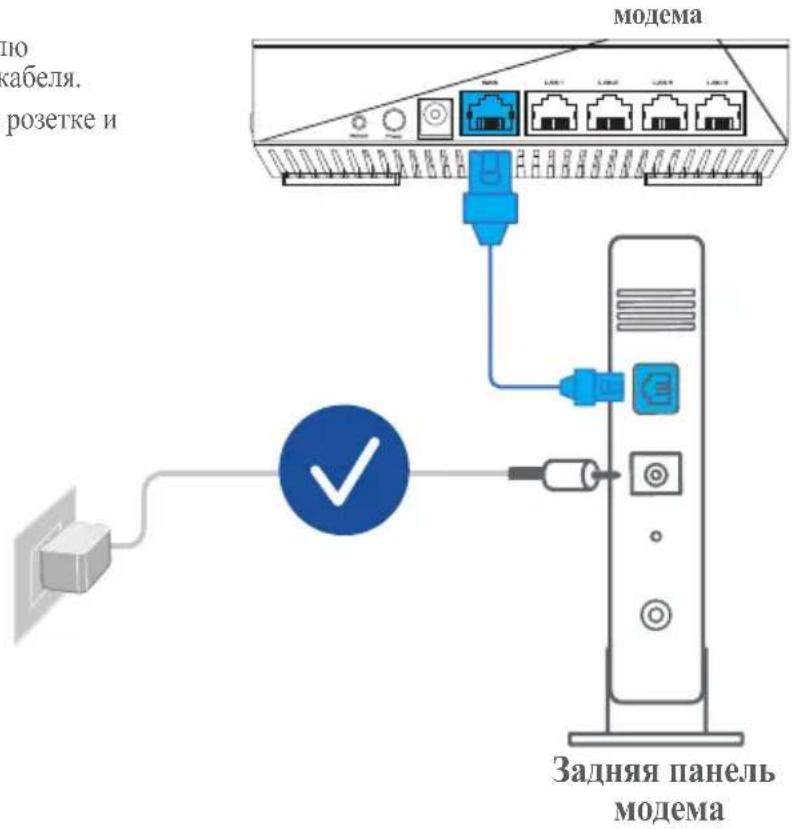
WAN PORT
Connect your modem to this port with a network cable.
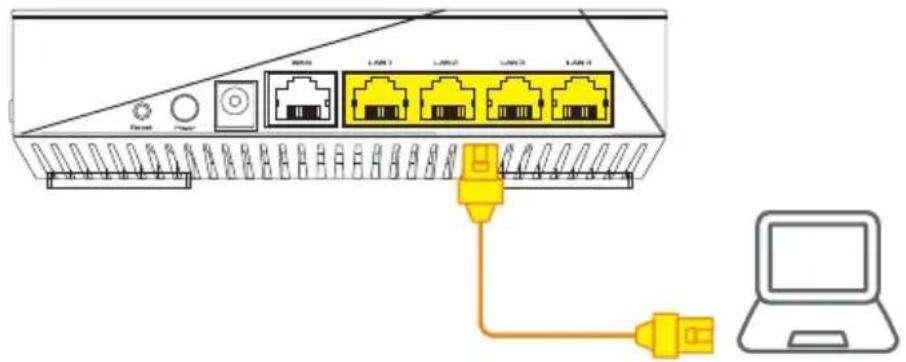
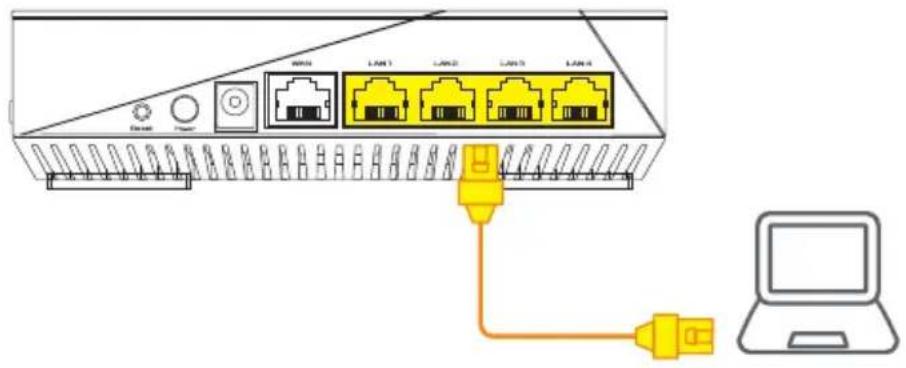
LAN PORT 1-4
Connect your PC to a LAN port with a network cable.
Specifications:
| DC Power adapter DC Output: +19V with max 1.75A current | |||
| Operating Temperature 0~40 °C Storage 0~70 °C | |||
| Operating Humidity 50~90% Storage 20~90% |
BEFORE SETTING
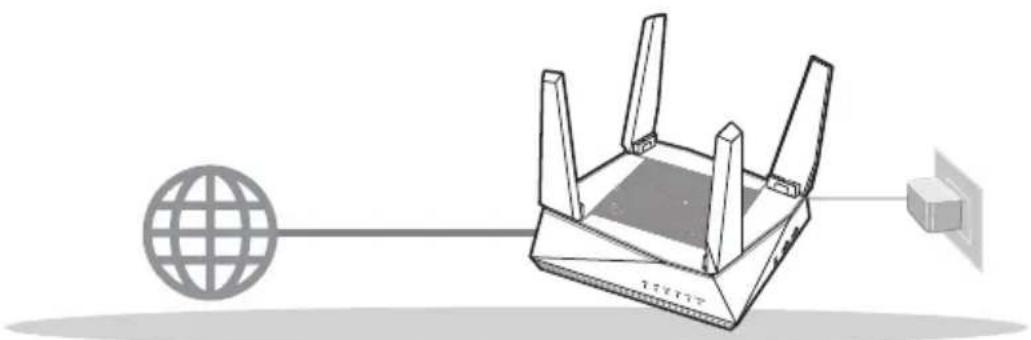
01 Preparing to setup a standalone router
1 Go to ONE ROUTER SETUP STEPS.
ONE ROUTER SETUP
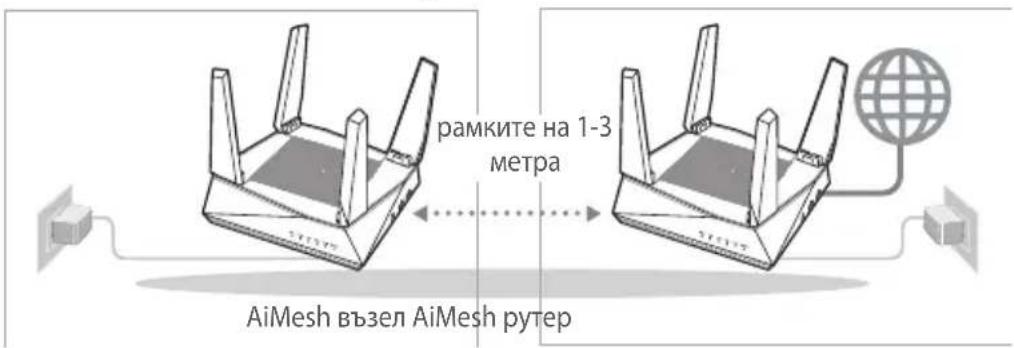
02 Preparing to setup an AiMesh Wi-Fi system
Two (2) ASUS routers (models supporting AiMesh https://www.asus.com/AiMesh/).
2 Assign one as AiMesh router, and another one as AiMesh node.
** If you have multiple AiMesh routers, we recommend using the router with the highest specifications as your AiMesh router and the others as AiMesh nodes.
3 Go to AiMesh SETUP STEPS.
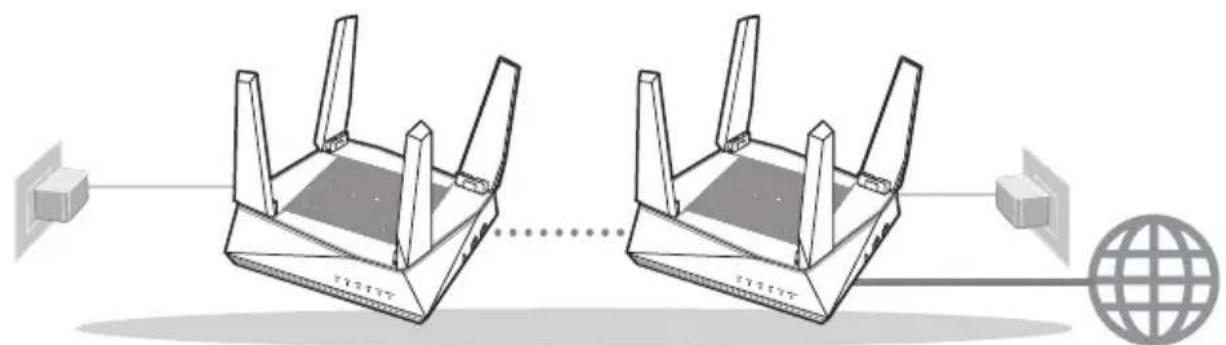
AiMesh routerAiMesh node
AiMesh SETUP STEPS
ONE ROUTER SETUP STEPS
WE SUGGEST…
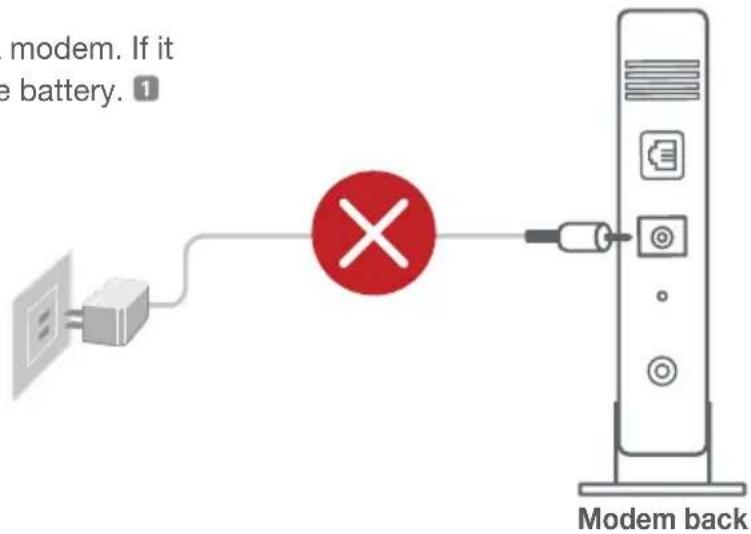
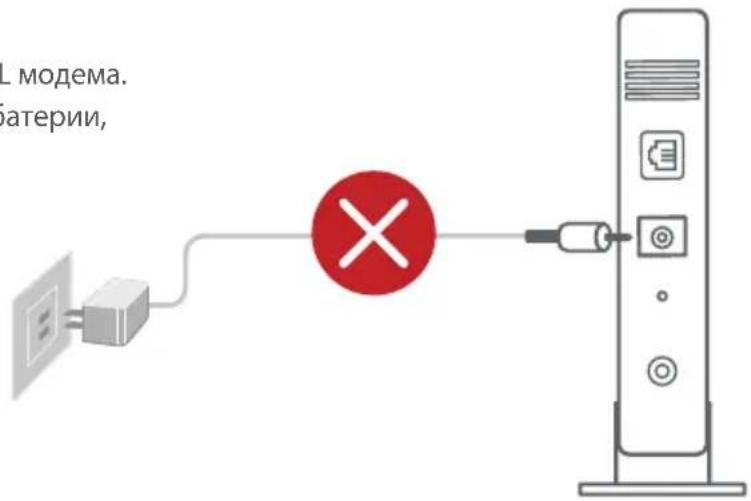
01 Prepare your Modem
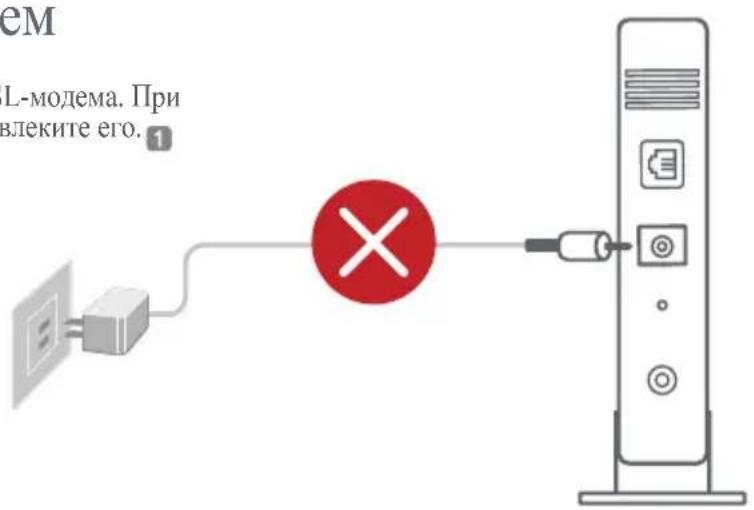
Unplug the power of cable / DSL modem. If it has a battery backup, remove the battery.
Connect your modem to the router with the network cable provided.
3 Power on the modem. Plug modem to the power outlet and power on.
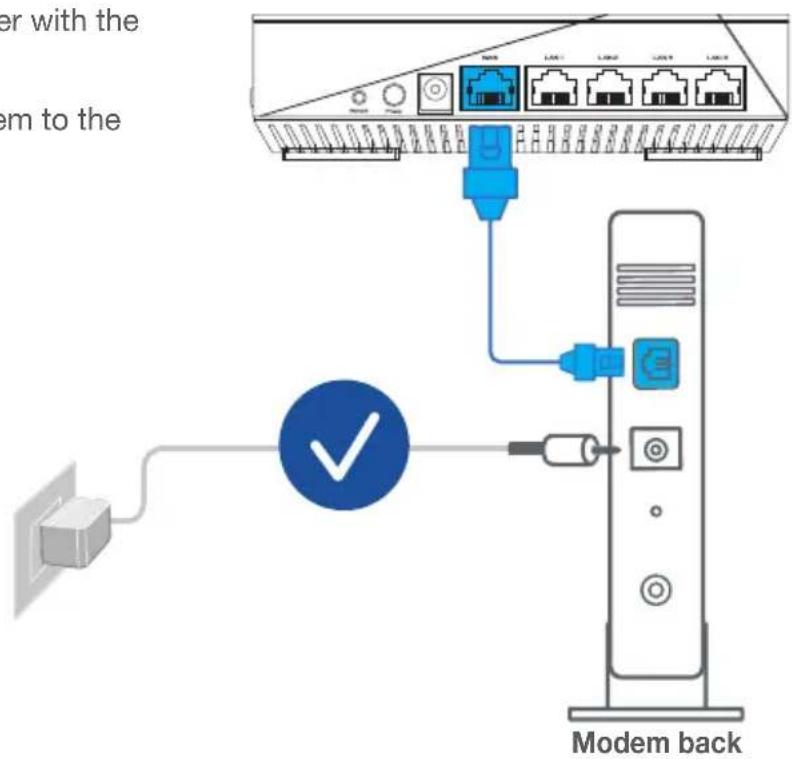
4 Check the modem LED lights to ensure the connection is active.
If you are using DSL for internet, you will need your username / password from your Internet service provider (ISP) to properly configure your router.
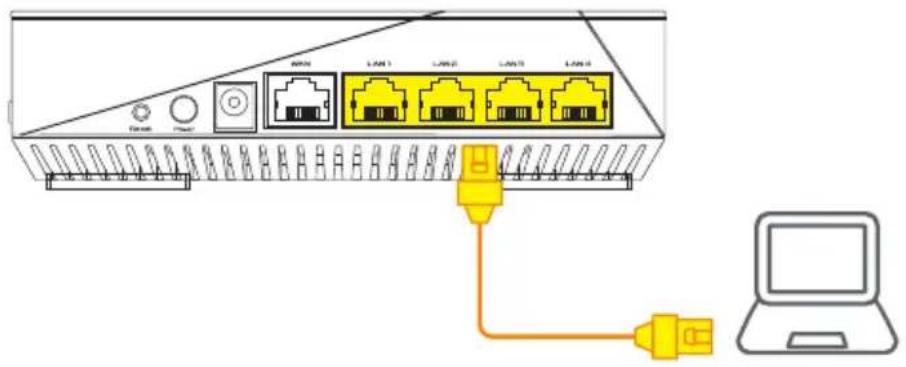
02 Connect your Device
1 Power on the router.
Plug in and press the power button at the back of your router.
Check the WAN and 2.4GHz/5GHz LED lights to ensure the hardware connection is ready.
3 Connect your PC to the router using an additional network cable.
03 Login and Connect
1 Open a web browser.
You will be redirected to the ASUS Setup Wizard. If not, navigate to http://router.asus.com.

AiMesh SETUP STEPS
01 Prepare
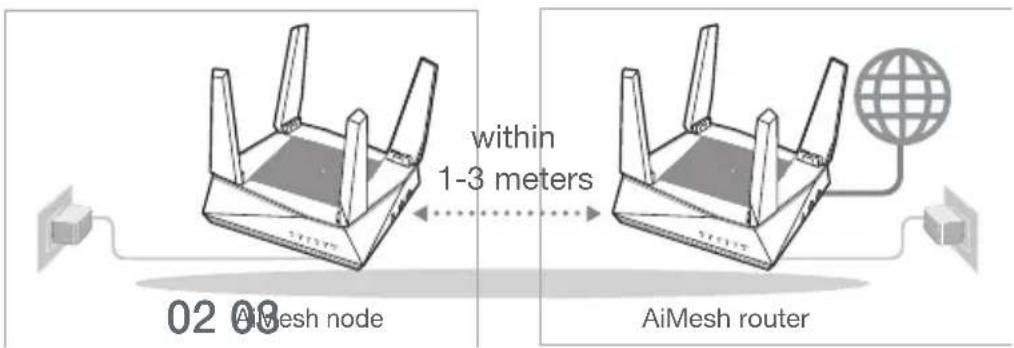
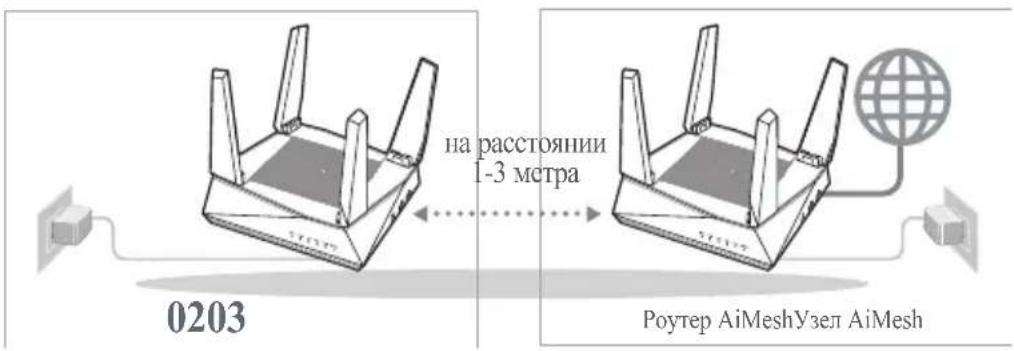
Place your AiMesh router and node within 1-3 meters of each other during the setup process.
02 AiMesh node
Factory default status. Keep power on and standby for AiMesh system settings.
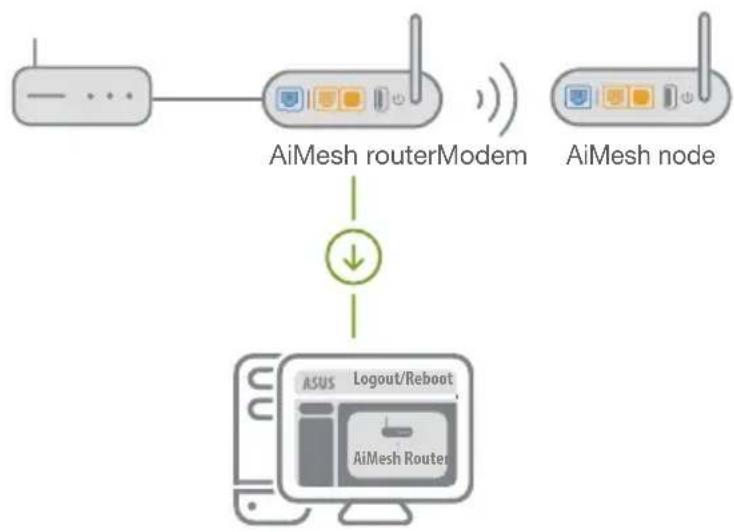
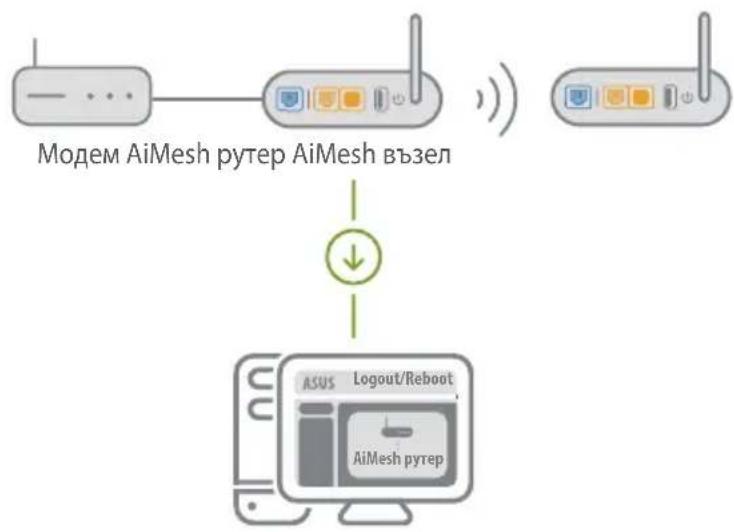
03 AiMesh router
Refer to ONE ROUTER SETUP STEPS to connect your AiMesh router to your PC and modem, and then log in into the web GUI.
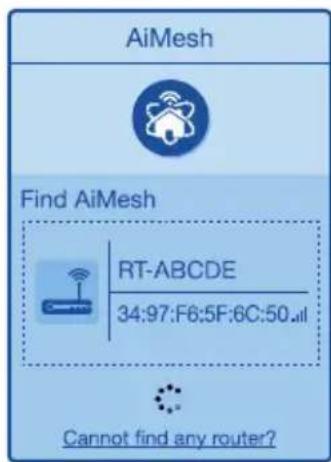
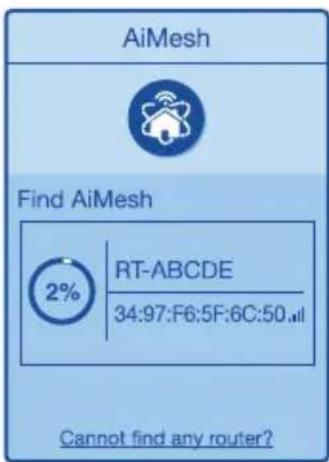
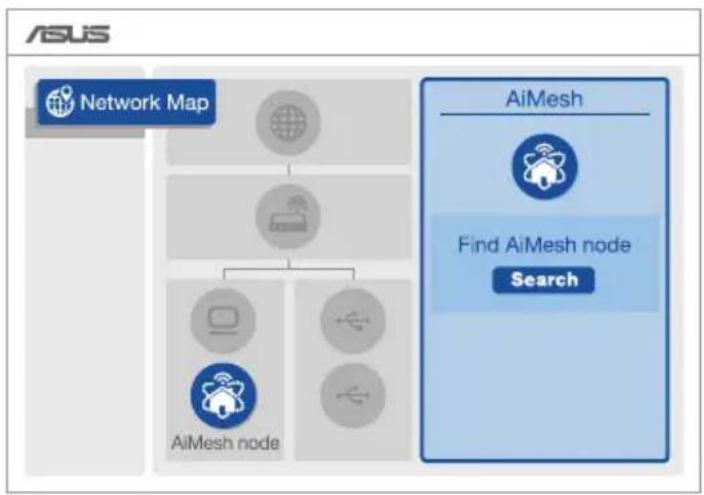
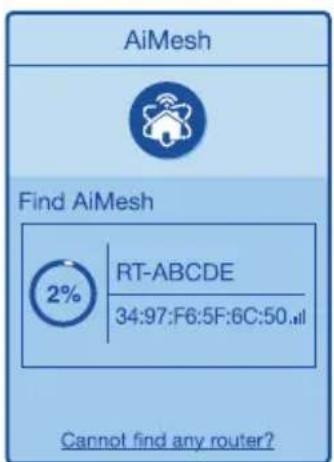
Go to Network Map page, click AiMesh icon and then Search for your extending AiMesh node.
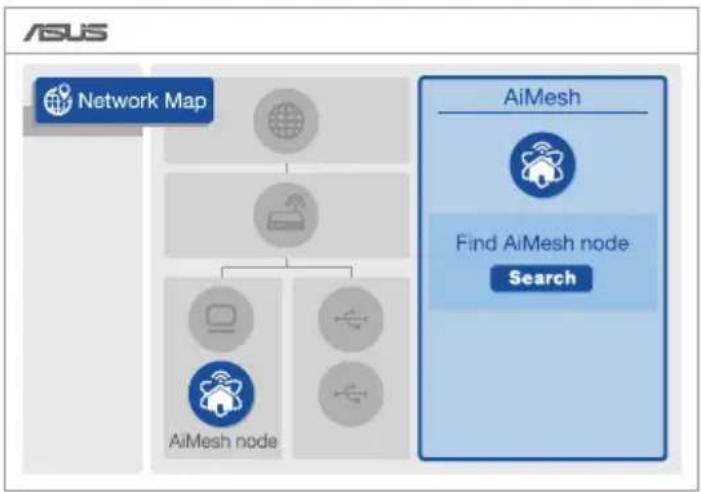
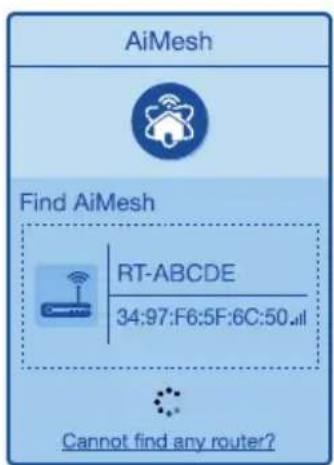
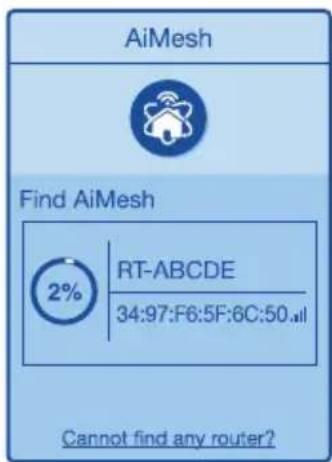
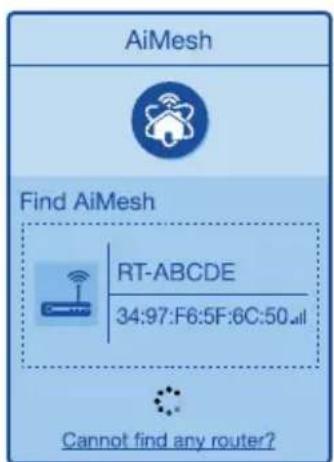
3 Click Search, it will automatically search for your AiMesh node. When the AiMesh node shows on this page, click it to add it into the AiMesh system.
** If you cannot find any AiMesh node, please go to TROUBLESHOOTING.
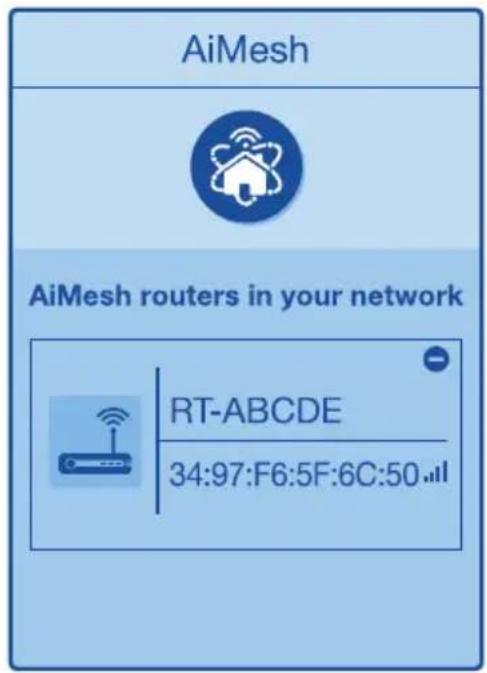
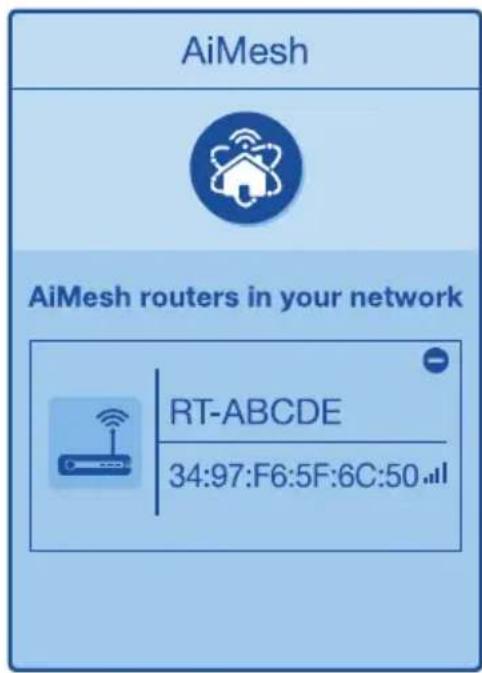
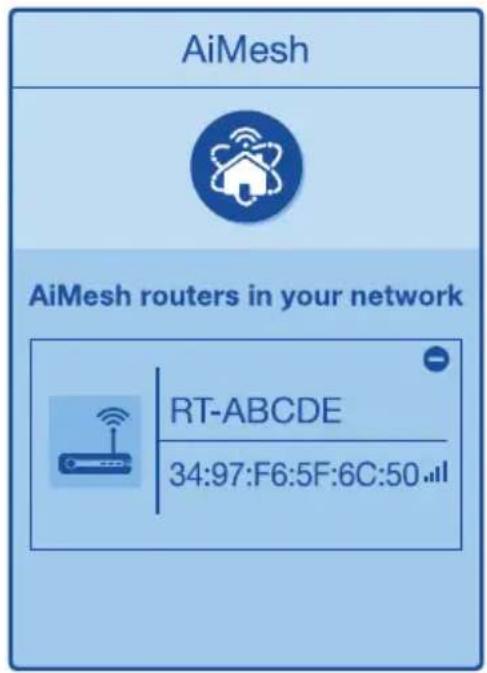
A message is displayed when synchronization is completed.
Successfully added RT-ABCDE to your AiMesh system, it will take awhile to show up as connected in the AiMesh router list.
OK
Congratulations! You will find the pages below show up when an AiMesh node has been successfully added to the AiMesh network.

TROUBLESHOOTING
If your AiMesh router cannot find any AiMesh node nearby or synchronization fails, please check the following and try again.
Move your AiMesh node closer to the AiMesh router ideally. Ensure that it is within 1-3 meters.
b Your AiMesh node is powered on.
RELOCATION
Locate the AiMesh router and node at the best place.
NOTES: To minimize interference, keep the routers away from devices like cordless phones, Bluetooth devices and microwave ovens.
We recommend that you place the routers in an open or spacious location.
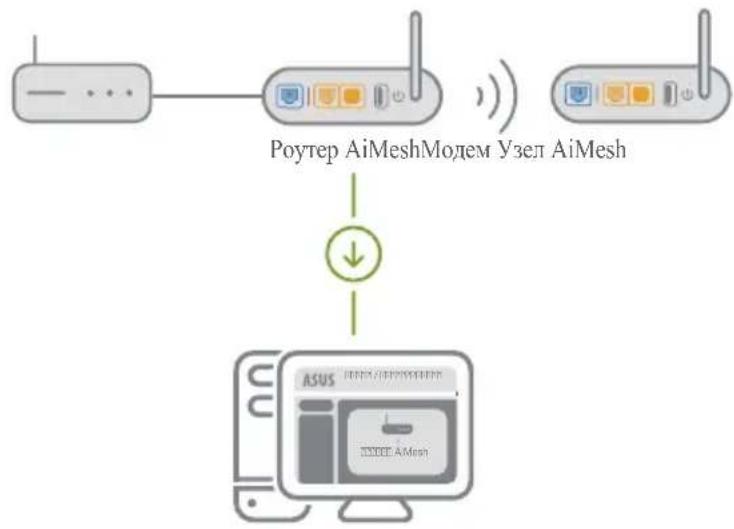
ASUS ROUTER APP
Download free ASUS Router APP to set up and manage your router(s).

ASUS Router


GET IT ON Google Play

Download on the App Store
FAQ
FREQUENTLY ASKED QUESTIONS
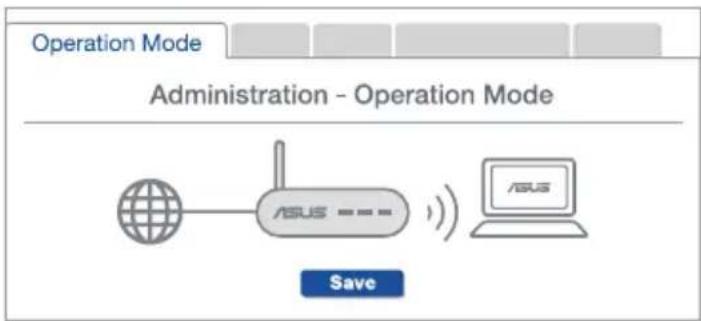
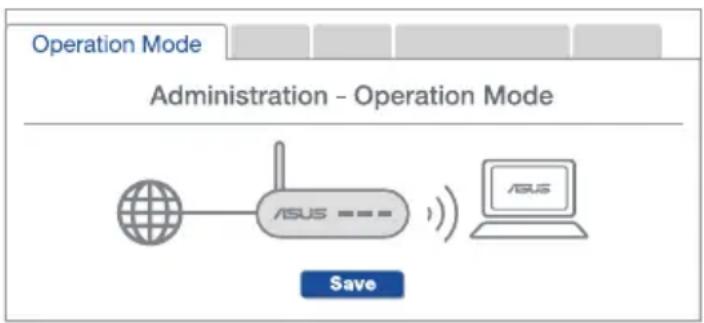
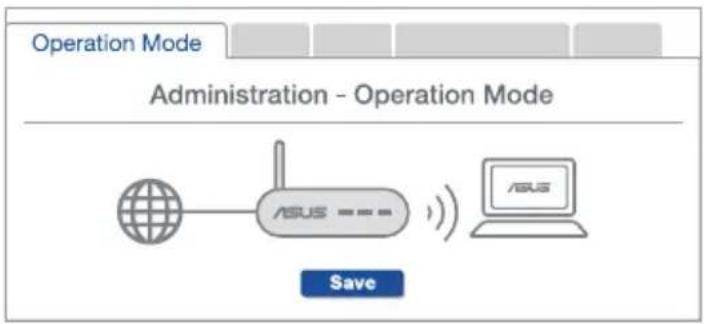
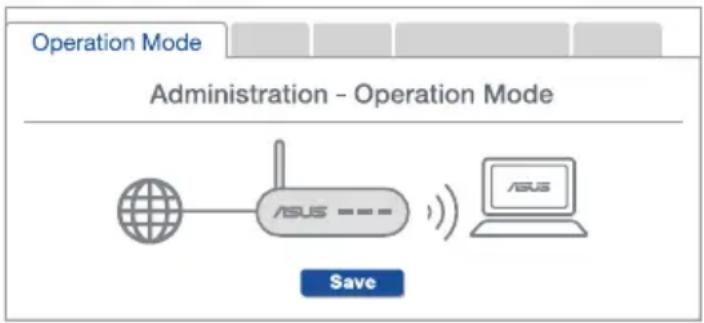
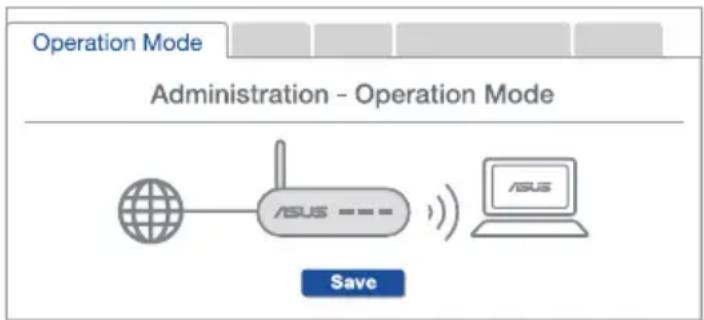
Q1 Does the AiMesh router support Access Point mode?
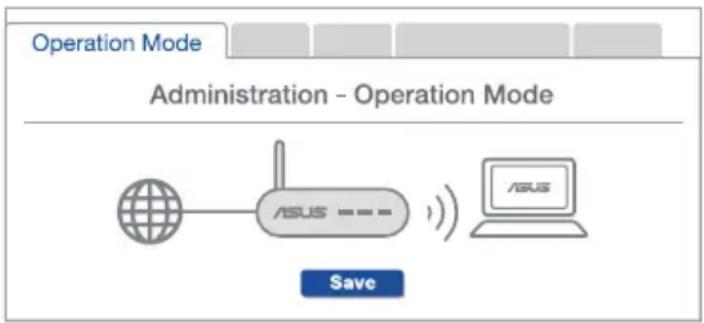
A: Yes. You can choose to set the AiMesh router as router mode or access point mode. Please go to web GUI (http://router.asus.com), and go to the page Administration > Operation Mode.
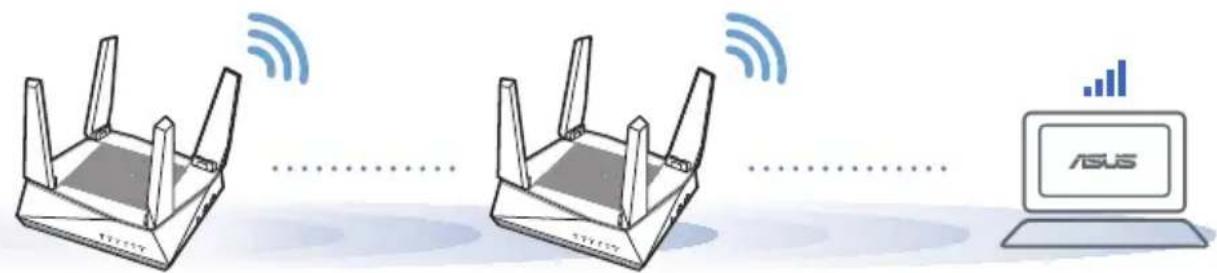
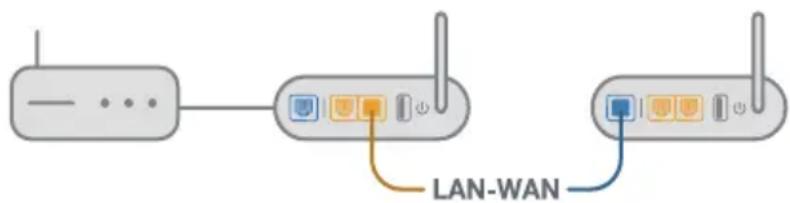
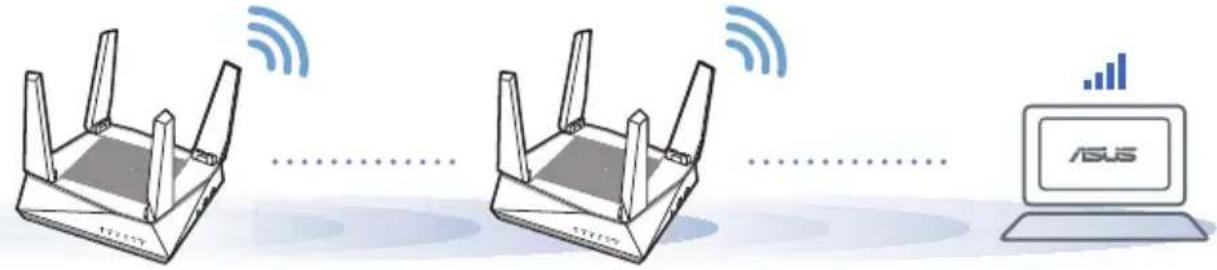
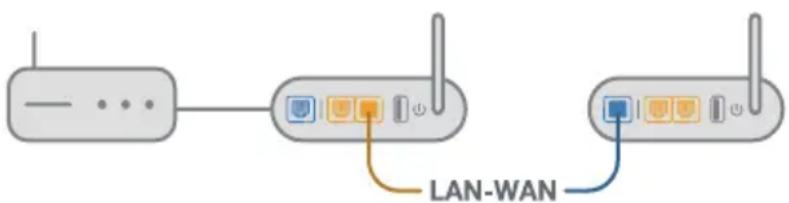
Q2 Could I set up wired connection between AiMesh routers (Ethernet backhaul)?
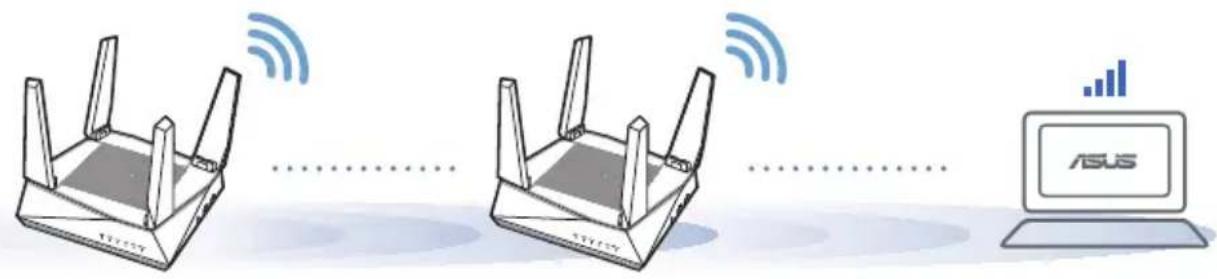
A: Yes. The AiMesh system supports both wireless and wired connection between the AiMesh router and node to maximize throughput and stability. AiMesh analyzes the wireless signal strength for each frequency band available, and then determines automatically whether a wireless or wired connection is the best to serve as the inter-router connection backbone.
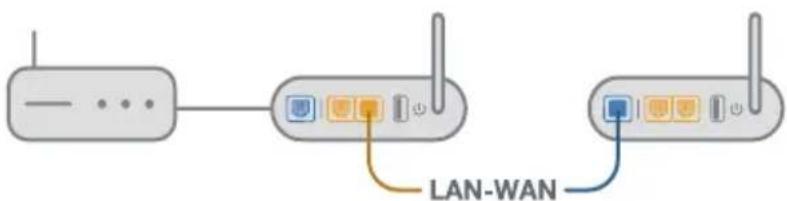
1 Follow the setup steps to establish a connection between the AiMesh router and node via Wi-Fi first.
Place the node in the ideal locations for best coverage. Run an Ethernet cable from the LAN port of the AiMesh router to the WAN port of AiMesh node.
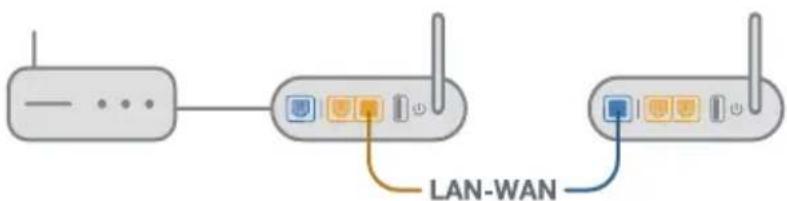
The AiMesh system will auto-select the best path for data transmission, whether wired or wireless.
Osha nHΦopMaζηa 3a pyTepa
Cbpxte 3axpaHbaun aanTep KbM 3axpaHbaOTo rHe3do Ha pyTepa n HataChete power 6ytoHa (3axpaHbaHe).
2 LED nHnkaTopnte 3a yeCTOTHTe IeHTn ot 2.4GHz/5GHz ue cBeTHaT, KOrato Baunr pyTepe CBbp3aH.
O6aChenHa 6yToHnTe n nopTOBete
BYTOH RESET (HYJINPAHE)
Hynpa cnTeMaTa KaTo Bpbuca a6puHnTe HacTpoiKn No noDpa36npaHe.
WANIOPT
Toba e npotbT, B KOnTo Cbbp3BaTe MoJem Upe3 MpeKob Ka6eJI.
LANIOPT1-4
Tei npToBe (4,3,2,1) cBbP3BaT pyTepa KbM IokaHInTe KOMNIOTpN ue3 Ka6eJ.
TexHnueckxapaKTePmCTmKn:
3aEN nAHeH Ha MoDema
2 CbpxKeTe Baunm Moem KbM pyTepa KaTo n3nON3BaTe npedocTaBeHm MpeXOB Ka6eI.
BkIIOUeTe MoEma. BkIOUeTe MoEma B KOHTaKTa n BkIOUeTe 3axpaHbAHeTo.

3aen nahanen Ha MoDema
4ПроверетeВашияKa6eI/LEDинdkaTopuTeHaDSLmoema3a da cTe cnrypHn,уeВpb3kaTa eakTINBHa.
1 Ako n3non3BaTe DSL moEm 3a INHTepHeT, Tp86Ba da mATE notpe6uTeNcKO nme/napoJa, npedoctabeHOn OT Baunn INHTepHET DOCTABUHK (ISP), 3a npabuInHO KOHnrgupaHe Ha pyTepa.

Cbbp3BaHeHa pytepa
02 CbpxKeTe yctpoNCTBOTO cn
1BknIoueTepyTepa.
BkIIOUeTe nHaTnCHeTe 6yToHa 3a BkIIOUBaHe n N3KIOUBaHe, HAMIPAuCe Ha rbp6a Ha pyTepa.
2 Ybepete ce, ue nHnkaTopnte 3a WAN n yeCTOTnTe JeHTn 2.4GHz/5GHz cBeTJ.

3 CBpbjxTe KOMIOITbpa cn KbM pyTepa KaTO n3nON3BaTe dONbHHTeHe MpeKOB Ka6eJ.
03 Cbbp3BaHe
OTcBbP3aHnKaBmpyTepaKOMNIOTpO TBOpTeye66pay3bp.
Ie 6bTe npenacouen KbM ASUS Setup Wizard (CbBcTHNK 3a nHCTaIInpaHe Ha ASUS). Ako ToBa He cTaHe, BbBeTe B URL nonTo http://router.asus.com.

CTbПКИЗАИСHTАЛИРАЕHA AiMesh
01 PoiDrToBka
IocTabete Baunr AiMesh pyTep n AiMesh ha pa3ctoHne ot 1 do maKcHym 3 MeTpaeHN OT npy rno BpeMe Ha npouceHa NHCTaIauN.
02 AiMeshвьзел
Φa6pnuHcBCTOHaHne no nOpa3bnpaHe.ДрBXTe 3axpaHbaHeTO BKIOUeHO IN B rOToBHOCT 3a AiMesh cnCTemHn HacTpoiKn.
03 AiMesh pyTep
1 BnKTe CTbIKN 3A NHCTALIPAHE HA EEDH PYTEP, 3a da cBbpxte cBoA AiMesh pyTep KbM KOMNtbp n MoDEm, CneI KOeTo BHe3e B ye6 Notpe6ntckn INHTepceic.

OtnndeHa cTpaHncaTa Network Map (KapTa Ha mpeXnTe), ippaKHeTe Bbpxu IkoHata Ha AiMesh, cned Koeto ippaKHeTe Bbpxy Search (TbpceHe) 3a pa3wnpBaHe Ha Baunia AiMesh Bb3en.

UpaKHe Tbpy Search (Tbpche) 3a aBtOMaMTnHc TbpcHe Ha Baunr AiMesh b3en. Korato AiMesh b3enbT ce noBn Ha Ta3n cTpaHnca, UpaKHe Tbpy Hero, 3a da ro do6abnte B AiMesh cnCTemata.
** Ako He moxete da OTkpneTe AiMesh Bb3en, OTnpeTe Ha OTCTPAHRAHE HA HEN3PABHOCTN.
4 Ako cunxpoHn3npaHeTo Ha yctpoiCTBaTa e ycneuho, ce neoBn CneHOTcbo6ueHne
Successfully added RT-ABCDE to your AiMesh system, it will take awhile to show up as connected in the AiMesh router list.
OK
5ПоЗдравлия!АкOBиДITEи3ОБраженьeto ПО-ДONY,TO AiMeshВьЗЕЯ e nHCTaIIpaH uCpeшноюбavenКbM AiMeshmpexkaTа.

OTCTPAHЯBAHE HA HEN3ПРABHOCTN
Ako BaunrAiMesh pyer He moke da otKpne AiMesh Bb3enB 6n30ct nnn aKO cnHxpoHn3aunrae e HeycneuHa, npOBepTe daJI n3nHnJIn CTbPKITE NO- dOJy IN ONTaNTE OTHBO.
a IpemeTeTe cBor AiMesh Bb3eI no-6n3o do AiMesh pyTepa. YBepeTe ce, ye pa3ctOarHneTo MeKdy TEx e ot 1 do 3 MeTpa.
Baunr AiMesh Bb3e n e BkIouen.
Download on the App Store

YECTO 3AADABAHN BbPPOCN
Q1 AiMesh pyTepbT noDbpxa In pexm Access Point (Toka 3a doctbn)?
O:Дa. Можete Да ИЗберete Ддл Дд Зада对接 AiMesh pyтьт Дд Бд В ржим ртуг почka за дocъп. OTидete B ye6 notpebntelckma nHTepфeic (http://ruter.asus.com), OTидete на стравиca Administration (Admnnctpaць) >Operation Mode (PexmHa pa6ota).
Q2 Mora li na nHcTaInpam Ka6eHa Bp3ka MeJy AiMesh pyTePte (Ethernet backhaul)?
O:Дa. AiMesh система тпдьрka n 6e3кчha, n Ka6eнha Bpb3ka мжdy AiMesh pytepa n Bb3ela 3a MaKcImaJIHa cKOpocT ha npedabAhe n CTa6nHocT. AiMesh aHaJIIN3Ipa CInIaTa Ha 6e3ЖИЧЯ CInrHaJI 3a BCa KaHInUHa YecToTHa JENTa, cIeI KOeTO aBtOMaTNo OnpedeJЯ dAIe n PO-INO6pe 6e3ЖИчHa IIn K6eInHa Bpb3ka da ce N3ПОЛ3Ba KaTO OCHOBHa Bpb3Ka MEXdpy PyTePte.
1 CnEaBaiTe CTbNknte 3a INHCTaIInpaHe, 3a da yCTaHOBInTe Wi-Fi Bpb3ka MeJy AiMesh pyTepa N Bb3ena.
2 IocTaBeTe Bb3eHa Ha NdeaHnTe MeCTa 3a Hau-Do6po nokpntne. IpokapaiTe Ethernet Ka6en ot LAN nopTa Ha AiMesh pyTepa do WAN nopTa Ha AiMesh Bb3eHa.
3 AiMesh cnctemata aBTomatnuHo ige n36epe hai-do6pna 3a npe Hoc Ha daHHn, He3abncmo daJIy Upe3 Ka6eI nn6e3KNUHO.
Successfully added RT-ABCDE to your AiMesh system, it will take awhile to show up as connected in the AiMesh router list.
OK
Cestitamo! Kada se AiMesh modul uspjesno doda u AiMesh mrezu, pri Kazakhstan se sljedeca stranice.
OTKLANJANE POTESKOCA
Successfully added RT-ABCDE to your AiMesh system, it will take awhile to show up as connected in the AiMesh router list.
OK
Successfully added RT-ABCDE to your AiMesh system, it will take awhile to show up as connected in the AiMesh router list.
OK
OFTE STILLDE SPØRGSMÄL
Successfully added RT-ABCDE to your AiMesh system, it will take awhile to show up as connected in the AiMesh router list.
OK
AiMeshi SEADISTUSTOIMINGUD
01 Ettevalmistus
Successfully added RT-ABCDE to your AiMesh system, it will take awhile to show up as connected in the AiMesh router list.
OK
Download on the App Store
FAQ FOIRESAUXQUESTIONS
Successfully added RT-ABCDE to your AiMesh system, it will take awhile to show up as connected in the AiMesh router list.
OK
Successfully added RT-ABCDE to your AiMesh system, it will take awhile to show up as connected in the AiMesh router list.
OK
5 Suyyapntnpia! Oa pseite Tc npapakatw oelidec nou eupaviovtai otav evac kOaBoc AiMesh exi npooTe0e iE enituyia oTo δiktu AiMesh.
ANTIMETΩΠΙΣH ΠPOBAHMATΩN
Download on the App Store
FAQ ΣYXN'EΣ EPΩTHΣEΙΣ
F1 YnooTnpiEio o dpouoLoynntc AiMesh ioupyia onmuieou npoBaonc;
A:Nai. Mnpoeite v a eiliee t eitoupyia tou dpooloynnt AiMesh w c
dpopooyntnc n oetaio poobaonc. Mtaeite oTo diaiktuako GUI (http://router.
asus.com) kai mtaeite oTn ola Administration (aixepion) > Operation Mode (Kataoan laitoupyiac).
E2 Mnpw va puOmuo evoupuatn ouvdeltaon tau dpouoloyntaw AiMesh (oio0eU Ethernet);
A:Nai. To ouotma AiMesh unooptie aoupuatn kai evoupuatn ouvdeon metau Tou dpooloaynt AiMesh kai tou kou yia meyio tooinan tnc anodooanc kai tnc otaepotntac.To AiMesh avaluei tv ivxu tou aoupatou onmuato cya kahe diathetaiun zwn ouyovntwv kai otn ouvexia kathetai autouata av ia aoupauatn n evoupuatn ouvdeon eivai kalutepn wc bao n i a tn ouvdeon metauTwv dpooloayntwv.
Akooutheta ta hmuata ykaataoanc yia va dnmuoynoe Tpwa mua uvdoeon meo Wi-Fi tou dpopooloynt AiMesh kai tou kou
ToioeTne Tov kouo otnv 1davikn eoyn yia kautepn kauyn. Uvdoet e eva Kaowio Ethernet tn thupa LAN tou dpoooynt AiMesh u Tn thupa WAN tou kouAiMesh.
3 To ouotma AiMesh tha eiléxi autómuata tny kaIutepn diapoum n etadooog δeodouevwv, evuρμatn n aupμatn.
Successfully added RT-ABCDE to your AiMesh system, it will take awhile to show up as connected in the AiMesh router list.
OK
AZ OPTIMALIS TELJESITMÉNY
Download on the App Store
FAQ DOMANDE FREQUENTI
Successfully added RT-ABCDE to your AiMesh system, it will take awhile to show up as connected in the AiMesh router list.
OK
Sveikiname! Kai RT-AX92U sékmingai pridétas prie „AiMesh“ tinklo, bus rodomi toliau esantys puslapiai.

PROBLEMU SPRENDIMAS
Successfully added RT-ABCDE to your AiMesh system, it will take awhile to show up as connected in the AiMesh router list.
OK
5 Apsveicam! Jus redzesiet zemak paradito attelu, ja AiMesh mezglpunkts ir veiksmigi pievienots AiMesh tiklam.

KLUMJU NOVERSA
Ja AiMesh marsrutetajs nevar atrast tuvuma nevienu AiMesh mezglpunktu vai sinhronizacija neizdevas, ludzu, veiciet turpmak noraditas pbaraudes un meginiet velreiz.
Download on the App Store
BUJ BIEZAK UZDOTIE JAUTAJUMI
- jautajums. Vai AiMesh marsrutetajs atbalsta Access Point rezimu?
Successfully added RT-ABCDE to your AiMesh system, it will take awhile to show up as connected in the AiMesh router list.
OK
Download on the App Store
OSS OFTE STILTE SPÖRSMÄL
Q1 Stotter AiMesh-ruteren tilgangspunktsmodus?
A: Ja. Du kan velge Å sette AiMesh-ruteren i rutermodus ellertilgangspunktsmodus. Gå til web-grensesnittet (http://router.asus.com), og gàtil sider Administration (Administrasjon) > Operation Mode (Driftsmodus).
Q2 Kan jeg sette opp en kablet tilkobling mellom AiMesh-rutere (Ethernet backhaul)?
Download on the App Store
Successfully added RT-ABCDE to your AiMesh system, it will take awhile to show up as connected in the AiMesh router list.
OK
Download on the App Store

CZESTO ZADAWANE PYTANIA
OsbjcHeHHa KHOIOK HnOpTOB
KHOIKA CBPOCA
C6poc cHCTeMbI K 3aBOJCKHM HAcTpoHKam IIO yMOJIHaHHIO.
IIOPT WAN
IIOKIIIOHTe poyter KMOEmy HIN Ka6JIIO IPOBaIepa(ISPCHOMOIIbIO cereBOrO Ka6JIa.
IIOPTBI LAN 1-4
IoiKIOUHTe KOMIIbIOTep K poyTepy C HOMOIIbIO cTeBOrO Ka6JIa.
CneuΦkaun:
01 IopIroTOBbTe MoJeM
OTKJIIOHHTe IITaHHe OT Ka6eJIbHOro /DSL-MoIema.IIpn HAJIINH pe3epBHOro aKKMyJITopa, H3BJIeKHTe erO.
3aannnnae.
2ПIOKJIIOHHTepoTepKMOJEmyHJIKNa6eIIO IPOBaAIEpa(ISP)cIIOMOIIbIO cTeBOrO Ka6eJIa.
3BKnIOHTMe moJem. IIOKJIIOHTe moJem K pO3eTKe H BKNIOHTe ETO.
4IpoBepbTe HINIKaTOpbIMoJemaH yoeiHTecb HnIHHNIOJKIIIOUeHH.
HNCIOJIb3OBAHHIIOKJIIOUChHJDSLBaM IOTpe6yETc BBeCTN HMa IOJIb3OBATeJIa /napoJIbOT IPOBaJIepa (ISP).
IIb Moema
02 IopKJIIOHTe ycTPOcTBO
BknnoHTe poyrep.
HaKMMTe KHOIIKy IITaHnHa Ha 3aIHei PaHeJn poyTepa.

2 IpoBepbTe cBeHHe HnHKaTopoB WAN n 2.4GHz/5GHz, 03naHoiIee roTOBIOCTb ycTPOINCTBa.
3 IIOJKIHOHTe KOMIIbIOTep K poyTepy c HOMOIIbIO IOIOJIHHTeJIbHOrO cTeBOrO Ka6eJIa.
03 BxoI IIOKJIIOHHe
1 OrkpoiTe 6pay3ep.
Bb6yTe IpeHApBJIeHb B MaCTep HAcTPOJKN. EcJH He, IpeHJITHe Ha http://router.asus.com.

IHCTPYKIIIN IIO HACTPOIKe AiMesh
01 IopIroTOBka
B Ipocece hactpokn pa3mecnte poyTe n y3e AiMesh ha pacctoHnn 1-3 metpa npyT ot npya.
02 Y3eJI AiMesh
CocToHHe IyMOJTHAHIO.BKJIIOHTe IHTaHHe N OxHJaIte HAcTpOyKn CnCTEmbAiMesh.
03 Poyrep AiMesh
1IJIIOIKJIOHEnnpoYtepaAiMeshK KOMNbIOTepy H MOJeMy o6paHTeCb K NHCTPyKIIHNIO HACTPOINKE POYTEPA B ODNHOCHOM PEXHM, 3aTeM BOINITE B Be6-HHTeppeic.
Ipeennte Ha ctpaHnHy KapTa ceTn, HaxMHTe NKOHky AiMesh n HauNTe IonoJIHHTeJbHbY3eJI AiMesh.
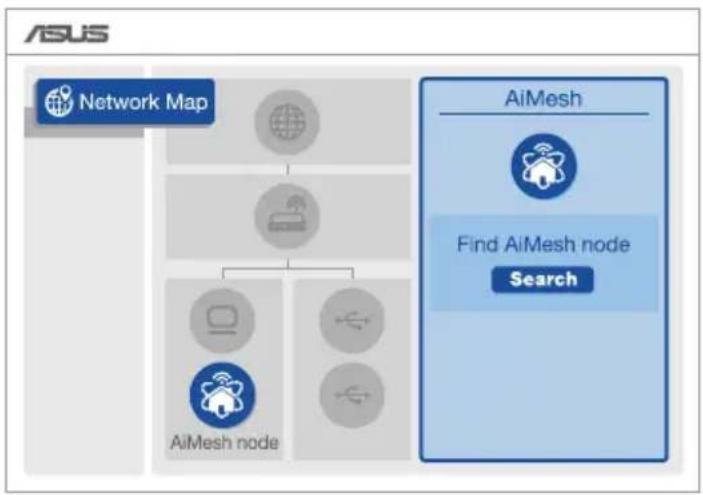

3 HaKMITE IOnCK JIA ABROMATNueCKO RIO NIOCKa y3IOB AiMesh. IIpH IOBHeHH y3Ja AiMesh, HAKMITE HA HERO JIO6ABJIeHH erO B CHCTeMy AiMesh.
** EcII Bb He haIIy3e AiMesh, nepeIITe B pa3deYCTPAHEHNE HENCIIPABHOCTEIN.
4 IIO 3aBepHHeHH cHHxpoHH3aHH oTo6pa3HTc8 coo6HHe.
YcTpoIcTHo RT-ABCDE ycHHeHIO IO6aBTeHO B CnCTeMy AiMesh, Upe3 HcKOTOpoc Bpemr OHO OTo6pa3HTcB CnHcKe poyTePOB AiMesh.
OK
5 Iop3ipabJIaem! CtpaHnua Hnke IIOBJIaTeTc np yCpeHHOM IO6aJIeHHN y3JIa B cetb AiMesh.
YCTPAHEHNE HENCIIPABHOCTEIN
EcJn poyTep AiMesh He haIeJI y3eJI AiMesh IIN IOBJIaETc8 OIIb6Ka IIprn cHHxpoHn3aIIHN, BblIOJIHNTe HNCTpyKUnn HInKe I IOBTOpHTe IIOBITKy.
a Iepemecntte y3eAiMesh 6nke K poytepy AiMesh. Y6eHTecb, TTO OHn HaxoTcHa pacctOHH 1-3 MeTpa.
b Y3eAiMesh BKIOueH.
PACIOJIOJXEHNIE
JIyUHIAI IPOIN3BOJNTEJIbHOCTb
HaIInTe IooXoJnuee MeCTO nIpyTepa H y3Ja AiMesh.
IIPIMEAHH: Iy mehbien Hnemx paonIOKHTe poTyepbl BnHOT 6ecpOBOHbIX ycTpoNCTB,HaipHmep 6ecpOBOHbIX TeTeFOHOB,ycTpoNCTB Bluetooth n MHKPOBOHOBIX neey.
PeKOMEHyETcpa3MeCTHbpoTepbHaOTKpBTOMHHIPOCTOPHom MeTe.
ПИJOJOKEHNEДЛЯPOYTEPA
CkaaHte 6ecIIaTHoe npJIooKeHne ASUS Ruter IJIa HacTPOKn N yIpaBJIeHn poyTePOM.

ASUS Router


GET IT ON Google Play

Download on the App Store
FAQ YACTO 3AДABAEMbie BOПСбI
B1 Poyrepa AiMesh noDiepKnBaet peXn m TOnKn IocTyna?
A:Дa.Можно HabToHb pouTepa AiMesh b peKHe poyTepa HIn Tockn JocTyIa. BoiHTe B Be6-HHTeppeic (http://router.asus.com) H HepeiHTe Ha cTpaHHu AdmHnctpnpObaHne > PeKm pa60TbI.

B2 MoJHo JIN HacTpOHTb IODKJIIOueHHe MeKdIy poyTepaMn AiMesh n y3JaMn (Ethernet backhaul)
A:Да.CnCTema AiMesh IOJIePKeHNaeT 6ecIIpoBOJHOe I IpoBOJHOe IOIJKJIIOHe MekJy poyTePOM AiMesh H y3JOM IIIA MaKcHMajbHOJ IPOH3BOJNTeJIbHOCTN I CTa6HJIbHOCTN. AiMesh aHaJIIN3HpyET 6ecIIpoBOJHOJ cHrHaJI IIIA KaJIOJ IOJIOcbI YactOT N BbIbHpaeT HaJIYUHIEE IOIKJIIOHeHne MeKJy poyTepAMH.
CnayaJIa BbIIIOJIHHTe HcIpyKINH IO HAcTpoIKe 6ecIpOBOJHO IIOJKIOUHeHH MExJy poyTePOM y3JOM AiMesh.
PacIOIOXHTe y3eB HHeaJIbHOM MecTe IJI HAJIyUHero IIpHema cHHaJa. IIOKJIIOHTe Ka6JIb Ethernet K IIOpy LAN poyTepa AiMesh n K IIOpy WAN y3Ja AiMesh.
3 CnCTema AiMesh aBTOMaTHueckn BbIepeT HauJyHHe IoKJIIOUeHHe IJIa IJIa IpeJaH daHHbIX (IpOBOdHOe HIN becnpoBOdHOe).
Explicaţii hardware
Successfully added RT-ABCDE to your AiMesh system, it will take awhile to show up as connected in the AiMesh router list.
OK
Felicitar! Vei descoperi cã paginile de mai jos apar cand un nod AiMesh a fost adaugat cu succes la reteaua AiMesh.

DEPANARE
Download on the App Store

INTREBAI FRECVENTE
Q1 Router-ul AiMesh accepta modul Access Point (Punct de acces)?
A:Da. Putei alege sa seta i router-ul AiMesh ca mod router sau mod punct de acces. Accesati GUI prin browser-ul web (http://router.asus.com) si accesa pagina Administration (Administrare) > Operation Mode (Mod fonctionare).
Q2 Pot configura o conexiune cu fir intre router-ele AiMesh (backhaul Ethernet)?
Successfully added RT-ABCDE to your AiMesh system, it will take awhile to show up as connected in the AiMesh router list.
OK
SOLUTIONAR PROBLEMAS
Successfully added RT-ABCDE to your AiMesh system, it will take awhile to show up as connected in the AiMesh router list.
OK
Download on the App Store
FAQ
CESTO POSTAVLJANA PITANJA
Successfully added RT-ABCDE to your AiMesh system, it will take awhile to show up as connected in the AiMesh router list.
OK
5 Blahoželáme! Po uspěšnom pridani uzla AiMesh do siete AiMesh budú k dispozífii dolu zobrazené strány.

RIEŠENIE PROBLEMOV
Successfully added RT-ABCDE to your AiMesh system, it will take awhile to show up as connected in the AiMesh router list.
OK
Download on the App Store
FAQ
POGOSTA VPRASANJA
Successfully added RT-ABCDE to your AiMesh system, it will take awhile to show up as connected in the AiMesh router list.
OK
Download on the App Store
FAQ VANLIGA FRÅGOR
Successfully added RT-ABCDE to your AiMesh system, it will take awhile to show up as connected in the AiMesh router list.
OK
Download on the App Store
SSS
SIK SORULAN SORULAR
BidkpniTe Be6-6pay3ep.
Bac 6ynde nepeHa npabNeHo do nporpaMn-nomiuHnka HanaStyBaHHA ASUS. JKso Hi, To nepeiTb 3a nocnilanm http://router.asus.com.

KPOKN HAJAHTYBAHHA AiMesh
01ПiДrOToBka
Successfully added RT-ABCDE to your AiMesh system, it will take awhile to show up as connected in the AiMesh router list.
OK
5 Biraem! HxquenodaHi ctopiHKn 3'YBnTbcra, KOnn By3oN AiMesh bye ycniHo do daHo do Mepeki AiMesh.

UCYHEHHH HECPABHOCTEN
Rkso MapuTn3atop AiMesh He moke 3naTn npuy kOndoro By3na AiMesh, a6o TpanIeTbcnOMnka cHxpoHizaui, nepeBipTe hactynHe Ta nobTopitb cnpo6y.
B iIeani BapTo nepecyHytu ByzOn AiMesh 6nJxue do MapupyTu3aTopa AiMesh. IpekoHaTecra, 0o BIn 3NaXoDITbcry y paDiYci 1-3 MeTpIB.
b YbIMKHeHO KINBneHnBy3na AiMesh.
ПЕРМИЦЕНЯ
IOOB OTPIMATN HAIKPAUPOBOUIXAPAKTEPNUCTIKN
3haɪdɪt b haɪkpaʊe Mice dɪn Maɪpʌpyɪn3aTopa Ta Byʒa AiMesh.
YKpaIHcbKa
PUMITK: 3BcT Do MImy 3aBn, po3mUyTe MappyTu3aTopu noJani BiD Taknx npictpoB, k6e3dpoTobi teleoH, npictpOi Bluetooth i mikpoxBnIbObi neui.
Papmo po3miuBaTu MapupytnaTopn Ha BiDkPunTomy a6o B npocToPommyicui.
MOБIELBA ПРОГPAMA ASUS ROUTER
3aBaHTaXTe 6e3KoTobHy nporpamy ASUS Router, 06 hanaTbyBatn MapuTy3aTop(n).

ASUS Router


GET IT ON Google Play

FAQ PO3ПОВСЮДЖЕHI 3АПИТAHнЯ
01 Yu nipiTpmye Mapwpytn3atop AiMesh pexm tockn doctyny?
A: Tak. Moxha BCTaHOBnTm MappyTu3aTop AiMesh y peKmI mappyTu3aTopa a6o B peKmI ToCkN DoctuNy. IpeeNdIb do rpaΦiHoro Be6-iHTepΦeIcy (http:// router.asus.com) i BiKpNiTe cToPiHKy Administration (AdmiHicTpBuHaH) > Operation Mode (PeKm Po6oTu).
Q2 Yu moxHa BCTaHOBtN dpoTOBe 3'eHaHHaMIX MapuTy3aTopamAiMesh (Ethernet-3'eHaHHa)?
A:Tak.Cnctema AiMesh nIITpIMyE k6e3dpoTOBe, taK i dpoTOBe nIKNUOeHHaMIX mapuTyN3aTOpOM i By3nom AiMesh, uo6 rapaHTyBaTN MaKcImaJIbHy npOnyckHy 3daTHicTh i cta6iNbHicTh. AiMesh aHaI3ye cnly 6e3dpoTOBO rCnHany DnKoKHO 3doCTynHNx diAna3OHIB qactOT, a NOTIM aBTOMaTHUHO BN3Hauae, JaKe nIKNUOeHHra-6e3dpoTOBe nn dpoTOBe-HaNkpaue nIXoDHTb IJMaICTPaJIbHOrO 3B'3Ky mIX mapuTyN3aTOpAMn.
1 BnKoHaTe KpOKn HanaTbAHN, 06 BCTaHOBNTn Pdkluoyehn MIX MapspTy3atOpom i By3nom AiMesh cnoataKy uepez Wi-Fi.
2 3hauiiB ideaIbHe micue Iy3na, uo6 3a6e3neuHTn HauKpaue nokpTT. PpoBeiTb ka6eIb Ethernet BiD nopTy LAN Ha MapwpyTu3atopi AiMesh do nopTy WAN Ha By3ni AiMesh.
3 CnCTema AiMesh abTomatnuHo Bn6epe NaKpaun MapwpyT dny nepeaqui daHnx-ayk DpoTOBnx, TaKi 6e3dpoTOBux.
ASUS Recycling/Takeback Services
ASUS recycling and takeback programs come from our commitment to the highest standards for protecting our environment. We believe in providing solutions for you to be able to responsibly recycle our products, batteries, other components, as well as the packaging materials. Please go to http://csr.asus.com/english/Takeback.htm for the detailed recycling information in different regions.
REACH
Complying with the REACH (Registration, Evaluation, Authorisation, and Restriction of Chemicals) regulatory framework, we published the chemical substances in our products at ASUS REACH website at http://csr.asus.com/english/REACH.htm
Precautions for the use of the device
a. Pay particular attention to the personal safety when use this device in airports, hospitals, gas stations and professional garages.
b. Medical device interference: Maintain a minimum distance of at least 15cm (6 inches) between implanted medical devices and ASUS products in order to reduce the risk of interference.
c. Kindly use ASUS products in good reception conditions in order to minimize the radiation's level.
d. Keep the device away from pregnant women and the lower abdomen of the teenager.
For more information, visit the ASUS support site at: https://www.asus.com/support/
English
CE statement
Simplified EU Declaration of Conformity
ASUSTek Computer Inc. hereby declares that this device is in compliance with the essential requirements and other relevant provisions of Directive 2014/53/EU. Full text of EU declaration of conformity is available at https://www.asus.com/ca-en/Networking/RT-AX92U/HelpDesk_Declaration/.
Declaration of Conformity for Ecodesign directive 2009/125/EC
Testing for eco-design requirements according to (EC) No 1275/2008 and (EU) No 801/2013 has been conducted. When the device is in Networked Standby Mode, its I/O and network interface are in sleep mode and may not work properly. To wake up the device, press the Wi-Fi on/off, LED on/off, reset, or WPS button. This equipment complies with EU radiation exposure limits set forth for an uncontrolled environment. This equipment should be installed and operated with minimum distance 20cm between the radiator & your body. All operational modes:
2.4GHz: 802.11b, 802.11g, 802.11n (HT20), 802.11n (HT40), 802.11ac(VHT20), 802.11ac (VHT40), 802.11ax(HE20), 802.11ax(HE40)
5GHz: 802.11a, 802.11n (HT20), 802.11n (HT40), 802.11ac (VHT20), 802.11ac(VHT40), 802.11ac (VHT80), 802.11ac(VHT160), 802.11ax(HE20), 802.11ax(HE40), 802.11ax(HE80), 802.11ax(HE160)
The frequency, mode and the maximum transmitted power in EU are listed below:
2412-2472MHz (802.11b): 18.22 dBm
5180-5240MHz (802.11ac VHT40 MCS0): 20.99 dBm
5260-5320MHz (802.11ac VHT20 MCS0): 20.99 dBm
5500-5700MHz (802.11a): 28.18 dBm
The device is restricted to indoor use only when operating in the 5150 to 5350 MHz frequency range.
The adapter shall be installed near the equipment and shall be easily accessible.
| AT BE | BG CZ | DK EE FR | |||
| DE IS | E IT E L | ES CY | |||
| LV | LI | LT | LU | HU | MT |
| NO | PL | PT | RO | SI | SK |
| FI | SE CH | UK HR |
Safety Notices
- Use this product in environments with ambient temperatures between 0^(32^) and 40^(104^) .
Refer to the rating label on the bottom of your product and ensure your power adapter complies with this rating.
DO NOT place on uneven or unstable work surfaces. Seek servicing if the casing has been damaged.
DO NOT place or drop objects on top and do not shove any foreign objects into the product.
DO NOT expose to or use near liquids, rain, or moisture. DO NOT use the modem during electrical storms.
DO NOT cover the vents on the product to prevent the system from getting overheated.
DO NOT use damaged power cords, accessories, or other peripherals.
If the Adapter is broken, do not try to fix it by yourself. Contact a qualified service technician or your retailer. - To prevent electrical shock hazard, disconnect the power cable from the electrical outlet before relocating the system.
Danish
CE statement
Forenklet EU-overensstemmelseserklaeringen
ASUSTek Computer Inc. erklær herved, at davon enhed er i overensstemmelse med hovedkravene og øvrige relevante bestemmelser i direktiv 2014/53/EU. Hele EU-overensstemmelseserklaeringen kan findes på https:// www.asus.com/ca-en/Networking/RT-AX92U/HelpDesk_Declaration/.
Overensstemmelseserklaering for miljovenlicht design i direktiv 2009/125/EC
Norwegian CE statement
Forenklet EU-samsvarserklaering
ASUSTek Computer Inc. erklærher herved at donne enheten er i samsvar med hovedsaklige krav og andre relevante forskritter i direktivet 2014/53/EU. Fullstendig tekst for EU-samsvarserklaeringen finnes pa https:// www.asus.com/ca-en/Networking/RT-AX92U/HelpDesk Declaration/.
Bulgarian CE statement
OnpocteHa deKlapaun3a cbOTbETBne Ha EC
C hactoIto ASUSTeK Computer Inc. Jeklapupa, ye ToBa yCTpoiCTBO e B cBoTBeTCTBne Cbc CbueCTBeHInTe N3NCKBaHHa n Dpyrnte npnIOxIMn NOCTaHOBHeHHa H NipeKTINBa 2014/53/EC. PblHnT TeKCT Ha JeklapaunTa 3a CboTBeTCTBne Ha EC e DocTbneH Ha aDpec https://www.asus.com/ca-en/Networking/RT-AX92U/HelpDesk Declaration/.