
CDM1132 - Screwdriver Ferm - Free user manual and instructions
Find the device manual for free CDM1132 Ferm in PDF.
| Product type | Cordless screwdriver |
| Brand | Ferm |
| Model | CDM1132 |
| Charger number | CDA1102 |
| Power supply | Li-ion battery 3.6 V, 1.3 Ah |
| Charger input voltage | 100-240 V~, 50-60 Hz |
| Charger output voltage | 5 V DC, 0.5 A |
| Charging time | 3 to 5 hours |
| No-load speed | 230 rpm |
| Chuck capacity | 1/4" hex |
| Sound pressure level (LPA) | 58.67 dB(A), K=3 dB(A) |
| Sound power level (LWA) | 69.67 dB(A), K=3 dB(A) |
| Vibrations (screwdriving without impact) | 0.361 m/s², K=1.5 m/s² |
| Main functions | Screwing and unscrewing, reversible rotation direction, spindle lock, overload protection |
| Charge indicator | LED (flashes while charging, steady when charged) |
| Work light | Yes |
| Maintenance and cleaning | Clean with a slightly damp soft cloth; do not use solvents |
| Safety | Double insulation, overload protection, switch lock |
| Weight | Approx. 0.5 kg (estimated) |
| Dimensions | Approx. 20 x 5 x 5 cm (estimated) |
| Warranty | See provided warranty certificate |
| Environment | Separate recycling according to the WEEE directive |
Frequently Asked Questions - CDM1132 Ferm
User questions about CDM1132 Ferm
0 question about this device. Answer the ones you know or ask your own.
Ask a new question about this device
Download the instructions for your Screwdriver in PDF format for free! Find your manual CDM1132 - Ferm and take your electronic device back in hand. On this page are published all the documents necessary for the use of your device. CDM1132 by Ferm.
USER MANUAL CDM1132 Ferm
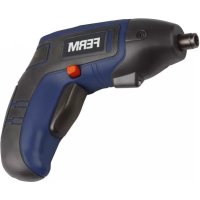
Li-Ion screwdriver 3.6V CDM1132
Thank you for buying this Ferm product. By doing so you now have an excellent product, delivered by one of Europe's leading suppliers. All products delivered to you by Ferm are manufactured according to the highest standards of performance and safety. As part of our philosophy we also provide an excellent customer service, backed by our comprehensive warranty. We hope you will enjoy using this product for many years to come.
1. SAFETY INSTRUCTIONS

Read the enclosed safety warnings, the additional safety warnings and the instructions. Failure to follow the safety
warnings and the instructions may result in electric shock, fire and/or serious injury. Save the safety warnings and the instructions for future reference.
The following symbols are used in the user manual or on the product:

Read the user manual.

Denotes risk of personal injury, loss of life or damage to the tool in case of non-observation of the instructions in this manual.

Risk of electric shock

Variable electronic speed

Rotation, left/right

Do not use in rain

Indoor use only

Class II machine - Double insulation - You don't need any earthed plug.

In case of failure, the transformer is not dangerous

Max temperature 40^

Do not throw the battery into fire

Do not throw the battery into water

Do not dispose of the product in unsuitable containers.

Separate collection for Li-ion battery.

The product is in accordance with the applicable safety standards in the European directives.
Additional safety warnings for drills and screw drivers
a) Wear ear protectors when impact drilling. Exposure to noise can cause hearing loss.
b) Use auxiliary handle(s), if supplied with the tool. Loss of control can cause personal injury.
c) Hold the power tool by insulated gripping surfaces, when performing an operation where the fastener may contact hidden wiring. Fasteners contacting a "live" wire may make exposed metal parts of the power tool "live" and could give the operator an electric shock.
Battery tool use and care
a) Recharge only with the charger specified by the manufacturer. A charger that is suitable for one type of battery pack may create a risk of fire when used with another battery pack.
b) Use power tools only with specifically designated battery packs. Use of any other battery packs may create a risk of injury and fire.
c) When battery pack is not in use, keep it away from other metal objects, like paper clips, coins, keys, nails, screws or other small metal objects, that can make a connection from one terminal to another. Shorting the battery terminals together may cause burns or a fire.
d) Under abusive conditions, liquid may be ejected from the battery; avoid contact. If contact accidentally occurs, flush with water. If liquid contacts eyes, additionally seek medical help. Liquid ejected from the battery may cause irritation or burns.
e) Integrated batteries may only be removed for disposal by qualified personnel.
Service
a) Have your power tool serviced by a qualified repair person using only identical replacement parts. This will ensure that the safety of the power tool is maintained.
For the charger
Intended use
Charge only 3.6V max.1.3Ah Li-ion type rechargeable battery packs. Other types of batteries may burst causing personal injury and damage.
a) The appliance is not to be used by persons (including children) with reduced physical, sensory or mental capabilities, or lack of experience and knowledge, unless they have been given supervision or instruction
b) Children being supervised not to play with the appliance
c) Do not recharging non-rechargeable batteries!
d) During charging, batteries must be placed in the well ventilated area!
Residual risks
Even when the power tool is used as prescribed it is not possible to eliminate all residual risk factors. The following hazards may arise in connection with the power tool's construction and design:
a) Health defects resulting from vibration emission if the power tool is being used over longer period of time or not adequately managed and properly maintained.
b) Injuries and damage to property to due to broken accessories that are suddenly dashed.

Warning! This power tool produces an electromagnetic field during operation. This field may under some circumstances interfere with active or passive medical implants. To reduce the risk of serious or fatal injury, we recommend persons with medical implants to consult their physician and the medical implant manufacturer before operating this power tool.
2. MACHINE INFORMATION
Intended use
This screw driver is intended for driving in and loosening screws
Technical specifications
| Model No CDM1132 | |
| Charger CDA1102 | |
| Input of charger 100-240V~ 50/60Hz | |
| Output of charger 5V DC 0.5A | |
| Battery charging time 3-5 hours | |
| Rechargeable battery cell | 3.6V Li-ion 1300mAh |
| Chuck capacity | 1/4” hex |
| No load speed | 230 /min |
| Sound pressure level LPA | 54 dB(A) K= 3 dB(A) |
| Sound power level LwA | 65 dB(A), K=3dB(A) |
| Hand-arm vibration ah(screw driving without impact) | 0.369 m/s2K=1.5 m/s2 |
Vibration level
The vibration emission level stated in this instruction manual has been measured in accordance with a standardized test given in EN 62841; it may be used to compare one tool with another and as a preliminary assessment of exposure to vibration when using the tool for the applications mentioned.
- Using the tool for different applications, or with different or poorly maintained accessories, may significantly increase the exposure level.
- The times when the tool is switched off or when it is running but not actually doing the job, may significantly reduce the exposure level.
Protect yourself against the effects of vibration by maintaining the tool and its accessories, keeping your hands warm, and organizing your work patterns.
Description
The numbers in the text refer to the diagrams on pages 2-3
Fig. A
- Machine
- Charging socket
- Charging indication light
- Bit holder
- Direction switch
- On / off switch
- Work light
- Charger adaptor
- Screw driver bit
3. OPERATING

The machine must be charged before first use.
Charging the machine
- Plug the small cable plug (8A) into the machine's charging socket (2).
- Plug the charger into an electrical outlet and wait for a while. The LED indicator on the machine (3) will lighten up and show the charging status.
Charging indication light (3)
Fig.A
The machine has a charging indication light (3) which indicates the status of the charging process:
LED Status
Blinking Battery charging in progress
Continuous Battery charging finished, battery fully charged
- Fully charging the battery may take up to 3 - 5 hours.
Fitting and removing drills or screwdriver bits Fig.B
The machine bit holder (4) is suitable for drills and screwdriver bits with a standard 1/4 inch. hexagonal shaft. To fit a screwdriver bit:
- Insert the screw driver bit (10) into the machine's bit holder (4), it will be hold by a magnet.
- The screw driver bit can be removed by pulling it out of the bit holder again.
Adjusting the direction of rotation Fig.A
- Set the direction switch (5) to position in order to drive screws or to use it for drilling.
- Set the direction switch (5) to position in order to remove screws.
Switching the machine on and off Fig.A
- Pressing the on/off switch (6) will activate the machine.
- Releasing the on/off switch (6) will stop the machine.
- Move the direction switch (5) to the middle position to lock the movement of the on/off switch. It cannot be activated in this position.

The machine is equipped with electronic overload protection function. When the machine gets overloaded it will shut down automatically. When this happens, please wait for at least 5 seconds to let the overload protection reset itself.
Spindle lock function
The machine is fitted with an automatic spindle lock feature. When the on/off switch (6) is not pressed, the bit holder (4) rotation is locked. Now it is possible to use the screwdriver (even when the battery is empty) as a manual tool.
4. MAINTENANCE

Before cleaning and maintenance, always switch off the machine and remove the battery pack from the machine.
Clean the machine casings regularly with a soft cloth, preferably after each use. Make sure that the ventilation openings are free of dust and dirt. Remove very persistent dirt using a soft cloth moistened with soapsuds. Do not use any solvents such as gasoline, alcohol, ammonia, etc. Chemicals such as these will damage the synthetic components.
WARRANTY
The warranty conditions can be found on the separately enclosed warranty card.
ENVIRONMENT

Faulty and/or discarded electrical or electronic apparatus have to be collected at the appropriate recycling locations.
Only for EC countries
Do not dispose of power tools into domestic waste. According to the European Guideline 2012/19/EC for Waste Electrical and Electronic Equipment and its implementation into national right, power tools that are no longer usable must be collected separately and disposed of in an environmentally friendly way.
The product and the user manual are subject to change. Specifications can be changed without further notice.
Specifications techniques
Rotation,vanster/hoger

Anvand inteiregn

2. INFORMACE O NARADI
Urcené pouziti
He ucnonb3yume 3neekmpouHcmpymem no doxkdeM.

IcnoB3yume monbko 8 nomueHuax.

I3deJue II Knacca - BouHa u3oJaua B 3a3emHeHou po3emKe hem Heo6xodumocmu.

B cnyuae HeucnpaehocmupaHcqopMamop He onaceH.

MakcumaBna meNepamypa 40^
He 6pocaume 6amapeo 0oohs.

He 6pocaume 6amapeo e oody.

BbIbpaCbeaMe u3eue monbko 8 npedHa3NaeHHbIe dna 3mo20 KOHmeuHepbl.

HnHO-Jumueebe 6amapeu HyxHo ymuun3upoabmb omdeNbHO.
JaHoe u3dene coombeemcmyem npumehmblm cmahdapmam 6e3oNaChocmu eeponeueckux dupekmue.
IOnonHnTeJIbHaTexHnka 6e3oNaChOcTu IJa DpeJeN OTBepToK
a) Pn ydapHom CBepeHnn Heo6xOIMMo nCNoIb3OBaTb 3auNTy dny uwei. Wym 6bICOKo UHMecHCuBHOcmu MoKem npueecmu K noepexdeHuO cnyxa.
b) Ecnn B KOMnKeTauH OJIeKTPoHHCTpyMeHTa BXOJaT DOONHHTeHBhIe pyKOaTK, NcNoJb3yIte nx. Iomepr ynpaeHnHa Had 3JIeKmpouHcmpymemmOM MoXem npueecMu K mpaemam.
c) Bo Bpemr BbIOnHeHn pa6OuX onepaun, rde cyueCTByeT BO3MOxHOCTb cOpNKOCHOBENK PpeNekHOJ DeTann CO CkpyTO 3NEKTPoPBOPOKoN, 3NEKTPoHNCTpymeHT Heo6XoDmO DePkaTb TOlbKO 3a H3OJIPOBaHHbIe NOBepXHOCTn pyKoTOK. B cnUyae, ecnu KpeNekHna demalb cOpPKoChemc c KaBelem nod HanpJKeHEm, MemanLueckue demanu 3NEKmpouHCmpymehma makke bydym Haxodumbcra nod HanpJKeHEm u, KaK cneOcmbue, Moym npa3umb onepamopa 3NEKmpueckum mokom.
3Kcnpnyataun yxod 3a 6atapee
a)ДяподзардкбатAPEиноль3уTe TOnbKO OPNHnHaNbHoe 3apdHoe yctpoiCTBO.3apdHoe ycmpoicmeo, pa3pa6omahHoe dno onpepeHHO2O muna akKymynmOpHbIX 6amapeu, moxem npueecMu K noXapy npu UcNoIb30aHuU dpyzux munoe akKymynmOpHbIX 6amapeu.
b) 3NeKtpOnHCTpyMeHTbI Heo6xOdmo
NcNoJIb3OBaTb TOJbKO C npEHa3HaueHHbIMn
ДЯ HIX aKKyMnyTOpHbIMn 6aTapeMn.
IVcNoJIb3OeAHue dpyaux aKKyMnymopHbIX
6amapeu moXem npueecmu K noXapuy u
mpaBmAM.
c) Korda akkymnyTopna 6aTape He HaxoDntcB HcNoIb3OBAHn, Depxknte ee Ha 6e30nacHom pacctOraHHn OT MeTaJIHueCKnx PpeMToB, TaKx KaK cKePENKn Dnla 6ymaru, MoHeTbI, KInOuN, TB03dN, BnHTbI INpOyne He6OJIbUWe MeTaJIHueCKnx PpeMToB, KOtOpbl E MOrII 6bl 3aMKHyTb Cenb MeXdy DByMa KJIeMMamn aKKymyJrTOphOH 6bapen. 3aMbIkaHue mepMuHaNoB aKKymyJmopHO bamapeu MeXdy co6ou MoXem npueecmu K oXkoam u noxapy.
e) BcTpoeHHbIe aKkymyIaTOPhIbe 6aTapeu MOryt 6bITb N3BLeueHbI dIra yTnN3aCNI TOJbKO KBaIINΦUncPOBaHHbIM TexHnueckm nepcoHaJOM.
d) B cnyuae rpy6oro nCnoB3OBAHnnaKKymyIaTOpHoi 6aTapeHneNoHa3NaYeHHIO H3 Hee MoKeT BbITEKaTb
XnKocTb.He npKacaiTeCb!B clyuae
nonaHnna XnKocTn Ha Koxy HeMeJeHHo
npomOte Bdoi. B cnyae nonaHnna
XnKocTn B rIa3a o6paTntEc 3a
MeuHcNkOoi NOMOsbU. XnKocTb B
aKKymJIaTOphbIX BaTapeAx MOKeT npVBecTu K
pa3dpaxeHnM IN OxOram.
06cnyxnbAHne
a) 06cnyxHBAHne 3JKeKtpOHcTpymeHTa DOJXHO BbINOJIHrTbcra KBaINΦnIUPoBAHHbIM NlucOM C NcNoJIb3OBaHHem TOJIbKO OpRmHaJIbHbIX 3aNaChbIX YacTei. 3To oBeCneuNT COxpaHeHHe 6e3OanachOrO nCNoJIb3OBaHHa 3JKeKtpOHcTpymeHTa.
1.1jbs jss 2. jbs all

a 1

g 111111111111111

1 1111111111111111111111111111
1 1
eaiie aigaiiaaaii iaiyiyaiyaiyai (C
aiaii aaii aaii aaii aaii aaii aaii
aijai "ayss" all yss "yyso" aiwai all
ayai ai yds ayg ayiyiyaiyaiyaiyaiyaiyaiyai
aaiia aiee iieae eae ee eae eae eae eae eae eae eae eae eae eae eae eae eae eae eae eae eae eae eae eae eae eae eae eae eae eae eae eae eae eae eae eae eae eae eae eae eae eae eae eae eae eae eae eae eae eae eae eae eae eae eee
aannnlll 111111111111111111111111111111111
C 100000000000000000000000000000000000000000000000000000000000000
y 1000000000000000000000000000000000000000000000000000000000000000
g 153 2y! gia caiiil aalal lylal allj y (e
4.15
a 1 a
a
y 13 3.6 3.6 y j 1
aal lglal 1 (4) aal Jal
4/1 4
(4) (01)
a aall Jala jla leaa yj 1dall aal all j!
S 求
1111111111
1.5.21
jglblby“gall (5)olla lba
(5)a
gaiy
1.5.51
(6)
2
(6)JJIJIJIJIJIJIJIJIJIJIJIJIJIJIJIJIJIJIJIJIJIJIJIJIJIJIJIJIJIJIJIJIJIJIJIJIJIJIJIJIJIJIJIJIJIJIJIJIJIJIJIJIJIJIJIJIJIJIJIJIJIJIJIJIJIJIJIJIJIJIJIJIJIJIJIJIJIJIJIJIJIJIJIJIJIJIJIJIJIJIJIJIJIJIJIJIJIJIJIJI
55
1 1
.
ii jll lal ji aji g jxl iy laaill iaiy jia ai
Jy
5 1
aill 1g aai jiall lalil
2012/19/EC 2012/19
DECLARATION OF CONFORMITY CDM1132 - LI-ION SCREW DRIVER
(EN) We declare under our sole responsibility that this product is in conformity with directive 2011/65/EU of the European parliament and of the council of 8 June on the restriction of the use of certain hazardous substances in electrical and electronic equipment is in conformity and accordance with the following standards and regulations:
(DE) Der Hersteller erklärt eigenverantwortlich, dass这点 Produkt der Directive 2011/65/EU des Europäischen Parlaments und des Rats vom 8. Juni 2011 über die Einschränkung der Anwendung von bestimmten gefährlichen Stoffen in elektrischen und elektronischen Geräten entspricht. den folgenden Standards und Vorschriften entspricht:
(NL) Wij verklaren onder once volledige verantwoerdelijkheid dat dit product voldoet aan de conform Richtlijn 2011/65/EU van het Europees Parlement en de Raad van 8 Juni 2011 betreffende beperking van het grabuik van bepaalde gevaarlijke stoffen in elektrische en elektronische apparatus en in overeenstemming is met de volgende standardaarden en reguleringen:
(FR) Nous déclarons sous notre seule responsabilité que ce produit est conforme aux standards et directives suivants: est conforme à la Directive 2011/65/EU du Parlement Européen et du Conseil du 8 juin 2011 concernant la limitation d'usage de certaines substances dangereuses dans l'équipment électrique et électronique.
(ES) Declaramos bajo esta exclusiva responsabilidad que este producto cumple con las siguientes normas y estandares de configuracion: se enquirytra conforme con la Directiva 2011/65/UE del Parliamento Europeo y del Consejo de 8 de junio de 2011 sobre la restriccion del uso de determinadas sustancias peligrosas en los equipos electricos y electronicos.
(PT) Declaramos por esta total responsabilità-de que este produits está em conformidade e cumpe as normas e regulamentações que se seguem: está em conformidade com a Directa 2011/65/EU do Parliamento Europeu e com o Conselho de 8 de Junho de 2011 no que respeita à restrico de'utilisation de determinadas substancias perigosas existentes em equipamento eletrico e electrônicos.
(ITT) Dichiariamo, sulla la nostra responsabilità, che questo prodotto è conforme alle normativè e ai regolamenti segunti: è conforme alla Direttiva 2011/65/UE del Parliamento Europeo e del Consiglio dell'8 giugno 2011 sulla limitazione dell'uso di determinate sostanze pericolose nelle apperecchaturie elettriche ed elettroniche.
(SV) Vi garanterar pa eget ansvar attenna produit uppyller och foljer foljande standarder och bestammelser: uppyller direktiv 2011/65/EU fran Europeiska parliamentet och EG-radet fran den 8 juni 2011 om begransningen av anvandning av farliga substanser i elektrisk och elektronikn ultrusting.
(FI) Vakuutamme yksinomaan omalla vastuullamme, etta tama tuote tayttaa seuraavat standardit ja saedokset: tayttaa Europon parlementin ja neuvoston 8. kesakuta 2011 paivyn direktivn 2011/65VA vaumuksel koskien vaarallisten aineiden kayton rajaotista sahko- je elektronisissa laiteissa.
(NO) Vi erklaere under vart eget ansvar at dette Produktet er i samsvar med folgende standarder og regler: er i samsvar med EU-direktivet 2011/65/EU fra Europa-parlamentet og Europa-radet, pr. 8 Juni 2011, om begrensning i Bruken av visse farlige sloffer i elektrisk og elektronisk ulstyr.
(DA) Vi erkräner under eget ansvar, at dette produit er i overensstemmelse med falgende standarder og bestemmelser: er i overensstemmelse med direktiv 2011/65/EU fra Europa-Farmentet og Rådet af 8, Juni 2011 om begraensning af anvendelsen af visse farlige stoffer i elektrisk og elektronisk udystr.
(HU) Felelosssegung teljes tudataban kijelentjuk, hogy ez a termek teljes mertekben megfelel az alabbi szabvanyoknak es eliorasoknak: je v souladu se smernici 2011/65/EU Evropskho parlamentu a Rady EU ze dne 8. cervna 2011, ktera se tyká omezeni pouziti urciti nebezpechnych latek v elektrickych a elektronickych zaizenich.
(CS) Na naši vlastni zodpovednost prohlaušujeme,Že je tento vyrobek v souladu s následujicimi standarda y normami: Je v sūlade s normou 2011/65/EU Europskeho parlementu a Rady z 8. juna 2011 týkajúcej sa obmedzenia použivania určitych nebepezćních látok v elektrikkom a elektronickom vyaveneni.
(SK) Vyhlasujeme na nasu vyhradnú zodpovednost,Že tento vyrobok je v zhode a sulade n nasledujuciimi nomami a prepidmi: Je v sulade s normou 2011/65/EU Europskeho parlementa a Rady z 8. juna 2011 tykajucej sa obmedzenia pouzivania urichynebezepechnych látok v elektrikkom a elektronickom vybaveni.
(SL) S polno odgovomostjo izjavljamo, da je tizdelek v skladu in da odgovarja naslednjinm standardom terpredispom: je v skladu z direktvo 2011/65/EU Evropskega parlementa in Sveta z dne 8. junji 2011 o mejevanju uporabe dolocenih nevarhih snovi v elektrici n in elektronki opremi.
(PL) Deklarujemy na wasnaq odopiewdiaznolosce, ze ten produktspenia wymogi zawarte w nastepujacych nomrach i przypesach: jest zgodny z Dyrektywa 2011/65/EU Para-mentu Europejskiego i Rady z dnia 8 czernca 2011 r. w spraweogranoziania stosowania niedtorych niebezpiecznych substancj w sprzecie elektrycznym i elektroniczynm.
(LT) Prisirdami visa atsakomybek deklaruojame, kad sis gaminys attinkia zemiau paminetus standartus arba nuostatus: attinka 2011 m. birzeli 8 d. Europos Parliamento ir Tarybos direktyva 2011/65/EB del tam tikru pavojingu medziagu naudojoim elektros ir elektroninjei irangoje apriboimo.
(LV) Ir abtilistósa Eriopas Parliamenta un Padomes 2011. gada 8. jünjia Direktivai 2011/65/ ES par dazu bistamu vielu izmantoşanas ierobežošanu elektriskas un elektroniskas iekartás.
(ET) Apgalvojam ar visu atbildibu, ka sis produits ir saskapà un atbilst sekojsiem stand-artiem un nolikummi: ir atbilstósa Eriopas Parliamenta un Padomes 2011, gada 8. junja Direktivä 2011/65/ES par daß zu bistamu vielu izmantoşanas ierobežošanu elektriskas un elektroniskas jegärás.
(RO) Declarãm prin aceasta cu raspunderea deplina ca produsul acesta este in conformitate cu urmatoarele standarde sau directive: este in conformitate cu Direcva 2011/65/UE a Parliamentului Europeano si a Consiliului din 8 unie 2011 cu privire la interizcerea'utilizari anumitor substante periculoase la echipamentele electrice si electronece.
(HR) Izjavljemo pod vaslitom odgovroLsu da je strojem ukladan sa lijedesim standardima ill standardiziranim dokumentima i u skladu sa odredbama: usklaDENs Dektivom 2011/65/EU europskog parliamenta i vije za izdanom 8. lipna 2011. o ogranicenju koristjena odreedeni opasnih vari u elektrochno j elektronickoj opremi.
(SRL)Pod punom odgovoroscu izjavljEUme daje usaglasen sa sledecim standardima lii normama: usaglasen sa direktivom 2011/65/EU Evropskog parlamenta i Saveta od 8.juna.2011. godine za restrkciju upotrebe odredenih opasnih materija u elektricnoj i elektronskoj opremi.
(RO) NIO CBOO OTOBCTBENHOCTAARBAHREM, YTO DAHNHOE 3DNEIe COOTBCTBYET CNEyDOUIM CTANDAPTAMN HOPMAMCOTOBCTBYET Tp6oBAnHIM DnpeKtNB1 2011/65/EU Ebponeckoro naprameHTa n cobetota 8 INOHJ 2011.r no ORPAHCHENH KNOCB0AHNA ONPDEENHbX ONAChbX BELCECTB 3JNEKTPnueCKOM NIEKTEPHOM NO60pyDOnAHM
(UK) Ha cboo anachy Bidy noidaipdihbictb 3aaerneMo, 10 dahe o6nadHnB iDnOiae nactynmm ctahdapram i HOPMATBaam: 3do8onbHnBE BMONI DpeKTHM 2011/65/ CC Cbponebcko Napamehty Ta PaDiB 8 cepBn 2011 poky ha 6mEkeHHN BHKOPCTAHN DEAeHX NHe63neHHX peoBH IN B eNEKTPHOMY ta eNEKTPHOHMy 06nadHnH.
(EL) Anivoume uttobva on to npov auto uuguvei kai nepitou tnapakatowavoupuoc kai npotua: ouupagapvetae me ty Oynia 2011/85/EE tou EupwraikouKovbouluoi ka tau Uspouliou ts Bng laioviu vio tvn Tepkopiao ts xipansopiaevtu etikivuvovuovu o aeekpiokia knaekpovika eoTiamqio.
EN 62233, EN 55014-1, EN 55014-2, EN 61000-3-2, EN 61000-3-3 EN 62841-1, EN 62841-2-2, EN 60335-1, EN 60335-2-29,
2006/42/EC, 2011/65/EU, 2012/19/EC, 2014/35/EU, 2014/30/EU
Zwolle, 01-05-2020
H.G.FRosberg CEO FERM
FERM - Lingenstraat 6 - 8028 PM - Zwolle - The Netherlands


- Li-Ion screwdriver 3.6V CDM1132
- SAFETY INSTRUCTIONS
- Additional safety warnings for drills and screw drivers
- Battery tool use and care
- Service
- For the charger
- Intended use
- Residual risks
- MACHINE INFORMATION
- Technical specifications
- Vibration level
- Description
- Fig. A
- OPERATING
- Charging the machine
- Charging indication light (3)
- Fig.A
- Fitting and removing drills or screwdriver bits Fig.B
- Adjusting the direction of rotation Fig.A
- Switching the machine on and off Fig.A
- Spindle lock function
- MAINTENANCE
- WARRANTY
- ENVIRONMENT
- Only for EC countries
- Specifications techniques
- INFORMACE O NARADI
- Urcené pouziti
- IOnonHnTeJIbHaTexHnka 6e3oNaChOcTu IJa DpeJeN OTBepToK
- 3Kcnpnyataun yxod 3a 6atapee
- 06cnyxnbAHne
- 4.15
- a
- 1111111111
- gaiy
- DECLARATION OF CONFORMITY CDM1132 - LI-ION SCREW DRIVER
Brand : Ferm
Model : CDM1132
Category : Screwdriver