
Multiquick 5 Vario MQ 5177 - Blender BRAUN - Free user manual and instructions
Find the device manual for free Multiquick 5 Vario MQ 5177 BRAUN in PDF.




| Brand | Braun |
| Model | Multiquick 5 Vario MQ 5177 |
| Product type | Immersion blender with multifunction accessories |
| Power supply | 220-240 V, 50-60 Hz |
| Power | 700 W |
| Speeds | Variable speed control (21 positions) + Turbo (maximum speed) |
| Main functions | Blending, chopping, whisking, mashing, slicing, grating, kneading (max 250 g flour), making french fries |
| Included accessories | Blending shaft, whisk, measuring cup (800 ml), masher attachment, chopper bowl 500 ml, processor bowl 1.5 L, chopper blade, slicing/shredding blades, french fry tool, pusher |
| Materials | ABS plastic, stainless steel blades, plastic bowls (unless otherwise stated), non-slip base |
| Dimensions (motor unit + shaft) | Approximately 40 cm height, 6 cm diameter |
| Weight | Approximately 1.2 kg (with main accessories) |
| Bowl capacities | Measuring cup: 800 ml; Chopper bowl: 500 ml; Processor bowl: 1.5 L |
| Safety | Very sharp blades, motorized unlock, lockable lid, automatic shut-off in case of overload (not specified in manual but typical) |
| Cleaning | Motor unit and gearboxes: damp cloth; other parts: dishwasher safe (except lids), soak to soften residues |
| Maintenance | Remove non-slip bases for deep cleaning; oil plastic parts after contact with colored vegetables |
| Spare parts and repairability | Repair only by Braun Authorized Service Center; optional accessories available (MQ 10, MQ 20, etc.) |
| Cable length | Approximately 1.2 m |
Frequently Asked Questions - Multiquick 5 Vario MQ 5177 BRAUN
User questions about Multiquick 5 Vario MQ 5177 BRAUN
0 question about this device. Answer the ones you know or ask your own.
Ask a new question about this device
Download the instructions for your Blender in PDF format for free! Find your manual Multiquick 5 Vario MQ 5177 - BRAUN and take your electronic device back in hand. On this page are published all the documents necessary for the use of your device. Multiquick 5 Vario MQ 5177 by BRAUN.
USER MANUAL Multiquick 5 Vario MQ 5177 BRAUN
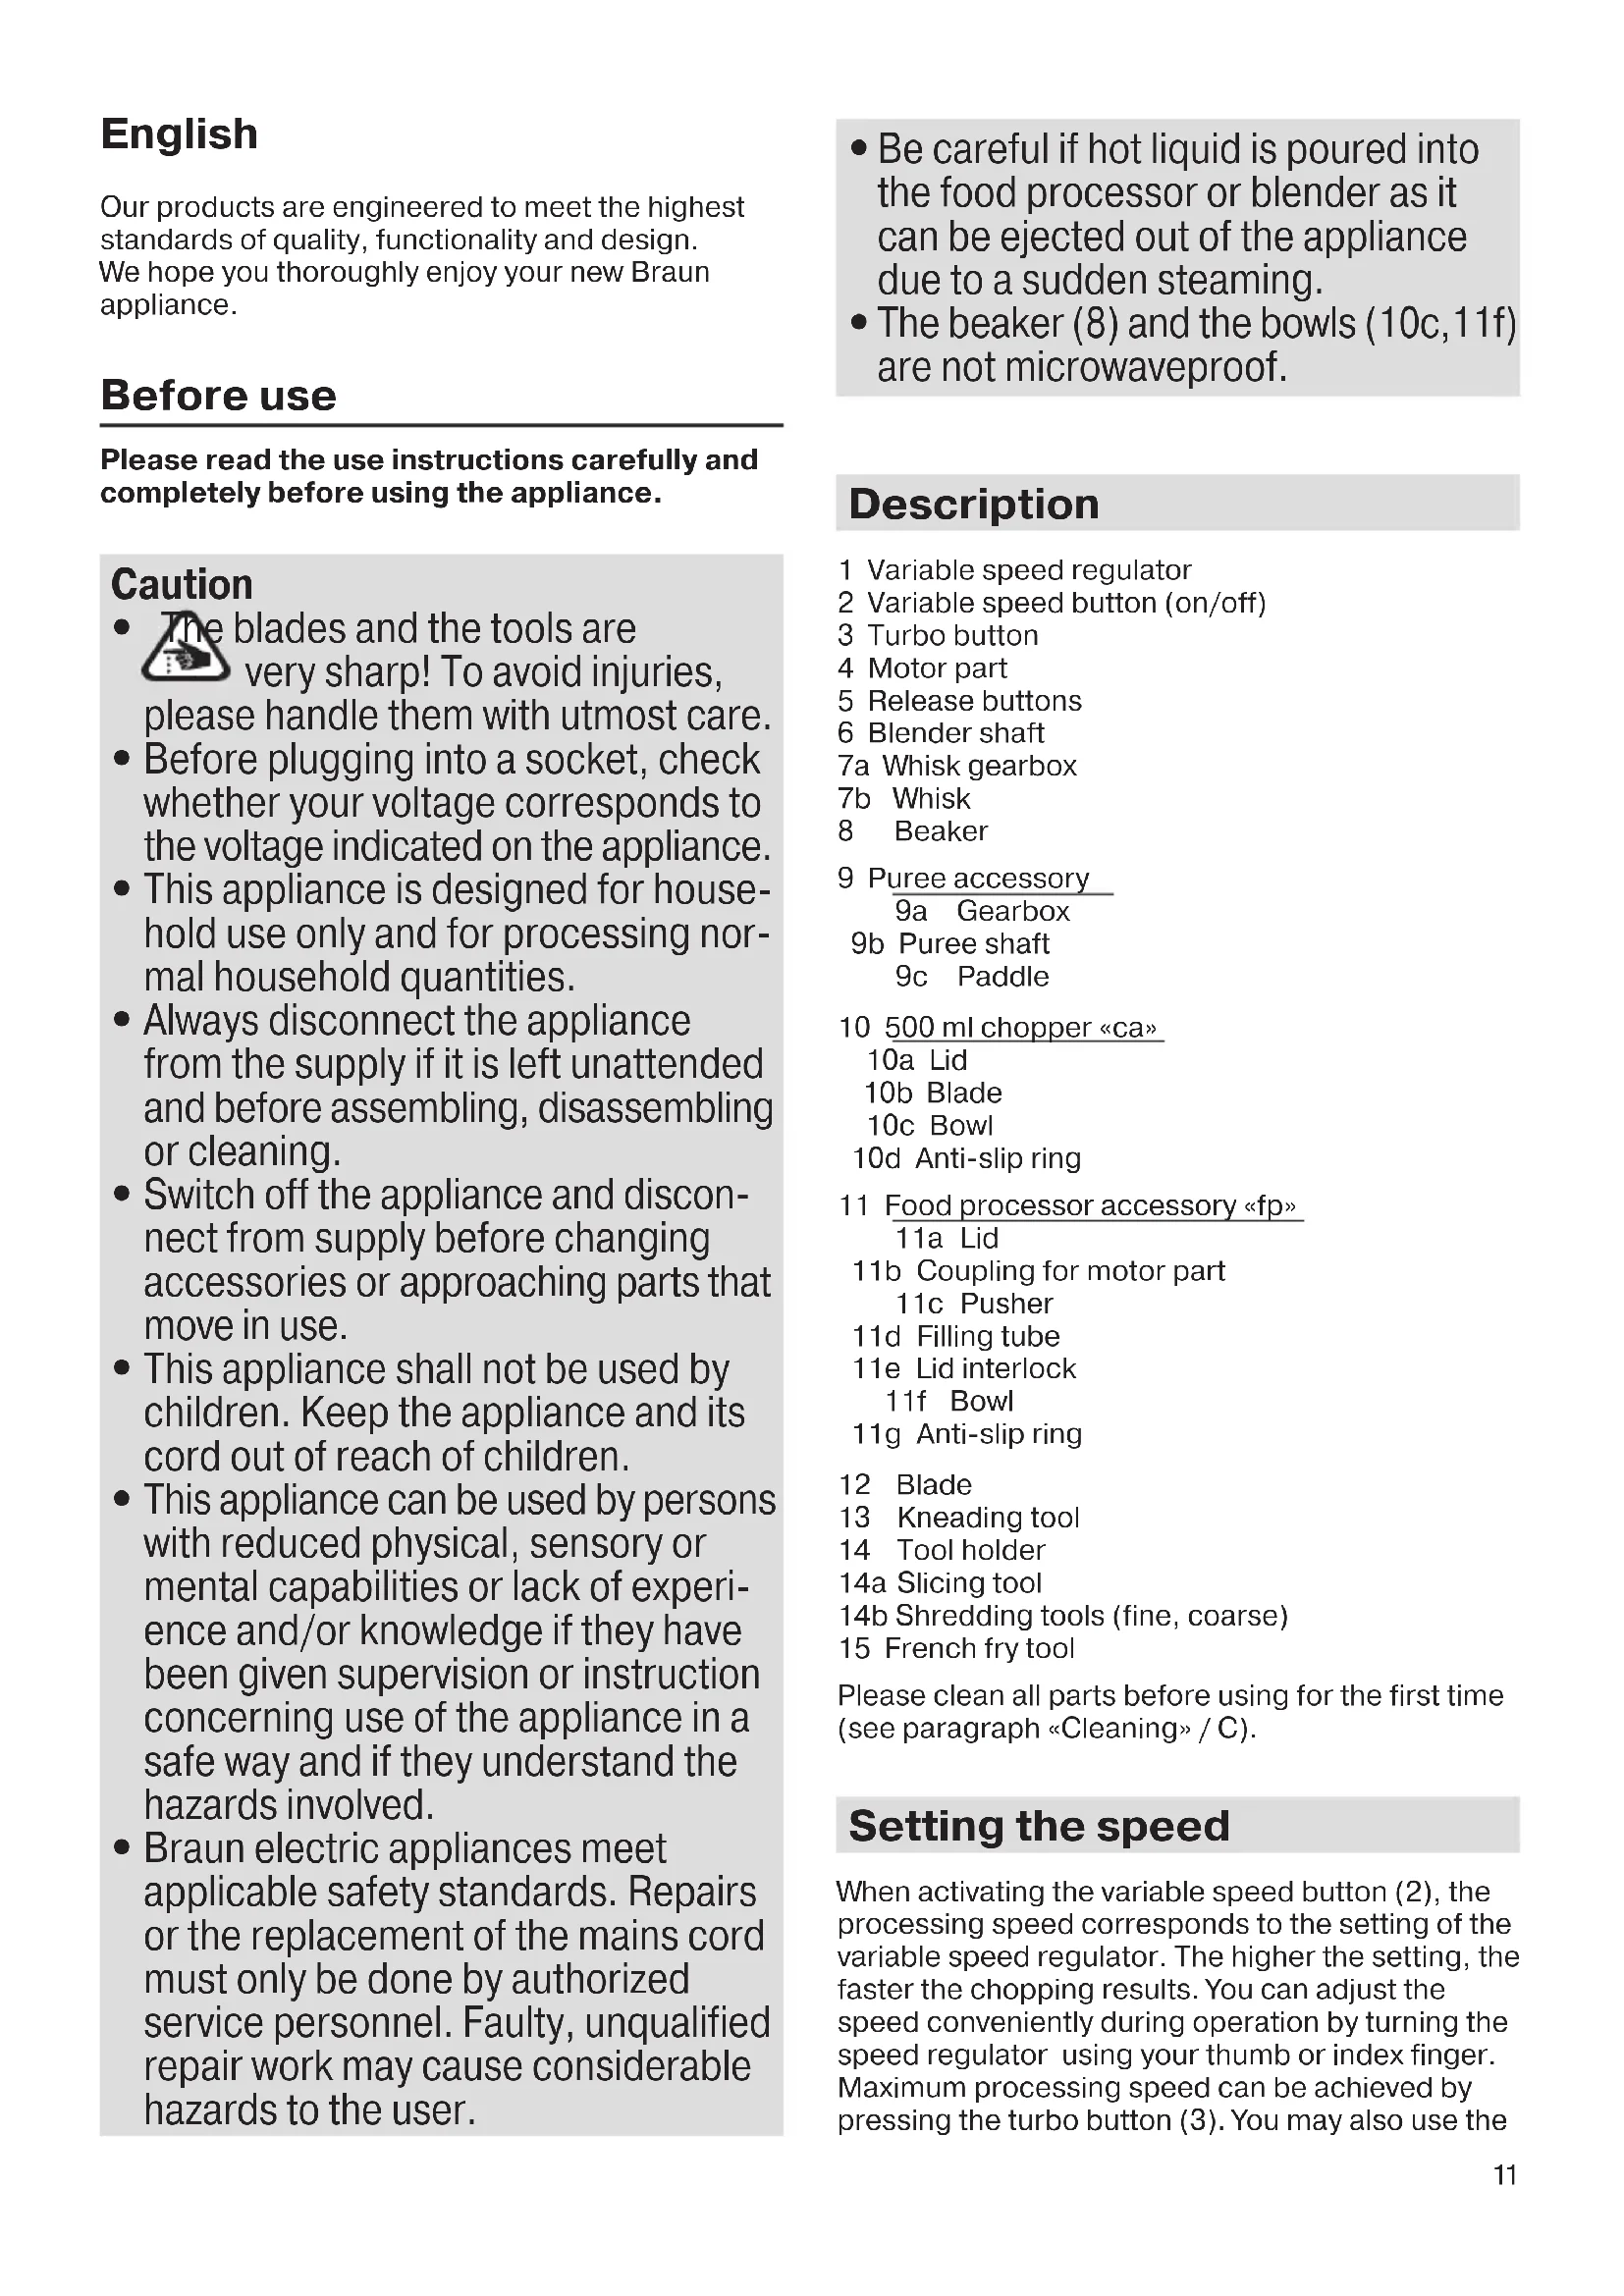
Our products are engineered to meet the highest standards of quality, functionality and design. We hope you thoroughly enjoy your new Braun appliance.
Before use
Please read the use instructions carefully and completely before using the appliance.
Caution

The blades and the tools are very sharp! To avoid injuries, handle them with utmost care.
- Before plugging into a socket, check whether your voltage corresponds to the voltage indicated on the appliance.
- This appliance is designed for household use only and for processing normal household quantities.
- Always disconnect the appliance from the supply if it is left unattended and before assembling, disassembling or cleaning.
- Switch off the appliance and disconnect from supply before changing accessories or approaching parts that move in use.
- This appliance shall not be used by children. Keep the appliance and its cord out of reach of children.
- This appliance can be used by persons with reduced physical, sensory or mental capabilities or lack of experience and/or knowledge if they have been given supervision or instruction concerning use of the appliance in a safe way and if they understand the hazards involved.
- Braun electric appliances meet applicable safety standards. Repairs or the replacement of the mains cord must only be done by authorized service personnel. Faulty, unqualified repair work may cause considerable hazards to the user.
- Be careful if hot liquid is poured into the food processor or blender as it can be ejected out of the appliance due to a sudden steaming.
- The beaker (8) and the bowls (10c, 11f) are not microwaveproof.
Description
1 Variable speed regulator
2 Variable speed button (on/off)
3 Turbo button
4 Motor part
5 Release buttons
6 Blender shaft
7a Whisk gearbox
7b Whisk
8 Beaker
9 Puree accessory 9a Gearbox
9b Puree shaft
9c Paddle
10 500 ml chopper «ca»
10a Lid
10b Blade
10c Bowl
10d Anti-slip ring
11 Food processor accessory «fp» 11a Lid
11b Coupling for motor part
11c Pusher
11d Filling tube
11e Lid interlock
11f Bowl
11g Anti-slip ring
12 Blade
13 Kneading tool
14 Tool holder
14a Slicing tool
14b Shredding tools (fine, coarse)
15 French fry tool
Please clean all parts before using for the first time (see paragraph «Cleaning» / C).
Setting the speed
When activating the variable speed button (2), the processing speed corresponds to the setting of the variable speed regulator. The higher the setting, the faster the chopping results. You can adjust the speed conveniently during operation by turning the speed regulator using your thumb or index finger. Maximum processing speed can be achieved by pressing the turbo button (3). You may also use the
turbo button for instant powerful pulses without having to manipulate the speed regulator.
Hand blender (A)
The hand blender is perfectly suited for preparing dips, sauces, soups, mayonnaise and baby food as well as for mixing drinks and milk shakes. For best blending results use highest speed.
- Click the motor part (4) into the blender shaft (6).
- Position the hand blender deep in a beaker or bowl. Then switch the appliance on as described above.
- After use unplug and press the release buttons (5) to detach the motor part. When blending directly in the saucepan while cooking, remove the pan from the stove first to avoid splashing of the boiling liquid (risk of scalding).
Recipe example: Mayonnaise
250 g oil (e.g. sunflower oil),
1 egg and 1 extra egg yolk,
1-2 tbsp. vinegar (approx. 15 g),
salt and pepper to taste
Place all ingredients (at room temperature) into the beaker in the order as mentioned above. Place the hand blender on the bottom of the beaker. Operate the hand blender by pressing the turbo button, keep it in this position until the oil starts emulsifying. Then without switching off slowly raise the shaft to the top of the mixture and back down to incorporate the rest of the oil. Processing time: from 1 minute (for salad) up to 2 minutes for more stiffness (e.g. for dip).
Whisk (A)
Use the whisk only for whipping cream, beating egg whites and mixing sponges and ready-mix desserts.
- Insert the whisk (7b) into the whisk gear box (7a) then click the motor part (4) into the gear box.
- Place the whisk in a bowl and only then switch the appliance on. After use, unplug and press the release buttons (5) to detach the motor part. Then pull the whisk out of the gearbox.
Tips for best results
- Use a medium-sized bowl.
- Move the whisk clockwise, holding it slightly inclined. Whipped cream (max. 400 ml chilled cream, min. 30% fat content, 4-8 °C):
Start with low speed and increase the speed while whipping.
- Beaten egg whites (max. 4 eggs):
Start with a medium speed and increase the speed while whipping.
Chopper (D)
The chopper (10) is perfectly suited for chopping meat, hard cheese, onions, herbs, garlic, carrots, nuts, almonds etc.
Always chop hard food at full speed (e.g. parmesan, chocolate).
For best results see processing tables (E,H,J) Maximum operation time for the chopper: 2 minutes.
Before chopping ...
- Pre-cut meat, cheese, onions, carrots.
- Remove stems from herbs, shell nuts.
- Remove bones, tendons and gristle from meat. Always make sure that the anti-slip ring is attached to the bowl.
Caution: The blade is very sharp! Always hold it by the upper plastic part and handle it carefully.
- Carefully remove the protective cover from the blade.
- Place the blade on the centre pin of the bowl, push it down and give it a turn so that it locks.
- Fill the chopper bowl with food and put on the lid.
- Click the motor part onto the lid.
- Press switch (2) or (3) to operate the chopper. During processing, hold the motor part with one hand and the bowl with the other.
- After use, unplug and press the release buttons (5) to detach the motor part.
- Remove the lid.
- Carefully take out the blade before removing the processed food. To remove the blade, slightly turn and pull off.
Food processor accessory (F)
The food processor accessory (11) is perfectly suited for
- chopping and blending
- kneading dough (based on max. 250 g flour)
- slicing, shredding, french fries
For best results see processing tables (H + J)
Chopping
Using the blade you can chop meat, cheese, onions, herbs, garlic, carrots, walnuts, hazelnuts, almonds etc.
For best results, please refer to the maximum quantities and speed settings indicated in the processing table of section H.
Do not chop extremely hard food, such as ice cubes, nutmeg, coffee beans or grains.
Before chopping ...
- pre-cut meat, cheese, onions, garlic, carrots, chillies
- remove stems from herbs, shell nuts
- remove bones, tendons and gristle from meat
- always make sure that the anti-slip ring is attached to the chopper bowl
Caution: The blade is very sharp! Always hold it by the upper plastic part and handle it carefully.
Carefully remove the plastic cover from the blade.
- Place the blade (12) on the centre pin of the bowl and give it a turn so that it locks.
- Fill the bowl with food. Attach the lid onto the bowl with the interlock (11e) positioned next to the bowl handle.
- To lock the lid, turn it clockwise so that the interlock engages with a «click» above the handle.
- Insert the motor part (4) into the coupling (11b) until it locks.
- Plug in the appliance and make sure the pusher is in place.
- Switch the appliance on and hold the bowl with the other hand.
- After use unplug and press the release buttons (5) to remove the motor part. Remove the pusher.
- Press the lid interlock (11e) and hold it. Turn the lid (11a) counter-clockwise to unlatch it.
- Lift the lid up.
- Carefully take out the blade before removing the processed food. To remove the blade, slightly turn it then pull it off.
Mixing light dough
Using the blade (12), you may also mix light dough like a pancake batter or a cake mixture based on up to 250g flour.
Recipe example: Pancake batter
First pour 375 ml milk into the bowl, then add 250 g flour and finally 2 eggs. Using full speed, mix the batter until smooth.
Kneading dough
Picture section F also applies for the use of the kneading tool.
The kneading tool (13) is ideal for kneading different types of dough like yeast dough or pastry (based on max. 250 g flour).
- Place the kneading tool into the bowl (11f).
- Fill the bowl with max. 250 g flour, then add the other ingredients except liquids.
- Turn the appliance on at speed 21.
- Add liquids through the filling tube while the motor is running. Maximum kneading time: 1 minute - then allow the motor part to cool down for 10 minutes.
Recipe example: Pizza dough
250 g flour, 1/2 tsp salt, 1/2 tsp dried yeast, 5 tbsp olive oil, 150 ml water (lukewarm).
Recipe example: Pastry
250 g flour, 170 g butter (cold/hard, small pieces), 80 g sugar, 1 vanilla sugar, 1 small egg, 1 pinch salt. For good results, do not use warm, soft butter.
Stop kneading shortly after dough has formed a ball. Dough will become too soft from excessive kneading.
Slicing / shredding / french fries
Using the slicing tool (14a) you can slice e.g. cucumbers, onions, mushrooms, apples, carrots, radishes, raw potatoes, courgettes, cabbage. Using the shredding tools (14b), you can shred e.g. apples, carrots, raw potatoes, beetroot, cabbage, cheese (soft to medium).
Use the french fry tool (15) to prepare french fries.
- For slicing / shredding place a tool (14 a,b) into the tool holder (14) and snap into position. Place the tool holder (14) or french fry tool (15) on the centre pin of the bowl (11f) and make sure it locks into place.
- Attach the lid (11a) onto the bowl with the interlock (11e) positioned next to the bowl handle.
- To lock the lid turn it clockwise so that the interlock engages with a «click» above the handle.
- Insert the motor part into the coupling (11b) until it locks.
- Plug in the appliance and insert the food to be processed into the filling tube.
- Switch the appliance on to operate. Never reach into the filling tube when the appliance is switched on. Always use the pusher (11c) to feed in food.
- After use unplug and press the release buttons (5) to detach the motor part.
- Press the lid interlock (11e) and hold it. Turn the lid (11a) counter-clockwise to unlatch it.
- Lift the lid up.
- Take out the tool holder or french fry tool before removing the processed food. To remove the tool (14a,b), push it up at the one end that protrudes at the bottom side of the tool holder.
Puree accessory (B)
The masher can be used to mash cooked vegetables and fruits such as potatoes, sweet potatoes, tomatoes, plums and apples.
Before use
Don't mash hard or uncooked food; you may damage the unit. Remove hard parts such as peel, stones and stems, then cook and drain.
Important
- Never use the puree accessory in a saucepan over direct heat.
- Always remove the saucepan from the heat and allow to cool slightly.
- Do not tap the puree accessory on the side of the cooking vessel during or after using. Use a spatula to scrape excess food away.
- For best results when mashing never fill a saucepan etc., more than half full with food.
- Do not process more than 1 batch without interruption.
- Let the appliance cool down for 4 minutes before you continue processing.
How to use the puree accessory
- Fit the gear box (9a) to the shaft (9b) by turning in a clockwise direction.
- Turn the puree accessory upside down and fit the paddle (9c) over the central hub and turn anticlockwise to locate. (If the gear box isn't fitted then the paddle doesn't secure in place).
- Fit the motor part to the puree accessory and push to lock. Plug in.
- Place the puree accessory in the saucepan or bowl etc., and switch on the appliance. Move the puree accessory in an up and down movement throughout the mix until the desired result is achieved. After use unplug and press the release buttons (5) to remove the puree accessory.
- Remove the paddle by turning clockwise and detach the gear box from the shaft.
Recipe example: Mashed potatoes
- Put 1 kg cooked potatoes in a bowl
- Mash 30 s with speed 21 Add 200 ml warm milk
- Resume mashing for about 30s
Cleaning (C)
Clean the motor part (4), the gear boxes (7a,9a) with a damp cloth only.
The lids can be cleaned under running water but do not immerse them in water, nor clean it in a dishwasher. All other parts can be cleaned in a dishwasher.
If food has been allowed to dry onto the puree accessory, remove the paddle. Soak the paddle and bottom of the puree accessory shaft in warm water to soften and then wash thoroughly.
You may remove the anti-slip rings from the chopper bowls for extra thorough cleaning. When processing foods with a high pigment content (e.g. carrots), the plastic parts of the appliance may become discoloured. Wipe these parts with vegetable oil before cleaning them.
Accessories
can be bought individually, not available in every country)
| MQ 10: Whisk for whipping cream, beating egg whites |
| MQ 20: 350 ml chopper to chop herbs, carrots, etc. |
| MQ 30: 500 ml chopper to chop carrots, meat, onions, etc. |
| MQ 40: 1250 ml chopper to chop, mix, blend and crush ice |
| MQ 50: puree accessory to puree cooked vegetable and potatoes |
| MQ 70: food processor accessory for chopping, blending, kneading and shredding |
Subject to change without notice.
Please do not dispose of the product in the household waste at the end of its useful life. Disposal can take place at a Braun Service Centre or at appropriate collection points provided in your country.
For UK Only
Guarantee Information
All Braun Household products carry a minimum guarantee period of two years. The rights and benefits under this guarantee are additional to your statutory rights which are not affected.
Please keep your receipt as this will form the basis of your guarantee.
In the unlikely event of a breakdown you have access to professional help from our team simply by calling: 02392 392333
For service in the Republic of Ireland please call: 012475471
Braun Household undertakes within the specified period to repair or replace any part of the appliance, free of charge (with the exception of any glass or porcelain-ware incorporated in the product) found to be defective provided that;
We are promptly informed of the defect. The product is used and maintained in accordance with the User Instructions. - The appliance has not been altered in any way or subjected to misuse or repair by a person other than an authorised service agent for Braun Household.
- No rights are given under this guarantee to a person acquiring the appliance second hand or for commercial or communal use.
- Any repaired or replaced appliance will be guaranteed on these terms for the unexpired portion of the guarantee.
- The need for repair has not been caused by insufficient aftercare or cleaning: or damage caused by the chemical or electrochemical effects of water.
Under no circumstances shall the application of this guarantee give rise to the complete replacement of the appliance or entitle the consumer to damages.
Braun Household, New Lane, Havant, Hampshire PO9 2NH
www.braunhousehold.co.uk
French
Clothes rail mounting rod (A)
10d Non-slip base
10d Non-slip base
11b Coupling for motor part
11c Pusher
11d Filling tube
11e Locking catch
11f Bowl
11g Non-slip ring
12 Blade
13 Kneading attachment 14 Insert holder 14a Slicing insert 14b Shredding inserts (fine, coarse) 15 French fry maker tool
2 Variable speed button (on/off)
3 Turbo button
4 Motor unit
5 Release button for motor unit
5 Boat Tymmelepi 6 Bilehndep Tipeyi 7a BepinicTeK opa6bI 7b ApaJacTbipfblu 8 CtaKaH
9 Πηρε ḌαδᵢbIfbī
9a XbIJaAMdbIK Kopa6bl 9b Iope canTaMaCbI 9c KaJauKaJwa
11g AHTN-cbIPfyxy3iri
12 Xy3 13 ApaIacTbIpy Kypalbl 14 Kypan yCTaFbIwbl 14a Typay KypaJIbI 14b YcaKtay KypaIapbl (XhiHke, KaTkbil) 15Фркартоблкуральbl
AnFaUKbI KOJIaHbIC aJIbIHJa 6apMbIK 6eJIWeKTepeJ Ta3aIaI anIbIHbI3 («Ta3aIay» naparpaΦiH KapaHbI3 / C cypeTi).
KbIJaMdbIfbIH peTtey
XbIJaMdbIfbH peTtey TuMeciH KocKaHaDa (2), eHJeY XbIJaMdbIfbI peTTeJIReH DeHReIe CaiKec 60aIbI. JeHRei HeFypblIM XofApbl 6oJCa, Typay XbIJaMdbIfbI Da COFypblIM XbIJaM 6oJaBl. XbIJaMdbIfbIH KpaI KOCblBn TpyFaH Ke3de 6ac 6apMaFbHb36eH Hemece CYK CaycaFbIHb36eH peTteYHi3re 6oJaBl.
DereHMeH, eH XOFapbI eHdey XblnamdbIFbIH TaHday yuH Typ6o TyuMeHi bacy KaKeT 6oJaDbI (3). Typ6o TyuMeHi XblnamdbIFbIH peTtey FyHKunraCbH bypamaTikKeJe Kafbc6epy yuH de KOlaHaFb6oJaDbI.
KoI 6JIeHdepi (A)
KoJI 6JIeHepi coycTapbl, KKeJIepdi, MaIOHe3di, C6NI TaFAMApbIH a3IpyRe XaHE CyCbIHap MEH CYT KOKeINbEpIn apaJnactbipyFa eTe XaKCbl 6eIMdIgren.
EHXakcbi apanaactbipy HAtnxkelepihe KOJIKeTki3y yuiH eH XOFapFbl KblJaMaDblkTbl KOJlHaHbIHbI3.
- MoTOp 6eJIirH (4) 6JIeHNDiep TipeyIHe (6) 6aCbIHbI3. KoJI 6JIeHJepiH CTaKaHHbIH HEmeCE TOCTaFaHHbIH, iUHe opHaTbIHbI3. CoaH KeiH KypblfblHbI XOFapbIa CnNaTTaJIFaHdA NOCbIHbI3. KoIaHbICTaH KeiIH ToKTaH axbipatbIN, MOTOP 6eJIirH axbipaty yuH 6ocaty Tymecin (5) 6acblb3.
CoyctbI Ta6ada Tikeleapanactbipfahda KaHaFaH CybIKtbIH, WAsbIpamaybl yuH Ta6aHbI neTeh aBbIN KoBHb3 (KyIn Kany Kayni 6ap!.
Peuert ylrici: Maiohe3
250 ml (approximately 1 cup), 1 cucumber, 1 cup of sour cream, 1 sprig of dill,
1-2 teaspoons of salt (to taste), for spiciness add black pepper
All ingredients (except for the temperature-sensitive ones) place in a blender glass and blend. If the blender glass is not large enough, blend in batches. Turn on the blender and blend until the ingredients are well combined and smooth. Then, for a smoother consistency, add the remaining ingredients and blend again. Note: For thickening the yogurt, blend for 1 minute (for sauce) or 2 minutes (for soup, sauce).
Blender (A)
The blender is used only for blending cooked ingredients, sour cream, eggs, and other soft products.
- Blender (B): To blend, first attach the blender to the motor unit (7a), then attach the motor unit to the base (4).
- Place the blender in the container and blend, then remove it. After blending, to stop the motor, press the switch (5). Then remove the blender from the container.
Tips for best results
Do not overfill the container. - When blending hot liquids, be careful; they may splash. - For blending (max. 400 ml, min. 30% capacity, 4-8°C): Start blending at low speed, then increase to high speed. - For sour cream: Start blending at low speed, then increase to high speed.
Chopper (D)
The chopper (10) is used for chopping meat, hard cheese, onions, garlic, herbs, nuts, etc.
Do not chop very hard foods (e.g., frozen meat, chocolate).
For best results (E, H, J), refer to the operating instructions. The recommended chopping time for the chopper is 2 minutes.
Recipes ...
- Season the meat with salt, pepper, garlic, parsley, carrots, and onions. - Place the meat on a plate and garnish with herbs. - Add the bones and tendons to the meat and mix well. - Check the seasoning and adjust if necessary. - Serve the meat on a plate.
IpeDynpexJeHne: HOxbTe Mhoro ocTbp! BnHaRn ITO XBaAsaIte 3a TropHaTa PIACTMaCOBa YacT N BHNMaBaIte npi pa6Ota C Hero.
- Xy3diH Ka6bH a6aIaIaJIbHbI3.
- Xy3di aaykTBiH, OpTacbIHdaFbi icikke opHaJIacTbIPbIHbI3, TeMeH KapaB6acbln, 6ypan, 6ekirihi3.
- AaKtbi TaFAmFa TOnTbipBn, KaKaTaBih Xa6bHbI3.
- MoTOp 6eJIirIH KaKaNaKa eHri3iHi3.
- TypaftbIbI Kocy ywiH (2) Hemece (3) TyMecin 6acbIbI3. XMbICbI Ke3iHne MOTOP 6IoTbIH 6ip KOJIbIHbI36eH, aJ aAKTbI eKIHwI KOJIbIHbI36eH YCTan TypbHbI3.
- KolandaHBCTaH KeiH, KyaT Ke3iHeH cybipBn, MOTOP 6eJIirH axbipaty yuH 6ocaty TymMeIepiH (5) 6acbIHb3.
- KaKaTbI aJIbIHb3.
- Θινηρεινταγαπβίαλπας 6υρήαδαηλαπχγ3ιαλβίνιδι. χγ3ιαγγιδιαδαπδγραπ, TaρΤ𝑏ινιδι3.
TamaK Kom6aHbIHbIH Ka6DbIfbl (F)
TamaK KOM6aHbIHbI Xa6DbIFbl (11) KeNeci HapceIepre kapaMdbI
TypayXeHe apanaTbipy Kamblip nley (eH KEN dereHne 250 r yH heri3iHne) Typay XeHe yCaKay
Kakcbi HToNkere kety yuHin eHney keCTepeHH KapaHbI3 (H + J)
Typay
Xy3di (14) kondaHa oTbipbn, ci3 eTTi, ipimwiKti, nna3dbI, wenTi, capbIMCaKTbI, ca6i3di, rpek
Safety instructions, operational instructions, maintenance. T.6. Type of device.
Before starting work, please read the instructions for use and safety recommendations carefully.
We, the manufacturer, are not responsible for damages or malfunctions caused by improper use.
Before use ...
- meat, fish, vegetables, fruits, berries, mushrooms, and herbs before use
- Wash the device and its parts before first use.
- Remove meat, fish, and poultry before use.
- Do not immerse the device in water or other liquids.
Attention: Do not operate the device without food! Do not use it without the plastic container installed.
Remove the plastic container before use.
- Install the device (12) correctly, place it on a flat surface, and secure it for operation.
- Install the device securely. Insert the lid (11a) into the opening of the container (11e) and turn it clockwise.
- To lock the lid, turn it clockwise until it clicks into place.
- Insert the motor unit (4) into the lid (11b) and turn it clockwise.
- After use, disconnect the device from the power supply and clean it.
- KypbIINFbIHbIKocbIn,TOCTaFaHdbI eKHHJI KOJIbIHb36eH YCTaHb3.
- KolandaHbictaH Kein THoTah axbipatbIn, MOTOP 6eJiriH axbipaty uin 6ocaty Tymecin (5) 6acbHb3. Ntepriwi anbT tacTaHb3.
- KaKaKa 6yFaTaTaBbH (11e) 6acbIn yCTan TypbHb3. Bocaty wuH KaKaKaTbI (11a) caFATiJIHe Kapcbl 6ypaHb3.
- KaKaNaKbI XoFapbl KeTepeHiz.
- Θнделген TaFamdbI aJIMac 6ypbH, Ky3di abaian anbIn nbIFbIbI3. Ky3di anbIn Tactay yshin OHbl KIIkeHe 6ypbIn, codan KeiH TapTbIn aIbIHbI3.
KeHil KaMbipdbi apaJacTbipy
Ky3di (12) KoIdaHa OToBipbIn, XeHJI KaMbIpDbI eH, Ke6i 250 r yN HerizHde KyIMaK KaMbIpbI HeMece TopT Kocnacbl peIHde apaJnactbIpa aJnacbl3.
Peuent yllici: Kyimak kambipbi
BipiHwidiEH TOCTaHaFRA 375 Ml CYT KynbHbI3, CodaH KeiH 250 r yH MeH 2 KymblpTKa KocbHbI3. EH YJKeH XbldAmdbIKbI KOcbln, KaMbp 6ipKeJIk KaJbInKa KeJIrHeHwe apaJaactbIpblHbI3.
Kambip nley
E tapaybHbIH, cypeti de nIeey KypaJIbIHbIH, KOJaNbICbHa KaTaIbl.
Iney KypaJIb (13) ap TpyJI KaMbIp TpyJIepiH MbICaNfA, aUbIFaH KaMbIp MeH aUbIMaFAH KaMbIpDbl Ineyre dJI KeJIeJI (eH KeN dereHne 250 r yH Heri3iHne).
- Nley KypaJIbIH ToCTaFaHfa (11f) opHaTbIHbI3. ToctaraHfa eH KeN dereHne 250 r yHdbI caJIbIHbI3, cOdaH KeiH cyIbIKTBkTapHaH backa HrpeDneHTePdi KocblbI3. KypblfbiHb21XblnAaMdbIFbIMeH KocbiHb3. CytbIKTBtAPDbI TOITbipy TYTiri apKbIbI MOTOp 6JIrIXyMbIC ICTEN TypFaH yaKbITTa KOCblHbI3.
- EH y3ak nIey yaKbITbl: 1 MNHyT - codaH KeiH MOTOP 6eJIri caIKbIHdaFaHwa 10 MNHyT KYTe TpybIHbI3.
Peuert ylrici: Niuca kambipb
250 g flour, 1/2 cup kefir, 1/2 cup sour cream, 5 tablespoons sugar, 150 ml water (warm).
Recipe: Adygei cheese
250 g flour, 170 g butter (dry/melted, margarine or butter), 80 g sugar, 1 vanilla sugar, 1 teaspoon baking soda, 1 pinch of salt
For a good result, use cold butter.
Do not overknead the dough. The more you knead, the tougher the dough becomes.
Recipe: Baked potatoes
- 1 kg potatoes, wash them, put them in a bowl, add 200 ml of water, cook for 30 minutes, then drain.
Dish (C)
Wash the motor parts (4) and the attached parts (7a, 9a) with a brush.
They can be washed by hand, but not in the dishwasher. The parts can also be washed with a brush.
If the dough sticks to your hands, add a little flour. Knead the dough and hands with flour, then continue.
To clean the appliance, remove the anti-slip feet from the base.
The appliance may be damaged if the high parts (motor, bearings) are immersed in water. Before cleaning these parts, wipe them with a damp cloth.
Cables
(Can be washed by hand, but not in the dishwasher)
MQ 10: For mixing and blending
MQ 20: For whipping, boiling, etc. 350 ml capacity
MQ 30: For boiling, meat, plastic, etc. 500 ml capacity. MQ 40: For mixing, blending and for crushing ice 1250 ml capacity. MQ 50: For sauces and carton packaging. MQ 70: For tobacco, mixing, plywood and other purposes.
Smoke emission
To determine smoke emission, press the 5th button on the control panel. The button, when pressed once, shows the smoke emission value. Next, 2 seconds after pressing, the smoke emission value is displayed.
The value is displayed. Then, after 2 seconds, starting from 1992, the automatic type is calculated and the smoke emission value is displayed. Example: 30421 - this was emitted in 2013, 4th quarter.
EAC
Hand blender/chopper, Multiquick 5 Vario MQ 5007 Puree+, MQ 5037 Sauce+, MQ 5077 Buffet+ Tn4191 220-240 V, 50-60 Hz, 750 W
Manufacturer: De'Longhi Braun Household GmbH, German law applies. De'Longhi Braun Household GmbH, Carl-Ulrich-Straße 63263 Neu-Isenburg
For service, if service is needed, please contact the Braun company's service centers via the phone number 8 800 200 5262.
This product is intended for household use only. The product's service life is 2 years from the date of sale to the consumer.
Importer: «De'Longhi» LLC, Russia, 127055, Moscow, Suvorovskaya Street, 27/3 (building 27, building 3) Tel. +7 (495) 781-26-76
Service centers
Operating instructions
This product meets the highest quality, functionality and design standards.
Braun, you will be satisfied with your new blender.
Before use
Please read this instruction manual carefully before using the appliance.
Warning

The blades are very sharp! To avoid injury, please handle them with extreme care. - Before connecting, check that the mains voltage matches the voltage indicated on the appliance. - This appliance is intended exclusively for household use and is designed for processing quantities of food in domestic scales. - Always disconnect the appliance from the mains if you leave it unattended, and also before assembly, disassembly, cleaning, and storage. - Before changing accessories or approaching moving parts, switch off the appliance and disconnect it from the mains. - The appliance is not intended for use by children. Keep the appliance and its cord out of reach of children. - The appliance may be used by persons with reduced physical, sensory, or mental capabilities, or lack of experience and knowledge, provided they have been given supervision or instruction concerning use of the appliance in a safe way and understand the hazards involved. Braun electric appliances meet applicable safety standards. Repairs or replacement of the power cord must only be carried out by specialists at service centers. Unqualified repairs can be dangerous for the user. Be careful when pouring hot liquids into the blender or jug, as they may splash out of the appliance due to sudden boiling. - The measuring cup (8) and lid (10c, 11f) are not intended for use in a microwave oven.
Description and contents
1 Speed regulator 2 Speed control button (on/off) 3 "Turbo" button 4 Motor unit 5 Release buttons 6 Blender foot 7a Gear drive 7b Drive 8 Measuring cup 9 Chopper attachment
9a Gearbox 9b Chopper attachment shaft 9c Blade
Before chopping ...
- Cut meat, cheese, onion, garlic, carrots into pieces.
- Remove stems from greens, shells from nuts.
- Remove bones, tendons, and gristle from meat.
- Make sure the non-slip base is on the chopper bowl.
Warning: Very sharp blade! Always hold it by the upper plastic part and handle it with extreme care.
- Carefully remove the protective cover from the blade.
- Install the knife on the central shaft of the chopper, press and turn until it clicks.
- Place the products in the chopper bowl and cover with the lid. 4. Connect the motor unit to the lid and lock it.
- Press the start button (2) or (3) to begin operation. During operation, hold the motor unit with one hand and the bowl with the other.
- After use, disconnect the appliance from the power supply and press the release buttons (5) to detach the motor unit.
- Remove the lid.
- Carefully pull out the knife before removing the chopped products. To remove the knife, slightly turn and lift it.
Attach the chopping blade (F)
Accessories for the chopping blade (11) are ideally suited for
- Chopping and mixing dough (up to 250 g of flour) and slicing vegetables
For optimal results, refer to the tables (H + J).
Chopping
With the chopper (12), you can chop meat, cheese, onions, herbs, garlic, carrots, walnuts, onions, almonds, etc.
For best results, please refer to the maximum
quantities and speeds indicated in the table in section H.
Do not chop overly hard products such as ice cubes, nutmeg, coffee beans, or grains.
Ipeed n3MeJIbYeHnEm ...
-празырптеловнарекьтмясо,сьл,лук,ЧECHOK,MOPKOBb,чИЛN - ydaJInte cTe6n 3eJIeHn, ckOpIyNy opexOB - ydaJIInTe KOCTn, XJNbI IN XpAun N3 MraCa - y6eIntecb, B haJIuHn npOTnBOCKOJIb3aUeI NOCTabKn Ha YaWe N3MeJIbTeJI.
BHHMaHHe: OueHb octpbH HOx! Bcerda depxKHTe ero 3a BepXHIO pIacTKOByU qAcTb N o6paauTeCb C Hm OCTOpOxHO.
OCTOPOXHO CHIMnte 3aunTHbI yEXoI C HOXA.
- UctaHOBHTe HOX Ha ueHTpaJIbHbI CTepXeHb YauN (12), NOBepHHTe ero do FUKcauN.
- Помет范围内 рожу в чашу. Рисец сенье Крышки (11a) Кшире пи поочи phikcaTopа Крышки (11e), которьй paclnoложен радом с рунков чаши. 3.ДЯЗakpbITNKeKpbIshKNIOBepHInTe ee nO yacobOy CTrpeJIke,HTo6bIΦNKcAtOp 3aueJKNHyIcRHaIpyKoI.
- BCTaBbTe MToPHyIO yAcTb (4) B CcEJIeHne MToPHOJ yAcTn (11c)do fNkcaun.
- BkIIOUHTe npnbOp BCetb u y6eINTEcB,TO TOJIKAteJIb Ha MeCTe.
- BkIIOUHTe npIbOp n npIepeKINBaIte HaSy dpyroI pykoI.
- Послеснольбовая OTКЮчITE npибор OT cETин НжмITE KHOПКИ ΦИКсацIN (5), YTOБы OTCoeДИНТь MOTOPHyI OЧТь. Yберпт ToJkaTeJIb.
- Haxmnte 3amok Kpbiikn (11e) n depxnte. NobepHnte Kpbikky (11a) npotnb yacoboi CTpeIKN DJIY OTKpbITnJ.
- NpOdHmTe KpbIuKy.
- OctopOxHo BbItaHnTe HOx npeed Tem, KaK BbIHMaTb N3MeJIbYeHHbIe npOdyKTbl. IЯ ChrTnHOxCa CJIerKa NOBepHnTe n npINoDnHMnTe ero.
3ameunBaHne JERKORO Tecta
C nOMOuHoxa (12) Bb moKeTe 3aMeCnTb IeKoe TcTeTo,ДЯ 6JIuHOB uIu NIpOra,C INcNoJIb3OBaHNEm He 6oJee 250 rMyKn.
Mashed potato masher (B)
The press can be used to mash cooked vegetables and fruits by softness, for example potatoes, sweet potatoes, tomatoes, plums or apples.
Before use
Do not use the appliance to prepare hard or raw products, as this may lead to damage to the device. Remove hard parts such as skin, pits and stems, then cook and drain the water.
Important!
Do not place the masher in a saucepan that is directly on the heat source. Always first remove the saucepan from the stove and let it cool slightly. Do not use the masher during or after its use against the wall of the saucepan. To remove residues, use a spatula. - To achieve the best results when preparing puree, do not fill the saucepan (or other container) with products more than half full. Do not process more than 1 portion without a break. - Let the device rest for a few minutes, then continue processing.
Using the masher
- Install the speed box (9a) on the shaft (9b), turning clockwise.
- Turn the masher upside down and install the blade (9c) on the central shaft, then turn counterclockwise until it clicks into place. (If the speed box is not installed, it is impossible to securely fix the blade.) Connect the masher to the motor block and press to lock. Plug the appliance into the mains.
- Place the masher into the saucepan, bowl or other container and turn on the device. Move the masher
up and down in the food mixture until you get the desired result.
- After use, unplug the appliance from the mains and press the release button (5) to remove the masher.
- Remove the blade by turning clockwise, then disconnect the speed box from the masher-blender.
Example recipe: Mashed potatoes
- Place 1 kg of cooked potatoes
- Warm up for no more than 30 seconds at speed 21 - Add 200 ml of liquid
- Continue warming up for about 30 seconds
Care (C)
Clean the motor block (4) or gearbox (7a, 9a) exclusively with a damp cloth.
The lid can be rinsed under running water, but should not be immersed in water or rinsed in the dishwasher. All other parts can be washed in the dishwasher.
If there are dried food residues on the attachment, remove the blade. Soak the blade and the lower part of the shaft in hot water according to the amount of residues, then rinse thoroughly.
With the help of a cleaning brush, you can remove the anti-slip coating for more thorough cleaning.
When working with products that have a rich color (e.g., carrots), plastic parts may become stained. Before cleaning, rub such parts with vegetable oil.
Accessories
(Available separately, not available in all countries)
MQ 50: Attachment for making puree from cooked vegetables and potatoes
MQ70: Attachment for the kitchen machine, intended for chopping, mixing, kneading dough and whisking
Changes may be made without prior notice.
Date of manufacture
To find out the date of manufacture, look at the rating plate on the product (next to the label with the designation and series). The first digit indicates the last digit of the year of manufacture. The next two digits indicate the calendar week. The last two digits indicate the edition (since 1992). Example: 30421 - the product was manufactured in 2013 (in week 4).

PuyHoi 6IeHep,
Multiquick 5 Vario
MQ 5007 Puree+, MQ 5037 Sauce+,
MQ 5077 Buffet+
Tyn 4191
220-240 V, 50-60 Hz, 750 W
Made in Romania
De'Longhi Braun Household GmbH Germany
De'Longhi Braun Household GmbH
Carl-Ulrich-Straße 4
63263 Neu-Isenburg/Germany
Troubleshooting
The hand blender is perfect for making sauces, purees, soups, mayonnaise, and other foods, as well as for mixing drinks and milkshakes. For best mixing results, use the highest speed.
(Optional accessories, not available in all countries)
Country of origin: Romania Year of manufacture
To determine the year of manufacture, refer to the 5-digit production code located near the type plate. The first digit of the production code refers to the last digit of the year of manufacture. The next 2 digits refer to the calendar week in the year of manufacture. And the last 2 digits show the print date automatically calculated since 1992.
Example: 30421 - The product was manufactured in week 4 of 2013.
10
a
1
5
Therefore, angle 5 equals angle 6.
J 6
Therefore S = 1/2 × 18 = 14
(F)


- BEFORE USE
- CAUTION
- DESCRIPTION
- SETTING THE SPEED
- HAND BLENDER (A)
- WHISK (A)
- TIPS FOR BEST RESULTS
- CHOPPER (D)
- BEFORE CHOPPING
- FOOD PROCESSOR ACCESSORY (F)
- CHOPPING
- MIXING LIGHT DOUGH
- RECIPE EXAMPLE: PANCAKE BATTER
- KNEADING DOUGH
- RECIPE EXAMPLE: PIZZA DOUGH
- RECIPE EXAMPLE: PASTRY
- SLICING / SHREDDING / FRENCH FRIES
- PUREE ACCESSORY (B)
- IMPORTANT
- HOW TO USE THE PUREE ACCESSORY
- CLEANING (C)
- ACCESSORIES
- FOR UK ONLY
- PLEASE KEEP YOUR RECEIPT AS THIS WILL FORM THE BASIS OF YOUR GUARANTEE
- FRENCH
- CLOTHES RAIL MOUNTING ROD (A)
- KBIJAMDBIFBIH PETTEY
- KOI 6JIEHDEPI (A)
- PEUERT YLRICI: MAIOHE
- BLENDER (A)
- RECIPES
- TAMAK KOM6AHBIHBIH KA6DBIFBL (F)
- TYPAY
- KEHIL KAMBIPDBI APAJACTBIPY
- PEUENT YLLICI: KYIMAK KAMBIPBI
- KAMBIP NLEY
- PEUERT YLRICI: NIUCA KAMBIPB
- RECIPE: ADYGEI CHEESE
- RECIPE: BAKED POTATOES
- DISH (C)
- CABLES
- SMOKE EMISSION
- EAC
- OPERATING INSTRUCTIONS
- PLEASE READ THIS INSTRUCTION MANUAL CAREFULLY BEFORE USING THE APPLIANCE
- WARNING
- DESCRIPTION AND CONTENTS
- ATTACH THE CHOPPING BLADE (F)
- IPEED N3MEJIBYEHNEM
- AMEUNBAHNE JERKORO TECTA
- MASHED POTATO MASHER (B)
- USING THE MASHER
- EXAMPLE RECIPE: MASHED POTATOES
- CARE (C)
- DATE OF MANUFACTURE
- COUNTRY OF ORIGIN: ROMANIA YEAR OF MANUFACTURE
- A
- (F)
Brand : BRAUN
Model : Multiquick 5 Vario MQ 5177
Category : Blender