
Peltor Alert M2RX7P3E201 - Protective headphones 3M - Free user manual and instructions
Find the device manual for free Peltor Alert M2RX7P3E201 3M in PDF.
| Type of product | Hearing protection headset with built-in radio |
| Brand | 3M |
| Model | Peltor Alert M2RX7P3E201 |
| Power supply | 2 AA 1.5 V batteries (alkaline) |
| Battery life | Approximately 100 hours of continuous use |
| External audio input | 3.5 mm stereo connector |
| Main functions | AM/FM radio, volume adjustment, station search, sound level modulation (surround function), noise attenuation |
| Attenuation | SNR compliant with EN standards, high, medium and low frequency attenuation |
| Maximum sound level | 82 dB(A) at ear level (entertainment function) |
| Operating temperature | -20 °C to +55 °C |
| Storage temperature | -20 °C to +55 °C |
| Maintenance and cleaning | Clean with soap and warm water, do not immerse. Replace sealing rings and cushions regularly. |
| Recommended spare parts | HY81 hygiene kit, 60/2 windscreen, FL6CE/1 cable, 1073 SV battery box cover |
| Repairability | Spare parts available: sealing rings, cushions, batteries, cables |
| Safety | Complies with EC directives. Do not use without batteries or in case of malfunction. Check before use. |
| Recycling | WEEE compliant. Do not dispose of with unsorted municipal waste. |
Frequently Asked Questions - Peltor Alert M2RX7P3E201 3M
User questions about Peltor Alert M2RX7P3E201 3M
0 question about this device. Answer the ones you know or ask your own.
Ask a new question about this device
Download the instructions for your Protective headphones in PDF format for free! Find your manual Peltor Alert M2RX7P3E201 - 3M and take your electronic device back in hand. On this page are published all the documents necessary for the use of your device. Peltor Alert M2RX7P3E201 by 3M.
USER MANUAL Peltor Alert M2RX7P3E201 3M
(A) Headband M2RX7A2-01
(B) Helmet attachment M2RX7P3E2-01
(c)
(D)
(E)
(F:1) M2RX7A2-01 Headband
| Frequency (Hz) 1) 63 125 250 500 1000 2000 4000 8000 | |||||||||||
| Mean attenuation (dB) 2) 18.1 16.3 23.5 30.6 35.1 30.7 34.0 33.8 | |||||||||||
| Std deviation (dB) 3) 3.1 3.0 2.6 2.8 3.1 3.4 2.4 2.8 | |||||||||||
| Assumed Protection Value (dB)9) 15.0 13.3 20.9 27.8 32.0 27.3 31.6 30.9 |
5) 361g
SNR=30db H=29db M=28db L=21db
(F:2) M2RX7P3E2-01 Helmet attachment
| Frequency (Hz) 1) 63 125 250 500 1000 2000 4000 8000 | ||||||||||
| Mean attenuation (dB) 2) 16.4 17.5 22.8 29.2 35.9 30.0 34.1 34.9 | ||||||||||
| Std deviation (dB) 3) 2.8 2.6 2.8 3.1 2.8 2.7 2.7 3.3 | ||||||||||
| Assumed Protection Value (dB) 4) 13.6 15.0 20.0 26.2 33.1 27.3 31.4 31.6 |
5) 390g
SNR=30db H=29db M=28db L=22db
| (F:3) | Criterion Levels |
| H= 114 dB(A) | |
| M= 108 dB(A) | |
| L= 99 dB(A) |
| External Audio |
| Maximum input signal: 500mV |
(H:1) The product is in conformity with the provisions set out in the following directives. Thereby it fulfils the requirements for CE marking.
- PPE directive 89/686/EEC
EMC 2004/108/EC
ROHS-directive 2011/65/EU
(H:2) The product is tested and approved in accordance with following standards:
EN352-1: 2002, EN 352-3: 2002, EN 352-4: 2001/A1:2005, EN 352-8: 2008, EN55013:2001+A1:2003+A2:2006, EN55020:2007
FCC:FCC Part 15.B
IC: ICES-003, Issue 4, February 2004
C-tick: AS/NZS CISPR 13:2009
(H:3) The product has been examined by:
- Combitech AB, Ånkhusgatan 9, Box 1017, SE-551 11 Jönköping, Sweden. Notified body: 2279
Technical data
Operating temperature: -20 °C to +55 °C
FM radio frequency range: 87.5-108.0 MHz
Approximate operating time: 100h
External audio input: max 108 mV
(I)
| 1) Helmet Manufacturer | 2) Helmet Model 3) Attachment | 3) Head size: S=slmall, N=medium, L=large | |
| 3M 1465 E NL | |||
| 3M Airstream AH1, AH4, AH7 | HT-701, HT-702, HT-705, HT-707 | AE NL | |
| 3M Mistral M-106, M-107, M-3D6, M-307 AF NL | |||
| 3M G5000 Headgear E SNL | |||
| 3M G2000 K,E SNL | |||
| 3M G22 (BASIC SET) E NL | |||
| 3M G3000 E SNL | |||
| Auboueix Brennus | F SNL | ||
| Auboueix Fondelec | F SNL | ||
| Auboueix Iris | E NL | ||
| Auboueix Iris 2 | E NL | ||
| Sofop Taliaplast | Oceanic | E | NL |
| Sofop Taliaplast | Opus | E | NL |
| Berendsen Safety, | Balance HD | N | SNL |
| Centurion | 1125/ARCO plus | H | SNL |
| Centurion | 1100/ARCO type 2 | H | NL |
| Centurion | 1540/ARCO | A | NL |
| Evert Larsson | Robust | E | SNL |
| Evert Larsson | Balance | E | NL |
| Evert Larsson | Balance AC/3M 1465 | E | NL |
| Kemira | Top Cap | A | SNL |
| LAS | LP2002 E SNL | ||
| LAS | LP2006 | E | SNL |
| MSA | Super V-Gard II | E | SNL |
| MSA | V-Gard | E | SNL |
| Petzl | Vertex | E | SNL |
| Protector | Style 300 | E | SNL |
| Protector | Style 600 | G | SNL |
| Protector | Tuffmaster II | E, G | NL |
| Römer | Bravo 2 Nomaz | B | SNL |
| Römer | Marcus Top 2 Atlas Nomaz | B | SNL |
| Römer | N2 Atlas Nomaz | BB | SNL |
| Römer | Profi Expo | E | SNL |
| Römer | Profi Nomaz | E | SNL |
| Römer | Top Expo Atlas | B | SNL |
| Schuberth | BEN | BB | SNL |
| Schuberth | BER80/WPC80 | EA | SNL |
| Schuberth | BER S | E | SNL |
| Schuberth | BOP R | B | SNL |
| Schuberth | PIONIER | B | SNL |
| Schuberth | SH 91/WPL 91 | EB | SNL |
| Schuberth | SW1 | EB | NL |
| UVEX | Airwing | E | SNL |
| Voss | Inap 88 | E | SNL |
| Voss | Inap Master | E | NL |
| Voss | Inap Star | E | NL |
| Voss | Inap PCG | G | NL |
(J)

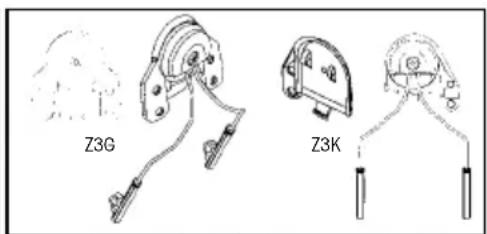
| GB, IE, ZA, AE | 2-4 |
| FR, CH, BE | 5-7 |
| DE, CH, AT | 8-10 |
| IT, CH | 11-13 |
| ES | 14-16 |
| NL, BE | 17-19 |
| SE | 20-22 |
| DK | 23-25 |
| NO | 26-28 |
| IS | 29-31 |
| FI | 32-34 |
| PT | 35-37 |
| GR | 38-40 |
| PL | 41-43 |
| HU | 44-46 |
| CZ | 47-49 |
| SK | 50-52 |
| SI | 53-55 |
| EE | 56-58 |
| LV | 59-61 |
| LT | 62-64 |
| RO | 65-67 |
| RU, BY, AZ | 68-71 |
| HR | 72-74 |
| BG | 75-77 |
| RS | 78-80 |
| TR | 81-83 |
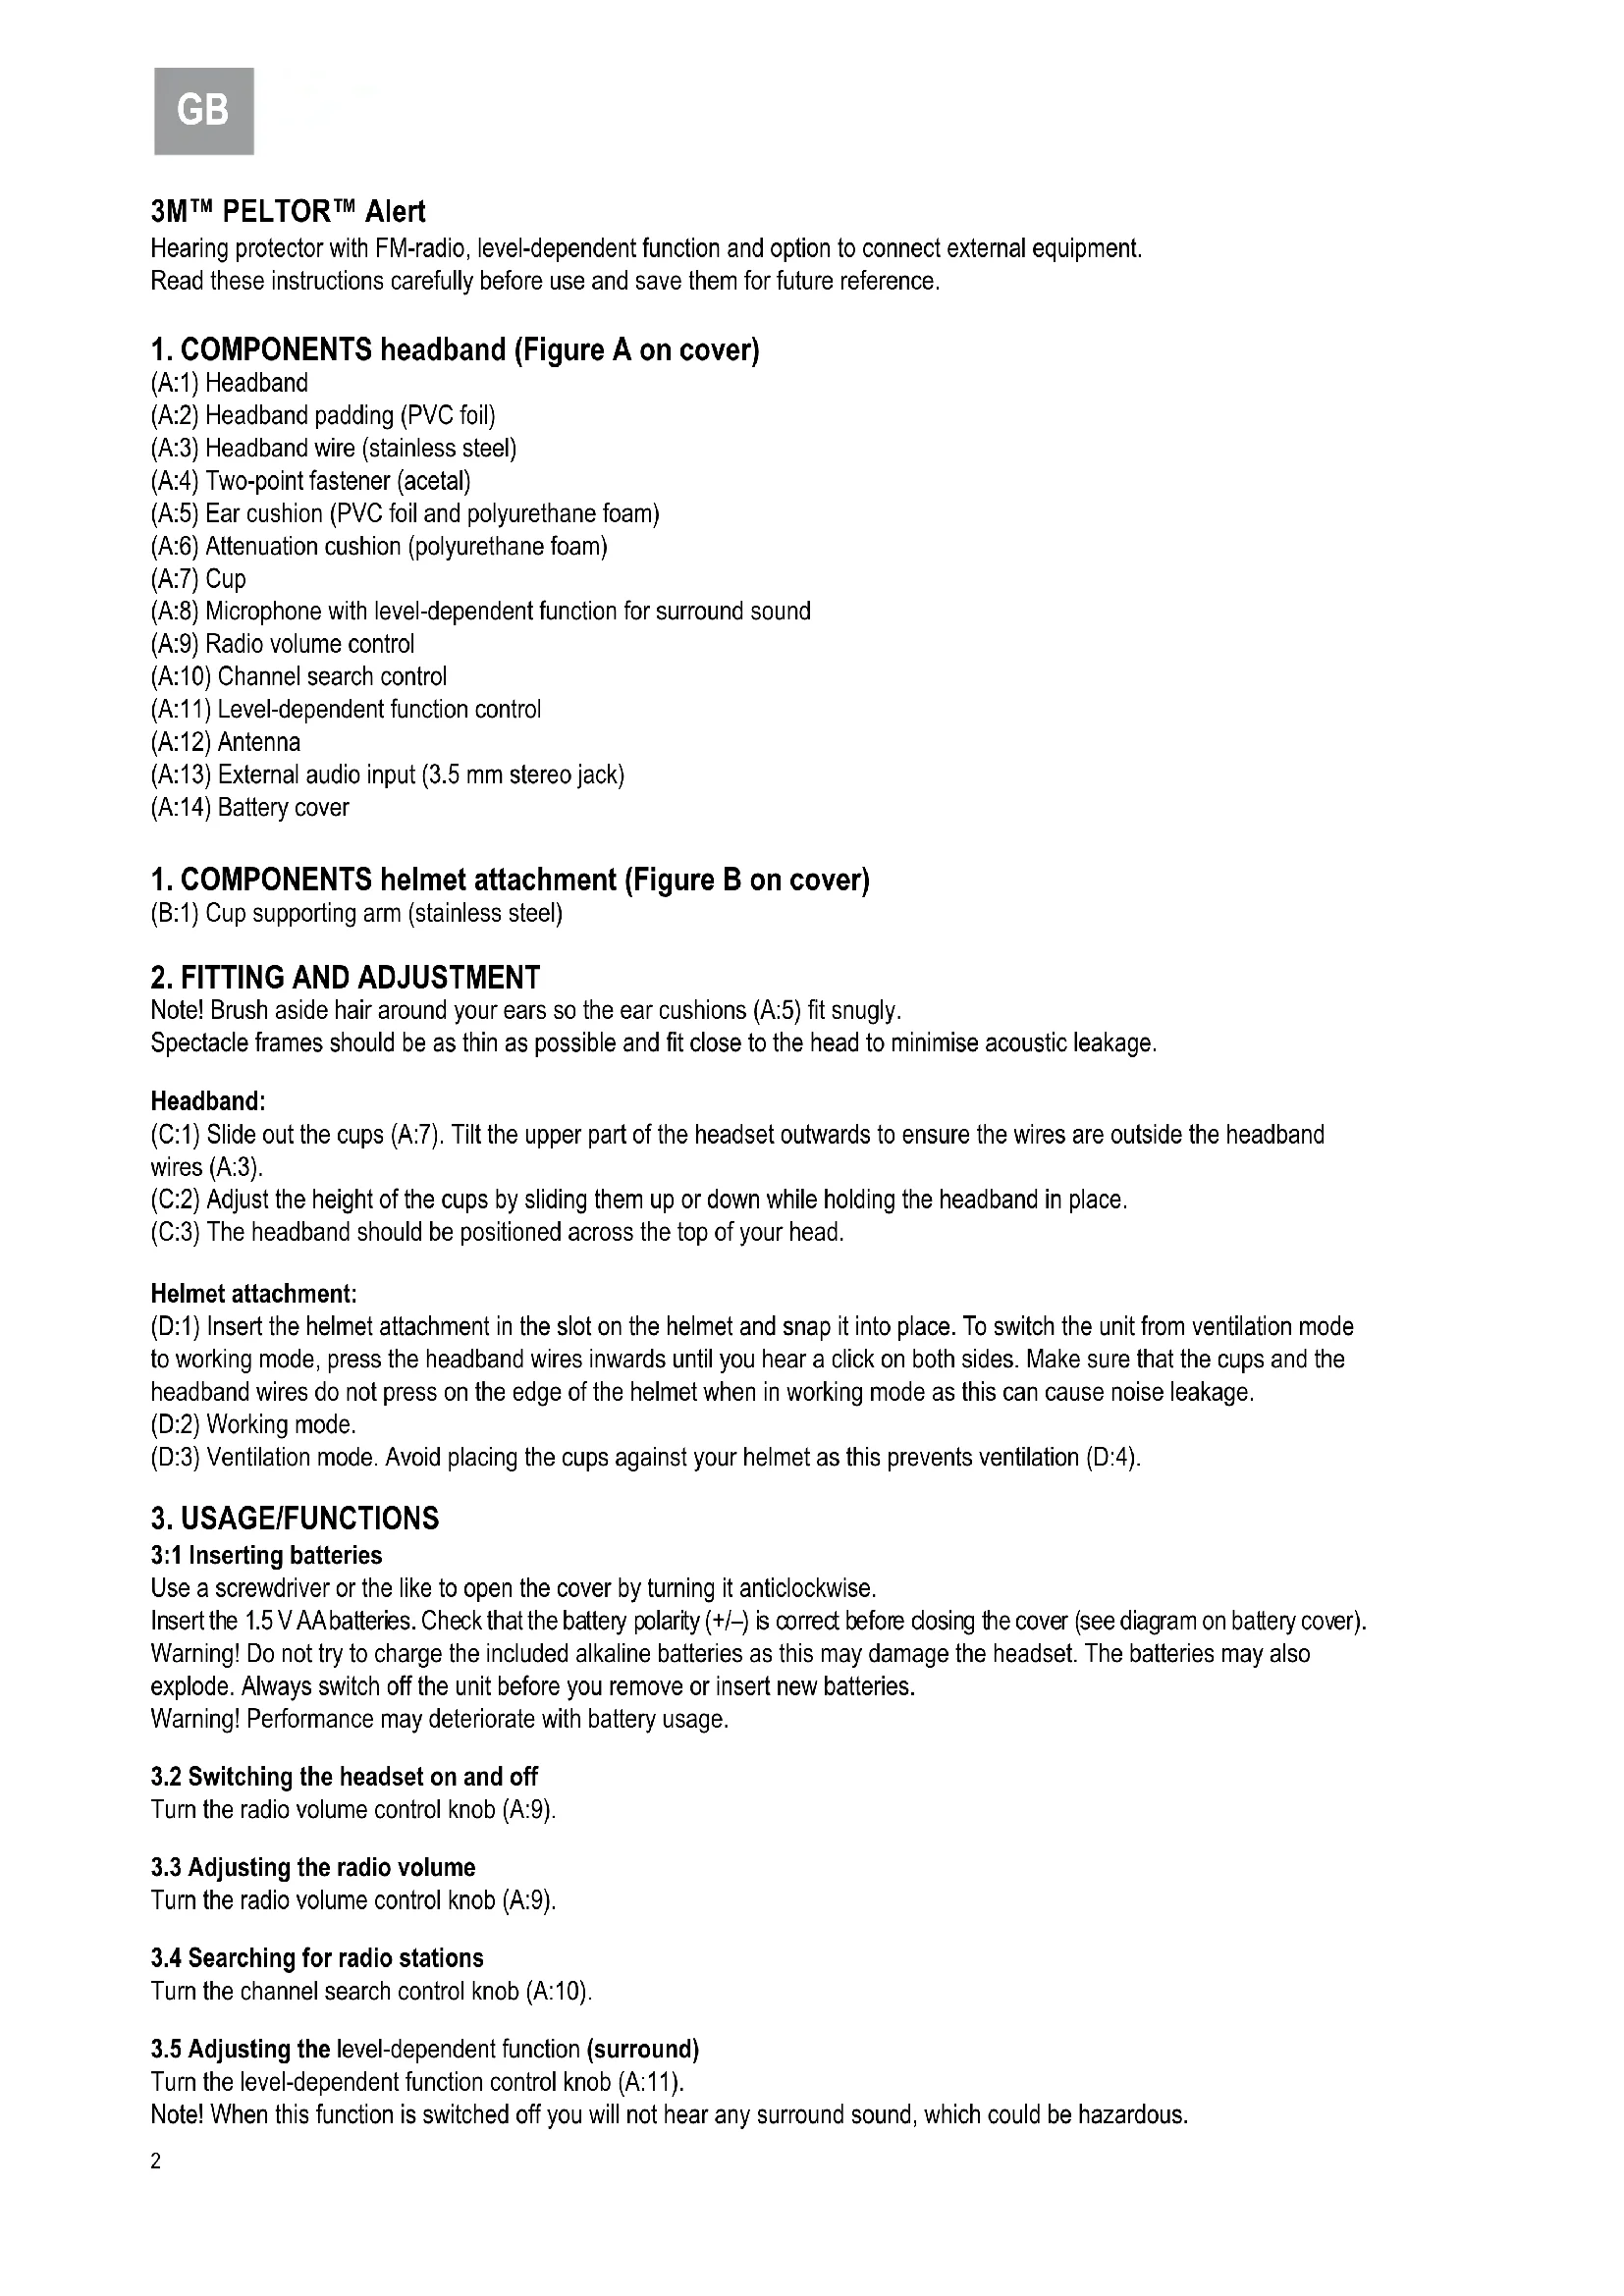
3MTPELTORTM Alert
Hearing protector with FM-radio, level-dependent function and option to connect external equipment.
Read these instructions carefully before use and save them for future reference.
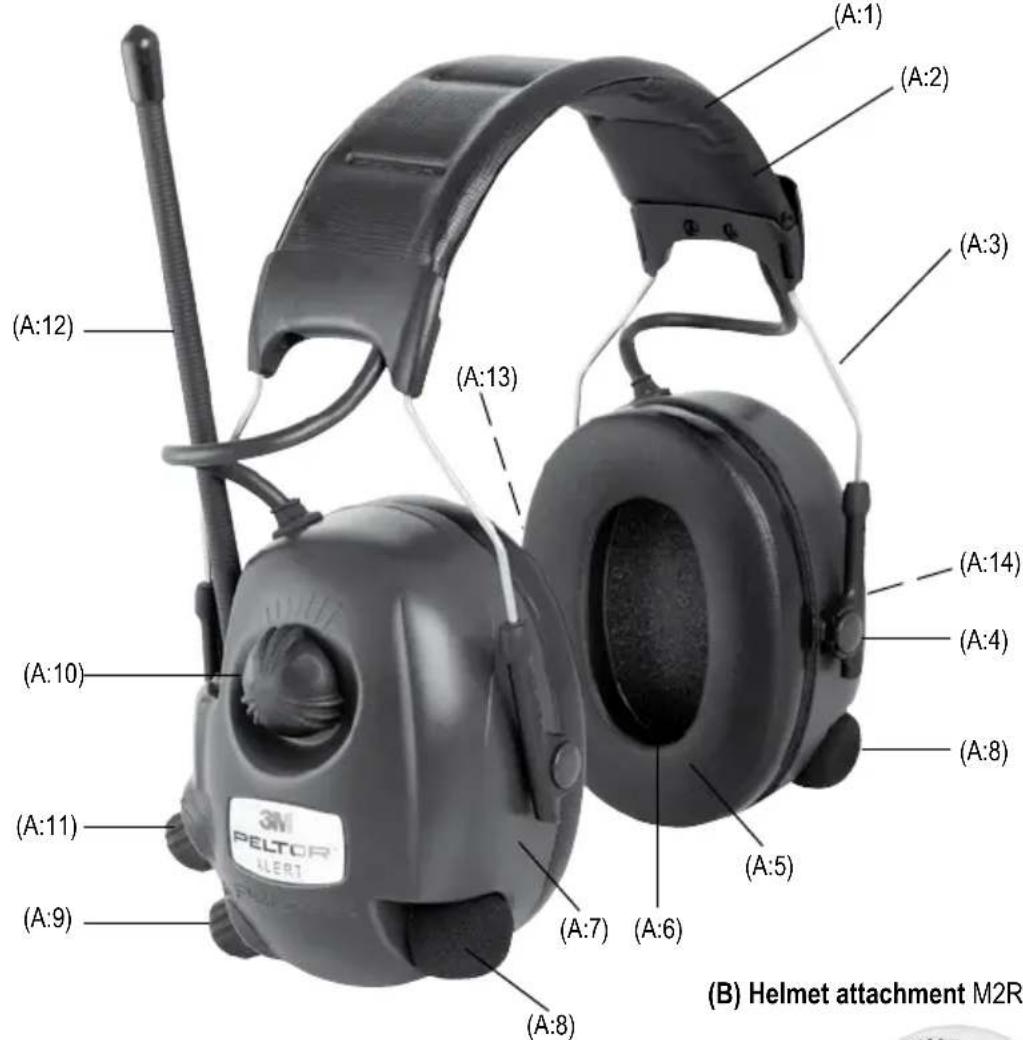
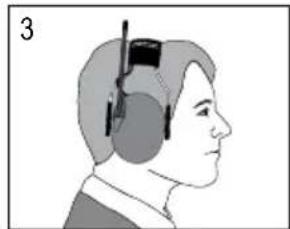
1. COMPONENTS headband (Figure A on cover)
(A:1) Headband
(A:2) Headband padding (PVC foil)
(A:3) Headband wire (stainless steel)
(A:4) Two-point fastener (acetal)
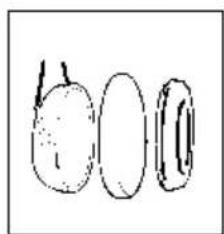
(A:5) Ear cushion (PVC foil and polyurethane foam)
(A:6) Attenuation cushion (polyurethane foam)
(A:7) Cup
(A:8) Microphone with level-dependent function for surround sound
(A:9) Radio volume control
(A:10) Channel search control
(A:11) Level-dependent function control
(A:12) Antenna
(A:13) External audio input (3.5 mm stereo jack)
(A:14) Battery cover
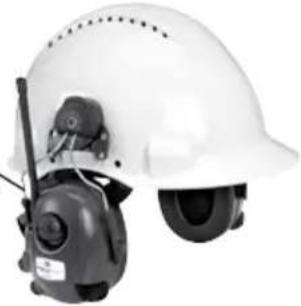
1. COMPONENTS helmet attachment (Figure B on cover)
(B:1) Cup supporting arm (stainless steel)
2. FITTING AND ADJUSTMENT
Note! Brush aside hair around your ears so the ear cushions (A:5) fit snugly.
Spectacle frames should be as thin as possible and fit close to the head to minimise acoustic leakage.
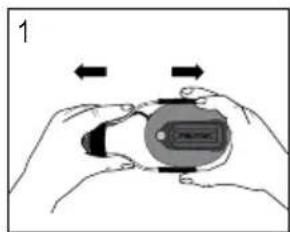
Headband:
(C:1) Slide out the cups (A:7). Tilt the upper part of the headset outwards to ensure the wires are outside the headband wires (A:3).
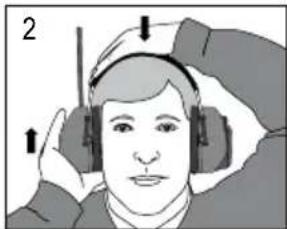
(C:2) Adjust the height of the cups by sliding them up or down while holding the headband in place.
(C:3) The headband should be positioned across the top of your head.
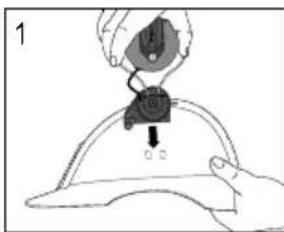
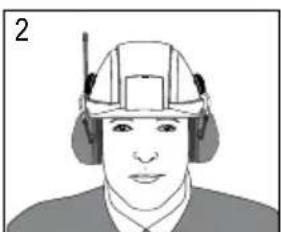
Helmet attachment:
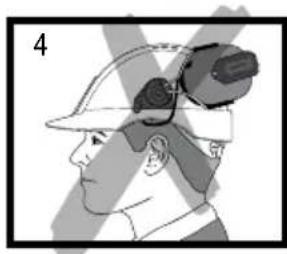
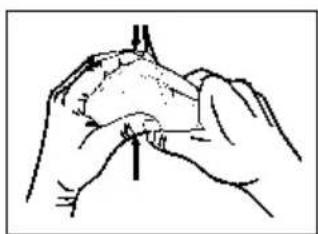
(D:1) Insert the helmet attachment in the slot on the helmet and snap it into place. To switch the unit from ventilation mode to working mode, press the headband wires inwards until you hear a click on both sides. Make sure that the cups and the headband wires do not press on the edge of the helmet when in working mode as this can cause noise leakage.
(D:2) Working mode.
(D:3) Ventilation mode. Avoid placing the cups against your helmet as this prevents ventilation (D:4).
3. USAGE/FUNCTIONS
3:1 Inserting batteries
Use a screwdriver or the like to open the cover by turning it anticlockwise.
Insert the 1.5 V AA batteries. Check that the battery polarity (+/-) is correct before closing the cover (see diagram on battery cover).
Warning! Do not try to charge the included alkaline batteries as this may damage the headset. The batteries may also explode. Always switch off the unit before you remove or insert new batteries.
Warning! Performance may deteriorate with battery usage.
3.2 Switching the headset on and off
Turn the radio volume control knob (A:9).
3.3 Adjusting the radio volume
Turn the radio volume control knob (A:9).
3.4 Searching for radio stations
Turn the channel search control knob (A:10).
3.5 Adjusting the level-dependent function (surround)
Turn the level-dependent function control knob (A:11).
Note! When this function is switched off you will not hear any surround sound, which could be hazardous.
3.6 External audio input
Switch the headset on as described in 3.2. Lower the radio volume to the minimum level. Connect your external audio source via the 3.5mm stereo jack.
Note! See the maximum permitted external audio signal in table G.
4. IMPORTANT USER INFORMATION
It is recommended that:
- The-ear muffs are worn at all times in noisy surroundings.
- The ear-muffs are fitted, adjusted and maintained according to the instructions in this manual. The ear-muffs are regularly inspected for serviceability.
Warning! If these recommendations are no adhered to, the protection offered by the ear-muffs will be severely impaired.
- This product may be adversely affected by certain chemical substances. Further information should be sought from the manufacturer.
- Ear-muffs, and in particular cushions, may deteriorate with use and should be examined at frequent intervals for cracking and leakage, for example.
- The fitting of hygiene covers to the cushions may affect the acoustic performance of the ear-muffs.
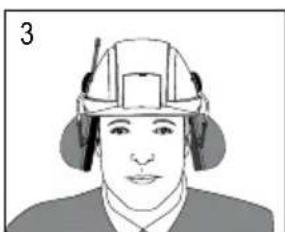
- This hearing protector should only be used with the recommended industrial safety helmets. (Figure 1 on cover).
This ear-muff is provided with level-dependent attenuation and electrical audio input. - The wearer should check correct operation before use. If distortion or failure is detected, the wearer should refer to the manufacturers advice for maintenance and replacement of the battery.
This ear-muff provides audio signal sound pressure level limitation and that the ear-muff limits the entertainment audio signal to 82 dB(A) effective to the ear.
Warning - performance may deteriorate with battery usage. The typical period of continuous use that can be expected from the ear-muff battery is 100 hours
Warning! The audibility of warning signals at a specific workplace may be impaired while using the entertainment facility Warning! If these recommendations are not followed it may lead to a loss of attenuation, which can in turn lead to hearing damage.
Warning! The output of the electrical audio circuit of this hearing protector may exceed the daily limit sound level.
Warning! The output of the level-dependent circuit of this hearing protector may exceed the external sound level.
5. MAINTENANCE/CLEANING
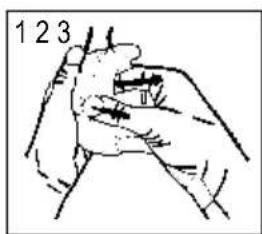
(E:1-3) Remove the ear cushions and attenuation cushions if you have been wearing the hearing protector for a long time or if moisture has formed inside the cups. Clean and disinfect the cups, headband and ear cushions regularly with soap and warm water. Allow the hearing protector to dry before you use it again.
Note! Do not immerse the hearing protector in water!
Note! Make sure the cleaning agents used are known not to be harmful to the wearer.
6. STORAGE AND OPERATING TEMPERATURE
Remove the batteries before storing the product. Store at no more than +55^ and no less than -20^ .
7. RECYCLING
This product is covered by the EU WEEE Directive (Waste Electrical and Electronic Equipment). Below requirement applies in the European Union.

Do not dispose of your product as unsorted municipal waste!
The crossed-out wheeled-bin symbol indicates that all EEE (Electrical and Electronic Equipment), batteries and accumulators must be disposed of according to local law by the use of available return and collection systems.
8. REMOIVING/ REPLACING EAR CUSHIONS
(E:1-3) Slide your fingers under the edge of the ear cushion and pull straight out. Insert a new ear cushion by pressing until it snaps into place.
9. TECHNICAL DATA
9:1 Attenuation values, SNR (F)
(F:1) Headband
(F:2) Helmet attachment
Explanation of the attenuation data table (F:1, F:2)
- Frequency (Hz)
- Mean attenuation (dB)
- Standard deviation (dB)
- Assumed protection value (dB)
- Weight of the product
9.2 Explanation of the criterion level table (F:3)
A criterion level is the amount of noise (measured as A-weighted sound pressure) outside the hearing protector that gives 85 dB(A) inside. The criteria level varies depending on the frequency content of the noise.
H = attenuation of high-frequency noise.
M = attenuation of mid-range noise.
L = attenuation of low-frequency noise.
9.3 Explanation of the testing and approval table
(H:1) This product is in conformity with the provisions set out in the following directives. Thereby it fulfils the requirements for CE marking.
(H:2) This product has been tested and approved in accordance with following standards.
(H:3) The product has been examined by.
9.4 Explanation of safety helmet table (I)
These ear-muffs should be fitted to, and used only with, the industrial safety helmets listed in table (I).
- Helmet manufacturer
- Helmet model
- Helmet attachment (J)
- Sizes: S = Small, N = Medium, L = Large
10. SPARE PARTS/ACCESSORIES
3M^TM PeltorTM HY81 Hygiene kit
Replaceable hygiene kit consisting of two attenuation cushions and two snap-in ear cushions. Replace at least twice a year to ensure constant attenuation, hygiene and comfort.
3MTM PeltorTM HY100A Single-use protectors
A single-use protector that is easy to fit to the ear cushions. Pack of 100 pairs.
3MTM PeltorTM M60/2 Wind protection for ambient microphones
Effective against wind noise; enhances life span and protects the microphones. One pair per pack.
3MTM PeltorTM 1073 SV Battery cover
3MT PeltorTM FL6CE/1 Connection cables for external audio input
3.5 mm stereo jack
Important message
3M does not accept liability of any kind, be it direct or consequential (including, but not limited to, loss of profits, business and/ or goodwill) arising from reliance upon any information herein provided by 3M. The user is responsible for determining the suitability of the products for their intended use. Nothing in this statement will be deemed to exclude or restrict 3M's liability for death or personal injury arising from its negligence.
PeltorTM is a brand owned by 3M, St. Paul, MN 55144-1000, USA.
3MTPELTORTM Alert
2. PASSFORM OCH JUSTERING
3.4 Sg after radiostationer
Drej pa kanalvaelgerknappen (A:10).
- Hjelmproducent
- Hjelmmodel
3.Hjelmfaeste (J) - Storrelser: S = Small, N = Medium, L = Large
10. RESERVEDELE/TILBEHØR
3MTM PeltorTM HY81 Hygiejnekit
5. VEDLIKEHOLD/RENGJØRING
8. AD FJARL/EGJA/SKIPTA UM EYRNAPUDA
9.1 Udaje ot timeni hluku, SNR (F)
(F:1) Hlavovy páš
(F:2) Prvok na upevnenie k helme
Vysvetlenie tablky s udajmi o tlmen hluku (F:1, F:2)
- Frekvencia (Hz)
- Prieméré tlmenie (dB)
- Štandardná odchylka (dB)
- Predpokladaná hodnota ochrany (dB)
- Hmotnost'vyrobku
9.2 Vysvetlenie tabl'ky s urovnami kriterii (F:3)
BHHMaHHe! 3ByK n3 dNHaMnKOB yCtpoiCTBa MoKeT MMeT b NHTeHCNBHOCTb, PpeCTaBnaIOyO ONaCHOCTb DnI opraHOB cLyxa npn dNITeJIbHOM Bo3deJcTBnI.
BHHMaHHe! 3Byk n3 dHnAmNKOB yCTpOcTbCa peryIInpoBaHem rPOMKocTn OKpyKaIOuX 3ByKOB MoKet IMeTb INHTeHCNBHOCTb, INpeBbIaIOUyIO INTeHCNBHOCTb OKpyKaIOuX 3ByKOB.
5. UNCTKA IN TEXHNUECKOE OBCJNYKUBAHNE
(E:1-3) Nocne dInTeBHorO HoWeHnHayuHnKOB, a TaKke B Cnyae KOHeHcaun Bnarn B YaWKax, ydaNtB 3ByKoI3OpHyUOuIe BaNkN i 3ByKoNOrIooAIOUe NodyuKn YaWkn HayuHnKOB, orOnOBbe n 3ByKoN3OlnpyUOuIe BaNkN Heo6xOIMO peryIpaHNO uCTntb N de3HHpUPOBaT b NyTem MbITb TepIIOB BOIoC MbllOM. IpeE IOBTOPbIM mNoJIb3OBAHmE HauHnKOB BbICyUHTb nx. PnpMeHaHne. 3AnpeaTcN porpyKaTb N3dJeIe B BODY. PnpMeHaHne. Heo6xOIMO ydoCTOBepNTbcR, yTO hCnoJIb3yEmble MOUSe cpeCTBa He npEdCTabJIHO tOnaCHOt DIOPOBBJ.
6. TEMNEPATypbIXXPAHEHNI3KCIJYATAUIN
Ipeen Hauanom xpaehnna n3dennn Heo6xOIMo n3Bney n3 Hero 3nemeHb IITaHn. XpaHntb npi TemnepaType oT -20do +55°C.
7. YTNJN3AUIN
HactoIeue H3dJIne COOTBETCTBye Tpe6oBaHnM DnpeKTHbI EC 06 oTxOaX 3JKeTpuYeCKoro n 3JeKtpoHHoro o6OpyDoBaHn. CNeDyUoIee Tpe6oBaHnpeacnpocTpaHreTcHa cTpaHb Ebponeckoro Co03a.
3aIpeuaeTcBb6paCbBaTbN3dEneB roPOnckne KOHTeHepblnHecOpTnpoBaHHoro Mycopa!
PepeuepkHytoe n3obpaXeHne MycopHOKOHTeHepa oO3Naayet, YTO yTNIm3aun JIO60r OJIeKTPnuCeCKOr O 3JIeKTPoHHORO oOpyDObAHnA, a TaKke IepBnHbIX 3JIeMeHTOB INtAHnA n AKKyMnyTopOB, DOJINHa
pON3BOiNTBCR B COOTBeCTBmN C Tpe6oBAHnIM DeIcTByUoJeRO B DaHHOM peHNOHe 3aKOHODaTeNbCTBa Chepe3
cIyX6by c6opa OTxOIOB.
8.CHRTNEI3AMEHA3BYKON3OJNPHYIOUXBAJIKNOB
IopuHNTb npaBcAmKpA 3BykON3OInpyUoJero BaNka N BbTnHyTb erO HApyKy (pnc. E:1-3). BCTaBnTb HObbl 3BykON3OInpyUoJn BaNk N HaDaBnTb Ha Hero do UeJnka.
9. TEXHNUECKNE XAPAKTEPNUCTNIKU
9.1 3BykONorIooHne,OTHOWeHne CnHn/WM (Ta5n.F)
F:1.Oronobbe.
F:2.KpenJIeHne Kkacke.
IorchenK Ta6nue 3BykONOrnoueHn (F:1,F:2)
- Yactota, Γι.
2.CpeDHee 3ByKoNOrnloSeHne, d6.
3.CtahapthoeOTKIOHHeHne,16
4.Ппсдпалагаимэффektнвостьзштbl,ДБ. - Macca n3dennia.
9.2 TocchenK Ta5nue nporobbix ypOBne (Ta6n.F:3)
Ioporobb uyOBeh - 3TO ypoBeb uyma (n3MepeHHb kak ypoBeb 3ByKOBO r daBHeHr no shKane A) 3a npedamn cpeCTBa 3aunTbI opraHOB cnlyxa, daoui Bnytpn Hrero ypoBeb 85 n6 (A). 3naueHne noporoboro ypOBHr 3abncnt ot qactOTHO r CNEKTpa 3Byka.
H-3ByKoNOrnloSeHneIa 3ByKOB BbICOKOaCTOTbl.
M-3BykONorNoeHneIa 3ByKOB cpeHne YaCToTbI.
L-3ByKoNOrnloUeHHeIa3ByKOB Hn3KoU qAToTbI.
9.3. PioaehnK Ta6nue nCbTaHn N ceptnkaun
(H:1)Издени COOTBETCTBye Tpe6OBaHЯm CneIyUOxN DnpeKTHB. 3TO O3Haayetero COOTBeTCTBNE Tpe6OBaHЯm,прдяВлЯсьIM K ИЗдени M МарКИРОВКоI CE.
(H:2) N3eJIne 6bIIO nCbI TaHO n cepTnΦuPobAO coIaCHO Tpe6oBaHnM CJIeDyUOx CTAnApTOB:
(H:3) Ceptnuunpyuonn opran:
9.4 TOncHEnnK Ta6JInue Kacok (Ta6J.I)
YcTpoIcTBo DOJIXHO IcNoJIb3OBAbCra TOnbKO Cpa6OuIMN Kackamn,pepeuCNEHbIMN B Ta6J.1
1.ПоиЗБОДТЕЛКСИ.
2. Moenb Kackn.
3. Kpenenne Hne K kace. (J)
4. Pa3mepbI: S = mJIbI, N = cpeHnI, L = 6oJIbIoI.
10. 3ANACHbIe YACTn I DOONJIHHTeJIbHbIe INPINAADJEXKHOCTN
11.CPOK CJYXbI IN IAPAHTN
Cpok cnkykbbln3deJnna coctabnre 5 let c daTbI n3roTOBHeHn npn ycNOBn 3KcNpyataunn o6cnykBaHn B COOTBETCTBm C hactoJe HnCTpyKneB. B cnYae noIOMKn n3deJnna, dnn ocUeCTBHeHn peMOHTa obpaNTecb B cepBnchbln ceHtp. N3deJnna, He noNDexKaunne BOCCTAHOBHeHIO, DOJKNbI 6bITb 3aMeHeHbl.
IaTa I3rOToBnHn BxOHT B COCTAB CepiHOrO Homepa N3dEInna, KOtOpb HaneuataH Ha cepe6pncTOM CTnKepe HAKJIeEHHom Ha 3dEInne. CepiHbH HOMep npeCtabIaTe coboi nocJeIOBaTeIbHOcTb n3 deCrtn UINpp, rIe nepBbIe DBe UINPbI O603HaAOT HeDJIIO I3rOToBnHnA, a CNEyUoJne DBe - roD I3rOToBnHnA. HanpIMep, ecNI cepiHbH Homep npOdykTa IMeET BID 0112XXXXXX, 3TO O3NaHaet, YTO OH 6bl IN3rOToBnH Ha nepBoH HeJeNe 2012 roJa.
TapaHTnHbI cpoK coCTaBJIeT 1 roD c DaTbI npOdaJx KOHeuHOMy noJIb3oBaTeJIIO. IOpO6Ha nHΦopMaζry o6 ycNoBnx rapaHTnHOrO 6cbnyKunBaHHn npVeBeHa B rapaHTnHOM TaHOhe.
12. INΦOPMAUЯOB OБОБ3ATEJIbHOM NOДTBEPXDEHIM COOTBETCTBIA
CpeCTBO uHINBnDyAubHO 3aunTbO oprHa cnyx oMexAHuecknx BO3deCTBn (onacbix ypOBHe Wyma).DaHHbI npOyKT npoWeI npOeDpy obraTeBHO rIOITBepXDeHn COOTBeCTBn Tpe6oBaHnM TexHnueckoro pernaMeTa TaMOxHeHOro co103a TP TC 019/2011 «O 6e3oNaChocn CpeCTB uHNBnDyAubHO 3aunTb» B opMe DeKnapoBaHn COOTBeCTBn I MapKnipobAH eHNbIM 3HaKOM oBaUeHn IpoDyKUn Ha pbIHke roCydapCTB-NeHOB TaMOxHeHOro co103a.
-Edinb3nokobpaueHn npodykunnHa pbIHKe rocyapCTB-HeHOB TaMOKeHHOro co03a DaHoe CN3 coOTBeTcByET Tpe6OBaHm HauHOHaNbHoro cTaHApTa PΦ FOCT P 12.4.255-2011 CnCTema cTaHApTOB 6e3OpacHocTn Tpyd.ApeCTBa HnduaybHo 3aunTbI opraHa cnyxa.Osune TexHueckne Tpe6OBaHn. MexAHueckne MeToDbI NCblItahn
IOpnduueckn aDpec n3rObnteJia:
3M LWeuAB, MaIbMcTeHc 19, Baphamo, SE-331 02 LWeu
CdeNaHO B WBeuM
3MTPELTORTM Alert
Stitnik za uši s FM radiouredajem, radom koji ovisi o razini zvuka i mogućnosću priključivanja vanjske opreme.
Prije upotrebe pažljivo pročitajte ove upute i spremite ih za buduce korištenje.
3.4 TbpcheHa paadno cTaHcnn
3aBbptete 6yToHa 3a TbpcHe Ha KaHann (A:10).
3.5 Perynnpahe Ha 3abncmata OT HNBOTo cyHKUma (OKOJEN 3ByK)
3aBbptTe 6yToHa Ha 3aBcImMaTa OT HbTO fynKuJn (A:11).
3a6eJekka! Korato Ta3n cyHKuIe e n3KJIouHe HaMa da yyeTe HnKaKbB OKoJeH 3ByK, KoTo MoKe Da 6bDe OnaCHO.
3.6 BbHueh aydno BXoJ
BkHouTe CnyuajKIne, KaTTo e OnncaHO B 3.2. HamaneTe 3Byka Ha paAnoto Do MNHmAJHo HnBO. CbpxKeTe Baunr BbHseH ayDIO n3TOUHK Upe3 3.5 MM cTepeo Jxak.
3a6eJekka! BIXTe MaKcImaJIHnIa DonyCtMn BbHWeH ayDIO CnIHan Ba6NIca G.
4. BAXHA INΦOPMALU 3A NOTPENEJI
3M Australia Pty. Limited
Building A, 1 Rivett Road
North Ryde, N.S.W. 2113
+61 1800 024 464
Austria
3M Österreich GmbH
"BRIDGE Plaza" 4th floor,
12 Bakikhanov street Baku AZ 1065
+994 12 404 5050
Belarus
3M Belarus Representation Office
Mogilevskaya str 18, office 4220007
Minsk
+375 172 22 97 90
Belgium
3M Belgium N.V./S.A.
Hermeslaan 7
1831 Diegem
+32 2 722 53 10
Bulgaria
3M Bulgaria Representation Office
1715 Sofia, Mladost 4Business Park, sgrada 4
+359 2 960 19 11
China
41/F, Maxdo Centre, No.8 Xing Yi Rd.
Hong Qiao Development Zone Shanghai,
200336 China
+86 021 22103047
Croatia
3M Croatia Representation Office
Predstavništro, Žitnjak bbHRA 10000
Zagreb
+38512499750
Czech Republic
3M Cesko, spel. s r.o.
V Parku 2343/24
140 00 Praha 4
+420 261 380 111
Denmark
3Ma/s
Fabriksparken 15
DK-2600 Glostrup
+4543480100
Egypt
3M Egypt
Sofitel Tower,
Corniche el-Nil St.
19th Floor, Maadi, Cairo
+20225259007
Estonia
3M Eesti filial
Mustamae tee 410621 Tallinn
+3726115900
Finland
Suomen 3M Oy PL 90,
Lars Sonckin kaari 602601
Espoo
+358952521
France
3M France
Bd de I'Oise
PLC3M Centre, Cain Road Bracknell,
RG12 8HT
+448706080060
Greece
3M Hellas Limited
Knpioc 20151 25 Mapouoi,
Aerva-Mapouai
+30 210 68 85 300
Hungary
3M Hungária Kft.
Corporate Office, Concorde Block, UB City,
24Vittal Mallya Road Bangalore - 560001
+918066595759
Ireland
3M Ireland
3M House, Adelphi Centre,
Upper Georges Street Dun Loaghaire,
Co. Dublin
+353 1800 320 500
Israel
Tn nnnnnnn 3M y
2042.1n91
Italy
3M Italia S.p.A.
Loc. San Felice-Via San Bovio 3
20090Segrate (MI)
+39800802145
Kazakhstan
3M Kazakhstan Representation Office
3M Morocco La Colline II, N°33 Rdc,
Route de Nouasser, Sidi Maarouf
Casablanca
+212 22 977 977
Netherlands
3M Nederland B.V.
Industriebweg 24
2482 NW Zoeterwoude
+310715450450
New Zealand
3M New Zealand Limited
94 Apollo Drive, Rosedale, AUCKLAND 0632
+64 (0)800 364 357
Norway
3M Norge A/S,
Avd. Verneprodukter, Postboks 100,
3M Pakistan (PVT) Ltd.
Islamic Chamber of Commerce Building ST-2/A,
Block 9, KDA Scheme 5,
Clifton-Karachi 75600
+9221111225536
Poland
3M Poland Sp. z o.o.
Aleja Katowicka 117, 05-830 Nadarzyn
Bucharest Business Park,
Krylatsky Hills Business Park,
Krylatskaya st., 17, bldg. 3
121614 Moscow
+74957847474
Serbia
3M Representation Office
Beograd Milutina Milankovica 2311070
Novi Beograd
+381 11 3018459
Slovakia
3M Slovakia Representation Office
Obchodné zastupitelstvo
Vajnorska 142,83104 Bratislava
+421 2 491 05 211
Slovenia
3M (East) AG
Podruznica v LjubljaniCesta v Gorice 8,
SI-1000 Ljubljana
+386 1 2003 630
South Africa
3M South Africa
146a Kelvin Drive, Woodmead Sandton
2128 Rivonia
+27 011 806 2355
Spain
3M España,
S.A.Juan Ignacio Luca de
Tena 19-25, 28027 Madrid
+34 91 321 60 00
Singapore
3M Singapore Pte Ltd
3M Technologies (Singapore) Pte Ltd
1 Yishun Avenue 7
Singapore 768923
(65) 6450 8888 (Yishun)
Sweden
3M Svenska AB
Bollstanäsvagen 3
191 89 Sollentuna
+468922100
Switzerland
3M (Schweiz) AG
Eggstrasse 93,
6F, NO. 95, Dunhua S. Rd.,
Sec. 2 Taipei, Taiwan
886227049011
Turkey
3M Sanayi ve Ticaret A.S.
Sehit Sinan Eroglu Cad
Suryapi Akel Is Merkezi No:6
A Blok Kavacik Beykoz
34805 Istanbul
(90) 2165380777
Ukraine
3M Ukraine30-B,
Fizkulture St., Business center"Farenheit"
3rd floor, Kyiv, 03680,
+380444905777
United Arab Emirates
3M Gulf Ltd
P.O.Box 20191 Building 11,
Third Floor, Dubai Internet City,
Deira
+97143670777
3M
3M Svenska AB
Box 2341
SE-331 02 Varnamo
Sweden
Phone: +46 (0) 370 65 65 65
Fax: +46 (0) 370 65 65 99
Email: peltorcommunications@mmm.com
Internet: www.3M.com/Peltorcomms
Please recycle. Printed in Sweden.
© 3M 2013. All rights reserved.