
SpeediMo 360C - Lawn mower FLYMO - Free user manual and instructions
Find the device manual for free SpeediMo 360C FLYMO in PDF.

| Product Type | Electric rotary lawn mower |
| Brand | Flymo |
| Model | SpeediMo 360C |
| Rated Power | 1500 W |
| Supply Voltage | 230 V AC |
| Frequency | 50 Hz |
| Cutting Width | 36 cm |
| Cutting Height Adjustment | 20 to 60 mm (5 positions) |
| Grass Box Volume | 30 L |
| Weight | 11.8 kg |
| Blade Speed | 3700 rpm |
| Sound Pressure Level | 87 dB(A) |
| Guaranteed Sound Power Level | 93 dB(A) |
| Hand/Arm Vibration | 2.3 m/s² |
| Power Source | Mains (corded) |
| Main Functions | Lever start + safety button, height adjustment, grass box |
| Maintenance | Brush cleaning; blade replacement after 50 hours or 2 years |
| Safety | Double insulation; motor stops when lever released; protection against projections |
| Spare Parts Available | Replacement blade (ref. 590605190 / Art. FLY071) |
| Supplied Accessories | Grass box, adjustable handle |
| Intended Use | Family garden lawn; do not use on slopes >20° |
Frequently Asked Questions - SpeediMo 360C FLYMO
User questions about SpeediMo 360C FLYMO
0 question about this device. Answer the ones you know or ask your own.
Ask a new question about this device
Download the instructions for your Lawn mower in PDF format for free! Find your manual SpeediMo 360C - FLYMO and take your electronic device back in hand. On this page are published all the documents necessary for the use of your device. SpeediMo 360C by FLYMO.
USER MANUAL SpeediMo 360C FLYMO
1 Start/stop lever
2 Lock off button
3 Cable clip
4 Wing knob
5 Lower handle
6 Safety guard
7 Upper handle
8 Grassbox upper
9 Motor cover
10 Wheel
11 Deck
12 Grassbox lower
13 Height adjust lever
A1A2
B1
B2
B3
B4
C
D1
D2

E
F
Measuring process complying with: 1) EN IEC 62841-4-3 2) RL 2000/14/EC / S.I. 2001 No.1701
https://www.flymo.com/uk/content/contact-us
10. ENTSORGUNG
Original instructions.
1.SAFETY 8
2.ASSEMBLY 9
3. OPERATION 10
4.MAINTENANCE 10
5. STORAGE 11
6.TROUBLESHOOTING 11
7. TECHNICAL DATA 11
8 ACCESSORIES/SPARE PARTS 11
9. SERVICE 11
10.DISPOSAL 11
This product may be used under supervision, or if instruction regarding the safe use of the product has been provided and the resulting dangers have been understood, by children aged 8 and above, as
well as by persons with physical, sensory or mental disabilities or a lack of experience and knowledge. Children must not be allowed to play with the product. Cleaning and user maintenance must not be performed by children without supervision. The use of this product by young people under the age of 16 is not recommended.
1. SAFETY
1.1 Symbols on the product

Read operator's manual.
WARNING!
Be careful of parts being ejected-keep bystanders away.
WARNING!
Keep the mains cable away from the blades (not applicable to cordless mowers).

ARNING!
Keep hands and feet away from the blades.

WARNING!
Unplug the mains plug before maintenance or if the mains cable is damaged (not applicable to cordless mowers).

WARNING!
Disconnect the battery before maintenance.

WARNING!
Remove the locking device before maintenance (not applicable to cordless lawnmowers without locking device).
1.2 General safety instructions
1.2.1 General machine safety warnings

WARNING!
Read all safety warnings, instructions, illustrations and specifications provided with this machine.
Failure to follow all instructions listed below may result in electric shock, fire and/or serious injury.
Save all warnings and instructions for future reference.
The term "machine" in the warnings refers to your mains-operated (corded) machine or battery-operated (cordless) machine.
1) Work area safety
a) Keep work area clean and well lit. Cluttered or dark areas invite accidents. b) Do not operate machines in explosive atmospheres, such as in the presence of flammable liquids, gases or dust. Machines create sparks which may ignite the dust or fumes.
c) Keep children and bystanders away while operating a machine. Distractions can cause you to lose control.
2) Electrical safety
a) Machine plugs must match the outlet. Never modify the plug in any way. Do not use any adaptor plugs with earthed (grounded) machines. Unmodified plugs and matching outlets will reduce risk of electric shock.
b) Avoid body contact with earthed or grounded surfaces, such as pipes, radiators, ranges and refrigerators. There is an increased risk of electric shock if your body is earthed or grounded.
c) Do not expose machines to rain or wet conditions. Water entering a machine will increase the risk of electric shock.
d) Do not abuse the cord. Never use the cord for carrying, pulling or unplugging the machine. Keep cord away from heat, oil, sharp edges or moving parts. Damaged or entangled cords increase the risk of electric shock.
e) When operating a machine outdoors, use an extension cord suitable for outdoor use. Use of a cord suitable for outdoor use reduces the risk of electronic shock.
f) If operating a machine in a damp location is unavoidable, use a residual current device (RCD) protected supply. Use of an RCD reduces the risk of electric shock.
3) Personal safety
a) Stay alert, watch what you are doing and use common sense when operating a machine. Do not use a machine while you are tired or under the influence of drugs, alcohol or medication. A moment of inattention while operating machines may result in serious personal injury.
b) Use personal protective equipment. Always wear eye protection. Protective equipment such as dust mask, non-skid safety shoes, hard hat, or hearing protection used for appropriate conditions will reduce personal injuries.
c) Prevent unintentional starting. Ensure the switch is in the off-position before connecting to power source and/or battery pack, picking up or carrying the machine. Carrying machines with your finger on the switch or energising machines that have the switch on invites accidents.
d) Remove any adjusting key or wrench before turning the machine on. A wrench or a key left attached to a rotating part of the machine may result in personal injury.
e) Do not overreach. Keep proper footing and balance at all times. This enables better control of the machine in unexpected situations.
f) Dress properly. Do not wear loose clothing or jewellery. Keep your hair and clothing away from moving parts. Loose clothes, jewellery or long hair can be caught in moving parts.
g) If devices are provided for the connection of dust extraction and collection facilities, ensure these are connected and properly used. Use of dust collection can reduce dust-related hazards.
h) Do not let familiarity gained from frequent use of machines allow you to become complacent and ignore tool safety principles. A careless action can cause severe injury within a fraction of a second.
4) Machine use and care
a) Do not force the machine. Use the correct machine for your application. The correct machine will do the job better and safer at the rate for which it was designed.
b) Do not use the machine if the switch does not turn it on and off. Any machine that cannot be controlled with the switch is dangerous and must be repaired.
c) Disconnect the plug from the power source and/or remove the battery pack, if detachable, from the machine before making any adjustments, changing accessories, or storing machines. Such preventive safety measures reduce the risk of starting the machine accidentally.
d) Store idle machines out of the reach of children and do not allow persons unfamiliar with the machine or these instructions to operate the machine. Machines are dangerous in the hands of untrained users.
e) Maintain machines and accessories. Check for misalignment or binding of moving parts, breakage of parts and any other condition that may affect the machine's operation. If damaged, have the machine repaired before use. Many accidents are caused by poorly maintained machines.
f) Keep cutting tools sharp and clean. Properly maintained cutting tools with sharp cutting edges are less likely to bind and are easier to control.
g) Use the machine, accessories and tool bits etc. in accordance with these instructions, taking into account the working conditions and the work to be performed. Use of the machine for operations different from those intended could result in a hazardous situation. h) Keep handles and grasping surfaces dry, clean and free from oil and grease. Slippery handles and grasping surfaces do not allow for safe handling and control of the machine in unexpected situations.
5) Service
a) Have your machine serviced by a qualified repair person using only identical replacement parts. This will ensure that the safety of the machine is maintained.
1.2.2 Lawnmower safety warnings
D) Do not use the lawnmower in bad weather conditions, especially when there is a risk of lightning. This decreases the risk of being struck by lightning.
b) Thoroughly inspect the area for wildlife where the lawnmower is to be used. Wildlife may be injured by the lawnmower during operation.
c) Thoroughly inspect the area where the lawnmower is to be used and remove all stones, sticks, wires, bones, and other foreign objects. Thrown objects can cause personal injury.
Before using the lawnmower, always visually inspect to see that the blade and the blade assembly are not worn or damaged. Wom or damaged parts increase the risk of injury.
e) Before use, check the supply cord and any extension cord for signs of damage or aging. Do not use the lawnmower if the cord is damaged or worn. If the cord is damaged or worn during use, switch off the lawnmower and do not touch the cord before disconnecting it from the supply. A damaged supply cord or extension cord may result in electric shock, fire and/or serious injury.
f) Check the grass catcher frequently for wear or deterioration. A worn or damaged grass catcher may increase the risk of personal injury.
g) Keep guards in place. Guards must be in working order and be properly mounted. A guard that is loose, damaged, or is not functioning correctly may result in personal injury.
h) Keep all cooling air inlets clear of debris. Blocked air inlets and debris may result in overheating or risk of fire.
) While operating the lawnmower, always wear non-slip and protective footwear. Do not operate the lawnmower when barefoot or wearing open sandals. This reduces the chance of injury to the feet from contact with the moving blade.
) While operating the lawnmower, always wear long trousers. Exposed skin increases the likelihood of injury from thrown objects.
Do not operate the lawnmower in wet grass. Walk, never run. This reduces the risk of slipping and falling which may result in personal injury.
) Do not operate the lawnmower on excessively steep slopes. This reduces the risk of loss of control, slipping and falling which may result in personal injury.
m) When working on slopes, always be sure of your footing, always work across the face of slopes, never up or down and exercise extreme caution when changing direction. This reduces the risk of loss of control, slipping and falling which may result in personal injury.
n) Use extreme caution when reversing or pulling the lawnmower towards you. Always be aware of your surroundings. This reduces the risk of tripping during operation.
a) Keep the supply cord away from the cutting blades. A damaged supply cord may result in electric shock, fire and/or serious injury.
p) Switch off and remove plug from mains if the cord is entangled or damaged. Entangled or damaged cords can increase the risk of electric shock.
Q) Do not touch blades and other hazardous moving parts while they are still in motion. This reduces the risk of injury from moving parts.
r) When clearing jammed material or cleaning the lawnmower, make sure all power switches are off and the power cord is disconnected. Unexpected operation of the lawnmower may result in serious personal injury.
1.3 Additional safety instructions
1.3.1 Intended use
The FLYMO Lawnmower is intended to mow lawn in private domestic gardens and allotments. The product is not intended for long term use.

DANGER! Risk of injury!
Do not use the product to cut bushes, hedges, shrubs and perennials, to cut climbing plants or grass on roofs or on balconies, to crush branches and twigs, and to compensate for irregularities in the ground.
Do not use the product on slopes with an inclination of more than 20^
1.3.2 Additional electrical safety instructions

DANGER! Risk of cardiac
This product generates an electromagnetic field during operation. This electromagnetic field may affect the functionality of active or passive medical implants (e.g. pacemakers), which may result in serious injury or death.
Consult your doctor and the manufacturer of your implant before using this product.
Remove the plug when you are not using the product.
Cables
If extension cables are used, these must comply with the minimum cross-sections in the table below:
Voltage Cable length Cross section
220-240V/50HzUp to 20 m 1.5 mm²
220-240V/50Hz20-50m2.5mm²
- Mains cables and extensions are available from your local Approved ServiceCentre.
- Only use extension cables specifically designed for outdoor use and which conform to one of the following specifications:
Ordinary rubber (60245 IEC 53), Ordinary PVC (60227 IEC 53) or Ordinary PCP (60245 IEC 57).
- If the connection lead is damaged, it must be replaced by the manufacturer, its service agent or similarly qualified persons in order to avoid a hazard.
1.3.3 Additional personal safety instructions

DANGER! Risk of suffoc
Smaller parts can be swallowed.
Keep toddlers away when you assemble the product.
Stop the machine, remove the mains plug from the mains socket and wait for all moving parts to come to a complete stop.
If the machine hits a foreign object:
In this case, inspect the machine for damage and repair it before restarting and operating it again.
If the machine begins to vibrate abnormally:
In this case, immediately inspect the machine for damage, replace or repair damaged parts and inspect and tighten any loose parts.
→Before mowing, check the area to be mowed for hidden objects such as branches and remove them. This will reduce the risk of the cutting tool becoming jammed.
Stop the cutting tool if the machine needs to be tilted for transport when crossing surfaces other than grass and when transporting the machine to and from the mowing area.
Do not tilt the machine when the motor is switched on.
Empty the grass catcher before storing.
Recommendation: Perform cleaning and maintenance work before storing.
Service the machine regularly. This increases the life span of the machine.
Use only FLYMO-approved spare parts. Inappropriate spare parts can cause injuries or damage the machine.
Do not modify any safety components. Modifying safety components increase the risk of injury.
Take care when adjusting the machine. This prevents fingers from being caught between the moving cutting tool and stationary parts of the machine.
→Always allow the machine to cool before storing.
When performing maintenance on the cutting tool, be aware that the cutting tool can still move after it has been switched off.
Recommendation: Wear hearing protection.
Danger of slipping:
-in wet grass
-on steep slopes
- during transport
Do not overload the mower.
Be careful while going backwards.
2. ASSEMBLY

DANGER!
Risk of cutting injury from the blade.
If the product starts unintentionally, people can be injured by the blades.
Wait until the blade stops.
Disconnect the product from the power supply.
Wear protective gloves when assembling the product.
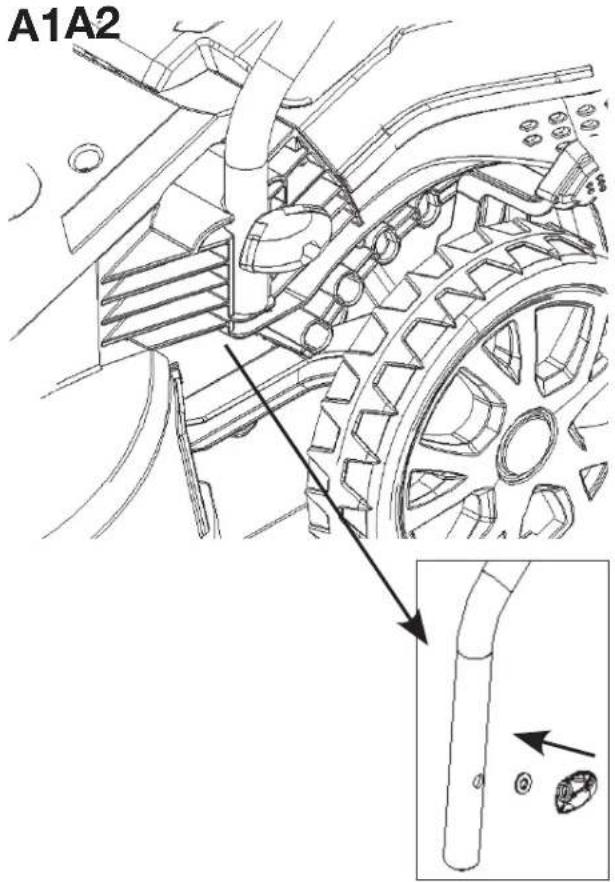
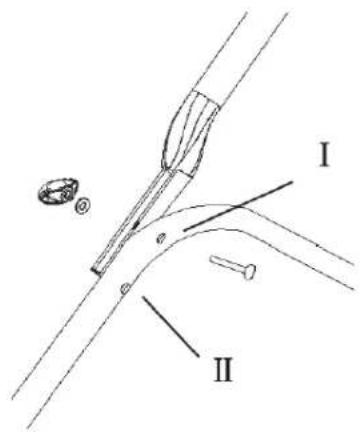
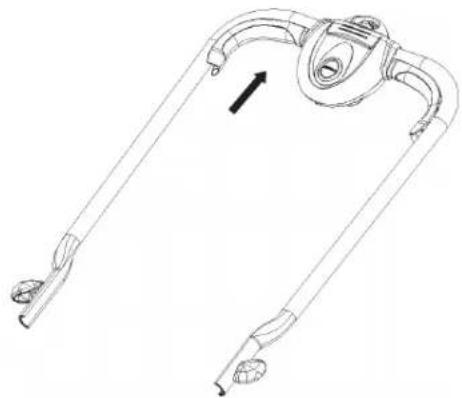
2.1 To assemble the handle [Fig. A1 / A2]:
- Insert the lower handles into the holes provided in the deck.
Secure with the wing knob (Fig. A1). - Attach the upper handle to the lower handles with the wing knob (Fig. A2).
The upper handle is height adjustable. The handles can be fixed in position I or II as desired (Fig. A2).
NOTE: Ensure that the cable clips are used to fix the cable to the handle.
Attach the cable to the cable hook ensuring that sufficient cable slack is available.
Ensure the cables are not trapped when folding and unfolding the top handles. Do not drop the handles.
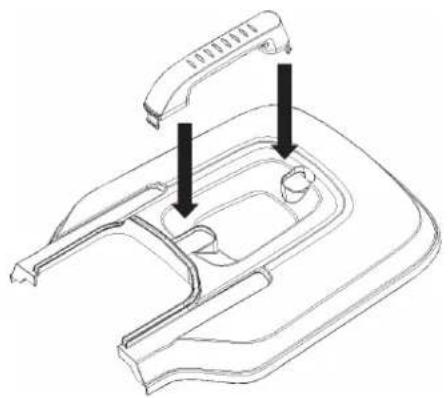
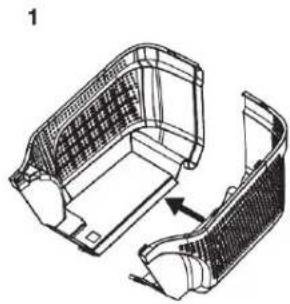
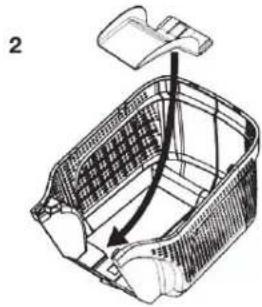
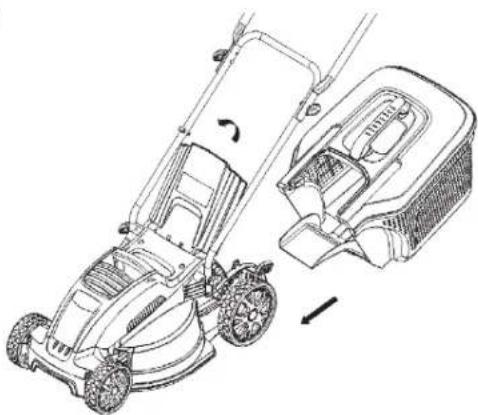
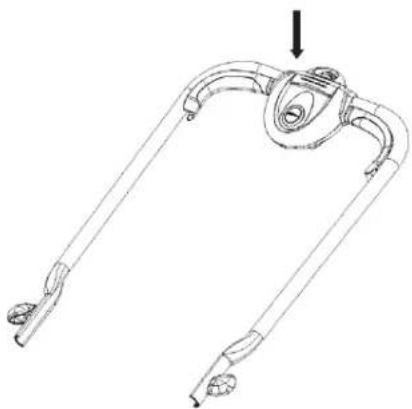
2.2 To assemble the grass box [Fig. B1/B2/B3/B4]:
- Push the grassbox handle into the slots in the grassbox upper until it clicks securely into position (Fig. B1).
- Connect the two parts of the grassbox together, then install the tongue (Fig. B2).
- Starting at the rear of the grassbox, install the grassbox cover into the grassbox with the clips.
Ensure all clips are correctly located (Fig. B3).
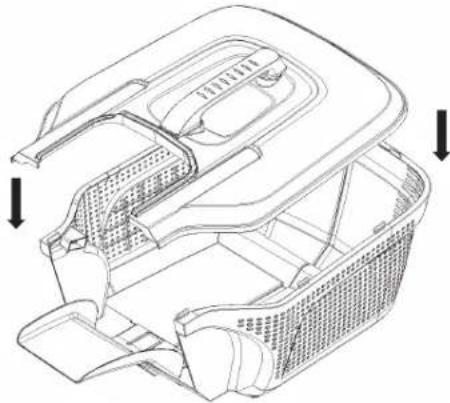
- Attach the complete grassbox to the lawnmower (Fig. B4).
a. Lift the safety guard.
b. Make sure the discharge chute is clean and free from debris.
c. Install the fully assembled grassbox onto the location points at the rear of the deck as illustrated.
d. Place the safety flap on top of the grassbox.
NOTE: If you do not want to collect the grass, the lawnmower can be used without the grassbox. The safety guard must be in the down position.
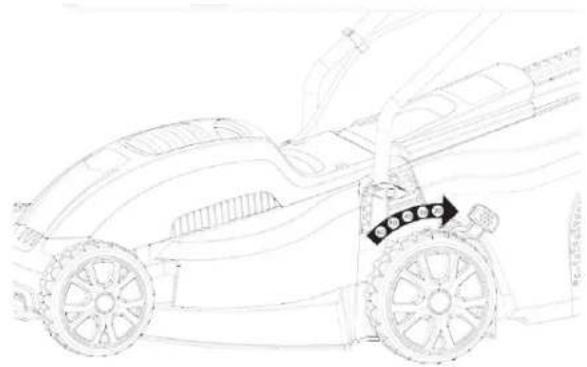
2.3 To adjust the cutting height [Fig. C]:
WARNING!
Risk of injury due to rotating blades.
The blades continue to rotate for a few seconds after the machine is switched off. A rotating blade can cause injury.
→Wait until the blade stops before you adjust the height.
Five cutting heights are available on this product.
Adjust the cutting height by moving the height adjustment handle (Fig. C).
NOTE: A medium height of cut is recommended for most lawns.
3. OPERATION
DANGER!
Risk of cutting injury from the blade.
If the product starts unintentionally, people can be injured by the blades.
→Wait until the blade stops.
Disconnect the product from the power supply.
Wear protective gloves when adjusting or transporting the product
3.1 To start the mower [Fig. D1/D2]:
DANGER! Risk of injury
Risk of injury if the product does not stop when the start lever is released.
Do not bypass the safety device or switches.
For example, do not attach the start lever to the handle.
Do not make any changes to the product that are not described in this manual.
3.1.1 To start
- Squeeze the start / stop lever (Fig. D1) towards the handle.
- Press and hold the safety button (Fig. D2).
- Release the safety button.
Make sure the blade stops rotating before switching on again.
Do not rapidly switch on and off.
3.1.2 To stop
Release the pressure on the start / stop lever.
3.2 How to mow:
- Start mowing the edge of the lawn nearest to the power point so the cable is laid out on the lawn you have already cut (Fig. E).
- Mow twice a week during the growing season. Your lawn will suffer if more than a third of its length is cut at one time.
DO NOT OVERLOAD YOUR LAWNMOWER.
Mowing long thick grass may cause the motor speed to drop. You will hear a change in the motor sound. If the motor speed drops you may overload your lawnmower which may cause damage. When mowing in long thick grass a first cut with the cutting height set higher will help reduce the load. See Adjusting the cutting height.
4. MAINTENANCE
DANGER! Risk of cutting
If the product starts unintentionally, people can be injured by the blades.
Wait until the blade stops.
Disconnect the product from the power supply.
Wear protective gloves when maintaining the product.
4.1 Service recommendations
Your product is uniquely identified by a silver and black product rating label.
We strongly recommend that your product is serviced at least every twelve months, preferably by a professional.
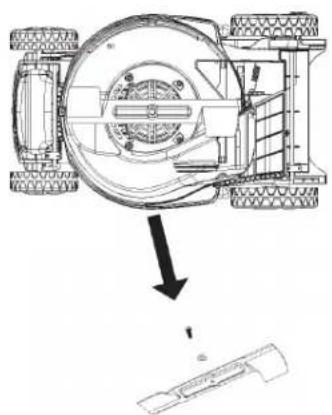
4.2 Removing and fitting the blade:
WARNING!
Risk of injure due to sharp edges.
→Always handle the blade with care.
Wear protective gloves.
Never use more than 3 cutting height spacers.
Spacers must only be fitted between the blade and the fan and
NEVER between the blade and the bolt.
- Switch off, wait until the blade has stopped rotating.
- Disconnect the product from the mains electricity supply.
- Remove or refit the blade.
4.2.1 Removing the blade:
- To remove the blade bolt, hold the blade firmly with a gloved hand and with a spanner, loosen the blade bolt by turning it anti-clockwise (Fig. F).
- Remove the blade bolt, washer and blade.
- Inspect for damage and clean as necessary.
Renew your metal blade after 50 hours mowing or 2 years, whichever is sooner, regardless of condition.
If the blade is cracked or damaged replace it with a new one.
4.2.2 To fit the blade:
- Fit the blade to the shaft with the sharp edges of the blade pointing away from the shaft.
- Re-assemble blade bolt through the washer and the blade.
- Hold the blade firmly with a gloved hand and tighten the blade bolt firmly with a spanner. Do not over tighten.
4.3 To clean the mower
DANGER! Risk of injury!
Risk of injury and risk of damage to the product.
Do not use water or a water jet (especially a high-pressure water jet) to clean the product. This can damage the product or allow water to penetrate the electrical components and cause corrosion or short circuits.
Do not clean with chemicals, including petrol or solvents. Some can destroy critical plastic parts.
WARNING! Fire hazard due to
Grass clippings left in any of the air intakes or under the deck could become a potential fire hazard.
The airflow slots must always be clean.
After receiving your lawnmower from the manufacturer, it is very important that you keep your unit clean.
- Disconnect lawnmower from the mains electricity supply.
- Remove grass from under the deck with a brush.
- Using a soft brush, remove grass clippings from all air intakes, the discharge chute and the grassbox.
- Using a soft brush, remove grass clippings from the vision window (if equipped).
- Wipe over the surface of your lawnmower with a dry cloth.
5. STORAGE
5.1 To put into storage [Fig.S1]
The product must be stored away from children.
- Disconnect the mower from the mains.
- Clean the mower (see 4. MAINTENANCE)
- The cable hooks must both be on the upper handle. Wrap the cable in a figure of 8.
- Store the mower in a dry, enclosed and frost-free place.
5.2 Storing your cable:
Your electric cable can be wrapped around hooks to enable tidy and safe storage.
5.3 Storing your lawnmower:
Store in a dry place where your lawnmower is protected from damage.
Loosen the wing knobs to enable the handles to be folded over the product ensuring that the upper handle is supported.
5.4 At the end of the mowing season:
- Replace bolts, nuts or screws, if necessary.
- Clean your lawnmower thoroughly.
- Make sure that the electric cable is stored correctly to prevent damage.
6. TROUBLESHOOTING

DANGER!
Risk of cutting injury from the blade.
If the product starts unintentionally, people can be injured by the blades.
→Wait until the blade stops.
Disconnect the product from the power supply.
Wear protective gloves when troubleshooting the product.
6.1 Fails to operate:
- Is the correct starting procedure being followed?
See To start the lawnmower. - Is the power turned on?
- Check the fuse in the plug. Replace if blown.
6.2 Poor grass collection:
- Disconnect from the mains electricity supply.
- Clean the outside of the air intakes, the discharge chute and the underside of the deck.
- Raise to a higher height of cut. See Adjusting the cutting height.
6.3 Excessive vibration:
- Disconnect from the mains electricity supply.
- Check that the blade is fitted correctly.
- If the blade is damaged or worn, replace it with a new one.
6.4 Lawnmower becomes heavy to push:
- Disconnect from the mains electricity supply.
- In long grass or uneven ground, the height of cut should be raised to a higher position. See Adjusting the cutting height.
- Check that the wheels and rollers can rotate freely.

NOTE: For any other malfunctions please contact the FLYMO customer service. Repairs must only be done by FLYMO customer service or specialist dealers approved by FLYMO.
7. TECHNICAL DATA
Electric Lawnmower Unit Value
Speedi-Mo 360C 9676634-xx
| Rated power W 1500 | ||
| Mains voltage V (AC) 230 | ||
| Mains frequency Hz 50 | ||
| Speed of rotation cutting blade | R/min | 3700 |
| Cutting width | cm | 36 |
| Cutting height adjustment | mm | 20-60 |
| Volume of grass box | l | 30 |
| Weight | kg | 11.8 |
| Sound pressure level \( {\mathrm{L}}_{\mathrm{{pa}}}{}^{1)} \) | dB(A) | 87 |
| Uncertainty \( {\mathrm{k}}_{\mathrm{{pa}}} \) | dB(A) | 1.5 |
| Sound power level \( {\mathrm{I}}_{\mathrm{{wa}}}{}^{2)} \)measured / guaranteed | dB(A) | 93/94 |
| Hand / arm vibration \( {\mathrm{a}}_{\text{over }}{}^{1)} \) | \( m/s^2 \) | 2.3 |
| Uncertainty \( {\mathrm{k}}_{\text{straw }} \) | 1.5 | |
Measuring process complying with: 1) EN IEC 62841-4-3 2) RL 2000/14/EC / S.I. 2001 No.1701
NOTE: The stated vibration emission value has been measured according to a standardized test procedure and can be used for comparison of one electric power tool with another. It can also be used for preliminary evaluation of exposure. The vibration emission value can vary during actual use of the electric power tool.
8. ACCESSORIES / SPARE PARTS
The FLYMO spare parts are available from your FLYMO dealer or from the FLYMO service.
Only use an original FLYMO blade:
FLYMO replacement blade As replacement for blunt blade. Part. no.: 590605190
Art. FLY071
9. SERVICE
Please find the current contact information of our service on the back page and online:

https://www.flymo.com/uk/content/contact-us
10. DISPOSAL
10.1 Disposal of the product
(In accordance with Directive 2012/19/EU / S.I. 2013 No. 3113)

The product must not be disposed of together with normal household waste. It must be disposed of in line with local environmental regulations.
IMPORTANT!
Dispose of the product through or via your local recycling collection centre.

6.3 Vibrations excessives :
https://www.flymo.com/uk/content/contact-us
10. MISE AU REBUT
6) He pa6oTeTe C MaunHnTe B EKcnnoBnCpeDn, KaTo Hanpnmep
B npncbctBnETo Ha 3aapanm TeuHocTn, ra0Be nn npax. Maunnnte
TIPOWBOKDAT NCKPI, KOVTO MOKO DA TIPODIMBMKAT ZANI/BAHO HA TIPAX HNAMDMH RAQOE.
B)ДрькTe DeцаTn CtpaHnHnTe Ha6IIOaTeJIHa pa3cToHnE, KOraTO
pa60THTe C mAAHNI. OHKJHOBHANH H A BHAMAHMETO MOAT DA PNOYHHRT 3AByGc HA KOHDTN HAD NCTOYMHTe.
2) EneKtpnuecka 6e0nacnoct
a) UenceHnTE Ha MaunHnTa TPR6Ba Da CbOTBeTcBt Ha KOHTaKaTa.
Hnkora He npomeHaTe 1e enceJa no KaKbBTo n da bno haun.
He n3no3BaIe npexoHN uencen 3a 3a3eMeH MaunHH.
HemodnnpaHNTe 1n KcbOTaeTbaauTe NMOKHTAKTu eHaMaIAT
PnCKaOT eNEKTPnueckn ydap.
6) 368raTe KOHTaKT Ha TAnOTo Cbc 3a3eMeHH HnH 3aMaCeHN
NoBbpxHocTH, KaTo HAnpImep Tpbbn, OToNnTeHNr TeNa, NeuKn
XnAINHNIHm. IMA NOBIMBE NpCK OT ENTKPTNHECKN YdAp, Ako BAseto TINO e 33AEMOHO WIMAMACHO
B) He 3nanaire mna nna Hbcknnn bna. Habni3aHTo h Boda 6 MaHHaHTI Ie NnNn nncsOeEETKpHeeCKy npd
r) He n3naraTe wHypa Ha cHNOBb3dEeCTBn. HNKORA He
H3NoI3BaHTe Hypa 3a HocHe, DbpNaHe Nn N3KnIOyBaHe Ha MaunHaTa
OT KOHTaTa. IpbXTe W hypa daneu OT TOnnnHHN N3ToCHNu, MacNo,
ocpn p5b0e mnnnneeece cactm. Tobpehme HmnnnneH WHypoBe BoNnBaB PnCKA OT ENKPNYNECKM YABD.
J)Korato pa6oTHe C MaunHa HABh, H3No3BaHTe ydbnHTeH
Hyp, KOTo e noDxOJa 3a yNoTppe6a Ha oTKpHTo. Hnon3BaHero Ha
hHyp, KOJIe o NdoXdOa 3a yOnTopeBa Na ObKpIto, HAMANBA PmCKa ot eNekTmeckn YUdA.
K) Ako pa6oTaTc MaunHa Ha BnaXHO MRCTo e Hen36eKHa,
N3NOJ3BAIte N3TOUHHK Ha 3axpaHbaHe C DepeKTHOToKOba 3aunTa
(RCD).V3n07BaHTo Ha RCD HAmnBa pCKa ot enektpneckn yap.
3)ПИЧА 6e3oNacHocT
a) bJdete hauepe, BHMABAJIe KaKbI npBaIte N bJdete paacblnIB, Korato pabotne C maHIna. He Icnon3BJIae MaHIna, Korato cTe
HMOpeHN HNI KORATO CTE NOI BINHHNETO HA HApKOTnH, ANKOON HNI NEkapc7Ba. ENMH MNR HEBHMAMHe No BPeme Ha paOta C MaunHHTe MOKe DA BOE DE CEPOM3A TEIECHA NOPEDA.
6) N3no3BaIte IuHn npEpa3HcpeCTBa. BInHaH HocTe 3aunTHN
cpedTba 3a ouHTe. PpeNa3HnTe CpeCTBa, KATO peCnnpaTOpHa MaKa,
Hentbpaanrncn cpeaansnn OOBky. TbeDaa KaKcN MAn HtphOHNsON3Aa 3CbotBEThTHe YcNOnBa, Nue HamaRnT TeNsChTe NOB
B) Nocnrypete, He He Bb3HKnBa HnepeHaMepeHo CTapTnpaHe.
YBepete Ce, Ye npeKBIOyBaTeNaTE B N3KIOOyeHO NOIOXKeHne
Hpei Da CbBpKefe MaunHata KbM N3toCHKa Ha 3axpaHbaHe
HnAkyMylaTopHaTa baTePn, npEn Da nOBnIraTe Hnn npEnacrte.
HoceroRt HauMnC hTabeA tipBra TpeBnOaBmW
TOTIKENHE MOKE DA JOBENE DO 3NIOJNYK
r)OTCTpaHETe BCnKKnIOOBe 3a HAcTpOJa nn raeHN KIOOObE,
PpeHn Da BKNIOHTe MaunHata. Ia64EH KIOH NNN KIOH, KOHO 0 OCTaBEH
3aKpenb Km Bbptaa Ce qact Ha MaWnHata, Moke Da Dobede Do Tenecha Nopeeda.
I) He ce npotraaTe npekomepno. NpOdbpxaTe cTaNHa cToKa
n banaHc npesrnoTo BpeMe. Oba ocHyprBaNo-d06b KoHTpOHa
MaHHaBHeOoayKaBnCmtyauu
e) Hocete noxoadu o6neKno. Hkora He hocete u npokn dpexn
Hnn bNkTy. upbkTe Kocata N dpexnte cn daNeu ot DnBnKeunTE ce
aactn. Wnpok npexn, bnyta nn nla Koc a Morat da 0d4t 3axbaHAn OT
DBINXUENTCEACTN.
K) Ako ca npedocTaBeHH yctpoiCTBa 3a Cbbp3BaHe Ha npncnoc6JIeHH
3a n3cMyKBaHe n c6bnpaHe Ha npax, c6uNTe Tpr6Ba da 6bDat Cbbp3AHN
H3NO3BAHn npabnnHO. 3nON3BaHTo Ha CbDOBc 3a CbOpae Hn pax
MOKe Da HamaNn ONaCHOCTHTe, Cbbp3aHn C npaxa.
3) He no3BOLIaBte OINbT, npHIO6NT OT YecTa yNtpe6a Ha MaunHH,
Da Bn no3BONn Da cTaHeTe He6peXHn N Da nHOpHpAte npNHcunn
Be3onachocT npn paBToa C MaunH. HebpexHOTo NOBedeHHe MOKe 3a
actio of cekyndata da doebe docepo3no HapaaHbahe.
4) ynotpe6a n noDpBkKa Ha MaunHaTa
a) He ynpaxHBAaTe CNIOBn Bb3dEhCTBn Bbpx MaHHaTa.
MaHnHa 3a Baueto npHIOJeHne. IpaHnHata MaHnHaIcBpUINdEHaTaa 3aJaVaNo-OpE nO-BeOncHO Cbc CKoDcTa, 3a KOTe E OVA bDaDAEHa.
6 He MnON3BAAITE MAHNHATA, AOKI pNE BKNIOYBATENRT HRe BKNIOYBA nKNO4Ba. BcKa MaINHa, KORTO He MOKeJa Da cynepaJIbRA C pNEBKOYBATEN, e ONACh I TPOBA Da CE PEMOHIOA.
B)Pa3KaueTe uenCnAOTNtOCHNkHa 3axpaHbAHe N/nnmOTcPahetE akyMnatOpHa7BaTepnToMaHnHa,At KOmoJe Da oCTpAHn, npDn da npabnte KaKbnto H da 6hMoH NaCTPOKn, da CMeHTe PnHdNeXKHOCT NH da cbxpaHbATE MauHH. TeH pReBHTNHPM MEKNa 3a 6e0nachOCT npTeOpTaRaBAT PnCKa EJekTpOHNCTpyMeHTb Ta Dbde BKIOHIO TO HOHNMMHNO.
r) CbxaHBAIte HeN3NONBAAHITe MaHHH N38bH Docera Ha Deua HpeaepaaBaIte Ha Nua, KOTHO He Ca 3ano3HATn C MaHHATA INC TeINHCTpyKUN, da paoTc Hn. MaHHHTe ca ONACHn B pueTe Ha HeooyHnHNotPebETHe.
I) Nodbpaite MaunHnnte n npnaHnEeKHOCTne. IpObePBae 3a paueHTpObaHe mHa 3aHpaHe HaNbKeuHte Ce cactm, CuYBaHe ha actn KAKBTo H a Gnlo npy CbctOnHae, KOTo Moke da NoBHnre Ha paoTata Ha MaunHnata. Ako MaunHnata ce NobpeRn, naIte 3a peMOHT, npdeRa HnONsBeate. MHOTo 3noNOnyKn Ca npnuHHeHOT NOIObDxHnMssHNH.
e) NopdbpkaIte pexeunite HNCTpyMeHTn HatoHeH n UcCTn. PpaHnHO npdaPkaHJepeeku HNCTpyMeHTn c octpn peeku pBbObe ca no-TOyDn 3a orBaBeNe C ne ynpabraRat no-NEcho.
K)NIOI3BAAITE MAHINATA, PnHNAJEXHXOCTNE, NpHCTABKNTE H.T.HCBFACHO TcHNTCPKUN, KATO MHTATE ppeDBYUCNOBNTA INECTBCTO HA paOToTA, KOHO 3bBbpWBe. HIOI30aHETO HA MAUHNATA 3a ONEpaUy, PAaMIVHOT TE3H, 3a KOHO e ppeHdHaayeHA, MOKe Da DOBoDe Do IONACHCITAYu.
3) NpIbPkaTe pkoBxBAtKnTE nOBpXHOCTNE 3a XbaaHe cyxn, cHNTn bEaMaco n CMA3Ka. X1b3ABTpe pkoXBAtKn HIOBpXHOCTN 3a XbaaHe He NoBcBOBaTa BeOcnAChO BCnykBaHe ynpaBHe Ha MaIIHHaT B HeoakBaHn CNYaUa.
5) CepBu3
a) Baulata MauHna Tpr6Ba da ce 6cnyXba cama OT KbaNnMpuHa Nmie no pemOHNTHe cAmc CnEHTNHnpe3ePBn Hactn. TaKa ce rapaHnO, ye He ce 3an3n 6030nACCHTt Ha MaHnHata.
1.2.2IpeDynpexKdHn3a6e3onacHOCTHaKocaykata3aTpeBa
a) He 3n03aTe KOc4kata 3a TpeBa Pn NnoM MeTOPOrOHNH yCNOBn,OCo6eHO KOrATo HMaPCK OMbHN. TOBa HAmARBa PCKa Da bDeTe VdREHnOT MbJHNA.
5) BHIMATEHNOIPOBEPETNIOUHTA, KJDETO CE N3N0N3BA KOCAHKA T3a TPEBA, 3a DNINKOBOTHN. IIO Bpeme Ha paOOTA KOCAHKA T3a TPEBA MOKE DA HAPAHDNIVMIKBHOTHN.
B) NpOBepe TBNMATEIHO NNOU, KbTeO Ue CE H3N0JI3BA KOCaYKaTAtA 3a TPEBA, NOCTPnHeTE BCHKN KAMbHn, npuOBDHnC, KOCTn HpyruyxJyDn npEeMeTn. NxBypIeHHTe npEeMeTn MoRt Da npWHyHRT TeJeHa NoPeJa.
r)IpeHn ynoTpe6a BHHaN npOBepBaBte BN3yAnHO KocAkaKata 3a Tpe8a,3a da ce ybePHTe,ue HOXbT NMOynbT Ha HOXA He ca N3HOcEH HNOBpeEHN NHOceHE Me NIOBpeEHN cactY neMmabat pCKAOT HADAHBHe.
Ⅱ)Ппдзнлбане npobepete 3axpaHbauin N Bcekn ydlnkntenen Hwyp 3a npnsbaun Ha nobpea HnNtHcOBAe. He nIOn3BaTKeKocaykata 3a TpeBa, Anko KaBent O npOBpeDen HnNtHocen A.KaBent ce noBpeDn HnNtHocn No Bpeme Ha yNtOp6ea, N3KnIOueTe Kocaykata 3a TpeBHaNe HnNtNaHTe Ka6ena, npDn Da ro p3aKaYMeT O 3axpaHbAteTo. NpOpeDn 3axpaHbauin Nm YdlnkNToEN Ho KaBON MOKe Da npMvynTHOKOByDap, NOKAp WmN TeKKO HpaHrBAe.
e) NpOBePraBte HcTe KOua 3a TpeBa 3a HnOcbAHH Nn BnOwAbaHe Ha KaHecTbTa. HNocEHHT Nn NIOpeEHN KOW 3a TpeBa MoKe Da yBmH PnCKA OT TEneCA NOpeDa.
X) DpBxTe npEna3ntenHe Ha mrcTo. IppeNa3nteHte Tpa6Ba da ca B nnpabHOCT 3a paObTa N da ca npABINHO MOHTnPAHn. PaXnAbeH, NOpeDeHnn HnpeBAHNO FyHKUHOHPaW nppeNa3nteN MOKc Da DOB6De DO TEnecha NopeDxa.
3) NODbPkae BCHKn BXOHN OTBOPn 3a OXNAHdAaBb3dyHX HCTN OT ONahtbmy. BLOKIPAHNE BTOHn OTBOPm 3a B3dyHX NOCTbUHTe MOKe DaDOEBATNO pERpBaHBe HTH PCKT ONoHk.
N)No Bpeme Ha paboC kocaykaTa 3a TpeBa BNHaHn Hocete Hennb3raun Ce n 3auTHM obyBKn. He paboTe C kocakKaTa 3a TpeBa, KORATO cTe MNn HocTe OTboPepn caHann. ToBa HAMARBA BEPOrTOCTA OHTAPAHNBAe H CTbNAIATA NND KOHTAKC D BDOKELMN CE HOX.
Korato paobTne C kocaykata 3a TpeBa, BnHaH HocTe DbIrn naHTHO. CByeCTyBA BeepoTHOCT OKPNTNE YaCTHa KOKATA Da bDpaHApAHENOT MxEBpHEN PNDEMETM
Ke paoboteTe c KocauKaTa 3a TpeBa B Mokpa TpeBa. XoTe, HNKora He TaHnate.ToRaHAMAnBa pMcKTA OIOXbTb3BaHe N PaHaHe, KOeTo MoKe Da DOBede To TEIECHA NOBEOE.
I) He paobete c kocaykata 3a tpeba no npekanelo ctpbmn HAKLOH. Toba hamaunba pcka O 34y08 ha KOHTPO, noDxvIb3BaH nndahe, KOTo MOKe JDA DIOEDE IO TEJIECHA IIOEOJA.
M) Korato pa6oTne no HAKOHN, BHAHn Ce YEpeBnAte, Ye cTe CTbNnIbdope, BHAHn pa6oTete HAnpeyHO NaHKONHtne, HNKORA hAroge NIMNaHOny, Nb6dete NkIOuHTenHO BHNMaTeHNPi np CMHa Ha NocOKATA. Toba HAMBAIBa PnCK O3r4Ba H KOHTPO, NOxVb3s8eH e NpaHe, KcEOTo M0KeJ Da BODoBe DO TE NcIECHA POEpEDA.
H)БьTeH3KIOUHTeHNO BHHMaTeHn npIN DnBHexHe Ha 3aJeH XoH nnn PnpDpNaHc H KocauKATA 3a TpeBa Km Ce6e Cn. BnHarn BHHMaBaiTe 3a 0b6nKaIaTa OpeA. ToBa HamaJIraBa pNcKa OT peOeOpbuahe NO BOMe Ha paBota.
C)DpBxTe 3axpaHbAunn Hyp daney ot pexeunTe DnCKOB. Ioppehen 3axpaHbAu NHymp MoJe da npEINBnka TOKOB yad, nokap mNm Cepno3HO HadaHBAe
n)Nknohe NTcpaheTe uenCenaOT enekTPOaXpAHBaUATA MPeKa, aKHYbT e 3aannet Hm NOBpeH. 3aennetHm NIOBpeHn WHyPOBE MORAT DA YBENHT PCKA OT TKOB Uydp.
p) He dokocbaite HoKobete n npyHn onaChn DInbHexu n ce cactn,doKato Te BCE oue ce dBHXkAT. ToBa HMaNraRa pCKA OT HApAHBaHe OT DInbHexu CE YACTH.
c) Korato OTCpaHBAte 3aceHn MaTePnH Nn NoNCTBaTe KocAkaKata 3a TpeBa, CeYbePeTe, YceBcKnU PneKcbau Cn HKnIOeHN Ue 3axpaHbAunT uHp e pKaChy. HeoayKaBHOTo 3aJeNCTBaHe Ha KocAkaKata 3a TpeBa MOKe DaNoBeDe Do CepVOnsHa TeneCHe NaOpEpa.
1.3 DOnbHnTeJHn HNCTpyKun 3a 6e30NaCHOCT
1.3.1 PpeHa3NaeHne
Kocaykata Ha tpeba FLYMO e npedha3HaeHa 3a KocHe H MopABn B aactHN DmaHHI rpaHHN napuei. PpOyKbT He e npEHa3HaeH 3a dIroccPOHO HNOON3BAhe.

ONACHOCT! Pnck O T npaHnBaH
He mnoanbae npodykta 3a prhahe Ha xpaactn, kbn nIteTOB,xpaTanaUN TpaHn HacaKdEHN,3a pnahe Ha Blaueu ce paCTeHN ININ TpeBa HA NOKPbUN ININ BaNKOHN, 3a Kbpuhe He KaNHO INOHTA IN3pabHBaaHe Ha HepaBOCTN B NOyBata.
→He pa6oTeTe c npOyKTa HaHaKaIOnH C HaKaIOn H aN 20"
1.3.2 DornHHTenHH HcTpyKun 3a enektpuecka 6e3onacnoct

ONACHOCT! Pnck ot cnnpahe n
To3n npOkyTReHepnpa eNkTpomarHHTHo NOe NO Bpeme Ha pa60ta.ToBa enektpomarHHTHo NOE MOKe Da NOBnHHe HfHKUHOHaHOCCTHa aKTHBHN NIN NACNBHN MeDNUHCKN NMIJIaHTN (Hapn. neCmKbPn), KOEt MOKe da DOBeDe Do CEPNO3HO HApAHBAHe NIM CMbPT.
→KohcyntpaateceBaWnnaNekapnnpo3BodnteHa BaWnnaHmPnAHT, npde Da n3pO3BaTe TOnn npOdyKT.
→OctpaHete uencena, Korato He n3non3BaTe npodykTa.
Ka6enn
ПИ ИПОПБАВHA NaIbIbKITENHII KaIeJIb CbUITe TpRbBA DA OTTOBAPHT HAMIMAHNITHe HANPEHNI CEVEHNII B TaCILMATA RO:do-NO:
HanpeXeHne DblxHa Ha Ka6ena HanpeuHo ceeHne
220-240V/50HzDp20m1.5mm²
220-240V/50Hz20-50m2,5mm²
- KaBbI KbMb 3aXpaHBaAaata MpoKya YdybKtEtnHi N KaBbI c0 ppeIaIarat Bbb BaaiM MeTeH Odo6eH cepBImeH CEHTsp.
- 13nON3BANTe CMOyDhKHTENH KABEN, KOIO CA npDEHa3HaEHN CNEUAMHO 3a yIOTpe6a H OTKPITO N OTTOBApAT HA eDAOT CLEDHTE texHHueckx XapakTePVCTIKK:
-06MKBHeH KAYyK (60245 IEC 53), o6MKBHeH NIOINBHNNINKnPnI (PVC) (60227 IEC 53) nii
-06nKHOBeH noJnxIoponpeH (PCP) (60245 IEC 57).
3.Ako CbprbaaunrKaBeIe NIOBpeH, TOnT PReBa Da bSe CMeHeH OT npOv3BDOJIeTe, HReoB cepRbEHN areHT INN MInu cCbxC OAnDA KBAINIFKALU, 3A da Ce I36BfHE OAnCHOCT.
1.3ДоьннTeHH npedynpeKdHn 3a nHa 6e3onacHOCT

ONACHOCT! Pnck ot 3aynawa
No-mankte yactn morat da 6bdat norbnhat.
→πpθxTe MaKNTe nLaIa IaIe N O BpeMe Ha MoHTaKa Ha npOyKta.
→CnpTe MAHnHATA,OTCPaHTe Ⅲcncna3a3axpaHbauata MPeka OT CTOHNIA KOHTAKI HNKAHAcBcNKN BnKueu c CaYtIN Da CnPAT HAJIbIHIO-AKO MAHnHATA ydpA YyKa PpeMeT:
BTOsCnhyaNPoepeBeMaHJINa3aNoPbEduNpaEMOHNTpaIte,npEdu Da aRcctaprTaPeA NdaNnO3Na3BaTe OTHOB。
Ako MaunHata 3anOHe da Bn6pnpa n Heo6Haen HauHH:
→BTO3N CNYaH He3abABHO npoBepeTe MaunHATA 3a NOpeDn, CMEHETe HIN POMHTAPAtIO BPOEHNITcA Tn NPOOBPeTe N 3aTOrTHTo BCNUKN PAxNAbENHnCtAyn.
3Pdpe da 3anoohete Na KocTe, npopebe NIOoTt Ka, Te Do ce kc Koc, 3a CKpHTn PnpDMTeN, Kato HAnpImep KLOHn, n Tn OCTpaHeTe.
Toba ue HamaHn pCKa oT 6nOKuPae Ha peKeueH INCTpyMeHT.

Ako MaunHata Tp8Ba Da 6bDe HAKNoHeHa 3a TpaHCnOpTnpAne, KOraTo pncnate NOBpXHOCT, PAaIIMnOT TpeBa, INKoTa TPOACnOpTnpAte MaunHata Do n ITIOUa 3A KOc6He, CnPETe Pekuua NHTCPYMGE.
→He HAKJaHReTe MaJINHaTa, KOraTo DBuRatEnrT E BKNIOyeH
→H3npa3HeTe K0uTa Ta TpeBa IpeDu CbXpaHHeU.
→Pnienopbka;NabpbweteNoHCTBaHeIteHNHIECKO6cJIyKbaHEPipei cnXpKaHBeHs.
PeoBHOO 60cbNyBaTe MauHnHa. ToBa yBeuNc7Ba cPoka Ha EKCIOTaUIN H9 MaMnHnTa.
→H3noJ3BaIe cAmo pe3epBHN qactn, oO6peHn ot FLYMO.
HenoXoXoXoXoXoXoXoXoXoXoXoXoXoXoXoXoXoXoXoXoXoXoXoXoXoXoXoXoXoXoXoXoXoXoXoXoXoXoXoXoXoXoXoXoXoXoXoXoXoXoX0
→ He MoDnHnIpaTe HNKAKBn PnpaHNN KOMIOHNHTM. MoDnHnIpaHToH NpOHeHnIbHTHe KOMIOHNHTY BVEyIbVbBnPcKs O THOHNBHbE.
BHNMABAITE, KORA TACTPOBATE MAHINATA. Toa nroepotpatn 3axBaAHTe Ha NpCTMeT MEKdy DmEkeuN CE pekuMHCTPymENT HENIOOHHNTE ACTN HA MAHINATA.
→BnHaN octaBnTe MaHnHaTa da ce OxnaI npEn CbXpaHeHne.
Korato INBpUbATE ToxHMHcKO O6CJyKBAHO Ha pOKeUIN HnHTpyMOHT, NMaIte PnpBDN, Yce CND INKIOuHaBEpeKeuMHTnHCTpyMeHT BCE OILe MOKe Da Ce DBKm.
Tpienopbka; Hocete 3auieta Ha cniya. OOnachoct oT noqDxNBAhe:
B MOKpa TPOBA
-NOCTpbMHNAKIOHNI
- no Bpeme Ha TpaHcnpTtpaHe
→He npetobaaTe Kocaykata.
→BnMaBaIe npu nBuXKeHne HaSaI.
2. MOHTAX

ONACHOCT!
Pnck OT HapaRaBaHe OT npR3BaHe OT HOXa.
Ako npdykTbTe 3aedctBa NO HOBHMnHcE, Xopata MOrat da 6bDat HApaeHNe OTOHXOBETe.
→U3yakaiTe,doKaTo HOXbT cnpe.
→Pa3kaheTe npodykTa oT 3axpaHbAHeTO.
HocTe 3aunTH npn crnoBaHe Ha npOkyKaTa.
2.1 3a crno6BaHe Ha pbkoxbatkata [mR.A1/A2]:
- NocabeTe DoJIHnTe DpbKn B OTbOpnte, PpeBnDeHn Ha nlatfoomata.
→Φκκυραίητες Βυβρταιύησι φκκατορ (Φινι.Α1).
2.3akpenete rohpata pboKoXBaTKa KbMdoJIHnTe pboKoXBaTKn C BbpTAAHnФKCaTOp (fHr.A2).
TOpHaTApBkKaeperynnpyemaHaBaBcOuHb.PbKoXBaTKteMOrat Da 6bDat KcnpaHn BnoJokhenI nn I noKeJahne (pnr.A2).
3A6ENEKKA:yepeTeCe,ye Ka6enHIne cKo6n Ce n3nol3BAt 3a
3aKpeneteKa6ena 3a Ka6enHata Kyka, Kato ce yBepnTe, Ye nMa DOCTaTbHc CBO6oDen Ka6en.
YBepete ce, ye KaBenite He ca 3akJeHn npn CrbBaHe npa3rBbaHe Ha rOpHne dpbKKn. He n3nyckaIte dpbKnte.
2.2 3a crno6bahe Ha kOa 3a TpeBa [fnr.B1/B2/B3/B4]:
- Hatachete pkoKXBATkata Ha KOwa 3a TpeBa B cNOTObTe B rOpHata NaCT Ha KOwa 3a TpeBa,doKaTO UpaKaHe CNpyHO B cBtBTHTO NOJIOXENHe (fN:B1).
2.CbpxkTe DBeTe Ha KaOa 3a TpeBa 3aedHO, CJeT TOBa MOHTpaIte e3nka (fH.R.B2). - 3anoyheTe O3aHaTa YacT Ha K0wa, KaTo Noctabnte Kanaka Ha KOwa B Hero C NOMOHTA HcKo6nte.
→YBepTe ce, Ye BCnKKn ckO6n ca npaBnHnPo pa3noJoxHeN (ΦnR. B3).
- 3akpenete cienn Kow 3a TpeBa KbM Kocaukata 3a TpeBa (fmr.B4).
a. NOBdHHeTe npedna3ntenr.
b. YBepete ce, ye paTOBaPnteJIHHrT yIe n cHCT N Ye B Hero HrMa OCTaTbU.
c. MoHTnpaIe HAnbHo CRNo6EHHa Koo 3a TpeBa Bbpxy ToKInTe 3a MeToIOJIOKeHHe B 3aHaT aCt Ha IlaTΦopMaT, KaKTo e NOKa3Ao.
d. NocTabete Kanaka 3a 6e3onachoc Tbpxy Kowla 3a TpeBa.
3ABENEKKA:ako He nckate da cbspate Tpeba, KocauKata Moke da bse nnoa ha 60 Kaia. PpndnaeITJrT Pr6Ba da E doHOIIOKENHe.
2.3 3a perynipane Ha BncoounHaTa Ha p3aHe [fHr.C]:
![FLYMO SpeediMo 360C - 3a perynipane Ha BncoounHaTa Ha p3aHe [fHr.C]: - 1](/content/2026/02/424479/images/8ebcdc455d829c7794f87c0f3e5320d6c90e861f91567ac8932a4ed311d906d3.jpg)
PENEYNPEXDEHNE!
PnCK OT HapaHbAHe nopadn BbpTnCe HOKOBe.
Hokobete npoDbjkaBAT da ce BbptT BnpoDjNKeHHe Ha HNKoIKO cekHynd, cnke Ka moaHaHaTa e NkKIOHeHa. BpTAA, ce HOK MoKe da ppeIM3BnKa HapaHaBaHe.
→U3aKaITe,doKATO HOKbT Cnpe, npedn da perynpate BnCOuHata.
TETBnCOUHnHa p3aHe Ca HAnuHn Ha To3n npOdyKT.
→PerynpaTe BnCOHNHATA Ha p3aHe ype3 MeCTeH a pbKOXBtKaTa 3a perynpHa H BnCOHNHATA (fM. C).
3A6ENEKKA:
PnpeopbYBa ce cpeHa BmcoUHa Ha pna3aHe 3a
IOBEHTOMOPABH.
3. OBCJNYKBAHE

ONACHOCT!
Puck OT HapaHBAHe OT Nop3BaHe OT HOXa.
Ako npodykTb Ce 3aednCTBa No HeBHMaHne, Xopata Morat da 6bdat Hapaehn OT HOKOBete.
→N3aKaIe,doKaTo HOKbT cnpe.
→Pa3kayeI npOdykTa O T 3axpaHbAHeTo.
Hocete3aunTHnpbKaBnpi nppeynapaHe nn
TpaHcnpOptnpAHe Ha npOdyKTA.
3.1 3a cTAPtnpaHe Ha KocauKaTa [fmr.D1/D2]:
![FLYMO SpeediMo 360C - 3a cTAPtnpaHe Ha KocauKaTa [fmr.D1/D2]: - 1](/content/2026/02/424479/images/42c1754b77d3f50822e7e8e2df7efead3a5a01dc203a39097aad809da3580aca.jpg)
ONACHOCT!
OnachOCT OT HapaHBAHe
OnachocOT HapaHbHahe, ako npdykTB He cnpe, KOrato JIOCTbT 3a CTapTnpaHe 6bJe cOBboJeH.
→He wHTnpaTte 3auTHOTO yCTPOCTBO nINn pBeBKIOuBaTeNTe.
→Hapnmed He Cbbp3BaYTe pUkyKUTe 3a BKIOyBaHe KbM
DbKOXBATkata.
→He npabete npomeHn NO npOvKTo, KOHTo He ca ONuCaHn B
3.1.1 3a ctraptnpahe
- PnTNCHETe NoCTa 3a CTAPtnpaHe/cnnpaHe (pHr.D1) KbM pBkoXBtKATA.
- HatncheTe 3aPbKte 6yToHa 3a 6e3oNaChocT (fHr.D2).
- OTnycheTe 6yToHa 3a 6e3oNaCHOCT.
Baxho!
→YBepete ce, ye octpneTo cnpa da ce Bbptn, npedn da BKIOHNTe OTHOBO.
→He BkIIOuBaIte H He N3KIOUoBaIte 6bp30.
3.1.2 CnnpaHepa6ota
→OcbobondeHaTnckaBbpxyNocta3a cTatnpaHe/cnnpaHe.
3.2 KaK da ce Kocn:
- 3aOHTHHe Ta KcNtE Kpa H MaopabTa, KOIO E HaI-6nI3o Do TOHKATA Ha 3axpaHbAe, Taka Ye KaEBIbT Da CE Ipocntnpa No cactTa OT MOpabaT, KORTO BEe Cte OKocnn (fpr. E).
- Kocete Dba TbN CemMnHO no apeme Ha cetoHa paCTek. BaWata Mopaba une Noctpda, ako nobee ot eHa TpeTa OT bJIKHATA nCe OKOHNABeHbK.
HE INPETOBAPBAIte BAJATA KOCAYKA 3A TPEBA.
KocheTo Ha IbIra n IbCTa TpeBa MoKe Da npuHHn cnaHa He
ckopocTt Ha dBiratEnla. 1e yete npomHb 3Byka Ha DbrarTei.
Ako ckopocTt Ha dBiratEnla CnAdHe, MoeJa dpetobapte BaWata
kocaKa, KoTo MOKe Da npuHHn YbpeXdane. Korato Kocite DaIra n
IbCTa TpeBa, eoHbPBO p3aHe C BucOHNaTa Ha p3aHe, 3aDaHe
no-BUCOko, 1e NOMoHE 3a HamaJIBAHe Ha HATOBapBaHTo. BnKTe
"PerynpaHe Ha BucOHNaTa Ha p3aHe".
4. TEXHnuecko OBCJyXBAHE

ONACHOCT!
PnCK OT HapaHbAHe OT nop3BaHe OT HOXa.
Ako npdykTbTe 3aedyctBa NO HeBHMAnHe, Xopata MOrat da 6bDat HapaeHn OT HOKOBete.
→U3aKaIte,OKaTO HOKbT Cnpe.
→Pa3KaayTe npOdykTa o3axpaHbAHeTo.
→Hocete 3aunTHn pbkabuN npn N3BbPwBaHe Ha TexHuecko
06cnykBaHeHa npodyKaTa.
4.1 Ipenopbkn 3a cepBn3Ho 06cnyKbaHe
BauHNT npOdyKT eEHOHaHOnIOIeHTnPhuPAn CbC cpe6bpEn Huepe ETKeT 3a peTnHr Na npOdyKT.
Hne npenopbYBaMe da 13BbPWBate cepn3HO o6cnykaHe Ha npoDyKaHaMaIKO Ha BcEKn DbaHaNdeCeT Mececa, 3a npednoHTaHE ot npoechoNoHAnCT.
4.2 OToCTpaHbAHe HnOCTaBHe Ha HOXa:

PENPENPEXDEHNE!
Pnck OT HapaHbAHe npaOn octpn p6oBe.
→BHHarnpa6oTeTe cHOXA BHIMATEHNO.
HOcete3aunTHn pkaBnH. Hkora He n3non3BaHTe noBeHeOT 3nctAHNOHH enemeHa 3a BucOHHa p3aHe.
→ДИСТАЦИОНHITe eIeMENTn TpR6Ba Da CE NOCTABRT cAmO MekNHOKa N BERTaTOPa HNKORA MeKny HOKa N 60NTa.
- N3KIOUOHTe, H3HAKaIeT, DOKATO HOXbST cPpe Da ce Bbptn.
- Pa3kaheTe npodykTa oEneKtpo3axpaHbauata Mpeka.
- OToTpaHete nn noCTaBeTe OTHOBHOXA.
4.2.1 OToTpaHbAbe Ha HOka:
- 3a da oTcpaHnTE 60NTa Ha HOKa, npbKte HOKa 3npabO c pka, nokpnta C pKBaNua, n C raeueh KIOu paXnaBeTe 60NTa Ha HOKa, kato ro 3abptnte 6opatHO Ha YacOBHkoBata CTpeKNa (fir.F).
- MaxHete 60nta, wai6ata n octpneTo.
- PpOBepeTe 3a noBpeDn noocnteTe, aKo e Heo6xoDmo
→NoHOBeTe MeTaNnHOK CneI 50 yaca KocHe Nnn 2 rOHN, KOETOT DBeTe HAcTBnNO paHO, He3aBcNMO OT CbCToAHNETo MY.
→Ako octpneTo e HanykaHO nn noBpeDeHO, 3aMeHeTe rC HOBO.
4.2.23a noCTaBHe Ha HOXa:
- IocTaBete OCTpneTo HA Bana, KaTO OCTpnte p6OBe HA OCTpneTo COHAT HABbH OT Bana.
- MoHTnpaIte OTHOBO 6oTa npe3 wai6ata n octpneTo.
3.ДьхteocptneTo 3apBOC pKabuHn 3aterHeTe 6oTa 3dpBO C raeueH KIOU. He 3aTaraIte npekaneno.
4.3 3a nouCTBaHe Ha KocayKaTa

ONACHOCT!
Puck ot HapaHbaHe!
Pnck ot npahrahe n pck ot nobpea ha npodykta. He n3no3bae To BA nn B0Ha CTpy (oc6eHO BOHa CTpy C BNCOKO HnlaRae) 3a noCTBaHe Ha npdykta. Toba MoKe da NobpeynpDnykta WnDa No3BOHn HA BOJa Da npOHKnE B eJIeKTPuecknte KOMIOHEHTN N da npuHN KOpO3N IN NKbCO CbeINHeHne. He noCTBaBe C XmIKaNN, BKNoHTeHNO BeH3Mn nn pa3TbOpTeIn. HkON ot TRx MORat da NobpeaT OCHOBn PnaCTMACOBN qACTn.

PNEyIPEXDEHNE!
OnachocOT nOxkap npadn 3anyweHn OTBOPN 3a Bb3dywen notok
Okoena Tpeba, octaHana B HAKOI OT Bb3dyxONpOBOyNTe NIN NOI nlatfopMaT, MOKe Da npEcdTaBnBA ONaCHOCT ONoKap.
→OTBOPNTe 3a BB3dywEH NOTOK BnHaHr Tp6Ba Da Ca HCTN.
→Cnei noIyUaBaHe Ha BaWata KocauKa OT npOn3BouNTeHa eMHOrO BAKHO Da NoIbPkAte YpeDa YnCT.
- PpeKbchete KocauKaTAt O TEnktpueckata Mpeka.
- MaxheTe TpeBaT OToNHy Ha NnAToPmTa C NOMouTa HcETKa
3.ИЗнOLЗВаймЕКа YeТКА,МAXHETe OKOCEHATA TpeBa OT BCNCHKINBbДухОпpoBOД,OT pa3TOBaPHTeJIHnIУгнIOT KOWa. - C nomouta Ha meka yetKa npemaxheTe OKoceHata TpeBa OT npo3opeua 3a cneneHe (ako nma TaKbB).
- N36bpwTe noBbpxHocTtHa BaWata Kocayka cbc cyx KaPna.
5.CbXPAHEHNE
5.1 3a octabane Ha cbxpanenne
IpoodykTbTp6Ba DaCe CbXpaHbHa MRCTo, KOEt e N3BbH o6cera Ha deua.
- Pa3kaheTe KocauKaTAt O T 3axpaHbuaTa MpeXa.
2.ПоустeteКocaykaTа(BnKTe 4.TEXHnueCKO OBCJNYKBAHE). - IV DBete Kyk 3a Ka6ena Tp6Ba Da 6bDat Bbpy RopHaTa pbKoBAtKa.YBnTe Ka6ena BBb FOpMaTa Ha 8.
4.CbxpahraBaeTKeocaKaTaHaCyxo3akpntoMaCTO6e3ycIOBn83a 0bpaaBaHeHaCKpeK.
5.2 CbxpaaBaHe Ha Ka6ena:
→EneKtpnuecknT KAben MoKeJa 6bJe yBnT OKoNo KyKn 3a no-nopeDeHo N 6eOonacHO CbXpaHeHne.
5.3 CbXpaHrBaHe Ha Kocaykata 3a TpeBa:
→CbxpahnBaHte Ha cyxo MRCTO, KbdeTo BaWata KocauKa e 3aunTeHa OT nobpeHn.
→Pa3xaabeTe BpTnUte PnKcATOpN, 3a Da daTe Bb3MOxHocHT Ha npknte da 6bDat CbHaTN BpXy npOyKta, Kato ce yBepNTe, 4e ropHata dpjka Ce noDnbpka.
5.4 B Kpa Ha ce3oHa Ha KocHe:
- 3aMeHete6oTobete,raKNTeNNBHTOBTe,AKO e Heo6xOIMMO
- NoucTeTe cTapaTeHNO KocayKaTa.
3.YBepTeCe,ye enektpuecknT Ka6e Ce cbxpanBa npabInHO,3a Da npedotBpatNTe nobpeJa.
6. OTCTPAHBAHE HA IOBPEI

ONACHOCT!
PnCK OT HapaHbAHe OT nopraBaHe OT HOxa.
Ako npolykTBc 3aJeNCTBa No HeBHMnHne, Xopata Morat da 6bDat Hapaehn OT HOKOBete.
→N3aKaITe,doKaT0HOKbTcnpe.
→Pa3kaayete npodykta ot 3axpaHbAheTo.
HOcTe 3aunTHn pbKaBnI np TbpceHe n OTOCTpaHBAHe Ha HEN3npabHOctn no npOdykTa.
6.1 PpOdykTbT He yHKnOHnpa:
1.CneBaIc npabHnHaTnpoepypaNo cTAPtnpane?
→BnKTe "3a cTapTnpaHe Ha KocayKaTa 3a TpeBa".
2. PpOdyKTbT BKNIOHEn Ie?
3. PpOBepeTe npEaNTeB uenceJa.CMeHeTe, aKe e nArOpA.
6.2 loo kauectbo Ha cbbnpahe Ha TpeBa:
1.ИЗКИПОЕТЕΚОСАКATAOTENEKTPUPECKAТМРЕKA
2.ПоунстeteБьншATAстаHaВьздунхрбОпTe, paoTobapnteJIHnYeI nДOLHATA qaCt HaПлatфopмATA.
3.Повишете Ви cohнata Ha pr3aHe.ВикTe "PerynpaHа BИСочнATA Ha pr3aHe".
6.3 Ppekomepha Bnbpauqra:
1.ИЗкноуeteКOCaЧКаТОТЕКТрУeCKaTAMpeKa.
2.Поверете дддocтpenTo e noctaBeHo npabuHIO
3.AKOocTpneToe NOBpeNouNnHcHo,CMHeTeCHOBO.
6.4 Kocaykata 3a TpeBa CTaba TeKka 3a 6yTahe:
- N3KlHouTe KocauKaTAt O TEnEeTpueeCKaTa MpeKa.
- Pn bIra TpeBa Wn HepaBHe TepeH BnCOuHATA Ha p3aHe Tpa6Ba Da 6Be De 3aJaEHa Ha No-BnCoka N03uHa. BnKTe "PerynnpaHe Ha BnCOuHATA Ha p3aHe".
- YBepete ce, Ye konenata n poKnte MoarTa da ce BpTAT CBO6oHNo.

3A5EJEXKA: 3a dpyrH HeH3npabHocTH, MOJI, CbpxTe ce c OtDena 3a 06cIyXBaHa Na KInHTn Ha FLYMO. PEmOHn TpRbBA da Ce HbPwB a camo OT dOteHa 3a 06cNyBaHa na KInHTn Ha FLYMO nH CNeuaHn3pAnH dnBpN, Odo6pHn ot FLYMO.
7. TEXHnueCKN XAPAKTEPNCIKN
EeKTPnuecka Kocauka EHHMa CToHcT 3a Speedi-Mo 360C
9676634-xx
HomHaMoHocr W 1500
MpexoBo HappeXeHne V (AC) 230
MoeKoBa yecToTa Hz 50
06opnHaBbPTAaCepeKeu 05/MH3700
UmpnHa Ha paahe cm 36
Perylnaphe Ha BncoMHATA Ha mm 20-60 p3aane
06em Ha Kowla 3a TpeBa 30
Terno kg 11,8
HbHO HA 3ByKOBO HAIrahe L.1) dBi(A) 87
Heonpeenenoct k 1,5

EneKtpueeKa Kocayka EinnHua CToHooCT 3a Speedi-Mo 360C 9876634-xx
| HIMBO HA 38ykoBATA MOUHOCT LwK m3mepeHO/TapaHTmpaHO | Zc. | |
| dB(A) 93/94 | ||
| Bn6paunH npHДlaHTo/PbKaTa aVHr | mys2 | 2,3 |
| 1,5 | ||
| HeonpeDeHEnOCT KmW |
PpueeLH Hnmepeae B CIOBcBIEC e:1ENIEC 02841-4-32)NL 2000/14/E0/S.2001 N1701
3A6EENKKA: O6BHeHATA CTNOCT HA B6paunite e Nmepeha
B CbOTBECTBc C5 CTAHAP3HnPA HA PCNEyPA HA MNTINBAHEMOKe Da c8 HNO3Ba 3a CPABHBAe HA EIN ENEETPKIENCKN INCHPTPYMEHTC Dpyr TaH CTOHOC MOKe Da bDa HNO3BaHnHa 3a npEDAHPaTHe HNA OENKHO HAKA HekrO3HnHA. ToCtHO7A HnBOPAHNHNEMCCN MOKe Da BAPINA NO BPEMe HA DeCTBmTeHNO HNO3BaHBe HA ENEETPKIENCKN INCHPTYMEHT.
8. ПИНHAДLEXHOCKTN/PE3EPBHN YACTN
Pe3epBnHTe yactHa FLYMO ca doctbHn ot Baun dInbp Ha FLYMO nIOT cepBn3 Ha FLYMO.
→N3noJ3BaIe cAmo opnHJaHeH HOK Ha FLYMO:
Peepen HOH Ha FLYMO Kato cmaHa 3a 3aTneH HOK. Kar. No: 590605190 apt. FLY071
9. CEPBN3
AkyanHata HOpmaa 3a KOHTaK T cHaWnte Cnyk6n He HamepTe Ha rbp6a Ha nocneHATA CTpaHua N OHnaH:

https://www.flymo.com/uk/content/contact-us
10.И3XBbPJIaHE
N3XbBpIaHn npOdyKta
(cbrnacno DnpektnBa 2012/19/EC/S.l.2013 N3113)

PpOyKbTHe TpRbSbJa Ce N3XbPnBa 3aeDHO C O6HKnOBHeHte BHTOB CTNAbu. ToT Pn6BaJa Ce N3XbPnBA BCTOBETBcBe M CECTHnTe PERIaMENTH 3a ONa3BaHe HA CKONHATA CpeDa.
BAXHO!
→N3XbPnTe npOyKTA Ha nnupe3 Baunm MeCTeH cHTbp 3a cb6npaHe n peuknnpaHe H aonabu.
https://www.flymo.com/uk/content/contact-us
10.LIKVIDACE
LikvidaceVyrobku
(v souladu se smemici 2012/19/EU / S.I. 2013 c. 3113)

Vyrotebek nesmi byt likvidovan spoi u beznym domovnim ocapdern. Musi byt likvidovan podle platnych mistrich ekologickych pdefipsiu.
UPOZORNENI!
Likvidujte vyrobek prostrechnictvimmistno sbemeho a recyklacniho strediska.
da Elektrisk rotorplaeneklipper
Originale instruktioner.
- SIKKERHED. 24
- MONTERING 25
3.BETJENING 26 - VEDLIGEHOLDELSE 26
- OPBEVARING 26
- FEJLAFHJAELPNING 27
- TEKNISKE DATA 27
8.TILBEHOB/RESERVEDELE 27 - SERVICE 27
- BORTSKAFFELSE 27
q) Rar违法犯罪 and/or the use of a computer, including computers for example, or for recording, broadcasting, or advertising.
Nar du fjerner fastsldende materiale er renger plaeneklipperen, skal du sorge for, at alle kontakter er slaet fra, og at netledningen er frakoblet. Uveritet betjening at plaeneklipperen kan medfare alvortig personskade.
pa stelle skraninger
under transport
Overbelast aldrig plaeneklipperen.
Vaer forsigtig, nár du kərer baglaens.
2. MONTERING

FARE!
Risiko for at skare sig pa kniven.
Hvis Produkket starter ulisigitet, kan folkkommen til skade pga. knivene.
Vent, til kniven stopper.
https://www.flymo.com/uk/content/contact-us
10. BORTSKAFFALSE
https://www.flymo.com/uk/content/contact-us
10. ANOPPIΨH
https://www.flymo.com/uk/content/contact-us
10. ELIMINACION DEL PRODUCTO
220-240V/50Hz20-50m2,5mm
https://www.flymo.com/uk/content/contact-us
10. KASUTUSELT KÖRVALDAMINE
https://www.flymo.com/uk/content/contact-us
10. HAVITTÄMINEN
https://www.flymo.com/uk/content/contact-us
10. ODLAGANJE U OTPAD
Odlaganje proizvoda
(sukladno Direktiv 2012/19/EU/S.l. 2013 br. 3113)

Proizvod nije dopusteno odlagati u obican komunalni otpad, Morate je odloziti u otpad u sikladu si likalnim zakonomi za zaisttu okola.
VAZNO!
Proizvod predajte u lokalni reciklazni centar.
https://www.flymo.com/uk/content/contact-us
10. HULLADEKKEZELES
A termek artilmatlanitasa
(a 2012/19/EU/S.l. 2013 No. 3113 iranyel szenint)

https://www.flymo.com/uk/content/contact-us
10. SMALTIMENTO
https://www.flymo.com/uk/content/contact-us
10. ŠALINIMAS
Gaminioutilizavimas
(pagal direktyva 2012/19/ES/S.I. 2013 Nr. 3113)

Gaminio negalima salinti karto su jprastomis buitinemis atlikommis. Jj butina salinti pagal vietinius apinkosaugos rokaivimus.
SVARBU!
→ Salinkite gaminji vietiniame buitiniu atlieku surinkimo ir perdirbimo punke.

220-240V/50Hz20-50m2,5mm
https://www.flymo.com/uk/content/contact-us
10. UTILIZÁCIJA
Zales plavejautilizacija
(saskana ar Direktivas 2012/19/ES/S.I. 2013 Nr. 3113 prasibam)

Zales plaveju nedrifik istznest sadzives atkritumos. No ta jaatbrivojas saskana ar konkretas valsts vides aizsardzibas normativiem.
SVARIGI
Nogadajiet zales plaveju utilizacjai vieteja sparstrades uznemuma.
220-240V/50Hz20-50m2,5mm
https://www.flymo.com/uk/content/contact-us
10. AFVOER
6.2 Darlig gressoppsmling:
- Koble Produktet fra stramforsyningen.
- Rengjor utsiden av luftinntakene, utkasterkanalen og undersiden av aggregatet.
- Juster til en hoyere klippehoyde. Se Justere klippehoyden.
https://www.flymo.com/uk/content/contact-us
10. KASSERING
https://www.flymo.com/uk/content/contact-us
10.UTYLIZACJA
Utylizacja produktu
https://www.flymo.com/uk/content/contact-us
10. ELIMINAGAO
220-240V/50Hz20-50m2,5mm
https://www.flymo.com/uk/content/contact-us
10. ELIMINAREA CA DESEU
https://www.flymo.com/uk/content/contact-us
10.LIKVIDÁCIA
Likvidácia vyrobku
podla smernice 2012/19/EU/S.I.2013c.3113

Vyrobok sa nesmie likvidovat spolocne s beznym domovym oxpadom, Musi sa zlikvidovat podla platych miestnych predispov tyskajcich sa ochrana zvctheho prostredia.
DOLEZITE!
https://www.flymo.com/uk/content/contact-us
10. ODLAGANJE
Odaganie izdelka
(v skladu z Direktivo 2012/19/EU/S.l. 2013 st. 3113)

https://www.flymo.com/uk/content/contact-us
10. KASSERING
https://www.flymo.com/uk/content/contact-us
10. TASFIYE
Urunun tasfiyesi
(2012/19/AB/S.I.2013 No.3113 Direktifi uyannca)

Urun, normal esvel atiklara brilite tasefie ecilmeleridir. Yerel cevre duenzlemelerine uygun segelide bartera efcdilmeleridir.
ONEMLI!
| UKCA Declaration of Conformity [only for UK]The manufacturer: GARDENA Germany AB, PO Box 160 89, S-103 92, Stockholm, Sweden hereby certifies that, when leaving our factory, the unit(s) indicated below is/are in accordance with the UK Regulations, designated standards of safety and product specific designated standards.This certificate becomes valid if the units are modified without our approval. | |
| Description of the product: Electric Rotary Lawnmower | |
| Type: Speedi-Mo 360C | |
| Article number: Art. 9676634-xx | |
| UK regulations: S.I. 2008/1597 | S.I. 2016/1091S.I. 2012/3032S.I. 2001/1701 |
| Designated standards: EN ISO 12100 | EN 62841-1EN IEC 62841-4-3 |
| Approved Body: DEKRA Testing and Certification GmbHHandwerkstraße 1570565 StuttgartGermany | |
| Approved Body Number: 0158 | |
| Noise level: measured / guaranteed Art. 9676633-xx: 93 dB(A) / 94 db(A) | |
| Conformity Assessment Procedure: According to S.I. 2001/1701 Art.11 Schedule 9 | |
| Dokumentation Deposited: GARDENA Manufacturing GmbH,Technische Dokumentation,A.OchsD-89079 Ulm, Hans-Lorenser-Str.40 | |
| UK importer:Authorized representative | Husqvarna UK LimitedPreston Road, Aycliffe, County DurhamUK DL5 6UP |
| Ulm, 29.11.2024 | Martin LienhardSenior Vice PresidentBusiness Unit Electric and Battery |
Armenia AFS Sylvania LLC
AeSsion 50
022Yeroy
Pp:1+3760651651
mssischaryan@icnd.com
A
Austana Huaan
1009484256730000000000000000000000000000000000000000000000000000
ControlQuestBC
MSW2252
Phone: (1) 81) 243827406
AzeBaijian PuTong Xinyi
Alyas Alya 21, Beku
Sae: +994705260714
Aftersalus-934773260714
WANPROGRS-garden
info@progess-garder.az
Bahralin
MHNbms
BULDING 200,BLOOx356
ROAO 328
Sahiya 070-17-16-8000
P19731406001
amnncnre
Belarus / Elenapyc 602, Nizovsk, Enya
000000000000000000000000000000000000000
22016.1.MFEC, www.mfec.org/
TCL(+3751725700.33)
m#
Belgium
Belgium
Husserla Schumann
Gardena Division
Leuwrss:swvcy 542
POTALE Used for:
1952 284 1960
Buloi
Borrio (Hemarestro)
Bosnia / Herzegovina
Sib Tukurcu
Sik W.P. Pesharim Zorga Via Br. 20
Phone: (1387)61 105 598
info@silkred.com.br
Brazil
NodheraManningsCoMnatesLTD.
Aerida Juselino Kubielsch
de Oiveira Curitiba
$103 Brazil 15
Phone: (135) 41-3898-9300 Fax: (135) 41-3898-9300
certifio#scn.com
WAVINDACTCH-0
Bulgaria
AGPANDBc004A
Cn.8D93B004,N-13
051700
1700CryPnTnPn
C
8011359124666910http://www.combed.com/
1007/28 19:30
Canada/USA
CANCECA Canada Ltd 126 Etnm 30
125 898Ae 1000
Bremnng 6005
CN. Canda
Phane119057928330
garden.cisternerevice@husparqgroup.com
Chile
Unit3.5,7F LwTcwD,No.786Jin Zhong RLChang
King Dist.,Shanghai, +RC 2003
Colombia
Equipes de Toyaria Colombia 545
Cra.88D No 25 B 86 Dt.618
Czech Republic Gaochen
Service Center Wtro
0+
Manningzuring C2 8.1.3
Jennifer 146 77325 USA
79328 100000000000000000000000000000000000000000000000000000
www.msfamc.com
Denmark
Ling 15.1
3500 Varies
T 45170254770
cardanack@nuqatagroup.com
www.geructr.com/dk
Dominican Republic
1030385, SRL Senior Financial Officer
Cunmnnn nn nnnn nn nnnnnnnnnnnnnnnnnnnnnnnnnnnnnnnnnnnnnnnnnnnnnnnnnnnnnnnnnnnnnnnnnnnnnnnnnnnnnnnnnnnnnnnnnnnnnnnnnnnnnnnnnnnnnnnnnnnnnnnnnnnnn
Eaing Eood II
5100C Dominican Republic
199911808-682-0475
Camaiaiofo1c.
Egypt
Universal Agencies Co. 28, Madrid, Spain
25,ALERARNOLONSC
Phone:12037615757
Felonie
Estomia
Husnagma Essa CU
Valteku 32
EE 11216 Tallin
mcc@2019.com
Finland
CYHECSTA 59
01510X#
www.gefcutl.com
France
Husqams France
911 Alice des perees repeles
9263 Gerewiers Cuxex
http://www.gardena.com/
N°AZR:0610007923
Pid n appol locale
Georgla
Transporter LLC
V70Bekishwliu street
0191353248
info@inetracker.com
YNYFJH2A0
Service Address:
Service Address and Importer to Great Britain
Hosperma UK Ltd
Positron Road
Acetic Inteiral Park
Reserve Innissie
Counse Dukker
DLS部
Pn:1404444556
cusermer serdesoHspara.ooK
Greece
HANASO
7841.
1813442
EMd50
13.102105183100
Intrapepopepoulas.com gr
Hong Kong
Tung Tien Cang 100, UPD, China
13.55A0B103
Hong Kong
Pnne 18593583 1602
amrntingtae.com
Hungary
Husqama Magyaroszag Kt.
Eznd L-3 1045
P.O. Box 163, Industrial Area,
Phase 2. Rm Dabur
Chungqiu
18002ndn Phone:+9:2814065320
raman@agannarow.com
Iraq
Wqk Akhtalal Akhtar
Al Faysalicah, Near Estate Bank
Mou
19819447818184675
Ireland
Lilly Distributors Ltd.
309 NW Business Park, Babcockton 15 Dr.Hir
1008:3591.8242000
info@llzq.com
Israel
JASABLLTD
2 Nondual St
812201 Yenwei jie@chinastock.com.cn
mtnr@pajrr.com.cn Phone:19728-8-932-0400
Italy
Husparin Cil P.A. Centre for Disease Control and Prevention
17.00/15.00/14.00
laned/unlaned.kz
Kuwait
Parns Agro Production Co.
At Pal- Faunh BrgnRcad-Bccs56
P0Bbc 1976 Sat
1302C4B9 2007
P19019862730740info@nelma-ku.com
m
Kyrgyzstan
C. 100% 非
7200 € basis
Phone: (+96) 312 32215
Latvia
Huxpama Latae Sb.
Udokeas 154
17-1271Bgeinfo@wltp.cninfo.com.cn
1
Lebanon
Technicals: Safra Highway Befin 1
G22 Merber Blg.
P.O.Bm 215
MIRROR PIPER: +961,9535327;
(+961)395546
ecncc@tdin no.8
Lithuania
UAB Hspame 1
Alleles p176 L53104-2p
12345678901
A
Luxembourg
Nantes, La Jolla, Spain
- JHOON SHS
Luxembourg Gasperich 2549
Case Posso 13
Low/High 2015 Prowse:253.40-16.61
中
Malaysia Cloned by
Japan Busco No.30
Sun Ram Sehno
40150明志社
P0914374967
0
Maita
- 100 San Pedro
R001-RB1124D
Pn:1+35621454289
Mauritius
SpaceMasonThe
La City, USA, St. Jean
Curtis Hines
Cnrrnnr 1000+270
1997-92-03568400000000000000000000000000000000000000000000000000000000000
Mexico
A
A. Topes Matens Sur 4018
Cll La Cane 450/0
70open,1952,Mexico 100001-873-2848686
一、募集资金基本情况
Mokyo
MOOVA
Hannunica Molloy
muni.Chiseu,
38Munroe 284
Pruessy 277-52
P132:137522637-126
Hospitaun New Zealand Ltd. 90000 100-457
1086764532
P001-54.00
SUN 12005/10/18 00:00:00
North Mac
Srpeks d.g.
Ul. Krawski Fat Ob
7000B64 P
P102-38947 205500 spon@snp.net
No
Norway Huesoane Xyne AS
Gardena Design
Trackenwien 36
1708 Sanborg
infected garden no
Northern Cyprus
Dedierear Home ANo 150486, New
Tin 1000000000000000000000000000000000000000000000000000000000000
P00E1-953221380
intell@menger.com
Oman
General Development Services
PO 1475,PC-111
11.0
Phone:96824587818
osaman@osaman.com
Paraguay
Agroel Srl
M. CHOFFREIS, MD CHICK 1982-670
444
Phone:+855121
consultat@ugrand
Peru
Seras y Hermantiantas Forestal SNC
W. Las Gañntas 233, Cherlons
100 P@-5112520252
supervanovendal@osera.com
www.cib.com.cn
Philippines
RoyalDraconTradersInc.1712006,October 18,2006
To LIMA SICCI & BARTING Saint Peter (Quinoo City)
11.4 Philippines
Phone:16327426893
aida.fernandez2@tfi.com.ph
Poland
Gardens Service Center Wm
601LgamaMngatlon 2
79326 Wnre pod Pocco
Czech Republic
Prrn:1223387890
93
Portugal
Hispanie Periop, S4
Lama Abrahance
2655.56581张卡
Pn01-351215226530
Fox-351219226536
1
Romania
Macex International SScience Press 117-123
00116754acgwlslS1
Pone:40123527603
modex@ina.no
Saudi
SACD
Takhasue Main Head P.O. Box: 97521-40-47877
89.57 89.43 1263 47011 Sard 4900
P00:665114823677
webmaster@sapo-ksa.com
Austarko Engineering
5147A1A000Rs
Ryadn 951
P1-97142667003
U.S.S.K.
Singapore
H-HH HMOXIFIMITED 101
2017年/6月3日
Singapore 57/185
Pme+65)62532277
infu
Slovak Republic
Gardens
10
Manufacturing G7.3.1
Jesericai 146
70328 We are proud to record
Pn
09103
Slovenia Huxenius, 114
Insturmental 35
40°0Lin
Phone: (+43)732770101/65
service.gardena.com/husqtnpgroup.com
South Africa
Hosipang South Africa iPty Ltd
1100 West Park Drive, London
Gard Dwyk & Co.
Bases Naive Cross and Yesetoh
Road Frankpark Fugc, Rumburg
Phone: +27 10 05 5730
support@Smartboard.com
2.1.1.1.1
South Korea
Korea, USA
Kangming Wang, PhD
Shenzhen Jiao Tong University, China
Sankara@hokou.com, 210
Gangram Dacro 137 691 Seoul
Phone:1-8225746300
knoknok
Spain
Hospame Lepara S.A. 1Sri Ram Hospital, 45
Cilco Co. Baus IT 28067 Mathi
Phone:13491
alcoedicn@garden.com
(续)
8171
1
chaccii N.Y.
74
m = 311 ;
5050
1
1
( x - 2x) t - xy^2 = ( x - 2x) f^ t
( x - 2x) t - xy^2 = ( x - 2x) f^ t
5146002
E
Schwelz
1
626873792
m = 311
2019.
- Rost
(1025)
228146
4021
图
- INT
273
ian.com
oride et miliine
code of Star Hip 32
419
11
mrisa.com
- No.3
3693939
m = 311
dowformchannel
FAR Stopping Center,
m = 311
73.18.4
1
1
12
m = 311
W:
414141
092
1,2,3 1,3,4 2,3,4 3,4 4,5 5,6 6,7 7,8 8,9 9,10 10,11 11,12 12,13 13,14 14,15 15,16 16,17 17,18 18,19 19,20 20,21 21,22 22,23 23,24 24,25 25,26 26,27 27,28 28,29 29,30 30,31 31,32 32,33 33,34 34,35 35,36 36,37 37,38 38,39 39,40 40,41 41,42
Comper
No-100NanXueYuanKong
Liem
3462853/34
2.1.1.1
(2)
770
10376
01232.02.053.04.1001
2136U-80,960 Huaqiu AB
Huskivahla AB Proltbjgss
Brothlinggatian 2 55-561-62 Hukumura
Sweden
Sweden
Our policy of continuous improvement means that the specification of products may be altered from time to time without prior notice.
Copyright © 2024 Flymo S.A. All rights reserved.
Flymo and other product and feature names are registered or unregistered trademarks of Flymo S.A.

- ENTSORGUNG
- Original instructions.
- SAFETY
- Symbols on the product
- WARNING!
- ARNING!
- General safety instructions
- General machine safety warnings
- Save all warnings and instructions for future reference.
- 1) Work area safety
- 2) Electrical safety
- 3) Personal safety
- 4) Machine use and care
- 5) Service
- Lawnmower safety warnings
- Additional safety instructions
- Intended use
- DANGER! Risk of injury!
- Additional electrical safety instructions
- DANGER! Risk of cardiac
- Cables
- Voltage Cable length Cross section
- Additional personal safety instructions
- DANGER! Risk of suffoc
- ASSEMBLY
- DANGER!
- To assemble the handle [Fig. A1 / A2]:
- To assemble the grass box [Fig. B1/B2/B3/B4]:
- To adjust the cutting height [Fig. C]:
- Risk of injury due to rotating blades.
- OPERATION
- Risk of cutting injury from the blade.
- To start the mower [Fig. D1/D2]:
- DANGER! Risk of injury
- To start
- To stop
- How to mow:
- DO NOT OVERLOAD YOUR LAWNMOWER.
- MAINTENANCE
- DANGER! Risk of cutting
- Service recommendations
- Removing and fitting the blade:
- Risk of injure due to sharp edges.
- Removing the blade:
- To fit the blade:
- To clean the mower
- WARNING! Fire hazard due to
- STORAGE
- To put into storage [Fig.S1]
- The product must be stored away from children.
- Storing your cable:
- Storing your lawnmower:
- At the end of the mowing season:
- TROUBLESHOOTING
- Fails to operate:
- Poor grass collection:
- Excessive vibration:
- Lawnmower becomes heavy to push:
- TECHNICAL DATA
- ACCESSORIES / SPARE PARTS
- SERVICE
- DISPOSAL
- Disposal of the product
- IMPORTANT!
- Vibrations excessives :
- MISE AU REBUT
- 2) EneKtpnuecka 6e0nacnoct
- 3)ПИЧА 6e3oNacHocT
- 4) ynotpe6a n noDpBkKa Ha MaunHaTa
- a) He ynpaxHBAaTe CNIOBn Bb3dEhCTBn Bbpx MaHHaTa.
- 5) CepBu3
- 1.2.2IpeDynpexKdHn3a6e3onacHOCTHaKocaykata3aTpeBa
- DOnbHnTeJHn HNCTpyKun 3a 6e30NaCHOCT
- PpeHa3NaeHne
- ONACHOCT! Pnck O T npaHnBaH
- DornHHTenHH HcTpyKun 3a enektpuecka 6e3onacnoct
- ONACHOCT! Pnck ot cnnpahe n
- Ka6enn
- HanpeXeHne DblxHa Ha Ka6ena HanpeuHo ceeHne
- 1.3ДоьннTeHH npedynpeKdHn 3a nHa 6e3onacHOCT
- ONACHOCT! Pnck ot 3aynawa
- MOHTAX
- ONACHOCT!
- Pnck OT HapaRaBaHe OT npR3BaHe OT HOXa.
- 3a crno6BaHe Ha pbkoxbatkata [mR.A1/A2]:
- 3a crno6bahe Ha kOa 3a TpeBa [fnr.B1/B2/B3/B4]:
- 3a perynipane Ha BncoounHaTa Ha p3aHe [fHr.C]:
- PENEYNPEXDEHNE!
- PnCK OT HapaHbAHe nopadn BbpTnCe HOKOBe.
- OBCJNYKBAHE
- Puck OT HapaHBAHe OT Nop3BaHe OT HOXa.
- 3a cTAPtnpaHe Ha KocauKaTa [fmr.D1/D2]:
- OnachOCT OT HapaHBAHe
- 3a ctraptnpahe
- Baxho!
- CnnpaHepa6ota
- KaK da ce Kocn:
- HE INPETOBAPBAIte BAJATA KOCAYKA 3A TPEBA.
- TEXHnuecko OBCJyXBAHE
- PnCK OT HapaHbAHe OT nop3BaHe OT HOXa.
- Ipenopbkn 3a cepBn3Ho 06cnyKbaHe
- OToCTpaHbAHe HnOCTaBHe Ha HOXa:
- PENPENPEXDEHNE!
- OToTpaHbAbe Ha HOka:
- 4.2.23a noCTaBHe Ha HOXa:
- 3a nouCTBaHe Ha KocayKaTa
- PNEyIPEXDEHNE!
- OnachocOT nOxkap npadn 3anyweHn OTBOPN 3a Bb3dywen notok
- 5.CbXPAHEHNE
- 3a octabane Ha cbxpanenne
- IpoodykTbTp6Ba DaCe CbXpaHbHa MRCTo, KOEt e N3BbH o6cera Ha deua.
- CbxpaaBaHe Ha Ka6ena:
- CbXpaHrBaHe Ha Kocaykata 3a TpeBa:
- B Kpa Ha ce3oHa Ha KocHe:
- OTCTPAHBAHE HA IOBPEI
- PpOdykTbT He yHKnOHnpa:
- loo kauectbo Ha cbbnpahe Ha TpeBa:
- Ppekomepha Bnbpauqra:
- Kocaykata 3a TpeBa CTaba TeKka 3a 6yTahe:
- 3A5EJEXKA: 3a dpyrH HeH3npabHocTH, MOJI, CbpxTe ce c OtDena 3a 06cIyXBaHa Na KInHTn Ha FLYMO. PEmOHn TpRbBA da Ce HbPwB a camo OT dOteHa 3a 06cNyBaHa na KInHTn Ha FLYMO nH CNeuaHn3pAnH dnBpN, Odo6pHn ot FLYMO.
- TEXHnueCKN XAPAKTEPNCIKN
- ПИНHAДLEXHOCKTN/PE3EPBHN YACTN
- CEPBN3
- 10.И3XBbPJIaHE
- N3XbBpIaHn npOdyKta
- 10.LIKVIDACE
- LikvidaceVyrobku
- UPOZORNENI!
- da Elektrisk rotorplaeneklipper
- Originale instruktioner.
- MONTERING
- FARE!
- Risiko for at skare sig pa kniven.
- BORTSKAFFALSE
- ANOPPIΨH
- ELIMINACION DEL PRODUCTO
- KASUTUSELT KÖRVALDAMINE
- HAVITTÄMINEN
- ODLAGANJE U OTPAD
- Odlaganje proizvoda
- VAZNO!
- HULLADEKKEZELES
- A termek artilmatlanitasa
- SMALTIMENTO
- ŠALINIMAS
- Gaminioutilizavimas
- SVARBU!
- UTILIZÁCIJA
- Zales plavejautilizacija
- SVARIGI
- AFVOER
- Darlig gressoppsmling:
- KASSERING
- 10.UTYLIZACJA
- Utylizacja produktu
- ELIMINAGAO
- ELIMINAREA CA DESEU
- 10.LIKVIDÁCIA
- Likvidácia vyrobku
- DOLEZITE!
- ODLAGANJE
- Odaganie izdelka
- TASFIYE
- Urunun tasfiyesi
- ONEMLI!
Brand : FLYMO
Model : SpeediMo 360C
Category : Lawn mower