BLV 48 Li - Blower STIGA - Free user manual and instructions
Find the device manual for free BLV 48 Li STIGA in PDF.
| Product type | Cordless blower/vacuum mulcher |
| Brand | STIGA |
| Model | BLV 48 Li |
| Motor | 48 V DC |
| Maximum air speed | 300 km/h |
| Weight (without battery) | 4 kg |
| Sound pressure level (LpA) | 89 dB(A) (uncertainty 3 dB(A)) |
| Guaranteed sound power level (LwA) | 104 dB(A) (uncertainty 3 dB(A)) |
| Vibration (Ah) | 2.8 m/s² (uncertainty 1.5 m/s²) |
| Power supply | 48 V lithium-ion battery (not included) |
| Functions | Blowing, vacuuming, mulching |
| Variable speed control | Yes, continuously adjustable |
| Turbo mode | Yes, via high-speed switch |
| Collection bag | Yes, with zipper |
| Concentrator nozzle | Yes, for tight spaces |
| Shoulder strap | Yes, adjustable |
| User protection | Safety glasses, gloves, long pants recommended |
| Safety distance | 15 m from people and animals |
| Maintenance | Clean the bag after use, check fastenings, store in dry place |
| Spare parts | Use only STIGA original parts |
| Warranty | Refer to the manual (warranty void if unauthorized modifications are made) |
Frequently Asked Questions - BLV 48 Li STIGA
User questions about BLV 48 Li STIGA
0 question about this device. Answer the ones you know or ask your own.
Ask a new question about this device
Download the instructions for your Blower in PDF format for free! Find your manual BLV 48 Li - STIGA and take your electronic device back in hand. On this page are published all the documents necessary for the use of your device. BLV 48 Li by STIGA.
USER MANUAL BLV 48 Li STIGA
ENGLISH - Translation of the original instructions ...... EN
INDICE
- General safety warnings ....1
- Symbols 3
- Specifications .... 3
- Description 4
- Assembly 4
- Maintenance....6
- Dispoal 7
- Troubleshooting....7
1. GENERAL SAFETY WARNINGS
Your machine has been engineered and manufactured to tools's high standard for dependability, ease of operation, and operator safety. When properly cared for, it will give you years of trouble-free performance.
WARNING
When using battery operated tools basic safety precautions should always be followed to reduce the risk of fire, leaking batteries and personal injury, including the following.
■ Do not touch the fan when operating this unit.
- Keep the handles dry and clean.
TRAINING
- Read the instructions carefully be familiar with the controls and the proper use of the appliance.
■ Never allow children to use the appliance.
■ Never allow people unfamiliar with these instructions for use the appliance local regulations may restrict the age of the operator.
■ Never operate the appliance while people especially children, or pets are nearby.
■ The operator or user is responsible for accidents or hazards occurring to other people or their properly.
PREPARATION
■ While operating the appliance, always wear substantial footwear and long trousers.
■ Do not wear loose clothing or jewellery that can be drawn into the air inlet. Keep long hair away from the air inlets.
■ Wear protective goggles while operating.
■ Wearing a face mask is recommended to prevent dust irritation.
OPERATION
■ Operate the appliance only in daylight or in good artificial light.
■ Do not overreach and keep your balance at all times.
■ Always be sure of your footing on steps.
■ Walk, never run.
- Keep all cooling air inlets clear of debris.
■ Never blow debris in the direction of bystanders
MAINTENANCE AND STORAGE
- Keep all nuts, bolts and screws tight to be sure the appliance is in safe working condition.
■ Replace worn or damaged parts.
■ Use only genuine replacement parts and accessories.
■ Store the appliance only in a dry place.
WARNING
Use only the manufacturer's replacement parts. Failure to do so may cause poor performance, possible injury and may void your warranty.
The term “power tool” in the warnings refers to your mains-operated (corded) power tool or battery-operated (cordless) power tool.
WORK AREA SAFETY
- Keep work area clean and well lit. Cluttered or dark areas invite accidents.
■ Do not operate power tools in explosive atmospheres, such as in the presence of flammable liquids, gases or dust. Power tools create sparks which may ignite the dust or fumes. - Keep children and bystanders away while operating a power tool. Distractions can cause you to lose control.
ELECTRICAL SAFETY
■ Avoid body contact with earthed or grounded surfaces, such as pipes, radiators, ranges and refrigerators. There is an increased risk of electric shock if your body is earthed or grounded.
■ Do not expose power tools to rain or wet conditions. Water entering a power tool will increase the risk of electric shock.
PERSONAL SAFETY
■ Stay alert, watch what you are doing and use common sense when operating a power tool. Do not use a power tool while you are tired or under the influence of drugs, alcohol or medication. A moment of inattention while operating power tools may result in serious personal injury.
■ Use personal protective equipment. Always wear eye protection. Protective equipment such as dust mask, non-skid safety shoes, hard hat, or hearing protection used for appropriate conditions will reduce personal injuries.
■ Prevent unintentional starting. Ensure the switch is in the off-position before connecting to power source and/or battery pack, picking up or carrying the tool.
Carrying power tools with your finger on the switch or energising power tools that have the switch on invites accidents.
■ Remove any adjusting key or wrench before turning the power tool on. A wrench or a key left attached to a rotating part of the power tool may result in personal injury.
■ Do not overreach. Keep proper footing and balance at all times. This enables better control of the power tool in unexpected situations.
■ Dress properly. Do not wear loose clothing or jewellery. Keep your hair, clothing and gloves away from moving parts. Loose clothes, jewellery or long hair can be caught in moving parts.
ENVIRONMENTAL PROTECTION
■ Environmental protection should be a priority of considerable importance when using the machine, for the benefit of both social coexistence and the environment in which we live. Try not to cause any disturbance to the surrounding area.
■ Scrupulously comply with local regulations for the disposal of packaging, deteriorated parts or any elements with a strong environmental impact; this waste must not be disposed of as normal waste, it must be separated and taken to specified waste disposal centres where the material will be recycled.
■ Scrupulously comply with local regulations for the disposal of waste materials after mowing.
■ When decommissioning, do not pollute the environment with the machine, but hand it over to a disposal centre, in accordance with the local laws in force.
■ User types: This machine is intended for use by consumers, i.e. non-professional operators. he machine is intended for “DIY” use only.
POWER TOOL USE AND CARE
■ Do not force the power tool. Use the correct power tool for your application. The correct power tool will do the job better and safer at the rate for which it was designed.
■ Do not use the power tool if the switch does not turn it on and off. Any power tool that cannot be controlled with the switch is dangerous and must be repaired.
■ Store idle power tools out of the reach of children and do not allow persons unfamiliar with the power tool or these instructions to operate the power tool. Power tools are dangerous in the hands of untrained users.
- Maintain power tools. Check for misalignment or binding of moving parts, breakage of parts and any other condition that may affect the power tool's operation. If damaged, have the power tool repaired before use. Many accidents are caused by poorly maintained power tools.
- Keep cutting tools sharp and clean. Properly maintained cutting tools with sharp cutting edges are less likely to bind and are easier to control.
■ Use the power tool, accessories and tool bits etc. in accordance with these instructions, taking into account the working conditions and the work to be performed. Use of the power tool for operations different from those intended could result in a hazardous situation.
BATTERY TOOL USE AND CARE
■ Recharge only with the charger specified by the manufacturer. A charger that is suitable for one type of battery pack may create a risk of fire when used with another battery pack.
■ Use power tools only with specifically designated battery packs. Use of any other battery packs may create a risk of injury and fire.
■ When battery pack is not in use, keep it away from other metal objects, like paper clips, coins, keys, nails, screws or other small metal objects, that can make a connection from one terminal to another. Shorting the battery terminals together may cause burns or a fire.
■ Under abusive conditions, liquid may be ejected from the battery; avoid contact. If contact accidentally occurs, flush with water. If liquid contacts eyes, additionally seek medical help. Liquid ejected from the battery may cause irritation or burns.
SERVICE
■ Have your power tool serviced by a qualified repair person using only identical replacement parts. This will ensure that the safety of the power tool is maintained.
SAVE THESE INSTRUCTIONS. REFER TO THEM FREQUENTLY AND USE THEM TO INSTRUCT OTHERS WHO MAY USE THIS UNIT. IF YOU LOAN SOMEONE THIS UNIT, LOAN THEM THESE INSTRUCTIONS ALSO.
2. SYMBOLS
Some of the following symbols may be used on this tool. Please study them and understand their meaning. Proper interpretation of these symbols will allow you to operate the tool better and safer.
| SYMBOL NAME DESIGNATION/EXPLANATION | ||
 | Safety Alert Precautions that involve your safety. | |
 | Read The Operator's Manual | Read the operation manual and follow all warnings and safety instructions. |
 | Eyes and ears protection Wear eye protection and ear protection. | |
 | Ricochet alert | Thrown objects can ricochet and result in personal injury or property damage. Wear protective clothing and boots. |
 | Keep bystanders away | Keep all bystanders, especially children and pets, at least 15m from the operating area. |
  | Do not touch the fan. Do not touch the fan when operating this unit. | |
 | Wet conditions alert | Do not expose to rain or damp conditions. |
| The following signal words and meanings are intended to explain the levels of risk associated with this product. | ||
| SYMBOL | SIGNAL | MEANING |
| DANGER: | Indicates an imminently hazardous situation, which, if not avoided, will result in death or serious injury. | |
| WARNING: | Indicates a potentially hazardous situation, which, if not avoided, could result in death or serious injury. | |
| CAUTION: | Indicates a potentially hazardous situation, which, if not avoided, may result in minor or moderate injury. | |
| CAUTION: | (Without Safety Alert Symbol) Indicates a situation that may result in property damage. | |
3. SPECIFICATIONS
| Product Specifications | |
| Type BLV 48 Li | |
| Motor 48 Volt DC | |
| Air Velocity 300 km/h (Max) | |
| Weight (Battery Pack not included) 4kg | |
| Sound pressure level- Measurement uncertainty | L_pA : 89dB(A)k:3 dB(A) |
| Sound power level-Measurement uncertainty | LWA: 104dB(A)k:3 dB(A) |
| Vibration level- Measurement uncertainty | An: 2.8m/s^2 , k: 1.5m/s^2 |
4. DESCRIPTION
- Variable switch
- Low/high button
- ON/OFF button
- Auxiliary handle
- Mulch/vacuum gate
- Lock button
- Blower tube
- Mulcher tube
- Bag
- Notched area
- Air outlet
- Slot
- Tab
- Strap
- Identification plate
15.1) EC Conformity marking
15.2) Name and address of the manufacturer
15.3) Guaranteed sound power level
15.4) Machine model
15.5) Serial number
15.6) Year of manufacture
15.7) Power supply frequency and voltage
15.8) Motor power
15.9) Article Code
15.10) Manufacturing country
5. ASSEMBLY
UNPACKING
■ Carefully remove the product and any accessories from the box.
■ Inspect the product carefully to make sure no breakage or damage occurred during shipping.
■ Do not discard the packing material until you have carefully inspected and satisfactorily operated the product.
■ If any parts are damaged or missing, please call your Tools service centre for assistance.
The blower vac is supplied with some components not assembled. To assemble these, proceed as follows:
ASSEMBLE AS A MULCHER
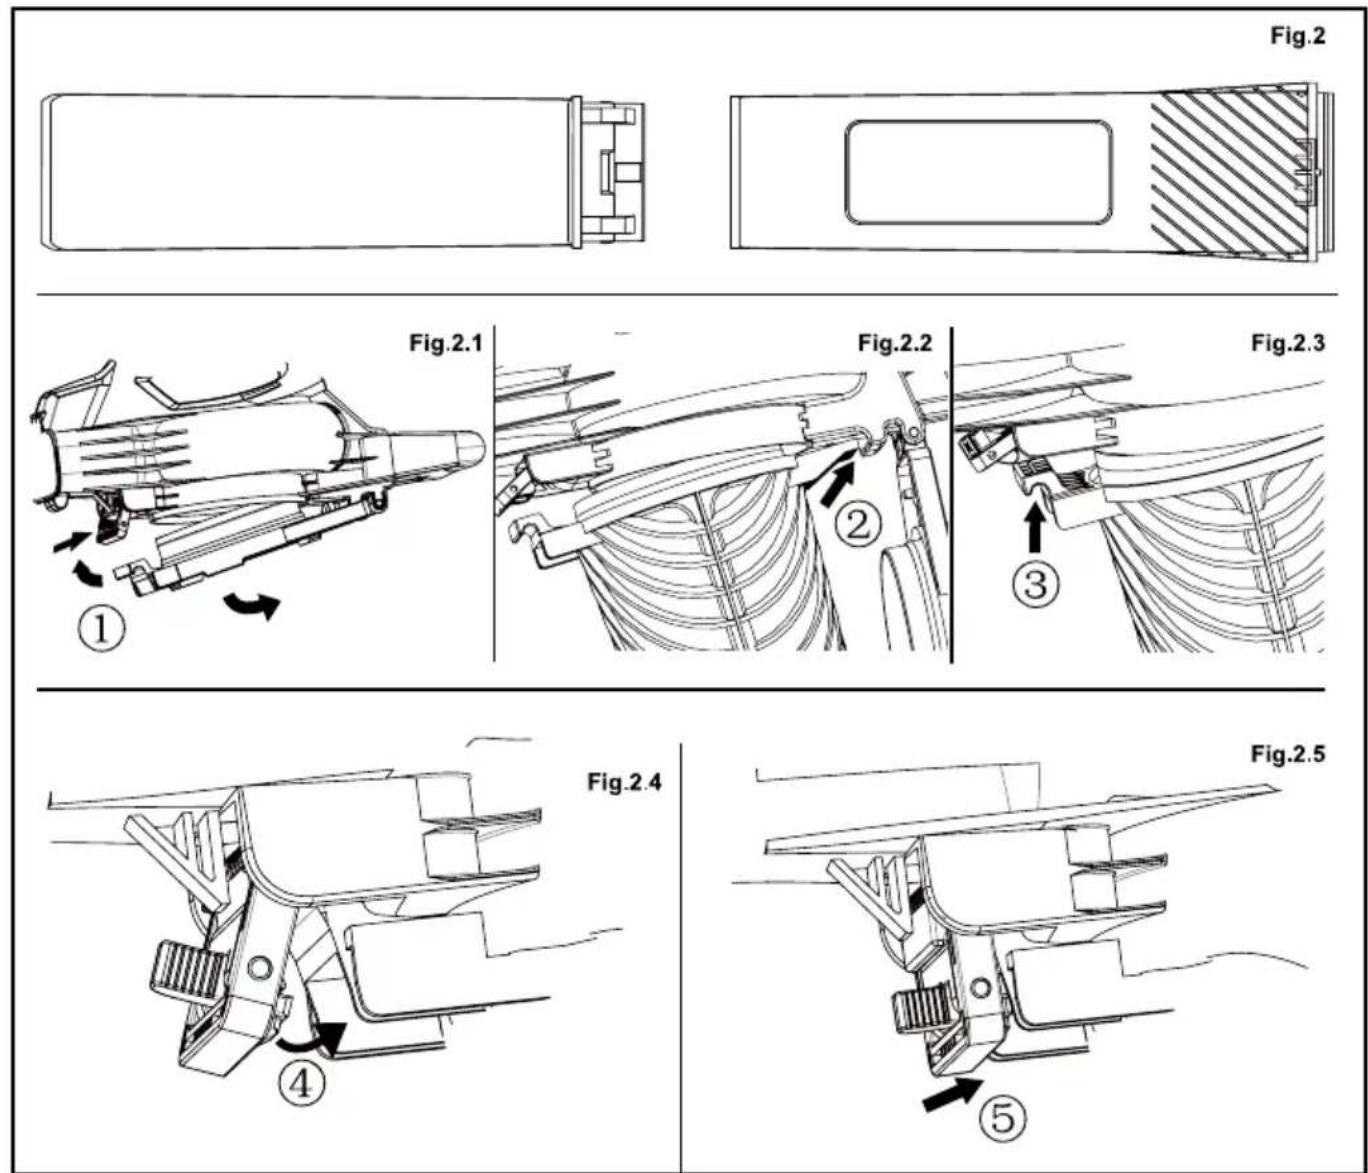
See Figure 2.
■ Slide the front and rear mulcher tubes together until locked. (See fig 2)
■ Pull the lock button forward to disengage the gate. Hold the gate open. (See fig 2.1)
■ Insert the "wedged" end clip of the mulcher tube into the rear clip. (See fig 2.2). Push the "hooked" end clip of the mulcher tube into the front clip. (See fig 2.3). Press the lock button back to engage the mulcher tube. (See fig 2.4)
■ To remove mulcher tubes, follow the steps(3) (2) (1).
■ Insert the bag adaptor into the blower outlet. Lock the bag adaptor with the lock button. To remove the bag, simply press lock button and remove bag. (see Fig.4).
NOTE: It may be necessary to remove the blower tube or mulcher tubes to clear a blocked tube or impeller.
WARNING
To prevent serious personal injury, make sure the switch is in the OFF position, it is unplugged, and the impellers have stopped before attaching or removing tubes.
ASSEMBLE AS A BLOWER See Figure 3.
■ Slide blower tube forward until the notched areas on the blower housing click into the slots on the tube.
■ Insert the concentrator nozzle into the regular nozzle to lock. (Concentrator nozzle is used to increase air flow in tight areas: flower beds, under decks, etc)
INSTALLING BAG WITH SHOULDER HARNESS See Figure 4.
■ While standing in the operating position adjust the length to fit the operator's size. Pull the tab lengthen, pull the strap to shoten.
For complete charging instructions, refer to the Operator's Manuals for your battery pack and charger models.
NOTE: To avoid serious personal injury, always remove the battery pack and keep hands clear of the variable speed trigger when carrying or transporting the tool.
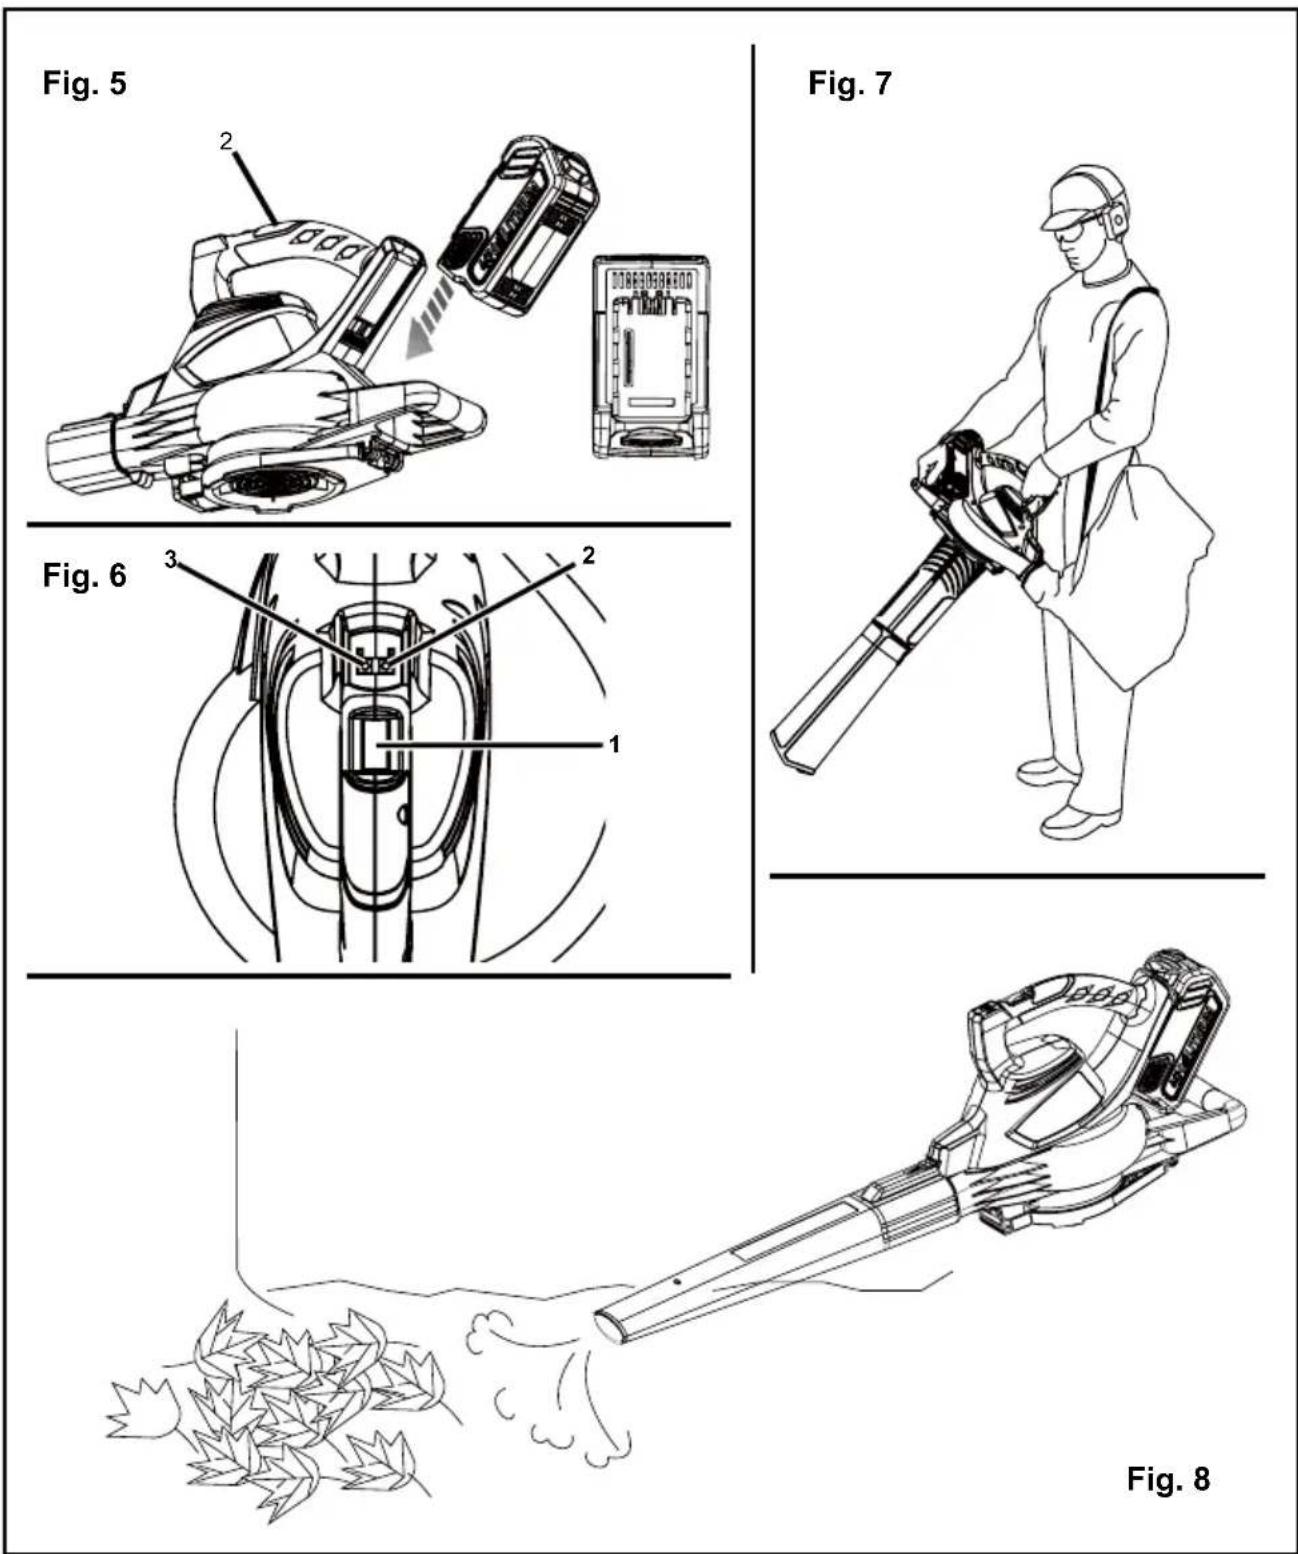
TO INSTALL BATTERY PACK
See Figure 5.
Place the battery pack in the blower. Align raised rib on battery pack with grooves in the blower's battery port.
■ Make sure the latch on bottom of the battery pack snaps in place and that battery pack is secured in the blower before beginning operation.
CAUTION
When placing battery pack in the blower, be sure the raised ribs on the battery pack align with the grooves in the top of the blower. Make sure the battery is fully seated, and it latches into place properly. Improper installation of the battery pack can cause damage to internal components.
TO REMOVE BATTERY PACK
See Figure 5.
■ Release the variable speed trigger to stop the blower.
■ Press and hold the button at the bottom of the battery pack.
■ Remove battery pack from the blower.
STARTING/STOPPING THE BLOWER/MULCHER See Figures 6.
- Press the On/Off ( ⏻ ) Switch and you will hear beeping sounds, and the blower will turn on in low speed.
- Roll the variable speed dial forward to increase speed from 110km/h to 210km/h.
-
Press the low/high switch ( ) to increase the speed options from 130km/h to 280km/h.
-
To Turn off, press the on/off switch ( ⏻ )
IMPORTANT: TURBO-MULCH by pressing the "LOW HIGH button, with the variable speed dial set to high speed.
HOLDING THE BLOWER/MULCHER
See Figures 7.
Before operating the unit, stand in the operating position.
Check for the following:
■ Operator is wearing proper clothing, such as boots, safety glasses or goggles, ear/hearing protection, gloves, long pants and a long sleeve shirt.
WARNING
To avoid serious personal injury, wear goggles or safety glasses at all times when operating this unit. Wear a face mask or dust mask in dusty locations.
| STATUS | LED SOLVE | METHOD |
| hall fault protection | Green light off red light on; flash 7 times; each time keep 1hz interval: 3s; keep 60s buzzer alarm | Off the trigger and restart it |
| low-voltage protection | Green light off red light on; flash 5 times; each time keep 1hz interval: 3s; keep 60s buzzer alarm | Off the trigger and restart it or Charging the battery |
| Over load protection | Green light off red light on; flash 4 times; each time keep 1hz interval: 3s; keep 60s buzzer alarm | Off the trigger and restart it |
| Battery jam protection | Green/Red light off; Unit stop running | Resetting the blower vac by removing the battery for 5 seconds |
| Abnormal battery temp | Led off When the temp. of the battery low down, the blower can run well |
WARNING
To prevent serious personal injury or damage to the unit, make sure the blower tube or the mulcher tubes and the bag are in place before operating the unit.
OPERATING TIPS
See Figure 8.
■ The bag is installed and zipped closed (when used as a mulcher).
■ Be sure the bag is zipped closed before operating the unit.
■ Assure the unit is not directed at anybody or any loose debris before starting the unit.
- Verify that the unit is in good working condition. Make sure the tubes and guards are in place and secure.
■ Always hold the unit with both hands when operating.
- Keep a firm grip on both the front and rear handle or grips.
■ To reduce the risk of hearing loss associated with sound level(s), hearing protection is required.
■ Use the shoulder strap when using unit as a mulcher.
■ Operate power equipment only at reasonable hours not early in the morning or late at night when people might be disturbed. Comply with times listed in local ordinances. Usual recommendations are 9:00 am to 5:00 pm, Monday through Saturday.
■ To reduce noise levels, limit the number of pieces of equipment used at any one time.
■ To reduce noise levels, operate power blowers at the lowest possible speed to do the job.
■ Use rakes and brooms to loosen debris before blowing.
■ In dusty conditions, slightly dampen surfaces.
■ Conserve water by using power blowers instead of hoses for many lawn and garden applications, including areas such as gutters, screens, patios, grills, porches, and gardens.
NOTE: Please ensure that the Mulch/Vacuum Gate is completely closed and locked.
AIR VENTS
Never cover air vents. Keep them free from obstructions and debris. They must always remain clear for proper motor cooling.
WARNING
To avoid serious personal injury, do not wear loose fitting clothing or articles such as scarves, strings, chains, ties, etc., that could get drawn into the air vents. To make sure long hair does not get drawn into the air vents, tie back long hair.
Hold the blower firmly. Sweep from side to side with the nozzle several inches above the ground or floor. Slowly advance the unit, keeping the accumulated pile of debris in front of you. Most dry blowing operations are better suited to low speeds, rather than high. High speed blowing is a better way to move heavier items like large debris or gravel.
OPERATING AS A MULCHER
Hold the vac firmly, tilting the mulcher tubes (2-4 in. or 5-10 cm), and use a sweeping action to collect light debris. The debris will flow into the bag. Items such as small leaves and twigs will be mulched as they pass through the fan housing. For longer bag life and increased performance, empty the bag often.
CLEANING THE COLLECTION BAG
■ Empty the collection bag after each use to avoid deterioration and obstruction of the air flow which will reduce the performance of the unit.
■ Clean the collection bag as needed. With eye protection on, turn the dust bag inside out after initial emptying and vigorously shake out the dust and debris.
CLEARING A BLOCKED TUBE /IMPELLER
WARNING
To avoid serious personal injury, be sure the unit is OFF and unplugged before clearing the impeller.
WARNING
To avoid serious personal injury, always wear gloves to protect yourself from the impeller blades or other sharp objects.
- Press the on/off ( ⏻ ) button and wait for the unit to come to a complete stop.
- Remove the battery pack.
- Remove the blower tube or mulcher tubes and the bag.
- Carefully remove material blocking the tube or impeller. Inspect the blades to ensure no damage has occurred. Rotate the impeller blades by hand to ensure the blockage is completely cleared.
- Reinstall the blower tube or mulcher tubes and the bag.
- Insert the battery pack into the unit.
6. MAINTENANCE
WARNING
When servicing use only identical replacement parts. Use of any other parts may create a hazard or cause product damage.
Avoid using solvents when cleaning plastic parts. Most plastics are susceptible to damage from various types of commercial solvents and may be damaged by their use. Use clean cloths to remove dirt, dust, oil, grease, etc.
WARNING
Do not at any time let brake fluids, gasoline, petroleum based products, penetrating oils, etc. come in contact with plastic parts. They contain chemicals that can damage, weaken or destroy plastic.
WARNING
Do not attempt to modify this tool or create accessories not recommended for use with this tool. Any such alteration or modification is misuse and could result in a hazardous condition leading to possible serious personal injury.
WARNING
To avoid serious personal injury, always remove the battery pack from the tool when cleaning or performing any maintenance.
STORING THE BLOWER
Clean the blower thoroughly before storing. Store the blower in a dry, well-ventilated place that is inaccessible to children. Keep away from corrosive agents such as garden chemicals and de-icing salts.
■ Store and charge your batteries in a cool area. Temperatures above or below normal room temperature will shorten battery pack life.
■ Never store batteries in a discharged condition. Wait for battery pack to cool and fully charge immediately.
All batteries gradually lose their charge. The higher the temperature, the quicker they lose their charge. If you store your unit for long periods of time without using it, recharge the batteries every month or two. This practice will prolong battery pack life.
The example of the conformity declaration is found in the penultimate page of the manual.
7. DISPOSAL

Waste electrical products should not be disposed of together with household waste. Please recycle where facilities exist. Check with your local authority or retailer for recycling advice.
Do not dispose of electrical equipment with household waste material. In observance of European Directive 2012/19/EC on waste electrical and electronic equipment and its implementation in accordance with national regulations, electric equipment that has reached the end of its life must be collected separately and recycled
in an ecologically compatible way. If electrical equipment is disposed of in dumps or in landfills, hazardous substances can leak into the groundwater and get into the food chain, damaging your health and well-being. For further information on the disposal of this product, contact a domestic waste collection authority or your dealer
8. TROUBLESHOOTING
| PROBLEM POSSIBLE CAUSE SOLUTION | ||
| Unit will not blow or mulcher.Air Velocity Weight (Battery Pack not included) | 1. Bag full 1. Empty the bag. | |
| 2. Blocked tube 2. Clear the blockage. | ||
| 3. Blocked impeller 3. Clear the blockage | ||
| 4. Dirty bag 4. Clean the bag. | ||
| 5. Torn bag 5. Replace the bag. | ||
| 6. Bag unzipped 6. Zip up the bag. | ||
| 7. Battery is not secure. | 7. To secure the battery pack, make sure the latches on the top of the battery pack snap into place. | |
| 8. Battery is not charged. | 8. Charge the battery pack according to the instructions included with your model. | |
| Unit will not start. | 1. Battery is not secure. | 1. To secure the battery pack, make sure the latches on the top of the battery pack snap into place. |
| 2. Battery is not charged. | 2. Charge the battery pack according to the instructions included with your model. | |
| 3. Power/speed switch is in the OFF position. | 3. Press the on/off switch. | |
| 4. Vac tubes are not correctly installed. | 4. Check vac tubes to ensure that they are allowing the switch to be engaged when correctly installed. | |
| 5. Intake gate/cover is not closed. | 5. Ensure that gate/cover is fully closed and locked. | |
SOMMAIRE
MISE EN PLACE DU SAC AVEC LA BANDOULIÈRE (FIG. 4)
ALS MULCHER MONTEREN (AFB. 2)
INNEHÅLLSFÖRTECKNING
3. TUOTTEEN TEkNISET TIEDOT
VEDLIKEHOLD OG LAGRING
BRUK OG VEDLIKEHOLD AV ELEKTROVERKT∅Y
T∅MMING AV OPPSAMLINGSPOSEN
To avoid serious personal injury, wear goggles or safety glasses at all times when operating this unit. Wear a face mask or dust mask in dusty locations.
To prevent serious personal injury or damage to the unit, make sure the blower tube or the mulcher tubes and the bag are in place before operating the unit.
RADY PRO PROVOZ (OBR. 7)
D. Lgs. 262/2002, ANNEX VI, proc. 1 (Italy)